1
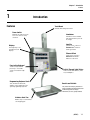
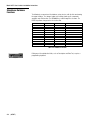
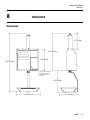
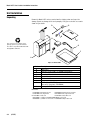
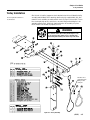
2451
Hanging
Scale/Printer
User’s Guide
and
Installation Instructions
©Mettler-Toledo, Inc. 2002
No part of this manual may be reproduced or transmitted in any form or by any means, electronic or
mechanical, including photocopying and recording, for any purpose without the express written
permission of Mettler-Toledo, Inc.
U.S. Government Restricted Rights: This documentation is furnished with Restricted Rights.
METTLER TOLEDO®
Customer Feedback
Attention: Retail Quality Manager - MTWR
If you have a problem with one of our products or publications, or just a
suggestion on how we can serve you better, please fill out this form and
send it to the address on the opposite side of this page (U.S. postage paid),
or fax it to us at (614) 438-4355. Your feedback will help us to improve
product performance, quality, and service.
Part / Product Name:
Part / Model Number:
Date:
Provided By:
Customer Name:
Address:
Phone Number:
Fax Number:
Your comments:
Do not write in space below. For METTLER TOLEDO use only. Response (if appropriate) and corrective action taken.
METTLER TOLEDO
Scales & Systems
1900 Polaris Parkway
Columbus, Ohio 43240
METTLER TOLEDO® is a registered trademark of Mettler-Toledo, Inc.
©2002 Mettler-Toledo, Inc.
Printed in USA
FOLD THIS FLAP FIRST
NO POSTAGE
NECESSARY IF
MAILED IN THE
UNITED STATES
BUSINESS REPLY MAIL
FIRST CLASS
PERMIT NO. 414
COLUMBUS, OH
POSTAGE WILL BE PAID BY ADDRESSEE
Mettler-Toledo, Inc.
Retail Quality Manager - MTWR
P.O. Box 1705
Columbus, OH 43216
USA
Please seal with tape.
FCC Notice
This device complies with Part 15 of the FCC Rules and the Radio Interference
Requirements of the Canadian Department of Communications. Operation is subject to
the following conditions: (1) this device may not cause harmful interference, and (2)
this device must accept any interference received, including interference that may cause
undesired operation.
This equipment has been tested and found to comply with the limits for a Class A digital
device, pursuant to Part 15 of FCC Rules. These limits are designed to provide
reasonable protection against harmful interference when the equipment is operated in a
commercial environment. This equipment generates, uses, and can radiate radio
frequency energy and, if not installed and used in accordance with the instruction
manual, may cause harmful interference to radio communications. Operation of this
equipment in a residential area is likely to cause harmful interference in which case the
user will be required to correct the interference at his own expense.
Publication Revision
History
Part Number
Date
16511900A_
23-Jul-07
Revisions
Chg 1: Add Dec.of Conf * update p/n on pg 8-2.
PRECAUTIONS
READ this manual BEFORE operating or
servicing this equipment.
WARNING
FOLLOW these instructions carefully.
FOR CONTINUED PROTECTION AGAINST SHOCK HAZARD
CONNECT TO PROPERLY GROUNDED OUTLET ONLY. DO NOT
REMOVE THE GROUND PRONG.
SAVE this manual for future reference.
DO NOT allow untrained personnel to
operate, clean, inspect, maintain, service,
or tamper with this equipment.
WARNING
ALWAYS DISCONNECT this equipment from
the power source before cleaning or
performing maintenance.
DISCONNECT ALL POWER TO THIS UNIT BEFORE REMOVING
THE FUSE OR SERVICING.
CALL METTLER TOLEDO for parts,
information, and service.
Declaraton of
Conformance
Mettler-Toledo Inc.
Columbus, Ohio
Declaration of Conformance to SMA Standard
Year of Declaration 2006
Production Meets Type
We the manufacturer of
Model
Certificate and Number
Issued by
2451
NTEP CoC 97-062
NCWM
declare in our responsibility the conformance of the above listed models and types to the mentioned certificates and the
requirements of the SMA standard.
This declaration becomes valid when the SMA Compliance Logo, having our name or trademark is applied to the device
or its accompanying documentation.
CONTENTS
1
Introduction.................................................................................................... 1-1
Features .............................................................................................................................1-1
Keyboard Layout..................................................................................................................1-2
Display ...............................................................................................................................1-3
2
Label Installation............................................................................................ 2-1
3
Operating the Scale ........................................................................................ 3-1
General Guidelines..............................................................................................................3-1
Basic Functions ...................................................................................................................3-2
Starting the Model 2451 ......................................................................................................... 3-2
Zero...................................................................................................................................... 3-2
Clear .................................................................................................................................... 3-2
Label Feed............................................................................................................................. 3-3
Time, Date, Department .......................................................................................................... 3-3
Calling a PLU and Printing Labels ............................................................................................ 3-4
Tare.................................................................................................................................... 3-10
Memory Mode...................................................................................................................... 3-11
Void ................................................................................................................................... 3-11
Manual Override Functions.................................................................................................3-12
Tare Override ....................................................................................................................... 3-12
Price Override ...................................................................................................................... 3-12
ET, NF Record Override ......................................................................................................... 3-13
Net Weight, Count Override.................................................................................................... 3-13
Shelf Life Override................................................................................................................. 3-14
Blank Label Fields ................................................................................................................ 3-14
Master Off Line .................................................................................................................3-15
4
Standalone Database Functions ....................................................................... 4-1
General Description.............................................................................................................4-1
Standalone Database Functions ............................................................................................... 4-2
Database Setup Mode..........................................................................................................4-3
Passwords ............................................................................................................................ 4-3
Edit ...................................................................................................................................... 4-3
Quick Change ........................................................................................................................ 4-9
Print ..................................................................................................................................... 4-9
Clear .................................................................................................................................... 4-9
5
Maintenance .................................................................................................. 5-1
External Cleaning................................................................................................................5-1
Internal Printer Cleaning.......................................................................................................5-2
6
Label Formats................................................................................................. 6-1
7
Error Messages .............................................................................................. 7-1
8
Installation..................................................................................................... 8-1
Dimensions.........................................................................................................................8-1
Unit Installation ..................................................................................................................8-2
Unpacking............................................................................................................................. 8-2
Installation Checklist............................................................................................................... 8-3
Track Installation.................................................................................................................8-4
Trolley Installation ..............................................................................................................8-5
Trolley Mount - Scale Mounting and Wiring ............................................................................... 8-7
Electrical Wiring .................................................................................................................8-8
Chapter 1: Introduction
Features
1
Introduction
Features
Track Mount
Available with sliding track mount.
Power Switch
Mounted out of the way on the
rear cover. Limits access by
customers.
Standalone
Standalone version available
with optional memory sizes for
file storage.
Satellite
Displays
Two bright easy-to-see
vacuum fluorescent
displays.
Satellite version connects to
SmartTouch® master or
8422 Type master.
Ethernet Client
Client version connects to
SmartTouch® Ethernet
Master or Scale Server.
Easy-to-Use Keyboard
Tactile feel keyboard with
preset keys. A reversible
overlay is included for setup
mode.
Built-in Thermal Label Printer
Prints PLU data with Nutrifacts, Extra
Text, and Graphics.
Programming Keyboard Jack
Jack (mounted on the bottom)
available on the Standalone for the
optional programming keyboard.
Durable and Reliable
This product was developed, produced and
tested in a Mettler Toledo facility that has been
audited and registered according to
international (ISO 9001) quality standards.
Stainless Steel Pan
Durable easy-to-clean stainless
steel weighing pan.
(07/07)
1-1
Model 2451 User's Guide & Installation Instructions
Keyboard Layout
If the scale drifts from zero,
pressing the ZERO key returns
scale to zero (± 2%).
Clears incorrect entries
and messages from
display. Backs out of
menu selections.
Weight lb
In normal mode, displays time,
date, and department. In Setup
mode, allows changing these
items. On the Standalone, Dept is
changed under
Setup/Database/Edit/Dept Info.
Accesses Setup Mode and
Database (Standalone). Setup
Cursor on Display lights while
in Setup Mode.
Preset Quick Keys for
calling PLUs.
5.02 0.49 2.46
Zero
1/4 1/2
Net
Take Label
Toggles Prepack mode
on/off. Prepack retains
the PLU until the CLEAR
key is pressed.
Prepack
Online
Setup
Memory
Prints a batch of
Extra Text Labels.
Capacity 30x0.01 lb
Red
Delic
Apple
McInt
Apple
Bannana
Celery
Red
Snapper
Gran Sm Artichoke AsparaApple
gus
Broccoli Cabbage Cantaloupe
Corn
Collard
Greens
Carrots
Cucum- Eggplant
ber
Cauliflower
Garlic
164031.CDR
Up/Down are used to scroll
through possible selections,
including Yes/No selections.
Grapefruit
Grapes
Green
Beans
Lemons
Lettuce
Iceberg
Lettuce
Leafy
Limes
Mushrooms
Nectarine
Onion
Yellow
Onion
White
Onion
Vadalia
Pear
Bartlett
Pear
Green
Peas
Pepper
Green
Oranges Peaches
ET/NF Change is used to
Override the Extra Text
and/or Nutrition Fact
number of the called PLU.
(07/07)
SETUP
MODE
TIME
DATE
DEPT
ZERO
DOWN
UP
CLEAR
7
8
9
4
5
6
1
2
3
0
TARE
ENTER
VOID
PREPACK
Overrides quantity/count of
Standard Pack/By-Count PLU.
Overrides the net weight field of
Std Pack PLU.
Prints a batch of
Nutrifacts Labels.
Enters the quantity of PLU
labels to print in batch mode.
After calling PLU,
overrides the Sell-By
date or Use-By date.
MEM
PRINT
Used to selectively blank Unit
Price, Total Price, Pack Date,
and/or Net Weight on label.
METTLER TOLEDO
Prints a label and
feeds blank labels.
Enters tare or overrides
programmed tare. Tare
can be entered
numerically (Keyboard
Tare) or by placing item
on platter, then pressing
the TARE key
(Pushbutton Tare).
1-2
Removes a transaction
from the totals
accumulator.
Accepts displayed
data or displayed
selection.
Enters current transaction
into memory for printing a
receipt label. When pressed
at the READY prompt,
receipt prints and memory is
cleared.
Manually overrides the
price of the called PLU.
Chapter 1: Introduction
Display
Display
Indicates a tare has
been entered and the
weight is net (gross,
minus container and
overwrap weight).
The Zero cursor
indicates the scale is
within the zero range,
either net or gross zero.
If the display does not
read 00.00 at ready,
press the ZERO key.
Weight
Top Display shows
Weight/Count, Unit Price,
and Total Price in normal
mode.
Unit Price $
Total Price $
aa^aaaaaaa^aaaaaa^aa
Zero (*Motion) Net
1/4
Indicates
pricing per
quarter
pound.
Not printed on the lens.
The Motion cursor
illuminates when the
scale does not have a
stable weight.
1/2
Take Label
Indicates
pricing per
half pound.
Indicates a
label is present
on the printer.
ABCDEFGHI0123456789
Prepack
Online
Memory
(*Host)
Lower Display shows
PLU description and
scrolling marquee
messages.
Setup
Indicates Prepack
mode has been
selected.
Indicates Satellite is
communicating with
the master.
Indicates there are
transactions in the
memory accumulator.
Not printed on the lens.
Illuminates when standalone is
online with a host PC. Access to
the standalone database is not
available when illuminated.
Indicates that the unit is
in setup mode.
(07/07)
1-3
Model 2451 User's Guide & Installation Instructions
For your notes
1-4
(07/07)
Chapter 2: Label Installation
2
Label Installation
Open the printer door and follow the illustrations on the left column. (It is not necessary
to unlock the printhead to load labels.)
1. Press the release lever. (For Unstripped mode skip to step 4.)
2. To load standard labels for stripped mode, remove the liner take-up spool from the
printer mechanism.
3. Slide the two halves of the liner take-up spool apart and discard any spent liner.
4. Insert the end of the paper into the rear chute and through the Gap Sensor.
5. Feed labels into the chute until they stop at the platen roller.
6. For first time installation, or if changing label size, set the label size by pressing the
SETUP MODE key, then the LABEL SIZE key. Press the UP/DOWN keys to toggle
through the available label sizes, then press ENTER to accept. Next press the STRIP
key and use the UP/DOWN key to select Stripped or Unstripped delivery mode, then
press ENTER to accept. Press CLEAR to return to the ready mode. Press the PRINT
button to feed the labels, while gently pushing the label stock into the rear chute
until the label feeds out the front of the mechanism. If the label stock will not feed
out the front check for an obstruction or a label jam inside the mechanism. If the
delivery method is Unstripped, you are done loading labels and can close the
printer door.
7. For Stripped mode, insert the label liner through the fingers of one half of the liner
take-up spool.
8. Reassemble the two halves of the liner take-up spool.
9. Wind the spool upwards until the slack is taken up on the liner.
10. Reinstall the liner take-up spool into the printer mechanism. At this point, you are
finished and you can close the printer door.
(07/07)
2-1
Model 2451 User's Guide & Installation Instructions
For your notes
2-2
(07/07)
Chapter 3: Operating the Scale
General Guidelines
3
Operating the Scale
General Guidelines
When weighing items, please follow the DO List.
•
Do place the item on the scale pan gently.
•
Do place any oversize objects on the pan carefully and centered on the pan.
•
Do weigh only items under the scale capacity (30 lb or 15 kg) to prevent damage
to the unit.
•
Do exercise care when weighing any unstable items that could fall out of the pan.
•
Do periodically check for any loose hardware or mounting brackets and report any
problems to your maintenance representative.
Figure 3-1: Oversized Items
(07/07)
3-1
Model 2451 User's Guide & Installation Instructions
Basic Functions
Starting the Model 2451
+
=
Zero
ZERO
-00.01 00.00 00.00
00.00 00.00 00.00
UNDER READY
READY
Clear
Manual Clear
CLEAR
01.29 01.99 02.57
00.00 00.00 00.00
12345
READY
Automatic Clear
In the Service Mode, after a label is printed for a By Weight PLU, and the item is
removed from the platter, the display will automatically clear the PLU and return to the
READY prompt.
01.23 04.99 06.14
TROUT
3-2
(07/07)
-
=
00.00 00.00 00.00
READY
Chapter 3: Operating the Scale
Basic Functions
Label Feed
PRINT
+
00.00 00.00 00.00
READY
=
Time, Date, Department
View Only
8:13am
9/9/01
MEAT
1
=
Change
+
+
8:13 AM
9/9/99
MEAT
+
+
+
ENTER
ENTER
ENTER
CLEAR
+
+
1
0
+
CLEAR
=
3
9
0
1
= DELI +
=
8:13
9/19/01
MEAT
0
9
ENTER
ENTER
0
1
= 1:00 PM
ENTER
= 9/19/01
= DELI
READY
(07/07)
3-3
Model 2451 User's Guide & Installation Instructions
Calling a PLU and Printing
Labels
By-Weight PLU Service Mode
00.00 00.00 00.00
READY
1
+
TROUT
-
=
2
3-4
(07/07)
0 00 1 1 5 02 2 1
4
+
ENTER
+2+3 +
+
PRINT
PRINT
PRINT
=
00.00 00.00 00.00
READY
Chapter 3: Operating the Scale
Basic Functions
By-Weight PLU Prepack Mode
PLU 123
00.00 00.00 00.00
READY
1
+
TROUT
+2+3 + +
ENTER
+
+
=
00.00 01.99 00.00
Trout
01.11 01.99 02.21
Trout
+
+
=
=
PREPACK
-
=
=
PREPACK
CLEAR
00.00 00.00 00.00
READY
(07/07)
3-5
Model 2451 User's Guide & Installation Instructions
By-Count and Standard Pack (Single Label)
PLU 345
00.00 00.00 00.00
READY
3
+
=
3-6
(07/07)
APPLES
+4+5 +
+
PRINT
ENTER
PRINT
PRINT
Chapter 3: Operating the Scale
Basic Functions
Batch Printing (By-Count and Standard Pack Only)
PLU 678
00.00 00.00 00.00
READY
QTY
LABELS
+
NF
LABELS
=
00.00
PLU?
0
ET
LABELS
6
+
=
00.00
QTY?
0
+7+8 +
+
6
ENTER
+
ENTER
=
(07/07)
3-7
Model 2451 User's Guide & Installation Instructions
Manual Mode PLU Label Printing
9
9
9
ENTER
MAN MODE BY WGT:
MAN MODE BY WGT:
COUNT?
1
MAN MODE BY CNT:
NET WEIGHT?
1
MAN MODE STD PCK:
COUNT?
1
MAN MODE LB FOR:
+
DOWN
=
+
MAN MODE 1/4 LB:
MAN MODE 1/2 LB:
ENTER
UP
COUNT?
1
+
1
=
ENTER
=
NET WEIGHT?
1
COUNT?
1
+
1
PRICE?
1.00
ENTER
DELI
+
3-8
(07/07)
1
9
9
ENTER
PRINT
=
1
1 99
$2.21
Chapter 3: Operating the Scale
Basic Functions
Manual Tare and Tare Override
PLU 123
00.00 00.00 00.00
READY
=
+2+3 +
1
+
00.08 01.00 00.08
PASTA
TARE
+
9
+
TARE
+
+
+
PRINT
+
+
ENTER
=
00.08
TARE:
0.01
ENTER
=
00.00 01.00 00.00
PASTA
ENTER
=
01.11 01.99 02.21
PASTA
=
(07/07)
3-9
Model 2451 User's Guide & Installation Instructions
Tare
PLU Stored Tare
A tare may be stored with a PLU. In this case, when the PLU is called and no weight is
on the platter, the weight display will show a negative number (the tare weight) and a
cursor will appear over Net.
Proportional Tare
Proportional tares may be used when supported by the master scale and the PLU is
programmed for a proportional tare. This calculation is done automatically by the
scale.
Forced Tare
Some items will require the operator to enter a tare to complete a transaction. This is
called a “forced tare.”
Select the PLU.
The bottom display will show TARE. You can either key in the tare and press ENTER, or
place the tare on the platter and press ENTER. If no tare is desired, press TARE, then
ENTER, then place the item on the platter.
Pushbutton Tare
A tare can be manually entered by the following procedure using the TARE button.
Select the PLU (either by entering the number or pressing the preset key).
Press the TARE key.
Place the container on the platter and press TARE.
Keyboard Tare
If the Canadian Tare is set to YES
in the Calibration Settings then the
platter must be empty when
keying in the tare, and you
cannot clear the Tare by entering
0.00.
3-10 (07/07)
Select the PLU (either by entering the number or pressing the preset key).
Press the TARE key.
Key in the tare weight. Press ENTER.
Place the item on platter.
Chapter 3: Operating the Scale
Basic Functions
Memory Mode
When enabled, the Memory mode feature is an alternative to printing individual labels
and allows accumulating multiple items for a customer. A receipt label can be printed
showing the grand total and a department bar code.
Call the PLU, and place the item on the scale.
The MEM key can act as an
ENTER/MEM key. To eliminate
keystrokes, press MEM after keying in
the PLU to immediately enter the
transaction into the scale’s memory.
If Continuous stock is used the label
shows a line of description and the
price information for up to 15 items.
Press the MEM key to enter the current transaction into memory. The cursor over
“Memory” on the Display tower will light.
Remove the item from the platter and repeat for the desired number of transactions,
pressing the MEM key after each transaction.
When all items are entered for a particular customer, clear the platter and press the MEM
key.
You will be prompted to print the total. Press ENTER to print the accumulated total price.
You are then asked PRINT OK? If the printing was successful, press the DOWN key to
answer YES, then press ENTER; the memory is now cleared and the cursor over
“Memory” will turn off.
If the printing was not okay, or you do not want to clear the memory, press the DOWN
key until NO appears, then press ENTER. You may then either print again or add
additional transactions to the accumulator.
At the initial PRINT? prompt after pressing MEM with an empty platter, you can scroll
with the UP and DOWN keys to CANCEL? or CONTINUE?. At the CANCEL? prompt,
pressing ENTER will bring up the CLEAR MEMORY? NO prompt. Toggle between YES
and NO here to clear the memory. At the CONTINUE? prompt, pressing ENTER will
retain the current memory as is so that more items can be added.
Void
The last ten transactions can be voided from the totals accumulators using this function.
Press the VOID key and use the DOWN and UP keys to display previous transactions.
The transactions will be displayed as follows: the top display will show the number of
transactions/labels printed, item number, and total price.
The lower display will show the product description and whether it has been voided or
not (Y/N). When the transaction you wish to void is displayed, press ENTER.
The display will ask if you want to void the transaction. Use the DOWN key to change
your response to Y, then press ENTER.
You may either continue to void other transactions or press CLEAR to return to the
READY prompt.
(07/07)
3-11
Model 2451 User's Guide & Installation Instructions
Manual Override
Functions
Certain information can be overridden after the PLU has been called. These changes are
temporary and last only for a single transaction or a single “run” in Prepack mode.
Some or all of these overrides may be disabled through Unit Setup.
Tare Override
When the unit setup allows for programmed tares to be overridden, the desired tare can
be entered as if there were no preprogrammed tare.
Keypad Tare
Call the PLU. If a tare is programmed in the PLU the Weight display will show the tare as
a negative number and the “Net” cursor will light.
Press TARE.
Enter in the desired tare weight, then press ENTER.
Pushbutton Tare
Call the PLU.
Press TARE.
Place the container on the platter, then press TARE.
Place the item on the platter.
Price Override
When allowed by the unit set up, prices may be overridden by the operator with either of
the following procedures:
Place the item on the platter.
Select the PLU.
Key in the new price, and press ENTER.
or
Call the PLU.
Press PRICE CHANGE.
Key in the new price. Press ENTER.
Place the item on the platter.
3-12 (07/07)
Chapter 3: Operating the Scale
Manual Override Functions
ET, NF Record Override
Extra Text and Nutrition Facts records are linked to a PLU using Extra text and Nutrition
Fact record numbers programmed into the PLU record in the master database. These
Record numbers can be overridden using the ET/NF CHANGE key.
Extra Text Change
When allowed by the unit set up, the Extra Text for a single transaction or Prepack “run”
may be changed.
Call the PLU.
Press the ET/NF CHANGE key.
Using the DOWN and UP keys, you will be able to toggle between ET (Extra Text) and
NF (Nutrition Facts). When ET is displayed, press ENTER.
The current Extra Text number will be displayed. Key in the new Extra Text number, then
press ENTER.
Place the item on the platter (if By Weight item).
Press PRINT to print the label (if in Service mode).
Nutrition Fact Change
When allowed by the unit set up, the Nutrition Facts may be changed.
Call the PLU.
Press the ET/NF CHANGE key.
Using the DOWN and UP keys, you will be able to toggle between ET (Extra Text) and
NF (Nutrition Facts). When NF is displayed, press ENTER.
The current Nutrition Fact number will be displayed. Key in the new Nutrition Fact
number, then press ENTER.
Place the item on the platter (if By Weight item).
Press PRINT to print the label (if in Service mode).
Net Weight, Count Override
Standard Pack Weight/Count Change
For Standard Pack items, the count and/or the Net weight may be changed. When the
count is changed, a new total price and net weight will be calculated from the unit price
and new count value. When the Net weight is changed, the total price does not change,
however a new unit price is calculated from the total price and new Net weight.
To change the quantity or weight of the item, press the CNT/WT CHANGE key.
Use the DOWN and UP keys to toggle between QTY (quantity, count) and WEIGHT.
To change the quantity of the pack, press ENTER when QTY is displayed. Key in the
new quantity, then press ENTER.
To change the total weight, press ENTER when WEIGHT is displayed.
Key in the new weight (in ounces), then press ENTER.
Press CLEAR to return to the Item Description display.
Press PRINT to print a label.
(07/07)
3-13
Model 2451 User's Guide & Installation Instructions
By Count Change
For products that are priced By Count (e.g., 10 biscuits for $5.00), the count (10
biscuits) may be changed; a new price will then be calculated (e.g., 5 biscuits would
be $2.50).
Retrieve the PLU. Press the CNT/WT CHANGE key.
The current quantity will be displayed and you will be prompted to enter the new
quantity. Key in the new quantity; press ENTER.
The new quantity and the adjusted price will appear on the display and will also be
printed on the label.
Press PRINT to print a label.
Shelf Life Override
After calling up the PLU, press the SHELF LIFE CHANGE key.
You are prompted to enter the new Sell By date. Depending on the unit setup, you will
enter in the new date one of two ways: if your display reads ENTER DAYS, enter the
number of days until the desired Sell By date. If the display reads ENTER DATE, enter
the date of the desired Sell By date in the format of MMDDYY, then press ENTER.
Place the item on the platter (if By Weight item).
Press PRINT to print the label (if in Service mode).
Blank Label Fields
When allowed by the unit setup, certain fields on the labels may be temporarily blanked
out. Select the PLU. Press the BLANK FIELD key.
Use the DOWN and UP keys to toggle between BLANK PACK DATE, BLANK NET
WEIGHT, BLANK UNIT PRICE, BLANK TOTAL PRICE, BLANK SHELF LIFE, BLANK USE
BY (date).
When you have the field you would like to blank out displayed, press ENTER.
The display will ask you if you want the field blanked. Press the DOWN and UP keys to
change the answers to YES, then press ENTER.
You may continue to blank other fields or press CLEAR two times when you are done.
Place the item on the platter (if By Weight item).
Press PRINT to print the label (if in Service mode).
3-14 (07/07)
Chapter 3: Operating the Scale
Master Off Line
Master Off Line
Not Applicable to StandAlone model.
During scale operations, the satellite relies on the master to supply PLU files and record
the PLU accumulators after a transaction. When PLU’s are retrieved from the master
scale, the satellite scale makes a backup record of the PLU information.
If the master is turned off, or the connecting cables to the master are disconnected or
broken the unit will be off line.
When the master is off line and a PLU is called, the display shows SEARCHING... for a
few seconds, the Online cursor is removed, and the satellite searches its backup files for
the PLU record.
The satellite does not store the PLU
accumulators for later transmission
to the master during off line
operation.
If a PLU is called and no backup file exists, the scale will default to “manual PLU’s.”
The PLU is then treated as a “Manual PLU.”
The display will show MANUAL MODE BY WGT. Use the DOWN and UP keys to select
between BY WEIGHT, LB FOR, ¼ LB, ½ LB, BY COUNT, or STD PACK pricing. Place the
item on the platter. (For Standard Pack items, the weight must first be entered, in
ounces, then press ENTER). Key in the price, then press ENTER.
To print a label, press PRINT. A label will be printed with the department name in the
product description field and department UPC in the Item number field of the bar code.
(07/07)
3-15
Model 2451 User's Guide & Installation Instructions
For your notes
3-16 (07/07)
Chapter 4: Standalone Database Functions
General Description
4
Standalone Database Functions
General Description
The Standalone stores and maintains its own database of PLU information, extra text,
nutrifacts, and graphics. It is available with 256K, 512K or 1M capacity memory. The
following table details the amount of records each size of memory can hold.
1 Meg
512K
256K
PLUs
(223 bytes each)
ET Records
(540 bytes each)
NF Records
(383 bytes each)
4600
1350
900
1700
2300
675
450
850
1150
335
225
425
0
1350
900
0
0
675
450
0
0
335
225
0
0
0
900
1700
0
0
450
850
0
0
225
425
ET recs + NF Recs + Graphic Recs = 7280 Max
Table 4-1: Approximate Memory Capacities
More than one department of information can be stored in memory but only the current
department’s information can be accessed at a time. For example, if department 1 is the
current department, only PLUs entered in department 1 will be accessible. The
department can be changed in either the Unit Setup Mode or in the Database Setup
Mode.
(07/07)
4-1
Model 2451 User's Guide & Installation Instructions
Standalone Database
Functions
The following is an overview of the database setup structure, with the first row showing
the major headings. The columns below each heading show specific commands
available under that function. The UP/DOWN key scrolls through the selections. The
ENTER key allows changes to the selected function.
EDIT
PLU
ET
NF
ACTION CODE
GRADE
GROUP
DEPT INFO
- DEPT #
- DEPT NAME
- DEPT ADDR
- DEPT UPC
ITEM # DUPE
QUICK
PRICE
TARE 1
ET #
NF #
SHELF LIFE
USE BY
GROUP
ACTION CODE
ITEM #
GRADE #
PRINT
PLU TOTALS
GROUP TOTALS
HOURLY TOTAL
GRAND TOTALS
MEM AVAILABLE
CLEAR
CLEAR PLU/ITEM
CLEAR ET
CLEAR NF
CLEAR GR
CLEAR PLU/ITEM TOTALS
CLEAR GROUP TOTALS
HOURLY ACCUMULATORS
VOID ACCUMULATORS
COMPRESS DATABASE
CLEAR ALL
Table 4-2: Database Functions
Editing any of the alphabetical fields, such as Description and Extra Text, requires a
programming keyboard.
Required
4-2
(07/07)
Chapter 4: Standalone Database Functions
Database Setup Mode
Database Setup Mode
To access database setup, press the SETUP MODE key. Use UP/DOWN to toggle to
DATABASE, then press ENTER. If a password has been set up for the database mode,
key in the password and press ENTER.
Passwords
To change the password for database access, press the PASSWORDS key. At the
PASSWORD prompt, enter a number between 1 and 9999. To disable the password
enter 0.
Edit
This function allows you to edit records in the database. The fields which are editable
vary depending on the type of PLU. For example, a Standard Pack PLU will not need a
Tare or Unit Price field.
PLU
Press ENTER at the PLU prompt to change or to add a new PLU record. Enter the PLU
you wish to edit or add. If it is a new PLU, the prompt PLU NT FD! ADD ACTV will
appear. To continue and add a new active record press ENTER, otherwise press CLEAR.
Respond to each of the following prompts by pressing ENTER to update it, or DOWN or
UP to scroll to the next.
PLU NUMBER:
Enter a new PLU number from 1 - 999999.
ITEM:
Enter an item number between 0 - 9999999999. This number is used in the Bar
Code symbol.
Required
DESC 1 and DESC 2:
These fields are edited by pressing ENTER at the DESC1 or DESC2 prompt.
Changes must be made on the programming keyboard which is connected to the
jack on the bottom of the Model 2451. The Desc1 line displays when that PLU is
called up. There is a maximum of 32 alphanumeric characters per description field.
PLU TYPE:
Choose BY WGT, LB FOR, BY 1/2, BY 1/4, BY CNT, STD PACK or MANUAL by
toggling to that prompt and pressing ENTER.
TARE1/COUNT:
Toggle between FORCED or a numeric value. For the numeric value, enter the value
of these tares with the numeric keypad and press ENTER. For a forced tare, toggle
to FORCED and press ENTER.
TARE/PROP TARE:
Toggle between FORCED, PROP, or a numeric value. For the numeric value, enter
the value of these tares with the numeric keypad and press ENTER. For a forced
tare, toggle to FORCED and press ENTER. For PROP proportional tare, press ENTER
(07/07)
4-3
Model 2451 User's Guide & Installation Instructions
and then enter the percentage for the proportional tare as a value between 0 and
99.99. For example, if 10.00 is entered, the proportional tare is 10%.
UNIT/TOTAL PRICE:
Enter 6 digits 0 - 999999 or FORCED price for By-Weight, lb/for, ¼, ½, total price
for By-Count, and Standard Pack. To change the currency increments, enter the
currency function under Unit Setup.
SHELF LIFE:
0 - 999 days used to calculate Sell By date printed on the label.
USE BY:
0 - 999 days used to calculate Use By date printed on the label.
GROUP #:
Items can be categorized by groups within a department. For example, in a bakery
there could be a group for cookies and a group for pies. This allows various
reports to be printed based on each group. To change this enter a new value
between 0 - 500 with the numeric keypad and press ENTER.
GRADE #:
Lines of text with grade information can be linked to each PLU. Enter the number of
the Grade text between 0 - 16 to be linked to this PLU with the numeric keypad and
press ENTER. 0 means no grade is selected.
ET #:
Lines of extra text can be linked to each PLU. Enter the number of the Extra Text
record between 0 - 999999 to be linked with this PLU with the numeric keypad and
press ENTER. 0 means no ET is selected.
NF #:
Nutrition Fact information can be linked to each PLU. Enter the number of the
Nutrition Fact record between 0 - 999999 to be linked with this PLU with the
numeric keypad and press ENTER. 0 means no NF is selected.
GRAPHIC:
Graphics can be linked to each PLU and will be printed if a label format which
prints a graphic is selected. Enter the number of the graphic record between 0 999999 to be linked with this PLU with the numeric keypad and press ENTER. 0
means no Graphic is selected.
ACTION CODE #:
Action codes can be linked to each PLU which will replace the store address,
display a different PLU description, or can be used to scroll a marquee. Enter the
number of the Action Code record between 0 - 50 to be linked with this PLU with
the numeric keypad and press ENTER. 0 means no Action Code is selected.
4-4
(07/07)
Chapter 4: Standalone Database Functions
Database Setup Mode
BARCODE:
The barcode to be printed on the label is determined by this setting. This menu is
different depending on the Unit Setup for barcode type, EAN or UPC.
At the prompt you can choose from USE SCL SETTING or choose a type from the
TYPE? List. These types include GEN MERCH (0), NOT IDENT (1), RAND WT (2),
DRUG & HEALTH (3), STORE MARK (4), COUPONS (5), PRICE ENCODED (6) and
NOT IDENT (7). (The numbers in parentheses correspond to the values of these
bar code types in the master units.) If RAND WT or PRICE ENCODED types are
selected, a format string can be selected from the FORMAT? prompt list. For RAND
WT and PRICE ENCODED these format strings are:
Note:
N = Item Number
C = Price Check Digit
$= Total Price
# = Weight
W = Weight Check Digit
X = Bar Code Check Digit.
0: NNNNN C$$$$ X
1: NNNNN 0$$$$ X
2: NNNNN N$$$$ X
3: NNNNN $$$$$ X
4: NNNNN W#### X
5: NNNNN 0#### X
6: NNNNN N#### X
7: NNNNN ##### X
If the Unit Setup barcode type is EAN, you can first choose USE SCL SETTING. There
is an additional field called PREFIX. There will be BY_WGT_PREFIX,
BY_CNT_PREFIX, STD_PACK_PREFIX, AND RUN_TOT_PREFIX. Both the first and
second digit of the EAN barcode can be changed. To change the prefix, follow the
example below.
Press ENTER
Enter digits 2 and 4
Press ENTER
Display
BY_WGT_PREFIX: 5_3
BY_WGT_PREFIX? 5_3
BY_WGT_PREFIX? 2_4
The digits 2 and 4 are now set as the first and second digit of the
“BY_WGT_PREFIX” prompt. The display now shows the next prompt
“BY_CT_PREFIX 5_3: 2_1”. Use the same procedure to set the other barcode prefix
for the other PLU types.
BLANK:
This allows you to blank one of the following fields on a label: PACK DATE, NET
WEIGHT, UNIT PRICE, or TOTAL PRICE. To blank one of these fields, press ENTER
at that prompt and toggle YES or NO. When these fields are blanked, only the
values are blanked not the legends.
(07/07)
4-5
Model 2451 User's Guide & Installation Instructions
Extra Text
Required
This allows you to add a new or edit an existing extra text record. Press ENTER at the
EXTRA TEXT prompt. With the numeric keypad enter the number of the extra text record
to be edited (6 digit number 1-999999).
New Extra Text Records
If it is a new record, the prompt will display XT NT FD! ADD XT. To add the new
extra text, press ENTER, otherwise press CLEAR. At the CHAR PER LINE prompt,
enter a number between 1 and 99. 54 is the maximum number of characters per
line without wrapping the line around. The most common numbers are 32, 42 and
54 characters per line.
Entering the Extra Text
Now you should be able to begin typing in the extra text with the programming
keyboard. If the extra text was not a new record, the current text will be displayed
on the screen and ready for editing. Otherwise, type in the new extra text. Press
[F10] on the keyboard when finished. You will be prompted to SAVE CHANGES.
Pressing ENTER will result in a SURE? YES prompt and require one more ENTER to
save or CLEAR to exit without saving. Pressing CLEAR at the SAVE CHANGES
prompt will exit without saving.
Nutrition Facts
Required
This allows you to edit a current or add a new nutrition facts record. The first prompt
requests a nutrition facts record number (6 digit number 1-999999). If it is a new
nutrition facts record, the display will read NF NT FD! ADD NF. Pressing ENTER here will
continue and add a new record as the following describes. Pressing CLEAR will leave
the nutrition facts editing.
LABEL?
At this prompt, choose the type of label for the nutrition facts to be printed on by
toggling through the choices and pressing ENTER. SINGLE will print the nutrition
facts on the label with all the rest of the PLU information. ALT PLU/NF will print a
PLU label followed by a nutrition facts label, while ALT NF/PLU will print a nutrition
facts label followed by a PLU label. BATCH PLU/NF and BATCH NF/PLU will do the
same but in a batch process. The second nutrition facts only label will be printed
according to the label format selected in the Unit Setup Label Format menu.
FORMAT?
The format for the nutrition facts record can be chosen by toggling through the
following choices and pressing ENTER: VRT STD (vertical standard), VERT SIMP
(vertical simplified), TABULAR, LINR LND (linear landscape), and LINR PRT (linear
portrait).
SERV UNITS?
This will select the serving units used to calculate servings per container by
toggling through the following prompts: OZ (numeric entry for By Weight and
Standard Pack PLUs only), PIECES (numeric entry for by Count or Standard Pack
PLUs ony), or TEXT (alphanumeric entry, entered for both serving units and
servings per container). This is done by pressing ENTER on the prompt and
entering in the requested information followed by ENTER. Table 4-3 lists the fields
that are required (R) and voluntary (V) along with the insignificant value (when
applicable).
4-6
(07/07)
Chapter 4: Standalone Database Functions
Database Setup Mode
* = For the Vertical Simple
template, these fields are not
printed in the main Nutrition
Facts table when they have
insignificant values. They are
printed in the footnote, following
the words "Not a significant
source of . . ." with the other
fields that contain insignificant
amounts. See 21 CFR part
101.9(f).
Nutrition Field
Calories
Calories from fat
Calories from saturated
Total fat (g)
Total fat (%)
Saturated fat (g)
Saturated fat (%)
Polyunsaturated fat (g)
Monounsaturated fat(g)
Cholesterol (mg)
Cholesterol (%)
Sodium (mg)
Sodium (%)
Potassium (mg)
Potassium (%)
Total carbohydrate (g)
Total carbohydrate (%)
Dietary fiber (g)
Dietary fiber (%)
Soluble fiber (g)
Insoluble fiber (g)
Sugar (g)
Sugar Alcohol
Other carbohydrates (g)
Protein (g)
Protein (%)
Vitamin A (%)
Beta-carotene (%)
Vitamin C (%)
Calcium (%)
Iron (%)
Vitamin D (%)
Vitamin E (%)
Thiamin (%)
Riboflavin (%)
Niacin (%)
Vitamin B6 (%)
Folate (%)
Vitamin B12 (%)
Biotin (%)
Pantothenic acid (%)
Phosphorus (%)
Iodine (%)
Magnesium (%)
Zinc (%)
Copper (%)
Type
R
R
V
R
R
R
R
V
V
R
R
R
R
V
V
R
R
R
R
V
V
R
V
V
R
V
R
V
R
R
R
V
V
V
V
V
V
V
V
V
V
V
V
V
V
V
Insig. Amount
<=5
<=5*
<=0.5
<=0.5
<=2*
*
<=5
<=1
<=1*
*
0*
<=1
<=2%*
<=2%*
<=2%*
<=2%*
Table 4-3: NF Record
Press CLEAR to exit the Nutrition Facts setup. A prompt to SAVE CHANGES will be
displayed. Press ENTER to save and exit. Press CLEAR to exit without saving.
(07/07)
4-7
Model 2451 User's Guide & Installation Instructions
Action Code
Required
Action Code records can be linked to a PLU to do one of three things, print a store
address line, print a PLU description or scroll a marquee. Press ENTER at the ACTION
CODE prompt to enter into this function. Type a current action code record number or a
new record number and press ENTER (2 digit number 1-50). The next prompt, TYPE?,
will toggle through the three types. Press ENTER to choose one of the types described
below.
STORE ADDR
This type will print a store address at the bottom of a label. After pressing ENTER,
the prompt LINE 1 will appear. Press ENTER and type the LINE 1 text on the
programming keyboard followed by ENTER. The prompt LINE 2 will then appear.
Enter the LINE 2 text followed by ENTER. At the SAVE CHANGES prompt, press
ENTER to save and exit, or press CLEAR to exit without saving.
PLU DESCR
This type will override the PLU description that is normally displayed on the lower
scale display. It does not change the description printed on the label. It can be used
to display a special message for the customer or operator. After pressing ENTER,
the prompt LINE 1 will appear. Press ENTER here and type the text on the
programming keyboard followed by ENTER. At the SAVE CHANGES prompt, press
ENTER to save and exit, or press CLEAR to exit without saving.
MARQUEE
This type of action code will define the text for a scrolling marquee. After pressing
ENTER, a cursor will appear waiting for text input from the PCAT keyboard. Enter the
marquee text and press ENTER. At the SAVE CHANGES prompt, press ENTER to
save and exit, or press CLEAR to exit without saving.
Grade
Required
This function is used to program Grade Text. After pressing ENTER, enter the record
number of the grade text to be edited (2 digit number 0-16). A cursor will appear
waiting for text input from the programming keyboard. Enter the grade text and press
ENTER. At the SAVE CHANGES prompt, press ENTER to save and exit and CLEAR to exit
without saving.
Group
This function will assign a text string to a group number. This text string will then be
printed on the Group Totals report heading. After pressing ENTER, enter the record
number of the group text to be edited. A cursor will appear waiting for text input from the
programming keyboard. Enter the group text and press ENTER. At the SAVE CHANGES
prompt, press ENTER to save and exit and CLEAR to exit without saving.
Department Info
Required
This allows information about the department to be entered. At each of the prompts,
enter the requested information followed by ENTER. DEPT NAME and DEPT ADDR are
alphanumeric entries from the programming keyboard. The DEPT ADDR can have 2
lines. The DEPT UPC is a generic UPC number for totals labels for that department.
Item # Duplication
This function simply toggles YES and NO entries. Selecting YES allows different PLU
records to have the same item number. Selecting NO does not allow this.
4-8
(07/07)
Chapter 4: Standalone Database Functions
Database Setup Mode
Quick Change
This function allows you to change one of the following fields of a PLU without having to
go through all of the other fields at the same time: PRICE, TARE, ET #, NF #, SHELF
LIFE, USE BY, GROUP #, ACTION CODE, ITEM, and GRADE #. The QUICK PRICE
changes the UNIT PRICE field for By Weight PLUs and the TOTAL PRICE field for
Standard Pack and By Count PLUs. The QUICK TARE changes the TARE1 field.
Print
This function will print reports for the following: PLU TOTALS, GROUP TOTALS, HOURLY
TOTALS, GRAND TOTALS, and MEMORY AVAILABLE. The reports are printed on labels
the format of which is chosen in the Unit Setup Label Format function. Refer to Appendix
2 for the label formats for reports. To print one of these reports, press ENTER at that
prompt. The results are displayed on the tower display. To print, press the PRINT key
(exception: Hourly totals will print automatically). To stop printing in the middle of a
run, press the CLEAR key.
Clear
This function allows you to clear out or delete various parts of the database. The first 4
choices, CLEAR PLU\ITEM, CLEAR EXTRA TEXT, CLEAR NUTRIFACT, and CLEAR
GRAPHIC, will clear individual records in each of those areas. Press ENTER at the
prompt. The next prompt can be toggled between ALL and the record type. For example,
press ENTER at the CLEAR PLU/ITEM prompt. Now you can toggle between PLU/ITEM
and ALL. Pressing ENTER at PLU/ITEM, will request a PLU number to delete. Pressing
ENTER at ALL will clear all PLU records. Both cases will prompt with SURE?? NO before
continuing. The other 3 choices work the same way but with the other record types of
extra text, nutrifact, and graphic.
The next four choices, CLEAR PLU\ITEM TOT, CLR GROUP TOTALS, HOURLY
ACCUMULATORS, and VOID ACCUMULATORS, will clear the totals for each of those
areas. CLEAR PLU/ITEM TOT works as described in the above paragraph where there is
a choice between clearing totals for ALL PLUs or for just one PLU. CLR GROUP TOTALS
requests a group number to be entered. Both end with a SURE?? NO prompt. The two
accumulators display a prompt with the current department number and a toggle
between YES and NO. There is no SURE? prompt to double check on clearing
accumulators.
The next choice, COMPRESS DATABASE, should be used if any ‘Out of Memory’ errors
are displayed. Press ENTER at the prompt and toggle YES and NO at the SURE??
prompt to continue.
The final choice, CLEAR ALL, will clear everything from the database completely
including all PLU, Extra Text, Nutrition Facts and Graphic records and accumulators.
There is a SURE?? NO prompt to make sure this is what you want to do.
(07/07)
4-9
Model 2451 User's Guide & Installation Instructions
For your notes
4-10 (07/07)
Chapter 5: Maintenance
External Cleaning
5
Maintenance
External Cleaning
WARNING
DO NOT SPRAY OR WASH DOWN. HAZARD OF
ELECTRICAL SHOCK OR BURN.
WARNING
DISCONNECT ALL POWER TO THIS UNIT BEFORE
REMOVING THE FUSE OR SERVICING.
Turn the scale power off by placing the power switch to the OFF position (press the “o”
on the power switch). Disconnect the power cord from the outlet.
=
Use a soft clean cloth dampened with a mild detergent and water (or a mild cleaner) to
wipe the exterior surfaces. Do not spray liquid directly on the unit. A mild spray cleaner
can be used by spraying the cleaning cloth.
HEAVY DUTY
COMMERCIAL
CLEANER
SPRAY
SOLVENT
(07/07)
5-1
Model 2451 User's Guide & Installation Instructions
Internal Printer
Cleaning
WARNING
DISCONNECT ALL POWER TO THIS UNIT BEFORE
REMOVING THE FUSE OR SERVICING.
Turn the power off by placing the power switch to the OFF position (press the “o” on the
power switch). Disconnect the power cord from the outlet.
=
Open the printer door. Clean any adhesive or debris buildup from the stripper bar, platen
roller, and printhead using METTLER TOLEDO liquid cleaner or equivalent or the
METTLER TOLEDO Clean Pen. DO NOT USE A METAL DEVICE TO REMOVE LABELS
FROM COMPONENTS OR SEVERE DAMAGE MAY RESULT. DO NOT SCRAPE THE
PRINTHEAD WITH ANY OBJECT TO REMOVE GLUE OR LABEL DEBRIS.
To clean the printhead, unlock the printhead by lifting the rear of the printhead assembly
forward and up at the same time. Once the rear of the assembly is unlocked then lift the
front of the printhead assembly. Refer to Figure 5-1. Remove the paper stock and clean
the printhead and paper path with a soft, clean cloth soaked in isopropyl alcohol,
METTLER TOLEDO liquid cleaner or equivalent, or the METTLER TOLEDO Cleaning Pen.
Paper path
Platen Roller
Printhead
Figure 5-1: Unlocking the Printhead
Figure 5-2: Locking the Printhead
To lock the printhead back down when complete, see Figure 5-2.
5-2
(07/07)
Chapter 6: Label Formats
6
BCB
By Cnt
By Wght
Cont
Grd
NF
Pack
Sell
SH
Bar Code on Bottom
By Count Pricing
By Weight Pricing
Continuous Strip Label
Grade
Nutrifact Text
Pack Date
Sell By Date
Safe Handling Text Printed
by 8461.
SHS
Safe Handling Space on
Preprinted labels.
Std Pck Standard Pack Pricing
Refer to the Model 2451 or 8450
Service Manual for label format
illustrations.
Label Formats
Label
Number
31
32
33
34
35
36
37
38
39
40
41
42
43
44
45
46
47
48
49
50
51
52
53
54
55
56
57
58
59
60
61
62
63
64
65
66
67
68
69
70
71
72
73
74
75
76
77
78
79
Size
1.9"
1.9"
1.9"
1.9"
1.9"
1.9"
1.9"
1.9"
1.9"
2.1"
2.1"
2.1"
2.1"
2.1"
2.1"
2.1"
2.1"
2.1"
2.4"
2.4"
2.4"
2.4"
2.4"
2.4"
2.4"
2.4"
2.4"
2.4"
2.4"
2.4"
2.4"
2.4"
3.3"
3.3"
3.3"
3.3"
3.3"
3.3"
3.3"
3.3"
3.7"
3.7"
3.7"
3.7"
3.7"
3.7"
3.7"
3.7"
3.7"
Type
By Wght
By Cnt
Std Pck
By Wght
By Cnt
Std Pck
By Wght
By Cnt
Std Pck
By Wght
By Cnt
Std Pck
By Wght
By Cnt
Std Pck
By Wght
By Cnt
Std Pck
By Wght
By Cnt
Std Pck
By Wght
By Cnt
Std Pck
By Wght
By Cnt
Std Pck
BW
By Cnt
Std Pck
By Wght
By Wght
By Wght
By Cnt
Std Pck
By Wght
By Cnt
Std Pck
By Wght
By Wght
By Wght
By Cnt
Std Pck
By Wght
By Cnt
Std Pck
By Wght
By Wght
By Wght
Other
BC
Label
Date Info Position Number Size Type
Sell Grd
80
3.7" By Cnt
Sell Grd
81
4.2" By Wght
Sell Grd
82
4.2" By Cnt
83
4.2" Std Pck
84
4.2" By Wght
85
4.2" By Cnt
Pack Grd
86
4.2" Std Pck
Pack Grd
87
4.2" By Wght
Pack Grd
88
4.2" By Wght
Sell Grd
89
4.2" By Wght
Sell Grd
90
4.2" By Cnt
Sell Grd
91
4.2" Std Pck
92
4.7" By Wght
93
4.7" By Cnt
94
4.7" Std Pck
Pack Grd
95
4.7" By Wght
Pack Grd
96
4.7" By Cnt
Pack Grd
97
4.7" Std Pck
Sell Grd
98
4.7" By Wght
Sell Grd
99
4.7" By Wght
Sell Grd
100 4.7" By Wght
Sell Grd
BCB
101 4.7" By Cnt
Sell Grd
BCB
102 4.7" Std Pck
Sell Grd
BCB
103 5.1" By Wght
Sell Grd
104 5.1" By Cnt
Sell Grd
105 5.1" Std Pck
Sell
106 5.1" By Wght
Sell Grd
BCB
107 5.1" By Cnt
Sell Grd
BCB
108 5.1" Std Pck
Sell
BCB
109 5.1" By Wght
Sell Grd
SH
110 5.1" By Wght
Sell Grd
SHS
111 5.1" By Wght
Sell Grd
112 5.1" By Cnt
Sell Grd
113 5.1" Std Pck
Sell Grd
114 Con By Wght
Sell Grd
BCB
115 Con By Cnt
Sell Grd
BCB
116 Con Std Pck
Sell Grd
BCB
117 Con By Wght
Sell Grd
SH
118 Con By Wght
Sell Grd
SHS
119 Con By Cnt
Sell Grd
120 Con Std Pck
Sell Grd
121 Rec
Sell Grd
Sell Grd
BCB
Sell Grd
BCB
Sell Grd
BCB
Sell Grd
SH
Sell Grd
SHS
Sell NF
Date
Sell
Sell
Sell
Sell
Sell
Sell
Sell
Sell
Sell
Sell
Sell
Sell
Sell
Sell
Sell
Sell
Sell
Sell
Sell
Sell
Sell
Sell
Sell
Sell
Sell
Sell
Sell
Sell
Sell
Sell
Sell
Sell
Sell
Sell
Sell
Sell
Sell
Sell
Sell
Sell
Sell
Other
BC
Info Position
NF
Grd
Grd
Grd
Grd
BCB
Grd
BCB
Grd
BCB
Grd
SH
Grd
SHS
Grd
NF
Grd
NF
NF
Grd
Grd
Grd
Grd
BCB
Grd
BCB
Grd
BCB
Grd
SH
Grd
SHS
Grd
NF
Grd
NF
Grd
NF
Grd
Grd
Grd
Grd
BCB
Grd
BCB
Grd
BCB
Grd
SH
Grd
SHS
Grd
NF
Grd
NF
Grd
NF
BCB
BCB
BCB
SH
BCB
NF
BCB
NF
BCB
NF
BCB
(07/07)
6-1
Model 2451 User's Guide & Installation Instructions
For your notes
6-2
(07/07)
Chapter 7: Error Messages
7
Error Messages
The following is a list of “Operator” errors that may occur. These errors are an “invalid
operation” type and are displayed in order to explain the problem:
Error Message
*DOWNLOAD ERROR*
Description
Indicates an error during the backup download from
the master. The master may be off-line. Check the
master and the communication cable on the scale.
BAD PRINTER COMM
This is a printer error. Turn power off, then on. Try
printing another PLU. If problem persists, call for
service.
CHECK LABEL STOCK
Scale may be out of labels or incorrectly threaded.
COMMUNICATION ERROR
INVALID ENTRY
Indicates the satellite has lost communication with the
master scale. This could occur during a download
PLU routine. The cause could be the master scale
being turned off, a loose or broken communication
line, or a failure in the master scale. Also check power
to the master scale and the fuse.
Incorrect entry made when making an accumulator
adjustment, under zero, or overflow.
INVALID PRICE MODE
Incorrect entry found in modifier or package code
fields during a price entry (or change). When the
package code is “2”, the modifier must be a “2” or a
“4” indicating one half or one quarter lb pricing. When
the package code is “1” (By Count), the modifier must
be greater than “0”. When in Pound For or By Count
mode, the number of pounds or the count is too many
digits.
INVALID PRICE MODE
Invalid date found in modification or package code
fields in the PLU record.
INVALID TARE
ITEM # NOT FOUND
MEMORY IS FULL
NO EXTRA TEXT FOUND
OVER READY
PLU # NOT FOUND
Invalid tare entry.
The entered Item number was not found (does not
exist).
The satellite memory is full.
The entered Extra Text number was not found (does
not exist).
Scale is over capacity.
The entered PLU number was not found (does not
exist).
(07/07)
7-1
Model 2451 User's Guide & Installation Instructions
Error Message
PROP TARE 2 ERROR
The Tare 2 field in the PLU record is set to a
proportional tare and the satellite is set up to use Tare
2. However, the satellite is also set up to prohibit the
use of proportional tare. Change the setup to allow
proportional tare.
RECORD NOT FOUND
The Extra Text, Nutrition Fact, or Graphics number
does not exist in the master database.
TEXT FILE TOO LARGE
Extra Text file is too big to fit in memory.
TOTAL$>$999.99
UNDER READY
7-2
(07/07)
Description
Total dollar amount exceeds the ability of the printer to
print the value.
Scale is under capacity.
Chapter 8: Installation
Dimensions
8
Installation
Dimensions
9.7" [24.6cm]
22.9" [58.2cm]
13.2" [33.6cm]
36.0" [91.4cm]
6.5 IN/16.5 CM CLEARANCE
REQUIRED ON THIS SIDE
FOR PRINTER DOOR
OPENING.
13.3" [33.9cm]
16.0" [40.7cm]
12.5" [31.7cm]
(07/07)
8-1
Model 2451 User's Guide & Installation Instructions
Unit Installation
Unpacking
Remove the Model 2451 and accessories from the shipping carton and inspect for
damage. Report any damage to the carrier promptly. Verify you received the accessories
shown in figure below.
C
B
H
D
E
Note: If you choose to dispose of the
package, please recycle the materials.
The carton is recyclable natural fiber with
biodegradable adhesives.
G
I
A
Figure 8-1: Model 2451
Ref
A
B
C
D
E
F
G
H
I
Description
Model 2451
25 ft/7.62 m TNET Cable 12716500A (Satellite Only)
TNET Phone Jack 12716300A (Satellite Only)
Power Cord 15039600A
Operator Manual
Stainless Steel Pan
Hanger
Electrical Box (15345500A) and
Cover w/1/2” Knockout (15345600A)
Bushing, (13785100A)
Not shown:
16496800A Keypad Envelope-Std
16496600A Keypad Envelope-Self Serve
16496700A Insert, English-Std
16477900A Insert, English-Self Serve
B12363300A Security Seal
16574100A Security Wire Seal
R0538900A (2) M8 Hex Nuts R0535800A M4x6 Fl Hd Screws.
R0550800A (2) M8x5 Hex Hd Screws A12800700A Sample Label Form
8-2
(07/07)
F
Chapter 8: Installation
Unit Installation
Installation Checklist
Install optional kits. Install any optional kits at this time.
Install optional Track and Trolley. Refer to the Track Installation and Trolley Installation
Sections. The Trolley Mount installation is recommended.
Connect Data Cable Wiring for TNET or host. Refer to the Model 2451 Service Manual.
Connect AC power. Refer to Electrical Wiring Section.
Note: If the unit has been stored or
transported in below freezing
temperatures, allow the unit to warm
up to room temperature before turning
on AC power.
Note: After performing the Reset
Ram/Database Function procedures
for Satellite and Standalone, you
must reset the printhead resistance
and print speed/power setting, and
the Scale ID.
Reset Ram (Satellite/Client) - The scale must be initialized. To initialize the scale and
reset all softswitches to factory defaults, press the SETUP MODE key. Next, press the
CAL Switch. The display will show Sure?? No. Press DOWN/UP to toggle to Yes. Press
ENTER with Yes displayed to initialize or with No displayed to abort. Cycle power when
complete.
Reset Ram (Standalone) - The scale must be initialized. To initialize the scale and reset
all softswitches to factory defaults (but not clear the PLUs, ET, NF Database), press the
SETUP MODE key. Next press the ENTER key, followed by the CAL Switch. The display
will show: Sure?? No. Press DOWN/UP to toggle to Yes. Press ENTER with Yes
displayed to initialize, or with No displayed to abort.
Reset Database (Standalone) The Database Functions must be reset by pressing
SETUP MODE key, UP/DOWN to display Database on the lower display, ENTER, CLEAR
(on the Setup Keypad), UP to display Clear All, then press ENTER. The display will
show Sure?? No. Press the DOWN/UP keys to toggle to Yes. Press ENTER with Yes
displayed to initialize, or with No displayed to abort. Cycle power when complete.
Continue setup in the following order:
1. Setup Printer - Set the print speed/power setting and the print head resistance.
Tip: A question mark following a
message on the left side of the
display means the Model 2451
expects you to enter a number or
select an option followed by pressing
ENTER. A colon means the data on
the right of the display is the current
setting. Pressing ENTER will allow
you to change it.
2. Unit ID - Set the Satellite and Client Unit ID to a unique number on the network. Do
not duplicate any ID numbers on the network or communications errors will occur.
Set the Standalone Unit ID to 255. Refer to Chapter 3 Unit Setup in the Model 2451
Service Manual.
3. Protocol - When using the Model 2451 Satellite with the SmartTouch® Master or
Model 8422/8423/8305 NF Master, set the TNET Protocol to SmartTouch. When
using the Model 2451 with the Standard Model 8422 Type Master, Select PLU 4 or
PLU 6. Set the Standalone protocol to SmartTouch.
4. Calibrate - Refer to Calibration Instructions in Chapter 3 CAL Key in the Model 2451
Service Manual.
5. Password - To bypass either a Unit Password or Database Password, press the
CAL switch when the display prompts for the password.
6. Install Labels - Install labels in the printer. Refer to Label Installation.
7. Set Scale Options - Scale options must be configured such as Bar Code settings,
Label Size, and Label Formats. Refer to Chapter 3 Unit Setup in the Model 2451
Service Manual.
8. Database (Standalone) Load the standalone database either manually or from
Intelli-Net or Databack. Make necessary changes. Use Databack to back it up if
manually entered (Refer to the Model 2451 Service Manual)
9. DataBack - Use DataBack to backup and restore the presets, custom label formats,
label styles, and miscellaneous categories.
(07/07)
8-3
Model 2451 User's Guide & Installation Instructions
Track Installation
Refer to the illustration in Figure 8-2 for track installation. The Trolley Mount installation
is recommended.
Mounting Requirements
1. Mount the track to the supporting structure using all eight
mounting holes. The track must be mounted with 5/16 in steel
hex bolts.
2. The supporting structure must provide a solid, stable, and
level support that is braced to prevent lateral movement in all
directions.
3. The supporting structure must be designed and installed in the
building by a qualified contractor and must be designed to
support 300 lb/136 kg without deformation. The ultimate
strength must be at least 600 lb/273 kg.
4. Before installing the trolley, make sure all bolts are properly
secured.
Figure 8-2: Track Installation
8-4
(07/07)
Chapter 8: Installation
Trolley Installation
Trolley Installation
The Trolley Mount installation is
recommended.
After the track is installed, remove one track stop bracket on the track. Mount the trolley
assembly onto the Model 2451 mounting column using the supplied bolts (2N), then
mount the scale and trolley assembly onto the track (See Figures 8-3 and 8-4). Ensure
there is adequate help on site, and exercise care when lifting and installing the scale
and trolley onto the track. Install track stop bracket when the assembly is in place.
Check to make sure all bolts are properly secured.
WARNING
Use extreme caution when lifting and moving the scale
to the desired location. Ensure there is adequate help
when lifting and installing scale and trolley on the track.
Cut Cable 2R to
length and install
tubing 2T and
clamp 2U.
Figure 8-3: Trolley Assembly
(07/07)
8-5
Model 2451 User's Guide & Installation Instructions
WARNING
Make sure the track stop is re-installed after the trolley
assembly is installed on the track. Properly secure all
mounting bolts.
Remove one track stop
bracket to install the scale
with the trolley assembly
mounted on the scale support
post.
Mount the Scale Support
Post to the trolley with
the supplied bolts.
Figure 8-4: Support Post Mounted to Trolley
8-6
(07/07)
Chapter 8: Installation
Trolley Installation
Trolley Mount - Scale
Mounting and Wiring
WARNING
DISCONNECT ALL POWER TO THIS UNIT BEFORE
INSTALLING, SERVICING, CLEANING, OR REMOVING THE
FUSE. FAILURE TO DO SO COULD RESULT IN BODILY
HARM AND/OR PROPERTY DAMAGE.
The Trolley Mount installation is
recommended.
CONDUIT
POWER IN
(*15345500A)
ELECTRICAL BOX
RACO #153 4" OCTAGON
OR #185 4" SQUARE
(*15345600A)
COVER
RACO #724 OR #753
W/1/2" KNOCK OUT
BUSHING 13785100A
CABLE 15039600A
Mounting Scale to Column
1.
2.
3.
4.
Remove the top two bolts in the
column mounting brackets.
Carefully lift the scale so the
holes in the brackets are aligned
with the holes in the column.
Install the two mounting bolts
and fasten securely.
Make sure all other mounting
bolts are securely fastened.
Remove cover for
access to AC Power
Cord Jack
Figure 8-5: Trolley Mount – Scale Mounting and Wiring
(07/07)
8-7
Model 2451 User's Guide & Installation Instructions
Electrical Wiring
NOTE: The branch circuit must be protected by a 20A maximum rated UL listed circuit
breaker. All wiring must comply with all National and local wiring codes.
WARNING
DISCONNECT ALL POWER TO THIS UNIT BEFORE
INSTALLING, SERVICING, CLEANING, OR REMOVING THE
FUSE. FAILURE TO DO SO COULD RESULT IN BODILY
HARM AND/OR PROPERTY DAMAGE.
Refer to Figure 8-5.
1. Install the electrical supply junction box near the center of the track and
approximately 6 to 12 inches from the track.
2. Install the bushing (13785100A) in the cover of the junction box with the "O" ring
on the outside of the cover and the metal nut on the inside. Securely tighten the
metal nut.
3. Cut the scale power cord supplied to the proper length for the installation. This
length will depend on the length of the vertical support and must allow the scale to
move freely from one end of the track to the other without binding the power cord.
4. Route the power cord down through the vertical support (before mounting the
vertical support to the trolley) with the IEC plug at the scale end.
5. Loosen the collar of the bushing and insert the free end of the power cord through
the bushing from the outside allowing sufficient length of cord on the inside to
make connections in the box.
6. Hand tighten the collar on the bushing snug and then turn one more turn to provide
a secure grip on the power cord.
7. Remove the outer jacket from the power cord approximately 3 inches back from the
end and strip the ends of the conductors for connection using wire nuts.
®
METTLER TOLEDO Power Cord:
Black or Brown = AC Line (120VAC)
Blue or White = Neutral
Green or Green/Yellow = Ground
8. Connect the supply line white wire to the white or blue wire of the scale power cord
using a wire nut of the proper size.
9. Connect the supply line black wire to the black or brown wire of the scale power
cord using a wire nut of the proper size.
10. Connect the green/yellow wire of the scale power cord to the electrical ground.
11. Install the cover on the junction box.
WARNING
For continued protection against shock hazard,
connect to properly grounded outlet only.
8-8
(07/07)
METTLER TOLEDO
1900 Polaris Parkway
Columbus, Ohio 43240
www.mt.com
P/N: 16511900A
(07/07).01
®
METTLER TOLEDO is a registered trademark of Mettler-Toledo, Inc.
©2007 Mettler-Toledo, Inc.
Printed in USA
16511900A