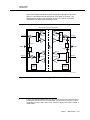
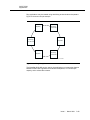
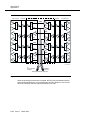
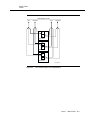
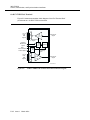
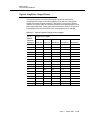
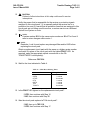
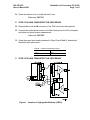
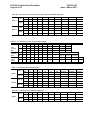
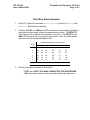
1
WaveStar™ OLS 40G Release 3.4 User/Service Manual 365-575-536 Issue 1 March 2001 Copyright © 2001 Lucent Technologies. All Rights Reserved. This material is protected by the copyright laws of the United States and other countries. It may not be reproduced, distributed, altered in any fashion by any entity (either internal or external to Lucent Technologies), except in accordance with applicable agreements, contracts or licensing, without the express written consent of the Customer Training and Information Products organization and the business management owner of the material. For permission to reproduce or distribute this document please contact your Account Executive. Notice Every effort was made to ensure that the information in this document was complete and accurate at the time of printing. However, information is subject to change. Federal Communications Commission (FCC) Statement This equipment has been tested and found to comply with the limits for a Class A digital device, pursuant to Part 15 of FCC Rules. These limits are designed to provide reasonable protection against harmful interference when the equipment is operated in a commercial enrironment. This equipment generates, uses, and can radiate radio frequency energy, and, if not installed and used in accordance with the instruction manual, may cause harmful interference to radio communications. Operation of this equipment in a residence is likely to cause harmful interference in which case the user will be required to correct the interference at his own expense. Security In rare instances, unauthorized individuals make connections to the telecommunications network through the use of remote access features. In such event, applicable tariffs require that the customer pay all network charges for traffic. Lucent Technologies cannot be responsible for such charges and will not make any allowance or give any credit for charges that result from unauthorized access. Trademarks 5ESS, DACScan, LGX, ST, and TrueWave are registered trademarks of Lucent Technologies WaveStar is a trademark of Lucent Technologies ANSI is a registered trademark of American National Standards Institute, Inc Common Language is a registered trademark and CLEI, CLLI, CLCI, and CLFI are trademarks of Telcordia CSA is a registered trademark of the Canadian Standards Association DANTEL is a registered trademark of DANTEL Inc Harris is a registered trademark of Harris Corporation IBM is a registered trademark of International Business Machines Corporation Microsoft, MS-DOS, and Windows 95, Windows 98, Windows NT, and Windows 2000 are registered trademarks of Microsoft Corporation Pentium is a registered trademark of Intel Corporation Styrofoam is a registered trademark of the Dow Chemical Company UL is a registered trademark of Underwriters Laboratories, Inc. Warranty The terms and conditions of sale will include a one-year warranty on hardware and applicable software. Customer Assistance and Technical Support The Lucent Technologies North American Regional Technical Assistance Center (NARTAC) provides a technical assistance telephone number that is monitored 24 hours a day. For technical assistance, call 1-800-225-RTAC (1-800-225-7822). You can also call this telephone number to provide comments on the product or to suggest enhancements. International customers, please either call +1-630-224-4672: Prompt 2 or contact your Account Executive for your local technical support number. This document was developed by the Lucent Technologies Optical Networking Group, Lucent Learning Organization. Lucent Technologies values your comments! WaveStar OLS 40G User/Service Manual Release 3.4 365-575-536 Issue 1 Date: March 2001 Lucent Technologies welcomes your comments on this information product. Your opinion is of great value and helps us to improve. 1. Was the information product: Yes No Not applicable In the language of your choice? In the desired media (paper, CD-ROM, etc.)? Available when you needed it? Please provide any additional comments: ________________________________________________________________________________________________ ________________________________________________________________________________________________ 2. Please rate the effectiveness of this information product: Excellent More than satisfactory Satisfactory Less than satisfactory Unsatisfactory Not applicable Ease of use Level of detail Readability and clarity Organization Completeness Technical accuracy Quality of translation Appearance If your response to any of the above questions is “Less than satisfactory” or “Unsatisfactory,” please explain your rating. ________________________________________________________________________________________________ ________________________________________________________________________________________________ 3. If you could change one thing about this information product, what would it be? ________________________________________________________________________________________________ ________________________________________________________________________________________________ 4. Please write any other comments about this information product: ________________________________________________________________________________________________ ________________________________________________________________________________________________ Please complete the following if we may contact you for clarification or to address your concerns: Name: ______________________________________________________ Company/organization: ______________________________ Date: ________________________________ Telephone number: ________________________________ Address: ____________________________________________________________________________________________ Email address: ______________________________ Job function: __________________________________________ If you choose to complete this form online, go to http://www.lucent-info.com/comments Otherwise fax to 407 767 2760 (U.S.) or +1 407 767 2760 (outside the U.S.) or email comments to [email protected] Lucent Technologies values your comments! WaveStar OLS 40G User/Service Manual Release 3.4 365-575-536 March 2001 Date: March 2001 Lucent Technologies welcomes your comments on this information product. Your opinion is of great value and helps us to improve. 1. Was the information product: Yes No Not applicable In the language of your choice? In the desired media (paper, CD-ROM, etc.)? Available when you needed it? Please provide any additional comments: ________________________________________________________________________________________________ ________________________________________________________________________________________________ 2. Please rate the effectiveness of this information product: Excellent More than satisfactory Satisfactory Less than satisfactory Unsatisfactory Not applicable Ease of use Level of detail Readability and clarity Organization Completeness Technical accuracy Quality of translation Appearance If your response to any of the above questions is “Less than satisfactory” or “Unsatisfactory,” please explain your rating. ________________________________________________________________________________________________ ________________________________________________________________________________________________ 3. If you could change one thing about this information product, what would it be? ________________________________________________________________________________________________ ________________________________________________________________________________________________ 4. Please write any other comments about this information product: ________________________________________________________________________________________________ ________________________________________________________________________________________________ Please complete the following if we may contact you for clarification or to address your concerns: Name: ______________________________________________________ Company/organization: ______________________________ Date: ________________________________ Telephone number: ________________________________ Address: ____________________________________________________________________________________________ Email address: ______________________________ Job function: __________________________________________ If you choose to complete this form online, go to http://www.lucent-info.com/comments Otherwise fax to 407 767 2760 (U.S.) or +1 407 767 2760 (outside the U.S.) or email comments to [email protected] Contents About This Information Product 1 2 xxi ■ Purpose xxi ■ Software Release xxi ■ Intended Audiences xxi ■ Reason for Reissue xxii ■ How to Use This Document xxiii ■ Conventions Used xxiv ■ Safety Instructions xxiv ■ Security xxxvi ■ Related Documentation/Training xxxvi ■ Technical Support xliv ■ Documentation Support xlv ■ How to Order Documents xlv ■ How to Comment on the WaveStar OLS xlvi ■ How to Comment on This Document xlvi ■ Electronic Documentation xlvi ■ Product Change Notifications xlvi System Introduction 1-1 ■ Overview ■ Introduction to Lucent Technologies Optical Networking Products 1-1 ■ What is the WaveStar OLS 40G? 1-2 ■ Features 1-6 Applications 2-1 ■ 1-1 Basic WaveStar OLS 40G Configurations 2-1 Issue 1 March 2001 iii Contents 3 4 5 iv Issue 1 Platform Description 3-1 ■ Introduction 3-1 ■ WaveStar OLS 40G Bay/Cabinet Design 3-2 ■ WaveStar OLS 40G Shelf Design 3-5 ■ WaveStar OLS 40G Architecture 3-9 ■ WaveStar OLS 40G Shelf Descriptions 3-10 ■ Transmission Circuit Packs 3-15 ■ Control Circuit Packs 3-19 ■ Optical Transmission Elements 3-20 ■ End Terminal Shelf Configurations 3-23 ■ WaveStar OLS 40G Packages 3-34 ■ WaveStar OLS 40G Integration Cable Engineering 3-47 ■ Interconnection Panels 3-51 ■ Power 3-60 Power 4-1 ■ Overview 4-1 ■ General 4-1 ■ Power Distribution 4-2 ■ Power Dissipation 4-9 ■ LED Indicators 4-11 Control, Transmission, and Synchronization Interfaces 5-1 ■ Overview 5-1 ■ Control 5-1 ■ Transmission 5-4 ■ Synchronization 5-33 March 2001 Contents 6 7 8 Operations Interfaces 6-1 ■ Overview 6-1 ■ Craft Interface Terminal (CIT) 6-1 ■ Indicator Strip/User Panel 6-8 ■ Fuse/Power Indicating Panel 6-12 ■ Fuse Panel 6-13 ■ Circuit Pack Faceplate LED Indicator 6-15 ■ Office Alarms Interface 6-16 ■ Parallel Telemetry Interface 6-17 ■ User-Settable Miscellaneous Discrete Interface 6-17 ■ TL1/X.25 Interface 6-21 ■ Message-Based Operations System Interface 6-25 ■ Orderwire Interface 6-33 Circuit Pack Descriptions 7-1 ■ Overview 7-1 ■ General 7-1 ■ Circuit Pack/Unit/Modules and Software Compatibility 7-2 ■ Control 7-4 ■ Transmission 7-24 Administration and Provisioning 8-1 ■ Overview 8-1 ■ Administration 8-1 ■ Provisioning 8-12 Issue 1 March 2001 v Contents 9 10 vi Issue 1 Maintenance Description 9-1 ■ Overview ■ Maintenance Philosophy 9-1 ■ Maintenance Signals 9-2 ■ Fault Detection and Isolation 9-4 ■ Fault Reporting 9-5 ■ Optical Translator Fault Reporting (via the Miscellaneous Discrete Interface) 9-13 ■ Protection Switching 9-16 ■ Automatic Optical Amplifier Power Shut Down/Restart 9-17 ■ Loopbacks 9-20 ■ Tests 9-20 ■ Provisioning Consistency Audits 9-27 ■ Performance Monitoring 9-28 ■ Reports 9-37 Technical Specifications 9-1 10-1 ■ Overview 10-1 ■ Optical Connector Interfaces 10-1 ■ Transmission Medium 10-1 ■ Lightguide Jumpers 10-1 ■ Optical Safety (FDA/CDRH Classification) 10-2 ■ Operating Wavelengths and Tone Frequencies 10-7 ■ OMU Optical Input Power 10-8 ■ OTU/OTPM Optical Output Power 10-9 ■ Optical Amplifier Output Power 10-11 ■ Optical Dispersion 10-12 ■ Optical Return Loss 10-12 ■ Optical Reflections Tolerance 10-12 ■ Engineering Rules for Systems with Two Optical Amplifiers 10-13 March 2001 Contents Engineering Rules for Systems with One Optical Amplifier 10-14 Engineering Rules for Systems with Optical Translators 10-15 ■ Capacity 10-16 ■ Transmission Characteristics 10-16 ■ Transmission Delay 10-16 ■ Signal-to-Noise Ratio Performance 10-17 ■ Customer Maintenance Signal IS-3 Access 10-17 ■ Cable Access 10-18 ■ Power Specifications 10-18 ■ Low Voltage Cutoff 10-22 ■ Cabinet/Shelf Dimensions 10-22 ■ Circuit Pack/Unit Dimensions 10-23 ■ Floor Loading Specifications 10-24 ■ Environmental Specifications 10-25 ■ Handling and Transportation Specifications 10-25 ■ Craft Interface Terminal 10-26 ■ Modem Requirements 10-27 ■ Operations System Interfaces 10-28 ■ Reliability Specifications 10-29 ■ Circuit Pack/Unit/Module FIT Rates 10-31 ■ X.25 Interface 10-32 ■ ■ 11 Craft Interface Terminal Usage 11-1 ■ Overview 11-1 ■ CenterLink Introduction 11-2 ■ Inputs (Commands) 11-2 ■ Outputs 11-8 ■ Examples of Reports [Generated by Various Inputs (Commands)] 11-9 Issue 1 March 2001 vii Contents A B C viii Issue 1 Pin Repair A-i ■ General A-1 ■ Metral Tool Descriptions A-1 ■ Pin Designations A-2 ■ OT Circuit Pack and Equipment Location A-3 ■ Procedures for Pin Replacement A-3 State Names B-1 ■ Introduction B-3 ■ State Names for Customer Maintenance Signal Ports B-5 ■ State Names for Optical Channels B-6 ■ State Names for OA and TLM Circuit Pack Slots B-7 State Diagrams C-1 ■ Introduction C-2 ■ Figure C-1: Customer Maintenance Signal Port States C-3 ■ Figure C-2: Optical Channel States C-4 ■ Figure C-3: OA and TLM Circuit Pack Slot States C-5 ■ Figure C-4: Optical Line States C-6 ■ Figure C-5: Optical Translator Port Signal States C-7 ■ Figure C-6: Supervisory Channel States C-8 March 2001 Figures About This Information Product 1 DANGER Label for Shelf Assembly xxvii 2 HAZARD LEVEL 3A Label for Optical Amplifier Circuit Pack xxviii 3 HAZARD LEVEL 3B for LEA104 Optical Amplifier Circuit Pack xxix 4 Notice Label 5 Compliance Label xxx 6 Static Control Wrist Strap xxxiii 1 System Introduction 2 Applications 2-1 xxx WaveStar OLS 40G Single Span with Two-OA Operation 2-3 WaveStar OLS 40G Single Span with Single-OA Operation 2-4 WaveStar OLS 40G Multiple Span System with Repeaters (two-span system shown)* 2-5 2-4 Two-OA/Two-OA Dual-facing Shelf 2-7 2-5 Two-OA/Single-OA Dual-facing Shelf 2-8 2-6 Single-OA/Two-OA Dual-facing Shelf 2-9 2-7 Single-OA/Single-OA Dual-facing Shelf 2-10 2-8 Point-to-Point Linear Add/Drop Chain 2-11 2-9 WaveStar OLS 40G Application Using OTUs 2-12 2-10 Ring Example 2-13 2-11 Ring Application with SONET/SDH Lightwave Terminals 2-14 2-2 2-3 2-12 Two Rings Sharing a WaveStar OLS 40G System 2-16 Issue 1 March 2001 ix Figures 2-13 Multiple WaveStar OLS 40G Systems and OTU/QOTUs as Regenerators (2-fiber Application) 2-17 WaveStar OLS 40G with Wavelength Add/Drop (WAD) 2-18 2-15 4-Fiber Regenerator 2-19 2-16 4-Fiber WAD 2-20 2-17 Telemetry Feed-thru 2-21 2-14 3 Platform Description 3-1 WaveStar OLS 40G Cabinet (Doors Closed) 3-3 3-2 WaveStar OLS 40G Bay Frame 3-4 3-3 Miscellaneously-Mounted WaveStar OLS 40G Shelf with Front Covers (flat cover shown) 3-5 Miscellaneously-mounted OT Shelf with Front Cover (flat cover shown) 3-6 3-5 WaveStar OLS 40G Cabinet Shelf 3-7 3-6 WaveStar OLS 40G Integrated Bay Shelves 3-8 3-7 System Control Architecture for WaveStar OLS 40G 3-9 WaveStar OLS 40G End Terminal Shelf (fully equipped) 3-11 WaveStar OLS 40G Repeater Shelf (fully equipped) 3-12 Miscellaneously-mounted OT System Controller Shelf (8 OTUs; fully equipped) 3-13 Miscellaneously-Mounted Complementary Shelf 1 (12 OTUs; fully equipped) 3-14 3-12 QOTU Design 3-18 3-13 1A-TX End Terminal Configuration 3-24 3-14 1A-TX-THRU End Terminal Configuration 3-25 3-15 1A-RCV End Terminal Configuration 3-26 3-16 1A-RCV-THRU End Terminal Configuration 3-27 3-17 Dual Facing End Terminal Configuration 3-28 3-4 3-8 3-9 3-10 3-11 x Issue 1 March 2001 Figures 3-18 3-19 3-20 3-21 Single Optical Amplifier 1A-TX End Terminal Configuration 3-29 Single Optical Amplifier 1A-TX-THRU End Terminal Configuration 3-30 Single Optical Amplifier 1A-RCV End Terminal Configuration 3-31 Single Optical Amplifier 1A-RCV-THRU End Terminal Configuration 3-32 3-22 Single Optical Amplifier Dual Facing End Terminal Configuration 3-34 3-23 Dual End Terminal Cabinet (fully equipped) 3-36 3-24 Dual Repeater Cabinet (fully equipped) 3-37 3-25 End Terminal and Repeater Cabinet 3-38 3-26 Bay-Mounted End Terminal and Repeater 3-39 3-27 OT Cabinet 3-40 3-28 Bay-Mounted OT 3-41 3-29 Integrated Bay (Single) 3-42 3-30 Integrated Bay (Double) 3-44 3-31 Integrated Bay (Triple 1) 3-45 3-32 Integrated Bay (Triple 2) 3-46 3-33 Integrated Bay/Cabinet Double and Triple 1 Cabling Diagram 3-48 3-34 Integrated Bay/Cabinet Triple 2 Cabling Diagram 3-49 3-35 OT System Controller Shelf Interconnection Panel and Cabling 3-51 3-36 OT Complementary Shelf Interconnection Panel and Cabling 3-52 Indicator Strip for Dual End Terminal and Dual Repeater Cabinets 3-53 3-38 OT Cabinet Indicator Strip 3-55 3-39 WaveStar OLS 40G Shelf User Panel 3-56 3-40 WaveStar OLS 40G Fuse Panel 3-57 3-41 Miscellaneously-Mounted OT Complementary Shelf Fuse/Power Indicating Panel 3-59 3-42 OT Shelf Fuse Panel 3-60 3-43 General Power Distribution in a Two-Shelf WaveStar OLS 40G Bay or Cabinet 3-62 3-37 Issue 1 March 2001 xi Figures 3-44 OT Power Distribution in a Three Shelf Bay or Cabinet 3-63 WaveStar OLS 40G Power Distribution at Shelf Level 3-64 4-1 OLS Cabinet/Bay Power Distribution 4-3 4-2 Optical Translator Cabinet/Bay Power Distribution 4-4 4-3 End Terminal and Repeater Shelf Power Distribution 4-5 System Controller and Complementary Shelf Power Distribution 4-6 Shelf and Circuit Pack Power Distribution 4-7 3-45 4 Power 4-4 4-5 5 Control, Transmission, and Synchronization Interfaces 5-1 System Control Architecture 5-2 1A-TX End Terminal Transmission Block Diagram 5-4 5-3 1A-TX-THRU End Terminal Transmission Block Diagram 5-7 5-4 1A-RCV End Terminal Transmission Block Diagram5-9 5-5 1A-RCV-THRU End Terminal Transmission Block Diagram 5-12 5-6 DUAL End Terminal Transmission Block Diagram 5-14 5-7 Single Optical Amplifier 1A-TX End Terminal Transmission Block Diagram 5-16 5-8 Single Optical Amplifier 1A-TX-THRU End Terminal Transmission Block Diagram 5-19 5-9 Single Optical Amplifier 1A-RCV End Terminal Transmission Block Diagram 5-21 Single Optical Amplifier 1A-RCV-THRU End Terminal Transmission Block Diagram 5-24 Single Optical Amplifier DUAL End Terminal Transmission Block Diagram 5-26 5-10 5-11 xii Issue 1 5-2 March 2001 Figures 6 5-12 Repeater Shelf Transmission Block Diagram 5-28 5-13 Optical Translator Transmission Block Diagram 5-31 Operations Interfaces 6-1 Indicator Strip (4 Bidirectional Optical Line Systems) 6-8 6-2 Indicator Strip (Dual Systems) 6-9 6-3 Indicator Strip (Optical Translator Cabinet) 6-9 6-4 User Panel (OLS End Terminal and Repeater Shelves) 6-10 6-5 Fuse/Power Indicating Panel (Optical Translator Complementary and System Controller Shelves) 6-12 6-6 Fuse Panel (OLS End Terminal and Repeater Shelves) 6-13 Fuse Panel (Optical Translator System Controller and Complementary Shelves) 6-14 6-8 Normal Case - No Failure, No Redirect 6-22 6-9 Failure Case 6-23 6-10 Redirect Case 6-24 6-7 7 Circuit Pack Descriptions 7-1 SYSCTL (LEA1) Circuit Pack 7-4 7-2 SYSCTL Circuit Pack Block Diagram 7-6 7-3 SYSMEM (LEA2) Circuit Pack 7-9 7-4 SYSMEM Circuit Pack Block Diagram 7-11 7-5 TOHCTL (LEA5) Circuit Pack 7-16 7-6 TOHCTL Circuit Pack Block Diagram 7-17 7-7 OTCTL (LUD1) Circuit Pack 7-20 7-8 OTCTL Circuit Pack Block Diagram 7-21 7-9 TLM (LDA1) Circuit Pack 7-24 7-10 TLM Circuit Pack Block Diagram 7-26 7-11 OMU (505A) 7-32 Issue 1 March 2001 xiii Figures 7-12 OMU (506A) 7-33 7-13 OMU Block Diagram 7-34 7-14 ODU (605A) 7-36 7-15 606B ODU 7-37 7-16 605A and 606A ODU Block Diagram 7-38 7-17 606B ODU Block Diagram 7-39 7-18 OA (LEA7, LEA104, and LEA105) Circuit Pack 7-42 7-19 LEA7B OA Circuit Pack 7-43 7-20 OA Circuit Pack Block Diagram 7-44 7-21 OC48/STM16 OTU (41A_C, 41BB, and 41C_C) Circuit Pack 7-48 7-22 OC48/STM16 OTU Circuit Pack Block Diagram 7-50 7-23 QUAD OTU (41S) Circuit Pack (Equipped with Four OTPMs) 7-56 7-24 QUAD OTU Circuit Pack Block Diagram 7-57 7-25 OC12/STM4 OTPM (42A_ and 42B) 7-60 7-26 OC12/STM4 OTPM Block Diagram 7-62 7-27 OC3/STM1 OTPM (43A_ and 43B) 7-66 7-28 OC3/STM1 OTPM Block Diagram 7-68 7-29 LSBB OTPM (44A_ and 44B) 7-73 7-30 LSBB OTPM Block Diagram 7-75 8 Administration and Provisioning 9 Maintenance Description xiv Issue 1 9-1 Automatic Optical Amplifier Power Shut Down and Restart Example 9-18 9-2 Local CMS Self-Test (End Terminal with Two OA Circuit Packs) 9-21 9-3 Local CMS Self-Test (End Terminal with a Single OA Circuit Pack) 9-22 9-4 Local CMS Self-Test (Repeater) March 2001 9-22 Figures 9-5 9-6 9-7 Local SUPR Self-Test (End Terminal with Two OA Circuit Packs) 9-23 Local SUPR Self-Test (End Terminal With a Single OA Circuit Pack) 9-24 Local SUPR Self-Test (Repeater) 9-24 10 Technical Specifications 11 Craft Interface Terminal Usage 11-1 CONFIGURATION-Delete-Association-OT_ Port_Signal (Input) 11-10 CONFIGURATION-Enter-Association-OT_ Port_Signal (Input) 11-11 CONFIGURATION-Enter Customer_ Maintenance_Signal (Input) 11-12 11-4 CONFIGURATION-Enter-OPS (Input) 11-13 11-5 CONFIGURATION-Enter-OT_Port_Signal (Input) 11-14 11-6 CONFIGURATION-Initialize-System (Input) 11-15 11-7 CONFIGURATION-Retrieve-Attribute-Alarm 11-16 11-8 CONFIGURATION-Retrieve-Attribute-Control (Screen 1 of 2) 11-17 11-9 CONFIGURATION-Retrieve-Equipment 11-19 11-10 CONFIGURATION-Retrieve-Map-Network 11-20 11-11 CONFIGURATION-Retrieve-Map-Ring 11-21 11-12 CONFIGURATION-Retrieve-OPS 11-22 11-13 CONFIGURATION-Retrieve-Optical_Line 11-23 11-14 CONFIGURATION-Retrieve-OT_Port_Signal 11-24 11-15 CONFIGURATION-Retrieve-Section_Trace 11-25 11-16 CONFIGURATION-Retrieve-Supervisory 11-26 11-17 CONFIGURATION-Update-System (Input) 11-27 11-18 FAULT-Retrieve-Alarm-All 11-28 11-19 FAULT-Retrieve-Alarm-Network 11-29 11-2 11-3 Issue 1 March 2001 xv Figures 11-20 FAULT-Retrieve-Condition-All 11-30 11-21 FAULT-Retrieve-State (Screen 1 of 2) 11-31 11-22 FAULT-Test-LED (Input) 11-33 11-23 FAULT-Test-Telemetry-Parallel (Input) 11-34 11-24 PERFORMANCE-Initialize-Register-Optical_Line (Input) 11-35 PERFORMANCE-Retrieve-Performance_ Monitor-Optical_Line 11-36 11-25 11-26 PERFORMANCE-Retrieve-Relative_Signal_Power 11-37 11-27 PERFORMANCE-Retrieve-Threshold.Optical_ Channel ) 11-38 PERFORMANCE-Retrieve-Threshold.OT_ Port_Signal (Screen 1 of 2) 11-39 11-29 SECURITY-Activate-User (Input) 11-41 11-30 SECURITY-Cancel-User (Input) 11-42 11-31 SECURITY-Edit-User-System (Input) 11-43 11-32 SECURITY-Enter-Channel_Identifier-Security (Input) 11-44 SECURITY-Enter-Network_Element-Security (Input) 11-45 11-34 SECURITY-Enter-System (Input) 11-46 11-35 SECURITY-Enter-User-Security (Input) 11-47 11-36 SECURITY-Retrieve-Far End Communications 11-48 11-37 SECURITY-Retrieve-Network_Element-Security 11-49 11-38 SECURITY-Retrieve-OSI 11-50 11-39 SECURITY-Retrieve-System 11-51 11-40 SECURITY-Retrieve-User-Security 11-52 11-28 11-33 xvi Issue 1 March 2001 Tables About This Information Product 1 System Introduction 1-1 Major Features of Product Releases 1 Through 3.4 1-4 2 Applications 3 Platform Description 3-1 WaveStar OLS 40G Optical Amplifiers 3-21 3-2 WaveStar OLS 40G OMUs/ODUs 3-21 3-3 WaveStar OLS 40G OTUs/OTPMs 3-22 3-4 User Panel Indicators forWaveStar OLS 40G in SONET Applications 3-53 User Panel Indicators for WaveStar OLS 80G in SDH Applications 3-54 3-6 Indicator Strip LED indicators for OT (SONET) 3-55 3-7 SONET Indicators on WaveStar OLS 40G User Panel (L10 and L11) 3-58 SDH Indicators Present on WaveStar OLS 80G User Panel (L10 and L11) 3-58 Power Cable Color Codes 3-61 4-1 Changes to Wire Size of Power Feeders 4-2 4-2 Power Dissipation and Current Drains 4-9 3-5 3-8 3-9 4 Power Issue 1 March 2001 xvii Tables 5 Control, Transmission, and Synchronization Interfaces 6 Operations Interfaces 7 6-1 Miscellaneous Discrete Output Assignments 6-18 6-2 Supported TL1 Commands 6-26 Circuit Pack Descriptions 7-1 7-2 8 7-3 Overhead Bytes 7-19 Administration and Provisioning 9 xviii Circuit Packs/Units/Modules and Compatible Software 8-1 WaveStar OLS 40G Access Identifier Values 8-10 8-2 Provisionable Parameters 8-13 8-3 Provisionable Threshold Crossing Alert (TCA) Parameters 8-18 Maintenance Description Issue 1 9-1 Incoming Signals and Monitored Condition 9-4 9-2 Condition Descriptions 9-7 9-3 OTU Circuit Pack Fault Reporting (via the Miscellaneous Discrete Interface) 9-13 9-4 QUAD OTU Circuit Pack and OTPM Fault Reporting (via Miscellaneous Discrete Interface) 9-15 9-5 Performance-Monitoring Parameters 9-6 Parameters Accumulated During Failed Conditions 9-34 March 2001 9-28 Tables 10 Technical Specifications 10-1 Optical Safety Data on Laser-Containing Circuit Packs 10-2 10-2 Wavelength Tone Frequencies 10-7 10-3 OMU Optical Power Input Specifications (1.5m) 10-8 10-4 OTPM and OTU Circuit Pack Output Power 10-9 10-5 Optical Signal Specifications for 1.3mm OTU/OTPM10-10 10-6 Optical Amplifier Output Power Examples 10-11 10-7 Engineering Rules for Systems with Two Optical Amplifiers 10-13 Engineering Rules for Systems with One Optical Amplifier 10-14 10-8 11 10-9 Examples of using OTUs and OTPMs to Concatenate 16-Channel WaveStar OLS Systems10-15 10-10 Examples of using OTUs and OTPMs to Concatenate 8-Channel WaveStar OLS Systems 10-16 10-11 TL1/X.25 Interface — X.25 Packet Layer Parameters 10-32 10-12 TL1/X.25 Interface — LAPB Link Layer Parameters 10-32 10-13 TL1/X.25 Interface — EIA-232D Pin Connections 10-33 Craft Interface Terminal Usage Issue 1 March 2001 xix Tables xx Issue 1 March 2001 About This Information Product Purpose This user/service manual provides the following information about the Lucent Technologies WaveStar™ Optical Line System (OLS) : ■ Detailed descriptive information to circuit pack/unit level ■ Craft interface terminal usage ■ Operation and maintenance (O&M) task oriented practice (TOP) supporting acceptance, circuit order, operation, and trouble clearing tasks. Software Release The WaveStar OLS has a phased release plan. Each phased release provides new sets of features. This user/service manual covers product Release 3.4. For more information about the WaveStar OLS and a complete list of features, refer to 365-575-535, WaveStar OLS , Applications, Planning, and Ordering Guide. Intended Audiences This user/service manual is primarily for end users responsible for operating and maintaining the WaveStar OLS . It may be used by anyone desiring specific operation and maintenance information. Issue 1 March 2001 xxi 365-575-536 About This Information Product Reason for Reissue This document is built from 365-575-381, Issue 1, WaveStar OLS 40G, Release 3.3, User/Service Manual. Release 3.4 updates the WaveStar OLS with the following feature. ■ X.25 traffic redirect — Allows a WaveStar OLS 40G Network Element (End Terminal) to perform intelligent rerouting of TL1 traffic over the customer X.25 network in the case of line failure. — Decreases the time needed to identify a failure in the network — Establishes, for linear systems, communication with the other end of the system around a line failure xxii Issue 1 March 2001 365-575-536 About This Information Product How to Use This Document The sections in this document are marked with tabs and provide the following information: ■ "About This Document" describes the purpose, intended audience, and organization of this document. This section also presents safety information, references other related documentation, and provides product support information. It also explains how to order and make comments or recommendations for changes to this document. ■ Chapter 1, “System Introduction," introduces and briefly describes the WaveStar OLS . ■ Chapter 2, "Applications," describes how the WaveStar OLS operates with lightwave terminals in point-to-point and ring applications. ■ Chapter 3, "Platform Description," introduces the WaveStar OLS equipment packages and provides a more detailed view of the WaveStar OLS physical design. ■ Chapter 4, "Power," describes the power distribution and dissipation of the WaveStar OLS . ■ Chapter 5, "Control, Transmission, and Synchronization Interfaces," describes the WaveStar OLS interfaces and architecture. The system control and transmission interfaces and architecture are described down to the circuit pack/unit level. ■ Chapter 6, "Operations Interfaces," describes the interfaces that allow access to the WaveStar OLS and provides alarm and status information. ■ Chapter 7, "Circuit Pack Descriptions," provides a detailed circuit description of each WaveStar OLS circuit pack/unit. ■ Chapter 8, "Administration and Provisioning," describes administration and provisioning of the WaveStar OLS . ■ Chapter 9, "Maintenance Description," defines the "maintenance philosophy" outlining the various features available to monitor and maintain the WaveStar OLS . ■ Chapter 10, "Technical Specifications," lists the technical specifications for the WaveStar OLS . ■ Chapter 11, "Craft Interface Terminal Usage" describes how the craft interface terminal is used and shows the WaveStar OLS commands, output messages, and reports. It also includes a tutorial on the use of the craft interface terminal. ■ The "Operation And Maintenance (TOP)" contains specific task oriented procedures for the acceptance, circuit order, operation, and trouble clearing of the WaveStar OLS . Issue 1 March 2001 xxiii 365-575-536 About This Information Product Conventions Used The BOLD font is used throughout this manual for emphasis. The descriptive sections in this manual use a Courier Bold font to identify menu input selections to the system. UPPERCASE letters identify letter designations (panel stampings) on panels, shelves, and circuit packs/units. The procedures in the "Operation and Maintenance (TOP)" section use a MONOSPACE font to identify text on a screen or a response displayed from the system. A BOLD font identifies letter designations on panels, shelves, and circuit packs/units. Safety Instructions Safety Labels This manual may contain safety labels in the form of DANGERS, WARNINGS, and CAUTIONS. These admonishments have the following definitions: ■ DANGER shows the presence of a hazard that will cause death or severe personal injury if the hazard is not avoided. ■ WARNING shows the presence of a hazard that can cause death or severe personal injury if the hazard is not avoided. ■ CAUTION shows the presence of a hazard that will or can cause minor personal injury or property damage if the hazard is not avoided. Caution is also used for property-damage-only accidents. This includes equipment damage, loss of software, or service interruption. These safety labels are noted by the alert symbol ! . Lightwave Safety Guidelines General Laser Information The WaveStar OLS and associated optical test sets use semiconductor laser transmitters that emit light at wavelengths between approximately 800 nanometers (nm) and 1600 nm. The emitted light is above the red end of the visible spectrum, which is normally not visible to the human eye. Although radiant energy at near-infrared wavelengths is officially designated invisible, some people can see the shorter wavelength energy even at power levels several orders of magnitude below any that have been shown to cause injury to the eye. Conventional lasers can produce an intense beam of monochromatic light. Monochromatic light is a single wavelength output of pure color that may be visible or invisible to the eye. A conventional laser produces a small-size beam of light, and because the beam size is small the power density (also called irradiance) is xxiv Issue 1 March 2001 365-575-536 About This Information Product very high. Consequently, lasers and laser products are subject to federal and applicable state regulations as well as international standards for their safe operation. A conventional laser beam expands very little over distance or is said to be very well collimated. Thus, conventional laser irradiance remains relatively constant over distance. However, lasers used in lightwave systems have a large beam divergence, typically 10 to 20 degrees. Here, irradiance obeys the inverse square law (doubling the distance reduces the irradiance by a factor of 4) and rapidly decreases over distance. Lasers and Eye Damage Light energy emitted by laser and high-radiance light-emitting diodes (LEDs) in the 400- to 1400-nm range may cause eye damage if absorbed by the retina. When a beam of light enters the eye, the eye magnifies and focuses the energy, magnifying the irradiance. The irradiance of the energy that reaches the retina is approximately 105 or 100,000 times that at the cornea; and if sufficiently intense, may cause a retinal burn. The damage mechanism at the wavelengths used in telecommunications is thermal in origin, for example, damage caused by heating. Therefore, a specific amount of energy is required for a definite time to heat an area of retinal tissue. Damage is not instantaneous. It occurs only when one looks at the light sufficiently long enough that the product of the retinal irradiance and the viewing time exceeds the damage threshold. Light energies above 1400 nm would cause surface and skin burns and do not affect the retina. Issue 1 March 2001 xxv 365-575-536 About This Information Product Classification of Lasers Manufacturers of lasers and laser products in the United States are regulated by the Food and Drug Administration's Center for Devices and Radiological Health (FDA/CDRH) under 21 CFR 1040. These regulations require manufacturers to certify each laser or laser product as belonging to one of four major Classes I, II, IIa, IIIa, IIIb, or IV. Lasers are classified according to the accessible emission limits and their potential for causing injury. Lightwave systems are generally classified as Class I, because, under normal operating conditions, all energized laser transmitting circuit packs are terminated on optical fibers which enclose the laser energy with the fiber sheath forming a protective housing. Also, covers are in place over the circuit pack shelves. Lightwave Safety Precautions Under normal operating conditions, the WaveStar OLS is totally enclosed and presents no risk of eye injury. It is a Class I system under the FDA/CDRH scheme. The lightguide cables that interconnect various components of a lightwave system can disconnect or break and may expose people to lightwave emission. Also, certain measures and maintenance procedures may expose the technician to emission from the semiconductor laser during installation and servicing. Unlike more familiar laser devices, such as solid-state and gas lasers, the emission pattern of a semiconductor laser results in a highly divergent beam. In a divergent beam, the irradiance (power density) decreases rapidly with distance. The greater the distance, the less energy will enter the eye and the less potential risk for eye injury. Inadvertently viewing an unterminated fiber or damaged fiber with the unaided eye at distances greater than 5 to 6 inches normally will not cause eye injury provided the power in the fiber is less than a few milliwatts at the shorter wavelengths and higher at the longer wavelengths. However, damage may occur if an optical instrument such as a microscope, magnifying glass, or eye loupe is used to stare at the energized fiber end. ! CAUTION: Use of controls, or adjustments, or performance of procedures other than those specified herein may result in hazardous laser radiation exposure. xxvi Issue 1 March 2001 365-575-536 About This Information Product Safety Precautions for Enclosed Systems Under normal operating conditions, the WaveStar OLS is completely enclosed; nonetheless, the following precautions should be observed: ■ Because of the potential for eye damage, technicians should neither disconnect any lightwave cable nor splice or stare into the optical connectors terminating the cables. ■ Under no circumstance should lightwave/lightguide operations be performed by a technician before satisfactorily completing an approved training course. ■ Since viewing lightwave emission directly with an optical instrument such as an eye loupe greatly increases the risk of eye damage, an appropriate label must appear in plain view on the front of the main frame or lightguide termination/interconnection equipment. A warning label is provided on the inside front cover of each shelf assembly. The warning label shows the word “DANGER” in white lettering on a safety red background, and the text of the warning label in black lettering on a white background. See Figure 1 for the wording in both English and French. Figure 1. DANGER Label for Shelf Assembly Issue 1 March 2001 xxvii 365-575-536 About This Information Product Figure 2. HAZARD LEVEL 3A Label for Optical Amplifier Circuit Pack An IEC Laser Hazard Level and CAUTION label is provided on the faceplate of each Optical Amplifier circuit pack. Both labels use black lettering on a safety yellow background. The LEA7, LEA7B, and LEA105 circuit packs use a “Hazard Level 3A” label with a CAUTION label. See Figure 2 for the wording in both English and French. The LEA104 circuit pack uses a “Hazard Level 3B” label with a CAUTION label. See Figure 3 for the wording in both English and French. xxviii Issue 1 March 2001 365-575-536 About This Information Product Figure 3. HAZARD LEVEL 3B for LEA104 Optical Amplifier Circuit Pack Issue 1 March 2001 xxix 365-575-536 About This Information Product An additional warning label is provided on the rear cover of each equipment bay, cabinet, and miscellaneously mounted shelf. Figure 4 notice label is also located on the rear cover that states. NOTICE: UNTERMINATED OPTICAL CONNECTORS MAY EMIT LASER RADIATION. AVOID DIRECT EXPOSURE TO THE BEAM. DO NOT VIEW BEAM WITH OPTICAL INSTRUMENTS. Figure 4. Notice Label In addition, a compliance label stating that the system has been certified, along with the manufacturer's name and place of manufacture, is attached to the rear of each equipment bay, cabinet, and miscellaneously mounted shelf. Figure 5 shows an example of a compliance label. The compliance label is located on the rear of the equipment cabinet (at eye level) and miscellaneously mounted shelves. Figure 5. xxx Issue 1 Compliance Label March 2001 365-575-536 About This Information Product Safety Precautions for Unenclosed Systems During service, maintenance, or restoration, the WaveStar OLS is considered unenclosed. During service, maintenance, or restoration, observe the following precautions: ■ Only authorized, trained personnel should be permitted to do service, maintenance, and restoration. Avoid exposing the eye to emissions from unterminated, energized optical connectors at close distances. Laser circuit packs equipped with optical ports are typically recessed, which limits the exposure distance. Optical ports shelter and Automatic Power ShutDown (APSD) feature are engineering controls that are used to limit harmful emisions. However, technicians removing or replacing laser circuit packs should not stare or look directly into the optical port with optical instruments or magnifying lenses. (Normal eyewear or indirect viewing instruments, such as Find-R-Scope's infrared optical viewers, are not considered magnifying lenses or optical instruments.) ■ Only authorized, trained personnel should use the lightwave test equipment during installation or servicing, since this equipment contains semiconductor lasers. [Some examples of lightguide test equipment are Optical Time Domain Reflectometers (OTDRs), Hand-Held Loss Test Sets, and Feature Finders.] ■ Under no circumstances should any personnel scan a fiber with an optical test set without verifying that all lightwave sources on the fiber are turned off. ■ All unauthorized personnel should be excluded from the immediate area of lightwave transmission systems during installation and service. Consult ANSI * Z136.1, American National Standard for Safe Use of Lasers, for guidance on the safe use of lasers in the workplace. * Registered trademark of the American National Standards Institute. Issue 1 March 2001 xxxi 365-575-536 About This Information Product Electrostatic Discharge (ESD) Considerations ! CAUTION: Industry experience has shown that all integrated circuit packs can be damaged by static electricity that builds up on work surfaces and personnel. The static charges are produced by various charging effects of movement and contact with other objects. Dry air allows greater static charges to accumulate. Higher potentials are measured in areas with low relative humidity, but potentials high enough to cause damage can occur anywhere. Observe the following precautions when handling circuit packs/units to prevent damage by electrostatic discharge: * xxxii ■ Assume all circuit packs contain solid-state electronic components that can be damaged by ESD. ■ When handling circuit packs/units (storing, installing, removing, etc.) or when working on the backplane, always wear a grounded wrist strap or wear a heel strap and stand on a grounded, static-dissipating floor mat. ■ Handle all circuit packs/units by the faceplate or latch and by the top and bottom outermost edges. Never touch the components, conductors, or connector pins. ■ Observe all warning labels on bags and cartons. Whenever possible, do not remove circuit packs/units from antistatic packaging until ready to insert them into slots. ■ If possible, open all circuit packs/units at a static-safe work position, using properly grounded wrist straps and static-dissipating table mats. ■ Always store and transport circuit packs/units in static-safe packaging. Shielding is not required unless specified. ■ Keep all static-generating materials such as food wrappers, plastics, and styrofoam* containers away from all circuit packs/units. When removing circuit packs/units from a cabinet, immediately place the circuit packs/units in static-safe packages. ■ Whenever possible, maintain relative humidity above 20 percent. ■ Always keep the electromagnetic interference (EMI)/ESD protective front covers on the shelves except during an upgrade or maintenance procedure. Once a circuit pack/unit is replaced in the shelf, immediately close the front cover. Registered trademark of the Dow Chemical Company. Issue 1 March 2001 365-575-536 About This Information Product Any connectors on the shelf interconnection panel that are not cabled should be fitted with a plastic dust cap to provide ESD protection. To reduce the possibility of ESD damage, shelves are equipped with grounding jacks to enable personnel to ground themselves using wrist straps (Figure 6), while handling circuit packs/units or working on a shelf. The wrist straps should be checked periodically with a wrist strap tester to ensure that they are working properly. Figure 6. Static Control Wrist Strap The grounding jacks for connection of wrist straps are located on each fuse panel, fuse/power indicating panel, user panel, the right-front of the equipment cabinet, and the rear of the equipment bay. These jacks are labeled. NOTE: The fuse panel on the shelves of the Optical Translator Cabinet are not equipped with grounding jacks. Issue 1 March 2001 xxxiii 365-575-536 About This Information Product IMPORTANT SAFETY INSTRUCTIONS READ AND UNDERSTAND ALL INSTRUCTIONS. When using this telecommunication equipment, basic safety precautions should always be followed to reduce the risk of fire, electric shock, and injury to persons, including the following: xxxiv 1. Follow all warnings and instructions marked on the product. 2. Slots and openings in this product at the back or bottom are provided for ventilation. To protect it from overheating, these openings must not be blocked or covered. 3. Opening or removing rear covers or sheet-metal parts may present exposure to high current or electrical energy levels, or to other risks. 4. Never push objects of any kind into this product through slots as they may touch dangerous voltage points or short out parts that could result in a risk of fire or electrical shock. Never spill liquid of any kind on the product. 5. Refer servicing to qualified service personnel. 6. Use caution when installing and modifying telecommunications lines. 7. Never install telecommunication wiring during a lightning storm. 8. Never install telecommunication jacks in wet locations unless the jack is specifically designed for wet locations. 9. Never touch uninsulated telecommunication wires or terminals unless the telecommunication line has been disconnected at the network interface. 10. Installation must include an independent frame ground conductor to building ground. Grounding/bonding circuit continuity is vital for safe operation of this equipment. Never operate with grounding/bonding conductor disconnected. 11. This product has two −48 V DC input power feeders. Disconnecting one power feeder will not de-energize the product. To reduce the risk of injury, disconnect both power supply cables when removing power from the system. 12. Metallic telecommunication interfaces should not leave the building premises unless connected to telecommunication devices providing primary and secondary protection, as applicable. 13. For continued protection against risk of fire, replace only with same type and rating of fuse. Issue 1 March 2001 365-575-536 About This Information Product 14. Use only Lucent Technologies manufactured, recognized circuit packs/ units/modules. Refer to 365-575-539, WaveStar OLS , Installation Manual. 15. This equipment is intended for installation in Restricted Access Locations where access is controlled or where access can only be gained by service personnel with a key or tool. Access to this equipment is restricted to qualified service personnel only. 16. Power the unit only from −48 V DC sources providing Safety Extra Low Voltage (SELV) outputs. 17. This equipment must be provided with a readily accessible input power disconnect device as part of the building installation (such as a main power disconnect switch or external circuit breaker). SAVE THESE INSTRUCTIONS! Issue 1 March 2001 xxxv 365-575-536 About This Information Product Security Lucent Technologies has designed the craft interface terminal (CIT) so that, when properly administered, it will minimize the ability of unauthorized persons to gain access to the network. Each authorized user should be instructed about the proper use of the CIT. Related Documentation/Training Lucent Technologies Practices The following Lucent Technologies practices provide information about the WaveStar OLS : ■ Number: 365-575-535 Title: WaveStar OLS , Applications, Planning, and Ordering Guide Audience: System planners and engineers Content: Features, applications, general description, system planning/ engineering, and ordering information ■ Number: 365-575-539 Title: WaveStar OLS , Installation Manual Audience: Customers planning to install and turn up the equipment Content: Customer installation instructions ■ Number: 365-575-540 Title: WaveStar OLS , Operations Systems Engineering Guide Audience: End-user maintenance personnel Content: Operations systems software commands, messages, and other information for R3.4 OLS software ■ Number: Comcode 109069161 (R3.4) Title: WaveStar OLS , Software Release Description, Release 3.4 OLS Audience: End-user maintenance personnel Content: Status of problems fixed and known problems for R3.4 OLS software xxxvi Issue 1 March 2001 365-575-536 About This Information Product Lucent Technologies Drawings The following Lucent Technologies drawings provide information about the Optical Line System: J68982C-1 Optical Line System Cabinet (Equipment and Circuit Packs Ordered with Equipment) J68982D-1 Optical Line System Integrated Bay (Single) J68982CS-1 Optical Line System (Software and Documentation) J69000C-1 Optical Translator Cabinet (Equipment and Circuit Packs Ordered with Equipment) SD-5G276-01 Optical Line System Application Schematic Drawing SD-6G156-01 Optical Translator System Cabinet Application Schematic Drawing SD-6G157-01 Optical Line System Integrated Bay Application Schematic Drawing T-5G276-33 Optical Line System Interconnection Drawing T-5G276-30 Optical Line System Wiring Drawing T-5G273-30 Optical Line System Shelf Circuit Drawing T-6G156-30 Optical Translator System Circuit T-6G156-33 Optical Translator Interconnect Circuit T-6G157-30 Optical Line System Integrated Bay Circuit T-6G157-33 Optical Line System Integrated Bay Interconnect Circuit ED-7G033-30 Optical Line System Cabinet Framework ED-7G028-20 Optical Line System Cable Assembly Issue 1 March 2001 xxxvii 365-575-536 About This Information Product xxxviii ED-7G028-22 Optical Line System Intercabinet Cable Assembly ED-7G028-30 Optical Line System Shelf Assembly ED-7G027-30 Optical Line System User/Fuse Panel Assembly ED-7G044-30 Optical Translator Cabinet Framework ED-7G045-20 Optical Translator Cable Assembly ED-7G045-22 Optical Translator Cable Assembly (Intercabinet Cable) ED-7G045-30 Optical Translator Shelf Assembly ED-7G048-30 Optical Line System Integrated Bay Framework ED-5D785-70 5ESS-2000 Switching Equipment Global Single Bay Frame and Cabinet Assembly (Phase II) G1A, G2A ED-5D786-70 5ESS-2000 Switching Equipment End Guard Assembly ED-8C800-50 Seismic Network Bay Frame ED-5D779-70 5ESS-2000 Switching Equipment Line Up Rack Assembly, GX FPD-804-604-161-( ) Optical Line System (Floor Plan Data Sheets) FPD-804-604-162-( ) Optical Translator Cabinet (Floor Plan Data Sheets) Issue 1 March 2001 365-575-536 About This Information Product Training No product offering is complete without a formal training package. Suitcasing of these courses is also available. To register for a course or obtain schedule information in the continental United States, please call 1-888-LUCENT8 (582-3688): Prompt 2. For course registration or schedule information outside the continental United States, please contact your in-country training representative or call +1-407-767-2798. Also, to obtain more information or to register for these courses write to the following address. Lucent Technologies Customer Training and Information Products 307 North Lake Blvd. Altamonte Springs, FL 32701 USA Curriculum Path for the WaveStar OLS 40G Applications, Planning, and Ordering Guide ■ TSCBAS, Communications Basics (CD-ROM) Audience: Personnel working in telecommunications or preparing to work in telecommunications. Content: This course provides an overview of communications and describes its media. The evolution of telecommunications and the topic of electrical signals as a communications technique in the telecommunications industry are presented. Prerequisites: None. However, a familiarity with general telecommunications principles and the fundamentals of optical line transmission equipment is helpful. ■ TSANLG, Analog and Digital Concepts (CD-ROM) Audience: Personnel working in telecommunications or preparing to work in telecommunications. Content: This course discusses analog and digital signals, modulation techniques, and types of multiplexing including an explanation of distributive processing. Prerequisites: None. However, a familiarity with general telecommunications principles and the fundamentals of optical line transmission equipment is helpful. Issue 1 March 2001 xxxix 365-575-536 About This Information Product ■ TR9203, SONET: Understanding the Basics (CD-ROM) Audience: This course is primarily intended for network planners; product/ project managers; operations, maintenance, installation, and equipment engineers; and account representatives/sales personnel.In general, the course will be helpful to anyone needing a general knowledge of the requirements of a Synchronous Optical Network (SONET) network. Content: This course provides a basic description of the SONET standard and addresses key points which include SONET advantages and capabilities, topologies and rings, pointers, virtual tributaries, and synchronous transport signal (STS) multiplexing. Prerequisites: A familiarity with general telecommunications principles and the fundamentals of optical line transmission equipment is helpful or: — TSANLG - Analog and Digital Concepts, (CD-ROM) — ■ TSCBAS - Communication Basics, (CD-ROM) TR9208, Dense Wavelength Division Multiplexing (CD-ROM) Audience: This course is primarily intended for network, facility, and strategic planners, product managers, equipment engineers, technical consultants, and account representatives. In general, the course will be helpful to anyone responsible for network implementation and operations. Content: This course investigates what Dense Wavelength Division Multiplexing (DWDM) technology is, why it was developed, how it works, and where it fits in communications networks. Prerequisites: The student should have previous transmission experience or: — TSANLG - Analog and Digital Concepts, (CD-ROM) — TSCBAS - Communication Basics, (CD-ROM) — TR9203 - SONET: Understanding the Basics (CD-ROM) or TR5951 - Synchronous Digital Hierarchy Introduction, or TR5951M Synchronous Digital Hierarchy Introduction (CD-ROM) xl Issue 1 March 2001 365-575-536 About This Information Product ■ LW2252, WaveStar Optical Line System 40G Applications and Planning Audience: This course is primarily intended for network planners, product managers, project managers, equipment engineers, technical consultants, and account representative/sales personnel. In general, the course will be helpful to anyone needing a general knowledge of the optical line system (OLS) equipment. Content: This course provides instruction on the product applications, features and architecture as well as the office and network planning needed for implementation. Included in the last session is instruction and practice on ordering the equipment. This course is based on the contents of the WaveStar OLS 40G Applications, Planning, and Ordering Guide. Prerequisites: The student should have a basic understanding of SONET and transmission fiber-optic signals or: — TSANLG - Analog and Digital Concepts, (CD-ROM) — TSCBAS - Communication Basics, (CD-ROM) — TR9203 - SONET: Understanding the Basics (CD-ROM) — TR9208 - Dense Wavelength Division Multiplexing, (CD-ROM). Curriculum Path for the WaveStar OLS 40G User Service Manual ■ TSCBAS, Communications Basics (CD-ROM) Audience: Personnel working in telecommunications or preparing to work in telecommunications. Content: This course provides an overview of communications and describes its media. The evolution of telecommunications and the topic of electrical signals as a communications technique in the telecommunications industry are presented. Prerequisites: None. However, a familiarity with general telecommunications principles and the fundamentals of optical line transmission equipment is helpful. Issue 1 March 2001 xli 365-575-536 About This Information Product ■ TSANLG, Analog and Digital Concepts (CD-ROM) Audience: Personnel working in telecommunications or preparing to work in telecommunications. Content: This course discusses analog and digital signals, modulation techniques, and types of multiplexing including an explanation of distributive processing. Prerequisites: None. However, a familiarity with general telecommunications principles and the fundamentals of optical line transmission equipment is helpful. ■ TR9203, SONET: Understanding the Basics (CD-ROM) Audience: This course is primarily intended for network planners; product/ project managers; operations, maintenance, installation, and equipment engineers; and account representatives/sales personnel.In general, the course will be helpful to anyone needing a general knowledge of the requirements of a Synchronous Optical Network (SONET) network. Content: This course provides a basic description of the SONET standard and addresses key points which include SONET advantages and capabilities, topologies and rings, pointers, virtual tributaries, and synchronous transport signal (STS) multiplexing. Prerequisites: A familiarity with general telecommunications principles and the fundamentals of optical line transmission equipment is helpful or: — TSANLG - Analog and Digital Concepts, (CD-ROM) — ■ TSCBAS - Communication Basics, (CD-ROM) TR9208, Dense Wavelength Division Multiplexing (CD-ROM) Audience: This course is primarily intended for network, facility, and strategic planners, product managers, equipment engineers, technical consultants, and account representatives. In general, the course will be helpful to anyone responsible for network implementation and operations. Content: This course investigates what Dense Wavelength Division Multiplexing (DWDM) technology is, why it was developed, how it works, and where it fits in communications networks. Prerequisites: The student should have previous transmission experience or: — TSANLG - Analog and Digital Concepts, (CD-ROM) — xlii Issue 1 TSCBAS - Communication Basics, (CD-ROM) March 2001 365-575-536 About This Information Product — TR9203 - SONET: Understanding the Basics (CD-ROM) or TR5951 - Synchronous Digital Hierarchy Introduction, or TR5951M Synchronous Digital Hierarchy Introduction (CD-ROM) ■ LW2652, WaveStar Optical Line System 40G Operations and Maintenance (Hands On) Audience: This course is primarily intended for technicians responsible for the operation and maintenance of the equipment, but will be useful to technical support people and anyone needing a working knowledge of the equipment. Content: This course prepares the student for operation and maintenance of WaveStar OLS 40G. The course provides in-depth description of the equipment and how it is used with other lightwave equipment. The course is based on the WaveStar OLS 40G User Service Manual. Prerequisites: The student should have a basic understanding of SONET and transmission fiber-optic signals or: — TSANLG - Analog and Digital Concepts, (CD-ROM) — TSCBAS - Communication Basics, (CD-ROM) — TR9203 - SONET: Understanding the Basics (CD-ROM) — ■ TR9208 - Dense Wavelength Division Multiplexing, (CD-ROM) TR3510, Integrated Transport Management-SubNetwork Controller User Training (optional) Audience: This course is primarily intended for operations, maintenance, and engineering personnel responsible for the operation and maintenance of the SONET network elements using the Integrated Transport Management-SubNetwork Controller (ITM-SNC). Content: This course provides an introduction to the features, network applications, and configurations of the ITM-SNC. In addition, the course provides hands-on exercises with the ITM-SNC to cover provisioning of sitespecific instructions, monitoring of events, and maintenance activities. Prerequisites: The student should be familiar with SONET multiplexing structures and terminology, the principles of provisioning, and maintenance of central office equipment in addition to: — TR9203 - SONET: Understanding the Basics (CD-ROM) — TR5951 (SDH) - Synchronous Digital Hierarchy Introduction, or TR5951M - Synchronous Digital Hierarchy Introduction (CD-ROM) Issue 1 March 2001 xliii 365-575-536 About This Information Product Technical Support The Lucent Technologies North American Regional Technical Assistance Center (NARTAC) provides a technical assistance telephone number that is monitored 24 hours a day. For technical assistance, call 1-800-225-RTAC (1-800-225-7822). You can also call this telephone number to provide comments on the product or to suggest enhancements. Global Technical Support International customers, please either call +1-630-224-4672: Prompt 2 or contact your Account Executive for your local technical support number. xliv Issue 1 March 2001 365-575-536 About This Information Product Documentation Support The Lucent Technologies Customer Training and Information Products Organization provides a contact to report errors to or to ask questions about information in this document. The document support telephone number is 1-800-645-6759 (Monday through Friday, 8:00 a.m. to 4:00 p.m. EST). How to Order Documents To order additional copies of this document and/or to request placement on the standing order list, send or call in an order as follows: Customer Mail Order Telephone Order (Monday through Friday) Commercial Lucent Technologies Within USA Customers* Customer Information Center Attention: Order Entry Section 2855 N. Franklin Road North American P.O. Box 19901 Region (NAR) Indianapolis, IN 46219 Asia/Pacific Region, China; Internet Address: Caribbean/Latin American (CALA), www.lucentdocs.com Australia , and New Zealand Europe, Middle East, and Africa (EMEA) 1-888-LUCENT8 (1-888-582-3688) 1-800-566-9568 (Fax) 1-317-322-6646 1-317-322-6699 (Fax) 1-317-322-6411 1-317-322-6699 (Fax) 1-317-322-6416 1-317-322-6699 (Fax) RBOC/BOC Process through your Company Documentation Coordinator * For commercial customers, a check, money order, purchase order number, or charge card number is required with all orders. Make checks payable to Lucent Technologies. Lucent Technologies entities should use Form IND 1-80.80 FA, available through the Customer Information Center. One-time orders include a binder (if applicable) and the document contents for the current issue in effect at the time of order. Also, you may request placement on the standing order list for all later reissues of any document. The standing order list for each document provides automatic distribution for all reissues of the document. RBOC/BOC customers should process document orders or standing order requests through their Company Documentation Coordinator. If you do not have a Company Documentation Coordinator, use the commercial customer telephone number listed above. Issue 1 March 2001 xlv 365-575-536 About This Information Product How to Comment on the WaveStar OLS The Customer Technical Assistance Management (CTAM) technical assistance telephone number is available 24 hours a day for customers to provide feedback and enhancement suggestions for improving the WaveStar OLS . The toll free number is 1-800-225-4672. How to Comment on This Document Feedback forms are located immediately after the title page of this document. Please fill out the form and fax it to the number provided on the form. If the feedback forms are missing, send comments on this document to: WaveStar OLS 40G Document Coordinator Fax Number:732.949.5000 Electronic Documentation Lucent Technologies electronic documentation on compact disk, read-only memory (CD-ROM) has many advantages over traditional paper documentation, including cost-savings, search and retrieve capability, and the assurance of the most current documentation. CD-ROM is available by annual subscription (on standing order). ■ To order, call your Technical Information Resource Manager, your Lucent Technologies Account Executive, or the Lucent Technologies Customer Information Center (1-888-LUCENT8). The CD-ROM Product Line Order Number for the Lucent Technologies transmission product documentation is 300-100-010. ■ For pricing information, contact your Lucent Technologies Account Executive or the Lucent Technologies Customer Information Center (1-888-LUCENT8). ■ For technical information, call Lucent Technologies Documentation Support (1-800-645-6759). Product Change Notifications During the life of a product, changes may be required in service to correct an existing or potential problem. Product changes are issued in the form of product change notices (PCNs). Customers are notified about PCNs through the Design Change Management System (DCMS). The DCMS is an on-line tool similar to COACH. For more information about DCMS, contact your local Account Executive. xlvi Issue 1 March 2001 1 System Introduction Contents Overview 1-1 Introduction to Lucent Technologies Optical Networking Products 1-1 What is the WaveStar OLS 40G? 1-2 Features 1-6 ■ Release 3.4 1-6 ■ Release 3.3 1-7 ■ System Features 1-8 ■ Maintenance Features 1-9 ■ Physical Features 1-13 Issue 1 March 2001 1-i Contents 1-ii Issue 1 March 2001 System Introduction 1 Overview 1 1 This section introduces the next generation of Lucent Technologies optical networking products and briefly describes the WaveStar™ OLS 40G. Introduction to Lucent Technologies Optical Networking Products 1 Lucent Technologies offers the industry's widest range of high-quality optical networking systems and related services designed to provide total network solutions. Lucent Technologies optical networking products are designed to help telecommunications service providers enter a new century of advanced services and revenue generating capabilities. These products enable a broad range of solutions from simple point-to-point applications to self-healing ring applications that provide maximum service assurance. As networks evolve from their telephony base to new time-sensitive, bandwidth intensive services, the need for cost-effective ring applications becomes increasingly critical. Lucent Technologies offers a wide array of systems and can provide solutions to any specific networking needs. The FT-2000 OC-48 Lightwave System and OLS are flexible, high capacity lightwave systems that may be used to solve customer optical networking needs. The FT-2000 OC-48 Lightwave System transports digitally encoded information through single-mode optical fibers at the synchronous optical network (SONET) OC-48 signal level of 2.5 Gb/s (up to 32,256 voice channels). Issue 1 March 2001 1-1 365-575-536 System Introduction The WaveStar OLS 40G provides higher capacity per fiber over longer distances in point-to-point and ring applications than previously possible. What is the WaveStar OLS 40G? 1 The WaveStar OLS 40G is a flexible, high capacity, lightwave system that transports digitally encoded information contained in up to 16 different wavelengths of optical signals (up to 32,256 voice channels each) through standard single-mode or TrueWave® optical fibers. The WaveStar OLS 40G uses dense wavelength division multiplexing and erbiumdoped fiber amplifiers to extend the reach and capacity of fiber transmissions. Dense wavelength division multiplexing is used to combine up to 16 1.25 Gigabit Ethernet (GbE-1), OC-48, OC-12, OC-3, synchronous digital hierarchy (SDH) STM-16, STM-4, STM-1, and/or 100-750 Mb/s low speed broadband signals with different wavelengths in the 1.3- and 1.5-micrometer (µm) range on the same fiber. One erbium-doped fiber amplifier can amplify the combined signals together, in contrast to a traditional system where the individual optical signals are amplified separately. One erbium-doped fiber amplifier replaces several traditional amplifiers. The erbium-doped fiber amplifiers use photoluminescent properties of the rareearth element erbium to amplify an incoming optical signal. When light at the 980-µm wavelength is inserted into a piece of erbium-doped fiber, the photons change state and emit light at the 1.5-µm wavelength. If this emission is combined with a 1.5-µm optical signal, the 1.5-µm optical signal is amplified. The 980-µm light comes from high-powered internal lasers called pump lasers. The light is combined with the 1.5-µm optical signals on the erbium-doped fiber using special internal couplers. The WaveStar OLS 40G consists of several equipment packages. 1-2 Issue 1 ■ OLS Dual End Terminal ■ OLS Dual Repeater ■ OLS End Terminal and Repeater ■ Optical Translator ■ OLS Integrated Bay (Single) ■ OLS Integrated Cabinet/Bay (Double) ■ OLS Integrated Cabinet/Bay (Triple 1) ■ OLS Integrated Cabinet/Bay (Triple 2) ■ OLS End Terminal Shelf (Miscellaneously Mounted) ■ OLS Repeater Shelf (Miscellaneously Mounted) ■ Optical Translator System Controller Shelf (Miscellaneously Mounted) March 2001 365-575-536 System Introduction ■ Optical Translator Complementary Shelf 1 (Miscellaneously Mounted) ■ Optical Translator Complementary Shelf 2 (Miscellaneously Mounted) ■ Miscellaneously Mounted Optical Translator. Different equipment packages enable the WaveStar OLS 40G to offer flexible features for different applications and to provide different sets of features. The WaveStar OLS 40G software enables equipment packages to be upgraded with new features when they become available. The WaveStar OLS 40G is designed to support applications that need to grow to accommodate increasing amounts of information. The WaveStar OLS 40G can be upgraded in-service with up to 16 different wavelengths and up to four bidirectional optical lines. The WaveStar OLS 40G is designed for easy installation and operation. Centralized operation is supported by a full set of remote maintenance and control features. Automatic turnup tests and original value provisioning simplify installation and eliminate the need for external test equipment. The personal computer-based craft interface terminal gives assess to sophisticated maintenance and reporting features. The WaveStar OLS 40G will be made available in a series of phased product releases. These phased product releases will provide new sets of features. This user/service manual covers Release 3.4. Issue 1 March 2001 1-3 365-575-536 System Introduction Table 1-1 shows the major features of the WaveStar OLS 40G and the product releases that the features are available. ! DANGER: Disabling the APSD feature during installation, servicing, or maintenance results in an FDA/IEC Class IIIb/3B laser hazard. Table 1-1. Major Features of Product Releases 1 Through 3.4 Available in Product Release Major Features 1 2 2.1 3 3.3 3.4 X X X X X X X X X X X X X X X X X X X X X — Applications with the DDM-2000 OC-3 and OC-12 Multiplexers X X X X — Applications with other Vendors SONET Lightwave Systems (OC-48, OC-12, and /or OC-3) X X X X — Applications with other Vendors SDH Lightwave Systems (STM-16, STM-4 and/or STM-1) X X X X — Applications with 400-700 Mb/s Broadband Systems X X X X X X X Applications — Applications with the FT-2000 OC-48 Large Capacity Terminal — Applications with the FT-2000 OC-48 Add/Drop-Rings Terminal — Applications with the SLM-2000 Lightwave System X — Applications with the Optical Translator System — Applications with 100-750 Mb/s Low Speed Broadband Systems — Long Span 8-Wavelength Systems X X X X X X X X X X — Long Reach 16-Wavelength Systems (up to 7 or 8 Spans) X X X X — Short Reach 16-Wavelength Systems X X X X X X X — Long Reach 8-Wavelength Systems (up to 7 or 8 Spans) — Long Span 16-Wavelength Systems Continued on next page. 1-4 Issue 1 March 2001 X 365-575-536 System Introduction Table 1-1. Major Features of Product Releases 1 Through 3.4 Available in Product Release Major Features 1 2 2.1 3 3.3 3.4 — Double-Pumped Optical Amplifiers X X X X X X — 8 Wavelength Ready X X X X X X X X X X X X High Speed Interfaces — 16 Wavelength Ready — 1.25 Gb/s Ethernet (GbE-1) Interface Supported by 41F(1-16) and 41G OTUs Administration and Provisioning — Automatic and CIT Provisioning X X — CenterLink Management Console (Web Browser-Based CIT) X X X X X X X X — Login and Password Aging X X X X X X — Multi-Level Security X X X X X X X X X X — Enhanced User Security — Orderwire X X X X X X — Remote Software Downloads X X X X X X — TL1 Operations System Interface X X X X X X X X X X X X X X X X X X — Additional User-Settable Miscellaneous Discrete Inputs and Outputs — Extended Data Communications Channel Connectivity for 2-Fiber Rings — Extended Data Communications Channel Connectivity for 4-Fiber Rings (Telemetry Feed Through) — X.25 Traffic Redirect X Maintenance — 155-Mb/s customer maintenance signal X X X X X X — Automatic Fault Detection and Isolation X X X X X X — Alarm Gateway Network Element (AGNE) Operation X X X X X X — Optical Signal Performance Monitoring X X X X X X — Pump Performance Monitoring X X X X X X X X X — Automatic Optical Amplifier Power Shutdown/Restart — Parallel Telemetry X X X X X X — Threshold Crossing Alert (TCA) Reporting X X X X X X — TL1 Gateway Network Element (GNE) Operation X X X X X X Continued on next page. Issue 1 March 2001 1-5 365-575-536 System Introduction Table 1-1. Major Features of Product Releases 1 Through 3.4 Available in Product Release Major Features 1 2 2.1 3 3.3 3.4 X X X X X X X X X X X X X X X — OC-48 Section Trace X X X — Enhanced OLS/Optical Translator Operation and Maintenance Capabilities X X X — Enhanced TL1 Commands and Reports — Additional TL1 Commands and Reports — Complete Set of TL1 Commands and Reports For more information about the WaveStar OLS 40G releases and their availability, refer to 365-575-535, WaveStar OLS 40G, Applications, Planning, and Ordering Guide. 1 Features The features of WaveStar OLS 40G are presented in six categories: ■ Release 3.4 feature ■ Release 3.3 feature ■ System features ■ Maintenance features ■ Physical features 1 Release 3.4 The X.25 Traffic Redirect feature is introduced in Release 3.4. The ENT-SYS TL1 command has a new provisionable parameter PVC2_REDIRECT which allows the selection of the X.25 Traffic Redirect feature. ■ Allows a WaveStar OLS 40G Network Element (End Terminal) to perform intelligent rerouting of TL1 traffic over the customer X.25 network in the case of line failure. ■ Decreases the time needed to identify a failure in the network ■ Establishes, for linear systems, communication with the other end of the system around a line failure For more information on the X.25 Redirect Traffic feature see the WaveStar™ OLS 40G Release 3.4 , Operations Systems Engineering Guide. 1-6 Issue 1 March 2001 365-575-536 System Introduction 1 Release 3.3 The Release 3.3 features of the WaveStar OLS 40G include a new optical amplifier, LEA7B. LEA7B Optical Amplifier 1 WaveStar OLS 40G Release 3.3.1 introduces the LEA7B OA. The LEA7B OA is a hardware enhancement to the current LEA7 that adds the following features: ■ A dual filter to support either 1532- or 1510-nm optical supervisory channel (OSC) ■ An optical monitoring test port at the optical amplifier output to enable the customer to monitor individual wavelengths. The LEA7B OA has the following engineering rules: NOTE: When operating in 1510-nm mode, the LEA7B OA cannot detect the supervisory signal tone. The LDA4 has a supervisory input band-pass filter to extract 1510 nm signal from 1532 nm signal. However, even with the band-pass filter, the Signal/Noise ratio is so low that the LOS (Loss of Modulation for E1) detector on the E1 framer is unreliable; therefore, a supervisory LOF (Loss of Frame) is used instead. You will see an incoming signal failure alarm regardless of whether it is from LOS or LOF. ■ The LEA7B is not backwards compatible. ■ The LEA7B cannot be mixed with any other OA-type within the same end terminal to end terminal configuration ■ For the 1532-nm telemetry, the LEA7B can be used in all applications, except in a one-OA configuration. ■ For the 1510-nm telemetry the configurations supported by the LEA7B are limited by the engineering rules for the LDA4 telemetry circuit pack. The maximum span losses for the one and two span applications cannot exceed 33 db. The engineering rules are developed for up to eight spans. Issue 1 March 2001 1-7 365-575-536 System Introduction System Features 1 The System features of the WaveStar OLS 40G are: ■ 16-wavelength point-to-point and ring applications ■ Automatic power shut-down (APSD) and restart capability 16-Wavelength Point-to-Point and Ring Applications 1 WaveStar OLS 40G can be deployed in 2- and 4-fiber configurations for point-to-point applications. WaveStar OLS 40G may also be deployed in a dual-facing end terminal configuration. In this configuration, transmission is supported in both the East and West directions, similar to an add/drop multiplexer. When WaveStar OLS 40G is deployed in repeater and dual-facing end terminal configurations, linear add/drop and ring topologies may also be deployed. To optimize WaveStar OLS 40G for a variety of applications, four optical amplifiers are available for 16λ applications. These amplifier choices allow selection of the amplifier that best suits the span distance in a given application. Optical Translator Units (OTUs) and Optical Translator Port Modules (OTPMs) may be used as an interface to SONET/SDH network elements (GbE-1, OC-3/ STM-1, OC-12/STM-4, OC-48/STM-16) or for signals with data rates from 100 –750 Mb/s (for example, PDH or data). SONET/SDH products equipped with OLS-compatible optics may be connected directly to the OLS multiplexing/demultiplexing units without the need for an Optical Translator (OT), for example, FT-2000 Add Drop Ring (ADR), FT-2000 Large Capacity Terminal (LCT), SLM-2000. Refer to the appropriate product documentation for availability). Refer to Chapter 10, “Technical Specifications” for engineering rules. 1-8 Issue 1 March 2001 365-575-536 System Introduction Automatic Power Shut-down (APSD) and Restart 1 The APSD feature is provided as a safety mechanism for WaveStar OLS 40G equipment. It protects against optical surges and exposure to high-powered lasers by automatically reducing output power during an optical power loss (caused by equipment failure, a fiber cut, or a removed connector). Specifically, WaveStar OLS 40G qualifies as a Class 3B system; during a power loss, the OA is brought down to Class 1 levels. Once the system has been repaired or links have been reestablished, APSD ensures that normal operation resumes within four to five seconds. The APSD feature has the following benefits: ■ Increases safety levels of equipment use ■ Meets IEC requirements ■ Facilitates operation at very high levels of optical power Maintenance Features 1 WaveStar OLS 40G provides multiple maintenance features that are similar to and compatible with those of other Lucent Technologies 2000 family products. Maintenance features provide a wide range of system information and control, from summary-level status information to detailed reporting. CenterLink-CIT 1 The CenterLink-CIT is a graphical craft interface terminal that provides extensive on-line help as well as security against unauthorized access. Running under the Windows 95®, Windows 98®, Windows NT®, or Windows 2000® operating system, CenterLink-CIT also provides detailed information and system control for specialized local and remote maintenance and administrative activities. Operations Interface Flexibility 1 WaveStar OLS 40G offers a variety of operations interfaces to meet the needs of an evolving operations system (OS) network. The operations interfaces include the following: ■ Office alarms interface: provides a set of discrete relays that control office audible and visible alarms ■ Parallel telemetry interface: provides a minimum set of alarm and status information to an operations center for local and remote alarm centers ■ Miscellaneous discrete interface: provides a total of 144 miscellaneous discrete input points and 36 miscellaneous discrete output points. Miscellaneous discrete inputs can monitor conditions like open doors or high temperatures, and miscellaneous discrete outputs can control equipment like fans and generators Issue 1 March 2001 1-9 365-575-536 System Introduction ■ X.25 interface: uses X.25 protocol to provide communications with a message-based operations system through Transaction Language 1 (TL1) operations messages. A message-based operations system can access local and remote WaveStar OLS 40G network elements in a maintenance WaveStar OLS 40G using the gateway network element (GNE) capability ■ User panel: provides indicators showing critical (CR), major (MJ), and minor (MN) alarms, abnormal conditions (ABN), near-end activity (NE ACTY), and far-end activity (FE ACTY). The user panel also features CIT DCE connection, an electrostatic discharge (ESD) jack, power on (PWR ON) light-emitting diode (LED), and an alarm cut-off button (ACO) that silences audible office alarms when pressed and lights up during suppression of the alarm. Operations Domains 1 WaveStar OLS 40G subnetwork continues to include all dual-facing end terminals and repeaters interconnected with each other. The subnetwork may originate/ terminate at two single-facing end terminals, two single side equipped dual-facing end terminals, or in a ring made of dual-facing end terminals and repeaters. WaveStar OLS 40G, however, comprises two end terminals and the repeaters between them. WaveStar OLS 40G network elements and the signal transmitter network elements (such as the FT-2000 OC-48 LCT and FT-2000 OC-48 Lightwave System ADR) operate as separate and independent systems. There is no DCC connectivity between the two types of network elements. The dual-facing shelf feature extends WaveStar OLS 40G operations domain in 2-fiber applications to adjoining WaveStar OLS 40G subnetworks, maintaining communication. Single-Ended Operations 1 The single-ended operations capability provides operations support from a single location to remote WaveStar OLS 40G network elements in the same WaveStar OLS 40G subnetwork. With this capability, you can perform operations, administration, maintenance, and provisioning on a centralized basis, saving travel time and money. Both the CIT and the OS interfaces can access network elements that can be WaveStar OLS 40G End Terminals or Repeaters. Capabilities of single-ended operations (operations interworking) include: 1-10 ■ GNE (remote TL1 operations system access) ■ Alarm groups ■ Remote login (remote craft access) ■ Inventorying capabilities ■ Remote network element status (remote alarming, alarm groups, AGNE, remote alarm status, remote office alarms, and parallel telemetry) ■ Local and remote software copy/upgrades ■ Directory Service Network Element (DS-NE). Issue 1 March 2001 365-575-536 System Introduction 1 Gateway Network Element (GNE) One or more WaveStar OLS 40G network elements can be used as a GNE. The GNE serves as a single interface to the X.25 message-based operations system for all network elements in the same WaveStar OLS 40G subnetwork. The GNE receives operations information from these network elements through the DCC and reports that information and its own information to the operations system. The operations information is in the form of TL1 messages. Through the GNE, the operations system can send TL1 commands to any network elements in WaveStar OLS 40G subnetwork. The number of GNEs you use depends on your application and operations needs. For example, to reduce the number of operations data communication links between WaveStar OLS 40G subnetwork and the operations system, you might choose to use one WaveStar OLS 40G network element as the GNE. If you need redundancy, you might choose to use two network elements as GNEs. 1 Alarm groups To communicate remote status information efficiently, you must provision each network element with an alarm group parameter. Members of the alarm group exchange remote network element status information through one or more AGNEs that are defined in the same alarm group. 1 Remote Login You can log in remotely from one WaveStar OLS 40G network element to another WaveStar OLS 40G network element when they are in the same WaveStar OLS 40G subnetwork. 1 Inventorying Capabilities WaveStar OLS 40G provides automatic version recognition of all hardware and software installed in the system. Circuit pack types, circuit pack CLEI™ codes, and serial numbers are accessible via CenterLink and SNMS. These capabilities greatly simplify troubleshooting, dispatch decisions, and inventory audits. 1 Remote Network Element Status (Through DCC) Through the supervisory channel DCC interface, a WaveStar OLS 40G network element can receive and transmit summary alarm and status information from and to remote network elements in the same WaveStar OLS 40G. A far-end activity LED on the local terminal indicates whether any condition is present in a WaveStar OLS 40G network element elsewhere in the subnetwork. 1 Local Software Copy/Upgrades WaveStar OLS 40G can upgrade system software while in service. To upgrade, no control circuit pack changes are required. System monitoring and control are fully functional during software download. The CIT can be used to load software locally, or a modem can be used to download it remotely. Issue 1 March 2001 1-11 365-575-536 System Introduction 1 Remote Software Copy/Upgrades System software contained in one WaveStar OLS 40G (source) can be copied / upgraded to another (destination) in the same maintenance subnetwork. System monitoring and control are fully functional during the copying process. Directory Service Network Element (DS-NE) Any one node in a WaveStar OLS 40G system can be designated as the “DS-NE”. The DS-NE provides a centralized database that maps terminal names (TIDs) to addresses (Network Service Access Points (NSAPs)). The NSAPs are used internally for routing information within WaveStar OLS 40G. No provisioning is required for the DS-NE database; the mapping is configured automatically. Continuous Performance Monitoring 1 Continuous performance monitoring allows WaveStar OLS 40G to detect transmission problems before they affect service. WaveStar OLS 40G monitors analog performance on each wavelength of an optical line. WaveStar OLS 40G receives digital performance information on the supervisory channel. Depending on customer needs, thresholds for each parameter can be provisioned. You can specify a single start time for measuring all twenty-four hour performance monitoring parameters. The start time can be the beginning of any hour (the default is midnight). The performance monitoring parameters for each day are collected separately, beginning at the specified time. WaveStar OLS 40G keeps information for the current day and the previous six days. WaveStar OLS 40G also records performance data at fifteen minute intervals, storing data from the previous eight hours. Original Value Provisioning and User-Selectable Thresholds 1 WaveStar OLS 40G provides extensive circuit provisioning capabilities such as performance monitoring thresholds. The alarm severity of incoming signal failures can be provisioned. To minimize provisioning, each parameter is initially assigned an original value which can easily be changed. Either the CIT or X.25 interface can be used to modify the value of any parameter. Security Features 1 WaveStar OLS 40G provides the following three tiers of security to protect against unauthorized access to the CIT and OS functions: 1-12 ■ Port security ■ Network element login security ■ Enhanced user login security. Issue 1 March 2001 1 365-575-536 System Introduction Physical Features 1 WaveStar OLS 40G packaging is designed for ease of use and adaptability. The following information highlights some of these features. For more details, see Chapter 3 “Platform Description.” 1 Front Access You can access all operation, maintenance, and installation activities from the front of WaveStar OLS 40G. Front access provides greater flexibility, permitting placement of the equipment in physically restricted locations. Equipment Packages 1 WaveStar OLS 40G is available in the following packages: ■ Cabinets ■ Bay frames ■ Miscellaneously-mounted. Easy Installation and Self-tests 1 WaveStar OLS 40G minimizes installation time with one box product deliveries, connectorized cabling with commercially available connectors, and simplified procedures. The one box product delivery concept ensures that all product components arrive at the installation site at the same time in a small number of containers. A set of automatic turn-up tests is provided to verify that installation cabling is present to and from various circuit packs for each optical line. A manual local test is also provided to verify components are working properly. Since test signal generators and detectors are integrated into the system, external test equipment is not needed. Issue 1 March 2001 1-13 365-575-536 System Introduction 1-14 Issue 1 March 2001 2 Applications Contents Basic WaveStar OLS 40G Configurations 2-1 ■ Applications Without Repeaters 2-1 ■ Applications With Repeaters 2-5 ■ Dual-facing Shelf Applications 2-6 ■ Applications With Multi-Regenerated Spans 2-17 ■ Applications With Wavelength Add/Drop (WAD) 2-18 ■ Alternate Configurations for Regeneration and WAD 2-19 Issue 1 March 2001 2-i Contents 2-ii Issue 1 March 2001 Applications 2 2 This chapter describes WaveStar OLS 40G configurations, applications, and the basics of its transmission technology. For more information about the physical components of WaveStar OLS 40G, see Chapter 3, “Platform Description.” For information about Lucent products that are compatible with WaveStar OLS 40G, see the documents referenced in the section “Documentation for Related Equipment and Software” in “About This Document.” Basic WaveStar OLS 40G Configurations 2 As a bit-rate independent optical system, WaveStar OLS 40G can be configured in a variety of ways, ranging from single span, two terminal systems to complex multi-span systems involving multiple repeaters and end terminals. The information in this section describes basic configurations in which WaveStar OLS 40G can be used. Applications Without Repeaters 2 Point-to-point applications may or may not need repeaters. Two types of applications can be applied to this situation. ■ Two-OA (2-OA) ■ Single-OA (1-OA) (repeaterless applications only) Issue 1 March 2001 2-1 365-575-536 Applications Two-OA Applications 2 For Long Span and Long Reach applications, two-OAs are used to prevent signal degradation. In addition to two-fiber applications the WaveStar OLS 40G may also be equipped for four-fiber applications. Figure 2-1 shows a single, bidirectional WaveStar OLS 40G span. In the transmit direction, a WaveStar OLS 40G End Terminal does the following: ■ Combines up to sixteen optical wavelengths* onto a common optical fiber (performed by the OMU) ■ Amplifies the light (performed by the OA) ■ Couples the supervisory signal into the optical line signal ■ Monitors the power of each optical signal in the OA ■ Launches the signal (optical line signal) onto the transmission fiber. At the receive end, a WaveStar OLS 40G End Terminal does the following: ■ Receives the low level optical line signal from the optical line and amplifies it (performed by the second OA) ■ Optically demultiplexes up to sixteen optical signals from the optical line (performed by the ODU) ■ Demultiplexes the supervisory signal from the optical line signal and provides this to the TLM (telemetry) circuit pack ■ Monitors the received power of each optical wavelength and the total received optical power. Depending on the particular span distance, the OAs can be either LEA7, LEA7B, LEA104, or LEA105. See Chapter 10, “Technical Specifications” for specific engineering rules. * 2-2 These wavelengths originate from up to sixteen add/drop multiplexers [ADM]. The receiveend ODU demultiplexes the optical line signal back into sixteen optical wavelengths for transmission to the receive-end ADMs. Optical channels, one each wavelength, can carry any combination of OC-48/STM-16, OC-12/STM-4, OC3/STM-1, GbE-1, and 100–750 Mb/ s signals. Issue 1 March 2001 365-575-536 Applications OLS End Terminals OTU Incoming Optical Signals 1 O M U (Optional) OTU 1 OA OA 16 1 OTU SUPR O D U (Optional) Outgoing Optical Signals OTU SUPR TLM Outgoing Optical Signals (Optional) 16 SUPR OTU O D U OTU TLM 1 SUPR OA OA 16 O M U OTU (Optional) 16 Control Circuits Incoming Optical Signals OTU Control Circuits NC-OLS80G002 Figure 2-1. * WaveStar OLS 40G Single Span with Two-OA Operation* In the Figure 2-1 and Figure 2-2, (Optional) denotes that OTUs are not required when the transmitter/receiver of the optical channel source are WaveStar OLS-compatible. The label OTU is used here to refer to OC-48/STM-16 OTUs or GbE-1 OTUs or OC-12/STM-4 OTPMs or OC-3/STM-1 OTPMs, or 100–750 Mb/s OTPMs. Issue 1 March 2001 2-3 365-575-536 Applications 2 Single-OA Applications Over shorter span lengths, pre-amplification at the receive-end ODU is not necessary because signal degradation is less prevalent. Figure 2-2 shows a single, bidirectional WaveStar OLS 40G span in a Short Reach, 2-fiber application. One OA is used on the transmit side of the optical fiber without an OA on the receive end. Due to the short span length, the LEA105, LEA7, or LEA7B OA and the 606B ODU are required in these Short Reach applications. Except for the absence of a receive pre-amplifier, the operation of this type of end terminal is the same as other end terminal shelves. The WaveStar OLS 40G may also be deployed in a 4-fiber configuration. NOTE: Additional repeaters may be used to increase the number of spans between end terminals. OLS End Terminals OTU Incoming Optical Signals 1 O M U (Optional) OTU 1 OA 16 O D U (Optional) 16 SUPR 1 1 SUPR O D U (Optional) OTU OTU TLM SUPR Outgoing Optical Signals Outgoing Optical Signals SUPR TLM OTU OTU OA 16 O M U (Optional) 16 Control Circuits OTU Incoming Optical Signals OTU Control Circuits Note: OAs must be LEA105 or LEA7 ODUs must be 606B or 606D NC-OLS80G115 Figure 2-2. 2-4 Issue 1 WaveStar OLS 40G Single Span with Single-OA Operation* March 2001 365-575-536 Applications 2 Applications With Repeaters Figure 2-3 shows a multi-span WaveStar OLS 40G. For through-transmission of the optical line signal, WaveStar OLS 40G Repeaters are used in the intermediate spans. WaveStar OLS 40G Repeaters contain only OAs and control circuit packs. OMUs and ODUs are not required. Repeaters use LEA7, LEA7B, or LEA104 OAs, depending on span distance and fiber type. Specific engineering rules appear in Chapter 10, “Technical Specifications.” Repeaters use the same OAs as the end terminals on either end of the system. span Incoming Optical Signals O M U (Optional) OLS End Terminal OA OA 16 OTU OLS Repeater OLS End Terminal 1 OTU span 1 O D U OA (Optional) 16 SUPR SUPR SUPR OTU Outgoing Optical Signals OTU SUPR TLM TLM TLM OTU Outgoing Optical Signals 1 SUPR O D U 1 SUPR SUPR (Optional) OTU TLM SUPR OA OA OA O M U 16 (Optional) 16 Control Circuits Control Circuits OTU Incoming Optical Signals OTU Control Circuits NC-OLS80G004 Figure 2-3. * WaveStar OLS 40G Multiple Span System with Repeaters (two-span system shown)* In Figure 2-2, (Optional) denotes that OTUs are not required when the transmitter/receiver of the optical channel source are WaveStar OLS-compatible. The label OTU is used here to refer to OC-48/STM-16 OTUs or GbE-1 OTUs or OC-12/STM-4 OTPMs or OC-3/STM-1 OTPMs, or 100–750 Mb/s OTPMs. Issue 1 March 2001 2-5 365-575-536 Applications Dual-facing Shelf Applications 2 In two-fiber applications, collocated end terminals with dual-facing shelf capability can be combined both physically and operationally into a single network element. In each of the two-OA, single-OA, or repeater applications shown previously, a 2fiber end terminal may be replaced with a dual-facing shelf. The dual-facing shelf can support a two-OA, a single-OA, or repeater application on one side and another two-OA, single-OA or repeater application on the other side, thus replacing two 2-fiber end-terminal shelves with one dual-facing shelf. The applications supported on each side are independent and may be different in a dual-facing shelf; the OAs in each direction may be different depending on the span length and number of spans required. In applications where it is desirable to carry DCC information between WaveStar OLS 40G systems, an End Terminal Shelf can be provisioned as a dual-facing network element. Dual-facing shelves allow a compact terminal design to handle WAD applications for two-fiber applications. Additionally, dual-facing shelves allow extension of the operations domain across WAD sites. Telemetry channels may be connected through between two four-fiber end terminals in the same office to extend the management subnetwork size. This capability is useful for end terminal sites where Operations Systems access might otherwise be difficult to provide. 2-6 Issue 1 March 2001 365-575-536 Applications Figure 2-4 illustrates a dual-facing shelf configuration utilizing two OA circuit packs on both bidirectional lines. Dual-facing End Terminal (Single Shelf) 1 Incoming OA O D U OTU (Optional) 16 OTU OTU 1 O M U (Optional) OTU 16 SUPR SUPR TLM LINE 2 LINE 1 TLM SUPR 1 SUPR Outgoing Outgoing OA OA O M U OTU (Optional) 16 OTU OTU 1 O D U (Optional) OTU Control Circuits OA Incoming 16 Control Circuits NC-OLS80G006 Figure 2-4. * Two-OA/Two-OA Dual-facing Shelf* In Figure 2-4 (Optional) denotes that OTUs are not required when the transmitter/receiver of the optical channel source are OLS-compatible. The label OTU is used here to refer to OC-48/STM-16 OTUs or GbE-1 OTUs or OC-12/STM-4 OTPMs or OC-3/STM-1 OTPMs, or LSBB OTPMs. Issue 1 March 2001 2-7 365-575-536 Applications Figure 2-5 illustrates a dual-facing shelf configuration utilizing one OA circuit pack on one bidirectional line (Line 2 in Figure 2-5) and two OA circuit packs on the other (line 1 in Figure 2-5). Dual-facing End Terminal (Single Shelf) 1 O D U Incoming OTU (Optional) 16 OTU OTU 1 O M U (Optional) OTU 16 OA Outgoing SUPR SUPR TLM LINE 2 LINE 1 TLM SUPR 1 SUPR Outgoing OA O M U OTU (Optional) 16 OTU OTU 1 O D U (Optional) OTU Control Circuits OA Incoming 16 Control Circuits NC-OLS80G007 Two-OA/Single-OA Dual-facing Shelf* Figure 2-5. * 2-8 In Figure 2-5 (Optional) denotes that OTUs are not required when the transmitter/receiver of the optical channel source are OLS-compatible. The label OTU is used here to refer to OC-48/STM-16 OTUs or GbE-1 OTUs or OC-12/STM-4 OTPMs or OC-3/STM-1 OTPMs, or LSBB OTPMs. Issue 1 March 2001 365-575-536 Applications Figure 2-6 illustrates a dual-facing shelf configuration utilizing two OA circuit packs on one bidirectional line and one OA circuit pack on the other. This configuration is similar to the one shown in Figure 2-5; the OA circuit pack arrangement has been switched between lines. Dual-facing End Terminal (Single Shelf) 1 Incoming O D U OA OTU OTU (Optional) 16 1 O M U (Optional) OTU OTU 16 SUPR SUPR TLM LINE 2 LINE 1 Outside Plant TLM 1 SUPR Outgoing Outgoing OA O M U OA OTU (Optional) 16 OTU SUPR OTU 1 O D U (Optional) OTU Control Circuits Incoming 16 Control Circuits NC-OLS80G008 Figure 2-6. * Single-OA/Two-OA Dual-facing Shelf* In Figure 2-6 (Optional) denotes that OTUs are not required when the transmitter/receiver of the optical channel source are OLS-compatible. The label OTU is used here to refer to OC-48/STM-16 OTUs or GbE-1 OTUs or OC-12/STM-4 OTPMs or OC-3/STM-1 OTPMs, or LSBB OTPMs. Issue 1 March 2001 2-9 365-575-536 Applications Figure 2-7 illustrates a dual-facing shelf configuration utilizing one OA circuit pack on both bidirectional lines. 1 Incoming O D U OTU (Optional) 16 OTU OTU 1 O M U (Optional) OTU 16 OA Outgoing SUPR SUPR TLM LINE 2 LINE 1 TLM SUPR 1 SUPR Outgoing OA O M U OTU (Optional) 16 OTU OTU 1 O D U (Optional) OTU Incoming 16 Control Circuits Control Circuits NC-OLS80G005 Figure 2-7. * 2-10 Single-OA/Single-OA Dual-facing Shelf* In Figure 2-7 (Optional) denotes that OTUs are not required when the transmitter/receiver of the optical channel source are OLS-compatible. The label OTU is used here to refer to OC-48/STM-16 OTUs or GbE-1 OTUs or OC-12/STM-4 OTPMs or OC-3/STM-1 OTPMs, or LSBB OTPMs. Issue 1 March 2001 365-575-536 Applications When dual-facing end-terminals are used in a point-to-point or ring configuration, the network end-to-end configuration can contain up to 32 OLS network elements, as shown in Figure 2-8. Larger applications may be supported using the technique described in the section, “Alternate Configurations for Regeneration and Wavelength Add/Drop”. OLS End Terminal UP TO 30 DUAL-FACING END TERMINALS AND REPEATERS OLS End Terminal NC-OLS80G009 Figure 2-8. Point-to-Point Linear Add/Drop Chain WaveStar OLS 40G can also utilize OTUs in order to support interfaces to network elements using standard interfaces. Issue 1 March 2001 2-11 365-575-536 Applications Figure 2-9 illustrates a WaveStar OLS 40G application designed to carry 2-fiber bidirectional traffic. In the illustration, all OTUs are associated with the same WaveStar OLS 40G which is configured as a dual-facing shelf. The term, “ADM,” refers generically to SONET/SDH ADM equipment. In this figure, wavelength add/ drop is also shown. To simplify the figure, OMUs, ODUs and OAs are not shown. Dual-Facing End Terminal Pass-thru Traffic WEST LINE 1 EAST LINE OTU OTU 3 5 6 8 OTU OTU OTU OTU OTU OTU 4 OTU ADDs/ DROPs OTU OTU ADDs/ DROPs OTU OTU 2 7 OTU 4 1.3 µm ADM ADM 7 * * * ADM * ADM 1.3 µm ADM 2 These Lucent NEs do not require OTUs because they have WaveStar OLS-compatible optics. The NEs include: WaveStar BWM, WaveStar TDM 2.5G (OC-48)/10G (OC-192) (2-Fiber), FT-2000 ADR, FT-2000 LCT, and ADM 16-1. NC-OLS80G010 Figure 2-9. WaveStar OLS 40G Application Using OTUs In Figure 2-9, wavelengths 1, 3, 5, 6, and 8 are carrying optical channels that are being expressed through this location. In the west direction, wavelengths 2 and 7 are provided from ADMs using WaveStar OLS-compatible optics. Wavelength 4 uses an OT to interface to an ADM with a standard interface. In the east direction, wavelengths 2 and 4 are provided from ADMs with WaveStar OLS-compatible optics and wavelength 7 from an ADM with a standard interface. 2-12 Issue 1 March 2001 365-575-536 Applications Ring applications may be created using dual-facing end terminals and repeaters. Figure 2-10 shows a simple example. Repeater Dual-facing End Terminal Dual-facing End Terminal Repeater Repeater Dual-facing End Terminal NC-OLS80G011 Figure 2-10. Ring Example The WaveStar OLS 40G can be used in ring applications to increase the distance between SONET/SDH lightwave terminals and multiplexers, to increase span capacity, and to relieve fiber exhaust. Issue 1 March 2001 2-13 365-575-536 Applications Figure 2-11 shows a ring application with four SONET/SDH lightwave terminals connected with four separate WaveStar OLS 40Gs. LS O OL S Lightwave Terminal* Lightwave Terminal* LS O OL S Lightwave Terminal* Lightwave Terminal* * Any Standard SONET/SDH Lightwave Terminal or Multiplexer Optical Line System Repeater Optical Line System End Terminal NC-OLS80G098 Figure 2-11. Ring Application with SONET/SDH Lightwave Terminals The WaveStar OLS 40G can interface with any standard OC-48/STM-16, GbE-1, OC-12/STM-4, OC-3/STM-1, and/or 100–750 MB/s lightwave terminals or multiplexers. If required, OTU circuit packs and/or OTPMs may be used for wavelength conversion and/or electrical regeneration. The OTU circuit packs and/or OTPMs may also be used to provide wavelength add/drop. With the OTU circuit packs and/or the OTPMs, the WaveStar OLS 40G can be used to create very large ring networks where express wavelengths bypass intermediate offices without going through a lightwave terminal. In ring applications, a separate WaveStar OLS 40G is used between each pair of adjacent SONET/SDH nodes. 2-14 Issue 1 March 2001 365-575-536 Applications The WaveStar OLS 40G also allows the data communications channel DCC bytes to be passed form one WaveStar OLS 40G subnetwork to another in 2-fiber and 4-fiber rings. In 2-fiber ring applications, an OLS End Terminal equipped as dual facing and provisioned as DUAL can be used to replace back-to-back OLS End Terminals at intermediate offices. In 4-fiber ring applications, an OLS End Terminal equipped and provisioned as 1A-TX-THRU can exchange the data communication channel bytes with a co-located OLS End Terminal equipped and provisioned as 1A-RCV-THRU in another subnetwork. For more information about equipping an OLS End Terminal, refer to Chapter 4, “Product Description.” For more information about provisioning, refer to Chapter 5, “Operations, Administration, Maintenance, and Provisioning.” The WaveStar OLS 40G allows flexibility in ring applications.The WaveStar OLS 40G can accept optical signals from different lightwave terminals in different rings. For example, the following figure shows two rings equipped with lightwave terminals sharing the same WaveStar OLS 40G system. The lightwave terminals that share the same optical line transmit different wavelengths of optical signals. Issue 1 March 2001 2-15 365-575-536 Applications LS O OL S Lightwave Terminal* Lightwave Terminal* Lightwave Terminal* OL S LS O OL S Lightwave Terminal* Lightwave Terminal* Lightwave Terminal* LS O OL S Lightwave Terminal* Lightwave Terminal* * Any Standard SONET/SDH Lightwave Terminal or Multiplexer Optical Line System Repeater for 4 Bidirectional Optical Lines Optical Line System End Terminal for 4 Bidirectional Optical Lines NC-OLS80G099 Figure 2-12. Two Rings Sharing a WaveStar OLS 40G System 2-16 Issue 1 March 2001 365-575-536 Applications Applications With Multi-Regenerated Spans 2 Figure 2-13 shows how WaveStar OLS 40G systems can be concatenated for routes extending beyond the eight span capability of the traditional LEA7 OA. To go beyond five spans (LEA104) or eight spans (LEA7 and LEA7B), the optical line signal must be regenerated. Regeneration is performed by OTUs/QOTUs in an OT Bay or Cabinet arrangement or in miscellaneously-mounted OT shelves. Engineering rules appear in Chapter 10, “Technical Specifications.” Span OTU End Terminal 1 O M OA U Incoming Optical Signals OTU Span Span Dual-Facing ET Repeater OA OA O D U OA OA Outgoing Optical Signals 16 1 OA OA O OA M U O D U Incoming Optical Signals 16 Signal Amplification OTU O OA M U OA 16 Optical Line Signal OTU Optional OTUs 1 O D U OTU O D U OTUs/ QOTUs Outgoing Optical Signals OTU O M U 16 Optional OTUs OTU End Terminal 1 OTU Signal Regeneration NC-OLS80G013 Figure 2-13. Multiple WaveStar OLS 40G Systems and OTU/QOTUs as Regenerators (2-fiber Application) Issue 1 March 2001 2-17 365-575-536 Applications Applications With Wavelength Add/Drop (WAD) 2 Figure 2-14 shows a multi-span WaveStar OLS 40G with an intermediate WAD site. This site consists of a WaveStar OLS 40G Integrated Bay configured as dual-facing. It comprises an End Terminal shelf, an OT System Controller Shelf, and one OT Complementary Shelf. Figure 2-9 also illustrates wavelength add/ drop. End Terminal 1 Incoming Optical Signals O M U Repeater OA OA Integrated Bay O D U OA End Terminal 1 O M U OA OA Outgoing Optical Signals O D U 16 16 OTUs/ QOTUs 1 1 O D U Outgoing Optical Signals OA OA OA O M U O D U OA 16 OA O M U Incoming Optical Signals 16 Optical Line Signal Wavelength add-drop signals NC-OLS80G014 Figure 2-14. WaveStar OLS 40G with Wavelength Add/Drop (WAD) 2-18 Issue 1 March 2001 365-575-536 Applications Alternate Configurations for Regeneration and WAD 2 Figure 2-15 and Figure 2-16 show how signals can be regenerated or added/ dropped in 4-fiber applications. These configurations may also be used in 2-fiber applications where dual-facing shelves are not supported or desired. Co-located End Terminal Repeater End Terminal OA O D U OTU End Terminal Repeater End Terminal OTU O M U OA OA OTU O M U OTU OA OA OA O D U OTU OTU OTU OTU O D U OA OA OA OTU O M U OTU O D U OA OA OA O M U OTU OTU OTU OTU O M U OA OA OA O D U OTU O M U OTU OA OA OA O D U OTU OTU OTU OTU O D U OA OA OA O M U OTU OTU O D U OA OA OTU OA O M U OTU Regenerator Application NC-OLS80G015 Figure 2-15. 4-Fiber Regenerator Issue 1 March 2001 2-19 365-575-536 Applications End Terminal Repeater End Terminal OA O D U End Terminal THRU OTU O M U OA OA OTU OTU OTU O D U OA OA OA O M U OTU THRU OTU O M U OA OA OA O D U OTU OTU OTU O D U OA OA OA OTU O M U OA OA OTU OTU O D U OA OA OA O M U OTU OTU OTU OTU O M U OA OA OA O D U OTU OTU THRU Drop Add OA O D U THRU Add Drop OTU O M U OTU Drop Add End Terminal OTU Add Drop Repeater OTU O D U OTU OA OA OA O M U OTU NC-OLS80G016 To OLS-compatible Interface Standard Interface Wavelength Add/Drop Application Figure 2-16. 4-Fiber WAD When single-facing terminals are co-located, the DCN may be extended beyond end terminal boundaries by using the telemetry feed-thru feature to connect end terminals.Telemetry feed-thru requires Release 3.0 or later. 2-20 Issue 1 March 2001 365-575-536 Applications Telemetry feed-thru can be used to connect two end-terminals where it is not convenient to provide a physical X.25 connection to the location as in Figure 2-17. X.25 to OLS End Terminal End Terminal Repeater End Terminal Repeater Co-located End Terminal Telemetry (TLM) Feed-thru NC-OLS80G017 Figure 2-17. Telemetry Feed-thru There cannot be more than 32 WaveStar OLS 40G single-facing End Terminals, repeaters and dual-facing terminals in configurations connected via the telemetry feed-thru capability. Each single-facing end terminal at the telemetry feed-thru location counts as one network element for a total of two at that site. Dual-facing end terminals may not be equipped with the telemetry feed-thru feature. Singlefacing end terminals may be equipped for telemetry feed-thru. Issue 1 March 2001 2-21 365-575-536 Applications 2-22 Issue 1 March 2001 3 Platform Description Contents Introduction 3-1 WaveStar OLS 40G Bay/Cabinet Design 3-2 WaveStar OLS 40G Shelf Design 3-5 WaveStar OLS 40G Architecture 3-9 WaveStar OLS 40G Shelf Descriptions 3-10 ■ End Terminal Shelf 3-10 ■ WaveStar OLS 40G Repeater Shelf 3-12 ■ OT System Controller Shelf 3-13 ■ OT Complementary Shelves 1 and 2 3-14 Transmission Circuit Packs 3-15 ■ Optical Amplifier (OA) 3-15 ■ Optical Multiplexer Unit (OMU) 3-16 ■ Optical Demultiplexer Unit (ODU) 3-16 ■ Optical Translator Unit (OTU) 3-16 ■ Quad Optical Translator Unit (QOTU) 3-17 ■ Optical Translator Port Module (OTPM) 3-18 ■ Telemetry (TLM) Circuit Pack 3-18 Control Circuit Packs 3-19 ■ System Controller (SYSCTL) 3-19 ■ System Memory (SYSMEM) 3-19 ■ Tributary Overhead Controller (TOHCTL) 3-20 ■ OT Controller (OTCTL) 3-20 Optical Transmission Elements ■ 3-20 Optical Amplifier 3-20 Issue 1 March 2001 3-i Contents ■ Optical Multiplexer Units/Optical Demultiplexer Units 3-21 ■ Optical Translator Units 3-22 ■ Other Elements 3-23 End Terminal Shelf Configurations ■ 1A-TX End Terminal 3-24 ■ 1A-TX-THRU End Terminal 3-25 ■ 1A-RCV End Terminal 3-26 ■ 1A-RCV-THRU End Terminal 3-27 ■ Dual Facing (DUAL) End Terminal 3-28 ■ Single Optical Amplifier 1A-TX End Terminal 3-29 ■ Single Optical Amplifier 1A-TX-THRU End Terminal 3-30 ■ Single Optical Amplifier 1A-RCV End Terminal 3-31 ■ Single Optical Amplifier 1A-RCV-THRU End Terminal 3-32 ■ Single Optical Amplifier Dual Facing End Terminal 3-33 WaveStar OLS 40G Packages 3-34 WaveStar OLS 40G Integration Cable Engineering 3-47 ■ Integration Cable Descriptions 3-47 ■ Integration Cable Configurations 3-48 Interconnection Panels 3-51 ■ WaveStar OLS 40G Interconnection Panel 3-51 ■ OT Interconnection Panel (System Controller Shelf) 3-51 ■ OT Interconnection Panel (Complementary Shelves) 3-52 ■ WaveStar OLS 40G Cabinet Indicator Strips 3-53 ■ Panels 3-56 ■ OT Shelf Fuse Panel Assembly in Cabinet Configurations 3-60 Power 3-60 ■ Power Cables 3-61 ■ Power Distribution for End Terminal and Repeater Bay/Cabinet 3-62 ■ WaveStar OLS 40GIntegrated Bay (Single) and OT Bay/Cabinet Power Distribution 3-63 Shelf-Level Power Distribution 3-64 ■ 3-ii 3-23 Issue 1 March 2001 Platform Description 3 3 This chapter describes shelf design, package descriptions, and configuration information for the WaveStar OLS 40G. It also includes package illustrations and information on equipment packages, system control, physical design, transmission, protection, and powering. Introduction 3 WaveStar OLS 40G is available in the following equipment packages: ■ Dual End Terminal Cabinet or Bay ■ Dual Repeater Cabinet or Bay ■ End Terminal and Repeater Cabinet or Bay ■ End Terminal Shelf (miscellaneously-mounted) ■ Repeater Shelf (miscellaneously-mounted) ■ Integrated Bay (Single) ■ Integrated Cabinet or Bay (Double) ■ Integrated Cabinet or Bay (Triple 1) ■ Integrated Cabinet or Bay (Triple 2) Additional Optical Translator (OT) equipment is available in the following equipment packages: ■ OT Cabinet or Bay ■ Miscellaneously-mounted OT ■ Miscellaneously-mounted OT System Controller Shelf Issue 1 March 2001 3-1 365-575-536 Platform Description ■ Miscellaneously-mounted OT Complementary Shelf 1 ■ Miscellaneously-mounted OT Complementary Shelf 2. For descriptions and illustrations of these packages, refer to “WaveStar OLS 40G Packages” later in this chapter. WaveStar OLS 40G Bay/Cabinet Design 3 WaveStar OLS 40G Bay and Cabinet shelves are similar to each other but have key differences. Bay-mounted shelves have front covers while cabinet shelves have front doors. In addition, a bay frame arrangement or miscellaneously-mounted unit has heat baffles attached to the shelf, whereas heat baffles are supplied as a physical component of the cabinet (one heat baffle is located between the two shelves). In addition, miscellaneously-mounted shelves are not used in cabinet arrangements. Figure 3-1 shows the WaveStar OLS 40G Cabinet. 3-2 Issue 1 March 2001 365-575-536 Platform Description 60 cm (24 inches) 86 cm (34 inches) Door Logo Badge End Guard CIT Interface and ESD jack 183 cm (6 feet) Latch Fixture Wave Profile Kickplate NC-OLS80G019 Figure 3-1. WaveStar OLS 40G Cabinet (Doors Closed) Issue 1 March 2001 3-3 365-575-536 Platform Description Figure 3-2 shows a front view of the WaveStar OLS 40G Bay frame. 2134 cm (84 in.) 660 cm (26 in.) NC-OLS80G018 Figure 3-2. 3-4 Issue 1 WaveStar OLS 40G Bay Frame March 2001 365-575-536 Platform Description WaveStar OLS 40G Shelf Design 3 WaveStar OLS 40G shelves can be used in a variety of ways. They can be housed in Lucent Technologies Newlook 2000 cabinets, mounted in European Telecommunications Standard Institute (ETSI) compatible racks, or mounted in a Network System Bay Framework (800 or 801 type). The shelves can be ordered from the factory with a cabinet or bay frame or as separate, miscellaneously-mounted units. Miscellaneously-mounted and bay-mounted WaveStar OLS 40G shelves include: ■ Two front shelf covers (flat or Newlook-2000) ■ Attached heat baffle ■ User panel ■ Bay mounting brackets. Figure 3-3 shows a miscellaneously-mounted WaveStar OLS 40G shelf with front covers (bay-mounted shelves are similar). Right Top Cover Latch User Panel Top Cover Top Cover Hinge Left Bottom Cover Latch Mounting Bracket Bottom Cover Bottom Cover Hinge Heat Baffle NC-OLS080G-022 Figure 3-3. Miscellaneously-Mounted WaveStar OLS 40G Shelf with Front Covers (flat cover shown) Issue 1 March 2001 3-5 365-575-536 Platform Description Miscellaneously-mounted and bay-mounted OT shelves include: ■ One front shelf cover (flat or Newlook-2000) ■ Attached heat baffle ■ Fuse/power indicating panel for Complementary Shelf 1 and 2 ■ User panel for the System Controller Shelf ■ Bay mounting brackets. Figure 3-4 shows a miscellaneously-mounted OT shelf with front cover (bay-mounted shelves are similar). Fuse/Power Indicating Panel or User Panel Mounting Bracket Cover Hinge Heat Baffle NC-OLS80G023 Figure 3-4. Miscellaneously-mounted OT Shelf with Front Cover (flat cover shown) WaveStar OLS 40G cabinet shelves include: 3-6 Issue 1 ■ Fuse panel ■ Alarm and status indicators (provided on an indicator strip at the top of the cabinet, rather than on shelf indicator panels). March 2001 365-575-536 Platform Description Figure 3-5 shows the WaveStar OLS 40G cabinet shelf (cabinet doors open). Externally, it is similar to the OT Cabinet. Indicator Strip Fuse Panel Heat Baffle NC-OLS80G020 Figure 3-5. WaveStar OLS 40G Cabinet Shelf Issue 1 March 2001 3-7 365-575-536 Platform Description Figure 4-6 depicts an unequipped WaveStar OLS 40G Integrated Bay. Interconnection Panel Fuse/Power Indicating Panel OT Complementary Shelf 1 Heat Baffle Interconnection Panel OT System Controller Shelf Interconnection Panel User Panel OLS Shelf NC-OLS80G021 Figure 3-6. 3-8 Issue 1 WaveStar OLS 40G Integrated Bay Shelves March 2001 365-575-536 Platform Description WaveStar OLS 40G Architecture 3 WaveStar OLS 40G uses a hierarchical control architecture. The control system hierarchy consists of two levels, the system controller complex and the board controller. The system controller complex functions as the higher level of control and the board controller, residing on the OA and telemetry (TLM) circuit packs, serve as the lower level of control. Figure 3-7 shows WaveStar OLS 40G system control architecture. See “Control Circuit Packs” in Chapter 4 for more information. The system controller complex is responsible for system-wide computations and system user interface functions. The complex is physically partitioned into two separate circuit packs, referred to as the system controller (SYSCTL) and system memory (SYSMEM) circuit packs, respectively. The board controller local area network (BCLAN) connects these two control levels. The system controller complex also plays a major role in providing the operations, administration, maintenance, and provisioning functions. A single system controller complex controls up to four bidirectional optical lines. Figure 3-7. System Control Architecture for WaveStar OLS 40G Issue 1 March 2001 3-9 365-575-536 Platform Description The board controller contains a micro-controller with supporting circuitry. This controller monitors and controls the OA and TLM circuit packs, isolates faults at the circuit pack level, controls the FAULT LED indicators, controls hardware provisioning data, maintains a sanity timer, and provides debugging functions. The tributary overhead controller (TOHCTL) performs data communications channel (DCC) processing functions. The controllers communicate among the various levels of the system using internal local area networks (LANs). The board controllers communicate using the board controller local area network (BCLAN). The TOHCTL circuit pack and the system controller complex communicate using the overhead access local area network (OALAN). WaveStar OLS 40G control features are available to the operator through several craft and operations system (OS) interfaces. In addition to accessing the local terminal, the craft and OS interfaces can reach a remote terminal using the DCC in the optical signal. These functions are provided by the SYSCTL, SYSMEM, and TOHCTL circuit packs. WaveStar OLS 40G Shelf Descriptions 3 This section describes the basic types of WaveStar OLS 40G shelves that are equipped with circuit packs. These shelves include the following: ■ End Terminal Shelf ■ Repeater Shelf ■ Optical Translator System Controller Shelf ■ Optical Translator Complementary Shelves 1 and 2. End Terminal Shelf 3 In WaveStar OLS 40G End Terminal shelves, the Optical Multiplexer Units (OMU) and Optical Demultiplexer Units (ODU) are placed in different order at each end of an WaveStar OLS 40G system to produce different shelf configurations, all of which are provisionable by network element software. This type of shelf contains telemetry (TLM) circuit packs, OAs, OMUs, and ODUs that provide Dense Wavelength Division Multiplexing (DWDM) of up to sixteen wavelengths per fiber, and system control circuit packs (TOHCTL, SYSCTL, and SYSMEM) see Figure 3-8. For information on circuit packs, refer to “WaveStar OLS 40G Integration Cable Engineering” and “Control Circuit Packs” later in this chapter. See Chapter 8, “Administration and Provisioning,” for provisioning information and shelf illustrations. 3-10 Issue 1 March 2001 365-575-536 Platform Description Interconnection Panel T L M T L M O M U O D U O M U O D U OA OA OA OA 1A 1B 2A 2B Fuse Panel T O H C T L S Y S C T L S Y S M E M NC-OLS80G101 Figure 3-8. WaveStar OLS 40G End Terminal Shelf (fully equipped) Issue 1 March 2001 3-11 365-575-536 Platform Description 3 WaveStar OLS 40G Repeater Shelf The WaveStar OLS 40G Repeater Shelf, shown in Figure 3-9, is similar to the End Terminal Shelf, except that it does not contain an OMU or ODU and it requires two TLM circuit packs per line. The Repeater shelf contains OA circuit packs, associated system control and telemetry circuit packs, a fuse panel, and an interconnection panel. For information on circuit packs, refer to “WaveStar OLS 40G Integration Cable Engineering” and “Control Circuit Packs” later in this chapter. Interconnection Panel T L M T L M T L M T L M O M U O D U O M U O D U OA OA OA OA 1A 1B 2A 2B Fuse Panel T O H C T L S Y S C T L S Y S M E M NC-OLS80G049 Figure 3-9. 3-12 Issue 1 WaveStar OLS 40G Repeater Shelf (fully equipped) March 2001 365-575-536 Platform Description 3 OT System Controller Shelf To accommodate OT integration, the OT Controller (OTCTL) circuit pack is inserted into the shelf between the System Controller circuit pack (SYSCTL) and the OTUs. It is controlled by the existing SYSCTL and SYSMEM circuit packs in the WaveStar OLS 40G shelf. For information on circuit packs, refer to “WaveStar OLS 40G Integration Cable Engineering” and “Control Circuit Packs” later in this chapter. In addition to the OTCTL, each miscellaneously-mounted OT System Controller Shelf consists of eight OTU (or four QOTU) circuit pack slots and one empty slot. Figure 3-10 shows a miscellaneously-mounted OT System Controller Shelf without the front shelf cover. FUSE/PWR IND. PANEL OTU-8 OTU-7 OTU-6 OTU-5 OTU-4 OTU-3 OTU-2 OTU-1 INTERCONNECTION PANEL OTCTL HEAT BAFFLE NC-OLS80G050 Figure 3-10. Miscellaneously-mounted OT System Controller Shelf (8 OTUs; fully equipped) Issue 1 March 2001 3-13 365-575-536 Platform Description 3 OT Complementary Shelves 1 and 2 Each miscellaneously-mounted Complementary Shelf consists of 12 OTU or 6 QOTU circuit pack slots (one QOTU utilizes two slots), an interconnection panel, a fuse/power indicating panel, a designation label strip, an attached heat baffle, power filters, cables, a front and rear cover, and an indicator strip. For information on circuit packs, refer to “WaveStar OLS 40G Integration Cable Engineering” and “Control Circuit Packs” later in this chapter. The Complementary Shelves each have a fuse/power indicating panel that displays a green-colored Power On (PWR ON) LED indicator. This LED indicator illuminates to indicate that the respective shelf is receiving -48 V power. Figure 3-11 shows a miscellaneously-mounted Complementary Shelf 1 without the front shelf cover. Complementary Shelf 2 is identical to Complementary Shelf 1 except that the OTUs are numbered from 21 to 32 in Shelf 2. OTU-20 OTU-19 OTU-17 OTU-16 OTU-15 OTU-14 OTU-13 OTU-12 OTU-11 OTU-10 OTU-9 OTU-18 FUSE/PWR INDICATING PANEL INTERCONNECTION PANEL HEAT BAFFLE NC-OLS80G051 Figure 3-11. Miscellaneously-Mounted Complementary Shelf 1 (12 OTUs; fully equipped) 3-14 Issue 1 March 2001 365-575-536 Platform Description Transmission Circuit Packs 3 The following are transmission circuit packs used in the WaveStar OLS 40G: ■ Optical Amplifier (OA) ■ Optical Multiplexer Unit (OMU) ■ Optical Demultiplexer Unit (ODU) ■ Optical Translator Unit (OTU) ■ Quad Optical Translator Unit (QOTU) ■ Optical Translator Port Module (OTPM) ■ Telemetry (TLM) All circuit pack, unit, and port module assemblies connect to the backplane. All optical connections in and out of the circuit packs run through faceplate-mounted optical connectors. Optical Amplifier (OA) 3 The OAs operate in the 1.5 µm wavelength band. The main components of the OAs are as follows: ■ Pump lasers– Two high powered optical pump lasers, operating at a wavelength of 980 nm, provide power which is combined with the 1.5 µm signal ■ Filter– In the middle of the OA, a filter separates the light at 1532 nm from the rest of the 1.5 µm band. This filtering separates the supervisory channel from the optical (signal) wavelengths and reduces noise ■ Optical splitter– An optical splitter in the OA splits off a small amount of light for monitoring purposes ■ Optical isolators– Optical isolators prevent optical reflections from degrading system performance. WaveStar OLS 40G demultiplexes the signals at the other end of the optical line and passes them on to compatible optical receivers. WaveStar OLS 40G also uses a highly flexible form of WAD. For details on span length and network topologies and a description of the engineering rules used in building WaveStar OLS 40G networks and management subnetworks, see Chapter 10, “Technical Specifications” The OA circuit pack does the following: ■ Amplifies the optical line signal ■ Provides power monitors on the optical monitor point provided by the amplifier module Issue 1 March 2001 3-15 365-575-536 Platform Description ■ Controls the pump lasers which, in turn, automatically control OA output power ■ Provides add/drop ports for the supervisory signal ■ Provides temperature control for the ODU ■ Receives data from the OMUs and ODUs for version and type information. NOTE: WaveStar OLS 40G utilizes the LEA104 OA for Long Span, 16-wavelength systems. Long Reach systems use the LEA7 or LEA7B OA while the LEA105 OA is used for Short Reach systems. Both LEA7 and LEA105 are required for single-OA operation. Optical Multiplexer Unit (OMU) 3 Used at the end terminal site, the OMU combines up to sixteen optical wavelengths into one signal called the optical line signal. The OMUs used with WaveStar OLS 40G, are: ■ 506A which combines up to 16 optical wavelengths into one signal. This signal, known as the optical line signal, has a through loss of ≤ 15 dB. Both the OMU and ODU units are mechanically fastened to the shelf with screw fasteners and are field replaceable. The shelf card guides enable proper alignment with the backplane. Optical Demultiplexer Unit (ODU) 3 The ODU demultiplexes the input optical signal into a maximum of sixteen wavelengths. There four types of ODUs used with WaveStar OLS 40G. NOTE: The 606B ODU is required for single-OA operation. ■ 606A (sixteen wavelength; without Supervisory Channel Output, and a through loss of ≤ 10 dB) ■ 606B (sixteen wavelength; with Supervisory Channel Output, and a through loss of ≤ 10 dB) Optical Translator Unit (OTU) 3 The OTU circuit pack regenerates an OC-48/STM-16 optical signal by: ■ 3-16 Issue 1 Converting the signal from optical to electrical format March 2001 365-575-536 Platform Description ■ Converting the signal back into an optical signal that is compatible with WaveStar OLS 40G or a receiver of the optical channel source ■ Monitoring the signal for degradation. The OTU control structure provides the following functionality: ■ Equipment version information per OTU (OC-48/STM-16), QOTU, and OTPM (OC-3/STM-1, OC-12/STM-4, 100–750 Mb/s) and GbE-1. ■ Software download from the SYSCTL/SYSMEM to the OTCTL and through the OTCTL to the OTUs and QOTUs ■ Equipment failure indications for OTUs, QOTUs, and OTPMs ■ Incoming signal failure indications (LOS, LOF, and AIS) for OTU and OTPM ports ■ B1 performance monitoring in 15 minute/daily bins and TCAs for each OTU and OTPM port (this is not provided for the LSBB OTPM ■ Optical parameter performance monitoring (LBFC/OPT, RCV PWR/OPR, LBC) for the OC-48/STM-16 OTUs. For OC-3/STM-1 and OC-12/STM-4 OTPMs and 100–750 Mb/s LSBB OTPMs, analog performance parameters are not provided (available for factory testing and calibration) and all out-ofrange indications are treated as OTPM failures. ■ Autonomous TL1 alarm reporting for all OTU, QOTU, and OTPM equipment ■ Autonomous TL1 alarm reporting for QOTU and OTPM incoming signal conditions, including the T-x condition types for TCAs ■ Incoming signal port state provisioning for all OTU and OTPM ports ■ In-service indications (green LED indicator) for OTPM ports. This information is reported through the WaveStar OLS 40G user interface. Quad Optical Translator Unit (QOTU) 3 Each QOTU circuit pack occupies two OTU slots in an OT shelf, and contains a maximum of four GbE-1, OC-3/STM-1, OC-12/STM-4, or 100–750 Mb/s OTPMs in any combination. OTPMs are housed individually in QOTU ports 1, 2, 3, and 4. Figure 4-8 illustrates the port locations on the QOTU. Issue 1 March 2001 3-17 365-575-536 Platform Description Port 3 Port 4 41S OTU 42A9 42A1 OTPM OTPM FAULT FAULT ACTIVE ACTIVE FAULT IN IN OUT OUT 42A12 42A11 OTPM OTPM FAULT FAULT ACTIVE ACTIVE IN IN OUT OUT Port 1 Port 2 NC-OLS80G024 Figure 3-12. QOTU Design Optical Translator Port Module (OTPM) 3 The OTPMs perform the same functions as the OTUs for sixteen wavelength GbE-1, OC-3/STM-1, OC-12/STM-4, and 100–750 Mb/s rate signals. Telemetry (TLM) Circuit Pack 3 The TLM circuit pack provides a supervisory channel on the optical line. This channel is used for fault location and maintenance functions. A fully-equipped End Terminal Shelf requires one TLM circuit pack per line, while a fully-equipped 3-18 Issue 1 March 2001 365-575-536 Platform Description Repeater Shelf requires two TLM circuit packs per line. When the end terminal uses the telemetry-thru feature, two TLM circuit packs per line are used. A network can contain LDA1 circuit packs (for 1532 nm). The LDA1 TLM circuit pack hardware also supports an IS-3 interface that can be used to transmit anSTS-3 maintenance signal. The customer can use the payload in the STS-3 signal for site-to-site customer-specific data. In addition, three orderwire channels, E1, E2, and F1, are available with the LDA1. Control Circuit Packs 3 Control circuit packs used in WaveStar OLS 40G are as follows: ■ System controller (SYSCTL) ■ System memory (SYSMEM) ■ Tributary overhead controller (TOHCTL) ■ OT controller (OTCTL– used in the OT) System Controller (SYSCTL) 3 The SYSCTL circuit pack, together with the SYSMEM, provides the highest level of system control for WaveStar OLS 40G. The SYSCTL circuit pack provides system-level user and operations systems interfaces, performs system-wide maintenance computations and performance monitoring, and supports serial telemetry and X.25 interfaces. The SYSCTL circuit pack can support two fully-integrated OT System Controller Shelves and up to four Complementary Shelves. An Integrated Bay or Cabinet (Double, Triple 1, or Triple 2) package can be used for full operation. System Memory (SYSMEM) 3 The SYSMEM circuit pack provides memory support for the system controller (SYSCTL) circuit pack. The SYSMEM circuit pack contains erasable/ programmable read-only memory (EPROM) for nonvolatile storage of the system state and user-provisioned data. It also contains a flash EPROM for nonvolatile storage of the software for the entire system. The SYSMEM circuit pack also supports the user panel, parallel telemetry, miscellaneous discretes, and office alarms. Issue 1 March 2001 3-19 365-575-536 Platform Description Tributary Overhead Controller (TOHCTL) 3 The TOHCTL circuit pack processes the overhead (D1 - D3) of the supervisory channel. The TOHCTL interfaces with the transmission overhead on the TLM circuit pack in order to deliver and receive DCC data. The TOHCTL interfaces with the system controller complex by means of the OALAN. Refer to Chapter 8, “Administration and Provisioning,” for more information on this circuit pack. OT Controller (OTCTL) 3 To facilitate integration of the OT with WaveStar OLS 40G, the OTCTL is used to integrate the OTUs into the WaveStar OLS 40G control structure. It occupies three slots in the OT System Controller Shelf. Operationally, the integration of these circuit packs makes the combination of WaveStar OLS 40G and OT appear as a single network element. The OTCTL controls all of the OTUs within the same cabinet or network bay frame via the BCLAN connections provided in the backplane and inter-shelf OT cabling. Optical Transmission Elements 3 WaveStar OLS 40G can be used in a variety of applications. The following sections describe basic WaveStar OLS 40G transmission elements and configurations that use these elements. WaveStar OLS 40G uses Optical Amplifiers (OAs), Optical Multiplexer Units (OMUs), Optical Demultiplexer Units (ODUs), and Optical Translator Units (OTUs/ OTPMs) as its basic components. Optical Amplifier 3 WaveStar OLS 40G Optical Amplifier (OA) is an erbium-doped fiber amplifier (EDFA). OAs generate high optical power which supports longer optical sections and lines between lightwave terminals than traditional lightwave applications. For any given application, one OA code can serve as a power amplifier, pre-amplifier, or repeater. WaveStar OLS 40G uses one or two-OAs per line at each End Terminal site. Depending on the type of operation, one OA serves as a power amplifier at the transmit end and the other serves as an optional pre-amplifier at the receive end. At Repeater sites, an OA serves as an optical repeater. Each OA can amplify the multiplexed signals, handling up to sixteen wavelengths simultaneously. 3-20 Issue 1 March 2001 365-575-536 Platform Description Table 3-1 lists the five types of available OAs and their associated applications. Table 3-1. WaveStar OLS 40G Optical Amplifiers OA Code Application Two-OA Operation Single-OA Operation LEA7 Long Reach 4 4 LEA7B Long Reach 4 LEA104 Long Span 4 LEA105 Short Reach 4 4 Optical Multiplexer Units/Optical Demultiplexer Units 3 WaveStar OLS 40G supports ■ One type of 16λ OMU ■ two types of 16λ ODUs [one 16λ with supervisory channel, one 16λ without supervisory channel Optical Multiplexer Units (OMUs) multiplex up to 16 signals together. Optical Demultiplexer Units (ODUs) optically demultiplex the signals, separating the optical input signal into sixteen separate wavelength signals. Table 3-2 lists the types of optical units supported by WaveStar OLS 40G. Table 3-2. WaveStar OLS 40G OMUs/ODUs Unit Code Wavelengths Notes OMU 506A 16 Provides supervisory channel output ODU 606A 16 Does not provide supervisory channel output ODU 606B 16 Provides supervisory channel output for single-OA applications Issue 1 March 2001 3-21 365-575-536 Platform Description 3 Optical Translator Units WaveStar OLS 40G utilizes Optical Translator Units (OTUs and OTPMs) supporting up to sixteen wavelengths and OC-48/STM-16, OC-12/STM-4, OC-3/STM-1, GbE-1, and 100–750 Mb/s bit rates. The OC-48/STM-16 and GbE-1 OTUs are standard WaveStar OLS 40G OTUs covering sixteen wavelengths. For OC-12/STM-4, OC-3/STM-1, and 100–750 Mb/ s applications, a Quad Optical Translator Unit (QOTU) carrier pack holds up to four Optical Translator Port Modules (OTPMs) in any combination. Table 3-3 lists the supported OTUs and OTPMs. For specific engineering rules, refer to Chapter 10, “Technical Specifications.” Table 3-3. WaveStar OLS 40G OTUs/OTPMs Code Bit Rate Wavelength Band 41A(1-16)C OC-48/STM-16 1.5 µm OTU. For applications with dispersion of up to 6800 ps/nm. 41A(1-16)D OC-48/STM-16 1.5 µm For dispersion up to 6800 ps/nm. 41BB OC-48/STM-16 1.3 µm OTU, used to transmit from the OLS ODU to a SONET/SDH Network Element receiver 41C(1-16)C OC-48/STM-16 1.5 µm OTU. For applications with dispersion of up to 10,900 ps/nm, concatenation of up to 20 OTUs, and used to transmit to the OLS OMU. 41D(1-16) OC-48/STM-16 1.5 µm Used in systems with dispersion up to 12,800 ps/nm. 41E OC-48/STM-16 1.5 µm OTU, used to transmit from the OLS ODU to a SONET/SDH Network Element receiver having a sensitivity of -28dB 41F(1-16) GbE-1 1.5 µm OTU. For applications with dispersion of up to 6800 ps/nm 41G GbE-1 1.3 µm OTU 41S Notes QOTU carrier pack for up to 4 OTPMs of any mix 42A(1-16)B OC-12/STM-4 1.5 µm OTPM, used to transmit to the OLS OMU 42B OC-12/STM-4 1.3 µm OTPM, used to transmit from the OLS ODU to a SONET/SDH Network Element receiver 3-22 Issue 1 March 2001 365-575-536 Platform Description Table 3-3. WaveStar OLS 40G OTUs/OTPMs (Contd) Code Bit Rate Wavelength Band 43A(1-16)B OC-3/STM-1 1.5 µm OTPM, used to transmit to the OLS OMU 43B OC-3/STM-1 1.3 µm OTPM, used to transmit from the OLS ODU to a SONET/SDH Network Element receiver 44A(1-16)B 100–750 Mb/s 1.5 µm LSBB OTPM, used to transmit to the OLS OMU 44B 100–750 Mb/s 1.3 µm LSBB OTPM, used to transmit from the OLS ODU to a Network Element receiver Other Elements Notes 3 In addition to the transmission elements described previously, WaveStar OLS 40G contains telemetry and control circuits, as well as having a collocated external miscellaneous discrete unit (EMDU). These units are described in Chapter 3, “Platform Description.” End Terminal Shelf Configurations 3 This section provides information on the following end terminal shelf configurations: ■ 1A-TX end Terminal ■ 1A-TX-THRU End Terminal ■ 1A-RCV End Terminal ■ 1A-RCV-THRU End Terminal ■ Dual Facing (DUAL) End Terminal ■ Single OA 1A-TX End Terminal ■ Single OA 1A-TX-THRU End Terminal ■ Single OA 1A-RCV End Terminal ■ Single OA 1A-RCV-THRU End Terminal ■ Single OA DUAL Facing End Terminal Issue 1 March 2001 3-23 365-575-536 Platform Description 3 1A-TX End Terminal The End Terminal may be configured with two OA circuit packs per bidirectional optical line and provisioned as 1A-TX. Figure 3-13 shows the End Terminal equipped for 2 bidirectional optical lines. In this configuration, the A slot of the OMU/ODU slot pair must be equipped with the OMU, and the B slot of the slot pair must be equipped with the ODU. The OA circuit packs in the OA 1A and OA 2A slots act as transmitters, and the OA circuit packs in the OA 1B and OA 2B slots act as receivers. Interconnection Panel T L M T L M TLM 1A TLM TLM 1B 2A TLM 2B O M U O D U O M U O D U 1A OMU/ODU 1B 2A OA OA OA OA OA 1A OA 1B OA 2A OA 2B Fuse Panel or User Panel 2B S Y S C T L T O H C T L TOHCTL S Y S M E M SYSMEM SYSCTL NC-OLS80G040 Figure 3-13. 1A-TX End Terminal Configuration 3-24 Issue 1 March 2001 365-575-536 Platform Description 3 1A-TX-THRU End Terminal The End Terminal may be configured with two OA circuit packs per bidirectional optical line and provisioned as 1A-TX-THRU. Figure 3-14 shows the End Terminal equipped for 2 bidirectional optical lines. In this configuration, the A slot of the OMU/ODU slot pair must be equipped with the OMU, and the B slot of the slot pair must be equipped with the ODU. The OA circuit packs in the OA 1A and OA 2A slots act as transmitters, and the OA circuit packs in the OA 1B and OA 2B slots act as receivers. The TLM circuit packs in the TLM 1B and TLM 2B slots are used to extend the data communication channel in 4-fiber ring applications (telemetry feed-through). Interconnection Panel T* L M T L M TLM 1A T* L M O M U O D U TLM 2B 1A OMU/ODU 1B 2A T L M TLM TLM 1B 2A O M U O D U OA OA OA OA OA 1A OA 1B OA 2A OA 2B Fuse Panel or User Panel 2B T O H C T L S Y S C T L TOHCTL S Y S M E M SYSMEM SYSCTL * Required for DCC Protection NC-OLS80G041 Figure 3-14. 1A-TX-THRU End Terminal Configuration Issue 1 March 2001 3-25 365-575-536 Platform Description 3 1A-RCV End Terminal The End Terminal may be configured with two OA circuit packs per bidirectional optical line and provisioned as 1A-RCV. Figure 3-15 shows the End Terminal equipped for 2 bidirectional optical lines. In this configuration, the A slot of the OMU/ODU slot pair must be equipped with the ODU, and the B slot of the slot pair must be equipped with the OMU. The OA circuit packs in the OA 1A and OA 2A slots act as receivers, and the OA circuit packs in the OA 1B and OA 2B slots act as transmitters. Interconnection Panel T L M T L M TLM 1A T L M TLM TLM 1B 2A T L M O D U O M U O D U O M U TLM 2B 1A OMU/ODU 1B 2A OA OA OA OA OA 1A OA 1B OA 2A OA 2B Fuse Panel or User Panel 2B T O H C T L S Y S C T L TOHCTL S Y S M E M SYSMEM SYSCTL NC-OLS80G102 Figure 3-15. 1A-RCV End Terminal Configuration 3-26 Issue 1 March 2001 365-575-536 Platform Description 3 1A-RCV-THRU End Terminal The End Terminal may be configured with two OA circuit packs per bidirectional optical line and provisioned as 1A-RCV-THRU. Figure 3-16 shows the End Terminal equipped for 2 bidirectional optical lines. In this configuration, the A slot of the OMU/ODU slot pair must be equipped with the ODU, and the B slot of the slot pair must be equipped with the OMU. The OA circuit packs in the OA 1A and OA 2A slots act as receivers, and the OA circuit packs in the OA 1B and OA 2B slots act as transmitters. The TLM circuit packs in the TLM 1B and TLM 2B slots are used to extend the data communication channel in 4-fiber ring applications (telemetry feed through). Interconnection Panel T* L M T L M TLM 1A T* L M O D U O M U TLM 2B 1A OMU/ODU 1B 2A T L M TLM TLM 1B 2A O D U O M U OA OA OA OA OA 1A OA 1B OA 2A OA 2B Fuse Panel or User Panel 2B T O H C T L S Y S C T L TOHCTL S Y S M E M SYSMEM SYSCTL * Required For DCC Protection NC-OLS80G042 Figure 3-16. 1A-RCV-THRU End Terminal Configuration Issue 1 March 2001 3-27 365-575-536 Platform Description 3 Dual Facing (DUAL) End Terminal The End Terminal may be configured with two OA circuit packs per bidirectional optical line and provisioned as DUAL. DUAL indicates that the end terminal has two sides (side 1 and side 2). Side 1 represents line 1, and side 2 represents line 2. Each side is provisioned separately. Figure 3-17 shows the End Terminal equipped for 2 bidirectional optical lines. The side 1 (line 1) OMU/ODU 1A/1B slot pair must be equipped as a 1A-RCV end terminal, and the side 2 (line 2) OMU/ ODU 2A/2B slot pair must be equipped as a 1A-TX end terminal. The OA circuit packs in slots OA 1B and OA 2A act as transmitters, and the OA circuit packs in slots OA 1A and OA 2B act as receivers. Interconnection Panel T L M T L M TLM 1A TLM TLM 1B 2A TLM 2B O D U O M U O M U 1A OMU/ODU 1B 2A OA OA OA OA OA 1A OA 1B OA 2A OA 2B O D U Fuse Panel or User Panel 2B S Y S C T L T O H C T L TOHCTL S Y S M E M SYSMEM SYSCTL NC-OLS80G043 Figure 3-17. Dual Facing End Terminal Configuration 3-28 Issue 1 March 2001 365-575-536 Platform Description Single Optical Amplifier 1A-TX End Terminal 3 The End Terminal may be configured with one OA circuit pack per bidirectional optical line and provisioned as 1A-TX. Figure 3-18 shows the End Terminal equipped for 2 bidirectional optical lines. In this configuration, the A slot of the OMU/ODU slot pair must be equipped with the OMU, and the B slot of the slot pair must be equipped with the ODU. The OA circuit packs in the OA 1B and OA 2B slots act as transmitters. The OA circuit packs must be located in the OA slots that correspond to the OMU/ODU slots that are equipped with ODUs. The OA circuit packs provide temperature control for the corresponding ODUs. Figure 3-18. Single Optical Amplifier 1A-TX End Terminal Configuration Issue 1 March 2001 3-29 365-575-536 Platform Description Single Optical Amplifier 1A-TX-THRU End Terminal 3 The End Terminal may be configured with one OA circuit pack per bidirectional optical line and provisioned as 1A-TX-THRU. Figure 3-19 shows the End Terminal equipped for 2 bidirectional optical lines. In this configuration, the A slot of the OMU/ODU slot pair must be equipped with the OMU, and the B slot of the slot pair must be equipped with the ODU. The OA circuit packs in the OA 1B and OA 2B slots act as transmitters. The OA circuit packs must be located in the OA slots that correspond to the OMU/ODU slots that are equipped with ODUs. The OA circuit packs provide temperature control for the corresponding ODUs. The TLM circuit packs in the TLM 1B and TLM 2B slots are used to extend the data communication channel in 4-fiber ring applications (telemetry feed through). Figure 3-19. Single Optical Amplifier 1A-TX-THRU End Terminal Configuration 3-30 Issue 1 March 2001 365-575-536 Platform Description Single Optical Amplifier 1A-RCV End Terminal 3 The End Terminal may be configured with one OA circuit pack per bidirectional optical line and provisioned as 1A-RCV. Figure 3-20 shows the End Terminal Shelf 1 equipped for 2 bidirectional optical lines. In this configuration, the A slot of the OMU/ODU slot pair must be equipped with the ODU, and the B slot of the slot pair must be equipped with the OMU. The OA circuit packs in the OA 1A and OA 2A slots act as transmitters. The OA circuit packs must be located in the OA slots that correspond to the OMU/ODU slots that are equipped with ODUs. The OA circuit packs provide temperature control for the corresponding ODUs. Figure 3-20. Single Optical Amplifier 1A-RCV End Terminal Configuration Issue 1 March 2001 3-31 365-575-536 Platform Description Single Optical Amplifier 1A-RCV-THRU End Terminal 3 The End Terminal may be configured with one OA circuit pack per bidirectional optical line and provisioned as 1A-RCV-THRU. Figure 3-21 shows the End Terminal Shelf 1 equipped for 2 bidirectional optical lines. In this configuration, the A slot of the OMU/ODU slot pair must be equipped with the ODU, and the B slot of the slot pair must be equipped with the OMU. The OA circuit packs in the OA 1A and OA 2A slots act as transmitters. The OA circuit packs must be located in the OA slots that correspond to the OMU/ODU slots that are equipped with ODUs. The OA circuit packs provide temperature control for the corresponding ODUs. The TLM circuit packs in the TLM 1B and TLM 2B slots are used to extend the data communication channel in 4-fiber ring applications (telemetry feed through). Figure 3-21. Single Optical Amplifier 1A-RCV-THRU End Terminal Configuration 3-32 Issue 1 March 2001 365-575-536 Platform Description Single Optical Amplifier Dual Facing End Terminal 3 The End Terminal may be configured with one OA circuit pack per bidirectional optical line and provisioned as DUAL. DUAL indicates that the end terminal has two sides (side 1 and side 2). Side 1 represents Line 1, and Side 2 represents Line 2. Each side is provisioned separately. Dual shelves may be equipped with different OA configurations in each line. For example, Line 1 can be a single-OA configuration and Line 2 can be a two-OA configuration. Figure 3-22 shows the End Terminal Shelf 1 equipped for 2 bidirectional optical lines. The Side 1 (Line 1) OMU/ODU 1A/1B slot pair must be equipped as a 1ARCV end terminal, and the Side 2 (Line 2) OMU/ODU 2A/2B slot pair must be equipped as a 1A-TX end terminal. The OA circuit packs in the OA 1A and OA 2B slots act as transmitters. The OA circuit packs must be located in the OA slots that correspond to the OMU/ODU slots that are equipped with ODUs. The OA circuit packs provide temperature control for the corresponding ODUs. Issue 1 March 2001 3-33 365-575-536 Platform Description Figure 3-22. Single Optical Amplifier Dual Facing End Terminal Configuration WaveStar OLS 40G Packages 3 This section describes the different types of WaveStar OLS 40G packages that can be housed in cabinet or bay frame arrangements. All WaveStar OLS 40G network element configurations (except the Integrated Bay) are available in cabinet configurations. Packages include: 3-34 ■ Dual End Terminal or Dual Repeater Bay or Cabinet— houses two independent shelves, each shelf having a maximum of two bidirectional optical lines (See Figure 3-23 and Figure 3-24) ■ End Terminal and Repeater Bay or Cabinet— houses two independent shelves, each shelf having a maximum of two bidirectional optical lines (See Figure 3-25 and Figure 3-26) ■ Miscellaneously-mounted Shelf— independent WaveStar OLS 40G shelf similar to a bay-mounted shelf Issue 1 March 2001 365-575-536 Platform Description ■ OT Bay or Cabinet— houses three shelves, containing a maximum of 32 OTUs or 64 OTPMs per cabinet, depending on bit rate (See Figure 3-27 and Figure 3-28) ■ Integrated Bay (Single)— houses two OT shelves (20 OTUs or 40 OTPMs) and one End Terminal shelf in one bay, containing two bidirectional optical lines (See Figure 3-29) ■ Integrated Bay or Cabinet (Double)— a two-bay/cabinet arrangement housing one End Terminal Shelf and one unequipped shelf (first bay) and three OT shelves (second bay) (See Figure 3-30) ■ Integrated Bay or Cabinet (Triple 1)— a three-bay/cabinet arrangement housing two End Terminal Shelves (first bay), three OT shelves (second bay), and three additional OT shelves (third bay) (See Figure 3-31) ■ Integrated Bay or Cabinet (Triple 2)— a three-bay/cabinet arrangement housing one End Terminal Shelf and one unequipped shelf (first bay), three OT shelves (second bay), and three additional OT shelves (third bay) (See Figure 3-32). Illustrations of WaveStar OLS 40G packages are included in the following pages. The majority of these illustrations show cabinet arrangements. Issue 1 March 2001 3-35 365-575-536 Platform Description 73 cm (29 in) 183 cm (72 in) T T T T L L L L M M M M O O O O M D M D U U U U OA OA OA OA 1A 1B 2A 2B Fuse Panel 86 cm (34 in) TSS OY Y S HSM CCE T TM L L 8 cm (3 in) 73 cm (29 in) T T T T L L L L M M M M O O O O M D M D U U U U OA OA OA OA 1A 1B 2A 2B Fuse Panel Heat Baffle TSS OY Y S HSM CCE T TM L L 50 cm (20 in) NC-OLS80G053 Figure 3-23. Dual End Terminal Cabinet (fully equipped) 3-36 Issue 1 March 2001 365-575-536 Platform Description 73 cm (29 in) 183 cm (72 in) T T T T L L L L M M M M O O O O M D M D U U U U OA OA OA OA 1A 1B 2A 2B Fuse Panel 86 cm (34 in) TSS OY Y S HSM CCE T TM L L 8 cm (3 in) 73 cm (29 in) T T T T L L L L M M M M O O O O M D M D U U U U OA OA OA OA 1A 1B 2A 2B Fuse Panel Heat Baffle TSS OY Y S HSM CCE T TM L L 50 cm (20 in) NC-OLS80G054 Figure 3-24. Dual Repeater Cabinet (fully equipped) Issue 1 March 2001 3-37 365-575-536 Platform Description 73 cm (29 in) 183 cm (72 in) T T T T L L L L M M M M O O O O M D M D U U U U OA OA OA OA 1A 1B 2A 2B Fuse Panel 86 cm (34 in) TSS OY Y S HSM CCE T TM L L 8 cm (3 in) 73 cm (29 in) T T T T L L L L M M M M O O O O M D M D U U U U OA OA OA OA 1A 1B 2A 2B Fuse Panel Heat Baffle TSS OY Y S HSM CCE T TM L L 50 cm (20 in) NC-OLS80G055 Figure 3-25. End Terminal and Repeater Cabinet 3-38 Issue 1 March 2001 365-575-536 Platform Description 4 cm (1.5 in) T T T T L L L L M M M M O O O O M D M D U U U U User Panel 86 cm (34 in) 80 cm (31 in) 213 cm (84 in) OA OA OA OA 1A 1B 2A 2B TSS OY Y S HSM CCE T TM L L T T T T L L L L M M M M O O O O M D M D U U U U User Panel Heat Baffle 80 cm (31 in) OA OA OA OA 1A 1B 2A 2B TSS OY Y S HSM CCE T TM L L Heat Baffle 10 cm (4 in) 50 cm (20 in) NC-OLS80G056 Figure 3-26. Bay-Mounted End Terminal and Repeater Issue 1 March 2001 3-39 365-575-536 Platform Description 86 cm (34 in) 44 cm (17 in) FUSE PANEL ASSEMBLY OTU-21 OTU-22 OTU-23 OTU-24 OTU-25 OTU-26 OTU-27 OTU-28 OTU-29 OTU-30 OTU-31 OTU-32 INTERCONNECTION PANEL HEAT BAFFLE 183 cm 44 cm (72 in) (17 in) FUSE PANEL ASSEMBLY OTU-9 OTU-10 OTU-11 OTU-12 OTU-13 OTU-14 OTU-15 OTU-16 OTU-17 OTU-18 OTU-19 OTU-20 8 cm (3 in) INTERCONNECTION PANEL 8 cm (3 in) 44 cm (17 in) INTERCONNECTION PANEL FUSE PANEL ASSEMBLY OTU-1 OTU-2 OTU-3 OTU-4 OTU-5 OTU-6 OTU-7 OTU-8 HEAT BAFFLE OTCTL 50 cm (20 in) NC-OLS80G057 Figure 3-27. OT Cabinet 3-40 Issue 1 March 2001 365-575-536 Platform Description 4 cm (1.5 in) 86 cm (34 in) 50 cm (20 in) FUSE/PWR IND. PANEL OTU-21 OTU-22 OTU-23 OTU-24 OTU-25 OTU-26 OTU-27 OTU-28 OTU-29 OTU-30 OTU-31 OTU-32 INTERCONNECTION PANEL OT Complementary Shelf 2 213 cm (84 in) 50 cm (20 in) OTU-9 OTU-10 OTU-11 OTU-12 OTU-13 OTU-14 OTU-15 OTU-16 OTU-17 OTU-18 OTU-19 OTU-20 HEAT BAFFLE INTERCONNECTION FUSE/PWR IND. PANEL PANEL OT Complementary Shelf 1 HEAT BAFFLE 50 cm (20 in) FUSE/PWR IND. PANEL OTU-1 OTU-2 OTU-3 OTU-4 OTU-5 OTU-6 OTU-7 OTU-8 INTERCONNECTION PANEL OTCTL OT System Controller Shelf HEAT BAFFLE 10 cm (4 in) 50 cm (20 in) NC-OLS80G058 Figure 3-28. Bay-Mounted OT Issue 1 March 2001 3-41 365-575-536 Platform Description Figure 3-29. Integrated Bay (Single) 3-42 Issue 1 March 2001 365-575-536 Platform Description Figure 3-30 shows an Integrated Bay (Double). This package consists of a single WaveStar OLS 40G bay (with one equipped shelf) and an OT bay (with three equipped shelves) and has the following specifications: ■ Cabinet or bay-mounted (bay shown) ■ One WaveStar OLS 40G Shelf with one or two optical lines controls up to 64 OC-48/STM-16 or GbE-1 OTUs, or 128 OC-3/STM-1, OC-12/STM-4 OTPMs, or 100–750 Mb/s. ■ Appears operationally as a single network element ■ User interfaces are provided by the WaveStar OLS 40G interconnection panel ■ Allows fault correlation between WaveStar OLS 40G and OT equipment ■ Existing WaveStar OLS 40G and OT equipment can be combined with an in-service upgrade (OTCTL circuit packs and control cabling is added) ■ Depending on the configuration, WaveStar OLS 40G and OT equipment can be located up to 200 feet apart. Issue 1 March 2001 3-43 365-575-536 Platform Description FUSE/PWR INDICATING PANEL OA OA OA 1A 1B 2A 2B OTU-29 OTU-30 OTU-31 OTU-32 HEAT BAFFLE INTERCONNECTION PANEL FUSE/PWR INDICATING PANEL OTU-9 OTU-10 OTU-11 OTU-12 OTU-13 OTU-14 OTU-15 OTU-16 OTU-17 OTU-18 OTU-19 OTU-20 OA OTU-21 OTU-22 OTU-23 OTU-24 OTU-25 OTU-26 OTU-27 OTU-28 USER PANEL INTERCONNECTION PANEL HEAT BAFFLE T L M O O O O M D M D U U U U OA OA OA OA 1A 1B 2A 2B TSS OYY HSS C CM TTE L LM HEAT BAFFLE Control Cabling Figure 3-30. Integrated Bay (Double) 3-44 Issue 1 March 2001 HEAT BAFFLE INTERCONNECTION PANEL OTU-1 OTU-2 OTU-3 OTU-4 OTU-5 OTU-6 OTU-7 OTU-8 T L M USER PANEL INTERCONNECTION PANEL FUSE/PWR INDICATING PANEL OTCTL HEAT BAFFLE NC-OLS80G060 365-575-536 Platform Description Figure 3-31 shows an Integrated Bay (Triple 1) package. This package consists of two separate, bay-mounted WaveStar OLS 40G Shelves and two OT bays (three shelves each) and has the following specifications: ■ Cabinet or bay-mounted (bay shown) ■ Each WaveStar OLS 40G Shelf has two optical lines and controls up to 32 OC-48/STM-16 or GbE-1, or 64 OC-3/STM-1, OC-12/STM-4/100–750 Mb/ s OTPMs ■ User interfaces are accessed from the WaveStar OLS 40G interconnection panel ■ Depending on the configuration, WaveStar OLS 40G and OT equipment can be located up to 200 feet apart. O O O O M D M D U U U U OA OA OA 1A 1B 2A 2B TSS OY Y S HSM CCE T TM L L FUSE/PWR IND. PANEL HEAT BAFFLE INTERCONNECTION FUSE/PWR IND. PANEL PANEL OTU-9 OTU-10 OTU-11 OTU-12 OTU-13 OTU-14 OTU-15 OTU-16 OTU-17 OTU-18 OTU-19 OTU-20 OA User Panel T T T T L L L L M M M M OTU-9 OTU-10 OTU-11 OTU-12 OTU-13 OTU-14 OTU-15 OTU-16 OTU-17 OTU-18 OTU-19 OTU-20 HEAT BAFFLE INTERCONNECTION FUSE/PWR IND. PANEL PANEL INTERCONNECTION PANEL INTERCONNECTION PANEL OTU-21 OTU-22 OTU-23 OTU-24 OTU-25 OTU-26 OTU-27 OTU-28 OTU-29 OTU-30 OTU-31 OTU-32 FUSE/PWR IND. PANEL OTU-21 OTU-22 OTU-23 OTU-24 OTU-25 OTU-26 OTU-27 OTU-28 OTU-29 OTU-30 OTU-31 OTU-32 INTERCONNECTION PANEL Heat Baffle INTERCONNECTION PANEL O O O O M D M D U U U U OA OA OA OA 1A 1B 2A 2B HEAT BAFFLE TSS OY Y S HSM CCE T TM L L INTERCONNECTION PANEL FUSE/PWR IND. PANEL OTU-1 OTU-2 OTU-3 OTU-4 OTU-5 OTU-6 OTU-7 OTU-8 OTCTL T T T T L L L L M M M M User Panel HEAT BAFFLE FUSE/PWR IND. PANEL OTU-1 OTU-2 OTU-3 OTU-4 OTU-5 OTU-6 OTU-7 OTU-8 HEAT BAFFLE INTERCONNECTION PANEL OTCTL HEAT BAFFLE Control Cabling NC-OLS80G061 Figure 3-31. Integrated Bay (Triple 1) Issue 1 March 2001 3-45 365-575-536 Platform Description Figure 3-32 shows an Integrated Bay (Triple 2) package. This package consists of a single, bay-mounted WaveStar OLS 40G Shelf integrated with two OT bays (three shelves each) and has the following specifications: ■ Cabinet or bay-mounted (bay shown) ■ One WaveStar OLS 40G Shelf with two optical lines controls up to 64 OC-48/STM-16 or GbE-1 OTUs or 128 OC-3/STM-1, OC-12/STM-4/100– 750 Mb/s OTPMs ■ User interfaces are accessed from the WaveStar OLS 40G interconnection panel ■ Depending on the configuration, WaveStar OLS 40G and OT equipment can be located up to 200 feet apart. FUSE/PWR INDICATING PANEL OA OA OA 1A 1B 2A 2B OTU-29 OTU-30 OTU-31 OTU-32 OTU-21 OTU-22 OTU-23 OTU-24 OTU-25 OTU-26 OTU-27 OTU-28 USER PANEL OA OTU-9 OTU-10 OTU-11 OTU-12 OTU-13 OTU-14 OTU-15 OTU-16 OTU-17 OTU-18 OTU-19 OTU-20 INTERCONNECTION PANEL FUSE/PWR INDICATING PANEL HEAT BAFFLE INTERCONNECTION PANEL FUSE/PWR INDICATING PANEL OTU-9 OTU-10 OTU-11 OTU-12 OTU-13 OTU-14 OTU-15 OTU-16 OTU-17 OTU-18 OTU-19 OTU-20 HEAT BAFFLE FUSE/PWR INDICATING PANEL INTERCONNECTION PANEL OTU-29 OTU-30 OTU-31 OTU-32 OTU-21 OTU-22 OTU-23 OTU-24 OTU-25 OTU-26 OTU-27 OTU-28 INTERCONNECTION PANEL HEAT BAFFLE OTU-1 OTU-2 OTU-3 OTU-4 OTU-5 OTU-6 OTU-7 OTU-8 INTERCONNECTION PANEL FUSE/PWR INDICATING PANEL OTCTL T L M T L M O O O O M D M D U U U U OA OA OA OA 1A 1B 2A 2B HEAT BAFFLE HEAT BAFFLE TSS OYY HSS C CM TTE L LM HEAT BAFFLE INTERCONNECTION PANEL OTU-1 OTU-2 OTU-3 OTU-4 OTU-5 OTU-6 OTU-7 OTU-8 HEAT BAFFLE USER PANEL INTERCONNECTION PANEL FUSE/PWR INDICATING PANEL OTCTL HEAT BAFFLE Control Cabling NC-OLS80G062 Figure 3-32. Integrated Bay (Triple 2) 3-46 Issue 1 March 2001 365-575-536 Platform Description WaveStar OLS 40G Integration Cable Engineering 3 This section describes the integration cables that are used to combine WaveStar OLS 40G equipment with the OT. Engineering rules for each configuration are also described. See 365-575-380, WaveStar OLS 40G APG, Chapter 7, “Ordering,” for information on ordering these cables. Integration Cable Descriptions 3 The following three integration cables are used to connect WaveStar OLS 40G equipment to the OT Controller shelves: ■ LAN cable– supports LAN signals from the WaveStar OLS 40G to either one or two OT bays/cabinets ■ Reset-and-equipage cable– supports non-switching signals between WaveStar OLS 40G equipment and OT bays/cabinets ■ Dual Reset-and-equipage cable– provides same functionality as the reset-and-equipage cable with an additional cable branch for OT connections ■ Miscellaneous cable– provides LED indicator power and other nonswitching signals between WaveStar OLS 40G equipment and OT bays/ cabinets. These cables come in several lengths and configurations, depending upon the desired arrangement. These lengths are detailed in the following pages. Issue 1 March 2001 3-47 365-575-536 Platform Description Integration Cable Configurations 3 The integration cabling is used to form the Integrated Bay/Cabinet Double, Triple 1, and Triple 2 packages described earlier. The physical connections are illustrated in the sections that follow. Integration Cabling for Integrated Bay/Cabinet Double and Triple 1 3 The physical cable connection for an Integrated Bay/Cabinet Double or Triple 1 equipment packages is shown in Figure 3-33. Figure 3-33. Integrated Bay/Cabinet Double and Triple 1 Cabling Diagram To maintain LAN signal integrity, the maximum distance that is allowed between WaveStar OLS 40G equipment and the OT is 200 feet; the maximum length of the LAN cable is also 200 ft. Contrarily, the reset-and-equipage cable does not limit distance between equipment since switched signals are not present on it. To facilitate engineering and installation, however, the reset-and-equipage cable is offered in the same lengths as the LAN cable. 3-48 Issue 1 March 2001 365-575-536 Platform Description Integration Cabling for Integrated Bay/Cabinet Triple 2 3 The physical cable connection for an Integrated Bay/Cabinet Triple 2 equipment package is shown in Figure 3-34. NOTE: The sum of the lengths of LAN cable 1 and LAN cable 2 must not exceed 200 feet. LAN Cable 2 OT Shelf 1 Dual Reset-and-equipage Cable (Single Cable) LAN Cable 3 (Miscellaneous Cable) OT Shelf 2 LAN Cable 1 OLS NC-OLS80G113 Figure 3-34. Integrated Bay/Cabinet Triple 2 Cabling Diagram The maximum LAN cable length that is allowed for the Triple 2 arrangement is also 200 ft. Here, as before, LAN cables govern the maximum distances between the WaveStar OLS 40G equipment and OT shelves since the dual reset-andequipage and miscellaneous cables do not carry switched traffic. As depicted in Figure 3-34, the dual reset-and-equipage cable connects to the WaveStar OLS 40G equipment via a single connector and extends to each OT shelf via two completely independent branches of equal length. For example, the 20-foot dual reset-and-equipage cable (G812) consists of a single connector (for the WaveStar OLS 40G) and two 20-foot branches, one connecting to OT Shelf 1 and the other to OT Shelf 2. Similarly, the 100-foot cable consists of two 100-foot branches, and the 200-foot cable consists of two 200-foot branches. It is possible to engineer a configuration in which a single OT is equipped initially and a second OT is added later. To do this, the WaveStar OLS 40G equipment and the OT should be installed with dual reset-and-equipage cable and one of the LAN Cable 1 groups. Issue 1 March 2001 3-49 365-575-536 Platform Description NOTE: Careful preparation should be taken to insure a proper distance between the WaveStar OLS 40G equipment, OT Shelf 1, and the eventual OT Shelf 2. The appropriate dual reset-and-equipage cable should be chosen based on the maximum distance between the WaveStar OLS 40G equipment and either OT Shelf 1 or OT Shelf 2. The total cable length of LAN Cable 1 and the eventual LAN Cable 2 should not exceed 200 ft. When installing the WaveStar OLS 40G equipment and OT Shelf 1, the LAN path must be terminated once OT Shelf 1 has been connected. This termination is done using a supplied termination plug located on the backplane of the OT shelf. This plug must remain in place when OT Shelf 1, alone, is being installed. NOTE: The LAN cable connecting OT Shelf 1 to OT Shelf 2 cannot be installed without being terminated. The unused branch of the dual reset-and-equipage cable can be coiled and stored until needed. Similarly, the miscellaneous cable can have one end installed on the WaveStar OLS 40G and the other left coiled and stored until needed with no special termination required on the other end. When OT Shelf 2 is installed, the LAN termination plug on OT Shelf 1 is first removed from the backplane. The appropriate LAN Cable 2 group is then installed and the previously unused branch of the dual reset-and-equipage cable is connected to OT Shelf 2. Finally, a miscellaneous cable of appropriate length is installed between the WaveStar OLS 40G equipment and OT Shelf 2. 3-50 Issue 1 March 2001 365-575-536 Platform Description 3 Interconnection Panels This section describes the interconnection panels, cabinet indicator strips, and both the fuse and user panels associated with WaveStar OLS 40G shelves (including OT). 3 WaveStar OLS 40G Interconnection Panel At the top of WaveStar OLS 40G shelf, there is a built-in interconnection panel that is used for OAM&P connections. Each shelf’s backplane provides intrashelf interconnection between all circuit packs used in the shelf. The backplane also provides interconnection from the OAM&P interconnectors at the top of the shelf to the various circuit pack connector pins. All access to connections is from the front of the shelf, and a CIT access port is available for the interconnection panel. OT Interconnection Panel (System Controller Shelf) 3 Figure 3-35 depicts an interconnection panel of OT System Controller Shelf as seen from the front of the shelf. Associated cable groups and their connection points are indicated. G3 or G4 180 220 J1 CIT DTE 240 260 J3 INC SIG FAIL P W R J2 CP FAIL 300 320 360 O F F I A O C T L C T L A L M S A L M S I N O U T J 4 J 5 J 6 J 7 380 400 420 440 460 500 E Q P G E Q P G E Q P G J12 X.25 J14 RESET OUT2 O U T I N 1 I N 2 J11 USER PANEL J13 RESET OUT1 J 8 J 9 J 10 520 540 560 580 600 J16 RESET IN C I T P D W C R E J B 15 A G1 or G2 FL FL -48V -48V -48V G3 or G4 -48V 160 Power Filter (Left) Power Filter (Right) G16 or G17 (Connects to power filter) G16 or G17 NC-OLS80G026 Figure 3-35. OT System Controller Shelf Interconnection Panel and Cabling Issue 1 March 2001 3-51 365-575-536 Platform Description OT Interconnection Panel (Complementary Shelves) 3 Figure 3-36 depicts an OT Complementary Shelf’s interconnection panel as seen from the front of the shelf. Associated cable groups and their connection points are indicated. G3 or G4 180 220 J1 CIT DTE 240 260 J3 INC SIG FAIL P W R J2 CP FAIL 300 320 360 O F F I A O C T L C T L A L M S A L M S I N O U T J 4 J 5 J 6 J 7 380 400 420 440 460 500 E Q P G E Q P G E Q P G J12 X.25 J14 RESET OUT2 O U T I N 1 I N 2 J11 USER PANEL J13 RESET OUT1 J 8 J 9 J 10 520 540 560 580 600 J16 RESET IN C I T P D W C R E J B 15 A FL FL -48V -48V -48V G3 or G4 -48V 160 Power Filter (Left) Power Filter (Right) G16 or G17 (Connects to power filter) G16 or G17 NC-OLS80G027 Figure 3-36. OT Complementary Shelf Interconnection Panel and Cabling 3-52 Issue 1 March 2001 365-575-536 Platform Description 3 WaveStar OLS 40G Cabinet Indicator Strips Each WaveStar OLS 40G Cabinet has an indicator strip located in the front along the top front of the cabinet. Connectorized cabling connects the shelves to the indicator strip. Figure 3-37 shows the indicator strip for the Dual End Terminal and Dual Repeater cabinets. Refer to Table 3-4 for a list and description of the SONET indicators and Table 3-5 for the SDH indicators. LOW SHELF CR MJ MN ABN FE ACTY NE ACTY PWR ON UP SHELF ACO CR MJ MN ABN FE ACTY NE ACTY PWR ON ACO NC-OLS80G029 Figure 3-37. Indicator Strip for Dual End Terminal and Dual Repeater Cabinets Table 3-4. User Panel Indicators forWaveStar OLS 40G in SONET Applications Indicator Name Abbrev. Critical CR Major MJ Minor Type Color Description Red Indicates critical active alarm level LED indicator Red Indicates major active alarm level MN LED indicator Yellow Indicates minor active alarm level Alarm Cut-off ACO SW/LED indicator Green When depressed, silences active audible alarms Abnormal ABN LED indicator Yellow Indicates an abnormal condition Near End Activity NE ACTY LED indicator Yellow Indicates alarm or status conditions at the local equipment Issue 1 March 2001 3-53 365-575-536 Platform Description Table 3-4. User Panel Indicators forWaveStar OLS 40G in SONET Applications Indicator Name Abbrev. Type Color Description Far End Activity FE ACTY LED indicator Yellow Indicates alarm or status conditions at the remote equipment Power On (Lower Shelf)* PWR ON LOW SHELF LED indicator Green Indicates the lower shelf is receiving -48V power Power On (Upper Shelf)* PWR ON UP SHELF LED indicator Green Indicates the upper shelf is receiving -48V power * Applies only to cabinet applications. Table 3-5 provides the Synchronous Digital Hierarchy (SDH) equivalents of SONET-specific indicators found on the OT Cabinet indicator strip. Table 3-5. User Panel Indicators for WaveStar OLS 80G in SDH Applications Indicator Name Abbrev. Critical CR Prompt PROMPT Deferred Color Description Red Indicates critical active alarm level LED indicator Red Indicates prompt active alarm level DEFR LED indicator Yellow Indicates deferred active alarm level Suppress SUPPRESS SW/LED indicator Green When depressed, silences active audible alarms Abnormal ABN LED indicator Yellow Indicates an abnormal condition Info-N INFO-N LED indicator Yellow Indicates alarm or status conditions at the local equipment Info-F INFO-F LED indicator Yellow Indicates alarm or status conditions at the remote equipment Power On (Upper Shelf)* PWR ON LED indicator Green Indicates the lower shelf is receiving -48 V power Power On (Lower Shelf)* PWR ON LED indicator Green Indicates the upper shelf is receiving -48 V power * Applies only to cabinet applications. 3-54 Issue 1 March 2001 Type 365-575-536 Platform Description Each OT Cabinet is equipped with an indicator strip located in the front along the top of the cabinet. Refer to Table 3-6 for a list and description of the indicators. Connectorized cabling connects the shelves to the indicator strip. MJ CR MN ABN FE ACTY NE ACTY LOW SHELF MD SHELF PWR ON UP SHELF ACO NC-OLS80G030 Figure 3-38. OT Cabinet Indicator Strip Although Table 3-6 lists all the indicators that appear on the indicator strip, only the three Power On (PWR ON) LED indicators are active. Table 3-6. Indicator Strip LED indicators for OT (SONET) Indicator Name Abbrev. Color Description PWR ON Green Indicates that the respective shelf is receiving -48 V power Critical CR Red Indicates critical active alarm level Major MJ Red Indicates major active alarm level Minor MN Yellow Indicates minor active alarm level Near End Activity NE ACTY Yellow Indicates alarm or status conditions at the local equipment Far End Activity FE ACTY Yellow Indicates alarm or status conditions at the remote equipment Alarm Cut-off† ACO Green When depressed, silences active audible alarms Abnormal ABN Yellow Indicates an abnormal condition Power On * * The indicator panel has three PWR LED indicators representing the three shelves installed in the cabinet. The three LED indicators are designated as Lower Shelf (LOW SHELF, System Controller Shelf), Middle Shelf (MID SHELF, Complementary Shelf 1), and Upper (UP SHELF, Complementary Shelf 2). † The ACO switch is functional only after controller circuit packs are installed in future releases. Issue 1 March 2001 3-55 365-575-536 Platform Description 3 Panels This section provides information on user, fuse, and power indicating panels for WaveStar OLS 40G. 3 WaveStar OLS 40G User Panel Figure 3-39 shows a diagram of the WaveStar OLS 40G user panel for the miscellaneously-mounted shelf and bay configurations. -48A/10A/60V FUSE CR -48B/10A/60V MJ FUSE MN ABN SHELF 1 NE ACTY OLINE=1,2 FE ACTY ACO PWR ON CIT (DCE) NC-OLS80G028 Figure 3-39. WaveStar OLS 40G Shelf User Panel 3-56 Issue 1 March 2001 365-575-536 Platform Description 3 WaveStar OLS 40G Fuse Panel WaveStar OLS 40G fuse panel, shown in Figure 3-40, displays the fuse indicators for overcurrent protection (A and B feeds) and provides an electrostatic discharge (ESD) jack that is connected to a frame ground.The fuse panel can be replaced in the field. -48A/10A/60V -48B/10A/60V NC-OLS80G031 Figure 3-40. WaveStar OLS 40G Fuse Panel Issue 1 March 2001 3-57 365-575-536 Platform Description Table 3-7 lists all the SONET indicators that appear on the user panel. Note that only the green Power On (PWR ON) LED indicator should be active. Table 3-8 lists all the SDH indicators. Table 3-7. SONET Indicators on WaveStar OLS 40G User Panel (L10 and L11) Indicator Name Abbrev. Color Description Power On PWR Green Indicates the shelf is receiving -48 V power Critical CR Red Indicates critical active alarm level Major MJ Red Indicates major active alarm level Minor MN Yellow Indicates minor active alarm level Near End Activity NE ACTY Yellow Indicates alarm or status conditions at the local equipment Far End Activity FE ACTY Yellow Indicates alarm or status conditions at the remote equipment Alarm Cut-off ACO Green When depressed, silences active audible alarms Abnormal ABN Yellow Indicates an abnormal condition Table 3-8. SDH Indicators Present on WaveStar OLS 80G User Panel (L10 and L11) Indicator Name Abbrev. Color Description Power On PWR Green Indicates the shelf is receiving -48 V power Critical CR Red Indicates critical active alarm level Prompt PROMPT Red Indicates prompt active alarm level Deferred DEFR Yellow Indicates deferred active alarm level Info-N INFO-N Yellow Indicates alarm or status conditions at the local equipment Info-F INFO-F Yellow Indicates alarm or status conditions at the remote equipment Suppress SUPPRESS Green When depressed, silences active audible alarms Abnormal ABN Yellow Indicates an abnormal condition 3-58 Issue 1 March 2001 365-575-536 Platform Description OT Complementary Shelf Fuse/Power Indicating Panel Assembly 3 In OT miscellaneously-mounted and bay frame configurations, Complementary Shelves 1 and 2 are both equipped with a fuse/power indicating panel. Each panel provides the following: ■ Fuse indicators for overcurrent protection (A and B feeds) ■ One green Power On (PWR ON) LED indicator that lights up to indicate the shelf is receiving -48 V power ■ An electrostatic discharge (ESD) jack that is connected to a frame ground. Figure 3-41 shows a diagram of the OT Complementary Shelf fuse/power indicating panel. -48A 10A PWR ON 60V -48B 10A 60V ESD WRIST STRAP GROUND NC-OLS80G032 Figure 3-41. Miscellaneously-Mounted OT Complementary Shelf Fuse/Power Indicating Panel Issue 1 March 2001 3-59 365-575-536 Platform Description OT Shelf Fuse Panel Assembly in Cabinet Configurations 3 The OT Shelf fuse panel is used for all OT shelves in cabinet configurations. The fuse panel provides fuse indicators for overcurrent protection (A and B feeds). Figure 3-42 shows a diagram of the fuse panel. -48A 10A 60V -48B 10A 60V NC-OLS80G033 Figure 3-42. OT Shelf Fuse Panel 3 Power This section provides information on WaveStar OLS 40G power distribution. Power distribution is based on individual rather than bulk power supplies. Each circuit pack contains DC-to-DC converters that change the office battery voltages to the voltages required. This leads to improved system reliability with heat dissipated uniformly across the system, thereby avoiding “hot spots.” WaveStar OLS 40G is powered by -48 V direct current (DC). Power filtering and fusing are performed on the shelf level. DC-to-DC on-board power converters convert power on individual circuit packs. 3-60 Issue 1 March 2001 365-575-536 Platform Description 3 Power Cables The power feed cable uses stranded, color coded, and keyed connectors. All panel-mounted power connector functions are labeled. Table 3-9 shows the color codes used for power cabling. Table 3-9. Power Cable Color Codes Description Color -48V A Red -48V A RTN Black -48V B Slate -48V B RTN Slate/Black Issue 1 March 2001 3-61 365-575-536 Platform Description Power Distribution for End Terminal and Repeater Bay/Cabinet 3 Figure 3-43 shows overall two-shelf installation power distribution. Dual -48 V feeders (A and B) provide redundant power. Each installation uses two 8-gauge power cables that branch into two 10-gauge cables (one for each shelf). These power cables terminate directly onto the shelves. Each branch connects to an overcurrent limiter located on the shelves. FROM BATTERY PLANT -48 A -48 A -48 A RTN -48 B -48 A RTN -48 B -48 B RTN -48 B RTN PFU A PFU B Upper Shelf Fuses PFU A PFU B Lower Shelf NC-OLS80G036 Figure 3-43. General Power Distribution in a Two-Shelf WaveStar OLS 40G Bay or Cabinet 3-62 Issue 1 March 2001 365-575-536 Platform Description WaveStar OLS 40GIntegrated Bay (Single) and OT Bay/Cabinet Power Distribution 3 Dual -48 V feeders (A and B) provide redundant power. Each application uses two 8gauge power cables. Each 8-gauge cable branches into three 10-gauge power cables (one for each shelf) that terminate directly on the shelves. Each branch connects to an overcurrent limiter located on the shelves. Figure 3-44 shows the overall power distribution for a three-shelf installation. FROM BATTERY PLANT -48 A -48 A RTN -48 B -48 B RTN PFU A PFU B Upper Shelf PFU A PFU B Middle Shelf PFU A PFU B Lower Shelf NC-OLS80G037 Figure 3-44. OT Power Distribution in a Three Shelf Bay or Cabinet Issue 1 March 2001 3-63 365-575-536 Platform Description 3 Shelf-Level Power Distribution Figure 3-45 shows a block diagram of WaveStar OLS 40G power distribution at the shelf level. . Shelf Backplane Shelf Feed -48 A -48 A RET -48 B PWR FILTER A FUSE -48 B RET PWR FILTER B LAMP FUSE B LAMP NC-OLS80G038 Figure 3-45. WaveStar OLS 40G Power Distribution at Shelf Level Shelf-Level Filtering 3 The filters (one for each feeder) smooth the input current to the shelf. They plug directly into the backplane via a connector. The backplane distributes -48 V power to all the circuit packs by means of a printed power bus that spans the entire width of the panel. The power filter units also provide a low voltage cutoff feature. This protects the equipment from abnormally low incoming voltage. If the incoming voltage drops below -38.5± 1 V, the power is cut off until the incoming voltage returns to -43± 1 V. WaveStar OLS 40G will experience no damage if the power fluctuates between -38.5±1 and -43±1 V. If a fuse blows, the fuse cap illuminates to indicate which power feeder has opened. 3-64 Issue 1 March 2001 365-575-536 Platform Description Backplane and Circuit Pack Interface 3 All WaveStar OLS 40G (including OTU) circuit packs have identical common battery power and return pins. This avoids catastrophic failure if a pack is plugged into the wrong connector. An active circuit on the circuit packs provides in-rush current protection whenever a circuit pack is inserted and also when circuit packs are equipped and bay power is applied. Diode ORing, On-Board Fusing, Filtering, and Powering 3 Each WaveStar OLS 40G circuit pack is equipped with diodes that provide ORing to the two redundant feeds and their return leads as well as a fuse that protects the feeders. Board-mounted fuses are provided on each circuit pack. If one of these board-mounted fuses fails, the circuit pack fails and must be replaced with a new pack. A filtering section follows the fused input, prior to the DC-to-DC conversion. On-board power converters are used for -48 V power conversion. Issue 1 March 2001 3-65 365-575-536 Platform Description 3-66 Issue 1 March 2001 4 Power Contents Overview 4-1 General 4-1 Power Distribution 4-2 Power Dissipation 4-9 LED Indicators 4-11 Issue 1 March 2001 4-i Contents 4-ii Issue 1 March 2001 Power 4 Overview 4 4 This section describes the power distribution and dissipation of the WaveStar™ OLS 40G. General 4 The WaveStar OLS 40G power distribution philosophy is based on individual rather than bulk power supplies. Each circuit pack contains DC-to-DC converters that change the office battery voltages to the voltages required. This leads to improved system reliability, since heat is dissipated uniformly across the system avoiding hot spots. The WaveStar OLS 40G is powered by −48 V DC. The voltage range for all the components is −42.75 to −60 V DC as measured at the battery distribution and fuse bay. Issue 1 March 2001 4-1 365-575-536 Power Power Distribution 4 The WaveStar OLS 40G accepts two −48 V DC office power feeders for feeder redundancy from the battery distribution and fuse bay (BDFB) or equivalent. Figure 4-1 shows how power is distributed in an Optical Translator cabinet/bay. The power feeders are 15-foot stubs gutter-tapped to the feeder cables going to the BDFB. Power feeders can also be ordered to length. Refer to Table 4-1 for the current power feeder wire sizes. Table 4-1. Changes to Wire Size of Power Feeders Platform OLS Cabinet/Bay (J68982C-1) OLS Misc. Mounted Shelf (J69000C-1) OT Cabinet/Bay (J69000C-1) OT Misc. Mounted Shelf (J69000C-1) Integrated Bay (J68982D-1) 4-2 Issue 1 March 2001 Length (feet) Group 15 29 and 37 100 38 and 38 15 38 and 41 over 15 -- 15 24 and 31 100 15 and 16 15 43 and 44 over 15 -- 15 23 and 24 100 25 and 26 Wire Size (gauge) 12 10 12 10 12 365-575-536 Power FROM BATTERY PLANT -48 A -48 A RTN -48 B -48 B RTN PFU A PFU B Upper Shelf PFU A PFU B Middle Shelf PFU A PFU B Lower Shelf NC-OLS80G037 Figure 4-1. OLS Cabinet/Bay Power Distribution Issue 1 March 2001 4-3 365-575-536 Power FROM BATTERY PLANT -48 A -48 A -48 A RTN -48 B -48 A RTN -48 B -48 B RTN -48 B RTN PFU A PFU B Upper Shelf Fuses PFU A PFU B Lower Shelf NC-OLS80G036 Figure 4-2. Optical Translator Cabinet/Bay Power Distribution The power feeder stubs (power feeder A and power feeder B) enter the top of the OLS cabinet/bay and branch into two power feeder cables. In the Optical Translator cabinet/bay and OLS Integrated Bay (Single), the power feeder stubs enter the top of the cabinet and branch into three power feeders. The power feeders for power feeder A are cabled down the left side of the bay/ cabinet to the shelves (when viewed from the front), and the power feeders for power feeder B are cabled down the right side of the cabinet/bay to the shelves. 4-4 Issue 1 March 2001 365-575-536 Power Figure 4-3 shows how power feeders are routed to cabinet/bay mounted and miscellaneously mounted End Terminal and Repeater shelves. The power feeders are terminated at two power connectors on the interconnection panel behind the user panel or fuse panel. -48V A and Return -48V B and Return Interconnection Panel Office Battery Plant PWR A B Heat Baffle nc-84978801 Figure 4-3. End Terminal and Repeater Shelf Power Distribution Issue 1 March 2001 4-5 365-575-536 Power Figure 4-4 shows how power feeders are routed to cabinet/bay mounted and miscellaneously mounted System Controller and Complementary shelves. The power feeders are terminated at two power connectors on the interconnection panel. -48V A and Return -48V B and Return PWR A Interconnection Panel Office Battery Plant PWR B Heat Baffle nc-84978801.2 Figure 4-4. 4-6 Issue 1 System Controller and Complementary Shelf Power Distribution March 2001 365-575-536 Power The two independent −48 volt office power feeders (A and B) enter each shelf via a power interface circuit and are distributed to the circuit packs using the printed backplane (Figure 4-5). The power interface circuit consists of a green PWR ON LED indicator, two 10-amp fuses, and two power filter units (PFU). Shelf Backplane Shelf Feed -48 A -48 A RET -48 B PWR FILTER A FUSE -48 B RET PWR FILTER B LAMP FUSE B LAMP NC-OLS80G038 Figure 4-5. Shelf and Circuit Pack Power Distribution Issue 1 March 2001 4-7 365-575-536 Power The green PWR ON LED indicator (located on the indicator strip, user panel, and fuse/power indicating panel) shows that the shelf is receiving fused −48 volt power. The green PWR ON LED indicator will remain lighted as long as either −48 volt power feeder is supplying power to the shelf. Within the fuse panel (cabinet), user panel (bay mounted or miscellaneously mounted shelf), fuse/power indicating panel (bay mounted or miscellaneously mounted shelf) the power feeders are routed to two 10-amp fuses (red lamp is lighted when blown). One fuse is for power feeder A, and the other fuse is for power feeder B. The 10-amp fuses protect the shelf if a short-circuit occurs. The current-carrying capacity of an office battery feeder can be in the 100-ampere range. Each power filter unit smooths the input current and reduces the converter switching noise to the allowed limit. The power filter units plug directly into the backplane via a connector and can be replaced in the field. The power filter units on the System Controller and Complementary Shelves also provide a low voltage cutoff feature. This protects the equipment from abnormally low incoming voltage. If the incoming voltage drops below −38 ±1.5 V, the power is cut off until the incoming voltage returns to −42.5 ±1.5 V. WaveStar OLA and the Optical Translator will sustain no damage if the power fluctuates between −38 ±1.5 and −42.5 ±1.5 V. From the power filter units, the power feeders are connected to the backplane and distributed to the circuit packs on the shelf. All circuit packs have identical common battery power and return pins. This avoids catastrophic failure if a pack is plugged into the wrong connector. An active circuit on the circuit packs provides in-rush current protection whenever a circuit pack is inserted and also when circuit packs are equipped and bay power is applied. No special pin sequencing is required. Each circuit pack is equipped with diodes and fuses that protect the power feeders. If one of these board-mounted fuses fails, the circuit pack fails and must be replaced with a new circuit pack. A filtering section follows the fused input. The on-board filters minimize the noise on the backplane buses. Modular DC-to-DC power converters on each circuit pack convert the −48 V to the voltages required on the circuit pack. 4-8 Issue 1 March 2001 365-575-536 Power 4 Power Dissipation Table 4-2 shows the maximum power dissipation and current drains for the WaveStar OLS 40G. NOTE: Refer to the Floor Plan Data Sheet [FPD 804-604-161-( )] for complete information on power engineering for the OLS and Floor Plan Data Sheet [FPD 804-604-162-( )] for complete information on power engineering for the Optical Translator. Table 4-2. Power Dissipation and Current Drains Maximum Power Dissipated Current Drain per Feeder (Amps) (Two Feeders Required) Equipment Package (Watts) Nominal (Watts/ft2) (Note 1) Maximum (Note 2) OLS Dual End Terminal 276 22.1 2.9 6.5 OLS Dual Repeater 344 27.6 3.6 8.0 OLS End Terminal and Repeater 310 24.8 3.2 7.3 Optical Translator (3 Shelves) 646 51.7 5.9 13.2 OLS Integrated Bay (Single) 552 78.4 5.8 12.9 - OLS Cabinet/Bay 276 22.1 2.9 6.5 - Optical Translator Cabinet/Bay 646 91.8 6.7 15.1 - OLS Cabinet/Bay 276 22.1 2.9 6.5 - Optical Translator Cabinet/Bay 1 646 91.8 6.7 15.1 - Optical Translator Cabinet/Bay 2 646 91.8 6.7 15.1 OLS Integrated Cabinet/Bay (Double) OLS Integrated Cabinet/Bay (Triple 1) See notes at end of table. Issue 1 March 2001 4-9 365-575-536 Power Table 4-2. Power Dissipation and Current Drains (Contd) Maximum Power Dissipated Current Drain per Feeder (Amps) (Two Feeders Required) (Watts) Nominal (Watts/ft2) (Note 1) Maximum (Note 2) - OLS Cabinet/Bay 276 22.1 2.9 6.5 - Optical Translator Cabinet/Bay 646 91.8 6.7 15.1 OLS End Terminal Shelf (Miscellaneously Mounted) 138 — 1.4 3.2 OLS Repeater Shelf (Miscellaneously Mounted) 172 — 1.8 4.0 Optical Translator System Controller Shelf (Miscellaneously Mounted) 182 14.6 1.7 3.7 Optical Translator Complementary Shelf (Miscellaneously Mounted) 232 18.6 2.1 4.7 Optical Translator (3 Shelves) (Miscellaneously Mounted) 646 51.7 5.9 13.2 Equipment Package OLS Integrated Cabinet/Bay (Triple 2) Notes: 1. Nominal (List 1) current drains are used to size batteries and rectifiers. To size batteries and rectifiers, use twice the nominal current drain per feeder. These current drains represent the average busy-hour current at normal operating voltages. Nominal current drains occur at −48 V. 2. Maximum (List 2) current drains are used to size each feeder cable and fuse. To size feeder cables and fuses, use the maximum current drain per feeder. These current drains represent the peak current under worst-case operating conditions. Normally the current for the system is shared equally by both feeders. If one feeder fails, the other feeder carries the total load for both feeders (feeder A + feeder B current). Maximum current drains occur at −42.75 V. 4-10 Issue 1 March 2001 365-575-536 Power LED Indicators 4 The green PWR ON LED indicator (located on the indicator strip, and user panel, and fuse/power indicating panel) and the circuit pack red FAULT LED indicator (located on the OTU, QUAD OTU, OTPM, OA, OTCTL, TLM, TOHCTL, SYSCTL, and SYSMEM circuit pack faceplates) are associated with shelf and circuit pack power. The green PWR ON LED indicator shows that the shelf is receiving fused − 48 volt power. The green PWR ON LED indicator will remain lighted as long as either −48 volt power feeder is supplying power to the shelf. The red FAULT LED indicator shows circuit pack failures; however, the red FAULT LED indicator on the OTU, QUAD OTU, and OTPM circuit packs may not be lighted for some power converter or fuse failures. If the fuse or DC-to-DC converter fails on an OA, TLM, or TOHCTL circuit pack, the red FAULT LED indicator will be operated via a separate power path from the System Controller (SYSCTL) circuit pack. Issue 1 March 2001 4-11 365-575-536 Power 4-12 Issue 1 March 2001 5 Control, Transmission, and Synchronization Interfaces Contents Overview 5-1 Control 5-1 Transmission 5-4 ■ End Terminal Shelf 5-4 1A-TX End Terminal 5-4 1A-TX-THRU End Terminal 5-7 1A-RCV End Terminal 5-9 1A-RCV-THRU End Terminal 5-12 DUAL End Terminal 5-14 Single Optical Amplifier 1A-TX End Terminal 5-16 Single Optical Amplifier 1A-TX-THRU End Terminal 5-19 Single Optical Amplifier 1A-RCV End Terminal 5-21 Single Optical Amplifier 1A-RCV-THRU End Terminal 5-24 Single Optical Amplifier DUAL End Terminal 5-26 ■ Repeater Shelf 5-28 ■ Optical Translator 5-31 Synchronization 5-33 Issue 1 March 2001 5-i Contents 5-ii Issue 1 March 2001 Control, Transmission, and Synchronization Interfaces 5 Overview 5 5 This section describes the WaveStar™ OLS 40G architecture. The system control, transmission, and synchronization architecture are described down to the circuit pack level. Control 5 The WaveStar OLS 40G has a robust, flexible, 2-level system control architecture. Figure 5-1 shows the WaveStar OLS 40G control architecture. The system control architecture distributes the monitoring and control functions down to the lowest level where a particular function is performed. At the lowest level of the control hierarchy is the board controller that is located on each Optical Amplifier (OA), Telemetry Controller (TLM), Optical Translator Unit (OTU), and Quad Optical Translator Unit (QUAD OTU) circuit pack. The board controller contains a microprocessor and its supporting circuitry. The board controller is responsible for the real-time monitor and control functions of the OA, TLM, OTU, and QUAD OTU circuit packs. The board controller monitors and controls the OA, TLM, OTU, and QUAD OTU circuit packs, isolates faults at the circuit pack level, controls the circuit pack FAULT LEDs, calculates the signal quality factor (SQF), controls hardware provisioning data, maintains a sanity timer, and provides debugging functions. The QUAD OTU circuit packs also isolate faults at the Optical Translator Port Module (OTPM) level and controls the OTPM FAULT LED. Issue 1 March 2001 5-1 365-575-536 Control, Transmission, and Synchronization Interfaces Figure 5-1. 5-2 Issue 1 System Control Architecture March 2001 365-575-536 Control, Transmission, and Synchronization Interfaces The system controller complex is the highest level of the control hierarchy. The system controller complex consists of the System Controller (SYSCTL) circuit pack and the System Memory (SYSMEM) circuit pack. The system controller complex performs the non-real time intensive functions requiring overall system knowledge. The system controller complex is responsible for system wide computations and system user interface functions. It plays a major role in providing the extensive operations, administration, maintenance, and provisioning functions. For more information about the operations, administration, maintenance, and provisioning functions, refer to Chapter 6, "Operations Interfaces," Chapter 8, "Administration and Provisioning," and Chapter 9, "Maintenance Description." A single system controller complex controls up to four bidirectional optical lines. In Release 3 and later releases, the system controller complex also controls up to 64 OTU circuit packs or 128 OTPMs or a combination of OTU circuit packs and OTPMs. In applications involving crossing routes that require two system controller complexes in a single cabinet (for example, the OLS Dual End Terminal), each system controller complex is independent of the other. Therefore, each system controller complex controls two bidirectional optical lines. In Release 3 and later releases, each system controller complex also controls up to 32 OTU circuit packs or 64 OTPMs. The Overhead Controller - Tributary (TOHCTL) circuit pack performs synchronous optical network (SONET) section data communications channel (DCC) processing functions. In Release 3 and later releases, the Optical Translator Controller (OTCTL) circuit pack controls the board controllers on the OTU and QUAD OTU circuit packs. The controllers within the control architecture communicate among the different hierarchical levels using internal local area networks (LANs). The board controllers communicate using the board controller local area network (BCLAN). The TOHCTL circuit pack and the system controller complex communicate using the overhead access local area network (OALAN). In Release 3 and later releases, the system controller complex and the OTCTL circuit pack also communicate using the OALAN. The extensive control features of the WaveStar OLS 40G are available through several craft and operations system (OS) interfaces. In addition to accessing the local terminal, the craft and OS interfaces can reach a remote terminal using the DCC bytes (D1-D3) in the supervisory signal. These functions are provided by the SYSCTL, SYSMEM, and TOHCTL circuit packs. Issue 1 March 2001 5-3 365-575-536 Control, Transmission, and Synchronization Interfaces Transmission 5 End Terminal Shelf 5 1A-TX End Terminal 5 Figure 5-2 shows a transmission block diagram of the End Terminal Shelf provisioned as a 1A-TX end terminal. 1A-TX End Terminal 1 to 16 Drop Side Signals O M U IN OA 1B OUT Optical Line Signal TLM IN 1A Supervisory Signal CM OUT IN TLM Customer Maintenance Signal CM 1A OUT IN Supervisory Signal 1 to 16 Drop Side Signals O M U OUT TLM OUT OA IN 1B Optical Line Signal 1B NC-84979001.1 Figure 5-2. 1A-TX End Terminal Transmission Block Diagram The End Terminal Shelf interfaces with up to 16 GbE-1/OC-48/STM-16, OC-12/ STM-4, OC-3/STM-1, and/or 100-750 Mb/s drop side signals, one IS-3 customer maintenance signal, and up to two bidirectional optical lines. The End Terminal Shelf is equipped with the following transmission circuit packs per bidirectional optical line: 5-4 Issue 1 ■ One Optical Multiplexing Unit (OMU) ■ One Optical Demultiplexing Unit (ODU) ■ One Telemetry Controller (TLM) circuit pack ■ Two Optical Amplifiers (OA) circuit packs. March 2001 365-575-536 Control, Transmission, and Synchronization Interfaces The End Terminal Shelf accepts up to 16 different wavelengths of drop side signals in the 1.5 µm range. For detailed information about the wavelengths, frequencies, and power levels, refer to Chapter 10, “Technical Specifications.” The 16 different wavelengths of drop side signals are combined onto a single fiber using dense wavelength division multiplexing by the Optical Multiplexing Unit (OMU). The OMU in the OMU/ODU nA slot sends the combined signal (optical line signal) to the Optical Amplifier (OA) circuit pack. The Telemetry Controller (TLM) circuit pack accepts one IS-3 customer maintenance signal. The TLM circuit pack formats the customer maintenance signal with the data communications channel (DCC) bytes (D1 - D3) from the Overhead Controller - Tributary (TOHCTL) circuit pack and the overhead bytes (E1, E2, and F1) from the interconnection panel. The TLM circuit pack then sends the formatted signal (supervisory signal) to the OA circuit pack. The wavelength of the supervisory signal is 1532 nm. The OA circuit pack in the OA nA slot functions as a transmitter. The OA circuit pack amplifies the optical line signal from the OMU and combines it with the 1532-nm supervisory signal from the TLM circuit pack for transmission over a standard single mode or TrueWave® fiber. Issue 1 March 2001 5-5 365-575-536 Control, Transmission, and Synchronization Interfaces In the receive direction, the OA circuit pack in the OA nB slot functions as a receiver. The OA circuit pack accepts a low-level optical line signal and amplifies the optical line signal. The supervisory signal is then split (optically demultiplexed) from the optical line signal and sent to the TLM circuit pack for processing. The optical line signal is sent to the Optical Demultiplexing Unit (ODU). The Telemetry Controller (TLM) circuit pack accepts the 1532-nm supervisory signal from the OA circuit pack, and performs overhead processing functions. The DCC bytes (D1 - D3) are sent to the TOHCTL circuit pack, and the overhead bytes (E1, E2, and F1) are sent to the interconnection panel. The IS-3 customer maintenance signal is provided to the customer. The ODU in the OMU/ODU nB slot accepts the optical line signal from the OA circuit pack and splits (optically demultiplexes) the optical line signal into 16 different wavelengths of drop side signals. For detailed circuit pack and equipment unit descriptions, refer to Chapter 7, "Circuit Pack Descriptions." The WaveStar OLS 40G provides no optical line protection switching. However, the WaveStar OLS 40G does provide data communications channel switching between adjacent nodes. For more information about data communications channel switching, refer to Chapter 9, "Maintenance Description." The End Terminal Shelf is used in the following equipment packages: ■ OLS Dual End Terminal ■ OLS End Terminal and Repeater ■ OLS Integrated Bay (Single) ■ OLS Integrated Bay (Double) ■ OLS Integrated Bay (Triple 1) ■ OLS Integrated Bay (Triple 2) ■ OLS End Terminal Shelf (Miscellaneously Mounted). For more information about the End Terminal Shelf and the WaveStar OLS 40G equipment packages, refer to Chapter 3, "Platform Description." 5-6 Issue 1 March 2001 365-575-536 Control, Transmission, and Synchronization Interfaces 5 1A-TX-THRU End Terminal Figure 5-3 shows a transmission block diagram of the End Terminal Shelf provisioned as a 1A-TX-THRU end terminal. 1A-TX-THRU End Terminal 1 to 16 Drop Side Signals O M U IN OA 1A Optical Line Signal OUT TLM IN 1A Supervisory Signal Customer Maintenance Signal Data Communications Channel Bytes 1 to 16 Drop Side Signals CM OUT IN TLM TOHCTL CM 1A OUT IN IN OUT O D U 1B TLM 1B Supervisory Signal TLM OUT OUT OA 1B IN Optical Line Signal NC-84979001.7 Figure 5-3. 1A-TX-THRU End Terminal Transmission Block Diagram Issue 1 March 2001 5-7 365-575-536 Control, Transmission, and Synchronization Interfaces In Figure 5-3, the End Terminal Shelf interfaces with up to 16 GbE-1/OC-48/ STM-16, OC-12/STM-4, OC-3/STM-1, and/or 100-750 Mb/s drop side signals, one IS-3 customer maintenance signal, one data communications channel, and up to two bidirectional optical lines. The End Terminal Shelf is equipped with the following transmission circuit packs per bidirectional optical line: ■ One Optical Multiplexing Unit (OMU) ■ One Optical Demultiplexing Unit (ODU) ■ Two Telemetry Controller (TLM) circuit packs ■ Two Optical Amplifiers (OA) circuit packs ■ One Overhead Controller - Tributary (TOHCTL) circuit pack. The TOHCTL and the two TLM circuit packs pass through the data communications channel (DCC) bytes (D1 - D3) in 4-fiber ring applications. In the transmit direction, the TLM circuit pack in the nB slot accepts the DCC bytes from the other back-to-back End Terminal Shelf and sends the DCC bytes to the TOHCTL circuit pack. The TOHCTL circuit pack routes the DCC bytes to the TLM circuit pack in the nA slot. The TLM circuit pack in the nA slot formats the IS-3 customer maintenance signal with the DCC bytes from the TOHCTL circuit pack and the overhead bytes (E1, E2, and F1) from the interconnection panel. The TLM circuit pack in the nA slot then sends the formatted signal (supervisory signal) to the OA circuit pack. In the receive direction, the TLM circuit pack in the nA slot accepts the supervisory signal from the OA circuit pack and performs overhead processing functions. The DCC bytes (D1 - D3) are sent to the TOHCTL circuit pack, and the overhead bytes (E1, E2, and F1) are sent to the interconnection panel. The IS-3 customer maintenance signal is provided to the customer. The TOHCTL circuit pack routes the DCC bytes to the TLM circuit pack in the nB slot. The TLM circuit pack in the nB slot transmits the DCC bytes to the other back-to-back End Terminal Shelf. For detailed circuit pack and equipment unit descriptions, refer to Chapter 7, "Circuit Pack Descriptions." The End Terminal Shelf accepts up to 16 different wavelengths of drop side signals in the 1.5 µm range. For detailed information about the wavelengths, frequencies, and power levels, refer to Chapter 10, “Technical Specifications.” For more information about the 1A-TX end terminal, refer to the “1A-TX End Terminal” part of this section. 5-8 Issue 1 March 2001 365-575-536 Control, Transmission, and Synchronization Interfaces 5 1A-RCV End Terminal Figure 5-4 shows a transmission block diagram of the End Terminal Shelf provisioned as a 1A-RCV end terminal. 1A-RCV End Terminal 1 to 16 Drop Side Signals O M U OA 1A OUT IN TLM OUT Optical Line Signal 1A Supervisory Signal CM IN IN TLM Customer Maintenance Signal CM 1A OUT OUT Supervisory Signal 1 to 16 Drop Side Signals O M U 1B TLM IN IN OA 1B OUT Optical Line Signal NC-84979001.3 Figure 5-4. 1A-RCV End Terminal Transmission Block Diagram Issue 1 March 2001 5-9 365-575-536 Control, Transmission, and Synchronization Interfaces The End Terminal Shelf interfaces with up to 16 GbE-1/OC-48/STM-16, OC-12/ STM-4, OC-3/STM-1, and/or 100-750 Mb/s drop side signals, one IS-3 customer maintenance signal, and up to two bidirectional optical lines. The End Terminal Shelf is equipped with the following transmission circuit packs per bidirectional optical line: ■ One Optical Multiplexing Unit (OMU) ■ One Optical Demultiplexing Unit (ODU) ■ One Telemetry Controller (TLM) circuit pack ■ Two Optical Amplifiers (OA) circuit packs. The End Terminal Shelf accepts up to 16 different wavelengths of drop side signals in the 1.5 µm range. For detailed information about the wavelengths, frequencies, and power levels, refer to Chapter 10, “Technical Specifications.” The 16 different wavelengths of drop side signals are combined onto a single fiber using dense wavelength division multiplexing by the Optical Multiplexing Unit (OMU). The OMU in the OMU/ODU nB slot sends the combined signal (optical line signal) to the Optical Amplifier (OA) circuit pack. The Telemetry Controller (TLM) circuit pack accepts one IS-3 customer maintenance signal. The TLM circuit pack formats the customer maintenance signal with the data communications channel (DCC) bytes (D1 - D3) from the Overhead Controller - Tributary (TOHCTL) circuit pack and the overhead bytes (E1, E2, and F1) from the interconnection panel. The TLM circuit pack then sends the formatted signal (supervisory signal) to the OA circuit pack. The wavelength of the supervisory signal is 1532 nm. The OA circuit pack in the OA nB slot functions as a transmitter. The OA circuit pack amplifies the optical line signal from the OMU and combines it with the 1532-nm supervisory signal from the TLM circuit pack for transmission over a standard single mode or TrueWave fiber. 5-10 Issue 1 March 2001 365-575-536 Control, Transmission, and Synchronization Interfaces In the receive direction, the OA circuit pack in the OA nA slot functions as a receiver. The OA circuit pack accepts a low-level optical line signal and amplifies the optical line signal. The supervisory signal is then split (optically demultiplexed) from the optical line signal and sent to the TLM circuit pack for processing. The optical line signal is sent to the Optical Demultiplexing Unit (ODU). The Telemetry Controller (TLM) circuit pack accepts the 1532-nm supervisory signal from the OA circuit pack, and performs overhead processing functions. The DCC bytes (D1 - D3) are sent to the TOHCTL circuit pack, and the overhead bytes (E1, E2, and F1) are sent to the interconnection panel. The IS-3 customer maintenance signal is provided to the customer. The ODU in the OMU/ODU nA slot accepts the optical line signal from the OA circuit pack and splits (optically demultiplexes) the optical line signal into 16 different wavelengths of drop side signals. For detailed circuit pack and equipment unit descriptions, refer to Chapter 7, "Circuit Pack Descriptions." The WaveStar OLS 40G provides no optical line protection switching. However, the WaveStar OLS 40G does provide data communications channel switching between adjacent nodes. For more information about data communications channel switching, refer to Chapter 9, "Maintenance Description." The End Terminal Shelf is used in the following equipment packages: ■ OLS Dual End Terminal ■ OLS End Terminal and Repeater ■ OLS Integrated Bay (Single) ■ OLS Integrated Bay (Double) ■ OLS Integrated Bay (Triple 1) ■ OLS Integrated Bay (Triple 2) ■ OLS End Terminal Shelf (Miscellaneously Mounted). For more information about the End Terminal Shelf and the WaveStar OLS 40G equipment packages, refer to Chapter 3, "Platform Description." Issue 1 March 2001 5-11 365-575-536 Control, Transmission, and Synchronization Interfaces 5 1A-RCV-THRU End Terminal Figure 5-5 shows a transmission block diagram of the End Terminal Shelf provisioned as a 1A-RCV-THRU end terminal. 1A-RCV-THRU End Terminal O D U 1 to 16 Drop Side Signals OUT OA 1A Optical Line Signal IN TLM OUT 1A Supervisory Signal Customer Maintenance Signal CM IN IN TLM 1A CM OUT OUT Data Communications Channel Bytes IN OUT O M U 1 to 16 Drop Side Signals TLM 1B TOHCTL Supervisory Signal TLM IN IN OA 1B OUT Optical Line Signal 1B NC-84979001.8 Figure 5-5. 5-12 Issue 1 1A-RCV-THRU End Terminal Transmission Block Diagram March 2001 365-575-536 Control, Transmission, and Synchronization Interfaces In Figure 5-5, the End Terminal Shelf interfaces with up to 16 GbE-1/OC-48/ STM-16, OC-12/STM-4, OC-3/STM-1, and/or 100-750 Mb/s drop side signals, one IS-3 customer maintenance signal, one data communications channel, and up to two bidirectional optical lines. The End Terminal Shelf is equipped with the following transmission circuit packs per bidirectional optical line: ■ One Optical Multiplexing Unit (OMU) ■ One Optical Demultiplexing Unit (ODU) ■ Two Telemetry Controller (TLM) circuit packs ■ Two Optical Amplifiers (OA) circuit packs ■ One Overhead Controller - Tributary (TOHCTL) circuit pack. The TOHCTL and the two TLM circuit packs pass through the data communications channel (DCC) bytes (D1 - D3) in 4-fiber ring applications. In the transmit direction, the TLM circuit pack in the nB slot accepts the DCC bytes from the other back-to-back End Terminal Shelf and sends the DCC bytes to the TOHCTL circuit pack. The TOHCTL circuit pack routes the DCC bytes to the TLM circuit pack in the nA slot. The TLM circuit pack in the nA slot formats the IS-3 customer maintenance signal with the DCC bytes from the TOHCTL circuit pack and the overhead bytes (E1, E2, and F1) from the interconnection panel. The TLM circuit pack in the nA slot then sends the formatted signal (supervisory signal) to the OA circuit pack. In the receive direction, the TLM circuit pack in the nA slot accepts the supervisory signal from the OA circuit pack and performs overhead processing functions. The DCC bytes (D1 - D3) are sent to the TOHCTL circuit pack, and the overhead bytes (E1, E2, and F1) are sent to the interconnection panel. The IS-3 customer maintenance signal is provided to the customer. The TOHCTL routes the DCC bytes to the TLM circuit pack in the nB slot. The TLM circuit pack in the nB slot transmits the DCC bytes to the other back-to-back End Terminal Shelf. For detailed circuit pack and equipment unit descriptions, refer to Chapter 7, "Circuit Pack Descriptions." The End Terminal Shelf accepts up to 16 different wavelengths of drop side signals in the 1.5 µm range. For detailed information about the wavelengths, frequencies, and power levels, refer to Chapter 10, “Technical Specifications.” For more information about the 1A-RCV end terminal, refer to the “1A-RCV End Terminal” part of this section. Issue 1 March 2001 5-13 365-575-536 Control, Transmission, and Synchronization Interfaces 5 DUAL End Terminal Figure 5-6 shows a transmission block diagram of the End Terminal Shelf provisioned as a DUAL end terminal. DUAL indicates the end terminal has two sides. Side 1 represents lines 1 and 3. Side 2 represents lines 2 and 4. Side 1 is equipped as a 1A-RCV end terminal, and side 2 is equipped as a 1A-TX end terminal. It is possible to equip one side only. Side 1 Optical Line Signal IN OA 1A OUT O D U TLM OUT 1A TLM IN OA 1B O M U IN OA 2A OUT Optical Line Signal TLM IN 2A OUT CM IN TLM 2A TCHCTL Supervisory Signal OUT 1 to 16 1 to 16 Drop Drop Side Side Signals Signals Supervisory Signal Supervisory Signal CM IN Customer IN TLM Maintenance CM 1A Signal OUT OUT Optical Line Signal Side 2 IN O M U 1B 1 to 16 1 to 16 Drop Drop Side Side Signals Signals Customer Maintenance Signal Supervisory Signal CM IN OUT O D U OUT TLM OUT OA IN 2B Optical Line Signal 2B NC-84979001.5 Figure 5-6. 5-14 Issue 1 DUAL End Terminal Transmission Block Diagram March 2001 365-575-536 Control, Transmission, and Synchronization Interfaces Each side of the End Terminal Shelf interfaces with up to 16 GbE-1/OC-48/ STM-16, OC-12/STM-4, OC-3/STM-1, and/or 100-750 Mb/s drop side signals, one IS-3 customer maintenance signal, and one bidirectional optical line. The End Terminal Shelf is equipped with the following transmission circuit packs: ■ Two Optical Multiplexing Unit (OMU) ■ Two Optical Demultiplexing Unit (ODU) ■ Two Telemetry Controller (TLM) circuit pack ■ Four Optical Amplifiers (OA) circuit packs ■ One Overhead Controller - Tributary (TOHCTL) circuit pack. The TOHCTL circuit pack passes through the data communications channel (DCC) bytes in 2-fiber ring applications. It is also possible to equip only one side of an End Terminal Shelf provisioned as a DUAL end terminal. For detailed circuit pack and equipment unit descriptions, refer to Chapter 7, "Circuit Pack Descriptions." The End Terminal Shelf accepts up to 16 different wavelengths of drop side signals in the 1.5 µm range. For detailed information about the wavelengths, frequencies, and power levels, refer to Chapter 10, “Technical Specifications.” For more information about a 1A-TX end terminal, refer to the “1A-TX End Terminal” part of this section. For more information about a 1A-RCV end terminal, refer to the “1A-RCV End Terminal” part of this section. Issue 1 March 2001 5-15 365-575-536 Control, Transmission, and Synchronization Interfaces Single Optical Amplifier 1A-TX End Terminal 5 Figure 5-7 shows a transmission block diagram of the End Terminal Shelf with a single optical amplifier (OA) circuit pack provisioned as a 1A-TX end terminal. 1A-TX End Terminal 1 to 16 Drop Side Signals O M U IN OA 1B OUT Optical Line Signal TLM IN 1A Supervisory Signal CM OUT IN TLM Customer Maintenance Signal CM 1A OUT IN Supervisory Signal 1 to 16 Drop Side Signals O M U Optical Line Signal 1B NC-84979001.2 Figure 5-7. 5-16 Issue 1 Single Optical Amplifier 1A-TX End Terminal Transmission Block Diagram March 2001 365-575-536 Control, Transmission, and Synchronization Interfaces he End Terminal Shelf interfaces with up to 16 GbE-1/OC-48/STM-16, OC-12/ STM-4, OC-3/STM-1, and/or 100-750 Mb/s drop side signals, one IS-3 customer maintenance signal, and up to two bidirectional optical lines. The End Terminal Shelf is equipped with the following transmission circuit packs per bidirectional optical line: ■ One Optical Multiplexing Unit (OMU) ■ One Optical Demultiplexing Unit (ODU) ■ One Telemetry Controller (TLM) circuit pack ■ One Optical Amplifier (OA) circuit pack. The End Terminal Shelf accepts up to 16 different wavelengths of drop side signals in the 1.5 µm range. For detailed information about the wavelengths, frequencies, and power levels, refer to Chapter 10, “Technical Specifications.” The 16 different wavelengths of drop side signals are combined onto a single fiber using dense wavelength division multiplexing by the Optical Multiplexing Unit (OMU). The OMU in the OMU/ODU nA slot sends the combined signal (optical line signal) to the Optical Amplifier (OA) circuit pack in the OA nB slot. The Telemetry Controller (TLM) circuit pack accepts one IS-3 customer maintenance signal. The TLM circuit pack formats the customer maintenance signal with the data communications channel (DCC) bytes (D1 - D3) from the Overhead Controller - Tributary (TOHCTL) circuit pack and the overhead bytes (E1, E2, and F1) from the interconnection panel. The TLM circuit pack then sends the formatted signal (supervisory signal) to the OA circuit pack. The wavelength of the supervisory signal is 1532 nm. The OA circuit pack in the OA nB slot functions as a transmitter. The OA circuit pack amplifies the optical line signal from the OMU and combines it with the 1532-nm supervisory signal from the TLM circuit pack for transmission over a standard single mode or TrueWave fiber. Issue 1 March 2001 5-17 365-575-536 Control, Transmission, and Synchronization Interfaces In the receive direction, the ODU in the OMU/ODU nB slot functions as a receiver. The ODU circuit pack accepts a low-level optical line signal and splits (optically demultiplexes) the optical line signal into 16 different wavelengths of drop side signals and a supervisory signal. The ODU sends the supervisory signal to the TLM circuit pack for processing. The Telemetry Controller (TLM) circuit pack accepts the 1532-nm supervisory signal from the ODU, and performs overhead processing functions. The DCC bytes (D1 - D3) are sent to the TOHCTL circuit pack, and the overhead bytes (E1, E2, and F1) are sent to the interconnection panel. The IS-3 customer maintenance signal is provided to the customer. For detailed circuit pack and equipment unit descriptions, refer to Chapter 7, "Circuit Pack Descriptions." The WaveStar OLS 40G provides no optical line protection switching. However, the WaveStar OLS 40G does provide data communications channel switching between adjacent nodes. For more information about data communications channel switching, refer to Chapter 9, "Maintenance Description." The End Terminal Shelf is used in the following equipment packages: ■ OLS Dual End Terminal ■ OLS End Terminal and Repeater ■ OLS Integrated Bay (Single) ■ OLS Integrated Bay (Double) ■ OLS Integrated Bay (Triple 1) ■ OLS Integrated Bay (Triple 2) ■ OLS End Terminal Shelf (Miscellaneously Mounted). For more information about the End Terminal Shelf and the WaveStar OLS 40G equipment packages, refer to Chapter 3, "Platform Description." 5-18 Issue 1 March 2001 365-575-536 Control, Transmission, and Synchronization Interfaces Single Optical Amplifier 1A-TX-THRU End Terminal 5 Figure 5-8 shows a transmission block diagram of the End Terminal Shelf with a single optical amplifier (OA) circuit pack provisioned as a 1A-TX-THRU end terminal. 1A-TX-THRU End Terminal 1 to 16 Drop Side Signals O M U OA 1B IN Optical Line Signal OUT TLM IN 1A Supervisory Signal Customer Maintenance Signal Data Communications Channel Bytes 1 to 16 Drop Side Signals CM OUT IN TLM CM 1A OUT IN IN OUT O D U TLM 1B TOHCTL Supervisory Signal TLM OUT Optical Line Signal 1B NC-84979001.9 Figure 5-8. Single Optical Amplifier 1A-TX-THRU End Terminal Transmission Block Diagram Issue 1 March 2001 5-19 365-575-536 Control, Transmission, and Synchronization Interfaces In Figure 5-8, the End Terminal Shelf interfaces with up to 16 GbE-1/OC-48/ STM-16, OC-12/STM-4, OC-3/STM-1, and/or 100-750 Mb/s drop side signals, one IS-3 customer maintenance signal, one data communications channel, and up to two bidirectional optical lines. The End Terminal Shelf is equipped with the following transmission circuit packs per bidirectional optical line: ■ One Optical Multiplexing Unit (OMU) ■ One Optical Demultiplexing Unit (ODU) ■ Two Telemetry Controller (TLM) circuit packs ■ One Optical Amplifier (OA) circuit pack. The TOHCTL and the two TLM circuit packs pass through the data communications channel (DCC) bytes (D1 - D3) in 4-fiber ring applications. In the transmit direction, the TLM circuit pack in the nB slot accepts the DCC bytes from the other back-to-back End Terminal Shelf and sends the DCC bytes to the TOHCTL circuit pack. The TOHCTL circuit pack routes the DCC bytes to the TLM circuit pack in the nA slot. The TLM circuit pack in the nA slot formats the IS-3 customer maintenance signal with the DCC bytes from the TOHCTL circuit pack and the overhead bytes (E1, E2, and F1) from the interconnection panel. The TLM circuit pack in the nA slot then sends the formatted signal (supervisory signal) to the OA circuit pack. In the receive direction, the TLM circuit pack in the nA slot accepts the supervisory signal from the ODU and performs overhead processing functions. The DCC bytes (D1 - D3) are sent to the TOHCTL circuit pack, and the overhead bytes (E1, E2, and F1) are sent to the interconnection panel. The IS-3 customer maintenance signal is provided to the customer. The TOHCTL circuit pack routes the DCC bytes to the TLM circuit pack in the nB slot. The TLM circuit pack in the nB slot transmits the DCC bytes to the other back-to-back End Terminal Shelf. For detailed circuit pack and equipment unit descriptions, refer to Chapter 7, "Circuit Pack Descriptions." The End Terminal Shelf accepts up to 16 different wavelengths of drop side signals in the 1.5 µm range. For detailed information about the wavelengths, frequencies, and power levels, refer to Chapter 10, “Technical Specifications.” For more information about the single OA 1A-TX end terminal, refer to the “Single OA 1A-TX End Terminal” part of this section. 5-20 Issue 1 March 2001 365-575-536 Control, Transmission, and Synchronization Interfaces Single Optical Amplifier 1A-RCV End Terminal 5 Figure 5-9 shows a transmission block diagram of the End Terminal Shelf with a single Optical Amplifier (OA) circuit pack provisioned as a 1A-RCV end terminal. 1A-RCV End Terminal 1 to 16 Drop Side Signals O M U OA 1A IN OUT Optical Line Signal TLM IN 1B Supervisory Signal CM OUT IN TLM Customer Maintenance Signal CM 1A OUT IN TLM OUT 1 to 16 Drop Side Signals O M U Supervisory Signal Optical Line Signal 1A NC-84979001.4 Figure 5-9. Single Optical Amplifier 1A-RCV End Terminal Transmission Block Diagram Issue 1 March 2001 5-21 365-575-536 Control, Transmission, and Synchronization Interfaces The End Terminal Shelf interfaces with up to 16 GbE-1/OC-48/STM-16, OC-12/ STM-4, OC-3/STM-1, and/or 100-750 Mb/s drop side signals, one IS-3 customer maintenance signal, and up to two bidirectional optical lines. The End Terminal Shelf is equipped with the following transmission circuit packs per bidirectional optical line: ■ One Optical Multiplexing Unit (OMU) ■ One Optical Demultiplexing Unit (ODU) ■ One Telemetry Controller (TLM) circuit pack ■ One Optical Amplifier (OA) circuit pack. The End Terminal Shelf accepts up to 16 different wavelengths of drop side signals in the 1.5 µm range. For detailed information about the wavelengths, frequencies, and power levels, refer to Chapter 10, “Technical Specifications.” The 16 different wavelengths of drop side signals are combined onto a single fiber using dense wavelength division multiplexing by the Optical Multiplexing Unit (OMU). The OMU in the OMU/ODU nB slot sends the combined signal (optical line signal) to the Optical Amplifier (OA) circuit pack in the OA nA slot. The Telemetry Controller (TLM) circuit pack accepts one IS-3 customer maintenance signal. The TLM circuit pack formats the customer maintenance signal with the data communications channel (DCC) bytes (D1 - D3) from the Overhead Controller - Tributary (TOHCTL) circuit pack and the overhead bytes (E1, E2, and F1) from the interconnection panel. The TLM circuit pack then sends the formatted signal (supervisory signal) to the OA circuit pack. The wavelength of the supervisory signal is 1532 nm. The OA circuit pack in the OA nA slot functions as a transmitter. The OA circuit pack amplifies the optical line signal from the OMU and combines it with the 1532-nm supervisory signal from the TLM circuit pack for transmission over a standard single mode or TrueWave fiber. 5-22 Issue 1 March 2001 365-575-536 Control, Transmission, and Synchronization Interfaces In the receive direction, the ODU in the OMU/ODU nA slot functions as a receiver. The ODU circuit pack accepts a low-level optical line signal and splits (optically demultiplexes) the optical line signal into 16 different wavelengths of drop side signals and a supervisory signal. The ODU sends the supervisory signal to the TLM circuit pack for processing. The Telemetry Controller (TLM) circuit pack accepts the 1532-nm supervisory signal from the ODU, and performs overhead processing functions. The DCC bytes (D1 - D3) are sent to the TOHCTL circuit pack, and the overhead bytes (E1, E2, and F1) are sent to the interconnection panel. The IS-3 customer maintenance signal is provided to the customer. For detailed circuit pack and equipment unit descriptions, refer to Chapter 7, "Circuit Pack Descriptions." The WaveStar OLS 40G provides no optical line protection switching. However, the WaveStar OLS 40G does provide data communications channel switching between adjacent nodes. For more information about data communications channel switching, refer to Chapter 9, "Maintenance Description." The End Terminal Shelf is used in the following equipment packages: ■ OLS Dual End Terminal ■ OLS End Terminal and Repeater ■ OLS Integrated Bay (Single) ■ OLS Integrated Bay (Double) ■ OLS Integrated Bay (Triple 1) ■ OLS Integrated Bay (Triple 2) ■ OLS End Terminal Shelf (Miscellaneously Mounted). For more information about the End Terminal Shelf and the WaveStar OLS 40G equipment packages, refer to Chapter 3, "Platform Description." Issue 1 March 2001 5-23 365-575-536 Control, Transmission, and Synchronization Interfaces Single Optical Amplifier 1A-RCV-THRU End Terminal 5 Figure 5-10 shows a transmission block diagram of the End Terminal Shelf with a single Optical Amplifier (OA) circuit pack provisioned as a 1A-RCV-THRU end terminal. 1A-RCV-THRU End Terminal 1 to 16 Drop Side Signals O M U IN OA 1A Optical Line Signal OUT TLM IN 1B Supervisory Signal Customer Maintenance Signal Data Communications Channel Bytes 1 to 16 Drop Side Signals CM OUT IN TLM TOHCTL CM 1A OUT IN IN OUT O M U 1A TLM 1B Supervisory Signal TLM OUT OUT OA 1B IN Optical Line Signal NC-84979001.10 Figure 5-10. Single Optical Amplifier 1A-RCV-THRU End Terminal Transmission Block Diagram 5-24 Issue 1 March 2001 365-575-536 Control, Transmission, and Synchronization Interfaces In Figure 5-10, the End Terminal Shelf interfaces with up to 16 GbE-1/OC-48/ STM-16, OC-12/STM-4, OC-3/STM-1, and/or 100-750 Mb/s drop side signals, one IS-3 customer maintenance signal, one data communications channel, and up to two bidirectional optical lines. The End Terminal Shelf is equipped with the following transmission circuit packs per bidirectional optical line: ■ One Optical Multiplexing Unit (OMU) ■ One Optical Demultiplexing Unit (ODU) ■ Two Telemetry Controller (TLM) circuit packs ■ One Optical Amplifier (OA) circuit pack. The TOHCTL and the two TLM circuit packs pass through the data communications channel (DCC) bytes (D1 - D3) in 4-fiber ring applications. In the transmit direction, the TLM circuit pack in the nB slot accepts the DCC bytes from the other back-to-back End Terminal Shelf and sends the DCC bytes to the TOHCTL circuit pack. The TOHCTL circuit pack routes the DCC bytes to the TLM circuit pack in the nA slot. The TLM circuit pack in the nA slot formats the IS-3 customer maintenance signal with the DCC bytes from the TOHCTL circuit pack and the overhead bytes (E1, E2, and F1) from the interconnection panel. The TLM circuit pack in the nA slot then sends the formatted signal (supervisory signal) to the OA circuit pack. In the receive direction, the TLM circuit pack in the nA slot accepts the supervisory signal from the ODU and performs overhead processing functions. The DCC bytes (D1 - D3) are sent to the TOHCTL circuit pack, and the overhead bytes (E1, E2, and F1) are sent to the interconnection panel. The IS-3 customer maintenance signal is provided to the customer. The TOHCTL circuit pack routes the DCC bytes to the TLM circuit pack in the nB slot. The TLM circuit pack in the nB slot transmits the DCC bytes to the other back-to-back End Terminal Shelf. For detailed circuit pack and equipment unit descriptions, Chapter 7, "Circuit Pack Descriptions." The End Terminal Shelf accepts up to 16 different wavelengths of drop side signals in the 1.5 µm range. For detailed information about the wavelengths, frequencies, and power levels, refer to Chapter 10, “Technical Specifications.” For more information about the single OA 1A-RCV end terminal, refer to the “Single OA 1A-RCV End Terminal” part of this section. Issue 1 March 2001 5-25 365-575-536 Control, Transmission, and Synchronization Interfaces Single Optical Amplifier DUAL End Terminal 5 Figure 5-11 shows a transmission block diagram of the End Terminal Shelf with a single Optical Amplifier (OA) circuit pack provisioned as a DUAL end terminal. DUAL indicates the end terminal has two sides. Side 1 represents lines 1 and 3. Side 2 represents lines 2 and 4. Side 1 is equipped as a 1A-RCV end terminal, and side 2 is equipped as a 1A-TX end terminal. Side 1 O D U Optical Line Signal TLM OUT 1A TLM IN OA 1A O M U IN OA 2B OUT Optical Line Signal TLM IN 2A OUT CM IN TLM 2A TCHCTL Supervisory Signal OUT 1 to 16 1 to 16 Drop Drop Side Side Signals Signals Supervisory Signal Supervisory Signal CM IN Customer IN TLM Maintenance CM 1A Signal OUT OUT Optical Line Signal Side 2 IN O M U 1B 1 to 16 1 to 16 Drop Drop Side Side Signals Signals Customer Maintenance Signal Supervisory Signal CM IN OUT O D TLM OUT U Optical Line Signal 2B NC-84979001.6 Figure 5-11. Single Optical Amplifier DUAL End Terminal Transmission Block Diagram 5-26 Issue 1 March 2001 365-575-536 Control, Transmission, and Synchronization Interfaces Each side of the End Terminal Shelf interfaces with up to 16 GbE-1/OC-48/ STM-16, OC-12/STM-4, OC-3/STM-1, and/or 100-750 Mb/s drop side signals, one IS-3 customer maintenance signal, and one bidirectional optical line. The End Terminal Shelf is equipped with the following transmission circuit packs: ■ Two Optical Multiplexing Unit (OMU) ■ Two Optical Demultiplexing Unit (ODU) ■ Two Telemetry Controller (TLM) circuit pack ■ Two Optical Amplifiers (OA) circuit packs. ■ One Overhead Controller - Tributary (TOHCTL) circuit pack. The TOHCTL circuit pack passes through the data communications channel (DCC) bytes in 2-fiber ring applications. It is also possible to equip only one side of an End Terminal Shelf provisioned as a DUAL end terminal. For more information about the End Terminal Shelf, refer to Section 3, “Platform Description.” The End Terminal Shelf accepts up to 16 different wavelengths of drop side signals in the 1.5 µm range. For detailed information about the wavelengths, frequencies, and power levels, refer to Chapter 10, “Technical Specifications.” For more information about a 1A-TX end terminal with a single OA circuit pack, refer to the “Single Optical Amplifier 1A-TX End Terminal” part of this section. For more information about a 1A-RCV end terminal with a single OA circuit pack, refer to the “Single Optical Amplifier 1A-RCV End Terminal” part of this section. Issue 1 March 2001 5-27 365-575-536 Control, Transmission, and Synchronization Interfaces 5 Repeater Shelf Figure 5-12 shows a transmission block diagram of the Repeater Shelf regenerating two optical line signals (for one bidirectional optical line) and interfacing with two IS-3 customer maintenance signals. Repeater OA Optical Line Signal Optical Line Signal IN 1A TLM OUT OUT TLM IN Supervisory Signal CM OUT IN TLM Customer Maintenance Signal OUT CM TLM IN 1A CM 1A CM OUT IN IN OUT Customer Maintenance Signal Supervisory Signal Optical Line Signal TLM IN TLM OUT OUT OA IN 1B Optical Line Signal NC-84979101 Figure 5-12. Repeater Shelf Transmission Block Diagram 5-28 Issue 1 March 2001 365-575-536 Control, Transmission, and Synchronization Interfaces In Figure 5-12, the Repeater Shelf is equipped with the following transmission circuit packs per bidirectional optical line: ■ Two Telemetry Controller (TLM) circuit packs ■ Two Optical Amplifiers (OA) circuit packs. The Repeater Shelf may be equipped with up to four Telemetry Controller (TLM) circuit packs and four Optical Amplifier (OA) circuit packs. The Repeater Shelf may regenerate up to four optical line signals for two bidirectional optical lines. The Repeater Shelf also interfaces with up to four bidirectional IS-3 customer maintenance signals. In Figure 5-12, the OA 1A circuit pack accepts an incoming optical line signal produced at an End Terminal Shelf and amplifies the optical line signal. The supervisory signal is then split (optically demultiplexed) from the optical line signal and sent to the TLM 1B circuit pack for processing. The TLM 1B circuit pack accepts the 1532-nm supervisory signal from the OA 1A circuit pack and performs overhead processing functions. The DCC bytes (D1 - D3) are sent to the TOHCTL circuit pack, and the overhead bytes (E1, E2, and F1) are sent to the interconnection panel. The IS-3 customer maintenance signal is provided to the customer. The TLM 1A circuit pack may also accept an IS-3 customer maintenance signal. The TLM 1A circuit pack formats the customer maintenance signal with the data communications channel (DCC) bytes (D1 - D3) from the Overhead Controller Tributary (TOHCTL) circuit pack and the overhead bytes (E1, E2, and F1) from the interconnection panel. The TLM 1A circuit pack then sends the formatted signal (supervisory signal) to the OA 1A circuit pack. The wavelength of the supervisory signal is 1532 nm. The OA 1A circuit pack combines the amplified optical line signal with the 1532-nm supervisory signal from the TLM 1A circuit pack for transmission over a standard single mode or TrueWave fiber. In the opposite direction, the OA 1B circuit pack accepts an incoming optical line signal produced at an End Terminal Shelf and amplifies the optical line signal. The supervisory signal is then split (optically demultiplexed) from the optical line signal and sent to the TLM 1A circuit pack for processing. The OA 1B circuit pack then combines the amplified optical line signal with the 1532-nm supervisory signal from the TLM 1B circuit pack for transmission over a standard single mode or TrueWave fiber. For detailed circuit pack and equipment unit descriptions, Chapter 7, "Circuit Pack Descriptions." Issue 1 March 2001 5-29 365-575-536 Control, Transmission, and Synchronization Interfaces The WaveStar OLS 40G provides no optical line protection switching. However, the WaveStar OLS 40G does provide data communications channel switching between adjacent nodes. For more information about data communications channel switching, refer to Chapter 9, "Maintenance Description." The Repeater Shelf is used in the following equipment packages: ■ OLS Dual Repeater ■ OLS End Terminal and Repeater ■ OLS Repeater Shelf (Miscellaneously Mounted). For more information about the Repeater Shelf and the WaveStar OLS 40G equipment packages, refer to Chapter 3, "Platform Description." 5-30 Issue 1 March 2001 365-575-536 Control, Transmission, and Synchronization Interfaces 5 Optical Translator Each Optical Translator Unit (OTU) circuit pack and Optical Translator Port Module (OTPM) can receive a single optical signal and convert it into an WaveStar OLS 40G specific wavelength with compatible power and tone signals. Two OTU circuit pack or OTPMs are required for a bidirectional optical line (one per unidirectional optical channel). Figure 5-13 shows a transmission block diagram of the Optical Translator equipped with two OTU circuit packs and two OTPMs. GbE-1/OC-48/STM-16 GbE-1/OC-48/STM-16 OTPM Optical Line GbE-1/OC-48/STM-16 Optical Line GbE-1/OC-48/STM-16 OTPM OTPM OC-12/STM-4 Optical OC3-STM-1 Line Broadband* OC-12/STM-4 OC3-STM-1 Broadband* Optical Line OTPM * 150-750 Mb/s low speed broadband signals. nc-81421801 Figure 5-13. Optical Translator Transmission Block Diagram The OTU circuit packs and OTPMs transmit the optical signals using a wavelength associated with the circuit pack code. The following circuit pack codes are associated with the OTU circuit packs and OTPMs: ■ 41A(1-16)C OC48/STM16 OTU: The 41A(1-16)B OC48/STM16 OTU circuit packs accept one non-WaveStar OLS compatible wavelength (1.3or 1.5-µm range) OC-48/STM-16 signal and transmit a WaveStar OLS compatible wavelength (1.5-µm range). The 41A(1-16)C OC48/STM16 OTU circuit packs support the 16 wavelengths on WaveStar OLS 40Gs with fiber dispersion not exceeding 6800 ps/nm. Issue 1 March 2001 5-31 365-575-536 Control, Transmission, and Synchronization Interfaces ■ 41BB OC48/STM16 OTU: The 41BB OC48/STM16 OTU circuit pack accepts one WaveStar OLS compatible wavelength (1.5-µm range) OC-48/ STM-16 signal and transmits a OC-48/STM-16 wavelength in the 1.3-µm range. ■ 41C(1-16)C OC48/STM16 OTU: The 41C(1-16)C OC48/STM16 OTU circuit packs accept one non-WaveStar OLS compatible wavelength (1.3or 1.5-µm range) OC-48/STM-16 signal and transmit a WaveStar OLS compatible wavelength (1.5-µm range). The 41C(1-16)C OC48/STM16 OTU circuit packs support the 16 wavelengths on WaveStar OLS 40Gs with fiber dispersion not exceeding 10900 ps/nm. ■ 41F(1 -16) OC48/STM16 1.25 Gigabit Ethernet Optical Translator Unit (Add). 1.5µm Wavelength n (n=1-16) ■ 41G OC48/STM16 1.25 Gigabit Ethernet Optical Translator Unit (Drop) 1.3µm Wavelength ■ 42A(1-16) OC12/STM4 OTPM: The 42A(1-16) OC12/STM4 OTPMs accept one non-WaveStar OLS compatible wavelength (1.3- or 1.5-µm range) OC12/STM-4 signal and transmit a WaveStar OLS compatible wavelength (1.5-µm range). ■ 42B OC12/STM4 OTPM: The 42B OC12/STM4 OTPM accepts one WaveStar OLS compatible wavelength (1.5-µm range) OC-12/STM-4 signal and transmits a OC-12/STM-4 wavelength in the 1.3-µm range. ■ 43A(1-16) OC3/STM1 OTPM: The 43A(1-16) OC3/STM1 OTPMs accept one non-WaveStar OLS compatible wavelength (1.3- or 1.5-µm range) OC3/STM-1 signal and transmit a WaveStar OLS compatible wavelength (1.5µm range). ■ 43B OC3/STM1 OTPM: The 43B OC3/STM1 OTPM accepts one WaveStar OLS compatible wavelength (1.5-µm range) OC-3/STM-1 signal and transmits a OC-3/STM-1 wavelength in the 1.3-µm range. ■ 44A(1-16) LSBB OTPM: The 44A(1-16) LSBB OTPMs accept one nonWaveStar OLS compatible wavelength (1.3- or 1.5-µm range) 100-750 Mb/ s signal and transmit a WaveStar OLS compatible wavelength (1.5-µm range). ■ 44B LSBB OTPM: The 44B LSBB OTPM accepts one WaveStar OLS compatible wavelength (1.5-µm range) 100-750 Mb/s signal and transmits a wavelength in the 1.3-µm range. For more information about the OTU circuit packs, OTPMs, and LSBB OTPMs, refer to Chapter 7, "Circuit Pack Descriptions." The Optical Translator provides no optical line protection switching. 5-32 Issue 1 March 2001 365-575-536 Control, Transmission, and Synchronization Interfaces Synchronization 5 The WaveStar OLS 40G is an optically amplified line system; therefore, synchronization considerations are minimized. The only synchronization required is associated with the Telemetry Controller (TLM) circuit pack. The following synchronization modes are used to synchronize the supervisory signal: ■ If the incoming customer maintenance signal is present and valid, the incoming customer maintenance signal is used to synchronize the supervisory signal. ■ If there is no incoming customer maintenance signal or the incoming customer maintenance signal is invalid, the on-board stratum 3 clock (51.84 MHz) is used to synchronize the supervisory signal. The following synchronization modes are used to synchronize the outgoing customer maintenance signal: ■ If the dropped supervisory signal is present and valid, the dropped supervisory signal is used to synchronize the outgoing customer maintenance signal. ■ If there is no dropped supervisory signal or the dropped supervisory signal is invalid, the on-board stratum 3 clock (51.84 MHz) is used to synchronize the outgoing customer maintenance signal. Issue 1 March 2001 5-33 365-575-536 Control, Transmission, and Synchronization Interfaces 5-34 Issue 1 March 2001 6 Operations Interfaces Contents Overview 6-1 Craft Interface Terminal (CIT) 6-1 ■ General 6-1 ■ PC with CenterLink Management Console Software 6-3 ■ ASCII-Based Terminal 6-4 ■ Local Access Through the CIT (DCE) Port 6-5 ■ Dial-Up Access Using a Modem Through the CIT (DTE) Port 6-6 ■ Remote Access Using the Supervisory Signal Data Communications Channel (DCC) 6-8 Indicator Strip/User Panel 6-8 Fuse/Power Indicating Panel 6-12 Fuse Panel 6-13 Circuit Pack Faceplate LED Indicator 6-15 Office Alarms Interface 6-16 Parallel Telemetry Interface 6-17 User-Settable Miscellaneous Discrete Interface 6-17 TL1/X.25 Interface 6-21 ■ X.25 Traffic Redirect Feature 6-21 Message-Based Operations System Interface 6-25 Orderwire Interface 6-33 Issue 1 March 2001 6-i Contents 6-ii Issue 1 March 2001 Operations Interfaces 6 Overview 6 6 This section presents the operations interfaces that allow access to the WaveStar™ OLS 40G and provide alarm and status information. Local operations interfaces include the craft interface terminal and the circuit pack faceplate light emitting diodes (LEDs). Other operations interfaces include office alarms, parallel telemetry, a user-settable miscellaneous discrete interface, a message-based operations system interface, and orderwire. Craft Interface Terminal (CIT) 6 General 6 The craft interface terminal (CIT) provides full access to the administrative, maintenance, and provisioning capabilities of the WaveStar OLS 40G. The WaveStar OLS 40G supports CIT local access through the CIT (DCE) port, dial-up access using a modem through the CIT (DTE) port, and remote access using the data communications channel (DCC) of the supervisory signal. Issue 1 March 2001 6-1 365-575-536 Operations Interfaces The following functions are provided using the CIT: ■ Reports ■ Loopbacks and testing ■ Initializing performance-monitoring storage registers ■ Provisioning. NOTE: In Release 3 and later releases, the CIT provides more detailed information about Optical Translator Unit (OTU) circuit packs, Quad Optical Translator Unit (QUAD OTU) circuit packs, and Optical Translator Port Modules (OTPMs). The OLS monitors OTU circuit packs, QUAD OTU circuit packs, and OTPMs via the overhead access local area network (OALAN) and Optical Translator Controller (OTCTL) circuit pack instead of using the miscellaneous discrete interface. The miscellaneous discrete interface is no longer needed and should not be used to avoid redundant alarms. The WaveStar OLS 40G also provides a security function to protect against unauthorized access to the CIT system functions (for example, provisioning). Logins, passwords, functional capabilities, authorization levels, and access to the system capabilities are provided. For more information about security, refer to Section 8, "Administration and Provisioning.” The CIT may be one of the following: ■ A personal computer (PC) loaded with the CenterLink Management Console software ■ An American Standard Code for Information Interchange (ASCII) based (dumb) terminal. The WaveStar OLS 40G accepts a PC loaded with the CenterLink Management Console software or an ASCII-based (dumb) terminal as the CIT. The WaveStar OLS 40G also accepts a PC loaded with Release 6 of CPro-2000 software. CPro-2000 is a Windows application that provides access to Lucent Technologies SONET network elements from a PC via a command-based graphical user interface. For more information about CPro-2000, refer to 365-576-120, CPro-2000 User Guide. 6-2 Issue 1 March 2001 365-575-536 Operations Interfaces PC with CenterLink Management Console Software 6 A PC loaded with CenterLink Management Console software communicates with the WaveStar OLS 40G using TL1 messages. The same TL1 message set (excluding autonomous messages) is used by the message-based operations system interface (X.25/TL1). A PC loaded with CenterLink Management Console software uses the Microsoft* Internet Explorer to provide a local and remote operations interface. Extensive on-line help is also provided. A PC loaded with CenterLink software must be used to install software in the WaveStar OLS 40G. A PC must meet the following minimum requirements to be loaded with CenterLink software and used as a CIT: ■ Pentium†-based desktop or laptop PC ■ 16 Megabytes random access memory (RAM) ■ Hard disk with approximately 20 Megabytes of free space ■ Windows 95®, Windows 98®, Windows NT®, or Windows 2000® operating system ■ Microsoft Internet Explorer® and Microsoft Personal Web Server® ■ Microsoft Mouse or compatible pointing device ■ 2x CD-ROM drive ■ Optional 16-bit sound ■ 800 x 600 VGA monitor. NOTE: Two or more commands to the same network element (at approximately the same time) may cause inappropriate responses to be displayed. For example, if one command is entered via the message-based operations system (X.25) interface and another command is entered via the CIT (DCE) port, the response to the command entered via the X.25 interface may be inappropriately displayed by the CIT connected to the CIT (DCE) port. When an inappropriate response is displayed, reenter the command. NOTE: The CenterLink Management Console software supports connections to only one internet protocol (IP) address at a time. However, another login session can be initiated to a different TID after minimizing the first window. With each additional login session, performance is diminished. Therefore, no more than five (5) login sessions are recommended. * † Registered trademark of Microsoft Corporation. Registered trademark of Intel Corporation. Issue 1 March 2001 6-3 365-575-536 Operations Interfaces ASCII-Based Terminal 6 An ASCII-based terminal may be used to interface with the WaveStar OLS 40G. Users communicate with the WaveStar OLS 40G using an ASCII-based terminal and Transaction Language 1 (TL1) messages. The same TL1 message set is used by the message-based operations system interface (X.25/TL1). The TL1 messages must be entered manually by an experienced user. The TL1 message set consists of maintenance commands (excluding autonomous messages) and cannot be used to install software in the WaveStar OLS 40G. On-line help messages and menus are not supported. For detailed information about TL1 messages, refer to 365-575-540, WaveStar OLS 40G, Operations Systems Engineering Guide. An ASCII-based terminal must meet the following minimum requirements to be used as a CIT: ■ ASCII-based data communications terminal with an 80-column display ■ Scroll capability ■ Local echo ■ Serial port (EIA-232-D) ■ Data transmission speed should be from 1200 to 9600 baud ■ XON/XOFF flow control capability. The ASCII-based terminal should be configured for byte serial data transmission of eight-bit bytes with one start bit and one stop bit. Parity should be "none" and the flow control should be "DC1/DC3." With flow control, entering <Ctl-S> stops the output (X/off state), and <Ctl-Q><CR>, <Ctl-Q><Ctl-J>, or <CtlQ><Ctl-M> resumes the output (X/on state). 6-4 Issue 1 March 2001 365-575-536 Operations Interfaces Local Access Through the CIT (DCE) Port 6 The WaveStar OLS 40G supports CIT local access through the CIT (DCE) port on the right front of WaveStar OLS 40G cabinets and the user panel of miscellaneously mounted shelves. The CIT (DCE) port is configured as data circuit equipment (DCE) for direct CIT access. This port is also compatible with the ASCII EIA-232-D standard. The CIT (DCE) port allows a PC running CenterLink software to communicate with the WaveStar OLS 40G using the same TL1 message set (excluding autonomous messages) as the message-based operations system interface (X.25/TL1). A PC running CenterLink software operates at 9600 baud. The CIT (DCE) port also allows an ASCII-based terminal to access the WaveStar OLS 40G. An ASCII-based terminal communicates with the WaveStar OLS 40G using the same TL1 message set (excluding autonomous messages) as the message-based operations system interface (X.25/TL1). NOTE: If a CIT login session is active and the cable connecting the CIT to the CIT (DCE) port is inadvertently disconnected, reconnect the cable and continue the session. When the cable is disconnected, a "Login to NE disconnected" message will appear at the CIT; however, the WaveStar OLS 40G will report that the CIT login session on the CIT (DCE) port is still active. For more information about local access using the CIT (DCE), refer to DLP-501 in the "Operation and Maintenance (TOP)" Section. Issue 1 March 2001 6-5 365-575-536 Operations Interfaces Dial-Up Access Using a Modem Through the CIT (DTE) Port 6 The WaveStar OLS 40G supports CIT dial-up access using a modem through the CIT (DTE) port on the interconnection panel of the End Terminal Shelf and Repeater Shelf. The CIT (DTE) port is configured as data terminating equipment (DTE) to allow a permanent connection to a modem. The CIT (DTE) port also allows local access using a modified null modem adapter. This port is also compatible with the ASCII EIA-232-D standard. The CIT (DTE) port allows a PC running CenterLink software to communicate with the WaveStar OLS 40G using the same TL1 message set (excluding autonomous messages) as the message-based operations system interface (X.25/TL1). A PC running CenterLink software operates at 9600 baud. The CIT (DTE) port also allows an ASCII-based terminal to access the WaveStar OLS 40G. An ASCII-based terminal communicates with the WaveStar OLS 40G using the same TL1 message set (excluding autonomous messages) as the message-based operations system interface (X.25/TL1). NOTE: If a CIT login session is active and the cable connecting the CIT to the CIT (DTE) port is inadvertently disconnected, reconnect the cable and continue the session. When the cable is disconnected, a "Login to NE disconnected" message will appear at the CIT; however, the WaveStar OLS 40G will report that the CIT login session on the CIT (DTE) port is still active. A pair of compatible modems allows remote dial-up access to the WaveStar OLS 40G from a CIT over the public switched telephone network. One modem is connected to the CIT (DTE) port at the WaveStar OLS 40G, and the other modem is connected to the serial port of the CIT. An internal modem in the CIT may be used instead of a stand-alone modem. A digital data network may be used in place of the modem pair to provide remote dial-up access to the WaveStar OLS 40G from the CIT. 6-6 Issue 1 March 2001 365-575-536 Operations Interfaces A compatible modem or digital data network must meet the following minimum requirements: ■ Full duplex ■ Asynchronous ■ Byte serial data transmission of eight bit bytes ■ One start bit ■ One stop bit ■ Data transmission speed should be from 1200 to 9600 baud. The modem must comply with one of the following transmission standards depending on the desired baud rate. These standards apply to signaling used between modems. Standard Bell 212A V.22 V.22 bis V.32 V.32 bis Baud Rate 1200 1200 2400 4800,9600 9600 (fax), 14400 (data) For more information about establishing dial-up access using a modem or the Datakit network, and local access using a null modem adapter, refer to DLP-520 in the "Operation and Maintenance (TOP)" section. Issue 1 March 2001 6-7 365-575-536 Operations Interfaces Remote Access Using the Supervisory Signal Data Communications Channel (DCC) 6 The WaveStar OLS 40G supports the following remote access using the supervisory signal data communications channel (DCC): ■ Remote access from an end terminal to the other end terminal ■ Remote access from an end terminal to a repeater ■ Remote access from a repeater to an end terminal ■ Remote access from a repeater to another repeater. Remote access allows an OLS End Terminal or Repeater to operate as a gateway network element (GNE) that serves as a single interface to the network. In Release 3 and later releases, the supervisory signal DCC can be extended from one end terminal in an WaveStar OLS 40G network to a colocated end terminal in another WaveStar OLS 40G network. For more information about extending the supervisory signal DCC in 2- and 4-fiber ring applications, refer to Section 2, “Applications.” Remote access to SONET/SDH lightwave terminal or multiplexer is not supported. There is no DCC connectivity between the WaveStar OLS 40G and the FT-2000 OC-48 Large Capacity Terminal. Indicator Strip/User Panel 6 The indicator strip is located along the header (top) of the OLS and Optical Translator cabinets. It runs the full width of the cabinet over the door in the front. Figure 6-1 shows the indicator strip for the following equipment packages: Figure 6-1. 6-8 Issue 1 Indicator Strip (4 Bidirectional Optical Line Systems) March 2001 365-575-536 Operations Interfaces Figure 6-2 shows the indicator strip for the following equipment packages: ■ OLS Dual End Terminal Cabinet ■ OLS Dual Repeater Cabinet ■ OLS End Terminal and Repeater Cabinet. LOW SHELF CR MJ MN FE ACTY ABN NE ACTY PWR ON UP SHELF ACO CR MJ MN ABN FE ACTY NE ACTY PWR ON ACO NC-OLS80G029 Figure 6-2. Indicator Strip (Dual Systems) Figure 6-3 shows the indicator strip for the Optical Translator Cabinet. CR MJ MN ABN FE ACTY NE ACTY LOW SHELF MD SHELF PWR ON UP SHELF ACO NC-OLS80G030 Figure 6-3. Indicator Strip (Optical Translator Cabinet) Issue 1 March 2001 6-9 365-575-536 Operations Interfaces Figure 6-4 shows the user panel on the bay mounted and miscellaneously mounted OLS End Terminal Shelf and OLS Repeater Shelf. The user panel is a factory-installed unit mounted next to the right-hand flange of the shelf. -48A/10A/60V FUSE CR -48B/10A/60V MJ FUSE MN ABN SHELF 1 NE ACTY OLINE=1,2 FE ACTY ACO PWR ON CIT (DCE) NC-OLS80G028 Figure 6-4. 6-10 Issue 1 User Panel (OLS End Terminal and Repeater Shelves) March 2001 365-575-536 Operations Interfaces NOTE: The indicator strip on the Optical Translator Cabinet provides the green power on (PWR ON) LEDs. The PWR ON LEDs are lighted when the shelves are receiving −48 V power. The other system level LEDs (CR, MJ, MN, ABN, FE ACTY, NE ACTY, and ACO) are not active. The indicator strip on the OLS cabinets and the user panel LEDs on the OLS End Terminal and Repeater Shelves show the following local system information: ■ The active alarm level is shown by red LEDs for critical (CR) and major (MJ) alarms and by a yellow LED indicator for minor (MN) alarms. ■ The yellow abnormal (ABN) LED indicator is lighted when a temporary condition potentially affecting transmission exists. ■ The yellow near-end activity (NE ACTY) LED indicator is lighted when any alarm or status condition exists at the local end terminal or local repeater site. ■ The yellow far-end activity (FE ACTY) LED indicator is lighted when any alarm or status condition exists at a remote end terminal or remote repeater site. The remote activity reporting parameter must be enabled using the SECURITY-Enter-Far End Communications command. ■ A green alarm cutoff (ACO) pushbutton with a built-in LED indicator activates the alarm cutoff function and lights the LED indicator. ■ The green power on (PWR ON) LED indicator is lighted when the shelf is receiving −48 V power. In Release 3 and later releases, the indicator strip on the OLS cabinets and the user panel LEDs on the OLS End Terminal also show the local system information for OTU circuit packs and OTPMs. The user panel on miscellaneously mounted shelves also provides two −48 V, 10-amp fuses (one for feeder A and one for feeder B) and an electrostatic discharge jack. Issue 1 March 2001 6-11 365-575-536 Operations Interfaces Fuse/Power Indicating Panel 6 The fuse/power indicating panel (Figure 6-5) is a factory-installed unit mounted next to the right-hand flange of the bay mounted and miscellaneously mounted Optical Translator Complementary and System Controller Shelves. The fuse/ power indicating panel has two −48 V, 10-amp fuses (one for feeder A and one for feeder B), a green power on (PWR ON) LED indicator, and an electrostatic discharge (ESD) jack. The PWR ON LED indicator is lighted when the shelf is receiving −48 V power. -48A 10A PWR ON 60V -48B 10A 60V ESD WRIST STRAP GROUND NC-OLS80G032 Figure 6-5. 6-12 Fuse/Power Indicating Panel (Optical Translator Complementary and System Controller Shelves) Issue 1 March 2001 365-575-536 Operations Interfaces 6 Fuse Panel Figure 6-6 shows the fuse panel on the End Terminal Shelves and Repeater Shelves mounted in OLS cabinets. The fuse panel is a factory-installed unit mounted next to the right-hand flange of the shelves. The fuse panel has two −48 V, 10-amp fuses (one for feeder A and one for feeder B) and an electrostatic discharge jack. -48A/10A/60V -48B/10A/60V NC-OLS80G031 Figure 6-6. Fuse Panel (OLS End Terminal and Repeater Shelves) Issue 1 March 2001 6-13 365-575-536 Operations Interfaces Figure 6-7 shows the fuse panel on the System Controller and Complementary Shelves mounted in the Optical Translator Cabinet. The fuse panel is a factoryinstalled unit mounted next to the right-hand flange of the shelves. The fuse panel has two −48 V, 10-amp fuses (one for feeder A and one for feeder B). -48A 10A 60V -48B 10A 60V NC-OLS80G033 Figure 6-7. 6-14 Fuse Panel (Optical Translator System Controller and Complementary Shelves) Issue 1 March 2001 365-575-536 Operations Interfaces Circuit Pack Faceplate LED Indicator 6 To supplement the indicator strip/user panel system-level view, each Optical Translator Unit (OTU), Quad Optical Translator Unit (QUAD OTU), Optical Translator Port Module (OTPM), Optical Amplifier (OA), Telemetry Controller (TLM), Overhead Controller - Tributary (TOHCTL), System Controller (SYSCTL), and System Memory (SYSMEM) circuit pack has a red FAULT LED indicator on its faceplate. The Optical Multiplexing Units (OMUs) and Optical Demultiplexing Units (ODUs) do not have a red FAULT LED indicator on their faceplate. A continuously lighted FAULT LED indicator means that the WaveStar OLS 40G has isolated a failure to this circuit pack. A continuously lighted FAULT LED indicator shows that the OTU, QUAD OTU, or OTPM circuit pack has failed, an optical parameter is out of range, or a reset/ initialization has occurred. (The FAULT LED indicator is lighted for approximately 15 seconds after a circuit pack is inserted in a shelf.) A flashing FAULT LED indicator shows the following: ■ A flashing FAULT LED indicator on an OA or TLM circuit pack shows that an incoming signal to that circuit pack has failed. ■ A flashing FAULT LED indicator on the SYSMEM circuit pack shows that the contents of the nonvolatile memory differs from the duplicate copy in the SYSCTL circuit pack. It can also indicate corrupted data in the nonvolatile memory of the SYSMEM circuit pack. ■ A flashing FAULT LED indicator on the OTU circuit pack or OTPM shows that the incoming signal to that circuit pack has failed. (The FAULT LED indicator flashes for 20 seconds when an incoming SONET B1 parity error is detected.) NOTE 1: The FAULT LED indicator on the OTU, QUAD OTU, and OTPM circuit packs may not light for certain power converter or fuse failures on the circuit pack. NOTE 2: The OTPM is also equipped with a green ACTIVE LED indicator. In Release 3 and later releases, the ACTIVE LED indicator is lighted to show that the optical translator port associated with the OTPM is in the IS (in service) state. The ACTIVE LED indicator is not active in releases prior to Release 3. Issue 1 March 2001 6-15 365-575-536 Operations Interfaces Office Alarms Interface 6 The WaveStar OLS 40G provides relays for connection to the local office audible and visible alarms. Relays are provided for each alarm condition: CR (critical), MJ (major), and MN (minor). The steady state current for office alarm connections must not exceed 0.9 A at 60 V or 1.8 A at 30 V. The maximum transient currents (20 msec duration) during initial contact closure must not exceed 9 A at 60 V or 18 A at 30 V. The audible office alarms are silenced through activation of the alarm cutoff (ACO) function. Visible alarms are not extinguished by the ACO function. To prevent intermittent failures from causing unnecessary maintenance activity, a provisionable incoming signal alarm delay is provided. The office alarms will not be activated unless an incoming signal condition of greater duration than the alarm delay occurs. When a failure clears, an alarm clear delay prevents premature clearing of the alarm. To accommodate Bell Operating Company (BOC) practices, the MJ and CR relay closures are designed to allow these office alarms to be OR'ed together and reported as an office MJ alarm. As with the indicator strip and user panel LEDs, when multiple alarm conditions occur, the highest level office alarm (audible and visible) is activated. When the highest level alarm condition clears, the office alarm "bumps down" to the next highest level alarm condition. If the ACO function has been activated to silence the active audible alarm and a "bump down" occurs, the audible alarm remains silent (that is, the lower level visible alarm is activated, but the corresponding audible alarm is not reactivated). If another alarmable condition occurs while the ACO is active, the highest level audible alarm is activated even if the new condition is a lower level (for example, if an MJ alarm was active and silenced using the ACO function and an MN alarmable condition occurs, the MJ audible alarm will sound). The office alarms (OFFICE ALMS) interface is located on the interconnection panel of the End Terminal Shelf and Repeater Shelf. The office alarms (OFFICE ALMS) interface on the interconnection panel of the System Controller Shelf is reserved for use in a future release. Refer to Section 3, "Platform Description,” for more information about the physical location of the office alarm interface. 6-16 Issue 1 March 2001 365-575-536 Operations Interfaces Parallel Telemetry Interface 6 The parallel telemetry interface of the WaveStar OLS 40G brings a minimum set of alarm information to an operations center. Six alarm closures show critical, major, and minor alarms for the local and remote network elements. The appropriate contact is activated when an alarm condition is detected. The parallel telemetry interface is designed for a maximum open circuit voltage of 60 V and a maximum current of 35 mA. As with the user panel LEDs and office alarms, when multiple alarms are active, the highest level parallel telemetry closure is activated. When the highest level alarm clears, the parallel telemetry output "bumps down" to the next highest level active alarm. Since the parallel telemetry alarm closures reflect the office alarms, the alarm delay and alarm clear parameters set for office alarms also apply to parallel telemetry alarm closures. The parallel telemetry (PAR TLM) interface is located on the interconnection panel of the End Terminal Shelf and Repeater Shelf. Refer to Section 3, "Platform Description,” for more information about the physical location of the parallel telemetry interface. Refer to 365-575-540, WaveStar OLS 40G, Operations Systems Engineering Guide, for detailed information about the parallel telemetry interface. User-Settable Miscellaneous Discrete Interface 6 NOTE: In Release 3 and later releases, the WaveStar OLS 40G monitors OTU circuit packs, QUAD OTU circuit packs, and OTPMs via the overhead access local area network (OALAN) and Optical Translator Controller (OTCTL) circuit pack. The miscellaneous discrete interface is no longer needed and should not be used to avoid redundant alarms. Instead of using the miscellaneous discrete interface, more detailed information is available from the CIT. The user-settable miscellaneous discrete interface allows an operations system to monitor and control equipment colocated with the WaveStar OLS 40G through a set of input and output contact closures. In Release 1, the WaveStar OLS 40G provides sixteen environmental inputs and four control outputs. The environmental inputs are used to monitor environmental conditions (for example, open door, high temperature, etc.), and the control outputs are used control external equipment (for example, pumps, generators, etc.). Issue 1 March 2001 6-17 365-575-536 Operations Interfaces In Release 2 and later releases, the WaveStar OLS 40G also provides a serial telemetry interface to an external miscellaneous discrete unit that provides an additional 128 miscellaneous discrete environmental inputs and 32 control outputs. The serial telemetry interface transfers alarm, status, and control information to and from the external miscellaneous discrete unit via a 2400-baud EIA-422 port (SER TLM 1). The external miscellaneous discrete unit is an external unit manufactured by DANTEL* Incorporated and HARRIS† Corporation that supports the additional miscellaneous discrete environmental inputs and control outputs. The external miscellaneous discrete unit detects and reports incoming signal failures and OTU/ QUAD OTU circuit pack failures to the WaveStar OLS 40G. The WaveStar OLS 40G monitors the OTU/QUAD OTU circuit packs through a set of input contact closures. The DANTEL external miscellaneous discrete unit can be miscellaneously mounted or wall mounted. The HARRIS external miscellaneous discrete unit can be miscellaneously mounted only. Table 6-1 shows the miscellaneous discrete output assignments and the monitored conditions. The miscellaneous discretes are activated for at least 20 seconds. Table 6-1. Miscellaneous Discrete Output Assignments Number Monitored Conditions Laser Bias Current (LBC) Out of Range (OOR) Optical Power Transmit (OPT) Out of Range (OOR) OTU/OTPM Internal Defect OTU/QUAD OTU Power Converter Failure Miscellaneous Discrete 1 (CP FAIL) OTU/QUAD OTU/OTPM Fuse Failure OTU/QUAD OTU Circuit Pack Reset/Initialization OTU/QUAD OTU/OTPM Insertion QUAD OTU in Wrong Slot Single Fuse Failure on a −48 V Feeder Incoming Loss of Signal (LOS) Miscellaneous Discrete 2 (INC SIG FAIL) Incoming Loss of Frame (LOF) Incoming B1 Parity Error * † 6-18 Registered trademark of Dantel Incorporated. Registered trademark of Harris Corporation. Issue 1 March 2001 365-575-536 Operations Interfaces Additional miscellaneous discrete outputs are also provided by the power filters on the System Controller Shelf and each Complementary Shelf. Each power filter (A and B) provides a single miscellaneous discrete output (2 additional miscellaneous discrete outputs per shelf). These miscellaneous discrete outputs report −48 V power failures on the −48 V power feeders from the office battery plant. Any external customer equipment to be monitored by the WaveStar OLS 40G must provide the electrical equivalent of a contact closure across the corresponding environmental input wiring pairs. The contact closure must be capable of passing at least 10 mA of drive current. The power source to enable the WaveStar OLS 40G to control external customer equipment may be from a minimum of 3 V to a maximum of 72 V. The WaveStar OLS 40G provides a unidirectional opto-isolator connection across each corresponding control output wiring pair. The load current across each control output wiring pair must be limited by the external customer equipment and must not exceed 35 mA. For detailed wiring information, refer to 365-575-539, WaveStar OLS 40G, Installation Manual and SD-5G276-01, OLS Cabinet Application Schematic. In Release 1, the environmental inputs are addressed by the numbers 1 through 16, and the control outputs are addressed by the numbers 1 through 4. In Release 2 and later releases, the additional environmental inputs are addressed starting with the number 17, and the additional control outputs are addressed starting with the number 5. The environmental inputs and control outputs can be assigned in any order. Refer to Section 8, "Administration and Provisioning,” for information about provisioning a string of characters associated with an environmental input or control output. Operations system access to individual environmental inputs and control outputs at the WaveStar OLS 40G is provided through the X.25 interface. Local access to environmental inputs is provided through the CIT interface using the FAULT-Retrieve-Alarm-Environment commands. Local access to environmental controls is provided through the CIT interface using the FAULT-Operate-External-Control and FAULT-Release-ExternalControl commands.For detailed information, refer to the on-line help available with the CenterLink Management Console or 365-575-540, WaveStar OLS 40G, Operations Systems Engineering Guide. Issue 1 March 2001 6-19 365-575-536 Operations Interfaces The miscellaneous discrete (MISC DSCRT 1 and MISC DSCRT 2) interfaces are located on the interconnection panel of the End Terminal Shelf and the Repeater Shelf. The MISC DSCRT 1 and MISC DSCRT 2 interfaces each provide eight environmental inputs and two control outputs. Refer to Section 3, "Platform Description,” for more information about the physical location of the miscellaneous discrete interface. The serial telemetry (SER TLM 1) interface is located on the interconnection panel of the End Terminal Shelf and the Repeater Shelf. Refer to Section 3, "Platform Description,” for more information about the physical location of the serial telemetry interface. The miscellaneous discrete (CP FAIL and INC SIG FAIL) interfaces are located on the interconnection panel of the System Controller Shelf and the Complementary Shelf. Refer to Section 3, "Platform Description," for more information about the physical location of the miscellaneous discrete interface. For more information about the DANTEL external miscellaneous discrete unit, refer to the Installation and Operation Manual provided with the unit. For more information about the HARRIS external miscellaneous discrete unit, refer to the User Guide provided with the unit. 6-20 Issue 1 March 2001 365-575-536 Operations Interfaces TL1/X.25 Interface 6 The WaveStar OLS 40G supports a TL1/X.25 interface to report alarm and status conditions and performance-monitoring data to operations systems (OS) such as NMA (Network Monitoring and Analysis) operations systems. (See Telcordia's SR-STS-OO1665 for a list of NMA releases compatible with the WaveStar OLS 40G software releases.) The WaveStar OLS 40G TL1/X.25 interface provides significantly more detailed information than the alternate parallel telemetry interface to the operations system (OS). The WaveStar OLS 40G TL1 messages are based on Telcordia specification TR-TSY-000833, Issue 3, Revision 1.* X.25 Traffic Redirect Feature 6 Starting in Release 3.4, the WaveStar OLS 40G introduces an X.25 Traffic Redirect feature. The X.25 Traffic Redirect feature allows a WaveStar OLS 40G Network Element (End Terminal) to perform intelligent rerouting of TL1 traffic over the customer X.25 network in the case of line failure. For linear systems, the redirect feature establishes communication with the other end of the system around a single line failure. For Data Communications Channel (DCC) Ring systems, the redirect feature establishes communication with the other side of the ring around two line failures. The X.25 Traffic Redirect feature decreases the time needed to identify a failure in the network. * Where TR-TSY-000833, Issue 3, Revision 1 was deficient, the WaveStar OLS 40G conforms to Telcordia specification TR-NWT-000833, Issue 1. Issue 1 March 2001 6-21 365-575-536 Operations Interfaces 6 Normal Case During normal operations, the TL1 traffic is carried over the DCC channel embedded in the optical supervisory signal (Figure 6-8). Data Communication Network X.25 Transport (spans all Central Offices NMA, or other OS In Normal Case, pvc2 on Node 1 is unused. pvc1 To rest of network In Normal Case, pvc1 on Node 2 is unused. pvc2 End Terminal OLS 40G DCC Channel pvc1 pvc2 End Terminal OLS 40G Repeater OLS 40G DCC Channel Node 1 To rest of network DCC Channel Node 2 DCC Channel embedded in the fiber NC-OLS40G001 Figure 6-8. Normal Case - No Failure, No Redirect 6 Failure Case Prior to Release 3.4, the NMA could only detect a line failure by verifying a loss of communication with the Tail End Network Element. When the TL1 traffic is lost, the NMA cannot detirmine what specific failure has occurred, creating difficulties in isolating the problem (Figure 6-9). 6-22 Issue 1 March 2001 365-575-536 Operations Interfaces Data Communication Network X.25 Transport (spans all Central Offices NMA, or other OS Line failure pvc1 To rest of network pvc2 End Terminal OLS 40G DCC Channel pvc1 pvc2 End Terminal OLS 40G Repeater OLS 40G DCC Channel To rest of network DCC Channel Node 1 Node 2 DCC Channel embedded in the fiber Line failure causes break of DCC communications NC-OLS40G002 Figure 6-9. Redirect Case Failure Case 6 The X.25 Traffic Redirect feature allows Node 1 to detect the loss of communication with Node 2 and reroute the TL1 traffic onto pvc2. The TL1 traffic then travels through the X.25 network and reaches Node 2 using pvc1, re-establishing communication between the two End Terminals. With TL1 traffic restored, the NMA can receive the TL1 alarm messages generated due to the original failure, allowing maintenance to isolate the problem more quickly and efficiently (Figure 6-10). Once the line failure is fixed, the TL1 traffic automatically reverts back to the DCC channel embedded in the fiber. Issue 1 March 2001 6-23 365-575-536 Operations Interfaces Data Communication Network X.25 Transport (spans all Central Offices NMA, or other OS DCC traffic is rerouted through the X.25 Transport DCC traffic rerouted through pvc2 of Node 1. pvc1 To rest of network Line failure pvc2 End Terminal OLS 40G DCC Channel DCC traffic arrives on pvc1 of Node 2. pvc1 Repeater OLS 40G pvc2 End Terminal OLS 40G DCC Channel To rest of network DCC Channel Node 1 Node 2 DCC Channel embedded in the fiber Line failure causes break of DCC communications NC-OLS40G003 Figure 6-10. Redirect Case Affected TL1 Commands ! 6 WARNING: The PVC2_REDIRECT parameter should be set to YES on one AND ONLY ONE End Terminal in a string. TL1 commands that support the X.25 Traffic Redirect feature include: ■ ENT-SYS ■ RTRV-SYS The X.25 Traffic Redirect feature is provisioned via the ENT-SYS TL1 command by setting the Input Parameter PVC2_REDIRECT to YES on an End Terminal. 6-24 Issue 1 March 2001 365-575-536 Operations Interfaces Message-Based Operations System Interface 6 The WaveStar OLS 40G provides a message-based operations system interface to Bellcore's Network Monitoring and Analysis (NMA) operations system and Release 4.1 of Lucent Technologies’ Integrated Transport Management Subnetwork Controller (ITM-SNC) system. This interface uses an X.25 protocol and the Transaction Language 1 (TL1) message language. The TL1 commands are based on Bellcore's TR-TSY-000833, Issue 3, Rev. 1*. The WaveStar OLS 40G supports an X.25/TL1 interface to report alarm and status conditions and performance monitoring data. The X.25/TL1 interface provides significantly more detailed information, such as identifying specific circuit packs and facilities, than the parallel telemetry interface. The X.25/TL1 interface operates over a synchronous line at 1200 to 56,000 baud. Different virtual circuits on the X.25/TL1 interface may be used to interface to different operations systems. In Release 2 and later releases, the WaveStar OLS 40G supports 2 permanent virtual circuits (PVCs), 6 switched virtual circuits (SVCs), and 16 table entries. There is a fixed association between permanent virtual circuits and X.25 logical channel numbers. The OS type and the associated TL1 autonomous messages are provisionable on a virtual circuit basis using the SECURITY-Enter-Channel ID-Security command. The OS type is a filter that determines the types of TL1 autonomous messages that are transmitted on a virtual circuit to the OS. The calling address is also provisionable for each switched virtual circuit using the SECURITY-Enter-Channel ID-Security command. The calling address is used to determine the X.25 logical channel number for switched virtual circuits. The WaveStar OLS 40G also provides a security function for the X.25/TL1 interface to protect against unauthorized access to the system functions (for example, provisioning). Logins, passwords, functional capabilities, authorization levels, and access to the system capabilities are provided. For more information about security, refer to Section 8, "Administration and Provisioning." The WaveStar OLS 40G may operate as a gateway network element (GNE) that serves as a single interface to the local X.25 message-based operations system for all the WaveStar OLS 40Gs in a network. Any WaveStar OLS 40G in a network will automatically operate as a gateway network element if it receives TL1 messages through the local X.25 interface that are for another node in the network. * Where TR-TSY-000833, Issue 3, Rev. 1 was deficient, the WaveStar OLS 40G conforms to Bellcore's TR-NWT-000833, Issue 4. Issue 1 March 2001 6-25 365-575-536 Operations Interfaces The number of gateway network elements in a network is based on operation needs. For example, to reduce the number of X.25 links between the network and the operations system, one WaveStar OLS 40G network element may operate as the gateway network element. If redundancy is desired, two or more WaveStar OLS 40G network elements may operate as gateway network elements. NOTE: A single network element may be the TL1 gateway network element, the directory services network element (DS-NE), and the alarm group network element (AGNE). However, for networks larger than 5 to 7 nodes, it is recommended that the TL1 gateway network element, DS-NE, and AGNE functions reside at different network elements. The message-based operations interface (Shelf X.25) is located on the interconnection panel of the End Terminal Shelf and the Repeater Shelf. Refer to Section 3, "Platform Description,” for more information about the physical location of the Shelf X.25. NOTE: If an X.25 login session is active and the cable connected to the Shelf X.25 port is inadvertently disconnected, reconnect the cable and continue the session. When the cable is disconnected, the WaveStar OLS 40G will report that the X.25 login session on the Shelf X.25 port is still active. The WaveStar OLS 40G supports a full set of TL1 commands (Table 6-2). NOTE: For detailed information about TL1 commands, refer to the on-line help available with the CenterLink Management Console or 365-575-540, WaveStar OLS 40G, Operations Systems Engineering Guide. Table 6-2. Supported TL1 Commands TL1 Command Description Activate-User (ACT-USER) activates a TL1 access login session Allow-Message-Equipment (ALW-MSG-EQPT) allows transmission of autonomous messages Cancel-User (CANC-USER) terminates a TL1 login session Copy-Program (CPY-PRGM) copies software from one network element to another network element Delete-Association-OT Port Signal deletes an association between an optical channel and one optical translator port signal (DLT-ASSOC-OTPS)* See footnotes at end of table. 6-26 Issue 1 March 2001 365-575-536 Operations Interfaces Table 6-2. Supported TL1 Commands (Contd) TL1 Command Description Delete-TID Address Map (DLT-TADRMAP)† deletes a TID from the network address map at the DSNE Delete-User-Security (DLT-USER-SECU) deletes the security parameters associated with a user Edit-Date and Time (ED-DAT) changes the system date and time Edit-Private Identifier (ED-PID) changes the user password Edit-User-Security (ED-USER-SECU) changes the login ID, password, and/or user privileges of any non-privileged user Enter-Association-OT Port Signal (DLT-ASSOC-OTPS) * enters an association between an optical channel and one optical translator port signal Enter-Channel ID-Security (ENT-CID-SECU) † enters set port security parameters for X.25, DTE, DCE, DCC, and SER TL1 ports Enter-Customer Maintenance Signal (ENT-CMS) provisions various parameters of the customer maintenance signal port Enter-Far End Communications (ENT-FECOM) † enables/disables remote access capabilities Enter-Network Element-Security (ENT-NE-SECU) † enters the global security parameters of the system Enter-Optical Channel (ENT-OCHAN) provisions various parameters of the optical channels Enter-OT Port Signal (ENT-OTPS) * provisions various parameters of an optical translator port signal Enter-Section Trace (ENT-SECTRC) * enters the expected transmit and receive section trace fields (J0 byte) of a SONET section terminating signal Enter-Supervisory (ENT-SUPR) provisions various parameters of the supervisory channel Enter-System (ENT-SYS) sets network element name and other system level parameters Enter-User-Security (ENT-USER-SECU) enters the security parameters associated with a user Inhibit-Message-Eqipment (INH-MSG-EQPT) inhibits transmission of all autonomous TL1 messages, office alarms, and/or parallel telemetry from a network element Initialize-Register-All (INIT-REG-ALL) initializes all current day and/or current 15-minute performance-monitoring storage registers Initialize-Register-Optical Line (INIT-REG-OLINE) initiates a request to the network element to baseline certain optical parameters for each optical line in a network element See footnotes at end of table. Issue 1 March 2001 6-27 365-575-536 Operations Interfaces Table 6-2. Supported TL1 Commands (Contd) TL1 Command Description Initialize-System (INIT-SYS) initializes provisionable parameters to their original value and restarts the network element software Operate-Alarm Cutoff-All (OPR-ACO-ALL) operates alarm cutoff to silence the audible office alarms Operate-External-Control (OPR-EXT-CONT) operates an external miscellaneous discrete control output Report Alarm (REPT ALM) autonomous reports of alarm conditions Report Alarm Environment (REPT ALM ENV) autonomous reports of environmental alarm conditions Report Conditions (REPT COND) autonomous reports of active status (nonalarmed) conditions every 6 hours Report Database Changes (REPT DBCHG) autonomous reports of internal provisioning commands, and line terminations Report Event (REPT EVT) autonomous reports of status conditions, including performance-monitoring threshold-crossing alerts (TCAs) Release-External-Control (RLS-EXT-CONT) releases an external miscellaneous discrete control output Retrieve-All (RTRV-ALL) retrieves the current provisioned state of low speed ports and slots Retrieve-Alarm-All (RTRV-ALM-ALL) retrieves active alarm conditions Retrieve-Alarm-Customer Maintenance-Signal (RTRV-ALM-CMS) retrieves facility-related events on the customer maintenance signal Retrieve-Alarm-Common (RTRV-ALM-COM) retrieves active alarm conditions that are common to the network element as a whole Retrieve-Alarm-Environment (RTRV-ALM-ENV) retrieves active environmental alarm conditions Retrieve-Alarm-Equipment (RTRV-ALM-EQPT) retrieves active equipment-related alarm conditions Retrieve-Alarm-Network (RTRV-ALM-NTWK) † retrieves active network alarm conditions Retrieve-Alarm-Optical Channel (RTRV-ALM-OCHAN) retrieves active alarm conditions that are facility related Retrieve-Alarm-Optical Line (RTRV-ALM-OLINE) retrieves active alarm conditions that are facility related events on the optical line See footnotes at end of table. 6-28 Issue 1 March 2001 365-575-536 Operations Interfaces Table 6-2. Supported TL1 Commands (Contd) TL1 Command Description Retrieve-Alarm-OT Port Signal (RTRV-ALM-OTPS) * retrieves active alarm conditions that apply to optical translator port signals Retrieve-Alarm-Supervisory (RTRV-ALM-SUPR) retrieves active alarm conditions that apply to facility related events on the supervisory line Retrieve-Autonomous Output (RTRV-AO) retrieves copies of autonomous TL1 messages Retrieve-Association-OT Port Signal (RTRV-ASSOC-OTPS) * retrieves optical channel and optical translator port signal associations Retrieve-Attribute-All (RTRV-ATTR-ALL) retrieves the notification codes associated with incoming low speed signal failure events Retrieve-Attribute-Alarm (RTRV-ATTR-ALM) retrieves the current values of the incoming signal alarm delay, alarm clear delay interval, and power minor alarm parameters Retrieve-Attribute-Control (RTRV-ATTR-CONT) retrieves provisioned description(s) of the external control outputs Retrieve-Attribute-Environment (RTRV-ATTR-ENV) retrieves provisioned description(s) of the environmental inputs Retrieve-Baseline (RTRV-BASELINE) † retrieves the time and the reason for last baseline of the optical lines Retrieve-Channel ID-Security (RTRV-CID-SECU) † retrieves the current CIT or TL1 port provisioning information Retrieve-Customer Maintenance Signal (RTRV-CMS) retrieves the current provisioned state and status conditions of the facility related events on the CMS port Retrieve-Condition-All (RTRV-COND-ALL) retrieves the current state of circuit pack slots and facilities Retrieve-Condition-Customer Maintenance Signal (RTRV-COND-CMS) retrieves status conditions of facility-related events on the CMS channel Retrieve-Condition-Common (RTRV-COND-COM) retrieves the status conditions that apply to the network element as a whole Retrieve-Condition- Equipment (RTRV-COND-EQPT) retrieves the alarm conditions reported in the RTRVALM-EQPT or RTRV-ALM-ENV reports Retrieve-Condition- Optical Channel (RTRV-COND-OCHAN) retrieves the status conditions of facility-related events at the channel level Retrieve-Condition-Optical Line (RTRV-COND-OLINE) retrieves the status conditions of facility-related events on the optical line Retrieve-Condition-OT Port Signal retrieves the status conditions of facility-related events (RTRV-COND-OTPS) * on optical translator port signals See footnotes at end of table. Issue 1 March 2001 6-29 365-575-536 Operations Interfaces Table 6-2. Supported TL1 Commands (Contd) TL1 Command Description Retrieve-Condition-Supervisory (RTRV-COND-SUPR) retrieves status conditions of facility-related events on the supervisory channel in the optical line Retrieve-Date (RTRV-DAT) † retrieves the date and daylight savings time provisioning information Retrieve-Equipment (RTRV-EQPT) retrieves circuit pack and version information for one or more slots Retrieve-Far End retrieves the provisioned state the OC-48 section data Communications (RTRV-FECOM) † communications channel (DCC) Retrieve-Header (RTRV-HDR) Retrieve-Log (RTRV-LOG) † retrieves system ID, time, and date retrieves the history log Retrieve-Map-Network (RTRV-MAP-NETWORK) retrieves a list of all network elements in the local SONET subnetwork Retrieve-Map-Ring (RTRV-MAP-RING) retrieves a list of all network elements in the local ring Retrieve-Network ElementSecurity (RTRV-NE-SECU) † retrieves the network element global security information Retrieve-Optical Channel (RTRV-OCHAN) retrieves the current provisioned state and current state of the optical channel Retrieve-Optical Line (RTRV-OLINE) retrieves the current provisioned state and current state of the optical line Retrieve-OT Port Signal (RTRV-OTPS) * retrieves the current provisioned state and current state of the optical translator port signals Retrieve-Performance Monitoring- retrieves performance-monitoring (PM) data, including All (RTRV-PM-ALL) historical PM data Retrieve-Performance Monitoring-Optical Channel (RTRV-PM-OCHAN) retrieves performance-monitoring (PM) data, including historical PM data associated with one or more channels Retrieve-Performance Monitoring-Optical Line (RTRV-PM-OLINE) retrieves performance-monitoring (PM) data, including historical PM data associated with one or more optical lines for a WaveStar OLS terminal Retrieve-Performance Monitoring-OT Port Signal (RTRV-PM-OTPS) * retrieves performance-monitoring (PM) data, including historical PM data associated with optical translator port signals Retrieve-Performance Monitoring- retrieves the start time for measuring the day bins Start Time (RTRV-PM-STIME) † Retrieve-Performance Monitoring-Supervisory (RTRV-PM-SUPR) See footnotes at end of table. 6-30 Issue 1 March 2001 retrieves performance-monitoring (PM) data, including historical PM data associated with the supervisory channel for a WaveStar OLS terminal 365-575-536 Operations Interfaces Table 6-2. Supported TL1 Commands (Contd) TL1 Command Description Retrieve-Relative Signal Power (RTRV-RELSPR) † reports instantaneous relative signal power of each channel Retrieve-Section Trace (RTRV-SECTRC) * retrieves the provisioned transmit and receive section traces, status of the section trace, and the actual receive section trace Retrieve-State (RTRV-STATE) † retrieves network element protection switching state and switch priority information Retrieve-Supervisory (RTRV-SUPR) retrieves current provisioned and current state of the supervisory channel Retrieve-System (RTRV-SYS) retrieves network element name and other system level parameters. Retrieve-Threshold-All (RTRV-TH-ALL) retrieves the current threshold level of one or more monitored parameters Retrieve-Threshold- Optical Channel (RTRV-TH-OCHAN) retrieves the current threshold level and TCA autonomous reporting status for one or more monitored parameters for the optical channel Retrieve-ThresholdOptical Line (RTRV-TH-OLINE) retrieves the current threshold level and TCA autonomous reporting status for one or more monitored parameters for the optical line Retrieve-ThresholdOT Port Signal (RTRV-TH-OTPS) * retrieves the current threshold level and TCA autonomous reporting status for one or more monitored parameters for the optical translator port signals Retrieve-Threshold- Supervisory (RTRV-TH-SUPR) retrieves the current threshold level and TCA autonomous reporting status for one or more monitored parameters for the supervisory channel Retrieve-User-Security (RTRV-USER-SECU) retrieves security parameters associated with a login Set-Attribute-Alarm (SET-ATTR-ALM) sets the current values of the incoming signal alarm delay, alarm clear delay interval, and power minor alarm parameters Set-Attribute-Control (SET-ATTR-CONT) provisions the description(s) of the external control outputs Set-Attribute-Environment (RTRV-ATTR-ENV) provisions the description(s) of the environmental inputs Set-Performance MonitoringStart Time (SET-PM-STIME) † sets the start time for measuring all 24-hour performance monitoring parameters Set-Source ID (SET-SID) sets the target identifier (TID) of the network element See footnotes at end of table. Issue 1 March 2001 6-31 365-575-536 Operations Interfaces Table 6-2. Supported TL1 Commands (Contd) TL1 Command Description Set-Threshold-Optical Channel (SET-TH-OCHAN) sets the threshold level for monitored parameters for optical channels Set-Threshold-Optical Line (SET-TH-OLINE) sets the threshold level for monitored parameters for optical lines Set-Threshold-OT Port Signal (SET-TH-OTPS) * sets the threshold level for monitored parameters for optical translator port signals Set-Threshold-Supervisory (SET-TH-SUPR) sets the threshold level for monitored parameters for the supervisory channel Test-Alarm (TEST-ALM)‡ tests audible and visible office alarms Test-Auto-Local (TEST-AUTO-LOCAL) ‡ tests the internal network element transmission paths for missing cabling between circuit packs Test-LED (TEST-LED) ‡ tests the LEDs of the whole system or a single circuit pack Test-Telemetry- Parallel (TEST-TLM-PAR) ‡ tests parallel telemetry and miscellaneous discrete points Update-System (UPD-SYS) updates the state of all the automatically provisioned parameters See footnotes at end of table. * Available in Release 3 and later releases. † Available in Release 2 and later releases. ‡ Available in Release 2.1 and later releases. 6-32 Issue 1 March 2001 365-575-536 Operations Interfaces Orderwire Interface 6 The orderwire and section user channel interfaces provide a facility for voice communications between adjacent network elements for maintenance personnel to perform facility maintenance. The End Terminal Shelf and Repeater Shelf provide the following channels per optical line and per direction for customer use: ■ 64-kb/s line orderwire (SONET E2 byte) ■ 64-kb/s section orderwire (SONET E1 byte) ■ 64-kb/s section user channel (SONET F1 byte). The line orderwire, section orderwire, and section user channel interfaces are EIA-422. The End Terminal Shelf can provide up to a maximum of 3 channels (2 orderwire and 1 user channel) per optical line for customer use. The Repeater Shelf can provide up to a maximum of 3 channels (2 orderwire and 1 user channel) per optical line and per direction for customer use. The line orderwire (LINE ORDERWIRE), section orderwire (SECTION ORDERWIRE), and section user channel (SECTION USER CHAN) interfaces are located on the interconnection panel of the End Terminal Shelf and Repeater Shelf. Refer to Section 3, "Platform Description,” for more information about the physical location of the line and section orderwire interfaces. Standard equipment can be connected to the orderwire interface. For example, a DANTEL * orderwire shelf may be used with the WaveStar OLS 40G. The orderwire and user channel interfaces provide channels for voice communications on a point-to-point basis between OLS End Terminals and/or OLS Repeaters. Each orderwire and user channel interface† provides a balanced pair for the following signals: ■ Transmit clock ■ Transmit frame ■ Receive clock ■ Receive frame ■ Receive data. The user must provide a balanced pair for the transmit data signal. * † Registered trademark of DANTEL Inc. The transmit and receive directions are not necessarily synchronized with each other. The phase and frequency will differ. The receive clock and frame signals are recovered from the incoming OC-48 signal. The transmit clock and frame signals are derived according to the provisioned synchronization mode. Issue 1 March 2001 6-33 365-575-536 Operations Interfaces All the balanced pairs use RS-422 signal levels and characteristics. These signals are provided as 12 pins in a 15-pin D-subconnector field. For detailed wiring and connector information, refer to SD-5G276-01, OLS Cabinet Application Schematic. The user side of the orderwire interface is configured as data circuit equipment (DCE). Internally, the WaveStar OLS 40G flips the transmit and receive data streams. 6-34 Issue 1 March 2001 7 Circuit Pack Descriptions Contents Overview 7-1 General 7-1 Circuit Pack/Unit/Modules and Software Compatibility 7-2 Control 7-4 ■ SYSCTL (LEA1) Circuit Pack Description 7-4 ■ SYSMEM (LEA2) Circuit Pack Description 7-9 ■ TOHCTL (LEA5) Circuit Pack Description 7-15 ■ OTCTL (LUD1) Circuit Pack Description 7-20 Transmission 7-24 ■ TLM (LDA1) Circuit Pack Description 7-24 ■ OMU (505A and 506A) Description 7-32 ■ ODU (605A, 606A, and 606B) Description 7-36 ■ OA (LEA7, LEA7B, LEA104, and LEA105) Circuit Pack Description 7-41 ■ OTU (41A_C, 41A_D, 41BB, 41C_C, 41D_, 41E, 41F_, and 41G) Circuit Pack Description 7-48 ■ QUAD OTU (41S) Circuit Pack Description 7-55 ■ OC12/STM4 OTPM (42A_ and 42B) Description 7-59 ■ OC3/STM1 OTPM (43A_ and 43B) Description 7-65 ■ LSBB OTPM (44A_ and 44B) Description 7-72 Issue 1 March 2001 7-i Contents 7-ii Issue 1 March 2001 Circuit Pack Descriptions 7 Overview 7 7 This section provides a detailed functional description of the WaveStar™ OLS 40G circuit packs, equipment units, and modules. 7 General The WaveStar OLS 40G circuit packs, equipment units, and modules are divided into two main categories: ■ Control circuit packs — System Controller (SYSCTL) LEA1 — System Memory (SYSMEM) LEA2 — Overhead Controller - Tributary (TOHCTL) LEA5 — Optical Translator Controller (OTCTL) LUD1 ■ Transmission circuit packs/equipment units/modules — Optical Amplifier (OA) LEA7 — Optical Amplifier (OA) LEA7B — Optical Amplifier (OA) LEA104 — Optical Amplifier (OA) LEA105 — Optical Multiplexing Unit (OMU) 505A — Optical Multiplexing Unit (OMU) 506A — Optical Demultiplexing Unit (ODU) 605A Issue 1 March 2001 7-1 365-575-536 Circuit Pack Descriptions — Optical Demultiplexing Unit (ODU) 606A — Optical Demultiplexing Unit (ODU) 606B — Telemetry Controller (TLM) LDA1 — 41F1 through 41F16 1.25 Gigabit Ethernet Optical Translator Unit (Add). 1.5µm Wavelength n (n=1-16) — 41G 1.25 Gigabit Ethernet Optical Translator Unit (Drop) 1.3µm Wavelength — SONET OC48/SDH STM16 Optical Translator Unit - 1.5µm Wavelength n (OTU 1.5 Wn) 41AnC (n=1-16) — SONET OC48/SDH STM16 Optical Translator Unit - 1.3µm (OTU 1.3) 41BB — SONET OC48/SDH STM16 Optical Translator Unit - 1.5µm Wavelength n 640km Dispersion Limit (OTU 1.5 Wn DISP) 41CnC (n=1-16) — Quad Optical Translator Unit (QUAD OTU) 41S — SONET OC12/SDH STM4 Optical Translator Port Module - 1.5µm Wavelength n (OTPM 1.5 Wn) 42An (n=1-16) — SONET OC12/SDH STM4 Optical Translator Port Module - 1.3µm (OTPM 1.3) 42B — SONET OC3/SDH STM1 Optical Translator Port Module - 1.5µm Wavelength n (OTPM 1.5 Wn) 43An (n=1-16) — SONET OC3/SDH STM1 Optical Translator Port Module - 1.3µm (OTPM 1.3) 43B — Low Speed Broadband Optical Translator Port Module - 1.5µm Wavelength n (LSBB OTPM 1.5 Wn) 44An (n=1-16) — Low Speed Broadband Optical Translator Port Module - 1.3µm (LSBB OTPM 1.3) 44B. Circuit Pack/Unit/Modules and Software Compatibility 7 Refer to Table 7-1 for information about circuit packs/units/modules and compatible software. 7-2 Issue 1 March 2001 365-575-536 Circuit Pack Descriptions Table 7-1. Circuit Packs/Units/Modules and Compatible Software Circuit Pack/Unit/Module Compatible Software R3.0.1 or R3.0.2 X X X X X Code Name R1.0 R2.0 R2.1 R3.3 R3.4 LDA1 TLM X X X X X LEA1 SYSCTL X X X X X LEA2 SYSMEM X X X X X LEA5 TOHCTL X X X X X LEA7 OA X X X X X LEA7 B OA X X LEA104 OA X X X LEA105 OA X X X X LUD1 OTCTL X X X 505A OMU X X X X X X 506A OMU X X X X 605A ODU X X X X X X 606A ODU X X X X 606B ODU X X X X * 41A1C – 41A16C OTU 1.5 Wn X X X 41BB* OTU 1.3 X X X 41C1C –41C16C* OTU 1.5 Wn DISP X X X 41F1 – 41F16* OTU GbE-1 1.5 Wn X X 41G* OTU GbE-1 1.3 X X 41S* QUAD OTU X X X 42A1–42A16* OTPM 1.5 Wn X X X 42B* OTPM 1.3 X X X 43A1–43A16* OTPM 1.5 Wn X X X 43B* OTPM 1.3 X X X 44A1–44A16* LSBB OTPM 1.5 Wn X X X 44B* LSBB OTPM 1.3 X X X * In releases prior to Release 3, the OTU, QUAD OTU, and OTPM circuit packs are equipped with only firmware. Downloadable software and the Optical Translator Controller (OTCTL) circuit pack are available in Release 3. Issue 1 March 2001 7-3 365-575-536 Circuit Pack Descriptions Control 7 SYSCTL (LEA1) Circuit Pack Description 7 Purpose of Circuit 7 The System Controller (SYSCTL) circuit pack is the main controller in the system. It has control over all WaveStar OLS 40G functions and, together with the System Memory (SYSMEM) circuit pack, provides all user interfaces to the system. Faceplate LED Indicator 7 The SYSCTL circuit pack has a red FAULT LED indicator on its faceplate (Figure 7-1). The red FAULT LED indicator is lighted when a circuit pack failure is detected or when the circuit pack loses power. If the circuit pack loses power, a separate path is provided for power from the SYSMEM circuit pack to light the FAULT LED indicator on the SYSCTL circuit pack. LEA1 XXXXXXXXX_ SYSCTL FAULT NC-84979301 Figure 7-1. 7-4 Issue 1 SYSCTL (LEA1) Circuit Pack March 2001 365-575-536 Circuit Pack Descriptions The sanity check circuitry detects hardware and software faults. When a fault occurs, the microprocessor is reset and the FAULT LED indicator on the circuit pack faceplate is lighted. General Description of Operation 7 The SYSCTL circuit pack provides overall administrative control of the WaveStar OLS 40G. It performs system-wide computations and performance monitoring. It also provides the serial user interfaces. The SYSCTL circuit pack also interfaces with the System Memory (SYSMEM), and Overhead Controller - Tributary (TOHCTL) circuit packs. In Release 3 and later releases the SYSCTL circuit pack also interfaces with the Optical Translator Controller (OTCTL) circuit pack. Detailed Description of Operation 7 7 Control Circuitry Microprocessor. Figure 7-2 provides an overall block diagram of the SYSCTL 7 circuit pack. The SYSCTL circuit pack is the highest level processor in the 2-level control hierarchy of the WaveStar OLS 40G. 7 Memory Start-Up Memory. The start-up memory consists of 64 kilobytes of read-only 7 memory. The start-up memory contains the program that allows the microprocessor to copy the executable code and data for the system from the nonvolatile memory of the SYSMEM circuit pack into the operating memory of the SYSCTL circuit pack. This allows the microprocessor to start up operation during a power-up or a reset condition or when initializing new software. The SYSCTL circuit pack also has a unique network services access point (NSAP) code in the read-only memory. Operating Memory. The main operating memory consists of 8 megabytes of 7 dynamic random access memory (DRAM). Direct memory access (DMA) allows the SYSCTL circuit pack to copy the executable code and data for the system from the nonvolatile memory of the SYSMEM circuit pack into the operating memory during a power-up or reset condition, or when initializing new software. Nonvolatile Memory. The nonvolatile memory consists of 128 bytes of 7 electrically-erasable programmable read-only memory (EEPROM). The nonvolatile memory is used to store information about the history of the SYSCTL circuit pack, such as the Common Language* CLEI code and type/version information. * Common Language is a registered trademark and CLEI, CLLI, CLCI, and CLFI are trademarks of Telcordia. Issue 1 March 2001 7-5 365-575-536 Circuit Pack Descriptions For more information about memory administration, refer to Chapter 8, "Administration and Provisioning." Sanity Timer FAULT LED Real Time Clock System Memory Interface Microprocessor Memory CIT (DCE) Overhead Access LAN Interface Overhead Access LAN CIT (DTE) User Interfaces Serial Telemetry Number 1 Serial Telemetry Number 2 X.25 -48 V (A) -48 V (B) Power Circuit nc-84979401 Figure 7-2. 7-6 Issue 1 SYSCTL Circuit Pack Block Diagram March 2001 365-575-536 Circuit Pack Descriptions Interface Circuitry 7 Overhead Access Interface. The overhead access allows the SYSCTL circuit pack to communicate with the Overhead Controller - Tributary (TOHCTL) and Optical Translator Controller (OTCTL) circuit packs (Release 3 and later). 7 Serial User Interfaces. The SYSCTL circuit pack provides the following serial user 7 interfaces: ■ CIT (DCE) interface: The CIT (DCE) interface is configured as data circuit equipment (DCE) for direct craft interface terminal (CIT) access. The CIT (DCE) interface allows direct access to a PC running CenterLink Management Console software. The CIT (DCE) interface may also be provisioned to allow direct access to an ASCII-based terminal. The CIT (DCE) interface supports data rates up to 9600 baud. ■ CIT (DTE) interface: The CIT (DTE) interface is configured as data terminating equipment (DTE) to allow a permanent connection to a modem. The CIT (DTE) interface allows dial-up access to a PC running CenterLink Management Console software. The CIT (DTE) interface may also be provisioned to allow access to an ASCII-based terminal. The CIT (DTE) interface supports data rates up to 9600 baud. ■ Serial telemetry interface: In Release 2 and later releases, the serial telemetry interface is used to transfer alarm, status, and control information to and from an external miscellaneous discrete unit via a 2400-baud EIA-422 port. The external miscellaneous discrete unit provides an additional 128 miscellaneous discrete environmental inputs and 32 control outputs. ■ X.25 interface: The X.25 interface supports X.25 protocol and the Transaction Language 1 (TL1) message language. The X.25 interface is used to report alarm and status conditions and performance-monitoring data to Bellcore's Network Monitoring and Analysis (NMA) system, Bellcore's Operations System/Intelligent Network Elements (OPS/INE), and Lucent Technologies' Integrated Transport Management Subnetwork Controller (ITM-SNC) systems using an EIA-232-D port operating at 1200 to 56,000 baud. For more information about these interfaces, refer to Chapter 6, "Operations Interfaces." 7 Power Circuitry The SYSCTL circuit pack receives two sources of −48 volts that are diode OR'd, fused, and filtered. A modular DC-to-DC power converter produces +5 volts and −5 volts used on the circuit pack. The power converter also provides a +5 volt source for the FAULT LED indicator on any circuit pack that has a power failure. The SYSCTL circuit pack monitors the two −48 volt sources to the circuit pack. If the SYSCTL circuit pack detects a failure of the onboard fuse or power converter, the red FAULT LED indicator will light. If the fuse or power converter fails, the SYSMEM circuit pack provides +5 volts to light the FAULT LED indicator on the SYSCTL circuit pack. Issue 1 March 2001 7-7 365-575-536 Circuit Pack Descriptions Quick Reference Summary 7 Control Functions 7 The SYSCTL circuit pack performs the following control and maintenance functions: (a) Stores the operating copy of the system executable code and data (b) Performs system-wide maintenance computations and performance monitoring (c) Automatically resets the system during power up (d) Maintains the real-time clock (e) Performs self audits (f) Controls the circuit pack faceplate FAULT LED indicator on the SYSCTL and the SYSMEM circuit packs. Interface Functions The SYSCTL circuit pack provides the following interface functions: 7-8 (a) Communications between the SYSCTL and SYSMEM circuit packs using the SYSCTL/SYSMEM interface (b) Communications between the SYSCTL circuit pack and the TOHCTL circuit pack (c) Communications between the SYSCTL circuit pack and the OTCTL circuit pack (Release 3 and later) (d) CIT (DCE) interface for direct local access to the system operating at 1200, 2400, 4800, or 9600 baud (e) CIT (DTE) interface for remote dial-up access to the system operating at 1200, 2400, 4800, or 9600 baud (f) Serial telemetry interface for additional miscellaneous discrete environmental inputs and control outputs operating at 2400 baud (g) X.25 interface for advanced provisioning, performance monitoring, administration, and maintenance activities operating at 1200 to 56,000 baud. Issue 1 March 2001 7 365-575-536 Circuit Pack Descriptions SYSMEM (LEA2) Circuit Pack Description 7 Purpose of Circuit 7 The System Memory (SYSMEM) circuit pack provides the nonvolatile memory necessary for storing the executable code and data for the system. The SYSMEM circuit pack also contains the office alarm circuitry and the processor parallel input/output (I/O) circuitry. Faceplate LED Indicator 7 The SYSMEM circuit pack has a red FAULT LED indicator on its faceplate (Figure 7-3). The red FAULT LED indicator is lighted during a reset condition, when a circuit pack failure is detected or when the circuit pack loses power. If the circuit pack loses power, a separate path is provided for power from the System Controller (SYSCTL) circuit pack to light the FAULT LED indicator on the SYSMEM circuit pack. LEA2 XXXXXXXXX_ SYSMEM FAULT NC-84979501 Figure 7-3. SYSMEM (LEA2) Circuit Pack Issue 1 March 2001 7-9 365-575-536 Circuit Pack Descriptions General Description of Operation 7 The SYSMEM circuit pack provides the following: ■ Nonvolatile program (executable code) and configuration (data) memory ■ Office alarms interface ■ User panel LED indicators and controls ■ Parallel telemetry interface ■ User-settable miscellaneous discrete interface. Detailed Description of Operation 7 Memory 7 Nonvolatile Program (Executable Code) Storage. Figure 7-4 shows a functional 7 block diagram of the SYSMEM circuit pack. The nonvolatile program storage is provided by 8 megabytes of flash erasable programmable read-only memory (flash-EPROM). This contains the main system software for all the controllers in the system (for example, System Controller, and board controllers). FlashEPROM combines the nonvolatility of EPROM with the in-circuit reprogramming ability of electrically erasable programmable read-only memory (EEPROM). Flash-EPROM allows in-service software upgrades to be performed locally or remotely (via modem connections). Nonvolatile Configuration (Data) Storage. The nonvolatile configuration storage 7 is provided by 128 kilobytes of EEPROM. This contains all system state and userprovisioned data. This includes all system parameters with their original and current values. EEPROM is byte erasable and writable. This allows configuration information to be easily changed during system operation. Nonvolatile Memory. The nonvolatile memory consists of 128 bytes of 7 electrically-erasable programmable read-only memory (EEPROM). The nonvolatile memory is used to store information about the history of the SYSMEM circuit pack such as the CLEI code and type/version information. For more information about memory administration, refer to Chapter 8, "Administration and Provisioning." 7-10 Issue 1 March 2001 365-575-536 Circuit Pack Descriptions System Controller FAULT LED System Controller Memory Interface Sanity Timer User Panel LEDs Office Alarms EEPROM Flash EPROM Alarm Cutoff Parallel Telemetry User-Settable Discrete Input -48 V (A) -48 V (B) Power Circuit User-Settable Discrete Output nc-81330301 Figure 7-4. SYSMEM Circuit Pack Block Diagram Issue 1 March 2001 7-11 365-575-536 Circuit Pack Descriptions Office Alarms Interface 7 The SYSMEM circuit pack provides relays for the WaveStar OLS 40G to interface with a central office alarm grid. The relays are controlled by the microprocessor on the SYSCTL circuit pack. Relays are provided for audible and visible alarms for the following: ■ Critical ■ Major ■ Minor. The normally closed contacts for the critical and major relays provide the alarm closure if power fails. For more information about the office alarms interface, refer to Chapter 6, "Operations Interfaces." Indicator Strip/User Panel LEDIndicators and Controls The SYSMEM circuit pack provides the outputs to light the following LED indicators on the indicator strip of OLS cabinets and the user panel of End Terminal and Repeater Shelves: ■ Critical (CR) alarm ■ Major (MJ) alarm ■ Minor (MN) alarm ■ Abnormal (ABN) status ■ Near-end activity (NE ACTY) ■ Far-end activity (FE ACTY). The SYSMEM circuit pack also accepts the alarm cutoff (ACO) input from the indicator strip of OLS cabinets or the user panel of End Terminal and Repeater Shelves. For more information about the indicator strip and user panel, refer to Chapter 6, "Operations Interfaces." 7-12 Issue 1 March 2001 7 365-575-536 Circuit Pack Descriptions 7 Parallel Telemetry Interface The SYSMEM circuit pack supplies the following alarms from the WaveStar OLS 40G as remote information accessible to an operations system: ■ Local CR, MJ, and MN alarms ■ Remote CR, MJ, and MN alarms. For more information about the parallel telemetry interface, refer to Chapter 6, "Operations Interfaces." 7 User-Settable Miscellaneous Discrete Interface The SYSMEM circuit pack accepts 16 user-settable environmental inputs and provides 4 user-settable control outputs at a WaveStar OLS 40G network element. For more information about the miscellaneous discrete interface, refer to Chapter 6, "Operations Interfaces." 7 Power Circuitry The SYSMEM circuit pack receives two sources of −48 volts that are diode OR'd, fused, and filtered. Two modular DC-to-DC power converters produce +5 volts and +12 volts used on the circuit pack. The +5 volt power converter provides a +5 volt source for the FAULT LED indicator on the System Controller (SYSCTL) circuit pack if a power failure occurs on the SYSCTL circuit pack. The +12 volt power converter is used to program the flash memory. The SYSMEM circuit pack monitors the two −48 volt sources to the circuit pack. If the SYSMEM circuit pack detects a failure of the onboard fuse or power converter, the red FAULT LED indicator will light. If the fuse or +5 volt power converter fails, the SYSCTL circuit pack provides +5 volts to light the FAULT LED indicator on the SYSMEM circuit pack. Issue 1 March 2001 7-13 365-575-536 Circuit Pack Descriptions Quick Reference Summary 7 Control Functions 7 The SYSMEM circuit pack performs the following control functions: (a) Provides program (executable code) memory storage (b) Provides configuration (data) memory storage. Interface Functions The SYSMEM circuit pack provides the following interface functions: 7-14 (a) Office alarms (b) Indicator strip/user panel LED indicators and controls (c) Parallel telemetry to remotely report alarm information to an operations system (d) User-settable miscellaneous discrete interface that provides environmental inputs and control outputs. Issue 1 March 2001 7 365-575-536 Circuit Pack Descriptions TOHCTL (LEA5) Circuit Pack Description 7 Purpose of Circuit 7 The Overhead Controller - Tributary (TOHCTL) circuit pack provides access to the synchronous optical network (SONET) section overhead of the supervisory signal. The SONET overhead contains section data communications channel (DCC) bytes (bytes D1-D3). Faceplate LED Indicator 7 The TOHCTL circuit pack has a red FAULT LED indicator on its faceplate (Figure 7-5). The red FAULT LED indicator is lighted during a reset condition, when a circuit pack failure is detected or when the circuit pack loses power. If the circuit pack loses power, a separate path is provided for power from the System Controller (SYSCTL) circuit pack to light the FAULT LED indicator on the TOHCTL circuit pack. The sanity check circuitry detects hardware and software faults. When a fault occurs, the microprocessor is reset and the FAULT LED indicator on the circuit pack faceplate is lighted. Issue 1 March 2001 7-15 365-575-536 Circuit Pack Descriptions LEA5 XXXXXXXXX_ TOHCTL FAULT NC-84979601 Figure 7-5. TOHCTL (LEA5) Circuit Pack General Description of Operation 7 The TOHCTL circuit pack terminates up to eight section overhead channels. However, end terminals only use one channel, and repeaters use two channels. The section overhead channel includes section data communications channel bytes D1-D3. Detailed Description of Operation Control Circuitry 7 7 Processor. Figure 7-6 provides an overall block diagram of the TOHCTL circuit 7 pack. The processor performs protocol processing for layer 3 (network) of the Open Systems Interconnection (OSI) 7-layer stack for the SONET section DCC. The processor also manages the overhead access local area network (OALAN) communications with the SYSCTL circuit pack. 7-16 Issue 1 March 2001 365-575-536 Circuit Pack Descriptions Sanity Timer FAULT LED Processor Memory Overhead Access LAN Interface 8 TLM Circuit DCC 8 Pack Overhead Access LAN DCC Interface -48 V (A) -48 V (B) Power Circuit nc-84979701 Figure 7-6. TOHCTL Circuit Pack Block Diagram Issue 1 March 2001 7-17 365-575-536 Circuit Pack Descriptions Memory 7 Start-Up Memory. The start-up memory consists of 64 kilobytes of read-only 7 memory. The start-up memory contains the program that allows the processor to load the executable code and data from the SYSCTL circuit pack into the operating memory. This allows the processor to start up operation during a powerup, or a reset condition, or when initializing new software. Operating Memory. The main operating memory consists of 4 megabytes of 7 DRAM. Direct memory access (DMA) allows the processor to load the executable code and data received from the SYSCTL circuit pack (via the overhead access local area network) into the operating memory during a power-up, or reset condition, or when initializing new software. Nonvolatile Memory. The nonvolatile memory consists of 128 bytes of 7 electrically-erasable programmable read-only memory (EEPROM). The nonvolatile memory is used to store information about the history of the TOHCTL circuit pack such as the CLEI code and type/version information. Interface Circuitry 7 DCC Interface. The DCC interface interacts with the Telemetry Controller (TLM) 7 circuit packs. The DCC interface performs protocol processing for layer 1 (physical) and layer 2 (data link) of the OSI 7-layer stack for the section DCC of the supervisory signal. In the receive direction, the TLM circuit pack transmits the DCC overhead bytes via the overhead channel to the DCC interface. The DCC interface transmits the information to the processor for layer 3 (network) protocol processing. In the transmit direction, the DCC interface accepts the DCC bytes from the processor and transmits the information via the overhead channel to the TLM circuit pack. This information provides end-to-end communications and maintenance. The DCC interface also supports bidirectional 1x1 protection switching for the supervisory signal DCC. 7-18 Issue 1 March 2001 365-575-536 Circuit Pack Descriptions Table 7-2 shows the section DCC bytes that are provided by the TOHCTL circuit pack. Table 7-2. Overhead Bytes Name Overhead Byte Data Rate Access DCC D1-D3 192 kb/s System Controller Overhead Access Local Area Network Interface. The overhead access local 7 area network (OALAN) interface allows the TOHCTL circuit pack to communicate with the SYSCTL circuit pack. The SYSCTL circuit pack allows users to access the section DCC using the CIT and message-based operations system (X.25) interfaces for single-ended operations. 7 Power Circuitry The TOHCTL circuit pack receives two sources of −48 volts that are diode OR'd, fused, and filtered. A modular DC-to-DC power converter produces +5 volts used on the circuit pack. The TOHCTL circuit pack monitors the two −48 volt sources to the circuit pack. If the TOHCTL circuit pack detects a failure of the onboard fuse or power converter, the red FAULT LED indicator will light. If the fuse or power converter fails, the SYSCTL circuit pack provides +5 volts to light the FAULT LED indicator on the TOHCTL circuit pack. Quick Reference Summary 7 The TOHCTL circuit pack performs the following control and interface functions: (a) Interfaces with the TLM circuit packs to send and receive DCC data (b) Performs low-level (layers 1 through 3 of the OSI 7-layer stack) protocol processing for the section DCC of the supervisory signal (c) Provides communications with the SYSCTL circuit pack using the OALAN interface (d) Performs debugging functions, trace functions, and sanity checks (e) Controls the circuit pack faceplate FAULT LED indicator. Issue 1 March 2001 7-19 365-575-536 Circuit Pack Descriptions OTCTL (LUD1) Circuit Pack Description 7 Purpose of Circuit 7 The Optical Translator Controller (OTCTL) manages the board controllers on the Optical Translator Unit (OTU) and Quad Optical Translator Unit (QUAD OTU) circuit packs. The OTCTL circuit pack also interfaces with the System Controller (SYSCTL) circuit pack. Faceplate LED Indicator 7 The OTCTL circuit pack has a red FAULT LED indicator on its faceplate (Figure 7-7). The red FAULT LED indicator is lighted during a reset condition, when a circuit pack failure is detected, or when the circuit pack loses power.If the circuit pack loses power, a separate path is provided for power from the System Controller (SYSCTL) circuit pack to light the FAULT LED indicator on the OTCTL circuit pack. LUD1 OTCTL nc-81360301 Figure 7-7. OTCTL (LUD1) Circuit Pack The sanity check circuitry detects hardware and software faults. When a fault occurs, the microprocessor is reset and the FAULT LED indicator on the circuit pack faceplate is lighted. 7-20 Issue 1 March 2001 365-575-536 Circuit Pack Descriptions 7 General Description of Operation The OTCTL circuit pack interfaces with the SYSCTL circuit pack and the board controllers on the OTU and QUAD OTU circuit packs. 7 Detailed Description of Operation Control Circuitry 7 Processor . Figure 7-8 provides an overall block diagram of the OTCTL circuit pack. 7 Sanity Timer FAULT LED Memory Processor 1 Board Controller LAN 0 and 1 Board Controller LAN Interface Line Controller LAN 0 Line Controller LAN Interface -48 V (A) -48 V (B) Power Circuit nc-81330401 Figure 7-8. OTCTL Circuit Pack Block Diagram Issue 1 March 2001 7-21 365-575-536 Circuit Pack Descriptions Memory 7 Start-Up Memory . The start-up memory consists of 64 kilobytes of read-only 7 memory. The start-up memory contains the program that allows the processor to load the executable code and data from the SYSCTL circuit pack into the operating memory. This allows the processor to start up operation during a powerup or a reset condition, or when initializing new software. Operating Memory . The main operating memory of the OTCTL circuit pack 7 consists of 8 megabytes of DRAM. Direct memory access (DMA) allows the board controller to load the executable code and data received from the SYSCTL circuit pack (via the overhead access local area network) into the operating memory during a power-up or reset condition, or when initializing new software. Nonvolatile Memory . The nonvolatile memory consists of 128 bytes of electrically-erasable programmable read-only memory (EEPROM). The nonvolatile memory is used to store information about the history of the OTCTL circuit pack such as the CLEI code and type/version information. 7 For more information about memory administration, refer to Section 8, "Administration and Provisioning." Interface Circuitry 7 Overhead Access Local Area Network Interface . The overhead access local area network (LCLAN) interface allows the OTCTL circuit pack to communicate with the SYSCTL circuit pack. 7 Board Controller Local Area Network Interface . Two board controller local area 7 network (BCLAN) interfaces (BCLAN 0 and BCLAN 1) allow the OTCTL circuit pack to communicate with the board controllers on the OTU and QUAD OTU circuit packs. Power Circuitry The OTCTL circuit pack receives two sources of −48 volts that are diode OR'd, fused, and filtered. A modular DC-to-DC power converter produces +5 volts used on the circuit pack. The power converter also provides two +5 volt sources for the FAULT LED indicators on the OTU and QUAD OTU circuit packs if a power failure occurs. The OTCTL circuit pack monitors the two −48 volt sources to the circuit pack. If the OTCTL circuit pack detects a failure of the onboard fuse or power converter, the red FAULT LED indicator will light. If the fuse or power converter fails, the SYSCTL circuit pack provides +5 volts to light the FAULT LED indicator on the OTCTL circuit pack. 7-22 Issue 1 March 2001 7 365-575-536 Circuit Pack Descriptions Quick Reference Summary OTCTL 7 7 Control Functions The OTCTL circuit pack performs the following control and maintenance functions: a. Controls the board controllers on the OTU and QUAD OTU circuit packs b. Control of the circuit pack faceplate FAULT LED indicator c. Isolation of faults for the BCLANs. 7 Interface Functions The OTCTL circuit pack provides the following interface functions: a. Communications between the OTCTL and SYSCTL circuit packs using the OALAN interface b. Communications between the OTCTL and the board controllers on the OTU and QUAD OTU circuit packs using the BCLAN interface. Issue 1 March 2001 7-23 365-575-536 Circuit Pack Descriptions Transmission 7 TLM (LDA1) Circuit Pack Description 7 Purpose of Circuit 7 The Telemetry Controller (TLM) circuit pack provides a bidirectional interface between an IS-3/STM-1 customer maintenance signal and the supervisory signal. The TLM circuit pack also performs maintenance functions that are used to monitor the performance of the optical line. Faceplate LED Indicator 7 The TLM circuit pack has a red FAULT LED indicator on its faceplate (Figure 7-9). The red FAULT LED indicator is continuously lighted when a circuit pack failure is detected or when the circuit pack loses power. If the circuit pack loses power, a separate path is provided for power from the System Controller (SYSCTL) circuit pack to light the FAULT LED indicator on the TLM circuit pack. LDA1 TLM FAULT CM IN IN CM OUT OUT nc-84979801 Figure 7-9. 7-24 Issue 1 TLM (LDA1) Circuit Pack March 2001 365-575-536 Circuit Pack Descriptions The board controller on the TLM circuit pack detects hardware and software faults on the circuit pack. When a fault occurs, the FAULT LED indicator on the circuit pack is continuously lighted. If an incoming customer maintenance signal from the lightguide cross-connect panel (or equivalent) fails, the FAULT LED indicator will flash on and off. General Description of Operation 7 The TLM circuit pack terminates one bidirectional IS-3 customer maintenance signal. In the transmit direction (toward the optical line), the TLM circuit pack converts the incoming IS-3/STM-1 optical signal to an electrical STS-3 signal (155.52 Mb/s). The STS-3 signal is demultiplexed into three STS-1 signals (51.84 Mb/s) and synchronized to the system clock. The three STS-1 signals are then multiplexed back to one STS-3 signal. The overhead channel bytes are added to the STS-3 signal, and the STS-3 signal is converted to an IS-3 supervisory signal and transmitted to the Optical Amplifier (OA) circuit pack. In the receive direction (toward the customer maintenance signal), the TLM circuit pack converts the incoming IS-3 supervisory signal to an electrical STS-3 signal (155.52 Mb/s). The overhead channel bytes are removed from the STS-3 signal and sent to the transport overhead hyperchannel (TOH) processor. The STS-3 signal is demultiplexed into three STS-1 signals (51.84 Mb/s) and synchronized to the system clock. The three STS-1 signals are then multiplexed back to one STS-3 signal. The STS-3 signal is then converted to an IS-3/STM-1 customer maintenance signal and transmitted to the customer. Detailed Description of Operation 7 7 Transmission Circuitry Transmit Direction. Figure 7-10 provides an overall block diagram of the TLM 7 circuit pack. In the transmit direction (toward the optical line), the circuit pack accepts one synchronous optical network (SONET) IS-3 (155.52 Mb/s) nonreturn-to-zero (NRZ) or synchronous digital hierarchy (SDH) STM-1 compatible optical signal. Fiber access to the TLM circuit pack is via a fixed ST-type buildout block and a removable ST-type, FC-type, or SC-type lightguide buildout on the circuit pack faceplate (labeled CM IN). Lightguide buildouts are chosen based on the attenuation desired, the type of connector interface, and the type of lightguide jumpers (single-mode or multimode). All factory-equipped TLM circuit packs come with a removable ST-type 0-dB lightguide buildout. When installing or removing lightguide buildouts, do not pull the beam (front tab) outward. Pulling the beam (front tab) outward could result in breaking the beam (front tab). Issue 1 March 2001 7-25 365-575-536 Circuit Pack Descriptions The customer maintenance signal (CMS) receiver accepts the IS-3/STM-1 signal, converts it to an electrical STS-3 signal (155.52 Mb/s), and sends it to a timing recovery circuit. The timing recovery circuit recovers a 155.52 MHz clock signal from the STS-3 signal and retimes the STS-3 signal with the recovered clock signal. This clock signal provides all the timing for the transmit direction. The STS-3 and clock signals are then sent to the customer maintenance signal (CMS) STS-3 byte processor. The CMS STS-3 byte processor descrambles and demultiplexes the STS-3 signal into three STS-1 signals (51.84 Mb/s) and outputs the three STS-1 signals and a common clock signal to the supervisory (SUP) STS-3 byte processor. E1, E2, F1 Transmit Direction Tone Generator CMS RCVR Customer Maintenance Signal OC-3/ IS-3/ STM-1 CMS TRMTR STS-3 Byte Processor (CMS) TOH Processor DCC1-3 Interconnection Panel TOHCTL Tone Generator STS-3 Byte Processor (SUP) SUP TRMTR To OA Supervisory Signal SUP RCVR From OA or ODU* -48 V (A) -48 V (B) BCLAN Power Circuit Board Controller Circuit Tone Monitor Receive Direction * Release 2.1 and later nc-84979901 Figure 7-10. TLM Circuit Pack Block Diagram The SUP STS-3 byte processor scrambles and multiplexes the three STS-1 signals back to one STS-3 signal (155.52 Mb/s). The SUP STS-3 byte processor also accepts the overhead channel bytes (D1-3, E1, E2, and F1 bytes) from the transport overhead hyperchannel (TOH) processor and adds the bytes to the STS-3 signal. The STS-3 signal is timed using a 155.52-MHz signal generated by the clock generator. 7-26 Issue 1 March 2001 365-575-536 Circuit Pack Descriptions The SUP transmitter converts the STS-3 signal to a 1532-nm IS-3 supervisory signal for transmission to an Optical Amplifier (OA) circuit pack. Fiber access to the TLM circuit pack is via a fixed ST-type buildout block and a removable ST-type, FC-type, or SC-type lightguide buildout on the circuit pack faceplate (labeled OUT). Receive Direction. In the receive direction (toward the customer maintenance 7 signal line), the SUP receiver accepts the STS-3 signal (155.52 Mb/s) from the OA circuit pack or Optical Demultiplexer Unit (ODU) in single OA applications. Fiber access to the TLM circuit pack is via a fixed ST-type buildout block and a removable ST-type, FC-type, or SC-type lightguide buildout on the circuit pack faceplate (labeled IN). Lightguide buildouts are chosen based on the attenuation desired, the type of connector interface, and the type of lightguide jumpers (single-mode or multimode). All factory-equipped TLM circuit packs come with a removable ST-type 0-dB lightguide buildout. When installing or removing lightguide buildouts, do not pull the beam (front tab) outward. Pulling the beam (front tab) outward could result in breaking the beam (front tab). The SUP receiver accepts the IS-3 supervisory signal, converts it to an electrical STS-3 signal (155.52 Mb/s), and sends it to a timing recovery circuit. The timing recovery circuit recovers a 155.52 MHz clock signal from the STS-3 signal and retimes the STS-3 signal with the recovered clock signal. This clock signal provides all timing for the receive direction. The STS-3 and clock signals are then sent to the SUP STS-3 byte processor. The STS-3 byte processor descrambles and demultiplexes the STS-3 signal into three STS-1 signals (51.84 Mb/s) and outputs the three STS-1 signals and a common clock signal to the CMS STS-3 byte processor. The SUP STS-3 byte processor also recovers the overhead bytes and sends them to the TOH processor. The CMS STS-3 byte processor scrambles and multiplexes the three STS-1 signals back to one STS-3 signal (155.52 Mb/s). The CMS transmitter converts the STS-3 signal to an IS-3/STM-1 CMS signal (155.52 Mb/s) for transmission. Fiber access to the TLM circuit pack is via a fixed ST-type buildout block and a removable ST-type, FC-type, or SC-type lightguide buildout on the circuit pack faceplate (labeled CM OUT). Lightguide buildouts are chosen based on the attenuation desired, the type of connector interface, and the type of lightguide jumpers (single-mode or multimode). All factory-equipped TLM circuit packs come with a removable ST-type 0-dB lightguide buildout. When installing or removing lightguide buildouts, do not pull the beam (front tab) outward. Pulling the beam (front tab) outward could result in breaking the beam (front tab). Issue 1 March 2001 7-27 365-575-536 Circuit Pack Descriptions Control Circuitry 7 The board controller circuit controls all the circuit pack activities. The board controller circuit interfaces with the SYSCTL circuit pack using the board controller local area network (BCLAN). The TLM circuit pack reports the status of the circuit pack and the incoming customer maintenance and supervisory signals, as well as the circuit pack inventory information (CLEI code, serial number, etc.). The SYSCTL circuit pack uses the status information for fault detection and isolation. The TLM circuit pack also responds to control signals from the SYSCTL circuit pack. Overhead Controller Circuitry 7 The transport overhead hyperchannel (TOH) circuitry provides access to the overhead bytes of the supervisory signal. Access is only provided to the DCC (D1-D3 bytes), orderwire (E1, E2 bytes), and section user channel (F1 byte). Timing Circuitry 7 Timing for the transmit direction of the TLM pack (toward the optical line) is normally derived from the IS-3 customer maintenance signal. Timing for the receive direction is normally derived from the supervisory signal received from the Optical Amplifier (OA) circuit pack or the Optical Demultiplexer Unit (ODU). When the customer maintenance signal is not present or other customer maintenance signal alarm conditions are present, the SUP STS-3 byte processor sends an alarm indication signal (AIS) or unequipped signal with clock provided by the local, free running, 51.84 MHz clock generator circuitry. If the CMS receiver detects a loss of signal or loss of frame, the board controller circuitry will switch to the local clock. When the supervisory signal coming from the OA circuit pack or ODU is lost, the entire receive portion of the TLM circuit pack is lost. For example, the DCC channels and E1, F1, and E2 bytes must be obtained from another optical line. However, the CMS STS-3 byte processor sends AIS to the customer using the local clock generator circuitry. Fault Detection Circuitry 7 Monitoring and Testing. The board controller circuit monitors all the activities on 7 the circuit pack. The TLM circuit pack has an in-service and out-of-service built-in test capability. In-service testing is continuous. If an error occurs, the board controller reports the error to the SYSCTL circuit pack using the board controller local area network (BCLAN). An out-of-service test is performed whenever the TLM circuit pack is inserted in a slot or when a reset is performed. The tone generator circuitry provides a 12.960-KHz signal to modulate the supervisory signal. This modulation will be detected on the receive side of an OA to OA optical section to estimate the performance of the supervisory channel. The 12.960 KHz tone is derived from the clock generator circuitry. 7-28 Issue 1 March 2001 365-575-536 Circuit Pack Descriptions 7 Performance Monitoring. The TLM circuit pack monitors the following performance-monitoring parameters for the supervisory signal: ■ Laser bias current (LBC-SU) ■ Signal power received (SPR-SU) ■ Line (B2) coding violations (CV-L) ■ Line (B2) errored seconds (ES-L) ■ Line (B2) severely errored seconds (SES-L) ■ Line (B2) unavailable seconds (UAS-L). When an incoming customer maintenance signal defect from the customer is detected, the TLM circuit pack inserts STS-1 path AIS in each STS-1 tributary of the STS-3 signal (155.52 Mb/s) transmitted toward the OA circuit pack. When an incoming supervisory signal defect from the OA circuit pack or ODU is detected, the TLM circuit pack inserts STS-1 path AIS in each STS-1 tributary of the customer maintenance signal transmitted toward the customer. When an internal fault is detected, the TLM circuit pack inserts STS-1 path AIS in each STS-1 tributary of the supervisory signal transmitted toward the OA circuit pack and in the customer maintenance signal transmitted toward the customer. 7 Power Circuitry The TLM circuit pack receives two sources of −48 volts that are diode OR'd, fused, and filtered. A modular DC-to-DC power converter produces +5 volts used on the circuit pack. If the TLM circuit pack detects the failure of the onboard fuse or power converter, the red FAULT LED indicator will light. If the fuse or power converter fails, the SYSCTL circuit pack provides +5 volts to light the FAULT LED indicator on the TLM circuit pack. Issue 1 March 2001 7-29 365-575-536 Circuit Pack Descriptions Quick Reference Summary 7 Transmit Functions 7 The TLM circuit pack performs the following transmit functions: (a) Receives one IS-3/STM-1 customer maintenance signal [(155.52 Mb/s) non-return-to-zero (NRZ) SONET compatible optical signal] from the customer (b) Converts the customer maintenance signal to an electrical STS-3 signal (c) Recovers a 155.52 MHz clock signal from STS-3 signal and retimes the STS-3 signal with the recovered clock (d) Descrambles and demultiplexes the STS-3 signal into three STS-1 signals (51.84 Mb/s) (e) Scrambles and multiplexes the three STS-1 signals to an STS-3 signal (155.52 Mb/s) (f) Adds overhead channel bytes (D1-3, E1, E2, and F1) (g) Provides the supervisory signal to an OA circuit pack (h) Accepts the SONET section DCC bytes from the TOHCTL circuit pack (i) Accepts the SONET section orderwire and user channel byte from the interconnection panel. Receive Functions The TLM circuit pack performs the following receive functions: 7-30 (a) Receives an IS-3/STM-1 supervisory signal (155.52 Mb/s) from an OA circuit pack or ODU (b) Recovers a 155.52 MHz clock signal from STS-3 signal and retimes the STS-3 signal with the recovered clock (c) Recovers the overhead bytes from the STS-3 signal (d) Descrambles and demultiplexes the STS-3 signal into three STS-1 signals (51.84 Mb/s) (e) Scrambles and multiplexes the three STS-1 signals to an STS-3 signal (155.52 Mb/s) (f) Converts the electrical STS-3 signal to an IS-3 customer maintenance signal (g) Provides the customer maintenance signal to the customer. (h) Provides the SONET section DCC bytes to the TOHCTL circuit pack (i) Provides the SONET section orderwire and user channel bytes to the interconnection panel. Issue 1 March 2001 7 365-575-536 Circuit Pack Descriptions 7 Timing and Control Functions The TLM circuit pack performs the following timing and control functions: (a) Uses the incoming supervisory signal to synchronize the outgoing customer maintenance signal (b) Uses the incoming customer maintenance signal to synchronize the outgoing supervisory signal (c) Performs internal fault detection and interfaces with the SYSCTL circuit pack using the board controller local area network (BCLAN) (d) Stores inventory information (CLEI code, serial number, etc.) (e) Controls the circuit pack faceplate FAULT LED indicator. 7 Maintenance Signal Functions The TLM circuit pack performs the following maintenance signal functions: (a) Detects incoming (from the customer) customer maintenance signal (CMS) loss of signal (LOS), loss of frame (LOF), and signal degrade (SD) based on the B2 error rate (b) Detects incoming (from the optical line) supervisory signal loss of signal (LOS), loss of frame (LOF), and signal degrade (SD) based on the B2 error rate (c) Inserts STS-1 path AIS in each STS-1 tributary of the customer maintenance signal (155.52 Mb/s) transmitted toward the customer when incoming (from the optical line) supervisory signal LOS or LOF is detected (d) Inserts STS-1 path AIS in each STS-1 tributary of the supervisory signal (155.52 Mb/s) transmitted toward the OA circuit pack when incoming (from the customer) CMS LOS or LOF is detected (e) Inserts STS-1 path AIS in each STS-1 tributary of the supervisory signal transmitted toward the OA circuit pack and in the customer maintenance signal transmitted toward the customer when an internal fault is detected. Issue 1 March 2001 7-31 365-575-536 Circuit Pack Descriptions OMU (505A and 506A) Description 7 Purpose of Circuit 7 The Optical Multiplexing Units (OMU) provide an interface between incoming drop side signals and an outgoing wavelength division multiplexed optical line signal. The 505A OMU accepts up to 8 incoming drop side signals. The 506A (Release 2.1.0-OLS and later software) OMU accepts up to 16 incoming drop side signals. 7 Faceplate LED Indicator The OMUs do not have a red FAULT LED indicator on the faceplate. The 505A OMU faceplate (Figure 7-11) has optical connectors for up to 8 incoming drop side signals and one optical connector for the outgoing optical line signal. Optical Connectors OMU (505A) nc-84980001 Figure 7-11. OMU (505A) 7-32 Issue 1 March 2001 365-575-536 Circuit Pack Descriptions The 506A OMU faceplate (Figure 7-12) has optical connectors for up to 16 incoming drop side signals and one optical connector for the outgoing optical line signal. OMU (506A) 1. IN 2. IN 3. IN 4. IN 5. IN 6. IN 7. IN 8. IN 9. IN 10. IN 11. IN 12. IN 13. IN 14. IN 15. IN 16. IN OMU.OUT nc-84980001.1 Figure 7-12. OMU (506A) General Description of Operation 7 The OMU combines the incoming drop side signals using wavelength division multiplexing onto a single outgoing fiber. The 505A OMU accepts up to 8 incoming drop side signals. The 506A OMU accepts up to 16 incoming drop side signals. Issue 1 March 2001 7-33 365-575-536 Circuit Pack Descriptions Detailed Description of Operation 7 7 Transmission Circuitry Figure 7-13 provides an overall block diagram of the OMU. The 505A OMU accepts up to eight drop side signals, and the 506A OMU accepts up to sixteen drop side signals. Fiber access to the 505A OMU is via fixed ST-type buildout blocks on the OMU faceplate. Fiber access to the 506A OMU is via fixed LC-type buildout blocks on the OMU faceplate. The OMU passes through all optical signals into the system. The combiner module of the OMU optically combines the drop side signals onto a single fiber. The combined signal (optical line signal) is sent to the Optical Amplifier (OA) circuit pack. Drop Side Signals OTCTL Combiner Module BCLAN Optical Line Signal OPS Circuit Pack Board Controller Circuit -48 V (A) -48 V (B) Power Circuit nc-84980101.1 Figure 7-13. OMU Block Diagram 7-34 Issue 1 March 2001 365-575-536 Circuit Pack Descriptions 7 Control Circuitry The OMU does not have a board controller circuit. However, the OMU has an equip lead that is connected to the System Controller (SYSCTL) circuit pack. This equip lead is shared among all the OMUs and Optical Demultiplexing Units (ODUs). The equip lead becomes active when any OMU or ODU becomes equipped. Four status leads connect each OMU to an OA circuit pack. These four leads are used to indicate version/type information to the board controller on an OA circuit pack. Quick Reference Summary 7 7 Transmit Functions The OMU performs the following transmit functions: (a) Receives up to sixteen drop side signals from a compatible lightwave system (b) Wavelength division multiplexes the drop side signals onto a single fiber (c) Provides the combined signal (optical line signal) to an OA circuit pack. Issue 1 March 2001 7-35 365-575-536 Circuit Pack Descriptions ODU (605A, 606A, and 606B) Description 7 Purpose of Circuit 7 The Optical Demultiplexing Unit (ODU) provides an interface between an incoming wavelength division multiplexed optical line signal and outgoing drop side signals. The 605 ODU provides up to 8 outgoing drop side signals. The 606A and 606B (Release 2.1.0-OLS and later software) ODUs provide up to 16 outgoing drop side signals. The 606B ODU provides one outgoing supervisory signal. 7 Faceplate LED Indicator The ODUs do not have a red FAULT LED indicator on the faceplate. The 605A ODU faceplate (Figure 7-14) has optical connectors for an incoming optical line signal and up to 8 outgoing drop side signals. Optical Connectors ODU (605A) 1.OUT 8.OUT ODU.IN nc-84980201 Figure 7-14. ODU (605A) 7-36 Issue 1 March 2001 365-575-536 Circuit Pack Descriptions The 606A and 606B ODU faceplate has optical connectors for an incoming optical line signal and up to 16 outgoing drop side signals. The 606B ODU faceplate (Figure 7-15) also has an optical connector for an outgoing supervisory signal (TLM.OUT). ODU (606B) 1. OUT 2. OUT 3. OUT 4. OUT 5. OUT 6. OUT 7. OUT 8. OUT 9. OUT 10. OUT 11. OUT 12. OUT 13. OUT 14. OUT 15. OUT 16. OUT TLM.OUT ODU.IN nc-84980001.2 Figure 7-15. 606B ODU General Description of Operation 7 The ODU accepts one optical line signal and splits the optical line signal using wavelength division multiplexing. The 605A ODU splits the optical line signal into up to 8 drop side signals. The 606A and 606B ODUs split the optical line signal into up to 16 drop side signals. The 606B ODU also filters out the supervisory signal. The supervisory signal output from the ODU is used when the network element is in a 1-OA configuration. The 606B ODU can be used in 1- and 2-OA configurations. Issue 1 March 2001 7-37 365-575-536 Circuit Pack Descriptions Detailed Description of Operation 7 7 Transmission Circuitry Figure 7-16 provides an overall block diagram of the 605A and 606A ODUs. The ODU accepts one optical line signal from an Optical Amplifier (OA) circuit pack. Fiber access to the 605A ODU is via fixed ST-type buildout blocks on the ODU faceplate. Fiber access to the 606A ODU is via fixed LC -type buildout blocks on the ODU faceplate. The splitter module of the 605A ODU optically splits the optical line signal into up to 8 drop side signals. The splitter module of the 606A ODU optically splits the optical line signal into up to 16 drop side signals. The ODU is designed with specific passbands. Optical signals outside the specific bands will not pass through. Drop Side Signals OA Splitter Module Optical Line Signal OA Temperature Monitor/Control SYSCTL OA 4 nc-84980301 Figure 7-16. 605A and 606A ODU Block Diagram 7-38 Issue 1 March 2001 365-575-536 Circuit Pack Descriptions Figure 7-17 provides an overall block diagram of the 606B ODU. The 606B ODU accepts one optical line signal. Fiber access to the 606B ODU is via fixed LC-type buildout blocks on the ODU faceplate.The splitter module optically splits the optical line signal into up to 16 drop side signals and a supervisory signal. The ODU is designed with specific passbands. Optical signals outside the specific bands will not pass through. Drop Side Signals OTCTL Combiner Module BCLAN Optical Line Signal OPS Circuit Pack Board Controller Circuit -48 V (A) -48 V (B) Power Circuit nc-84980101.1 Figure 7-17. 606B ODU Block Diagram Issue 1 March 2001 7-39 365-575-536 Circuit Pack Descriptions 7 Control Circuitry The ODU does not have a board controller circuit. However, the ODU has an equip lead that is connected to the System Controller (SYSCTL) circuit pack. This equip lead is shared among all the ODU and Optical Multiplexing Units (OMUs). The equip lead becomes active when any ODU or OMU becomes equipped. Four status leads connect each ODU to an OA circuit pack. These four leads are used to indicate version/type information to the board controller on an OA circuit pack. The passband filter in the ODU must be temperature controlled for proper operation. The temperature monitor/control is located on the OA circuit pack. This temperature/control operation requires an ODU and OA match, for example, an ODU in slot 1B must have an OA in slot 1B or an ODU in slot 2A must have an OA in slot 2A. Quick Reference Summary 7 Receive Functions The ODU performs the following receive functions: 7-40 (a) Receives one optical line signal (b) Splits the optical line signal into up to sixteen drop side signals and one supervisory signal (c) Provides the drop side signals to compatible lightwave systems. Issue 1 March 2001 7 365-575-536 Circuit Pack Descriptions OA (LEA7, LEA7B, LEA104, and LEA105) Circuit Pack Description 7 Purpose of Circuit 7 The LEA7, LEA7B, LEA104, and LEA105 Optical Amplifier (OA) circuit packs optically amplify an optical line signal and provide an add/drop function for the supervisory signal. The LEA7 and LEA7B OA circuit pack supports long reach applications with 16 wavelengths and one or two optical amplifiers. The LEA7B includes an optical monitoring test port at the optical amplifier output. The port enables the customer to monitor data channels using an optical spectrum analysis instrument. The LEA7B OA circuit pack is compatible with Release 3.3 and later software. The LEA104 OA circuit pack supports long span applications with 16 wavelengths and two optical amplifiers. The LEA104 OA circuit pack is compatible with Release 3.3. The LEA105 OA circuit pack supports short reach applications with 16 wavelengths and one or two optical amplifiers.The LEA105 OA circuit pack is compatible with Release 3.3. For more information about applications, refer to Chapter 2, "Applications." Issue 1 March 2001 7-41 365-575-536 Circuit Pack Descriptions 7 Faceplate LED Indicator The LEA7, LEA104, and LEA105 OA circuit packs have a red FAULT LED indicator on the faceplate (Figure 7-18). Figure 7-19 shows the LEA7B OA circuit pack faceplate. LEA7 xxxxxxxxx_ OA FAULT Optical connectors OUT IN TLM OUT TLM IN nc-849804/01 Figure 7-18. OA (LEA7, LEA104, and LEA105) Circuit Pack The red FAULT LED indicator is continuously lighted when a circuit pack failure is detected or when the circuit pack loses power. If the circuit pack loses power, a separate path is provided for power from the System Controller (SYSCTL) circuit pack to light the FAULT LED indicator on the OA circuit pack. The board controller on the OA circuit pack detects hardware and software faults on the circuit pack. When a fault occurs, the FAULT LED indicator on the circuit pack is continuously lighted. If an incoming drop side signal or optical line signal fails, the FAULT LED indicator will flash on and off. 7-42 Issue 1 March 2001 365-575-536 Circuit Pack Descriptions LEA107B XXXXXXXX_ OA FAULT O_MON OUT IN TLM OUT TLM IN Optical Connectors nc-40G-84980401.5 Figure 7-19. LEA7B OA Circuit Pack General Description of Operation 7 The OA circuit pack optically amplifies an optical line signal. The OA circuit pack accepts an optical line signal from an Optical Multiplexing Unit (OMU) or from another OA circuit pack. The OA circuit pack also accepts a supervisory signal from the Telemetry Controller (TLM) circuit pack. The supervisory signal is combined with the amplified optical line signal using wavelength division multiplexing. The OA circuit pack provides the amplified optical line signal to an Optical Demultiplexing Unit (ODU) or another OA circuit pack. Issue 1 March 2001 7-43 365-575-536 Circuit Pack Descriptions 7 Detailed Description of Operation 7 Transmission Circuitry Figure 7-20 provides an overall block diagram of the OA circuit pack. Optical Line Signal Optical Line Signal Amplifier Module Supervisory Signal Supervisory Signal TLM TLM Pump Laser ODU/OMU SYSCTL 4 BCLAN Monitor Circuit Board Controller Circuit -48 V (A) -48 V (B) ODU Power Circuit Temperature Control Circuit nc-84980501 Figure 7-20. OA Circuit Pack Block Diagram The OA circuit pack accepts one optical line signal and one supervisory signal. Fiber access to the OA circuit pack is via fixed ST-type buildout blocks and a removable ST-type, FC-type, or SC-type lightguide buildout on the circuit pack faceplate (labeled IN, OUT, TLM IN, and TLM OUT). Lightguide buildouts are chosen based on the attenuation desired, the type of connector interface, and the type of lightguide jumpers (single-mode or multimode). All factory-equipped OA circuit packs come with a removable ST-type 0-dB lightguide buildout. When installing or removing lightguide buildouts, do not pull the beam (front tab) outward. Pulling the beam (front tab) outward could result in breaking the beam (front tab). The OA circuit pack provides optical amplification for optical line signals within the 1555-nm±6 nm wavelength. Pump lasers provide the power for amplification.The optical line signal input to the OA circuit pack passes through erbium-doped fiber. 7-44 Issue 1 March 2001 365-575-536 Circuit Pack Descriptions The same fiber is also driven with a 980-nm optical output from the pump lasers. The erbium-doped fiber transfers energy from the 980-nm pump laser signal to the optical line signal. The OA circuit pack accepts an optical line signal, drops the 1532-nm supervisory signal to a TLM circuit pack after the pre-amplifier stage, combines the amplified optical line signal (after the pre-amplifier and post-amplifier stages) with the 1532-nm supervisory signal from a TLM circuit pack, and outputs the combined optical line signal and supervisory signal. For information about output power and engineering rules, refer to Section 10, “Technical Specifications.” 7 Control Circuitry The board controller circuit controls all the circuit pack activities. The board controller circuit interfaces with the SYSCTL circuit pack using the board controller local area network (BCLAN). The OA circuit pack reports the status of the circuit pack and the incoming optical line and supervisory signals, as well as the circuit pack inventory information (CLEI code, serial number, etc.). The board controller also reads OMU/ODU inventory information using four status leads. The SYSCTL circuit pack uses the status information for fault detection and isolation. The OA circuit pack also responds to control signals from the SYSCTL circuit pack. The board controller circuit also monitors and controls the temperature of the passband filters on the Optical Demultiplexing Units (ODUs). This temperature/ control operation requires an ODU and OA match, for example, an ODU in slot 1B must have an OA in slot 1B or and ODU in slot 2A must have an OA in slot 2A. 7 Fault Detection Circuitry Monitoring and Testing. The board controller circuit monitors all the activities on 7 the circuit pack. The OA circuit pack has an in-service and out-of-service built-in test capability. In-service testing is continuous. If an error occurs, the board controller reports the error to the SYSCTL circuit pack using the board controller local area network (BCLAN). An out-of-service test is performed whenever the OA circuit pack is inserted in a slot or when a reset is performed. The temperature control circuit monitors and controls the temperature of the passband filters on the ODU. The temperature control unit monitors the resistance and passes current through a simple heater circuit on the ODU to increase the temperature (the component itself does not generate any heat). The component cannot be cooled but can only be allowed to cool by free convection. The OA circuit packs monitor and control the temperature of the ODU in the samenumbered OMU/ODU slot. For example, the OA circuit pack in slot 1A of a shelf monitors and controls the temperature of the ODU in the OMU/ODU 1A slot. The monitor circuitry detects an amplitude modulated (AM) signal that is superimposed on each drop side signal by the transmitting lightwave system. A different tone frequency is used for each possible wavelength. The total bandwidth Issue 1 March 2001 7-45 365-575-536 Circuit Pack Descriptions allocated to the tone frequencies is 5 to 30 kHz. For more information about the possible wavelengths and the approximate associated tone frequencies, refer to Section 10, “Technical Specifications.” The monitor circuitry samples the optical power after the first stage of amplification in the amplifier module. The monitor circuitry converts the optical signal to an electrical signal and measures the power of the electrical signals that are present in the 5- to 30-kHz frequency band. The monitor circuitry measures the following parameters: ■ Tone Power: The tone power is the amplitude of the signal present in the frequency band dedicated to each of the tones. The magnitude of the measured signal is assumed to be proportional to the magnitude of the optical signal that carries the tone. ■ Total Power (Signal plus Noise): The total power is the sum of the tone powers of the optical channels excluding the supervisory channel. The measured value is proportional to the total optical power in the optical channels. Performance Monitoring. The OA circuit pack monitors the following performance-monitoring parameters for the optical line signal: ■ Total optical power received (TOPR-OL) ■ Laser bias current for pump 1 (LBC-P1) ■ Laser bias current for pump 2 (LBC-P2) ■ Laser backface current for pump 1 (LBFC-P1) ■ Laser backface current for pump 2 (LBFC-P2) 7 The OA circuit pack also monitors the signal power received (SPR-C) performance-monitoring parameter for each optical channel. Power Circuitry The OA circuit pack receives two sources of −48 volts that are diode OR'd, fused, and filtered. A modular DC-to-DC power converter produces +5 volts used on the circuit pack. If the OA circuit pack detects the failure of the onboard fuse or power converter, the red FAULT LED indicator will light. If the fuse or power converter fails, the SYSCTL circuit pack provides +5 volts to light the FAULT LED indicator on the OA circuit pack. 7-46 Issue 1 March 2001 7 365-575-536 Circuit Pack Descriptions Quick Reference Summary 7 7 Transmit Functions The OA circuit pack performs the following transmit functions: (a) Optically amplifies the optical line signal (b) Adds/drops the supervisory signal. 7 Control Functions The OA circuit pack performs the following timing and control functions: (a) Performs internal fault detection and interfaces with the SYSCTL circuit pack using the board controller local area network (BCLAN) (b) Stores inventory information for ODU/OMU and OA circuit pack (CLEI code, serial number, etc.) (c) Monitors and controls the temperature of the passband filters on the ODU (d) Controls the circuit pack faceplate FAULT LED indicator. Issue 1 March 2001 7-47 365-575-536 Circuit Pack Descriptions OTU (41A_C, 41A_D, 41BB, 41C_C, 41D_, 41E, 41F_, and 41G) Circuit Pack Description 7 Purpose of Circuit 7 The SONET OC48/SDH STM16 Optical Translator Unit (OC48/STM16 OTU) circuit pack electrically regenerates (amplifies, retimes, and reshapes) a single OC-48/STM-16 signal in one direction and inserts a clean tone signal. 7 Faceplate LED Indicator The OC48/STM16 OTU circuit pack has a red FAULT LED indicator on its faceplate (Figure 7-21). The red FAULT LED indicator is continuously lighted when a circuit pack failure is detected or when the circuit pack loses power. Fault LED Lock IN OUT Lock nc-85222201 Figure 7-21. OC48/STM16 OTU (41A_C, 41BB, and 41C_C) Circuit Pack 7-48 Issue 1 March 2001 365-575-536 Circuit Pack Descriptions The board controller on the OC48/STM16 OTU circuit pack detects hardware and software faults on the circuit pack. When a fault occurs, the FAULT LED indicator on the circuit pack is continuously lighted. If the incoming OC-48/STM-16 signal fails, the FAULT LED indicator will flash on and off. General Description of Operation 7 The OC48/STM16 OTU circuit pack accepts any SONET OC-48/SDH STM-16 wavelength in the 1.3-µm (1280-1335 nm) or 1.5-µm (1480-1580 nm) range and converts it to an electrical STS-48 signal. The electrical STS-48 signal is reshaped, retimed, and amplified. The electrical STS-48 signal is also demultiplexed into sixteen 155.52 Mb/s signals. This allows certain SONET section (B1) overhead bytes to be extracted and monitored. In Release 3 and later releases, the OC48/STM16 OTU circuit pack [except 41F(1-6) and 41G]also reads the OC-48 section trace byte (J0). NOTE: The OC48/STM16 OTU circuit pack does not change the SONET overhead bytes and is not considered a SONET regenerator. The STS-48 signal is then combined with a wavelength specific tone signal and converted back to a specific wavelength OC-48/STM-16 signal for transmission over a single mode fiber. The 41F(1-16) 1.25 Gigabit Ethernet Optical Translator Unit, also called the GbE1 OTU, supports the 1.0 Gigabit Ethernet interface (not a SONET or SDH signal). The 41F(1-16) OTU supports the use of Severely Errored Seconds - Section (SESS) for performance monitoring but not the J0 byte for section trace or the B1 byte. The SESS will be accumulated only when a loss of signal is present. They are used to add 1.5µm wavelength signals. The 41G 1.25 Gigabit Ethernet Optical Translator Unit (Drop), also called the GbE-1 OTU, operates at the 1.3µm wavelength. The GbE-1 OTU is capable of recieving and transmitting the 1.0 Gb/s Ethernet as specified in the IEEE Standard 802.3, Clause 38. The OTU interfaces with the following 10000BASE-LX Transmit characteristics on the add side and 1000BASE-SX on the drop side. The 41A(1-16)C OC48/STM16 OTU circuit packs support the 16 wavelengths on systems with total dispersion not exceeding 6800 ps/nm. The 41C(1-16)C OC48/ STM16 OTU circuit packs support 16 wavelengths on systems with total dispersion not exceeding 10900 ps/nm. The 41BB OC48/STM16 OTU circuit pack generates a SONET OC-48/SDH STM-16 signal in the 1.3-µm range for other SONET OC-48/SDH STM-16 receivers. Issue 1 March 2001 7-49 365-575-536 Circuit Pack Descriptions For detailed information about the specific wavelengths and tone signals associated with the 41A(1-16)C, 41BB, and 41C(1-16)C OC48/STM16 OTU circuit packs, refer to Section 10, “Technical Specifications.” 7 Detailed Description of Operation 7 Transmission Circuitry Figure 7-22 shows an overall block diagram of an OC48/STM16 OTU circuit pack. The OC48/STM16 OTU circuit pack accepts one 2.5 Gb/s non-return-to-zero (NRZ) SONET OC-48/SDH STM-16 optical signal. BCLAN Tone Detector Tone Generator Receiver Module Transmitter Module Byte Demultiplexor Receive Byte Processor Board Controller Circuit CP FAIL INC SIG FAIL Misc. Discrete Outputs -48V (A) -48V (B) Power Circuit nc81422501.1 Figure 7-22. OC48/STM16 OTU Circuit Pack Block Diagram 7-50 Issue 1 March 2001 365-575-536 Circuit Pack Descriptions Fiber access to the OC48/STM16 OTU circuit pack is via two fixed ST-type buildout blocks and removable ST-type, FC/PC-type, or SC-type lightguide buildouts on the circuit pack faceplate (labeled IN and OUT). Lightguide buildouts for the IN connector are chosen based on the attenuation desired and the type of connector interface the single-mode lightguide jumper is equipped with. Lightguide buildouts for the OUT connector are chosen based on the type of connector interface the single-mode lightguide jumper is equipped with. There are three types of lightguide buildouts available for OC48/STM16 OTU circuit packs: ST-type, FC/PC-type, and SC-type. All factory-equipped OC48/STM16 OTU circuit packs come with a removable ST-type 0-dB lightguide buildout on the IN and OUT connectors. When installing or removing lightguide buildouts, do not pull the beam (front tab) outward. Pulling the beam (front tab) outward could result in breaking the beam (front tab). The receiver module accepts the OC-48/STM-16 signal and converts it to an electrical STS-48 signal. The receiver module also detects loss of signal (LOS). Timing is also extracted and the data is regenerated. This includes signal amplification, retiming, and reshaping. The STS-48 data signal is then passed to the transmitter module. The STS-48 data signal and 2.5 GHz clock signal are also passed to the byte demultiplexer. The byte demultiplexer receives the STS-48 data signal from the receiver module and demultiplexes the STS-48 data signal to sixteen 155.52 Mb/s signals. The sixteen 155.52 Mb/s data signals and a 155.52 MHz clock signal are sent to the receive byte processor in a parallel format. The receive byte processor frames on the incoming signals and converts them to 16 byte serial 155.52 Mb/s data signals. The SONET section B1 overhead bytes are also extracted and monitored for errors. The receive byte processor is only used for error monitoring. Its output signals are not used. In Release 3 and later releases, the receive byte processor also reads the OC-48 section trace byte (J0). The transmitter module combines a wavelength specific tone signal from the tone generator with the STS-48 signal and converts it back to an optical OC-48/ STM-16 signal. A single line distributed feedback laser with driver and control circuits, converts the electrical signal to optical pulses for transmission. The tone generator circuit generates specific tones based on the wavelength assigned to the OC48/STM16 OTU circuit pack. For detailed information about the specific tones and the associated wavelengths assigned to the OC48/STM16 OTU circuit packs, refer to Section 10, “Technical Specifications.” Issue 1 March 2001 7-51 365-575-536 Circuit Pack Descriptions Control Circuitry 7 The board controller circuit controls all the circuit pack activities. In Release 3 and later releases, the board controller circuit also interfaces with the Optical Translator Controller (OTCTL) circuit pack via the board controller local area network (BCLAN). The board controller reports the status of the circuit pack and the incoming OC-48/STM-16 signal using the BCLAN interface (Release 3 and later), miscellaneous discrete outputs, and the FAULT LED indicator on the circuit pack faceplate. NOTE: The miscellaneous discrete outputs are no longer needed and should not be used to avoid redundant alarms. Fault Detection Circuitry 7 Monitoring and Test . The board controller circuit monitors all the activities on the 7 circuit pack. The OC48/STM16 OTU circuit pack has an in-service and out-ofservice built-in test capability. An out-of-service test is performed whenever the OC48/STM16 OTU circuit pack resets. In-service testing is continuous. The board controller circuit reports failures when they occur via the BCLAN interface (Release 3 and later), miscellaneous discrete interface, and the circuit pack faceplate FAULT LED indicator. When the OC48/STM16 OTU circuit pack is inserted in a slot or reset, an out-of-service test is performed. Performance Monitoring . The OC48/STM16 OTU circuit pack provides performance-monitoring circuitry for the following performance parameters: ■ Laser bias current (LBC) ■ Optical transmit power (OPT) ■ Coding violations - section near end (CVS*) (Release 3 and later) ■ Errored second - section near end (ESS*) (Release 3 and later) ■ Severe errored second - section near end (SESS*) (Release 3 and later) ■ Severe errored framing seconds - section near end (SEFS) (Release 3 and later). *When using an ITM-SC in an OLS, only the CVS, ESS, and SESS parameters are available. 7-52 Issue 1 March 2001 7 365-575-536 Circuit Pack Descriptions 7 Power Circuitry The OC48/STM16 OTU circuit pack receives two sources of −48 volts that are diode OR'd, fused, and filtered. Modular DC-to-DC power converters produce +1.8, +5, −2, and −5.2 volts used on the circuit pack. The OC48/STM16 OTU circuit pack monitors the two −48 volt sources to the circuit pack and any failures are reported to the board controller. If the OC48/ STM16 OTU circuit pack detects a loss of power feeder A or power feeder B, the board controller activates miscellaneous discrete 1 and keeps the laser turned on. If the OC48/STM16 OTU circuit pack detects a failure of the onboard fuse or power converter, the board controller activates miscellaneous discrete 1, turns off the laser, and may light the FAULT LED indicator. The FAULT LED indicator may not light for some fuse or power converter failures on the OC48/STM16 OTU circuit pack. Issue 1 March 2001 7-53 365-575-536 Circuit Pack Descriptions Quick Reference Summary 7 Receive Functions 7 The OC48/STM16 OTU circuit pack performs the following receive functions: (a) Receives a standard SONET OC-48/SDH STM-16 optical signal (b) Converts the OC-48/STM-16 signal to an electrical STS-48 signal (c) Extracts the 2.5 GHz clock signal and regenerates the STS-48 data signal (d) Demultiplexes the STS-48 signal into sixteen 155.52 Mb/s signals (e) Monitors the SONET section (B1) overhead bytes (f) Reads the SONET section (B1) trace byte (J0) (Release 3 and later). Transmit Functions 7 The OC48/STM16 OTU circuit pack performs the following transmit functions: (a) Combines a wavelength specific tone signal with the STS-48 signal from the receiver module (b) Modulates a laser transmitter to produce a SONET OC-48/SDH STM-16 optical signal. Timing and Control Functions The OC48/STM16 OTU circuit pack performs the following timing and control functions: 7-54 (a) Extracts a 2.5 GHz clock signal from the incoming OC-48/STM-16 high speed signal (b) Performs internal fault detection (c) Controls the circuit pack faceplate FAULT LED indicator (d) Activates miscellaneous discrete outputs to an external miscellaneous discrete unit (e) Reports to the Optical Translator Controller (OTCTL) circuit pack using the board controller local area network (BCLAN) (Release 3 and later) (f) Stores inventory information (CLEI code, serial number, etc.). Issue 1 March 2001 7 365-575-536 Circuit Pack Descriptions QUAD OTU (41S) Circuit Pack Description 7 Purpose of Circuit 7 The Quad Optical Translator Unit (QUAD OTU) circuit pack consists of a module carrier and up to four plug-in Optical Translator Port Modules (OTPMs). Each OTPM electrically regenerates a single optical signal in one direction and inserts a clean tone signal. Faceplate LED Indicator 7 The QUAD OTU circuit pack has a red FAULT LED indicator on its faceplate (Figure 7-23). The red FAULT LED indicator is continuously lighted when a circuit pack failure is detected or when the circuit pack loses power. Issue 1 March 2001 7-55 365-575-536 Circuit Pack Descriptions 41S S1:1 OTU Lucent SNC6101EAA S1:1 OTPM SNC670REAA Lucent 42A1 SNC670GEAA 42A9 S1:1 OTPM Lucent ACTIVE ACTIVE IN IN OUT OUT Port 1 S1:1 OTPM Lucent FAULT FAULT ACTIVE ACTIVE SNC670JEAA Lucent 42A11 SNC670KEAA 42A12 S1:1 OTPM FAULT Port 4 Invisible Laser RadiationWhen Open And Fiber Optic CableDisconnected.Avoid Direct ExposureTo Beam. Rayonnement laser Invisible en cas d’ouverture et al le cable otique est deconnecte. Exposition Dangereuse au faisceau. FAULT DANGER Port 3 FAULT IN IN OUT OUT Port 2 nc-85232401.5 Figure 7-23. QUAD OTU (41S) Circuit Pack (Equipped with Four OTPMs) 7-56 Issue 1 March 2001 365-575-536 Circuit Pack Descriptions The board controller on the QUAD OTU circuit pack detects hardware and software faults on the circuit pack. When a fault occurs, the FAULT LED indicator on the circuit pack is continuously lighted. 7 General Description of Operation The Quad Optical Translator Unit (QUAD OTU) circuit pack consists of a module carrier and up to four Optical Translator Port Modules (OTPMs). The module carrier contains the common interface circuitry required to mount, power, control, and monitor up to four OTPMs. Each OTPM electrically regenerates a single optical signal in one direction and inserts a clean tone signal. 7 Detailed Description of Operation 7 Control Circuitry Figure 7-24 shows an overall block diagram of an QUAD OTU circuit pack. BCLAN Board Controller Circuit Up to 4 OTPMs CP FAIL INC SIG FAIL Misc. Discrete Outputs -48V (A) -48V (B) Power Circuit Up to 4 OTPMs nc81422501.2 Figure 7-24. QUAD OTU Circuit Pack Block Diagram The board controller circuit controls all the circuit pack activities. The board controller circuit also controls and monitors up to four OTPMs. In Release 3 and later releases, the board controller circuit interfaces with the Optical Translator Controller (OTCTL) circuit pack via the board controller local area network (BCLAN). The board controller reports the status of the circuit pack and the incoming signals using the BCLAN interface (Release 3 and later), miscellaneous discrete outputs, and the faceplate FAULT LED indicator of the QUAD OTU circuit pack and OTPM. Issue 1 March 2001 7-57 365-575-536 Circuit Pack Descriptions NOTE: The miscellaneous discrete outputs are no longer needed and should not be used to avoid redundant alarms. 7 Fault Detection Circuitry Monitoring and Test . The board controller circuit monitors all the activities on the 7 circuit pack and polls the OTPMs for alarm and status information. The QUAD OTU circuit pack has an in-service and out-of-service built-in test capability. An out-of-service test is performed whenever the OTPM resets. In-service testing is continuous. The board controller circuit reports failures when they occur via the BCLAN interface (Release 3 and later), the miscellaneous discrete interface, and the faceplate FAULT LED indicator of the QUAD OTU circuit pack and OTPM. When the QUAD OTU circuit pack is inserted in a slot or reset, an out-of-service test is performed. 7 Power Circuitry The QUAD OTU circuit pack receives two sources of −48 volts that are diode OR'd, fused, and filtered. Modular DC-to-DC power converters produce and −5.2, +3.3, and +5 volts used on the circuit pack and on up to four OTPMs. Quick Reference Summary 7 Timing and Control Functions The QUAD OTU circuit pack performs the following timing and control functions: 7-58 (a) Performs internal fault detection for module carrier and up to four OTPMs (b) Controls the QUAD OTU circuit pack and OTPM faceplate FAULT LED indicator (c) Activates miscellaneous discrete outputs to an external miscellaneous discrete unit (d) Reports to the Optical Translator Controller (OTCTL) circuit pack using the board controller local area network (BCLAN) (Release 3 and later) (e) Stores inventory information (CLEI code, serial number, etc.). Issue 1 March 2001 7 365-575-536 Circuit Pack Descriptions OC12/STM4 OTPM (42A_ and 42B) Description 7 Purpose of Circuit 7 The SONET OC12/SDH STM4 Optical Translator Port Module (OC12/STM4 OTPM) electrically regenerates a single OC-12/STM-4 signal in one direction and inserts a clean tone signal. Faceplate LED Indicator 7 The OC12/STM4 OTPM has a red FAULT LED indicator and a green ACTIVE LED indicator on its faceplate (Figure 7-25). The red FAULT LED indicator is continuously lighted when a OC12/STM4 OTPM failure is detected or when the OC12/STM4 OTPM loses power. In Release 3 and later releases, the green ACTIVE LED indicator is lighted to show that the optical translator port associated with the OTPM is in the IS (in service) state. The ACTIVE LED indicator does not function in releases prior to Release 3. Issue 1 March 2001 7-59 365-575-536 Circuit Pack Descriptions Lucent SNC670REAA 42A1 S1:1 OTPM FAULT ACTIVE IN OUT nc-85232401.2 Figure 7-25. OC12/STM4 OTPM (42A_ and 42B) The board controller on the QUAD OTU circuit pack detects hardware and software faults on the OTPM. When a fault occurs, the FAULT LED indicator on the circuit pack is continuously lighted. If the incoming OC-12/STM-4 signal fails, the FAULT LED indicator will flash on and off. 7-60 Issue 1 March 2001 365-575-536 Circuit Pack Descriptions General Description of Operation 7 The OC12/STM4 OTPM accepts any SONET OC-12/SDH STM-4 wavelength in the 1.3-µm (1280-1335 nm) or 1.5-µm (1480-1580 nm) range and converts it to an electrical STS-12 signal. The electrical STS-12 signal is reshaped, retimed, and amplified. The electrical STS-12 signal is also demultiplexed into four 155.52 Mb/s signals. This allows certain SONET section (B1) overhead bytes to be extracted and monitored. NOTE: The OC12/STM4 OTPM does not change the SONET overhead bytes and is not considered a SONET regenerator. The STS-12 signal is then combined with a wavelength specific tone signal and converted back to a specific wavelength OC-12/STM-4 signal for transmission over a single mode fiber. The 42A(1-16) OC12/STM4 OTPMs support the 16 wavelengths on systems. The 42B OC12/STM4 OTPM generates a SONET OC-12/SDH STM-4 signal in the 1.3-µm range for other SONET OC-12/SDH STM-4 receivers. For detailed information about the specific wavelengths and tone signals associated with the 42A(1-16) and 42B OC12/STM4 OTPMs, refer to Section 10, “Technical Specifications.” Issue 1 March 2001 7-61 365-575-536 Circuit Pack Descriptions 7 Detailed Description of Operation 7 Transmission Circuitry Figure 7-26 shows an overall block diagram of an OC12/STM4 OTPM. The OC12/ STM4 OTPM accepts one SONET 622.08 MHz OC-12/SDH STM-4 optical signal. BCLAN Tone Detector Tone Generator Receiver Module Transmitter Module Byte Demultiplexor Receive Byte Processor Board Controller Circuit CP FAIL INC SIG FAIL Misc. Discrete Outputs -48V (A) -48V (B) Power Circuit nc81422501.1 Figure 7-26. OC12/STM4 OTPM Block Diagram Fiber access to the OC12/STM4 OTPM is via two fixed ST-type buildout blocks and removable ST-type, FC/PC-type, or SC-type lightguide buildouts on the circuit pack faceplate (labeled IN and OUT). Lightguide buildouts for the IN connector are chosen based on the attenuation desired and the type of connector interface the single-mode lightguide jumper is equipped with. Lightguide buildouts for the OUT connector are chosen based on the type of connector interface the single-mode lightguide jumper is equipped with. There are three types of lightguide buildouts available for OC12/STM4 OTPMs: ST-type, FC/ PC-type, and SC-type. All factory-equipped OTU circuit packs come with a removable ST-type 0-dB lightguide buildout on the IN and OUT connectors. When 7-62 Issue 1 March 2001 365-575-536 Circuit Pack Descriptions installing or removing lightguide buildouts, do not pull the beam (front tab) outward. Pulling the beam (front tab) outward could result in breaking the beam (front tab). The receiver module accepts the OC-12/STM-4 signal and converts it to an electrical STS-12 signal. The receiver module also detects loss of signal (LOS). Timing is also extracted and the data is regenerated. This includes signal amplification, retiming, and reshaping. The STS-12 data signal is then passed to the transmitter module. The STS-12 data signal and clock signal are also passed to the byte demultiplexer. The byte demultiplexer receives the STS-12 data signal from the receiver module and demultiplexes the STS-12 data signal to four 155.52 Mb/s signals. The four 155.52 Mb/s data signals and a 155.52 MHz clock signal are sent to the receive byte processor in a parallel format. The receive byte processor frames on the incoming signals and converts them to 4 byte serial 155.52 Mb/s data signals. The SONET section B1 overhead bytes are also extracted and monitored for errors. The receive byte processor is only used for error monitoring. Its output signals are not used. The transmitter module combines a wavelength specific tone signal from the tone generator with the STS-12 signal and converts it back to an optical OC-12/STM-4 signal. A single line distributed feedback laser with driver and control circuits, converts the electrical signal to optical pulses for transmission. The tone generator circuit generates specific tones based on the wavelength assigned to the OC12/STM4 OTPM. For detailed information about the specific tones and the associated wavelengths assigned to the OC12/STM4 OTPM, refer to Section 10, “Technical Specifications.” 7 Control Circuitry The OC12/STM4 OTPM activities are controlled by the board controller circuit on the QUAD OTU circuit pack. The QUAD OTU circuit pack reports the status of the circuit pack and the incoming OC-12/STM-4 signal using the board control local area network (BCLAN) interface (Release 3 and later), the miscellaneous discrete interface, and the FAULT LED indicator on the circuit pack faceplates of the QUAD OTU circuit pack and OC12/STM4 OTPM. NOTE: The miscellaneous discrete outputs are no longer needed and should not be used to avoid redundant alarms. 7 Fault Detection Circuitry Monitoring and Test . The board controller circuit of the QUAD OTU circuit pack 7 monitors all the activities on the OC12/STM4 OTPM. The QUAD OTU circuit pack has an in-service and out-of-service built-in test capability. An out-of-service test Issue 1 March 2001 7-63 365-575-536 Circuit Pack Descriptions is performed whenever the OC12/STM4 OTPM resets. In-service testing is continuous. The board controller circuit reports failures when they occur via the BCLAN interface (Release 3 and later), the miscellaneous discrete interface, and the FAULT LED indicator on the circuit pack faceplates of the QUAD OTU circuit pack and OC12/STM4 OTPM. When the OC12/STM4 OTPM is inserted in a slot or reset, an out-of-service test is performed. Performance Monitoring . The OC12/STM4 OTPM provides performancemonitoring circuitry for the following performance parameters: ■ Laser bias current (LBC) ■ Optical transmit power (OPT) ■ Coding violations - section near end (CVS) (Release 3 and later) ■ Errored second - section near end (ESS) (Release 3 and later) ■ Severe errored second - section near end (SESS) (Release 3 and later) ■ Severe errored framing seconds - section near end (SEFS) (Release 3 and later). 7 7 Power Circuitry The OC12/STM4 OTPM receives two sources of −48 volts from the QUAD OTU that are diode OR'd, fused, and filtered. Modular DC-to-DC power converters on the QUAD OTU circuit pack produce −5.2, +3.3, and +5 volts used on the circuit pack. Quick Reference Summary 7 Receive Functions 7 The OC12/STM4 OTPM performs the following receive functions: a. Receives a standard SONET 622.08 MHz OC-12/SDH STM-4 optical signal b. Converts the OC-12/STM-4 signal to an electrical STS-12 signal c. Extracts the clock signal and regenerates the STS-12 data signal d. Demultiplexes the STS-12 signal into four 155.52 Mb/s signals e. Monitors the SONET section (B1) overhead bytes. Transmit Functions The OC12/STM4 OTPM performs the following transmit functions: 7-64 a. Combines a wavelength specific tone signal with the STS-12 signal from the receiver module b. Modulates a laser transmitter to produce a SONET OC-12/SDH STM-4 optical signal. Issue 1 March 2001 7 365-575-536 Circuit Pack Descriptions OC3/STM1 OTPM (43A_ and 43B) Description 7 Purpose of Circuit 7 The SONET OC3/SDH STM1 Optical Translator Port Module (OC3/STM1 OTPM) electrically regenerates a single OC-3/STM-1 signal in one direction and inserts a clean tone signal. Faceplate LED Indicator 7 The OC3/STM1 OTPM has a red FAULT LED indicator and a green ACTIVE LED indicator on its faceplate (Figure 7-27). The red FAULT LED indicator is continuously lighted when a circuit pack failure is detected or when the circuit pack loses power. In Release 3 and later releases, the green ACTIVE LED indicator is lighted to show that the optical translator port associated with the OTPM is in the IS (in service) state. The ACTIVE LED indicator does not function in releases prior to Release 3. Issue 1 March 2001 7-65 365-575-536 Circuit Pack Descriptions Lucent SNC670REAA 42A1 S1:1 OTPM FAULT ACTIVE IN OUT nc-85232401.2 Figure 7-27. OC3/STM1 OTPM (43A_ and 43B) The board controller on the QUAD OTU circuit pack detects hardware and software faults on the OTPM circuit pack. When a fault occurs, the FAULT LED indicator on the circuit pack is continuously lighted. If the incoming OC-3/STM-1 signal fails, the FAULT LED indicator will flash on and off. General Description of Operation 7 The OC3/STM1 OTPM accepts any SONET OC-3/SDH STM-1 wavelength in the 1.3-µm (1280-1335 nm) or 1.5-µm (1480-1580 nm) range and converts it to an electrical STS-3 signal. The electrical STS-3 signal is reshaped, retimed, and amplified. The electrical STS-3 signal is also demultiplexed into a 155.52 Mb/s signal. This allows certain SONET section (B1) overhead bytes to be extracted and monitored. 7-66 Issue 1 March 2001 365-575-536 Circuit Pack Descriptions NOTE: The OC3/STM1 OTPM does not change the SONET overhead bytes and is not considered a SONET regenerator. The STS-3 signal is then combined with a wavelength specific tone signal and converted back to a specific wavelength OC-3/STM-1 signal for transmission over a single mode fiber. The 43A(1-16) OC3/STM1 OTPMs support the 16 wavelengths on systems. The 43B OC3/STM1 OTPM generates a SONET OC-3/SDH STM-1 signal in the 1.3µm range for other SONET OC-3/SDH STM-1 receivers. For detailed information about the specific wavelengths and tone signals associated with the 43A(1-16) and 43B OC3/STM1 OTPMs, refer to Section 10, “Technical Specifications.” Issue 1 March 2001 7-67 365-575-536 Circuit Pack Descriptions 7 Detailed Description of Operation 7 Transmission Circuitry Figure 7-28 shows an overall block diagram of an OC3/STM1 OTPM. The OC3/ STM1 OTPM accepts one SONET 155.52 MHz OC-3/SDH STM-1 optical signal. BCLAN Tone Detector Tone Generator Receiver Module Transmitter Module Byte Demultiplexor Receive Byte Processor Board Controller Circuit CP FAIL INC SIG FAIL Misc. Discrete Outputs -48V (A) -48V (B) Power Circuit nc81422501.1 Figure 7-28. OC3/STM1 OTPM Block Diagram 7-68 Issue 1 March 2001 365-575-536 Circuit Pack Descriptions Fiber access to the OC3/STM1 OTPM is via two fixed ST-type buildout blocks and removable ST-type, FC/PC-type, or SC-type lightguide buildouts on the circuit pack faceplate (labeled IN and OUT). Lightguide buildouts for the IN connector are chosen based on the attenuation desired and the type of connector interface the single-mode lightguide jumper is equipped with. Lightguide buildouts for the OUT connector are chosen based on the type of connector interface the single-mode lightguide jumper is equipped with. There are three types of lightguide buildouts available for OC3/STM1 OTPMs: ST-type, FC/ PC-type, and SC-type. All factory-equipped OTU circuit packs come with a removable ST-type 0-dB lightguide buildout on the IN and OUT connectors. When installing or removing lightguide buildouts, do not pull the beam (front tab) outward. Pulling the beam (front tab) outward could result in breaking the beam (front tab). The receiver module accepts the OC-3/STM-1 signal and converts it to an electrical STS-3 signal. The receiver module also detects loss of signal (LOS). Timing is also extracted and the data is regenerated. This includes signal amplification, retiming, and reshaping. The STS-3 data signal is then passed to the transmitter module. The STS-3 data signal and clock signal are also passed to the byte demultiplexer. The byte demultiplexer receives the STS-3 data signal from the receiver module and demultiplexes the STS-3 data signal to a155.52 Mb/s signal. The 155.52 Mb/s data signal and a 155.52 MHz clock signal are sent to the receive byte processor in a parallel format. The receive byte processor frames on the incoming signals and converts them to a byte serial 155.52 Mb/s data signal. The SONET section B1 overhead bytes are also extracted and monitored for errors. The receive byte processor is only used for error monitoring. Its output signals are not used. The transmitter module combines a wavelength specific tone signal from the tone generator with the STS-3 signal and converts it back to an optical OC-3/STM-1 signal. A single line distributed feedback laser with driver and control circuits, converts the electrical signal to optical pulses for transmission. The tone generator circuit generates specific tones based on the wavelength assigned to the OC3/STM1 OTPM. For detailed information about the specific tones and the associated wavelengths assigned to the OC3/STM1 OTPMs, refer to Section 10, “Technical Specifications.” Issue 1 March 2001 7-69 365-575-536 Circuit Pack Descriptions Control Circuitry 7 The OC3/STM1 OTPM activities are controlled by the board controller circuit on the QUAD OTU circuit pack. The QUAD OTU circuit pack reports the status of the circuit pack and the incoming OC-3/STM-1 signal using the board control local area network (BCLAN) interface (Release 3 and later), the miscellaneous discrete interface, and the FAULT LED indicator on the circuit pack faceplates of the QUAD OTU and OC3/STM1 OTPMs. NOTE: The miscellaneous discrete outputs are no longer needed and should not be used to avoid redundant alarms. Fault Detection Circuitry 7 Monitoring and Test . The board controller circuit of the QUAD OTU circuit pack 7 monitors all the activities on the OC3/STM1 OTPM. The QUAD OTU circuit pack has an in-service and out-of-service built-in test capability. An out-of-service test is performed whenever the OC3/STM1 OTPM resets. In-service testing is continuous. The board controller circuit reports failures when they occur via the BCLAN interface (Release 3 and later), the miscellaneous discrete interface, and the FAULT LED indicator on the circuit pack faceplates of the QUAD OTU and OC3/STM1 OTPMs. When the OC3/STM1 OTPM is inserted in a slot or reset, an out-of-service test is performed. Performance Monitoring . The OC3/STM1 OTPM provides performancemonitoring circuitry for the following performance parameters: ■ Laser bias current (LBC) ■ Optical transmit power (OPT) ■ Coding violations - section near end (CVS) (Release 3 and later) ■ Errored second - section near end (ESS) (Release 3 and later) ■ Severe errored second - section near end (SESS) (Release 3 and later) ■ Severe errored framing seconds - section near end (SEFS) (Release 3 and later). Power Circuitry The OC3/STM1 OTPM receives two sources of −48 volts from the QUAD OTU that are diode OR'd, fused, and filtered. Modular DC-to-DC power converters on the QUAD OTU circuit pack produce −5.2, +3.3, and +5 volts used on the circuit pack. 7-70 Issue 1 March 2001 7 7 365-575-536 Circuit Pack Descriptions Quick Reference Summary 7 7 Receive Functions The OC3/STM1 OTPM performs the following receive functions: a. Receives a standard SONET 155.52 MHz OC-3/SDH STM-1 optical signal b. Converts the OC-3/STM-1 signal to an electrical STS-3 signal c. Extracts the clock signal and regenerates the STS-3 data signal d. Demultiplexes the STS-3 signal into a 155.52 Mb/s signal e. Monitors the SONET section (B1) overhead bytes. 7 Transmit Functions The OC3/STM1 OTPM performs the following transmit functions: a. Combines a wavelength specific tone signal with the STS-3 signal from the receiver module b. Modulates a laser transmitter to produce a SONET OC-3/SDH STM-1 optical signal. Issue 1 March 2001 7-71 365-575-536 Circuit Pack Descriptions LSBB OTPM (44A_ and 44B) Description 7 Purpose of Circuit 7 The Low Speed Broadband Optical Translator Port Module (LSBB OTPM) electrically amplifies an incoming OC-3, OC-12, or 100-750 Mb/s optical signal in one direction and inserts a clean tone signal. Faceplate LED Indicator 7 The LSBB OTPM has a red FAULT LED indicator and a green ACTIVE LED indicator on its faceplate (Figure 7-29). The red FAULT LED indicator is continuously lighted when a module failure is detected or when the module loses power. In Release 3 and later releases, the green ACTIVE LED indicator is lighted to show that the optical translator port associated with the OTPM is in the IS (in service) state. The ACTIVE LED indicator does not function in releases prior to Release 3. 7-72 Issue 1 March 2001 365-575-536 Circuit Pack Descriptions Lucent SNC670REAA 44A1 S1:1 OTPM FAULT ACTIVE IN OUT nc-85232401.4 Figure 7-29. LSBB OTPM (44A_ and 44B) The board controller on the QUAD OTU circuit pack detects hardware and software faults on the LSBB OTPM. When a fault occurs, the FAULT LED indicator on the LSBB OTPM is continuously lighted. If the incoming optical signal fails, the FAULT LED indicator will flash on and off. General Description of Operation 7 The LSBB OTPM accepts any OC-3, OC-12, or 100-750 Mb/s signal with a wavelength in the 1.3-µm (1280-1335 nm) or 1.5-µm (1480-1580 nm) range and converts it to an electrical signal and amplifies it. NOTE: The LSBB OTPM does not reshape or retime the optical signals. The LSBB OTPM should not be used to concatenate multiple WaveStar OLS 40G networks. Issue 1 March 2001 7-73 365-575-536 Circuit Pack Descriptions The electrical signal is then combined with a wavelength specific tone signal and converted back to a specific wavelength OC-3, OC-12, or 100-750 Mb/s signal for transmission over a single mode fiber. The 44A(1-16) LSBB OTPMs support the 16 wavelengths on systems. The 44B LSBB OTPM generates an OC-3, OC-12, or 100-750 Mb/s signal in the 1.3-µm range for 1.3-µm receivers. For detailed information about the specific wavelengths and tone signals associated with the 44A(1-16) and 44B LSBB OTPMs, refer to Section 10, “Technical Specifications.” Detailed Description of Operation 7 Transmission Circuitry Figure 7-30 shows an overall block diagram of a LSBB OTPM. The LSBB OTPM accepts one OC-3, OC-12, or 100-750 Mb/s optical signal. Fiber access to the LSBB OTPM is via two fixed ST-type buildout blocks and removable ST-type, FC/PC-type, or SC-type lightguide buildouts on the circuit pack faceplate (labeled IN and OUT). Lightguide buildouts for the IN connector are chosen based on the attenuation desired and the type of connector interface the single-mode lightguide jumper is equipped with. Lightguide buildouts for the OUT connector are chosen based on the type of connector interface the single-mode lightguide jumper is equipped with. There are three types of lightguide buildouts available for OTPMs: ST-type, FC/PC-type, and SC-type. All factory-equipped OTU circuit packs come with a removable ST-type 0-dB lightguide buildout on the IN and OUT connectors. When installing or removing lightguide buildouts, do not pull the beam (front tab) outward. Pulling the beam (front tab) outward could result in breaking the beam (front tab). 7-74 Issue 1 March 2001 7 365-575-536 Circuit Pack Descriptions Tone Detector Tone Generator Receiver Module Transmitter Module Control Circuit QOTU -48V (A) QOTU -48V (B) Power Circuit nc81422501.4 Figure 7-30. LSBB OTPM Block Diagram The receiver module accepts the OC-3, OC-12, or 100-750 Mb/s signal, converts it to an electrical data signal, and amplifies the electrical data signal. The receiver module also detects loss of signal (LOS). The receiver module does not reshape or retime the electrical data signal. The SONET section B1 overhead bytes are not extracted/monitored for errors. The electrical data signal is then passed to the transmitter module. The transmitter module combines a wavelength specific tone signal from the tone generator with the electrical data signal and converts it back to an optical OC-3, OC-12, or 100-750 Mb/s signal. A single line distributed feedback laser with driver and control circuits, converts the electrical signal to optical pulses for transmission. In Release 3 and later releases, the transmission rate band (LSBBRATE parameter) must be provisioned “high band (original value)” or “low band” using the CONFIGURATION-Enter-OT Port Signal command. When provisioned “high band” the tone modulation index and output signal power levels are compatible with OC-12 and 430-750 Mb/s signals. When provisioned “low band” the tone modulation index and output signal power levels are compatible with OC-3 and 100-430 Mb/s signals. The tone generator circuit generates specific tones based on the wavelength assigned to the LSBB OTPM. For detailed information about the specific tones and the associated wavelengths assigned to the LSBB OTPMs, refer to Section 10, “Technical Specifications.” Issue 1 March 2001 7-75 365-575-536 Circuit Pack Descriptions 7 Control Circuitry The LSBB OTPM activities are controlled by the board controller circuit on the QUAD OTU circuit pack. The QUAD OTU circuit pack reports the status of the circuit pack and the incoming 100-750 Mb/s signal using the board control local area network (BCLAN) interface (Release 3 and later), miscellaneous discrete interface, and the FAULT LED indicator on the circuit pack faceplates of the QUAD OTU circuit pack and OTPMs. NOTE: The miscellaneous discrete outputs are no longer needed and should not be used to avoid redundant alarms. 7 Fault Detection Circuitry Monitoring and Test . The board controller circuit of the QUAD OTU circuit pack 7 monitors all the activities on the LSBB OTPM. The QUAD OTU circuit pack has an in-service and out-of-service built-in test capability. An out-of-service test is performed whenever the LSBB OTPM resets. In-service testing is continuous. The board controller circuit reports failures when they occur via the BCLAN interface (Release 3 and later), the miscellaneous discrete interface, and the FAULT LED indicator on the circuit pack faceplates of the QUAD OTU circuit pack and OTPMs. When the LSBB OTPM is inserted in a slot or reset, an out-of-service test is performed. Performance Monitoring . The OTPM circuit pack provides performancemonitoring circuitry for the following performance parameters: ■ Received optical power ■ Errored frames ■ Section (B1) errors ■ Laser bias current ■ Optical transmit power. 7 7 Power Circuitry The LSBB OTPM receives two sources of −48 volts from the QUAD OTU that are diode OR'd, fused, and filtered. Modular DC-to-DC power converters on the QUAD OTU circuit pack produce −5.2, +3.3, and +5 volts used on the circuit pack. Quick Reference Summary 7 Receive Functions The LSBB OTPM performs the following receive functions: (a) 7-76 Issue 1 Receives a standard OC-3, OC-12, or 100-750 Mb/s optical signal March 2001 7 365-575-536 Circuit Pack Descriptions (b) Converts the incoming optical signal to an electrical data signal (c) Amplifies the electrical data signal 7 Transmit Functions The LSBB OTPM performs the following transmit functions: (a) Combines a wavelength specific tone signal with the electrical data signal from the receiver module (b) Modulates a laser transmitter to produce an OC-3, OC-12, or 100-750 Mb/s optical signal. Issue 1 March 2001 7-77 365-575-536 Circuit Pack Descriptions 7-78 Issue 1 March 2001 8 Administration and Provisioning Contents Overview 8-1 Administration 8-1 ■ Memory Administration 8-1 ■ Version Recognition 8-4 ■ Security 8-4 General 8-4 Port Security 8-5 Enhanced User Login Security 8-5 Network Element Login Security 8-6 Password Aging 8-7 ■ Software Upgrades 8-8 ■ Correlating Alarms 8-8 ■ Access Identifications 8-10 Provisioning 8-12 ■ Provisionable Parameters and Original Values 8-12 ■ Local Provisioning 8-20 ■ Provisioning Circuit Pack Slots 8-20 ■ Provisioning on Circuit Pack Replacement 8-20 ■ Auto Provisioning Date/Time 8-20 ■ Circuit Pack Slot, Port, and Optical Channel Provisioning States 8-21 Issue 1 March 2001 8-i Contents 8-ii Issue 1 March 2001 8 Administration and Provisioning 8 8 Overview This section describes the administration and provisioning features of the WaveStar™ OLS 40G. It also presents a list of provisionable parameters with their ranges and original values. Administration 8 Memory Administration 8 The WaveStar OLS 40G memory consists of the following: ■ Executable code: This is the collection of "programs" that controls the operation of the system. ■ Data: This is a collection of system parameters and their associated values. A parameter is a characteristic of the system that affects its operation. A value is a number, text string, or other menu selection associated with a parameter. Issue 1 March 2001 8-1 365-575-536 Administration and Provisioning There are two complete copies of executable code in the system under normal conditions. One complete copy of executable code is located in the nonvolatile memory of the System Memory (SYSMEM) circuit pack. The other copy is distributed in the volatile memory of the System Controller (SYSCTL) circuit pack and the individual board controllers on the Overhead Controller - Tributary (TOHCTL), Telemetry Controller (TLM), and Optical Amplifier (OA) circuit packs. [The Optical Multiplexing Units (OMUs), Optical Demultiplexing Units (ODUs), and Optical Translator Port Modules (OTPMs) do not have board controllers.] In Release 3 and later releases, the other copy of executable code is distributed in the volatile memory of the Optical Translator Controller (OTCTL), Optical Translator Unit (OTU), and Quad Optical Translator Unit (QUAD OTU) circuit packs. The system executes the copy in the board controllers and the SYSCTL circuit packs. There are three sets of data in the system under normal conditions: ■ Two sets of data are located in the nonvolatile memory of the SYSMEM circuit pack. — One set contains the system parameters and their original values (value assigned to a parameter at the factory). — The second set contains the system parameters and their current values (values currently being used by the system). ■ The third set of data is located in the volatile memory of the SYSCTL circuit pack, plus the board controller of the other circuit packs. This set contains the system parameters and their current values. If the system loses power and then regains power, the executable code and the data (with current values) are copied from the nonvolatile memory in the SYSMEM circuit pack to the volatile memory in the SYSCTL circuit pack. The system then starts running the executable code. If the SYSCTL circuit pack is replaced, the executable code and data (with current values) are copied from the nonvolatile memory in the SYSMEM circuit pack to the volatile memory in the SYSCTL circuit pack. The system then starts running the executable code. If the SYSMEM circuit pack is replaced and the executable code in the new SYSMEM circuit pack is different from what is running in the SYSCTL circuit pack, one of the following functions can be performed: 8-2 Issue 1 ■ Restart the system with the version of executable code in the new SYSMEM circuit pack. ■ Load another copy of the currently running version of the executable code from the craft interface terminal (CIT) to the SYSMEM circuit pack. ■ Copy the currently running version of the executable code from the SYSMEM at another network element to the SYSMEM circuit pack via the supervisory signal data communications channel (DCC). March 2001 365-575-536 Administration and Provisioning The WaveStar OLS 40G supports the following CIT memory administration functions: ■ Install-Software: This copies the executable code and original values from floppy disks in the CIT to the SYSMEM circuit pack. Refer to the InstallSoftware function in the "Operation" tab of this manual. ■ Initialize-System: The CONFIGURATION-Initialize-System (ph=9 in Release 2.1 and later releases) command replaces most current values in the SYSMEM circuit pack with the original values in the SYSMEM circuit pack and initiates the reset function (see Reset). Automatically provisioned parameters are unaffected by this command. The current values that are not replaced with their original values are those set with the following inputs: — CONFIGURATION-Edit-Date — SECURITY-Edit-Private Identifier — SECURITY-Edit-User-Security — SECURITY-Enter-User-Security — SECURITY-Enter-Far End Communications — SECURITY-Enter-Network Element-Security. [The current values of the Target Identifier (TID) and Directory Service Network Element (DSNE) parameters are not replaced with their original values; but, the current values of the other parameters provisioned with this command are replaced with their original values.] ■ Reset: The CONFIGURATION-Initialize-System (ph=3 in Release 2.1 and later releases) command copies the current values from the SYSCTL circuit pack to the SYSMEM circuit pack and the executable code from the SYSMEM circuit pack to the SYSCTL circuit pack. The executable code in the SYSCTL circuit pack is then restarted and the current values in the SYSMEM circuit pack are reformatted to work with the new executable code. ■ Update: The CONFIGURATION-Update-System command updates the state of all the automatically provisioned parameters based on what circuit packs are present and the condition of the incoming signals. Refer to "Provisionable Parameters and Original Values" in this section for more information about automatically provisioned parameters. ■ Copy-Program: The CONFIGURATION-Copy-Program command copies the executable code and original values from the SYSMEM circuit pack of the network element (where the input is invoked) to the SYSMEM circuit pack of any other network element. Refer to the Copy-Software function in the "Operation" tab of this manual. For more information about the memory administration commands, refer to the on-line help available with the Centerlink Management Console or 365-575-540, WaveStar OLS 40G, Operations Systems Engineering Guide. Issue 1 March 2001 8-3 365-575-536 Administration and Provisioning Version Recognition 8 The WaveStar OLS 40G provides automatic version recognition of all the hardware and software installed. The WaveStar OLS 40G is able to report the type and version of the circuit pack that is installed in each slot. The Common Language* CLEI code and serial number of each circuit pack are stored on the circuit pack and are accessible by the System Controller circuit pack. The equipment catalog item (ECI) version identification and apparatus code for each circuit pack are also provided. Refer to Section 11, "Craft Interface Terminal Usage," for an example of the CONFIGURATION-Retrieve-Equipment report. For detailed information, refer to the on-line help available with the CenterLink Management Console or 365-575-540, WaveStar OLS 40G, Operations Systems Engineering Guide. Security 8 General 8 The WaveStar OLS 40G provides a security function to protect against unauthorized access to the CIT functions (for example, provisioning). The security function limits access to the WaveStar OLS 40G to legitimate users only. Security is provided using a four-tier approach that provides maximum flexibility and control. The four tiers are as follows: * 8-4 ■ Port security ■ User login security ■ Network element login security ■ Password aging. Common Language is a registered trademark and CLEI, CLLI, CLCI, and CLFI are trademarks of Bell Communications Research, Inc. Issue 1 March 2001 365-575-536 Administration and Provisioning 8 Port Security Port security provides the capability to control user access to the WaveStar OLS 40G on a per port basis. Port security includes the following: ■ Provisionable port status: Dial-up access using the CIT (DTE) port may be enabled to allow users to log in to that port or disabled to deny any attempt to log in to that port. Local access to the CIT (DCE) port may never be disabled. However, legitimate logins to the CIT (DCE) port are required. ■ Inactivity timers: A provisionable inactivity timer (0-999 minutes) is provided for the local CIT (DCE) and CIT (DTE) ports. Inactivity timers do not apply to logins using the X.25 interface. If the user does not interact with the WaveStar OLS 40G within the provisioned time, the user will automatically be disconnected. The inactivity timer is reset by any data received at the port from a user, regardless of whether the data is addressed to a local or remote login session. The inactivity timer is also reset by any output addressed to the local port, regardless of origin (local or remote login session). In Releases 2.1 and later releases, the SECURITY-Enter-Channel Identifier-Security command is used to enable/disable port security. The SECURITY-Retrieve-Channel Identifier-Security command is used to report port status. For more information, refer to the on-line help available with the Centerlink Management Console or 365-575-540, WaveStar OLS 40G, Operations Systems Engineering Guide. Enhanced User Login Security 8 Enhanced user login security provides the capability to control access to the WaveStar OLS 40G on an individual user basis. Enhanced user login security includes the following: ■ Login ID and password: All users must properly identify themselves by providing a valid login ID and password before gaining access to the WaveStar OLS 40G. ■ User authorization levels: Each user login ID may be assigned a different authorization level for each function category of commands (that is, fault, configuration, performance, and security). The authorization level for each login ID is not required to be the same for all function categories. The following authorization levels are available (in descending order): — Expert: level 5 (original value, non-provisionable) — Privileged: level 4 — General: level 3 — Basic: level 2 — Reports: level 1. Issue 1 March 2001 8-5 365-575-536 Administration and Provisioning Each user is allowed to execute any commands in the function category with the same or lower authorization level. Refer to Section 11, “Craft Interface Terminal Usage,” for more information about commands and their associated authorization levels. ■ Expert users: There are only two expert users. An expert user has the expert: level 5 authorization level assigned in all command function categories (non-provisionable). An expert user is allowed to perform all network element functions including those affecting security, access to the network element, system initialization, and software installation. An expert user is also allowed to perform high speed tests and specify that certain commands affect all low speed ports (for example, commands that have the potential for massive service interruption). An expert user login ID and password may only be changed by the other expert user. A new expert user may not be created, or an existing expert user may not be deleted. ■ User created login IDs: Up to 98 login IDs may be provisioned in the WaveStar OLS 40G. The authorization level of each command function category is provisionable for each user created login ID. The authorization level for each command function category is not required to have the same value. Users must provision the authorization level of each command function category associated with a user created login ID. There is no original value associated with the authorization level parameter. ■ Visitor Logins: Visitor logins may be provisioned with expiration dates. Visitor logins are automatically deleted on the provisioned expiration date regardless of their use. Visitor logins are reports, basic, general, or privileged logins. Login IDs and passwords are administered with the SECURITY-Enter-UserSecurity, SECURITY-Edit-User-Security, and SECURITY-RetrieveUser-Security commands. For more information about provisioning user login security, refer to the on-line help available with the Centerlink Management Console or 365-575-540, WaveStar OLS 40G, Operations Systems Engineering Guide. Network Element Login Security 8 Network element login security provides the capability to control access to the WaveStar OLS 40G on a network element basis. Network element login security is provided by controlling whether or not nonexpert users are allowed to access the network element. When logins are allowed, nonexpert users may log in and access the network element. When logins are not allowed, login attempts are denied. Expert users are not affected by this security measure and are always allowed to log in. Network element security is intended to disable nonexpert logins quickly on a temporary basis. This capability might be used during routine maintenance or upgrade activities. Permanent security should be provided using port security or user login security. 8-6 Issue 1 March 2001 365-575-536 Administration and Provisioning Login aging prevents inactive, nonexpert users from accessing the WaveStar OLS 40G. If the difference between the last login date and the current date* of a nonexpert login exceeds the provisioned login lifetime parameter, the login is automatically deleted. An audit runs each day at 11:59 p.m. to check for and delete expired logins. The same audit automatically deletes visitor logins at 11:59 p.m. on the provisioned expiration date. Login aging applies only to nonexpert logins. An expert login is never deleted. In Release 2.1 and later releases, the SECURITY-Enter-Network ElementSecurity command is used to enable/disable nonexpert user logins. The SECURITY-Retrieve-Network Element-Security command is used to report whether logins are allowed or not. For more information about provisioning network element security, refer to the on-line help available with the Centerlink Management Console or 365-575-540, WaveStar OLS 40G, Operations Systems Engineering Guide. Password Aging 8 Password aging provides the capability to force users to periodically change their password. If the users do not change their password within the provisioned period of time, their password will expire. The next time the users attempt to log in, they will not be allowed to execute any commands until they change their password. To enable password aging, the password aging interval must be provisioned in the range of 7 to 999 days. To disable password aging, the password aging interval must be provisioned to 0 days. If password aging is enabled, a user may not change a password unless at least 7 days have passed since the last password change for that login. Any attempt to change a password when less than 7 days have passed is denied. In Releases 2.1 and later, the SECURITY-Enter-Network ElementSecurity command is used to enable/disable password aging and provision the password aging interval. The SECURITY-Retrieve-Network ElementSecurity command is used to report the password aging interval in days. For more information about provisioning password aging, refer to the on-line help available with the Centerlink Management Console or 365-575-540, WaveStar OLS 40G, Operations Systems Engineering Guide. * An expert user may change the current date using the CONFIGURATION-Edit-Date command so that the login lifetime is exceeded even though the number of calendar days since the last login attempt is less. Issue 1 March 2001 8-7 365-575-536 Administration and Provisioning Software Upgrades 8 The WaveStar OLS 40G provides an in-service software upgrade capability using a CIT locally or remotely (with a modem or digital data network). The CIT (PC running CenterLink Management Console software) must be used locally to install the initial software into a system. Remote software upgrades over the supervisory signal DCC are possible. The WaveStar OLS 40G is fully operational during the software upgrade. For example, the WaveStar OLS 40G maintains all transmission, performance monitoring, and system reporting functions. For detailed information about installing a particular software release, refer to the applicable software release description: Release 3.4 Comcode 109069161, WaveStar OLS 40G Software Release Description, Release 3.4 The software release descriptions are shipped with the software and are not orderable from the Lucent Technologies Customer Information Center. Correlating Alarms 8 In Releases prior to Release 3, the OLS and Optical Translator are installed so that the alarms from each Optical Translator Unit (OTU) circuit pack and Optical Translator Port Module (OTPM) are reported through the downstream OLS End Terminal. This arrangement makes it easier for an operations system to correlate alarms. An optical signal takes one of the following paths through the OLS and Optical Translator: 8-8 Issue 1 ■ Through: The through path is from an OLS End Terminal through an OTU circuit pack or OTPM to another OLS End Terminal. ■ Add: The add path is from a SONET/SDH lightwave terminal through an OTU circuit pack or OTPM to an OLS End Terminal. ■ Drop: The drop path is from an OLS End Terminal through an OTU circuit pack or OTPM to a SONET/SDH lightwave terminal. March 2001 365-575-536 Administration and Provisioning In Release 3 and later releases, users can provision the association of an Optical Translator port to an optical channel. This association is used for correlating alarms rather than relying on the operations system. The CONFIGURATIONEnter-Association-OT Port Signal command is used to provision an association from an Optical Translator port to one or two “upstream” or “downstream” optical channels. Each Optical Translator port can be associated with: ■ one upstream and one downstream optical channel (through path) ■ one downstream optical channel (add path) ■ one upstream optical channel (drop path). NOTE: The provisioning state of the Optical Translator port and the associated optical channel(s) must be the same. If the states are different, multiple trouble conditions may be reported for a single optical channel loss of signal condition. For more information about Optical Translator port and optical channel provisioning states, refer to “Circuit Pack Slot, Port, and Optical Channel Provisioning States” in this section. If a trouble condition (for example, equipment failure or incoming signal failure) is reported for a particular optical translator port, the port’s output will be turned off. Normally, this causes an additional loss of signal (LOS) condition to be reported at the downstream optical channel, but if the user has provisioned an associated downstream optical channel, reporting of the LOS condition is suppressed on the downstream optical channel. The OLS End Terminal transmits an alarm indication message to downstream repeaters and end terminals to suppress any alarms generated because of the LOS condition at the optical translator port. If an alarm indication message or LOS condition is detected on an upstream optical channel, the OLS would normally either do nothing (alarm indication message) or report the LOS condition. An Optical Translator port connected to this optical channel also reports a trouble condition. However, if the Optical Translator port has an associated upstream optical channel with an active alarm indication message or LOS condition, the port will suppress the condition being reported. The optical translator port’s output will also be turned off and any associated downstream optical channel will suppress reporting the condition. The CONFIGURATION-Delete-Association-OT Port Signal command is used to delete an association between an Optical Translator and optical channels. For more information about provisioning alarm correlations, refer to the on-line help available with the Centerlink Management Console or 365-575-540, WaveStar OLS 40G, Operations Systems Engineering Guide Issue 1 March 2001 8-9 365-575-536 Administration and Provisioning 8 Access Identifications The access identifications (AIDs) are used to access the functionality of the WaveStar OLS 40G. The WaveStar OLS 40G also uses AIDs to identify, address, and report on entities within the system. Entities are circuit pack slots, ports, signals, transmission lines, operations interfaces, data communications channels (DCC), and alarm interfaces. Table 8-1 shows the CIT output values of the WaveStar OLS 40G. Table 8-1. WaveStar OLS 40G Access Identifier Values Entity Values System system Optical Line oline-{1a-4b} Optical Channel ochan-{all,1a-4b}-{all,1-16} Single Optical Channel ochan-{1a-4b}-{1-16} Supervisory Channel supr-{all,1a,2a,3a,4a} Single Supervisory Channel supr-{1a,2a,3a,4a} Port (CMS) cms-{all,1a,2a,3a,4a} Single Port (CMS) cms-{1a,2a,3a,4a} Port (COM) {all,dce,dte,dcc,x25,ser_tlm1*} Single Port (COM) {dce,dte,dcc,x25,ser_tlm1*} Port (OTU) otu-{all,1,2}-{all,1-32}-{1} Single Port (OTU)† † otu-{1,2}-{1-32}-{1} Port (OTPM) otpm-{all,1,2}-{all,1,3,5,7,9,11,13,15,17,19, 21,23,25,27,29,31}-{1} Single Port (OTPM)† otpm-{1,2}-{1,3,5,7,9,11,13,15,17,19,21, 23,25,27,29,31}-{1} Slot (OA) oa-{all,1a-4b} Single Slot (OA) oa-{1a-4b} Slot (TLM) tlm-{all,1a,2a,3a,4a} Single Slot (TLM) tlm-{1a,2a,3a,4a} Slot (SYSCTL) sysctl Slot (SYSMEM) sysmem Slot (TOHCTL) tohctl Slot (OTCTL)† otctl-{all,1,2} Single Slot (OTCTL)† Slot (OTU)† otu-{all,1,2}-{all,1-32) † Single Slot (OTU) See footnotes at end of table. 8-10 Issue 1 otctl-{1,2} March 2001 otu-{1,2}-{1-32) 365-575-536 Administration and Provisioning Table 8-1. WaveStar OLS 40G Access Identifier Values (Contd) Entity Values Slot (OTPM)† otpm-{all,1,2}-{all,1,3,5,7,9,11,13,15,17,19, 21,23,25,27,29,31} Single Slot (OTPM)† otpm-{1,2}-{1,3,5,7,9,11,13,15,17,19,21, 23,25,27,29,31} Operations Interface (CIT) {cit,tl1}-{dce,dte,dcc,x25} Operations Interface (OFFICE ALARMS) {OFFICE ALMS} Operations Interface (PAR TLM) {PAR TLM} Operations Interface (UID) <User-Login> Operations Interface (User Panel) {user}-{panel} Operations Interface (DCC-SUPR) dccsupr-{all,1a,1b,2a,2b} Miscellaneous Discrete (Control Point)* cont-{all,1-36} * cont-{1-36} * Miscellaneous Discrete (Environmental Point) env-{all,1-144} Miscellaneous Discrete (Single Environmental Point)* env-{1-144} Shelf shlf-{all,1-2} Miscellaneous Discrete (Single Control Point) † Shelf (OT) shlf-ot-{all,1-2}-{all,lo,mid,up} PM Register reg-{all,day,QH} * Available in Release 2 and later releases. † Available in Release 3 and later releases. Issue 1 March 2001 8-11 365-575-536 Administration and Provisioning Provisioning 8 Provisionable Parameters and Original Values 8 Installation provisioning is minimized with provisionable parameters and original values. Each provisionable parameter is assigned an original value. The provisionable parameters and original values are copied from CD-ROM in the CIT to the SYSMEM circuit pack. The SYSMEM circuit pack contains one copy of the provisionable parameters with their original values and another copy of the provisionable parameters with their current values. The SYSCTL circuit pack, plus the board controllers on the other circuit packs, contain one copy of the provisionable parameters with their current values. The original values cannot be changed. The current values can be changed through local provisioning. NOTE: The WaveStar OLS 40G has no switch-settable parameters. 8-12 Issue 1 March 2001 365-575-536 Administration and Provisioning Table 8-2 shows the provisionable parameters of the WaveStar OLS 40G. This includes the parameters that can be provisioned using the CIT, plus the parameters that are automatically provisioned or have fixed values (cannot be changed). The original value for each provisionable parameter in Table 8-2 is shown in brackets [ ]. Table 8-2 also shows the applicable CenterLink Management Console and TL1 commands. Table 8-3 shows the provisionable threshold crossing alert (TCA) parameters of the WaveStar OLS 40G. This includes the threshold range and original values for the quarter-hour and day bins of each performance-monitoring parameter. The original value for each provisionable parameter in Table 8-3 is shown in brackets [ ]. Table 8-2. Provisionable Parameters CenterLink Management Console Parameter Options [Original Value] Method Command [TL1 Command] Report [TL1 Report] SECURITY-EnterSystem† [ENT-SYS] SECURITYRetrieve-System [RTRV-SYS] System Identification - New Target Identifier (NEW_TID)* † [LT-FT-2000] ≤20 characters - Standard (STD) [SONET], SDH - Automatic Power Shut Down (APSD) ‡ [ENABLE], DISABLE - Directory Service Network Element (DSNE) Yes, [No] - Alarm Gateway Network Element (AGNE) Yes, [No] - Alarm Group (ALMGRP) 0-[255] - X.25 Packet Size (X25PS) 128, [256] - Direction (DIRN) [1A-TX], 1A-RCV, 1A-TXTHRU, 1A-RCV-THRU, DUAL - Side 1 System Type (SIDE1_SYS) CIT [A], B, C, 1 OA - Side 2 System Type (SIDE2_SYS) [A], B, C, 1 OA - X.25 traffic redirect feature (PVC2_REDIRECT) [YES], NO See footnotes at end of table Issue 1 March 2001 8-13 365-575-536 Administration and Provisioning Table 8-2. Provisionable Parameters (Contd) CenterLink Management Console Options [Original Value] Parameter Command [TL1 Command] Report [TL1 Report] PERFORMANCESet-Performance Monitor-Start Time [SET-PM-STIME] PERFORMANCERetrievePerformance Monitor-Start Time [RTRV-PM-STIME] None None CIT SECURITYEnter-Far End Communications [ENT-FECOM] SECURITYRetrieve-Far End Communications [RTRV-FECOM] CIT SECURITY-EnterNetwork ElementSecurity [ENT-NE-SECU] SECURITY-RetrieveNetwork ElementSecurity [RTRV-NE-SECU] CIT SECURITY-EnterChannel IdentifierSecurity [ENT-CID-SECU] SECURITY-RetrieveChannel IdentifierSecurity [RTRV-CID-SECU] Method Performance Monitoring - Start Time 0-23 [0] CIT Operations - Operation Port Baud Rates CIT (DCE) 9600 CIT (DTE) 9600 X.25§ 1200, 2400, 4800, 9600,19200, 56000 [No Original Value] Automatic - Remote Access Remote Activity Reporting (RAR) Enable, [Disable] Remote Office Alarms (ROA) Enable, [Disable] - Network Element Security Logins Allowed (ALW UID) [Yes], No Password Aging Interval (PAGE) [0], 7-999 Days Login Aging (UOUT) [0], 7-999 Days - Port Security Access Identifier (AID) DCE, DTE, DCC, X.25 [No Original Value] Timeout (TMOUT) 0-999 Minutes [15] Port Access (PORTACC) [Enable], Disable Baud Rate (BAUDRATE) 9600 X.25 Channel Type (CHAN) PVC{1-2}, TBL{1-16} OS Type (OSTYPE) MT, MA, CMDR, OTHR, RST, NONE SVC Calling Address (CALLADDR) X.25 SVC #1-#16 15 or Less Numeric Characters See footnotes at end of table. 8-14 Issue 1 March 2001 365-575-536 Administration and Provisioning Table 8-2. Provisionable Parameters (Contd) CenterLink Management Console Parameter Options [Original Value] Command [TL1 Command] Report [TL1 Report] CIT SECURITYEdit-Private Identifier [ED-PID] None CIT SECURITYEnter-UserSecurity†† [ENT-USER-SECU] SECURITYRetrieve-UserSecurity [RTRV-USER-SECU] Method Operations (Contd) - Login Security Private Identifier (PID) [FT-2000 ¶ **] 6 to 10 Characters, (at least 1 numeric character and 1 symbolic character) User Identifier 1-100 (UID) [LT01 or LT02 **] or 1 to 10 Alphanumeric Characters User Access Privilege (UAP) C[1-4]&F[1-4]& PM[1-4]&S[1-4] Type of Temporary Login (TYPE) Visitor Expiration Date (EXPDAT) YY-MM-DD Slot State Provisioning - All Slots EQ, [AUTO] FAULTRetrieve-State [RTRV-STATE] Automatic None OC-48 Termination LBO (Optical) 0, 3, 3.5, 4, 4.5, 5, 5.5, 6, 6.5, 7, 7.5, 8, 8.5, 9, 9.5, 10, 10.5, Lightguide None (Manually Installed) 11, 11.5, 12, 12.5, 13, 13.5, Jumper 14, 14.5, 15, 16, 18, 20 dB None (Stamping on LBO) 0, 5, 7.1, 10, 12, 15, 17, 17.5, Lightguide None 20 dB Jumper (Manually Installed) None (Stamping on LBO) IS-3 Termination LBO (Optical) - Incoming Signal Alarm 0-120 Seconds [2] Delay (ALMDEL) - Alarm Clear Delay (CLRDEL) 0-120 Seconds [10] CIT CONFIGURATIONSet-AttributeAlarm [SET-ATTR-ALM] CONFIGURATIONRetrieveAttribute-Alarm [RTRV-ATTR-ALM] CONFIGURATIONSet-AttributeControl [SET-ATTR-CONT] CONFIGURATIONRetrieveAttribute-Control [RTRV-ATTR-CONT] CONFIGURATIONSet-Attribute Environment [SET-ATTR-ENV] CONFIGURATIONRetrieve-Attribute Environment [RTRV-ATTR-ENV] - User-Settable Miscellaneous Discretes Description of Control Outputs 1-36 (CONTTYPE) ≤26 Characters Environmental Input Alarm Message (ALMMSG) ≤26 Characters Notification Code (NTFCNCDE) CR, MJ,[MN], NA, NR, NO, CR_Prompt, MJ_Prompt, [MN_Deferred], NA_No_Alarm, NR_No_Report, NO_Not_Indicated CIT CIT See footnotes at end of table. Issue 1 March 2001 8-15 365-575-536 Administration and Provisioning Table 8-2. Provisionable Parameters (Contd) CenterLink Management Console Options [Original Value] Parameter Command [TL1 Command] Report [TL1 Report] CONFIGURATIONEdit-Date and Time [ED-DAT] CONFIGURATIONRetrieve-Date [RTRV-DAT] ONFIGURATIONEnter-SectionTrace [ENT-SECTRC] CONFIGURATIONRetrieve-SectionTrace [RTRV-SECTRC] CIT CONFIGURATIONEnterSupervisory [ENT-SUPR] CONFIGURATIONRetrieveSupervisory [RTRV-SUPR] CIT CONFIGURATIONEnter-Optical Channel [ENT-OCHAN] CONFIGURATIONRetrieve-Optical Channel [RTRV-OCHAN]‡‡ Method Operations (Contd) - Date YY-MM-DD [94-06-30] - Time HH-MM-SS - Time Zone (TZ) [blank] ≤3 Letter Characters - Start Daylight Savings Date (STRTDST) MM-DD [01-01] - Stop Daylight Savings Date(STOPDST) MM-DD [01-01] - Daylight Savings Time Zone (DSTZ) [blank] ≤3 Letter Characters CIT OC-48 Section - Expected Incoming Path Trace Message (EXPTRC)* - Notification Code (NTFCNCDE)* [No original value] ≤15 characters CR, [MJ], MN, NA, NR, NO, CR_Prompt, MJ_Prompt, MN_Deferred, NA_No_Alarm, NR_No_Report, NO_Not_Indicated CIT Supervisory Signal - Notification Code (NTFCNCDE) [CR], MJ, MN, NA, NR, NO, CR_Prompt, MJ_Prompt, MN_Deferred, NA_No_Alarm, NR_No_Report, NO_Not_Indicated - Signal Degrade Threshold (SDTHR) 10-5, [10-6], 10-7, 10-8,10-9 Optical Channel State Provisioning - Primary State (PST) - Port [OOS-MA-AS(AUTO)/IS], OOS(NMON) [AUTO], IS See footnotes at end of table. 8-16 Issue 1 March 2001 Automatic None CONFIGURATIONRetrieve-Optical Channel [RTRV-OCHAN]‡‡ 365-575-536 Administration and Provisioning Table 8-2. Provisionable Parameters (Contd) CenterLink Management Console Parameter Options [Original Value] Method Command [TL1 Command] Report [TL1 Report] CONFIGURATIONEnter-Customer Maintenance Signal [ENT-CMS] CONFIGURATIONRetrieve-Customer Maintenance Signal [RTRV-CMS]‡‡ CMS Provisioning [OOS-MA-AS(AUTO)/IS], - Access Identifier (AID) OOS(NMON) - Secondary State (SST) [AUTO], IS CIT CONFIGURATIONRetrieve-Customer Maintenance Signal [RTRV-CMS]‡‡ Automatic None OT Port Signal Provisioning - Low Speed Broad Band Low_Band, [High_Band] Bit Rate (LSBBRATE)** - Notification Code (NTFCNCDE)* - Primary State (PST)* * [MJ_Prompt], MN_Deferred, NA_No_Alarm, NR_No_Report, NO_Not_Indicated CIT CONFIGURATIONEnter-OT Port Signal [ENT-OTPS] CONFIGURATIONRetrieve-OT Port Signal[RTRV-OTPS] [OOS-MA-AS (AUTO)], OOS (NMON) The SECURITY-Set-Source Identification command (SET-SID) may also be used to set a new target identifier. † Hint when changing TID: If the ITM-SC is used as a Network Manager and CenterLink is used to change the TID, the node associations must be deleted from the ITM-SC and then re-create them using a new TID name. This will change the TID at CenterLink and at the ITM-SC. ‡ DANGER: Disabling the Automatic Power Shut-down (APSD) feature results in a FDA/IEC Class IIIb/3B laser hazard. APSD is a safety feature. Do not attempt to defeat or disable APSD. Defeating APSD may result in harm to personnel exposed to disconnected or cut optical fibers. § The baud rate is determined by the clock to the X.25 interface. ¶ FT-2000 is the original value of the password for LT01 and LT02. ** At startup, there are exactly two privileged logins and no others. †† The SECURITY-Edit-User-Security command (ED-USER-SECU) can also be used. ‡‡ The FAULT-Retieve-State command (RTRV-STATE) may also be used. Issue 1 March 2001 8-17 365-575-536 Administration and Provisioning Table 8-3. Provisionable Threshold Crossing Alert (TCA) Parameters Parameter Threshold Range [Original Value] CenterLink Management Console Current 15 Minute Current 1 Day Command [TL1 Command] Report [TL1 Report] [Enable]/Disable [Enable]/Disable PERFORMANCESetThresholdOptical Line [SET-TH-OLINE] PERFORMANCERetrieveThresholdOptical Line [RTRV-TH-OLINE]* PERFORMANCESet-ThresholdOptical Channel [SET-TH-OCHAN] PERFORMANCERetrieveThresholdOptical Channel [RTRV-TH-OCHAN]* Optical Line - TCA Autonomous Report (TOPR-OL) - Total Optical Power Received 10,20,30,40,50 10,20,30,40,50 (TOPR-OL) [60],70,80,90,100 [60],70,80,90,100 Optical Channel - TCA Autonomous Report (SPR-C) - Signal Power Received per Channel (SPR-C) [Enable]/Disable [Enable]/Disable 0,10,20,30,40,50 0,10,20,30,40,50 [60],70,80,90,100 [60],70,80,90,100 Supervisory Channel - Line Coding Violations (CVL)† -7,-8,[-9],-10 ,-11 -7,-8,-9,[-10],-11, -12 - TCA Autonomous Report (CVL)† [Enable]/Disable [Enable]/Disable - Line Errored Seconds (ESL) 1-900 [25] 1-65535[250] - TCA Autonomous Report (ESL) [Enable]/Disable [Enable]/Disable - Line Severely Errored Seconds (SESL) 1-63 [10] 1-4095 [40] - TCA Autonomous Report (SESL) [Enable]/Disable [Enable]/Disable - Line Unavailable Seconds (UASL) 1-63 [10] 1-4095 [10] - TCA Autonomous Report (UA-L) [Enable]/Disable [Enable]/Disable See footnotes at end of table. 8-18 Issue 1 March 2001 PERFORMANCEPERFORMANCERetrieveSet-ThresholdThresholdSupervisory Supervisory [SET-TH-SUPR] [RTRV-TH-SUPR]* 365-575-536 Administration and Provisioning Table 8-3. Provisionable Threshold Crossing Alert (TCA) Parameters Parameter Threshold Range [Original Value] CenterLink Management Console Current 15 Minute Command [TL1 Command] Current 1 Day Report [TL1 Report] OT Port Signal - Coding Violations - Section Near End (CVS)† -7,-8,[-9],-10 ,-11 -7,-8,-9,[-10],-11, -12 - TCA Autonomous Report (CVS) † [Enable]/Disable [Enable]/Disable - Errored Seconds - Section Near End (ESS) 1-900 [25] 1-65535[250] - TCA Autonomous Report (ESS) [Enable]/Disable [Enable]/Disable - Severely Errored Seconds Section Near End (SESS) 1-63 [10] 1-4095 [40] - TCA Autonomous Report (SESS) [Enable]/Disable [Enable]/Disable - Severe Errored Framing 1-63 [10] Seconds - Section Near End (SEFS) 1-4095 [10] - TCA Autonomous Report (SEFS) [Enable]/Disable [Enable]/Disable PERFORMANCEPERFORMANCERetrieveSet-ThresholdThreshold-OT OT Port Signal Port Signal [SET-TH-OTPS] [RTRV-TH-OTPS]* * The PERFORMANCE-Retrieve-Threshold-All command [RTRV-TH-ALL] report may also be used. † The coding violations parameter specifies the coding violations error rate that will cause a TCA and is the base 10 logarithm of the desired error rate. However, the specified report will show the number of coding violations that will cause a TCA. Issue 1 March 2001 8-19 365-575-536 Administration and Provisioning Local Provisioning 8 For detailed information about the CenterLink commands and reports used to provision the WaveStar OLS 40G, refer to the on-line help available with the CenterLink Management Console or 365-575-540, WaveStar OLS 40G, Operations Systems Engineering Guide. Provisioning Circuit Pack Slots 8 To simplify circuit pack installation, circuit pack slot parameters can be provisioned before installing the corresponding circuit pack. All system parameters and values (current and original) are preserved by the WaveStar OLS 40G in the nonvolatile memory of SYSMEM circuit pack. The parameters and values are protected by the nonvolatile memory if a power failure occurs and are retrievable on demand regardless of the means used for provisioning. The parameters are automatically downloaded when the affected circuit pack is installed in the slot. Provisioning on Circuit Pack Replacement 8 Replacement of a failed circuit pack is simplified by the WaveStar OLS 40G's automatic provisioning of the current circuit pack values. The SYSCTL and SYSMEM circuit packs maintain a provisioning map of the entire system, so when a transmission circuit pack is replaced, the SYSCTL and SYSMEM circuit packs automatically download provisioning parameters and current values to the new circuit pack. Auto Provisioning Date/Time 8 When the SYSCTL circuit pack is reseated/replaced or a node power failure/ recovery occurs, the WaveStar OLS 40G uses the original date/time values (70-01-01, 00:00:00) in all reports. During ring startup the node obtains the correct date and time from the node provisioned as directory services network element (DS-NE). If the SYSCTL circuit pack is reseated/replaced or a node power failure/recovery occurs at the DS-NE, the DS-NE obtains the correct date and time from an adjacent node during ring startup. 8-20 Issue 1 March 2001 365-575-536 Administration and Provisioning Circuit Pack Slot, Port, and Optical Channel Provisioning States 8 The OA and TLM circuit pack slots may be in one of the following states: ■ AUTO (Auto): AUTO is the original value of the circuit pack slot state parameter. AUTO refers to a circuit pack slot that is available for automatic provisioning. A circuit pack slot makes a transition from the AUTO state to the EQ state when the presence of a circuit pack is detected. ■ EQ (Equipped): EQ refers to a circuit pack slot that is fully monitored and alarmed. A circuit pack slot makes a transition from the EQ state to the AUTO state when the CONFIGURATION-Update-System command is executed while the absence of a circuit pack is detected. The IS-3/STM-1 customer maintenance signal (CMS) and Optical Translator signal ports (Release 3 and later) may be in one of the following states: ■ AUTO (Auto): AUTO is the original value of the port state parameter. AUTO refers to a port that is available for automatic provisioning. A port makes a transition from the AUTO state to the IS state after a good signal is detected. A port in the AUTO state can also be provisioned to the NMON state, using the CONFIGURATION-Enter-CMS and CONFIGURATIONEnter-OT Port Signal commands. ■ IS (In Service): IS refers to a port that is fully monitored and alarmed. A port makes a transition from the IS state to the AUTO state when the CONFIGURATION-Update-System command is executed while the absence of a good signal is detected. A port also makes a transition from the IS state to the AUTO state when the associated circuit pack slot makes an EQ-to-AUTO circuit pack slot state transition. A port in the IS state can also be provisioned to the AUTO or NMON state, using the CONFIGURATION-Enter-CMS and CONFIGURATION-Enter-OT Port Signal commands. ■ NMON (Not Monitored): NMON refers to a port that is not monitored and will not make a transition to the IS state when a good signal is detected. A port in the NMON state can be provisioned to the AUTO state, using the CONFIGURATION-Enter-CMS and CONFIGURATION-Enter-OT Port Signal commands. Issue 1 March 2001 8-21 365-575-536 Administration and Provisioning The optical channels may be in one of the following states: ■ AUTO (Auto): AUTO is the original value of the optical channel state parameter. AUTO refers to an optical channel that is available for automatic provisioning. An optical channel makes a transition from the AUTO state to the IS state after the presence of an optical channel is detected. An optical channel in the AUTO state can also be provisioned to the NMON state, using the CONFIGURATION-Enter-Optical Channel command. ■ IS (In Service): IS refers to an optical channel that is fully monitored and alarmed. An optical channel makes a transition from the IS state to the AUTO state when the CONFIGURATION-Update-System command is executed while a loss of signal is detected. An optical channel in the IS state can also be provisioned to the AUTO or NMON state, using the CONFIGURATION-Enter-Optical Channel command. ■ NMON (Not Monitored): NMON refers to an optical channel that is not monitored and will not make a transition to the IS state when the presence of an optical channel is detected. An optical channel in the NMON state can be provisioned to the AUTO state, using the CONFIGURATIONEnter-Optical Channel command. The WaveStar OLS 40G monitors, reports, and alarms trouble conditions associated with optical channels, supervisory channels, CMS ports, and Optical Translator ports according to the optical channel state, port state, and the circuit pack slot state. The circuit pack slot state must be in the EQ state. For more information about provisioning states, refer to Appendix B, “State Names,” and Appendix C, “State DIagrams.” 8-22 Issue 1 March 2001 9 Maintenance Description Contents Overview 9-1 Maintenance Philosophy 9-1 Maintenance Signals 9-2 Fault Detection and Isolation 9-4 Fault Reporting 9-5 Optical Translator Fault Reporting (via the Miscellaneous Discrete Interface) 9-13 Protection Switching 9-16 ■ General 9-16 ■ Supervisory Signal Data Communications Channel Protection 9-16 Automatic Optical Amplifier Power Shut Down/Restart 9-17 ■ General 9-17 ■ Shut Down Procedure 9-18 ■ Restart Procedure 9-19 Loopbacks 9-20 Tests 9-20 ■ Auto Turnup 9-20 ■ Manual 9-25 ■ Operations Interface Tests 9-25 Provisioning Consistency Audits 9-27 Performance Monitoring 9-28 Performance Parameters 9-28 ■ Issue 1 March 2001 9-i Contents ■ Optical Line Parameters 9-29 ■ OC-48/STM-16 Line Parameters 9-30 ■ Optical Channel Parameters 9-30 ■ Supervisory Channel Parameters 9-31 ■ Optical Translator Port Signal Parameters 9-32 ■ Performance-Monitoring Data Storage and Reports 9-32 ■ Performance Monitoring During Failed Conditions 9-34 ■ Performance-Monitoring Parameter Thresholds 9-36 ■ Threshold Crossing Alert Transmission to an Operations System 9-36 Reports 9-ii 9-37 ■ Active Alarms and Status 9-37 ■ Active Alarms 9-37 ■ 6-Hour Autonomous TL1 Report 9-38 ■ Provisioning Reports 9-38 ■ Performance Monitoring 9-39 ■ State 9-39 ■ Version/Equipment List 9-39 Issue 1 March 2001 Maintenance Description 9 Overview 9 9 This section defines the maintenance philosophy and outlines the various features available to monitor and maintain the WaveStar™ OLS 40G. Maintenance Philosophy 9 The WaveStar OLS 40G allows operation and maintenance of network elements in a network from a centralized location. The WaveStar OLS 40G continuously monitors the equipment and incoming signals, and reports any current or potential troubles. This enables the user to take the appropriate corrective action. The WaveStar OLS 40G supports proactive and reactive maintenance. Proactive maintenance refers to the process of detecting degrading conditions not severe enough to initiate protection switching or alarming, but indicative of an impending hard or soft failure. Proactive maintenance consists of monitoring performance parameters associated with the optical lines, optical channels, supervisory signals, and optical translator signals (Release 3 and later). Reactive maintenance occurs after a failure. The LEDs on the indicator strip/user panel and circuit pack faceplates report internal troubles. Most troubles can be detected and corrected at this level. The craft interface terminal (CIT) may be used to retrieve detailed reports about performance monitoring, alarm and status, and configurations for network elements in a network. Issue 1 March 2001 9-1 365-575-536 Maintenance Description Maintenance Signals 9 The WaveStar OLS 40G uses several maintenance related signals and messages to aid locating faults. The WaveStar OLS 40G is an optically amplified line system and has no access to the digital data in the optical line signal. Therefore, the WaveStar OLS 40G cannot insert alarm indications signals (AIS), upstream failure indication signals (for example, remote defect indicator signals), and path unequipped signals at any of the SONET layers. However, the WaveStar OLS 40G uses the following signals to support maintenance: ■ Tone signal: The tone signal is a low frequency signal that is amplitude modulated on a drop side signal. Each drop side signal wavelength is assigned a tone signal with a unique frequency. The Telemetry Controller (TLM) circuit pack amplitude modulates a tone signal on the supervisory signal. The Optical Amplifier (OA) circuit packs use the tone signals to detect the presence of a signal. The WaveStar OLS 40G also uses the tone signal to derive the signal power of the drop side signal. The power of the tone signal is proportional to the power of the drop side signal. For detailed information about wavelengths and the approximate associated tone signal frequencies, refer to Section 10, “Technical Specifications.” 9-2 Issue 1 ■ Supervisory signal: The supervisory signal is a 155.52-Mb/s signal that is transmitted between WaveStar OLS 40G network elements. The supervisory signal is transported in the supervisory channel of the optical line signal. The supervisory signal consists of the supervisory overhead (SONET overhead portion) and the customer maintenance payload (SONET payload portion). The supervisory overhead carries the data communications channel for communications between network elements. ■ Optical line ID: The optical line ID is a value (0-4) used to uniquely identify each optical line. The TLM circuit pack inserts the optical line ID in the three least significant bits of the K2 byte of the supervisory overhead. The optical line ID is verified by the downstream TLM circuit pack. The optical line ID is used to identify any fiber misconnections between WaveStar OLS 40G network elements. ■ Section trace signal: In Release 3.3 and higher, the WaveStar OLS 40G does not read the section trace byte (J0) in the section overhead of an OC-48 signal. The 41F(1-16) and 41G OTUs are used in Release 3.3 and higher. The OC-48 section trace signal is transmitted by a SONET OC-48 lightwave terminal repetitively to verify the continuity of the OC-48 section. The 41A_C and 41C_C OC48/STM16 Optical Translator Unit (OTU) circuit packs are the only circuit packs that are capable of reading the section trace byte. Thus, the other circuit packs pass through any section trace signals. The value of the expected incoming section trace signals is provisionable for OC-48 signals only. The value of the provisionable expected incoming section trace signal is compared to the actual incoming section trace signal to verify OC-48 section continuity. March 2001 365-575-536 Maintenance Description For more information about the CONFIGURATION-Enter-Section Trace and CONFIGURATION-Retrieve-Section Trace commands and provisioning section trace, refer to the on-line help available with the CenterLink Management Console or 365-575-540, WaveStar OLS 40G, Operations Systems Engineering Guide. The data communications channel of the supervisory signal carries the following out-of-band alarm indication messages to suppress downstream alarms: ■ Optical channel alarm indication message: The optical channel alarm indication message notifies downstream equipment when an incoming optical channel loss of signal defect is declared at an OA circuit pack. ■ Optical line alarm indication message: The optical line alarm indication message notifies downstream equipment when an incoming optical line loss of signal or an OA circuit pack defect is declared. NOTE: The Optical Translator Unit (OTU) circuit packs and Optical Translator Port Modules (OTPMs) signal downstream transmission equipment by disabling the circuit pack output optical signal. The OTU circuit packs and OTPMs disable the output optical signal for incoming loss of signal, incoming loss of frame, incoming line AIS, and circuit pack failures. The OTU circuit packs and OTPMs do not insert line alarm indication signals or other SONET maintenance signals. NOTE: In Release 3 and later releases, users can provision the association of an Optical Translator port to an optical channel. This association is used for correlating alarms. For more information about correlating alarms, refer to Section 8, “Administration and Provisioning.” Issue 1 March 2001 9-3 365-575-536 Maintenance Description 9 Fault Detection and Isolation The WaveStar OLS 40G continuously monitors its internal condition and incoming signals according to the state of the circuit pack slots, customer maintenance signal (CMS) ports, Optical Translator ports (Release 3 and later), optical channels, and optical lines. (For information about circuit pack slot, port, optical channels, and optical line states and transitions, refer to Section 8, "Administration and Provisioning.") If a circuit pack slot is in the EQ state, the WaveStar OLS 40G monitors the circuit pack and activates the appropriate indicators when a failure occurs. Table 9-1 shows the incoming signals and the associated conditions the WaveStar OLS 40G monitors. Table 9-1. Incoming Signals and Monitored Condition Incoming Signal Level Monitored Conditions Optical Line* Loss of Signal (LOS) Optical Channel* Loss of Signal (LOS) Supervisory Channel† Failure Signal Degrade (SD) Signal Fail (SF) Customer Maintenance Signal† Loss of Frame (LOF) Loss of Signal (LOS) Signal Degrade (SD) Signal Fail (SF) Optical Translator Port Signal‡ Failure * If the OA and OTU slots are in the EQ state, the associated incoming optical line signal is also monitored and alarmed † If the TLM slots are in the EQ state, the incoming supervisory signals are monitored and alarmed. ‡ Available in Release 3 and later releases. When a trouble condition is detected, the WaveStar OLS 40G employs automatic diagnostics to isolate the failed circuit pack or signal. Most faults are isolated to a maximum of two circuit packs, but some faults may be isolated to more than two circuit packs. Failures are reported to the local technician and operations systems so that repair decisions can be made. If desired, operations system personnel and the local technician can use the CIT to gain more detailed information on the trouble condition. 9-4 Issue 1 March 2001 365-575-536 Maintenance Description Fault Reporting 9 All trouble conditions detected and isolated by the WaveStar OLS 40G are stored and made available to be reported, on demand, through the CIT. In addition, a history of the past 500 alarm and status conditions and CIT events is maintained and available for on-demand reporting. The CIT events include condition starting events, condition clearing events, autonomous actions by the system, and user actions. Each event is date and time stamped. The alarm level associated with each condition is the alarm level of the system at the time the condition is recorded. The WaveStar OLS 40G also automatically reports all detected alarm and status conditions and CIT events through indicators that are subject to the provisionable incoming signal alarm delay and through indicators that are not subject to incoming signal alarm delay. The following indicators that are subject to incoming signal alarm delay: ■ Audible and visible office alarm outputs ■ Parallel telemetry outputs ■ TL1 autonomous messages* ■ Critical (CR), major (MJ), and minor (MN) LEDs on the indicator strip/user panel. The following indicators that are not subject to incoming signal alarm delay: * ■ FAULT LEDs on the circuit packs ■ All CIT reports ■ TL1 command response messages ■ Abnormal (ABN), near-end activity (NE ACTY), far-end activity (FE ACTY), alarm cutoff (ACO), and POWER ON LEDs on the indicator strip/user panel. TL1 autonomous messages for alarm and status conditions are only available on X.25 virtual circuits when the value of the OS Type parameter is provisioned "maintenance" or "other" using the SECURITY-Enter-Channel Identifier-Security command. Issue 1 March 2001 9-5 365-575-536 Maintenance Description The incoming signal alarm delay only applies to autonomous indications of the following incoming signal conditions: 9-6 Issue 1 ■ incoming CMS LOF ■ incoming CMS LOS ■ incoming CMS SD ■ incoming CMS SF ■ incoming LSBB failure ■ incoming OC12 failure ■ incoming OC3 failure ■ incoming OC-48 failure ■ incoming optical channel LOS ■ incoming optical line LOS ■ incoming STM1 failure ■ incoming STM16 failure ■ incoming STM4 failure ■ incoming supr chnl fail ■ incoming supr chnl SD ■ incoming supr chnl SF . March 2001 365-575-536 Maintenance Description Table 9-2 contains a list of alarm and condition descriptions and their likely causes. ! CAUTION: This table is for information only and should not be used for trouble clearing. Refer to the Operation and Maintenance (TOP) section for trouble clearing information. Table 9-2. Condition Descriptions Description (from Retrieve-Alarm Report) Meaning APSD active - NE The automatic power shut down feature has been activated because of the detection of a LOS condition at the local network element. APSD active - FE The automatic power shut down feature has been activated because of the detection of a LOS condition at the far end network element. BC LAN failure The board controller (BC) LAN circuitry on a circuit pack is failed in such a way as to affect the BC LAN. CP reset in progress A circuit pack has been installed and the necessary software is being downloaded to the circuit pack. CP (unknown type) failure The circuit pack in the indicated slot has failed, but its type is unknown. CP (unknown type) removed The circuit pack in the indicated slot has been removed, but its type is unknown. CPYPGM:IP tid Copy program in progress. DCC APS data error An error has been detected in the DCC APS byte. DCC startup in progress The DCC is starting up. different OA types in side There are two different types of OA circuit packs on the same side of an end terminal shelf that has been provisioned as DUAL. (The OA circuit packs on the same side of the end terminal shelf must be the same code.) DS-NE not reachable One of the network elements in the ring network has not been provisioned "DS-NE," far end communications has been disabled to the "DS-NE," or communication to the provisioned "DS-NE" has been interrupted. duplicate TID defined A recently entered target identifier (TID) value is a duplicate of the TID of another network element in the ring network. equipage/prov mode inconsistent The equipped OA circuit pack is not compatible with the provisioned terminal configuration mode. Issue 1 March 2001 9-7 365-575-536 Maintenance Description Table 9-2. Condition Descriptions (Contd) Description (from Retrieve-Alarm Report) Meaning fuse/power failure A The network element has a blown fuse in feeder A, a power failure to a shelf, or a power failure within the cabinet. Likely causes: A blown 10A fuse or a defective filter board in the filter panel. fuse/power failure A and B The network element has blown fuses in feeders A and B, a power failure to a shelf, or a power failure within the cabinet/bay. fuse/power failure B The network element has a blown fuse in feeder B, a power failure to a shelf, or a power failure within the cabinet. Likely causes: A blown 10A fuse or a defective filter board in the filter panel. incoming CMS LOF A CMS loss-of-frame (LOF) condition has been detected on an incoming CMS line. Likely cause: Failure of the far end customer equipment or the local TLM circuit pack. incoming CMS LOS A CMS loss-of-signal (LOS) condition has been detected on an incoming CMS line. Likely causes: Failure of the far end customer equipment, the incoming CMS line (receive fiber), or the local TLM circuit pack. incoming CMS SD A signal degrade (SD) condition has been detected on an incoming CMS line. The line parity error rate threshold has been exceeded. Likely causes: Failure of the far end customer equipment or the local TLM circuit pack. incoming CMS SF A signal failure (SF) condition has been detected on an incoming CMS line. Likely causes: Failure of the far end customer equipment, the incoming CMS line (receive fiber), or the local TLM circuit pack. inc. (from SUPR) DCC failure The local network element cannot communicate through the supervisory signal data communications channel (DCC). incoming GbE-1 failure No incoming 1.25 Gb/s ethernet signal is present at OTU. incoming LSBB failure An LSBB failure has been detected on an incoming LSSB port. Likely causes: Failure of the far end LSBB circuit pack, the incoming LSBB line (receive fiber) or the local QAUD OTU circuit pack or LSBB OTPM. 9-8 Issue 1 March 2001 365-575-536 Maintenance Description Table 9-2. Condition Descriptions (Contd) Description (from Retrieve-Alarm Report) Meaning incoming OC12 failure An OC12 failure has been detected on an incoming OC12 port. Likely causes: Failure of the far end OC12 circuit pack, the incoming OC12 line (receive fiber) or the local QAUD OTU circuit pack or OC12 OTPM. incoming OC3 failure An OC3 failure has been detected on an incoming OC3 port. Likely causes: Failure of the far end OC3 circuit pack, the incoming OC3 line (receive fiber) or the local QAUD OTU circuit pack or OC3 OTPM. incoming OC-48 failure An OC-48 failure has been detected on an incoming OC-48 port. Likely causes: Failure of the far end OC-48 circuit pack, the incoming OC-48 line (receive fiber) or the local OTU circuit pack. incoming optical channel LOS An optical channel loss-of-signal (LOS) condition has been detected on an incoming optical channel. incoming optical line LOS An optical line loss-of-signal (LOS) condition has been detected on an incoming optical line. incoming STM1 failure An STM1 failure has been detected on an incoming STM1 port. Likely causes: Failure of the far end STM1 circuit pack, the incoming STM1 line (receive fiber) or the local QAUD OTU circuit pack or STM1 OTPM. incoming STM16 failure An STM16 failure has been detected on an incoming STM16 port. Likely causes: Failure of the far end STM16 circuit pack, the incoming STM16 line (receive fiber) or the local STM16 OTU circuit pack. incoming STM4 failure An STM4 failure has been detected on an incoming STM4 port. Likely causes: Failure of the far end STM4 circuit pack, the incoming STM4 line (receive fiber) or the local QAUD OTU circuit pack or STM4 OTPM. incoming supr chnl fail An incoming supervisory channel loss-of-frame (LOF) or loss-of-signal (LOS) condition has been detected on an incoming (from the optical line) supervisory channel. incoming supr chnl SD A signal degrade (SD) condition has been detected on an incoming (from the optical line) supervisory channel. Issue 1 March 2001 9-9 365-575-536 Maintenance Description Table 9-2. Condition Descriptions (Contd) Description (from Retrieve-Alarm Report) Meaning incoming supr chnl SF A signal failure (SF) condition has been detected on an incoming (from the optical line) supervisory channel. inconsistent OTPM association An association between an OTPM and an optical channel is inconsistent with the side configuration. inconsistent OTU association An association between an OTU and an optical channel is inconsistent with the side configuration. inhibit alarms-office alarms Alarm reporting via the office alarms interface is disabled. inhibit alarms-parallel telem Alarm reporting via the parallel telemetry interface is disabled. inhibit alarms-X.25 Alarm reporting via the X.25 (TL1) interface is disabled. logins inhibited Logins are disabled. multiple DS-NEs defined Two or more network elements in a ring network have their "Directory Server" (DS-NE) parameter provisioned to "Yes". There must be one and only one DSNE in the ring network. NE status comm failure The NE is not associated with an AGNE or the AGNE cannot establish associations with all of the NEs in the alarm group. If the AGNE loses power, all NEs in the alarm group will report this condition; however, the condition may not be reported for several minutes. OA failure Failure of an OA circuit pack. OA LAN failure The local area network (LAN) circuitry on a circuit pack has failed in such a way as to affect the Overhead Access (OA) LAN. OA output disabled The output of the specified OA circuit pack has been shut down because of a problem with the ODU at the downstream network element. OA removed An OA circuit pack is missing from slot. ODU warmup in progress An ODU has been installed and is warming up to a stable operating temperature. OMU/ODU mismatch or missing An OMU/ODU mismatch has been detected or an OMU/ODU is missing. opr/prov mode inconsistent The side is provisioned for single OA operation and equipped with an OA circuit pack that does not support single OA operation. 9-10 Issue 1 March 2001 365-575-536 Maintenance Description Table 9-2. Condition Descriptions (Contd) Description (from Retrieve-Alarm Report) Meaning optical line ID mismatch A fiber misconnection has been detected between WaveStar OLS 40G network elements. optical line reset in progress An optical line has transitioned from the AUTO state to the IS state or the OA configuration has changed form the single OA to Dual OA configuration with missing circuit packs. OTCTL failure Failure of OTCTL circuit pack. OTCTL removed OTCTL circuit pack is missing from slot. OTPM failure Failure of OTPM. OTPM mismatch An OTPM has been replaced with a defective or a non-similar port module. OTPM removed OTPM is missing from slot. OTPM unknown The OTPM in the indicated slot is unrecognizable. OTU failure Failure or OTU circuit pack. OTU removed OTU circuit pack is missing from slot. provisionedcontrolpt The specified control point (miscellaneous discrete output) is active. Note: The actual message that appears in the condition description report for this condition can be provisioned; this is the default message. See the RTRV-ATTR-CONT and SETATTR-CONT commands. provisionedenvironmentalpt A contact closure is present at an environmental input point of the network element. Note: The actual message that appears in the condition description report for this condition can be provisioned; this is the default message. See the RTRV-ATTR-ENV and SET-ATTR-ENV commands. QOTU failure Failure of QOTU circuit pack. QOTU removed QOTU circuit pack is missing from slot. reset in progress The WaveStar OLS network element is in progress of downloading its software from SYSMEM to SYSCTL, to TOHCTLs, and to all other circuit pack board controllers. Likely cause: Reset or INIT-SYS has been executed. SER TLM 1 port failure The serial telemetry 1 port has failed. software download in progress A software download from the CIT-PC to the SYSMEM is currently in progress. SYSCTL failure Failure of SYSCTL circuit pack. SYSMEM failure Failure of SYSMEM circuit pack. Issue 1 March 2001 9-11 365-575-536 Maintenance Description Table 9-2. Condition Descriptions (Contd) Description (from Retrieve-Alarm Report) Meaning SYSMEM removed SYSMEM circuit pack is missing from slot. SYSMEM/SYSCTL code mismatch A software mismatch has been detected between the software stored in the SYSMEM circuit pack and the software version running in the WaveStar OLS network element. Likely cause: A software upgrade procedure is in progress. SYSMEM unrecognizable code The software stored in the SYSMEM circuit pack has become corrupted and is no longer usable. Likely causes: Corrupted software download to SYSMEM circuit pack or spontaneous corruption of the software in the SYSMEM circuit pack. system incomplete The designated directory server network element (DS-NE) is unable to create a complete ring map because of a controller or transmission failure in the network. system startup in progress This is normally a transient condition that indicates the network is starting up. test alarm in progress An office alarm test is in progress. test auto turnup in progress An auto turnup test is in progress. test telemetry in progress A telemetry test is in progress. TID address map full The local subnetwork has exceeded the maximum number of network elements. TL-1 link failure An incoming TL1 link failure has been detected. TLM failure Failure of a TLM circuit pack. TLM removed TLM circuit pack is missing from slot. TOHCTL failure Failure of TOHCTL circuit pack. TOHCTL removed TOHCTL circuit pack is missing from slot. unexpected CP type A circuit pack has been replaced with a pack that has a different code. 9-12 Issue 1 March 2001 365-575-536 Maintenance Description Optical Translator Fault Reporting (via the Miscellaneous Discrete Interface) 9 NOTE: In Release 3.3 and higher, the WaveStar OLS 40G monitors OTU circuit packs, QUAD OTU circuit packs, and OTPMs via the overhead access local area network (OALAN) and Optical Translator Controller (OTCTL) circuit pack. The miscellaneous discrete interface is no longer needed and should not be used to avoid redundant alarms. Instead of using the miscellaneous discrete interface, more detailed information is available from the CIT. The OTU and QUAD OTU circuit packs continuously monitor their internal condition and incoming signals.The QUAD OTU circuit pack also continuously monitors the internal condition of the equipped OTPMs and the incoming signals. When a trouble condition is detected, the OTU and QUAD OTU circuit packs employ automatic diagnostics to isolate the fault. Failures are reported to the local technician using the circuit pack FAULT LED and the miscellaneous discrete outputs so that repair decisions can be made. NOTE: The miscellaneous discretes outputs from the OTU and QUAD OTU circuit packs are monitored by the colocated OLS End Terminal using an external miscellaneous discrete unit. Table 9-3 shows the trouble conditions detected and reported by the OTU circuit pack, and Table 9-4 shows the trouble conditions detected and reported by the QUAD OTU circuit pack. Table 9-3. OTU Circuit Pack Fault Reporting (via the Miscellaneous Discrete Interface) Condition FAULT LED (Note 1) Miscellaneous Discretes 1 and 2 (Note 2) Laser No failure conditions Off 1 and 2 Off On Incoming OC-48 Loss of Signal (LOS) Flashing 2 On Off Incoming OC-48 Loss of Frame (LOF) Flashing 2 On Off Incoming OC-48 B1 Parity Error Flashing 2 On On Laser Bias Current (LBC) Out of Range (OOR)* On 1 On Off Optical Power Transmit (OPT) Out of Range (OOR)* On 1 On Off See notes and footnotes at end of table. Issue 1 March 2001 9-13 365-575-536 Maintenance Description Table 9-3. OTU Circuit Pack Fault Reporting (via the Miscellaneous Discrete Interface) (Contd) Condition FAULT LED (Note 1) Miscellaneous Discretes 1 and 2 (Note 2) Laser OTU Circuit Pack Internal Defect On 1 On Off OTU Circuit Pack Power Converter/Fuse Failure On† 1 On Off OTU Circuit Pack Insertion On 1 On Off‡ OTU Circuit Pack Reset/Initialization On 1 On On Single Fuse Failure on −48 V Feeders§ Off 1 On On Notes: 1. The FAULT LED will be active for the period of "defect duration + alarm clear delay." 2. Multiple failures may cause both miscellaneous discretes 1 and 2 to be active. * Downstream errors may not be detected/reported with this condition; however, the OTU circuit pack can be replaced, if desired. † The FAULT LED may not be lighted for some power converter or fuse failures on the OTU circuit pack. ‡ When the OTU circuit pack is inserted in a slot, the laser is turned on after the firmware is initialized. § For a single fuse failure of a −48 V feeder at the shelf/cabinet, all OTU circuit packs in the shelf/cabinet will report this condition. NOTE: When multiple failures occur, the OTU circuit pack may activate miscellaneous discretes 1 and 2 simultaneously. When this occurs, observe the following priorities: (1) OTU/QUAD OTU/OTPM circuit pack defects, (2) incoming LOS/LOF, (3) incoming B1 parity error, (4) LBC/OPT OOR conditions and single fuse failures on −48 V feeders. 9-14 Issue 1 March 2001 365-575-536 Maintenance Description Table 9-4. QUAD OTU Circuit Pack and OTPM Fault Reporting (via Miscellaneous Discrete Interface) Condition OTPM FAULT LED (Note 1) QUAD OTU Miscellaneous FAULT LED Discretes 1 (Note 1) and 2 (Note 2) Laser No failure conditions Off Off 1 and 2 Off On Incoming OC-3/OC-12 Loss of Signal (LOS) Flashing Off 2 On Off Incoming OC-3/OC-12 Loss of Frame (LOF) Flashing Off 2 On Off Incoming 100-750 Mb/s Loss of Signal (LOS) Flashing Off 2 On Off Incoming OC-3/OC-12 B1 Parity Error Flashing Off 2 On On Laser Bias Current (LBC) Out of Range (OOR)* On Off 1 On Off Optical Power Transmit (OPT) Out of Range (OOR)* On Off 1 On Off OTPM Internal Defect On Off 1 On Off QUAD OTU Circuit Pack Power Converter Failure Off On† 1 On Off QUAD OTU Fuse Failure Off On 1 On Off ‡ OTPM Fuse Failure On† Off 1 On Off Single Fuse Failure on −48 V Feeders§ Off Off 1 On On QUAD OTU Circuit Pack Reset On On 1 On On QUAD OTU Circuit Pack Insertion On On 1 On Off‡ QUAD OTU Circuit Pack In Wrong Slot On On 1 On Off OTPM Insertion Off 1 On Off¶ On Notes: 1. The FAULT LED will be active for the period of "defect duration + alarm clear delay." 2. Multiple failures may cause both miscellaneous discretes 1 and 2 to be active. * Downstream errors may not be detected/reported with this condition; however, the OTPM can be replaced, if desired. † The FAULT LED may not be lighted for some power converter or fuse failures on the OTU circuit pack. ‡ All OTPM lasers in the QUAD OTU circuit pack will be turned off. § For a single fuse failure of a −48 V feeder at the shelf/cabinet, all OTU circuit packs in the shelf/cabinet will report this condition. ¶ When the OTPM is inserted in a slot, the laser is turned on after the firmware is initialized. Issue 1 March 2001 9-15 365-575-536 Maintenance Description Protection Switching 9 General 9 The WaveStar OLS 40G does not provide protection switching to maintain transmission; however, the WaveStar OLS 40G does perform supervisory signal data communications channel (DCC) protection switching. If a transmissionaffecting failure occurs, the WaveStar OLS 40G will raise a minor (MN) non-service affecting condition. The lightwave terminals (for example, FT-2000 OC-48 Large Capacity Terminal) will independently detect the failure and protect transmission by switching traffic to the protection line. Supervisory Signal Data Communications Channel Protection 9 The WaveStar OLS 40G performs 1x1 data communications channel (DCC) protection switching in response to automatically detected faults. No manual DCC switching is supported. The supervisory signal DCC uses bidirectional 1x1 revertive protection switching on an optical section basis. Bidirectional refers to when protection switching is performed in the transmit and receive directions. In revertive switching, the DCC switches from the supervisory signal of optical line 1 to the supervisory signal of optical line 2 when a fault occurs. When the fault clears, the DCC switches back (reverts) to the supervisory signal of optical line 1. The supervisory signal on optical line 1 carries the DCC between adjacent nodes. If a fiber or TLM circuit pack fails on optical line 1, the WaveStar OLS 40G reports the inc. (from SUPR) DCC failure condition and switches the DCC to the supervisory signal on optical line 2. If a fiber or TLM circuit pack fails on optical line 2, the WaveStar OLS 40G does not report the inc. (from SUPR) DCC failure condition. The WaveStar OLS 40G does not monitor the DCC on optical line 2. The K1 and K2 bytes of the supervisory signal on optical line 2 are used to control the DCC protection switching. The supervisory signals on optical lines 3 and 4 do not carry the DCC. 9-16 Issue 1 March 2001 365-575-536 Maintenance Description Automatic Optical Amplifier Power Shut Down/Restart 9 General 9 In Release 3.3 and higher, the WaveStar OLS 40G supports automatic power shut down and restart of the Optical Amplifier (OA) circuit packs. The WaveStar OLS 40G reduces the OA circuit pack power to an IEC Class 1 level on the optical line between adjacent offices. NOTE: The link between an OA and ODU at the receive-end OA should be protected as well. In this case, an LBO needs to be installed during system installation to ensure that power levels never exceed IEC Class 3A. This protects against possible exposure and optical surges. An incoming loss of signal is caused by a fiber cut, removed connectors, or equipment failures. When the failure is repaired, the WaveStar OLS 40G resumes normal operation. ! DANGER: Disabling the Automatic Power Shut-Down (APSD) feature results in a FDA/ IEC Class IIIb/3B laser hazard. APSD is a safety feature. Do not attempt to defeat or disable APSD. Defeating APSD may result in harm to personnel exposed to disconnected or cut optical fibers. ! CAUTION: To comply with IEC regultations, systems containing an IEC Class 3B laser hazard must be installed in a controlled environment. Please refer to applicable IEC standards. For detailed information, refer to the on-line help available with the CenterLink Management Console or 365-575-540, WaveStar OLS 40G, Operations Systems Engineering Guide. Figure 9-1 shows an example of automatic power shut and restart in a WaveStar OLS 40G with two OA circuit packs. Issue 1 March 2001 9-17 365-575-536 Maintenance Description Optical Amplifier Power Shut Down Procedure OA Normal 1. Fiber Cut OA1 OA2 2. 0-Channel Power 2. 0-Channel Power 4. Class I Power Class I Power Class I Power OA 2. Class I Power OA4 OA3 2. TLM RDI Normal End Terminal B End Terminal A Optical Amplifier Power Restart Procedure OA Normal Normal Normal OA OA1 OA4 End Terminal A 1. Fiber Restored 3. Normal Power OA2 4. Normal Power 2. TLM RDI Cleared OA3 4. Normal Power 2. Normal Power Normal End Terminal B NC-84976201.7 Figure 9-1. Automatic Optical Amplifier Power Shut Down and Restart Example Shut Down Procedure 9 In Figure 9-1, when the (1) fiber cut occurs, the End Terminal B detects an incoming loss of signal. (2) The OA2 circuit pack powers down to the 0-channel level and (2) the OA3 circuit pack powers down to Class I levels with a fiber cut. (3) The OA3 circuit pack also transmits a telemetry remote defect indicator (TLM RDI) signal downstream. End Terminal B also reports the APSD active - NE condition. When End Terminal A detects the TLM RDI signal, (4) the OA1 circuit pack powers down to Class I levels. End Terminal A also reports the APSD active - FE condition. The OA1 and OA3 circuit packs power down within 3 seconds of the fiber cut. The OA circuit packs downstream from the OA2 circuit pack detect a loss of channels and power down to 0-channel levels. The OA circuit packs downstream 9-18 Issue 1 March 2001 365-575-536 Maintenance Description from the OA4 circuit pack will detect a decrease in the power level of the incoming signal. In applications with a single OA circuit pack, the WaveStar OLS 40G powers down the output of the OA circuit packs when an incoming supervisory signal fail condition is detected. Restart Procedure 9 In Figure 9-1, when the (1) fiber cut is repaired, (2) the End Terminal B clears the incoming loss of signal, TLM RDI signal, and the APSD active - NE condition. When the End Terminal A detects no TLM RDI signal, (3) the OA1 circuit packs power up to normal levels. End Terminal A also clears the APSD active - FE condition. (4) The OA2 and OA3 circuit packs also power up to normal levels. The OA1 and OA3 circuit packs adjust to normal power levels within a second of the restart procedure. The restart procedure is completed approximately 5 seconds after the fiber is repaired. Issue 1 March 2001 9-19 365-575-536 Maintenance Description 9 Loopbacks The WaveStar OLS 40G allows loopbacks to be performed on all optical line interfaces and customer maintenance signal interfaces. Front access to the optical connectors on the Optical Amplifier (OA) circuit pack faceplates allows a manual optical loopback. This loopback is performed by connecting the OUT optical connector on the faceplate of an OA circuit pack to the IN optical connector on the faceplate of the corresponding OA circuit pack with a single-mode fiber jumper and a lightguide buildout. Front access to the optical connectors on the Telemetry Controller (TLM) circuit pack faceplates allows a manual optical loopback. This loopback is performed by connecting the CMS OUT optical connector on the faceplate of a TLM circuit pack to the CMS IN optical connector with a multimode fiber jumper. Tests 9 Auto Turnup 9 The auto turnup tests are performed by the WaveStar OLS 40G, along with manual tests, to verify that the system has been installed correctly. These tests verify the system transmission capabilities and test all the transmission paths to detect any cabling errors. The auto turnup tests are controlled using the CIT and should only be performed on an out-of-service system. Before executing an auto turnup test at the CIT, no trouble conditions should be present in the system except the conditions associated with the test setup. After executing an auto turnup test, the CIT will not accept any commands until the test is complete. An auto turnup test can be aborted at any time or terminated prematurely if a condition exists that prevents the test from completing. The test results are displayed on the CIT. For more information about auto turnup tests, refer to the "Operation and Maintenance (TOP)" section. 9-20 Issue 1 March 2001 365-575-536 Maintenance Description The FAULT-Test-Auto Turnup-Local input provides the following CMS and SUPR local tests: ■ CMS: The local (CMS) test verifies the transmission path between the CMS IN and CMS OUT ports of the Telemetry Controller (TLM) circuit pack at end terminals with two OA circuit packs (Figure 9-2), end terminals with a single OA circuit pack (Table 9-3), and at repeaters (Figure 9-4). O M U Local Fiber Loopback OA 1A CMS 1A O D U TLM 1A/B L G (Open) X OA 1B NC-84993401 Figure 9-2. Local CMS Self-Test (End Terminal with Two OA Circuit Packs) For the local CMS test, the output (CM OUT) of the TLM circuit pack(s) of the optical line under test must be looped back with a multimode fiber jumper to the input (CM IN) of the TLM circuit pack. For example, when all optical lines are being tested, all TLM circuit packs must be manually looped back. In end terminals with two OA circuit packs, the corresponding OA circuit pack output (OUT) and input (IN) connections of the optical line(s) under test must be open. In end terminals with a single OA circuit pack, the corresponding OA circuit pack output (OUT) and ODU input (IN) connections of the optical line(s) under test must be open. Issue 1 March 2001 9-21 365-575-536 Maintenance Description O M U Local Fiber Loopback OA 1A CMS 1A L G (Open) X TLM 1A/B O D U NC-84993401.1 Figure 9-3. Local CMS Self-Test (End Terminal with a Single OA Circuit Pack) OA L (Open) G X Local Fiber Loopback CMS 1B TLM 1B/A TLM 1A/B CMS 1A Local Fiber Loopback L G (Open) X OA NC-84993501 Figure 9-4. 9-22 Issue 1 Local CMS Self-Test (Repeater) March 2001 365-575-536 Maintenance Description To verify the continuity of each CMS transmission path, each TLM circuit pack inserts one parity bit error on the outgoing CMS signal toward the CMS line. The output of the TLM circuit pack is looped back to the input of the TLM circuit pack and the TLM circuit pack monitors the incoming CMS signal. If only one parity bit error is detected within 1 second, the test passes. ■ SUPR: The local (SUPR) test verifies the transmission path between the Telemetry Controller (TLM) circuit packs and the Optical Amplifier (OA) circuit packs at end terminals with two OA circuit packs (Figure 9-5), end terminals with a single OA circuit pack (Figure 9-6), and at repeaters (Figure 9-7). O M U Local Fiber Loopback OA 1A CMS 1A TLM 1A/B L G (Open) X O D U NC-84993401.1 Figure 9-5. Local SUPR Self-Test (End Terminal with Two OA Circuit Packs) For the local SUPR test, the output (OUT) of the OA circuit pack(s) must be looped back with a single-mode fiber jumper at the lightguide cross connect panel (if available) and a lightguide buildout to the input (IN) of corresponding OA circuit pack (or ODU for end terminals with a single OA circuit pack) on the optical line(s) to be tested. For example, when all optical lines are being tested, all OA circuit pack pairs (or OA/ODU pairs) must be manually looped back. The CMS ports of each TLM circuit pack of the optical line under test must be open. Loop back any optical lines that are not in service, but not under test, to prevent any trouble conditions from denying the test. Issue 1 March 2001 9-23 365-575-536 Maintenance Description O M U OA 1A CMS 1A (Open) L G X TLM 1A/B Local Fiber Loopback O D U NC-84980601.1 Figure 9-6. Local SUPR Self-Test (End Terminal With a Single OA Circuit Pack) OA Local Fiber Loopback L G X (Open) CMS 1B (Open) TLM 1B/A TLM 1A/B CMS 1A L G X Local Fiber Loopback OA NC-84980701 Figure 9-7. 9-24 Issue 1 Local SUPR Self-Test (Repeater) March 2001 365-575-536 Maintenance Description To verify the continuity of each transmission path between the TLM circuit pack(s) and OA circuit pack(s), each TLM circuit pack inserts one parity bit error on the supervisory signal toward the optical line. The output of the OA circuit pack is looped back to the corresponding OA circuit pack and the TLM circuit pack monitors the supervisory signal from the optical line. If only one parity bit error is detected within 1 second, the test passes. There is no self-test for the Optical Multiplexing Unit (OMU), Optical Demultiplexing Unit (ODU), Optical Translator Unit (OTU) circuit pack, Optical Translator Port Module (OTPM), Optical Translator Controller (OTCTL), and Overhead Controller - Tributary (TOHCTL) circuit pack. The OMU, ODU, OTPM, and OTU circuit pack are tested manually with noise measurements (refer to "Manual" tests). The TOHCTL and OTCTL circuit pack is tested at the factory. 9 Manual Manual tests are required to test the fiber cables to the Optical Multiplexing Unit (OMU) and from the Optical Demultiplexing Unit (ODU) at end terminals. In the manual tests, the OA circuit packs transmit amplified noise to the ODU as the source signal for verifying signal continuity. Through a specific procedure using fiber loopbacks, each cable to and from the OMU and ODU should be tested. An optical power meter is required to verify the continuity of the cabling path. Signal quality may be verified for the OMU-OA-OA-ODU path by using a signal generated by the lightwave terminal (for example, the FT-2000 OC-48 Large Capacity Terminal) as the test signal source. However, this procedure will not verify the cabling to/from the TLM circuit pack. The continuity of the CMS fiber cables are also determined by manual tests. Manual tests are also required for Optical Translator Unit (OTU) circuit packs and Optical Translator Port Modules (OTPMs). For more information about manual tests, refer to the "Operation and Maintenance (TOP)" section. Operations Interface Tests 9 The WaveStar OLS 40G provides the following inputs to test LEDs, parallel telemetry interfaces, and office alarms: ■ FAULT-Test-LED: This input lights the specified LEDs. The test consists of one or more test cycles repeated as many times as specified. Each test cycle the LED(s) is lighted for 10 seconds, then turned off for 10 seconds. The LED(s) reverts to normal operation after the test is completed. The PWR ON LED is always on if the bay is powered and cannot be tested with this input. Issue 1 March 2001 9-25 365-575-536 Maintenance Description 9-26 ■ FAULT-Test-Telemetry-Parallel: This input tests the operation of the local parallel telemetry and miscellaneous discrete control output points. Each test cycle activates the selected control output point(s) for 20 seconds, then clears the control output point(s) for 20 seconds. The control output points revert to normal operation after the test is completed. ■ FAULT-Test-Alarm: This input tests the audible and visible office alarm outputs and their corresponding user panel LEDs (CR, MJ, and MN). The test consists of one or more test cycles repeated as many times as specified. The alarms revert to normal operation after the test is completed. Issue 1 March 2001 365-575-536 Maintenance Description Provisioning Consistency Audits 9 The WaveStar OLS 40G audits (monitors) the following provisioning information: ■ Target Identifier (TID): Each WaveStar OLS 40G network element in a network must have a unique TID. The WaveStar OLS 40G automatically detects and reports any duplicated TIDs. ■ End Terminal Direction: Each OLS end terminal must have the direction parameter provisioned as 1A-TX, 1A-TX-THRU, 1A-RCV, 1A-RCV-THRU, or DUAL. The direction parameter at one end terminal in a network must be provisioned as 1A-TX and the direction parameter at the other end terminal must be provisioned as 1A-RCV. The direction parameter at both end terminals must not be provisioned the same value. In Release 2.1 and later releases, an OLS end terminal may also be provisioned as a dual facing end terminal (DUAL). In Release 3 and later releases, one OLS End Terminal may be provisioned 1A-TX-THRU and another colocated back-toback OLS End Terminal may be provisioned 1A-RCV-THRU in applications with telemetry pass through.The WaveStar OLS 40G automatically detects and reports any inconsistent values. The WaveStar OLS 40G also makes provisioning consistency information available in reports. For more information, refer to the SECURITY-RetrieveSystem command in Section 11, "Craft Interface Terminal Usage." Issue 1 March 2001 9-27 365-575-536 Maintenance Description Performance Monitoring 9 Performance Parameters 9 The WaveStar OLS 40G provides performance monitoring to support proactive maintenance of a network. Proactive maintenance refers to the process of detecting degrading conditions not severe enough to initiate protection switching or alarming, but indicative of an impending hard or soft failure. Proactive maintenance consists of monitoring performance parameters associated with the optical lines, optical channels, supervisory channels, and customer maintenance signals. Table 9-5 lists the performance parameters monitored. Performance parameter thresholds are set to show degraded performance. When a performance-monitoring threshold is crossed, it is reported to the operations system where all threshold crossings associated with a particular path can be correlated, and the likely source of the degradation can be identified. In Release 3.3 and higher, the only derived performance parameter is the severely errored seconds (SES) which is based on lost of signal. For more information about provisioning thresholds and enabling/disabling the reporting of threshold crossing alerts (TCAs) to an operations system, refer to Section 8, "Administration and Provisioning." Table 9-5. Performance-Monitoring Parameters Maximum Counts Measured Parameter Current 15 Minute Current 1 Day Total Optical Power Received (TOPR-OL) Laser Bias Current for Pump 1 (LBC-P1) Laser Bias Current for Pump 2 (LBC-P2) Laser Backface Current for Pump 1 (LBFC-P1) Laser Backface Current for Pump 2 (LBFC-P2) — — — — — — — — — — OC-48/STM-16 Line* Laser Bias Current (LBC) Optical Power Transmit (OPT) Optical Power Received (OPR) — — — — — — Optical Channel Signal Power Received (SPR-C) — — Supervisory Channel Signal Power Received (SPR-SU) Laser Bias Current (LBC-SU) Line (B2) Coding Violations (CV-L) Line (B2) Errored Seconds (ES-L) Line (B2) Severely Errored Seconds (SES-L) Line (B2) Unavailable Seconds (UAS-L) — — 14000 900 900 900 — — 1343750 65535 65535 65535 Facility Optical Line See footnotes at end of table. 9-28 Issue 1 March 2001 365-575-536 Maintenance Description Table 9-5. Performance-Monitoring Parameters (Contd) Maximum Counts Facility Optical Translator Port Signals* * Measured Parameter Current 15 Minute Current 1 Day OC-3/STM-1Section (B1) Coding Violations (CV-S) OC-12/STM-4Section (B1) Coding Violations (CV-S) OC-48/STM-16 Section (B1) Coding Violations (CV-S) Section (B1) Errored Seconds (ES-S) Section (B1) Severely Errored Seconds (SES-S) Section (B1) Severely Errored Frame Seconds (SEFS-S) 64000 56000 224000 900 900 900 1343750 5375000 21500000 65535 65535 65535 Release 3 and later releases. Optical Line Parameters 9 The following optical line parameters are monitored continuously to detect degraded performance of the laser: ■ Total Optical Power Received (TOPR-OL): This parameter is the total power for all the optical channels. The total optical power received is reported using a scale from 0 to 100. The total optical power received parameter can be used with other proactive performance-monitoring parameters to isolate the source of an impending optical line failure. ■ Laser Bias Current for Pump 1 (LBC-P1): This parameter indicates whether the system optics are working within normal margins (in range or out of range). The upper limit is 1.5 times the initial factory (nominal) value. There is no lower limit. ■ Laser Bias Current for Pump 2 (LBC-P2): This parameter indicates whether the system optics are working within normal margins (in range or out of range). The upper limit is 1.5 times the initial factory (nominal) value. There is no lower limit. ■ Laser Backface Current for Pump 1 (LBFC-P1): This parameter indicates whether the laser for pump 1 is working within normal margins (in range or out of range). ■ Laser Backface Current for Pump 2 (LBFC-P2): This parameter indicates whether the laser for pump 2 is working within normal margins (in range or out of range). Threshold crossing alerts (TCAs) are generated if the TOPR-OL parameter exceeds the set thresholds. (Threshold crossing alerts are not supported for the LBC-P1, LBC-P2, LBFC-P1, and LBFC-P2 parameters.) The generation of TCAs for the TOPR-OL parameter can be enabled or disabled using the PERFORMANCE-Set-Threshold-Optical Line command. In Release 2 and later releases, TCAs can be enabled or disabled for a single parameter. Issue 1 March 2001 9-29 365-575-536 Maintenance Description OC-48/STM-16 Line Parameters 9 In Release 3 and later releases, the following OC-48/STM-16 optical parameters are monitored continuously to detect degraded performance of the laser: ■ Laser Bias Current (LBC): This parameter indicates whether the system optics are working within normal margins (in range or out of range). The upper limit is 1.5 times the initial factory (nominal) value. There is no lower limit. ■ Optical Power Transmit (OPT): This parameter indicates whether the signal power (facet power) generated by the laser is within normal margins (in range and out of range). The upper limit is 0.8 dBm above the initial factory (nominal) value, and the lower limit is 1.0 dBm below the initial factory (nominal) value. ■ Optical Power Receive (OPR): This parameter is not an absolute measure of the received optical power and, therefore, should not be used as a proactive performance-monitoring parameter. The optical power receive parameter indicates whether the received optical power is currently within the nominal sensitivity limits of the receiver (in range or out of range). The optical power receive parameter can be used with other proactive performance-monitoring parameters to isolate the source of an impending high speed failure. Threshold crossing alerts are not supported for the OC-48/STM-16 line parameters. Optical Channel Parameters 9 The following optical channel parameters are monitored continuously to detect degraded performance of the laser: ■ Signal Power Received (SPR-C): This parameter is the measurement of the signal power per channel. The signal power is determined by monitoring the power of the tone on the supervisory signal. The signal power received is reported using a scale from 0 to 100. The signal power received parameter can be used with other proactive performancemonitoring parameters to isolate the source of an impending optical channel failure. Threshold crossing alerts (TCAs) are generated if the SPR-C parameter exceeds the set thresholds. The generation of TCAs can be enabled or disabled using the PERFORMANCE-Set-Threshold-Optical Channel command. In Release 2 and later releases, TCAs can be enabled or disabled for a single parameter. 9-30 Issue 1 March 2001 365-575-536 Maintenance Description Supervisory Channel Parameters 9 The following supervisory channel parameters are monitored continuously to detect degraded performance of the laser: ■ Signal Power Received (SPR-SU): This parameter is the measurement of the supervisory channel signal power. The signal power is determined by monitoring the power of the tone on the supervisory signal. The signal power received is reported using a scale from 0 to 100. The signal power received parameter can be used with other proactive performancemonitoring parameters to isolate the source of an impending supervisory channel failure. ■ Laser Bias Current (LBC-SU): This parameter indicates whether the system optics are working within normal margins (in range or out of range). The upper limit is 1.5 times the initial factory (nominal) value. There is no lower limit. ■ Line (B2) Coding Violations (CV-L): To monitor the performance of the supervisory channel, the line B2 parity is calculated, written, and checked for errors. The line B2 parity violation counter is incremented for each line bit interleaved parity (BIP) error detected. Each line BIP-8 can detect up to eight errors per STS-1 frame. ■ Line (B2) Errored Seconds (ES-L): An errored second (ES) is a second in which there are one or more B2 parity violations or a supervisory channel defect detected. ■ Line (B2) Severely Errored Seconds (SES-L): A severely errored second (SES) is a second in which there are 9 or more B2 parity violations or a supervisory channel AIS defect detected. ■ Line (B2) Unavailable Seconds (UAS-L): An unavailable second (UAS) is a second during which the supervisory channel is "unavailable." Unavailable seconds are counted after 10 consecutive line (B2) severely errored seconds (SES). These 10 severely errored seconds are counted, and each subsequent second is counted until there are 10 consecutive seconds without a severely errored second. The 10 consecutive seconds without a severely errored second are not counted as unavailable seconds. A threshold crossing alert (TCA) is generated if a CV-L, ES-L, SES-L, or UAS-L parameter exceeds the provisionable threshold. The generation of TCAs can be enabled or disabled using the PERFORMANCE-SetThreshold-Supervisory command. In Release 2 and later releases, TCAs can be enabled or disabled for a single parameter. Issue 1 March 2001 9-31 365-575-536 Maintenance Description Optical Translator Port Signal Parameters 9 In Release 3 and later releases, the following OC-48/STM-16, OC-12/STM-4, and OC-3/STM-1 section parameters are monitored: ■ Section (B1) Coding Violations (CV-S): To monitor the performance of an OC-48/STM-16, OC-12/STM-4, or OC-3/STM-1 section, the section B1 parity is calculated, written, and checked for errors. The section B1 parity violation counter is incremented for each section error detected. ■ Section (B1) Errored Seconds (ES-S): An errored second (ES) is a second in which there are one or more B1 parity violations detected, one or more LOS defects, or one or more LOF defects. ■ Section (B1) Severely Errored Seconds (SES-S): A severely errored second (SES) is a second in which there are 16 or more B1 parity violations detected on an OC-3/STM-1 section, 63 or more B1 parity violations detected on an OC-12/STM-4 section, 249 or more B1 parity violations detected on an OC-48/STM-16 section, one or more LOS defects, or one or more LOF defects. ■ Section (B1) Severely Errored Frame Seconds (SEFS-S): A section severely errored frame second (SEFS) is the number of seconds during which an out-of-frame event occurred. A threshold crossing alert (TCA) is generated if a section parameter exceeds the provisionable threshold. The generation of TCAs can be enabled or disabled using the PERFORMANCE-Set-Threshold-OT Port Signal command. Performance-Monitoring Data Storage and Reports 9 The WaveStar OLS 40G provides current 15-minute and current 1-day registers for all accumulated performance parameters. There is also 5 previous 1-day registers and 31 previous 15-minute registers (8 hours). NOTE: The 15-minute and 1-day intervals are accurate to within ±10 seconds. For example, a 15-minute interval (900 seconds) varies from 890 to 910 seconds. The WaveStar OLS 40G can initialize the current 15-minute and/or current 1-day registers through the CIT at any time, as well as retrieve and report the contents of any parameter storage register at any time. When performance-monitoring data is retrieved, any previous 1-day or 15-minute register with all zero data is not reported. The current 1-day and 15-minute registers are always reported, even when they contain all zero data. 9-32 Issue 1 March 2001 365-575-536 Maintenance Description For examples of the PERFROMANCE-Initialize-Register-All, PERFORMANCE-Retrieve-Performance Monitoring-All, PERFORMANCE-Retrieve-Performance Monitoring-Optical Channel, PERFORMANCE-Retrieve-Performance Monitoring-Optical Line, PERFORMANCE-Retrieve-Performance Monitoring-Supervisory, and PERFORMANCE-Retrieve-Performance Monitoring-OT Port Signal (Release 3 and later) reports, refer to Section 11, “Craft Interface Terminal Usage.” For detailed information, refer to the on-line help available with the CenterLink Management Console or 365-575-540, WaveStar OLS 40G, Operations Systems Engineering Guide. The WaveStar OLS 40G can also initialize (baseline) certain optical parameters of an optical line through the CIT at any time. The initialized (baseline) value of the affected optical parameters is measured and used as the normal operating reference. The affected optical parameters include the total optical power received for an optical line (TOPR-OL) and the optical channel signal power (SPR-C) of the addressed optical line. The optical parameters should be initialized when an Optical Amplifier circuit pack is replaced, the outside plant loss changes or an optical channel is deleted. When these optical parameters are initialized, the current 1-day and/or current 15-minute registers for the TOPR-OL and SPR-C parameters will be corrupted. For detailed information about the PERFORMANCE-Initialize-RegisterOptical Line command, refer to the on-line help available with the CenterLink Management Console or 365-575-540, WaveStar OLS 40G, Operations Systems Engineering Guide. A single start time can be provisioned for measuring all the current 1-day performance-monitoring parameters. The start time can be provisioned to start at any hour. The performance-monitoring parameters will reset and begin daily at the provisioned start time. For more information about provisioning the performancemonitoring start time, refer to Section 8, "Administration and Provisioning." Issue 1 March 2001 9-33 365-575-536 Maintenance Description Performance Monitoring During Failed Conditions 9 When a trouble condition is detected, the WaveStar OLS 40G stops accumulating affected performance parameters per Bellcore requirements. All unaffected performance parameters continue to be accumulated during the trouble condition. The coding violations (CV) and errored seconds (ES) counts are accumulated until a severely errored second (SES) is counted. When a severely errored second (SES) is counted, the coding violations (CV) count is inhibited. The errored seconds (ES) and severely errored seconds (SES) counts continue to be accumulated until an unavailable second (UAS) is counted. When an unavailable second (UAS) is counted, the coding violations (CV), errored seconds (ES), and severely errored seconds (SES) counts are inhibited. The unavailable seconds (UAS) parameter counts are not inhibited. Table 9-6 shows the parameters that are monitored during failed conditions and the parameters that are inhibited. Y shows the parameters that are monitored during the failed condition. N shows the parameter that are inhibited during the failed condition. Table 9-6. Parameters Accumulated During Failed Conditions Failed Conditions Optical Line Parameters Optical Channel Supervisory Channel OT Port Signal LOS AIM LOS AIM LOS LOF SF SD LOS LOF Laser Bias Current (LBC-P) Y Y Y Y Y Y Y Y Y Y Laser Backface Current (LBFC-P) Y Y Y Y Y Y Y Y Y Y Total Optical Power Received (TOPR-OL) Y* Y* Y Y Y Y Y Y Y Y Laser Bias Current (LBC) Y Y Y Y Y Y Y Y N N Optical Power Transmit (OPT) Y Y Y Y Y Y Y Y N N Optical Power Received (OPR) Y Y Y Y Y Y Y Y Y Y Y* Y* Y* Y Y Y Y — — Optical Channel Optics OC-48/STM-16 Line Optical Channel Optics Signal Power Received (SPR-C) See footnotes at end of table. 9-34 Issue 1 March 2001 Y* 365-575-536 Maintenance Description Table 9-6. Parameters Accumulated During Failed Conditions (Contd) Failed Conditions Optical Line Parameters Optical Channel Supervisory Channel OT Port Signal LOS AIM LOS AIM LOS LOF SF SD LOS LOF Y Y Supervisory Channel Optics Laser Bias Current (LBC-SU) Signal Power Received (SPR-SU) Y Y * Y Y Y Y * Y Y Y Y Y Y Y N Y Y * Y * Y * N N Y Y Supervisory Channel Line Coding Violations (CV-L) N N † Severely Errored Seconds (SES-L) N † Unavailable Seconds (UAS-L) Errored Seconds (ES-L) Y Y Y N N † † N N † N † N N † N † Y Y N † Y Y N † Y Y Y Y Y N Y Y Y Y Y Y Y Y Y Y Coding Violations (CV-S) Y Y Y Y Y Y Y Y N N Errored Seconds (ES-S) Y Y Y Y Y Y Y Y Y Y Severely Errored Seconds (SES-S) Y Y Y Y Y Y Y Y Y Y Severely Errored Frame Seconds (SEFS-S) Y Y Y Y Y Y Y Y Y Y OT Port Signal * Autonomous TCA reporting for this parameter is inhibited during failed conditions. † This parameter is inhibited during periods of unavailability only. Issue 1 March 2001 9-35 365-575-536 Maintenance Description Performance-Monitoring Parameter Thresholds 9 The current 15-minute and current 1-day thresholds for each performancemonitoring parameter are provisionable using the CIT. Whenever the current 15-minute or the current 1-day threshold for a given performance-monitoring parameter is reached or exceeded, the WaveStar OLS 40G generates a threshold crossing alert (TCA). The TCA is then entered into the appropriate performancemonitoring report. For information about provisioning thresholds using the PERFORMANCE-SetThreshold-All, PERFORMANCE-Set-Threshold-Optical Channel, PERFORMANCE-Set-Threshold-Optical Line, PERFORMANCE-SetThreshold-Supervisory and PERFORMANCE-Set-Threshold-OT Port Signal (Release 3 and later) commands, refer to the on-line help available with the CenterLink Management Console or 365-575-540, WaveStar OLS 40G, Operations Systems Engineering Guide. Also refer to examples of the PERFORMANCE-Retrieve-Threshold-Optical Line, PERFORMANCE-Retrieve-Threshold-Optical Channel, PERFORMANCE-Retrieve-Threshold-Supervisory and PERFORMANCERetrieve-Threshold-OT Port Signal (Release 3 and later) reports in Section 11, “Craft Interface Terminal Usage.” For detailed information, refer to the on-line help available with the CenterLink Management Console or 365-575-540, WaveStar OLS 40G, Operations Systems Engineering Guide. Threshold Crossing Alert Transmission to an Operations System 9 To trigger proactive maintenance activity within an operations system, the WaveStar OLS 40G supports autonomous messages reporting threshold cross alerts. These autonomous messages show the crossing of a performancemonitoring threshold for the current 15-minute and 1-day registers. 9-36 Issue 1 March 2001 365-575-536 Maintenance Description Reports 9 Active Alarms and Status 9 The WaveStar OLS 40G provides a report that shows all the local active alarm and status conditions. Refer to the examples of the following reports in Section 11, “Craft Interface Terminal Usage:” FAULT-Retrieve-Condition-All FAULT-Retrieve-Condition-Customer Maintenance Signal FAULT-Retrieve-Condition-Common FAULT-Retrieve-Condition-Equipment FAULT-Retrieve-Condition-Optical Channel FAULT-Retrieve-Condition-Optical Line FAULT-Retrieve-Condition-Supervisory FAULT-Retrieve-Condition-OT Port Signal (Release 3 and later) For detailed information, refer to the on-line help available with the CenterLink Management Console or 365-575-540, WaveStar OLS 40G, Operations Systems Engineering Guide. Active Alarms 9 The WaveStar OLS 40G provides reports that show all the local active alarm conditions. The WaveStar OLS 40G also provides a report that shows the active alarm level at each network element with active alarm conditions. Refer to the examples of the following reports in Section 11, “Craft Interface Terminal Usage:” FAULT-Retrieve-Alarm-All FAULT-Retrieve-Alarm-Common FAULT-Retrieve-Alarm-Customer Maintenance Signal FAULT-Retrieve-Alarm-Environment FAULT-Retrieve-Alarm-Equipment FAULT-Retrieve-Alarm-Network FAULT-Retrieve-Alarm-Optical Channel FAULT-Retrieve-Alarm-Optical Line FAULT-Retrieve-Alarm-Supervisory FAULT-Retrieve-Alarm-OT Port Signal (Release 3 and later) For detailed information, refer to the on-line help available with the CenterLink Management Console or 365-575-540, WaveStar OLS 40G, Operations Systems Engineering Guide. Issue 1 March 2001 9-37 365-575-536 Maintenance Description 6-Hour Autonomous TL1 Report 9 The WaveStar OLS 40G generates REPT-COND messages periodically and autonomously to report active status conditions to a remote operations system. The REPT-COND messages are generated every 6 hours (that is, 6:00 AM, 12:00 noon, 6:00 PM, and 12:00 midnight). Provisioning Reports 9 Provisioning reports list the current state of all provisionable options in the WaveStar OLS 40G. For examples of the following reports within the CONFIGURATION category, refer to Section 11, "Craft Interface Terminal Usage." Retrieve-All (Release 2.1 and later) Retrieve-Attribute-All (Release 2.1 and later) Retrieve-Attribute-Alarm Retrieve-Attribute-Control Retrieve-Attribute-Environment Retrieve-Attribute-Supervisory (Release 2.1 and later) Retrieve-Customer Maintenance Signal (Release 2.1 and later) Retrieve-Date Retrieve-Equipment Retrieve-Optical Channel (Release 2.1 and later) Retrieve-Optical Line (Release 2.1 and later) Retrieve-Supervisory (Release 2.1 and later) Retrieve-Association-OT Port Signal (Release 3 and later) Retrieve-OT Port Signal (Release 3 and later) Retrieve-Section Trace (Release 3 and later). Also refer to the examples of the following reports within the SECURITY category in Section 11, "Craft Interface Terminal Usage." Retrieve-Channel Identifier-Security (Release 2.1 and later) Retrieve-Far End Communications Retrieve-Network Element-Security (Release 2.1 and later) Retrieve-System (Release 2.1 and later) Retrieve-User-Security (Release 2.1 and later) Also refer to the example of the FAULT-Retrieve-State report in Section 11, "Craft Interface Terminal Usage." For detailed information, refer to the on-line help available with the CenterLink Management Console or 365-575-540, WaveStar OLS 40G, Operations Systems Engineering Guide. 9-38 Issue 1 March 2001 365-575-536 Maintenance Description Performance Monitoring 9 The WaveStar OLS 40G provides reports that contain a snapshot of all the performance-monitoring registers at the time the report is requested. The time each register was last reinitialized is also included. The reports contain a summary of all requested performance parameters that have crossed their 15-minute and 1-day threshold within the last 24 hours. For examples of the PERFORMANCE-Retrieve-Performance MonitoringAll, PERFORMANCE-Retrieve-Performance Monitoring-Optical Line, PERFORMANCE-Retrieve-Performance Monitoring-Optical Channel, PERFORMANCE-Retrieve-Performance MonitoringSupervisory and PERFORMANCE-Retrieve-Performance MonitoringOT Port Signal (Release 3 and later) reports, refer to Section 11, “Craft Interface Terminal Usage.” For detailed information, refer to the on-line help available with the CenterLink Management Console or 365-575-540, WaveStar OLS 40G, Operations Systems Engineering Guide. 9 State An on-demand report displays the state of each addressed slot, optical line, optical channel, supervisory channel, and customer maintenance signal port. For examples of the FAULT-Retrieve-State report, refer to Section 11, "Craft Interface Terminal Usage." For detailed information, refer to the on-line help available with the CenterLink Management Console or 365-575-540, WaveStar OLS 40G, Operations Systems Engineering Guide. Version/Equipment List 9 The version/equipment list report is an on-demand report that lists the circuit pack version and the software release (if applicable) for the WaveStar OLS 40G. This report also lists all the circuit packs that are present. For examples of the CONFIGURATION-Retrieve-Equipment report, refer to Section 11, "Craft Interface Terminal Usage." For detailed information, refer to the on-line help available with the CenterLink Management Console or 365-575-540, WaveStar OLS 40G, Operations Systems Engineering Guide. Issue 1 March 2001 9-39 365-575-536 Maintenance Description 9-40 Issue 1 March 2001 Technical Specifications 10 Contents Overview 10-1 Optical Connector Interfaces 10-1 Transmission Medium 10-1 Lightguide Jumpers 10-1 Optical Safety (FDA/CDRH Classification) 10-2 Operating Wavelengths and Tone Frequencies 10-7 OMU Optical Input Power 10-8 OTU/OTPM Optical Output Power 10-9 Optical Amplifier Output Power 10-11 Optical Dispersion 10-12 Optical Return Loss 10-12 Optical Reflections Tolerance 10-12 Engineering Rules for Systems with Two Optical Amplifiers 10-13 Engineering Rules for Systems with One Optical Amplifier 10-14 Engineering Rules for Systems with Optical Translators 10-15 Capacity 10-16 Transmission Characteristics 10-16 Transmission Delay 10-16 Signal-to-Noise Ratio Performance 10-17 Issue 1 March 2001 10-i Contents 10-ii Customer Maintenance Signal IS-3 Access 10-17 Cable Access 10-18 Power Specifications 10-18 Low Voltage Cutoff 10-22 Cabinet/Shelf Dimensions 10-22 Circuit Pack/Unit Dimensions 10-23 Floor Loading Specifications 10-24 Environmental Specifications 10-25 Handling and Transportation Specifications 10-25 Craft Interface Terminal 10-26 ■ Personal Computer Requirements) 10-26 ■ ASCII-Based Terminal Requirements 10-26 Modem Requirements 10-27 Operations System Interfaces 10-28 Reliability Specifications 10-29 Circuit Pack/Unit/Module FIT Rates 10-31 X.25 Interface 10-32 Issue 1 March 2001 Technical Specifications 01 Overview 01 10 This section contains the technical specifications for the WaveStar™ OLS 40G. Bellcore Technical Reference 253 (TR 253) is the basis for this information. Optical Connector Interfaces 01 The Optical Amplifier, Telemetry Controller, Optical Multiplexing Unit, Optical Demultiplexing Unit, Optical Translator Unit, and Optical Translator Port Module circuit packs use ST lightguide connectors (standard), LC lightguide connectors, FC lightguide connectors, or SC lightguide connectors. Transmission Medium 01 Single-mode fiber TrueWave® non-zero dispersion-shifted fiber Lightguide Jumpers 01 Single-mode lightguide jumpers are used for the optical line signals on the Optical Amplifier circuit pack and the supervisory signal on the Telemetry Controller circuit pack. Single-mode lightguide jumpers are also used on the transmit side of the Optical Translator Port Modules. Issue 1 March 2001 10-1 365-575-536 Technical Specifications Multimode lightguide jumpers are used for the customer maintenance signal on the Telemetry Controller circuit packs. Multimode lightguide jumpers are also used on the receive side of the Optical Translator Port Modules. Single-mode (green) optical line buildouts (LBOs) must be used on the transimit side of the Optical Translator Port Modules (OTPMs). Multimode (gray) optical LBOs must be used on receive side of the OTPMs. Optical Safety (FDA/CDRH Classification) 01 Table 10-1 shows the optical safety data for the circuit packs that contain lasers. Table 10-1. Optical Safety Data on Laser-Containing Circuit Packs Circuit Pack Code (Note 1) (Note 2) * LEA7 OA Bit Rate Wavelength (nm) Power Range (dB) Output FDA/CDRH Classification (Note 3) N/A 1550 12.4 to 17.0 Class IIIb * N/A 1550 12.4 to 17.0 Class IIIb * LEA104 OA N/A 1550 12.4 to 19.5 Class IIIb LEA7 OA* N/A 1550 12.4 to 17.0 Class IIIb LDA1 TLM (OUT) 155 Mb/s 1532 −4.5 to 0 Class I 41A1D OTU (Add) 2.488 Gb/s 1549.32 −4.0 ±0.7 Class I 41A2D OTU 2.488 Gb/s 1550.92 −5.3 ±0.7 Class I 41A3D OTU 2.488 Gb/s 1552.52 −6.5 ±0.7 Class I 41A4D OTU 2.488 Gb/s 1554.13 −7.2 ±0.7 Class I 41A5D OTU 2.488 Gb/s 1555.75 −7.7 ±0.7 Class I 41A6D OTU 2.488 Gb/s 1557.37 −8.2 ±0.7 Class I 41A7D OTU 2.488 Gb/s 1558.98 −8.0 ±0.7 Class I 41A8D OTU 2.488 Gb/s 1560.61 −6.5 ±0.7 Class I 41A9D OTU 2.488 Gb/s 1548.52 −2.0 ±0.7 Class I 41A10D OTU 2.488 Gb/s 1550.12 −4.6 ±0.7 Class I 41A11D OTU 2.488 Gb/s 1551.72 −5.8 ±0.7 Class I 41A12D OTU 2.488 Gb/s 1553.33 −6.8 ±0.7 Class I 41A13D OTU 2.488 Gb/s 1554.94 −7.4 ±0.7 Class I 41A14D OTU 2.488 Gb/s 1556.56 −7.9 ±0.7 Class I 41A15D OTU 2.488 Gb/s 1558.17 −8.1 ±0.7 Class I 41A16D OTU 2.488 Gb/s 1559.79 −7.2 ±0.7 Class I LEA7B OA See notes and footnotes at end of table. 10-2 Issue 1 March 2001 365-575-536 Technical Specifications Table 10-1. Optical Safety Data on Laser-Containing Circuit Packs (Contd) Bit Rate Wavelength (nm) Power Range (dB) Output FDA/CDRH Classification (Note 3) 41D1 OTU (Add) 2.488 Gb/s 1549.32 −4.0 ±0.7 Class I 41D2 OTU 2.488 Gb/s 1550.92 −5.3 ±0.7 Class I 41D3 OTU 2.488 Gb/s 1552.52 −6.5 ±0.7 Class I 41D4 OTU 2.488 Gb/s 1554.13 −7.2 ±0.7 Class I 41D5 OTU 2.488 Gb/s 1555.75 −7.7 ±0.7 Class I 41D6 OTU 2.488 Gb/s 1557.37 −8.2 ±0.7 Class I 41D7 OTU 2.488 Gb/s 1558.98 −8.0 ±0.7 Class I 41D8 OTU 2.488 Gb/s 1560.61 −6.5 ±0.7 Class I 41D9 OTU 2.488 Gb/s 1548.52 −2.0 ±0.7 Class I 41D10 OTU 2.488 Gb/s 1550.12 −4.6 ±0.7 Class I 41D11 OTU 2.488 Gb/s 1551.72 −5.8 ±0.7 Class I 41D1D OTU 2.488 Gb/s 1553.33 −6.8 ±0.7 Class I 41D13 OTU 2.488 Gb/s 1554.94 −7.4 ±0.7 Class I 41D14 OTU 2.488 Gb/s 1556.56 −7.9 ±0.7 Class I 41D15 OTU 2.488 Gb/s 1558.17 −8.1 ±0.7 Class I 41D16 OTU 2.488 Gb/s 1559.79 −7.2 ±0.7 Class I 41E OTU (Drop) Circuit Pack Code (Note 1) (Note 2) 2.488 Gb/s 1310.00 −2.0 to 2.5 Class IIIb † 41_1C OTU (Add) 2.488 Gb/s 1549.32 −4.0 ±0.7 Class I 41_2C OTU† 2.488 Gb/s 1550.92 −5.3 ±0.7 Class I 41_3C OTU† 2.488 Gb/s 1552.52 −6.5 ±0.7 Class I 41_4C OTU† 2.488 Gb/s 1554.13 −7.2 ±0.7 Class I 41_5C OTU† 2.488 Gb/s 1555.75 −7.7 ±0.7 Class I 41_6C OTU† 2.488 Gb/s 1557.37 −8.2 ±0.7 Class I 41_7C OTU† 2.488 Gb/s 1558.98 −8.0 ±0.7 Class I 41_8C OTU† 2.488 Gb/s 1560.61 −6.5 ±0.7 Class I 41_9C OTU† 2.488 Gb/s 1548.52 −2.0 ±0.7 Class I 41_10C OTU† 2.488 Gb/s 1550.12 −4.6 ±0.7 Class I 41_11C OTU† 2.488 Gb/s 1551.72 −5.8 ±0.7 Class I 41_12C OTU† 2.488 Gb/s 1553.33 −6.8 ±0.7 Class I 41_13C OTU† 2.488 Gb/s 1554.94 −7.4 ±0.7 Class I 41_14C OTU† 2.488 Gb/s 1556.56 −7.9 ±0.7 Class I 41_15C OTU† 2.488 Gb/s 1558.17 −8.1 ±0.7 Class I 41_16C OTU† 2.488 Gb/s 1559.79 −7.2 ±0.7 Class I See notes and footnotes at end of table. Issue 1 March 2001 10-3 365-575-536 Technical Specifications Table 10-1. Optical Safety Data on Laser-Containing Circuit Packs (Contd) Bit Rate Wavelength (nm) Power Range (dB) Output FDA/CDRH Classification (Note 3) 41BB OTU (Drop) 2.488 Gb/s 1310.00 −2.0 to 2.5 Class IIIb 41F1 OTU (Add) 2.488 Gb/s 1549.32 −4.0 ±0.7 Class I 41F2 OTU 2.488 Gb/s 1550.92 −5.3 ±0.7 Class I 41F3 OTU 2.488 Gb/s 1552.52 −6.5 ±0.7 Class I 41F4 OTU 2.488 Gb/s 1554.13 −7.2 ±0.7 Class I 41F5 OTU 2.488 Gb/s 1555.75 −7.7 ±0.7 Class I 41F6 OTU 2.488 Gb/s 1557.37 −8.2 ±0.7 Class I 41F7 OTU 2.488 Gb/s 1558.98 −8.0 ±0.7 Class I 41F8 OTU 2.488 Gb/s 1560.61 −6.5 ±0.7 Class I 41F9 OTU 2.488 Gb/s 1548.52 −2.0 ±0.7 Class I 41F10 OTU 2.488 Gb/s 1550.12 −4.6 ±0.7 Class I 41F11 OTU 2.488 Gb/s 1551.72 −5.8 ±0.7 Class I 41F1D OTU 2.488 Gb/s 1553.33 −6.8 ±0.7 Class I 41F13 OTU 2.488 Gb/s 1554.94 −7.4 ±0.7 Class I 41F14 OTU 2.488 Gb/s 1556.56 −7.9 ±0.7 Class I 41F15 OTU 2.488 Gb/s 1558.17 −8.1 ±0.7 Class I 41F16 OTU 2.488 Gb/s 1559.79 −7.2 ±0.7 Class I 41G OTU (Drop) 2.488 Gb/s 1310.00 −2.0 to 2.5 Class IIIb 42A1B OTPM, 44A1B OTPM (High Range) 622 Mb/s 1549.32 −7.0 ±0.7 Class I 42A2B OTPM, 44A2B OTPM (High Range) 622 Mb/s 1550.92 −8.3 ±0.7 Class I 42A3B OTPM, 44A3B OTPM (High Range) 622 Mb/s 1552.52 −9.5 ±0.7 Class I 42A4B OTPM, 44A4B OTPM (High Range) 622 Mb/s 1554.13 −10.2 ±0.7 Class I 42A5B OTPM, 44A5B OTPM (High Range) 622 Mb/s 1555.75 −10.7 ±0.7 Class I 42A6B OTPM, 44A6B OTPM (High Range) 622 Mb/s 1557.37 −11.2 ±0.7 Class I 42A7B OTPM, 44A7B OTPM (High Range) 622 Mb/s 1558.98 −11.0 ±0.7 Class I 42A8B OTPM, 44A8B OTPM (High Range) 622 Mb/s 1560.61 −9.5 ±0.7 Class I Circuit Pack Code (Note 1) (Note 2) See notes and footnotes at end of table. 10-4 Issue 1 March 2001 365-575-536 Technical Specifications Table 10-1. Optical Safety Data on Laser-Containing Circuit Packs (Contd) Bit Rate Wavelength (nm) Power Range (dB) Output FDA/CDRH Classification (Note 3) 42A9B OTPM, 44A9B OTPM (High Range) 622 Mb/s 1548.52 −5.0 ±0.7 Class I 42A10B OTPM, 44A10B OTPM (High Range) 622 Mb/s 1550.12 −7.6 ±0.7 Class I 42A1B1 OTPM, 44A11B OTPM (High Range) 622 Mb/s 1551.72 −8.8 ±0.7 Class I 42A12B OTPM, 44A12B OTPM (High Range) 622 Mb/s 1553.33 −9.8 ±0.7 Class I 42A13B OTPM, 44A13B OTPM (High Range) 622 Mb/s 1554.94 −10.4 ±0.7 Class I 42A14B OTPM, 44A14B OTPM (High Range) 622 Mb/s 1556.56 −10.9 ±0.7 Class I 42A15B OTPM, 44A15B OTPM (High Range) 622 Mb/s 1558.17 −11.1 ±0.7 Class I 42A16B OTPM, 44A16B OTPM (High Range) 622 Mb/s 1559.79 −10.2 ±0.7 Class I 42B OTPM, 44B OTPM (High Range) 622 Mb/s 1310.00 −2.5 to 2.0 Class IIIb 43A1B OTPM, 44A1B OTPM (Low Range) 155 Mb/s 1549.32 −10.0 ±0.7 Class I 43A2B OTPM, 44A2B OTPM (Low Range) 155 Mb/s 1550.92 −11.3 ±0.7 Class I 43A3B OTPM, 44A3B OTPM (Low Range) 155 Mb/s 1552.52 −12.5 ±0.7 Class I 43A4B OTPM, 44A4B OTPM (Low Range) 155 Mb/s 1554.13 −13.2 ±0.7 Class I 43A5B OTPM, 44A5B OTPM (Low Range) 155 Mb/s 1555.75 −13.7 ±0.7 Class I 43A6B OTPM, 44A6B OTPM (Low Range) 155 Mb/s 1557.37 −14.2 ±0.7 Class I 43A7B OTPM, 44A7B OTPM (Low Range) 155 Mb/s 1558.98 −14.0 ±0.7 Class I 43A8B OTPM, 44A8B OTPM (Low Range) 155 Mb/s 1560.61 −12.5 ±0.7 Class I 43A9B OTPM, 44A9B OTPM (Low Range) 155 Mb/s 1548.52 −8.0 ±0.7 Class I Circuit Pack Code (Note 1) (Note 2) See notes and footnotes at end of table. Issue 1 March 2001 10-5 365-575-536 Technical Specifications Table 10-1. Optical Safety Data on Laser-Containing Circuit Packs (Contd) Bit Rate Wavelength (nm) Power Range (dB) Output FDA/CDRH Classification (Note 3) 43A10B OTPM, 44A10B OTPM (Low Range) 155 Mb/s 1550.12 −10.6 ±0.7 Class I 43A11B OTPM, 44A11B OTPM (Low Range) 155 Mb/s 1551.72 −11.8 ±0.7 Class I 43A12B OTPM, 44A12B OTPM (Low Range) 155 Mb/s 1553.33 −12.8 ±0.7 Class I 43A13B OTPM, 44A13B OTPM (Low Range) 155 Mb/s 1554.94 −13.4 ±0.7 Class I 43A14B OTPM, 44A14B OTPM (Low Range) 155 Mb/s 1556.56 −13.9 ±0.7 Class I 43A15B OTPM, 44A15B OTPM (Low Range) 155 Mb/s 1558.17 −14.1 ±0.7 Class I 43A16B OTPM, 44A16B OTPM (Low Range) 155 Mb/s 1559.79 −13.2 ±0.7 Class I 43B OTPM, 44B OTPM (Low Range) 155 Mb/s 1310.00 −7.0 to 0.0 Class IIIb Circuit Pack Code (Note 1) (Note 2) Notes: 1. All optical transmitter circuit packs utilize faceplate-mounted universal-type connector build-out blocks. These build-out blocks are normally equipped with lightguide buildouts (LBOs) with ST-type connectors, but the build-out blocks can also accommodate LBOs with the FC- and SC-type connectors. 2. The OA and OTU circuit packs use single mode fiber pigtails and jumpers with an 8.3 micron core diameter and 8.8 micron mode field diameter. Single mode fiber pigtails and jumpers are also used on the transmit side of the OTPMs. (Multimode fiber pigtails and jumpers are used on the TLM circuit packs and the receive side of the OTPMs.) 3. The FDA/CDRH classification for the entire system is Class I. The classifications listed above are for the individual circuit packs and modules. * The LEA7, LEA7B, LEA104, and LEA105 Optical Amplifier circuit packs utilize 2 internal pump lasers, which operate at the wavelength of 980 nm with an output power of 19.5 dBm; however, no residual radiation in the 980 nm range is emitted outside of the OA circuit pack or even into the optical fiber transmission line. The only radiation emitted into the optical fiber transmission line is the incident signal at 1550 nm which is amplified by the LEA6 and LEA7 OA circuit pack to a maximum power of 17.0 dBm. The LEA105 OA circuit packs to a maximum power of 16.2 dBm. The LEA104 OA circuit packs amplify the signal to a maximum power of 19.5 dBm. † A or C, for example, 41A1C OTU or 41C1C OTU. 10-6 Issue 1 March 2001 365-575-536 Technical Specifications Operating Wavelengths and Tone Frequencies 01 Table shows the wavelengths on the optical channels and the supervisory channel within the optical line signal, as well as the tone frequencies associated with each wavelength. Wavelength and Tone Frequencies. Table 10-2. Wavelength Tone Frequencies Optical Channel Wavelength (nm) Tone Frequency (Hz) 1 1549.32 ±0.16 5273 2 1550.92 ±0.16 6934 3 1552.52 ±0.16 9277 4 1554.13 ±0.16 11328 5 1555.75 ±0.16 14746 6 1557.37 ±0.16 17285 7 1558.98 ±0.16 19336 8 1560.61 ±0.16 21680 9 1548.52 ±0.16 22754 10 1550.12 ±0.16 23730 11 1551.72 ±0.16 24707 12 1553.33 ±0.16 25684 13 1554.94 ±0.16 26660 14 1556.56 ±0.16 27637 15 1558.17 ±0.16 28613 16 1559.79 ±0.16 29590 Supervisory channel 1532.00 ±4.00 12960 Supervisory channel 1510 12960 Issue 1 March 2001 10-7 365-575-536 Technical Specifications 01 OMU Optical Input Power Table 10-3 provides OMU input power specifications from an OC-48/STM-16, OC-12/ STM-4/, low speed broadband (LSBB) 100-750 Mb/s, and OC-3/STM-1 signal wavelengths. This table reflects optical signal power in the 1.5m range entering the OMU. This signal power can originate from either Lucent Technologies, WaveStar OLS 40G compatible terminals or non-Lucent terminals. For non-Lucent terminals, the appropriate signal characteristics enter the OMU from an OTU or OTPM located between the OMU and the originating terminal. Table 10-3. OMU Optical Power Input Specifications (1.5m) Nominal Input Power (±0.7 dBm) Signal* Wavelength OC-48/ STM-16 (nm) 1 1549.32 −4.0 -7.0 -10.0 2 1550.92 −5.3 -8.3 -11.3 3 1552.52 −6.5 -9.5 -12.5 4 1554.13 −7.2 -10.2 -13.2 5 1555.75 −7.7 -10.7 -13.7 6 1557.37 −8.2 -11.2 -14.2 7 1558.98 −8.0 -11.0 -14.0 8 1560.61 −6.5 -9.5 -12.5 9 1548.52 −2.0 -5.0 -8.0 10 1550.12 −4.6 -7.6 -10.6 11 1551.72 −5.8 -8.8 -11.8 12 1553.33 −6.8 -9.8 -12.8 13 1554.94 −7.4 -10.4 -13.4 14 1556.56 −7.9 -10.9 -13.9 15 1558.17 −8.1 -11.1 -14.1 16 1559.79 −7.2 -10.2 -13.2 * 10-8 Issue 1 OC-12/STM-4/ OC-3/ STM-1/ LSBB High Range LSBB Low Range Each signal (1-16) is handled by a respective 41F(1-16), 41A(1-16)C, 41A(1-16)D, 41C(116)C, 41D(1-16), 42A(1-16)B, 43A(1-16)B, and 44A(1-16)B circuit pack. March 2001 365-575-536 Technical Specifications OTU/OTPM Optical Output Power 01 Table 10-4 shows the Optical Translator Port Module and Optical Translator Unit (OTU) circuit pack transmit output power levels. Table 10-4. OTPM and OTU Circuit Pack Output Power 41-Type OTU, 42-Type, 43-Type, 44-Type OTPM Output Power (dBm) Wavelength 1 −5.0 to −3.0 Wavelength 2 −6.3 to −4.3 Wavelength 3 −7.5 to −5.5 Wavelength 4 −8.2 to −6.2 Wavelength 5 −8.7 to −6.7 Wavelength 6 −9.2 to −7.2 Wavelength 7 −9.0 to −7.0 Wavelength 8 −7.5 to −5.5 Wavelength 9 −1.0 to −3.0 Wavelength 10 −3.6 to −5.6 Wavelength 11 −4.8 to −6.8 Wavelength 12 −5.8 to −7.8 Wavelength 13 −6.4 to −8.4 Wavelength 14 −6.9 to −8.9 Wavelength 15 −7.1 to −9.1 Wavelength 16 −6.2 to −8.2 41BB,41E, 42B, 43B, 44B 0.0 to 2.0 41F, 41G 0.0 to 2.0 Issue 1 March 2001 10-9 365-575-536 Technical Specifications Table 10-5 provides signal specifications for optical signal power in the 1.3µm range exiting the ODU. NOTE: When using LBOs on the input of add-side OTUs and OTPMs, select an optical LBO that can attenuate the input signal to a value that is between -12 and -22 dB. Table 10-5. Optical Signal Specifications for 1.3µm OTU/OTPM Wavelength Range (nm) Power Range Received (dBm) 10-10 Circuit Pack Code min max min max 41BB 1280 1335 -2.0 +2.5 41E 1280 1335 -2.0 +2.5 41G 1270 1335 -2.0 +2.5 42B 1280 1335 -2.5 +2.0 43B 1280 1335 -7.0 0 44B (low setting) 1280 1335 -7.0 0 44B (high setting) 1280 1335 -2.5 +2.0 Issue 1 March 2001 365-575-536 Technical Specifications 01 Optical Amplifier Output Power The Optical Amplifier circuit pack automatically adjusts the output power according to the number of channels equipped, the bit rate of the transported signals, the number of sections (spans) in the system, and the type of Optical Amplifier circuit pack. Table 10-6 shows an example of the Optical Amplifier circuit pack output power levels. These power levels are based on the OUT connector on the faceplate of the Optical Amplifier circuit pack equipped with a 0 dB LBO. Table 10-6. Optical Amplifier Output Power Examples No. of Optical Channels Equipped Output Power (dBm) LEA6 OA LEA7 OA LEA7B OA LEA104 OA LEA105 OA 0 11.9 11.9 11.9 11.9 8.1 1 12.4 12.4 12.4 12.4 8.6 2 12.4 12.4 12.4 12.4 9.1 3 13.8 13.8 13.8 13.8 10.8 4 14.5 14.5 14.5 14.5 11.8 5 15.2 15.2 15.2 15.2 12.7 6 15.8 15.8 15.8 15.8 13.3 7 16.0 16.0 16.0 16.0 13.9 8 16.5 16.5 16.5 16.5 14.1 9 — 16.5 16.5 17.0 14.6 10 — 16.5 16.5 17.5 15.1 11 — 16.5 16.5 17.9 15.5 12 — 16.5 16.5 18.3 15.7 13 — 16.5 16.5 18.6 15.7 14 — 16.5 16.5 18.9 15.7 15 — 16.5 16.5 19.0 15.7 16 — 16.5 16.5 19.0 15.7 Issue 1 March 2001 10-11 365-575-536 Technical Specifications Optical Dispersion 01 The optical output circuit packs can accommodate up to the following maximum levels of optical dispersion in the outside plant. Circuit Pack/Module 41A(1-16)C OTU ............................................... 41A(1-16)D OTU ............................................... 41C(1-16)C OTU ............................................... 41D(1-16) OTU ................................................. 41F(1-16) OTU .................................................. 42A(1-16)B OTPM............................................. 43A(1-16)B OTPM............................................. 44A(1-16)B OTPM............................................. Optical Return Loss Optical Dispersion (max.) 6800 ps/nm 6800 ps/nm 10900 ps/nm 12800 ps/nm 6800 ps/nm 10900 ps/nm 10900 ps/nm 10900 ps/nm 01 Maximum system optical return loss ................. >40.0 dB Optical Reflections Tolerance 01 Maximum at Optical Amplifier............................ −27 dB 10-12 Issue 1 March 2001 365-575-536 Technical Specifications Engineering Rules for Systems with Two Optical Amplifiers 01 Table 10-7 shows the engineering rules for systems with two Optical Amplifiers and a mix of different optical signals. NOTE: Refer to Issue 2 or later of this IP to ensure technical accuracy of these engineering rules. Table 10-7. Engineering Rules for Systems with Two Optical Amplifiers Span Loss (dB) Number OA Circuit of Number Pack Code Channels of Spans Min. LEA7/ LEA7B 16 LEA104 16 LEA105 16 Distance (km) Total Max System Span (Note 1) Loss (dB) (Note 1) Total System (Note 1) 1 22 33 33 132 132 2 22 30 60 120 240 3 22 28 84 112 236 4 22 27 108 108 432 5 21 26 130 104 520 6 21 26 156 104 624 7 17 22 154 88 616 8 17 22 176 88 640* 1 22 35 35 140 140 2 22 34 68 136 272 3 22 33 99 132 396 4 26 31 124 124 496 5 23 27 135 108 540 1 14 18 18 72 72 Notes: * This distance is limited by the dispersion characteristics of standard single-mode fiber (640 x 17 ps/nm-km = 10880 ps/nm). For non-zero dispersion shifted fiber where the distance is not dispersion limited, a total distance of 704 km (= 176 dB total system loss/ 0.25dB/km) can be obtained. 1. Some spans with span losses more than the maximum value may be accommodated. Lucent Technologies provides network engineering support to optimize systems for networks. Please contact a Lucent Technologies sales representative for more information. 2. Based on a maximum fiber loss of 0.25 db/km. Issue 1 March 2001 10-13 365-575-536 Technical Specifications Engineering Rules for Systems with One Optical Amplifier 01 Table 10-8 shows the engineering rules for systems with one Optical Amplifier and a mix of different optical signals. When a wavelength is patched through an OADM office, the ODU–OMU connection adds to the span loss for that express-through wavelength. There will be no more than 12 dB between terminals for 1-OA systems. An express-through wavelength can go: ■ 3 spans of 9 dB outside plant loss ■ 2 spans of 12 dB outside plant loss. NOTE: Refer to Issue 2 or later of this IP to ensure technical accuracy of these engineering rules. Table 10-8. Engineering Rules for Systems with One Optical Amplifier OA Circuit Pack Code Number of Channels LEA105 16 or LEA7 Span Loss (dB) Number of Spans Min. Max. Total Distance (km) (Note 1) Bit Rates 1 0 12 48/43 Mix of OC48/12/3, STM-16/4/1 1 0 12 48/43 OC-48/12,STM-16/4, or BB* 1 0 13 52/46 OC-48/3, or STM-16/1 1 0 16 64/57 OC-12/3,STM-4/1, or BB* 1 0 13 52/46 OC-48 only 1 0 16 64/57 OC-12 only or BB* 1 0 20 80/71 OC-3 only Notes: 1. * Fiber loss = 0.25 db/km/0.28 db/km. 100-750 Mb/s low speed broadband signals 10-14 Issue 1 March 2001 365-575-536 Technical Specifications Engineering Rules for Systems with Optical Translators 01 Table shows examples of Optical Translator Unit (OTU) circuit packs and Optical Translator Port Modules (OTPMs) used to extend the distance between 16channel systems and increase the distance between SONET/SDH terminals. Table 10-10 shows examples of OTU circuit packs and OTPMs used in 8-channel systems. A maximum of sixteen OTU circuit packs or OTPMs may be used between WaveStar OLS 40G systems. Each example shows the maximum distance between WaveStar OLS 40G systems with the maximum number of spans using various optical amplifier configurations. Table 10-9. Examples of using OTUs and OTPMs to Concatenate 16-Channel WaveStar OLS Systems Example 1 Example 2 Example 3 Example 4 Per OLS System (Note 1) LEA7/ LEA7B OA Two OA System LEA105 OA Two OA System LEA105 OA Single OA System LEA104 OA Two OA System Max. No. of Spans 8 1 1* 5 Max. Span Loss (dB) 22 18 12 27 Total Reach (km)† 640 72 48 540 Max. No. of OTUs/ OTPMs 16 16 16 16 Max. No. of Systems 17 17 17 17 Max. No. of Spans 136 17 17 85 Max. Overall Distance (km) 11,880 1224 816 9180 Per Wavelength Notes: 1. * The following data is applicable using standard single-mode fiber (SSMD), and dispersion value 17 ps/nm-km is assumed. Receive OTU is not required in single span application. † Fiber loss of 0.25 dB/km is assumed. Issue 1 March 2001 10-15 365-575-536 Technical Specifications Table 10-10. Examples of using OTUs and OTPMs to Concatenate 8-Channel WaveStar OLS Systems Example 1 Per WaveStar OLS System (Note 1) LEA7 OA Max. No. of Spans 8 Max. Span Loss (dB) 22 * Total Reach (km) 640 Per Wavelength Max. No. of OTUs/OTPMs 16 Max. No. of Systems 17 Max. No. of Spans 136 Max. Overall Distance (km) 11,968 Note: 1. The following data is applicable using standard single-mode fiber (SSMD), and dispersion value 17 ps/nm-km is assumed. * Fiber loss of 0.25 dB/km is assumed. 01 Capacity 768 DS3 Equivalent Signals (561,096 two-way voice circuits per fiber pair). Up to 4 fiber pairs per cabinet. Transmission Characteristics 01 The WaveStar OLS 40G meets single-mode interoffice digital fiber optic systems requirements and objectives as specified in TR 253 and TR 499. The 41F(1-16) and 41G OTUs meet IEEE Standard 802.3 for 1 Gb/s ethernet signals. Transmission Delay 01 The WaveStar OLS 40G has a worst-case measured one-way transmission delay time through a single Optical Amplifier of 250 nanoseconds. 10-16 Issue 1 March 2001 365-575-536 Technical Specifications Signal-to-Noise Ratio Performance 01 System Output Signal-to-Noise Ratio (SNR) Condition Worst Case Minimum SNR ......................... 20.0 dB (no pump failure) Worst Case Minimum SNR ......................... 16.5 dB (1 pump failure per optical line) Customer Maintenance Signal IS-3 Access 01 The customer maintenance signal has an IS-3 interface. This is an STS-3 rate and format signal with the following optical interface specifications: Interface ...................................................... Standard IS-3 intermediate reach (IR) and short reach (SR) interface as specified by TR-253* Growth Increment ....................................... One IS-3 per circuit pack Line Code ................................................... Scrambled nonreturn to zero (NRZ) Protection Scheme ..................................... 0x1 (circuit pack and line) Minimum Wavelength ................................. 1270 nm Maximum Wavelength ................................ 1380 nm Spectral Width ............................................ 170 nm Maximum Transmitter Power....................... −14.0 dBm Minimum Transmitter Power........................ −20.8 dBm Maximum Received Power ......................... −14.0 dBm Receiver Sensitivity .................................... −30.8 dBm † Minimum System Gain .............................. 10.0 dB Optical Path Penalty‡ .................................. 1.0 dB § * † ‡ § Connector Loss ......................................... 1.5 dB Unallocated Margin..................................... 2.0 dB Minimum Loss Budget ................................ 0.0 dB Maximum Loss Budget ............................... 5.5 dB The TLM circuit pack is IR and SR compliant as shipped from the factory. The TLM circuit pack can be configured for applications with spans up to 3.6 kilometers. The minimum system gain takes into acMarch 2001count aging, temperature, and manufacturing tolerances. Optical path penalty includes effects of dispersion, reflection, and jitter that occur on the optical path. One connector (0.75 dB) on each end is assumed. Issue 1 March 2001 10-17 365-575-536 Technical Specifications The IS-3 interface can interwork with an OC-3 interface or an IS-3 interface over multi-mode fiber, subject to the following distance limitations: Fiber Bandwidth Distance 1000 MHz-km .............................................. 3.4 km 800 MHz-km ................................................ 3.3 km 500 MHz-km ................................................ 2.7 km 300 MHz-km ................................................ 1.9 km Cable Access 01 ■ Front for all customer access ■ Connectorized cabling with commercially available connectors. Power Specifications 01 NOTE: Consult FPD 804-604-161 for complete engineering of battery plant and feeders. Voltage Range, all components................... −42.75 to −60 V DC Power Feeders ............................................ Two −48 V power feeders ("A" and "B") Fuse Size (per shelf) ................................... 10 amps Maximum Power Dissipation — OLS Dual End Terminal .......................... 276 watts (22.1 watts/ft.2) — OLS Dual Repeater ................................ 344 watts (27.6 watts/ft.2) — OLS End Terminal .................................. 310 watts (24.8 watts/ft.2) and Repeater — Optical Translator (3 Shelves)................. 646 watts (51.7 watts/ft.2) — OLS Integrated Bay ................................ 552 watts (78.4 watts/ft.2) (Single) — OLS Integrated Cabinet/Bay (Double) OLS Cabinet/Bay................................... 276 watts (22.1 watts/ft.2) Optical Translator Cabinet/Bay .............. 646 watts (91.8 watts/ft.2) 10-18 Issue 1 March 2001 365-575-536 Technical Specifications — OLS Integrated Cabinet/Bay (Triple 1) OLS Cabinet/Bay .................................. 276 watts (22.1 watts/ft.2) Optical Translator Cabinet/Bay 1 .......... 646 watts (91.8 watts/ft.2) Optical Translator Cabinet/Bay 2 .......... 646 watts (91.8 watts/ft.2) — OLS Integrated Cabinet/Bay (Triple 2) OLS Cabinet/Bay .................................. 276 watts (22.1 watts/ft.2) Optical Translator Cabinet/Bay 1 .......... 646 watts (91.8 watts/ft.2) Optical Translator Cabinet/Bay 2 .......... 646 watts (91.8 watts/ft.2) — OLS End Terminal.................................. 138 watts (NA) Shelf (Miscellaneously Mounted) — OLS Repeater ........................................ 172 watts (NA) Shelf (Miscellaneously Mounted) — Optical Translator System Controller...... 182 watts (14.6 watts/ft.2) Shelf (Miscellaneously Mounted) — Optical Translator Complementary......... 232 watts (18.6 watts/ft.2) Shelf (Miscellaneously Mounted) — Optical Translator (3 Shelves) ................ 646 watts (51.7 watts/ft.2) (Miscellaneously Mounted) Current Drains per Feeder Cable Nominal (List 1 *) (−48 V DC) — OLS End Terminal.................................. 2.6 amps 4 Bidirectional Optical Lines — OLS Repeater ........................................ 3.3 amps 4 Bidirectional Optical Lines — OLS Dual End Terminal ......................... 2.9 amps — OLS Dual Repeater................................ 3.6 amps — OLS End Terminal.................................. 3.2 amps and Repeater — Optical Translator (3 Shelves) ................ 5.9 amps — OLS Integrated Bay................................ 5.8 amps (Single) — OLS Integrated Cabinet/Bay (Double) OLS Cabinet/Bay .................................. 2.9 amps Optical Translator Cabinet/Bay ............. 6.7 amps * Nominal (List 1) current drains used to size batteries and rectifiers. To size batteries and rectifiers, use twice the nominal (List 1) current drain per feeder. These current drains represent the average busy-hour current at normal operating voltages. Issue 1 March 2001 10-19 365-575-536 Technical Specifications — OLS Integrated Cabinet/Bay (Triple 1) OLS Cabinet/Bay................................... 2.9 amps Optical Translator Cabinet/Bay 1 ........... 6.7 amps Optical Translator Cabinet/Bay 2 ........... 6.7 amps — OLS Integrated Cabinet/Bay (Triple 2) OLS Cabinet/Bay................................... 2.9 amps Optical Translator Cabinet/Bay 1 ........... 6.7 amps Optical Translator Cabinet/Bay 2 ........... 6.7 amps — OLS End Terminal .................................. 1.4 amps Shelf (Miscellaneously Mounted) — OLS Repeater......................................... 1.8 amps Shelf (Miscellaneously Mounted) — Optical Translator System Controller ...... 1.7 amps Shelf (Miscellaneously Mounted) — Optical Translator Complementary ......... 2.1 amps Shelf (Miscellaneously Mounted) — Optical Translator (3 Shelves)................. 5.9 amps (Miscellaneously Mounted) Maximum (List 2*) (−42.75 V DC) — OLS End Terminal .................................. 5.9 amps 4 Bidirectional Optical Lines — OLS Repeater......................................... 7.5 amps 4 Bidirectional Optical Lines — OLS Dual End Terminal .......................... 6.5 amps — OLS Dual Repeater ................................ 8.0 amps — OLS End Terminal .................................. 7.3 amps and Repeater — Optical Translator (3 Shelves)................. 13.2 amps — OLS Integrated Bay ................................ 12.9 amps (Single) — OLS Integrated Cabinet/Bay (Double) OLS Cabinet/Bay................................... 6.5 amps Optical Translator Cabinet/Bay .............. 15.1 amps * 10-20 Maximum (List 2) current drains used to size each feeder cable and fuse. To size feeder cables and fuses, use the maximum (List 2) current drain per feeder. These current drains represent the peak current under worst-case operating conditions. Normally the current for the system is shared equally by both feeders. If one feeder fails, the other feeder carries the total load for both feeders (feeder A + feeder B current). Issue 1 March 2001 365-575-536 Technical Specifications — OLS Integrated Cabinet/Bay (Triple 1) OLS Cabinet/Bay .................................. 6.5 amps Optical Translator Cabinet/Bay 1 .......... 15.1 amps Optical Translator Cabinet/Bay 2 .......... 15.1 amps — OLS Integrated Cabinet/Bay (Triple 2) OLS Cabinet/Bay .................................. 6.5 amps Optical Translator Cabinet/Bay 1 .......... 15.1 amps Optical Translator Cabinet/Bay 2 .......... 15.1 amps — OLS End Terminal.................................. 3.2 amps Shelf (Miscellaneously Mounted) — OLS Repeater ........................................ 4.0amps Shelf (Miscellaneously Mounted) — Optical Translator System Controller...... 3.7 amps Shelf (Miscellaneously Mounted) — Optical Translator Complementary......... 4.7 amps Shelf (Miscellaneously Mounted) — Optical Translator (3 Shelves) ................ 13.2 amps (Miscellaneously Mounted) Issue 1 March 2001 10-21 365-575-536 Technical Specifications Low Voltage Cutoff 01 Cut Off ............................................................... -38.0 V DC ±1.5 V Restart............................................................... -42.5 V DC ±1.5 V Cabinet/Shelf Dimensions 01 OLS Cabinets* ............................................. 72 inches (183 cm) high 34 inches (86 cm) wide 24 inches (61 cm) deep OLS Bays .................................................... 84 inches (213 cm) high 26 inches (66 cm) wide 12 inches (31 cm) deep OLS End Terminal Shelf ............................. 28.5 inches (72.4 cm) high 19.6 inches (50 cm) wide 11 inches (28 cm) deep OLS Repeater Shelf ................................... 28.5 inches (72.4 cm) high 19.6 inches (50 cm) wide 11 inches (28 cm) deep OLS End Terminal Shelf ............................. 28.5 inches (72.4 cm) high 19.6 inches (50 cm) wide 11 inches (28 cm) deep Optical Translator System Controller Shelf . 17.7 inches (45 cm) high 19.6 inches (50 cm) wide 11 inches (28 cm) deep Optical Translator Complementary Shelf .... 17.7 inches (45 cm) high 19.6 inches (50 cm) wide 11 inches (28 cm) deep Heat Baffle................................................... 3.0 inches (7.5 cm) high 19.6 inches (50 cm) wide 11 inches (28 cm) deep OLS Miscellaneous Shelves........................ 31.0 inches (80 cm) high 19.6 inches (50 cm) wide 11 inches (28 cm) deep Optical Translator Miscellaneous Shelves ... 20.7 inches (52.5 cm) high 19.6 inches (50 cm) wide 11 inches (28 cm) deep * 10-22 OLS cabinets and miscellaneous shelves are central office white, and the cabinet end guards, cable racks, and lower door frame are central office soft blue. Issue 1 March 2001 365-575-536 Technical Specifications Circuit Pack/Unit Dimensions 01 SYSCTL...................................................... 14 inches (35.6 cm) high 1.2 inches (3 cm) wide 8 inches (20 cm) deep SYSMEM .................................................... 14 inches (35.6 cm) high 0.8 inches (2 cm) wide 8 inches (20 cm) deep TOHCTL ..................................................... 14 inches (35.6 cm) high 0.8 inches (2 cm) wide 8 inches (20 cm) deep OA............................................................... 14 inches (35.6 cm) high 4 inches (10 cm) wide 8 inches (20 cm) deep TLM............................................................. 9 inches (22.8 cm) high 2 inches (5 cm) wide 8 inches (20 cm) deep OMU ........................................................... 9 inches (22.8 cm) high 2 inches (5 cm) wide 6 inches (15 cm) deep ODU............................................................ 9 inches (22.8 cm) high 2 inches (5 cm) wide 6 inches (15 cm) deep OC48/STM16 OTU ..................................... 13.2 inches (33.6 cm) high 1.6 inches (4 cm) wide 9.3 inches (23.6 cm) deep QUAD OTU ................................................ 13.2 inches (33.6 cm) high 3.2 inches (8.0 cm) wide 9.3 inches (23.6 cm) deep OC12/STM4 OTPM .................................... 5.3 inches (13.5 cm) high 1.2 inches (3.0 cm) wide 8.1 inches (20.6 cm) deep OC3/STM1 OTPM ...................................... 5.3 inches (13.5 cm) high 1.2 inches (3.0 cm) wide 8.1 inches (20.6 cm) deep LSBB OTPM ............................................... 5.3 inches (13.5 cm) high 1.2 inches (3.0 cm) wide 8.1 inches (20.6 cm) deep Issue 1 March 2001 10-23 365-575-536 Technical Specifications Floor Loading Specifications 01 Cabinet (1 End Terminal Shelf) ................... 568 lbs (45.4 lbs/ft.2) Cabinet (2 End Terminal Shelves)............... 615 lbs (49.2 lbs/ft.2) Cabinet (1 Repeater Shelf).......................... 564 lbs (45.1 lbs/ft.2) Cabinet (2 Repeater Shelves) ..................... 608 lbs (48.6 lbs/ft.2) OT Cabinet (3 Shelves) ............................... 700 lbs (56.0 lbs/ft.2) Bay (2 End Terminal Shelves) ..................... 330 lbs (43.5 lbs/ft.2) Bay (2 Repeater Shelves) ........................... 322 lbs (42.5 lbs/ft.2) Integrated Bay (3 Shelves) .......................... 373 lbs (49.1 lbs/ft.2) OT Bay (3 Shelves) ..................................... 342 lbs (45.0 lbs/ft.2) End Terminal Shelf ..................................... 95 lbs (Miscellaneously Mounted) Repeater Shelf ........................................... 90 lbs (Miscellaneously Mounted) OT System Controller Shelf......................... 64 lbs (Miscellaneously Mounted) OT Complementary Shelf............................ 74 lbs (Miscellaneously Mounted) 10-24 Issue 1 March 2001 365-575-536 Technical Specifications Environmental Specifications 01 Normal Operating Temperature .................. 41°F to 104°F (5°C to 40°C) Short Term* Operating Temperature ........... 23°F to 122°F (−5°C to 50°C) Normal Operating Humidity† ....................... 5 to 85 percent Short Term* Operating Humidity† ............... 5 to 90 percent Maximum Operating Temperature .............. 1.8°F per minute Change Rate .......................................... (1°C/minute) Earthquake and vibration, fire resistance, and airborne contaminant requirements meet GR-63-CORE Issue 1, October 1995. Electrostatic, electromagnetic, electrical grounding, and safety requirements meet GR-1089-CORE Issue 1, November 1994. The WaveStar OLS 40G is also designed to meet the electromagnetic compatibility requirements of GR-1089-CORE. The WaveStar OLS 40G is UL‡ and CSA§ certified. Handling and Transportation Specifications 01 Handling and Shock Design Criteria........... Complies with GR-63-CORE Issue 1, October 1995 Temperature (Transport/Storage)................ −40°F to 158°F (−40°C to 70°C) Relative Humidity (Transport/Storage)........ 5 to 95 percent Storage/Shipment Altitude .......................... −200 to 40,000 feet (−61 to 12,133 meters) * † ‡ § Short term refers to a period of up to 72 consecutive hours and a total of up to 15 days in 1 year. Noncondensing. Registered trademark of Underwriters Laboratories Inc. Registered trademark of Canadian Standards Association. Issue 1 March 2001 10-25 365-575-536 Technical Specifications Craft Interface Terminal 01 Personal Computer Requirements) 01 A PC must meet the following minimum requirements to be loaded with Centerlink Management Console software and used as a CIT: ■ Pentium* desktop or laptop PC ■ 16 Megabyte RAM ■ Hard disk with approximately 20 Megabytes of free space ■ Windows 95®, Windows 98®, Windows NT®, or Windows 2000® operating system ■ Microsoft Internet Explorer® and Microsoft Personal Web Server® ■ Microsoft mouse or compatible pointing device ■ 2x CD-ROM Drive† ■ 16 bit sound (optional) ■ SVGA color monitor (Active matrix color display, if laptop). ASCII-Based Terminal Requirements 01 An ASCII-based (dumb) terminal may be used as a CIT. The ASCII-based terminal must meet the following minimum requirements: ■ ASCII-based data communications terminal with an 80-column display ■ Scroll capability ■ Local echo ■ Serial port (EIA-232-D) ■ Data transmission speed should be from 1200 to 9600 baud ■ XON/XOFF flow control capability. The ASCII-based terminal should be configured for byte serial data transmission of eight-bit bytes with one start bit and one stop bit. Parity should be "none" and the flow control should be "DC1/DC3." * † 10-26 Registered trademark of Intel Corporation The CIT software will be distributed on a CD or a set of floppy disks. Issue 1 March 2001 365-575-536 Technical Specifications Modem Requirements 01 A compatible modem or digital data network must meet the following minimum requirements: ■ Full duplex ■ Asynchronous ■ Byte serial data transmission of eight-bit bytes ■ One start bit ■ One stop bit ■ Data transmission speed should be from 1200 to 9600 baud. The modem must comply with one of the following transmission standards, depending on the desired baud rate. These standards apply to signaling used between modems. Standard Bell 212A V.22 V.22 bis V.32 V.32 bis Baud Rate(s) 1200 1200 2400 4800,9600 1200 (fax), 56,000 (data) Issue 1 March 2001 10-27 365-575-536 Technical Specifications Operations System Interfaces 01 ■ Office alarms: The steady state current for office alarm connections should not exceed 0.9 A at 60 V or 1.8 A at 30 V. The maximum transient currents (20 ms duration) during initial contact closure should not exceed 9 A at 60 V or 18 A at 30 V. ■ Parallel Telemetry: The parallel telemetry interface is designed for a maximum open circuit voltage of 60 V and a maximum current of 35 mA. ■ Miscellaneous Discretes: Any external customer equipment to be monitored by the WaveStar OLS 40G must provide the electrical equivalent of a contact closure across the corresponding environmental input wiring pairs. The contact closure must be capable of passing at least 10 mA of drive current. The power source to enable the WaveStar OLS 40G to control external customer equipment may be from a minimum of 3 V to a maximum of 72 V. The WaveStar OLS 40G provides a unidirectional opto-isolator connection across each corresponding control output wiring pair. The load current across each control output wiring pair must be limited by the external customer equipment and must not exceed 35 mA. 10-28 ■ Serial Telemetry: The serial telemetry interface operates at 2400-baud through an EIA-422 port. ■ X.25 Protocol/Transaction Language 1 (TL1): The X.25/TL1 interface operates at 1200 to 56,000 baud through an EIA-232-D port. Issue 1 March 2001 365-575-536 Technical Specifications Reliability Specifications 01 OC-48 Channel Unavailability* (hardware only) — 2 Line† End Terminal.............................. 0.003 minutes/year, per channel — 2 Line† Repeater .................................... 0.002 minutes/year, per channel — 4 Line† End Terminal.............................. 0.006 minutes/year, per channel — 4 Line† Repeater .................................... 0.005 minutes/year, per channel — 1 Line† End Terminal (Dual Facing) ....... 0.003 minutes/year, per channel — 640 km 4 Line † System .......................... 0.02 minutes/year, (two 4 Line† End Terminals per channel and seven 4 Line† Repeaters) OTU Channel Unavailability* (hardware only) — OC-48 OTU ............................................ 0.00027 minutes/year, per channel OTPM Channel Unavailability* (hardware only) — OC-3/STM-1 OTPM ............................... 0.00004 minutes/year, per channel — OC-12/STM-4 OTPM ............................. 0.00015 minutes/year, per channel — 100-750 Mb/s LSBB OTPM.................... 0.00015 minutes/year, per channel Telemetry Channel Unavailability* (hardware only) — Independent End Terminal ..................... 42 minutes/year, per channel — Independent Repeater ........................... 49 minutes/year, per channel — 1+1 End Terminal ................................... 0.0017 minutes/year, per channel — 1+1 Repeater ......................................... 0.0023 minutes/year, per channel * † Based on Method I of the Bellcore, Reliability Prediction Procedure for Electronic Equipment, Issue 5, December 1995 and a mean time to repair of less than or equal to two hours. One optical line is used for protection. Issue 1 March 2001 10-29 365-575-536 Technical Specifications Silent Failure Unavailability — End Terminal or Repeater....................... 0 — OTU ........................................................ 0 — OTPM ..................................................... 0 Mean Time* Between Maintenance Activities — 2 Line End Terminal ................................ 42 months — 2 Line Repeater ...................................... 40 months — 4 Line End Terminal ................................ 21 months — 4 Line Repeater ...................................... 20 months — Integrated Bay (Single) ........................... 19 months — Integrated Cabinet/Bay (Double) ............ 14 months — Integrated Cabinet/Bay (Triple 1) ............ 7 months — Integrated Cabinet/Bay (Triple 2) ............ 9 months — OT Complementary Shelf (Full) .............. 58 months — OT System Controller Shelf (Full ............ 85 months — OT Bay/Cabinet (3 Full Shelves) ............ 22 months Infant Mortality............................................. ≤ 1.6 times the steady state failure rate Product Design Life ..................................... 25 years * 10-30 Based on the Lucent Reliability Information Notebook, 7th Edition, August 1995. Issue 1 March 2001 365-575-536 Technical Specifications Circuit Pack/Unit/Module FIT Rates 01 Circuit Pack/Unit Failures/109 hours* (FIT) LEA1 SYSCTL ............................................ 3387 LEA2 SYSMEM .......................................... 7118 LEA5 TOHCTL............................................ 2549 505A OMU .................................................. 1538 506A OMU ................................................. 2500 605A ODU .................................................. 1540 606A ODU .................................................. 2500 606B ODU ................................................. 2500 LEA7/LEA7B OA ........................................ 16848 LEA104 OA ................................................ 16848 LEA105 OA ................................................ 16848 LDA1 TLM................................................... 6625 LUD1 OTCTL .............................................. 6000 OC48/STM16 OTU .................................... 8000 41S QUAD OTU ......................................... 1000 OC12/STM4 OTPM .................................... 6000 OC3/STM1 OTPM ...................................... 3000 LSBB OTPM ............................................... 6000 * Based on Method I of the Bellcore, Reliability Prediction Procedure for Electronic Equipment, Issue 5, December 1995. Issue 1 March 2001 10-31 365-575-536 Technical Specifications 01 X.25 Interface Each WaveStar OLS 40G is capable of supporting a direct, synchronous TL1/X.25 link to the OS. The following tables list X.25 detailed technical specifications that are supported by the WaveStar OLS 40G. The X.25 interface to the WaveStar OLS 40G supports two permanent virtual circuits (PVCs) and up to six switched virtual circuits (SVCs). Every virtual circuit may be used to issue TL1 commands to the WaveStar OLS 40G and obtain responses. Once communication is established, the OS can send a TL1 command to any connected virtual circuit (VC) and can expect the WaveStar OLS 40G to reply via the same VC. At the packet layer, the WaveStar OLS 40G is configured as a passive data terminating equipment (DTE) with the parameters listed in Table 10-11. Table 10-11. TL1/X.25 Interface — X.25 Packet Layer Parameters Parameter Value Packet Size 256 bytes Window Size 2 packets D bit support No M bit support Yes Q bit support No At the link layer, the WaveStar OLS 40G uses the standard link access procedure B (LAPB) protocol with the parameters listed in Table 10-12 Table 10-12. TL1/X.25 Interface — LAPB Link Layer Parameters 10-32 Parameter Value Maximum Frame Size 2104 bits Module 8 Window Size 7 frames n2 6 retries T1 3 seconds T3 not supported Issue 1 March 2001 365-575-536 Technical Specifications The WaveStar OLS 40G uses synchronous, full duplex, continuous carrier communication. Data rates of 1200, 2400, 4800, 9600, 19200, and 56000 are supported. The EIA-232D interface is configured as DTE, using the pins listed in Table 10-13. Table 10-13. TL1/X.25 Interface — EIA-232D Pin Connections Pin Description 1 Protective Ground (Shield) 2 Transmitted Data 3 Received Data 4 Request to Send (RTS)* 5 Clear to Send (CTS)† 6 DCE Ready 7 Signal Ground 8 Received Line Signal Detector 15 Transmit Clock (TC) 17 Receive Clock (RC) 20 Data Terminal Ready (DTR)* * DTR and RTS are always on when the WaveStar OLS 40G is powered. † The WaveStar OLS 40G will only transmit data via X.25 when CTS is on. The X.25 circuits between a WaveStar OLS 40G and the OS may be transported via an X.25 packet network, dedicated private line, or circuit switched network, at the user's option. Issue 1 March 2001 10-33 365-575-536 Technical Specifications 10-34 Issue 1 March 2001 Craft Interface Terminal Usage 11 Contents Overview 11-1 CenterLink Introduction 11-2 Inputs (Commands) 11-2 Help 11-3 CenterLink Functions 11-3 Browser Functions 11-4 Outputs 11-8 Examples of Reports [Generated by Various Inputs (Commands)] 11-9 Issue 1 March 2001 11-i Contents 11-ii Issue 1 March 2001 Craft Interface Terminal Usage 11 Overview 11 11 This section covers the following topics: ■ CenterLink NE Command Manager Introduction ■ Inputs (Commands) ■ Help ■ Browser ■ Tool Bar ■ Task Bar ■ Other CenterLink Features ■ Outputs ■ Examples of Reports ■ CenterLink Tutorial. The user should be familiar with the information in this tab before using the Operation and Maintenance Task Oriented Practices (TOP) procedures in this manual. Issue 1 March 2001 11-1 365-575-536 Craft Interface Terminal Usage CenterLink Introduction 11 CenterLink is a web-based browser interface that is user-friendly, menu-driven and can be used with the OLS. CenterLink software runs on a Windows 95®*, Windows 98®, Windows NT®, and Windows 2000® opererating system compatible personal computer (PC). The PC and CenterLink software together make up the craft interface terminal (CIT). The CIT connects to an OLS node (also referred to as an network element (NE) in this manual). The NE Command Manager allows a connection to be established to an NE. Once established, commands are sent and the resulting reports are displayed at the CIT (web browser). Inputs (Commands) 11 Inputs to CenterLink consist of a series of selections from menus and parameter inputs followed by clicking on Enter . This sequence of selecting and executing can be called an "input" or a "command". Table 11-1 (Release 3.4) lists the inputs (commands) menu for an OLS. A brief definition of the commands is located in Chapter 6, "Operations Interfaces.". The commands are arranged alphabetically by the verb to help in locating a specific command. NOTE: Two or more commands to the same network element (at approximately the same time) may cause inappropriate responses to be displayed as indicated by a NETO error code. For example, if one command is entered over an X.25 link and the other command via CenterLink, the X.25 response may be inappropriately displayed by CenterLink because both are using the TL1 interface. To correct, wait a short time and enter the command again. Some inputs are potentially service-affecting which cause a CAUTION or explanation box to appear on the screen. This alerts the user to the possible consequences of executing this command. Clear removes all data that was entered in the fields of the form. You can also clear a field by placing the pointer in the field (at end of text) and backspacing over the information. *Registered trademark of Microsoft Corporation. 11-2 Issue 1 March 2001 365-575-536 Craft Interface Terminal Usage 11 Help Help is available during the entering of data and during the responses (output process). Help in the output process causes the Adobe Acrobat Reader to be launched (activated), thus displaying the command page from the Operation Systems Engineering Guide (OSEG). Help may also be used to search for a particular text string from either the input or output screen. Highlighted words or CTL-C sends you to the Reader (OSEG page) where the "FIND" feature in Reader is used to locate all occurrences of the text string. Help takes you to the OSEG command page. CenterLink Functions 11 ■ NE Command Manager — lists the commands by management category. Click on the category and then on the command verb (for example, Operate, Release, Enter, Retrieve, Test, etc.) ■ NE SmartManual Manager — supports line build out (LBO) selection from tasks such as ‘RCVR Input Line Build Out Selection’ and ‘Optical amplifier Input Line Build Out Selection.’ ■ Software Installation Manager — allows different versions of LCT and OLS software to be installed. ■ Reference Library — lists references documents associated with the product. ■ Notepad — allows the user to record information (Edit) and to View all notes (from an index). ■ Options — allows the user to select the Target ID that will be deleted from a node. ■ Help — contains CenterLink information in the following categories: ■ ■ What's New — explains new features and improvements. ■ Using CenterLink — explains CenterLink's purpose and layout, application plug-ins, and other useful information. ■ How To... — provides help to optimize the display area. ■ Troubleshooting — provides information on frequently asked questions. ■ About Plug-ins — displays lists the plug-in components that are installed in this version of CenterLink. ■ About CenterLink — displays legal page of CenterLink license. Exit — removes CenterLink as a window on the CIT. Issue 1 March 2001 11-3 365-575-536 Craft Interface Terminal Usage 11 Browser Functions The browser being used should be year 2000 compliant. Check the web site at Microsoft to see if a service patch is available for downloading or if a browser upgrade is available. The browser functions are mostly self explanatory, and the ones that are not, may be located and explained in the browser Help menu. 11 Tool Bar The browser Tool Bar is located across the top of the screen with icons. A click on any of the following icons will: ■ Back - displays past browser screen NOTE: The back arrow icon of Microsoft Internet Explorer Version 4 displays the past command screens and their entered values. The back arrow icon of Microsoft Internet Explorer Version 3 displays the past command screens only. The entered values are not retained. ■ Forward - displays next browser screen ■ Stop - stops current action ■ Refresh - updates the screen ■ Home - displays your Home or starting page ■ Search - allows word and subject searches ■ Favorite.. - lists your favorite bookmarked sites ■ Print - prints the information ■ Font - increases or decreases point size of text (use arrows) ■ Mail - send or read mail messages ■ Address - displays the current site address or URL. Task Bar The browser Task Bar is located across the bottom of the screen and shows the current status, or an address when the cursor passes over a hyperlink area. 11-4 Issue 1 March 2001 11 365-575-536 Craft Interface Terminal Usage Table 11-1. Release 3.4 Inputs (Commands) Menu for OLS Management Category Verb Operate Release First Modifier Second Modifier Security Level Alarm_Cutoff All Reports External Control General Protection_Switch OPS General External Control General Protection_Switch OPS General All Reports Common Reports Customer_ Maintenance_Signal Alarm FAULT Retrieve Condition Environment Reports Equipment Reports Network Reports OPS Reports OT_Port_Signal Reports Optical_Channel Reports Optical_Line Reports Supervisory Reports All Reports Common Reports Customer_ Maintenance_Signal Reports Equipment Reports OPS Reports OT_Port_Signal Reports Optical_Channel Reports Optical_Line Reports Supervisory Reports Header Reports Log Reports State Reports Alarm Test Reports Auto Reports Local Privileged LED Telemetry Reports Parallel General Continued on next page Issue 1 March 2001 11-5 365-575-536 Craft Interface Terminal Usage Table 11-1. Release 3.4 Inputs (Commands) Menu for OLS (Continued) Management Category Verb First Modifier Copy Program Association Delete Target_Identifier _Address_Map Edit Date and Time Association Second Modifier Security Level OT_Port_Signal General Privileged Privileged Privileged OT_Port_Signal Customer_Maintena nce_Signal Enter Intialize Privileged OT_Port_Signal General Optical_Channel Privileged Section_Trace Privileged Supervisory Privileged System General All Reports Attribute Retrieve Privileged OPS Association CONFIGURATION General OT_Port_Signal Reports Alarm Reports Control Reports Environment Reports Customer_Maintena nce_Signal Reports Date Reports Equipment Reports Map Network Reports Ring Reports OPS Reports OT_Port_Signal Reports Optical_Channel Reports Optical_Line Reports Section_Trace Reports Supervisory Reports Set Attribute Update System Alarm Privileged Control Privileged Environment Privileged General Continued on next page 11-6 Issue 1 March 2001 365-575-536 Craft Interface Terminal Usage Table 11-1. Release 3.4 Inputs (Commands) Menu for OLS (Continued) Management Category Verb First Modifier Initialize Register Second Modifier Security Level All General Optical_Line General Baseline Reports All Performance_ Monitoring Retrieve Reports OT_Port_Signal Reports Optical_Channel Reports Optical_Line Reports Start_Time Reports Supervisory Reports Relative_Signal_ Power PERFORMANCE Reports All Threshold Performance_ Monitoring Set Threshold Activate User Allow Message Cancel User Delete User Reports OT_Port_Signal Reports Optical_Channel Reports Optical_Line Reports Supervisory Reports Start_Time General OT_Port_Signal General Optical_Channel General Optical_Line General Supervisory General Reports Equipment Reports Security Private_Identifier Edit SECURITY Enter User Privileged Privileged Reports Security Privileged Channel_Identifier Security Privileged Far_End_ Communications Privileged Network_Element Security OSI OSI Privileged Privileged NSAP Privileged System Privileged System OLINE User Security Issue 1 Privileged March 2001 11-7 365-575-536 Craft Interface Terminal Usage Continued on next page Table 11-1. Release 3.4 Inputs (Commands) Menu for OLS (Continued) Management Category Verb First Modifier Second Modifier Inhibit Message Equipment Privileged Channel_Identifier Security Reports Far_End_Communications Retrieve SECURITY Network_Element Reports Security Reports OSI Reports System Reports User Set Security Level Security Source_Identification Reports Privileged Upgrade_ Software Line_ Mode_TL1 ADVANCED Monitors 11 Outputs Every CenterLink input that is executed will result in an output on the screen. The output is either completed or denied with each displaying slightly different information. A green completed output displays the Target ID:, Command:, Date:, and Time:. A red denied output (Error) displays the Target ID:, Date:, Time:, Error Code:, and Description:. Another form of a denied output (Warning) displays the Error Code:, and Description:. An Error Code: consists of four-letters followed by a description of the error code. ■ Completed indicates that the action requested by the input was completed. The output may include a report if the verb Retrieve was used in the command. ■ Error indicates that the input was denied. The output includes a four-letter error code along with a description of the code. The following reports were obtained by using the verb (Retrieve). Each report is shown by an example. An example is introduced by its heading which shows the CenterLink input that produced the report. For an explanation of the column headings and parameters, refer to the OSEG command pages by clicking on Help. Note that vertical and horizontal scroll bars appear for reports that are too large to fit on a page. 11-8 Issue 1 March 2001 365-575-536 Craft Interface Terminal Usage Examples of Reports [Generated by Various Inputs (Commands)] 11 The reports from the retrieve commands are available only to the extent of their use in the User/Service Manual. Meaning that other retrieve commands are available but are not referenced in this manual and are therefore not shown in the Examples of Reports section. NOTE: The examples are presented in the order of CONFIGURATION, FAULT, PERFORMANCE, and SECURITY. Some of the examples show the input screen whereas others show the output or report screen. CONFIGURATION examples are 1 through 17 FAULT examples are 18 through 23 PERFORMANCE examples are 24 through 28 SECURITY examples are 29 through 40. Issue 1 March 2001 11-9 365-575-536 Craft Interface Terminal Usage Figure 11-1. 11-10 Issue 1 CONFIGURATION-Delete-Association-OT_Port_Signal (Input) March 2001 365-575-536 Craft Interface Terminal Usage Figure 11-2. CONFIGURATION-Enter-Association-OT_Port_Signal (Input) Issue 1 March 2001 11-11 365-575-536 Craft Interface Terminal Usage Figure 11-3. CONFIGURATION-Enter Customer_Maintenance_Signal (Input) 11-12 Issue 1 March 2001 365-575-536 Craft Interface Terminal Usage Figure 11-4. CONFIGURATION-Enter-OPS (Input) Issue 1 March 2001 11-13 365-575-536 Craft Interface Terminal Usage Figure 11-5. CONFIGURATION-Enter-OT_Port_Signal (Input) 11-14 Issue 1 March 2001 365-575-536 Craft Interface Terminal Usage Figure 11-6. CONFIGURATION-Initialize-System (Input) Issue 1 March 2001 11-15 365-575-536 Craft Interface Terminal Usage Figure 11-7. CONFIGURATION-Retrieve-Attribute-Alarm 11-16 Issue 1 March 2001 365-575-536 Craft Interface Terminal Usage Figure 11-8. CONFIGURATION-Retrieve-Attribute-Control (Screen 1 of 2) Issue 1 March 2001 11-17 365-575-536 Craft Interface Terminal Usage Figure 11-8. CONFIGURATION-Retrieve-Attribute-Control (Screen 2 of 2) – Continued 11-18 Issue 1 March 2001 365-575-536 Craft Interface Terminal Usage Figure 11-9. CONFIGURATION-Retrieve-Equipment Issue 1 March 2001 11-19 365-575-536 Craft Interface Terminal Usage Figure 11-10. CONFIGURATION-Retrieve-Map-Network 11-20 Issue 1 March 2001 365-575-536 Craft Interface Terminal Usage Figure 11-11. CONFIGURATION-Retrieve-Map-Ring Issue 1 March 2001 11-21 365-575-536 Craft Interface Terminal Usage Figure 11-12. CONFIGURATION-Retrieve-OPS 11-22 Issue 1 March 2001 365-575-536 Craft Interface Terminal Usage Figure 11-13. CONFIGURATION-Retrieve-Optical_Line Issue 1 March 2001 11-23 365-575-536 Craft Interface Terminal Usage Figure 11-14. CONFIGURATION-Retrieve-OT_Port_Signal 11-24 Issue 1 March 2001 365-575-536 Craft Interface Terminal Usage Figure 11-15. CONFIGURATION-Retrieve-Section_Trace Issue 1 March 2001 11-25 365-575-536 Craft Interface Terminal Usage Figure 11-16. CONFIGURATION-Retrieve-Supervisory 11-26 Issue 1 March 2001 365-575-536 Craft Interface Terminal Usage Figure 11-17. CONFIGURATION-Update-System (Input) Issue 1 March 2001 11-27 365-575-536 Craft Interface Terminal Usage Figure 11-18. FAULT-Retrieve-Alarm-All 11-28 Issue 1 March 2001 365-575-536 Craft Interface Terminal Usage Figure 11-19. FAULT-Retrieve-Alarm-Network Issue 1 March 2001 11-29 365-575-536 Craft Interface Terminal Usage Figure 11-20. FAULT-Retrieve-Condition-All 11-30 Issue 1 March 2001 365-575-536 Craft Interface Terminal Usage Figure 11-21. FAULT-Retrieve-State (Screen 1 of 2) Issue 1 March 2001 11-31 365-575-536 Craft Interface Terminal Usage Figure 11-21. FAULT-Retrieve-State (Screen 2 of 2) 11-32 Issue 1 March 2001 365-575-536 Craft Interface Terminal Usage Figure 11-22. FAULT-Test-LED (Input) Issue 1 March 2001 11-33 365-575-536 Craft Interface Terminal Usage Figure 11-23. FAULT-Test-Telemetry-Parallel (Input) 11-34 Issue 1 March 2001 365-575-536 Craft Interface Terminal Usage Figure 11-24. PERFORMANCE-Initialize-Register-Optical_Line (Input) Issue 1 March 2001 11-35 365-575-536 Craft Interface Terminal Usage Figure 11-25. PERFORMANCE-Retrieve-Performance_Monitor- Optical_Line 11-36 Issue 1 March 2001 365-575-536 Craft Interface Terminal Usage Figure 11-26. PERFORMANCE-Retrieve-Relative_Signal_Power Issue 1 March 2001 11-37 365-575-536 Craft Interface Terminal Usage Figure 11-27. PERFORMANCE-Retrieve-Threshold.Optical_Channel ) 11-38 Issue 1 March 2001 365-575-536 Craft Interface Terminal Usage Figure 11-28. PERFORMANCE-Retrieve-Threshold.OT_Port_Signal (Screen 1 of 2) Issue 1 March 2001 11-39 365-575-536 Craft Interface Terminal Usage Figure 11-28. PERFORMANCE-Retrieve-Threshold.OT_Port_Signal (Screen 2 of 2) – Continued 11-40 Issue 1 March 2001 365-575-536 Craft Interface Terminal Usage Figure 11-29. SECURITY-Activate-User (Input) Issue 1 March 2001 11-41 365-575-536 Craft Interface Terminal Usage Figure 11-30. SECURITY-Cancel-User (Input) 11-42 Issue 1 March 2001 365-575-536 Craft Interface Terminal Usage Figure 11-31. SECURITY-Edit-User-System (Input) Issue 1 March 2001 11-43 365-575-536 Craft Interface Terminal Usage Figure 11-32. SECURITY-Enter-Channel_Identifier-Security (Input) 11-44 Issue 1 March 2001 365-575-536 Craft Interface Terminal Usage Figure 11-33. SECURITY-Enter-Network_Element-Security (Input) Issue 1 March 2001 11-45 365-575-536 Craft Interface Terminal Usage Figure 11-34. SECURITY-Enter-System (Input) 11-46 Issue 1 March 2001 365-575-536 Craft Interface Terminal Usage Figure 11-35. SECURITY-Enter-User-Security (Input) Issue 1 March 2001 11-47 365-575-536 Craft Interface Terminal Usage Figure 11-36. SECURITY-Retrieve-Far End Communications 11-48 Issue 1 March 2001 365-575-536 Craft Interface Terminal Usage Figure 11-37. SECURITY-Retrieve-Network_Element-Security Issue 1 March 2001 11-49 365-575-536 Craft Interface Terminal Usage Figure 11-38. SECURITY-Retrieve-OSI 11-50 Issue 1 March 2001 365-575-536 Craft Interface Terminal Usage Figure 11-39. SECURITY-Retrieve-System Issue 1 March 2001 11-51 365-575-536 Craft Interface Terminal Usage Figure 11-40. SECURITY-Retrieve-User-Security 11-52 Issue 1 March 2001 365-575-536 Issue 1 March 2001 Operations Usage Page 1 of 8 CIT Tutorial Using CenterLink Software 11 General: This tutorial illustrates, through a series of exercises, the features of the Optical Line System CenterLink software. This software which supports the Optical Line System user interface is menu-driven and user-friendly. It is strongly recommended that this tutorial only be used with an Optical Line System network element that is out of service. It is assumed that the craft interface terminal (CIT) is conditioned and connected to the Optical Line System network element. If it is not, refer to DLP-501 in the Detailed Level Procedures section of this manual for assistance in getting to that point. Starting Assumptions: • All software (CD-ROM, disks, or tape) is installed and running, such as CenterLink, Win95, browser, Acrobat Reader. • PC is connected to DCE port of OLS, or equivalent. • PC is NOT communicating with network element. • Power to PC is turned on. 1. Obtain from the administrator the following: • Target ID • UID (User Identifier) • PID (Private ID) • UAP (User Access Privilege as Reports, Basic, General, Privileged, and Expert). 2. NOTE: The browser Address may need to be changed from "http://Localhost/lucent3/" to another address as directed by the system administrator. Double click the Internet Explorer icon. 3. Click on View and turn off by unchecking the Toolbar and Status Bar menu items. Craft Interface Terminal Usage Page 2 of 8 365-575-536 Issue 1 March 2001 4. Move the mouse pointer (arrow) to the upper right corner of the screen. Click once on the middle box of the three in the corner of the screen. This maximizes the window on the screen. 5. Click on File, Open and enter "http://localhost/lucent3/", then click OK. If previously used, a bookmark in Favorities may exists for your use. 365-575-536 Issue 1 March 2001 6. Click on NE Command Manager. 7. Select the desired Target ID and click on Submit or Operations Usage Page 3 of 8 a. Click on the down arrow next to the Target ID field and see if your assigned TID is in the list. b. Is your TID in the list? If YES, select the TID with the mouse pointer and click. If NO, then drag the mouse pointer over the text in the field beside Target ID (highlighted now), delete the text and type in the TID being used. Craft Interface Terminal Usage Page 4 of 8 c. 365-575-536 Issue 1 March 2001 Click on Submit. 8. Type your assigned UID in the UID (User Identifier) field and press the Tab key to advance to the next field. 9. Type your assigned Private Identifier in the PID (Private ID) field. Notice that an asterisk appears in place of a character which secures your Private Identifier. 365-575-536 Issue 1 March 2001 Operations Usage Page 5 of 8 10. Pull down each menu and click on your assigned privileged level for FAULT, CONFIGURATION, PERFORMANCE, and SECURITY. The privileged levels are Reports, Basic, General, Privileged, and Expert. Craft Interface Terminal Usage Page 6 of 8 365-575-536 Issue 1 March 2001 11. Click on Enter below the Network Element Login box. 12. ! CAUTION: For Steps 12 through 17, DO NOT CLICK on Enter unless told to do so. Select CONFIGURATION-Enter-Optical Channel. 13. NOTE: The TID selected is from a previous command and appears in the TID field. CenterLink remembers the TID of the last command entered. For the AID, select OCHAN in the first field, 1A in the second field, and ALL in the third field. 365-575-536 Issue 1 March 2001 14. Operations Usage Page 7 of 8 NOTE: A value must be entered in the PST field. Enter a value of OOS (not zeros). 15. DO NOT CLICK on Enter ! Instead, we are going to back out of this command by holding down the ALT key and pressing the left arrow key. 16. Shut down the browser by moving the cursor to the upper left corner of the screen and clicking on Close. The browser shuts down. 17. STOP! YOU HAVE COMPLETED THIS TUTORIAL. Craft Interface Terminal Usage Page 8 of 8 365-575-536 Issue 1 March 2001 Operation And Maintenance (TOP) This section supports operation and maintenance of the Optical Line System (OLS) product via task oriented practices (TOP) procedures. Use of these procedures should be preceded by a general knowledge and understanding of the software for the OLS. Refer to Section 11, "Craft Interface Terminal Usage." The TOP procedures are included in the following five separate tabs: ■ Acceptance — Yellow ■ Circuit Order — Orange ■ Operation —Green ■ Trouble Clearing — Red ■ Detailed Level Procedures — Blue. Reason for Reissue This document is issued to provide information for Release 3.4. A complete list of Release 3.4 features appear in the OLS Features Release Plan of 365-575-535, WaveStar OLS 40G, Applications, Planning, and Ordering Guide. As a result of a customer's suggestion, "road maps" have been included at the end of the nontrouble-clearing procedures (NTPs) to help technicians find their way among the procedures. Issue 1 March 2001 1 365-575-536 Operation And Maintenance (TOP) TOP Section Organization The Acceptance tab covers procedures that are used to accept the hardware AFTER installation by someone else. The Circuit Order tab covers procedures that are used when adding or deleting work order items for an optical line, an OC-48 channel, or the customer maintenance signal (CMS) to an in-service OLS. The Operation tab covers procedures that can be used in day-to-day operations. Such procedures are to enter/change/delete a user's login, to establish a remote login using the craft interface terminal (CIT), to establish remote access to a network element by using a dial-up modem, etc. A complete listing is in the "Operation Task Index" (Operation: IXL-001). The Trouble Clearing tab covers procedures on clearing the "condition" that caused the alarm and clearing trouble reports. These procedures are consistent with the maintenance philosophy given in TAD-1000, Technical Assistance. The Detailed Level Procedures (DLP) tab contains detailed "how to" instructions, beginning with DLP-500. Some procedures have an introductory "Overview" section that explains the purpose of the procedure. The other procedures are self-explanatory from the title. How To Use This TOP Section A tutorial is provided for you in Section 11 of this manual to familiarize yourself with the interactions of the CIT-PC software and the network element. However, it is strongly recommended that this tutorial only be used with an OLS network element that is out of service. To find the instructions for performing acceptance, circuit order, operation, or trouble-clearing tasks, proceed as follows: 1. Find your job in the Task Index under the appropriate colored tab and go to the referenced procedure; for example, Acceptance IXL-001. (This is the index for the acceptance tasks.) Or, you may use the Master Task Index (Operation and Maintenance: IXL-001) to find your job. 2. Go to the referenced procedure. This is a director level procedure and includes one of the following types: a. 2 Issue 1 Non-Trouble-Clearing Procedure (NTP) — a director level procedure that lists normal work items to perform other than trouble clearing. March 2001 365-575-536 Operation And Maintenance (TOP) b. Trouble Analysis Procedure (TAP) — a director level procedure that contains step-by-step trouble-clearing instructions to locate and/or fix troubles. The technical assistance hierarchical is contained in trouble analysis data (TAD)-100. c. Some DLPs are director level procedures. These procedures combine the "what to do" with the "how to do" information; for example, change, delete, or enter a user's login in DLP-519. All procedures are listed in numerical order but are not used in numerical order. A "Numerical List of Procedures" is provided as a reference only and should not be used alone in finding instructions for performing tasks. 3. Perform all the items in the director level procedure in the suggested order unless it sends you to another director level procedure. After you have completed a director level procedure, you have finished the task. Where more detailed information is required, you will be sent to a Detailed Level Procedure DLP-( ); or you may be sent to a Detailed Level Procedure by another Detailed Level Procedure. 4. IMPORTANT: When you complete a Detailed Level Procedure, you MUST return to the procedure (NTP, TAP, or DLP) that sent you there unless the DLP is a director level procedure; for example, change, delete, or enter a user's login (DLP-519). 5. IMPORTANT: Unless otherwise instructed, if one director level procedure sends you to another director level procedure, you should not return to the first director level procedure after you complete the second. 6. Sometimes you will be asked to verify that things have occurred. This may take the form of a formal statement of the expected response. At other times, the instructions will merely state verify that ... . If the expected response is not observed and a specific trouble-clearing reference is not made, you should reference the "Trouble Clearing Task Index" to start trouble clearing. 7. If you need help in clearing a trouble after completing all the applicable trouble-clearing procedures in this section, contact your local or regional maintenance assistance group. Then, the group may contact the Customer Technical Assistance Manager (CTAM) at 1-800-225-4672 in accordance with local procedures. Faulty equipment being returned for repair should be sent to the following address: Lucent Technologies Network Systems Returned Goods Dept. Dept. 11MV287122 1600 Osgood Street North Andover, Massachusetts 01845 Issue 1 March 2001 3 365-575-536 Operation And Maintenance (TOP) Screen Display and Equipment Designation Fonts The procedures in this manual use a MONOSPACE font to identify text on a screen or a response displayed from the network. A BOLD font identifies the lettering designations on panels, shelves, and circuit packs. Also, the bold font is used throughout this manual for emphasis. Optical Line System Installation The 365-575-539, Optical Line System (OLS) Installation Manual, is available for customers planning to install the equipment themselves. To acquire this manual, refer to "How to Order Documents" in the "About This Document" tab. Other associated installation manuals include 365-575-220, FT-2000 OC-48 Large Capacity Terminal, and 365-575-211, FT-2000 OC-48 Large Capacity Terminal, LCT Integration Manual. OLS Software Release Description Different releases have different comcode numbers and/or document numbers, but all documents contain information such as known problems, problems that have been fixed from an earlier release, and upgrade/download procedures. For the specific release and document, refer to the Operation: NTP-002 or to the "Related Documentation/Training" part of the "About This Document" section at the beginning of this manual. Safety Instructions Admonishments This section may contain admonishments as DANGERS, WARNINGS, and CAUTIONS. These admonishments have the following definitions: 4 Issue 1 ■ DANGER shows the presence of a hazard that will cause death or severe personal injury if the hazard is not avoided. ■ WARNING shows the presence of a hazard that can cause death or severe personal injury if the hazard is not avoided. ■ CAUTION shows the presence of a hazard that will or can cause minor personal injury or property damage if the hazard is not avoided. The caution is also used for property-damage-only accidents. This includes equipment damage, loss of software, or service interruption. March 2001 365-575-536 Operation And Maintenance (TOP) Lightwave Safety A Lucent Technologies' lightwave digital transmission system and associated optical test sets use semiconductor laser transmitters. The lasers emit lightwaves, at or near infrared wavelengths, into lightguide cables. This light is at the red end of the visible spectrum. Direct exposure at close distances should be avoided. ! DANGER: Disabling the Automatic Power Shut-Down (APSD) feature results in a FDA/ IEC Class IIIb/3B laser hazard. APSD is a safety feature. Do not attempt to defeat or disable APSD. Defeating APSD may result in harm to personnel exposed to disconnected or cut optical fibers. ! CAUTION: To comply with IEC regulations, systems containing an IEC Class 3B laser hazard must be installed in a controlled environment. Please refer to applicable IEC standards. ! WARNING: Never view any unterminated optical connector with optical instruments other than indirect image-converting devices, such as the FIND-R-SCOPE, since viewing optics tends to collimate the energy from an optical connector and, hence, increases the potential risk for injury. For Warning Label and Compliance Label information, refer to the "About This Document" section. Electrostatic Discharge (ESD) Considerations ! CAUTION: Industry experience has shown that all integrated circuit packs can be damaged by static electricity that builds up on work surfaces and personnel. The static charges are produced by various charging effects of movement and contact with other objects. Dry air allows greater static charges to accumulate. Higher potentials are measured in areas with low relative humidity, but potentials high enough to cause damage can occur anywhere. Observe the following precautions when handling circuit packs to prevent damage by electrostatic discharge: ■ Assume all circuit packs contain solid-state electronic components that can be damaged by ESD. Issue 1 March 2001 5 365-575-536 Operation And Maintenance (TOP) ■ When handling circuit packs (storing, inserting, removing, etc.) or when working on the backplane, always wear a grounded wrist strap or wear a heel strap and stand on a grounded, static-dissipating floor mat. ■ Handle all circuit packs by the faceplate or latch and by the top and bottom outermost edges. Never touch the components, conductors, or connector pins. ■ Observe warning labels on bags and cartons. Whenever possible, do not remove circuit packs from antistatic packaging until ready to insert them into slots. ■ If possible, open all circuit packs at a static-safe work position, using properly grounded wrist straps and static-dissipating table mats. ■ Always store and transport circuit packs in static-safe packaging. Shielding is not required unless specified. ■ Keep all static-generating materials, such as food wrappers, plastics, and Styrofoam containers away from all circuit packs. On removal from bay, immediately put circuit packs into static-safe packages. ■ Whenever possible, maintain relative humidity above 20 percent. ■ Keep the electromagnetic interference (EMI)/ESD protective front covers on the shelves at all times except during an upgrade or maintenance procedure. Once a circuit pack is replaced in the shelf, close the front cover immediately. To reduce the possibility of ESD damage, shelves are equipped with grounding jacks to enable personnel to ground themselves using wrist straps (Figure 1) while handling circuit packs or working on a shelf. The jacks for connection of wrist straps are located at the lower right-hand corner of each user panel and filter panel and at the rear of the bay. These jacks are labeled. The wrist straps should be checked periodically with a wrist strap tester to ensure that they are working properly. 6 Issue 1 March 2001 365-575-536 Operation And Maintenance (TOP) Figure 1. Static Control Wrist Strap IMPORTANT SAFETY INSTRUCTIONS READ AND UNDERSTAND ALL INSTRUCTIONS. When using this telecommunication equipment, basic safety precautions should always be followed to reduce the risk of fire, electric shock, and injury to persons, including the following: 1. Follow all warnings and instructions marked on the product. 2. Slots and openings in this product and the back or bottom are provided for ventilation. To protect it from overheating, these openings must not be blocked or covered. 3. Opening or removing rear covers or sheet-metal parts may present exposure to high current or electrical energy levels, or to other risks. Refer all servicing in those areas to qualified service personnel. 4. Never push objects of any kind into this product through slots as they may touch dangerous voltage points or short out parts that could result in a risk of fire or electrical shock. Never spill liquid of any kind on the product. 5. Refer servicing to qualified service personnel. Issue 1 March 2001 7 365-575-536 Operation And Maintenance (TOP) 8 Issue 1 March 2001 365-575-536 Issue 1 March 2001 Operations: IXL-001 Page 1 of 2 Master Task Index FIND YOUR JOB IN THE LIST BELOW . . . . . THEN GO TO Accept Optical Line System (OLS) . . . . . . . . . . . . . . . . . . . . . . . . . . Acceptance: NTP-002 Accept Optical Translator (OT) . . . . . . . . . . . . . . . . . . . . . . . . . . . . . Acceptance: NTP-003 Add Customer Maintenance Signal (CMS) to In-Service OLS . . . . . . . . . . . . . . . . . . . . . . . . . . . . . . . . . . . . Circuit Order: NTP-002 Add New Optical Line to In-Service OLS . . . . . . . . . . . . . . . . . . . . . Circuit Order: NTP-003 Add OCHAN() to In-Service OLS . . . . . . . . . . . . . . . . . . . . . . . . . . . Circuit Order: NTP-004 Add Optical Translator Port Module (OPTM) for Service . . . . . . . . . Circuit Order: NTP-011 Add Optical Translator Unit (OTU) for Service. . . . . . . . . . . . . . . . . Circuit Order: NTP-008 Add Quad Optical Translator Unit (QOTU) for Service . . . . . . . . . . .Circuit Order NTP-010 Change, Delete, or Enter a User’s Login . . . . . . . . . . . . . . . . . . . . . . . . . . . . . . . . DLP-519 Clear Local Office Alarm When NE ACTY and FE ACTY LEDS are Off . . . . . . . . . . . . . . . . . . . . . . . . . . . . . . . . . . . . . Trouble Clearing: TAP-136 Clear NE ACTY and/or FE ACTY (Regardless of Alarm Level) . Trouble Clearing TAP-101 Clear Trouble in CIT (CIT Does Not Respond to Commands). . Trouble Clearing: TAP-128 Clear Trouble Report . . . . . . . . . . . . . . . . . . . . . . . . . . . . . . . . Trouble Clearing: TAP-104 Copy Software from One Network Element to Another Network Element . . . . . . . . . . . . . . . . . . . . . . . . . . . . . . . . Operation: NTP-003 Continued on next page Issue 1 March 2001 9 Operations: IXL-001 Page 2 of 2 365-575-536 Issue 1 March 2001 Master Task Index (Contd) FIND YOUR JOB IN THE LIST BELOW . . . . . THEN GO TO Delete Customer Maintenance Signal (CMS) from In-Service OLS . . . . . . . . . . . . . . . . . . . . . . . . . . . . . . . . . .Circuit Order NTP-005 Delete OCHAN() from In-Service OLS . . . . . . . . . . . . . . . . . . . . . . Circuit Order: NTP-006 Delete Optical Line from In-Service OLS . . . . . . . . . . . . . . . . . . . . Circuit Order: NTP-007 Delete Optical Translator Unit (OTU) or Optical Translator Port Module (OTPM) from Service . . . . . . . . . . . . . . . Circuit Order: NTP-009 Delete Quad Optical Translator Unit (QOTU) From Service . . . . . . . . . . . . . . . . . . . . . . . . . . . . . . . . . . . . . . . . Circuit Order: NTP-012 Establish Modem or Datakit® Network Access . . . . . . . . . . . . . . . . . . . . . . . . . . . DLP-520 Initiate or Terminate Login Session To a Remote Network Element Using CerterLink . . . . . . . . . . . . . . . . . . . . . . . . . . . . . . . . . . . . . . . . . . . . . . . . DLP-518 Install Software (Initial Installation/Upgrade/Change) into CIT and Optical Line System Network Element . . . . . . . . . . . . Operation: NTP-002 Introduction to the PC . . . . . . . . . . . . . . . . . . . . . . . . . . . . . . . . . . . . . . . . . . . . . . DLP-516 Remove and/or Install OMU or ODU . . . . . . . . . . . . . . . . . . . . . . . . . . . . . . . . . . . DLP-521 Technical Assistance . . . . . . . . . . . . . . . . . . . . . . . . . . . . . . . . . Trouble Clearing: TAD-100 10 Issue 1 March 2001 365-575-536 Numerical List of Procedures Acceptance Tab: IXL-001 Acceptance Task Index NTP-002 Accept Optical Line System (OLS) NTP-003 Accept Optical Translator (OT) Circuit Order Tab: IXL-001 Circuit Order Task Index NTP-002 Add Customer Maintenance Signal (CMS) to In-Service OLS NTP-003 Add New Optical Line to In-Service OLS NTP-004 Add OCHAN() to In-Service OLS NTP-005 Delete Customer Maintenance Signal (CMS) from In-Service OLS NTP-006 Delete OCHAN() from In-Service OLS NTP-007 Delete Optical Line from In-Service OLS NTP-008 Add Optical Translator Unit (OTU) for Service NTP-009 Delete Optical Translator Unit (OTU) or Optical Translator Port Module (OTPM) from Service NTP-010 Add Quad Optical Translator Unit (QOUT) for Service NTP-011 Add Optical Translator Port Module (QTPM) for Service NTP-012 Delete Quad Optical Translator Unit (QOTU) from Service Operation Tab: IXL-001 Operation Task Index NTP-002 Install Software (Initial Installation/Upgrade/Change) into CIT and Optical Line System Network Element NTP-003 Copy Software from One Network Element to Another Network Element Trouble Clearing Tab: IXL-001 Trouble Clearing Task Index TAD-100 Technical Assistance TAP-101 Clear NE ACTY and/or FE ACTY (Regardless of Alarm Level) TAP-102 Clear Trouble Using Craft Interface Terminal (CIT) TAP-103 Clear ‘DCC APS Data Error’ TAP-104 Clear Trouble Report TAP-105 Clear ‘OMU/ODU Mismatch or Missing’ TAP-106 Address ‘TL-1 Link Failure’ TAP-107 Address Environmental Input and/or Control Output Condition TAP-108 Address Missing or Incorrect Response TAP-109 Clear ‘Optical Line ID Mismatch’ TAP-110 Address Incoming Signal Failure TAP-111 Clear ‘Circuit Pack Failure’ TAP-112 Clear ‘Circuit Pack Removed’ TAP-113 Clear ‘SYSMEM Failure’ or ‘SYSCTL Failure’ TAP-114 Clear Condition When ‘ABN’ and/or ‘NE ACTY’ LED is Lighted TAP-115 Clear No TL1 Response After System Reset (When No Cable Connection Between DTE and External Equipment) TAP-116 Clear Unsuccessful Circuit Pack Replacement TAP-117 Clear ‘CPYPGM:IP (tid)’ TAP-118 Clear ‘NE Status Comm Failure Continued on next page Issue 1 March 2001 11 365-575-536 Trouble Clearing Tab: (Contd) TAP-119 Clear OLS ‘Fuse/Power Failure )A/B)’ TAP-120 Clear ‘Incoming (From Supr) DCC Failure’ TAP-121 Address CP Reset in Progress TAP-122 Clear ‘CP (Unknown Type) Removed’ TAP-123 Clear ‘CP (Unknown Type) Failure’ or ‘OTPM Unknown’ TAP-124 Address ‘Reset In Progress’ TAP-125 Clear ‘SYSMEM Unrecognizable Code’ TAP-126 Clear ‘SYSMEM/SYSCTL Code Mismatch’ TAP-127 Clear ‘Unexpected CP Type’ or ‘Unexpected OTPM Type’ TAP-128 Clear Trouble in CIT (CIT Does Not Respond to Commands) TAP-129 Clear ‘DCC Startup In Progress’ TAP-130 Restore Network Element Operation After Power Loss TAP-131 Clear ‘Software Download in Progress’ TAP-132 Clear ‘System Startup In Progress’ TAP-133 Clear ‘SYSMEM Removed’ TAP-134 Clear ‘System Incomplete’ TAP-135 Clear ‘Multiple DS-NEs Defined’ TAP-136 Clear Office Alarm When NE ACTY and FE ACTY LEDs Are Off TAP-137 Clear ‘DS-NE Not Reachable’ TAP-138 Clear ‘Duplicate TID Defined’ TAP-139 Clear ‘SER TLM 1 Port Failure’ TAP-140 Clear ‘different OA types in side’ TAP-141 Clear ‘OA equipage inconsistent with mode’ TAP-142 Clear ‘opr/prov mode inconsistent’ TAP-143 Clear ‘incoming optical line LOS’ for a Single OA Network Element Configuration TAP-144 Clear ‘ODU warmup in progress’ TAP-145 Clear ‘optical line reset in progress’ TAP-146 Clear Trouble When OTU FAULT LED is Flashing or Lighted TAP-147 Clear OT Fuse/Power Failure (A,B) TAP-148 Clear ‘inconsistent OTPM association’ or ‘inconsistent OTU association’ TAP-149 Address Failure When FAULT LED is Continuously Lighted’ TAP-150 Clear Trouble Report (Optical Translator Release 1.0-MD1/MD2) TAP-151 Address Incoming Signal Failure (Flashing FAULT LED) TAP-152 Address OT Incoming Signal Failure TAP-153 Clear Combination ‘TLM Failure’ and ‘OA Failure’ TAP-154 Clear ‘APSD active - FE’ TAP-155 Clear ‘APSD active - NE’ TAP-156 Clear ‘j0 mismatch’ TAP-157 Clear ‘OA output disabled’ TAP-158 Address ‘TID Address Map Full’ Detailed Level Procedures Tab: DLP-500 Connect Optical Power Meter for Measurement in OLS DLP-501 Connect and Condition Craft Interface Terminal (CIT) DLP-502 Test LEDs on Front Panel and Circuit Packs DLP-503 Locate Circuit Packs/Fiber Connections Used in OLS DLP-504 Test Office Alarm Operation DLP-505 Perform Provisioning Continued on next page 12 Issue 1 March 2001 365-575-536 Detailed Level Procedures Tab: (Contd) DLP-506 Verify OLS Network Elements Are Connected DLP-507 Identify Source of Incoming Signal DLP-508 Test Parallel Telemetry DLP-509 Install/Remove Apparatus (Circuit Pack) Blank DLP-510 Clean Optical Fibers and Connectors DLP-511 Open/Close Cabinet Doors or Install/Remove Shelf Cover DLP-512 Install/Remove Lightguide Buildout DLP-513 Test OLS Miscellaneous Discrete Telemetry DLP-514 Install/Remove Circuit Pack DLP-515 Replace Fuse in Power Distribution and Fuse Panel or User Panel DLP-516 Introduction to the Personal Computer (PC) DLP-517 Inspect (Repair) Optical Fiber(s) DLP-518 Initiate or Terminate Login Session to a Remote Network Element Using Centerlink DLP-519 Change, Delete, or Enter a User’s Login DLP-520 Establish Modem or Datakit® Network Access DLP-521 Remove and/or Install OMU or ODU DLP-522 Replace Power Line Filter DLP-523 Test OT Miscellaneous Discrete (ME) Telemetry DLP-524 Connect Optical Power Meter for Measurement at OT DLP-525 Connect/Disconnect Optical Fibers at OTU/OTPM DLP-526 Create, Change, or Delete a DSNE DLP-527 Change the TID Issue 1 March 2001 13 365-575-536 14 Issue 1 March 2001 365-575-536 Issue 1 March 2001 Acceptance: IXL-001 Page 1 of 2 Acceptance Task Index FIND YOUR JOB IN THE LIST BELOW . . . . . THEN GO TO Accept Optical Line System (OLS) . . . . . . . . . . . . . . . . . . . . . Acceptance: NTP-002 Accept Optical Translator (OT). . . . . . . . . . . . . . . . . . . . . . . . Acceptance: NTP-003 IXL-001: Acceptance Page 2 of 2 365-575-536 Issue 1, March 2001 365-575-536 Issue 1 March 2001 Acceptance: NTP-002 Page 1 of 4 Accept Optical Line System (OLS) DO ITEMS BELOW IN ORDER LISTED FOR DETAILS, GO TO Overview: This acceptance procedure can be performed from any OLS network element (end terminal or repeater) connected in the system. This procedure is only used if the OLS was installed by someone else. If the installation has not been completed, notify the installation personnel or refer to 365-575-389 to complete the installation. If you completed the installation following the procedures in 365-575-389, do not perform this procedure. Required Test Equipment: Craft Interface Terminal (CIT) Wrist Strap ! WARNING: Unterminated optical connectors may emit invisible laser radiation. Eye damage may occur if beam is viewed directly or with improper optical instruments. Avoid direct exposure to beam. ! CAUTION: Use a static ground wrist strap whenever handling circuit packs or working on an OLS network element to prevent electrostatic discharge (ESD) damage to sensitive components. See "Electrostatic Discharge (ESD) Considerations" in Trouble Clearing: TAD-100. NOTE: If at any point in this procedure any OLS network element or system fails to respond in the indicated way, refer the trouble to installation personnel. - 1. Verify that the NE ACTY and the FE ACTY LEDs are off at the user panel or indicator panel. — Acceptance: NTP-002 Page 2 of 4 DO ITEMS BELOW IN ORDER LISTED 365-575-536 Issue 1 March 2001 FOR DETAILS, GO TO 2. Connect the craft interface terminal (CIT) to the local OLS network element and log into the network element to be tested. DLP-501 3. Verify that the OLS network elements are connected per the engineered configuration. DLP-506 4. At the CIT, select SECURITY-Retrieve-System command and execute to obtain an OLS System Provisioning Report for the local OLS network element. DLP-506 5. Verify that the report agrees with the engineering records, particularly the dsne value where only one is allowed per OLS. Verify the other parameters. Section 11 shows an example of the report. — tid dsne X25ps almgrp agne dirn System-type Side1_Sys=,Side1_opr= Side2_Sys=, Side2_opr= . 6. 7. Make an LED test. DLP-502 NOTE: If you are logged in to a remote network element, you will require assistance at the distant network element in order to perform this step. If required, test office alarm operation. 8. DLP-504 NOTE: If you are logged in to a remote network element, you will require assistance at the distant network element in order to perform this step. If required, check telemetry interfaces. a. b. 9. Parallel telemetry Miscellaneous discrete telemetry Initiate a login to one of the other OLS network elements. DLP-508 DLP-513 DLP-518 365-575-536 Issue 1 March 2001 Acceptance: NTP-002 Page 3 of 4 DO ITEMS BELOW IN ORDER LISTED FOR DETAILS, GO TO 10. Repeat Steps 4 through 8 for that OLS network element. 11. Terminate the login. — DLP-518 12. Repeat Steps 9 through 11 for each of the remaining OLS network elements. — 13. At the CIT, select FAULT-Retrieve-Alarm-Network command and execute to obtain a report. — 14. Are there any alarms indicated on the report? — If NO, then continue with Step 15. If YES, then the trouble must be referred to the group that installed it. 15. If required, notify personnel at the remote maintenance site (OS center) that the OLS is ready for any operational tests they wish to perform using the X.25 link. — 16. The OLS has passed this acceptance test and is now ready to provide service. If an Optical Translator is part of this configuration and is to be acceptance tested now, refer to ACCEPTANCE:NTP-003. — Acceptance: NTP-002---+---DLP-501 |---DLP-506 |---DLP-502 |---DLP-504 |---DLP-508 |---DLP-513 |---Acceptance: NTP-003 Acceptance: NTP-002 Page 4 of 4 365-575-536 Issue 1 March 2001 365-575-536 Issue 1 March 2001 Acceptance: NTP-003 Page 1 of 2 Accept Optical Translator (OT) DO ITEMS BELOW IN ORDER LISTED FOR DETAILS, GO TO Overview: This acceptance procedure can be performed from the Optical Translator (OT) which may be connected in an Optical Line System (OLS) network or equivalent network. This procedure is only used if the OT was installed by someone else. If the installation has not been completed, notify the installation personnel or refer to 365-575-389 to complete the installation. If you completed the installation following the procedures in 365-575-389, do not perform this procedure. Required Test Equipment: Wrist Strap ! WARNING: Unterminated optical connectors may emit invisible laser radiation. Eye damage may occur if beam is viewed directly or with improper optical instruments. Avoid direct exposure to beam. ! CAUTION: Use a static ground wrist strap whenever handling circuit packs or working on an OLS network element to prevent electrostatic discharge (ESD) damage to sensitive components. See "Electrostatic Discharge (ESD) Considerations" in Trouble Clearing: TAD-100. NOTE: If at any point in this procedure any OT fails to respond in the indicated way, refer the trouble to installation personnel. 1. At the CIT located at the OLS, select FAULT-Retrieve-Condition-All and execute to obtain a report. — Acceptance: NTP-003 Page 2 of 2 365-575-536 Issue 1 March 2001 DO ITEMS BELOW IN ORDER LISTED 2. FOR DETAILS, GO TO Are any alarm conditions associated with the OT? — If Yes, then refer the trouble condition to the installation personnel If No, then continue with Step 3. 3. Verify the green PWR ON LED is on at the indicator strip (three shelves per cabinet) or user panel (miscellaneously-mounted shelf). OT Arrangement User Panel Indicator Strip Bay-Misc. Mounted Shelf PWR ON — Cabinet-Shelf 2 Cabinet-Shelf 1 Cabinet-Controller Shelf — — — UP SHELF MID SHELF LOW SHELF — 4. Verify the FAULT LED is either flashing or off. If the LED is continuously lighted, then notify the installation personnel of the defective Optical Translator Unit (OTU).( — 5. If required, notify personnel at the remote maintenance site (Operations System center) that the OT is ready for any operational test they wish to perform using the remote miscellaneous discrete points. — 6. The OT has passed this acceptance test and is now ready to provide service. — Acceptance: NTP-002---+---TAD-100 365-575-536 Issue 1 March 2001 Circuit Order: IXL-001 Page 1 of 2 Circuit Order Task Index FIND YOUR JOB IN THE LIST BELOW . . . . . THEN GO TO Add Customer Maintenance Signal (CMS) to In-Service OLS . . . . . . . . . . . . . . . . . . . . . . . . . . . . . . . . . . . . . . Circuit Order: NTP-002 Add New Optical Line to In-Service OLS . . . . . . . . . . . . . . . . . . . . Circuit Order: NTP-003 Add OCHAN() to In-Service OLS . . . . . . . . . . . . . . . . . . . . . . . . . Circuit Order: NTP-004 Add Optical Translator Port Module (OTPM) for Service . . . . . . . . . Circuit Order: NTP-011 Add Optical Translator Unit (OTU) for Service. . . . . . . . . . . . . . . . . Circuit Order: NTP-008 Add Quad Optical Translator Unit (QOTU) for Service . . . . . . . . . . Circuit Order: NTP-010 Delete Customer Maintenance Signal (CMS) from In-Service OLS . . . . . . . . . . . . . . . . . . . . . . . . . . . . . . . . . . . . . . Circuit Order: NTP-005 Delete OCHAN() from In-Service OLS . . . . . . . . . . . . . . . . . . . . . . Circuit Order: NTP-006 Delete Optical Line from In-Service OLS . . . . . . . . . . . . . . . . . . . . Circuit Order: NTP-007 Delete Optical Translator Unit (OTU) or Optical Translator Port Module (OTPM) from Service. . . . . . . . . . . . . . . . . . . . . . . . Circuit Order: NTP-009 Delete Quad Optical Translator Unit (QOTU) from Service . . . . . . . Circuit Order: NTP-012 Circuit Order: IXL-001 Page 2 of 2 365-575-536 Issue 1 March 2001 365-575-536 Issue 1 March 2001 Circuit Order: NTP-002 Page 1 of 4 Add Customer Maintenance Signal (CMS) to In-Service OLS DO ITEMS BELOW IN ORDER LISTED . . . . FOR DETAILS, GO TO Overview: This procedure adds a Customer Maintenance Signal (CMS) to an in-service Optical Line System (OLS). The CMS is a155 Mb/s optical signal (IS-3 format) that originates and terminates at customer supplied equipment. Required Test Equipment: Craft Interface Terminal (CIT) Wrist Strap Technical assistance at the other network elements on the OLS. ! WARNING: Unterminated optical connectors may emit invisible laser radiation. Eye damage may occur if beam is viewed directly or with improper optical instruments. Avoid direct exposure to beam. ! CAUTION: Use a static ground wrist strap whenever handling circuit packs or working on an FT-2000 network element to prevent electrostatic discharge damage to sensitive components. See “Electrostatic Discharge(ESD) Considerations” in Trouble Clearing: TAD-100. 1. Obtain the circuit order instructions and note which optical line is associated with the CMS to be added. — 2. Open the cabinet doors or remove the shelf cover. All connections can be accessed from the front. DLP-511 Circuit Order: NTP-002 Page 2 of 4 365-575-536 Issue 1 March 2001 DO ITEMS BELOW IN ORDER LISTED . . . . . FOR DETAILS, GO TO 3. Connect the craft interface terminal (CIT) and log in to the local OLS network element. 4. At the LGX® or equivalent, identify the transmit and receive fibers (going to and coming from the customer provided equipment) for the customer maintenance (CM) signal(s). Verify that the fibers are connected — 5. Make a power measurement on the incoming fiber (that’s going to the CM IN port) and determine the correct LBO value. DLP-500 6. Install the appropriate LBO at the CM IN port of the TLM circuit pack and connect the incoming fiber (transmit side of customer provided equipment). DLP-512 7. Connect the outgoing fiber (receive side of customer provided equipment) to the CM OUT port of the TLM circuit pack. A 0-dBLBO should be connected to this port. DLP-512 8. Repeat Steps 4 through 7 for any remaining CM signals to be added in this cabinet or shelf. — 9. Close the cabinet door or install the shelf cover. 10. Does the customer provided equipment appear to be operating properly? DLP-501 DLP-511 — If NO then continue with Step 11. If YES, then continue with Step 13. 11. NOTE: It is possible that one or more customer provided equipment locations have an incorrect provisioned state. Meaning that a good signal is not detected and the state cannot change from AUTO to IS. At the CIT, select CONFIGURATION-Enter-Customer_Maintenance command and provision PST and SST to AUTO (not NMON) for the customer provided equipment location not operating properly. — 365-575-536 Issue 1 March 2001 Circuit Order: NTP-002 Page 3 of 4 DO ITEMS BELOW IN ORDER LISTED . . . . FOR DETAILS, GO TO 12. Wait until the NE ACTY LED goes off (approximately 5 minutes). 13. This completes adding a customer maintenance signal to an existing OLS. If required to add an optical channel or an optical line with this CM signal, then refer to the appropriate circuit order procedure Circuit Order: NTP-002---+---TAD-100 |---DLP-500 |---DLP-501 |---DLP-510 |---DLP-511 |---DLP-512 |---Circuit Order: NTP-003 |---Circuit Order: NTP-004 — NTP-004 NTP-003 Circuit Order: NTP-002 Page 4 of 4 365-575-536 Issue 1 March 2001 365-575-536 Issue 1 March 2001 Circuit Order: NTP-003 Page 1 of 8 Add New Optical Line to In-Service OLS DO ITEMS BELOW IN ORDER LISTED FOR DETAILS, GO TO Overview: This procedure applies to the OLS end terminals and to any and all OLS repeaters when adding optical lines 2, 3, and/or 4. Optical line 1 has already been installed (Reference DLP-503). Optical power measurements are made at each section along the optical line, therefore, assistance is very beneficial. Required Test Equipment: Craft Interface Terminal (CIT) Wrist Strap Optical Power Set or Equivalent ! CAUTION: Use a static ground wrist strap whenever handling circuit packs or working on an OLS network element to prevent electrostatic discharge damage to sensitive components. See "Electrostatic Discharge (ESD) Considerations" in Trouble Clearing: TAD-100. At Transmit End of Channel 1. Obtain the circuit order instructions to add an optical line(s) and note the assigned line number(s) and associated circuit packs locations, and fiber connections for the line(s) being added. DLP-503 2. Obtain all required circuit packs per the circuit order. 3. Open the cabinet doors or remove the shelf cover. All connections can be accessed from the front. DLP-511 4. Install TLM circuit packs in shelf 1 (line 2) or shelf 2 (lines 3 and 4) for the added optical line per the circuit order instructions. DLP-514 5. Connect the craft interface terminal (CIT) and log in to the OLS end terminal. DLP-501 — Circuit Order: NTP-003 Page 2 of 8 DO ITEMS BELOW IN ORDER LISTED 365-575-536 Issue 1 March 2001 FOR DETAILS, GO TO 6. Close the OA circuit pack latches and slide the OA into the shelf (the OA pack is not engaged at this time.) 7. Remove the protector caps and clean the fiber jumper ends to be used between the OA and TLM circuit packs. 8. — DLP-510 NOTE: Labeling information is contained in Chapter 7 of the Installation Manual (365-575-539). An OLS to OLS label sheet is comcode 847419629 and OLS to LCT is comcode 847344611. Connect and label fiber jumpers between OA and TLM circuit packs per circuit order. 9. 10. Remove the protector cap and clean the outside plant fibers for the optical line being placed in service. DLP-503 DLP-510 NOTE: Care must be used to ensure the correct transmission direction when connecting the outside plant fibers. Connect the outside plant fibers to the appropriate OUT connector on the transmit end terminal OA circuit packs per circuit order. DLP-503 11. Open the transmit OA circuit pack latches and push to seat the OA circuit pack. — 12. Is a repeater being used with this in-service OLS? — If NO, then continue with Step 25. If YES, then continue with Step 13. 13. NOTE: You will need assistance at the repeater site or travel to that location. Steps 13 through 23 apply to a repeater. Obtain all required circuit packs per the circuit order instructions. Note the circuit packs locations and fiber connections for the line being added. 14. Open the cabinet doors or remove the shelf cover. All connections can be accessed from the front. DLP-503 DLP-511 365-575-536 Issue 1 March 2001 DO ITEMS BELOW IN ORDER LISTED Circuit Order: NTP-003 Page 3 of 8 FOR DETAILS, GO TO 15. Install TLM circuit packs in shelf 1 (line 2) or shelf 2 (lines 3 and 4) for the added optical line per the circuit order instructions. DLP-514 16. Connect the craft interface terminal (CIT) and log in to the OLS repeater. DLP-501 17. If necessary, close both latches on the OA circuit pack. — 18. Place the OA circuit pack into the slot guides and slowly slide it into the shelf until the latches touch the shelf. DO NOT ROCK THE CIRCUIT PACK OR UNIT BACK AND FORTH. The OA circuit pack is not engaged at this time. — 19. NOTE: Labeling information is contained in Chapter 9 of the Installation Manual (OLS to OLS label sheet is comcode 847419629). Clean, connect, and label fiber jumpers between OA and TLM circuit packs per circuit order. 20. Select and install the correct LBO at the IN connector of the receive OA circuit pack. 21. DLP-510 DLP-500 NOTE 1: Care must be used to ensure the correct transmission direction when connecting the outside plant fibers. NOTE 2: Labeling information is contained in Chapter 9 of the Installation Manual (365-575-539). An OLS to OLS label sheet is comcode 847419629 and OLS to LCT is comcode 847344611. Connect and label the outside plant fibers to the appropriate IN/OUT connector on the repeater OA circuit pack per circuit order. 22. Verify that the inc optical line LOS condition has been cleared by selecting FAULT Retrieve-Condition-All command for a report. DLP-503 — Circuit Order: NTP-003 Page 4 of 8 DO ITEMS BELOW IN ORDER LISTED 365-575-536 Issue 1 March 2001 FOR DETAILS, GO TO 23. Close the cabinet doors or replace the shelf cover. 24. Repeat Steps 13 through 23 if another repeater is present in the in-service OLS. 25. DLP-511 — NOTE: You will need assistance at the receive end terminal or travel to that location. Steps 25 through 49 apply to the receive end terminal. Obtain all required circuit packs per the circuit order instructions. Note circuit pack locations and filter connections on the line being added. DLP-503 26. Open the cabinet doors or remove the shelf cover. All connections can be accessed from the front. DLP-511 27. Install TLM circuit packs in shelf 1 (line 2) or shelf 2 (lines 3 and 4) for the added optical line per the circuit order instructions. DLP-514 28. Connect the craft interface terminal (CIT) and log in to the OLS receive end terminal. DLP-501 29. NOTE: If the system configuration has changed from 1 OA to 2 OA or vice versa, then a system reset is required [use CONFIGURATION.Initialize.System:TID(All):PH(3) command and execute.] Is this OLS (end terminal) configured for single optical amplifier (OA) operation? — If NO, then continue with Step 30. If YES, then continue with Step 43. 30. If necessary, close both latches on the OA circuit pack. — 31. Place the OA circuit pack into the slot guides and slowly slide it into the shelf until the latches touch the shelf. DO NOT ROCK THE CIRCUIT PACK OR UNIT BACK AND FORTH. The OA circuit pack is not engaged at this time. — 365-575-536 Issue 1 March 2001 DO ITEMS BELOW IN ORDER LISTED Circuit Order: NTP-003 Page 5 of 8 FOR DETAILS, GO TO 32. Is OLS configured for Optical Protection Switching (OPS) operation? — If NO, then continue with Step 33. If YES, then continue with Step 34. 33. Verify that a 7-dB LBO is connected to the OUT connector of the OA circuit pack. — 34. Remove the protector caps and clean the fiber jumper ends to be used between the OA and TLM circuit packs. DLP-510 35. NOTE: Labeling information is contained in Chapter 7 of the Installation Manual (365-575-539). An OLS to OLS label sheet is comcode 847419629 and OLS to LCT is comcode 847344611. Connect and label fiber jumpers between OA and TLM circuit packs per circuit order. 36. Remove the protector caps and clean the outside plant fibers for the optical line being placed in service. 37. Select and install the correct LBO at the IN connector of the receive OA circuit pack. 38. — DLP-510 — NOTE: Care must be used to ensure the correct transmission direction when connecting the outside plant fibers. NOTE: Labeling information is contained in Chapter 8 of the Installation Manual (OLS to OLS label sheet is comcode 847419629 and OLS to LCT is comcode 847344611.) Connect and label the outside plant fibers to the appropriate IN connector at the receive end terminal OA circuit packs per circuit order. DLP-503 39. Open the latches on the OA circuit pack and push the circuit pack until it engages the connector pins. — 40. With a thumb on each latch, continue sliding the circuit pack with one firm, continuous motion until the latches are fully engaged (the clips are in the locked position). — Circuit Order: NTP-003 Page 6 of 8 DO ITEMS BELOW IN ORDER LISTED 365-575-536 Issue 1 March 2001 FOR DETAILS, GO TO 41. Verify that the incoming optical line LOS condition has been cleared by selecting FAULT-Retrieve-Condition-All command for a report. — 42. Repeat Steps 4 through 41 for the other direction of transmission of transmission and then continue with Step 48. — Single OA Operation 43. Remove the protector caps and clean the fiber jumper ends to be used between the ODU and TLM Circuit Packs. 44. DLP-510 NOTE: Labeling information is contained in Chapter 7 of the Installation Manual (365-575-539). An OLS to OLS label sheet is comcode 847419629 and OLS to LCT is comcode 847344611. Connect and label fiber jumpers between ODU and TLM circuit pack per circuit order. 45. Remove the protector cap and clean the receive outside plant fiber for the optical line being placed in service. DLP-503 DLP-510 46. Verify that the incoming optical line LOS condition has been cleared by selecting FAULT-Retrieve-Condition-All command for a report. — 47. Repeat process beginning at Step 4 for the other direction of transmission. — 48. At the CIT, select the CONFIGURATION-Update-System command and execute. — 49. Log in to every OLS network element one at a time and repeat Step 48. DLP-518 50. Close the cabinet doors or replace the shelf cover. DLP-511 365-575-536 Issue 1 March 2001 DO ITEMS BELOW IN ORDER LISTED Circuit Order: NTP-003 Page 7 of 8 FOR DETAILS, GO TO 51. An optical line has been added to the OLS and is now ready for service. Circuit Order:NTP-004---+---TAD-100 |---DLP-500 |---DLP-501 |---DLP-503 |---DLP-510 |---DLP-511 |---DLP-512 |---DLP-514 |---DLP-518 — Circuit Order: NTP-003 Page 8 of 8 365-575-536 Issue 1 March 2001 NTP-004 : Circuit Order Page 1 of 6 365-575-536 Issue 1 March 2001 Add OCHAN() to In-Service OLS DO ITEMS BELOW IN ORDER LISTED . . . . . FOR DETAILS, GO TO Overview: This procedure requires physical work functions at the end terminals but the required actions at the repeater sites may be accomplished byremotely logging in to the repeater. Work functions are first completed at the transmit end of the channel, then continues at the receive end. Required Test Equipment: Craft Interface Terminal (CIT) Wrist Strap Optical Power Set or Equivalent ! CAUTION: Use a static ground wrist strap whenever handling circuit packs or working on an Optical Line System (OLS) end terminal to prevent electrostatic discharge (ESD) damage to sensitive components. See “Electrostatic Discharge (ESD) Considerations” in Trouble Clearing:TAD-100. ! CAUTION: DO NOT ADD more than one channel at a time. When more than one optical channel is added simultaneously, degradation of the other in-service channels is likely to occur. 1. Obtain the circuit order instructions to add an optical channel. The channel is assumed to be bidirectional. — 2. Open the cabinet doors or remove the shelf cover. All connections can be accessed from the front. DLP-511 3. Connect the craft interface terminal (CIT) and log in. DLP-501 365-575-536 Issue 1 March 2001 Circuit Order: NTP-004 Page 2 of 6 DO ITEMS BELOW IN ORDER LISTED . . . . FOR DETAILS, GO TO At Transmit End of Channel 4. At the CIT, select FAULT-Retrieve-Alarm-Network command to obtain a report. — 5. Are there any alarm or status conditions listed in the report? — If NO, then continue with Step 6. If YES, then go to Trouble Clearing IXL-001. 6. Remove the protector cap and clean the OCHAN() IN port at the OMU for the channel being placed in service. DLP-510 7. If not already installed, clean and install a 0 dB lightguide buildout into the OMU OCHAN() IN port for the channel being added. DLP-512 8. NOTE: Each OCHAN(1-16) has a different required power level. DLP-500 Connect the optical power meter to the incoming fiber jumper (incoming from the LCT TRMTR or OTU/OTPM circuit pack) and verify the correct transmit power. 9. 10. Connect the incoming fiber jumper to the OCHAN() IN port of the OMU. — NOTE: The report is meaningful only for the end terminals with an OMU, and the data is only available when the channel signal is in the IS or OOS state. At the CIT, select PERFORMANCE-Retrieve-Relative Signal_Power command and obtain a report. — NTP-004: Circuit Order Page 3 of 6 365-575-536 Issue 1 March 2001 DO ITEMS BELOW IN ORDER LISTED . . . . . FOR DETAILS, GO TO 11. Verify that the retrieved Relative Signal Power for the channel being added is correct by comparing the report value with a value in Table A. — How to use Table A: The table lists the acceptable minimum Relative Signal Power values for OLS channels at installation. From the report, find the highest channel (it will be the only channel with a Relative Signal Power value of 100). Locate the row corresponding to this highest channel in Table A. Move across the table to the column corresponding to the newly installed channel and note the minimum value (installed properly if value is equal to or higher). A “--” in the table means that a reading of less than 100 indicates a bad channel. Table A – Values for Properly Installed Optical Channels High Chan Minimum RELSPR for Properly Installed Channel ch1 ch2 ch3 ch4 ch5 ch6 ch7 ch8 ch9 ch10 ch11 ch12 ch13 ch14 ch15 ch16 1 2 3 4 5 6 7 8 100 80 ------- 50 100 80 80 90 --90 40 50 100 70 80 90 90 80 30 40 60 100 70 80 80 70 30 40 50 60 100 80 80 70 20 30 40 50 60 100 70 60 20 30 40 50 50 60 100 60 30 30 40 50 60 70 80 100 80 -------- 60 70 90 ------ 50 60 70 80 90 --90 40 50 60 60 70 80 80 70 30 40 50 50 60 70 70 80 20 30 40 50 50 60 60 50 20 30 40 40 50 50 60 50 20 30 40 40 50 60 60 50 9 10 11 12 13 14 15 16 50 70 90 ------ 40 60 70 80 90 ---- 30 50 60 70 80 90 90 80 20 40 50 60 60 70 80 80 10 30 40 50 50 60 70 70 10 20 30 40 50 50 60 60 10 20 30 40 50 50 60 50 10 30 40 50 50 60 70 60 100 90 ------- 40 100 80 90 ----- 30 50 100 70 80 90 --- 20 40 50 100 70 80 90 80 20 30 40 50 100 70 80 70 10 30 40 40 50 100 60 60 10 20 30 40 50 50 100 50 10 20 30 40 50 50 60 100 DO ITEMS BELOW IN ORDER LISTED . . . . . FOR DETAILS, GO TO 12. Is the Relative Signal Power correct? If NO, then continue with Step 13. If YES, then continue with Step 25. — 365-575-536 Issue 1 March 2001 Circuit Order: NTP-004 Page 4 of 6 DO ITEMS BELOW IN ORDER LISTED . . . . FOR DETAILS, GO TO 13. Remove the incoming fiber jumper from the OMU OCHAN() IN port and remeasure the optical power coming from the LCT/OTU. DLP-500 14. Replace, if required, the lightguide buildout (LBO) in the OMU for this channel. DLP-512 15. Clean the LBO, port and incoming fiber jumper for this channel. DLP-510 16. Re-connect the incoming fiber jumper from the LCT/OTU to the OMU port. — 17. NOTE: The report is meaningful only for the end terminals with an OMU, and the data is only available when the channel signal is in the IS or OOS state. At the CIT, select PERFORMANCE-Retrieve-Relative_Signal_Power command and obtain a report. — 18. Verify that the retrieved Relative Signal Power for the channel being added is correct by comparing the report value with a value in Table A. — 19. Is the Relative Signal Power correct? — If NO, then continue with Step 20. If YES, then continue with Step 25. 20. Remove the incoming fiber jumper for the channel being added at the OMU and install protector caps on the fiber jumper and OMU port. — 21. At the CIT, select CONFIGURATION-UpdateSystem command and execute to update the equipment database. — 22. At the CIT, select PERFORMANCE-InitializeRegister-Optical_Line> command and execute to baseline certain optical parameters on the optical line. — NTP-004: Circuit Order Page 5 of 6 365-575-536 Issue 1 March 2001 DO ITEMS BELOW IN ORDER LISTED . . . . . FOR DETAILS, GO TO 23. Remotely login to each node (end terminal and repeaters) and repeat Steps 21 and 22. 24. Contact the appropriate maintenance support organization for further technical assistance. You have made two attempts to add an OCHAN and the relative signal power has been low both times. DLP-518 — At Receive End of Channel 25. NOTE: You will need assistance at the receive end or travel to that location. Remove the protector cap and clean the OCHAN() OUT port on the ODU for the channel being placed in service. 26. Clean the outgoing fiber jumper to the LCT/OTU and connect it to the OCHAN() OUT port of the ODU. 27. DLP-510 DLP-510 NOTE: Each OCHAN(1-16) has a different required power level. Determine the required LBO value for the RCVR IN connector of the LCT or IN connector of the OTU/OTPM. 28. Clean and install the LBOs as determined in Step 27. DLP-500 DLP-512 29. As required, connect the outgoing fiber jumper to the OCHAN() OUT port of the ODU and to the RCVR IN connector of the LCT or IN connector of the OTU. — 30. Repeat Steps 4 through 29 for the channel’s other direction of transmission. — 31. Close the cabinet doors or install the shelf cover. DLP-511 365-575-536 Issue 1 March 2001 Circuit Order: NTP-004 Page 6 of 6 DO ITEMS BELOW IN ORDER LISTED . . . . FOR DETAILS, GO TO 32. NOTE: The Line () number is the line on which this OCHAN() is being added. At the near-end terminal and using the CIT, select PERFORMANCE-Initialize-Register-Optical_Line command and execute. — 33. At the far-end terminal and using the CIT, select PERFORMANCE-Initialize-Register-Optical_Line command and execute. — 34. Does the optical line carrying the added channel have any repeaters? — If NO, then continue with Step 39. If YES, then continue with Step 35. 35. Initiate a login to an OLS repeater. 36. At the CIT, select PERFORMANCE-Initialize-Register-Optical_Line command and execute. 37. Terminate the login session with the remote OLS repeater. DLP-518 — DLP-518 38. Repeat Steps 35 through 37 or each remaining repeater in the OLS. — 39. The optical channel is now ready for service. — Circuit Order: NTP-004---+---TAD-100 |---DLP-500 |---DLP-501 |---DLP-510 |---DLP-511 |---DLP-512 |---DLP-518 NTP-005 : Circuit Order Page 1 of 2 365-575-536 Issue 1 March 2001 Delete Customer Maintenance Signal (CMS) from In-Service OLS DO ITEMS BELOW IN ORDER LISTED . . . . . FOR DETAILS, GO TO Overview: This procedure is used to delete a Customer Maintenance Signal (CMS) from an in-service Optical Line System(OLS). The procedure is written from the local elements perspective although action is required at the other OLS network elements. Required Test Equipment and Personnel: Craft Interface Terminal (CIT) Wrist Strap Technical assistance at the other network elements on the OLS. ! WARNING: Unterminated optical connectors may emit invisible laser radiation. Eye damage may occur if beam is viewed directly or with improper optical instruments. Avoid direct exposure to beam. ! CAUTION: Use a static ground wrist strap whenever handling circuit packs or working on an FT-2000 terminal to prevent electrostatic discharge damage to sensitive components. See “Electrostatic Discharge (ESD) Considerations” in Trouble Clearing: TAD-100. 1. Obtain the circuit order instructions and note which optical line is associated with the CMS to be Deleted. 2. Open the cabinet doors or remove the shelf cover. All connections can be accessed from the front. — DLP-511 365-575-536 Issue 1 March 2001 Circuit Order: NTP-005 Page 2 of 2 DO ITEMS BELOW IN ORDER LISTED . . . . FOR DETAILS, GO TO 3. 4. Connect the craft interface terminal (CIT) and log in to the local OLS network element. DLP-501 NOTE: Each OLS repeater contains two TLM circuit packs per optical line whereas an OLS end terminal contains one TLM circuit pack per optical line. The TLM circuit pack provides optical terminations for the customer maintenance (CM) signal. Locate and remove the appropriate optical connections from the CM IN and CM OUT ports on the TLM circuit pack as specified per the circuit order. DLP-503 5. Repeat Steps 1 through 4 for any remaining CMSs to be deleted in this cabinet or shelf. — 6. Close the cabinet door or install the shelf cover. 7. At the CIT, select CONFIGURATION-Update-System command to reflect the existing hardware and incoming signals in the system database. The port is now in the OOS-MA-AS state (use FAULT-Retrieve-State command to verify.) — 8. Repeat Steps 1 through 7 for the remaining network element(s) on the OLS. — 9. Wait until the NE ACTY LED goes off (approximately 5 minutes). — 10. This completes deleting a CMS from an existing OLS. If required to delete an optical channel or an optical line associated with this CMS, then refer to the appropriate circuit order procedure. Circuit Order: NTP-005---+---DLP-501 |---DLP-503 |---DLP-511 |---Circuit Order: NTP-006 |---Circuit Order: NTP-007 DLP-511 NTP-006 NTP-007 NTP-006 : Circuit Order Page 1 of 4 365-575-536 Issue 1 March 2001 Delete OCHAN() from In-Service OLS DO ITEMS BELOW IN ORDER LISTED . . . . . FOR DETAILS, GO TO Overview: This procedure provides a list of actions required to delete an optical channel from an in-service OLS. The optical fiber jumpers are removed first for the channel being deleted, then all network elements are updated and initialized. Required Test Equipment: Craft Interface Terminal (CIT) Wrist Strap ! CAUTION: Use a static ground wrist strap whenever handling circuit packs or working on an OLS end terminal to prevent electrostatic discharge damage to sensitive components. See "Electrostatic Discharge (ESD) Considerations" in Trouble Clearing: TAD-100. ! CAUTION: Use care in locating the optical line and assigned ports to avoid possible service interruption. ! CAUTION: DO NOT DELETE more than one channel at a time. When more than one optical channel is deleted simultaneously, degradation of the other in-service channels is likely to occur. 1. Obtain the circuit order instructions to delete an optical channel and note the associated optical line and assigned channels. The channel is assumed to be bidirectional. — 365-575-536 Issue 1 March 2001 Circuit Order: NTP-006 Page 2 of 4 DO ITEMS BELOW IN ORDER LISTED . . . . FOR DETAILS, GO TO At the (Near End) Terminal 2. Open the cabinet doors or remove the shelf cover. All connections can be accessed from the front. DLP-511 3. Locate the specific channel to be deleted at the OMU and ODU (optical fiber pair). DLP-503 4. Connect the CIT and log in. DLP-501 5. At the CIT, select FAULT-Retrieve-Alarm-Network command to obtain a report. — 6. From the report, verify that there are no system alarms other than those on the channel being deleted. Clear any other system or channel alarms before proceeding. — 7. Disconnect the incoming optical fiber to the OMU OCHAN() IN connector for the channel being deleted from service on the optical line(s) specified in the circuit order instructions. — 8. Place protector caps over the end of the incoming optical fiber and over the OMU OCHAN() IN connector. — 9. Disconnect the outgoing optical fiber from the ODU OCHAN() OUT connector for the channel being deleted from service on the optical line(s) specified in the circuit order instructions. — 10. Place protector caps over the end of the outgoing optical fiber and over the ODU OCHAN() OUT connector. — At The (Far End) End Terminal 11. NOTE: You may travel to the other end terminal or obtain assistance at that terminal. — Repeat Steps 1 through 10 at the other end terminal (far end). 12. At the CIT, select CONFIGURATION-Update-System command and execute to update the equipment database. — NTP-006: Circuit Order Page 3 of 4 365-575-536 Issue 1 March 2001 DO ITEMS BELOW IN ORDER LISTED . . . . . FOR DETAILS, GO TO 13. At the CIT, select PERFORMANCE-Initialize-Register-Optical_Line command and execute to baseline certain optical parameters on the optical line. — 14. Verify that the slot address indicates that the OCHAN() was not inadvertently left in the OOS state (use the FAULT-Retrieve-State command). — 15. — NOTE: Steps 12, 13, and 14 must be performed at both end terminals. Repeat Steps 12 through 14 at the far end (end terminal). 16. Does the optical line carrying the deleted channel have any repeaters? — If NO, then continue with Step 22. If YES, then continue with Step 17. 17. Initiate a login to the OLS repeater. DLP-518 18. At the CIT, select CONFIGURATION-Update-System command and execute to update the equipment database. — 19. At the CIT, select PERFORMANCE-Initialize-Register-Optical_Line command and execute to baseline certain optical parameters on the optical line. — 20. Terminate the login session with the repeater. DLP-518 21. Repeat Steps 17 through 20 for any remaining repeaters in the OLS. — 22. At the CIT, select FAULT-Retrieve-Alarm-Network command to obtain a report. — 365-575-536 Issue 1 March 2001 Circuit Order: NTP-006 Page 4 of 4 DO ITEMS BELOW IN ORDER LISTED . . . . FOR DETAILS, GO TO 23. From the report, verify that there are no system alarms. 24. Close the cabinet doors or install the shelf cover. 25. The optical channel has been deleted from service. Circuit Order: NTP-006---+---TAD-100 |---DLP-501 |---DLP-503 |---DLP-511 |---DLP-512 |---DLP-518 — DLP-511 — NTP-007 : Circuit Order Page 1 of 2 365-575-536 Issue 1 March 2001 Delete Optical Line from In-Service OLS DO ITEMS BELOW IN ORDER LISTED . . . . . FOR DETAILS, GO TO Overview: This procedure applies to the OLS end terminals and to any and all OLS repeaters when deleting an optical line(s). Required Test Equipment: Craft Interface Terminal (CIT) Wrist Strap ! CAUTION: Use a static ground wrist strap whenever handling circuit packs or working on an OLS network element to prevent electrostatic discharge damage to sensitive components. See "Electrostatic Discharge (ESD) Considerations" in Trouble Clearing: TAD-100. 1. Obtain the circuit order instructions to delete an optical line(s) from an in-service OLS and note the assigned line number(s) and associated CPs. DLP-503 At The (Near End) End Terminal 2. Open the cabinet doors or remove the shelf cover. All connections can be accessed from the front. DLP-511 3. Connect the craft interface terminal (CIT) and log in to the OLS network element. 4. Remove the optical fibers from the TLM circuit pack(s) for the optical line being deleted from service. — 5. Remove the OA fibers from the shelf guide below. — 6. Disengage the OA circuit pack(s) from the shelf. — DLP501 365-575-536 Issue 1 March 2001 Circuit Order: NTP-007 Page 2 of 2 DO ITEMS BELOW IN ORDER LISTED . . . . FOR DETAILS, GO TO 7. Remove the optical fibers from the OA circuit pack(s) for the optical line being deleted from service. — 8. If required, remove any LBO from the circuit packs for future use. DLP-512 9. Place protector caps over the end of the optical fibers and plugs in LBOs and the IN/OUT connectors of the OMU/ODU, OA, and TLM circuit packs — 10. As required, remove any remaining fibers going to/coming from the OA circuit pack. — 11. Remove circuit packs in shelf 1 (for lines 1 and 2) or shelf 2 (for lines 3 and 4) for the deleted optical line per the circuit order instructions. DLP-514 12. At the CIT, select the FAULT-Retrieve-Condition-All command and execute. — 13. From the report, verify that any and all alarms are associated with the line being deleted. If any alarms are associated with an in-service line, clear the in-service alarm first before proceeding. — 14. At the CIT, select the CONFIGURATION-Update-System command and execute. — 15. Repeat Steps 4 through 14 for each optical line being deleted from this shelf. — 16. Disconnect the craft interface terminal (CIT) from the OLS network element, if required. — 17. Close the cabinet doors or install the shelf cover. DLP-511 18. Repeat Steps 2 through 17 for the next OLS network element where the optical line is being deleted. — 19. An optical line(s) has been deleted from service. — Circuit Order: NTP-004---+---TAD-100 |---DLP-501 |---DLP-503 |---DLP-511 |---DLP-512 |---DLP-514 NTP-008 : Circuit Order Page 1 of 2 365-575-536 Issue 1 March 2001 Add Optical Translator Unit (OTU) for Service DO ITEMS BELOW IN ORDER LISTED . . . . . FOR DETAILS, GO TO Overview: This procedure adds an optical translator unit (OTU) to an in-service Optical Translator (OT) and may require action at an Optical Line System end terminal in determining the lightguide buildout values. Required Test Equipment: Wrist Strap Optical Power Set or Equivalent ! CAUTION: Use a static ground wrist strap whenever handling circuit packs, units, or working on an OT to prevent electrostatic discharge damage to sensitive components. See "Electrostatic Discharge (ESD) Considerations" in Trouble Clearing: TAD-100. 1. Obtain the circuit order instructions to add an OTU circuit pack. — 2. Open the cabinet doors or remove the shelf cover. All connections can be accessed from the front. DLP-511 3. Locate the assigned slot of the OTU circuit pack being added. DLP-503 4. Install an OTU circuit pack (includes LBOs and connecting fibers) into the assigned slot. DLP-514 5. Is the OTU FAULT LED on continuously? — If YES, then go to TAP-102. If NO, then continue with Step 6. 6. As required, repeat Steps 3 through 5 for the other direction of transmission. 7. Close the cabinet doors or install the shelf cover, as required. — DLP-511 365-575-536 Issue 1 March 2001 Circuit Order: NTP-008 Page 2 of 2 DO ITEMS BELOW IN ORDER LISTED . . . . FOR DETAILS, GO TO 8. The optical translator unit is now ready for service. Circuit Order: NTP-008---+---TAD-100 |---TAP-148 |---DLP-503 |---DLP-511 |---DLP-514 — NTP-009 : Circuit Order Page 1 of 2 365-575-536 Issue 1 March 2001 Delete Optical Translator Unit (OTU) or Optical Translator Port Module (OTPM) from Service DO ITEMS BELOW IN ORDER LISTED . . . . . FOR DETAILS, GO TO Overview: This procedure removes an optical translator unit (OTU) or optical translator port module (OTPM) from an Optical Translator (OT) that is in service. Required Test Equipment: Wrist Strap ! CAUTION: Use a static ground wrist strap whenever handling units, circuit packs or working on an OT to prevent electrostatic discharge damage to sensitive components. See "Electrostatic Discharge (ESD) Considerations" in Trouble Clearing: TAD-100. ! CAUTION: Use care in locating the OTU or OTPM and assigned slots to avoid possible service interruption. 1. Obtain the circuit order instructions to delete an OTU or OTPM and note the assigned slots or ports. 2. Open the cabinet doors or remove the shelf cover. All connections can be accessed from the front. DLP-511 3. Locate the specific slot of the OTU or OTPM being deleted. DLP-503 4. Disconnect the optical fibers at the OTU or OTPM. DLP-525 5. If required, remove the Lightguide Buildout (LBO) and insert plugs at the OTU or OTPM. DLP-512 6. Is the OTU or OTPM to remain in the shelf? If NO, then continue with Step 8. If YES, then continue with Step 7. — — 365-575-536 Issue 1 March 2001 Circuit Order: NTP-009 Page 2 of 2 DO ITEMS BELOW IN ORDER LISTED . . . . FOR DETAILS, GO TO 7. Disengage the OTU or OTPM from the shelf and then go to Step 9. For an OTU to remain in the shelf, close the latches and gentle slide the OTU back in until it touches the shelf. For an OTPM to remain in the shelf, slide it out about 1/2 inch. 8. Remove the OTU or OTPM from the shelf. 9. As required, repeat Steps 2 through 8 for the other direction of transmission. 10. For Release 3.0.1 and higher. At the CIT, select the — DLP-514 — — CONFIGURATION-Update-System command and execute. 11. Close the cabinet doors or install the shelf cover, as required. 12. The OTU or OTPM has been deleted from service Circuit Order: NTP-009---+---TAD-100 |---DLP-503 |---DLP-511 |---DLP-512 |---DLP-514 |---DLP-525 DLP-511 — NTP-010 : Circuit Order Page 1 of 2 365-575-536 Issue 1 March 2001 Add Quad Optical Translator Unit (QOTU) for Service DO ITEMS BELOW IN ORDER LISTED . . . . . FOR DETAILS, GO TO Overview: This procedure adds a quad optical translator unit (QOTU) to an in-service Optical Translator (OT). Required Test Equipment: Wrist Strap ! CAUTION: Use a static ground wrist strap whenever handling circuit packs, units, or working on an OT to prevent electrostatic discharge damage to sensitive components. See "Electrostatic Discharge (ESD) Considerations" in Trouble Clearing: TAD-100. 1. Obtain the circuit order instructions to add a QOTU. 2. Open the cabinet doors or remove the shelf cover. All connections can be accessed from the front. DLP-511 3. Locate the assigned slots (pair) of the QOTU being added. DLP-503 4. — NOTE: The QOTU must be installed so that it accesses the even-numbered connector on the shelf (OT slot pair). Install the QOTU into the assigned slot pair. 5. Is the QOTU FAULT LED on continuously? If YES, then go to TAP-102. If NO, then continue with Step 6. DLP-514 — 365-575-536 Issue 1 March 2001 Circuit Order: NTP-010 Page 2 of 2 DO ITEMS BELOW IN ORDER LISTED . . . . FOR DETAILS, GO TO 6. Is the QOTU to be equipped with an OTPM at this time. — If YES, then go to Circuit Order: NTP-011. If NO, then continue with Step 7. 7. Close the cabinet doors or install the shelf cover, as required. 8. The QOTU is now ready for service. Circuit Order: NTP-010---+---TAD-100 |---TAP-102 |---Circuit Order: NTP-011 |---DLP-503 |---DLP-511 |---DLP-514 DLP-511 — NTP-011 : Circuit Order Page 1 of 2 365-575-536 Issue 1 March 2001 Add Optical Translator Port Module (OTPM) for Service DO ITEMS BELOW IN ORDER LISTED . . . . . FOR DETAILS, GO TO Overview: This procedure adds an optical translator port module (OTPM) to an in-service quad optical translator unit (QOTU) and may require action at an Optical Line System end terminal in determining the lightguide buildout values. Required Test Equipment: Wrist Strap Optical Power Set or Equivalent ! CAUTION: Use a static ground wrist strap whenever handling circuit packs, units, or working on an OT to prevent electrostatic discharge damage to sensitive components. See "Electrostatic Discharge (ESD) Considerations" in Trouble Clearing: TAD-100. 1. Obtain the circuit order instructions to add an OTPM. 2. Open the cabinet doors or remove the shelf cover. All connections can be accessed from the front. DLP-511 3. Locate the assigned QOTU and port number (of the OTPM being added.) DLP-503 4. Install the OTPM circuit pack (includes LBOs and connecting fibers) into the assigned port of the QOTU. DLP-514 5. Is the OTPM FAULT LED on continuously? If YES, then go to TAP-102. If NO, then continue with Step 6. — — 365-575-536 Issue 1 March 2001 Circuit Order: NTP-011 Page 2 of 2 DO ITEMS BELOW IN ORDER LISTED . . . . FOR DETAILS, GO TO 6. As required, repeat Steps 3 through 7 for the other direction of transmission. 7. Close the cabinet doors or install the shelf cover, as required. 8. The OTPM circuit pack is now ready for service. Circuit Order: NTP-011---+---TAD-100 |---TAP-148 |---DLP-503 |---DLP-511 |---DLP-514 — DLP-511 — NTP-012 : Circuit Order Page 1 of 2 365-575-536 Issue 1 March 2001 Delete Quad Optical Translator Unit (QOTU) from Service DO ITEMS BELOW IN ORDER LISTED . . . . . FOR DETAILS, GO TO Overview: This procedure removes a quad optical translator unit (QOTU) from an Optical Translator (OT) that is in service. Required Test Equipment: Wrist Strap ! CAUTION: Use a static ground wrist strap whenever handling units, circuit packs or working on an OT to prevent electrostatic discharge damage to sensitive components. See "Electrostatic Discharge (ESD) Considerations" in Trouble Clearing: TAD-100. ! CAUTION: Use care in locating the QOTU and assigned slots to avoid possible service interruption. ! CAUTION: All service must be removed from the QOTU (equipped with OTPMs) before it is deleted from the OT or service interruptions will occur. 1. Obtain the circuit order instructions to delete a QOTU and note the assigned slots. 2. Open the cabinet doors or remove the shelf cover. All connections can be accessed from the front. DLP-511 3. Locate the specific slot of the QOTU being deleted. DLP-503 4. Is the QOTU to remain in the shelf? If NO, then continue with Step 6. If YES, then continue with Step 5 — — 365-575-536 Issue 1 March 2001 Circuit Order: NTP-012 Page 2 of 2 DO ITEMS BELOW IN ORDER LISTED . . . . FOR DETAILS, GO TO 5. Disengage the QOTU from the shelf, close the latches and gently slide the QOTU back in until it touches the shelf, and then go to Step 7. 6. Remove the QOTU from the shelf. 7. For Release 3 and higher. At the CIT, select the CONFIGURATION-Update-System command and execute. — 8. Close the cabinet doors or install the shelf cover, as required. DLP-511 9. The QOTU circuit pack has been deleted from service. Circuit Order: NTP-012---+---TAD-100 |---DLP-503 |---DLP-511 |---DLP-514 — DLP-514 — 365-575-536 Issue 1 March 2001 Circuit Order: NTP-012 Page 4 of 2 365-575-536 Issue 1 March 2001 Operations: IXL-001 Page 1 of 2 Operation Task Index FIND YOUR JOB IN THE LIST BELOW . . . . . THEN GO TO Change, Delete, or Enter a User's Login . . . . . . . . . . . . . . . . . . . . . . . . . . DLP-519 Copy Software from One Network Element to Another Network Element . . . . . . . . . . . . . . . . . Operation: NTP-003 Establish Modem or Datakit Network Access . . . . . . . . . . . . . . . . . . . . . . . . . DLP-520 Initiate or Terminate Login Session to a Remote Network Element Using CenterLink . . . . . . . . . . . . . . . . . . . . . . . . . . . . . . . . . . . . . . DLP-518 Install Software (Initial Installation/Upgrade/Change) into CIT and OLS Network Element . . . . . . . . . . . . . . . . . . Operation: NTP-002 Introduction to the PC . . . . . . . . . . . . . . . . . . . . . . . . . . . . . . . . . . . . . . . . DLP-516 Remove and/or Install OMU or ODU DLP-521 IXL-001: Operations Page 2 of 2 365-575-536 Issue 1 March 2001 NTP-002 : Operations Page 1 of 2 365-575-536 Issue 1 March 2001 Install Software (Initial Installation/Upgrade/Change) into CIT and Optical Line System Network Element DO ITEMS BELOW IN ORDER LISTED . . . . . FOR DETAILS, GO TO Required Test Equipment: Craft Interface Terminal (CIT) Wrist Strap ! CAUTION: When installing software, the CIT-PC software must be the same release or a higher release than the software currently running in the OLS network element. NOTE: The CenterLink CIT software is available on a CD-ROM . NOTE: For a general description on using a personal computer (PC) in the following procedures, refer to DLP-516. 1. Verify that the software package consists of a CD-ROM and the documentation as listed in Table A. — Table A – Optical Line System (End Terminal and Repeater) OLS Software Release Description R3.4 software for Initial Installation R3.4 software for Upgrade R3.4 software (spare) 2. Comcodes: 109069161 (SRD) 109069146 (CD-ROM) 109069286 (CD-ROM) 109069153 (CD-ROM) Refer to and perform the software download procedure (initial installation/ upgrade/change) per the software release description. — 365-575-536 Issue 1 March 2001 Operations: NTP-002 Page 2 of 2 365-575-536 Issue 1 March 2001 Operations: NTP-003 Page 1 of 2 Copy Software from One Network Element to Another Network Element DO ITEMS BELOW IN ORDER LISTED . . . . FOR DETAILS, GO TO Overview: This procedure is used to copy the software in one OLS network element to another OLS network element through the data communications channel (DCC) residing in the supervisory signal. All of the OLS network elements must be running the same software release. This procedure can be accomplished while the OLS is in service. Required Test Equipment: Craft Interface Terminal (CIT) Wrist Strap NOTE: For a general description on using a personal computer in the following procedure, refer to DLP-516. 1. If required, connect the craft interface terminal (CIT) to the local OLS network element and condition it. 2. Log in to the NE using the CIT. — 3. Verify that there are no active alarms or status conditions by selecting the FAULT-Retrieve-Condition-All. Review — the report and clear any conditions before proceeding with this procedure. DLP-501 NTP-003: Operations Page 2 of 2 365-575-536 Issue 1 March 2001 DO ITEMS BELOW IN ORDER LISTED . . . . . FOR DETAILS, GO TO 4. At the CIT, select — CONFIGURATION-Retrieve-Map-Network command to obtain the Network Map Report and verify the DCC status is good. An example of this report with a description of the output parameters is provided in Section 11 of this manual. 5. Refer to Table A for the Software Release Description (SRD) and perform the remote (DCC) download procedure. The SRD is shipped with the software. Table A – Optical Line System (End Terminal and Repeater) OLS Comcodes: Software Release Description R3.4 software for Initial Installation 109069161 (SRD) 109069146 (CD-ROM) R3.4 software for Upgrade R3.4 software (spare) 109069286 (CD-ROM) 109069153 (CD-ROM) Operation: NTP-003---+---DLP-501 |---DLP-516 — 365-575-536 Issue 1 March 2001 Trouble Clearing: IXL-001 Page 1 of 1 Trouble Clearing Task Index Clear Local Office Alarm When NE ACTY and FE ACTY LEDs Are Off . . TAP-136 Clear NE ACTY and FE ACTY LEDs (Regardless of Alarm Level) . . . . . TAP-101 Clear No TL1 Response After System Reset (When No Cable Connection Between DTE and External Equipment) . . . . . . . . . . . . . . . . . . . . . . . . . TAP-115 Clear Trouble in CIT (CIT Does Not Respond to Commands) . . . . . . . . . TAP-128 Clear Trouble Report . . . . . . . . . . . . . . . . . . . . . . . . . . . . . . . . . . . . . . . . TAP-104 Restore Network Element Operation After Power Loss . . . . . . . . . . . . . . . TAP-130 Technical Assistance . . . . . . . . . . . . . . . . . . . . . . . . . . . . . . . . . . . . . . . . . TAD-100 IXL-001: Trouble Clearing Page 2 of 2 365-575-536 Issue 1 March 2001 TAD-100 : Trouble Clearing Page 1 of 4 365-575-536 Issue 1 March 2001 Technical Assistance Overview: Technical assistance is built on gathering Optical Line System (OLS) information. A local visual inspection of the equipment may be made, but most internal hardware problems are detected and corrected using the craft interface terminal (CIT). A CIT is used to obtain detailed information on the Optical Line System. The CIT retrieves detailed reports about performance monitoring, alarms and status, and configurations for the local and remote OLS network elements. Trouble Analysis Procedures The trouble analysis procedures in this document involve replacing faulty circuit packs and obtaining performance reports and/or alarm and status reports for analysis to determine the status of the OLS. If a trouble cannot be corrected, the procedures direct the technician to obtain help. This means that the trouble is of a nature that requires local maintenance engineering or a higher level technical assistance. CTAM Assistance The technician must make the decision regarding trouble analysis, corrective action, and obtaining assistance. The technician and the local technical support staff may choose to continue trouble analysis based on their knowledge or experience with the OLS, or they may elect to obtain assistance by calling the Customer Technical Assistance Manager 1-800-225-4672 in accordance with local procedures. Global Technical Support Information Platform The Global Technical Support Information Platform (GTSIP) is used to record customer requests for various OLS products. Customers, utilizing several web-based applications, can search for and request data. Customers must contact the Customer Technical Assistance Management/Virtual Call Center at 1-800-225-4672 to obtain a Web Access login. The customer web-based applications are as follows: 365-575-536 Issue 1 March 2001 Trouble Clearing: TAD-100 Page 2 of 4 Bulletin Board The Bulletin board is used to display and search entries for information and notifications for OLS products. A search can be initiated using various fileds such as: Bulletin Board Number, product, created date, subject, and text. Diagnostic Dictionary The Diagnostic Dictionary is used to display and search for known problems and solutions for OLS products. A search can be initiated using various fields such as: Diagnostic Dictioonary Number, product, created date, description, or solution. This data may be useful in diagnosing, correcting, or avoiding an OLS problem. Urgent Problem Notification The Urgent Problem Notification (UPN) application is used to display and search for information regarding OLS products that have a critical issue that requires immediate availability to customers. A detailed description of the critical issue, with current status, and final resolution, is provided. A search can be initiated using various fields such as: UPN Number, product, created date, subject, or description. Circuit Pack Failures Circuit pack failures are identified by LEDs and reported by OLS network alarms and reports. Before replacing a circuit pack, look for and replace any damaged fiber and/or LBO connectors. Circuit packs are replaced in a specified sequence, but only one circuit pack is replaced at a time. If trouble is not cleared after replacing a circuit pack, the original circuit pack should be reinstalled. This reduces the chances of returning nondefective circuit packs for repair. Electrostatic Discharge (ESD) Considerations Any integrated circuit on a circuit pack can be damaged by static electricity that builds up within a work area, particularly in areas with low relative humidity. This static buildup on work surfaces and on personnel and their clothing is produced by the various charging effects of even simple movements and by contact between various objects. As a rule, the greatest potential for electrostatic damage occurs in areas with the lowest relative humidity. But, because such damage can occur anywhere, all personnel handling circuit packs should take the following precautions: TAD-100: Trouble Clearing Page 3 of 4 365-575-536 Issue 1 March 2001 1. Since materials such as food wrappers, plastics, and Styrofoam containers tend to generate static electricity, keep them away from all circuit packs. 2. Be sure to read all warning labels on bags and cartons before opening any packaging. 3. If possible, open all circuit packs at a static-safe work position using properly grounded wrist straps and table mats that can dissipate static electricity. 4. Whenever possible, wait to remove circuit packs from their protective antistatic packaging until it is time to insert them into a shelf. 5. Never touch a circuit pack’s components, conductors, or connector pins. Handle all circuit packs only by the faceplate or latch or by the top and bottom outermost edges. 6. When handling circuit packs (storing, installing, removing, etc.) or when working on backplanes, always wear a grounded wrist strap or wear a heel strap and stand on a grounded, static-dissipating floor mat. 7. Always store and transport circuit packs in static-safe packages. (Shielding is not required unless specified.) 8. When removing a circuit pack from the shelf, immediately put it into a static-safe package. 9. Try to keep relative humidity above 20 percent. 10. OLS network elements are equipped with grounding jacks for connecting the static ground wrist strap. The jacks are located on the user panel and on the filter panel. 11. Keep the electromagnetic interference (EMI)/ESD protective front shelf covers closed at all times. Close the cover immediately after a maintenance procedure such as replacing a circuit pack. 365-575-536 Issue 1 March 2001 Trouble Clearing: TAD-100 Page 4 of 4 365-575-536 Issue 1 March 2001 Trouble Clearing TAP-101 Page 1 of 3 Clear NE ACTY and/or FE ACTY (Regardless of Alarm Level) Overview: This procedure directs the technician to either the local OLS network element or to a remote OLS network element based on one or more conditions indicated by a lighted NE ACTY and/or FE ACTY LED(s) at the indicator strip (or user panel). (These conditions may or may not be accompanied by an alarm.) 1. Are both (NE ACTY and FE ACTY LEDs) lighted at the local indicator strip (or user panel)? If YES, then continue with Step 4. If NO, then continue with Step 2. 2. Is the NE ACTY LED lighted on the user panel? If YES, then go to TAP-102 (the trouble to be cleared is at the local OLS network element). If NO, then continue with Step 10. 3. STOP! YOU HAVE COMPLETED THIS PROCEDURE. 4. Is the CIT conditioned and connected to the local OLS network element? If YES, then continue with Step 5. If NO, then complete DLP-501 and return to this procedure. 5. At the CIT, select FAULT-Retrieve-Condition-All to obtain a report (an example is shown in Chapter 11 of this manual.) 6. Are there any local failures? If NO, then continue with Step 7. If YES, then go to TAP-102. 7. At the CIT, select FAULT-Retrieve-Alarm-Network to obtain a report (an example is shown in Chapter 11 of this manual.) TAP-101: Trouble Clearing Page 2 of 3 8. < 365-575-536 Issue 1 March 2001 NOTE: If the local TID appears in the report and is among the group of entries with the highest alarm level, the trouble condition is first cleared at the local network element before proceeding with trouble clearing at another network element. Is the local OLS network element (TID) in the group with the highest alarm level? If YES, then go to TAP-102 (the trouble to be cleared is at the local OLS network element). If NO, then continue with Step 10. 9. STOP! YOU HAVE COMPLETED THIS PROCEDURE. 10. Are you responsible for maintaining the remote OLS network element as well as the local OLS network element? If YES, then continue with Step 14. If NO, then continue with Step 11. 11. At the CIT, select FAULT-Retrieve-Alarm-Network to obtain a report (an example is shown in Chapter 11 of this manual.) 12. NOTE: The condition to be cleared is at a remote OLS network element. Referring to the topmost entry in the report, issue a Trouble Report to the remote OLS network element by using the TID in the TID column. 13. STOP! YOU HAVE COMPLETED THIS PROCEDURE. 14. NOTE: The trouble clearing process begins at a remote OLS network element. Remember, when the following procedures refer to the local CIT, that it is really logged in to a remote network element and that any corrective action will apply to the remote OLS network element. Initiate a login session with the remote network element. 15. Were you able to log in to the remote OLS network element? If YES, then continue with Step 16. If NO, then continue with Step 18. 365-575-536 Issue 1 March 2001 16. Trouble Clearing TAP-101 Page 3 of 4 NOTE: You may require assistance at the remote OLS network element to replace a circuit pack(s) or to observe LEDs. NOTE: Trouble clearing begins with the topmost entry in the report. Clear the particular condition at the remote OLS network element. Reference: TAP-102 17. STOP! YOU HAVE COMPLETED THIS PROCEDURE. 18. You must travel to the remote OLS network element location or obtain assistance at the remote OLS network element location to clear the trouble. 19. STOP! YOU HAVE COMPLETED THIS PROCEDURE. TAP-101: Trouble Clearing Page 4 of 3 365-575-536 Issue 1 March 2001 TAP-102 : Trouble Clearing Page 1 of 4 365-575-536 Issue 1 March 2001 Clear Trouble Using Craft Interface Terminal (CIT) Overview: This procedure is used to clear the conditions listed in the FAULT.Retrieve.Condition.All report in the order listed, from top to bottom, regardless of the indicated alarm severity, date, or time. NOTE: If at any time during the following procedure you observe that the PWR ON light emitting diode (LED) on the addressed shelf is not lit, go to TAP-119 to restore power to the shelf. 1. Is the CIT conditioned and connected to the OLS network element? If YES, then continue with Step 2. If NO, then complete DLP-501 and return to this procedure. 2. 3. At the CIT, select FAULT-Retrieve-Condition-All to obtain a report. NOTE: The report shown below is an example that shows several entries. There may be only one entry in the actual report. Record the information in the AID and the CONDDSCR columns for the topmost entry in the report. 4. Was env-(1-144) or cont-(1-36), the AID recorded in Step 3? If YES, then go to TAP-107. If NO, then continue with Step 5. 5. Find the CONDDSCR information that was recorded in Step 3 in Table A and go to the referenced TAP. 365-575-536 Issue 1 March 2001 Trouble Clearing: TAP-102 Page 2 of 4 FAULT.Retrieve.Condition.All Report Table A - Trouble Conditions CONDDESCR Go To TAP APSD active - FE APSD active - NE CP reset in progress CP (unknown type) failure CP unknown type) removed CPYPGM:IP tid DCC APS data error DCC startup in progress TAP-154 TAP-155 TAP-121 TAP-123 TAP-122 TAP-117 TAP-103 TAP-129 TAP-102: Trouble Clearing Page 3 of 4 365-575-536 Issue 1 March 2001 Table A - Trouble Conditions CONDDESCR different OA types in side DS-NE not reachable duplicate TID defined fuse/power failure A fuse/power/failure B fuse/power failure A and B incoming CMS LOF incoming CMS LOS incoming CMS SD incoming CMS SF incoming (from Supr) DCC failure incoming GbE-1 failure incoming LSBB failure incoming OC 12 failure incoming OC3 failure incoming OC-48 failure incoming optical channel LOS incoming optical line LOS incoming STM1 failure incoming STM4 failure incoming STM16 failure incoming supr chnl fail incoming supr chnl SD incoming supr chnl SF inconsistent OPTM association inconsistent OTU association inhibit alarms-office alarms inhibit alarms-parallel telem inhibit alarms-X.25 j0 mismatch logins inhibited Go To TAP TAP-140 TAP-137 TAP-138 TAP-119 TAP-119 TAP-119 TAP-110 TAP-110 TAP-110 TAP-110 TAP-120 TAP-152 TAP-152 TAP-152 TAP-152 TAP-152 TAP-110 TAP-110 TAP-152 TAP-152 TAP-152 TAP-110 TAP-110 TAP-110 TAP-148 TAP-148 TAP-114 TAP-114 TAP-114 TAP-156 TAP-114 Continued on Next Page 365-575-536 Issue 1 March 2001 Trouble Clearing: TAP-102 Page 4 of 4 Table A - Trouble Conditions CONDDESCR Go To TAP multiple DS-NEs defined NE status comm failure OA equipage inconsistent with mode OA failure OA output disabled OA removed ODU warmup in progress OMU/ODU mismatch or missing opr/prov mode inconsistent optical line ID mismatch optical line reset in progress OTCL failure OTCL removed OTPM failure OTPM removed OTPM unknown OTU failure OTU removed QOTC failure QOTC removed reset in progress SER TLM 1 port failure software download in progress SYSCTL failure SYSMEM failure SYSMEM removed SYSMEM/SYSCTL code mismatch SYSMEM unrecognizable code system incomplete system startup in progress test alarm in progress test auto turnup in progress test telemetry in progress TID address map full TL-1 link failure TLM failure TLM removed TOHCTL failure TOHCTL removed unexpected CP type unexpected OTPM type TAP-135 TAP-118 TAP-141 TAP-111 TAP-157 TAP-112 TAP-144 TAP-105 TAP-142 TAP-109 TAP-145 TAP-111 TAP-112 TAP-111 TAP-112 TAP-123 TAP-111 TAP-112 TAP-111 TAP-112 TAP-124 TAP-139 TAP-131 TAP-113 TAP-113 TAP-133 TAP-126 TAP-125 TAP-134 TAP-132 TAP-114 TAP-114 TAP-114 TAP-158 TAP-106 TAP-111 TAP-112 TAP-111 TAP-112 TAP-127 TAP-127 TAP-103 : Trouble Clearing Page 1 of 2 365-575-536 Issue 1 March 2001 Clear `DCC APS Data Error' 1. NOTE: This condition applies only to the supervisory channel of optical line 2. NOTE: The APS channel (K1 and K2) on the optical line 2 supervisory overhead will be used to control the DCC protection switching. The DCC protection switching is revertive, bidirectional 1X1 switching. Determine the location of the transmit TLM circuit pack for optical line 2. Reference: DLP-503 2. Replace the transmit TLM circuit pack. Reference: DLP-514 3. Wait 5 minutes for the OLS diagnostics to stabilize. After this time, the DCC APS data error condition should be cleared. 4. Obtain another FAULT-Retrieve-Condition-All. Has the condition cleared? If NO, then continue with Step 5. If YES, then STOP! YOU HAVE COMPLETED THIS PROCEDURE. 5. NOTE: Assistance may be required at the receive end of optical line 2 or travel to that location. Repeat Steps 1 through 3 except for the receive TLM circuit pack. 6. Obtain another FAULT-Retrieve-Condition-All. Has the condition cleared? If NO, then call for technical assistance in the next level of trouble clearing. If YES, then STOP! YOU HAVE COMPLETED THIS PROCEDURE. 365-575-536 Issue 1 March 2001 Trouble Clearing: TAP-103 Page 2 of 2 365-575-536 Issue 1 March 2001 Trouble Clearing: TAP-104 Page 1 of 4 Clear Trouble Report Overview: This procedure is used to clear a Trouble Report that was received from a remote location. The remote location is receiving a bad signal or other condition from this local OLS network element. 1. Is the NE ACTY LED lighted on the user panel? If YES, then continue with Step 4. If NO, then continue with Step 2. 2. Test the LEDs at the local user panel or indicator strip as follows: At the CIT, select FAULT-Test-Led:All command, and then execute. 3. Did all the LEDs light? If YES, then continue with Step 4. If NO, then go to TAP-108. 4. At the CIT, select FAULT-Retrieve-Condition-All and obtain a report. 5. Are any alarm or status conditions indicated on the report? If YES, then go to TAP-102. If NO, then continue with Step 6. 6. Does the Trouble Report (received) relate to more than one of the OLS outputs? If YES, then continue with Step 7. If NO, then continue with Step 9. 7. NOTE: The trouble is less likely to be in the outgoing cables than in the internal cable between the receive OA identified in Table A and the ODU. Make a visual inspection of the cable between the receive OA and the ODU, and correct any problem(s) found. Reference: DLP-517 TAP-104: Trouble Clearing Page 2 of 4 8. 365-575-536 Issue 1 March 2001 Was a problem found with the cable? If YES, then continue with Step 19. If NO, then continue with Step 9. 9. Make a visual inspection of ALL outgoing cable(s) and connection(s) and correct any problem(s) found. Reference: DLP-517 10. Was a problem(s) found with the outgoing cable(s) or connection(s). If YES, then continue with Step 19. If NO, then continue with Step 11. 11. Replace the local transmit circuit pack as indicated from the Trouble Report and Table A. Reference: DLP-514 12. Contact office that issued Trouble Report and determine if the trouble has cleared? If YES, then STOP! YOU HAVE COMPLETED THIS PROCEDURE. If NO, then continue with Step 13. 13. Remove the replacement circuit pack (installed in Step 11) and reinstall the original circuit pack. Reference: DLP-514 14. NOTE: There is a remote possibility that an incoming optical channel LOS condition at the tail-end OA can be associated with an unreported drop in the level of the incoming optical channel at the head-end OA. Was the condition that sent you here an incoming optical channel LOS condition at the tail-end OA? If YES, then continue with Step 15. If NO, then continue with Step 17. 15. Use TAP-110 to trouble shoot the head-end OA as if there were an active incoming optical channel LOS condition at that NE. For example, when TAP-110 asks if the incoming optical channel LOS condition has cleared you will check to see if that condition has cleared at the tail-end OA. 365-575-536 Issue 1 March 2001 Trouble Clearing: TAP-104 Page 3 of 4 16. STOP! YOU HAVE COMPLETED THIS PROCEDURE. 17. Return a NO TROUBLE FOUND conclusion to the report (no active local alarms or visual problems). 18. NOTE: OC-48 and/or OC-3 optical lines can be tested by using optical line meters and/or optical time domain reflectometers (OTDR) to help locate a fiber bend or cut. Refer to local operating procedures for further guidance in addressing this condition. 19. STOP! YOU HAVE COMPLETED THIS PROCEDURE. 20. Contact office that issued Trouble Report and notify them that a cable problem was found and corrected. 21. STOP! YOU HAVE COMPLETED THIS PROCEDURE. Table A — Failures, Addresses, and Associated Slot (Note) Failure Condition Source Address Associated Slot incoming optical line LOS incoming optical channel LOS oline-{1a-4b} ochan-{1a-4b}-{1-16} OA1A,1B,2A,2B,3A,3B,4A,4B incoming CMS incoming CMS incoming CMS incoming CMS cms-{1a,2a,3a,4a} for ET or cms-{1a-4b} for Repeater LOF LOS SD SF incoming supr channel fail incoming supr channel SD incoming supr channel SF End Terminal: TLM 1A,1B,2A,2B,3A,3B,4A,4B supr-{1a,2a,3a4a} for ET or Repeater: supr-{1a-4b} for Repeater TLM 1A/B,1B/A,2A/B,2B/A, 3A/B,3B/A,4A/B,4B/A Note: For example, an "incoming CMS LOF" condition with a source address of "cms-2a" is associated with slot TLM 2A. TAP-104: Trouble Clearing Page 4 of 4 365-575-536 Issue 1 March 2001 TAP-105 : Trouble Clearing Page 1 of 2 365-575-536 Issue 1 March 2001 Clear `OMU/ODU Mismatch or Missing' Overview: This condition implies an incorrect provisioned OLS end terminal or an incorrect fiber connection at an end terminal. It is very probable the DCC is not functioning between end terminals. NOTE: Assistance is required at the end terminal having the condition if you are not already physically located there. 1. Log in to the OLS end terminal with the OMU/ODU mismatch or missing condition. 2. At the CIT, select SECURITY-Retrieve-System command and execute to obtain a report. 3. From the report, is the dirn parameter provisioned per the office records? If NO, then continue with Step 4. If YES, then continue with Step 8. 4. At the CIT, select the SECURITY-Enter-System command and provision DIRN to the correct parameter per the office records. 5. Wait 1 minute for the system to stabilize. 6. At the CIT, select FAULT-Retrieve-Condition-All command to obtain a report. 7. Has the OMU/ODU mismatch or missing condition been cleared? If NO, then continue with Step 8. If YES, then STOP! YOU HAVE COMPLETED THIS PROCEDURE. 8. Open the cabinet door or remove the shelf cover to gain access to the fibers on the front of the circuit packs. Reference: DLP-511 365-575-536 Issue 1 March 2001 9. Trouble Clearing: TAP-105 Page 2 of 2 Locate the circuit packs associated with the optical line having the OMU/ODU mismatch or missing condition. Reference: DLP-503 10. Is this end terminal provisioned as the 1A-TX (transmit) or 1A-RCV (receive)? If Transmit, then continue with Step 11. If Receive, then continue with Step 14. 11. Verify the ODU is in the correct physical slot. Reference: DLP-503 12. Check the fiber connections between the OA and TLM circuit packs and make the necessary corrections. Reference: DLP-503 13. Has the OMU/ODU mismatch or missing condition been cleared? If YES, then STOP! YOU HAVE COMPLETED THIS PROCEDURE. If NO, then call for technical assistance in the next level of trouble clearing. 14. Verify the OMU is in the correct physical slot. Reference: DLP-503 15. Check the fiber connections between the OA and TLM circuit packs and make the necessary corrections. Reference: DLP-503 16. Has the OMU/ODU mismatch or missing condition been cleared? If YES, then STOP! YOU HAVE COMPLETED THIS PROCEDURE. If NO, then call for technical assistance in the next level of trouble clearing. TAP-106 : Trouble Clearing Page 1 of 2 365-575-536 Issue 1 March 2001 Address `TL-1 Link Failure' 1. Does the FAULT-Retrieve-Condition-All report show a controller failure (TOHCTL or SYSCTL circuit pack)? If YES, then go to TAP-102. If NO, then continue with Step 2. 2. Initiate a Trouble Report to the responsible Operations System stating an incoming TL1 link failure has been detected on this network. 3. STOP! YOU HAVE COMPLETED THIS PROCEDURE. 365-575-536 Issue 1 March 2001 Trouble Clearing: TAP-106 Page 2 of 2 365-575-536 Issue 1 March 2001 Trouble Clearing: TAP-107 Page 1 of 2 Address Environmental Input and/or Control Output Condition Overview: If either condition appears in the FAULT-Retrieve-Condition-All report, it indicates that the condition is active. These conditions are provisioned by the customer (user enters the text string). There are 144 environmental (input) points and 36 control (output) points. (Release 1 has sixteen inputs and four outputs.) 1. Which condition are you to address? If environmental, then continue with Step 2. If control, then continue with Step 4. 2. At the CIT, select CONFIGURATION-Retrieve-Attribute-Environment to obtain a list of the environmental inputs. NOTE: The environmental condition is external to the OLS network element. Consult and follow the local maintenance procedures to clear the indicated environmental condition. This condition may be cleared by something as simple as closing a door and completing a contact closure or the resetting of a relay switch, thus clearing the condition. 3. STOP! YOU HAVE COMPLETED THIS PROCEDURE. 4. At the CIT, select CONFIGURATION-Retrieve-Attribute-Control to obtain a list of the control outputs. 5. Consult and follow the local maintenance procedures to clear the indicated control condition. The control condition is external to the OLS network element and can be (if required) released by a manual command at the CIT (refer to TAP-114). 6. STOP! YOU HAVE COMPLETED THIS PROCEDURE. TAP-107: Trouble Clearing Page 2 of 2 365-575-536 Issue 1 March 2001 TAP-108 : Trouble Clearing Page 1 of 2 365-575-536 Issue 1 March 2001 Address Missing or Incorrect Response Overview: You were sent here from another procedure because the OLS Network Element responded in an unexpected manner. This unexpected response was a missing or incorrect LED indication or CIT message. 1. Review, and remember, the unexpected response that sent you to this TAP. 2. Was the unexpected response from an LED or from the CIT? If from an LED, then continue with Step 3. If from the CIT, then continue with Step 9. 3. At the CIT, select FAULT-Test-LED:All command. Response: All LEDs are lighted for 10 seconds, off for 10 seconds, then they return to their normal condition. 4. Did the LED(s) of interest operate as indicated above? If YES, then continue with Step 5. If NO, then continue with Step 13. 5. NOTE: The LED operation appears to be normal. Is the same unexpected response still observed? If NO, then STOP! YOU HAVE COMPLETED THIS PROCEDURE. If YES, then continue with Step 6. 6. Wait 15 minutes until the MJ LED is off at the user panel, whichever comes first. Reset takes approximately 15 minutes, but some user panel LEDs flash and relays click in about a minute, indicating that reset has started. If the network element is equipped with OTPMs, wait an additional 5 minutes. 7. Return to the procedure that sent you here. If the same unexpected response is observed again, contact the appropriate maintenance support organization for further technical assistance. 8. STOP! YOU HAVE COMPLETED THIS PROCEDURE. 365-575-536 Issue 1 March 2001 9. Trouble Clearing: TAP-108 Page 2 of 2 NOTE: The CIT will disconnect from the network element when the CONFIGURATION-Initialize-System command is executed. At the CIT, select CONFIGURATION-Initialize-System:TID:AID(All):PH(3) command. 10. Wait 10 minutes for the Reset to complete. During this time the lighting of LEDs and clicking of relays will be observed. 11. Return to the procedure that sent you here. If the same unexpected response is observed again, contact the appropriate maintenance support organization for further technical assistance. 12. STOP! YOU HAVE COMPLETED THIS PROCEDURE. 13. Replace the circuit pack, indicator strip, user panel, or filter panel containing the LED(s) that did not operate as indicated in Step 4. Reference:For Circuit Packs: DLP-514 For Panels: Drawing ED-7G027-30 or Installation Manual For Strip: Drawing ED-6G994-30 or Installation Manual 14. Return to the procedure that sent you here. If the same unexpected response is observed again, contact the appropriate maintenance support organization for further technical assistance. 15. STOP! YOU HAVE COMPLETED THIS PROCEDURE. TAP-109 : Trouble Clearing Page 1 of 2 365-575-381 Issue 1 March 2001 Clear `Optical Line ID Mismatch' Overview: The three least significant bits of the K2 byte on the supervisory overhead channel carry the optical line ID. The optical line ID is added via the TLM circuit pack at the transmit end and read at the next receive TLM circuit pack in the optical section. This condition indicates that optical fiber connections in the optical section are incorrect. 1. Check the fiber connections between the TLM and OA circuit packs at the local network element and correct if necessary. Reference: DLP-503 2. Were any fibers incorrectly connected? If NO, then continue with Step 5. If YES, then continue with Step 3. 3. At the CIT, select FAULT-Retrieve-Condition-All to obtain a report. 4. Has the optical line ID mismatch condition been cleared? If YES, then STOP! YOU HAVE COMPLETED THIS PROCEDURE. If NO, then continue with Step 5. 5. Check the fiber connections between the outside plant fibers and the OA circuit packs at the local network element and compare with office records, and correct if necessary. Reference: DLP-503 6. Were any fibers incorrectly connected? If NO, then continue with Step 9. If YES, then continue with Step 7. 7. At the CIT, select FAULT-Retrieve-Condition-All to obtain a report. 8. Has the optical line ID mismatch condition been cleared? If YES, then STOP! YOU HAVE COMPLETED THIS PROCEDURE. If NO, then continue with Step 9. 9. Repeat Steps 1 through 8 for the remote network element. 365-575-536 Issue 1 March 2001 Trouble Clearing: TAP-109 Page 2 of 2 10. Replace the TLM circuit packs at the local network element. Reference: DLP-514 11. At the CIT, select FAULT-Retrieve-Condition-All to obtain a report. 12. Has the optical line ID mismatch condition been cleared? If YES, then STOP! YOU HAVE COMPLETED THIS PROCEDURE. If NO, then continue with Step 13. 13. Repeat Steps 10 through 12 at the remote network element. 14. At the CIT, select FAULT-Retrieve-Condition-All to obtain a report. 15. Has the optical line ID mismatch condition been cleared? If YES, then STOP! YOU HAVE COMPLETED THIS PROCEDURE. If NO, then call for technical assistance in the next level of trouble clearing. TAP-110 : Trouble Clearing Page 1 of 6 365-575-536 Issue 1 March 2001 Address Incoming Signal Failure NOTE: One of the following incoming signal failures was detected: Incoming Incoming Incoming Incoming Incoming Incoming Incoming Incoming Incoming CMS LOF (loss of frame) CMS LOS (loss of signal) CMS SD (signal degrade) CMS SF (signal failure) optical channel LOS (loss of signal) optical line LOS (loss of signal) supr chnl fail supr chnl SD (signal degrade) supr chnl SF (signal failure). NOTE: Multiple incoming optical channel LOS failure conditions can be caused by: • for the receive direction, optical line power levels that are marginal. • for the transmit direction, OMU failures, fiber jumper or connector failures between the OMU and OA circuit pack. • for the transmit direction in systems with OPS, multiple incoming failure conditions occur due to a bridge in the OPS CP. 1. Refer to the FAULT-Retrieve-Condition-All report and determine the type of incoming signal failure. 2. Is this condition an incoming optical line LOS (loss of signal)? If YES, continue with Step 3. If NO, continue with Step 4. 3. Is this network element configured for single OA operation? If YES, go to TAP-143. If NO, continue with Step 4. 4. Open the cabinet door or remove the shelf cover. All connections can be accessed from the front. Reference: DLP-511 365-575-536 Issue 1 March 2001 5. Trouble Clearing: TAP-110 Page 2 of 6 NOTE: The circuit pack associated with the indicated failure condition and indicated AID is indicated in Table A on page 5 of 6. Make a visual inspection of the incoming signal cable(s) and connection(s) and correct any problems found. Reference: DLP-517 6. Did the visual inspection result in correcting any problems? If YES, then STOP! YOU HAVE COMPLETED THIS PROCEDURE. If NO, then continue with Step 7. 7. Was an OA circuit pack associated with the incoming failure? If NO continue with Step 9. If YES continue with Step 8. 8. ! CAUTION: Failure to follow instructions in this step could result in service interruptions. Notify the person that is responsible for the service or protection signals assigned to this OA; (1) to manually switch the service line to a protection line, and (2) ensure that all protection lines that are assigned to this OA are not being used for service. 9. If a visual inspection did not reveal any problems, make an optical measurement on the appropriate incoming fiber. Reference: DLP-500 10. Was the optical power measurement correct? If NO, then continue with Step 23. If YES, then continue with Step 11. 11. Clean and reconnect the incoming fiber. Reference: DLP-510 12. At the CIT, select FAULT-Retrieve-Condition-All command and execute to obtain the report. 13. Referring to the report obtained in Step 12, is the same incoming signal failure still listed? TAP-110: Trouble Clearing Page 3 of 6 365-575-536 Issue 1 March 2001 If YES, then continue with Step 14. If NO, then continue with Step 34. 14. NOTE: The circuit pack associated with the indicated failure condition and indicated AID is indicated in Table A. Replace the receive circuit pack as indicated in the AID column of the report from Step 12 and Table A. Reference: DLP-514 15. Obtain another report (as in Step 12). Is the same incoming signal failure still listed? If YES, then continue with Step 21. If NO, then continue with Step 16. 16. Did you replace an OA circuit pack in Step 14? If NO, then STOP! YOU HAVE COMPLETED THIS PROCEDURE. If YES, then continue with Step 17. 17. Did you replace a receive end terminal OA circuit pack in Step 14? If NO continue with Step 18. If YES continue with Step 27. 18. At the CIT, select PERFORMANCE-Initialize-Optics command and execute to baseline certain optical parameters on the replacement OA circuit pack. 19. Notify the person that is responsible for all affected LCTs that have service or protection signals assigned to this OA that this Optical Line can now be returned to service. 20. STOP! YOU HAVE COMPLETED THIS PROCEDURE. 21. Remove the replacement circuit pack (installed in Step 14) and reinstall the original circuit pack. Reference: DLP-514 22. Is the incoming signal failure in the receive line direction or transmit line direction? 365-575-536 Issue 1 March 2001 Trouble Clearing: TAP-110 Page 4 of 6 If receive direction, then continue with Step 23. If transmit direction, then continue with Step 25. 23. NOTE: At this point, it appears that the local network element is operating correctly. Initiate a Trouble Report to the source of the failed incoming signal indicating the type of failure. If the source of the failed incoming signal returns a Trouble Report indicating "no trouble found," then contact the appropriate maintenance support organization for further technical assistance before following the prescribed operating procedures to fault isolate the cable/fiber carrying the failed incoming signal. Reference: DLP-507 24. STOP! YOU HAVE COMPLETED THIS PROCEDURE. 25. NOTE: At this point, it appears the trouble is in the local network element. Visually check and note any problems at the OMU fiber connections including the fiber jumper between the OMU and the transmit OA circuit pack. Contact the appropriate maintenance support organization for further technical assistance before correcting any problems. 26. STOP! YOU HAVE COMPLETED THIS PROCEDURE. 27. NOTE: At the LCT, use the PERFORMANCE-Retrieve-PM-Line command and execute to verify line performance. See Chapter 11 for additional information. Monitor all LCTs and OTUs connected to this OLS to verify an error free operation for at least one quarter hour interval (15 minutes). 28. Were any errors detected? If NO then continue with Step 32. If YES, then continue with Step 29. 29. At the LCT, measure the receive power for each optical channel and install LBOs (new values as required) at the LCT IN and ODU OUT connectors. Reference: DLP-500 (Replacing end terminal OA) 30. Clean the optical fiber(s) and connector(s). TAP-110: Trouble Clearing Page 5 of 6 365-575-536 Issue 1 March 2001 Reference: DLP-510 31. Connect the optical fibers to the LBOs on the ODU OCHAN() OUT and LCT IN port. 32. At the CIT, select PERFORMANCE-Initialize-Optics command and execute to baseline certain optical parameters on the replacement OA circuit pack. 33. Notify the person that is responsible for all affected LCTs that have service or protection signals assigned to this OA that this Optical Line can now be returned to service. 34. STOP! YOU HAVE COMPLETED THIS PROCEDURE. Table A – Failures, Addresses, and Associated Slot (Note) CONDDESCR AID Associated Slot incoming optical line LOS incoming optical channel LOS oline-{1a-4b} ochan-{1a-4b}-{1-16} OA 1A,1B,2A,2B,3A,3B,4A,4B incoming CMS incoming CMS incoming CMS incoming CMS cms-{1a,2a,3a,4a} for ET or cms-{1a-4b} for Repeater End Terminal: TLM 1A/B,2A/B,3A/B,4A/B supr-{1a,2a,3a4a} for ET or supr-{1a-4b} for Repeater Repeater: TLM 1A/B,1B/A,2A/B,2B/A, 3A/B,3B/A,4A/B,4B/A LOF LOS SD SF incoming supr channel fail incoming supr channel SD incoming supr channel SF Note: For example, an "incoming CMS LOF" condition with a source address of "cms-2a" is associated with slot TLM 2A. *For single OA configuration, one OA is replaced by ODU. 365-575-536 Issue 1 March 2001 Trouble Clearing: TAP-110 Page 6 of 6 365-575-536 Issue 1 March 2001 Trouble Clearing: TAP-111 Page 1 of 6 Clear `Circuit Pack Failure' Overview: This procedure is used to replace a circuit pack with a lighted FAULT LED in response to one of these indicated failures: OA failure OPTM failure OTCTL failure OTU failure QOTU failure TLM failure TOHCTL failure. NOTE: A "silent" failure of the TOHCTL circuit pack at the network element sending a failed DCC input or at the network element detecting it is possible NOTE: If you are unable to login to the network element, go to TAP-128. If still unable to login after completing TAP-128, contact your next level of technical support as indicated by TAP-128. NOTE: An OTCTL failure condition will prevent the retrieval of any OTU/OTPM performance monitoring data, but the retrieve command/report completes. 1. 2. At the CIT, select FAULT-Retrieve-Condition-All command and execute to obtain a report. NOTE: The SYSMEM/SYSCTL code mismatch or SYSMEM unrecognizable code condition may not be listed as the top condition. Is the SYSMEN/SYSCTL code mismatch or SYSMEM unrecognizable code condition listed in the report? If NO, then continue with Step 3. If YES, then go to TAP-102 for that condition and clear it first before returning to this procedure. TAP-111: Trouble Clearing Page 2 of 6 3. 365-575-536 Issue 1 March 2001 Are BOTH failures indicated (combination TLM failure and OA failure)? If NO, then continue with Step 4. If YES, then go to TAP-153. 4. Identify the appropriate shelf associated with the circuit pack failure condition. Reference: DLP-503 5. Open the cabinet doors or remove shelf cover. All connections can be accessed from the front. Reference: DLP-511 6. At the OT bay/cabinet, are ALL OTU FAULT LEDs lighted on the shelves? If NO, then continue with Step 7. If Yes, then continue with Step 29. 7. Is the FAULT LED lighted on the circuit pack identified in the AID column? If YES, then continue with Step 8. If NO, then go to TAP-108. 8. Is the circuit pack an OTCTL circuit pack? If NO, then continue with Step 11. If YES, then continue with Step 9. 9. Locate the green PWR ON LED at the user/fuse panel for the OT Controller Shelf housing the failed OTCL circuit pack. 10. Is the PWR ON LED lighted? If YES, then continue with Step 13. If NO, then continue with TAP-147. 11. Is the circuit pack with the lighted FAULT LED a TOHCTL or TLM circuit pack? If NO, then continue with Step 12. If YES, then continue with Step 13. 365-575-536 Issue 1 March 2001 12. ! Trouble Clearing: TAP-111 Page 3 of 6 CAUTION: Failure to follow instructions in this step could result in service interruptions. Notify the person that is responsible for the service or protection signals assigned to this circuit pack; (1) to manually switch the service line to a protection line, and (2) ensure that all protection lines that are assigned to this circuit pack are not being used for service, or restore service on a different Optical Line System or route. 13. NOTE: A series number S1:2 is the same series number as S1:4. The 2 and 4 refer to minor changes within series 1. NOTE: Reminder: Look for and replace any damaged fiber and/or LBO before replacing the circuit pack. Obtain a replacement circuit pack with the same or a higher series number and install it in place of the circuit pack with the lighted FAULT LED. As required, make the appropriate optical connections on the OA TLM/OPTM/OTU circuit pack(s). Reference: DLP-514 14. Wait for the time indicated in Table A. Table A — Mini Reset Waiting Times CP Inserted OA OPTM OTCTL OTU QOTU TLM TOHCTL Waiting Time 1 minute 1 minute 10 minutes 1 minute 1 minute 1 minute 10 minutes 15. Is the FAULT LED lighted on the replacement circuit pack? If YES, then continue with Step 16. If NO, then continue with Step 20. 16. Was the circuit pack replaced a TLM circuit pack? If NO, then go to TAP-116. If YES, then continue with Step 17. TAP-111: Trouble Clearing Page 4 of 6 365-575-536 Issue 1 March 2001 17. Are the fiber jumpers between the TLM OUT of the OA circuit pack and the IN of the TLM circuit pack properly connected and conditioned? If NO, then connect or replace the fiber jumper and continue with Step 25. If YES, then continue with Step 18. 18. Contact the upstream node and have them replace the associated TLM circuit pack on that line and wait 1 minute. 19. At the local node, is the FAULT LED extinguished on the replacement circuit pack? If YES, then STOP! YOU HAVE COMPLETED THIS PROCEDURE. If NO, then go to TAP-116. 20. Was an OA circuit pack just replaced (Step 13)? If NO, then continue with Step 25. If YES, then continue with Step 22. 21. Was the circuit pack replaced an end terminal receive OA circuit pack? If NO, then continue with Step 23. If YES, then continue with Step 20. 22. NOTE: At an LCT, use the PERFORMANCE-Retrieve-Performance_Monitoring:OC48-mont ype=ESL command to verify line performance. See Chapter 11 for additional information. Monitor all LCTs and OTUs/OTPMs connected to this OLS to verify an error free operation for at lease one quarter hour interval (15 minutes). 23. Were any errors detected? If NO, then continue with Step 25. If YES, then continue with Step 24. 24. Measure optical power and determine correct LBO values for the LCT RCVR IN port and ODU OCHAN() OUT port. Reference: DLP-500 (Replacing end terminal receive OA) 365-575-536 Issue 1 March 2001 Trouble Clearing: TAP-111 Page 5 of 6 25. At the CIT, select PERFORMANCE-Initialize-Register-Optical_Line command and execute to baseline certain optical parameters on the replacement OA circuit pack. 26. Notify the person that is responsible for all affected LCTs that have service or protection signals assigned to this OA that this Optical Line can now be returned to service. 27. Close the cabinet doors or replace the shelf cover. Reference: DLP-511 28. Is the NE ACTY LED lighted at the user panel? If YES, then go to Trouble Clearing: IXL-001. If NO, then STOP! YOU HAVE COMPLETED THIS PROCEDURE. 29. NOTE: Multiple OTU failures may be caused by a defective OTCTL circuit pack (All the OTU circuit packs have their FAULT LED lighted.) Obtain a replacement OTCTL circuit pack with the same or a higher series number and replace the existing circuit pack (note the FAULT LED is not lighted). Reference: DLP-514 30. Wait 10 minutes for the OTCLT circuit pack to become operational. 31. Are ALL the OTU FAULT LEDs off? If NO, then contact the next level of technical support. If YES, then STOP! YOU HAVE COMPLETED THIS PROCEDURE. TAP-111: Trouble Clearing Page 6 of 6 365-575-536 Issue 1 March 2001 TAP-112 : Trouble Clearing Page 1 of 2 365-575-536 Issue 1 March 2001 Clear `Circuit Pack Removed' Overview: This procedure is used to clear one of the conditions below by (1) installing the missing circuit pack or (2) updating the SYSMEM circuit pack to reflect the current equipage: OA removed TLM removed TOHCTL removed OTU removed OTPM removed OTCTL removed QOTU removed. NOTE: An OTCTL removed condition will prevent the retrieval of any OTU/OTPM performance monitoring data, but the retrieve command/report completes. 1. Identify the appropriate shelf associated with the removed circuit pack. Reference: DLP-503 2. Open the cabinet door or remove the shelf cover. All connections can be accessed from the front. Reference: DLP-511 3. Is the indicated slot empty? If YES, then continue with Step 4. If NO, then go to TAP-108. 4. Do the office records show that the slot should contain a circuit pack? If YES, then continue with Step 8. If NO, then continue with Step 5. 5. At the CIT, select CONFIGURATION-Update-System (records the current hardware arrangement in SYSMEM circuit pack). 6. Close the cabinet door or replace the shelf cover. Reference: DLP-511 365-575-536 Issue 1 March 2001 Trouble Clearing: TAP-112 Page 2 of 2 7. STOP! YOU HAVE COMPLETED THIS PROCEDURE. 8. Obtain the missing circuit pack and install it into the appropriate slot. As required, make the appropriate optical connections on the TLM and OA circuit pack(s). Reference: DLP-514 9. Wait for the time indicated in Table A. Table A - Mini Reset Waiting Times CP Inserted Waiting Time OTCTL SYSCTL SYSMEM TOHCTL All Others 10 minutes 15 minutes 15 minutes 10 minutes 1 minute 10. Is the FAULT LED lighted on the replacement circuit pack? If YES, then go to Trouble Clearing: IXL-001. If NO, then continue with Step 11. 11. Was the circuit pack replaced an end terminal receive OA circuit pack? If NO, then continue with Step 14. If YES, then continue with Step 12. 12. Measure optical power and determine correct LBO value at LCT. Reference: DLP-500 (Replacing end terminal receive OA) 13. Install correct LBOs at appropriate LCT RCVR IN port and ODU OCHAN() OUT port. Reference: DLP-512 14. Close the cabinet door or replace shelf cover. Reference: DLP-511 15. Is the NE ACTY LED lighted at the user panel? If YES, then go to Trouble Clearing: IXL-001. If NO, then STOP! YOU HAVE COMPLETED THIS PROCEDURE. TAP-113 : Trouble Clearing Page 1 of 4 365-575-536 Issue 1 March 2001 Clear `SYSMEM Failure' or `SYSCTL Failure' ! CAUTION: Do not remove the SYSCTL circuit pack unless instructed to do so by this procedure. If removed, provisioning data (current values) could be lost. Current values were provisioned with the Set commands. NOTE: The installation of a replacement SYSMEM circuit pack may generate certain unexpected alarm conditions. Ignore these indications until the code mismatch condition has been cleared, then clear any remaining condition(s). NOTE: This procedure begins with the replacement of the SYSMEM circuit pack even though the SYSCTL circuit pack FAULT LED may be lighted. NOTE: This procedure requires SYSMEM/SYSCTL circuit packs be removed and installed several times. Therefore, at each time, the technician should logout, remove and install the SYSMEM/SYSCTL, and then log back in to the network element. 1. Remove the SYSMEM circuit pack and install a replacement circuit pack having the same or a higher series number. For example, an LEA2 with series number S1:2 is the same series number as S1:4. The 2 and 4 refer to minor changes within series 1. Reference: DLP-514 2. Wait 15 minutes or until the MJ LED is off at the user panel, whichever comes first. 3. At the CIT, select CONFIGURATION-Retrieve-Equipment and enter SYSCTL to obtain a report. 4. Refer to the report and compare the software release (VSRN=) in the sysmem and sysctl line entries. 5. Are software releases and/or platforms identical? If YES, then continue with Step 7 If NO, then continue with Step 6. 365-575-536 Issue 1 March 2001 6. Trouble Clearing: TAP-113 Page 2 of 4 Install identical software into the SYSMEM circuit pack that is running in the OLS. Reference: Operation: NTP-002 7. NOTE: The CIT will disconnect from the network element when the command CONFIGURATION-Initialize-System:TID(All):PH(3) is executed. At the CIT, select the command CONFIGURATION-Initialize-System. The AID field should indicate ALL and the PH field should be set to 3. Select Enter to execute. 8. Wait 15 minutes or until the MJ LED is off at the user panel, whichever comes first. Reset takes approximately 15 minutes but some user panel LEDs flash and relays click in about a minute indicating that reset has started. If the network element is equipped with OTPMs, wait an additional 5 minutes. 9. At the CIT, select FAULT-Retrieve-Condition-All to obtain a report. 10. Does the SYSCTL failure or SYSMEM failure appear under the CONDDSCR column of the report? If YES, then continue with Step 11. If NO, then continue with Step 16. 11. Reinstall the SYSMEM circuit pack that was removed in Step 1. 12. NOTE: For circuit pack and software compatibility, refer to Table 7-1 in Section 7, "Circuit Pack Description." Remove the SYSCTL circuit pack and install a replacement circuit pack having the same or a higher series number. For example, an LEA1 with series number S1:2 is the same series number as S1:4. The 2 and 4 refer to minor changes within series 1. Reference: DLP-514 13. Wait 15 minutes or until the MJ LED is off at the user panel, whichever comes first. 14. At the CIT, select FAULT-Retrieve-Condition-All to obtain a report. TAP-113: Trouble Clearing Page 3 of 4 365-575-536 Issue 1 March 2001 15. Does a SYSCTL failure or SYSMEM failure appear under the CONDDSCR column of the report? If YES, then go to TAP-116. If NO, then continue with Step 16. 16. Is the NE ACTY LED off at the user panel? If YES, then STOP! YOU HAVE COMPLETED THIS PROCEDURE. If NO, then go to Trouble Clearing: IXL-001. 365-575-536 Issue 1 March 2001 Trouble Clearing: TAP-113 Page 4 of 4 365-575-536 Issue 1 March 2001 Trouble Clearing: TAP-114 Page 1 of 2 Clear Condition When `ABN' and/or `NE ACTY' LED is Lighted Overview: This procedure is used to clear one or more of the following conditions: (control pointstring)* inhibit alarms-office alarms† inhibit alarms-parallel telem†inhibit alarms-X.25† logins inhibited† test alarm in progress† test auto turnup in progress† test telemetry in progress †. * The ABN LED is on. † The NE ACTY LED is on. NOTE: The indicated condition was initiated by a user command. You must determine, by consulting with the appropriate maintenance personnel, whether the need for the user-initiated condition still exists before proceeding. 1. Does the need for the user initiated condition still exist? If YES, then continue with Step 2. If NO, then continue with Step 3. 2. Referring to the FAULT-Retrieve-Condition-All report on the CIT screen, are any other conditions indicated? If YES, then go to TAP-102 to clear the remaining condition(s), ignoring the condition that sent you here. If NO, then STOP! YOU HAVE COMPLETED THIS PROCEDURE. 3. Use the CIT to clear the indicated condition by performing the function listed in Table A. 4. STOP! YOU HAVE COMPLETED THIS PROCEDURE. TAP-114: Trouble Clearing Page 2 of 2 365-575-536 Issue 1 March 2001 Table A - Determine Command for Condition Condition To Be Cleared Perform Function inhibit alarms-office alarms inhibit alarms-parallel telem inhibit alarms-X.25 SECURITY-Allow-Message-Equipment:All logins inhibited SECURITY-Enter-Network_Element-Security:ALW_UID:Yes (control point string) FAULT-Release-External-Control test alarm in progress test auto turnup in progress test telemetry in progress Wait for the test to complete. 365-575-536 Issue 1 March 2001 Trouble Clearing: TAP-115 Page 1 of 2 Clear No TL1 Response After System Reset (When No Cable Connection Between DTE and External Equipment) Overview: This procedure is used to clear trouble in the TL1 DTE port caused by executing a reset with no cable connections between DTE and external equipment. 1. At the CIT, use the SECURITY-Enter-Channel_Identifier-Security command to provision the port type of the DTE port to "cit". 2. Use the SECURITY-Enter-Channel_Identifier-Security command to provision the port type of the DTE port to "tl1". 3. Does the DTE port now respond to valid TL1 messages? If YES, then STOP! YOU HAVE COMPLETED THIS PROCEDURE. If NO, then refer the trouble to the next level of support. TAP-115: Trouble Clearing Page 2 of 2 365-575-536 Issue 1 March 2001 TAP-116 : Trouble Clearing Page 1 of 4 365-575-536 Issue 1 March 2001 Clear Unsuccessful Circuit Pack Replacement Overview: Only useIssue 1 this procedure in the unlikely event that you were sent here by another procedure (for example, TAP-123) because a circuit pack replacement did not clear the associated failure indicator(s). This procedure is used to replace other circuit packs that could possibly cause such a failure indication(s). NOTE: A series number S1:2 is the same series number as S1:4. The 2 and 4 refer to minor changes within series 1. NOTE: In this procedure, the circuit pack that first indicated "failed" is called the original circuit pack. The replacement circuit pack that did not clear the failure is called the original replacement circuit pack (same type of circuit pack). If the failure still exists, then one or more circuit packs which are called alternative replacement circuit packs are substituted. NOTE: The report generated by the CONFIGURATION-Retrieve-Equipment command indicates an alternative CP to be used when replacing the circuit pack identified in the FAULT.Retrieve.Condition.All report failed to clear the trouble indication. 1. 2. At the CIT, select CONFIGURATION-Retrieve-Equipment to obtain a report. NOTE: If there is no alternative circuit pack given, do one of the following: • Contact the appropriate maintenance support organization for technical assistance before proceeding with other trouble clearing procedures. • If multiple TLM circuit packs have been changed and the trouble is still present, suggest replacing the TOHCTL circuit pack at the locat node. Referring to the entry in the report for the circuit pack just replaced, note the type and slot address of the alternative circuit pack (shown as alternative circuit pack (shown as alternative CP in the report). 3. Obtain a circuit pack of the type identified in Step 2 and install it in the slot address identified in Step 2. Reference: DLP-514 365-575-536 Issue 1 March 2001 4. Trouble Clearing: TAP-116 Page 2 of 4 Wait for the time indicated in Table A. Table A - Mini Reset Waiting Times CP Inserted Waiting Time SYSCTL SYSMEM OTCTL TOHCTL All Others 5. 15 minutes 15 minutes 10 minutes 10 minutes 1 minute Is the FAULT LED on the original replacement circuit pack lighted? If YES, then continue with Step 6. If NO, then continue with Step 13. 6. Remove the alternative replacement circuit pack and reinstall the circuit pack that was removed in Step 3. 7. Wait for the time indicated in Table A. 8. Is the FAULT LED still lighted on the original replacement circuit pack (that sent you to this procedure)? If YES, then continue with Step 9. If NO, then STOP! YOU HAVE COMPLETED THIS PROCEDURE. 9. NOTE: The failure could possibly be due to a broken or bent backplane pin. Remove the original replacement circuit pack and carefully examine its backplane connector for a broken backplane pin. In the same way, examine the backplane connectors on the alternative replacement circuit pack and the original circuit pack. 10. Was a broken pin found in the connector of any of the three circuit packs examined in Step 9? If YES, then continue with Step 16. If NO, then continue with Step 11. 11. Obtain a suitable light source and examine the backplane behind the circuit pack removed in Step 9. TAP-116: Trouble Clearing Page 3 of 4 12. ! 365-575-536 Issue 1 March 2001 CAUTION: Do not put the original circuit pack back into the NE. Is there a broken or bent pin in the backplane? If YES, then continue with Step 16. If NO, then reinstall the original replacement circuit pack that was removed in Step 9 and go to TAP-108. 13. NOTE: The remaining steps help prevent returning nondefective circuit packs for repair. Reinstall the original circuit pack (that sent you to this procedure). 14. Wait for the time indicated in Table A. 15. Is the FAULT LED still lighted on the original circuit pack? If YES, then go to TAP-108. If NO, then STOP! YOU HAVE COMPLETED THIS PROCEDURE. 16. The trouble is most likely due to the broken or bent backplane pin(s). Repair the broken or bent pin(s) per the instructions in Appendix A of this document, or refer the trouble to the next level of technical support for assistance. 17. STOP! YOU HAVE COMPLETED THIS PROCEDURE. 365-575-536 Issue 1 March 2001 Trouble Clearing: TAP-116 Page 4 of 4 365-575-536 Issue 1 March 2001 Trouble Clearing: TAP-117 Page 1 of 2 Clear `CPYPGM:IP (tid) ' NOTE: This condition means that software is being copied from this OLS network element to the OLS network element whose target identification (TID) appears in the message. NOTE: The software download is performed in the background (about 10 minutes) and is from one SYSMEM circuit pack to another SYSMEM circuit pack. Up to three downloads can occur simultaneously. NOTE: You cannot cancel the background download once it is initiated. 1. If desired, you may perform other CenterLink or activities during this time, for example, checking the status of the download. If an error message appears on the screen during the background download, reinitiate the software download per Operation: NTP-003. 2. STOP! YOU HAVE COMPLETED THIS PROCEDURE. TAP-117: Trouble Clearing Page 2 of 2 365-575-536 Issue 1 March 2001 TAP-118 : Trouble Clearing Page 1 of 4 365-575-536 Issue 1 March 2001 Clear `NE Status Comm Failure' Overview: This condition could arise from situations such as (1) the Directory Service Network Element (DSNE) is not reachable, (2) one or more nodes are not reachable because of a supervisory channel failure, or (3) an alarm gateway network element (AGNE) was not provisioned for the alarm group. Remember, that for this procedure, a network element (NE) and a node are interchangeable. NOTE: This procedure assumes that you are logged into the NE with the NE status comm failure condition. NOTE: This condition is complicated because it may be caused by other trouble conditions; therefore, these other conditions must be cleared first. If you obtain any reports, one or all may be inaccurate (not up-to-date). 1. 2. At the CIT, select FAULT-Retrieve-Condition-All command and execute to obtain a report. NOTE: The SYSMEM/SYSCTL code mismatch or SYSMEM unrecognizable code condition may not be listed as the top condition. Is the SYSMEN/SYSCTL code mismatch or SYSMEM unrecognizable code condition listed in the report? If NO, then continue with Step 3. If YES, then go to TAP-102 for that condition and clear it first before returning to this procedure. 3. Is an OMU/ODU mismatch or missing condition shown on the report? If YES, then go to TAP-105, clear the condition, and return to this procedure. If NO, then continue with Step 4. 365-575-536 Issue 1 March 2001 4. Trouble Clearing: TAP-118 Page 2 of 4 Is an optical line ID mismatch condition shown on the report? If YES, then go to TAP-109, clear the condition, and return to this procedure. If NO, then continue with Step 5. 5. Is a TOHCTL failure condition shown on the report? If YES, then go to TAP-111, clear the condition, and return to this procedure. If NO, then continue with Step 6. 6. Is a DS-NE not reachable condition shown on the report? If NO, then continue with Step 7. If YES, then clear this condition first (refer to TAP-137). Wait 5 minutes for condition to stabilize, and return to this procedure. 7. Wait 5 minutes for condition to stabilize. 8. Obtain another FAULT-Retrieve-Condition-All report. Is the NE status comm failure condition still shown? If NO, then STOP! YOU HAVE COMPLETED THIS PROCEDURE. If YES, then continue with Step 9. 9. 10. At the CIT, select CONFIGURATION-Retrieve-Map command and execute to obtain a Network Map Report. NOTE: Each NE has a provisionable alarm group value (default value is 255). From the report in Step 9, determine the alarm group value for this NE (the NE with the NE status comm failure condition.) 11. Determine from office records which NE is designated as the AGNE for the alarm group. 12. Log in to the node that should be the AGNE, if required. If a remote login is required and you need additional help, refer to DLP-518. 13. At the CIT, select SECURITY-Retrieve-Network_Element-Security command and execute to obtain a report. 14. From the report in Step 13, determine the value of the Alarm Group. TAP-118: Trouble Clearing Page 3 of 4 365-575-536 Issue 1 March 2001 15. Does the alarm group value match the value in the office records? If NO, then continue with Step 16. If YES, then continue with Step 18. 16. At the CIT, select SECURITY-Enter-System command to provision the Alarm Group to the correct value. 17. Wait 2 minutes for the system to stabilize (condition will clear). 18. From the report (Step 13), determine if this node is provisioned to Yes for the Alarm Gateway NE. 19. Is the Alarm Gateway NE from the report (Step 13) match that in the office records? If NO, then continue with Step 20. If YES, then continue with Step 23. 20. At the CIT, select SECURITY-Enter-System command to provision the Alarm Gateway NE to Yes. 21. Wait 2 minutes for the system to stabilize (condition will clear). 22. If you wish to verify the provisioning, obtain another OLS System Provisioning Report (use SECURITY-Retrieve-System). 23. At the CIT, select FAULT-Retrieve-Condition-All command and execute to obtain a report. 24. Is a trouble condition listed in the CONDDSCR column of the report? If NO, then STOP! YOU HAVE COMPLETED THIS PROCEDURE. If YES, then call for technical assistance in the next level of trouble clearing. 365-575-536 Issue 1 March 2001 Trouble Clearing: TAP-118 Page 4 of 4 365-575-536 Issue 1 March 2001 Trouble Clearing: TAP-119 Page 1 of 4 Clear `Fuse/Power Failure (A/B)' Overview: This procedure is used to clear a fuse/power failure by replacing a blown fuse (lighted) at the Fuse Panel or User Panel on the shelf associated with the fuse or power failure, by clearing a voltage supply problem at the battery distribution and fuse bay (BDFB), or by replacing a failed power filter on a shelf. ! CAUTION: Do not press non-lighted fuses. This may cause momentary power failure on that fuse's power feed. NOTE: Contact the maintenance support organization before proceeding if a failure of both fuses (A and B) or both power feeders (A and B) to a bay exists. 1. Is a fuse lighted (blown) at the Fuse Panel or User Panel on the shelf associated with the fuse or power failure? If YES, then continue with Step 2. If NO, then go to Step 4. 2. NOTE: The fuse cap lamp is a fuse status indicator (Comcode 407411719). The cap lamp works correctly when it is fully engaged and the fuse retainer is locked in place. If the lamp lights in any other position, it may incorrectly indicate a bad fuse. Replace the lighted fuse with a new fuse (Comcode 405749920). Reference: DLP-515 3. Did the fuse blow (light) again? If YES, then go to Step 11. If NO, then STOP! YOU HAVE COMPLETED THIS PROCEDURE. 4. Are ALL top of the bay indicator strip, Fuse Panel or User Panel LEDs extinguished (including PWR ON LED)? If YES, then go to Step 6. If NO, then continue with Step 5. TAP-119: Trouble Clearing Page 2 of 4 5. 365-575-536 Issue 1 March 2001 Is the MJ LED on? If YES, then go to Step 8. If NO, then go to Step 11. 6. Both power feeder cables are NOT supplying voltage to the bay that has its PWR LEDs off. Check at the BDFB or equivalent and correct the voltage supply problem. 7. STOP! YOU HAVE COMPLETED THIS PROCEDURE. 8. NOTE: One power feeder cable is NOT supplying voltage to a bay. At the CIT, select FAULT-Retrieve-Condition-All and execute to obtain a report. 9. Determine from the report, which power feeder cable is dead and correct the voltage supply problem at the BDFB or equivalent. 10. STOP! YOU HAVE COMPLETED THIS PROCEDURE. 11. ! CAUTION: Steps 11 through 13 require a voltage measurement at the power filter. The filter associated with feeder A is located above the filter associated with feeder B for a cabinet mounted shelf. The filters for a miscellaneous mounted shelf are located on the left (feeder A) and right (feeder B) sides of the shelf. Remove the faceplate to the User Panel or Fuse Panel on the shelf associated with the lighted fuse or power failure. Notice that the -48 V filter associated with the A feeder has red/black power cable connections and is above the power filter associated with the B feeder on the shelf which has gray/slate power cable connections. 12. Measure the voltage at the rear of the appropriate fuse. 13. Does the voltage measure between -42.75 and -60 volts? If YES, then go to Step 16. If NO, then continue with Step 14. 14. Visually check within the bay for a loose connection or a shorted power cable between the power distribution panel and the shelf with the failure. 365-575-536 Issue 1 March 2001 Trouble Clearing: TAP-119 Page 3 of 4 15. Was a problem found? If YES, then correct the problem and notify Technical Support. If NO, then continue with Step 16. 16. ! CAUTION: Steps 16 through 20 require replacement of a power filter. Replacing the wrong power filter will interrupt power to the shelf that is providing service. Contact Technical Support and indicate that you are about to start replacing a power filter on a shelf. 17. NOTE: Location of the A and B filters in the OT bays are different than in the OLS bays. Replace the appropriate filter on the appropriate shelf. For example, if fuse A is blown on a shelf, replace the top filter on the shelf. References: DLP-522 or DLP-523 18. Did the fuse/power failure ( ) clear? If YES, then STOP! YOU HAVE COMPLETED THIS PROCEDURE. If NO, then continue with Step 19. 19. Contact Technical Support that you are checking and may replace a panel attributing to other potential shelf troubles as follows: • If the shelf has power but the PWR ON LED is off, then replace the User Panel or Fuse Panel. Reference: Drawing ED-7G027-30, G1 OLS User/Fuse Panel Reference: Drawing ED-7G028-30, G1 OLS Shelf Assembly Reference: Drawing ED-7G045-30 OT Shelf Assembly Reference: Drawing ED-7G047-30 OT User/Fuse Panel. • If the User Panel or Fuse Panel has any other defective LEDs, replace that panel. Reference: Drawing ED-7G027-30, G1 OLS User/Fuse Panel. Reference: Drawing ED-7G028-30, G1 OLS Shelf Assembly TAP-119: Trouble Clearing Page 4 of 4 365-575-536 Issue 1 March 2001 • If the User Panel on the Switch Fabric shelf No. 1 has any other defective LEDs, replace that panel. Reference: Drawing ED-7G045-30 OT Shelf Assembly Reference: Drawing ED-7G047-30 OT User/Fuse Panel. 20. STOP! YOU HAVE COMPLETED THIS PROCEDURE. 365-575-536 Issue 1 March 2001 Trouble Clearing: TAP-120 Page 1 of 4 Clear `Incoming (From Supr) DCC Failure' NOTE: Failure of the incoming data communications channel (DCC) is usually associated with hardware failure(s) at the source of the incoming supervisory signal or with other troubles involving the incoming supervisory signal from that source. 1. At the CIT, select FAULT-Retrieve-Condition-All to obtain a report. 2. Referring to the report obtained in Step 1, are there any conditions other than incoming (from Supr) DCC failure? If YES, then continue with Step 3. If NO, then continue with Step 6. 3. 4. Referring to the report obtained in Step 1, identify the topmost condition other than the incoming(from Supr) DCC failure. NOTE: While following the instructions in the procedure(s) to which you will now be sent, you MUST ignore the incoming (from Supr) DCC failure in the report. For example, if you are asked whether there are any alarm or status conditions listed and the only condition shown in the report is incoming (from Supr) DCC failure the answer is NO. NOTE: After clearing the condition identified in Step 3, continue the trouble clearing procedure using TAP-102 at the network element that initially reported the incoming (from Supr) DCC failure condition. Find the condition identified in Step 3 in Table A of TAP-102 and go to the indicated TAP to clear that condition [ignoring the incoming (from Supr) DCC failure condition throughout the remainder of the trouble clearing procedure]. 5. STOP! YOU HAVE COMPLETED THIS PROCEDURE. TAP-120: Trouble Clearing Page 2 of 4 6. 365-575-536 Issue 1 March 2001 The source of the failed DCC input may be the upstream OLS network element. From office records, determine which network element is upstream of the failed DCC input. 7. NOTE: You may not be able to remotely log in to the network element sending the failed DCC input. If you cannot log in to that network element, you will need assistance there to continue with this procedure. At the source of the failed DCC input, use the CIT to obtain a FAULT-Retrieve-Condition-All report. 8. NOTE: It is possible that an incoming (from Supr) DCC failure will also be observed at this network element. If so, you MUST ignore the incoming (from Supr) DCC failure condition in the FAULT-Retrieve-Condition-All report. Referring to the report obtained in Step 7, are there any conditions other than incoming (from Supr) DCC failure listed? If YES, then continue with Step 9. If NO, then continue with Step 12. 9. 10. Referring to the report obtained in Step 7, identify the topmost condition other than the incoming (from Supr) DCC failure condition. NOTE: While following the instructions in the procedure(s) to which you will now be sent, you MUST ignore the incoming (from Supr) DCC failure condition in the report. For example, if you are asked whether there are any alarm or status conditions listed and the only condition shown in the report is incoming (from Supr) DCC failure, the answer is NO. NOTE: After clearing the condition identified in Step 9, continue the trouble clearing procedure using TAP-102 at the network element that initially reported the incoming (from Supr) DCC failure condition. Find the condition identified in Step 9 in Table A of TAP-102 and go to the indicated TAP to clear that condition [ignoring the incoming (from Supr) DCC failure condition throughout the remainder of the trouble clearing procedure]. 11. STOP! YOU HAVE COMPLETED THIS PROCEDURE. 365-575-536 Issue 1 March 2001 12. Trouble Clearing: TAP-120 Page 3 of 4 NOTE: The incoming (from Supr) DCC failure is possibly due to a "silent" failure of the TOHCTL circuit pack at the network element sending the failed DCC input or at the network element detecting it. At the CIT, select CONFIGURATION-Retrieve-Equipment:OHCTL command and execute for the upstream node identified in Step 6. 13. From the report, replace the OHCTL circuit pack for the line associated with the failed DCC output. Reference: DLP-514 14. Wait 10 minutes for the TOHCTL circuit pack to reboot. 15. Is the incoming (from Supr) DCC failure condition still reported at the network element where it was initially detected? If YES, then continue with Step 16. If NO, then STOP! YOU HAVE COMPLETED THIS PROCEDURE. 16. At the network element that originally reported the incoming (from Supr) DCC failure condition, replace the TOHCTL circuit pack for the line associated with the failed DCC output. 17. Wait 10 minutes for the circuit pack to reboot. 18. Is the incoming (from Supr) DCC failure condition still reported at the network element where it was initially detected? If YES, then continue with Step 22. If NO, then continue with Step 19. 19. At the network element identified in Step 6, return the original TOHCTL circuit pack to service by removing the replacement circuit pack and installing the original TOHCTL. 20. Wait 10 minutes for the TOHCTL circuit pack to reboot. 21. Is the incoming (from Supr) DCC failure condition still reported at the network element where it was initially detected? If YES, then continue with Step 22. If NO, then STOP! YOU HAVE COMPLETED THIS PROCEDURE. TAP-120: Trouble Clearing Page 4 of 4 365-575-536 Issue 1 March 2001 22. Consult the appropriate maintenance support organization for further technical assistance. 23. STOP! YOU HAVE COMPLETED THIS PROCEDURE. 365-575-536 Issue 1 March 2001 Trouble Clearing: TAP-121 Page 1 of 2 Address `CP Reset In Progress' NOTE: When a circuit pack is installed, it is downloaded with the necessary software. While this is occurring, the CP reset in progress condition will be active. 1. Find the circuit pack with the CP reset in progress condition in Table A and wait for the indicated time. Table A - Circuit Pack Reset Times Circuit Pack OTCTL SYSCTL SYSMEM TOHCTL All Others Time 10 minutes 15 minutes 15 minutes 10 minutes 1 minute 2. At the CIT, select the FAULT-Retrieve-Condition-All and execute to obtain another report. 3. Is the CP reset in progress condition still indicated for the same circuit pack? If YES, then go to TAP-108. If NO, then STOP! YOU HAVE COMPLETED THIS PROCEDURE. TAP-101: Trouble Clearing Page 2 of 2 365-575-536 Issue 1 March 2001 TAP-122 : Trouble Clearing Page 1 of 2 365-575-536 Issue 1 March 2001 Clear `CP (Unknown Type) Removed' NOTE: The AID of the removed circuit pack is shown in the report. 1. Identify the appropriate shelf associated with the removed circuit pack. Reference: DLP-503 2. Open the cabinet doors or remove the shelf cover. All connections can be accessed from the front. Reference: DLP-511 3. Is the indicated slot empty? If YES, then continue with Step 4. If NO, then go to TAP-108. 4. Do office records show that the slot should contain a circuit pack? If YES, then continue with Step 8. If NO, then continue with Step 5. 5. At the CIT, select CONFIGURATION-Update-System (records the current hardware arrangement in SYSMEM circuit pack). 6. Close the cabinet doors or replace the shelf cover. Reference: DLP-511 7. STOP! YOU HAVE COMPLETED THIS PROCEDURE. 8. Obtain the type of circuit pack determined from office records and install it in the appropriate slot. As required, make the appropriate optical connections on the OA or TLM circuit pack(s). Reference: DLP-514 365-575-536 Issue 1 March 2001 9. Trouble Clearing: TAP-122 Page 2 of 2 Wait for the time indicated in Table A. Table A - Mini Reset Waiting Times CP Inserted OTCTL SYSCTL SYSMEM TOHCTL All Others Waiting Time 10 minutes 15 minutes 15 minutes 10 minutes 1 minute 10. Is the FAULT LED lighted on the replacement circuit pack? If YES, then replace shelf cover and go to Trouble Clearing: IXL-001. If NO, then continue with Step 11. 11. Close the cabinet doors or replace the shelf cover. Reference: DLP-511 12. Is the NE ACTY LED lighted at the user panel. If YES, then go to Trouble Clearing: IXL-001. If NO, then STOP! YOU HAVE COMPLETED THIS PROCEDURE. TAP-123 : Trouble Clearing Page 1 of 2 365-575-536 Issue 1 March 2001 Clear ‘CP (Unknown Type) Failure’ or ‘OTPM Unknown’ 1. If the affected circuit pack was just installed, wait for the time indicated in Table A to allow the software in the affected circuit pack to start up. Table A - Mini Reset Waiting Times CP Inserted Waiting Time OTCTL SYSCTL SYSMEM TOHCTL All Others 2. 10 minutes 15 minutes 15 minutes 10 minutes 1 minute NOTE: The circuit pack in the indicated slot has failed, but its type is unknown to the software. The type or code appears on the circuit pack faceplate. NOTE: Section 3, "Platform Descriptions," lists the circuit pack codes that are supported by the slot for a particular shelf. Also listed is the compatible software for the particular circuit pack code. Consult office records to determine the type of circuit pack to be installed in the slot. 3. Obtain and install a replacement circuit pack determined in Step 2. As required, make the appropriate optical connections on the OA or TLM circuit pack(s). Reference: DLP-514 4. Wait for the time indicated in Table A for the download of software. 5. Did the FAULT LED on the replacement circuit pack go off? If YES, then continue with Step 6. If NO, then go to TAP-116. 6. Is the NE ACTY LED lighted? If YES, then go to Trouble Clearing: IXL-001. If NO, then STOP! YOU HAVE COMPLETED THIS PROCEDURE. 365-575-536 Issue 1 March 2001 Trouble Clearing: TAP-101 Page 2 of 2 365-575-536 Issue 1 March 2001 Trouble Clearing: TAP-124 Page 1 of 2 Address `Reset in Progress' NOTE: A software reset is in progress. This involves downloading software from SYSMEM to SYSCTL, and to TOHCTLs, OTCTLs, and to board controllers on all other circuit packs. This can take as long as 10 minutes. During this time, the miscellaneous discrete control points are deactivated. 1. Is the MJ LED lighted? If YES, then wait 10 minutes before proceeding with Step 2. If NO, then continue with Step 5. 2. At the CIT, select FAULT-Retrieve-Condition-All to obtain an updated report. 3. Is reset in progress still reported? If YES, then continue with Step 4. If NO, then continue with Step 7. 4. Wait 10 minutes or until the MJ LED is off at the user panel. 5. At the CIT, select FAULT-Retrieve-Condition-All to obtain an updated report. 6. Is reset in progress still reported? If YES, then go to TAP-108. If NO, then continue with Step 7. 7. Is the NE ACTY LED lighted? If YES, then go to Trouble Clearing: IXL-001. If NO, then STOP! YOU HAVE COMPLETED THIS PROCEDURE. TAP-101: Trouble Clearing Page 2 of 2 365-575-536 Issue 1 March 2001 TAP-125 : Trouble Clearing Page 1 of 2 365-575-536 Issue 1 March 2001 Clear `SYSMEM Unrecognizable Code' Overview: The software code stoMarch 2001red in the nonvolatile memory of the SYSMEM circuit pack is corrupted or its version is not recognized by the SYSCTL circuit pack. The recommended way to clear this condition is to download new software code from the CIT to the SYSMEM circuit pack. However, other methods to clear this condition are (a) to install a replacement SYSMEM circuit pack pre-loaded with the correct code, and (b) to copy software from another network element. NOTE: This procedure requires SYSMEM circuit packs be removed and installed several times. Therefore, at each time, the technician should logout, remove and install the SYSMEM, and then log back in to the network element. 1. At the CIT, select CONFIGURATION-Retrieve-Equipment and enter sysctl to obtain a report. 2. Refer to the report and record the software release information (VRSN=) from the sysctl line entry. For example, OLS RELEASE 3.3.0-OLS. This software release is now running in the SYSCTL circuit pack. 3. Which one of the following do you want to do? To download new software, go to OPERATION: NTP-002. To use a prel-loaded SYSMEM circuit pack, continue with Step 4. To copy software from another NE, go to OPERATION: NTP-003. 4. Open the cabinet door or remove the shelf cover. All connections can be accessed from the front. 5. Is the FAULT LED flashing at the SYSMEM circuit pack? If YES, then continue with Step 6. If NO, then go to TAP-108. 6. 7. Obtain a replacement SYSMEM circuit pack containing an exact copy of the software identified in Step 2. NOTE: The installation of a replacement SYSMEM circuit pack may generate certain unexpected alarm conditions. Ignore these indications until the code mismatch condition has been cleared, then clear any remaining condition(s). 365-575-536 Issue 1 March 2001 Trouble Clearing: TAP-125 Page 2 of 2 Remove the SYSMEM circuit pack and install the replacement SYSMEM circuit pack. Reference: Reference: DLP-514 8. Wait several minutes for the OLS to stabilize (indicated by the FAULT LED on the SYSMEM circuit pack being continuously lighted, flashing, or off.) 9. Is the FAULT LED continuously lighted on the SYSMEM circuit pack? If YES, then continue with Step 10. If NO, then continue with Step 12. 10. Is a second replacement SYSMEM circuit pack available? If YES, then continue with Step 11. If NO, then continue with Step 13. 11. Replace the SYSMEM circuit pack with the second replacement SYSMEM circuit pack (loaded with an exact copy of the software identified in Step 2.) Reference: Reference: DLP-514 12. Use the FAULT-Retrieve-Comdition-All command to obtain an updated report. Is the SYSMEM/SYSCTL code mismatch condition reported? If YES, then go to TAP-126. If NO, then continue with Step 15. 13. Reinstall the original SYSMEM circuit pack. Reference: Reference: DLP-514 14. Install new software (same release as currently running in the SYSCTL circuit pack). Reference: Operation: NTP-002. 15. Close the cabinet door or replace the shelf cover. Reference: DLP-511 16. Is the NE ACTY LED lighted at the user panel? If YES, then go to Trouble Clearing: IXL-001. If NO, then STOP! YOU HAVE COMPLETED THIS PROCEDURE. TAP-126 : Trouble Clearing Page 1 of 2 365-575-536 Issue 1 March 2001 Clear `SYSMEM/SYSCTL Code Mismatch' Overview: The software code stored in the nonvolatile memory of the SYSMEM circuit pack is different from the current code running in the SYSCTL circuit pack. The OLS network element is currently functioning from the code running in the SYSCTL circuit pack. The `SYSMEM/SYSCTL code mismatch' condition will be cleared by one of the following actions: • by executing CONFIGURATION-Initialize-System:TID:AID(All):PH(3) that causes the SYSMEM circuit pack to download code to the SYSCTL circuit pack. • by downloading the code from diskettes via the CIT to the SYSMEM circuit pack. • by performing a remote (DCC) download procedure that will copy code from another network element. NOTE: During the duration of the code mismatch, a major indication will exist at the control panel. Ignore this indication until the code mismatch condition has been cleared, then clear any remaining trouble conditions. 1. At the CIT, select CONFIGURATION-Retrieve-Equipment and enter sysctl to obtain a report. 2. Refer to the report and record the software release information (VRSN=) from the sysctl line entry; for example, OLS RELEASE 3.3.0-OLS. This software release is now running in the SYSCTL circuit pack. 3. Refer to the report and record the software release information (VRSN=) from the sysmem line entry; for example, OLS RELEASE 3.3.0-OLS. This software release is stored in the nonvolatile memory of the SYSMEM circuit pack. 4. Are the software releases and/or platforms recorded in Steps 2 and 3 different from each other? If YES, then continue with Step 5. If NO, then go to TAP-108. 5. Determine which of the two software releases is supposed to be running in the OLS network element. 365-575-536 Issue 1 March 2001 6. Trouble Clearing: TAP-126 Page 2 of 2 Is the software release running in the SYSCTL (software release recorded in Step 2) supposed to be running in this OLS network element? If YES, then continue with Step 11. If NO, then continue with Step 7. 7. Is the software release running in the SYSMEM (software release recorded in Step 3) supposed to be running in this OLS network element? If YES, then continue with Step 8. If NO, then continue with Step 11. 8. NOTE: The CIT will disconnect from the network element when the CONFIGURATION-Initialize-System command is executed. At the CIT, select CONFIGURATION-Initialize-System:TID:AID(All):PH(3) and execute. During the reset time, the miscellaneous discrete control points will be deactivated. 9. Wait 15 minutes or until the MJ LED is off at the user panel, whichever comes first. Reset takes approximately 15 minutes, but some panel LEDs flash and relays click in about a minute, indicating that reset has started. If the network element is equipped with OTPMs, wait an additional 5 minutes. 10. STOP! YOU HAVE COMPLETED THIS PROCEDURE. 11. Is the correct software release running in a remote OLS network element and is the DCC connection good to that network element? If YES, then go to OPERATION: NTP-003 to copy software. If NO, then go to OPERATION: NTP-002 to install software. 12. STOP! YOU HAVE COMPLETED THIS PROCEDURE. TAP-127 : Trouble Clearing Page 1 of 2 365-575-536 Issue 1 March 2001 Clear `Unexpected CP Type' or ‘Unexpected OTPM Type’ Overview: The unexpected CP type condition is issued whenever the OLS software detects a difference between what it expects in a circuit pack (CP) slot and which CP is actually in the slot. This condition is normally cleared by correcting the difference (wrong CP type or incomplete records). NOTE: Do not remove any additional circuit packs from the shelf until the unexpected CP type or unexpected OTPM type condition has been cleared. 1. At the CIT, select CONFIGURATION-Retrieve-Equipment:All to obtain a report. 2. Determine from office records the correct CP type for the slot in question. 3. Compare the report with the office records and determine which indicates the correct CP type. 4. Is the correct CP actually plugged into the slot? If YES, then continue with Step 5. If NO, then continue with Step 7. 5. At the CIT, select CONFIGURATION-Update-System to update the network element. 6. STOP! YOU HAVE COMPLETED THIS PROCEDURE. 7. Obtain the correct CP type according to office records. 8. If required, open the cabinet doors or remove the shelf cover. All connections can be accessed from the front. Reference: DLP-511 9. Remove the incorrect CP type from the slot and insert the correct CP type. Reference: DLP-514 365-575-536 Issue 1 March 2001 Trouble Clearing: TAP-127 Page 2 of 2 10. Close the cabinet doors or replace the shelf cover. Reference: DLP-511 11. STOP! YOU HAVE COMPLETED THIS PROCEDURE. TAP-128 : Trouble Clearing Page 1 of 2 365-575-536 Issue 1 March 2001 Clear Trouble In CIT (CIT Does Not Respond to Commands) Overview: This procedure is used to clear trouble within the Craft Interface Terminal (CIT) such as a software hang-up or a malfunction. 1. NOTE: The DCE/DTE port must be provisioned for TL1 operation. Is the mouse operational? If YES, then click on Help and on Troubleshooting or ask for technical assistance from your FT-2000 administrator. If NO, then continue with Step 2. 2. Perform a hard boot on the PC by pressing the RESET switch or by turning the power switch off and then on again. 3. Did the PC reboot? If YES, then continue with Step 4. If NO, then refer to the Software Release Description to reload the software and/or replace the PC. 4. NOTE: The browser and the NE server software are considered parts of the CenterLink software. Did the CenterLink software load? If YES, then continue with Step 5. If NO, then go to Operation: NTP-002. 5. Log in to the network element. Reference: DLP-501 6. Were you able to log in to the NE? If YES, then STOP! YOU HAVE COMPLETED THIS PROCEDURE. If NO, then continue with Step 7. 7. First try solving your problem by going to Troubleshooting under Help at the main CenterLink screen. If additional help is required, contact technical support who may recommend the replacement of the SYSMEM circuit pack. 8. STOP! YOU HAVE COMPLETED THIS PROCEDURE. 365-575-536 Issue 1 March 2001 Trouble Clearing: TAP-128 Page 2 of 2 365-575-536 Issue 1 March 2001 Trouble Clearing: TAP-129 Page 1 of 2 Clear `DCC Startup In Progress' NOTE: The data communication channel (DCC) is starting up. This interaction between the OLS network elements takes from 10 to 15 minutes. 1. Wait 15 minutes or until the NE ACTY LED goes off. 2. Did the "DCC startup in progress" condition clear? If YES, then continue with Step 3. If NO, then go to TAP-108. 3. Is the NE ACTY LED lighted? If YES, then go to Trouble Clearing: IXL-001. If NO, then STOP! YOU HAVE COMPLETED THIS PROCEDURE. TAP-129: Trouble Clearing Page 2 of 2 365-575-536 Issue 1 March 2001 TAP-130 : Trouble Clearing Page 1 of 1 365-575-536 Issue 1 March 2001 Restore Network Element Operation After Power Loss Overview: The network element has had its power restored and one or more circuit packs have an "unexpected" or "unrecognized" failure. 1. Is the green POWER ON LED on the user panel lighted? If NO, then go to TAP-119. If YES, then continue with Step 2. 2. NOTE: If one or more FAULT LEDs is lighted during the reset process, it should be ignored during this procedure. Wait 15 minutes for all circuit packs to reset. 3. At the CIT, select the command CONFIGURATION-Initialize-System. The AID field should indicate ALL and the PH field should be set to 3. Select Enter to execute and to reset the network element. 4. Are any conditions listed in the CONDDSCR column of the report? If NO, then STOP! YOU HAVE COMPLETED THIS PROCEDURE. If YES, then continue with Step 5. 5. NOTE: The CIT will disconnect from the network element when the CONFIGURATION-Initialize-System command is executed. At the CIT, select CONFIGURATION-Initialize-System:TID:AID (All:PH(3) command and execute to reset the network element. 6. Wait 15 minutes or until the MJ LED is off at the user panel, whichever comes first. Reset takes approximately 15 minutes, but some user panel LEDs flash and relays click in about a minute, indicating that reset has started. If the network element is equipped with OTPMs, wait an additional 5 minutes. 7. At the CIT, select FAULT-Retrieve-Condition-All command and execute to obtain a report. 8. Are any conditions listed in the CONDDSCR column of the report? If NO, then STOP! YOU HAVE COMPLETED THIS PROCEDURE. 365-575-536 Issue 1 March 2001 If YES, then go to TAP-102. Trouble Clearing: TAP-130 Page 2 of 1 TAP-131 : Trouble Clearing Page 1 of 2 365-575-536 Issue 1 March 2001 Clear `Software Download in Progress' Overview: A software download can take as long as 2 hours at 9600 baud (less time at the higher baud rate of 19,200 or 38,400). 1. Wait for the download to be completed. 2. Did the "software download in progress" condition clear? If YES, then STOP! YOU HAVE COMPLETED THIS PROCEDURE. If NO, then refer the trouble to the people doing the software download. 365-575-536 Issue 1 March 2001 Trouble Clearing: TAP-131 Page 2 of 2 365-575-536 Issue 1 March 2001 Trouble Clearing: TAP-132 Page 1 of 2 Clear `System Startup In Progress' NOTE: This condition is normally a transient condition. NOTE: An event can occur that will cause a node to default to the original date/time (70-01-01 00:00:00). Then as part of the system startup process, the node will acquire the date and time from the DSNE node (or neighboring node) once the system startup has successfully completed. 1. Wait 5 minutes or until the NE ACTY LED on the user panel goes off. 2. At the CIT, select FAULT-Retrieve-Condition-All to obtain a report. 3. Has the OLS system startup in progress condition cleared? If YES, then STOP! YOU HAVE COMPLETED THIS PROCEDURE. If NO, then go to TAP-108 to clear the unexpected response. TAP-132: Trouble Clearing Page 2 of 2 365-575-536 Issue 1 March 2001 TAP-133 : Trouble Clearing Page 1 of 2 365-575-536 Issue 1 March 2001 Clear `SYSMEM Removed' ! CAUTION: Do not remove the SYSCTL circuit pack. If removed, provisioning data (current values) will be lost. Current values were provisioned with the Set command. NOTE: A series number S1:2 is the same series number as S1:4. The 2 and 4 refer to minor changes within series 1. 1. Obtain a replacement SYSMEM circuit pack having the same or a higher series number. 2. Install the replacement SYSMEM circuit pack. Reference: DLP-514 3. Wait 10 minutes or until the MJ LED goes off. 4. Is the NE ACTY LED off? If YES, then STOP! YOU HAVE COMPLETED THIS PROCEDURE. If NO, then go to TAP-101. 365-575-536 Issue 1 March 2001 Trouble Clearing: TAP-133 Page 2 of 2 365-575-536 Issue 1 March 2001 Trouble Clearing: TAP-134 Page 1 of 2 Clear `System Incomplete' Overview: This condition indicates that the designated DS-NE network element is unable to create a complete system map because of a controller or transmission failure in the network or an NE reset. 1. At the CIT, select FAULT-Retrieve-Condition-All to obtain a report. 2. Does a controller circuit pack (SYSCTL, SYSMEM, or TOHCTL) condition or an incoming optical line condition appear in the Active Alarms and Status Reports? If YES, then go to TAP-102 to clear the indicated condition(s). If NO, then continue with Step 3. 3. NOTE: You cannot obtain a valid Ring Map Report or Network Map Report while this condition exists. NOTE: The optical line may not be configured per office records. Select CONFIGURATION-Retrieve-Map to verify all the network elements. Consult office records to determine the Target Identifiers (TIDs) of the other nodes in the network. 4. NOTE: When the network is in this state, you will probably not be able to initiate login to one or more of the other nodes. If a remote login is possible and if you need additional help, refer to DLP-518. Otherwise, local CIT assistance will be required at those nodes. Initiate a login to any one of the other network elements identified in Step 3. If you need help with the remote login, refer to DLP-518. 5. At the CIT, select FAULT-Retrieve-Condition-All to obtain a report for that network element. 6. Does a controller circuit pack (SYSCTL, SYSMEM, or TOHCTL) condition or an incoming optical line condition appear in the Active Alarms and Status Reports? If YES, then go to TAP-102 to clear the indicated condition(s). If NO, then continue with Step 7. TAP-134: Trouble Clearing Page 2 of 2 365-575-536 Issue 1 March 2001 7. Repeat Steps 4 through 6 for each of the remaining network elements identified in Step 3. 8. Is the ring incomplete condition still active at the original network element? If YES, then continue with Step 9. If NO, then STOP! YOU HAVE COMPLETED THIS PROCEDURE. 9. Consult the appropriate maintenance support organization for further technical assistance. 10. STOP! YOU HAVE COMPLETED THIS PROCEDURE. 365-575-536 Issue 1 March 2001 Trouble Clearing: TAP-135 Page 1 of 2 Clear `Multiple DS-NEs Defined' Overview: This condition means that two or more network elements in a network have their "Directory Service" (DS-NE) parameter provisioned to "Yes." There must be one and only one DS-NE in the network. 1. 2. At the CIT, select CONFIGURATION-Retrieve-Map to obtain a report. The topmost entry shows the TID of the local node, which is where the report is requested followed by all remaining nodes. NOTE: To clear the multiple DS-NEs defined condition, all nodes in the network must first be provisioned to No, then only the designated node is provisioned to Yes. At the CIT, select SECURITY-Enter-System and provision the DSNE parameter to No. 3. NOTE: When the network is in this state, you will probably not be able to initiate login to one or more of the other nodes. If a remote login is possible and if you need additional help, refer to DLP-518. Otherwise, local CIT assistance will be required at those nodes. NOTE: The TOHCTL takes about 5 minutes to stabilize after provisioning the DS-NE parameter. Ask for assistance at the next node on the report or travel to that location and condition and connect the CIT to the network element. Reference: DLP-501 4. After you are logged in to that node, repeat Step 2. 5. Log off of the network element. 6. Repeat Steps 3, 4, and 5 for each of the remaining nodes in the network. 7. Determine from office records which network element is to be the DS-NE. 8. Log in to that network element (the designated DS-NE). If a remote login is possible and you need additional help, refer to DLP-518. TAP-135: Trouble Clearing Page 2 of 2 9. 10. 365-575-536 Issue 1 March 2001 At the CIT, select SECURITY-Enter-System and provision the DSNE parameter to Yes. NOTE: The TOHCTL takes about 5 minutes to stabilize after provisioning the DS-NE parameter. Ask for assistance at the next node on the report or travel to that location and condition and connect the CIT to the network element. Reference: DLP-501 11. At the CIT, select CONFIGURATION-Retrieve-Map-Network to obtain a report. 12. Verify from the report that one and only one node is provisioned as the DS-NE. 13. Log off of the network element. 14. STOP! YOU HAVE COMPLETED THIS PROCEDURE. 365-575-536 Issue 1 March 2001 Trouble Clearing: TAP-136 Page 1 of 4 Clear Office Alarm When `NE ACTY' and `FE ACTY' LEDs are Off Overview: This procedure is used to clear an active office alarm originating at an OLS network element when both the NE ACTY and the FE ACTY LEDs on the user panel are off. If the SYSMEM circuit pack has been removed from a node, the ‘SYSMEM failure’ condition (or any other conditions) will not be locally reported to CenterLink. However, the condition will be reported to ITM-SC via CMISE or a DCC link which will in turn inform the technician to replace the SYSMEM circuit pack at the node. 1. Is the green POWER ON LED on the user panel lighted? If YES, then continue with Step 2. If NO, then go to TAP-119. 2. Open the cabinet doors or remove the shelf cover. All connections can be accessed from the front. Reference: DLP-511 3. Is the CIT conditioned and connected to the OLS network element? If YES, then continue with Step 4. If NO, then complete DLP-501 and return to this procedure. 4. NOTE: It is unlikely that the CIT will be able to communicate with the network element under these conditions. At the CIT, select FAULT-Retrieve-Condition-All to obtain a report. 5. Were you able to communicate with the network element (and obtain a report)? If YES, then continue with Step 6. If NO, then continue with Step 7. 6. Make a note that the office alarm outputs and/or the NE ACTY and FE ACTY LEDs on the user panel are not operating properly and go to TAP-108. TAP-136: Trouble Clearing Page 2 of 4 7. 365-575-536 Issue 1 March 2001 NOTE: The SYSCTL and/or the SYSMEM circuit pack has either failed or been removed. Are SYSCTL and SYSMEM circuit packs installed? If YES, then continue with Step 8. If NO, then continue with Step 17. Reference: DLP-503 8. NOTE: The installation of a replacement SYSMEM circuit pack may generate certain unexpected alarm conditions. Ignore these indications until the code mismatch condition has been cleared. Then clear any remaining condition(s). NOTE: This procedure begins with the replacement of the SYSMEM circuit pack even though the SYSCTL circuit pack FAULT LED may be lighted. Remove the SYSMEM circuit pack, and install a replacement circuit pack having the same or a higher series number. For example, a series number S1:2 is the same series number as S1:4. The 2 and 4 refer to minor changes within series 1. Reference: DLP-514 9. Wait 15 minutes. (If a FAULT-Retrieve-Condition-All report is obtained during this time and the CONDDSCR Column shows a reset in progress condition, don't worry because this is a normal software download operation.) 10. Is the NE ACTY and/or FE ACTY LED lighted? If YES, then continue with Step 21. If NO, then continue with Step 11. 11. Are visual and/or audible office alarms off? If YES, then continue with Step 21. If NO, then continue with Step 12. 12. Reinstall the original SYSMEM circuit pack removed in Step 8. Reference: DLP-514 365-575-536 Issue 1 March 2001 Trouble Clearing: TAP-136 Page 3 of 4 13. Remove the SYSCTL circuit pack and install a replacement circuit pack having the same or a higher series number. For example, a series number S1:2 is the same series number as S1:4. The 2 and 4 refer to minor changes within series 1. Reference: DLP-514 14. Wait 15 minutes. 15. Is the NE ACTY and/or FE ACTY LED lighted? If YES, then continue with Step 21. If NO, then continue with Step 16. 16. Are visual and/or audible office alarms off? If YES, then continue with Step 21. If NO, then contact your local maintenance support group for a higher level of technical assistance. 17. Install a replacement SYSMEM and/or SYSCTL circuit pack in the appropriate slot(s). Reference: DLP-514 18. Wait 15 minutes, or until the NE ACTY or FE ACTY LED is on, or until the office alarm(s) is off, whichever comes first. 19. Is the NE ACTY and/or FE ACTY LED lighted? If YES, then continue with Step 21. If NO, then continue with Step 20. 20. Are visual and/or audible office alarms off? If YES, then continue with Step 21. If NO, then contact your local maintenance support group for a higher level of technical assistance. 21. Log into the network element as directed by the instructions on the CIT screen. 22. At the CIT, select CONFIGURATION-Retrieve-Equipment and enter SYSCTL to obtain a report. TAP-136: Trouble Clearing Page 4 of 4 365-575-536 Issue 1 March 2001 23. Refer to the report and compare the software version stored in the SYSMEM (shown under the sysmem entry in the report) and the software version running in the network element (shown under the sysctl entry in the report) with office records. If office records are not available, log in remotely to another network element and obtain a report to determine what software version is running in the network. 24. Is the correct software version stored in the SYSMEM and running in the network element? If YES, then continue with Step 26. If NO, then continue with Step 25. 25. Install the appropriate software into the SYSMEM circuit pack. Reference: Operation: NTP-002 26. NOTE: The CIT will disconnect from the network element when the CONFIGURATION-Initialize-System command is executed. At the CIT, select CONFIGURATION-Initialize-System:TID:AID(All):PH(3) and execute. 27. Wait 15 minutes or until the MJ LED is off at the user panel, whichever comes first. Reset takes approximately 15 minutes, but some user panel LEDs flash and relays click in about a minute, indicating that reset has started. If the network element is equipped with OTPMs, wait an additional 5 minutes. 28. Close the cabinet doors or replace the shelf cover. Reference: DLP-511 29. Is the NE ACTY LED off? If YES, then STOP! YOU HAVE COMPLETED THIS PROCEDURE. If NO, then go to the Trouble Clearing: IXL-001 365-575-536 Issue 1 March 2001 Trouble Clearing: TAP-137 Page 1 of 2 Clear `DS-NE Not Reachable' Overview: This condition indicates that one of the network elements (nodes) in the network has not been provisioned "DS-NE" or more likely that the DCC has failed and is in reset. 1. 2. Determine from office records which node is designated the "Directory Service NE" (DS-NE) in the network. NOTE: A TOHCTL failure condition must be cleared before a DS-NE not reachable condition. Is there a TOHCTL failure condition at the far end (FE)? If YES, then go to TAP-111, clear the TOHCTL failure condition, and return to this procedure. If NO, then continue with Step 3. 3. NOTE: When the network is in this state, you will probably not be able to initiate login to one or more of the other nodes. If a remote login is possible and if you need additional help, refer to DLP-518. Otherwise, local CIT assistance will be required at those nodes. Ask for assistance at the DS-NE location or travel to that location and condition and connect the CIT to the network element. Reference: DLP-501 4. At the CIT connected to the node designated to be the DS-NE, select SECURITY-Enter-System and provision the DSNE parameter (DS-NE) of that network element to Yes. The remaining nodes in the network must be provisioned to No for the DSNE parameter. 5. Wait 10 minutes for the OLS diagnostics to stabilize. After this time, the DS-NE not reachable condition should be cleared. Supplemental Information: You can verify that only one node is provisioned as the DS-NE by obtaining a Ring Map Report (at the CIT, select CONFIGURATION-Retrieve-Ring). TAP-137: Trouble Clearing Page 2 of 2 6. 365-575-536 Issue 1 March 2001 Did the DS-NE not reachable condition clear? If YES, then continue with Step 7. If NO, then call for technical assistance in the next level of trouble clearing. 7. Log off of the network element. 8. STOP! YOU HAVE COMPLETED THIS PROCEDURE. 365-575-536 Issue 1 March 2001 Trouble Clearing: TAP-138 Page 1 of 2 Clear `Duplicate TID Defined' Overview: A recently entered target identifier (TID) value is a duplicate of another network element in the OLS. 1. Determine from office records the correct TID for the network elements showing the duplicate values. 2. Log in to the network element that is in error. If a remote login is required and you need additional help, refer to DLP-518. 3. At the CIT, select SECURITY-Enter-System and enter the correct TID for that network element. 4. Log off of the network element, as required. 5. STOP! YOU HAVE COMPLETED THIS PROCEDURE. TAP-138: Trouble Clearing Page 2 of 2 365-575-536 Issue 1 March 2001 TAP-139 : Trouble Clearing Page 1 of 2 365-575-536 Issue 1 March 2001 Clear `SER TLM 1 Port Failure' Overview: The external miscellaneous discrete unit (EMDU) has failed to respond to polling by the local OLS network element. The OLS network element is connected to the EMDU via the SER TLM 1 port. The communication is based on a telemetry byte-oriented serial (TBOS) protocol, with the OLS network element functioning as master. The OLS network element polls the EMDU at an interval of every 10 to 13 seconds. This alarm condition indicates that the EMDU is not responding to the poll. 1. Open the cabinet doors or remove shelf cover. All connections can be accessed from the front. Reference: DLP-511 2. Make an inspection of the serial telemetry cable connected to the P19 SER TLM 1 connector at the interconnect panel. (Verify cable is properly seated in the connector.) 3. At the CIT, select FAULT-Retrieve-Condition-All command and execute to obtain a report. 4. Referring to the report obtained in Step 3, is the SER TLM 1 port failure still listed? If YES, then continue with Step 5. If NO, then STOP! YOU HAVE COMPLETED THIS PROCEDURE. 5. Use the appropriate vendor maintenance documents to determine if the EMDU is operating properly. If operating properly, then continue with Step 6. If not operating properly, then clear trouble using vendor supplied maintenance documents. 6. Contact the appropriate maintenance support organization for further technical assistance. 7. STOP! YOU HAVE COMPLETED THIS PROCEDURE. 365-575-536 Issue 1 March 2001 Trouble Clearing: TAP-139 Page 2 of 2 365-575-536 Issue 1 March 2001 Trouble Clearing: TAP-140 Page 1 of 2 Clear `different OA types in side' Overview: This condition indicates that the network element is operating with OAs that have different apparatus (APP) codes. Dual facing terminals are capable of supporting OAs with different apparatus codes on each side of the terminal. So this implies the OAs in optical line pairs 1 and 3 (side 1) could be a different apparatus code than the OAs in the optical line pairs 2 and 4 (side 2). But the OAs in a side (side 1 or side 2) must be of the same apparatus code. Since (non-dual) end terminal and repeater type network elements have only side 1, all OAs in this type network element must be of the same apparatus code. The only exception to this is LEA6 and LEA7 when the network element is provisioned to operate in mode A. 1. At the CIT, select CONFIGURATION-Retrieve-Equipment command and execute to obtain a report. 2. Scan the APP= entry of the report and determine which OA has a different apparatus code than the other equipped OAs in the network element. 3. From office records, determine the correct apparatus code for the OA slot identified as having a different apparatus code in Step 2. 4. Obtain the correct OA type according to office records. 5. If required, open the cabinet doors and remove the shelf cover. Reference: DLP-511 6. Remove the incorrect OA type from the slot and insert the correct OA type. Reference: DLP-514 7. If required, replace the shelf cover and close the cabinet doors. Reference: DLP-511 8. STOP! YOU HAVE COMPLETED THIS PROCEDURE. TAP-140: Trouble Clearing Page 2 of 2 365-575-536 Issue 1 March 2001 TAP-141 : Trouble Clearing Page 1 of 4 365-575-536 Issue 1 March 2001 Clear `OA equipage inconsistent with mode' Overview: This condition indicates that the network element is equipped with the wrong type OA(s) based on the provisioned system type or the system is provisioned as the wrong system type. The network element must be equipped with certain OA apparatus (APP) codes depending on the various possible system types that can be provisioned. 1. At the CIT, select SECURITY-Retrieve-System command and execute to obtain a report. 2. From office records, determine the correct side_sys= or side2_sys= for this network element. For example, side1_sys=C or side2_sys=B. 3. Compare the network element sys= listed in the report obtained in Step 1 with the office records. 4. Is the sys= information in the report and office records the same? If YES, then continue with Step 5. If NO, then continue with Step 13. 5. At the CIT, select the command CONFIGURATION-Retrieve-Equipment. Enter OA-ALL in the AID field. Select Enter to execute. 6. Using Table A, determine the correct OA APP Code for the provisioned sys= determined in Step 3, for this network element. 7. From the report obtained in Step 5, scan the OA rows for the APP= to determine which OA has the incorrect apparatus code for the provisioned sys=. 8. Obtain the correct OA type according to office records and Table A. 9. If required, open the cabinet door or remove the shelf cover. Reference: DLP-511 10. Remove the incorrect OA type from the slot and insert the correct OA type. Reference: DLP-514 365-575-536 Issue 1 March 2001 Trouble Clearing: TAP-141 Page 2 of 4 11. Close the cabinet doors or replace the shelf cover. Reference: DLP-511 12. STOP! YOU HAVE COMPLETED THIS PROCEDURE. 13. At the CIT, select SECURITY-Enter-System and execute. 14. Enter the correct sys= for this network element and execute. 15. STOP! YOU HAVE COMPLETED THIS PROCEDURE. TAP-141: Trouble Clearing Page 3 of 4 365-575-536 Issue 1 March 2001 Table A – OA Types Shown With Specific System Types OA APP Code LEA7/ LEA7B LEA105 or LEA7 LEA104 side1_sys= and/or side2-sys= Number System Type of Spans Min Max Max No. of Wavelengths Bit rates A 22 33 16 OC48/12/3 16 OC48/12 OC48/3 OC12/3 OC48 OC12 OC3 16 OC48/12/3 1 Span loss (dB) 2 3 30 28 B 4 5 22 21 27 26 C 6 7 8 1 1 21 17 17 14 0 26 22 22 18 12 13 16 13 16 20 A 1 2 3 22 35 34 33 B 4 5 26 31 30 A 1_OA 365-575-536 Issue 1 March 2001 Trouble Clearing: TAP-141 Page 4 of 4 TAP-142 : Trouble Clearing Page 1 of 4 365-575-536 Issue 1 March 2001 Clear `opr/prov mode inconsistent' Overview: This condition indicates that the network element provisioned to operate 1_OA configuration is actually operating in the 2_OA mode. The operating mode is defined by the OA in Optical Line 1 for non-dual facing end terminals and repeaters and side 1 of dual facing end terminals. So the 1_OA mode requires that an LEA105 or LEA7 OA be equipped in OA slot 1A or 1B, that is OA slot 1A if the ODU is in ODU slot 1A, and OA slot 1B if the ODU is in ODU slot 1B. The operating mode for side 2 of a dual facing terminal is defined by the OA in Optical Line 2. For side 2, the 1_OA mode requires that an LEA105 or LEA7 OA be equipped in OA slot 2A or 2B, that is OA slot 2A if the ODU is in ODU slot 2A, and OA slot 2B if the ODU is in ODU slot 2B. 1. At the CIT, select SECURITY-Retrieve-System and obtain a report. 2. From the report, determine if the network element is provisioned for dirn=DUAL. 3. Is this network element provisioned as DUAL? If YES, then continue with Step 4. If NO, then go to Step 6. 4. At the CIT, select SECURITY-Retrieve-System and obtain a report. 5. Using the data in the sys= column, determine which side is operating in 2_OA mode? If side 1, continue with Step 6. If side 2, go to Step 23. 6. Is the ODU in ODU slot 1B or 1A? If 1A, continue with Step 7. If 1B, go to Step 15. 7. At the CIT, select CONFIGURATION-Retrieve-Equipment, enter OA-ALL, and then execute to obtain a report. 365-575-536 Issue 1 March 2001 Trouble Clearing: TAP-142 Page 2 of 4 8. Scan the APP column and determine the OA type in OA slot 1A. 9. From office records, determine the correct apparatus code for OA slot 1A. 10. Obtain the correct OA type according to office records. 11. If required, open the cabinet door and/or remove the shelf cover. Reference: DLP-511 12. Remove the incorrect OA type from the slot and insert the correct OA type. Reference: DLP-514 13. If required, replace the shelf cover and/or close the cabinet doors. Reference: DLP-511 14. STOP! YOU HAVE COMPLETED THIS PROCEDURE. 15. At the CIT, select CONFIGURATION-Retrieve-Equipment, enter OA-ALL, and then execute to obtain a report. 16. Scan the APP column and determine the OA type in OA slot 1B. 17. From office records, determine the correct apparatus code for OA slot 1B. 18. Obtain the correct OA type according to office records. 19. If required, open the cabinet doors and/or remove the shelf cover. Reference: DLP-511 20. Remove the incorrect OA type from the slot and insert the correct OA type. Reference: DLP-514 21. If required, replace the shelf cover and/or close the cabinet doors. Reference: DLP-511 22. STOP! YOU HAVE COMPLETED THIS PROCEDURE. TAP-142: Trouble Clearing Page 3 of 4 365-575-536 Issue 1 March 2001 23. Is the ODU in ODU slot 2B or 2A? If 2B continue with Step 24. If 2A continue with Step 32. 24. At the CIT, select CONFIGURATION-Retrieve, enter OA-ALL, and then execute to obtain a report. 25. Scan the APP column and determine the type OA in OA slot 2B. 26. From office records, determine the correct apparatus code for OA slot 2B. 27. Obtain the correct CP type according to office records. 28. If required, open the cabinet doors and/or remove the shelf cover. Reference DLP-511 29. Remove the incorrect OA type from the slot and insert the correct OA type. Reference DLP-514 30. If required, replace the shelf cover and/or close the cabinet doors. Reference DLP-511 31. STOP! YOU HAVE COMPLETED THIS PROCEDURE. 32. At the CIT select, CONFIGURATION-Retrieve-Equipment, enter OA-ALL, and then execute to obtain a report. 33. Scan the APP column and determine the OA type in OA slot 2A. 34. From office records, determine the correct apparatus code for OA slot 2A. 35. Obtain the correct OA type according to office records. 36. If required, open the cabinet doors and/or remove the shelf cover. Reference DLP-511 37. Remove the incorrect OA type from the slot and insert the correct OA type. Reference DLP-514 365-575-536 Issue 1 March 2001 Trouble Clearing: TAP-142 Page 4 of 4 38. If required, replace the shelf cover and/or close the cabinet doors. Reference DLP-511 39. STOP! YOU HAVE COMPLETED THIS PROCEDURE. TAP-143 : Trouble Clearing Page 1 of 6 365-575-536 Issue 1 March 2001 Clear `incoming optical line LOS' for a Single OA Network Element Configuration Overview: This network element has detected a loss of the supervisor channel tone. The single OA configuration does not have a receive OA, so the individual optical channel tones cannot be detected. Therefore, the autonomous fault locating process did not determine the scope of this failure. This procedure provides a process to determine if this condition is an optical line loss or a supervisor channel loss and then proceeds to clear the trouble. 1. Open the cabinet door or remove the shelf cover. All connections can be accessed from the front. Reference: DLP-511 2. Is this incoming signal failure in the receive or transmit line direction? If receive line direction, continue with Step 3. If transmit line direction, go to Step 30. Reference: DLP-503 3. Make a visual inspection of the incoming signal cable(s) and connection(s) and correct any problems found. Reference: DLP-517 4. Contact the person that is responsible for all the LCTs/OTs that have service or protection signals assigned to this Optical Line and determine if any of the assigned LCTs/OTs indicate line failures. 5. Did the LCTs/OTs indicate any line failures? If YES, continue with Step 6. If NO, go to Step 20. 6. ! CAUTION: Failure to follow instructions in this step could result in service interruptions. NOTE: Because an LCT/OT incoming line failure was indicated, the trouble clearing emphasis is on an incoming optical Line LOS. 365-575-536 Issue 1 March 2001 Trouble Clearing: TAP-143 Page 2 of 6 Notify the person that is responsible for the service or protection signals assigned to this OA; (1) to manually switch the service line to a protection line, and (2) ensure that all protection lines that are assigned to this OA are not being used for service. 7. Make an optical power measurement on the incoming fiber that is connected to the ODU input port Reference: DLP-500 8. Was the optical power measurement within the limits? If YES, then continue with Step 9. If NO, then go to Step 18. 9. Clean and reconnect the incoming fiber. Reference: DLP-510 10. At the CIT, select FAULT-Retrieve-Condition-All command and execute to obtain the report. 11. Referring to the report, is the same incoming signal failure still listed? If YES, then go to Step 14. If NO, then continue with Step 12. 12. Notify the person that is responsible for all affected LCTs that have service or protection signals assigned to this OA that this optical line can now be returned to service. 13. STOP YOU HAVE COMPLETED THIS PROCEDURE. 14. Replace the ODU unit associated with this optical line. Reference: DLP-521 15. Wait 15 minutes or until the ODU warmup in progress condition to clear. 16. At the LCT, measure the receive power for each optical channel and install LBOs (new values as required) at the LCT IN and ODU OUT connectors. Reference: DLP-500 TAP-143: Trouble Clearing Page 3 of 6 365-575-536 Issue 1 March 2001 17. Obtain another report (as in Step 10). Is the same incoming signal failure still listed? If YES, then continue with Step 18. If NO, then STOP! YOU HAVE COMPLETED THIS PROCEDURE. 18. NOTE: At this point, it appears that the local network element is operating correctly. Initiate a Trouble Report to the source of the failed incoming signal indicating the type of failure. If the source of the failed incoming signal returns a Trouble Report indicating "no trouble found," then contact the appropriate maintenance support organization for further technical assistance before following the prescribed operating procedures to fault isolate the cable/fiber carrying the failed incoming signal. Reference: DLP-507 19. STOP! YOU HAVE COMPLETED THIS PROCEDURE. 20. NOTE: Because an LCT/OT incoming line failure was NOT indicated, the trouble clearing emphasis is on an incoming supervisory channel LOS. Make an optical power measurement on incoming supervisory channel. Reference: DLP-500 (supervisory channel) 21. Was the optical power measurement correct? If YES, then continue with Step 22. If NO, then go to Step 28. 22. Clean and reconnect the incoming fiber. Reference: DLP-510 23. At the CIT, select FAULT-Retrieve-Condition-All command and execute to obtain the report. 24. Referring to the report obtained in Step 23, is the same incoming signal failure still listed? If YES, continue with Step 25. If NO, then STOP! YOU HAVE COMPLETED THIS PROCEDURE. 365-575-536 Issue 1 March 2001 25. Trouble Clearing: TAP-143 Page 4 of 6 NOTE: The circuit pack associated with the indicated failure condition and indicated AID is shown in Table A. Replace the Telemetry circuit pack as indicated in the AID column of the report from Step 23 and Table A. Reference: DLP-514 26. Obtain another report (as in Step 23). Is the same incoming signal failure still listed? If YES, then continue with Step 27. If NO, then STOP! YOU HAVE COMPLETED THIS PROCEDURE. 27. Remove the replacement circuit pack (installed in Step 25) and reinstall the original circuit pack. Reference: DLP-514 28. NOTE: At this point, it appears that the local network element is operating correctly. Initiate a Trouble Report to the source of the failed incoming signal indicating the type of failure. If the source of the failed incoming signal returns a Trouble Report indicating "no trouble found, then contact the appropriate maintenance support organization for further technical assistance before following the prescribed operating procedures to fault isolate the cable/fiber carrying the failed incoming signal. Reference: DLP-507 29. STOP! YOU HAVE COMPLETED THIS PROCEDURE. 30. NOTE: At this point, it appears the trouble is in the local network element. Visually check and repair any problems at the OMU fiber connections including the fiber jumper between the OMU and the transmit OA circuit pack. Contact the appropriate maintenance support organization for further technical assistance before correcting any problems. TAP-143: Trouble Clearing Page 5 of 6 365-575-536 Issue 1 March 2001 31. STOP! YOU HAVE COMPLETED THIS PROCEDURE. Table A — Condition, AID, and Associated Slot (Note) CONDDESCR AID incoming optical line LOS incoming optical channel LOS oline-{1a-4b} ochan-{1a-4b}-{1-16} incoming CMS incoming CMS incoming CMS incoming CMS cms-{1a,2a,3a,4a} LOF LOS SD SF Associated Slot End Terminal: 1A,1B,2A,2B,3A,3B,4A,4B Note: For example, an "incoming optical line LOS" condition with an AID of "oline-2a" is associated with slot TLM 2A. 365-575-536 Issue 1 March 2001 Trouble Clearing: TAP-143 Page 6 of 6 365-575-536 Issue 1 March 2001 Trouble Clearing: TAP-144 Page 1 of 2 Clear `ODU warmup in progress' Overview: This condition indicates that the optical filters in the ODU are below their correct operating temperature and the heater is in the process of correcting the filter temperature. This condition is normally caused by maintenance functions that require the replacement of OA circuit packs or optical demultiplexer unit (ODU). 1. Wait 15 minutes or until ODU warmup in progress clears. 2. Did the ODU warmup in progress clear? If YES, then continue with Step 3. If NO, then go to TAP-108. 3. Is the NE ACTY LED lighted? If YES, then go to Trouble Clearing: IXL-001. If NO, then STOP! YOU HAVE COMPLETED THIS PROCEDURE TAP-144: Trouble Clearing Page 2 of 2 365-575-536 Issue 1 March 2001 TAP-145 : Trouble Clearing Page 1 of 2 365-575-536 Issue 1 March 2001 Clear `optical line reset in progress' Overview: The processors that monitor and control the optical line are being reset. This condition will be present when an optical line transitions from the auto (OOS-MA-AS) state to an in-service (IS) state or when the system configuration is changed from 1_OA operation to 2_OA operation. 1. Wait 15 minutes. 2. At the CIT, select FAULT-Retrieve-Condition-All and execute to obtain a report. 3. Is the optical line reset in progress condition still indicated for the same optical line? If YES, then go to TAP-108. If NO, then STOP! YOU HAVE COMPLETED THIS PROCEDURE 365-575-536 Issue 1 March 2001 Trouble Clearing: TAP-145 Page 2 of 2 365-575-536 Issue 1 March 2001 Trouble Clearing: TAP-146 Page 1 of 2 Clear Trouble When OTU FAULT LED is Flashing or Lighted Overview: This procedure is used to clear a trouble at an Optical Translator Unit (OTU) located in a cabinet or shelf when a flashing or lighted light-emitting diode (LED) is present. 1. Are you restoring power to the cabinet or shelf after a power outage? If YES, then go to TAP-119. If NO, then continue with Step 2. 2. NOTE: If at any time during the following procedure you observe that the PWR ON Led on the addressed shelf is not lighted, go to TAP-119 to restore power to the shelf. If required, open the cabinet doors or remove the shelf cover. All connections can be accessed from the front. Reference: DLP-505 3. Is the FAULT LED lighted on all OTUs in the shelf or bay? If YES, then go to TAP-119. If NO, then continue with Step 4. 4. Locate the OTU with a FAULT LED condition. 5. Observe the condition of the FAULT LED on the OTU and go to the referenced TAP for that condition. Table A – OTU Trouble Conditions Indication Go to TAP FAULT LED is flashing TAP-151 FAULT LED is lighted continuously TAP-149 6. Close the cabinet doors or install the shelf cover. Reference: DLP-505 7. STOP! YOU HAVE COMPLETED THIS PROCEDURE. TAP-146: Trouble Clearing Page 2 of 2 365-575-536 Issue 1 March 2001 TAP-147 : Trouble Clearing Page 1 of 4 365-575-536 Issue 1 March 2001 Clear OT ‘Fuse/Power Failure (A,B)’ Overview: This procedure is used to clear a fuse/power failure by replacing a blown fuse (lighted), at the Fuse Panel or the User Panel on the shelf associated with the fuse or power failure by clearing a voltage supply problem at the battery distribution and fuse bay (BDFB), or by replacing a failed power filter on a shelf. ! CAUTION: Do not press non-lighted fuses. This may cause momentary power failure on that fuse's power feed. NOTE: Contact the maintenance support organization before proceeding if a failure of both fuses (A and B) or both power feeders (A and B) to a bay exists. 1. Is a fuse lighted (blown) at the user panel or fuse panel? If YES, then continue with Step 2. If NO, then continue with Step 4. 2. NOTE: The fuse cap lamp is a fuse status indicator (Comcode 407411719). The cap lamp works correctly when it is fully engaged and the fuse retainer is locked in place. If the lamp lights in any other position, it may incorrectly indicate a bad fuse. Replace the lighted fuse with a new fuse (Comcode 405749920). Reference: DLP-515 3. Did the fuse blow (light) again? If YES, then continue with Step 11. If NO, then STOP! YOU HAVE COMPLETED THIS PROCEDURE. 4. Are ALL top of the bay indicator strip, Fuse Panel or User Panel LEDs extinguished (including PWR ON LED)? If YES, then continue with Step 6. If NO, then continue with Step 5. 365-575-536 Issue 1 March 2001 5. Trouble Clearing: TAP-147 Page 2 of 4 Is the MJ LED on? If YES, then continue with Step 8. If NO, then continue with Step 11. 6. NOTE: Both power feeder cables are NOT supplying voltage to the bay that has its PWR LEDs off. Check at the BDFB or equivalent and correct the voltage supply problem. 7. STOP! YOU HAVE COMPLETED THIS PROCEDURE. 8. NOTE: One power feeder cable is NOT supplying voltage to a bay. Remove the faceplate to the User Panel or Fuse Panel on the shelf associated with the lighted fuse or power failure. 9. Measure the voltage at the rear of the fuses to determine which power feeder cable is dead and then correct the voltage supply problem at the BDFB or equivalent. 10. STOP! YOU HAVE COMPLETED THIS PROCEDURE. 11. ! CAUTION: Steps 11 through 13 require a voltage measurement at the power filter. The filter associated with feeder A is located on the left side of the cabinet frame and the filter associated with feeder B is located on the right side of the cabinet frame. Remove the faceplate to the User Panel or Fuse Panel on the shelf associated with the lighted fuse or power failure. Notice that the -48 V filter associated with the A feeder has red/black power cable connections and the power filter associated with the B feeder on the shelf which has gray/slate power cable connections. 12. Measure the voltage at the rear of the appropriate fuse. 13. Does the voltage measure between -42.75 and -60 volts? If YES, then continue with Step 16. If NO, then continue with Step 14. 14. Visually check within the bay for a loose connection or a shorted power cable between the power distribution panel and the shelf with the failure. TAP-147: Trouble Clearing Page 3 of 4 365-575-536 Issue 1 March 2001 15. Was a problem found? If YES, then correct the problem and notify Technical Support. If NO, then continue with Step 16. 16. ! CAUTION: Steps 16 through 20 require replacement of a power filter. Replacing the wrong power filter will interrupt power to the shelf that is providing service. Contact Technical Support and indicate that you are about to start replacing a power filter on a shelf. 17. NOTE: Location of the A and B filters different for OT bays. Replace the appropriate filter on the appropriate shelf. For example, if fuse A is blown on a shelf, replace the left mounted filter for that shelf. Reference: DLP-522 18. Did the fuse/power failure ( ) clear? If YES, then STOP! YOU HAVE COMPLETED THIS PROCEDURE. If NO, then continue with Step 19. 19. Contact Technical Support that you are checking and may replace a panel attributing to other potential shelf troubles as follows: • If the shelf has power but the PWR ON LED is off, then replace the User Panel, or Fuse Panel. Reference: Drawing ED-7G045-30 OT Shelf Assembly Reference: Drawing ED-7G047-30 User/Fuse Panel. • If the User Panel on the Switch Fabric shelf No. 1 has any other defective LEDs, replace that panel. Reference: Drawing ED-7G045-30 OT Shelf Assembly Reference: Drawing ED-7G047-30 User/Fuse Panel. 20. STOP! YOU HAVE COMPLETED THIS PROCEDURE. 365-575-536 Issue 1 March 2001 Trouble Clearing: TAP-147 Page 4 of 4 365-575-536 Issue 1 March 2001 Trouble Clearing: TAP-148 Page 1 of 2 Clear `inconsistent OTPM association' or `inconsistent OTU association' Overview: To help isolate fault conditions and prevent reporting of multiple alarms for the same failure, the OLS network element provides a mechanism for provisioning associations between OTU/OTPM IN/OUT ports and the Ochan () IN/OUT ports. This condition indicates that an incorrect association has been entered by the user. The OLS network element allows two distinct associations for each OTU/OTPM: • An upstream association is established between an OTU/OTPM IN port and the Ochan () OU port. • A downstream association is established between an OTU/OTPM OUT and the Ochan () IN port. 1. Is an OMU/ODU mismatch or missing condition listed in the report? If YES, then go to TAP-105 ( and clear the condition before proceeding.) If NO, then continue with Step 2. 2. At the CIT, select SECURITY-Retrieve-System command and execute to obtain a report. 3. From the report, is the dirn parameter provisioned per the office records? If NO, then continue with Step 4. If YES, then continue Step 7. 4. At the CIT, select the SECURITY-Enter-System command and provision DIRN (Direction) to the correct parameter per the office records. 5. Wait 1 minute for the system to stabilize. 6. Did the inconsistent OTPM association or the inconsistent OTU association condition clear? If NO, then continue with Step 7. If YES, then STOP! YOU HAVE COMPLETED THIS PROCEDURE. TAP-148: Trouble Clearing Page 2 of 2 7. 365-575-536 Issue 1 March 2001 NOTE: The most likely discrepancy is that an association is incorrect but the office direction is correct. At the CIT, select CONFIGURATION-Retrieve-Association OT_Port_Signal and execute to obtain a report. 8. Compare the associations of the report and office records; Are they correct (the same)? If YES, then go to TAP-108 If NO, then continue with Step 9. 9. NOTE: The states of the OTU/OTPM and the associated optical channel MUST BE PROVISIONED THE SAME, for example, AUTO, IS, or NMON. If the states are different, multiple trouble conditions may be reported for the incoming optical channel LOS condition. At the CIT, select CONFIGURATION-Enter-Association OT_Port_Signal and correct the discrepancy. 10. STOP! YOU HAVE COMPLETED THIS PROCEDURE. 365-575-536 Issue 1 March 2001 Trouble Clearing: TAP-149 Page 1 of 2 Address Failure When FAULT LED is Continuously Lighted Overview: A continuously lighted FAULT LED is caused by a fault located to a specific circuit pack. 1. Open the cabinet doors or remove the shelf cover. All connections can be accessed from the front. Reference: DLP-511 2. 3. Locate the unit/module with the FAULT LED continuously lighted. ! CAUTION: Before removing optical fibers, verify that the optical fibers are not carrying service. Disconnect the optical fibers at the unit/module identified in Step 2. Reference: DLP-525 4. Remove the unit/module from the shelf (called the original unit/module). Reference: DLP-514 5. ! CAUTION: The replacement unit/module must have the same circuit pack code or traffic could be interrupted. Install the replacement unit/module. Reference: DLP-514 6. Connect the optical fibers to the replacement unit/module. Reference: DLP525 7. Did the FAULT LED go off? If YES, then continue with Step 13. If NO, then continue with Step 8. 8. As required, check for bent or broken pins and replace using the BERG MT370 pin kit for the METRAL pins. Refer to Appendix A, Pin Repair. TAP-149: Trouble Clearing Page 2 of 2 9. 365-575-536 Issue 1 March 2001 Reinstall the original /unit/module that was removed in Step 4. Reference: DLP-514 10. Connect the optical fibers to the original unit/module. Reference: DLP-525 11. Did the FAULT LED go off? If YES, then continue with Step 13. If NO, then continue with Step 12. 12. Contact the appropriate maintenance support organization for further technical assistance in clearing the trouble. 13. Close the cabinet doors or install the shelf cover. Reference: DLP-511 14. STOP! YOU HAVE COMPLETED THIS PROCEDURE. 365-575-536 Issue 1 March 2001 Trouble Clearing: TAP-150 Page 1 of 4 Clear Trouble Report (Optical Translator Release 1.0-MD1/MD2) Overview: This procedure is used to clear a Trouble Report of a suspected defective optical translator unit (OTU). The report originates from a remote operations center or from an environmental alarm at an Optical Line System end terminal. 1. Open the cabinet doors or remove the shelf cover. All connections can be accessed from the front. Reference: DLP-511 2. Are any OTU FAULT LEDs lighted or flashing? If YES, then go to TAP-146. If NO, then continue with Step 3. 3. Locate the OTU from the Trouble Report. The Trouble Report should indicate the slot of the suspected defective OTU. Reference: DLP-503 4. Disconnect the optical fibers at the OTU identified in Step 3. Reference: DLP-525 5. Remove the OTU identified in Step 3 (called the original OTU). Reference: DLP-514 6. ! CAUTION: The replacement OTU must have the same circuit pack code or traffic could be interrupted. Connect the optical fibers to the replacement OTU. Reference: DLP-525 7. Install the replacement OTU and wait 1 minute. Reference: DLP-514 TAP-150: Trouble Clearing Page 2 of 4 8. 365-575-536 Issue 1 March 2001 NOTE: Contact must be made with the office that initiated the Trouble Report. Did the trouble clear? If YES, then continue with Step 17. If NO, then continue with Step 9. 9. NOTE: OC-48 optical fiber jumpers can be tested by using optical power meters to help locate a fiber bend or cut. Refer to local operating procedures for further guidance in operating the equipment. Make a visual inspection of ALL fibers and connections and correct any problem(s) found. Reference: DLP-525 10. Was a problem found with the fibers or connections? If YES, then continue with Step 11. If NO, then continue with Step 13. 11. Contact the office that issued the Trouble Report and notify them that a fiber problem was found and corrected. 12. STOP! YOU HAVE COMPLETED THIS PROCEDURE. 13. Reinstall the original OTU that was removed in Step 5. Reference: DLP-514 14. Connect the optical fibers to the original OTU. Reference: DLP-525 15. Return a NO TROUBLE FOUND conclusion to the report (no active local alarms or visual problems). 365-575-536 Issue 1 March 2001 Trouble Clearing: TAP-150 Page 3 of 4 16. Contact your local maintenance support group for a higher level of technical assistance. 17. Close the cabinet doors or install the shelf cover. Reference: DLP-511 18. STOP! YOU HAVE COMPLETED THIS PROCEDURE. TAP-150: Trouble Clearing Page 4 of 4 365-575-536 Issue 1 March 2001 TAP-151 : Trouble Clearing Page 1 of 4 365-575-536 Issue 1 March 2001 Address Incoming Signal Failure (Flashing FAULT LED) Overview: An incoming signal failure such as a loss of signal, a loss of frame, or a B1 parity error will cause a flashing FAULT LED. The contacts for miscellaneous discrete 2 (MD2) will close for a minimum of 20 seconds when an incoming signal B1 parity error is detected. During the same 20 seconds, the FAULT LED will flash. NOTE: An optical translator unit (OTU) is hereafter referred to as unit and an optical translator port module (OTPM) is hereafter referred to a module. 1. Make a visual inspection of the incoming signal jumper(s) and connection(s) and correct any problems found. Reference: DLP-525 2. Did a visual inspection reveal any problems? If YES, then continue with Step 21. If NO, then continue with Step 3. 3. Make an optical power measurement on the incoming optical jumper at the unit/module. Reference: DLP-524 4. Was the optical power measurement within the limits? If NO, then continue with Step 5. If YES, then continue with Step 9. 5. Clean the incoming fiber jumper. Reference: DLP-510 6. Connect the incoming fiber jumper to the unit/module. Reference: DLP-525 365-575-536 Issue 1 March 2001 7. Trouble Clearing: TAP-151 Page 2 of 4 NOTE: At this point, it appears that the local unit/module is operating correctly. The trouble appears to be in the optical fiber jumper, optical line, or in the far-end network element. Initiate a Trouble Report to the source of the failed incoming signal indicating the type of failure. If the source of the failed incoming signal returns a Trouble Report indicating "no trouble found," then contact the appropriate maintenance support organization for further technical assistance before following the prescribed operating procedures to fault isolate the fiber jumper carrying the failed incoming signal. Reference: DLP-503 8. STOP! YOU HAVE COMPLETED THIS PROCEDURE. 9. Locate the unit/module with the flashing FAULT LED. 10. Disconnect the optical fibers at the unit/module. Reference: DLP-525 11. Remove the unit/module from the shelf (called the original unit/module). Reference: DLP-514 12. ! CAUTION: The replacement unit/module must have the same circuit pack code or traffic could be interrupted. Connect the optical fibers to the replacement unit/module. Reference: DLP-525 13. Install the replacement unit/module. Reference: DLP-514 14. Did the FAULT LED stop flashing? If YES, then continue with Step 21. If NO, then continue with Step 15. 15. Remove the optical jumpers, clean again, and reconnect to the unit/module. Reference: DLP-510 TAP-151: Trouble Clearing Page 3 of 4 365-575-536 Issue 1 March 2001 16. Did the FAULT LED stop flashing? If YES, then continue with Step 21. If NO, then continue with Step 17. 17. As required, check for bent or broken pins and replace using the BERG MT370 pin kit for the METRAL pins. Refer to Appendix A, Pin Repair. 18. Reinstall the original unit/module that was removed in Step 11. Reference: DLP-514 19. Connect the optical fibers to the original unit/module. Reference: DLP-525 20. Initiate a Trouble Report to the source of the failed incoming signal indicating the type of failure. If the source of the failed incoming signal returns a Trouble Report indicating "no trouble found," then contact the appropriate maintenance support organization for further technical assistance before following the prescribed operating procedures to fault isolate the fiber jumper carrying the failed incoming signal. Reference: DLP-503 21. Close the cabinet door or install the shelf cover. Reference: DLP-511 22. STOP! YOU HAVE COMPLETED THIS PROCEDURE. 365-575-536 Issue 1 March 2001 Trouble Clearing: TAP-151 Page 4 of 4 365-575-536 Issue 1 March 2001 Trouble Clearing: TAP-152 Page 1 of 4 Address OT Incoming Signal Failure NOTE: One of the following incoming signal failures was detected: Incoming Incoming Incoming Incoming Incoming Incoming Incoming GbE-1 failure OC3 failure OC12 failure OC-48 failure STM1 failure STM3 failure STM16 failure. NOTE: An optical translator unit (OTU) is hereafter referred to as unit and an optical translator port module (OTPM) is hereafter referred to as a module. 1. Refer to the AID column of the FAULT-Retrieve-Condition-All report and determine the bay location of the unit/module with the incoming failure. Reference: DLP-503 2. Open the cabinet door or remove the shelf cover. All connections can be accessed from the front. Reference: DLP-511 3. Make a visual inspection of the incoming signal cable(s) and connections and correct any problems found. Reference: DLP-517 4. Did a visual inspection reveal any problems? If YES, continue with Step 22. If NO, continue with Step 5. 5. Make an optical power measurement on the incoming optical jumper at the unit/module. Reference: DLP-524 TAP-152: Trouble Clearing Page 2 of 4 6. 365-575-536 Issue 1 March 2001 Was the optical power measurement within the limits? If NO, then continue with Step 7. If YES, then continue with Step 11. 7. Clean the incoming fiber jumper. Reference: DLP-504 8. Connect the incoming fiber jumper to the unit/module. Reference: DLP-510 9. NOTE: At this point, it appears that the local unit/module is operating correctly. The trouble appears to be in the optical fiber jumper, optical line, or in the far-end network element. Initiate a Trouble Report to the source of the failed incoming signal indicating the type of failure. If the source of the failed incoming signal returns a Trouble Report indicating "no trouble found," then contact the appropriate maintenance support organization for further technical assistance before following the prescribed operating procedures to fault isolate the fiber jumper carrying the failed incoming signal. Reference: DLP-507 10. STOP! YOU HAVE COMPLETED THIS PROCEDURE. 11. Remove the unit/module indicating the incoming failure from the shelf. Reference: DLP-514 12. NOTE: The replacement unit/module must have the same circuit pack code. Obtain and install the replacement unit/module. Reference: DLP-514 13. At the CIT, select FAULT-Retrieve-Condition-All command and obtain a report. 14. Did the incoming failure clear? If YES, then continue with Step 20. If NO, then continue with Step 15. 365-575-536 Issue 1 March 2001 Trouble Clearing: TAP-152 Page 3 of 4 15. Remove the optical jumper, clean again, and reconnect to the unit/module. Reference: DLP-510 16. Did incoming failure clear? If YES continue with Step 21. If NO continue with Step 17. 17. As required, check for bent or broken pins and replace using the BERG MT370 pin kit for the METRAL pins. Refer to Appendix A, Pin Repair. 18. Reinstall the original unit/module that was removed in Step 11. Reference: DLP-508 19. Connect the optical fibers to the original unit/module. Reference: DLP-510 20. Initiate a Trouble Report to the source of the failed incoming signal indicating the type of failure. If the source of the failed incoming signal returns a Trouble Report indicating "no trouble found," then contact the appropriate maintenance support organization for further technical assistance before following the prescribed operating procedures to fault isolate the fiber jumper carrying the failed incoming signal. Reference: DLP-507 21. Close the cabinet door or install the shelf cover. Reference: DLP-505 22. STOP! YOU HAVE COMPLETED THIS PROCEDURE. TAP-152: Trouble Clearing Page 4 of 4 365-575-536 Issue 1 March 2001 TAP-153: Trouble Clearing Page 1 of 2 365-575-536 Issue 1 March 2001 Clear Combination ‘TLM Failure’ and ‘OA Failure’ Overview: This procedure is used to clear a trouble that is characterized by a series of circuit pack failures, first the TLM and OA circuit packs, then approximately 90 minutes later, the TOHCTL and SYSCTL circuit packs fail with the SYSCTL locking up. 1. NOTE: The CIT will disconnect from the network element when the CONFIGURATION-Initialize-System command is executed. At the CIT, select CONFIGURATION-Initialize-System: TID(All):PH(3) command and execute. 2. Did the Optical Line System (network element) respond to the CIT? If NO, then continue with Step 3. If YES, then continue with Step 4. 3. NOTE: This indicates the SYSCTL circuit pack is locked up. Go to Step 7 ONLY AFTER VERIFING from an alternate maintenance history log (if available) that a combination TLM failure and OA failure occurred. If unable to verify, contact your next level of technical support. 4. Wait 15 minutes or until the MJ LED is off at the user panel,whichever comes first. Reset takes approximately 15 minutes but some user panel LEDs flash and relays click in about a minute indicating that reset has started. If the network element is equipped with OTPMs, wait an additional 5 minutes. 5. At the CIT, select FAULT-Retrieve-Condition-All command and execute to obtain a report. 6. Have BOTH failures cleared (combination TLM failure and OA failure)? If NO, then continue with Step 7. If YES, then STOP! YOU HAVE COMPLETED THIS PROCEDURE. 365-575-536 Issue 1 March 2001 7. Trouble Clearing: TAP-153 Page 2 of 2 NOTE: For circuit pack and software compatibility, refer to Table 7-1 in Section 7, “Circuit Pack Description.” NOTE: If this step does not clear the combination TLM failure and OA failure, contact your next level of technical support. NOTE: Reminder: Look for and replace any damaged fiber and/or LBO before replacing the circuit pack. Remove the SYSCTL circuit pack and install a replacement circuit pack having the same or a higher series number. For example, an LEA1 with series number S1:2 is the same series number as S1:4. The 2 and 4 refer to minor changes within series 1. Reference: DLP-514 8. Return the SYSCTL circuit pack for repair. 9. STOP! YOU HAVE COMPLETED THIS PROCEDURE. TAP-154: Trouble Clearing Page 1 of 2 365-575-536 Issue 1 March 2001 Clear ‘APSD active - FE’ Overview: This procedure is used to clear the APSD active - FE condition. The system reduces the OA circuit pack output power to safe levels if an incoming loss of signal is detected. The APSD active - FE indicates that the upstream (transmit direction) network element has detected an incoming signal failure. The incoming loss of signal is caused by a fiber cut, removed connectors, or equipment failures. When the incoming loss of signal condition at the upstream is repaired the system will resume normal operation and the APSD active - FE condition will clear. See Maintenance Description (Section 9) for complete details of feature. NOTE: Conditions are shown in the CONDDESCR column of the FAULT.Retrieve. Condition.All report. 1. Is there one or more other conditions with the same line AID in the reportt? If YES, then continue with Step 2. If NO, then continue with Step 4. 2. NOTE: While following the instructions in the procedure(s) to which you will now be sent, you MUST ignore the APSD active - FE condition in the FAULT.Retrieve.Condition.All report. Find the condition identified in Step 1 in Table A of TAP-102 and go to the indicated TAP to clear that condition (ignoring the APSD active - FE condition throughout the remainder of the trouble clearing procedure). 3. STOP! YOU HAVE COMPLETED THIS PROCEDURE. 4. Wait 1 minute. 5. At the CIT, select FAULT.Retrieve.Condition.All command and execute to obtain an updated report. 6. Is the APSD active - FE condition still listed? If YES, then continue with Step 7. If NO, then STOP! YOU HAVE COMPLETED THIS PROCEDURE. 365-575-536 Issue 1 March 2001 7. Trouble Clearing: TAP-154 Page 2 of 2 NOTE: At this point, it appears that the local network element is operating correctly. Initiate a Trouble Report to the upstream network element of the line indicating the APSD active - FE condition. 8. STOP! YOU HAVE COMPLETED THIS PROCEDURE. TAP-155: Trouble Clearing Page 1 of 1 365-575-536 Issue 1 March 2001 Clear ‘APSD active - NE’ Overview: This procedure is used to clear the APSD active - NE condition. The system reduces the OA circuit pack output power to safe levels if an incoming loss of signal is detected. The APSD active - NE indicates that the upstream (transmit direction) network element has detected an incoming signal failure. The incoming loss of signal is caused by a fiber cut, removed connectors, or equipment failures. When the incoming loss of signal condition at the upstream is repaired the system will resume normal operation and the APSD active - NE condition will clear. See Maintenance Description (Section 9) for complete details of feature. NOTE: Conditions are shown in the CONDDESCR column of the FAULT.Retrieve. Condition.All report. 1. Is there one or more other conditions with the same AID line in the report? If YES, then continue with Step 2. If NO, then continue with Step 4. 2. NOTE: While following the instructions in the procedure(s) to which you will now be sent, you MUST ignore the APSD active - NE condition in the FAULT.Retrieve.Condition.All report. Find the condition identified in Step 1 in Table A of TAP-102 and go to the indicated TAP to clear that condition (ignoring the APSD active - NE condition throughout the remainder of the trouble clearing procedure). 3. STOP! YOU HAVE COMPLETED THIS PROCEDURE. 4. Wait 1 minute. 5. At the CIT, select FAULT.Retrieve.Condition.All command and execute to obtain an updated report. 6. Is the APSD active - NE condition still listed? If YES, then go to TAP-108. If NO, then STOP! YOU HAVE COMPLETED THIS PROCEDURE. 365-575-536 Issue 1 March 2001 Trouble Clearing: TAP-155 Page 2 of 2 365-575-536 Issue 1 March 2001 Trouble Clearing: TAP-156 Page 1 of 2 Clear ‘j0 mismatch’ Overview: This procedure is used to clear the j0 mismatch condition. The system reads the section trace byte (J0) in the section overhead of an OC-48 signal. The OC-48 section trace signal is transmitted by a SONET OC-48 lightwave terminal repetitively to verify the continuity of the OC-48 section. The 41A_C and 41C_C OC-48/STM16 Optical Translator Unit circuit packs are the only circuit packs capable of reading the section trace byte. This condition indicates that the incoming section trace does not match the expected incoming section trace. NOTE: Conditions are shown in the CONDDESCR column of the FAULT.Retrieve. Condition.All report. 1. At the CIT, select CONFIGURATION.Retrieve.Section Trace command and execute to obtain a report. 2. From local office records, determine correct expected incoming section trace for this OC-48. 3. Do the office records for the expected incoming section trace match the data in the EXPSECTRC column in the report from Step 1? If YES, continue with Step 4 If NO, continue with Step 10. 4. At the CIT, select FAULT.Retrieve.Condition.All command and execute to obtain an updated report. 5. Trace the fiber jumper connected to the IN port of the OTU, identified in the AID column, back to the source. 6. Do office records indicate that the fiber jumper is connected to the correct source? If YES, continue with Step 13. If NO, continue with Step 7. 7. Using local procedures, connect the fiber jumper to the correct source. TAP-156: Trouble Clearing Page 2 of 2 365-575-536 Issue 1 March 2001 8. At the CIT, select FAULT.Retrieve.Condition.All command and execute to obtain an updated report. 9. Is the j0 mismatch condition still present? If YES, continue with Step 13. If NO, then STOP! YOU HAVE COMPLETED THIS PROCEDURE. 10. At the CIT, use the CONFIGURATION.Enter.Section Trace command and enter the correct expected incoming section trace. 11. At the CIT, select FAULT.Retrieve.Condition.All command and execute to obtain an updated report. 12. Is the j0 mismatch condition still present? If YES, continue with step 13. If NO, then STOP! YOU HAVE COMPLETED THIS PROCEDURE. 13. NOTE: At this point, it appears that the local network element is operating/connected correctly. Initiate a Trouble Report to the downstream network element of the line indicating the j0 mismatch condition. Before initiating a Troublr Report to the downstream network element, measure the input power level of the line indicating the j0 mismatch, and include this information in the report. 14. STOP! YOU HAVE COMPLETED THIS PROCEDURE. 365-575-536 Issue 1 March 2001 Trouble Clearing: TAP-157 Page 1 of 2 Clear ‘OA output disabled’ Overview: This procedure is used to clear the OA output disabled condition. The system reduces the OA circuit pack output power to safe levels if an incoming loss of signal is detected. The OA output disabled indicates that the upstream (transmit direction) network element has detected an incoming signal failure. The incoming loss of signal is caused by a fiber cut, removed connectors, or equipment failures. When the incoming loss of signal condition at the upstream is repaired, the system will resume normal operation and the OA output disabled condition will clear. This condition is unique to single Optical Amplifier configurations. NOTE: Conditions are shown in the CONDDESCR column of the FAULT.Retrieve. Condition.All report. 1. Is there one or more other conditions with the same line AID in the report? If YES, then continue with Step 2. If NO, then continue with Step 4. 2. NOTE: While following the instructions in the procedure(s) to which you will now be sent, you MUST ignore the OA ouput disabled condition in the FAULT.Retrieve.Condition.All report. Find the condition identified in Step 1 in Table A of TAP-102 and go to the indicated TAP to clear that condition (ignoring the OA output disabled condition throughout the remainder of the trouble clearing procedure). 3. STOP! YOU HAVE COMPLETED THIS PROCEDURE. 4. Wait 1 minute. 5. At the CIT, select FAULT.Retrieve.Condition.All command and execute to obtain an updated report. TAP-157: Trouble Clearing Page 2 of 2 6. 365-575-536 Issue 1 March 2001 Is the OA output disabled condition still listed? If YES, then continue with Step 7. If NO, then STOP! YOU HAVE COMPLETED THIS PROCEDURE. 7. NOTE: At this point, it appears that the local network element is operating/connected correctly. Initiate a Trouble Report to the upstream network element of the line indicating the OA output disabled condition. 8. STOP! YOU HAVE COMPLETED THIS PROCEDURE. 365-575-536 Issue 1 March 2001 Trouble Clearing: TAP-158 Page 1 of 1 Address ‘TID Address Map Full’ Overview: The network has exceeded the maximum number of 16 nodes per network. 1. Determine from office records why another node is being engineered for the network that exceeds the 16 node maximum. 2. At the CIT, select the CONFIGURATION-Retrieve-Map-Network command and execute to obtain a report. 3. Does the TID information from the office records and the TID assignment in the report agree? If NO, then continue with Step 4. If YES, then continue with Step 7. 4. NOTE: The extra TID(s) that appears on the report must be removed. At the CIT, select CONFIGURATION-Delete-Target_Identifier_ Address_Map command and execute to remove the extra TID(s). 5. At the CIT, select FAULT-Retrieve-Condition-Allcommand and execute to obtain a report. 6. Is the TID address map full condition still present? If NO, then STOP! YOU HAVE COMPLETED THIS PROCEDURE. If YES, then continue with Step 7. 7. NOTE: This step is performed only if there is no extra TID(s). Notify the network administrator of the continued TID address map full condition after all extra TID(s) have been removed.Nothing else can be done locally to clear the trouble. 8. STOP! YOU HAVE COMPLETED THIS PROCEDURE. 365-575-536 Issue 1 March 2001 Trouble Clearing: TAP-156 Page 3 of 1 TAP-156: Trouble Clearing Page 4 of 1 365-575-536 Issue 1 March 2001 365-575-536 Issue 1 March 2001 Detailed Level Procedure: DLP-500 Page 1 of 8 Connect Optical Power Meter for Measurement in OLS Overview: This procedure provides the correct fiber connections required when making an optical power measurement. Also, tables are provided for determining the correct lightguide buildout (LBO) values (see Figures 1 and 2). Required Test Equipment: Craft Interface Terminal (CIT) Wrist Strap Optical Power Meter ! CAUTION: Use a static ground wrist strap whenever handling circuit packs or working on an OLS network element to prevent electrostatic discharge (ESD) damage to sensitive components. See "Electrostatic Discharge (ESD) Considerations" in Trouble Clearing: TAD-100. 1. If necessary, open the cabinet doors or remove the shelf cover. All connections can be accessed from the front. Reference: DLP-511 2. Are you adding or trouble clearing an optical line, optical channel, supervisory channel, customer maintenance (CM) signal, or replacing an end terminal OA? If optical line, then continue with Step 3. If optical channel, then continue with Step 9. If replacing end terminal receive OA, then continue with Step 20. If CM signal, then continue with Step 22. If supervisory channel, then continue with Step 28. 3. Remove the protector caps and clean receive optical fiber, if required. Reference: DLP-510 4. Connect receive optical fiber to optical power meter and obtain optical power measurement. DLP-500: Detailed Level Procedure Page 2 of 8 5. 365-575-536 Issue 1 March 2001 Using the power level measurement obtained in Step 4 and the SmartManual, determine the LBO value for the receive OA circuit pack. • For Release 3.0.1, use SmartManual to determine the LBO value by: 6. a. Open NE SmartManual Manager from the CenterLink launch console screen. b. Perform the "Select Line Build Out for OA input" task by following the steps displayed on the screen. Install the LBO at the IN connector of the receive OA circuit pack. Reference: DLP-512 7. Close the cabinet door or install the shelf cover. Reference: DLP-511 8. STOP! YOU HAVE COMPLETED THIS PROCEDURE. 9. Are you making connections to an OMU or ODU? If OMU, then continue with Step 10. If ODU, then continue with Step 16. 10. Remove the protector cap and clean the fiber coming from the LCT transmitter or OTU/OTPM circuit pack for the channel being added. Reference: DLP-510 11. Connect the optical power meter to the fiber coming from the LCT transmitter or OTU/OTPM circuit pack for the channel being added and obtain an optical power measurement. 365-575-536 Issue 1 March 2001 Detailed Level Procedure: DLP-500 Page 3 of 8 12. Compare the optical power measurement obtained in Step 11 with the requirement listed in Table A for the channel being added. Table A — OMU Input Power Channel Input Power (±1.0 dBm) OC-48/STM-16 OC-12/STM-4 OC-3/STM-1 1 -4.0 -7.0 -10.0 2 -5.3 -8.3 -11.3 3 -6.5 -9.5 -12.5 4 -7.2 -10.2 -13.2 5 -7.7 -10.7 -13.7 6 -8.2 -11.2 -14.2 7 -8.0 -11.0 -14.0 8 -6.5 -9.5 -12.5 9 -2.0 -5.0 -8.0 10 -4.6 -7.6 -10.6 11 -5.8 -8.8 -11.8 12 -6.8 -9.8 -12.8 13 -7.4 -10.4 -13.4 14 -7.9 -10.9 -13.9 15 -8.1 -11.1 -14.1 16 -7.2 -10.2 -13.2 13. Does the power measurement meet the requirements? If NO, then continue with Step 14. If YES, then STOP! YOU HAVE COMPLETED THIS PROCESURE. 14. Measure at the LCT TRMTR OUT connector or at the OTU/OTPM out connector (for that channel) and compare the results with Table B1, B2 or B3. If in specification, investigate fiber and connections between LCT, OTU/OTPM, and OMU. If out of specification, replace the LCT TRMTR or OTU/OTPM circuit pack. 15. STOP! YOU HAVE COMPLETED THIS PROCEDURE. 16. At the LCT or OTU/OTPM, if required, remove the protector caps at the RCVR IN or IN connector, respectively, and clean the fiber coming from the ODU for the channel being added Reference: DLP-510 DLP-500: Detailed Level Procedure Page 4 of 8 365-575-536 Issue 1 March 2001 Table B1 — OC-48 Transmitter Output Power Channel LCT TRMTR OTU OUT Output Power (dBm) 1 739D1, 739F1, 739E1 41A1, 41C1 -4.0 ± 0.7 2 739D2, 739F2, 739E2 41A2, 41C2 -5.3 ± 0.7 3 739D3, 739F3, 739E3 41A3, 41C3 -6.5 ± 0.7 4 739D4, 739F4, 739E4 41A4, 41C4 -7.2 ± 0.7 5 739D5, 739F5, 739E5 41A5, 41C5 -7.7 ± 0.7 6 739D6, 739F6, 739E6 41A6, 41C6 -8.2 ± 0.7 7 739D7, 739F7, 739E7 41A7, 41C7 -8.0 ± 0.7 8 739D8, 739F8, 739E8 41A8, 41C8 -6.5 ± 0.7 9 739D9, 739F9 41A9, 41C9 -2.0 ± 0.7 10 739D10, 739F10 41A10, 41C10 -4.6 ± 0.7 11 739D11, 739F11 41A11, 41C11 -5.8 ± 0.7 12 739D12, 739F12 41A12, 41C12 -6.8 ± 0.7 13 739D13, 739F13 41A13, 41C13 -7.4 ± 0.7 14 739D14, 739F14 41A14, 41C14 -7.9 ± 0.7 15 739D15, 739F15 41A15, 41C15 -8.1 ± 0.7 16 739D16, 739F16 41A16, 41C16 -7.2 ± 0.7 Table B2 — OC-12 Transmitter Output Power OTPM OUT Output Power 400-700 Mb/s (dBm) ± 0.7 42A1 44A1 -7.0 42A2 44A2 -8.3 Channel OTPM OUT 1 2 3 42A3 44A3 -9.5 4 42A4 44A4 -10.2 5 42A5 44A5 -10.7 6 42A6 44A6 -11.2 7 42A7 44A7 -11.0 8 42A8 44A8 -9.5 9 42A9 44A9 -5.0 10 42A10 44A10 -7.6 11 42A11 44A11 -8.8 12 42A12 44A12 -9.8 13 42A13 44A13 -10.4 14 42A14 44A14 -10.9 15 42A15 44A15 -11.1 16 42A16 44A16 -10.2 365-575-536 Issue 1 March 2001 Detailed Level Procedure: DLP-500 Page 5 of 8 Table B3 — OC-3 Transmitter Output Power Channel OTPM OUT Output Power (dBm) ± 0.7 1 43A1 -10.0 2 43A2 -11.3 3 43A3 -12.5 4 43A4 -13.2 5 43A5 -13.7 6 43A6 -14.2 7 43A7 -14.0 8 43A8 -12.5 9 43A9 -8.0 10 43A10 -10.6 11 43A11 -11.8 12 43A12 -12.8 13 43A13 -13.4 14 43A14 -13.9 15 43A15 -14.1 16 43A16 -13.2 17. At the LCT or OTU/OTPM, connect the optical power meter to the fiber coming from the ODU and obtain an optical power measurement. 18. Determine the LBO value as follows: a. Open the NE SmartManual Manager from the CenterLink launch console. b. Select and click on "Select Line Build Out (LBO) for RCVR input" task. c. Complete the task by following the steps displayed on the screen. 19. STOP! YOU HAVE COMPLETED THIS PROCEDURE. DLP-500: Detailed Level Procedure Page 6 of 8 20. ! 365-575-536 Issue 1 March 2001 CAUTION: Make sure the optical signals assigned to this optical line are switched to the protection line, if necessary. Determine the LBO value as follows: a. Open the NE SmartManual Manager from the CenterLink launch console. b. Select and click on "Select Line Build Out (LBO) for RCVR input" task. c. Complete the task by following the steps displayed on the screen. 21. STOP! YOU HAVE COMPLETED THIS PROCEDURE. 22. At the OLS, remove the protector cap and clean the CM IN port for the CM signal being added. Install a 0 dB LBO at the CM IN port. Reference: DLP-510 23. Remove the protector cap and clean the fiber coming from the customer provided equipment. Reference: DLP-510 24. Connect the optical power meter to the fiber coming from the transmit side of the customer provided equipment for the CM signal being added and obtain an optical power measurement. 25. Using the power level reading obtained in Step 24 and Table C, determine the correct customer equipment/test set attenuation needed for the correct CM IN power level. Table C — CM Input Power CM Input Power (dBm) Transmit Side LBO (dB) ≤ -14 and > -30 0 > -14 Select an LBO that results in the CM input power being between -14 and -30 dBm. ≤ -30 Decrease the LBO until the CM input power is between -14 and -30 dBm. 365-575-536 Issue 1 March 2001 Detailed Level Procedure: DLP-500 Page 7 of 8 26. Close the cabinet door or install the shelf cover. Reference: DLP-511 27. STOP! YOU HAVE COMPLETED THIS PROCEDURE. 28. Remove fiber from the IN connector of the TLM circuit pack being tested. 29. Connect the optical power meter to the fiber coming from the OA circuit pack and obtain an optical power measurement. Reference: DLP-503 30. Using the power level reading obtained in Step 29 and Table D, determine if the power level was correct. Table D — TLM Circuit Pack Input Power Maximum Power (dBm) Minimum Power (dBm) -10.5 -30.0 31. STOP! YOU HAVE COMPLETED THIS PROCEDURE. Figure 1 - Location of Lightguide Buildouts (LBOs) DLP-500: Detailed Level Procedure Page 8 of 8 365-575-536 Issue 1 March 2001 DLP-501 : Detailed Level Procedure Page 1 of 2 365-575-536 Issue 1 March 2001 Connect and Condition Craft Interface Terminal (CIT) Overview: This procedure provides instructions to verify proper connections between a network element and a personal computer (PC). The PC will be running CenterLink software or FT-2000 CIT-PC software. If you are unfamiliar with the PC, an "Introduction to the PC" is provided in DLP-516. NOTE: The PC must meet the minimum requirements as stated in the "Craft Interface Terminal" part of Section 6, "Operations Interfaces." 1. Verify the PC is safely positioned on a cart or table. 2. Verify the cable connections at the PC. Reference: 365-575-539, Optical Line System, Installation Manual. To summarize, check the following: • The appropriate 9-pin or 25-pin cable or equivalent interface cable is connected between the CIT (DCE) female connector on the user panel and a serial male connector on the PC. • If required, a printer with the appropriate printer cable is connected to the PC per the instructions provided with the printer. • If required, a modem (internal or external) is connected per the instructions provided with the modem. Many modem configurations exist and operate over the public switched network or a data communications network (Datakit network). Reference: DLP-520 (Establish modem or Datakit network access.) 3. 4. Turn the PC power switch to "on," if necessary. NOTE: The browser and NE server software are considered parts of the CenterLink software. NOTE: The CenterLink software has been loaded on the PC and Windows 95®, Windows 98®, Windows NT®, or Windows 2000® operating system is running on the PC. If you encounter difficulty in the following steps, a CIT tutorial is available in Chapter 11, “Craft Interface Terminal Usage.” At the PC desktop screen, double click on the CenterLink icon. 365-575-536 Issue 1 March 2001 Detailed Level Procedure: DLP-501 Page 2 of 2 Requirement: NESERVER will automatically start. Internet Explorer will start and a window called Work Offline will open. 5. Select Try again to continue. 6. Select NE Command Manager to advance to the next screen. 7. Select a target ID or enter a new Target ID and select the Submit button. 8. Complete the Network Element Login window and enter your previously obtained UID (user identifier), PID (private identifier), and user access privilege and click on Enter to log in to a network element. Requirement: A Completed message is displayed. 9. STOP! YOU HAVE COMPLETED THIS PROCEDURE. DLP-502 : Detailed Level Procedure Page 1 of 2 365-575-536 Issue 1 March 2001 Test LED Indicators on Front Panel and Circuit Packs 1. Open the cabinet doors or remove shelf cover. All LED indicators are visible from the front. Reference: DLP-511 2. At the CIT, select the command FAULT-Test-LED and set MODE:ALL. Select Enter to execute. Requirement: All LED indicators are lighted for 10 seconds, off for 10 seconds, then they return to their normal condition. 3. Did the LED indicator(s) of interest operate as indicated above? If YES, then continue with Step 4. If NO, then continue with Step 6. 4. NOTE: The LED indicator operation appears to be normal. Close the cabinet doors or install the shelf cover. Reference: DLP-511 5. STOP! YOU HAVE COMPLETED THIS PROCEDURE. 6. Notify the installation personnel to correct the LED indicator trouble before returning to this procedure. 7. Close the cabinet doors or install the shelf cover. Reference: DLP-511 8. STOP! YOU HAVE COMPLETED THIS PROCEDURE. 365-575-536 Issue 1 March 2001 Detailed Level Procedure: DLP-502 Page 2 of 2 365-575-536 Issue 1 March 2001 Detailed Level Procedure: DLP-503 Page 1 of 32 Locate Circuit Packs/Fiber Connections Used In OLS Overview: This information shows the physical location of the circuit packs and their optical fiber connections as used in an OLS. Detailed information on fiber connections is presented in Chapters 7, 8, and 9 of the Installation Manual (365-575-539). ! CAUTION: Use a static ground wrist strap whenever handling circuit packs or working on an OLS network element to prevent electrostatic discharge damage to sensitive components. 1. Which OLS configuration are you working with in determining circuit pack/fiber information? If End Terminal, then continue with Step 2. If Repeater, then continue with Step 3. 2. NOTE: Figures of circuit pack faceplates are located at the back of this procedure (Figures 22 through 31.) NOTE: The AIDs (associated slot and shelf) are shown in Table A for OLS and in Table B for OT. Which end terminal configuration are you working with? Refer to: Configuration Figure Table Step ET for 4 bidirectional optical lines 1, 6, 7 C1, C2 — ET for telemetry feed-through 3, 10 H — Dual ET 1, 8 D1, D2 — Dual Facing ET 4, 9 E — Integrated bay (Single) 14 I — Integrated bay/cabinet (Double) 15 — — Integrated bay/cabinet (Triple 1) 16 — — Integrated bay/cabinet (Triple 2) 17 — — Optical translator (OTU/QOTU/OTPM) — — 5 5, 13 G — 2, 11, 12 F1, F2 — Single OA Dual Facing Single OA ET DLP-503: Detailed Level Procedure Page 2 of 32 3. 365-575-536 Issue 1 March 2001 NOTE: Figures of circuit pack faceplates are located at the back of this procedure (Figures 22 through 31). NOTE: The AIDs (associated slot and shelf) are shown in Table A for OLS and in Table B for OT. Which repeater configuration are you working with? If 4 bidirectional optical lines, refer to Figures 1 and 18 and to Table J. If dual repeater, refer to Figure 19 and to Table K. 4. STOP! YOU HAVE COMPLETED THIS PROCEDURE. OTU/QOTU/OTPM Physical Locations and Fiber Connections 5. Locate the physical slot, shelf, and bay/cabinet of the OTU, QOTU,OTPM (Figure 20 or Figure 21). 6. Are you installing/removing an OTU, QOTU, or OTPM? If OTPM, continue with Step 9. If an OTU, continue with Step 7. If a QOTU, STOP! YOU HAVE COMPLETED THIS PROCEDURE. 7. NOTE: Detailed information on fiber connections is presented in the installation Manual (365-575-539). Refer to Figure 29 (for fibers) and Table L (for codes) to verify correct fiber connections at the OT. Chapters 2 and 3 of this manual show additional OT applications and physical arrangements. 8. STOP! YOU HAVE COMPLETED THIS PROCEDURE. 365-575-536 Issue 1 March 2001 9. Detailed Level Procedure: DLP-503 Page 3 of 32 NOTE: Detailed information on fiber connections is presented in the Installation Manual (365-575-539). Refer to Figures 30 and 31 (for fibers) and Tables M and N (for codes) to verify correct fiber connections at the OT when using a QOTU equipped with an OTPM. 10. STOP! YOU HAVE COMPLETED THIS PROCEDURE. Figure 1 — Optical Line System (One Line and One Repeater Shown) DLP-503: Detailed Level Procedure Page 4 of 32 365-575-536 Issue 1 March 2001 Figure 2 — Single OA End Terminals for 1A-TX and 1A-RCV Single WaveStar OLS 40G Subnetwork Network Element 1 End Terminal End Terminal OTU ODU OTU OMU OA OA OTU SUPi TLM 1A SUPo TLM 1B TOHCTL TOHCTL TLM 1B TLM 1A DCC DCC SUPo DCC SUPi OTU OA OMU OTU OA ODU ADM Network Element 2 NC-telemfeed2 Figure 3 — Telemetry Feed-Through at End Terminals 1A-TX and 1A-RCV 365-575-536 Issue 1 March 2001 Detailed Level Procedure: DLP-503 Page 5 of 32 Side 1 Line 1 Optical Line Signal IN O D U OA 1A TLM OUT 1 to 16 Drop Side Signals Supervisory 1A Signal IN CM OUT IN O M U 1B Side 1 Line 3 Optical Line Signal IN O D U OA 3A TLM OUT Supervisory 3A Signal IN CM TLM OUT Customer Maintenance Signal 1 to 16 Drop Side Signals 1 to 16 Drop Side Signals 1 to 16 Drop Side Signals CM OUT IN O M U 3B O M U OA 2A OUT Optical Line Signal TLM IN 2A Supervisory Signal CM OUT IN TLM CM 2A OUT IN Supervisory O Signal D TLM OUT U OA 2B 2B IN Optical Line Signal Side 2 Line 4 1 to 16 Drop Side Signals Customer Maintenance Signal 3A Supervisory Optical Signal Line TLM IN Signal OUT OA 3B 1 to 16 Drop Side Signals Customer Maintenance Signal TLM OUT 1A CM Supervisory Optical Signal Line TLM IN Signal OUT OA 1B Side 2 Line 2 Customer Maintenance Signal 1 to 16 Drop Side Signals 1 to 16 Drop Side Signals O M U OA 4A OUT Optical Line Signal TLM IN 4A Supervisory Signal CM OUT IN TLM CM 4A OUT IN Supervisory O Signal D TLM OUT U OA 4B 4B IN Optical Line Signal NC-Dual_oa_dfet Figure 4 — Dual Facing End Terminal DLP-503: Detailed Level Procedure Page 6 of 32 365-575-536 Issue 1 March 2001 Side 1 Line 1 Optical Line Signal IN TLM OUT O D U 1 to 16 Drop Side Signals 1A Supervisory Signal IN CM TLM OUT CM OUT IN Supervisory Optical Signal Line TLM IN Signal OUT OA 1A O M U 1B Side 1 Line 3 IN TLM OUT O D U 3A Supervisory Signal IN CM Customer Maintenance Signal 1 to 16 Drop Side Signals 1 to 16 Drop Side Signals 1 to 16 Drop Side Signals OUT IN O M U 3B O M U IN OA 2B OUT Optical Line Signal TLM IN 2A Supervisory Signal CM OUT IN TLM CM 2A OUT IN Supervisory Optical Signal Line Signal TLM OUT O D U IN 2B Side 2 Line 4 1 to 16 Drop Side Signals Customer Maintenance Signal TLM OUT 3A CM Supervisory Optical Signal Line TLM IN Signal OUT OA 3A 1 to 16 Drop Side Signals Customer Maintenance Signal 1A Optical Line Signal Side 2 Line 2 Customer Maintenance Signal 1 to 16 Drop Side Signals 1 to 16 Drop Side Signals O M U IN OA 4B OUT Optical Line Signal TLM IN 4A Supervisory Signal CM OUT IN TLM CM 4A OUT IN TLM OUT O D U IN Supervisory Optical Signal Line Signal 4B NC-single_oa_dfet Figure 5 — Single OA Dual Facing End Terminal 365-575-536 Issue 1 March 2001 Detailed Level Procedure: DLP-503 Page 7 of 32 Interconnection Panel T L M T L M TLM TLM TLM TLM 3A 3B 4A 4B O O O O Fuse M D M D Panel U U U U 3A OMU/ODU 3B 4A 4B Interconnection Panel T L M T L M TLM TLM TLM TLM 3A 3B 4A 4B O O O O Fuse D M D M Panel U U U U 3A OMU/ODU 3B 4A 4B OA OA OA OA OA OA OA OA OA 3A OA 3B OA 4A OA 4B OA 3A OA 3B OA 4A OA 4B Interconnection Panel T L M T L M TLM TLM TLM TLM 1A 1B 2A 2B Fuse O O O O Panel M D M D or U U U U User Panel 1A OMU/ODU 1B 2A 2B OA OA OA OA 3A OA 3B OA 4A TSS OYY OA H S S CCM T T E L LM OA 4B TOHCTL SYSMEM SYSCTL nc-84977001.6 Figure 6 — 1A-TX End Terminal for 4 Bidirectional Optical Lines Interconnection Panel T L M T L M TLM TLM TLM TLM 1A 1B 2A 2B Fuse O O O O Panel D M D M or U U U U User Panel 1A OMU/ODU 1B 2A 2B OA OA OA OA 3A OA 3B OA 4A TSS OYY OA H S S CCM T T E L LM OA 4B TOHCTL SYSMEM SYSCTL nc-84977001.7 Figure 7 — 1A-RCV End Termnal for 4 Bidirectional Optical Lines DLP-503: Detailed Level Procedure Page 8 of 32 365-575-536 Issue 1 March 2001 Interconnection Panel T L M T L M TLM TLM TLM TLM 3A 3B 4A 4B Interconnection Panel T L M O O O O Fuse D M D M Panel U U U U 3A OMU/ODU 3B 4A 4B OA OA OA OA 3A OA 3B OA 4A 1A-RCV End Terminal TSS OYY OA H S S CCM T T E L LM OA 4B TOHCTL SYSMEM SYSCTL TLM TLM TLM TLM 3A 3B 4A 4B T L M TLM TLM TLM TLM 1A 1B 2A 2B Fuse O O O O Panel M D M D or U U U U User Panel 1A OMU/ODU 1B 2A 2B OA OA OA OA 3A OA 3B OA 4A 3A OMU/ODU 3B 4A 4B OA OA OA OA 3A OA 3B OA 4A OA 4B Interconnection Panel T L M 1A-TX End Terminal TSS OYY OA H S S CCM T T E L LM OA 4B O O O O Fuse D M M D Panel U U U U OA Interconnection Panel T L M T L M TOHCTL SYSMEM SYSCTL nc-84977001.8 Figure 8 — Dual End Terminal T L M TLM TLM TLM TLM 1A 1B 2A 2B Fuse O O O O Panel D M M D or U U U U User Panel 1A OMU/ODU 1B 2A 2B OA OA OA OA 3A OA 3B OA 4A TSS OYY OA H S S CCM T T E L LM OA 4B TOHCTL SYSMEM SYSCTL nc-84977001.9 Figure 9 — Dual Facing End Terminal 365-575-536 Issue 1 March 2001 Detailed Level Procedure: DLP-503 Page 9 of 32 Interconnection Panel T T T T O O O O Fuse L L L L D M D M Panel M M M M U U U U TLM TLM TLM TLM 3A 3B 4A 4B 3A OMU/ODU 3B 4A 4B OA OA OA OA 3A OA 3B OA 4A 1A-RCV End Terminal TSS OYY OA H S S CCM T T E L LM OA 4B Interconnection Panel T L M T L M TLM TLM TLM TLM 1A 1B 2A 2B Fuse O O O O Panel M D M D or U U U U User Panel 1A OMU/ODU 1B 2A 2B OA OA OA OA 3A OA 3B OA 4A 1A-TX End Terminal TSS OYY OA H S S CCM T T E L LM OA 4B TOHCTL SYSMEM SYSCTL nc-84977001.14 Figure 10 — Telemetry Feed-Through at Dual End Terminals DLP-503: Detailed Level Procedure Page 10 of 32 365-575-536 Issue 1 March 2001 Interconnection Panel Interconnection Panel T L M T L M O O* O O* Fuse M D M D Panel U U U U TLM TLM TLM TLM 3A 3B 4A 4B 3A OMU/ODU 3B 4A 4B † † OA OA 3A OA 3B OA 4A T L M T L M TLM TLM TLM TLM 3A 3B 4A 4B † OA OA OA 4B OA 3A T L M Fuse O O* O O* Panel M D M D or U U U U User Panel T L M TLM TLM TLM TLM 1A 1B 2A 2B 1A OMU/ODU 1B 2A 2B TSS OYY OA H S S CCM T T E L LM † † OA OA 3A OA 3B OA 4A OA 4B 3A OMU/ODU 3B 4A 4B † OA OA 3B Interconnection Panel O* O O* O Fuse D M D M Panel U U U U OA 4A OA 4B Interconnection Panel T L M T L M TLM TLM TLM TLM 1A 1B 2A 2B † 1A OMU/ODU 1B 2A 2B TSS OYY HSS CCM T T E L LM † OA OA 3A Fuse O* O O* O Panel D M D M or U U U U User Panel OA OA 3B OA 4A OA 4B * Use only 606B and 606D ODUs † Use only LEA105 and LEA7 OAs * Use only 606B and 606D ODUs † Use only LEA105 and LEA7 OAs nc-84977001.10 nc-84977001.11 Figure 11 — Single OA End Terminal Figure 12 — Single OA End Terminal for 1A-RCV 365-575-536 Issue 1 March 2001 Detailed Level Procedure: DLP-503 Page 11 of 32 Interconnection Panel T L M T L M TLM TLM TLM TLM 3A 3B 4A 4B O* O O O* Fuse D M M D Panel U U U U 3A OMU/ODU 3B 4A 4B † † OA OA 3A OA OA 3B OA 4A OA 4B Interconnection Panel T L M T L M TLM TLM TLM TLM 1A 1B 2A 2B Fuse O* O O O* Panel D M M D or U U U U User Panel 1A OMU/ODU 1B 2A 2B TSS OYY OA H S S CCM T T E L LM † † OA OA 3A OA 3B OA 4A OA TOHCTL SYSMEM SYSCTL 4B * Use only 606B and 606D ODUs † Use only LEA105 and LEA7 OAs nc-84977001.12 Figure 13 — Single OA Dual Facing End Terminal DLP-503: Detailed Level Procedure Page 12 of 32 Figure 14 — OLS Integrated Bay (Single) 365-575-536 Issue 1 March 2001 365-575-536 Issue 1 March 2001 Detailed Level Procedure: DLP-503 Page 13 of 32 NOTE: For left bay, see OLS references for end terminal. For right bay, see OT references. An AID example is otu-1-18-3. Figure 15 — OLS Integrated Cabinet (Double) DLP-503: Detailed Level Procedure Page 14 of 32 365-575-536 Issue 1 March 2001 NOTE: For left and right bays, see OT references. An AID example of a left bay would be otu-2-18-3 and an AID example of the right bay would be otu-1-18-3. For center bay, see OLS references for end terminal. Figure 16 — OLS Integrated Cabinet (Triple 1) 365-575-536 Issue 1 March 2001 FUSE/PWR INDICATING PANEL FUSE/PWR INDICATING PANEL OA OA OA 1A 1B 2A 2B OTU-29 OTU-30 OTU-31 OTU-32 OTU-21 OTU-22 OTU-23 OTU-24 OTU-25 OTU-26 OTU-27 OTU-28 O O O O M D M D U U U U OA OTU-9 OTU-10 OTU-11 OTU-12 OTU-13 OTU-14 OTU-15 OTU-16 OTU-17 OTU-18 OTU-19 OTU-20 INTERCONNECTION PANEL T T T T L L L L M M M M HEAT BAFFLE INTERCONNECTION PANEL FUSE/PWR INDICATING PANEL OTU-9 OTU-10 OTU-11 OTU-12 OTU-13 OTU-14 OTU-15 OTU-16 OTU-17 OTU-18 OTU-19 OTU-20 HEAT BAFFLE FUSE/PWR INDICATING PANEL INTERCONNECTION PANEL USER PANEL OTU-29 OTU-30 OTU-31 OTU-32 INTERCONNECTION PANEL OTU-21 OTU-22 OTU-23 OTU-24 OTU-25 OTU-26 OTU-27 OTU-28 Detailed Level Procedure: DLP-503 Page 15 of 32 HEAT BAFFLE OTU-1 OTU-2 OTU-3 OTU-4 OTU-5 OTU-6 OTU-7 OTU-8 HEAT BAFFLE FUSE/PWR INDICATING PANEL OTCTL T T T T L L L L M M M M O O O O M D M D U U U U OA OA OA OA 1A 1B 2A 2B TSS OYY HSS C CM TTE L LM HEAT BAFFLE INTERCONNECTION PANEL OTU-1 OTU-2 OTU-3 OTU-4 OTU-5 OTU-6 OTU-7 OTU-8 HEAT BAFFLE INTERCONNECTION PANEL USER PANEL INTERCONNECTION PANEL HEAT BAFFLE FUSE/PWR INDICATING PANEL OTCTL HEAT BAFFLE Control Cabling NC-85232301.2 NOTE: For left and right bays, see OT references. An AID example of a left bay would be otu-2-18-3. An AID example of a right bay would be otu-1-18-3. For center bay, see OLS references for end terminal. Figure 17 — OLS Integrated Cabinet (Triple 2) DLP-503: Detailed Level Procedure Page 16 of 32 365-575-536 Issue 1 March 2001 Interconnection Panel T T T T L L L L M M M M TLM TLM TLM TLM 3A 3B 4A 4B OA OA 3A OA OA 3B Fuse Panel 3A OMU/ODU 3B 4A 4B OA OA 4A Interconnection Panel T T T T L L L L M M M M TLM TLM TLM TLM 3A 3B 4A 4B OA OA OA 3A OA 4B Interconnection Panel Fuse Panel or User Panel T T T T L L L L M M M M TLM TLM TLM TLM 1A 1B 2A 2B OA OA OA 3A OA 3B 1A OMU/ODU 1B 2A 2B OA OA 4A TSS OYY OA H S S CCM T T E L LM OA TOHCTL SYSMEM SYSCTL 4B nc-84972901.2 Figure 18 — OLS Repeater OA OA 3B Fuse Panel 3A OMU/ODU 3B 4A 4B OA OA 4A TSS OYY OA H S S CCM T T E L LM OA TOHCTL SYSMEM SYSCTL 4B Interconnection Panel Fuse Panel or User Panel T T T T L L L L M M M M TLM TLM TLM TLM 1A 1B 2A 2B OA OA OA 3A OA 3B 1A OMU/ODU 1B 2A 2B OA OA 4A TSS OYY OA H S S CCM T T E L LM OA TOHCTL SYSMEM SYSCTL 4B nc-84973101.2 Figure 19 — OLS Dual Repeater 365-575-536 Issue 1 March 2001 Interconnection Panel Detailed Level Procedure: DLP-503 Page 17 of 32 Fuse Panel O O O O O O O OO O O O T T T T T T T T T T T T U U U U U U U U U U U U Complementary Shelf 2 (OTU Slots 21-32) Heat Baffle Interconnection Panel Fuse Panel O O O O O O O OO O O O T T T T T T T T T T T T U U U U U U U U U U U U Complementary Shelf 1 (OTU Slots 9-20) Heat Baffle Interconnection Panel O O O O O O O O T T T T T T T T U U U U U U U U Fuse Panel OTCTL System Controller Shelf (OTU Slots 1-8) nc-84977001.13 Figure 20 — Optical Translator With OTCTL Shown in Cabinet DLP-503: Detailed Level Procedure Page 18 of 32 Interconnection Panel 365-575-536 Issue 1 March 2001 Fuse Panel O O O O O O O OO O O O T T T T T T T T T T T T U U U U U U U U U U U U Complementary Shelf 2 (OTU Slots 21-32) Heat Baffle Interconnection Panel Fuse Panel O O O O O O O OO O O O T T T T T T T T T T T T U U U U U U U U U U U U Complementary Shelf 1 (OTU Slots 9-20) Heat Baffle Interconnection Panel O O O O O O O O T T T T T T T T U U U U U U U U Fuse Panel OTCTL System Controller Shelf (OTU Slots 1-8) nc-84977001.13 Figure 21 — Optical Translator Shown in Bay 365-575-536 Issue 1 March 2001 ODU (606B) Detailed Level Procedure: DLP-503 Page 19 of 32 Optical Connectors ODU (605A) 1. OUT 2. OUT 3. OUT 4. OUT 5. OUT 1.OUT 6. OUT 7. OUT 8. OUT 9. OUT 10. OUT 8.OUT 11. OUT 12. OUT 13. OUT 14. OUT 15. OUT 16. OUT ODU.IN TLM.OUT ODU.IN nc-84980201 nc-84980001.2 Figure 22 — OMU 505A Figure 23 — ODU 605A DLP-503: Detailed Level Procedure Page 20 of 32 365-575-536 Issue 1 March 2001 LDA1 LEA7 OA XXXXXXXX_ TLM FAULT FAULT OUT IN TLM OUT TLM IN Optical Connectors CM IN IN CM OUT OUT nc-84979801 nc-84980401.6 Figure 24 — TLM (LDA1) Circuit Pack Figure 25 — OA (LEA6, LEA7, and LEA105) 365-575-536 Issue 1 March 2001 OMU (506A) Detailed Level Procedure: DLP-503 Page 21 of 32 ODU (606B) 1. IN 1. OUT 2. IN 2. OUT 3. IN 3. OUT 4. IN 4. OUT 5. IN 5. OUT 6. IN 6. OUT 7. IN 7. OUT 8. IN 8. OUT 9. IN 9. OUT 10. IN 10. OUT 11. IN 11. OUT 12. IN 12. OUT 13. IN 13. OUT 14. IN 14. OUT 15. IN 15. OUT 16. IN 16. OUT OMU.OUT TLM.OUT ODU.IN nc-84980001.1 Figure 26 — OMU with 16 Inputs nc-84980001.2 Figure 27 —ODU with 16 Outputs (With Supervisory Out) DLP-503: Detailed Level Procedure Page 22 of 32 365-575-536 Issue 1 March 2001 ODU (606A) 1. OUT 2. OUT 3. OUT 4. OUT 5. OUT 6. OUT 7. OUT 8. OUT 9. OUT 10. OUT 11. OUT 12. OUT 13. OUT 14. OUT 15. OUT 16. OUT ODU.IN nc-odu606a Figure 28 — 606A ODU with 16 Inputs (Without Supervisory Out) 365-575-536 Issue 1 March 2001 Detailed Level Procedure: DLP-503 Page 23 of 32 Fault LED Lucent Lock SNC670REAA 42A1 S1:1 OTPM FAULT ACTIVE IN OUT IN Lock OUT nc-85222201 Figure 29 — OTU nc-85232401.2 Figure 30 — Optical Translator Port Module (OTPM) DLP-503: Detailed Level Procedure Page 24 of 32 41S S1:1 OTU Lucent SNC6101EAA S1:1 OTPM SNC670REAA Lucent 42A1 SNC670GEAA 42A9 S1:1 OTPM Lucent ACTIVE ACTIVE IN IN OUT OUT Port 1 S1:1 OTPM Lucent FAULT FAULT ACTIVE ACTIVE SNC670JEAA Lucent 42A11 SNC670KEAA 42A12 S1:1 OTPM FAULT Port 4 Invisible Laser Radiation When Open And Fiber Optic CableDisconnected. Avoid Direct Exposure To Beam. Rayonnement laser Invisible en cas d’ouverture et al le cable otique est deconnecte. Exposition Dangereuse au faisceau. FAULT DANGER Port 3 FAULT IN IN OUT OUT Port 2 nc-85232401.5 Figure 31 — QOTU Equipped with OTPMs 365-575-536 Issue 1 March 2001 365-575-536 Issue 1 March 2001 Detailed Level Procedure: DLP-503 Page 25 of 32 Table A - AID and Associated Shelves Associated Shelf AID End Terminal oline-{1a,1b,2a,2b} ochan-{1a,1b,2a,2b}-{1-16} oa-{1a,1b,2a,2b} cms-{1a,2a} cms-{1a,1b,2a,2b} tohctl tlm-{1a,2a} tlm-{1a,1b,2a,2b} supr-{1a,2a} supr-{1a,1b,2a,2b} sysctl sysmem Yes Yes Yes No Yes Yes No Yes No Yes Yes yes oline-{3a,3b,4a,4b} ochan-{3a,3b,4a,4b}-{1-16} oa-{3a,3b,4a,4b} cms-{3a,4a} cms-{3a,3b,4a,4b} tlm-{3a,4a} tlm-{3a,3b,4a,4b} supr-{3a,4a} supr-{3a,3b,4a,4b} Yes Yes Yes Yes No Yes No Yes No Shelf No. Shelf 1 Shelf 2 Repeater Yes No Yes No Yes Yes No Yes No Yes Yes Yes Yes No Yes No Yes No Yes No Yes Table B - OT AID of Integrated Bay/Cabinet Shelf Associated Shelf AID Single Double Triple 1 Triple 2 otu-1-{1-9} otpm-1-{1,3,5,7,9}-{1-4} System Controller Shelf System Conroller Shelf System Controller Shelf System Controller Shelf otu-1-{10-20} otpm-1-{11,13,15,17,19}-{1-4} Complementary Shelf 1 Complementary Shelf 1 Complementary Shelf 1 Complementary Shelf 1 otu-1-{21-32} otpm-1-{21,23,25,27,29,31}-{1-4} Not Applicable Complementary Shelf 2 Complementary Shelf 2 Complementary Shelf 2 otu-2-{1-9} otpm-1-{1,3,5,7,9}-{1-4} Not Applicable Not Applicable System Controller Shelf System Controller Shelf otu-2-{10-20} otpm-2-{11,13,15,17,19}-{1-4} Not Applicable Not Applicable Complementary Shelf 1 Complementary Shelf 1 otu-2{21-32} otpm-2-{21,23,25,27,29,31}-{1-4} Not Applicable Not Applicable Complementary Shelf 2 Complementary Shelf 2 DLP-503: Detailed Level Procedure Page 26 of 32 365-575-536 Issue 1 March 2001 Table C1 — Circuit Packs for End Terminal at 1A-TX Shelf 1 Line 1 Line 2 Line 3 Shelf 2 Line 4 CP OA OA TLM - OMU ODU SYSCTL SYSMEM TOHCTL Slot 1A 1B 1A/B 1B 1A 1B SYSCTL SYSMEM TOHCTL CP OA OA TLM - OMU ODU — — — Slot 2A 2B 2A/B 2B 2A 2B — — — CP OA OA TLM - OMU ODU — — — Slot 3A 3B 3A/B 3B 3A 3B — — — CP OA OA TLM - OMU ODU — — — Slot 4A 4B 4A/B 4B 4A 4B — — — Table C2 — Circuit Packs for End Terminal at 1A-RCV Line 1 Shelf 1 Line 2 Line 3 Shelf 2 Line 4 CP OA OA TLM - ODU OMU SYSCTL SYSMEM TOHCTL Slot 1A 1B 1A 1B 1A 1B SYSCTL SYSMEM TOHCTL CP OA OA TLM - ODU OMU — — — Slot 2A 2B 2A 2A 2A 2B — — — CP OA OA TLM ODU ODU OMU — — — Slot 3A 3B 3A 3A 3A 3B — — — CP OA OA TLM ODU ODU OMU — — — Slot 4A 4B 4A 4A 4A 4B — — — Table D1 — Circuit Packs for Dual End Terminal at 1A-TX Line 1 Shelf 1 Line 2 Line 1 Shelf 2 Line 2 CP OA OA TLM - ODU SYSCTL SYSMEM TOHCTL Slot 1A 1B 1A 1B 1A SYSCTL SYSMEM TOHCTL CP OA OA TLM - OMU — — — Slot 2A 2B 2A/B 2B 2A — — — CP OA OA TLM - ODU SYSCTL SYSMEM TOHCTL Slot 1A 1B 1A 1B 1A SYSCTL SYSMEM TOHCTL CP OA OA TLM - OMU — — — Slot 2A 2B 2A/B 2B 2A — — — Table D2 — Circuit Packs for Dual End Terminal at 1A-RCV Line 1 Shelf 1 Line 2 Line 1 Shelf 2 Line 2 CP OA OA TLM - OMU ODU SYSCTL SYSMEM TOHCTL Slot 1A 1B 1A/B 1B 1A 1B SYSCTL SYSMEM TOHCTL CP OA OA TLM - ODU OMU — — — Slot 2A 2B 2A/B 2B 2A 2B — — — CP OA OA TLM - OMU ODU SYSCTL SYSMEM TOHCTL Slot 1A 1B 1A/B 1B 1A 1B SYSCTL SYSMEM TOHCTL CP OA OA TLM - ODU OMU — — — Slot 2A 2B 2A/B 2B 2A 2B — — — 365-575-536 Issue 1 March 2001 Detailed Level Procedure: DLP-503 Page 27 of 32 Table E— Circuit Packs for Dual Facing End Terminal Line 1 Shelf 1 Line 2 Line 3 Shelf 2 Line 4 CP OA OA TLM - ODU OMU SYSCTL SYSMEM TOHCTL Slot 1A 1B 1A 1B 1A 1B SYSCTL SYSMEM TOHCTL CP OA OA TLM _ OMU ODU — — — Slot 2A 2B 2A 2B 2A 2B — — — CP OA OA TLM - ODU OMU — — — Slot 3A 3B 3A 3B 3A 3B — — — CP OA OA TLM - OMU ODU — — — Slot 4A 4B 4A 4B 4A 4B — — — Table F1 — Circuit Packs for Single OA End Terminal at 1A-TX Line 1 Shelf 1 Line 2 Line 3 Shelf 2 Line 4 CP — OA TLM _ OMU ODU SYSCTL SYSMEM TOHCTL Slot 1A 1B 1A 1B 1A 1B SYSCTL SYSMEM TOHCTL CP — OA TLM TLM OMU ODU — — — Slot 2A 2B 2A 2B 2A 2B — — — CP — OA TLM _ OMU ODU — — — Slot 3A 3B 3A 3A 3A 3B — — — CP — OA TLM _ OMU ODU — — — Slot 4A 4B 4A 4B 4A 4B — — — Table F2 — Circuit Packs for Single OA End Terminal at 1A-RCV Line 1 Shelf 1 Line 2 Line 3 Shelf 2 Line 4 CP OA — TLM _ ODU OMU SYSCTL SYSMEM TOHCTL Slot 1A 1B 1A 1B 1A 1B SYSCTL SYSMEM TOHCTL CP OA — TLM _ ODU OMU — — — Slot 2A 2B 2A 2B 2A 2B — — — CP OA — TLM _ ODU OMU — — — Slot 3A 3B 3A 3B 3A 3B — — — CP OA — TLM _ ODU OMU — — — Slot 4A 4B 4A 4B 4A 4B — — — Table G — Circuit Packs for Single OA Dual Facing End Terminal Line 1 Shelf 1 Line 2 Line 3 Shelf 2 Line 4 CP OA — TLM _ Slot 1A CP — Slot 2A CP OA Slot 3A CP — Slot 4A 4B ODU OMU SYSCTL SYSMEM TOHCTL 1B 1A 1B OA TLM _ 1A 1B SYSCTL SYSMEM TOHCTL OMU ODU — — — 2B 2A 2B 2A 2B — — — — TLM _ ODU OMU — — — 3B 3A 3B 3A 3B — — — OA TLM _ OMU ODU — — — 4A 4B 4A 4B — — — DLP-503: Detailed Level Procedure Page 28 of 32 365-575-536 Issue 1 March 2001 Table H — Circuit Packs for Telemetry Feed-Through at Dual End Terminals Line 1 Shelf 1 Line 2 Line 1 Shelf 2 Line 2 CP OA OA TLM TLM OMU ODU SYSCTL SYSMEM TOHCTL Slot 1A 1B 1A 1B 1A 1B SYSCTL SYSMEM TOHCTL CP OA OA TLM TLM OMU ODU — — — Slot 2A 2B 2A 2B 2A 2B — — — CP OA OA TLM TLM ODU OMU SYSCTL SYSMEM TOHCTL Slot 1A 1B 1A 1B 1A 1B SYSCTL SYSMEM TOHCTL CP OA OA TLM TLM ODU OMU — — — Slot 2A 2B 2A 2B 2A 2N — — — Table I— Circuit Packs for OLS Integrated Bay (Single) Line1 End Terminal Shelf System Controller Shelf Complem entary Shelf 1 CP OA OA TLM — OMU ODU SYSCTL SYSMEM TOHCTL Slot 1A 1B 1A 1B 1A 1B SYSCTL SYSMEM TOHCTL CP OA OA TLM — OMU ODU — — — Line 2 Slot 2A 2B 2A 2B 2A 2B — — — CP OTU OTU OTU OTU OTU OTU OTU OTU OTCTL Slot 1 2 3 4 5 6 7 8 TOHCTL SYSCTL SYSMEM CP OTU OTU OTU OTU OTU OTU OTU OTU OTU OTU OTU OTU Slot 9 10 11 12 13 14 15 16 17 18 19 20 Table J — Circuit Packs for OLS Repeater Line 1 Shelf 1 Line 2 Line 3 Shelf 2 Line 4 CP OA OA TLM TLM TLM TLM SYSCTL SYSMEM TOHCTL Slot 1A 1B 1A 1B 1B 1BA SYSCTL SYSMEM TOHCTL CP OA OA TLM TLM TLM TLM — — — Slot 2A 2B 2A 2B 2B 2A — — — CP OA OA TLM TLM TLM TLM — — — Slot 3A 3B 3A 3B 3B 3A — — — CP OA OA TLM TLM TLM TLM — — — Slot 4A 4B 4A 4B 4B 4A — — — TLM TLM TLM SYSCTL SYSMEM TOHCTL Table K — Circuit Packs for OLS Dual Repeater Line 1 Shelf 1 Line 2 CP OA OA TLM Slot 1A 1B 1A 1B 1B 1BA SYSCTL SYSMEM TOHCTL CP OA OA TLM TLM TLM TLM — — — Slot 2A 2B 2A 2B 2B 2A — — — 365-575-536 Issue 1 March 2001 Detailed Level Procedure: DLP-503 Page 29 of 32 Table K — Circuit Packs for OLS Dual Repeater Line 3 Shelf 2 Line 4 CP OA OA TLM TLM TLM TLM SYSCTL SYSMEM TOHCTL Slot 3A 3B 3A 3B 3B 3A SYSCTL SYSMEM TOHCTL CP OA OA TLM TLM TLM TLM — — — Slot 4A 4B 4A 4B 4B 4A — — — Table L— Available OTU Codes OTU Circuit Pack OTU Circuit Pack Code Name Code Name 41F1 OC48 OTU 1.5 W1 41A1C OC48 OTU 1.5 W1 41F2 OC48 OTU 1.5 W2 41A2C OC48 OTU 1.5 W2 41F3 OC48 OTU 1.5 W3 41A3C OC48 OTU 1.5 W3 41F4 OC48 OTU 1.5 W4 41A4C OC48 OTU 1.5 W4 41F5 OC48 OTU 1.5 W5 41A5C OC48 OTU 1.5 W5 41F6 OC48 OTU 1.5 W6 41A6C OC48 OTU 1.5 W6 41F7 OC48 OTU 1.5 W7 41A7C OC48 OTU 1.5 W7 41F8 OC48 OTU 1.5 W8 41A8C OC48 OTU 1.5 W8 41F9 OC48 OTU 1.5 W9 41A9C OC48 OTU 1.5 W9 41F10 OC48 OTU 1.5 W10 41A10C OC48 OTU 1.5 W10 41F11 OC48 OTU 1.5 W11 41A11C OC48 OTU 1.5 W11 41F12 OC48 OTU 1.5 W12 41A12C OC48 OTU 1.5 W12 41F13 OC48 OTU 1.5 W13 41A13C OC48 OTU 1.5 W13 41F14 OC48 OTU 1.5 W14 41A14C OC48 OTU 1.5 W14 41F15 OC48 OTU 1.5 W15 41A15C OC48 OTU 1.5 W15 41F16 OC48 OTU 1.5 W16 41A16C OC48 OTU 1.5 W16 41G OC48 OTU 1.3 41A1B OC48 OTU 1.5 W1 41D1 OC48 OTU 1.5 W1 41A2B OC48 OTU 1.5 W2 41D2 OC48 OTU 1.5 W2 41A3B OC48 OTU 1.5 W3 41D3 OC48 OTU 1.5 W3 41A4B OC48 OTU 1.5 W4 41D4 OC48 OTU 1.5 W4 41A5B OC48 OTU 1.5 W5 41D5 OC48 OTU 1.5 W5 41A6B OC48 OTU 1.5 W6 41D6 OC48 OTU 1.5 W6 41A7B OC48 OTU 1.5 W7 41D7 OC48 OTU 1.5 W7 41A8B OC48 OTU 1.5 W8 41D8 OC48 OTU 1.5 W8 41A9B OC48 OTU 1.5 W9 41D9 OC48 OTU 1.5 W9 41A10B OC48 OTU 1.5 W10 41D10 OC48 OTU 1.5 W10 41A11B OC48 OTU 1.5 W11 41D11 OC48 OTU 1.5 W11 41A12B OC48 OTU 1.5 W12 41D12 OC48 OTU 1.5 W12 41A13B OC48 OTU 1.5 W13 DLP-503: Detailed Level Procedure Page 30 of 32 365-575-536 Issue 1 March 2001 OTU Circuit Pack OTU Circuit Pack Code Name Code Name 41D13 OC48 OTU 1.5 W13 41A14B OC48 OTU 1.5 W14 41D14 OC48 OTU 1.5 W14 41A15B OC48 OTU 1.5 W15 41D15 OC48 OTU 1.5 W15 41A16B OC48 OTU 1.5 W16 41D16 OC48 OTU 1.5 W16 41BB OC48 OTU 1.3 41E OC48 OTU 1.3 Table L— Available OTU Codes (Condt) OTU Circuit Pack OTU Circuit Pack Code Name Code Name 41A1D OC48 OTU 1.5 W1 DISP 41C1C OC48 OTU 1.5 W1 DISP 41A2D OC48 OTU 1.5 W2 DISP 41C2C OC48 OTU 1.5 W2 DISP 41A3D OC48 OTU 1.5 W3 DISP 41C3C OC48 OTU 1.5 W3 DISP 41A4D OC48 OTU 1.5 W4 DISP 41C4C OC48 OTU 1.5 W4 DISP 41A5D OC48 OTU 1.5 W5 DISP 41C5C OC48 OTU 1.5 W5 DISP 41A6D OC48 OTU 1.5 W6 DISP 41C6C OC48 OTU 1.5 W6 DISP 41A7D OC48 OTU 1.5 W7 DISP 41C7C OC48 OTU 1.5 W7 DISP 41A8D OC48 OTU 1.5 W8 DISP 41C8C OC48 OTU 1.5 W8 DISP 41A9D OC48 OTU 1.5 W9 DISP 41C9C OC48 OTU 1.5 W9 DISP 41A10D OC48 OTU 1.5 W10 DISP 41C10C OC48 OTU 1.5 W10 DISP 41A11D OC48 OTU 1.5 W11 DISP 41C11C OC48 OTU 1.5 W11 DISP 41A12D OC48 OTU 1.5 W12 DISP 41C12C OC48 OTU 1.5 W12 DISP 41A13D OC48 OTU 1.5 W13 DISP 41C13C OC48 OTU 1.5 W13 DISP 41A14D OC48 OTU 1.5 W14 DISP 41C14C OC48 OTU 1.5 W14 DISP 41A15D OC48 OTU 1.5 W15 DISP 41C15C OC48 OTU 1.5 W15 DISP 41A16D OC48 OTU 1.5 W16 DISP 41C16C OC48 OTU 1.5 W16 DISP 41C1B OC48 OTU 1.5 W1 DISP 41C2B OC48 OTU 1.5 W2 DISP 41C3B OC48 OTU 1.5 W3 DISP 41C4B OC48 OTU 1.5 W4 DISP 41C5B OC48 OTU 1.5 W5 DISP 41C6B OC48 OTU 1.5 W6 DISP 41C7B OC48 OTU 1.5 W7 DISP 41C8B OC48 OTU 1.5 W8 DISP 41C9B OC48 OTU 1.5 W9 DISP 41C10B OC48 OTU 1.5 W10 DISP 41C11B OC48 OTU 1.5 W11 DISP 365-575-536 Issue 1 March 2001 Detailed Level Procedure: DLP-503 Page 31 of 32 OTU Circuit Pack OTU Circuit Pack Code Name Code 4112B OC48 OTU 1.5 W12 DISP 41C13B OC48 OTU 1.5 W13 DISP 41C14B OC48 OTU 1.5 W14 DISP 41C15B OC48 OTU 1.5 W15 DISP 41C16B OC48 OTU 1.5 W16 DISP Name DLP-503: Detailed Level Procedure Page 32 of 32 365-575-536 Issue 1 March 2001 Table M — Available QOTU Codes QOTU Circuit Pack Code Name 41S QOTU Table N — Available OTPM Codes OTPM Circuit Pack Code Name 42A1 42A2 42A3 42A4 42A5 42A6 42A7 42A8 42A9 42A10 42A11 42A12 42A13 42A14 42A15 42A16 42B 43A1 43A2 43A3 43A4 43A5 43A6 43A7 43A8 43A9 43A10 43A11 43A12 43A13 43A14 43A15 43A16 43B OC12 OTPM 1.5 W1 OC12 OTPM 1.5 W2 OC12 OTPM 1.5 W3 OC12 OTPM 1.5 W4 OC12 OTPM 1.5 W5 OC12 OTPM 1.5 W6 OC12 OTPM 1.5 W7 OC12 OTPM 1.5 W8 OC12 OTPM 1.5 W9 OC12 OTPM 1.5 W10 OC12 OTPM 1.5 W11 OC12 OTPM 1.5 W12 OC12 OTPM 1.5 W13 OC12 OTPM 1.5 W14 OC12 OTPM 1.5 W15 OC12 OTPM 1.5 W16 OC12 OTPM 1.3 OC3 OTPM 1.5 W1 OC3 OTPM 1.5 W2 OC3 OTPM 1.5 W3 OC3 OTPM 1.5 W4 OC3 OTPM 1.5 W5 OC3 OTPM 1.5 W6 OC3 OTPM 1.5 W7 OC3 OTPM 1.5 W8 OC3 OTPM 1.5 W9 OC3 OTPM 1.5 W10 OC3 OTPM 1.5 W11 OC3 OTPM 1.5 W12 OC3 OTPM 1.5 W13 OC3 OTPM 1.5 W14 OC3 OTPM 1.5 W15 OC3 OTPM 1.5 W16 OC3 OTPM 1.3 365-575-536 Issue 1 March 2001 Detailed Level Procedure: DLP-504 Page 1 of 2 Test Office Alarm Operation 1. At the CIT, select the command FAULT-Test-LED and set MODE:ALL with Repeat:1. Select Enter to execute. 2. Verify the CR, MJ, and MN visual LED indicators are sequentially lighted for 4 seconds and then remain off per the sequence chart below. The NE ACTY LED indicator will be lighted for the duration of the test. The FE ACTY and ABN LED indicators are not lighted during this test. Also, the office audible alarms should be activated during this test. Step* Alarm LED indicators at User Panel CR MJ MN NE ACTY ABN FE ACTY 1 off off off on off off 2 on off off on off off 3 off on off on off off 4 off off on on off off 5 off off off on off off 6 off off off off off off * Each step has a 4-second duration. 3. Did the office alarms operate as described? If YES, then STOP! YOU HAVE COMPLETED THIS PROCEDURE. If NO, then refer problem to the group that installed the equipment. DLP-504: Detailed Level Procedure Page 2 of 2 365-575-536 Issue 1 March 2001 DLP-505 : Detailed Level Procedure Page 1 of 2 365-575-536 Issue 1 March 2001 Perform Provisioning NOTE: The OLS does not have any manual or switch-settable options on its circuit packs or units. NOTE: Information about OLS provisioning is provided in Section 8, "Administration and Provisioning," of this manual. Other helpful information is the CIT tutorial and command tables (by release), which are located in Section 11 of this manual. 365-575-382, WaveStar OLS 40G Provisioning Job Aid 365-575-383, WaveStar OLS 40G Threshold-Crossing Alert (TCA) Parameters Provisioning Job Aid 1. 2. At the CIT, select CONFIGURATION, PERFORMANCE, FAULT, SECURITY, or ADVANCED category and the appropriate inputs [verb and modifier(s)]. Inputs are also referred to as commands. NOTE: For example, a report is obtained by using CONFIGURATION-Retrieve-Attribute-Alarm . Another example is a report that is obtained by using CONFIGURATION-Retrieve-Supervisory. Did the appropriate report show that provisioning has been done? If YES, then STOP! YOU HAVE COMPLETED THIS PROCEDURE. If NO, then (1) refer the problem to the group that did the original provisioning, and/or (2) compare the report with the original work order and correct the provisioning discrepancy. Provisioning job aids are available; see Step 1 for the specific equipment references. 365-575-536 Issue 1 March 2001 Detailed Level Procedure: DLP-505 Page 2 of 2 365-575-536 Issue 1 March 2001 Detailed Level Procedure: DLP-506 Page 1 of 2 Verify OLS Network Elements Are Connected Overview: This procedure is used to verify that all network elements are connected in an OLS. NOTE: CIT-PC reports are used to verify OLS connectivity. 1. At the CIT, select FAULT-Retrieve-Condition-All command to obtain a report. This report indicates if any trouble conditions are present on the local OLS network element. 2. Are there any trouble conditions listed in the CONDDSCR column of the report? If NO, then continue with Step 3. If YES, then notify the installation personnel to correct the trouble condition before proceeding. 3. At the CIT, select FAULT-Retrieve-Alarm-Network command to obtain a report for the OLS. This report indicates if any conditions are present in the OLS. 4. Are there any alarms listed in the NTFCNCDE <System Alarm> column of the report? If NO, then continue with Step 5. If YES, then notify the installation personnel to correct the trouble condition before proceeding. 5. At the CIT, select CONFIGURATION-Retrieve-Map-Ring command to obtain a report. 6. Verify the TID's, DSNE, DCC Status, and FBRCONN from the report agree with the engineered documentation. 7. STOP! YOU HAVE COMPLETED THIS PROCEDURE. DLP-506: Detailed Level Procedure Page 2 of 2 365-575-536 Issue 1 March 2001 DLP-507 : Detailed Level Procedure Page 1 of 2 365-575-536 Issue 1 March 2001 Identify Source of Incoming Signal Overview: You were sent to this procedure to identify the signal source associated with an incoming signal condition so that you can issue a Trouble Report to the personnel at that location. 1. 2. Find the condition to be reported in the table below and continue with the indicated step. For This Condition Go To Incoming Incoming Incoming Incoming Incoming Incoming Incoming Incoming Incoming Incoming Incoming Incoming Incoming Step 2 Step 2 Step 5 Step 7 Step 7 Step 7 Step 7 Step 9 Step 9 Step 9 Step 9 Step 9 Step 9 CMS SD (signal degrade) CMS SF (signal failure) optical channel LOS (loss of signal) optical line LOS (loss of signal) supr chnl fail supr chnl SD (signal degrade) supr chnl SF (signal failure) OC3 failure OC12 failure OC-48 failure STM1 failure STM4 failure STM16 failure NOTE: The source of the incoming signal condition is at the upstream network element, meaning the transmit location for the incoming signal. From office records, determine the location of the customer provided equipment and send a Trouble Report to the personnel responsible for maintaining that site. 3. STOP! YOU HAVE COMPLETED THIS PROCEDURE. 4. Is this incomming optical channel LOS (loss of signal) in the receive line direction or transmit line direction? If transmit direction, continue with Step 5 If receive direction, continue with Step 7 365-575-536 Issue 1 March 2001 5. Detailed Level Procedure: DLP-507 Page 2 of 2 NOTE: The source of the incoming signal condition is the FT-2000 LCT/ADR/OTU/OTPM network element. From office records, determine the location of the FT-2000 LCT/ADR/OTU/OTPM network element associated with this channel and send a Trouble Report to the personnel responsible for maintaining that site. 6. 7. STOP! YOU HAVE COMPLETED THIS PROCEDURE. NOTE: The source of the incoming signal condition is the upstream network element in the direction of the incoming signal. From office records, determine the location of the upstream network element and send a Trouble Report to the personnel responsible for maintaining that site. 8. 9. STOP! YOU HAVE COMPLETED THIS PROCEDURE. NOTE: The source of the incoming signal condition is the upstream network element. Upstream network element meaning the transmit location for the incoming signal. From office records, determine the location of the upstream network element associated with this OTU/OTPM and send a Trouble Report to the personnel responsible for maintaining that site. 10. STOP! YOU HAVE COMPLETED THIS PROCEDURE. DLP-508 : Detailed Level Procedure Page 1 of 2 365-575-536 Issue 1 March 2001 Test Parallel Telemetry Overview: This procedure is used to test all the parallel telemetry points for proper operation. This procedure is performed during the acceptance of the OLS network elements when they are out of service and is performed only during this time. For additional information, refer to the "Parallel Telemetry Interface" part in Section 6, "Operations Interfaces." 1. Contact the remote operations center and request their assistance in monitoring the parallel telemetry points during this test. 2. At the remote operations center, disable the alarm threshold level for the telemetry points being tested. 3. At the local CIT, select FAULT-Test-Telemetry-Parallel command and execute. Response: All parallel telemetry points are simultaneously turned on for 20 seconds, then off for 20 seconds before reverting to normal operation. 4. Does the test pass as monitored from the remote operations center. If YES, then continue to Step 5. If NO, then refer to the Installation Manual to correct the problem or contact the group who did the installation. 5. At the remote operations center, enable the alarm threshold level for the points being tested, if disabled in Step 2. 6. STOP! YOU HAVE COMPLETED THIS PROCEDURE. 365-575-536 Issue 1 March 2001 Detailed Level Procedure: DLP-500 Page 2 of 2 365-575-536 Issue 1 March 2001 Detailed Level Procedure: DLP-509 Page 1 of 2 Install/Remove Apparatus (Circuit Pack) Blank 1. Is an apparatus blank to be installed or removed? To be installed, then continue with Step 2. To be removed, then continue with Step 7. 2. Position the apparatus blank vertically with its white painted surface towards you and its two extended protrusions away from you and on the right side. 3. Insert the apparatus blank's bottom extended protrusion into the bottom of the circuit pack slot and snap its spring-clip notch over the bottom shelf cross-support channel. 4. Carefully bend the apparatus blank so that it is slightly bowed towards you in the middle, insert its top protrusion into the top of the circuit pack slot, and snap its spring-clip notch over the top shelf cross-support channel. 5. Push the center of the apparatus blank inwards to fully seat it and to eliminate any residual bowing. 6. STOP! YOU HAVE COMPLETED THIS PROCEDURE. 7. Is there a vacant slot adjacent to the apparatus blank to be removed? If YES, then continue with Step 8. If NO, then continue with Step 12. 8. Carefully bend the apparatus blank so that it is slightly bowed towards you in the middle, unsnap its spring-clip notch from the top shelf cross-support channel, and remove its top protrusion from the top of the circuit pack slot. 9. Unsnap the apparatus blank's spring-clip notch from the bottom shelf cross-support channel and remove its bottom extended protrusion from the bottom of the circuit pack slot. 10. Lift the apparatus blank from the slot. 11. STOP! YOU HAVE COMPLETED THIS PROCEDURE. DLP-509: Detailed Level Procedure Page 2 of 2 365-575-536 Issue 1 March 2001 12. Use a flat-bladed screwdriver against the bottom shelf cross-support channel to pry the apparatus blank's bottom edge upward and forward. 13. Lift the apparatus blank from the slot. 14. STOP! YOU HAVE COMPLETED THIS PROCEDURE. 365-575-536 Issue 1 March 2001 Detailed Level Procedure: DLP-510 Page 1 of 4 Clean Optical Fibers and Connectors Overview: This procedure is used to clean the optical connectors used in an optical line system. Proper cleaning will eliminate exposure to dirt that may cause permanent damage to the connector. Once a connector has been permanently damaged, no amount of cleaning will rectify it. A damaged connector is suspected, despite rigorous cleaning, when power remains low in the system. Therefore, proper cleaning is especially critical in high-power systems. In the event that the connector is damaged, it must be replaced by installing a new jumper cable and/or a new circuit pack, depending on where the damage occurs. Typically, both mating ends of the connector become damaged. This damage may be caused when connectors are engaged or disengaged while significant optical power (greater than 3.0 dBm) is present in the connection. Do not attempt to clean optically powered connectors. Required Equipment: • CLETOP Cleaning Cassette Type A (comcode 901375154) or Type B (comcode TBD) • Replacement Reel for CLETOP Cleaning Cassette Type A (comcode 901375014) • Replacement Reel for CLETOP Cleaning Cassette Type B (comcode TBD) • CLETOP Stick (comcode 901375030) • Pre-saturated Alcohol Wipes - Tech Spray brand, 99% pure anhydrous isopropyl alcohol • 300B Microscope (comcode 104412077, used for ST, SC, and FC type connectors) or Optical Fiber Scope, Noyes OFS 300-200X (comcode 408197028, used for ST, SC, FC, and LC type connectors) • LC Microscope (comcode 107863946, used for LC type connectors) or LC Adapter Cap for Noyes OFS 300-200X (comcode 408197069). NOTE: All optical fiber connectors (ST, SC, FC, and LC types) should be subjected to this procedure before making initial connections or reconnections per the following instructions. Only the connectors being assembled at this particular time should be subjected to this procedure. NOTE: To prevent contamination, keep all dust caps and plugs in place on the fiber connectors as well as on the lightguide buildouts until it is time to make connections. After cleaning is complete and contamination is suspected, discard DLP-510: Detailed Level Procedure Page 2 of 4 365-575-536 Issue 1 March 2001 lightguide buildouts and/or connectors and replace them with new parts before making fiber connections. Cleaning Connectors on Optical Jumpers and Pigtails 1. 2. Remove (if necessary) optical connector from lightguide buildout/optical port or remove (if necessary) dust cap from the optical connector. Make sure that no optical signal is present on the optical connector by using an optical power meter or by disconnecting the other end of the fiber. ! WARNING: Disconnected or separated optical connectors may emit invisible laser radiation. Do not view the lightwave beam with the naked eye or with an optical instrument. Avoid direct exposure to the beam. Verify clean connector by using an appropriate microscope. 3. a. Make sure that the viewing area of the microscope itself is free of any spots that might be confused with the spots from a contaminated connector. To verify, look into the microscope eyepiece from a distance of 1 inch without a connector attached to it. The white background displayed by the eyepiece of a clean microscope witll be free of black spots and/or rings around its periphery. b. Attach the connector into the microscope. c. Look for a clean, white ferrule tip with a dark circle in the center (fiber cladding and core) by adjusting the focus setting on the microscope. . The image on the microscope for a clean connector will be free of any spots, streaks, and fiber particles as shown in Figure 1. To confirm that observed spots are on the connector, slowly disconnect the connector while viewing it through the microscope and verifying that the black spots fade away as the connector is removed form the microscope. Is the connector clean? If YES, then continue with Step 15. If NO, then go to Step 4. 4. Hold the CLETOP Reel Type A or B cleaner in the palm of one hand with the cleaning side facing you. 5. Press the lever with the thumb of the same hand all the way down and hold. Do not release the lever. 365-575-536 Issue 1 March 2001 Detailed Level Procedure: DLP-510 Page 3 of 4 6. While keeping the lever held down with one hand, use the other hand to press the optical ferrule endface against the cleaning cloth in any one slot and uniformly drag it in the direction indicated by the arrows on the cleaner. Note that the CLETOP Reel Type B has only one slot. Make sure that the endface is in contact with the cleaning cloth at all times, and that uniform force is used while dragging it. 7. Rotate the connector 90 degrees. 8. Press the ferrule endface against the cleaning cloth in the other slot for CLETOP Reel Type A or in the same slot for CLETOP Reel Type B and uniformly drag it in the direction indicated by the arrows on the cleaner. Make sure that the endface is in contact with the cleaning cloth at all times, and that uniform force is used while dragging it. 9. Release the lever and allow it to return to its initial position. 10. Verify clean connector by using an appropriate microscope. Look for a clean, white ferrule tip with a dark circle in the center (fiber cladding and core). A clean connector’s image will be free of any spots, streaks and fiber particles. 11. Is the connector clean? If YES, then continue with Step 15. If NO, then continue with Steps 12. 12. Open an individual foil packet of pre-saturated alcohol wipe. Grasp the connector housing and palce the connector ferrule endface perpendicular to the alcohol wipe. Drag it against the wipe three times in a figure eight pattern while maintaining uniform pressure. Do not use pre-saturated alcohol wipes other than the type specified in this procedure. Make sure that the pre-saturated alcohol wipe is resting on an unyielding surface while wiping the ferrule tip. Discard tissue in an appropriate manner when finished. 13. Repeat Steps 4 through 10. 14. Is the connector clean? If YES, then continue with Step 15. If NO, then repeat Step 12. If the connector remains dirty after Step 12 has been implemented twice, then discard the jumper. Cleaning Optical Connectors Inside the Faceplate DLP-510: Detailed Level Procedure Page 4 of 4 15. 365-575-536 Issue 1 March 2001 NOTE: To prevent contamination, keep the optical ports covered with a dust cap or plug when not in use. Is the optical port on the faceplate removable? (The optical port is removable when lightguide buildout is used.) If YES, continue with Step 16. If NO, continue with Step 20. 16. Remove the lightguide buildout from its base (block). Do not attempt to insert CLETOP Stick into lightguide buildout sleeve or any other optical connector sleeve. Reference: DLP-512 17. Is the connector inside the faceplate accessible? If YES, continue with Step 18. If NO, continue with Step 20. 18. Carefully wipe the cleaning cloth, present on the tip of the CLETOP Stick, against the ferrule endface by dragging the cloth over the enire ferrule endface surface three times. 19. Place the lightguide buildout into its base (block). Reference: DLP-512 20. STOP! YOU HAVE COMPLETED THIS PROCEDURE. Figure 1 – Image of Clean Connector 365-575-536 Issue 1 March 2001 Detailed Level Procedure: DLP-511 Page 1 of 2 Open/Close Cabinet Doors or Install/Remove Shelf Cover ! CAUTION: Use a static ground wrist strap whenever handling circuit packs or working on an OLS network element to prevent electrostatic discharge damage to sensitive components. See "Electrostatic Discharge (ESD) Considerations" in Trouble Clearing: TAD-100. 1. Is the network element cabinet installed or miscellaneously mounted? If cabinet installed, then continue with Step 10. If miscellaneously mounted, then continue with Step 2. 2. Locate the appropriate shelf cover. Reference: DLP-503 3. Is the cover being installed or removed? If Removed, then continue with Step 4. If Installed, then continue with Step 7. Remove Cover 4. At the top of each cover, locate a latch at each corner. 5. Unlatch the cover, swing toward you three inches and lift the cover from the shelf frame. 6. STOP! YOU HAVE COMPLETED THIS PROCEDURE. Install Cover 7. Place the cover bottom into the shelf frame. 8. Close the cover until both top corners latch. 9. STOP! YOU HAVE COMPLETED THIS PROCEDURE. 10. Locate the appropriate cabinet. Reference: DLP-503 DLP-511: Detailed Level Procedure Page 2 of 2 365-575-536 Issue 1 March 2001 11. Are the doors being opened or closed? If opened, then continue with Step 12. If closed, then continue with Step 15. Open Cabinet Doors 12. At the center of the right door, locate the latch release push button and press in and release. The latch handle will pop out. 13. Grasp the latch handle and open the door, now the left-hand door can be opened. 14. STOP! YOU HAVE COMPLETED THIS PROCEDURE. Close Cabinet Doors 15. Close the left-hand door first. 16. Close the right-hand door and press down on the latch handle. 17. STOP! YOU HAVE COMPLETED THIS PROCEDURE. 365-575-536 Issue 1 March 2001 Detailed Level Procedure: DLP-512 Page 1 of 4 Install/Remove Lightguide Buildout ! WARNING: Unterminated optical connectors may emit invisible laser radiation. Eye damage may occur if beam is viewed directly or with improper optical instruments. Avoid direct exposure to beam. ! CAUTION: Use a static ground wrist strap whenever handling circuit packs or working on an OLS network element to prevent electrostatic discharge damage to sensitive components. NOTE: Table A on page 4 of 4 lists the color and values of LBOs. The green LBOs must be used when adding channels because of their finer granularity. If yellow LBOs are already installed, you do not need to go back and replace with green LBOs. 1. Is the buildout being installed or removed (see Figure 1)? To Install, then continue with Step 2. To Remove, then continue with Step 5. Install Buildout 2. Remove the protector caps and plugs (if equipped) from the buildout and buildout block and store them in a clean container. 3. Align the buildout with the slot in the buildout block, push in, and rotate clockwise until locked into position. Refer to the appropriate Figure (2, 3, 4, or 5) for the specific buildout type. 4. STOP! YOU HAVE COMPLETED THIS PROCEDURE. Remove Buildout 5. ! CAUTION: Locking beam must only be pushed along a line perpendicular to buildout body in direction towards the buildout in order to avoid damage to the locking beam. Depress the locking beam on the buildout, rotate counterclockwise, and separate from the buildout block by sliding apart. Refer to the appropriate figure (2, 3, 4, or 5) for the specific buildout type. 6. STOP! YOU HAVE COMPLETED THIS PROCEDURE. DLP-512: Detailed Level Procedure Page 2 of 4 365-575-536 Issue 1 March 2001 ST Block ST Buildout FC Buildout SC Buildout nc-a110394 Figure 1 - ST Block and Buildouts Install Depress Beam to Remove Buildout nc-b110794 Figure 2 - ST Block and ST Buildout 365-575-536 Issue 1 March 2001 Install Detailed Level Procedure: DLP-512 Page 3 of 4 Depress Beam to Remove Buildout nc-d110294 Figure 3 - ST Block and FC Buildout Install Depress Beam to Remove Buildout nc-c110294 Figure 4 - ST Block and SC Buildout NC-OLS80G086 Figure 5 - LC Connector DLP-512: Detailed Level Procedure Page 4 of 4 365-575-536 Issue 1 March 2001 Table A – LBO Types (Maximum Reflectance = -30 dB) LBO Color Fiber Use* Attenuation Values Connectors Supported Wavelength at Nominal Attenuator Attenuation (nm) Element (dB) 0 ST and FC No Restriction 5,10,15,17.5 ST 1310 Optical Power Limits (dBm)† SM-SM SM-MM White Connector Limited MM-MM MM-MM Clear for 5 ≤20 Tinted for 10, 15,17.5 ≤5 SM-SM SM-MM Blue 0 SC No Restriction 5,10,15,17.5 SC 1310 Connector Limited MM-MM MM-MM Clear for 5 ≤20 Tinted for 10, 15,17.5 ≤5 Clear for ≤10 ≤20 SM-SM 3, 5, 7, 10, 15, 20 ST, FC, and SC 1310 to 1550‡ Tinted for >15 ≤5 Green§ SM-SM 3,3.5,4,4.5, 5.5,6,6.5,7, 7.5,8,8.5,9, 9.5,10,10.5,11,11 .5,12, 12.5,13, 13.5,14,14.515,1 6,18,20 ST and FC 1550 Clear ≤20 3,3.5,4,4.5, 5.5,6,6.5,7, 7.5,8,8.5,9, 9.5,10 SC 1550 Clear ≤20 5,7,10,12,15, 17,20 ST and FC 1550 Tinted ≤5 Yellow Gray ¶ SM-MM * SM = Single-mode fiber, MM = Multi-mode fiber. † These optical power values are conservative estimates. ‡ The Yellow LBOs have nominal values appropriate to both 1310 and 1550 nm. Worst case tolerance on attenuation is ±15% of nominal attenuation. § Green LBOs are highly recommended for 16 wavelength systems due to their finer granularity. These LBOs have nominal values appropriate to 1550 nm. Tolerance is ±0.3 dB of nominal attenuation for 3 to 15 dB values, ±0.5 dB for 16 dB value, and ±1 dB for 18 or 20 dB values. Use at the IN and OUT connectors of the OC-48/STM1;6 OTU. Use at the OUT connectors of the transmit OTPMs (toward line). ¶ Use at the IN connector of ALL drop-side OTPMs and ALL Lucent OC-3, OC-12, and LSBB receivers that are used directly with OLS without drop-side OTPMs. DLP-513 : Detailed Level Procedure Page 1 of 2 365-575-536 Issue 1 March 2001 Test OLS Miscellaneous Discrete Telemetry Overview: This procedure tests the user settable miscellaneous discrete environmental (input) points and control (output) points. 1. Contact the remote operations center and request their help to observe the environmental points and to activate the control points during this test. 2. At the remote operations center, disable, if desired, the alarm threshold level for the points being tested. 3. NOTE: When an external device connected to the OLS network element causes a contact closure to appear as an environmental input to the network element, a corresponding environmental point is activated at the remote operations center. Operate the first external device connected to the OLS network element in such a way as to cause a closed contact to appear at the network element's environmental input. 4. Was the corresponding environmental point activated at the remote operations center? If YES, then continue with Step 5. If NO, then report the trouble to the installation personnel. 5. Operate the first external device connected to the OLS network element in such a way as to cause an open contact to appear at the network element's environmental input. 6. Was the corresponding environmental point deactivated at the remote operations center? If YES, then continue with Step 7. If NO, then report the trouble to the installation personnel. 7. Repeat Steps 3 through 6 for any remaining environmental points to be tested. 365-575-536 Issue 1 March 2001 8. Detailed Level Procedure: DLP-513 Page 2 of 2 NOTE: When a control point is activated at the remote operations center, it results in a contact closure at the corresponding control output of the OLS network element which, in turn, can operate an external device connected to the network element. Ask the personnel at the remote operations center to activate the first control point being tested. 9. Was the corresponding external device connected to the network element operated correctly? (For example, was it turned on?) If YES, then continue with Step 10. If NO, then report the trouble to the installation personnel. 10. Ask the personnel at the remote operations center to deactivate the first control point being tested. 11. Was the corresponding external device connected to the network element operated correctly? (For example, was it shut off?) If YES, then continue with Step 12. If NO, then report the trouble to the installation personnel. 12. Repeat Steps 8 through 11 for any remaining control points to be tested. 13. At the remote operations center, enable the alarm threshold level for the points being tested, if disabled in Step 2. 14. STOP! YOU HAVE COMPLETED THIS PROCEDURE. DLP-514 : Detailed Level Procedure Page 1 of 12 365-575-536 Issue 1 March 2001 Install/Remove Circuit Pack ! CAUTION: Use a static ground wrist strap whenever handling circuit packs or working on an OLS network element to prevent electrostatic discharge damage to sensitive components. ! CAUTION: Do not remove the SYSCTL circuit pack unless instructed to by the procedure that sent you here. If the SYSCTL circuit pack is removed, provisioning data could be lost. NOTE: Verify that all fibers are labeled to prevent possible service interruption. 1. Are you to remove or install a circuit pack? If to remove, then continue with Step 2. If to install, then continue with Step 19. 2. What type of circuit pack is being removed? If OA circuit pack, then continue with Step 3. If TLM circuit pack, then continue with Step 11. If TOHCTL circuit pack, then continue with Step 16. If SYSMEM circuit pack, then continue with Step 16. If SYSCTL circuit pack, then continue with Step 16. If OTU circuit pack, then continue with Step 44 If OTPM circuit pack, then continue with Step 50. If QOTU circuit pack, then continue with Step 55. Remove OA 3. ! WARNING: Unterminated optical connectors may emit invisible laser radiation. Eye damage may occur if beam is viewed directly or with improper optical instruments. Avoid direct exposure to the beam. Remove any optical fibers from the guide below the shelf for the circuit pack being removed. 365-575-536 Issue 1 March 2001 4. ! Detailed Level Procedure: DLP-514 Page 2 of 12 CAUTION: The OA circuit pack must be unseated from the backplane before removing the output optical connector. Disengage the OA circuit pack from the shelf. 5. Remove the incoming fiber from the IN optical connectors of the OA circuit pack and install a protector cap on the fiber. 6. Remove the outgoing fiber from the OUT optical connectors of the OA circuit pack and install a protector cap on the fiber. 7. Remove the optical fibers from the TLM IN and/or TLM OUT connectors of the OA circuit pack and install protector caps on the fibers. 8. Remove any buildouts from the OA circuit pack and store for future use. Reference: DLP-512 9. Remove the circuit pack from the shelf by carefully sliding the circuit pack out of the slot guides to remove it from the shelf. DO NOT ROCK THE CIRCUIT PACK BACK AND FORTH. 10. Are you to install another circuit pack in this slot? If YES, then continue with Step 19. If NO, then STOP! YOU HAVE COMPLETED THIS PROCEDURE. Remove TLM 11. Remove the optical fibers from the slot guide on the shelf. This is to prevent damage to the fiber when the circuit pack is removed. 12. Remove the outgoing fiber from the OUT optical connectors of the TLM circuit pack and install a protector cap on the fiber. 13. Remove the incoming fiber from the IN optical connectors of the TLM circuit pack and install a protector cap on the fiber. 14. Remove the optical fibers from the CM IN and CM OUT connectors of the TLM circuit pack and install protector caps on the fibers. DLP-514: Detailed Level Procedure Page 3 of 12 365-575-536 Issue 1 March 2001 15. Remove any LBOs from the TLM circuit pack and store for future use. Reference: DLP-512 Remove TOHCTL, SYSMEM, or SYSCTL 16. Remove the circuit pack from the shelf as follows: a. Push up on the locking clip to unlock the circuit pack latch. b. Unseat the circuit pack by carefully and continuously pulling out on the circuit pack latch. c. Carefully slide the circuit pack out of the slot guides to remove it from the shelf. DO NOT ROCK THE CIRCUIT PACK BACK AND FORTH. 17. Are you to install another circuit pack in this slot? If YES, then continue with Step 19. If NO, then STOP! YOU HAVE COMPLETED THIS PROCEDURE. 18. If applicable, remove the apparatus (circuit pack) blank from the slot. Reference: DLP-525 19. What type of circuit pack is being installed? If OA circuit pack, then continue with Step 22. If TLM circuit pack, then continue with Step 38. If TOHCTL circuit pack, then continue with Step 20. If SYSMEM circuit pack, then continue with Step 20. If SYSCTL circuit pack, then continue with Step 20. If OTU circuit pack, then continue with Step 60. If OTPM circuit pack, then continue with Step 66. If QOTU circuit pack, then continue with Step 72. 365-575-536 Issue 1 March 2001 Detailed Level Procedure: DLP-514 Page 4 of 12 Install TOHCTL, SYSMEM, or SYSCTL 20. Install the circuit pack into the slot as follows: a. If necessary, close both latches on the circuit pack. b. Place the circuit pack into the slot guides and slowly slide it into the shelf until the latches touch the shelf. DO NOT ROCK THE CIRCUIT PACK OR UNIT BACK AND FORTH. c. Open the latches and push the circuit pack until it engages the connector pins. d. With a thumb on each latch, continue sliding the circuit pack with one firm, continuous motion until the latches are fully engaged (the clips are in the locked position). 21. STOP! YOU HAVE COMPLETED THIS PROCEDURE. Install OA 22. Is the circuit pack being installed either an end terminal receive OA or a single OA configuration transmit OA circuit pack? If NO, then continue with Step 31. If YES, then continue with Step 23. 23. Install the circuit pack into the slot as follows: a. If necessary, close both latches on the circuit pack. b. Place the circuit pack into the slot guides and slowly slide it into the shelf until the latches touch the shelf. DO NOT ROCK THE CIRCUIT PACK OR UNIT BACK AND FORTH. 24. Clean and connect the outgoing optical fiber to the OUT connector of the OA circuit pack. 25. Clean and connect the TLM IN and OUT optical fibers to their proper locations. DLP-514: Detailed Level Procedure Page 5 of 12 365-575-536 Issue 1 March 2001 26. Seat the OA circuit pack into the shelf as follows: a. Open the latches and push the circuit pack until it engages the connector pins. b. With a thumb on each latch, continue sliding the circuit pack with one firm, continuous motion until the latches are fully engaged (the clips are in the locked position). 27. Wait until the ODU warmup in progress condition clears or wait 15 minutes for the ODU temperature to stabilize in Releases 2.0 and earlier. 28. If required, clean and install the lightguide buildout to the IN connector of the receive OA circuit pack. Reference: DLP-512 29. Clean the incoming optical line fiber and connector and make the connection to the IN connector. Reference: DLP-510 30. STOP! YOU HAVE COMPLETED THIS PROCEDURE. 31. Install the circuit pack into the slot as follows: a. If necessary, close both latches on the circuit pack. b. Place the circuit pack into the slot guides and slowly slide it into the shelf until the latches touch the shelf. DO NOT ROCK THE CIRCUIT PACK OR UNIT BACK AND FORTH. 32. If required, install the LBO at the IN and OUT connectors of the OA circuit pack. Reference: DLP-512 33. Clean the optical fibers and connectors that will connect to the IN and OUT OA connectors. Reference: DLP-510 34. Connect the optical fibers to the LBOs and/or optical connectors at the OA circuit pack. 35. Connect the remaining optical fiber(s) to their proper location(s). 365-575-536 Issue 1 March 2001 Detailed Level Procedure: DLP-514 Page 6 of 12 36. Seat the OA circuit pack into the shelf as follows: a. Open the latches and push the circuit pack until it engages the connector pins. b. With a thumb on each latch, continue sliding the circuit pack with one firm, continuous motion until the latches are fully engaged (the clips are in the locked position). 37. STOP! YOU HAVE COMPLETED THIS PROCEDURE. Install TLM 38. Install the circuit pack as follows: a. Open the latch on the circuit pack. b. Place the circuit pack into the slot guides and slowly slide it into the shelf until latch engages the shelf. c. With a thumb on the latch, continue sliding the circuit pack with one firm, continuous motion until latch is fully engaged (locking clip is in locked position.) 39. If required, install LBOs at the CM IN and CM OUT connectors of the TLM circuit pack. Reference: DLP-512 40. Clean the optical fibers and connectors. Reference: DLP-510 41. Connect the optical fibers to the LBOs and/or optical connectors at the TLM circuit pack. 42. Connect the remaining optical fibers to their proper locations. 43. STOP! YOU HAVE COMPLETED THIS PROCEDURE. Remove OTU 44. Remove the optical fibers from the slot guide on the shelf. DLP-514: Detailed Level Procedure Page 7 of 12 365-575-536 Issue 1 March 2001 45. Remove the optical fiber from the OUT connector of the OTU circuit pack and install a protector cap on the fiber. 46. Remove the optical fiber from the IN connector of the OTU circuit pack and install a protector cap on the fiber. 47. If required, remove any LBOs from the OTU circuit pack and store for future use. 48. NOTE: If the OTU circuit pack being removed is in the left-most or right-most slot of the self, the gasket material around the shelf may interfere. Remove the pack carefully, and if the gasket material is dislodged, then replace the gasket material after the replacement pack has been inserted. Remove the OTU circuit pack from the shelf as follows: a. Push up on the bottom and down on the top metal locking clips to unlock the circuit pack latches. b. Unseat the circuit pack by carefully and continuously pulling out equally on the top and bottom latches. c. Carefully slide the circuit pack out of the slot guides to remove it from the shelf. DO NOT ROCK THE UNIT OR CIRCUIT PACK BACK AND FORTH. 49. Are you to install another OTU circuit pack in this slot? If YES, continue with Step 19. If NO, then STOP! YOU HAVE COMPLETED THIS PROCEDURE. Remove OTPM 50. Remove the optical fiber from the OUT connector of the OTPM circuit pack and install a protector cap on the fiber. 51. Remove the optical fiber from the IN connector of the OTPM circuit pack and install a protector cap on the fiber. 52. If required, remove any LBOs from the OTPM circuit pack and store for future use. 53. Remove the OTPM circuit pack from the QOTU as follows: 365-575-536 Issue 1 March 2001 Detailed Level Procedure: DLP-514 Page 8 of 12 a. Unscrew both thumb screws on the OTPM to be removed. b. Unseat the OTPM by carefully and continuously pulling out equally on the top and bottom thumb screws. c. Carefully slide the OTPM out of the slot guides to remove it from the QOTU. DO NOT ROCK THE UNIT OR CIRCUIT PACK BACK AND FORTH. 54. Are you to install another OTPM circuit pack in this slot? If YES, continue with Step 19. If NO, then STOP! YOU HAVE COMPLETED THIS PROCEDURE. Remove QOTU 55. Remove the optical fibers from the slot guide on the shelf. 56. Remove the optical fiber from the OUT connectors of each OTPM circuit pack and install a protector cap on the fiber. 57. Remove the optical fiber from the IN connectors of each OTPM circuit pack and install a protector cap on the fiber. 58. Remove the QOTU circuit pack from the shelf as follows: a. Push up on the bottom and down on the top metal locking clips to unlock the circuit pack latches. b. Unseat the circuit pack by carefully and continuously pulling out equally on the top and bottom latches. c. Carefully slide the circuit pack out of the slot guides to remove it from the shelf. DO NOT ROCK THE UNIT OR CIRCUIT PACK BACK AND FORTH. 59. Are you to install another QOTU circuit pack in this slot? If YES continue with Step 19. If NO, then STOP! YOU HAVE COMPLETED THIS PROCEDURE. DLP-514: Detailed Level Procedure Page 9 of 12 365-575-536 Issue 1 March 2001 Install OTU 60. ! CAUTION: The replacement OTU must have the same circuit pack code or traffic could be interrupted. NOTE: If the OTU circuit pack being installed is in the left-most or right-most slot of the shelf, the gasket material around the shelf may interfere. Install the pack carefully, and if the gasket material is dislodged, then replace the gasket material after the circuit pack has been inserted. Install the circuit pack as follows: a. If necessary, close both latches on the circuit pack. b. Place the circuit pack into the slot guides and slowly slide it into the shelf until the latches touch the shelf. DO NOT ROCK THE UNIT OR CIRCUIT PACK BACK AND FORTH. c. Open the latches and push the circuit pack until it engages the connector pins. d. With a thumb on each latch, continue sliding the circuit pack with one firm, continuous motion until the latches are fully engaged (the metal clips are in the locked position). 61. If required, determine value of LBO required for the IN connector. Reference: DLP-524 62. Clean optical fibers and connectors. Reference: DLP-510 63. If required, install LBO at the IN and OUT connectors of the OTU circuit pack. Reference: DLP-512 64. Connect the optical fiber to the IN and OUT connectors for the OTU circuit pack. 65. STOP! YOU HAVE COMPLETED THIS PROCEDURE. 365-575-536 Issue 1 March 2001 Detailed Level Procedure: DLP-514 Page 10 of 12 Install OTPM 66. ! CAUTION: The replacement OTU must have the same circuit pack code or traffic could be interrupted. Install OTPM as follows: a. Place the OTPM into the slot guides and slowly slide it into the QOTU until the screws touch the frame. DO NOT ROCK THE UNIT OR CIRCUIT PACK BACK AND FORTH. b. Tighten the screws until they are snug. DO NOT over tighten with a screwdriver. 67. If required determine value of LBO required for the IN connector. Reference: DLP-524 68. Clean optical fibers and connectors. Reference: DLP-510 69. If required, install LBO at the IN and OUT connectors of the OTPM circuit pack. Reference: DLP-512 70. Connect the optical fiber to the IN and OUT connectors of the OTPM circuit pack. Reference: DLP-525 71. STOP! YOU HAVE COMPLETED THIS PROCEDURE. Install QOTU 72. Install the QOTU as follows: a. If necessary, close both latches on the circuit pack. b. Place the circuit pack into the slot guides and slowly slide it into the shelf until the latches touch the shelf. DO NOT ROCK THE UNIT OR CIRCUIT PACK BACK AND FORTH. c. Open the latches and push the circuit pack until it engages the connector pins. DLP-514: Detailed Level Procedure Page 11 of 12 d. 365-575-536 Issue 1 March 2001 With a thumb on each latch, continue sliding the circuit pack with one firm, continuous motion until the latches are fully engaged (the metal clips are in the locked position). 73. STOP! YOU HAVE COMPLETED THIS PROCEDURE. 365-575-536 Issue 1 March 2001 Detailed Level Procedure: DLP-514 Page 12 of 12 365-575-536 Issue 1 March 2001 Detailed Level Procedure: DLP-515 Page 1 of 2 Replace Fuse in Power Distribution and Fuse Panel or User Panel Overview: This procedure is used to replace a blown 10A fuse (red lamp is lighted) in the power distribution and fuse panel or in the user panel. 1. Obtain a replacement 10A fuse (Comcode 405749920). 2. Unsnap and lift the latch (from bottom to top) that is around the red lens cap. 3. Push in and down at the top of the red lens cap. Release slowly because the lens cap/fuse should spring forward. 4. Remove the lens cap/fuse from the fuse socket. 5. Remove the blown 10A fuse from the lens cap/fuse and replace with the replacement 10A fuse. 6. T NOTE: The fuse cap lamp is a fuse status indicator. The cap lamp works correctly when it is fully engaged and the fuse retainer is locked in place. If the lamp lights in any other position, it may incorrectly indicate a bad fuse. Install the lens cap/fuse into the fuse socket by pushing in and up at the bottom of the lens cap. 7. Lower the latch (from top to bottom) around the red lens cap and snap into place. 8. STOP! YOU HAVE COMPLETED THIS PROCEDURE. DLP-515: Detailed Level Procedure Page 2 of 2 365-575-536 Issue 1 March 2001 DLP-516 : Detailed Level Procedure Page 1 of 6 365-575-536 Issue 1 March 2001 Introduction to the Personal Computer (PC) Overview: This DLP provides a brief introduction to the PC. It includes proper handling and storage of diskettes and CD-ROMs and some of the important procedures you should follow when working with your PC. This DLP is a brief review of PC concepts. Refer to your PC user's guide for a complete description. Parts of a PC PCs vary in physical appearance and size. Most IBM* compatible PCs consist of three basic parts — a main unit, a monitor, and a keyboard. Note that some PCs, particularly portables, integrate the keyboard, monitor, and main unit into a binder-size package. The FT-2000 generic program may be installed on either a desk top PC or a notebook PC. The diskettes used are 3-1/2 inch floppy disks. CD-ROMs are 5-3/4 inchs in diameter. Main Unit The main unit of the PC contains the central processing unit (CPU), disk drive(s), and memory, among other things. All main units have some common features which include: • ON/OFF Switch — Switches the PC ON or OFF. Newer desktop PCs have the switch located on the front. In older models, the switch is located on the back of the PC, near where the AC power cord plugs in to the PC. Notebook computers may have the power switch on the edge of the unit, on the keyboard surface of the unit, or it may be a keystroke combination on the keyboard. Refer to the PC documentation to determine the exact location and procedure. • Serial Port — A port which the PC uses to communicate with the customer's equipment. When using the PC to install a new generic program, either COM1 or COM2 port must be used. Some PCs have both COM ports. Refer to your PC documentation to determine which port is being used. There are two types of serial port connectors: — 25-pin RS-232 connector (male) — 9-pin connector (male). *Registered trademark of International Business Machines. 365-575-536 Issue 1 March 2001 Detailed Level Procedure: DLP-516 Page 2 of 6 If your PC has the 9-pin connector, you will need a serial port adapter which converts the 9-pin connector to a 25-pin connector. This is a cable which has a 9-pin connector on one end and a 25-pin male connector on the other end. • Parallel Port — This port is used to connect to some printers. • Disk Drives — PCs come in several basic types, such as: — Single floppy disk with hard disk — This type of PC has a single floppy disk drive and a hard disk drive, which can typically store 10 or more megabytes of data. The single floppy disk drive is referred to as drive A:, and the hard disk is usually referred to as drive C:. — Multimedia PC — This type of PC contains the above features along with a sound card and a CD-ROM drive. The CD-ROM drive is usually referred to as drive D:. Other combinations of floppy and hard drives are possible, but all that is required is a single floppy drive as a minimum. PCs used with the procedures in this manual for installing a new generic program from floppys indicate using drive A. Procedures for installing a generic program from CD-ROM requires a CD-ROM drive. Monitor The monitor, sometimes called a display screen, may be either monochrome or color. The higher the resolution, the better the monitor. Keyboard The keyboard is used to enter commands. This section reviews some of the features of the keyboard and points out some of the special keys. The keyboard is divided into three different sections: • Typewriter section — This area has the alphanumeric keys that resemble the layout of a typewriter. In particular, you should locate the ENTER key (sometimes referred to as RETURN). This key is located on the right side of the typewriter section. It may have the word ENTER or RETURN printed on the key or a bent arrow. When you are asked to select <ENTER>, you should momentarily depress that key, or equivalent. • Function Keys — The keyboard normally has 10 or 12 function keys. These keys can be set up (programmed) to perform different functions. Refer to your PC documentation to determine how to setup these keys. DLP-516: Detailed Level Procedure Page 3 of 6 365-575-536 Issue 1 March 2001 • Special Keys — The keyboard has many special keys which are interpreted differently by various software packages. Locate the CANCEL or DELETE key. Mouse A mouse is normally used to select commands or items from menus of a graphical user interface. A mouse pointer appears on the screen and one of the mouse buttons is depress to make the selection. Rebooting the PC Occasionally, you may have to reboot the PC. There are three ways to accomplish this: • Power ON/OFF switch -- If the PC is OFF, you should set the ON/OFF switch to the ON position. If the PC is already ON, it is preferable to reset it using one of the following two methods: • RESET button -- Not all PCs have a RESET button, but if yours does, it provides an easy way to reset the PC (also known as a hard reset). Alternatively, the following method may work. • Hold down theCTRL, ALT, and DELETE keys all at the same time (also known as a soft reset). If RESET or CTRL, ALT, and DEL keys are not effective, turn OFF the PC, wait a few seconds, and turn it back ON. Rebooting the PC clears all data you had in random access memory. If the time of day clock is not indicating the current time and date, set the time of day clock. Diskettes — Care and Handling Diskettes are sometimes called floppy disks, or floppies for short. Diskettes are similar to cassette tapes—magnetically encoded information is stored on the diskette for later retrieval. By adhering to the following guidelines you will increase the useful life of your diskettes: DO: — Keep the diskettes in a protective case, if available, when not in use. — Keep the diskettes in a dry place. — Keep the diskettes away from magnetic fields or objects (for example, magnetic screwdriver.) 365-575-536 Issue 1 March 2001 Detailed Level Procedure: DLP-516 Page 4 of 6 DO NOT: — Touch any of the exposed surfaces of the diskette itself. Very tiny scratches, fingerprints, or dust can ruin a diskette. — Bend a diskette. — Write on a diskette label with a ball point pen or pencil. Use a felt-tipped pen instead. Write the label before applying it to the diskette if possible. — Erase the diskette label with a pencil eraser. The dust may destroy the diskette. Instead, place a new label over the old one. Inserting Diskettes You should never remove or insert a diskette while the disk drive indicator light is on. (The computer turns the indicator light on to let you know that it is reading or writing from the disk.) Always wait for the indicator light to go off before opening the disk drive door. Failure to do this may result in damaging the diskette or loss of data on the diskette. Insert a diskette into a disk drive as follows: 1. 2. Gently insert the diskette with the label facing up (an arrow is on the top left). ! CAUTION: Do not attempt to force the diskette into the drive. Slide the diskette in as far as it will go, but do not force it. You may hear a click when the diskette is all the way in. If resistance is felt or it does not slide in easily, remove the diskette and insert it again. Removing Diskettes Wait for the indicator light on the disk drive to go off. Then, depress the eject button. (This is similar to ejecting a cassette from a cassette recorder.) The diskette may pop out for easy removal. After the diskette has been removed, place it into its protective case, if provided, or other storage facility. DLP-516: Detailed Level Procedure Page 5 of 6 365-575-536 Issue 1 March 2001 CD-ROMs — Care and Handling CD-ROMs are read-only devices usually used to distribute or run programs on a PC. CD-ROMs store data in the form of indentations in a metal substrate in the plastic binder. The indentations reflect light in different ways depending on the value of each bit of data (either 1 or 0). CDs are very durable, but reasonable care will increase their reliability. By adhering to the following guidelines you will increase the useful life of your CD-ROMs: DO: — Keep the CD-ROMs in a protective case, if available, when not in use. — Keep the CDs in a dry place. — Clean CD-ROM only with lens cleaner, and wipe very gently from the center hub toward the edge. — Handle the CD-ROM only by the edges. — Store CD-ROMs below 77 degrees for longest life. DO NOT: — Touch the shiny surface of the CD-ROM with fingers or tools. Tiny scratches, fingerprints, or dust can ruin a CD-ROM or cause it to lose data. — Apply solvents to the surface of a CD-ROM. — Blow on the surface of a CD-ROM. — Smoke around a CD-ROM. — Expose a CD-ROM to dust or dirt. — Bend a CD-ROM. — Place a label on a CD-ROM. — Write on a CD-ROM label with a ball point pen or pencil. Use a soft felt-tipped pen, and write on the top surface of the CD-ROM instead. — Peel a label from a CD-ROM. 365-575-536 Issue 1 March 2001 Detailed Level Procedure: DLP-516 Page 6 of 6 Inserting CD-ROMs Insert a CD-ROM into a disk drive as follows: 1. Open the door on the CD-ROM Drive by pressing the EJECT button on the CD-ROM Drive front panel. The cartridge or drawer will slide out. 2. Handling the CD-ROM by its edges only, gently insert the CD-ROM with the printed label facing up. 3. Press the button on the front panel of the CD-ROM Drive to draw the CD-ROM into the machine. 4. ! CAUTION: Do not attempt to force the CD-ROM into the drive. Removing CD-ROM Exit from program using the CD-ROM, or wait until the program no longer accesses the CD-ROM. Then, depress the eject button. The CD-ROM glides out for easy removal. After the CD-ROM is exposed in the carrier, grasp it by its edges and place it in its protective case or other enclosure. DLP-517 : Detailed Level Procedure Page 1 of 2 365-575-536 Issue 1 March 2001 Inspect (Repair) Optical Fiber(s) Overview: You were sent here from a trouble clearing procedure. This procedure is used to correct an input or output fiber problem such as a damaged or disconnected fiber. This procedure uses fiber in a general sense to refer to the IS-3 fiber, optical channel fiber jumper, or optical line fiber, as appropriate. 1. If required, open the cabinet doors or remove the appropriate shelf cover as follows: • Interconnection panel cover for low-speed (IS3) fibers. • Upper shelf cover for IS3 and fiber jumpers • Lower shelf cover for optical line fibers. 2. Verify the fibers are properly connected. 3. Visually inspect the fiber, starting at the connector on the local network element and going as far as practical (usually to an interconnection bay or to a cross-connect panel). 4. Correct any problems with the fiber, following local procedures. 5. Close the cabinet doors or replace the cover that was removed in Step 1. 6. STOP! YOU HAVE COMPLETED THIS PROCEDURE. 365-575-536 Issue 1 March 2001 Detailed Level Procedure: DLP-517 Page 2 of 2 365-575-536 Issue 1 March 2001 Detailed Level Procedure: DLP-518 Page 1 of 2 Initiate or Terminate Login Session To a Remote Network Element Using CenterLink Overview: This procedure is used to initiate or terminate a login session to a remote network element (NE). 1. Are you to initiate or terminate a remote login session? To initiate, then continue with Step 3. To terminate, then continue with Step 10. Initiate a Login Session 2. If required, connect and condition the craft interface terminal (CIT). Reference: DLP-501 3. At the task bar, select the Lauch Console button. 4. At the CenterLink launch console, click on NE Command Manager. 5. Select a Target ID or enter a new Target ID and click Submit. 6. Enter a valid UID and PID, and then select your appropriate privilege level from the pull-down menu. 7. Check all entries for correctness and then click on Enter. 8. NOTE: See the tutorial in Chapter 11 for examples of screens showing a successful login session. Perform any required work, such as obtaining reports or provisioning. 9. STOP! YOU HAVE COMPLETED THIS PROCEDURE. DLP-518: Detailed Level Procedure Page 2 of 2 365-575-536 Issue 1 March 2001 Terminate a Login Session 10. At the CIT, select SECURITY-Cancel-User command and click on Enter. 11. Observe the displayed TID, is this the correct network element with which you wish to terminate a login session? If correct TID, then continue with Step 12. If incorrect TID, enter the correct TID in the Target ID field and continue with Step 12. 12. Enter your user identifier (UID) in the User ID field and click on Enter. 13. The network element returns a normal completed response. 14. STOP! YOU HAVE COMPLETED THIS PROCEDURE. 365-575-536 Issue 1 March 2001 Detailed Level Procedure: DLP-519 Page 1 of 4 Change, Delete, or Enter a User's Login Overview: This procedure covers login aging and password aging in addition to changing, deleting, or entering a user's login. ! CAUTION: These tasks can only be performed by one of two privileged users. Privileged users cannot change their own login. (LT01 and LT02 are the original factory names NOTE: Additional information about security and aging is provided in Section 8, "Administration and Provisioning," of this manual. 1. If required, connect and condition the craft interface terminal (CIT). Reference: DLP-501 2. What do you want to do to a user's login? If to change a user's login, continue with Step 3. If to delete a user's login, continue with Step 7. If to enter a new user's login, continue with Step 10. If to enable/disable login aging, continue with Step 18. If to enable/disable password aging, continue with Step 18. If to enter/edit password, continue with Step 16. Change Login 3. At the CIT, select SECURITY-Edit-User-Security for the specified user's login to be changed. 4. Select the appropriate input parameter User Identifier, New User Identifier, New Private Identifier, User Access Privilege, Temporary Login Type, Expiration Date make the change, and click on Enter to make change(s). 5. At the CIT, select SECURITY-Retrieve-User-Security to obtain the Login Provisioning Report and verify that the user's login has been changed. 6. STOP! YOU HAVE COMPLETED THIS PROCEDURE. DLP-519: Detailed Level Procedure Page 2 of 4 365-575-536 Issue 1 March 2001 Delete Login 7. At the CIT, select SECURITY-Delete-User-Security for the specified user's login to be deleted and click on Enter to make change(s). 8. At the CIT, select SECURITY-Retrieve-User-Security: to obtain the Login Provisioning Report and verify that the user's login has been deleted. 9. STOP! YOU HAVE COMPLETED THIS PROCEDURE. Enter Login 10. NOTE: Each network element may have up to 98 nonprivileged users. NOTE: When defining User Access Privilege (UAP) refer to the note at the bottom of the screen for a definition of correct formats. At the CIT, select SECURITY-Enter-User-Security and enter the User Identifier, New User Identifier, New Private Identifier, User Access Privilege, Temporary Login Type, Expiration Date (the New Private Identifier must be from six to ten characters with one number and with one symbolic character except the @, #, and =). 11. Assign security level 1 through 4 for privileged (4), general (3), basic (2), reports (1) for each management category to the user's login. Also, at this time, a visitor's login along with an expiration date may be entered. 12. Press Enter key. 13. At the CIT, select SECURITY-Retrieve-User-Security to obtain the Login Provisioning Report and verify that the user's login has been entered. 14. The login and initial password may be given to the person working on the network element. 15. STOP! YOU HAVE COMPLETED THIS PROCEDURE. 16. At the CIT, select SECURITY-Edit-Private-Identifier. Make password change as needed (the New Private Identifier must be from six to ten characters with one number and with one symbolic character except the @, #, and =). 365-575-536 Issue 1 March 2001 Detailed Level Procedure: DLP-519 Page 3 of 4 17. STOP! YOU HAVE COMPLETED THIS PROCEDURE. Enable/Disable Login Aging and/or Password Aging 18. At the CIT, select the SECURITY-Enter-Network Element-Security command to gain access to the global security parameters for the system. 19. Select the appropriate input parameter, enter a value, and press Enter key <function key F9 .> Allow User Identifier = [Yes, No] If No, all nonPrivileged users will be immediately disconnected. Password Aging= [0, 7 through 999] A 0 (zero) will disable. Login Aging= [0, 7 through 999] A 0 (zero) will disable. 20. At the CIT, select SECURITY-Retrieve-Network Element-Security to obtain report and verify the correct parameter value(s). 21. STOP! YOU HAVE COMPLETED THIS PROCEDURE. DLP-519: Detailed Level Procedure Page 4 of 4 365-575-536 Issue 1 March 2001 DLP-520 : Detailed Level Procedure Page 1 of 12 365-575-536 Issue 1 March 2001 Establish Modem or Datakit Network Access Overview: This procedure is used to access a distant OLS network element (NE) from a local craft interface terminal (CIT). Some of the more common CIT access configurations are shown in Figures 1 through 4. Other configurations exist with access gained through local company procedures. Once access is gained, the OLS network element responds to any CIT selections just as if you were physically connected to it. 1. Are you using the public switched network (via modem) or the Datakit network? If public switched network, then continue with Step 2. If Datakit network, then continue with Step 31. Quick Check for Compatible Modems (Both Locations) 2. NOTE: Modems at the CIT and OLS NE locations must be compatible. Quick check/setup of the modem parameters and connections are given in this procedure for the OLS NE location first, then for the CIT location. NOTE: The manufacturer's manuals may be referred to for specific instructions on setting the modem parameters. For example, when using a Penril* modem, the speed conversion parameter 1must be set to off. NOTE: Additional information on using a modem for remote access is available in Section 6, "Operations Interface." Also, refer to 365-575-539, OLS, Installation Manual or 365-575-321, OLS and Optical Translator, Integration Manual. NOTE: CenterLink does not provide any procedures of its own for installing a modem. To install a modem for use by CenterLink, use the Windows 95®, Windows 98®, Windows NT®, or Windows 2000® operating system modem installation procedures. Any modem correctly installed under Windows 95, Windows 98, Windows NT, or Windows 2000 operating system can be used by CenterLink since CenterLink uses Windows 95, Windows 98, Windows NT, or Windows 2000 operating system for accessing the modem. 1. Registered trademark of Penril Corporation 365-575-536 Issue 1 March 2001 Detailed Level Procedure: DLP-520 Page 2 of 12 CIT-PC Public Switched Network DTE External Modem Modem Port Figure 1 - External Modem Configuration CIT-PC Public Switched Network DTE Internal Modem Modem Port Datakit Network Node DTE Modem DTE Figure 2 - Internal Modem Configuration CIT-PC Datakit Network Node Port Figure 3 - Datakit Network Configuration CIT-PC Public Switched Network Datakit Network Node Modem Internal Modem Port Figure 4 - Hybrid Network Configuration nc-84994301 DLP-520: Detailed Level Procedure Page 3 of 12 365-575-536 Issue 1 March 2001 Verify the generic parameters of the modem are set to the following: • Modem baud rate (AT&T 4024 or AT&T 2224 CEO modems at 2400, AT&T 2292 modem at 9600) for CIT (DCE) port. This port and the CIT automatically select the highest usable baud rate up to 9600. • Full duplex • 8 data bits • No parity bits • 1 start bit • 1 stop bit • No flow control. OLS Network Element Location (Refer to Figures 1 and 2) 3. ! CAUTION: Use a static ground wrist strap whenever handling circuit packs or working on an OLS network element to prevent electrostatic discharge damage to sensitive components. See "Electrostatic Discharge Considerations" in Trouble Clearing: TAD-100. Set the modem to answer incoming calls. For example, if you are using an AT&T 2224 CEO modem, do the following to program the modem: a. It is assumed the PC and modem ("AT" command compatible) are powered, and the PC is loaded with communications software. Set all front panel switches to DOWN (factory default) for AT command mode. b. Connect PC serial port to the modem RS-232C port using modem cable (Table A) or using a null modem adapter (Figure 5). c. Establish communications between the PC and modem using the communications software set for the generic parameters in Step 2. d. At the prompt, enter the following "AT" commands. 365-575-536 Issue 1 March 2001 Detailed Level Procedure: DLP-520 Page 4 of 12 PC Response Comment ATH AT&F AT&C1 ATS0=2 AT&W OK OK OK OK OK #hang-up (on-hook) #resets to factory defaults #data carrier is present when on answer on 2 rings wait for second dial tone e. Remove the connector at the PC serial port and plug into the CIT (DTE) connector at the interconnection panel (Low Speed Shelf System Controller) of the OLS network element. Dial-up access to the network element via a 2400 baud modem is now ready. See Figures 1 and 2 for the DTE port connection. 4. Verify the telephone line is plugged into the modem. 5. This completes the quick check/setup for the modem at the OLS NE location. Continue with the next step (modem at CIT-PC location). CIT-PC Location 6. Is the modem installed internally (card) or a stand-alone (external). If internal modem (Figure 2), then continue with Step 7. If external modem (Figure 1), then continue with Step 8. 7. Verify the telephone line is plugged into the internal modem of the CIT-PC. Continue by going to Step 10. 8. Verify the external modem is connected to the CIT-PC, using the appropriate modem cable. Tables B and C list the pins for the DB-25 connector and DB-9 connector, respectively. 9. Verify the telephone line is plugged into the external modem and the modem is powered. 10. This completes the quick check/setup for the external modem at the CIT-PC location. Are you using CenterLink to access the OLS? If YES, then continue with Step 11. If NO, then continue with Step 17. DLP-520: Detailed Level Procedure Page 5 of 12 365-575-536 Issue 1 March 2001 Using CenterLink DIAL Feature (CIT-PC Location) 11. NOTE: The NESERVER program is automatically started by Windows 95, Windows 98, Windows NT, or Windows 2000 operating system when the PC (loaded with CenterLink ) boots up. The NESERVER program is normally minimized and appears as a task on the Windows 95, Windows 98, Windows NT, or Windows 2000 operating system taskbar. Restore the NESERVER program by doing a left mouse click on the NESERVER task on the Windows 95 taskbar. This will allow one to view the NESERVER menu bar. 12. Left-click FILE and left-click Start Terminal Window menu item. The NESERVER window minimizes and a new window appears to allow text to be entered. 13. NOTE: The text, usually in the form of commands to peripheral equipment, is directly sent to the selected communications port (COM1 or COM2), and hence any peripheral equipment connected to it. All responses and echoing of commands from this equipment will be shown in the window. Enter the commands (for example, access telephone number for the NE's modem) in the Start Terminal Window. 14. Upon completion of entering text, left-click on File and left-click on Exit menu item from the CenterLink Terminal Window menu bar. This will end the Terminal Window session and close the window. 15. Start CenterLink via the desktop icon or via the Start -> Programs -> Lucent Technologies -> CenterLink menu item. 16. STOP. YOU HAVE COMPLETED THIS PROCEDURE. Using CIT DIAL Feature (CIT-PC Location) 17. Do you want to use the DIAL feature (function key F3) in the OLS CIT-PC software? If YES, then continue with Step 21. If NO, then continue with Step 18. 365-575-536 Issue 1 March 2001 Detailed Level Procedure: DLP-520 Page 6 of 12 18. Dial the remote OLS network element by entering the telephone number. A personal computer communications software package is very helpful in accessing the remote OLS network element. Many packages exist, so use the one you are familiar with which may be ProComm Plus*, CTRM, QMODEM, SimTerm, Terranova, etc. 19. After the remote modem answers, press the ENTER key or space bar until communication between the two is established. Some locations may use a server switch at the OLS network element which requires entering an additional login, password, and a port assignment in order to connect to the OLS network element. 1 20. Once communication has been established to the remote OLS network element, escape to MS-DOS† (at the CIT), enter "cit expert", 2and press the ENTER key. The OLS CIT-PC software should start and display the logo/copyright screen. Continue with Step 28. 21. At the CIT with an MS-DOS prompt, change directory to where the CIT-PC software is installed and enter "cit expert" without the quotes and press ENTER To clear the Network Systems screen, press ENTER 22. Press the F6 key for the CIT terminal SETUP. Select the desired communication port, baud rate to match the modem, and monitor and press F6, then press the ENTER key twice (to SAVE and EXIT). 23. Press the F3 key, labeled DIAL. 24. This step is optional and is only used if you wish to change the previous modem parameter settings. You may change the parameters by pressing the F6 key, labeled SETUP, then select the desired PORT and BAUD rate and press the ENTER key twice (to SAVE and EXIT). 25. For an external modem, press the ENTER key several times until the dial response appears on the screen. For an internal modem, enter the dial string "atdt xxx-xxxxx" (phone number of the OLS network element) and press the ENTER key. 26. Type the desired telephone number and press the 1. Registered trademark of Datastorm Technologies, Inc. 2. Registered trademark of Microsoft Corporation. ENTER key. DLP-520: Detailed Level Procedure Page 7 of 12 365-575-536 Issue 1 March 2001 27. After the connection is confirmed, press function key F9, labeled CONT (to continue). 28. Press the ENTER key to select OLS, then type your login and password. 29. After completing your work, log out of the OLS network element by pressing function key F4, labeled LOGOUT, or exit the software by pressing function key F5, labeled EXIT. At this time, you may press F3 again to establish a new connection to a different OLS network element. 30. STOP. YOU HAVE COMPLETED THIS PROCEDURE. Quick Check for Typical Datakit Network 31. NOTE: The Datakit network supports many configuration parameters. Some parameters are changeable by the user; others are set by the network administrator. The user should consult local procedures in determining how to configure their network. The manufacturer's manuals may be referred to for specific instructions on setting the parameters. NOTE: The DB25 to RJ11 (or what ever connector is used with your Datakit port) converter plug is required for the DTE port connection. NOTE: The provisioned state (parameter settings) of the Datakit port to which the user is connected may interfere with the successful interaction of the CIT-PC and the OLS NE. This procedure allows the connection to be made independently of the provisioned state of the Datakit port. Press the ENTER key and momentarily wait for the response DESTINATION: 32. Did you get the DESTINATION: prompt? If YES, then continue with Step 40. If NO, then continue with Step 33. 365-575-536 Issue 1 March 2001 33. Detailed Level Procedure: DLP-520 Page 8 of 12 NOTE: The Datakit port (to which the PC is connected) is NOT supporting the Datakit command mode. Perform the following steps to allow the connection to be made independently of the provisioned state of the Datakit port. This allows a method to connect to the CIT (DTE) port of an OLS NE via a Datakit network. Put the PC into a terminal emulation mode and send the "attention sequence" which is usually provisioned to be two BREAK characters. [Check with the Datakit network administrator for the local attention sequence character(s).] 34. Did the Datakit port respond with Command:? If YES, then continue with Step 37. If NO, then continue with Step 35. 35. NOTE: Assistance is required from your Datakit network administrator. The administrator must verify or provision the following parameters for the Datakit port you're using. Verify the generic parameters of the Datakit network port are set to the following: • Full duplex, asynchronous • 8 data bits per serial data byte with 1 start bit and 1 stop bit • No parity bits • Additional Datakit settings are required at the COMMAND prompt. — set attn none (sets the attention sequence to none) — set fc none (sets the flow control by device to none) — set nwkfc none (sets the flow control by network to none) 36. After verifying or provisioning the parameters, continue with Step 40. 37. At the Command: prompt, type SET ATTN NONE and press the 38. Type CONT and press the appear on the screen.) ENTER ENTER key. key. (The Destination: prompt should 39. This completes the provisioning state of the Datakit port. Continue with the next step. DLP-520: Detailed Level Procedure Page 9 of 12 365-575-536 Issue 1 March 2001 Using Datakit Network (Figures 3 and 4) 40. Establish the connection to the DTE port. 41. Type the desired Datakit network number and press the ENTER key. 42. Press the F4 key, labeled CHECK, to verify connectivity between the CIT and the network element. A notice frame appears on the screen, "The OLS NE is communicating with the CIT-PC." 43. What does the notice frame indicate? If the NE is communicating, then continue with Step 44. If the NE is not responding, then you may wish to (a) double check the Datakit port parameters (Step 35) and (b) seek the next level of Datakit network help. 44. Press the ESC key to clear the notice frame. 45. Press the F9 key, labeled CONT, to continue the CIT-PC software program. 46. Press the ENTER key to select OLS, then type your login and password. 47. After completing your work, log out of the OLS network element by pressing function key F4, labeled LOGOUT, or exit the software by pressing function key F5, labeled EXIT. At this time, you may press F3 again to establish a new connection to a different OLS network element. 48. STOP. YOU HAVE COMPLETED THIS PROCEDURE. 365-575-536 Issue 1 March 2001 Detailed Level Procedure: DLP-520 Page 10 of 12 Table A. Pin Connections at CIT (DTE) Connector CIT (DTE) Connector (Note) OLS Network Element Pin 1 - Protective Ground Protective frame ground. Pin 2 - Transmit Data Transmits data to the modem. Pin 3 - Receive Data Receives data from the modem. Pin 4 - Request to Send OLS network element notifies the modem that it is ready to send data. Pin 5 - Clear to Send Modem notifies the OLS network element that it is clear to send its data. Pin 6 - Data Set Ready Modem notifies the OLS network element that the modem is connected and ready to receive data. Pin 7 - Signal Ground Signal ground. Pin 8 - Receive Line Signal Detected This modem has detected carrier from the remote modem. Pin 20 - Data Terminal Ready OLS network element notifies the modem that it is connected. Note: All remaining pins are not connected. Table B. Pin Connections for Modem Using DB-25 Cable PC DB-25 Connector (Note) CIT Pin 1 - Protective Ground Protective frame ground. Pin 2 - Transmit Data Transmits data to the modem Pin 3 - Receive Data Receives data from modem Pin 4 - Request to Send CIT is requesting clearance from the modem so it can send data. Pin 5 - Clear to Send Modem notifies the CIT that it is clear to send data. Pin 6 - Data Set Ready Modem notifies the CIT that the modem is connected. Pin 7 - Signal Ground Signal ground Pin 8 - Carrier Detect This modem detects carrier from the remote modem. Pin 20 - Data Terminal Ready CIT notifies the modem that it is connected. Note: All remaining pins are not connected. DLP-520: Detailed Level Procedure Page 11 of 12 365-575-536 Issue 1 March 2001 Table C. Pin Connections for Modem Using DB-9 Cable PC DB-9 Connector CIT Pin 1 - Carrier Detect This modem detects carrier from the remote modem. Pin 2 - Receive Data Receives data from modem Pin 3 - Transmit Data Transmits data to the modem Pin 4 - Data Terminal Ready CIT notifies the modem that it is connected Pin 5 - Signal ground Signal ground Pin 6 - Data Set Ready Modem notifies the CIT that the modem is connected and ready to receive data. Pin 7 - Request to Send CIT is requesting clearance from the modem so it can send data. Pin 8 - Clear to Send Modem notifies the CIT that it is clear to send. Pin 9 - Ring indicator Modem notifies the CIT that ring signal is present when the modem is in an auto-answer mode. To PC Pin XMT 2 Pin 2 XMT RCV 3 3 RCV RTS 4 4 RTS CTS 5 5 CTS DSR 6 6 DSR GRD 7 7 GRD CDA 8 8 CDA DTR 20 20 DTR To CIT (DTE) nc-83229501 Figure 1 - Null Modem Internal Wiring Connections 365-575-536 Issue 1 March 2001 Detailed Level Procedure: DLP-520 Page 12 of 12 365-575-536 Issue 1 March 2001 Detailed Level Procedure: DLP-521 Page 1 of 4 Remove and/or Install OMU or ODU ! CAUTION: This procedure has the potential to affect transmission and should be performed only under the direction of the maintenance support organization. ! CAUTION: Use a static ground wrist strap whenever handling units or working on an OLS network element to prevent electrostatic discharge damage to sensitive components. 1. Are you to remove or install an OMU (Figure 1) or an ODU (Figure 2)? If to remove, then continue with Step 2. If to install, then continue with Step 7. 2. 3. Remove the OMU/ODU optical fibers from the slot guide on the shelf. This is to prevent damage to the fiber when the unit is removed. ! WARNING: Unterminated optical connectors may emit invisible laser radiation. Eye damage may occur if beam is viewed directly or with improper optical instruments. Avoid direct exposure to the beam. NOTE: Verify that all fibers are labeled to prevent mix-ups. Remove one optical fiber at a time and install a protector cap on the fiber. 4. Remove any LBOs from the OMU/ODU and install protector caps and/or plugs. Reference: DLP-512 5. Remove the OMU/ODU from the shelf as follows: a. Using a Phillips* screwdriver, extract the top and bottom screws holding the unit to the shelf, (see Figure 1). 1 b. Unseat the OMU/ODU from the shelf by continuously pulling out on the unit. 1. Registered trademark of Phillips Screw Company. DLP-521: Detailed Level Procedure Page 2 of 4 c. 6. 365-575-536 Issue 1 March 2001 Carefully slide the OMU/ODU out of the slot guides to remove it completely from the shelf. DO NOT ROCK THE UNIT BACK AND FORTH. Are you to install another unit in this slot? If YES, then continue with Step 7. If NO, then continue with Step 12. 7. Install an OMU/ODU as follows: a. Verify that the top and bottom screws have not been placed back in the shelf, (see Figure 3 or 4). b. Place the OMU/ODU into the slot guides and slowly slide it into the shelf until it meets the rear shelf connectors. c. Continue sliding the OMU/ODU with one firm and continuous motion until the OMU/ODU is fully engaged. 8. Use a Phillips screwdriver to install the top and bottom OMU/ODU screws to mount the unit to the shelf, (see Figure 3 or 4). 9. Install any required LBOs at the OMU/ODU connectors. Reference: DLP-512 10. Clean the optical fibers and connectors. Reference: DLP-510 11. Connect the optical fibers to the LBOs and/or optical connectors at the OMU/ODU. 12. At the CIT, select CONFIGURATION-Initialize-System:TID:AID(All):PH(3) command and execute so the system will recognize the change. 13. STOP! YOU HAVE COMPLETED THIS PROCEDURE. 365-575-536 Issue 1 March 2001 ODU (606B) Detailed Level Procedure: DLP-521 Page 3 of 4 OMU (506A) 1. OUT 1. IN 2. OUT 2. IN 3. OUT 3. IN 4. OUT 4. IN 5. OUT 5. IN 6. OUT 6. IN 7. OUT 7. IN 8. OUT 8. IN 9. OUT 9. IN 10. OUT 10. IN 11. OUT 11. IN 12. OUT 12. IN 13. OUT 13. IN 14. OUT 14. IN 15. OUT 15. IN 16. OUT 16. IN TLM.OUT OMU.OUT ODU.IN nc-84980001.2 Figure 1 — ODU (606B) with 16 Ports and Supervisory Channel Out nc-84980001.1 Figure 2 — OMU (506A) with 16 Ports DLP-521: Detailed Level Procedure Page 4 of 4 365-575-536 Issue 1 March 2001 M3 x 6mm Screw OMU (506A) OCHAN1 IN OCHAN2 IN OCHAN3 IN OCHAN4 IN OCHAN5 IN M3 x 6mm Screw OCHAN6 IN OCHAN7 IN OCHAN8 IN OCHAN9 IN OCHAN10 IN OCHAN11 IN OCHAN12 IN OCHAN13 IN OCHAN14 IN OCHAN15 IN OCHAN16 IN OMU OUT M3 x 6mm Screw nc-84980002.5 Figure 3 — OMU (506A) Screw Locations dlp521fig Figure 4 — Eight-Port OMU/ODU Screw Locations DLP-522 : Detailed Level Procedure Page 1 of 2 365-575-536 Issue 1 March 2001 Replace Power Line Filter ! WARNING: DO NOT ALLOW the metal portion of the red or gray lead to touch any metal part of the bay. ! CAUTION: DO NOT ALLOW the screws to fall into the bay. 1. Remove the two plastic snap-on fuse guards. 2. Remove the screws from the faceplate of the User Panel or Fuse Panel using a flat-bladed screwdriver. 3. Gently push up and remove the bracket that's for mounting the bottom of the faceplate. 4. Look at the back of the panel and identify the correct power filter to be removed. • For OLS, the top filter is for feeder A and bottom filter is for feeder B. • For OT, the left mounted filter is for feeder A and the right mounted filter is for feeder B. 5. Make a voltage measurement from the rear of the appropriate fuse, if desired. • Fuse A — measure between red wire and chassis • Fuse B — measure between gray wire and chassis. Requirement: Voltage between -42.75 V DC and -60 V DC. 6. Remove any cabling tie down or slid up out of the way, if required. 7. Label and remove the three power leads connected to the power line filter. 8. Loosen the screw holding the filter in place. 9. Remove the defective filter by gently pulling and sliding out the filter. 10. Orient and insert the new filter. 11. Tighten the screw holding the filter in place. 365-575-536 Issue 1 March 2001 Detailed Level Procedure: DLP-522 Page 2 of 2 12. Reconnect the three power leads that were removed in Step 7. Power Connections for Filter A red wire -48A black wire black wire -48AR Power Connections for Filter B gray wire -48B black wire slate wire -48BR 13. Attach a cabling tie down on the power leads or slid tie down, if required. 14. Gently insert the faceplate bracket and push down into place. 15. Screw in the faceplate screws. 16. STOP! YOU HAVE COMPLETED THIS PROCEDURE. DLP-523 : Detailed Level Procedure Page 1 of 2 365-575-536 Issue 1 March 2001 Replace OT Power Line Filter ! WARNING: Do Not ALLOW the metal portion of the red or gray lead to touch any metal part of the bay. ! CAUTION: DO NOT ALLOW the screws to fall in the bay. 1. 2. Remove the two plastic snap-on fuse guards. NOTE: Access to the A filter requires no faceplate removal. Remove the screws from the faceplate of the User Panel or Fuse Panel using a flat-bladed screwdriver and remove the faceplate. This will provide access to the B filter. 3. Look at the bracket holding the filter and identify the correct power filter to be removed (left mounted filter, located in bay, is for feeder A and right mounted filter, located in bay, is for feeder B). 4. Make a voltage measurement from the rear of the appropriate fuse, if desired. • Fuse A — measure between red wire and chassis • Fuse B — measure between gray wire and chassis. Requirement: Voltage between -42.75 V DC and -60 V DC. 5. Remove any cabling tie down or slide up out of the way, if required. 6. Label and remove the three power leads connected to the power line filter. 7. Loosen the screw holding the filter in place. 8. Remove the defective filter by gently pulling and sliding out the filter. 9. Orient and insert the new filter 10. Tighten the screw holding the filter in place. 365-575-536 Issue 1 March 2001 Detailed Level Procedure: DLP-523 Page 2 of 2 11. Reconnect the three power leads that were removed in Step 7. Power Connections for Filter A -48VR black wire black wire -48A Left Bay Location black wire Power Connections for Filter B grey wire -48B Right Bay Location black wire slate wire -48VR 12. Attach a cabling tie down on the power leads or slide tie down, if required. 13. Gently insert the faceplate bracket and push down into place. 14. Screw in the faceplate screws. 15. STOP! YOU HAVE COMPLETED THIS PROCEDURE. DLP-524 : Detailed Level Procedure Page 1 of 4 365-575-536 Issue 1 March 2001 Connect Optical Power Meter for Measurement at OT Overview: This procedure provides the correct fiber connections required when making an optical power measurement. Also, tables are provided for determining the correct power level and lightguide buildout (LBO) values when an FT-2000 Add/Drop Rings terminal or other vendor equipment is used (Figure 1). Wrist Strap Optical Power Meter ! CAUTION: Use a static ground wrist strap whenever handling units or circuit packs or working on an Optical Translator (OT) to prevent electrostatic discharge damage to sensitive components. See "Electrostatic Discharge (ESD) Considerations" in Trouble Clearing: TAD-100. 1. If necessary, open the cabinet doors or remove the shelf cover. All connections can be accessed from the front. Reference: DLP-511 2. Are you adding or trouble clearing an optical translator unit (OTU) or optical translator port module (OTPM)? If adding, then continue with Step 3. If trouble clearing, then continue with Step 18. 3. Is the OTU/OTPM input fiber jumper coming from an OLS, FT-2000 ADR, DDM-2000, OC3/OC12, or other vendor equipment? If OLS, then continue with Step 13. If FT-2000 ADR (Release 7.1 and earlier), then continue with Step 4. If other vendor, then continue with Step 4. If DDM-2000, (OC3/OC12) equipment, then continue with Step 4. 4. Remove the protector cap and clean the fiber coming from the FT-2000 ADR, DDM-2000, (OC3/OC12), or other vendor equipment. Reference: DLP-510 5. Connect the optical power meter to the incoming fiber cleaned in Step 4 and obtain an optical power measurement. 365-575-536 Issue 1 March 2001 6. Detailed Level Procedure: DLP-524 Page 2 of 4 What type of equipment is the incoming signal coming from? If FT-2000 ADR (Releases 7.1 and earlier), or OC48 vendor equipment, then continue with Step 7. If DDM-2000 (OC3/OC12), or other vendor OC3/OC12/565 Mb/s equipment, then continue with Step 10. 7. Using the power level reading obtained in Step 5 and Table A, determine the correct LBO for the IN connector of the Optical Translator Unit (OTU). Table A — OTU Input Power and LBO Selection Measured Input Power (dBm) IN Port LBO P* < -12 dBm 0 -12 dBm <= P < - 8 dBm 5 - 8 dBm <= P < - 4 dBm 10 - 4 dBm <= P < + 1 dBm 15 + 1 dBm <= P < 20 * Received power greater than -12 dBm requires a non-zero OTU IN port faceplate LBO. 8. Install the LBO into the IN connector of the OTU. Reference: DLP-512 9. STOP! YOU HAVE COMPLETED THIS PROCEDURE. 10. Using the power level reading obtained in Step 5 and Table B, determine the correct LBO for the IN connector of the OTPM. Table B — OTPM Input Power and LBO Selection Measured Input Power (dBm) IN Port LBO P* < -11 dBm 0 -11 dBm <= P < - 8 dBm 5 - 8 dBm <= P < - 4 dBm 10 - 4 dBm <= P < + 1 dBm 15 + 1 dBm <= P < 20 * Received power greater than -11 dBm requires a non-zero OTU IN port faceplate LBO. 11. Install the LBO into the IN connector of the OTPM. Reference: DLP-512 12. STOP! YOU HAVE COMPLETED THIS PROCEDURE. DLP-524: Detailed Level Procedure Page 3 of 4 13. 365-575-536 Issue 1 March 2001 NOTE: Each OCHAN(1-16) has a different required power level. Determine the required LBO value for the IN connector of the OTU/OTPM. 14. At the OTU/OTPM, if required, remove the protector caps at the IN connector, and clean the fiber coming from the ODU for the channel being added. •Reference: DLP-510 15. At the OTU/OTPM, connect the optical power meter to the fiber coming from the ODU and obtain an optical power measurement. 16. Determine the LBO value as follows: a. Open the NE SmartManual Manager from the CenterLink launch console. b. Select and click on "Select Line Build Out (LBO) for RCVR input" task. c. Complete the task by following the steps displayed on the screen. 17. STOP! YOU HAVE COMPLETED THIS PROCEDURE. 18. ! CAUTION: Make sure the protection tributaries (in 2-fiber) or protection line (in 4-fiber) is available or that the troubled OC-48 on this OT has been manually switched to protection. ! CAUTION: Make sure incoming fibers are not carrying service. Remove the fiber jumper connected to the IN connector of the OTU or OTPM involved in this trouble. 19. Connect the optical power meter to the fiber jumper removed from the IN connector of the OTU/OTPM in Step 18 and obtain an optical power measurement. 365-575-536 Issue 1 March 2001 Detailed Level Procedure: DLP-524 Page 4 of 4 20. Is the input fiber jumper coming from an OLS, FT-2000 ADR, DDM-2000 OC3/OC12 or other vendor equipment? If OLS, then continue with Step 23. If FT-2000 ADR (Release 7.1 and earlier), then continue with Step 21. If other vendor OC-48 equipment, then continue with Step 21. If DDM-2000 OC3/OC12 or other vendor OC3/OC12/565 Mb/s Equipment, continue with Step 21. 21. Using the power level reading obtained in Step 19 and the appropriate row of Table C, determine if the power level is within range. Table C— Input Power Range OTU Power Level (dBm) ≤ -12 to > -22 OTPM OC3 Power Level (dBm) ≤ -11 to > -33 OTPM OC12 Power Level (dBm) ≤ -11 to > -28 565 Mb/s Power Level (dBm) ≤ -11 to > -28 22. STOP! YOU HAVE COMPLETED THIS PROCEDURE. 23. Determine the LBO value as follows: a. Open the NE SmartManual Manager from the CenterLink launch console. b. Select and click on "Select Line Build Out (LBO) for RCVR input" task. c. Complete the task by following the steps displayed on the screen. 24. STOP! YOU HAVE COMPLETED THIS PROCEDURE. Figure 1 - Location of LBOs at OTU (One Direction) DLP-525 : Detailed Level Procedure Page 1 of 2 365-575-536 Issue 1 March 2001 Connect/Disconnect Optical Fibers at OTU/OTPM ! CAUTION: Use a static ground wrist strap whenever handling an Optical Translator Unit (OTU) or Optical Translator Port Module (OTPM) circuit pack or working on an Optical Translator (OT) to prevent electrostatic discharge (ESD) damage to sensitive components. NOTE: Verify that all fibers are labeled to prevent possible service interruption. 1. Are you to connect or disconnect the optical fibers at the OTU/OTPM? If connecting, then continue with Step 8. If disconnecting, then continue with Step 2. 2. ! WARNING: Unterminated optical connectors may emit invisible laser radiation. Eye damage may occur if beam is viewed directly or with improper optical instruments. Avoid direct exposure to the beam. Disconnect the optical fiber(s) from the Lightguide Buildouts (LBOs) and/or optical connector(s) at the OTU/OTPM circuit pack. 3. If required, place protector caps over the ends of the optical fibers. 4. If required, remove the LBOs from the connector(s) on the OTU/OTPM circuit pack. Reference: DLP-512 5. If required, place plugs in the OTU/OTPM IN/OUT connectors. 6. Remove the optical fiber from the slot guide on the shelf. This is to prevent damage to the fiber when the OTU/OTPM is removed. 7. STOP! YOU HAVE COMPLETED THIS PROCEDURE. 8. If required, remove the protective caps and/or plugs from the fibers and LBOs. 365-575-536 Issue 1 March 2001 9. Detailed Level Procedure: DLP-525 Page 2 of 2 If required, determine the LBO values for the IN connector for the OTU/OTPM circuit pack. Reference: DLP-524 10. Clean the optical fiber(s) and connector(s). Reference: DLP-510 11. If required, install an LBO in the IN connector. Reference: DLP-512 12. Connect the optical fiber(s) to the LBOs on the OTU/OTPM circuit pack. See table below: Receive fiber ==> Transmit fiber ==> OTU/OTPM (IN Connector) OTU/OTPM (OUT Connector) 13. Wait 1 minute for the OTU/OTPM circuit pack to accept an incoming signal. 14. Place the optical fiber in the shelf guide to prevent damaging it when closing the cabinet doors or replacing the shelf cover. 15. STOP! YOU HAVE COMPLETED THIS PROCEDURE. 365-575-536 Issue 1, March 2001 Detailed Level Procedure: DLP-526 Page 1 of 4 Create, Change, or Delete a DSNE Overview: This procedure covers creating, changing, or deleting a Directory Service Network Element (DSNE) parameter in a network. NOTE: These tasks can only be performed by a expert user having a level 5 authorization. See Section 8, "Administration and Provisioning," for additional information on user security. 1. If required, connect and condition the craft interface terminal (CIT). Reference: DLP-501 2. What do you want to do with a DSNE? If to create a DSNE, continue with Step 3. If to change a DSNE, continue with Step 12. If to delete a DSNE, continue with Step 27. Create a DSNE (No DSNE Present) 3. NOTE: This procedure can only be performed for a new DSNE. Log into the network element to be designated as the DSNE (must be a repeater). Reference: DLP-518 4. At the CIT, select FAULT.Retrieve.Condition.All command and execute for a report. 5. Is either the DS-NE not reachable or multiple DS-NEs defined condition listed in the report? If YES, then start at TAP-102 to clear these conditions before continuing with this procedure. If NO, then continue with Step 6. DLP-526: Detailed Level Procedure Page 2 of 4 365-575-536 Issue 1, March 2001 6. At the CIT, select CONFIGURATION.Retrieve.Map.Ring command and execute for a report. (A CONFIGURATION.Retrieve.Map.Network command may also be used.) 7. Verify DCCSTATUS is good for all nodes in the area. A failed DCC condition must be cleared before proceeding with this procedure (start at TAP-102). 8. At the CIT, select SECURITY.Enter.System command and execute for an input screen. 9. At the field for DSNE, change NO to YES and press ENTER. 10. Wait 20 minutes for the TOHCTL circuit pack to reboot. Wait an additional 30 to 50 minutes because the more nodes in a network, the longer it takes for them to be updated and to stablize the network. 11. STOP! YOU HAVE COMPLETED THIS PROCEDURE. Change a DSNE 12. Log into a network element. Reference: DLP-518 13. At the CIT, select FAULT.Retrieve.Condition.All command and execute for a report. 14. Is either the DS-NE not reachable or multiple DS-NEs defined condition listed in the report? If YES, then start at TAP-102 to clear these conditions before continuing with this procedure. If NO, then continue with Step 15. 15. At the CIT, select CONFIGURATION.Retrieve.Map.Ring command and execute for a report. (A CONFIGURATION.Retrieve.Map.Network command may also be used.) 16. Verify DCCSTATUS is good for all nodes in the area. A failed DCC condition must be cleared before proceeding with this procedure (start at TAP-102). 17. From the report obtained in Step 15, identify which node (TID) is the current DSNE. 365-575-536 Issue 1, March 2001 Detailed Level Procedure: DLP-526 Page 3 of 4 18. If necessary, remote login to the node that is currently the DSNE. Reference: DLP-518 19. At the CIT, select SECURITY.Enter.System command and execute for an input screen. 20. At the field for DSNE, change YES to NO and press ENTER. 21. Wait 20 minutes for the TOHCTL circuit pack to reboot. Wait an additional 30 to 50 minutes because the more nodes in a network, the longer it takes for them to be updated. Do not proceed until the system is stablized. 22. Log into the node to be designated as the new DSNE (must b a repeater) (you can remote login to that node from any other node except from the node where DSNE was just deleted. Reference: DLP-518 23. At the CIT, select SECURITY.Enter.System command and execute for an input screen. 24. At the field for DSNE, change NO to YES and press ENTER. 25. Wait 20 minutes for the TOHCTL circuit pack to reboot. Wait an additional 30 to 50 minutes because the more nodes in a network, the longer it takes for them to be updated and to stablize the network. 26. STOP! YOU HAVE COMPLETED THIS PROCEDURE. Delete a DSNE 27. Log into a network element. Reference: DLP-518 28. At the CIT, select FAULT.Retrieve.Condition.All command and execute for a report. 29. Is either the DS-NE not reachable or multiple DS-NEs defined condition listed in the report? If YES, then start at TAP-102 to clear these conditions before continuing with this procedure. If NO, then continue with Step 30. DLP-526: Detailed Level Procedure Page 4 of 4 365-575-536 Issue 1, March 2001 30. At the CIT, select CONFIGURATION.Retrieve.Map.Ring command and execute for a report. (A CONFIGURATION.Retrieve.Map.Network command may also be used.) 31. Verify DCCSTATUS is good for all nodes in the area. A failed DCC condition must be cleared before proceeding with this procedure (start at TAP-102). 32. From the report obtained in Step 30, identify which node (TID) is the current DSNE. 33. If necessary, remote login to the node where the DSNE is being deleted. Reference: DLP-518 34. At the CIT, select SECURITY.Enter.System command and execute for an input screen. 35. At the field for DSNE, change YES to NO and press ENTER. 36. Wait 20 minutes for the TOHCTL circuit pack to reboot. Wait an additional 30 to 50 minutes because the more nodes in a network, the longer it takes for them to be updated and to stablized the network. 37. STOP! YOU HAVE COMPLETED THIS PROCEDURE. 365-575-536 Issue 1, March 2001 Detailed Level Procedure: DLP-527 Page 1 of 2 Change the TID Overview: This procedure covers changing the Target Identifier (TID). ! CAUTION: When TID is changed using CenterLink, NE name inconsistency at the ITM-SC may occur, and this may result in a loss of association with the ITM-SC. This may also result in MIB synchronization problems (MIB closure, class instance conflict, etc.). If ITM-SC is used as the element manager and CenterLink as the local craft interface, you can only change the TID from CenterLink. To achieve this, continue with the following procedure. 1. Delete the node association from ITM-SC (delete MIB of affected NE). 2. Log off from the affected NE. 3. Restore the node associations from ITM-SC (re-create MIB of affected NE using new TID). 4. Using CenterLink, log on to the affected NE using the new TID. This will change the TID at CenterLink and at the ITM-SC. 5. STOP! YOU HAVE COMPLETED THIS PROCEDURE. DLP-526: Detailed Level Procedure Page 2 of 2 365-575-536 Issue 1, March 2001 A Pin Repair Contents General A-1 Metral Tool Kit Descriptions A-1 METRAL Press-Fit Repair Kit A-1 Pin Designations A-2 OLS Circuit Pack and Equipment Location A-2 OT Circuit Pack and Equipment Location A-3 Procedures for Pin Replacement A-3 Issue 1 March 2001 A- i 365-575-536 A - ii Issue 1 March 2001 A Pin Repair General This section describes the procedures for terminal repair in METRAL technology using the BERG MT370-01 Tool Kit for the METRAL technology. The tools were designed to remove and replace pins in MLPWB (Multilayer Printed Wiring Board) backplane areas equipped with or without spacer aligners. Metral Tool Kit Descriptions METRAL Press-Fit Repair Kit Repair Tool Kit: BERG MT370-01 Individual Pins: See Table A-1 Issue 1 March 2001 A-1 365-575-536 Pin Designations Pin Designations Table A-1 METRAL Pin Codes PIN ID Part Number A 88929-102 C 88929-119 D 88930-101 F 88929-106 OLS Circuit Pack and Equipment Location Table A-2 OLS Equipment Location A-2 Issue 1 Circuit Pack Backplane Location SYSMEM (LEA2) 20-604 SYSCTL (LEA1) 20-584 TOHCTL (LEA5) 20-554 OA (LEA6) 20-534, 20-434, 20-330,20-230 TLM (LDA1) 52-180, 52-230 52-280, 52-330 OMU/ODU (505A/605A) 52-382, 52-430 52-478, 52-526 USER PNL 45-557 PWR A 50-597 PWR B 44-597 March 2001 365-575-536 OT Circuit Pack and Equipment Location OT Circuit Pack and Equipment Location Table A-3 OT Equipment Location Circuit Pack Backplane Location SYSMEM 20-605 SYSCTL 20-565 TOHCTL 20-525 OTU (System Shelf) 20-163 20-203 20-243 20-283 20-323 20-363 20-405 20-445 *20-485 OTU (Complimentary Shelves 1&2) 20-163 20-203 20-243 20-283 20-323 20-363 20-405 20-445 20-485 20-525 20-565 20-605 PWR A 39-184 PWR B 39-570 *Note: Location 20-485 is not populated with andy circut pack at this time. Its inclusion is for accuracy. Procedures for Pin Replacement ! CAUTION: This procedure must been done with the shelf out of service and powered down to insure no further damage to the equipment or to the person doing the pin replacement. ! CAUTION: Proper ESD precautions must be used. Issue 1 March 2001 A-3 365-575-536 Procedures for Pin Replacement (1) Determine if the bent or broken pin is in an OLS, or an OT Bay or miscellaneous mounted shelf. (2) Determine the shelf in which the bent or broken pin resides. (3) Determine the circuit pack slot in which the pin resides. (4) Determine the number and column location of the pin. (5) Refer to the correct figure (Figures A1-A8 on pages A5-A12) to determine the letter pin code associated with the pin. (6) Using Table 1, “METRAL Pin Codes,” on page 2, determine the type of pin and the correct part number for the replacement pin. (7) Obtain the correct replacement pin (see the Applications, Planning and Ordering Guide). (8) Refer to "METRAL Press-Fit Repair Kit MT370-01" documentation for proper procedures to remove and replace the bent or broken pin. A-4 Issue 1 March 2001 365-575-536 Optical Line System (OLS) - Pin Type Location SYSMEM CC CC CCCC CC CC CCCC C C C C 157 CC CC AAAA AA AA AA AA AAAA AA AA 151 AAAA AAAA AA AA AA AA AAAA AA AA A A A A 145 AA AA AAAA AAAA AA AA A A A A 139 AAAA AAAA AA AA AAAA AAAA AA AA A A A A 133 AA AA AAAA AA AA AA AA AA AA 127 AA AA AAAA AAAA AA AA AAAA AA AA 121 AA AA AAAA AA AA AAAA AAAA AAAA A A A A 115 AA AA AA AA AA AA AAAA AA AA A A A A 109 0 12 3 SYSCTL CCCC CC CC CC CC CCCC CC CC CC CC F FF F FF FF FF FF FF FF FF FF FF FF AAAA AA AA AA AA AAAA AA AA AA AA AA AA AAAA AA AA AA AA AAAA AA AA AA AA AAAA AA AA AAAA AA AA AA AA AAAA AA AA AAAA AAAA AA AA AAAA TOHCTL 151 145 145 139 139 157 133 127 121 115 AA AA AA AA AAAA AA AA AAAA A A A A 109 0 12 3 OA CC CC CCCC CCCC CC CC CCCC C C C C 157 FF FF FF FF FF FF FF FF F F F F 151 FF FF AAAA AA AA AAAA AA AA AA AA AAAA AAAA AA AA AAAA AAAA AA AA AAAA AAAA AA AA AA AA AAAA AA AA AA AA AA AA AAAA AA AA AA AA AAAA AA AA 133 127 121 157 151 145 139 133 127 121 115 115 109 01 2 3 CC CC CCCC CCCC CC CC CCCC CCCC FF FF FF FF FF FF FF FF FF FF FF FF AA AA AAAA AAAA AA AA AAAA AAAA AAAA AA AA AAAA AAAA AA AA AAAA AA AA AA AA AAAA AA AA AAAA AAAA AA AA AAAA AA AA AAAA AA AA AA AA AA AA AAAA AAAA AA AA AAAA AA AA AA AA AAAA AA AA AA AA AA AA AAAA 109 01 2 3 Figure A-1 Optical Line System - All Shelves Component Side View Issue 1 March 2001 A-5 365-575-536 Optical Line System (OLS)- Pin Type Location SYSMEM (con’t) AAAA AAAA AAAA AAAA AAAA AA AA AAAA AAAA AAAA AAAA AA AA AAAA FFFF FFFF FFFF FFFF FFFF FFF F FFFF FFFF FFFF FFFF FFFF FFFF 108 103 097 091 085 SYSCTL (con’t) 108 TOHCTL (con’t) 108 103 103 AAAA AAAA AAAA AAAA AAAA AAAA AA AA AAAA AA AA AAAA AAAA AAAA AAAA AAAA AAAA AAAA AAAA AAAA AAAA AAAA AAAA AA AA AA AA AAAA 108 103 OMU/ODU 097 091 091 091 085 AA AA AAAA AAAA AAAA A A A A 085 AA AA 085 079 079 079 073 073 073 AA AA AAAA AAAA AA AA AAAA A A A A 067 AAAA AAAA AAAA AAAA AAAA A A A A 061 AAAA AAAA AAAA AAAA AAAA A A A A 055 067 067 067 AAAA AAAA AAAA AAAA AAAA A A A A 061 AAAA AAAA AAAA AAAA AAAA A A A A 055 061 061 055 055 073 0 12 3 097 012 3 01 2 3 CCCC CCCC CC CC CC CC CCCC CC CC AAAA AA AA AAAA AA AA AA AA AAAA AA AA AAAA AAAA AAAA AAAA AAAA AAAA AAAA AAAA AAAA AAAA AAAA AAAA AA AA AAAA AA AA AA AA AAAA 0 12 3 Figure A-2 Optical Line System (Middle) Component Side View A-6 TLM 103 AAAA AAAA AAAA AA AA AAAA A A A A 097 079 AA AA AAAA AA AA AA AA AAAA A A A A 067 AAAA AAAA AA AA AA AA AA AA A A A A 061 AA AA AA AA AAAA AAAA AAAA A A A A 055 012 3 OA (con’t) Issue 1 March 2001 097 091 085 079 073 CCCC CCCC CCCC CCCC CCCC CCCC FFFF FFFF FFFF FFFF FFFF FFFF AAAA AAAA AAAA AAAA AAAA AAAA AAAA AAAA AA AA AAAA AAAA AAAA AA AA AAAA AAAA AA AA AA AA AAAA AAAA AAAA AAAA AAAA AAAA AAAA AAAA AAAA AAAA AAAA AAAA AAAA 103 097 091 085 079 073 067 061 055 01 2 3 365-575-536 Optical Line System (OLS) - Pin Type Location SYSMEM (con’t) SYSCTL (con’t) TOHCTL (con’t) AAAA AAAA AAAA AAAA AAAA AA AA AAAA AAAA AA AA AAAA AAAA AA AA AAAA AAAA AAAA AAAA AAAA AAAA AAAA AAAA AAAA AAAA AAAA AAAA AAAA AAAA AAAA AAAA AAAA AAA A FFFF FFFF FFFF FFFF FFFF FFFF AAAA AA AA AAAA AAAA AA AA AAAA AAAA AA AA AA AA AAAA AA AA AA AA AAAA AAAA AAAA AAAA AAAA AAAA 012 3 AAAA AAAA AAAA AAAA AA AA A A A A 049 019 AAAA AAAA AAAA AAAA AAAA A A A A 049 AAAA AAAA AAAA AAAA AAAA A A A A 043 AAAA AAAA AAAA AAAA AAAA A A A A 037 AA AA AAAA AAAA AAAA AAAA A A A A 031 AAAA AA AA AAAA AA AA AA AA A A A A 025 AAAA AAAA AAAA AAAA AAAA A A A A 019 013 013 049 043 043 037 037 031 031 025 025 019 013 007 001 AAAA AAAA AAAA AAAA A A A A 007 AA AA AAAA AA AA AA AA AAAA AA AA 001 AA AA 0123 007 001 0123 TLM (con’t) OMU/ODU (con’t) OA (con’t) 049 049 043 043 037 037 031 031 025 019 013 AAAA AAAA AAAA AAAA AAAA A A A A 007 AAAA AAAA AAAA AAAA A A A A 001 AAAA 0 12 3 AA AA AAAA AAAA AAAA AAAA AA AA AA AA AAAA AAAA AAAA AAAA AAAA AAAA AAAA AAAA AAAA AAAA AA AA AA AA AAAA AAAA AAAA AAAA AAAA 012 3 025 019 049 AAAA AAAA AAAA AAAA AAAA AA AA AAAA AA AA AA AA AAAA AA AA AAAA AAAA AAAA AA AA AAAA AAAA AAAA AAAA AAAA AAAA AAAA AAAA AAAA 037 031 025 019 013 013 007 007 001 001 012 3 Figure A-3 Optical Line System (Lower) Component Side View Issue 1 043 March 2001 A-7 365-575-536 Optical Line System (OLS) - Pin Type Location USER PNL PWR A PWR B D DDDD DDDD D D DDD D 007 007 DDDD D D D DD D DD DD D DDD D D DDD D D 001 01 2 3 4 001 0 1 2 3 4 Figure A-4 OLS - Power and User Panel Component Side View A-8 Issue 1 March 2001 AAAA AA AA AA AA AAAA AAAA A A A A 007 AA AA AA AA AAAA AA AA AA AA A A A A 001 0 12 3 365-575-536 Optical Translator (OT) - Pin Type Location SYSMEM CC CC CCCC CC CC CC CC CCCC C C C C 157 AA AA AAAA AA AA AA AA AAAA 151 AA AA AA AA AAAA AAAA AA AA AAAA A A A A 145 AA AA AA AA AA AA AAAA AA AA A A A A 139 AA AA AAAA AA AA AA AA AAAA A A A A 133 AAAA AA AA AAAA AAAA AA AA A A A A 127 AAAA AA AA AA AA AAAA AA AA A A A A 121 AA AA AAAA AA AA AA AA AA AA A A A A 115 AAAA AA AA AAAA AA AA AAAA A A A A 109 01 2 3 SYSCTL CCCC CC CC CC CC CCCC CC CC CC CC AA AA AAAA AA AA AA AA AAAA AA AA AA AA AAAA AA AA AA AA AAAA AA AA AAAA AA AA AAAA AAAA AA AA AAAA AA AA AAAA AA AA AA AA AAAA AA AA AA AA AA AA AA AA AAAA AA AA AA AA AA AA AAAA AAAA AA AA AAAA AAAA AAAA AA AA AA AA AAAA AA AA AAAA AAAA AA AA AAAA AAAA AA AA AAAA 0 1 2 3 OTU TOHCTL 157 151 145 139 133 127 121 115 109 CCCC CC CC CCCC CCCC CC CC CCCC AA AA AAAA AAAA AA AA AAAA AA AA AAAA AA AA AAAA AAAA AA AA AAAA AA AA AAAA AA AA AAAA AA AA AA AA AA AA AAAA AA AA AA AA AAAA AA AA AA AA AA AA AAAA AA AA AAAA AAAA AAAA AA AA AAAA AAAA AA AA AAAA AA AA AAAA AA AA AA AA AAAA AA AA AA AA AAAA AA AA AA AA AAAA AA AA 0 1 23 157 151 145 139 133 127 121 115 109 CCCC CC CC CCCC CC CC CC CC CCCC AA AA AAAA AA AA AA AA AA AA AA AA AA AA AAAA AAAA AA AA AAAA AAAA AAAA AA AA AA AA AAAA AA AA AAAA AA AA AAAA AA AA AA AA AAAA AA AA AA AA AAAA AA AA AA AA AAAA AA AA AA AA AAAA AAAA AA AA AAAA AAAA AAAA AA AA AA AA AAAA AA AA AA AA AAAA AA AA AA AA AAAA AA AA AA AA 0 12 3 157 151 145 139 133 127 121 115 109 Figure A-5 Optical Translator (OT) - All Shelves Component Side View Issue 1 March 2001 A-9 365-575-536 Optical Translator (OT) - Pin Type Location SYSMEM (con’t) AAAA AAAA AAAA AAAA AAAA AAAA AAAA AAAA AAAA AAAA AAAA AAAA AAAA AAAA AAAA AAAA AAAA AAAA AAAA AA AA AAAA AA AA AAAA AAAA 108 103 097 091 085 AAAA AAAA AA AA AA AA AAAA AAAA AA AA AA AA AAAA AA AA AAAA AAAA AA AA AAAA AA AA AAAA AAAA AAAA AAAA AA AA AA AA AAAA AA AA AA AA (con’t) OTU (con’t) A A A A 108 AAAA AA AA AA AA AAAA AAAA A A A A 103 AAAA AAAA AA AA AAAA AAAA A A A A 097 AA AA AAAA AAAA AA AA A A A A 091 AA AA AAAA AAAA AAAA A A A A 085 AAAA AA AA AAAA AAAA AAAA AAAA AAAA AA AA AA AA AAAA AAAA AAAA AAAA AAAA AAAA AAAA AAAA AAAA AAAA AAAA AAAA AAAA AA AA AAAA AAAA TOHCTL SYSCTL (con’t) 108 103 097 091 085 103 097 091 085 079 079 079 073 073 073 073 AA AA AAAA AAAA AA AA AAAA A A A A 067 AAAA AAAA AAAA AA AA AA AA A A A A 061 AAAA AA AA AAAA AAAA AAAA A A A A 055 01 23 AAAA AAAA AAAA AAAA AAAA A A A A 067 AA AA AAAA AAAA AA AA AAAA A A A A 061 AAAA AAAA AAAA AAAA AA AA A A A A 055 A A A A 067 AA AA AAAA AAAA AA AA AAAA A A A A 061 AA AA AAAA AAAA AA AA AAAA A A A A 055 067 079 01 23 0 12 3 061 055 0 1 23 Figure A-6 Optical Translator (Middle) Component Side View A - 10 108 Issue 1 March 2001 365-575-536 Optical Translator (OT) - Pin Type Location SYSMEM (con’t) SYSCTL (con’t) TOHCTL (con’t) AAAA AAAA AA AA AAAA AAAA A A A A 049 AAAA AA AA AAAA AAAA AAAA A A A A 043 AAAA AAAA AAAA AAAA AAAA A A A A 037 AA AA AAAA AAAA AAAA AAAA A A A A 031 AAAA AAAA AAAA AAAA AAAA A A A A 025 AAAA AAAA AAA A AAAA AAAA A A A A 019 AAAA AAAA AA AA AA AA AAAA A A A A 013 AAAA AAAA AAAA AAAA AAAA A A A A 007 AAAA AA AA AA AA AAAA A A A A 001 AAAA 0 1 2 3 AAAA AA AA AAAA AAAA AA AA A A A A 049 AAAA AAAA AAAA AAAA AAAA A A A A 043 AAAA AAAA AA AA AAAA AAAA A A A A 037 AAAA AAAA AA AA AAAA AAAA A A A A 031 AAAA AAAA AA AA AAAA AAAA A A A A 025 AAAA AAAA AAAA AAAA AAAA A A A A 019 AAAA AAAA AAAA AAAA AAAA A A A A 013 AA AA AAAA AA AA AA AA A A A A 007 AAAA AAAA AA AA AA AA AAAA AAAA 001 AAAA 0 1 2 3 AAAA AAAA AAAA AAAA AAAA A A A A 049 AA AA AAAA AAAA AAAA AAAA A A A A 043 AA AA AAAA AA AA AAAA AAAA A A A A 037 AAAA AAAA AAAA AA AA AA AA A A A A 031 AAAA AAAA AAAA AAAA AAAA A A A A 025 AAAA AAAA AAAA AAAA AAAA A A A A 019 OTU (con’t) 049 043 037 031 025 019 013 AAAA AAAA AAAA AAAA A A A A 007 AAAA AAAA AAAA AAAA AAAA A A A A 001 AAAA 0 12 3 013 AA AA AAAA AA AA AAAA A A A A 007 AA AA AA AA AAAA AA AA AAAA A A A A 001 AA AA 0 1 23 Figure A-7 Optical Translator (Lower) Component Side View Issue 1 March 2001 A - 11 365-575-536 Optical Translator (OT) - Pin Type Location PWR A PWR B D DDDD DDDD D D DD D D DDD D D 007 007 DDDD D D D DD D DDDDD USER PNL DDD D D 001 001 01 2 3 4 0 1 2 3 4 AAAA AA AA AA AA AAAA AAAA A A A A 007 AA AA AA AA AAAA AA AA AA AA A A A A 001 0 1 2 3 Figure A-8 Optical Translator - Power and User Panel Component Side View A - 12 Issue 1 March 2001 State Names B 0 Contents ■ ■ ■ ■ Introduction B-3 State Name Definition B-3 Commands Related to State Names B-3 Entity Types B-3 How to Use This Appendix B-4 State Names for Customer Maintenance Signal Ports B-5 Description B-5 Table: State Names for Customer Maintenance Signal Ports B-5 State Names for Optical Channels B-6 Description B-6 Table: State Names for Optical Channels B-6 State Names for OA and TLM Circuit Pack Slots B-7 B-7 Description (Continued on next page) Issue 1 March 2001 B-1 365-575-536 Contents (Continued) Table: State Names for OA and TLM Circuit Pack Slots ■ ■ ■ B-2 Issue 1 March 2001 State Names for Optical Lines B-7 B-8 Description B-8 Table: State Names for Optical Lines B-8 State Names for Optical Translator Port Signals B-9 Description B-9 Table: State Names for Optical Translator Port Signals B-9 State Names for Supervisory Channels B-10 Description B-10 Table: State Names for Supervisory Channels B-10 365-575-536 Introduction State name definition A state name describes the state of a WaveStar™ Optical Line System (OLS) 40G entity. Commands related to state names The Transaction Language 1(TL1) commands that can cause a state transition or report on the state of entity types in this appendix are: Entity types ENT-CMS RTRV-CMS RTRV-STATE ENT-OCHAN RTRV-OCHAN UPD-SYS ENT-OTPS RTRV-OTPS States names are provided for the following entity types: ■ Customer maintenance signal ports ■ Optical channels ■ Optical amplifier (OA) and telemetry (TLM) circuit pack slots ■ Optical lines ■ Optical translator port signals ■ Supervisory channels (Continued on next page) Issue 1 March 2001 B-3 365-575-536 Introduction (Continued) How to use this appendix This appendix consists of a series of tables, one for each entity type. Each table contains an alphabetized list of the state names that apply to that entity type. First, find the entity type whose state name you want to find. Then refer to the list to locate the state name and description. If you want to see how the entity type transitions to and from the states listed in its table, refer to the “State Diagrams” appendix. The “State Diagrams” appendix contains a set of figures that correspond directly to the WaveStar OLS 40G entity tables provided in this appendix. B-4 Issue 1 March 2001 365-575-536 State Names for Customer Maintenance Signal Ports Description The following table provides a list of the state names associated with customer maintenance signal ports. The state diagram illustrating transitions among these states can be found in the corresponding figure of the “State Diagrams” appendix. Table: State Names for Customer Maintenance Signal (CMS) Ports Table B-1. State Names for Customer Maintenance Signal (CMS) Ports AUTO This customer maintenance signal port is available for automatic provisioning. IS This customer maintenance signal port is fully monitored and alarmed. NMON This customer maintenance signal port is not monitored. Issue 1 March 2001 B-5 365-575-536 State Names for Optical Channels Description The following table provides a list of the state names associated with optical channels. The state diagram illustrating transitions among these states can be found in the corresponding figure of the “State Diagrams” appendix. Table: State Names for Optical Channels B-6 Issue 1 Table B-2. State Names for Optical Channels AUTO This optical channel is available for automatic provisioning. IS This optical channel is fully monitored and alarmed. NMON This optical channel is not monitored. March 2001 365-575-536 State Names for OA and TLM Circuit Pack Slots Description The following table provides a list of the state names associated with OA and TLM Circuit Pack slots. The state diagram illustrating transitions between these states can be found in the corresponding figure of the “State Diagrams” appendix. Table: State Names for OA and TLM Circuit Pack Slots Table B-3. State Names for OA and TLM Circuit Pack Slots AUTO This circuit pack slot is available for automatic provisioning. EQ This circuit pack slot is fully monitored and alarmed. Issue 1 March 2001 B-7 365-575-536 State Names for Optical Lines Description The following table provides a list of the state names associated with optical lines. The state diagram illustrating transitions between these states can be found in the corresponding figure of the “State Diagrams” appendix. Table: State Names for Optical Lines B-8 Issue 1 Table B-4. Table State Names for Optical Lines AUTO This optical line is available for automatic provisioning. IS This optical line is fully monitored and alarmed. March 2001 365-575-536 State Names for Optical Translator Port Signals Description The following table provides a list of the state names associated with Optical Translator port signals. The state diagram illustrating transitions between these states can be found in the corresponding figure of the “State Diagrams” appendix. Table: State Names for Optical Translator Port Signals Table B-5. Table State Names for Optical Translator Port Signals AUTO This optical translator port signal is available for automatic provisioning. IS This coptical translator port signal is fully monitored and alarmed. NMON This optical translator port signal is not monitored. Issue 1 March 2001 B-9 365-575-536 State Names for Supervisor Channels Description The following table provides a list of the state names associated with supervisory channels. The state diagram illustrating transitions between these states can be found in the corresponding figure of the “State Diagrams” appendix. Table: State Names for Supervisory Channels B-10 Issue 1 Table B-6. State Names for Supervisory Channels AUTO This supervisory channel is available for automatic provisioning. IS This supervisory channel is fully monitored and alarmed. March 2001 State Diagrams C 0 Contents ■ Introduction C-2 How to use this appendix C-2 ■ Figure C-1: Customer Maintenance Signal Port States C-3 ■ Figure C-2: Optical Channel States C-4 ■ Figure C-3: OA and TLM Circuit Pack Slot States C-5 ■ Figure C-4: Optical Line States C-6 ■ Figure C-5: Optical Translator Port Signal States C-7 ■ Figure C-6: Supervisory Channel States C-8 Issue 1 March 2001 C-1 365-575-536 Introduction How to use this appendix This appendix contains the corresponding state diagrams for the WaveStar™ Optical Line System (OLS) 40G entities listed in the tables of the “State Names” appendix. Each state diagram portrays the transition(s) from one state to another for the entity. The command(s) and/or cause(s) for each state transition are provided by the callout connected to the arrow showing the direction of the state change. AUTO is the original state for WaveStar OLS 40G entities. C-2 Issue 1 March 2001 365-575-536 Figure C-1. Customer Maintenance Signal (CMS) Port States Issue 1 March 2001 C-3 365-575-536 Figure C-2. C-4 Optical Channel States Issue 1 March 2001 365-575-536 Figure C-3. OA and TLM Circuit Pack Slot States Issue 1 March 2001 C-5 365-575-536 Figure C-4. C-6 Optical Line States Issue 1 March 2001 365-575-536 Figure C-5. Optical Translator Port Signal States Issue 1 March 2001 C-7 365-575-536 Figure C-6. C-8 Supervisory Channel States Issue 1 March 2001 Glossary 0x1 Line Operation A 0x1 protection system has one service line and no protection line. 1+1 Line Protection A 1+1 protection system has two bidirectional lines. The transmitting terminal transmits the same signal on two lines. The receiving terminal monitors two lines independently and chooses one line as the active line and the other line as the standby line. When a protection switch occurs, the receiving terminal selects the signal from the standby line which causes the standby line to be the new active line. The original active line becomes the standby line. This status remains the same (nonrevertive) after the fault clears. Also see Nonrevertive Switching. 1x1 Line Protection A 1x1 protection system has two bidirectional lines. One line is designated as the service line, and the other line is designated as the protection line. The service line normally carries traffic. When a protection switch occurs, the protection line is selected to carry traffic. When the fault clears, the original service line is selected (revertive). Also see Revertive Switching. 1A-TX 1A-Transmit — When the direction parameter of an Optical Line System End Terminal is provisioned 1A-TX, the “A” optical lines are used in the transmit direction. 1A-TX-THRU 1A-Transmit — When the direction parameter of an Optical Line System End Terminal is provisioned 1A-TX, the “A” optical lines are used in the transmit direction and the supervisory signal data communications channel is passed through to a colocated end terminal in another network. 1A-RCV 1A-Receive — When the direction parameter of an Optical Line System End Terminal is provisioned 1A-RCV, the “A” optical lines are used in the receive direction. 1A-RCV-THRU 1A-Receive — When the direction parameter of an Optical Line System End Terminal is provisioned 1A-RCV, the “A” optical lines are used in the receive direction and the supervisory signal data communications channel is passed through to a colocated end terminal in another network. 3x33-dB System An Optical Line System (OLS) subnetwork consisting of two OLS End Terminals separated by up to 3 optical sections, with 33 dB of loss per optical section. Each optical line signal can travel up to 3 consecutive optical sections before electrical regeneration is required. 7x25-dB System An Optical Line System (OLS) subnetwork consisting of two OLS End Terminals separated by up to 7 optical sections, with 25 dB of loss per optical section. Each optical line signal can travel up to 7 consecutive optical sections before electrical regeneration is required. 8x24-dB System An Optical Line System (OLS) subnetwork consisting of two OLS End Terminals separated by up to 8 optical sections, with 24 dB of loss per optical section. Each optical line signal can travel up to 8 consecutive optical sections before electrical regeneration is required. Issue 1 March 2001 GL-1 365-575-536 A ABN Abnormal — An LED on the indicator strip and user panel that is lighted when a temporary condition potentially affecting transmission exists. ACO Alarm Cutoff — A pushbutton switch on the indicator strip and user panel that can be used to retire the active audible office alarm. If another alarmable condition occurs while the ACO is active, the highest level audible alarm is activated. The alarm cutoff function is also available from the CIT and from an operations system. AGNE Alarm Gateway Network Element — A network element that receives remote network element status information from other network elements in an alarm group and rebroadcasts the information to all network elements in the alarm group. Using AGNEs makes it unnecessary for each network element in the alarm group to communicate directly with all other network elements in the alarm group. AID Access Identifier — A unique identifier used to address circuit pack slots, ports, and tributaries. AIM Alarm Indication Message — A maintenance message transmitted downstream in a digital network that shows that an upstream failure has been detected and alarmed by some upstream equipment, if the upstream alarm has not been suppressed. AITS Acknowledged Information Transfer Service — A protocol used to transfer data between the network elements over the data communications channel (DCC). The AITS protocol is recommended in networks equipped with Release 4.0.0-OLS or later software. Alarm A contact closure to the office alarm grid. Alarm Correlation In Release 3 and later releases an upstream or downstream association can be provisioned from a single source Optical Translator port to a single destination optical channel. Alarm Group A group of network elements that share remote alarm information through an alarm gateway network element (AGNE). Also refer to AGNE. ANSI American National Standards Institute — An organization consisting of producer, consumer, and general interest groups that establishes the procedures by which accredited organizations create and maintain voluntary industry standards in the United States. APD Avalanche Photodiode — A highly sensitive optical detector. AS&C Alarm, Status, and Control GL-2 Issue 1 March 2001 365-575-536 ASCII American Standard Code for Information Interchange — A standard 8-bit code used for exchanging information among data processing systems and associated equipment. Asynchronous Refers to network elements that are not timed from references traceable to a single timing source. ATM Asynchronous Transfer Mode — A new technology based on a simple, fixed-length packet (or cell) format that allows integrated networking of voice, data, and video traffic. The packet length is set at 53 bytes. The first 5 bytes are reserved for address and control fields, and the remaining 48 bytes carry data. AUTO Automatic — One possible state of a slot, customer maintenance signal (CMS) port, or optical channel. When a CMS port or optical channel is in the automatic state and the presence of a good signal is detected, the port or optical channel is automatically placed in the IS (in service) state. When a slot is in the automatic state and the presence of a circuit pack is detected, the slot is automatically placed in the EQ (equipped) state. Automatic Optical Amplifier Shutdown and Restart This feature brings the Optical Amplifier circuit pack output power to safe levels if an incoming loss of signal power occurs. Autonomous Indicators Autonomous indicators are those indicators that are subject to incoming signal alarm delay. These include office alarm outputs, parallel telemetry outputs, TL1 autonomous messages, and the alarm LEDs (CR, MJ, and MN) on the indicator strip/user panel. B BCLAN Board Controller Local Area Network — The internal local area network that provides communications between the control circuit pack and board controllers on the circuit packs associated with an optical line. BDFB Battery Distribution and Fuse Bay BER Bit Error Rate — The ratio of bits received in error to bits sent. Bidirectional Switching Protection switching that is performed in the transmit and receive directions. BIP Bit Interleaved Parity — A method of error monitoring over a specified number of bits (BIP-3 or BIP-8). Issue 1 March 2001 GL-3 365-575-536 BIP-N Bit Interleaved Parity - N — A method of error monitoring. With even parity, an N-bit code is generated by the transmitting equipment over a specified portion of the signal in such a way that the first bit of the code provides even parity over the first bit of all N-bit sequences in the covered portion of the signal. The second bit provides even parity over the second bits of all the N-bit sequences within the specified portion, etc. Even parity is generated by setting the BIP-N bits so that there are an even number of ones in each of all the N-bit sequences including the BIP-N. BITS Building Integrated Timing Supply — A single clock that provides all the DS1 and DS0 synchronization references required by clocks in a building. BOC Bell Operating Company Broadband Communications Voice, data, and/or video communications at rates greater than DS1 rates (1.544 Mb/s). BRT Business Remote Terminal C CCITT International Telephone and Telegraph Consultative Committee — An international advisory committee under United Nations sponsorship that has composed and recommended for adoption worldwide standards for international communications. Recently changed to the International Telecommunications Union (ITU) Telecommunication Standardization Sector (TSS). CDRH Center for Devices and Radiological Health CEV Controlled Environment Vault CIT Craft Interface Terminal — A personal computer that meets Optical Line System minimum requirements loaded with the CenterLink Management Console software. CMISE Common Management Information Service Element - An application for communicating network management information among operations systems and network elements. In Release 4 and later releases, an intraoffice LAN interface (that uses CMISE messages) is provided to an element management system (for example, the Integrated Transport Management - Subnetwork Controller). CO Central Office — A telephone company building where switching and/or transmission system equipment is located. Condition Conditions persist in time and indicate that there is something abnormal about the system. Conditions appear in the Local Active Alarms and Status Report and the Network Alarms Report. GL-4 Issue 1 March 2001 365-575-536 CMS Customer Maintenance Signal — The 155-Mb/s optical signal originating from the customer supplied equipment. It is carried as part of the supervisory signal. Also see “Supervisory Signal.” CR Critical (alarm) CTS Customer Technical Support — A Lucent Technologies organization (formerly CTSI) that helps customers maintain installed systems. Current Value The value currently assigned to a provisionable parameter. CV-L Coding Violation — A performance-monitoring parameter. The coding violations are monitored for the supervisory channel of the optical line. D DACS Digital Access and Cross-Connect System DACS III-2000 One of Lucent Technologies SONET-compatible Digital Access and Cross-Connect Systems. DACS IV-2000 One of Lucent Technologies SONET-compatible Digital Access and Cross-Connect Systems. Dark Fiber Fiber that has been installed but is not carrying any optical signals. Data A collection of system parameters and their associated values. dB Decibels — A dimensionless unit used to express the ratio between input and output voltages, powers, currents, or sound intensities. DCC Data Communications Channel — The embedded overhead communications channel in the optical line. This is used for end-to-end communications and maintenance. It carries alarm, control, and status information between network elements in a SONET network. DCC Link Data Communications Channel Link — A bidirectional point-to-point fiber connection that has the DCC bytes terminated at both ends. DCE Data Circuit Equipment — The equipment that provides the signal conversion and coding between the data terminating equipment and the line. The DCE may be separate equipment or a part of the data terminating equipment. DCMS Design Change Management System — The Design Change Management System is used to issue product change notifications (PCNs) to customers. Issue 1 March 2001 GL-5 365-575-536 DDM-2000 Multiplexers Lucent Technologies SONET-ready network multiplexers that can function as a lightwave terminal. It is designed primarily for loop feeder and interoffice applications that will work in existing asynchronous as well as the emerging SONET networks. DDM-FiberReach The DDM-2000 FiberReach Multiplexer is an OC-1 low density access product offering DS0 and DS1 services for business carrier access, fiber-in-the-loop, or private network applications. DDM-2000 FiberReach is hosted by the DDM-2000 OC-3 or OC-12 Multiplexer or the SLC-2000 Access System with a single- or dual-homed ring or star topology. Demultiplexing A process applied to a multiplexed signal for recovering signals combined within it and for restoring the distinct individual channels of these signals. DFB Distributed Feedback Directivity (Near-End Crosstalk) The ratio (in dB) of the optical power reflected back to any input port, to the total power into all other input ports Dispersion A broadening of transmitted light pulses. DM Degraded Minutes — A performance-monitoring parameter. DMA Direct Memory Access — A data transfer technique that uses a control circuit to move data between a device and memory. Doping The addition of impurities in a substance to achieve desired properties. DRAM Dynamic Random Access Memory — Semiconductor random-access memory that requires short interval refreshing to retain its contents. Drop Side Signal An optical signal suitable for transmission over the Optical Line System. DS3 Digital Signal Level 3 (44.736 M/bs) DS-NE Directory Service Network Element — The single reference point in an Optical Line System network. The Directory Service Network Element stores the IDs of the other network elements and updates the other network elements after configuration changes. The Directory Service Network Element is responsible for administering a database that maps network element names (TIDs) to addresses (NSAPs). Also see NSAP and TID. DTE Data Terminating Equipment — The equipment that originates data for transmission and accepts transmitted data. GL-6 Issue 1 March 2001 365-575-536 DUAL When the direction parameter of an Optical Line System end terminal is provisioned as DUAL, one side acts as a 1A-TX end terminal and the other side acts as a 1A-RCV end terminal. Also refer to 1A-RCV and 1A-TX. DWDM Dense Wavelength Division Multiplexing — Allows customers to multiplex up to 16 different wavelengths of drop side signals onto a single fiber. E EC, EC-n Electrical Carrier — The basic logical building block signal with a rate of 51.840 Mb/s for an EC-1 signal and a rate of n times 51.840 Mb/s for an EC-n signal. EC-1 An STS-1 signal that has been shaped and encoded for transmission over electrical media. This refers to the actual physical representation of an electrical signal with an EC-1 format at a manual or electronic cross-connect interface. This signal is typically carried by coaxial cables from one equipment location to another. The term EC-1 not only refers to the organization and data rate of a signal but also to the voltage template the signal must conform to and the impedances for which the voltage template is valid. ECI Equipment Catalog Item EDFA Erbium Doped Fiber Amplifier — A form of optical amplification in which an optical signal passes through a section of erbium doped fiber and is amplified by a laser pump diode. EEPROM Electrically Erasable Programmable Read-Only Memory — Readable memory that is nonvolatile in nature, erased electrically, and programmed externally from the processor that uses it. EIA Electronic Industries Association — A trade association of the electronics industry that establishes electrical and functional standards. EMC Electromagnetic Compatibility EMDU External Miscellaneous Discrete Unit — An external unit manufactured by DANTEL* Incorporated and HARRIS† Corporation that supports the extended miscellaneous discrete feature in Release 2 of the Optical Line System. The EMDU can be miscellaneously mounted and is connected to the SER TLM 1 port of the Optical Line System (or equivalent) for monitoring. The DANTEL EMDU can also be wall mounted. The EMDU detects and reports incoming signal failures and OTU circuit pack failures to the Optical Line System (or equivalent). * † Registered trademark of Dantel Incorporated. Registered trademark of Harris Corporation. Issue 1 March 2001 GL-7 365-575-536 EMI Electromagnetic Interference — High-energy, electrically induced magnetic fields that cause data corruption in cables passing through the fields. EMS Element Managment System End Terminal Site The location of the Optical Line System equipment that terminates the optical line signals. EPROM Erasable Programmable Read-Only Memory — Readable memory that is nonvolatile in nature, erased by exposure to intense ultraviolet light, and programmed externally from the processor that uses it. EQ Equipped — A memory administrative state for OA and TLM circuit pack slots. EQ refers to an OA or TLM circuit pack slot that is fully monitored and alarmed. Erbium A soft rare earth element used in metallurgy and nuclear research. ES-L Errored Seconds — A second in which one or more coding violations are detected. Errored seconds are monitored for supervisory channel of the optical line. ESD Electrostatic Discharge — The discharge of static electricity into equipment that potentially causes component damage and logic errors. Ethernet To be supplied. Event Events happen at a particular time (do not persist in time) and appear in the Maintenance History Report. Executable Code The “program” that controls the operation of the system. Express Traffic All optical signals going between two colocated Optical Line System End Terminals in a wavelength add/drop site without going through SONET/SDH terminal. F FDA Food and Drug Administration FE ACTY Far-End Activity — An LED on the indicator strip and user panel that is lighted when an alarm or status condition exists at a remote network element. FIT Failures in Time — Circuit pack failure rates per 109 hours GL-8 Issue 1 March 2001 365-575-536 Flash EPROM A new technology that combines the nonvolatility of EPROM with the in-circuit reprogrammability of EEPROM (electrically-erasable PROM). FLS Frame Loss Seconds Folded Rings Folded (collapsed) rings are ring networks without fiber diversity. The terminology derives from the image of folding a ring into a linear segment. G Gb/s Gigabits (109 bits) per Second GbE-1 1.25 Gigabit Ethernet signal — An international standard supporting operation at the 1.25 Gb/s Ethernet rate as specified in the IEEE Standard 802.3, Clause 38. The OTU interfaces with the 10000BASE-LX Transmit characteristics on the add side and 1000BASE-SX on the drop side. GCNS-2000 Lucent Technologies Gigabit Cell Network Switch. GNE Gateway Network Element — A network element that serves as a single interface to the local X.25 message-based operations system for all the Optical Line System End Terminals and Repeaters in a network. H Hardware Ready The shelf, connector, and backplane have been designed to accept hardware (circuit packs) that is not available yet. Additional cables may be required. I IAOLRP The Optical Line System Intraoffice LAN Relay Pack circuit pack bridges the J13 INTRAOFFICE LAN connector and a DCC port of the TOHCTL circuit pack at the TLM 1B slot. I/O Input/Output IR Intermediate Reach Issue 1 March 2001 GL-9 365-575-536 IS In Service — A memory administrative state for CMS ports and optical channels. IS refers to a CMS port or optical channel that is fully monitored and alarmed. Insertion Loss The ratio of the incident (input) optical power to the transmitted (output) optical power (in dBs). Intraoffice Local Area Network Interface In Release 4 and later releases, the WaveStar OLS provides a 10 Mb/s intraoffice local area network (IAOLAN) interface to an element management system (for example, Lucent Technologies’ Integrated Transport Management Subnetwork Controller system). This interface uses the open systems interconnection (OSI) protocol and the Common Managment Information Service Element (CMISE) message language. ITM-SC Integrated Transport Mangement - Subnetwork Controller — An element management system that provides fault and configuration management for ring networks. ITU International Telecommunications Union — An international advisory committee under United Nations sponsorship that has composed and recommended for adoption worldwide standards for international communications. Also refer to CCITT. J Jitter Timing jitter is defined as short-term variations of the significant instants of a digital signal from their ideal positions in time. L LAN Local Area Network LBC Laser Bias Current — A parameter that indicates whether the system optics are working within normal margins. The laser bias current is monitored for pump 1 and pump 2 of the optical line. LBFC Laser Backface Current — A parameter that indicates whether the system optics are working within normal margins. The laser backface current is monitored for pump 1 and pump 2 of the optical line. LBO Line Buildout — An equalizer network that guarantees the proper signal level. Also see optical line buildout. LCT FT-2000 OC-48 Large Capacity Terminal LED Light-Emitting Diode GL-10 Issue 1 March 2001 365-575-536 Length of a Wavelength Route The number of spans in the Optical Line System that constitutes a wavelength route. The length of a wavelength route is bounded by the engineering rules. Line A bidirectional optical transmission line. In T1/Bellcore terminology, “line” refers to a transmission medium, together with the associated high speed equipment, required to provide the means of transporting information between two consecutive Network Elements, one of which originates the line signal and the other terminates the line signal. Local Traffic The optical signals that are added/dropped through a SONET/SDH terminals at a wavelength add/ drop site. LOF Loss of Frame — A failure to synchronize to an incoming signal. Long Reach Systems Refers to systems with up to 7 or 8 optical sections (spans). Long Span Systems Refers to systems with optical sections (spans) greater than 80 kilometers. LOS Loss of Signal — The absence of an adequate incoming signal. M µm Micrometer — 10-6 meters Menu A set of possible values for a parameter. MJ Major (alarm) MML Human-Machine Language MN Minor (alarm) MTBF Mean Time Between Failures MTBMA Mean Time Between Maintenance Activities Multiplexing The process of combining several distinct digital signals into a single composite digital signal. Issue 1 March 2001 GL-11 365-575-536 N NARTAC North American Regional Technical Assistance Center — A Lucent Technologies organization that helps North American customers maintain installed systems. NCDRH National Center for Devices and Radiological Health NE Network Element — Refers to an Optical Line System End Terminal or Optical Line System Repeater in a network. NE ACTY Near-End Activity — An LED on the indicator strip and user panel that is lighted when an alarm or status condition exists at the local network element. NEBS Network Equipment-Building System nm Nanometer — 10-9 meters NMA Network Monitoring and Analysis System — Bellcore’s alarm surveillance operations system. Nonrevertive Switching In nonrevertive switching, there is an active and standby line, circuit pack, etc. When a protection switch occurs, the standby line, circuit pack, etc., is selected causing the old standby line, circuit pack, etc., to become the new active line, circuit pack, etc. The original active line, circuit pack, etc., becomes the standby line, circuit pack, etc. This status remains in effect when the fault clears. Therefore, this protection scheme is “nonrevertive” in that there is no switch back to the original status in effect before the fault occurred. Also see 1+1 Line Protection. NRZ Nonreturn to Zero NSA Non-Service Affecting NSAP Network Services Access Point — An automatically assigned number (address) that uniquely identifies a network element for the purposes of routing data communications channel messages. Null Modem A null modem cable allows a CIT local access to the Optical Line System via the DTE port on the interconnection panel of the End Terminal and Repeater Shelves. O O&M Operation and Maintenance GL-12 Issue 1 March 2001 365-575-536 OA The Optical Line System Optical Amplifier circuit pack optically amplifies an optical line signal and provides an add/drop function for the supervisory signal. OALAN Overhead Access Local Area Network — The internal local area network that provides communications between the System Controller circuit pack and the Overhead Controller - Tributary circuit pack. OAM&P Operations, Administration, Maintenance, and Provisioning OC, OC-n Optical Carrier — The optical signal that results from an optical conversion of an STS signal; that is, OC-1 from STS-1 and OC-n from STS-n. OC-48 Section Trace Refer to “Section Trace.” ODU The Optical Line System Optical Demultiplexing Unit provides an interface between an incoming wavelength division multiplexed optical line signal and up to 16 outgoing optical drop side signals. OLS Optical Line System — The Optical Line System is a flexible, high capacity, analog lightwave system that transports digitally encoded information contained in up to sixteen different wavelengths of optical signals (up to 64,512 voice channels each) through standard single-mode or TrueWave® optical fibers. OLS End Terminal The Optical Line System End Terminal consists of an Optical Multiplexer Unit (OMU) and Optical Demultiplexer Unit (ODU) pair, Optical Amplifiers (OA), and Telemetry (TLM) circuit packs. OLS/OT Integration In Release 3 and later releases, enhanced operation/control capabilities are provided for Optical Translator Unit (OTU) circuit packs and Optical Translator Port Modules (OTPMs) that are used with the Optical Line System. OLS Repeater The Optical Line System Repeater consists of a pair of Optical Amplifiers (OA) and the corresponding Telemetry (TLM) packs. OMU The Optical Line System Optical Multiplexing Unit provides an interface between up to 16 incoming optical drop side signals and an outgoing wavelength division multiplexed optical line signal. OOS Out-of-Service — The CIT value that refers to the NMON state. OOS-MA-AS Out-of-Service, Memory Adminstration, Assigned — The CIT value that refers to the AUTO state. Operations Interface Any interface that provides information on the system behavior or control. These include the equipment LEDs, indicator strip/user panel, CIT, office alarms, and all telemetry interfaces. Operations Interworking The capability to access, operate, provision, and administer remote systems through CIT access from any site in a SONET network or from a centralized operations system. Issue 1 March 2001 GL-13 365-575-536 OPS The Optical Switch circuit pack performs 1+1 nonrevertive optical line protection switching in 2-fiber applications with two optical amplifiers. The Optical Switch circuit pack is compatible with Release 3.1.0-OLS and later software. Optical Bandpass The maximum range of wavelengths over which the insertion loss and wavelength isolation requirements are met. Optical Channel A single optical signal within the optical line signal. There are up to sixteen optical channels within one optical line signal. Optical Line Buildout An equalizer network between the Optical Line System and the lightguide cross-connect panel (or equivalent). It guarantees the proper received signal level at the Optical Amplifier circuit pack. Optical Line ID The part of the supervisory signal that identifies optical lines to prevent misconnections between sites. Optical Line Signal A wavelength division multiplexed optical signal that consists of up to sixteen optical channels and one supervisory channel. Optical Section The part of the optical line that exists between adjacent end terminal and repeater sites or between adjacent repeater sites. Optical sections are sometimes referred to as spans. Optical Translator The Optical Translator provides a flexible interface into the Optical Line System. The Optical Translator has 32 OTU circuit packs fitted in a cabinet or network bay framework. Optical Translator Port Module The Optical Translator Port Module electrically regenerates any incoming wavelength in 1.3- or 1.5-µm range into a specific outgoing wavelength. OTPM are available for OC-12/STM-4, OC-3/ STM-1, and 150-750 Mb/s signals. Optical Translator Unit An Optical Translator Unit refers to the Optical Translator Unit (OTU) circuit pack. The OTU circuit pack electrically regenerates any incoming OC-48/STM-16 wavelength in 1.3- or 1.5-µm range into a specific outgoing OC-48 wavelength. Orderwire The part of the supervisory signal that is used for communications between sites. Original Value The value given to a CIT provisionable parameter at the factory. Original Value Provisioning The original values are the values given to CIT provisionable parameters at the factory. At system startup, the original values are copied and become the current values. These current values can be changed using local or remote provisioning. The original values can never be changed. OS Operations System — A central computer-based system used to provide operations, administration, and maintenance functions. GL-14 Issue 1 March 2001 365-575-536 OSI Open Systems Interconnection — Referring to the OSI reference model, a logical structure for network operations standardized by the International Standards Organization (ISO). OT Optical Translator — Provides a flexible interface into the Optical Line System. The Optical Translator has 32 OTU circuit packs fitted in a cabinet or network bay framework. OTCTL Optical Translator Controller — The OTCTL circuit pack controls up to 32 Optical Translator Unit (OTU) circuit packs and Optical Translator Port Modules (OTPMs) and communicates with the Optical Line System system controller complex. OTPM Optical Translator Port Module — The OTPM electrically regenerates any incoming wavelength in 1.3- or 1.5-µm range into a specific outgoing wavelength. OTPM are available for OC-12/STM-4, OC-3/STM-1, and 150-750 Mb/s signals. OTU Optical Translator Unit — The OTU circuit pack electrically regenerates any incoming OC-48/ STM-16 wavelength in 1.3- or 1.5-µm range into a specific outgoing OC-48 wavelength. OTDR Optical Time Domain Reflectometer Outside Plant Loss The optical power loss (in dB) due to the fiber span between sites. P Parameter A characteristic of the system that affects its operation. PC Personal Computer PCN Product Change Notification — Product change notifications are issued to notify customers that in-service product changes are required to correct an existing or potential problem. Product change notifications are issued through the Design Change Management System. PFU Power Filter Unit Platform In the Optical Line System, a platform is a family of equipment and software configurations designed to support a particular set of applications. PM Performance Monitoring — Measures the quality of service and identifies degrading or marginally operating systems (before an alarm would be generated). POH Path Overhead — Overhead assigned to and transported with the payload until the payload is demultiplexed. It is used for functions that are necessary to transport the payload. Issue 1 March 2001 GL-15 365-575-536 Polarization Dependent Loss The difference between the maximum and minimum insertion loss, as the polarization state of the incident optical signal is varied over all orientations. Power Divergence Unequal amplification of incoming wavelengths in the OLS Optical Amplifier circuit pack results in power divergence between wavelengths. The power divergence will be small enough to fall within the dynamic range of an OLS channel detector and lightwave terminal receiver. Preprovisioning The capability to provision a slot before installing a circuit pack. Proactive Maintenance Refers to the process of detecting degraded conditions not severe enough to initiate protection switching or alarming, but indicative of an impending signal fail or signal degrade defect. Protocol A set of rules that govern the operation of functional units to achieve communications. Provisioning Assigning a value to a parameter in memory. PWR Power Q Quad Optical Translator Unit A Quad Optical Translator Unit requires two OTU slots and can be equipped with up to 4 Optical Translator Port Modules. Also see Optical Translator Port Module. QUAD OTU See Quad Optical Translator Unit. R RDI Remote Defect Indicator—A maintenance signal returned to the transmitting terminal that shows the receiving terminal has detected an incoming failure. Reactive Maintenance Refers to detecting defects/failures and clearing them. Reflectance The ratio of reflected optical power to the incident optical power at a reflection point or from a component. Repeater Site The location of the Optical Line System equipment that optically amplifies the optical line signals. GL-16 Issue 1 March 2001 365-575-536 Revertive Switching In revertive switching, there is a service and protection high speed line, DCC, etc. When a protection switch occurs, the protection line, DCC, etc., is selected. When the fault clears, service “reverts” back to the original service line. Also see 1x1 Line Protection. Reset The FAULT-Reset input copies the current values from the SYSCTL circuit pack to the SYSMEM circuit pack and the executable code from the SYSMEM circuit pack to the SYSCTL circuit pack. The executable code in the SYSCTL circuit pack is then restarted and the current values in the SYSMEM circuit pack are reformatted to work with the new executable code. RF Radio Frequency RMS Root Mean Square RPP Reliability Prediction Procedure RZ Return to Zero S SA Service Affecting SD Signal Degrade — A provisionable parameter for the incoming supervisory signal (from the optical line signal) that determines the threshold at which a signal degrade condition is declared. SDH Synchronous Digital Hierarchy Section Trace In Release 3 and later releases, the Optical Line System has the capability to read the J0 section trace byte of the OC-48 section overhead. This provides users the capability of tracing an OC-48 signal through optical sections. SES-L Severely Errored Seconds — A second in which the coding violations detected reach a fixed threshold. The severely errored seconds are monitored for the supervisory channels of the optical line. SF Signal Fail — Refers to a condition when an incoming signal’s bit error rate exceeds a fixed value. Short Reach Refers to systems with up to 3 optical sections (spans). Short Span Refers to systems with optical sections (spans) less than 80 kilometers. Issue 1 March 2001 GL-17 365-575-536 Side An Optical Line System End Terminal provisioned as DUAL has two sides. Side 1 (east) acts as a 1A-RCV end terminal and represents optical lines 1 and 3. Side 2 (west) acts as a 1A-TX end terminal and represents optical lines 2 and 4. Single-Ended Operations The capability to perform operations, administration, maintenance, and provisioning of remote network elements on a centralized basis. Site Address The unique address of each end terminal and repeater site in an optical line. SLM Single Longitudinal Mode Software Ready The software that runs on the Optical Line System will accept, run, boot, and operate normally when future hardware (circuit packs) is installed. SONET Synchronous Optical Network — The American National Standards Institute’s optical signal standard for broadband transmission. SPODU The Self Powered Optical Demultiplexing Unit provides an interface between an incoming wavelength division multiplexed optical line signal and up to 16 outgoing optical drop side signals. The Self Powered Optical Demultiplexing Unit is compatible with Release 3.1.0-OLS and later software. SPOMU The Self Powered Optical Multiplexing Unit provides an interface between up to 16 incoming optical drop side signals and an outgoing wavelength division multiplexed optical line signal. The Self Powered Optical Multiplexing Unit is compatible with Release 3.1.0-OLS and later software. SPR-C Signal Power Received - Channel — This parameter is the measurement of the signal power per optical channel. SPR-SU Signal Power Received - Supervisory — This parameter is the measurement of the supervisory channel signal power. Standard Fiber Single mode fiber in the 1550-µm range with nominal dispersion of 18 ps/nm-km and optical loss of less than 0.25 dB/km. Status Status means a condition that does not raise an alarm. STM, STM-n Synchronous Transport Module — The basic logical building block SDH signal with a rate of 155.52 Mb/s for an STM-1 signal and a rate of n times 155.52 Mb/s for an STS-n signal. STS, STS-n Synchronous Transport Signal — The basic logical building block SONET signal with a rate of 51.840 Mb/s for an STS-1 signal and a rate of n times 51.840 Mb/s for an STS-n signal. Subnetwork SONET networks with data communications channel connectivity. GL-18 Issue 1 March 2001 365-575-536 Subnetwork Size The maximum size of optical sections between OLS End Terminals that are not wavelength add/ drop (WAD) sites. Supervisory Channel A single 155-Mb/s channel within the optical line signal. Supervisory Signal An optical signal originating at the Telemetry Controller circuit pack that is used to communicate maintenance information. The supervisory signal consists of the supervisory overhead and the customer maintenance payload. The supervisory signal is wavelength division multiplexed onto the optical line by the Optical Amplifier circuit pack. SVC Switched Virtual Circuit Synchronous Refers to network elements that are timed from references traceable to a single timing source. Synchronous Network The synchronization of synchronous transmission systems with synchronous payloads to a master (network clock that can be traced to a single reference clock). SYSCTL The System Controller and System Memory circuit packs provide the highest level of system control for the Optical Line System. The System Controller circuit pack provides overall administrative control of the system. SYSMEM The System Memory and System Controller circuit packs provide the highest level of system control for the Optical Line System. The System Memory circuit pack provides memory support for the SYSCTL circuit pack. T T1X1 and T1M1 The ANSI committees responsible for telecommunications standards. TA Technical Advisory TCA Threshold-Crossing Alert — A condition set when a counter exceeds a user-selected high or low threshold. A TCA does not generate an alarm but is available on demand through the CIT. TEC Thermo-Electric Cooler Telemetry Feed Through The telemetry feed through feature allows the supervisory signal data communications channel to be passed from one end terminal in an Optical Line System network to a colocated end terminal in another Optical Line System network in 4-fiber ring applications. Telemetry feed through expands operation interworking capabilities (for example, remote access through a TL1 gateway network element). Issue 1 March 2001 GL-19 365-575-536 THz Terahertz — 1012 Hertz TID Target Identifier — A provisionable parameter used to identify an Optical Line System network element. TIE Time Interval Error — The variation of time delay of a given timing signal with respect to an ideal timing signal over a particular period of time. TL1 Transaction Language 1 — A machine-to-machine communications language that is a subset of ITU-T’s human-machine language. TLM The Optical Line System Telemetry Controller circuit pack provides a bidirectional interface between an IS-3 customer maintenance signal and the supervisory signal. The TLM circuit pack also performs maintenance functions that are used to monitor the performance of the optical line. TOHCTL The Optical Line System Overhead Controller - Tributary circuit pack provides user access to the data communications channel (DCC) bytes. Tone An amplitude-modulated signal in the 5- to 30-kHz range that is superimposed on the drop side signal at the end terminal site. TOPR-OL Total Optical Power Received — The total power for all the optical channels of the optical line. TR Technical Reference TrueWave Fiber Single mode fiber in the 1550-µm range with nominal dispersion of 1 to 5 ps/nm-km and optical loss of less than 0.25 dB/km. TSO Technical Support Organization — See CTSI. U UAS-L Unavailable Seconds — A second during which the supervisory channel of the optical line is unavailable. UITS Unacknowledged Information Transfer Service — A protocol used to transfer data between the network elements over the data communications channel (DCC). The UITS protocol is required in network elements interworking with networks equipped with Release 3.1.0-OLS or earlier software. Unidirectional Protection switching that is performed in one direction (transmit or receive) only. GL-20 Issue 1 March 2001 365-575-536 Update The CONFIGURATION-Update input updates the state of all the automatically provisioned parameters based on what circuit packs are present and the condition of the incoming signals. Refer to “Provisionable Parameters and Original Values” in this section for more information about automatically provisioned parameters. Upgrade An upgrade is the addition of new capabilities (features) to an existing platform. This requires new software and may require new hardware. V Value A number, text string, or other menu selection associated with a parameter. W WAD Wavelength Add/Drop — The capability to add and/or drop optical signal wavelengths from an optical line signal. Wavelength Add/Drop Site A site containing two or more OLS End Terminals with some optical signals being added and/or dropped locally and other optical signals being expressed through the site. Wavelength Add/Drop with Branching A wavelength add/drop site with more than two OLS End Terminals. Wavelength Interchange A capability to change the wavelength associated with an optical signal into another wavelength. For example, an optical signal traveling as wavelength 1 could be converted to wavelength 2. Wavelength Isolation (Far-End Crosstalk) The ability of wavelength division multiplexing to isolate light signals in the desired optical channel from the unwanted optical channel. Wavelength isolation is the ratio of light in the bandpass of the transmission channel to the light within the bandpass of the other blocked channel, at any given WDM port. Wideband Communications Voice, data, and/or video communications from the DS0 rate (64 kb/s) to the DS1 rate (1.544 Mb/s). Issue 1 March 2001 GL-21 365-575-536 GL-22 Issue 1 March 2001 Index Numerics 155 Mb/s customer maintenance signal, 5-4, 5-28 1A-RCV end terminal shelf transmission interfaces, 5-9 1A-RCV-THRU end terminal shelf transmission interfaces, 5-12 1A-TX end terminal shelf transmission interfaces, 5-4 1A-TX-THRU end terminal shelf transmission interfaces, 5-7 42A_ and 42B OTPM faceplate LED, 7-59 purpose of circuit, 7-59 quick reference summary, 7-64 43A_ and 43B OTPM detailed description, 7-68, 7-74 faceplate LED, 7-65, 7-72 general description, 7-66 purpose of circuit, 7-65 443A_ and 43B OTPM quick reference summary, 7-71 44A_ and 44B OTPM general description, 7-73 purpose of circuit, 7-72 quick reference summary, 7-76 8 wavelength ready, 1-2 A access CIT port, 3-51 front, 1-13 operations system, 3-10 Access IDs, 8-10 Active alarms and status report, 9-38 Administration Access IDs, 8-10 Enhanced user login security, 8-5 memory administration, 8-1 security, 8-4 software upgrades, 8-8 version recognition, 8-4 administration performing on a centralized basis, 1-10 Admonishments used in this user/service manual, xxiv AIDs, 8-10 alarm groups, 1-11 applications, 2-1, 2-6 multi-regenerated spans, 2-12 single-OA, 2-4 two-OA, 2-2 with repeaters, 2-5 with WAD, 2-18 without repeaters, 2-1 APSD, 1-9 benefits, 1-9 architecture OLS system control, 3-9 ASCII-based (dumb) terminal minimum requirements, 6-4, 10-26 Auto and CIT provisioning, 8-12 Auto provisioning, 8-12 Auto provisioning states, 8-21 automatic version recognition, 1-11 Automatic diagnostics, 9-4, 9-13 Automatic fault detection and isolation, 9-4, 9-13 Automatic laser shut off/restart, 9-17 Automatic power shutdown and restart, 9-17 Automatic provisioning on circuit pack replacement, 8-20 B backplane, 3-64, 3-65 Baselining optical parameters, 9-33 bay, 3-6 BCLAN, 3-10 bit rates, 3-22 board controller, 3-10 communication, 3-10 local area network, 3-10 Browser Functions, 11-4 C Cabinet weights, 10-24 cabinets description, 3-5, 3-53 indicator strip, 3-53, 3-55 Cable access, 10-18 cables into, 3-51, 3-52 power, 3-61 cabling, 3-55 Capacity, 10-16 CenterLink Functions, 11-3 CenterLink Introduction, 11-2 CenterLink-CIT, 1-9 Circuit pack descriptions introduction, 7-1 Circuit pack faceplate LED, 6-15 circuit pack faceplate LED, 6-15 Circuit pack slot states, 8-21 Issue 1 March 2001 IN-1 Index Circuit pack/unit and compatible software, 7-2 Circuit pack/unit descriptions compatible software, 7-2 SYSMEM, 7-4 Circuit packs automatic provisioning, 8-20 circuit packs backplane interface, 3-65 CLEI codes, 1-11 control, 3-19 OT Controller, 3-20 Tributary Overhead Controller, 3-20 diode oring, 3-65 filtering, 3-65 fuses, 3-65 OTUs, 3-16 powering, 3-65 QOTU, 3-17 TLM (telemetry), 2-2 transmission, 3-15, 3-47 Circuit packs/unit categories, 7-1 CIT access, 3-51 ASCII-based (dumb) terminal minimum requirements, 6-4, 10-26 ASCII-based terminal, 6-4 dial-up access, 6-6 dumb terminal, 6-4 functions, 6-2 general, 6-1 local access, 6-5 modem requirements, 6-7, 10-27 null modem adapter, 6-6, 6-7 PC with CenterLink software, 6-3 remote access using supervisory signal DCC, 6-8 security, 6-2 CIT (craft interface terminal), 6-1 CIT (DCE) port, 6-5 CIT (DTE) port, 6-6 modem requirements, 6-7 CIT functions, 6-2 CIT provisioning, 8-12 CIT requirements PC with CIT-PC, 6-3 CIT security, 6-2 CIT specifications, 10-26 ASCII-based (dumb) terminal, 10-26 personal computer, 10-26 CIT Tutorial Using OLS CIT-PC, 11-9 CLEI codes, 1-11 CMS port states, 8-21 compactness, 1-13 Complementary Shelves miscellaneously mounted, 3-14 Complete TL1 commands and Reports in Release 3, 6-26 control architecture, 3-9 Control circuit packs SYSCTL, 7-4 IN-2 Issue 1 March 2001 SYSMEM, 7-4 Control circuitry 43A_ and 43B OTPM, 7-70 44A_ and 44B OTPM, 7-76 OA, 7-45 ODU, 7-40 OMU, 7-35 OTCTL, 7-21 OTU, 7-52 SYSCTL, 7-5 TLM, 7-28 TOHCTL, 7-16 Control circuitry42A_ and 42B OTPM, 7-63 Conventions used in this user/service manual, xxiv Copy-Program, 8-3 Correlating alarms, 8-8 craft access remote, 1-10 Craft interface circuit pack faceplate LED, 6-15 craft interface terminal, 6-1 fuse panel, 6-13 fuse/power indicating panel, 6-12 indicator strip, 6-8 message-based operations system interface, 6-25 miscellaneous discrete interface, 6-17 office alarms, 6-16 orderwire, 6-33 parallel telemetry, 6-17 Craft Interface Terminal, 6-1 Craft interface terminal, 6-1 Current drains, 10-19 Customer maintenance signal, 10-17 Customer maintenance signal IS-3 access, 10-17 customer maintenance signal synchronization, 5-33 cut-off, low voltage, 3-64 D data communication links reduce number of, 1-11 DCC, 2-6 network element status, 1-11 dense wavelength division multiplexing, 1-2 Detailed description OA, 7-44 ODU, 7-38 OMU, 7-34 OTCTL, 7-21 SYSCTL, 7-5 SYSMEM, 7-10 TLM, 7-25 TOHCTL, 7-16 detailed description OTU, 7-50, 7-57, 7-62, 7-68, 7-74 diode oring circuit packs, 3-65 directory service network element, 1-12 Index Directory Service Network Element. See DS-NE discrete interface user-settable, 1-9 Document ordering, xlv one-time orders, xlv standing orders, xlv Documentation electronic, xlvi domains operations, 1-10 double-pumped optical amplifiers, 1-2 Drawings, xxxvii drop side input power, 10-8 DUAL end terminal shelf transmission interfaces, 5-14 dual-facing shelf, 2-5–2-9 E EIA-232D Pin Connections, 10-33 Electrostatic Discharge, xxxii, 5 enclosures for OLS, 3-5 end terminal shelf block diagram, 5-4, 5-7, 5-9, 5-12, 5-14, 5-16, 5-19, 5-21, 5-24, 5-26 transmission interfaces, 5-4 End Terminal Shelf 1 shelf configurations, 3-23 End Terminal Shelf 1 Configurations 1A-RCV End Terminal, 3-26 1A-RCV-THRU End Terminal, 3-27 1A-TX End Terminal, 3-24 1A-TX-THRU End Terminal, 3-25 single OA 1A-RCV End Terminal, 3-31 single OA 1A-RCV-THRU End Terminal, 3-32 single OA 1A-TX-THRU End Terminal, 3-30 single OA Dual Facing End Terminal, 3-33 end terminal shelf block diagram, 5-4, 5-7, 5-9, 5-12, 5-14, 5-16, 5-19, 5-21, 5-24, 5-26 end terminal shelf transmission interfaces, 5-4 Enhanced OLS/OT operation capabilities system control architecture, 5-3 Enhanced user login security, 8-5 Environmental specifications, 10-25 EPROM SYSMEM circuit pack, 3-19 equipment packages, 3-1 equipment packages, 1-13 erbium-doped fiber amplifier (EDFA), 3-20 erbium-doped fiber amplifiers, 1-2 ESD considerations, xxxii, 5 ESD wrist strap, xxxiii, 6 F Faceplate LED OTU, 7-48, 7-55, 7-59, 7-65, 7-72 SYSMEM, 7-9 TLM, 7-24 faceplate LED OA, 7-42 ODU, 7-36 OMU, 7-32 TOHCTL, 7-15 Fault detection, 9-4, 9-13 Fault detection circuitry 42A_ and 42B OTPM, 7-63, 7-70 44A_ and 44B OTPM, 7-76 OA, 7-45 OTU, 7-52 QOTU, 7-58 TLM, 7-28 Fault isolation, 9-4, 9-13 Fault reporting, 9-4, 9-13 features maintenance, 1-9 physical, 1-13 security, 1-12 filtering circuit packs, 3-65 OA, 3-15 shelf level, 3-64 Floor loading specifications, 10-24 Frequencies, tone, 10-7 fuse panel, 3-60, 6-13 description, 3-57 Fuse/power indicating panel, 6-12 fuse/power indicating panel, 3-59, 6-12 fuses, 3-64 circuit packs, 3-65 G gateway network element. See GNE General description OA, 7-43 ODU, 7-37 OMU, 7-33 OTCTL, 7-21 SYSCTL, 7-5 SYSMEM, 7-10 TLM, 7-25 TOHCTL, 7-16 general description OTU, 7-49, 7-57, 7-61, 7-66, 7-73 general laser information, xxiv GNE, 1-10, 1-11 redundancy, 1-11 Issue 1 March 2001 IN-3 Index and TL1, 1-11 Ground strap, xxxiii, 6 H L Handling and transportation specifications, 10-25 heat baffle Miscellaneously Mounted Application, 3-6 Help, 11-3 How to comment on this document, xlvi How to order documents, xlv How to request standing orders for documents, xlv How to use this user/service manual, xxiii I IAOLRP, 3-19 Inactivity timers, 8-5 indicator OLS user panel SDH, 3-58 SONET, 3-58 user panel SDH, 3-54 indicator strip, 3-53, 3-55, 6-8 OT, 3-54 OT, SONET, 3-55 indicator strip/user panel, 6-8 indicators fuse/power indicating panel, 3-59 Initializing optical parameters, 9-33 Initializing pm registers, 9-32 Input power, 10-8 Inputs (Commands), 11-2 installation, 1-13 integrated bay, 3-8 Integration OLS with OT, 1-9 Intended audience of user/service manual, xxi interconnection panel, 3-51 OLS, 3-51 OT Complementary Shelves, 3-52 OT System Controller shelf, 3-51 interface backplane, 3-65 backplane and circuit pack, 3-65 circuit pack, 3-65 operations, 1-9 Interface circuitry OTCTL, 7-22 SYSCTL, 7-7 TOHCTL, 7-18 Interfaces control, 5-1 synchronization, 5-33 IN-4 Issue 1 transmission, 5-4 Internet Explorer, 6-3, 10-26 IS-3 access, 10-17 March 2001 LANs, 3-10 laser and eye damage, xxv laser backface current for pump 1, 9-29 laser backface current for pump 2, 9-29 laser bias current for pump 1, 9-29 laser bias current for pump 2, 9-29 laser classifications, xxvi laser safety precautions, xxvi LEA104, 2-5, 3-16, 3-21 LEA105, 2-4, 3-21 LEA7, 2-5, 3-21 LEA7B, 3-21 LEDs fuse/power indicating panel, 3-59 indicator strip, 3-55 miscellaneously mounted Complementary Shelves, 3-14 Lightwave safety, xxiv, 5 general laser information, xxiv laser and eye damage, xxv laser classifications, xxvi safety precautions, xxvi Link layer parameters, 10-32 local area networks internal and controllers, 3-10 Local self-tests, 9-21 login remote, 1-11 Login aging, 8-6 Login ID and password, 8-5 Login/password aging, 8-6 Long Reach, 3-21 Long Span, 3-16, 3-21 16 wavelength, 1-8 Long Span 16-wavelength systems LEA104 Optical Amplifier (OA) circuit pack, 7-41 Loopbacks, 9-20 low-voltage cutoff, 4-8 Lucent Technologies optical networking products, 1-1 M Maintenance auto turnup tests, 9-21 automatic diagnostics, 9-4, 9-13 fault detection, 9-4, 9-13 fault isolation, 9-4, 9-13 fault reporting, 9-4, 9-13 loopbacks, 9-20 Index maintenance signals, 9-2 performance monitoring, 9-28 protection switching, 9-16 provisioning consistency audits, 9-27 remote maintenance philosophy, 9-1 reports, 9-38 supervisory signal DCC protection, 9-16 terminal self-tests, 9-21 tests, 9-20 thresholds, 9-37 maintenance performing on a centralized basis, 1-10 Maintenance philosophy, 9-1 maintenance philosophy, 9-1 Maintenance signal, customer, 10-17 Maintenance signals, 9-2 Major Product Release Features, 1-4 Manual tests, 9-25 Maximum power specifications, 10-18 Memory administration, 8-1 Copy-Program, 8-3 reset, 8-3 update, 8-3 MemoryOTCTL, 7-22 Message-based operations system interface, 6-25 Microsoft Internet Explorer, 6-3, 10-26 Personal Web Server, 6-3, 10-26 Windows 2000, 1-9, 6-3, 10-26, 1, 5 Windows 95, 1-9, 6-3, 10-26, 1, 5 Windows 98, 1-9, 6-3, 10-26, 1, 5 Windows NT, 1-9, 6-3, 10-26, 1, 5 Minimum modem requirements, 6-7, 10-27 Miscellaneous discrete interface, 6-17 miscellaneously mounted Complementary Shelves, 3-14 System Controller Shelf, 3-13 Modem requirements, 6-7, 10-27 Monitoring and testing OA, 7-45 TLM, 7-28 Multi-level security, 8-4 multi-regenerated spans, 2-17 N network element remote status, 1-11 Network element login security, 8-6 Network Monitoring and Analysis (NMA), 6-21 Network System Bay Framework, 3-5 Newlook 2000, 3-5 NMA (Network Monitoring and Analysis), 6-21 Null modem adapter, 6-6, 6-7 O OA, 2-4, 3-15, 3-16 block diagram, 7-44 circuit pack, 3-15 control circuitry, 7-45 detailed description, 7-44 faceplate LED, 7-42 fault detection circuitry, 7-45 functions, 3-15 general description, 7-43 monitoring and testing, 7-45 performance monitoring, 7-46 power circuitry, 7-46 purpose of circuit, 7-41 quick reference summary, 7-47 transmission circuitry, 7-44 OAM&P, 3-51 OC-48 optical parameters laser bias current, 9-30 optical power receive, 9-30 optical transmit power, 9-30 OC-48 section trace, 9-2 OC-48/STM-16 parameters Laser Bias Current, 9-30 Optical power receive, 9-30 Optical Transmit Power, 9-30 ODU block diagram, 7-38, 7-39 control circuitry, 7-40 detailed description, 7-38 faceplate LED, 7-36 general description, 7-37 purpose of circuit, 7-36 quick reference summary, 7-40 transmission circuitry, 7-38 ODU units description, 3-16 fastening in shelf, 3-16 Office alarms, 6-16 office alarms interface, 1-9 office alarms interface, 6-16 OLS integrated bay, 2-18 new features, 1-8 optical transmission elements, 2-1 self-tests, 1-13 shelf descriptions, 3-9 system control architecture, 3-19 OLS lightguide jumpers, 10-1 OLS optical reflections tolerance, 10-12 OLS optical return loss, 10-12 OLS/OT integration correlating alarms, 8-8 OMU 505A OMU block diagram, 7-34 control circuitry, 7-35 Issue 1 March 2001 IN-5 Index detailed description, 7-34 faceplate LED, 7-32 general description, 7-33 purpose of circuit, 7-32 quick reference summary, 7-35 transmission circuitry, 7-34 OMU units, 3-21 description, 3-16 fastening in shelf, 3-16 One-time document orders, xlv Operation interfaces user panel, 6-8 operations interfaces list of, 1-9 performing on a centralized basis, 1-10 remote, 1-10 single-ended, 1-10 system remote access, 1-10 Operations interface tests alarm test, 9-26 LED test, 9-25 parallel telemetry test, 9-25 Operations interfaces circuit pack faceplate LED, 6-15 craft interface terminal, 6-1 fuse panel, 6-13 fuse/power indicating panel, 6-12 indicator strip, 6-8 message-based operations system interface, 6-25 message-based OS interface, 6-25 miscellaneous discrete interface, 6-17 office alarms, 6-16 orderwire, 6-33 orderwire interface, 6-33 parallel, 6-17 user panel, 6-8 operations system (OS). See OS or operations, system Operations system interface specifications, 10-28 optical isolator OA, 3-15 line signal, 3-16 Optical Amplifier (OA) circuit pack. See OA circuit pack Optical Amplifier optical safety, 10-2 Optical amplifier output power (Nx33 dB systems), 10-11 optical channel parameters signal power received, 9-30 optical channel states, 8-22 Optical connector interfaces, 10-1 Optical Demultiplexer Unit (ODU), 3-21 See ODU units optical dispersion, 10-12 optical line ID, 9-2 optical line parameters laser backface current for pump 1, 9-29 laser backface current for pump 2, 9-29 laser bias current for pump 1, 9-29 IN-6 Issue 1 March 2001 laser bias current for pump 2, 9-29 total optical power received, 9-29 Optical Line System equipment packages, 1-2 Optical Line System features release plan, 1-3 Optical Line System overview, 1-2 Optical Multiplexer Unit, 3-21 Optical Multiplexer Unit (OMU), 3-16 Optical Multiplexer Unit (OMU). See OMU units Optical networking products, 1-1 Optical signal performance monitoring, 9-28 optical splitter OA, 3-15 Optical Translator transmission interfaces, 5-31 Optical Translator Port Module, 3-18 Optical Translator Port Module (OTPM), 1-8 Optical Translator Unit (OTU), 1-8, 3-22 See OTUs Optical Translator Unit (OTU). See OTUs optically amplified transmission, 1-2 Orderwire, 6-33 Original value, 8-12 ORing, 3-65 OS interfaces, 1-9 remote access, 1-10 OT bay, 2-17 cabinet, 2-17 miscellaneously-mounted shelves, 2-17 power distribution, 3-65 OT Cabinet fuse panel, 3-60 shelves, 3-2 OT Controller, 3-43 OT interconnection panel, 3-51, 3-52 OTCTL, 3-20, 3-43 control circuitry, 7-21 detailed description, 7-21 faceplate LED, 7-20 general description, 7-21 Memory, 7-22 nterface, 7-22 power circuitry, 7-22 purpose of circuit, 7-20 quick reference summary, 7-23 OTPM, 3-18 OTU Control circuitry, 7-52, 7-63, 7-70, 7-76 detailed description, 7-50, 7-62 faceplate LED, 7-48, 7-55 Fault detection circuitry, 7-52, 7-58, 7-63, 7-70, 7-76 general description, 7-49, 7-61 Performance Monitoring, 7-52, 7-64, 7-70, 7-76 Power circuitry, 7-53, 7-58, 7-64, 7-70, 7-76 purpose of circuit, 7-48, 7-55 quick reference summary, 7-54 OTUs, 2-11, 3-22 Complementary Shelves, 3-14 Index functionality, 3-17 regeneration, 2-17 Outputs, 11-8 Overhead controller circuitry TLM, 7-28 Overview of dense wavelength division multiplexing, 1-2 Overview of Optical Line System, 1-2 P packages bay Dual End Terminal, 3-34 Dual Repeater, 3-34 cabinet Dual End Terminal, 3-34 Dual Repeater, 3-34 End Terminal and Repeater, 3-34 Optical Line System (OLS), 3-1 OT bay, 3-35 OT cabinet, 3-35 shelf, miscellaneously-mounted, 3-34 Packet layer parameters, 10-32 panel, 3-55 fuse, 3-60 fuse/power indicating, 3-59 OT Complementary Shelf, 3-58 OLS fuse, 3-57 Parallel telemetry, 6-17 parallel telemetry, 6-17 interface, 1-9 Password aging, 8-7 PCNs, xlvi performance monitoring continuous, 1-12 thresholds, 1-12 Performance Monitoring 42A_ and 42B OTPM, 7-64, 7-70 44A_ and 44B OTPM, 7-76 OTU, 7-52 TCAs, 9-37 Performance monitoring data storage, 9-32 data storage and reports, 9-32 during failed conditions, 9-34 initializing optical parameters, 9-33 initializing pm registers, 9-32 OA, 7-46 OC-48/STM-16 line parameters, 9-30 optical channel parameters, 9-30 optical line parameters, 9-29 optical translator port signal parameters, 9-32 parameters, 9-28 supervisory channel parameters, 9-31 thresholds, 9-37 TLM, 7-29 Performance status report, 9-40 Personal computer minimum requirements pc with CenterLink software, 6-3 Personal Web Server, 6-3, 10-26 physical design, 3-8 PM reports, 9-40 PM thresholds, 9-37 Port security, 8-5 Port states, 8-21 Port status, 8-5 Power circuit pack power, 4-8 FAULT LED, 4-11 fuses, 4-4 general philosophy, 4-1 LEDs, 4-11 low-voltage cutoff, 4-8 power dissipation, 4-9 power distribution to cabinets, 4-2 power distribution to miscellaneously mounted shelves, 4-5, 4-6 power feeder stubs, 4-2 PWR ON LED, 4-8, 4-11 shelf power, 4-7 power, 3-60 bus, 3-64 cables, 3-61, 3-63 circuit packs, 3-65 distribution, 3-65 end terminal and repeater bay/cabinet, 3-62 OLS Integrated Bay (Single), 3-63 OT bay/cabinet, 3-63 philosophy, 3-60 shelf level, 3-64 shutdown, 1-9 voltage range, 4-1 Power circuitry 42A_ and 42B OTPM, 7-64 43A_ and 43B OTPM, 7-70 44A_ and 44B OTPM, 7-76 OA, 7-46 OTCTL, 7-22 OTU, 7-53 QOTU, 7-58 SYSCTL, 7-7 SYSMEM, 7-13 TLM, 7-29 TOHCTL, 7-19 Power dissipation, 4-9 Power feeders, 4-2 power filter units, 4-7 Power specifications (maximum), 10-18 Power, input, 10-8 Preprovisioning, 8-20 procedures maintenance, 1-9 Product change notifications, xlvi Product support documentation support, xlv Issue 1 March 2001 IN-7 Index Protection switching supervisory signal DCC protection, 9-16 protocol. See X.25 Provisionable port status, 8-5 Provisioning auto provisioning date/time, 8-20 automatic on circuit pack replacement, 8-20 local provisioning, 8-20 original values, 8-12 preprovisioning, 8-20 provisioning performing on a centralized basis, 1-10 provisioning consistency audits, 9-27 pump laser OA, 3-15 Pump performance monitoring, 9-28 Purpose of circuit OA, 7-41 ODU, 7-36 OMU, 7-32 OTU, 7-48, 7-55, 7-59, 7-65, 7-72 SYSMEM, 7-9 TOHCTL, 7-15 Purpose of circuitOTCTL, 7-20 Purpose of user/service manual, xxi Q QOTU, 3-17 detailed description, 7-57 general description, 7-57 port designations, 3-17 quick reference summary, 7-58 Quad Optical Translator Unit, 3-17 Quick reference summary OA, 7-47 ODU, 7-40 OMU, 7-35 SYSCTL, 7-8 SYSMEM, 7-14 TLM, 7-30 TOHCTL, 7-19 quick reference summary OTU, 7-54, 7-58, 7-64, 7-71, 7-76 R Reason for Reissue, xxii regeneration, 2-19 Related documentation, xxxvi drawings, xxxvii Lucent Technologies Modification Implementation Procedures, xxxvi Lucent Technologies practices, xxxvi Release 1 features, 1-3 IN-8 Issue 1 March 2001 155 Mb/s customer maintenance signal, 5-4, 5-28 8 wavelength ready, 1-2 Auto and CIT provisioning, 8-12 Automatic fault detection and isolation, 9-4 craft interface terminal, 6-1 double-pumped optical amplifiers, 1-2 Login/password aging, 8-6 Multi-level security, 8-4 Optical signal performance monitoring, 9-28 orderwire, 6-33 parallel telemetry, 6-17 Pump performance monitoring, 9-28 Threshold crossing alert (TCA) reporting, 9-37 TL1 operations system interface, 6-25 User software downloads, 8-8 Release 2 Additional TL1 messages, 6-25 Enable/disable TCAs for a single parameter, 9-30, 9-31 Release 2 features additional miscellaneous discretes, 6-17, 7-7 enable/disable TCAs for a single parameter, 9-29 Release 2.1 features enhanced user login security, 8-5 major features, 1-4 new equipment packages, 1-2 web browser-based CIT, 6-3 Release 3 features automatic power shut down and restart, 9-17 complete TL1 commands and reports, 6-26 enhanced OLS/OT operation capabilities, 5-3 Long span 16-wavelength systems, 7-41 new equipment packages, 1-2, 5-6, 5-11, 5-18, 5-23 OC-48 section trace, 9-2 OLS/OT integration, 8-8 reliability, 3-60 remote alarms, 1-10 login, 1-10, 1-11 Remote maintenance philosophy, 9-1 Remote software downloads (in-service software generic copy), 8-8 repeater shelf block diagram, 5-28 description, 3-12 transmission interfaces, 5-28 repeater shelf block diagram, 5-28 repeater shelf transmission interfaces, 5-28 repeaters, 2-5 Reports 6-hour autonomous report, 9-39 active alarms and status report, 9-38 performance monitoring reports, 9-40 provisioning reports, 9-39 state report, 9-40 version/equipment list report, 9-40 requirements, 3-7 Bellcore, 3-7 reset, 8-3 Index S Safety ESD considerations, 5 Lightwave, 5 Safety instructions, xxiv ESD considerations, xxxii Lightwave safety, xxiv safety labels, xxiv safety precautions (enclosed systems), xxvii safety precautions (unenclosed systems), xxxi Section (B1) CV, 9-32 Section (B1) ES, 9-32 Section (B1) SEFS, 9-32 Section (B1) SES, 9-32 Security, xxxvi, 8-4 inactivity timers, 8-5 login aging, 8-6 login ID and password, 8-5 network element login security, 8-6 password aging, 8-7 port security, 8-5 provisionable port status, 8-5 user login security, 8-5 Self tests, 9-20 shelf end terminal, 3-10 OT System Controller, 3-13 repeater, 3-12 Shelf power distribution, 4-8 shelves bay-mounted, 3-5, 3-6 description, 3-10 filtering, 3-64 miscellaneously-mounted, 3-5 power distribution, 3-64 Short Reach, 3-21 signal power received, 9-30, 9-31 Signal, customer maintenance, 10-17 Signal-to-noise ratio performance, 10-17 single OA 1A-RCV end terminal shelf transmission interfaces, 5-21 single OA 1A-RCV-THRU end terminal shelf transmission interfaces, 5-24 single OA 1A-TX end terminal shelf transmission interfaces, 5-16 single OA 1A-TX-THRU end terminal shelf transmission interfaces, 5-19 single OA DUAL end terminal shelf transmission interfaces, 5-26 single-OA, 2-4 single-OA/single-OA, 2-6, 2-10 single-OA/two-OA, 2-8 Slot and port auto provisioning states, 8-21 Slot states, 8-21 software download remote, 1-10 software copy local remote, 1-11 Software upgrades, 8-8 software upgrades local remote, 1-11 span multi-regenerated, 2-17 Specifications, 10-1 specifications optical signal power 1.3 microns, 10-10 1.5 microns, 10-8 splitter module, 3-21 standards, 3-7 Standing order document orders, xlv State report, 9-40 STS-48/STS-3 section parameters STS-48/STS-3 section (B1) CV, 9-32 STS-48/STS-3 section (B1) ES, 9-32 STS-48/STS-3 section (B1) SEFS, 9-32 STS-48/STS-3 section (B1) SES, 9-32 supervisory channel (B2) CV, 9-31 supervisory channel (B2) ES, 9-31 supervisory channel (B2) SES, 9-31 supervisory channel (B2) UAS, 9-31 supervisory channel laser bias current, 9-31 supervisory channel parameters laser bias current, 9-31 line (B2) CV, 9-31 line (B2) ES, 9-31 line (B2) SES, 9-31 line (B2) UAS, 9-31 signal power received, 9-31 supervisory signal, 9-2 Support documentation support, xlv documents, xxxvi drawings, xxxvii synchronization architecture, 5-33 SYSCTL block diagram, 7-6 control circuitry, 7-5 detailed description, 7-5 faceplate LED, 7-4 general description, 7-5 interface circuitry, 7-7 power circuitry, 7-7 purpose of circuit, 7-4 quick reference summary, 7-8 SYSCTL circuit pack description, 3-19 serial telemetry, 3-19 X.25 interfaces, 3-19 SYSCTL, supporting OT, 3-19 SYSMEM block diagram, 7-11 detailed description, 7-10 faceplate LED, 7-9 Issue 1 March 2001 IN-9 Index general description, 7-10 power circuitry, 7-13 purpose of circuit, 7-9 quick reference summary, 7-14 SYSMEM circuit pack, 3-19 EPROM, 3-19 system control architecture, 3-9 reliability, 3-60 System control architecture, 5-1 board controller, 5-1 system controller complex, 5-3 System Controller Shelf, 3-13 T TCAs, 9-37 Technical specifications, 10-1 Telemetry parallel, 6-17 telemetry (TLM) circuit pack, 3-18 See TLM circuit pack, 3-18 Telemetry-thru feature (TLS feature), 2-21 Tests alarm test, 9-26 auto turnup tests, 9-20 LED test, 9-25 manual, 9-25 operations interface tests, 9-25 parallel telemetry test, 9-25 Threshold crossing alert, 9-37 Threshold crossing alert (TCA) reporting, 9-37 Timing circuitry TLM, 7-28 TL1, 1-10 and GNE, 1-11 TL1 command/response messages, 6-26 TL1 commands and reports complete in Release 3, 6-26 TL1 commands through CIT(DCE) and CIT(DTE), 6-4 TL1 Messages, 6-25 TL1 operations system interface, 6-25 TL1/X.25 interface, 6-21 TLM block diagram, 7-26 control circuitry, 7-28 detailed description, 7-25 faceplate LED, 7-24 fault detection circuitry, 7-28 general description, 7-25 monitoring and testing, 7-28 overhead controller circuitry, 7-28 performance monitoring, 7-29 power circuitry, 7-29 quick reference summary, 7-30 timing circuitry, 7-28 transmission circuitry, 7-25 TLM circuit pack, 2-2, 3-18 description, 3-18 IN-10 Issue 1 March 2001 TLM IS-3 access, 10-17 TOHCTL, 3-20 block diagram, 7-16 circuit pack, 3-10, 3-20 control circuitry, 7-16 detailed description, 7-16 faceplate LED, 7-15 general description, 7-16 interface circuitry, 7-18 memory, 7-18 power circuitry, 7-19 purpose of circuit, 7-15 quick reference summary, 7-19 tone, 9-2 Tone frequencies, 10-7 tone trace, 9-2 total optical power received, 9-29 Transaction Language 1. See TL1 transmission circuit packs, 3-15 end terminal, 2-3 transmission architecture, 5-4 Transmission characteristics, 10-16 Transmission circuit packs/units TLM, 7-24 Transmission circuitry OA, 7-44 ODU, 7-38 OMU, 7-34 TLM, 7-25 Transmission delay, 10-16 transmission medium, 10-1 Tributary Overhead Controller. See TOHCTL two-fiber applications, 2-6 two-OA, 2-2 two-OA/single-OA, 2-9 two-OA/two-OA, 2-7 U Update, 8-3 User login security, 8-5 user panel, 6-8 User software downloads, 8-8 User-settable miscellaneous discrete interface, 6-17 V Version recognition, 8-4 version recognition automatic, 1-11 Version/equipment list report, 9-40 Index W WAD, 2-19 wavelength add/drop (WAD), 2-18 Web browser-based CIT, 6-3 Weights, 10-24 What is the Optical Line System, 1-2 Windows 2000, 1-9, 6-3, 10-26, 1, 5 Windows 95, 1-9, 6-3, 10-26, 1, 5 Windows 98, 1-9, 6-3, 10-26, 1, 5 Windows NT, 1-9, 6-3, 10-26, 1, 5 Wrist strap, xxxiii, 6 X X.25 interface, 1-10 X.25 connection, 2-21 X.25 interface, 6-25 X.25 technical specifications, 10-32 EIA-232D Pin Connections, 10-33 link layer parameters, 10-32 packet layer parameters, 10-32 X.25 Traffic Redirect feature affected TL1 commands, 6-24 Failure Case, 6-22 Normal Case, 6-22 Redirect Case, 6-23 Issue 1 March 2001 IN-11 Index IN-12 Issue 1 March 2001