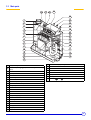
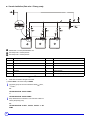
1
EN Gas fired condensing boiler C 230 ECO Installation and Service Manual D0006 300015171-001-E 51 Declaration of conformity 1 C002764-A The appliance complies with the standard model described in declaration of compliance 1. It is manufactured and distributed pursuant to the requirements of european directives. The original of the declaration of compliance is available from the manufacturer. 2 C 230 ECO 19/10/09 - 300015171-001-E Contents 1 Introduction . . . . . . . . . . . . . . . . . . . . . . . . . . . . . . . . . . . . . . . . . . . . . . . . . . . . . . . . . . . . . . . . . . . . . . . . . . . . .5 1.1 1.2 Symbols and abbreviations . . . . . . . . . . . . . . . . . . . . . . . . . . . . . . . . . . . . . . . . . . . . . . . . . . . . . . . . . . . . . . . . . . . . . . . . . . . . . . . .5 General. . . . . . . . . . . . . . . . . . . . . . . . . . . . . . . . . . . . . . . . . . . . . . . . . . . . . . . . . . . . . . . . . . . . . . . . . . . . . . . . . . . . . . . . . . . . . . . .5 1.2.1 User's liability . . . . . . . . . . . . . . . . . . . . . . . . . . . . . . . . . . . . . . . . . . . . . . . . . . . . . . . . . . . . . . . . . . . . . . . . . . . . . . . . . . . . .5 1.2.2 Manufacturer's liability . . . . . . . . . . . . . . . . . . . . . . . . . . . . . . . . . . . . . . . . . . . . . . . . . . . . . . . . . . . . . . . . . . . . . . . . . . . . . .5 1.3 Homologations . . . . . . . . . . . . . . . . . . . . . . . . . . . . . . . . . . . . . . . . . . . . . . . . . . . . . . . . . . . . . . . . . . . . . . . . . . . . . . . . . . . . . . . . . .6 1.3.1 Certifications . . . . . . . . . . . . . . . . . . . . . . . . . . . . . . . . . . . . . . . . . . . . . . . . . . . . . . . . . . . . . . . . . . . . . . . . . . . . . . . . . . . . .6 1.3.2 Gas category . . . . . . . . . . . . . . . . . . . . . . . . . . . . . . . . . . . . . . . . . . . . . . . . . . . . . . . . . . . . . . . . . . . . . . . . . . . . . . . . . . . . .8 2 Safety instructions and recommendations. . . . . . . . . . . . . . . . . . . . . . . . . . . . . . . . . . . . . . . . . . . . . . . . . . . .9 2.1 Safety instructions . . . . . . . . . . . . . . . . . . . . . . . . . . . . . . . . . . . . . . . . . . . . . . . . . . . . . . . . . . . . . . . . . . . . . . . . . . . . . . . . . . . . . . .9 2.1.1 Fire hazard . . . . . . . . . . . . . . . . . . . . . . . . . . . . . . . . . . . . . . . . . . . . . . . . . . . . . . . . . . . . . . . . . . . . . . . . . . . . . . . . . . . . . . .9 2.1.2 Risk of intoxication . . . . . . . . . . . . . . . . . . . . . . . . . . . . . . . . . . . . . . . . . . . . . . . . . . . . . . . . . . . . . . . . . . . . . . . . . . . . . . . . .9 2.1.3 Risk of being burnt . . . . . . . . . . . . . . . . . . . . . . . . . . . . . . . . . . . . . . . . . . . . . . . . . . . . . . . . . . . . . . . . . . . . . . . . . . . . . . . . .9 2.1.4 Risk of damage . . . . . . . . . . . . . . . . . . . . . . . . . . . . . . . . . . . . . . . . . . . . . . . . . . . . . . . . . . . . . . . . . . . . . . . . . . . . . . . . . . .9 2.2 Recommendations . . . . . . . . . . . . . . . . . . . . . . . . . . . . . . . . . . . . . . . . . . . . . . . . . . . . . . . . . . . . . . . . . . . . . . . . . . . . . . . . . . . . . . .9 3 Technical description . . . . . . . . . . . . . . . . . . . . . . . . . . . . . . . . . . . . . . . . . . . . . . . . . . . . . . . . . . . . . . . . . . . .10 3.1 3.2 3.3 3.4 4 General description . . . . . . . . . . . . . . . . . . . . . . . . . . . . . . . . . . . . . . . . . . . . . . . . . . . . . . . . . . . . . . . . . . . . . . . . . . . . . . . . . . . . .10 Technical characteristics . . . . . . . . . . . . . . . . . . . . . . . . . . . . . . . . . . . . . . . . . . . . . . . . . . . . . . . . . . . . . . . . . . . . . . . . . . . . . . . . .11 Main parts. . . . . . . . . . . . . . . . . . . . . . . . . . . . . . . . . . . . . . . . . . . . . . . . . . . . . . . . . . . . . . . . . . . . . . . . . . . . . . . . . . . . . . . . . . . . .13 Operating principle . . . . . . . . . . . . . . . . . . . . . . . . . . . . . . . . . . . . . . . . . . . . . . . . . . . . . . . . . . . . . . . . . . . . . . . . . . . . . . . . . . . . . .14 3.4.1 Operating cycle . . . . . . . . . . . . . . . . . . . . . . . . . . . . . . . . . . . . . . . . . . . . . . . . . . . . . . . . . . . . . . . . . . . . . . . . . . . . . . . . . .15 3.4.2 Cyclical sealing control of the gas valve unit (170, 210 kW) . . . . . . . . . . . . . . . . . . . . . . . . . . . . . . . . . . . . . . . . . . . . . . . .17 3.4.3 Minimum gas pressure switch . . . . . . . . . . . . . . . . . . . . . . . . . . . . . . . . . . . . . . . . . . . . . . . . . . . . . . . . . . . . . . . . . . . . . . .17 3.4.4 Max. safety temperature . . . . . . . . . . . . . . . . . . . . . . . . . . . . . . . . . . . . . . . . . . . . . . . . . . . . . . . . . . . . . . . . . . . . . . . . . . .17 3.4.5 Flow controller . . . . . . . . . . . . . . . . . . . . . . . . . . . . . . . . . . . . . . . . . . . . . . . . . . . . . . . . . . . . . . . . . . . . . . . . . . . . . . . . . . .17 Installation . . . . . . . . . . . . . . . . . . . . . . . . . . . . . . . . . . . . . . . . . . . . . . . . . . . . . . . . . . . . . . . . . . . . . . . . . . . . .18 4.1 Regulations governing installation . . . . . . . . . . . . . . . . . . . . . . . . . . . . . . . . . . . . . . . . . . . . . . . . . . . . . . . . . . . . . . . . . . . . . . . . . .18 4.1.1 In general . . . . . . . . . . . . . . . . . . . . . . . . . . . . . . . . . . . . . . . . . . . . . . . . . . . . . . . . . . . . . . . . . . . . . . . . . . . . . . . . . . . . . . .18 4.1.2 In particular for France . . . . . . . . . . . . . . . . . . . . . . . . . . . . . . . . . . . . . . . . . . . . . . . . . . . . . . . . . . . . . . . . . . . . . . . . . . . . .18 4.1.3 In particular for Germany . . . . . . . . . . . . . . . . . . . . . . . . . . . . . . . . . . . . . . . . . . . . . . . . . . . . . . . . . . . . . . . . . . . . . . . . . . .19 4.2 Package list . . . . . . . . . . . . . . . . . . . . . . . . . . . . . . . . . . . . . . . . . . . . . . . . . . . . . . . . . . . . . . . . . . . . . . . . . . . . . . . . . . . . . . . . . . .19 4.3 Mounting. . . . . . . . . . . . . . . . . . . . . . . . . . . . . . . . . . . . . . . . . . . . . . . . . . . . . . . . . . . . . . . . . . . . . . . . . . . . . . . . . . . . . . . . . . . . . .20 4.3.1 Position of the boiler. . . . . . . . . . . . . . . . . . . . . . . . . . . . . . . . . . . . . . . . . . . . . . . . . . . . . . . . . . . . . . . . . . . . . . . . . . . . . . .20 4.3.2 Main dimensions . . . . . . . . . . . . . . . . . . . . . . . . . . . . . . . . . . . . . . . . . . . . . . . . . . . . . . . . . . . . . . . . . . . . . . . . . . . . . . . . .22 4.3.3 Control panel assembly . . . . . . . . . . . . . . . . . . . . . . . . . . . . . . . . . . . . . . . . . . . . . . . . . . . . . . . . . . . . . . . . . . . . . . . . . . . .23 4.4 Hydraulic connections . . . . . . . . . . . . . . . . . . . . . . . . . . . . . . . . . . . . . . . . . . . . . . . . . . . . . . . . . . . . . . . . . . . . . . . . . . . . . . . . . . .26 4.4.1 Regulations . . . . . . . . . . . . . . . . . . . . . . . . . . . . . . . . . . . . . . . . . . . . . . . . . . . . . . . . . . . . . . . . . . . . . . . . . . . . . . . . . . . . .26 4.4.2 Hydraulic connection of the heating circuit. . . . . . . . . . . . . . . . . . . . . . . . . . . . . . . . . . . . . . . . . . . . . . . . . . . . . . . . . . . . . .26 4.4.3 Connecting the condensate discharge pipe . . . . . . . . . . . . . . . . . . . . . . . . . . . . . . . . . . . . . . . . . . . . . . . . . . . . . . . . . . . . .29 4.4.4 Water treatment . . . . . . . . . . . . . . . . . . . . . . . . . . . . . . . . . . . . . . . . . . . . . . . . . . . . . . . . . . . . . . . . . . . . . . . . . . . . . . . . . .30 4.4.5 Circulating pump . . . . . . . . . . . . . . . . . . . . . . . . . . . . . . . . . . . . . . . . . . . . . . . . . . . . . . . . . . . . . . . . . . . . . . . . . . . . . . . . .31 4.4.6 Low loss header . . . . . . . . . . . . . . . . . . . . . . . . . . . . . . . . . . . . . . . . . . . . . . . . . . . . . . . . . . . . . . . . . . . . . . . . . . . . . . . . . .31 4.5 Gas connection. . . . . . . . . . . . . . . . . . . . . . . . . . . . . . . . . . . . . . . . . . . . . . . . . . . . . . . . . . . . . . . . . . . . . . . . . . . . . . . . . . . . . . . . .32 19/10/09 - 300015171-001-E C 230 ECO 3 4.6 Flue gas system connections . . . . . . . . . . . . . . . . . . . . . . . . . . . . . . . . . . . . . . . . . . . . . . . . . . . . . . . . . . . . . . . . . . . . . . . . . . . . . .33 4.6.1 Connection options . . . . . . . . . . . . . . . . . . . . . . . . . . . . . . . . . . . . . . . . . . . . . . . . . . . . . . . . . . . . . . . . . . . . . . . . . . . . . . .33 4.6.2 Classification of type according to the discharge of combusted gases and air supply . . . . . . . . . . . . . . . . . . . . . . . . . . . .33 4.6.3 Connection conditions . . . . . . . . . . . . . . . . . . . . . . . . . . . . . . . . . . . . . . . . . . . . . . . . . . . . . . . . . . . . . . . . . . . . . . . . . . . . .33 4.6.4 Connection to a type B23 / B23p chimney . . . . . . . . . . . . . . . . . . . . . . . . . . . . . . . . . . . . . . . . . . . . . . . . . . . . . . . . . . . . . .34 4.6.5 Forced flue connection type C13 and C33. . . . . . . . . . . . . . . . . . . . . . . . . . . . . . . . . . . . . . . . . . . . . . . . . . . . . . . . . . . . . .36 4.6.6 Forced flue equipment (optional) . . . . . . . . . . . . . . . . . . . . . . . . . . . . . . . . . . . . . . . . . . . . . . . . . . . . . . . . . . . . . . . . . . . . .37 4.6.7 Connecting separate type C53 ducts . . . . . . . . . . . . . . . . . . . . . . . . . . . . . . . . . . . . . . . . . . . . . . . . . . . . . . . . . . . . . . . . . .41 4.6.8 Installation of 2 boilers in cascade . . . . . . . . . . . . . . . . . . . . . . . . . . . . . . . . . . . . . . . . . . . . . . . . . . . . . . . . . . . . . . . . . . . .41 4.7 Electrical connections. . . . . . . . . . . . . . . . . . . . . . . . . . . . . . . . . . . . . . . . . . . . . . . . . . . . . . . . . . . . . . . . . . . . . . . . . . . . . . . . . . . .42 4.7.1 General . . . . . . . . . . . . . . . . . . . . . . . . . . . . . . . . . . . . . . . . . . . . . . . . . . . . . . . . . . . . . . . . . . . . . . . . . . . . . . . . . . . . . . . .42 4.7.2 Electrical specifications . . . . . . . . . . . . . . . . . . . . . . . . . . . . . . . . . . . . . . . . . . . . . . . . . . . . . . . . . . . . . . . . . . . . . . . . . . . .42 4.8 Skeleton Diagrams . . . . . . . . . . . . . . . . . . . . . . . . . . . . . . . . . . . . . . . . . . . . . . . . . . . . . . . . . . . . . . . . . . . . . . . . . . . . . . . . . . . . . .43 5 Start-up. . . . . . . . . . . . . . . . . . . . . . . . . . . . . . . . . . . . . . . . . . . . . . . . . . . . . . . . . . . . . . . . . . . . . . . . . . . . . . . .44 5.1 5.2 5.3 5.4 Control panel . . . . . . . . . . . . . . . . . . . . . . . . . . . . . . . . . . . . . . . . . . . . . . . . . . . . . . . . . . . . . . . . . . . . . . . . . . . . . . . . . . . . . . . . . .44 Check points before commissioning. . . . . . . . . . . . . . . . . . . . . . . . . . . . . . . . . . . . . . . . . . . . . . . . . . . . . . . . . . . . . . . . . . . . . . . . .44 Commissioning procedure . . . . . . . . . . . . . . . . . . . . . . . . . . . . . . . . . . . . . . . . . . . . . . . . . . . . . . . . . . . . . . . . . . . . . . . . . . . . . . . .44 Gas settings . . . . . . . . . . . . . . . . . . . . . . . . . . . . . . . . . . . . . . . . . . . . . . . . . . . . . . . . . . . . . . . . . . . . . . . . . . . . . . . . . . . . . . . . . . .45 5.4.1 Checks . . . . . . . . . . . . . . . . . . . . . . . . . . . . . . . . . . . . . . . . . . . . . . . . . . . . . . . . . . . . . . . . . . . . . . . . . . . . . . . . . . . . . . . . .45 5.4.2 Fan speed . . . . . . . . . . . . . . . . . . . . . . . . . . . . . . . . . . . . . . . . . . . . . . . . . . . . . . . . . . . . . . . . . . . . . . . . . . . . . . . . . . . . . .45 5.4.3 Setting the gas/air ratio (High speed). . . . . . . . . . . . . . . . . . . . . . . . . . . . . . . . . . . . . . . . . . . . . . . . . . . . . . . . . . . . . . . . . .46 5.4.4 Setting the gas/air ratio (Low speed) . . . . . . . . . . . . . . . . . . . . . . . . . . . . . . . . . . . . . . . . . . . . . . . . . . . . . . . . . . . . . . . . . .47 5.4.5 Limiting input to 115 kW (Only 4 section boilers) . . . . . . . . . . . . . . . . . . . . . . . . . . . . . . . . . . . . . . . . . . . . . . . . . . . . . . . . .48 5.5 Changing gas . . . . . . . . . . . . . . . . . . . . . . . . . . . . . . . . . . . . . . . . . . . . . . . . . . . . . . . . . . . . . . . . . . . . . . . . . . . . . . . . . . . . . . . . . .48 5.5.1 Switching from gas H to gas L/Lw and vice versa . . . . . . . . . . . . . . . . . . . . . . . . . . . . . . . . . . . . . . . . . . . . . . . . . . . . . . . .48 5.5.2 Switching from Natural Gas to Propane. . . . . . . . . . . . . . . . . . . . . . . . . . . . . . . . . . . . . . . . . . . . . . . . . . . . . . . . . . . . . . . .49 5.5.3 Setting the burner parameters . . . . . . . . . . . . . . . . . . . . . . . . . . . . . . . . . . . . . . . . . . . . . . . . . . . . . . . . . . . . . . . . . . . . . . .49 5.5.4 Adjustment of the CO2 values . . . . . . . . . . . . . . . . . . . . . . . . . . . . . . . . . . . . . . . . . . . . . . . . . . . . . . . . . . . . . . . . . . . . . . .49 5.6 Changing the settings. . . . . . . . . . . . . . . . . . . . . . . . . . . . . . . . . . . . . . . . . . . . . . . . . . . . . . . . . . . . . . . . . . . . . . . . . . . . . . . . . . . .49 6 Stopping the boiler . . . . . . . . . . . . . . . . . . . . . . . . . . . . . . . . . . . . . . . . . . . . . . . . . . . . . . . . . . . . . . . . . . . . . .49 6.1 6.2 7 Precautions to take if there is a danger of frost . . . . . . . . . . . . . . . . . . . . . . . . . . . . . . . . . . . . . . . . . . . . . . . . . . . . . . . . . . . . . . . .49 Precautions to take in the event of prolonged shutdown (one year or more) . . . . . . . . . . . . . . . . . . . . . . . . . . . . . . . . . . . . . . . . . .49 Checking and maintenance . . . . . . . . . . . . . . . . . . . . . . . . . . . . . . . . . . . . . . . . . . . . . . . . . . . . . . . . . . . . . . .50 7.1 Checks . . . . . . . . . . . . . . . . . . . . . . . . . . . . . . . . . . . . . . . . . . . . . . . . . . . . . . . . . . . . . . . . . . . . . . . . . . . . . . . . . . . . . . . . . . . . . . .50 7.1.1 Checking the combustion in the boiler . . . . . . . . . . . . . . . . . . . . . . . . . . . . . . . . . . . . . . . . . . . . . . . . . . . . . . . . . . . . . . . . .50 7.1.2 Setting the ignition electrode . . . . . . . . . . . . . . . . . . . . . . . . . . . . . . . . . . . . . . . . . . . . . . . . . . . . . . . . . . . . . . . . . . . . . . . .50 7.1.3 Checking tightness (hydraulics, combusted gas discharge and gas) . . . . . . . . . . . . . . . . . . . . . . . . . . . . . . . . . . . . . . . . .51 7.1.4 Checking the hydraulic pressure . . . . . . . . . . . . . . . . . . . . . . . . . . . . . . . . . . . . . . . . . . . . . . . . . . . . . . . . . . . . . . . . . . . . .51 7.2 Maintenance . . . . . . . . . . . . . . . . . . . . . . . . . . . . . . . . . . . . . . . . . . . . . . . . . . . . . . . . . . . . . . . . . . . . . . . . . . . . . . . . . . . . . . . . . . .51 7.2.1 Clean the fan . . . . . . . . . . . . . . . . . . . . . . . . . . . . . . . . . . . . . . . . . . . . . . . . . . . . . . . . . . . . . . . . . . . . . . . . . . . . . . . . . . . .52 7.2.2 Clean the heat exchanger using the tool provided. . . . . . . . . . . . . . . . . . . . . . . . . . . . . . . . . . . . . . . . . . . . . . . . . . . . . . . .54 7.2.3 Clean the burner . . . . . . . . . . . . . . . . . . . . . . . . . . . . . . . . . . . . . . . . . . . . . . . . . . . . . . . . . . . . . . . . . . . . . . . . . . . . . . . . .55 7.2.4 Clean the siphon . . . . . . . . . . . . . . . . . . . . . . . . . . . . . . . . . . . . . . . . . . . . . . . . . . . . . . . . . . . . . . . . . . . . . . . . . . . . . . . . .55 7.3 Troubleshooting . . . . . . . . . . . . . . . . . . . . . . . . . . . . . . . . . . . . . . . . . . . . . . . . . . . . . . . . . . . . . . . . . . . . . . . . . . . . . . . . . . . . . . . .55 8 4 Spare parts - C 230 ECO . . . . . . . . . . . . . . . . . . . . . . . . . . . . . . . . . . . . . . . . . . . . . . . . . . . . . . . . . . . . . . . . . .56 C 230 ECO 19/10/09 - 300015171-001-E 1 Introduction 1.1 Symbols and abbreviations Caution danger Risk of injury and damage to equipment. Attention must be paid to the warnings on safety of persons and equipment. Specific information Information must be kept in mind to maintain comfort. DHW: Domestic hot water PCU: Primary Control Unit (Operating management electronics) SU: Safety Unit (Safety electronics) PSU: Parameter Storage Unit (Boiler parameter storage) Reference ZRefer to another manual or other pages in this instruction CCE: Leak proofing system manual. 1.2 General Thank you for choosing this quality product. We are convinced that it will meet all of your expectations. 1.2.1 In the interest of customers, De Dietrich Thermique SAS are continuously endeavouring to make improvements in product quality. All the specifications stated in this document are therefore subject to change without notice. User's liability To ensure the optimum operation of your appliance, we strongly recommend that you abide by the following instructions: ` Read and follow the instructions given in the manuals provided with the appliance. ` Call on qualified professionals to : 1.2.2 ` - Carry out installation in compliance with the prevailing legislation and standards, - Perform the initial start up - carry out work on the appliance and the installation ` Keep these instructions in a safe place close to the appliance. ` Get your fitter to explain your installation to you. Manufacturer's liability The liability of De Dietrich Thermique SAS as the manufacturer may not be invoked in the following cases: - Incorrect use of the appliance, - Faulty or insufficient maintenance of the appliance, - Incorrect installation of the appliance. 19/10/09 - 300015171-001-E C 230 ECO 5 1.3 Homologations 1.3.1 Certifications In general CE identification no: CE-0085BS0132 In particular for France Performance class recommendations. III boiler according to ATG B 84 In particular for Switzerland The boilers comply with the following standards: - Federal legislation on Air Protection (OPAIR) - Directives of the Société Suisse de l'Industrie des Gaz et des Eaux SSIGE - Directives of local and cantonal bodies - CFST directives, liquefied gases, part 2 - Directives of the Association des Etablissements Cantonaux d'Assurance Incendie AEAI Boilers are tested under the LRV-92 standard. In particular for Germany C 230 ECO boilers comply with Regulation 1. BlmSchV. 6 C 230 ECO 19/10/09 - 300015171-001-E In particular for Belgium The boilers comply with the specifications of the HR+ quality label. The boilers comply with the requirements and standards defined in the Royal Order of 8 January 2004. 19/10/09 - 300015171-001-E C 230 ECO 7 1.3.2 Gas category In general User country FR DE PL BE NL HU Gas category Gas type Connection pressure (mbar) G20 20 G25 25 G31 37 G20 20 G25 20 G31 50 G20 20 G27 20 G31 37 I2E(R)B G20 20 I3P G31 37 II2ESi3P II2ELL3P II2ELw3P G25 25 G31 30/50 I2H G20 25 G20 25 II2HS3P G25.1 25 G31 50 G20 20 G31 50 G20 20 G20 20 G31 50 G20 20 G31 30 G20 20 G31 37 G20 20 G31 37 G31 50 G31 37 II2L3P LU II2E3P UA, LV I2H AT, BG DK, EE, FI, IS, NO, RO, SE IE, LT, SI, ES, GB, IT, CH, TR, GR, PT CZ, CY, BY, HR, RU, SK MT II2H3P II2H3P II2H3P II2H3P I3P C 230 ECO boilers are delivered preset for operation on natural gases of H/E groups. For operation on another type of gas, see chapter "Changing Zgas". 8 C 230 ECO 19/10/09 - 300015171-001-E 2 Safety instructions and recommendations 2.1 Safety instructions 2.1.1 Fire hazard Do not stock products of an inflammable nature close to the appliance. 2.Open the windows 3.Extinguish all flames 4.Evacuate the premises 5.Contact a qualified professional 6.Inform the gas supplier If you smell gas, do not use a naked flame, do not smoke, do not operate electrical contacts or switches (doorbell, lights, motor, lift, etc.). 1.Cut the gas supply 2.1.2 Risk of intoxication Do not obstruct the air inlets in the room (even partially). If you smell flue gases 1. 2. 3. 4. 2.1.3 Switch the appliance off Open the windows Evacuate the premises Contact a qualified professional Risk of being burnt Avoid direct contact with the flame viewport. Depending on the settings of the appliance: - The temperature of the flue gas conduits may exceed 60°C - The temperature of the radiators may reach 95°C - The temperature of the domestic hot water may reach 65°C 2.1.4 Risk of damage Do not stock chloride or fluoride compounds close to the appliance. Install the appliance in frost-free premises. Do not neglect to service the appliance: Contact a qualified professional or take out a maintenance contract for the annual servicing of the appliance. 2.2 Recommendations Only qualified professionals are authorised to work on the appliance and the instalation. Before any work, switch off the mains supply to the appliance. Check regularly that the installation contains water and is pressurised. Keep the appliance accessible at all times. Avoid draining the installation. The appliance should be on Summer or Antrifreeze mode rather than switched off to guarantee the following functions: - Antifreeze protection - Protection against corrosion on domestic hot water tanks fitted with a titanium anode 19/10/09 - 300015171-001-E C 230 ECO 9 3 Technical description 3.1 General description The C 230 ECO boiler is a gas fired condensing boiler. The cast aluminium-silicium heat exchanger is designed for the recuperation of the sensible and latent heat in combusted gases. This watertight combustion circuit boiler can be used in a forced flue version. Installation with air intake from the premises is also possible. The burner and the combustive air inlet fan are very quiet. Gas and combustive air is supplied via the upper part of the boiler. Underneath the boiler is a condensates collector in composite material and a siphon to evacuate condensates, located on the side. The flow temperature can be set between 20°C and 90°C (Factory setting: 80 °C). The C 230 ECO boiler is fitted with a low water safety system based on divergence and rise in temperature readings. Output may modulate between 18%(1) and 100% depending on the heating requirement. The boilers can be fitted with a DIEMATICm3(2) electronic control panel which is factory set to include priority domestic hot water production and a control system which operates according to the outside temperature. The DIEMATIC-m3 control panel with built-in regulator controls automatic operation of heating as a function of: - The outside temperature. - The ambient temperature when the remote control (as an option) is connected. The K3 control panel is fitted only in association with a boiler fitted with a DIEMATIC-m3 control panel as part of a cascade installation. DHW regulation and programming is handled by the DIEMATIC-m3 control panel on the master boiler. The regulator also provides antifreeze protection for the installation and the environment, if the home is empty, for a period that may be programmed one year in advance and lasting for up to 99 days. (1) Depending on the boiler model (2) or K3 control panel for the secondary boiler(s) 10 C 230 ECO 19/10/09 - 300015171-001-E 3.2 Technical characteristics C 230-... ECO Unit 85 130 170 210 3 4 5 6 General Number of sections Burner operation Modulating Useful output (80/60°C) PN (G20) Useful output (50/30°C) PN (G20) Burner output (PCI) (G20) (Power input) minimum kW 16 22 29 39 (1) maximum kW 87 113 /120 166 200 minimum kW 18 24 33 44 maximum kW 93 121(1)/129 179 217 minimum kW 17 23 31 41 maximum kW 89 115(1)/123 170 205 Combustion gas and by-products Gas supply pressure G20 mbar 17 - 30 minimum m3/h 1.8 2.4 3.3 4.3 maximum m3/h 9.4 12.2(1)/13 18 21.7 minimum m3/h 2.1 2.8 3.8 5.0 maximum m3/h 11 14.4 20.9 25.2 minimum m3/h 2.2 3.0 4.0 - maximum m3/h 11.5 15.9 22.0 - minimum Kg/h 1.94 1.94 3.42 3.19 maximum Kg/h 6.91 9.56 13.21 15.93 CO2 (G20-G25) Qmin.-Qmax (Open air box) % 9.3-8.8 9.3-8.8 9.3-8.8 9.3-8.8 CO2 (G20-G25) Qmin.-Qmax (Closed air box) % 9.5-9.0 9.5-9.0 9.5-9.0 9.5-9.0 CO2 (G27) Qmin.-Qmax (Open air box) % 9.3-8.8 9.3-8.8 9.3-8.8 - CO2 (G27) Qmin.-Qmax (Closed air box) % 9.5-9.0 9.5-9.0 9.5-9.0 - CO2 (G31) Qmin.-Qmax (Open air box) % 10.5-9.8 10.5-9.8 10.5-9.8 10.5-9.8 CO2 (G31) Qmin.-Qmax (Closed air box) % 10.7-10.0 10.7-10.0 10.7-10.0 10.7-10.0 Average nitrogen oxide emission (NOx) mg/kWh 62 54 49 58 Average CO emission mg/kWh 19 15 16 19 Pa 130 130 130 130 Kg/h 27.2 36.7 49.5 65.5 286.0 344.9 Gas flow rate G20 (15 °C - 1013 mbar) Gas flow rate G25 (15 °C - 1013 mbar) Gas flow rate G27 (15 °C - 1013 mbar) Gas flow rate G31 Maximum pressure at the flue gas nozzle minimum Combusted gas flow (2) maximum Kg/h Classification of type according to the discharge of combusted gases and air supply 149.7 (1) 193.5 / 206.9 B23, B23P, C13, C33, C43, C53, C63, C83 Heating Safety temperature °C 110 Water setting range °C 20 - 90 minimum bar 0,8 maximum bar Water pressure Water content 6 l 12 16 20 24 Water resistance at ∆T = 10K mbar 660 540 680 720 Water resistance at ∆T = 20K mbar 165 135 170 180 Electricity characteristics Power supply voltage 19/10/09 - 300015171-001-E V/Hz C 230 ECO 230 / 50 11 C 230-... ECO Power consumption minimum maximum Insulation class Unit 85 130 170 210 W 34 36 56 59 W 125 193 206 317 170 200 IP 21 Miscellaneous Weight without water Acoustic level at 1 meter kg dBA 130 150 ≤ 57 ≤ 63 (1) For Italy - Limiting input to 115 kW : See chapter: 5.4.5 (2) G20 - Gas H 12 C 230 ECO 19/10/09 - 300015171-001-E 3.3 Main parts 30 27 29 28 26 1 25 2 24 3 23 4 16 5 22 6 21 7 20 8 19 9 18 10 17 11 15 12 14 13 D0006 1 Flue gas discharge duct 2 Measurement point O2/CO2 (Emplacement for fue gas sensor, Option) 3 Air enclosure 4 Control panel 5 Burner 6 Heat exchanger 7 Inspection hatch 8 Inspection cap / Cleaning 9 Ignition electrode / Ionization probe 58 23 Connector for the programming tool 24 Gas connection 25 Return connection 26 Flow connection 27 Reset button 28 Display DIEMATIC-m3 29 Air inlet (Protective cage) 30 General ON 8 / OFF 7 switch 10 Heating body sensor 11 Return sensor 12 Condensates collector 13 Siphon 14 Silencer 15 Filling and emptying tap 16 Circuit breaker 17 Multivalve gas unit 18 Venturi 19 Fan 20 Mixer pipe 21 Flue gas pressure switch 22 Output sensor 19/10/09 - 300015171-001-E C 230 ECO 13 3.4 Operating principle A venturi is placed to the side of the fan inlet. The air and gas are mixed in here at a constant ratio. The fan carries out a pre-sweep if there is a heat request. The fan sucks in the combustive air which will be optimally mixed with the gas in the venturi. The homogenous air/gas mixture is fed into the burner by the fan. The mixture is ignited by the ignition/ionization combination electrode which also monitors the flame. Boiler output is set according to the settings and temperatures of the water measured by the temperature sensors. When the combusted gas temperatures are lower than the dew point (approx. 55°C, the temperature as of which the steam in the combusted gases starts to condense), the steam in the combusted gases will condense in the lower part of the heat exchanger. The heat released during this condensation process (so-called latent or condensation heat) is also transferred to the central heating water. The condensed water is discharged via the siphon in the lower section of the heat exchanger. The combusted gases go into the condensates collector and are evacuated via the combusted gas evacuation duct. To provide continuous heat, the boiler requires a minimum of 30% of the water flow rate at a ∆T of 20 K at nominal output, high stage. The boiler can be ocnstructed with a second return (accessory). This second return can provide additional efficiency when various temperatures are present in the installation. The DIEMATIC-m3 control panel controls the room temperature in accordance to the outside temperature by action on the burner. Heating regulation is controlled by the influence of the regulator on the burner, the pumps and, if installed, the mixing valve(s). Connecting a remote control with room sensor or an interactive remote control CDI 2 also enables self adaptivity of the gradient and the parallel offset of the heating curve. The "installation anti-freeze" function is active regardless of the operating mode. It is triggered as soon as the outdoor temperature reaches the limiting value preset to +3°C (see paragraph: Further information on various parameters). The domestic hot water is regulated by the regulator acting on the load pump through the DHW sensor. The DHW loop can be handled by the S.AUX1:, S.AUX2: or S.AUX3: outlet (Heating according to the time programme). The DIEMATIC-m3 control panel includes the "anti-legionella" protection option See: Control panel instructions (Installer parameters: LEG ZPROTEC). In a cascade installation, the K3 control panel is intended to be fitted to the secondary boilers. 14 C 230 ECO 19/10/09 - 300015171-001-E 3.4.1 Operating cycle Normal operating cycle Heating request Fan Safety valve T3n Ignition transformer V1 and V2 Flame present Tw Tl Tpl Tvz D000784 Operating cycle on safety (start up without flame signal) Heating request Fan Safety valve Ignition transformer V1 and V2 Flame present BURNER FAILURE (14) Tw Tl Tvz Ts Tl Tvz Ts Tl Ts Tvz Tl Tvz Ts Tl Ts Tpl Tvz D000783 The safety control box makes 5 attempts to restart. If restart fails, the safety control box switches to BURNER FAILURE (14). Tl Preventilation time (20 seconds) Ts Safety time (3.5 seconds) Remarks: Minimal ionization current: 1µA Tpl Post-ventilation time (20 seconds) Tvz Pre-ignition time Tw Waiting time (After a thermostatic request - about 20 seconds) T3n Ignition time 19/10/09 - 300015171-001-E C 230 ECO 15 Loss of flame when running Tl Preventilation time (20 seconds) Ts Safety time (3.5 seconds) Tpl Post-ventilation time (20 seconds) Tvz Pre-ignition time Tvz Tvz Tvz Tvz Tvz BL.FLAME LOS 22 then I-CURRENT FAIL 36 Flame present V1 and V2 Ignition transformer Safety valve Fan Heating request Tl Ts T3n Tl Ts T3n Tl Ts T3n Tl Ts T3n Tl Ts T3n D000785 Tpl After the loss of signal, the safety control box switches to BL.FLAME LOS (22) for 10 seconds. If the safety control box detects 5 flame losses, it goes into safety shutdown with the message I-CURRENT FAIL (36). If the safety control box does not detect the flame loss 24 hours after the last loss, the meter is reset to zero. Tw Waiting time (After a thermostatic request - about 20 seconds) T3n Ignition time 16 C 230 ECO 19/10/09 - 300015171-001-E 3.4.2 Cyclical sealing control of the gas valve unit (170, 210 kW) The sealing control system for the gas valve unit controls and checks the safety valves in the combined gas valve unit. The VPS system checks the tightness of the 2 valves during the pre-sweep, which extends the pre-sweep time somewhat. If a leak is detected, the boiler goes into safety shutdown (locking). The fault is signalled on the DIEMATIC-m3. 3.4.3 Minimum gas pressure switch It is possible to connect a minimum gas pressure switch to the PSG connector. If there is a lack of gas pressure, the boiler is switched off with a message on the DIEMATIC-m3 if the set value is not reached. 3.4.4 The connection of the sealing control system is made by a plug that can be found in the control panel. The presence of the sealing control system must be activated by the parameter "Kit CCE". The boiler restarts when the pressure is back to normal and after the waiting time of 10 minutes. Max. safety temperature The boiler goes into safety shutdown if the temperature is too high (110°C or less). After the breakdown has been repaired, the boiler can be unlocked by pressing the key. 3.4.5 Flow controller The maximum difference in temperature between the outlet water and the return water, and the speed at which the outlet temperature increases, are restricted by the boiler's regulation. The C 230 ECO boiler is fitted with an electronic temperature regulator with flow and return temperature sensors. This principle guarantees risk-free operation for the boiler even during transitory irrigation operations induced by changes of status on the installation's hydraulic units (closure 3-way valve, circuit shutdown, etc.). These settings lead to the burner being put on standby in order to protect the boiler from any damage. We strongly recommend guaranteeing at all times a minimum flow corresponding to 30% of the nominal flow Qn (flow corresponding to a ∆T of 20K at Pn at 80/60°C). This enables optimum operation of the boiler's output range modulation device in order to get the best out of condensation (See table below). Maximum water flow: Flow speeds in the heating body which are too high reduce the transfer of heat. Therefore, it is necessary to restrict the water flow to the value obtained using the following formula: Qmaximum = Nominal useful output to 80/60 °C / 9,3 (See table below) Flow rate Boiler type (m3/h) Q minimum 1.0 Qn 3.4 Q maximum 8.6 Q minimum 1.6 C230-85 C230-130 Qn 5.2 Q maximum 12.9 Q minimum 2.1 Qn 6.9 Q maximum 17.2 Q minimum 2.6 C230-170 C230-210 Qn 8.6 Q maximum 21.5 19/10/09 - 300015171-001-E C 230 ECO 17 4 Installation 4.1 Regulations governing installation 4.1.1 In general Installation and maintenance of the boiler must be carried out by a qualified professional in compliance with prevailing local and national regulations. 4.1.2 In particular for France DTU 24.1 and DTU 65.4 define the technical terms and conditions with which the boiler room installation work must comply. Residential buildings Statutory terms and conditions of installation and maintenance: The installation and maintenance of the appliance must be carried out by a qualified professional in compliance with the statutory texts of the codes of conduct in force, particularly: - Order of 2 August 1977 Technical and safety rules applicable to combustible gas and liquefied hydrocarbon installations situated inside residential buildings and their annexes. - NF P 45-204 standards Gas installation, (formerly DTU 61-1, gas installations: April 1982, addendum no 1: July 1984). - Local Sanitary Regulations Establishments open to the public Statutory terms and conditions of installation: The installation and maintenance of the appliance must be carried out in compliance with the statutory texts and rules of the codes of conduct in force, particularly: - Safety regulations against fire and panic in establishments open to the public: a. General regulations For all appliances: - Articles GZ - Installations operating on combustible gases and liquefied hydrocarbons. Then, depending on use: - Articles CH-Heating, ventilation, refrigeration, air conditioning and production of steam and domestic hot water. b. Instructions specific to each type of establishment open to the public (hospitals, stores, etc.). For appliances connected to the electricity network: - NF C 15-100 standards Low voltage electrical installation - Rules.. Certificate of compliance For the application of article 25 of the modified decree dated 02/08/ 1977 and of article 1 of the modifed decree dated 05/02/1999, the installation engineer must be in possession of the certificates of compliance approved by the Ministries in charge of construction and gas safety: - Different forms (forms 1, 2 or 3) for a new gas installation - "Model 4" in particular after replacing a furnace with a new one 18 C 230 ECO 19/10/09 - 300015171-001-E 4.1.3 In particular for Germany The gas condensing boiler (group II hot water tank) is constructed in compliance with TRD 702 and is used in heating installations in accordance with DIN EN 12828. The terms and conditions of use given in these directives must be respected. It is compliant with DIN 4702, part 6 in respect of the nominal calorific output and the technical heating specifications. In addition to the instructions on construction and combustion equipment, also abide by the following standards, rules and directives when installing and commissiong gas condensing boilers: - DIN EN 12828 (June 2003 edition): heating systems in buildings. Planning of hot water heating installations (up to a maximum operating temperature of 105°C and a maximum output of 1 MW) - DIN 4753: drinking and industrial water heating installations - DIN 1988: technical rules on drinking water installations (TRW) - DVGW-TRGI: technical rules on gas installations, including complementary equipment - Working paper DVGW G 260/I: technical rules on the nature of the gas - DIN 4705: calculation of chimney dimensions 4.2 Package list Boilers - C 230-85 ECO: Package GV1 C 230-130 ECO : Package GV2 C 230-170 ECO : Package GV3 C 230-210 ECO : Package GV4 Control panel - Panel DIEMATIC-m3: Package GV6 - Panel K3: Package GV5 Options available - Flue gas thermostat - Package GV21 - Interactive remote control CDI 2 with room temperature sensor (package FM51), remote control with room temperature sensor (package FM52) An interactive remote control CDI 2 (package CDI 2 (FM51)) and/or a simplified remote control (package FM52) may be connected for each circuit controlled by the boiler. - Armoured connecting cable (length 40 metres) for connecting DIEMATIC VM or boiler cascade configuration (package DB119) - TELCOM telephone remote relay - For the connection of one or two circuits with mixer valve: 1 or 2 PCB + sensor option(s) for 1 valve (package FM48) - Air filter - Package GR8 - Horizontal forced flue - Vertical forced flue - Leak tightness control on gas block (5 and 6 section only) Package GV26 - Minimum gas pressure switch (3 to 4 sections) - Package GV22 - Minimum gas pressure switch (5 to 6 sections) - Package GV25 - Condensate neutralisation system with lift pump (Pn<120 kW Package DU13, 120<Pn<350 kW - Package DU14, Pn >350 kW Package DU15) - Condensate neutralisation system without lift pump (Package BP52) - Expansion valve GDJ 50 300 - 20 mbar (8802-7177) or GDJ 25 300 - 20 mbar (100011223) - Flue gas valve - Package GV24 - Propane conversion kit (3 to 4 sections) - Package GV23 - Propane conversion kit (5 to 6 sections) - Package GV27 - Second return kit (Package GR5) 19/10/09 - 300015171-001-E C 230 ECO 19 4.3 Mounting 4.3.1 Position of the boiler Location of the installation C 230 ECO boilers must be installed in a frost-free room. In order to avoid damage to the boiler, it is necessary to prevent the contamination of combustion air by chlorine and/or fluoride compounds, which are particularly corrosive. These compounds are present, for example, in aerosol sprays, paints, solvents, cleaning products, washing products, detergents, glues, snow clearing salts, etc. Therefore: - Do not suck in air evacuated from premises using such products: hairdressing salons, dry cleaners, industrial premises (solvents), premises containing refrigeration systems (risk of refrigerant leakage), etc. - Do not stock such products close to the boilers. If the boiler and/or peripheral equipment are corroded by such chloride or fluoride compounds, the contractual guarantee cannot be applied. The warranty does not apply to damage to the boiler caused by these instances. If the heating device is installed in residential premises where people are present all the time, it is necessary to use a concentric ambient air inlet / combustion gas evacuation installation. When installing the boiler, it is necessary to comply with degree of protection IP21. Position of the boiler The boiler is delivered fully assembled as standard, covered with plastic wrap, in a pallet crate (70x130 cm), enabling easy handling with a pallet stacker. This crate is designed to facilitate handling of the unit and to help in the positioning of the boiler. The standard packaging enables access to doors of 745 mm. The C 230 ECO can be positioned as follows: - Place the pallet close to the final installation position. - Remove the packaging. - Place the boiler in its final position. 20 C 230 ECO 19/10/09 - 300015171-001-E Example of an installation The minimum recommended dimensions are as follows: - Front: 600 mm Top: 400 mm Left: 50 mm Right: 250 mm D000650 Installing 1 boiler(s) Installing 2 boiler(s) Installing 2 boiler(s) Installing 2 boiler(s) back to back 19/10/09 - 300015171-001-E C 230 ECO 21 4.3.2 Main dimensions 1190 160 450 140 140 121 305 6 1 7 2 0 2 4 6 8 10 12 14 16 18 20 22 125 61 3 24 0 30 1070 1200 A l 61 4 316 152 5 D000643 22 Heating outlet Heating return Boiler type Gas inlet R 1 1/4 A Filling and emptying tap / Connection for second return C230-85 1290 R 1 1/4 R 1 1/4 C230-130 1290 R 1 1/4 R 1 1/4 Flow of condensates siphon delivered ext Ø 32 mm C230-170 1290 R 1 1/4 R 1 1/4 1305 R 1 1/2 (1) R 1 1/2 (1) C230-210 Flue gas nozzle Ø 150 Combustion air inlet (1) Diameter obtained using 2 1"1/2 - 1"1/4 reductions supplied with the boiler (in the polystyrene packaging block). C 230 ECO 19/10/09 - 300015171-001-E 4.3.3 Control panel assembly Two types of control panel are available: - Panel DIEMATIC-m3 Package GV6: Control panel intended for use with single boilers or master boilers as part of a cascade installation. - Panel K3 Package GV5: Control panel intended for secondary boilers in a cascade installation. Panel K3 may not be used on one boiler only. Installation of the panel on the boiler 7 1 5 2 3 10 5 6 4 D0 00 72 8 3 0 D0 07 26 24V 8 24V 230V 230V U PS D000727 19/10/09 - 300015171-001-E C 230 ECO 23 9 10 1 10 2 D000729 P S U 12 11 U PS D000732 24 C 230 ECO 19/10/09 - 300015171-001-E U S P 16 13 P 14 U S U S P 17 D000731 15 18 24V 230V D000730 Take the PSU delivered with the boiler and connect it to the position provided in the control panel. If the PSU is not connected, the boiler does not start. External connection - Refer to the connection instructions supplied with the control panel.. 19/10/09 - 300015171-001-E C 230 ECO 25 4.4 Hydraulic connections 4.4.1 Regulations Installation must be carried out in accordance with the prevailing regulations, the codes of practice and the recommendations in these instructions. Installing the boiler in new installations (installations less than 6 months old) - Clean the installation with a universal cleaner to eliminate debris from the appliance (copper, tow, brazing flux). 4.4.2 - Thoroughly rinse the installation until the water runs clear and shows no impurities. Installing the boiler in existing installations - Remove sludge from the installation. - Rinse the installation. - Clean the installation with a universal cleaner to eliminate debris from the appliance (copper, tow, brazing flux). - Thoroughly rinse the installation until the water runs clear and shows no impurities. Hydraulic connection of the heating circuit 1 D000669 2 Flow connection Return connection 26 C 230 ECO 19/10/09 - 300015171-001-E Cascade installation (Gate valve + Boiler pump) 14 1 1 13 13 D000648 Master boiler + Control panel DIEMATIC-m3 Secondary boiler + Control panel K3 Secondary boiler + Control panel K3 1 Control panel DIEMATIC-m3 8 Low loss header 2 Injection pump 9 Drain cock 3 Safety valve 10 Expansion vessel Installation 4 Non-return valve 11 Automatic air vent 5 Expansion vessel 12 Outside sensor 6 Gate valve 13 Control panel K3 7 Outlet sensor (Cascade) 14 Network pump VM (Optional) ` Injection pump connected to the boiler pump outlet. ` Gate valve connected to the gate valve outlet. ` Common outlet sensor to be connected to the E.AUX1 input on boiler . Set: #CONFIGURATION: E.AUX1: CASC: ` ` VM 14 network pump (if necessary) connected to outlet : AUX 3. Set: #CONFIGURATION: S.AUX3: VM PUMP Complete cascade system up to 10 boilers The 14 network pump switches on when at least one DIEMATIC-VM is required for heating. The cascade outlet sensor can also be connected to inputs E.AUX2 or E.UNIV. To do so: Set: `#CONFIGURATION: E.AUX2: CASC: or `#CONFIGURATION: E.UNIV: CASC: Pump VM 14 can also be connected to outlets : AUX 2. : AUX 1 or Set: `#CONFIGURATION: S.AUX1: VM PUMP or `#CONFIGURATION: S.AUX2: VM PUMP 19/10/09 - 300015171-001-E C 230 ECO 27 Cascade installation (Gate valve + Primary pump) 14 1 1 13 13 C001721 Master boiler + Control panel DIEMATIC-m3 Secondary boiler + Control panel K3 Secondary boiler + Control panel K3 1 Control panel DIEMATIC-m3 8 Low loss header 2 Primary pump 9 Drain cock 3 Safety valve 10 Expansion vessel Installation 4 Non-return valve 11 Automatic air vent 5 Expansion vessel 12 Outside sensor 6 Gate valve 13 Control panel K3 7 Cascade outlet sensor 14 Network pump VM (Optional) ` Primary pump connected to outlet : AUX 3 (1) ` Gate valve connected to the gate valve outlet (1) Outlet S.AUX3: is set in the factory to PRIM.P The primary pump can also be connected to outlets : AUX 1, : AUX 2. Set: `#CONFIGURATION: S.AUX1: PRIM.P or `#CONFIGURATION: S.AUX2: PRIM.P Pump VM 14 can be connected to one of the AUX outlets not used by the primary pump. Set: `#CONFIGURATION: S.AUX1:, S.AUX2:, S.AUX3: on VM PUMP 28 C 230 ECO 19/10/09 - 300015171-001-E 4.4.3 Connecting the condensate discharge pipe Discharge condensation water directly into the main drain. Given the degree of acidity (pH 3-5), use only plastic materials to make the connection. Fill the siphon with water. Make the connection to the main drain with a visible flow connection. Emplacement of the siphon Siphon assembly D000806 The discharge duct must have a minimum gradient of 30 mm/m. The discharge of condensation water via the gutter is not authorised, given the risk of frost and the damage to the materials usually used for gutters. D000805 Filling the siphon D0 19/10/09 - 300015171-001-E 00 80 4 C 230 ECO 29 4.4.4 Water treatment Specifications required for the heating water. Degree of acidity (water non-treated) 6.5 - 8.5 pH Degree of acidity (water treated) 7 - 9 pH Conductivity Oxygen ≤ 500 µS/cm to 25°C ≤ 20 mg/l ≤ 0.1 mg/l Other components < 1 ppm Chlorides Water hardness Installation: Flow temperature output 60°C Concentration (on first load) Concentration (top up) Useful output Pn (kW) mmol/l °dH °f mmol/l ≤ 70 0.5-3.5 2.8-20 5-35 0.5-3.5 70-200 0.5-2.0 2.8-11.2 5-20 200-550 0.5-1.5 2.8-8.4 5-15 > 550 0.4-0.5 2.2-2.8 4-5 ≤ 1.5 ≤ 0.5 ≤ 0.5 Remark: Installation maximum 200 kW, Useful output, Flow temperature output 90°C : Maximum hardness 1.50 mmol/l Installation > 200 kW, Useful output, Flow temperature output 90°C : Maximum hardness 0.50 mmol/l If, however, the installation requires water treatment: consult us, particularly for: - The treatment of the water is in compliance with the use of the materials used in the construction of the boiler with an aluminium heating body. - The precautions to be taken to prevent the formation and localisation of oxygen in the water in the installation. - Antifreeze products: ensure that these are compatible with aluminium and, if need be, with other components in the installation. If necessary, our Technical Department is at your disposal. Renovation of old boiler rooms If connecting the installation to an old network, we strongly recommend that you "clear sludge out" of the system before installing the new boiler. After carrying out this work, particular monitoring of the installation may be necessary both in respect of the water in the network and the quality of the water used for topping it up in order to be in full control of the consequences. Suitable filters may be necessary in some cases. 30 C 230 ECO 19/10/09 - 300015171-001-E 4.4.5 Circulating pump The C 230 ECO is not fitted with one of these, but the DIEMATIC-m3 makes it possible to control a external pump. 4.4.6 The water resistance at ∆T to 20 K is as follows: C 230-85 165 mbar C 230-130 135 mbar C 230-170 170 mbar C 230-210 180 mbar Low loss header Please refer to the prevailing regulations in your country. Boiler side Installation side Low loss header Useful output output Flow rate Square D d interior H A B kW m3/h inch DN mm inch mm mm mm 80 3.4 3 80 70 1 1/4 280 370 510 120 160 5.2 4 100 90 2 350 465 630 6.9 4 100 100 2 350 465 630 200 8.6 5 125 110 2 1/2 440 580 770 240 10.3 5 125 120 2 1/2 440 580 770 280 12.0 6 150 130 2 1/2 440 580 770 320 13.8 6 150 140 2 1/2 440 580 770 360 15.5 6 150 150 2 1/2 440 580 770 400 17.2 8 200 160 2 1/2 440 580 770 440 18.9 8 200 170 3 540 720 900 480 20.6 8 200 170 3 540 720 900 520 22.4 8 200 180 3 540 720 900 560 24.1 8 200 190 3 540 720 900 600 25.8 8 200 190 3 540 720 900 640 27.5 10 250 200 3 540 720 900 19/10/09 - 300015171-001-E ØD C 230 ECO 31 4.5 Gas connection The boiler is designed for the combustion of all qualities of 2nd family natural gas and propane after conversion using the propane conversion kit (Option). The boiler must be connected to the gas pipe compliance with the prevailing regulations. A main gas valve must be provided close to the boiler. Install a gas filter on the gas supply pipe to prevent fouling of the combined gas valve unit. - The gas connection is located at top right on the back of the boiler. Connection diameter (1"1/4) male. Install a gas filter on the gas supply pipe to prevent fouling of the combined gas valve unit. The boiler can handle gas pressures of between 17 and 25 mbar. For higher pressures and connection to a 300 mbar network, fit a regulator (optional). D000647 Respect the prevailing standards and regulations particularly the order of 2 August 1977 (Only in France). Gas supply: 1. Gas cut-off tap 2. Filter 3. Expansion valve 4. 0 manometer to 100 mbar 5. Bottle 1/1000(1) (1) It is useful to provide a gas reserve in the form of a bottle with a capacity at least equal to 1/1000 of the installation's hourly gas flow before and in immediate proximity to the gas train The dimension X between the bottle 1/1000 and the boiler will be as small as possible. 32 The connection pipes between the regulator unit and the boiler must be calculated according to the output of the boiler and the length of the piping! C 230 ECO 19/10/09 - 300015171-001-E 4.6 Flue gas system connections 4.6.1 Connection options Prior to installation, it must be decided whether the boiler is to be installed traditionally or with a forced flue. 4.6.2 Classification of type according to the discharge of combusted gases and air supply EC classification: Type B23 / B23p: Traditional unit without cut-off. Air from the room in which the boiler is installed, combusted gas discharge through the roof. Metal or plastic combusted gas evacuation with pictograms CE, complies with pressure class P1. Type C43: Forced flue unit with cascade coupling, connected to a common air inlet and combusted gas discharge duct (system 3 CE). Type C53: Forced flue unit, connected to different air inlet and combusted gas discharge ducts, coming out in areas of different pressure. Type C13: Forced flue unit, connected to the combined outlet on the front. Type C63: Force flue unit, sold without equipment for connection and/or outlet. Type C33: Forced flue unit, connected to the combined outlet to the roof. Type C83: Forced flue appliance, connected to a different air inlet and combusted gas discharge duct with a combusted gas discharge duct operating on a vacuum. 4.6.3 Connection conditions Connecting the combusted gas discharge and air inlet conduits: The welds and connections used on the combusted gas discharge duct must be watertight. The horizontal sections must be inclined towards the boiler (minimum 5 mm per metre). Combusted gas evacuation ducts of more than 2 m must be secured separately and not rest on the boiler. Materials used: Combusted gas evacuation systems must preferably be made of plastic. If using other systems, the following materials may be used: - With a single, rigid or flexible outer casing: aluminium, stainless steel or even plastic. - Hose: stainless steel or plastic. A broad range of flue gas system accessories is available as optional equipment. 19/10/09 - 300015171-001-E C 230 ECO 33 4.6.4 Connection to a type B23 / B23p chimney - Respect the prevailing standards and regulations particularly the order of 2 August 1977. - Particularly the order of 22 October 1969 (FRANCE) - DTU 24.1 - Flue gas system fittings(FRANCE) - On traditional installations, the fresh air required for combustion comes directly from the room in which the boiler has been installed. - A nozzle is provided for connection to the duct. - The flue gas duct must be airtight and watertight and must be constructed in such a way as to allow the discharge of condensates. - The horizontal sections will be constructed with a gradient of 5 mm per metre. - The chimney must be lined. - At the lowest points, provide a siphon for the discharge of condensates. - By way of an example, the table below gives the dimension L developed in the flue gas discharge duct according to the connection diameters and according to concept (see below table). "Max." total length developed in the flue gas discharge duct in metres (L) D (mm) Outlet without hood (open 'free') 1 C230-85 100 18 110 35 130 + C230-130 110 20 130 48 150 + C230-170 130 22 Installation of the combusted gas discharge duct 150 45 Duct without elbows 180 + C230-210 130 14 150 31 180 + + = Lengths up to 50 metres (more than this: consult us) - = not possible At each additional elbow of 90° or 45°, subtract the length given in the following table. Length D000652 D (mm) Elbow 90° Elbow 45° Ø 100 R = 1/2D 4,9 1,4 Ø 110 R = 1/2D 5,4 1,5 Ø 130 R=D 1,8 1,0 Ø 150 R=D 2,1 1,2 Ø 180 R=D 2,5 1,4 - With a terrace installation, it is essential to provide two low ventilation vents diagonally opposite each other in order to prevent vacuums in the boiler room caused by wind eddies. 34 C 230 ECO 19/10/09 - 300015171-001-E D000653 - If the boiler room is installed in the top section of the main building, a low chimney is sufficient. - Buildings up to 15m: H greater than or equal to 1 m above the roof of the boiler room - Buildings of 15 to 45 m: H greater than or equal to 1.5 m above the roof of the boiler room - Buildings of more than 45 m: H greater than or equal to 2 m above the roof of the boiler room 19/10/09 - 300015171-001-E C 230 ECO 35 4.6.5 Forced flue connection type C13 and C33 In an installation with a vertical or horizontal forced flue, it is essential always to ensure that emissions do not trouble the immediate vicinity of the combustion by-product outlet. No regular presence of physical persons, height of the emissions greater than 2 metres, no windows nearby, etc... - The flue gas duct must be airtight and watertight and must be constructed in such a way as to allow the discharge of condensates. - The horizontal sections will be constructed with a gradient of 5 mm per metre. - By way of an example, the table below gives the dimension L according to the connection diameters and according to concept (see below table). D000654 Installation of the combusted gas discharge and air supply ducts Vertical forced flue Horizontal forced flue Dimension L includes the air duct and the flue gas discharge duct in metres Models C230-85 C230-130 C230-170 C230-210 Situation Ø D (mm) Calculated with a forced flue Ø Dnominal (mm) 1 2 100 100 8 - 130 130 + - 130 150 + - 150 150 + + 100 100 3 - 130 130 22 - 130 150 25 - 150 150 + 34 130 150 11 - 150 150 22 13 180 150 + - 130 130 4 - 150 150 13 11 180 150 + 29 + = length up to 30 metres (consult us for longer lengths) - = not possible 36 At each additional elbow of 90° or 45°, subtract the length given in the following table. C 230 ECO 19/10/09 - 300015171-001-E Length D (mm) Elbow 90° Elbow 45° Ø 100 R = 1/2D 4,9 1,4 Ø 110 R = 1/2D 5,4 1,5 Ø 130 R=D 1,8 1,0 Ø 150 R=D 2,1 1,2 Ø 180 R=D 2,5 1,4 4.6.6 Forced flue equipment (optional) Two types of forced flue are available: vertical or horizontal. The equipment includes the terminal section of the duct comprising 2 concentric pipes: the internal pipe for combusted gas discharge, the external pipe for combustive air supply. The connections between the forced flue and the boiler are not supplied; they must be constructed by the fitter. 1 The material used must have specifications compatible with the acidity of the condensate. The combustive air supply pipe must be watertight. Our technical department is at your disposal to look at any specific forms of installation that you may wish to submit. 1 2 2 D000655 D000642 1. Adapter Ø150/160 mm (for PPS only) 2. Air connection part for forced flue + Adapter Ø150/160 mm (for PPS only) 19/10/09 - 300015171-001-E C 230 ECO 37 Dimensions of the vertical forced flue with flashing 220 227 Horizontal forced flue Not authorised in Germany 1 D000656 2 D000641 1. Adapter Ø150/160 mm (for PPS only) 2. Air connection part for forced flue + Adapter Ø150/160 mm (for PPS only) 38 C 230 ECO 19/10/09 - 300015171-001-E Dimensions of the horizontal forced flue 19/10/09 - 300015171-001-E C 230 ECO 39 metres Type of combination L max as a function of the Ø of conduit D for different "cascade" combinations 40 C 230 ECO 19/10/09 - 300015171-001-E 4.6.7 Connecting separate type C53 ducts Distinct air inlet and combusted gas discharge ducts, coming out in areas with different pressure can be considered with the exception of "coastal areas"1. (1) Specific case to be resolved: consult us D000657 The maximum height difference between the combustive air inlet and the combusted gas discharge is 36 m and the maximum authorised length of the combustive air inlet and the combusted gas discharge combined is given in "Connecting of forced flue" table. Dimension L includes the air duct and the flue gas discharge duct in metres 4.6.8 D (mm) metres C 230-85 150 36 C 230-130 150 36 C 230-170 150 23 C 230-210 150 11 Installation of 2 boilers in cascade Typical systems: Connection to a chimney Type B23 / B23p M M D000649 M : Flue gas valve (Option) 19/10/09 - 300015171-001-E C 230 ECO 41 4.7 Electrical connections 4.7.1 General As the electrical wiring has been carefuly checked in the factory, the internal connections on the control panel must not be changed in any way. Only qualified professionnals may carry out electrical connections, always with the power off. Electrical connections must match the electrical diagrams delivered with the equipment and comply with the instructions in the manual. Installation and electrical connections are to be made in accordance with existing regulations. The appliance must be powered by a circuit containing an omnipolar switch with an opening distance 3 mm. The earth connection shall comply with standard NFC 15100. The connection cables should be fed into the panels through the opening provided. These cables will be fixed on to the control panel with cable clips (supplied in a separate bag). Low voltage controls : The maximum current which may be switched per output is 2A with cos ϕ = 0.7 (= 450W establishing current below 16A). If the load exceeds either of these values, the control must be relayed using a contactor that must not be installed in the Diematic 3 control panel under any circumstances. The sensor cables have to be separated from the 230V circuit cables. Outside the boiler : Use 2 pipes or cable guides at least 10 cm apart All connections are made with the terminal boxes designed for that purpose on the back of the boiler's command board. 4.7.2 Electrical specifications Power supply voltage The C 230 ECO is designed to work on 230V-50Hz with a live/neutral/ earth system. Other voltages are only authorised if using a separation transformer. The earthwire must be longer than 8 mm that L and N wire. Safety box Mains voltage: 230 V / 50 Hz Safety time: 3.5 seconds Pre-sweep time: 20 seconds Post-sweep time: 20 seconds Anti-short cycle time: 1 to 10 minutes Power consumption Power consumption at stop/minimum output/full output: C 230-85: 7 W / 34 W / 125 W C 230-130: 7 W / 36 W / 193 W Circuit breaker values The boiler is fitted with a 4 A circuit breaker. Temperature control The C 230 ECO is fitted with outlet temperature, return temperature, heating body temperature and combusted gas temperature sensors. These sensors are used to vary boiler output according to the temperatures measured. The C 230 ECO is fitted with a water flow control device in which the operating principal consists in measuring the water temperature. If ∆T = 30K is reached (factory setting), the boiler reduces its output by modulating to enable the burner to remain in operation as long as possible.From ∆T =40K, the boiler switches itself off, no safety shutdown. A message is then displayed on the DIEMATIC-m3. Maximum temperature safety The boiler goes into safety shutdown if the temperature is too high (110°C or less). After the breakdown has been repaired, the boiler can be unlocked by pressing the key. C 230-170: 7 W / 56 W / 206 W C 230-210: 7 W / 59 W / 317 W 42 C 230 ECO 19/10/09 - 300015171-001-E Flue gas pressure switch The boiler is fitted with a flue gas pressure switch which checks that the combustion products are correctly evacuated. If the chimney is blocked, the pressure switch opens its contact and shuts down the boiler. To restart the boiler, it is necessary to reset the safety control box after correcting the problem (Refer to the connection instructions supplied with the control panel.). 4.8 Skeleton Diagrams Refer to the connection instructions supplied with the control Zpanel.. 19/10/09 - 300015171-001-E C 230 ECO 43 5 Start-up 5.1 Control panel Refer to the connection instructions supplied with the control Zpanel.. 5.2 Check points before commissioning Hydraulic circuit - Check that the installation and boiler are adequately filled with water and correctly irrigated and bled (Pmin: 0.8 mbar). - Check that the hydraulic connections are leak tight. Electrical connectors - Check that the connectors under the control panel are correctly fitted. - Check the presence of PSU in the control panel. - Check the earth. Gas circuit - Check that the appliance is properly set for the type of gas used. - Check the supply pressure. - Check the tightness of the gas circuit. 5.3 Commissioning procedure - Ensure that the boiler is switched off - Remove the front casing - Open the main gas valve - Open the boiler control panel (see chapter "Control panel assembly") - Check the electrical connection - Fill the installation with water and check hydraulic tightness (Pmin: 0.8 bar) - Bleed the heating installation - Fill the condensates siphon with water - Check the connection of the combusted gas evacuation and the air inlet - Empty the gas inlet - Open the gas valve on the gas pipe to the boiler - Check the gas connection - Turn the boiler on - Turn the main switch to 8 - The boiler type is displayed on the screen for 5 seconds - Provoke a heating request - The boiler starts to operate - Check the settings (See "Gas settings"). If necessary, correct the settings 44 C 230 ECO 19/10/09 - 300015171-001-E 5.4 Gas settings The boiler is preset in the factory to operate on natural gas (Gas H). For operation on natural gas L and propane, it is necessary to carry out a gas conversion and set CO2. For operation on propane, carry out the conversion using the optional conversion kit. ZSee paragraph "Changing gas" The nominal output and the CO2 value must be reset. 5.4.1 Carry out a check at low stage and at high stage on all boiler versions (a check at low stage only on C 230-85 ECO and C 230-130 ECO). For controlling and setting, use a CO2 analyser (based on O2). Close the opening around the sensor when taking the measurement. 5.4.2 Checks Fan speed Adjustment ` Press the K key until #CONFIGURATION is displayed. ` Press J successively until #BOILER is displayed, then I until MAX.VENT., MIN.VENT. and ST.VENT. are displayed. If the boilers are in cascade, press the * key for the boilers fitted with K3 control panels. The parameters can be modified with the + and - keys. 19/10/09 - 300015171-001-E C 230 ECO 45 5.4.3 Setting the gas/air ratio (High speed) C230-170 / C230-210 1 2 CO2 3 T000239-C 2. Press key M, the symbol Y is displayed. Y : Maximum output X: Minimum output 3. Use keys + and - to switch from Y to X. In the display area: 4. Measure the percentage of CO2 and compare it with the value in the table below. EMISSION MES. 88.8°:Boiler temperature 5. If the percentage of CO2 is different from these values, set the percentage of CO2 using the screw under the coupling on coil V2 on the gas valve unit (setting possible only for versions C 230170 ECO and C 230-210 ECO) (see drawing above). EMISSION MES. 88.8uA: Ionization current 1. Set the boiler to the high stage. EMISSION MES. 8888: Fan speed 6. Check the flame via the flame inspection window. It must not go out. The surface of the burner must not be red hot. O2/CO2 checking and setting value (Open air box) Fan rotation speed (rpm) Boiler type CO2 for Gas H Gas L and Gas Lw High speed CO2 for Propane Gas H Gas L Gas Lw Propane % % C 230-85 ECO 5100 5400 5100 (1) 8.8 ±0.3 (1) C 230-130 ECO 6400 6500 6400 (1) 8.8 ±0.3 (1) C 230-170 ECO 4800 4800 4800 (1) 8.8 ±0.3 (1) C 230-210 ECO 5700 5800 - (1) 8.8 ±0.3 (1) (1) For conversion to propane, refer to the instructions provided with the conversion kit. 46 C 230 ECO 19/10/09 - 300015171-001-E 5.4.4 Setting the gas/air ratio (Low speed) C230-85 / C230-130 C230-170 / C230-210 1 3 1 CO2 CO2 CO2 2 2 T001791-A D000664 4. Remove the measuring appliance and close the measurement points. 1. Check the boiler on low stage. 2. Press key M, the symbol Y is displayed. Press key -, the symbol X is displayed. 5. Carry out a gas tightness check. 3. Measure the percentage of CO2 and compare it with the value in the table below. If the percentage of CO2 differs from these values, set the percentage of CO2 using the setting screw on the pressure regulator on the gas valve unit (see drawing above). O2/CO2 checking and setting value (Open air box) Fan rotation speed (rpm) Low speed Boiler type - CO2 for Gas H Gas CO2 for Propane L and Gas Lw Gas H/L Gas Lw Propane % % C 230-85 ECO 1200 1200 (1) 9.3 ± 0.3 (1) C 230-130 ECO 1300 1300 (1) 9.3 ± 0.3 (1) C 230-170 ECO 1000 1000 (1) 9.3 ± 0.3 (1) C 230-210 ECO 1200 - (1) 9.3 ± 0.3 (1) Return the boiler to user level. Heat the installation to around 80°C and then stop the boiler. Bleed the heating installation. Check the water pressure. The boiler is now operational. Set the boiler control system. Indicate the type of gas used. Start the boiler. The boiler comes with a certain number of basic settings: Burner regulation - Modulating, depending on the outlet temperature Maximum outlet temperature: 80 °C. The various operating situations: - Regulating function : The boiler output varies depending on the flow temperature requested by the modulating regulator. - ON/OFF operation : The boiler output varies between the minimum and maximum values depending on the set flow temperature. (1) For conversion to propane, refer to the instructions provided with the conversion kit. 19/10/09 - 300015171-001-E C 230 ECO 47 5.4.5 Limiting input to 115 kW (Only 4 section boilers) 1. Press the K key until #CONFIGURATION is displayed. 2. Press J until #LIMITED TEMP. is displayed. 3. Press I until MAX.R.HEAT(%) is displayed. Set to: 93%. 4. Press I until MAX.DHW(%) is displayed. Set to: 93%. 5.5 Changing gas To switch from natural gas H to natural gas L/Lw or propane carry out the following operations. 5.5.1 Switching from gas H to gas L/Lw and vice versa If the % of CO2 differs from versions C 230-85 ECO and C 230130 ECO at high stage : - Check the boiler on low stage - Check the high stage - Check the position and measurement of the restriction LW (G27) 10 10 B 48 C 230 ECO 19/10/09 - 300015171-001-E 5.5.2 Switching from Natural Gas to Propane Refer to the instructions booklets provided in the conversion Zkits: - GV 23: 3 to 4 sections - GV 27: 5 to 6 sections 5.5.3 Setting the burner parameters ZSee chapter "Gas settings" 5.5.4 Adjustment of the CO2 values ZRefer to the settings tables provided with the conversion kits. 5.6 Changing the settings Refer to the connection instructions supplied with the control Zpanel.. 6 Stopping the boiler - Cut the power supply to the boiler. - Close the gas valve. Don't forget the risk of frost. 6.1 Precautions to take if there is a danger of frost Heating circuit: Use a correctly dosed antifreeze to prevent the heating water freezing. If this cannot be done, drain the system completely. In all cases, consult the fitter. Domestic hot water circuit: Drain the domestic water tank and pipes. 6.2 Precautions to take in the event of prolonged shutdown (one year or more) - Close the gas valve - The boiler and the chimney must be swept carefully. - Close the door of the boiler to prevent the internal circulation of air. 19/10/09 - 300015171-001-E C 230 ECO 49 7 Checking and maintenance 7.1 Checks The boiler is almost maintenance-free if it is set correctly. The boiler only requires an annual check and cleaning if necessary. The annual inspection of the C 230 ECO can be limited to the following operations: 7.1.1 - Checking the combustion in the boiler - Setting the ignition electrode - Checking tightness (hydraulics, combusted gas discharge and gas) - Checking the hydraulic pressure Checking the combustion in the boiler This check can be carried out by measuring the CO2 / O2 content in the combusted gas discharge duct at the measurement point and the gas pressure in the combined valve unit. To do this, heat the boiler to a water temperature of around 70°C. The temperature of the combusted gases can then be measured at the measurement point in the combusted gas discharge duct. This temperature may not exceed the flow temperature by more than 30°C. If the flow temperature is more than 30°C higher than the flow temperature setting, the heating body must be cleaned. 7.1.2 Setting the ignition electrode Check the setting of the ignition electrode. The gap in the ignition electrode must be 3-4 mm. Otherwise, replace the electrode (and the gasket). Check the good general appearance (particularly that there are no shards, cracks, fouling on the porcelain) and the state of wear of the electrodes. 3 ... 4 mm D000667 50 C 230 ECO 19/10/09 - 300015171-001-E 7.1.3 Checking tightness (hydraulics, combusted gas discharge and gas) Checking for leaks (water, combusted gas, gas). 7.1.4 Checking the hydraulic pressure The hydraulic pressure must be a minimum of 0.8 bars. The hydraulic pressure depends on the static height higher than the boiler (static pressure, 1 bar = 10 metres C.E.). We recommend filling the installation to around 0.8 bars higher than the static height. 7.2 Maintenance When the boiler is fouled, carry out the following maintenance operations. - Clean the fan Clean the heat exchanger using the tool provided Clean the burner Clean the siphon Before working on the appliance, ensure that the shut-off valve is closed and that the mains supply to the boiler is disconnected. 19/10/09 - 300015171-001-E C 230 ECO 51 7.2.1 Clean the fan C 230-85 and C 230-130 3 Remove the electrical connections from the fan Unscrew the connecting nut under the multi-gas-valve unit (don't forget the gasket) Unscrew the nuts and bolts on the outlet side of the fan 230 V 1 2 6 Disconnecting the gas valve mains supply cable. Remove the fan, the venturi and the multi-gas-valve unit Remove the bolts from the input side of the fan Remove the venturi from the fan Clean the fan with a plastic brush Remove dust from the fan before re-assembly 4 Remove the silencer from the venturi Clean the venturi with a plastic brush 5 Put the silencer in place Fit the venturi to the fan to Replace the fan. . 7 Connect the gas valve mains supply cable. Ensure that the finishing plate between the fan and the venturi is correctly positioned. 8 10 9 11 230 V 13 12 D000661 52 C 230 ECO 19/10/09 - 300015171-001-E C 230-170 and C 230-210 3 Remove the electrical connections from the fan Remove the bolts securing the venturi to the fan Unscrew the nuts and bolts on the outlet side of the fan 1 2 4 Disconnecting the gas valve mains supply cable. Remove the electrical connections from the fan Remove the bolts securing the venturi to the fan Unscrew the nuts and bolts on the outlet side of the fan Disconnecting the gas valve mains supply cable. Remove the fan, the venturi and the multi-gas-valve unit Clean the fan with a plastic brush Remove dust from the fan before re-assembly Remove the silencer from the venturi Clean the venturi with a plastic brush Put the silencer in place 5 6 to Replace the fan. Connect the gas valve mains supply cable. Ensure that the finishing plate between the fan and the venturi is correctly positioned. 7 9 8 D000660 19/10/09 - 300015171-001-E C 230 ECO 53 7.2.2 Clean the heat exchanger using the tool provided 1 2 3 4 3 6 5 D000665 The gasket between the inspection trap and the heat exchanger may stick, as may the one between the burner and the heat exchanger. Do not tear it - Remove the nuts from the inspection hatch on the front of the heat exchanger. - Remove the inspection trap from the heat exchanger. - Clean the exchanger with the cleaning tool provided or, alternatively, with compressed air: rinse with water if necessary. - The condensates collector can be cleaned by removing the plug from the top of the collector (before the flue gas discharge pipe) and rinsing the collector with water. 54 C 230 ECO 19/10/09 - 300015171-001-E 7.2.3 Clean the burner 2 - Remove the burner. - Check the burner and, if necessary, vacuum clean without touching it (e.g. with compressed air between 2 and 5 bars: respect a distance of around 1 cm from the surface of the burner). - Then replace all the parts in reverse order. 3 Avoid direct contact between the cables and the hot sections of the boiler 1 1 2 4 1cm 5 2-5 bar 6 8 8 6 7 D000666 7.2.4 Clean the siphon - Dismantle the siphon using the opposite of the assembly method. Clean the siphon. - Fill the siphon with water. - Re-assemble the siphon. 7.3 Troubleshooting Refer to the connection instructions supplied with the control Zpanel.. 19/10/09 - 300015171-001-E C 230 ECO 55 8 Spare parts - C 230 ECO 19/10/09- 300015171-002-B To order a spare part, give the reference number shown on the list. Boiler body 2053 C230-85ECO C230-130ECO C230-170ECO 2054 C230-210ECO C230-210ECO C230-210ECO -C DE DIETRICH THERMIQUE S.A.S. - Spare parts centre 4 rue d’Oberbronn - F-67110 REICHSHOFFEN - * +33 (0)3 88 80 26 50 - + +33 (0)3 88 80 26 98 cprdedietrichthermique.com Gas circuit C230-85/130ECO C230-170/210ECO 113276EVAL21H003b 19/10/09 - 300015171-001-E C 230 ECO 57 Casing 113276EVAL21H001b 58 C 230 ECO 19/10/09 - 300015171-001-E Ref. Code no. Boiler body 2033 S100587 Condensates tank plate - 3 sections S100633 Boiler body - Exchanger - 80 kW 2033 S100588 Condensates tank plate - 4 sections S100634 Boiler body - Exchanger - 120 kW 2033 S100589 Condensates tank plate - 5 sections S100635 Boiler body - Exchanger - 160 kW 2033 S100590 Condensates tank plate - 6 sections S100636 Boiler body - Exchanger - 200 kW 2038 S100291 Neoprene gasket 2001 S52481 Lateral section left 2039 S100542 Condensate tank 2002 S52482 Intermediate section 2041 S100536 Polyvinyl chloride pipe 2003 S52480 Lateral section right 2042 S100552 Siphon 2004 S44698 Temperature sensor 2043 S100586 Flow pipe 2005 S100604 Ignition electrode 2044 S100532 Plug 3.8" 2006 S35458 Flame inspection window gasket 2045 S100567 Flow water distribution pipe 2007 S100554 Inspection flange 2046 S100533 Plug 1/2" 2008 S100535 Screw M4 x 8 2050 S100544 O-ring 2009 S100592 Condensates evacuation pipe 2051 S100566 Reduction part 2012 S53489 Electrode gasket 2052 S100565 Reduction part 2013 S100550 O-ring 2053 S100626 cable form 230 V 2014 S100557 Water return distribution pipe - 3 sections 2054 S100627 cable form 230 V 2014 S100558 Water return distribution pipe - 4 sections S100637 Kit - Maintenance 2014 S100559 Water return distribution pipe - 5 sections 2014 S100560 Water return distribution pipe - 6 sections 3001 S100575 Gas valve - 5-6 sections 2015 S100582 Flue gas connection part 3001 S100617 Valve/venturi unit - 3-4 sections 2016 S55703 Valve 1/2" 3002 S100576 Fan RG148 2017 30629 7 mm Ø thermocord gasket 3002 S100611 Fan EBM G1G170 2018 S100545 Inspection hatch - 3 sections 3003 S100574 Venturi - Gas block 2018 S100546 Inspection hatch - 4 sections 3004 S53553 Burner - 3 sections 2018 S100547 Inspection hatch - 5 sections 3004 S53554 Burner - 4 sections 2018 S100548 Inspection hatch - 6 sections 3004 S53555 Burner - 5 sections 2019 S100556 M8 nut 3004 S57988 Burner - 6 sections 2020 S100549 Stud M8 3005 S100580 Premixing pipe - 3-4 sections 2021 S100561 Anchorage bars - 3 sections 3005 S100581 Premixing pipe - 5-6 sections 2021 S100562 Anchorage bars - 4 sections 3006 S100579 Pipe - Gas supply 2021 S100563 Anchorage bars - 5 sections 3006 S100616 Gas inlet pipe 2021 S100564 Anchorage bars - 6 sections 3007 S100597 Air silencer - 3-4 sections 2022 S44483 M8 nut 3007 S100598 Air silencer - 5-6 sections 2023 S100088 Washer - 8.4 mm 3008 S100613 Differential air pressure switch 2024 S100538 Spring 20 x 8.2 x 1 3009 S100618 Stop chip 2025 35208 Mastic 3010 S100572 Ignition transformer 2026 S100543 Pin 8 x 20 3011 S56151 Gasket Fan - Exchanger 2027 S62122 Leakproof plug 3012 S100632 Gasket 2028 S100603 Leak proofing ring 3013 S100551 Burner joint 2029 S100600 Tightening collar - Discharge pipe 3014 S100058 O-ring Fan-Venturi 2030 S62288 Flue gas sensor cap 3015 S100305 110 - 72 x 3.53 O-ring 2031 S100593 Discharge pipe 3016 S100056 Gasket 27 x 20 x 2.5 2032 S100591 Leakproof plug 3017 S100585 Elbow - Gas circuit 3018 S1000624 Venturi seal Ref. Code no. 19/10/09 - 300015171-001-E Description Description Gas circuit C 230 ECO 59 Ref. Code no. 3019 S100619 O-ring 3020 S21473 Spacer - Ignition electrode 3021 S14254 Screw 4.2 x 9.5 3022 S100602 Corner profile 3023 S100601 Transformer support plate - Gas pressure switch 3024 S100541 Stud M8 x 60 3025 S44483 Nut M8 3026 S46687 Nut M5 3027 S100537 Stud M5 x 12 3028 S100570 Stud M5 x 20 3029 1035 3030 S15524 Bolt M8 x 16 3031 S100531 Bolt M8 x 30 3032 S100055 M5 nut 3033 S100054 Screw M5 x 16 3034 S59818 M8 nut 58286 Cleaning knife 200012133 Description Pressure socket Gas 1/8" Accessories bag S100601 Transformer support plate - Gas pressure switch S100613 Differential air pressure switch S 44698 Sensor NTC S100572 Ignition transformer Casing 60 1001 200012132 Front panel 1002 S100610 Rear panel 1003 S100599 Air inlet basket 1004 S100534 Screw 1005 55683 1006 S100553 O-ring 1007 S100291 Neoprene gasket 1008 S100539 Grommet Ø 60 mm 1009 S100614 Set of grommets (red, blue and yellow) 1010 S100603 Leak proofing ring Ø 160 Closing hook with opening device C 230 ECO 19/10/09 - 300015171-001-E 19/10/09 - 300015171-001-E C 230 ECO 61 62 C 230 ECO 19/10/09 - 300015171-001-E 19/10/09 - 300015171-001-E C 230 ECO 63 DE DIETRICH THERMIQUE S.A.S. www.dedietrich-thermique.fr FR Direction des Ventes France 57, rue de la Gare F- 67580 MERTZWILLER +33 (0)3 88 80 27 00 +33 (0)3 88 80 27 99 ÖAG AG www.oeag.at AT NEUBERG S.A. www.dedietrich-heating.com DE DIETRICH REMEHA GmbH www.dedietrich-remeha.de DE Rheiner Strasse 151 D- 48282 EMSDETTEN +49 (0)25 72 / 23-5 +49 (0)25 72 / 23-102 [email protected] LU CH Weggevoerdenlaan 5 B- 8500 KORTRIJK +32 (0)56/23 75 11 39 rue Jacques Stas L- 2010 LUXEMBOURG +352 (0)2 401 401 DE DIETRICH www.dedietrich-otoplenie.ru VAN MARCKE www.vanmarcke.be BE Schemmerlstrasse 66-70 A-1110 WIEN +43 (0)50406 - 61624 +43 (0)50406 - 61569 [email protected] RU 129090 г. Москва ул. Гиляровского, д. 8 офис 52 +7 495 988-43-04 +7 495 988-43-04 [email protected] WALTER MEIER (Klima Schweiz) AG www.waltermeier.com WALTER MEIER (Climat Suisse) SA Bahnstrasse 24 CH-8603 SCHWERZENBACH +41 (0) 44 806 44 24 Serviceline +41 (0)8 00 846 846 +41 (0) 44 806 44 25 [email protected] Z.I. de la Veyre B, St-Légier CH-1800 VEVEY 1 +41 (0) 21 943 02 22 Serviceline +41 (0)8 00 846 846 +41 (0) 21 943 02 33 [email protected] DE DIETRICH www.dedietrich-heating.com Room 512, Tower A, Kelun Building 12A Guanghua Rd, Chaoyang District C-100020 BEIJING +86 (0)106.581.4017 +86 (0)106.581.4018 +86 (0)106.581.7056 +86 (0)106.581.4019 [email protected] AD001-AC CN © Copyright All technical and technological information contained in these technical instructions, as well as any drawings and technical descriptions supplied, remain our property and shall not be multiplied without our prior consent in writing. Subject to alterations. 19/10/09 DE DIETRICH THERMIQUE 57, rue de la Gare F- 67580 MERTZWILLER - BP 30