1
EPSON
Stylus Pro GS6000
Training
081010
Anders Nordin
lnfoCare Sweden
Internal Use Only
1
This Training document is based on EPSON Service Manual Rev. A,
www .epson.se and Users Manuals.
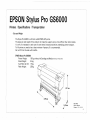
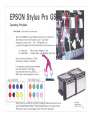
EPSON Stylus Pro GS60
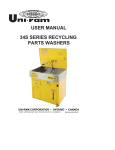
Main Features
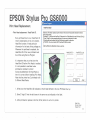
- Epson Stylus Pro GS6000 key f eatures summary :
* 8-co lor Epson UltraChrome GS eco-so lvent type ink set.
Prints with 2 Epson Micro Piezo print head.
* Long-lasting prints
- Durability both indoor and outdoor.
* Prints on a range of different coated and non-coated substrates such as vinyl,
making it an id eal, flexible production so luti on for multiple commerc ial applications.
~- - p ~
petppu
l.
* Quality and speed
-Up to 1440x1440 dpi and 25.3m2/hr .
* It has an excepti ona ll y wide co lour gamut which provides enhanced support for commonly
used spot colors, m aking the Sty lu s Pro GS6000 ideal for branded applications.
* User and env ironmenta lly friendly
- Epson GS eco-so lvent type ink avoids the spread of harmful VOCs so no additional ventilation is required.
* Importantly for the env ironment and operators , Epson UltraChrome GS ink doesn't spread harmful VOCs (volati le
organ ic compound) is the first major eco-so lvent type ink set to be launched without the need for a hazard symbol.
11
* Easy-to-use and contro l with versatile paper 11 management and high speed con nectivity.
*Th e Epson Sty lu s Pro GS6000 will retail at • 29,995 * (ex VA, April 08 ) including
auto-take-up-ree l, a maintenance and start er-kit (including ink).
Read More
www .epson.se
2
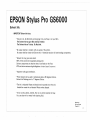
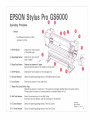
EPSON Stylus Pro GS6000
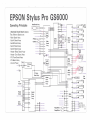
Main Features I Specifications
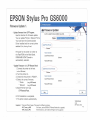
Technology:
On Demand Ink Jet, Epson Variable-sized Droplet Technology, (Smallest 3.7 picoliter).
Ink Types:
Epson Ultra Chrome GS ink (Eco fiendly Solvent Ink).
Printer should not be used in temperatures above 60 degrees Ce lc iu s. Flashing point 71 degrees Ce lcius.
Emu lation:
Epson ESC/P Raster, ESC/P2. RIP Support only (no driver avalible).
Printheads:
Two printhead with 2 * 180 Nozz le * 8 Co lors.
Ink Config:
8 Co lors Solvent Ink. Flashing point 71 degrees Celcius.
Left: Orange, Green, Light Magenta, Light Cyan. Right:
Pri ntspeed:
Up to 1440x1440 dpi and with 25.3 m2/hr.
Resolution:
360 * 360, 720 *
Memory:
256 mb, Not expandable.
Interface:
USB vers. 2.0 and Gigabit Ethernet.
M ed ia:
Roll Media
1 Singe l Roll
Cutter:
No cutter in printer. Only manual cutting with knife.
Roll Paper:
One Core Auto TakeUp unit is standard.
Paper Types:
No Epson media ava libl e. M ed ia from partners on ly .
M argins:
Top: Min 5mm.
Weight:
Printer:
.::>
Power:
XXX,
Core
3"
1440 *
XXX,
Black, Yellow, Magenta, Cyan. (page 8)
up to 1440 * 1440 dpi.
Out Diam.
Thickness
170mm I 6.7" 0.3- 1.3 mm
Side, Bottom: 5 to 25mm.
Size Width
300 mm- 1625 mm wide (12"- 64" ) .
A V~f<.. V t']""
::> 11 1
End of Roll 77 .4mm.
1 50 kg without lnkCa rtrid ge and Media (4 man lift) Stand: 34 kg. AutoTake Up Unit 19 kg.
Is the floor on the installation area steady and horizontal ?
Read More Service Manual
Chapter 1
Powe r Consumption are up tp 680 W in Operating M ode. Use 3 different AC conn.www .epson.se
3
~~
.
.
, EPSON Stylus Pro GS6000
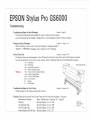
Printers I Specifications I Transportation
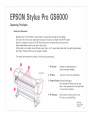
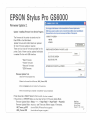
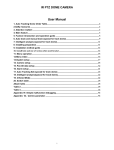
-Size and Weight
The Stylus Pro GS600 is a 64 inch width EPSON LFP printer.
The large size and weight of the product will make the support service more difficult than other models.
It is why it's necessary to take care of some items (instructions) before undertaking printer transport.
To lift printer you need to be at least minimum 4 persons. 6 is recommended.
Do not lift from the side with forklifts.
EPSON Stylus Pro GS6000
Printer Weight:
150 kg without lnkCartridge and Media (minimum 4 man lift)
Stand Weight:
34 kg.
AutoTake Up Unit 19 kg.
Pallet Weight:
255kg
r
1,267 mm
Read More
Service Manual
Chapter 1.3.1 I 6.2.2
4
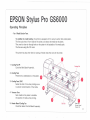
EPSON Stylus Pro GS6000
Features I Media I Drivers
- Epson will be supporting multiple solvent media suppliers.
* 3M and Avery will be prioritized for support.
* Epson is currently working with both 3M and Avery to support their various warranty programs.
* Print only on Banners, Vinyl, Backlight and Marking Films.
* No Paper based media can be used in the GS6000 with solvent ink.
* No Epson labeld media is sold.
- Drivers I RIP Pograms.
* Epson will support different RIP Manufatures such as Onyx, Co lor Burst Pro, EFI. ..... .
* All Printouts will be done throu RIP firmwares.
No driver for Windovs XP or Vista will be avalible for GS6000.
Read More
www.epson .se
5
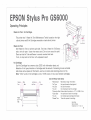
EPSON Stylus Pro GS6000
Solvent Ink.
- IMPORTENT Solvent Ink facts.
* Solvent ink, Do Not drink and Avoid get it in your Eays or on your Skin.
The Solvent Ink may give Skin and Eay irritation.
The Solvent Ink are Toxicity. Do Not drink.
* No water shall be in contact with any parts of the printer.
No water shall be mixed with Solvent Ink. A chemical reaction will start harding components.
* Solvent Ink may give some smell.
90% of the solvent ink evaporates during print.
Solvent components are heavier than air and lands on the floor.
VOC are below maximum legal obligations. (Volative Organic Component).
* lmportent with good ventilation.
* Printer should not be used in temeratures above 60 degrees Celcius.
Solvent Ink Flashing point is 71 degrees Celcius.
* The Ink is Industrial Waste and should not be poored down the zink.
Handle the waste ink as Industrial Waste when disposal.
* Ink on covers, platies, clothes, floor or any other material will stay.
You can clean ink on metal! with cleaning fluid.
Read More
Service Manual
Chapter 6.1
6
CA~ " RJ D ::> ~
EPSON Stylus Pro GS6000
I'IST. ' L NCW C EMi t- 3
C o«~ · RJ il G I--
Ink Installation First Time I Head Wash.
- First Time Power On!
* Printer is tested at Factory with Aquou s In k.
c :.~-< •
* Printer is washed in Factory with Aquou s Cleaning Liquid .
lllGE:
RCMO\fiO AL C.ART RJJG :OS
* Printer is shipped to customer.
* Printe r mu st be Re-Cleaned with So lvent Cleaning Liquid . (Solvent Cleaning cart. can only be used once).
* Printer is fill ed w ith So lvent Ink .
- Ink System Unit W ashing Steps.
NO CARTRIDGe
INS1AJ.L INK c.:...~ - RI D O t
If there is a In k Nozz le pro bl em, you ca n Re-W as h Sy ste m from M aintenance M enu .
* Go to MAIN TENENCE Menu and se lect "HEAD WA SH".
* "DRAIN INK" Will start (if system is filled with ink).
* "CLEAN" Clea ning Liquid will be charged in sy stem from Clean in g Cartidges (T623000) .
' --- - - --....
1J:3 -' 5 5 78
,--
* Remove Clea nin g Cartidges .
* Cleaning Liquid is Dra in ed.
* Ink Cartr id ges In stall ed .
* In k is Charging into sy st em.
When printer is not used for a log tim e it is best to DRA IN the printer from ink .
Use th e MAIN TE NAN CE M ENU I HEAD WA SHING M enu from Co ntrol Panel.
Wh en printer ask for Ink Ca rtridge s, Powe r Off printer.
Read More
Service Manual
Chapter 1.4.2
7
EPSON Stylus Pro GS6000
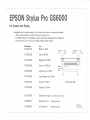
Ink System and Supply.
- lntellidge Solvent ca rtr idge system for ink level control even on re-inserted cartrid ges.
LED ink status system on printer showing, warning ink low .
The 950m l Solvent Ink cartrid ges is using a sin gle size packaging and ca rtrid ge size.
Printer can print 3 min with one cartridge missing before it stops.
Partnumber
C13T624100
Unit
Black (K) 950m
C13T624200
Cyan (C) 950ml
C13T624300
Magenta (M) 950m l
C13T624400
Yellow (Y) 950m ler
~~.~;;;;;;;;;;;;;;~
Waste
]
lnk----Tank
_
C 13T624500
Light Cyan (Lc) 950ml
C13T624600
Light M agenta (Lm) 950m l
C13T624700
Green (Gr) 950m l
C 13T624800
Orange (Or) 950m l
C13T623000
Cleaning Ca rtr id ge
(You need 8 for each printer).
C12C890611
Maintenance Kit
(User Manintenance).
C 12C890621
Ink Cleaner Kit
(User Manintenance) .
L____j-
Printer Back Sid e
Read More
www .epson .se
8
EPSON Stylus Pro GS6000
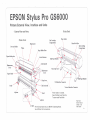
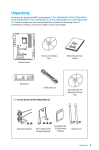
Printers External View, Interface and Units
Printer Back
- External View and Parts.
Printer Front
Paper feed )lot
Pressure Rollers.
Ink Cartridge
· Companmenr
Plateu
I
I
Paper Holder Plate
I
I
I
:\cth:e Indicator
Control panel
~fain ten a nee
Conr
l~ SB
Imerface Connector
Srand
I ~
-----:-----_:]
v-r
~--
-Yf ,
Stand
--
.......
When media is not loaded.
Keep the Paper Lever Open /Up.
To save media Feed Roller .
\._
AC iulet Power Consumption are up to 680 W in Operating Mode.
Use 3 different AC conneactions.
Read More
Service Manual
Chapter 1.3.2
Users Guide
9
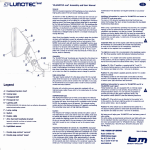
EPSON Stylus Pro GS6000
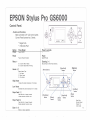
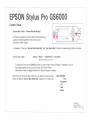
Control Panel.
check
•
,---,
0
- Button and Functions
Back luminated 2.5" LCD control panel.
Control Panel buttons has 2 levels.
Q '
00
\.~)
-J~]
* Singel Push
* 3 Seconds Push
Button
ower
Press Sin el
Press 3 seconds.
Power ON/OFF
Pause
Pause
Pause or Resume Situation
Cancel Print Job
Go to printer Menu (Ready)
Go to printer Status Menu (Printing)
Stop printing and Runs Heads Cleaning
Cleaning [ > ]
Menu>
Heater [ <]
[Paper F t>ed)
burton
(Power] button
Select Heater Type
1. Pre Heater
2. Platen Heater
3. After Heater
•
0
High Heate
High Heat)
burton
C>:<k , - - - - - - - - - - - ,
•
00
Increase the preset temperature of the heater.
Low Heate
Decreases the preset temperature of the heater.
Paper Feed [/\]
Paper feed for roll paper (reverse)
lncrese selected numerical value
Paper Feed [\/]
Paper feed for roll paper (forward)
Decrese selected numerical value
Enter [ < --1]
Select or execute
[Pame/Rt>set]
burton
Heater]
button
[Inte1·]
button
[Paper F .-ed)
burton
Read More
Service Manual
Chapter 1.4
Users Guide
1
arameter
o
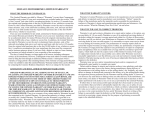
EPSON Stylus Pro GS6000
Control Panel.
- The Control Panel with backlight on DISPLAY, and some LEO s and other indication s .
- Control Panel LED statu s Information.
LED
Color
Display
Printer Status
Power
On
Blink
Off
The power is ON.
Receiving data, cleaning or executing power off sequence
Printer is Power Off
Pause
On
Printer is in Pauses I Menu.
Media check
On
Blink
No media in printer .
Media Jammed, Near End or Skewed.
A maintenance call error is occurring.
Ink Check
On
Blink
Not installed, wrong or expired Ink Error
Installed ink nearlly expired.
Low I High Heat
Active indicator
An combination of Led shows Heater Error
Blink
High Heat light
Power lioht
"'
Paper Check
light
lighr
Low Heat
light
Printer Error occured .
Display
a . Message
b. Media Type
c. Ink Cartridge info.
d. Platen Gap
e. Heater Icon
Read More
Service Manual
Chapter 1.4
Users Guide
11
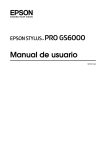
EPSON Stylus Pro GS6000
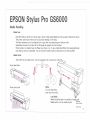
Media Handling
- M edia Feed
Only Roll media up to 64 inch can be used in printer. Paper based M edia can not be used in So lvent Ink printer.
This printer uses fri ction feed to carry out precise feeding of roll m edia.
The feed mechanism unit is conf igured from a grid roller and pressurizing and follower roller
assembl ies mounted on the back of the CR guide rail opposite the front su rf ace.
When media is not loaded. Keep the Paper Lever Open I Up. To save media Feed Roller from beeing deformed .
Auto take-up reel unit is standard. You can wind the media forward or backward on the Take Up Reel.
- M edia Cutter.
This printer has no media c utter. It is on ly possible to do a manual cut with knife.:---
0
Printer Back Sid e
l
~~ ~1' J
Printer Front Side
..
----~/
1
0
D
~
---------...:::=----
D\
~N
( o) \ o)
~ ~
M edia .
You can load media
both ways from roller.
,:-'-~ ,
·; ---=
~,___
·- -~~~~~_JI
~-~---:._-=n.l
-~....,"'"-~~.::- _
jr
·
1
Load M edia .
~
M ed ia shou ld be feed in the middel of media path.
M ed Ia
. Sensor IS
· ·In t h e ml·ddl e 0 f pat h .
Read More
Serv ice Manual
Users Guide
12
"J
·~
o.N
/V'vaA
Vl.
(')
Stylus Pro GS6000
(ij
~
:J
c
"'
~
Q)
u
·;;;
IDN.
en
Control Panel.
.,<tal
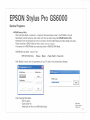
The MENU enables you to make settings to parameters and value you normally make in printer driver.~ '::: ~
Note that application programs may send commands to the printer that overrides Menu Settings.
" S. ~
To see the current settings, print a STATUS SHEET.
~ ~
Step in MENU with MENU Key!
B
PARAMETER I VALUE
MENU
ITEM
PRINTER SET UP
- SIDE MARGIN
- PAPER SIZE CHECK
- PAPER SKEW CHECK
- PRINT NOZZLE PATTERN
- HEATING TIME
- FLUSH ONTO PAPER
- FLUSHING FREQUENCY
- PAPER ORIGINAL SETUP
- AUTO TAKE-UP REEL
- HEAD FAN (Coolin g fan)
- REGULAR CLEANING
- INITIALIZE SETTING
-PAPER TYPE
-PAPER SETUP
-CLEAN ING (Very li ght)
-CLEAN ING (Light)
- CLEANING (Medium)
- CLEANING (Heavy)
- HEAD WASHING
- CARRIAGE MAINTENANCE
- CLOCK SETTING
- CONTRAST ADJUSTMENT
- NOZZLE Pattern
- STATUS Sheet
- NETWORK STATUS Sheet
-JOB INFORMATION
- CUSTOM PAPER
- VERSION
- PRINTABLE PAGE
- INK LEVEL
- USAGE COUNT
,J
~J~~~
~\Jy~r
~\~~ ,.xt
1' 1<};/1
·Jt"
PAPER SET UP
MAINTENANCE
Run to get Carriag.e..fmel
TEST PRINT
PRINTER STATUS
- CLEAR USAGE COUNT
-JOB HISTORY
- TOTAL PRINTS
- EDM STATUS
NETWORK SET UP
- NETWORK SETUP
- IP ADDRESS SETTING
- IP Address
- SUBNET Net Mask
-DEFAULT Gateway
- BONJOUR
- INIT NETWORK SETTING
5 - 25 mm
Qn/ Off
Qn I Off
Qff I Every Page I Every 1 0 page
Off /1..0..m.in - 240 min.
Ye.s I No
5..I'.a.s..s /1 - 999 Pass reNt ~ ,;" 't
800 mm
Qn I Off
~
,Jd..Qn I Off ~t-'flv- (ft\f'\. i-w"
Off, 1h,2h,3h,4h,5h,6h, 9h, 12h, 18h, 24h
fc..t h> ""/ d.Lfzv.JL:fExecute
Standard I Paper No.1 - 30
Standard I Paper No.1 - 30
Execute
Execute
Execute
Execute
Execute
Execute
<.'c1 ' r .·err\ C)~:r ul- h\l\ ho~erLvc~
MM I DD I YY HH:MM
-20 .. 0- + 20
Start Print
Start Print
Stat Print
Start Print
Start Print
tOxxxx-xx.xx .xxxx
nnnnn Pages
nn%
INK xxxxx .xml
Paper xxxxx.xcm
Ink Execute
Paper Execute
No. 0- No.9
INK xxxxx.xm l
Paper xxx.x cm2
nnnnn Pages
Not Started I Enabled I Disabled
Last Uplo aded MM I DD I YY HH :MM GMT
Not Uploaded
Disabled I Enabled
Auto I Panel
192.168.192.168
255.255 .255.000
255.255 .255.255
On / Off
Execute
o..mm-
EPSON Stylus Pro GS6000
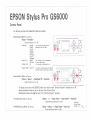
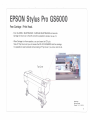
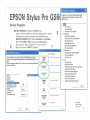
Control Panel I Test Prints.
Test print menu
TEST PRINT
Nozzle Check Pattern Printing
NOZZLE
Patterns IS printed if :
Left Printhead
Or Gr LM
y
K
LC
M
c
Right Printhead
LC
Or Gr LM
K
y
M
c
B
A
Version
Cur . lnk Count
Cur . PaperCount
: t01784-1 .01.8000
: 8733.1ml
Pre. lnkCount
636ft 2im
Pre. PaperCount
8724.9 ml
1634ft 9in
C- P: 8 .2 ml
C- P : 1ft 4in
* PRINT NOZZLE PATTERN
OFF = Do not print.
ON = Print before EVERY Print.
ON = Print EVERY 10 Pages.
= = = Printer Sett ing = = = ... =
Side margin
: 0.20 inch
Paper Size Check
: ON
Paper Skew Check : ON
Print Nozzle Pattern : OFF
===
= = = Printer Statu s = = = = = = = a :::o = = = = = = =
Version
: tOt 784- 1 .01 .8000
Total Print
: 143 PG
Use Ink
: 413.0 ml
Use Paper
: 636.4 ft 5 inch
=
~~~~~"Bn~~m~aper ~ ~~m i n
~~u;:ri"8ri~i~qs;;~~ ~ 5~ass
Auto take-Up Reel : ON
Regular Cleanibg
: 6 h
Netwo rk Se tting --- -·--- --- -· ·• · -- ···· ------------------ ·- -·- ---------------- -·-- ---- ·- -·-- ------ -··- ---- ·-- ----------
IP Adress Setting : Auto
IP Adress
: 172.30 . 10.123
Subnet Mask
: 255,555 ,555,001
Defau lt Gateway
: 255 .255 .255 .266
Bonjour
: ON
= Ink Cartridge = = = = = - = = = = = ""' = = = = = = = = = = = = = = = = = = = = = = = =
Manufacture :
EPSON
EPSON
EPSON
Ink Type
UltaChrome GS ink UltaChrome GS ink UltaChrome GS ink
:~~ l~~or
.
~!~n.g.e F
~!~e.n. F
~i~ ~! .~~genta
Produktion Date:
07/12
07/12
07/12
Expire Date
09/12
09/12
09/12
Ink life
6 month
6 month
6 month
Passe d
:
0 month
0 month
0 month
Printab le Sheet
343 pages
342 pages
232 pages
Status Printing
Job Information Print
JOB INFO
User Paper Setting Print
CUSTOM PAPER
Manufacture
Ink Type
Ink Color
Ink left
.
Produktion Date:
Expire Date
:
Ink Life
Passed
:
Printab le Sheet
EPSON
EPSON
EPSDN
UltaChrome GS ink UltaChrome GS ink UltaChrome GS ink
~ilJ~l C~an
~~!'~~ F
~~~owF
07/12
07/12
07/12
09/1 2
09/1 2
09/12
6 month
6 month
6 month
0 month
0 month
0 m onth
543 pages
382 pages
762 pages
Manufacture
Ink Type
Ink Color
Ink Left
Produktion Date :
Expire Date
Ink life
Pas sed
:
Printab le Sheet
EPSON
EPSDN
UltaChrome GS ink UltaChrome GS ink
===
•
~a~;nt~
07/12
09/12
6 month
0 month
~Y~~ F
07 /1 2
09/12
6 month
0 month
563 pag es
482 pages
Read More
Service Manual
Chapter 1.4.2
14
--------- - ------------------------------------~
EPSON Stylus Pro GS6000
Control Panel
- For Se rvice purpose so me Power On Tests are avalible.
r- ---------------
- Maintenance Mode (for Customer)
(Pause + PowerOn)
i;.:'
Se Service Manual 1.4.3 I 28
LANGUAGE
LENGTH UNIT
ENGLISH
FRENCH
ITALIAN
GERMAN
SPANISH
PORTUGUE
DUTCH
JAPANESE
METRIC
FEET/IN CH
THERMP . UNIT
oc
DEFAULT PANEL
EXECUTE
0
--
(~)0
You can select the language to be
displayed on the LCD panel.
~Cot;
II D •
0
---------~
oc
~*
D
You can select a un it of measurement
to use to display length.
Yo u can se lect a thermometer unit.
F
-Se rvic e Man. M ode. (for Service)
(Pause + M enu>
You can set all setting values you made in
the Menu mode to their factory set value.
+ PaperFeed T + PowerOn)
Se Serv ice Manual 1 .4.4 I 29
To adjust and work on the GS6000 printer you need to have " Se rvice Program" in stall ed on you PC.
Some adjustments and set up can be done from Contro l Panel.
Mainten ance Re set can .onl.¥ be don e from "Service Program" program.
- Firmware Download . (for Se rvice)
(Menu > +
< +
Paper Feed/\
+ Paper FeedV + PowerOn)
Se Se rvice Manual (Read 5 .6 .2 I 209)
- NVRAM Back Up M ode. (for Service)
(Pause
+ M enu> + Paper FeedV + Power On)
Se Se rvice Manual (Read 5.2 I 185 )
Read More
Service Manual
Chapter 1 .4 .3 I 1 .4.4
15
EPSON Stylus Pro GS6000
Training Exercise 1
- Power on printer
- Check Power On routine.
-Check the 3 AC plugs and how to set up and AC connect the prnter.
- Check Ink Cartridge and Maintenance Tank
- Check Media and Media Feed Paths
- Check TakeUp Unit and how to load Meda.
- Check Control Panel Buttons and their functions.
- Check how to change Heater temperature on After, Plaren and Pre Heaters.
- Select MENU and step throu setup parameters.
- Select MENU and Test Print Menu and do some testprints.
- Enter Manintenance Mode 1 and Service Man. Mode.
Read More
Service Manual
16
EPSON Stylus Pro GS6000
Free Carriage I Print Head.
- From the MENU I MAINTENANCE I CARR IAGE MAINTENANCE and execute.
Carriage viii move out to the left and will be possibel to access. (Se page 13).
-When Carriage is in Home position, you can loosen the CR Lock.
Take off Top Cover and you will access the CR LOCK SOLENO ID and free carriage.
It is possible to reach solenoid without taking off Top Cover if you know what to do.
Top Cover
Read More
Service Manual
Chapter 1.4.2 I 4.4 .9 .4
17
EPSON Stylus Pro GS6000
Operating Principles
- Carriage M echanism .
The
The
The
The
two printhead are mounted in a Carriage that moves left I right during printing.
position of carriage is controlled by an CR Encoder that reads a Scale Pattern with high presicion.
CR Motor has an Reduction Belt that conveys the CR Motor drive force to carraige.
Carriage Belt is a steel belt to get an accurate and stabile carriage movement.
0
cr
1~1~m~i'==-ril.L.......II
1 - CR Motor
The motor to drive the Carriage Unit.
2- CR Lock
Locks the Carriage Unit to the home posit ion.
It is driven by a so lenoid.
3 - CR Encoder
Detects the sca le patterns to control
the position of the Carriage Unit.
4 - CR Cursor A ssy
The unit mounting the Print Heads.
5- CR Belt
Conveys the drive force of the
CR Motor to the Carriage Unit.
6 - CR Reduction Belt Conveys the drive force of the
CR motor to the CR Belt.
Read More
Service Manual
Chapter 2.3
18
-Sensors
- The different Sensors and their
purpose in printer.
1 - PG HP Sensor
Detects the home position
of the platen gap.
2 - Paper Edge Sensor
3 - Paper Rear Sensor
4 - CR HP Sensor
Detects the home position of the Carriage Unit.
5 - M Cover Sensors
Detect the opening/closing status of the Maintenance Covers.
6 - Lever Sensor
Detects the position of the paper lever.
7 - Waste Fluid Level Switch Assy
Detects the amount of waste ink. If the waste ink exceeds specified level, the sensor reacts.
Always check if sensor is in correct position to indicate Waste Ink Full.
8 - Sub Tank Sensors
Detect the remaining ink in the Sub Tanks.
Each tank has two sensors, and the remaining ink is detected.
9 - IC Cover Sensors
Detect the opening/closing status of the Ink Covers.
1 0 - F Cover Sensors
Detect the opening/closing status of the Front Cover.
Read More
Service Manual
Chapter 2. 7 I 4.4.1.2
19
EPSON Stylus Pro GS6000
Operating Principles
- Head Height I Platen Gap Adjustment
Head Height I Platen Gap can be manual adjusted on the Carriage Unit to the correct distance.
Head Height can be ajusted in 2 different positions, Normal (0,3mm) or High (1,3mm) depending on media used.
Cust omer must adjust this to correct position for the used printed media.
Incorrect adjusted Head Height can result in bad or poor prints or may give banding problems.
~
Gk~
\ '--~.
J l lj . :::::~\ \
1- - - - -LL
-
~--~--
\J
---
I
t;:7~ ------------~
--- ---:::::::--_
~:-:.:.~'-- . ~----- II'
- ~~1
~
I
Read More
Service Manual
Chapter
20
EPSON Stylus Pro GS6000
Operating Principles
- M edia Feed M echanism
Rotation drive of the PF Motor is transmitted to the grid roller through the Timing Belt.
The contro l of the revolution speed and the steps of revolution are made with the PF Encoder
Sensor by reading the values of the PF Scale mounted on the same shaft as the grid roller.
Paper based Media should not be used in this printer.
When media is not loaded. Keep the Paper Lever Open I Up. To save media Feed roller from getting deformated.
Each Feed I Pressure Roller can be changed if needed.
The media feed mechanism cons ists of the following components.
1 - PF Encoder
Detects the scale patterns to
contro l the paper feeding.
2 - PF Motor
The motor to drive the Feed Roller.
3 - Pressure Rollers Hold and feed paper.
By sw itching the Paper Lever up and
down, they separate from the Feed Roller
or move back in position.
4 - PF Reduction
Belt Conveys the drive force of the
PF motor to the Feed Roller .
Read More
Service Manual
Chapter 2.4
21
EPSON Stylus Pro GS6000
Operating Principles
- Fan I M edia Suction Fans.
To stabilize the media feeding, this printer is equipped with 4 vaccum suction fans under platen.
The fan sucks the air from inside of the printer, and draws the media to the platen.
They work to draw air through hole s on the platen in the backside of the media path.
The fans are using 24v DC motor
The printer has also other fans for cooling of heater and other units of the printer.
1 - Cooling Fan PE
Cools the Main Board Assembly.
2 - Cooling Fans
Prevent dew condensat ion on the platen.
3 - Cooling Fans (24V)
Sucks the mist of ink when printing so as
to prevent contamination of th e inside .
4 - Vacuum Fans
Suck media to the platen to stabi li ze
the position of media when printing .
'
.......
5 - Heater Board Cooling Fan
Cools the Heater Control! Board Assembly.
Elec' Box
Service Manual
Chapter 2.8
22
EPSON Stylus Pro GS6000
Operating Principles
- Heaters.
Printer has 3 different heaters to heat media, Pre, Platen and After printing. Customer can from control panel
increase or decrease the heating from 30 to 50 degree C to get the best result in prints for the used media.
This Pre-heating combined with the heating on the Platen Heaters and the After Heaters allows raising the
media temperature successfully after the media feeding starts.
D
Temperature are controlled of different thermistors.
D
D
Incorrect heating may result in printouts with poor quality.
1
2
Printouts will not start untill the set temperarure are reached.
Different media have different heat temperatures for best result.
1 - Pre Heaters
Heat media before printing.
The pre-heating also prevents
the media from deforming when
heating during printing operation.
2 - Platen Heaters
Heat media to control the sizes
of dots landed on the paper (so
as to prevent the ink to spread).
3 -Thermistors
Detect the temperature of each heater.
4 - After Heaters
Heat media to dry ink after printing.
Read More
Service Manual
Chapter 2.5 I 4.4 .8
23
EPSON Stylus Pro GS6000
Operating Principles
Print Heads
- Correct heating .
Printer has 3 different heaters to heat media. Pre, Platen and After heaters.
Customer can from control panel increase or decrease the heating
from 30 to 50 degree C.
To get the best result in prints for the used media.
If the heating is incorrect you will get some defects in printout.
After
Heater To Cold
Platen
Pre - heating
Heater To Hot
c
Ink dry to slow
Color MIX gives banding.
Ink Dry to fast = Blank spaces gives banding.
Read More
Service Manual
Chapter
24
EPSON Stylus Pro GS6000---=
~~~~---~
./:>
----------=:.
jj~:-. ; ,. .__ - l --
Operating Principles
l. ~~---
- W aste Ink Tank I Ink Cartridges.
~~
This printer has 1 Waste Ink Tank (Maintenance Tanks) located on the right
side of printer and 8 Ink Cartridges mounted on back side of printer.
...__ hl.
~-·
.
€?§
-
(C ; ."'
~
.A
~
~t-
- W aste Ink Tank
One Waste Ink Tank on printers right side. Tank has a Waste Ink Full Sensor
and a va lve for open I close when empty tank. Do not trow away this tank!
Check so that Ink Tube and Sensor is correct mounted into tank.
If not, ink may land on the floor with unpleasant result!
- Ink Cartridges
Each Ink Cartridges has a memory chip (CSIC) with Information about unit.
Selection of ink types, detection of cartridges and the amount of remaining ink are controlled
and stores various pieces of information, such as ink colors and remaining amount of ink.
Note: "Chip" Levels in Ink Cartridges is not a 100% excact, it may wary between cartridges.
INK INFORMATION MENU
[9;. -
:a~~
Tank
L____J
A'J l
ij
--------------------
*
*
*
*
*
*
*
*
Manufacture
Ink Type
Ink Color
Ink Left
Production Date
Expire Date
Ink Life
Passed Time
Manufacture logo I information
Ink type information (dye/pigment)
Ink color information
Ink remaining of each ink cartridge
Product date information in < YY > I < MM > form.
Ink expire date of each ink cartridge
Ink life after opend cartridge information
Time after opened ink cartridge.
Read More
Service Manual
Chapter2.2./ 2. 7 I 4.4.1.2
25
EPSON Stylus Pro GS6000
Operating Principles
- Ink System.
The 8 Ink Cartridges is storing ink. They have a CSIC chip that have information on Ink Status.
The two way valves are located in the ink flow between the Ink Cartridges and the Sub Tanks.
The Sub Tanks that relays ink, are located between the Ink Ca rtridg es and the Print Head.
They prevent stopping printing due to an ink end during printing operation. Before Ink End it is possible
to print for 3 minutes. During printing it is possible to change ink cartd idg e without printer is stopping.
If Ink End is shown it is from the Sub Tank that is out of Ink . Not the Ink Cartridges.
The Valves Assembly are driven by so lenoids. They operate when carrying out the initial ink charge.
The Carriage Unit has two print head mounted in unit. Each head has eight 1 80 nozzle-rows (2 * 1 80) .
Head Cleaner c leans the nozzle surface of the Print Head with a rubber blade.
1 - Ink Cartridges
2 - Two-way valves
5 - Print Heads
6 - Head Cleaner
7 - Flushing Box
8- Pump Assys
9- Caps
Read More
Service Manual
Chapter 2 .2
26
EPSON Stylus Pro GS6000
Operating Principles
- Cleaning Unit.
Under normal working condition it is best NOT to Power Off printer. To keep print quality up.
You can set the PRINTER SETUP I REGULAR CLEANING to clean automatic every 1 to 24 hour after last printout.
This printer has 2 printhead, when they are in home position they are capped in Capping Unit.
If cleaning is needed pump starts and creates an vacum between Capp ing Unit and Print Head.
It is importent that the Capping Unit has an airtight seal against the printhead to get a good cleaning.
No nozzle firing is done at this point. Firing of nozzle is done into the Flushing Pad.
Wiping of printhead front is done by the rubber Cleaner Blade.
Ink are flushed out into Waste Ink Tank (Maintenance
Carriage Unit
Tanks) located on the right side of printer.
2 Print Head
Pt":\!P •.U,SY
(front)
T
[Front
Service Manual
Chapter 2 .2 7 4.4.11.3
27
EPSON Stylus Pro GS6000
Operating Principles
Tubes
Nuts
~~~~~
~~
0-rin g-s- - - - -.
- Print Head.
.l
-
Each printer has 2 Print Heads with different Head Rank numbers.
Whenever the PR INT HEAD is reinsta ll ed or replaced, the correspondi ng
adjustment must be carried out . When replacing the PRINT HEAD with a
new one, write down the 21-digit Head Rank ID indicated on the ID label
affixed to the new PR INT HEAD.
- Damper I V alve.
~
. .0!1'!)
~
8 dlannels/ head
1 damper is used for the ink supply of 2 colors .
(Same damper as in SP11880).
Do not use the damper for SP1 1880 because
th ey are washed in water. GS6000 Dampers
are marked with a blue dot! Always change
Damper when printhead is changed.
4 Dampers in each print head. - - - - - - Note:
For Adjustments Read Chapter 5.
Head Rank input Read Chapter 5.4
Valve
Read More
Service Manual
Chapter 2 .2 I 4.4.11
28
EPSON Stylus Pro G
Operating Principles
- Print Heads.
(takes at least 3 hours to change).
Stylus Pro GS6000 has 2 printheads mounted in the carriage unit.
Each head prints with 180 nozzles in color. To get higer
resolutions it prints with 2 * 180 = 360 Nozzles I dpi.
It use 8 Ink Cartridges with Ultra Chrome GS ink (Eco fiendly Solvent Ink).
Ink Tubes Left:
Ink Tubes Right:
Black, Yellow, Magenta, Cyan.
Orange, Green, Light Magenta, Light Cyan.
Each Ink Tube is divided into 2 Tubes,
connecting to Damper I PrintHead.
It is importent to get the tubes connected
to correct Damper in Print Head .
Each tube has a letter ring, ABCDE ....
Match this to letter engraved on cover.
..
Head 1 [.eft) CMYK
C
D
A
B
E
F
00
G
H
Head 2 (R imt 0 GLcLm)
A
C
D
B
--- ·- ·F
0-Gfl
00
E
G
H
When printer is not used for a log time it is best to DRAIN the printer from ink.
Use the MAINTENANCE MENU I HEAD WASHING Menu from Control Panel.
When printer ask for Ink Cartridges, Power Off printer (Se page 7).
Read More
Service Manual
Chapter 2.2 I 4.4.11
29
EPSON Stylus Pro GS6000
Operating Principles
- Circiuit Boards .
Printer ha s different PCBs with different function!
1 - Main Board Assembly.
2 - Sub-A Board Assembly .
3 - Sub-B Board Assembly.
4 - Sub-C Board Assembly .
5 - Sub-D Board Assemblies.
6 - Heater Relay Board Assembly .
7 - Heater Cont Board Assembly.
8 - PIS Term Board Assembly
9- PIS Board Assembly
(Power Supply).
(Power Supply).
1 0 - Control Panel .
Read More
Service Manual
Chapter 2.6 I 4.2
30
EPSON Stylus Pro GS6000
Operating Principles
- M ain Control Circuit Board and Control Panel.
Main Board and LV is located in a box under printer.
There are also 2 AC inlet plugs.
1 0 - Control Panel.
The Control Panel must be losend from the printer.
Only one FFC cable is conneted to Control Panel.
Power ON I OFF button is only a remote Power ON I OFF.
-When Service is done unplugg printer from AC Inlet.
- Power then ON printer to unload charges in printer.
r---- - - -- -
1 - Main Board Assembly
* Communicates with the RIP-computer.
* Processes received data.
* Controls the printer mechanism.
* Stores the correction values and various counters.
* Generates the voltages for the logic system from
the voltage of 42V supp li ed from the PIS Board
Assembly.
Read More
Service Manual
2 .6 I 4.4.6 .3
31
EPSON Stylus Pro GS6000
Operating Principles
- Main Control Circuit Board.
Description of the operation of MAIN Board, which controls and drives the Printer Mechanism in Stylus Pro GS6000.
Before start changing Main Board you must do a NVRAM Backup.
CN24
CN39 •
+---•
CN4 1•-t--t1CN28
CN29
CN34
0
CN11
~ LJ
- '\cN4 0"
~CN30
CN15•
CN22
T
.,.
c!J~...
~
Y
CN48
CN25
0--CNSS•
CN65
• "\cN 13•
CN 16"
CN31
CN35
CN 14"
"' : L"nused
CN509
D
C679PROG
-+-+- - Program PCB
CN507--
508"
CN506
CN2 0 - i - - - CN21--jtl_ _ __
.
CN3"- -
CN2•
D
New Main Board!
0
Auto Take Up Reel
USB 2.0
Ethernet
-Load Latest Firmware.
-Load NV RAM backup file.
??
- Set Init Ink Charge = OFF. Se 5 .4. 5
Default lnit Ink Charge = ON on new Main Board.
-Do this before Power On printer if you do not want !nit Ink Charge in printer.
CN1
CN2*
CN3*
CN5
CN8 *
CN11
CN12
CN13 *
CN14*
CN15*
CN16*
CN17*
CN18*
CN19*
CN20
CN21
CN22
CN23
CN24
CN25
CN26
CN28
CN29
CN30
CN31
CN34
CN35
CN38 *
CN39 *
CN40*
CN41*
CN48
CN64
CN65
CN66*
CN501
CN506
CN507
CN508 *
CN509
White
Black
Black
Black
White
White
Black
Red
Yellow
Blue
White
Black
Red
(FFC)
(FFC)
(FFC)
(FFC)
(FFC)
(FFC)
(FFC)
Red
Yellow
Black
Blue
Black
White
Black
Red
Yellow
Blue
(FFC)
White
Black
Yellow
White
(FFC)
Beige
White
P/S TERM BOARD ASSY (J2)
Unused
Unused
USB
Unused
CR MOTOR
PF MOTOR
Unused
Unused
Unused
Unused
Unused
Unused
Unused
SUB A BOARD ASSY (J1)
SUB- A BOARD ASSY (J2)
SUB-A BOARD ASSY (J3)
SUB- S BOARD ASSY (J 1)
SUB- C BOARD ASSY (J 1 l
SUB- D BOARD ASSY (J 1 l
SUB- D BOARD ASSY (J1)
VACUUM FAN
VACUUM FAN
VACUUM FAN
VACUUM FAN
CR LOCK SOLENOID
HEATER BOARD COOLING FAN
Unused
Unused
Unused
Unused
ALARM LED (CN 1)
SUB C BOARD ASSY (J4)
SUB- S BOARD ASSY (J8)
Unused
LAN
C679PROG
LVDS BOARD (J1) Read More
Service Manual
Unused
COOLING FAN PE
Chapter 2.6 I 4.4 .6 .3
32
EPSON Stylus Pro GS6000
Operating Principles
- Sub Boards Assembly.
2 - Sub-A Board Assembly.
Relay s the connection between the Main Board
A sse mbly and the following parts.
* CR Encoder
* P Edge Sensor
0I
* PG HP Sensor
* Print Heads
* Cooling Fans
3 - Sub-B Board Assembly.
Relay s the connection between the Main Board Assembly,
Sub-C Board A sse mbly, and the following parts.
* IC Cover Sensor (right)
* F Cover Sensor (right)
* M Cover Sensor (right)
* Sub Tank Sensors (right)
* Pump Motors
* Lever Se nsor
* Paper Rear Sensor
* CR HP Sensor
4 - Sub-C Board Assembly.
Relays the connection between the Main Board As se mbly, P/S Term Board
Assembly, Sub-B Board Assembly and the following parts.
* IC Cover Sensor (left)
* F Cover Sensor (left)
* M Cover Sensor (left)
* Sub Tank Sensors (left)
* PF Encoder
5 - Sub-D Board Assemblies.
Relay the connection between the Main Board Assembly and the following parts.
* Ink Cartridges (CSIC)
Read More
Service Manual
Chapter 2.6 I 4.4.6.8 - 11
33
EPSON Stylus Pro GS6000
Operating Principles
- Heater and Power Supply Circuit Boards.
Printer has different Power Supp lys with different
AC plugs. Connect them to different AC plug in wall.
lmportent.
Do not mix the 2 Serial Cables!.
6 - Heater Relay Board Assembly .
The asse mbly mounting the relays to control the heaters .
7 - Heater Cont Board .
Assembly Controls the heaters.
8- Power Supply Term Board .
Assembly Interface between the Main Board and the printer.
9 - Power Supply Board A ssembly .
Generates the voltage for this printer from the AC power supp ly .
Read More
Service Manual
Chapter 2.6 I 4.4 .6.4 - 7
34
EPSON Stylus Pro GS6000
Operating Prin ciples
Panel Board Assy
- Electrical Circuit Board layout.
The different Boards are:
- Main Board Assy
- Sub-A Board Assy
- Sub-B Board Assy
- Sub-C Board Assy
- Sub-D Board Assy
- Heater Relay Board Assy
- Heater Cant Board Assy
- P/S Term Board Assy
- P/S Board Assy
~r<J'H""LI!! L.OCKr--------,
- Contro l Panel
P.•'S Board ~~
...
1J
Assy
"[.!
SUB-A
. l
Print
SUB-C
Board
Assy
(] OW l
-·
·-·--· tl::--
-··-·
1
.-----Ec~-----------,
P.'" S Term
Board Assy
oo
I
Jls
oo
. od
. ht
D
Jl•
SUB-B
Bo;ud
Pum1) Motor ·1 -1101-iJ[]---[]
o.....
Pum1) Motor 2 -111
o=
11-iJ[]---[]
•'-" rn>< •n""" ,.,
od
"9
1,..------ro~
5L.IeT.a.t«~C:tC~I41 "-=,
n-----0
'N
lltS<Ltt«JD
Read More
::::>ervice Manual
.. I 0 11---{j '""-'" OOU:NC>Rj
L.napter 2 . 6 I 7 . 1
......___n
.l!O
D ..
..2 2
D
J.1 l
D
C:l
o----o
D----id
'JU.'#£ ~lLtO,R I
'.>.L'.C.
~LU.IOOJ
'i/U..'IC. SJL.ttOO.
35
EPSON Stylus Pro GS6000
Troubleshooting
- Troubleshooting Based on Panel Messages
Chapter 3 I Page 39.
This printer conducts self testing based on output conditions of each sensor.
Any error detected by self testing is displayed by an LCD message and LED or Activity indicator.
- Warning and Error Messages
Chapter 3.2 I Page 41 -44.
When a Warning or Error occurs, the printer displays a message instead of
"READY" or "PRINTING" messages . Active indicator is On or Flashing.
- Service Call Errors
Chapter 3.3 I Page 45- 49.
The Service Call errors are displayed on the LCD panel to inform the user that an error which requ ires a service
by a service personnel is occurring. Active indicator is On or Fla shing. Calls are in the following Error groups.
NEW group
11 xx =
1 2xx =
13xx =
17xx =
19xx =
1 Axx =
20xx =
30xx =
(D ... =
(F .... =
CR Related.
PF Related.
High Head Temperature.
Position (Scales/Encoders).
Heaters I Sub Tank Sensors Related.
Boards I Heads Related.
FW or NV-RAM Related.
Power Related .
Debug) .
CPU Related).
-Troubleshooting Based on Your Printout
Problems based on the media, heaters and printouts.
- Cleaning Cleaning can be done from Control Panel and with the following places I function s.
Maintenance Cleaning
- Menu I Maintenance I Cleaning 1 .4.1 I page 22
Cleaning
-Service Program. 5.4 .3 I 194
Ink Discharge Flag
-Service Program. 5.4.4 I 195
lnit Fill Charge Flag
-Service Program. 5.4.5 I 196
Wash Se uence On Off Fla
-Service Pro ram. 5.6.3 211
Read More
Service Manual
Chapter 3
36
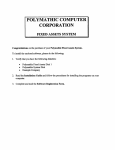
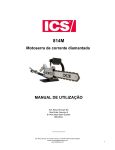
Preventive Maintenance
- Maintenance.
Any Preventive Maintanance indicated by messages on the LCD panel.
There are no regular "Maintenace Kit" for this printer oth~ !han .tl-se-r1\.llci"i;;t"enance.
Printer is deliverd with a M aintenance Kit + Metall tray:-This should be enough for first year Customer Maintenance.
After this, customer can order the 2, User Mainten~ nce I Cleaning Kit for maintenance (without metal tray).
&-r-t; o.:bt
~~<A~~
Maintenance Kit (C12C890611)
A - Plastic Gloves Plastic gloves for cleaning or maintaining the printer .
B - Flu shing Pad
Spare flush ing pad for replacement.
C - Cleaning Stick Used to clean the Cleaning Wiper or the PRINT HEAD.
a
c
b
\
.I
Ink Cleaner (C 12C890621)
Exclus ive liquid cleaner to remove ink stains.
1 - Ink Cleaner
Used to contain Ink Cleaner.
2- Plastic Cup
Check I Clean the Head Wiper
Check I Clean Around the Heads
Check I Clean the Heads
Check I Replace the Flushing Pad
Check I Empty the Waste Ink Tank
Check I Clean the Platen Pressure Rollers
Lubricate the carriage
\
f i,
I
i
I
I
0
I
I
\..._;'
Seven User Maintenance Points.
1)
2)
3)
4)
5)
6)
7)
2
IMPORTENT!
Cleaning Liqiud can be used to clean metal objects but NOT on plastic parts.
Clean metall objects in media path I platen with cleaning liquid.
Platen Pressure Roller in media path can be cleaned with soft cloth or with alcohol.
Avoid to tuch Pressu re Roller with your fingers, if you do, you get finger grease on rollers.
Read Service Manual chapter 6.3 and 6.4 how and what to clean.
- Maintenance Requet can ONLY be reset by using the Service Program firmware installed on your PC.
Part Name
Maintenance Req.
CR M otor
0001
Reset after change with Serv ice Program (6 . 7 1 2 1 2) .
Read More
Service Manual
Chapter 6.4
37
EPSON Stylus Pro GS6000
Training Exercise 2
- Power Off printer.
-Take off Covers.
- Power On Printer and check printer movements and functions.
- Check where the different PCBs are located.
- Check differnt Switches and Sensors positions.
- Check the functions of "Carriage Lock".
-Check the function of pumps when cleaning.
- Check the funktion of Paper Feed.
-Check the
Read More
Service Manual
38
EPSON Stylus Pro GS6000
Disassembly I Assembly.
-You must follow the Service Manual Chapter 4 when disassembly and assembly printer.
Disassembly WARNING
1. Disconnect the 3, AC cable from the AC inlet on the backside of the main unit everytime power is not required.
The Stylus Pro GS6000 printer has a secondly switch type for the power supply board.
Even if you turn off the printer on the control panet main power for driving motor and
print head will be on each board, so always disconnect the 3 AC cable from the Printer AC inlet.
2. After unplug the AC Cable, Power On printer on Control Panel. To empty chaged power in different PCBs.
3. In you need to remove or re-seat the Flexible Flat Cable, always pull or push it vertically towards each connector.
To do this by force without care, the PCBs can be damaged, with possible dot missing or head broken problems.
4. Always be aware of Static and take appropriate measures to overcome this.
5 . Solvent Ink will melt and do marks in any matetial. Ink Drops or marks are NOT possible to clean or remove.
Watch out for ink drops on FFC and cables to avoid shortcuts.
6. Use gloves to protect hands, watch out for drops in eays or mouth.
7. Do not mix water and solvent ink.
8. Do not use the TakeUp Unit when the SERVICE PROGRAM is used. Can not go backwards.
Read More
Service
Chapter 4.1
EPSON Stylus Pro GS6000
Control Panel
- Service Man . Mode I "Service Man Mode Map"
- For Service purpose you can do test prints and c leaning
cycles and also adjustments from control panel
from Service Man. Mode.
In Appendix 7 there are "Service Man Mode Map" and "User Menu Map" for better understanding of Menu structu re.
-Service Man. Mode.
(Pause
+ Menu > + PaperFeed V + PowerOn)
Se Service Manual 1.4.4/ 29
To adjust and work on the GS6000 printer you need to have "Service Program" installed on you PC.
Some adjustments and set up can be done from Control Panel.
Maintenance Reset can .o.nl.y_ be done from "Service Program" program.
After Power On in Service Man. Mode you can se lect in menu between
Se Service Manual "Service Man Mode Map" Appendix 7 or Page 183.
SELF TESTING
-Test
- Adju stment
- Life
-Feed
- Status
Read More
Service Manual
Chapter 1.4.4 I 5.8.3
40
EPSON Stylus Pro GS6000
Service Programs
- There are Service Programs that Service Engineer need and must use.
They should be in stalled on the PC in advance.
* Service Program
(5.1.5 1 179)
There are SERVICE PROGRAM for Stylus Pro GS6000 on ly .
SERVICE PROGRAM for Stylus Pro GS6000 does not work with
other Stylus Pro printers.
SERVICE PROGRAM for Stylus Pro GS6000 must be installed in
the correct way on the PC that should be used for adjustments.
It is not possible to just copy the firmware.
No Driver need to be installed.
* NVRAM Backup Utility page
42 (5.2 1 185)
A()JUS T MENTS
Individ...,l
Fl RMI'\IARE
UPDATE
TOO l
P'RINT
~lte1
.md ~ prrt 1~
lt.'AG£
*FIRMWARE Update Tool page 47. (5.6.2 I 209)
FLAG C HANGE
* LFR Remote Panel page 45.
This is a Custom Program that Service Engineer also can use.
& CO UNTER
RESET
PANEL II.IENU
SUMMARY
'{..., oil
""'"I r+.o.._
E:cil
Note: Do not use the TakeUp Unit when the SERV ICE PROGRAM is used.
Read More
Service Manual
Chapter 5.1.5
41
EPSON Stylus Pro GS6000
Service Programs
- NV RAM Backup Utility.
When the Main Board is replaced, it is importent that parameters stored in the NVRAM on the old
Main Board must be backed up and written onto the new board using the NVRAM BackUp Utility.
Parameters from the Old board can then be moved to the New Main Board and make change more easy.
Printer should be in READY Mode for this to work. (No driver is needed) .
If the printer is in ERROR Mode you must start printer in SERVICE MAN Mode.
NVRAM Back Up Mode
(Read 5.2 I 185)
SERVICE MAN Mode
(Pause
+ Menu> + Paper FeedV + Power On)
After BackUp is done, save the parameters on your PC disk on the printers Serial Number.
-------------
~ NV -RAM BACKUP UTILITY
~~;;~::;~~I
Serial Number:
~
NVRAM Write ~
Open
J
EPSON Stylus Pro
I
NVRAM is read ...
· 'll e
'111111111111
Cancel
Exit
After changing Main Board ....
- Start program
- Open saved File
- Read back this file to the NEW Main Board.
Read More
Service Manual
Chapter 5 .2
42
EPSON Stylus Pro GS6
Service Programs
2
-
--
-SE RVICE PROGRAM for Stylu s Pro GS6000 only.
Used for se rvice operations after parts replacement or failure.
Advanced print quality adjustment and Head Rank input.
SERVICE PROGRAM ha s 2 Mode s, Sequential and Individual.
Start from START - RUN and browse to servprog.exe
Mu st be set to USB or Network Port. (No driver needed)
Start with printer in READY in display.
-----·--
-
~ADJUSTMENTS (Sequence)
This mode guides you through each parts necessary 1
Select one or several parts that need adjustments in the left
button.
your selection is finished, click OK to check see a list of relevant adll~strnertts-lm
the parts you selected.
CR Belt
CR Cursor
CR Motor
CR Reduction Belt
Head R O,G,Lc,Lm
Main Board (Back-up NGJ
Main Board (Back-up OK)
PF Motor
PF Reduction Belt
Pump Motor
Wiper (Cleaner Head)
Head L M,C,K,Y
ARMWAR£
UPDATE
Input Serial Number
Check Network Communication
El CR Mechanism
CR Belt Tension Adjustment
CR Reduction Belt Tension Adjustment
·· CR Height Adjustment
Media Edge Sensor Test
Media Side Margin Adjustment
CR Lock Unlock/Lock
PF Mechanism
PF Reduction Belt Tension Adjustment
Paper Feed Adjustment
Rear Sensor Test
El Heads
Head Rank Input
Nozzle Check Pattern
Cleaning Very Light Light Medium and Heavy
PF direction CR SIant Check
Head Slant & Alignment Adjustment
··· Head Slant & Alignment Check
Head Uni-D Gap Adjustment
Head Bi-D Gap Adjustment
All Patterns (Adjustment Result Check)
TOO l..
Add
Back
PRINT
Remove
IMAGE
Remove All
FLAG C HANGE
8. COUtfTER
RESET
P A EL P..IENU
SUMMARY
OK
Back
Read More
Service Manual
Chapter 5.1.5
43
EPSON Stylus
Print Head Replacement.
- Print Head replacement I Head Rank ID .
Every printhead ha s its own Head Rank 10
which compensates unit-to-unit variation.
Head Rank consist of head particular
information for the best driving voltage set.
Whenever the printhead is replaced, the
Head Rank 10 of the new printhead must
be written using Service Program.
Head Rank Input
W henever a Print Head is replaced, input the head rank that consist of head specific information for the best
driving voltage setting.
[Procedure]: 1. Write down the Head Rank ID indicated on the ID label affixed to the new Print head. (See fig.)
2. Enter 21-digit ID into the appropriate edit boxes in the same wa_y as indicated on the labeL
3. After the print head is replaced, click the [Write] button to register it on the printer.
ATTENTION: Do not invert head L (MCKY) and head R (OGLclm) codes!
Click the [Finish] or the [Next] button when _you are done.
It is importent that you write down the
Head Rank ID before Print Head is in stalled.
It is not possible to read label when
printhead is installed in printer!
Always doubblecheck the Head Rank so
that it is correct before in stalling Print Head.
Note that the printer has 2 printheads with
2 different Read Ranks.
Head L (M.C_K_Y)
~ Head R (O,G,Lc,Lm)
····'./rite
_' _
E;_
:;r_
eg_a_er_·,d_e_JI_ _ s_l_ut_fo_
·r ____.~
Avbr_yt
1. Write down the Head Rank ID indi cated on the ID label affixed to the new Printhead. (See fig.)
2. Enter 21-digit ID into the ed it boxes in the same way as indicated on the label.
3. After printhead is replaced, c li ck the [Write] button to write it to printer.
Read More
Service Manual
Chapter 5 .4.1
44
Printer Driver I Utility
EPSON LFP Remote Panel
- EPSON LFP Remote Panel.
------------------------------------------ f;
Select a printer_ then select the function you want to perform.
A customer program that you also
can use for service purpose.
Thi s program come on the customer
CD together with printer or can be
downloaded from www .epson .co.uk
Printer
I
v
EPSON Stylus Pro GS6000
. - - - - - - - - - - - - - --iEPSON Stylus Pro 4880
Media Adjustment
EPSON Stylus Pro 7800
Make print settings and
EPSON Stylus Pro 9800
EPSON Stylus Pro 9880
EPSON Stylus Pro 11880
Jf:S.ON "S.tl'lus.Pro _G56000.
Procedure
from the Printer list,
application you want to
Firmware Updater
The firmware can be updated.
Use for:
* Media Adjustments.
- Custom Paper Set Up
-Activate Custom Paper
- Paper Feed Adjust
- Bidirectional Adjustment
*
You cannot print with this driver.
Firmware Update.
Mit dies em Treiber kann nicht gedruckt werden.
No puede imprimir con este controlador.
- Driver for GS6000 .::: -:::::_--:=._ __
These function s can only
be used if driver is installed.
Thi s is not a Print Driver.
Only for Communication.
Vous ne pouvez pas imprimer avec ce pilote.
Status
Anvand som standardskrivare
Avbryt alia dokument
Print driver avalible throu
RIP-manufatuers only.
Not possible to install in
Windows as a printer .
Nao
Utskr1fts1nstalln1ngar ...
Gor paus i utskrift
lmpossibile stampare con questo driver.
U kunt niet afdrukken met deze driver.
epossfvel imprimir com este controlador.
Jl
,___o_K_ _,j [
Avbryt
yerkst.311
Dela ut ...
Anvand skrivaren offline
Egenskaper
Stang
080405B.pdf
;tall
:F Remote Panel
45
Firmware Update 1.
- Update firmware from LFP Program.
Use this function for firmware update.
You can update Printer or Network Firmw
You must have the Communication
Driver installed and the correct printer
selected. (Only Working Printer!)
E "'" F;~
_:=-----------------File-N-ame
Firmware for the printer is written to
the Flash ROM on the Main Board.
FIRMWARE UPDATE mode is
automatically selected.
1
Version Information
Current Firmware Version:
Unknown
Updat.;,
Firmware File Version:
* Update Firmware with LFP Remote Panel
1 . Connect the printer to the host
Update Network Device Firmware
(with a USB cable).
2. Turn the printer on.
3. Check that the printer is "READY".
4. Select the correct firmw are.
* Printer
(xx_q .UPG format)
* Network
(xx_q .UPG format)
5. Se nd F/W file from host
LFP Remote! Pane.
ile--N-ame
Version Information
Current Firmware Version:
Unknown
Firm'Nare File Version:
Help
Exit
6. F/W installation is completed.
7 . The printer reboots automatically.
lmportent:
There are different types of firm wares for different situation s .
(For Users, use the EPSON LFP Remote Panel soft to upgrade.)
- MP_Txxxxx _q.UPG
- MPa_Txxxxx.UPG
(For Serviceman , use the Service Program soft to upgrade.)
TE080405B.pdf
Install
LRF Remote Panel
46
EPSON Stylus Pro GS6000
Firmware Update 2.
Do not UI)Qrade the firmware in Serviceman Mode or Firmware Ul)date mode.
With this 1nogram, the 1ninter must be started in Normal Mode when transmitting the
firmware files in order to 1nevent an unexr)ected failure ofthe UI)Qrade.
- Update I Installing Firmware from Service Program .
The firmware of the printer is sto red onto the
Flash ROM on th e Main Board.
Update firmware after Main Board are repla ce d .
Or when firmware upd ate is req uired .
There are four kinds of firmware provided for this
printer. Each of th em mu st be updated individually
is needed. Do this with USB interfa ce.
r CURRENT F/IN VERSION - - - - - - - - - - - - - - - - - - - - - - ,
PRINTER
NET'vVORK
I,;...... ."G·······rnr··················
......., II
.... ~~ ........ .9.r.rn~ti.9.1::'....... J
I PRINTERIHEATERINET'vVORK FIW UPDATE via USB
Browse
SELECTED FILE VERSION
SELECTED FILE TYPE
* Main firmware
* Heater firmware
* Network firmware
Update
~ NETWORK/EDM
F/IN UPDATE via NET'vVORK - - - - - - - - - - - - - - - - - - ,
* EDM firmware
Firmware Update Tool.
II
Update
Exit
1. Start the Firmware Update Tool.
2. Select the firmware file with Browse. ( MPa _Txxxxx .UPG)
3. Click the [Update] button to transfer the firmware data.
4. When the transferring is completed, "Completetion" pop-up is displayed.
Printer should be in READY Mode for this to work. (No driver is needed).
If the printer is in EROROR Mode you must start printer in Firmware Update Mode .
Firmware Update Mode (Menu > + < + Paper Feed/\ + Paper FeedV + PowerOn)
Firmware Update Mode (Read 5 .6.2 1 209) There are different type s of firmwares .
- MP_Txxxxx _ q .UPG
(Use the EPSON LFP Remote Panel to upgrade.)
- MPa Txxxxx.UPG
(Use the Service Program to upgrade.)
Read More :
TE0804058 .pdf
Service Man ual
Chapter 5.1 .20 I 5.6.2
47
r-· =EPSON Stylus Pro GS6000
Training Exercise 3
- Power on printer.
-Start Up SERVICE PROGRAM program.
* Select Sequential or Individual Adj. Mode.
-Start Up and run the NVRAM BACKUP program.
- Start Up Firware Update Utility.
*Select and do a FIRMWARE UPDATE (2)
-Start Up LFP Remote Panel Program.
* Select and test the different functions.
* Select and do a Fl RMW ARE UPDATE ( 1 )
Read More
Service Manual
48
EPSON Stylus Pro GS6000
Installed Program for Service !
-You must have a PC with the following program installed on your PC.
* USB Cable
* "Service Program" (for SP GS6000)
* "NVRAM Util".
* "Firmware Update Tool"
* "LFR Remote Panel"
* Service Manual Stylus Pro SP GS6000
Service Tools
- Service Ink cartridge 350ml.
Flashing Point 71 degree C.
1500235
INK CART.UNBOXED,BK,PIG'T;350ml
1500236
INK CART.UNBOXED,C,PIG'T;350ml
1500237
INK CART.UNBOXED,M,PIG'T;350ml
1500238
INK CART.UNBOXED,Y,PIG'T;350ml
1500239
INK CART.UNBOXED,LC,PIG'T;350ml
1500240
INK CART.UNBOXED,LM,PIG'T;350ml
1500241
INK CART.UNBOXED,GRN,PIG'T;350ml
1500242
INK CART.UNBOXED,OR,PIG'T;350ml
C13T623000
Clean Cartridg es. Use 8 for each printer. (Can only be used once)
1502538
Marking Film (Media) To be used in all adjustments.
Gloves Latex I Nitrile Gloves
-Tools.
Cv'
I_
f ~fHI\5 vO{i
A
r{ct·
11 '(\
t/'\
~
~
1501560
1501561
1501562
1501563
GS6K
GS6K
GS6K
GS6K
I
I
I
I
TUBE HOLDER
SPRING SET TOOL
HEAD HOLDER
PG ADJUSTMENT JIG
- Maint Kit.
C 12C890611
C12C890621
User Maintenance Kit
Ink Cleaner Kit
Read More
Service Manual
49
EPSON Stylus Pro GS6000
Where To find info
WEBs I TECH WEB I APMS
- EPSONs WEB,
http:llwww.epson.sel
or
http:llwww.epson.co.ukl
- lnfoCare TECH WEB I APMS http:llsweintranet.infocare.orglapmsl
Search on
P = PRINTER
under EPSON you can find
- Manuals
- Spare Parts List
- User • s Referance Manual
- Firmware
- Technical Bulletins
- Test and Maintenance Program
- Link to EPSON Printer Drivers
- lnfoCare TECH WEB I APMS http:llsweintranet.infocare.orglapmsl
Under PRINTER there is also a LINK to
KNOWN PRINTER PROBLEM and SOLUTION LINK
- IC
IC
Reservdelsdatas
Part Finder
http :Ilsweintranet. infocare .orglsparepartl
50
EPSON Stylus Pro GS6000
END!
Anders Nordin
lnfoCare Sweden
51