1
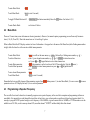
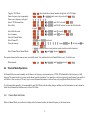
Wouxun KG-UV6D Wouxun KG-UV6X VHF/UHF Handheld FM Transceiver User's Manual Version 1.2, May 23rd, 2012 Table of Contents 1 Preface...............................................................................................................................................................................................................................3 2 Front Panel Diagram.........................................................................................................................................................................................................4 3 LCD Display Diagram......................................................................................................................................................................................................5 4 Quick-Start Guide.............................................................................................................................................................................................................6 4.1 Switching Between Modes.......................................................................................................................................................................................6 4.2 Menu Mode...............................................................................................................................................................................................................7 4.3 Programming a Repeater Frequency.........................................................................................................................................................................7 4.4 Channel Mode Operations ........................................................................................................................................................................................8 4.4.1 Channel Mode Sub-Modes................................................................................................................................................................................8 4.4.2 Odd Repeater Channel Offsets, Cross-band Settings........................................................................................................................................9 4.4.3 Channel Memories.............................................................................................................................................................................................9 4.5 Dealer Mode..............................................................................................................................................................................................................9 5 Standby, Scanning, Reverse, Monitor, and DTMF.........................................................................................................................................................10 5.1 Standby (Dual Receive) ........................................................................................................................................................................................10 5.2 Scanning..................................................................................................................................................................................................................10 5.3 Scanning CTCSS/DCS............................................................................................................................................................................................11 5.4 Scanning – Priority and Skipped Scans..................................................................................................................................................................11 5.5 Reverse Frequency..................................................................................................................................................................................................11 5.6 Monitor....................................................................................................................................................................................................................11 5.7 DTMF......................................................................................................................................................................................................................12 6 Extend Battery Run-time................................................................................................................................................................................................12 7 Locks and Resets.............................................................................................................................................................................................................12 7.1 Locks.......................................................................................................................................................................................................................12 7.2 Resets......................................................................................................................................................................................................................13 8 RPT and SideKey Functions..........................................................................................................................................................................................13 8.1 RPT (PF2) Multi-function Key...............................................................................................................................................................................13 8.2 Side Key 1 (PF1).....................................................................................................................................................................................................14 8.2.1 FM Radio Mode..............................................................................................................................................................................................14 8.2.2 1750Hz Burst Tone..........................................................................................................................................................................................15 8.2.3 SOS Function...................................................................................................................................................................................................15 8.3 Side Key 2...............................................................................................................................................................................................................15 9 Other Functions...............................................................................................................................................................................................................16 10 Software........................................................................................................................................................................................................................17 11 Useful Links..................................................................................................................................................................................................................18 2 1 Preface The Wouxun KG-UV6D and UV6X VHF/UHF FM handheld transceivers are quality, modern technology radios. Unfortunately, the user manual provided by Wouxun is not well organized and poorly translated. This revised manual addresses that shortcoming. This guide is designed to teach you how to manually program the radio. It will not duplicate some sections of the Wouxun manual (i.e. safety, description of functions, shortcut sheet, SOS function, wire cloning, charging, programming guide, troubleshooting, CTCSS-DCS charts, specifications, accessories, certifications). Programming via software is only briefly discussed in Section 10. All keypad entry sequences in this manual are designated with Courier font typeface and a relevant coloured background, e.g.: MENU 1 4. The rotary encoder knob is designated: ROTARY . This revised user's manual applies to the UV6D and UV6X radios – they share similar specifications, functions and keys with the KG-UVD1P, UV2D and UV3D radios. The known differences is that the 6 series may have an upgraded case, upgraded firmware and software, more memories, an additional 2.5KHz frequency step, a standard rather than reverse SMA antenna connector, wider TX-RX ranges, two extra menu items, an extra RPT multifunction key, 1700mAH battery and a dual slot charging unit. These additional features may not apply to all “6” series radios. Two diagrams and the logo from the Wouxun manual have been incorporated in this document. Acknowledgements to Quanzhou Wouxun Electronics Co. Ltd. in advance for their use. Thanks also to Bob, K0NR and Ed Griffin for their explanations of how the RPT key works. PS: the correct English language pronunciation of “Wouxun” sounds like “whoa-sheng”. Please freely distribute this document. Errata and constructive suggestions for improvement to [email protected] . Larry, VE7EA 3 2 Front Panel Diagram 4 3 LCD Display Diagram 5 4 Quick-Start Guide The key concept to understand the Wouxun KG-UV6 is “mode”. This radio has five modes: • • • • • VFO (Frequency) Mode Channel (Memory) Mode (which has 3 sub-modes) Menu Mode FM Radio Mode (see Section 8.1.1) Dealer Mode (see Section 4.5) The mode determines what is shown on the LCD display and how the radio behaves. The two most important modes, VFO and Channel Mode, can also be toggled to display either dual or single frequencies. Note that “Frequency” and “Channel” modes as used by Wouxun correspond to “VFO” and “Memory” modes, respectively, as used by Japanese radio manufacturers. It is essential to know how to switch between these modes. 4.1 Switching Between Modes Turning the POWER SWITCH/VOLUME CONTROL knob clockwise for the first time the radio should be in dual frequency VFO Mode. After a 3 second system initialization you will see a 146 MHz (2M) frequency displayed above a 440MHz (70CM) frequency. If not in VFO Mode the radio will be in Channel Mode. This is obvious by the fact that channel numbers will be seen at the far right of the LCD display. To toggle between VFO and Channel Modes: MENU S/D To toggle between single and dual frequency display in either VFO or Channel Mode: S/D (if dual frequency is selected then TDR appears at top centre of LCD display) (if single frequency is selected then KGUV6D replaces the secondary frequency/channel on the LCD display) To select the master frequency when in dual frequency display in either VFO or Channel Mode: A/B (master frequency is indicated by an ► arrow at left side of LCD display) 6 To enter Menu Mode: MENU To exit Menu Mode: EXIT (or wait 5 seconds) To toggle FM Radio Mode on/off: Side Key 1 (the button immediately below the PTT button. See Section 8.2.1.) To enter Dealer Mode: see Section 4.5 below. 4.2 Menu Mode There are 32 menu items, some with numerous choices (parameters). However, for manual repeater programming you need learn only four menu items (# 16, 24, 25 and 28). Most other menu items are “set and forget” options. When in Menu Mode the LCD display contains two lines of information – the upper line is the name of the Menu Item (with a flashing menu number at right) while the lower line is the current or default menu parameter. To enter Menu Mode: To select a Menu item: To enter Menu parameter: To select Menu parameter: To save chosen Menu parameter: To exit Menu Mode: MENU (you will see the menu name, e.g. STEP , followed by a flashing menu number, e.g. 01 ) either: 1) press keypad menu number, e.g. 2 1 or, 2) ROTARY to desired menu item or, 3) press ▲ or ▼ keypad buttons to select desired menu item. MENU (the parameter is on the lower line of the LCD menu display. Note the ► arrow.) either ROTARY to desired menu parameter or press ▲ or ▼ keypad buttons to select. MENU EXIT (or wait 5 seconds) Remember that to successfully change a Menu parameter requires three MENU button presses: 1) to enter Menu Mode, 2) to move cursor ► to menu parameter on lower LCD display line and, 3) to save selected parameter. 4.3 Programming a Repeater Frequency The user will at least need to know how to manually program a new repeater frequency in the event that a computer and programming software are unavailable. It is suggested you work through the steps below at least twice, once as shown and a second time with your local repeater details. For example, to program a VHF repeater having a receive frequency of 146.840MHz, a typical transmit offset of -600KHz, a CTCSS transmit access subaudible tone of 103.5Hz, saved to memory channel #25, name that channel “VE7RPT” and then finally delete that channel: 7 Toggle to VFO Mode: Ensure frequency step is appropriate: Enter receive frequency on keypad: Select CTCSS transmit tone: Select offset: Select offset direction: Save to memory: Switch to Channel Mode: Select Channel 25: Name the memory: Select Channel Name Channel Mode: MENU S/D (there should be no channel numbers at right side of LCD display) MENU 1 MENU ▲ or ROTARY (until correct step is selected), MENU EXIT 1 4 6 8 4 0 MENU 1 6 MENU ▲ or ROTARY (until 103.5 selected), MENU EXIT MENU 2 4 MENU ▲ or ROTARY (until 00.600 selected, or enter the offset from the keypad), MENU EXIT MENU 2 5 MENU ▲ or ROTARY (until - selected), MENU EXIT MENU 2 8 MENU ▲ or ROTARY (until 025 selected), MENU EXIT MENU S/D ROTARY until CH-025 is selected MENU 2 7 MENU V E 7 R P T (using ROTARY and ▼ for digits and ▲ for characters),MENU EXIT ( ROTARY clockwise moves to next position, counter-clockwise selects characters) MENU 2 2 MENU ▲ (until NAME selected), MENU EXIT The repeater channel and its name are now successfully stored. You would need to be in Channel Mode to use it. To delete it now: Delete channel: MENU 2 9 MENU ▲ or ROTARY (until CH-025 selected), MENU EXIT 4.4 Channel Mode Operations In Channel Mode you cannot manually use the Menu to set frequency step, transmit power, CTCSS, DCS, bandwidth, offset frequency, or shift direction. The reason for this is to protect saved channel specific information. You cannot also overwrite a previously stored channel, you must first of all delete it, then re-create it. The only way to overwrite channel information is with software or by using Dealer Mode (Section 4.5 below). To edit channel data manually it is recommended to enter VFO Mode, make the setting changes and then save that information in a new channel or delete the old channel first and then rewrite it from VFO Mode. 4.4.1 Channel Mode Sub-Modes When in Channel Mode you can choose to display either the channel number, the channel frequency or the channel name: 8 Enter Channel Mode: Select Menu Option 22: 4.4.2 MENU S/D (you should see channel numbers at right side of LCD display) MENU 2 2 MENU ▲ (to select CH = channel number, CH FREQ = channel frequency, or NAME = channel name), MENU EXIT (There is also a FREQ parameter, to set VFO mode on, but it is easier to toggle using MENU S/D ) Odd Repeater Channel Offsets, Cross-band Settings Normally, amateur radio repeaters have an rx/tx offset of 600KHz on the 2M band, 1.6MHz on the 1.25M band and 5MHz on the 70CM band. If you wish to program an oddball offset or otherwise operate cross-band you can directly program such offsets with software or use what Wouxun refers to as “dis-channel” settings. An example for an assumed satellite with 70CM FM uplink and 2M FM downlink follows: Toggle to VFO Mode: Enter receive frequency on keypad: Save RX frequency to memory: Enter transmit frequency on keypad: Save TX to same memory position: 4.4.3 MENU S/D (there should be no channel numbers at right side of LCD display) 1 4 5 9 5 0 MENU 2 8 MENU ▲ or ROTARY (until 026 selected), MENU EXIT (the receive downlink frequency is now saved) 4 3 5 9 5 0 MENU 2 8 MENU ▲ or ROTARY (until CH-026 selected), MENU EXIT (the transmit uplink frequency is now saved) Channel Memories The radios have 199 standard memory channels and 18 FM radio memories. When programming manually it is important to know what the unused channels are. Use ROTARY in Channel Mode to check the channel numbers in memory, or enter Menu 28 (MEM-CH): MENU 2 8 MENU , ROTARY , programmed channels show as, e.g., CH-025 while free unused channels appear as 025, EXIT 4.5 Dealer Mode Normally channel information is locked. If you must change channel parameters outside of software or without deleting and recreating a channel then use Dealer Mode. NOTE: the author has not checked this method on a UV6 radio, but it is reported to work: Enter dealer mode: Hold down keypad# 8 while turning the radio on POWER SWITCH/VOLUME CONTROL (you should see 2 lines of 6 underscore characters on the LCD display) Release key 8 after beeps 9 Enter dealer password: 2 6 8 1 6 0 Select required channel to alter Make required channel parameter changes Restart to exit dealer mode: MENU A/B MENU 5 Standby, Scanning, Reverse, Monitor, and DTMF “Standby” is used by Wouxun to refer to watching activity on both frequencies (dual receive) when in dual frequency or dual channel modes, “Scanning” is an automatic frequency/channel change to detect busy frequencies, “Reverse” refers to receiving the transmit frequency of a repeater input and “Monitoring” means to open the squelch temporarily to listen to a weak signal. How scanning behaves is dependent on the mode. 5.1 Standby (Dual Receive) When in dual frequency or dual channel mode the master frequency is indicated with an ► arrow at left of the chosen frequency/channel. However, the radio is also watching the secondary (sub) frequency. If the master frequency is clear signals detected on the sub frequency break through and an S is displayed in the upper right of the LCD display. If you do not require this dual receive behaviour switch to single frequency/channel mode with S/D . In single frequency/channel mode KGUV6D is displayed in place of a second frequency or channel. 5.2 Scanning Ensure frequency step is appropriate: MENU 1 MENU ▲ (until correct step is selected), MENU EXIT To scan in either VFO, Channel or FM Radio Mode: SCAN* (long press) To change scan direction: ▲ or ▼ To tune to a frequency or channel: ▲ or ▼ (long or short press, or ROTARY ) To set scan type: MENU 1 9 MENU ▼ to select TO/CO/SE scan type, MENU EXIT TO = time out scan - continues scanning if no operations 5 seconds after receiving a signal CO = carrier out scan - pauses when receiving signals and continues 3 seconds after no signal SE = search scan - scanning stops when a signal is received Note that these Wouxun radios do not have VFO mode scan limit edges. 10 5.3 Scanning CTCSS/DCS This advanced feature enables one to scan for a signal that is being transmitted on a repeater input frequency and determine the CTCSS or DCS tone/code necessary to access that repeater. This function only works in VFO Mode on the master frequency (indicated with a ► arrow): Toggle to VFO Mode: Set scan type to time-out: Select master frequency: Start frequency scan: When repeater signal detected: Start the tone/code scan: Set tone/code temporarily: MENU S/D (there should be no channel numbers at right side of LCD display). MENU 1 9 MENU ▼ to select TO , MENU EXIT A/B (if necessary enter scan start frequency now on keypad) SCAN* (long press) MENU 3 2 MENU ▼ or ▼ to choose either a CTCSS or a DCS scan, MENU MENU, EXIT Now enter this CTCSS/DCS tone in a channel memory or into Menu settings 15, 16, 17 or 18, as appropriate. 5.4 Scanning – Priority and Skipped Scans A priority scan frequency can be programmed with software. With this type of scan the priority scan frequency is checked alternately. Specific channels can also be designated to be skipped (ignored) during scanning. Both of these features are only available through software. 5.5 Reverse Frequency To monitor the reverse (transmit input) frequency of a repeater channel: An R will be displayed in the upper centre of the LCD display. SCAN* (short press) 5.6 Monitor To open the squelch to attempt to hear a weak station: Side Key 2 (long press) The BUSY symbol will appear at bottom left of the LCD display and the signal meter will register. 11 5.7 DTMF DTMF encoding (touch tones) are available by pressing and holding the PTT button while at the same time pressing the required DTMF tone code keys on the keypad. For example, to access an IRLP link through a repeater you might enter the following codes: PTT hold, # 9 3 1 4 DTMF touch tones for A, B, C and D can be transmitted by pressing MENU , ▲ , ▼ , and EXIT , respectively. Via software more DTMF functions are available: toggle transmit ANI (automatic number identification) ID Code, edit ANI ID Code, set delay time for ANI code and toggle DTMF sidetone. 6 Extend Battery Run-time There are number of functions which can extend battery life. These are listed below in approximate order of effectiveness: 1. 2. 3. 4. 5. 6. 7. Reduce transmit power: Toggle power during transmit: Set time-out timer to low value: Set power saver mode to on: Set voice prompt to off: Set keypad beep to off: Set auto backlight to off: MENU 4 MENU ▼ to select L for low power out (1 watt), MENU EXIT PTT S/D (press while transmitting, remains at this power until restart) MENU 6 MENU ▼ to select number of seconds to transmit time-out, MENU EXIT MENU 3 MENU ▼ to select ON ,(reduces active receiver on time), MENU EXIT MENU 9 MENU ▼ to select OFF , MENU EXIT MENU 1 1 MENU ▼ to select OFF , MENU EXIT MENU 2 3 MENU ▼ to select OFF, MENU EXIT (backlight does not work with Sidekey 2 nor with PTT.) When the battery is near exhausted the radio will alert the user with: 1) a voice prompt, 2) a backlight flash once every 5 seconds and 3) clicks will be emitted. 7 Locks and Resets 7.1 Locks To toggle a keypad lock on/off but still enable receive and transmit on the master frequency last in use: # (long press) A symbol will be displayed in the lower right corner of the LCD display when lock is activated. The keypad lock is saved through a system restart. 12 To lock the keypad automatically after 15 seconds of no input: MENU 1 4 MENU ▼ to select ON, MENU EXIT 7.2 Resets To reset (revert to factory settings): 1) all parameters for VFO mode: 2) all parameters for VFO and Channel Modes*: To restart the transceiver (rather than ON/OFF/ON): 8 MENU 3 0 MENU ▼ to select VFO, MENU EXIT MENU 3 0 MENU ▼ to select ALL, MENU EXIT (*Caution: the ALL command erases all your channels) MENU A/B MENU RPT and SideKey Functions There are two side key buttons on the left case side of the KG series radios, immediately below the PTT button. Side Key 1 is the upper button, Side Key 2 the lower. The KG-UV6 also has a circular green RPT multifunction key immediately above the A/B key. The Side Key 1 is sometimes designated “PF1” and the RPT key is “PF2” in the Wouxun manual. 8.1 RPT (PF2) Multi-function Key By default this RPT button selects between six different transmit/receive/repeater shift functions, with offsets using the frequency shift from Menu #24. These RPT features only work when in VFO Mode. The options are: +R -R R + OFF = positive shift on receive frequency = negative shift on receive frequency = no shift = positive shift on transmit frequency = negative shift on transmit frequency = normal VFO mode without shift 13 For example, assume that your shift in Menu #24 is set at 600KHz (00.600), and that you are in VFO mode with the receiver frequency set at 146.940 MHz. The results of each button press of the RPT key will be: +R -R R + - RX 147.540 146.340 146.940 146.940 146.940 TX 146.940 146.940 146.940 147.540 146.340 In addition, the RPT key can also be programmed to either: activate a stopwatch, turn on the flashlight, enable the SOS function, turn on the FM Radio, or inactivate the button entirely: MENU 2 1 MENU, ▼ to select RPT = multifunction shift, SECOND = activate a stopwatch, LAMP = turn on lamp, SOS = activate SOS function, RADIO = turn on FM Radio, FR/CH = select working mode (VFO or Channel), OFF = inactivate RPT Key, MENU EXIT This key, however, is most useful as its default multi-function repeater shift RPT Key. 8.2 Side Key 1 (PF1) By default this button toggles on and off the FM Radio. However, this button can be programmed to either: activate a scan, turn on the flashlight, enable the SOS function, turn on the FM Radio, or inactivate the button entirely: MENU 2 0 MENU, ▼ to select SCAN = activate scan, LAMP = turn on lamp, SOS-CH = activate SOS function, RADIO = turn on FM Radio, or, OFF = inactivate Side Key 1, MENU EXIT 8.2.1 FM Radio Mode This mode is toggled via Side Key 1 (unless the user has re-programmed Side Key 1, as above). The previously chosen master frequency stays on screen with the FM frequency visible either above or below the master frequency. The master frequency is now a standby priority channel and is watched continuously. If a carrier is detected on the master frequency the FM radio switches to the master frequency and only reverts back to FM Radio after five seconds of no signal. FM Radio Mode cannot be activated if a frequency is busy. To toggle FM Radio Mode: Side Key 1 14 To scan the FM Radio: SCAN* To tune the FM Radio: ▲ or ▼ (press repeatedly, or ROTARY ) To memorize a station in first nine FM memory locations: MENU , then choose 1 through 9 To memorize a station in second nine FM memory locations: # MENU , then choose 1 through 9 8.2.2 1750Hz Burst Tone Some European repeaters require a 1750Hz burst tone for access. To generate this tone press PTT and Side Key 1 simultaneously. 8.2.3 SOS Function As this function is not appropriate to amateur radio it is not discussed here. Refer to the Wouxun manual if required. 8.3 Side Key 2 To turn on flashlight: To activate “Monitor” (open the squelch): Side Key 2 (short press) Side Key 2 (long press) 15 9 Other Functions Thus far we have seen 20 of 32 menu items in action. Most of the other menu function items below are “set and forget” features: Set squelch level: MENU 2 MENU ▼ to select 0 through 9 MENU EXIT (5 is default and reasonable. Use higher numbers if suffering from intermod interference. If green receive LED flickers consider increasing squelch level) Enable transmit beeps: MENU 5 MENU ▼ to select OFF = no beeps, BOT = beep at transmission start, EOT = beep at transmission end, BOTH = beeps at begin and end, MENU EXIT Set VOX level: MENU 7 MENU ▼ to select either OFF or levels 1 through 10 MENU EXIT (voice activated transmit switch, VOX, is not recommended for handheld radios) Set FM bandwidth: MENU 8 MENU ▼ to select either WIDE (25KHz) or NARROW (12.5KHz) , MENU EXIT (recommendation is narrow for most modern repeater systems. If selected an N is displayed on upper right of the LCD display) Set transmit time-out alarm: MENU 1 0 MENU ▼ to select 1 through 10 for # of seconds for TOT alarm, MENU EXIT (alerts user when TOT is about to activate. See Section 6 concerning time-out timer) Set power on message: MENU 1 2 MENU ▼ to select either OFF , BATT for battery voltage display, or MSG for a welcome message, MENU EXIT (welcome message can be programmed only with software) Set busy channel lockout: MENU 1 3 MENU ▼ to select either OFF or ON , MENU EXIT (disables transmit if the PTT button is pressed when a frequency is busy) Enable receive CTCSS (tone squelch): Enable receive DCS: MENU 1 5 MENU ▼ to select 67.0Hz through 254.1Hz as a tone squelch (CTCSS RX) , MENU EXIT (the tone squelch opens only when receiving a signal with the same pre-programmed subaudible tone. Useful when distant repeaters have same transmit frequencies.) MENU 1 7 MENU ▼ to select D023N through D754N digital coded squelch code for receive , MENU EXIT 16 (DCS is rarely used in amateur radio) Enable transmit DCS: MENU 1 8 MENU ▼ to select D023N through D754N digital coded squelch code for transmit , MENU EXIT (DCS is rarely used in amateur radio) Enable stopwatch: MENU 2 6 MENU ▼ to select either OFF or ON , MENU EXIT (when enabled start stopwatch by short press of # , press any key to pause, short press of # again to restart.) Select SOS Function band: MENU 3 1 MENU ▼ to select either CH-A or CH-B , MENU EXIT (selects on which band to transmit the SOS function – see also Section 8.2 above.) 10 Software Ensure you have the correct Wouxun software* version specifically for the UV6 series radios as it has been reported that the UV1,2,3 series software can cause problems. Software programming of the Wouxun KG-UV6 enables additional features not available through manual keypad strokes or menus. These features may include: mode switch password, reset password, inactivate menu and resets, welcome message, priority scan channel, set scanned channels and DTMF options. See the software help files for more information. The majority of user issues with radio software are related to an incorrect port (or device name) setting or an incorrect driver for the computer-radio interface cable. Linux users must also ensure they are members of the uucp group. For wire cloning between similar radios see page 48 of the Wouxun manual. (* Wouxun software also works in Linux under Wine ( http://www.winehq.org/ ) . 17 11 Useful Links VE7EA's latest manual update: users-manual/ Yahoo KG-UV6D Group: KG-UV6D Service Manual: http://lggagnon.wordpress.com/2012/02/29/wouxun-kg-uvd1p-vhfuhf-handheld-transceiver-a-newhttp://groups.yahoo.com/group/KGUV6D-KGUV6X/ http://tinyurl.com/7nqtm7o 18