1
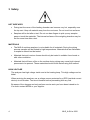
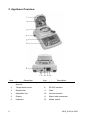
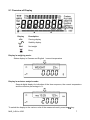
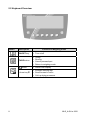
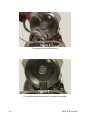
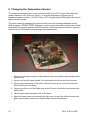
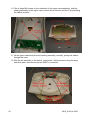
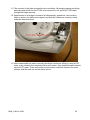
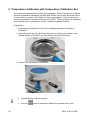
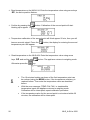
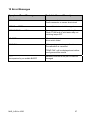
KERN & Sohn GmbH
Ziegelei 1
D-72336 Balingen
E-Mail: [email protected]
Tel: +49-[0]7433- 9933-0
Fax: +49-[0]7433-9933-149
Internet: www.kern-sohn.com
Service manual
Electronic Moisture Analyzer
KERN MLS-A
Version 2.0
5/2010
GB
MLS_A-SH-e-1020
GB
KERN MLS-A
Version 2.0 5/2010
Service Manual
Electronic Moisture Analyzer
Table of Contents
1 Basic Information ....................................................................................................... 3 2 Introduction ................................................................................................................. 3 3 Safety ........................................................................................................................... 4 4 Principle of Operation ................................................................................................ 5 5 Appliance Overview.................................................................................................... 6 5.1 Overview of Display ............................................................................................................. 7 5.2 Keyboard Overview .............................................................................................................. 8 6 Analyzer Menus ........................................................................................................ 10 6.1 Supervisor Menu ................................................................................................................ 10 6.2 Dealer Menu ................................................................................................................................................ 11 6.2.1 ADC COUNTS...................................................................................................................................... 12 6.2.2 CALIBRATE.......................................................................................................................................... 13 6.3 Factory Menu .............................................................................................................................................. 14 7 Changing the Heater................................................................................................. 16 8 Changing the Temperature Sensor ......................................................................... 20 9 Temperature Calibration with Temperature Calibration Set ................................. 24 10 Error Messages ......................................................................................................... 27 11 Load Cell .................................................................................................................... 28 11.1 Test Method .............................................................................................................................................. 28 11.2 Replacing the Load Cell ........................................................................................................................ 29 12 Electronics ................................................................................................................ 31 13 System Diagram ........................................................................................................ 32 14 Spare Parts ................................................................................................................ 34 2
MLS_A-SH-e-1020
1 Basic Information
Grundlegende Hinweise
The device must be repaired only by trained specialist staff or personnel with
professional formation (such as a repair-specialist accredited by law
concerning verification).
The service manual is obligatory for repair work.
After repair, original conditions of the device have to be restored.
Only original spare parts should be used.
Das Gerät darf nur von geschultem oder beruflich ausgebildetem
Fachpersonal (z. B. eichrechtlich anerkannter Instandsetzer) repariert werden.
Die Serviceanleitung ist bindend für Reparaturen.
Das Gerät muss nach erfolgter Reparatur wieder in den Originalzustand
zurückversetzt werden.
Es dürfen nur Originalersatzteile verwendet werden.
2 Introduction
This Service Manual will guide you through the normal service and calibration procedures
necessary to maintain the moisture analyzer. Please read this Manual thoroughly before
performing any service. This manual should be used in conjunction with the User
operation manual.
MLS_A-SH-e-1020
3
3 Safety
HOT SURFACES
•
During test the cover of the heating chamber can become very hot, especially near
the top vent. Keep all material away from the vent area. Do not touch hot surfaces.
•
Samples will be hot after a test. Do not use bare fingers to pick up any samples
pans or touch the materials. The internal surfaces of the weighing chamber may be
hot for some time after a test.
MATERIALS
•
The MLS-A moisture analyzer is not suitable for all materials. During the drying
process samples will be heated to high temperatures. Materials that are flammable
or explosive should not be tested.
•
Materials that emit noxious fumes should only be tested in suitable fume hoods or
with other ventilation.
•
Materials that will have a film on the surface during drying may cause high internal
pressures to be present. These materials should not be tested using this method.
HIGH VOLTAGE
The analyzer has high voltage inside and at the heating lamp. This high voltage can be
lethal.
When servicing the analyzer use a voltage source protected by a RCD (residual current
device) circuit breaker. Test circuit breaker before proceeding with any test.
Be aware of the dangers and only perform service work you have been trained to do.
If in doubt contact KERN or your supplier.
4
MLS_A-SH-e-1020
4 Principle of Operation
Refer to the MLS-A user manual for details of operation.
The basic principle of the moisture analyzer is to weigh a sample in its normal condition,
then apply heat to drive off any volatile components. This usually refers to moisture but in
some products it may be alcohol, oils or other volatile materials. It is the operator’s
responsibility to understand the materials to be used in the moisture analyzer and the
effects of heat on the materials.
The material may need to be prepared before a successful test can be done. It may be the
material will need to be ground to a powder, spread between sheets of glass fibre paper or
otherwise prepared. If the material is not uniform a number of tests may need to be done to
find an average moisture content. See user manual for more suggestions of how the
samples might be prepared for testing.
MLS_A-SH-e-1020
5
5 Appliance Overview
Item
6
Description
Item
Description
1
Foldable hood with heating
element
7
Spirit level
2
Temperature sensor
8
RS 232 interface
3
Sample dish
9
Fuse:
4
Adjustable foot
10
Not documented
5
Display
11
Mains cable connection
6
Keyboard
12
Master switch
MLS_A-SH-e-1020
5.1 Overview of Display
Display
a
Description
Zeroing display
Stability display
Net
Net weight
Busy
Display in weighing mode:
Status display in German and English / current temperature
Display in moisture analysis mode:
Second digital display for indication of the time sequence, the current temperature
and the moisture percentage in %.
To switch the display to the various units of the measured result, press the
MLS_A-SH-e-1020
key.
7
5.2 Keyboard Overview
Button
Description
ON/OFF key
y Turn on/off
TARE button
y
y
y
y
button
Arrow key Ï
8
Function in Weighing mode
Taring
Zeroing
Cancel process/input
Return to weighing mode
y Switch-over display
y Increase flashing digit
y Scroll forward in menu
y Call up drying processes
MLS_A-SH-e-1020
M-button
Arrow key Î
MENU-key
Arrow key
F-key
Arrow key Ð
PRINT button
Arrow key Í
Start/Stop
button
•
Store / call-up drying parameters
•
•
At numeric input digit selection to the right
In the menu block „SETUP“ one menu step back
•
Call-up configuration menu
•
Confirm / store settings
•
Invoke user menu (drying parameter setting)
•
•
Scroll backwards in menu
Decrease flashing digit
•
•
Calculate weighing data via interface
At numeric input digit selection to the left
•
Start/Stop drying
Numeric entry
Button
Description
Function
Arrow key Ï
Increase flashing digit
Arrow key Ð
Decrease flashing digit
Arrow key Í
Digit selection to the left
Arrow key Î
Digit selection to the right
Arrow key
Confirm entry
MLS_A-SH-e-1020
9
6 Analyzer Menus
The MLS-A has a number of submenus for setting the operation of the analyzer and the
communications. In addition to the Supervisors menu for setting the analyzer to the needs
of the user there is a Dealer MENU that allows a service person to calibrate the analyzer,
observe the ADC counts from the load cell.
The main topics of the Supervisors Menu are:
PASSCODES
to control unauthorised access to the menu system
SETUP
Setting of date and time
Date format, YMD, MDY, DMY
User ID
Key Buzzer On/Off
Test Buzzer On/Off
Backlight , On, Off, Auto
Filter and Auto zero settings
Language Selection
SERIAL
Baud rate
Parity
Continuous output
Time for continuous output
CALIBRATION
Weight Calibrate
Temperature Calibration
Cal Report On/Off
6.1 Supervisor Menu
Pressing the
key while in normal weighing gives access to the menu.
Details of this menu are given in the user manual.
10
MLS_A-SH-e-1020
6.2 Dealer Menu
The dealer has access to a menu to allow calibration of weight or temperature sensor
without the normal limitations put on the calibration during the user methods of setting
them. In addition it is possible to view the values delivered from the analog to digital
converter for both the chamber temperature and the weight.
This section describes the parameters available to the dealers for setting up the analyzer.
Access to these parameters is controlled by password.
key while in normal weighing gives access to the
1. Pressing the
supervisor menu.
2. Use the arrow keys Ð Ï to select PASSCODES and confirm with
key.
3. Use the arrow keys Ð Ï to select OPERATOR and confirm with
key.
4. The display appears
5. Use the arrow keys Ð Ï to enter the currently set password and confirm
with
key (only at first input acknowledge „0”).
If the password has been forgotten, enter [000015] as emergency
password.
6. The display appears
7. Use the arrow keys Ð Ï to enter the dealer passcode, which is 041218
(DLR as D=4th L=12th R=18th letter of the alphabet). Press the
key.
8. The display appears
9. Press the
key two times.
The display appears
MLS_A-SH-e-1020
11
10. Press the
key. The display appears DEALER.
11. Press the
key. The display appears SUPERVISOR.
12. Press the
key. The display appears DEALER.
13. Press the
key to enter the dealer menu.
14. Use the
key to select the required option and confirm with
key.
Available options on the dealer menu are:
6.2.1 ADC COUNTS
The analyzer displays the weight ADC counts or the heater temperature sensor ADC
counts.
12
•
Pressing the
key switches the display between the weight
(LOADCELL) and temperature (HEATER) ADC counts.
•
The weight ADC counts are normally stable within a few counts if the load
cell is functioning correctly, the environment is stable and the temperature
is stable. The range of the ADC counts will depend upon the load cell used
and if the pan support is in place or not.
Typical values are less than 1,000,000 with no mass on the pan (e.g.
428 295) and about 400,000 greater with 50 grams on the pan support
(e.g. 753 482).
•
The temperature ADC counts are normally stable within 10 counts if the
temperature sensor is at a stable temperature. The value seen is typically
200,000 to 400,000 counts (e.g. 289 852), it will depend upon normal
variations in the sensor values.
•
Pressing the
key escapes to the next item on the dealer menu.
•
Pressing the
key returns to weighing.
MLS_A-SH-e-1020
6.2.2 CALIBRATE
This menu offers two options, calibrate the analyzer for correct weight readings (CAL
MASS) or to calibrate the temperature sensor in the test chamber to control heating
temperatures (CAL TEMP » not recommended !!!).
6.2.2.1 Dealer Balance Calibration (CAL MASS)
•
Performs a weight calibration. You must have 2 masses available.
20 gram and 50 gram for the MLS 65-3A
•
Press the
•
Remove the sample pan from the pan support. The calibration is done
without a sample pan in place.
•
The display will instruct you to set the no load condition, “LOAD 0g”.
Check the pan support is empty.
•
When stable (stability mark appears), press the
ask for the first mass. “LOAD 20g”.
•
Place 20g on the pan support.
•
When stable (stability mark appears), press the
ask for the second mass. “LOAD 50g”.
•
Place 50g on the pan support.
•
When stable (stability mark appears), press the
•
The calibration will be completed and the display will return to the CAL
MASS parameter.
•
Remove the weight.
MLS_A-SH-e-1020
key to begin.
key. The display will
key. The display will
key.
13
6.2.2.2 Dealer Temperature Calibration (CAL TEMP)
Î
not recommended
To calibrate the balance using temperatures measured in the chamber
use the temperature calibration as described in section 9.
This was just a factory setting which should only be used by the factory for specific
PT100 probes.
Please just use the temperature calibration with temperature calibration set !
6.3 Factory Menu
Access to factory menu is controlled by password.
1. Pressing the
key while in normal weighing gives access to the
supervisor menu.
2. Use the arrow keys Ð Ï to select PASSCODES and confirm with
key.
3. Use the arrow keys Ð Ï to select OPERATOR and confirm with
key.
4. The display appears
5. Use the arrow keys Ð Ï to enter the currently set password and confirm
with
key (only at first input acknowledge „0”).
If the password has been forgotten, enter [000015] as emergency
password.
6. The display appears
7. Use the arrow keys Ð Ï to enter the dealer passcode, which is 041218
(DLR as D=4th L=12th R=18th letter of the alphabet). Press the
14
key.
MLS_A-SH-e-1020
8. The display appears
9. Press the
key two times.
The display appears
10. Press the
key. The display appears DEALER.
11. Press the
key. The display appears SUPERVISOR.
12. Press the
key two times. The display appears FACTORY.
13. Press the
key to enter the factory menu.
14. Use the
key to select the required option and confirm with
key.
Factory Menu:
Menu item
MODEL
Choice / Description
*OEM / 50g / 200g
CALIBRATE
LOAD 0g
LOAD 20g
LOAD 50g
SERIAL ID
Serial number, e.g. 0WP0901001
STABILITY
*5d / 10d / 1d / 2d
AUTO ZERO
*ON / OFF
AUTO ZERO: *2d / 5d / 1d
DRIFT TEST
not documented
15. Press the
MLS_A-SH-e-1020
key to return to normal weighing
15
7 Changing the Heater
To replace the heating lamp, over temperature switch or temperature sensor, you must use
the correct replacement parts supplied by KERN.
Before proceeding check the voltage of the replacement is correct for the unit. A heater
that is the wrong voltage will not work properly and can be a hazardous.
Remove the power cable from the back of the machine. There are live circuits associated
with the lamp. Power must be removed in order to do this repair.
Remove 3 screws securing the glass support brackets. Remove the cover over the bottom
of the ring and the glass.
Remove the 2 screws securing the cover. Remove only the 2 screws in the corners as
shown above. Do not remove the other 3 screws on the cover plate.
16
MLS_A-SH-e-1020
Lift the cover to clear the ring, then lift and rotate it. Place it to one side.
The temperature probe will be loose, place it so it cannot be damaged during the rest of
the procedure.
Using needle nose pliers remove the lamp cables from the high temperature switch and
the loose wire.
To remove the lamp, remove the one screw on the retainer.
MLS_A-SH-e-1020
17
The lamp can be now removed.
To install the new lamp reverse the order of assembly.
18
MLS_A-SH-e-1020
When installing a new lamp do not touch the glass with your bare fingers, wear cotton
gloves or use a tissue to prevent finger oils or dirt from being transferred to the lamp.
Ensure the plastic covers over the wires are in the correct location. They have 2 pins that
align with holes in the cover, and must sit firmly over the wires.
When attaching the lamp retainer to not over-tighten the screw. Make sure all connections
are tight and the wires are positioned so they do not interfere with each other or the action
of the door opening.
The temperature sensor locates on the lamp support, position the sensor near to its final
location, install the cover then make sure the sensor is fitted to the lamp support and is
positioned in the centre of the heating area.
If the plastic protection avers the wires are not fitted correctly the cover will not fit properly.
MLS_A-SH-e-1020
19
8 Changing the Temperature Sensor
The temperature sensor used in the moisture analyzer is a PT100 type, this means the
probe measures “100” Ohms at 0 deg C, so at room temperature it should give a
resistance reading of about 110 Ohm. Only a PT100 supplied by KERN should be used to
replace a faulty probe.
The main reason for changing the probe would be an error message displayed on the
MLS-A display. “ERROR TEMP” displayed, usually means the probe or wiring has a break
somewhere in the wires and has lost its continuity, check the probe connector is properly
attached to the PCB before commencing probe replacement.
1. Ensure the moisture analyzer is disconnected from the mains power supply before
starting work.
2. Remove all four M4 case screws, 2x underneath at the front and 2x at the rear.
3. Lift the upper case clear of the base, and disconnect all the connectors from the
PCB at the front of the base.
4. Remove the M4 nut on the Earth post at the RH rear of the base, and remove the
earth cable.
5. Lift the upper case assembly clear of the base.
6. Stand the upper case on the bench the right way up, open the lid and remove the
glass and the glass retainers (3 small screws secure the retainers).
20
MLS_A-SH-e-1020
7. Remove the 2x screws securing the closing plate, and pull the plate forward from
the top, this gains access to the overheat switch, the lamp fixing and the PT100.
NOTE: The overheat switch is designed to cut the power to the lamp if the control
circuit fails and the software can no longer control the heater, it is designed to
operate at chamber temperatures of around 240 deg C. If the switch was to fail
OPEN, then the lamp would not light.
Other causes of lamp failure could be the lamp itself being faulty or either of the
micro switches either failing or being incorrectly adjusted. Any of these faults would
need the rework method described.
8. To remove the PT100, slide out the cable securing clamp from the PT100 side if the
hinge, the PT100 should now pull out from the wire location.
9. Close the lid carefully, and turn the lid assembly upside down.
MLS_A-SH-e-1020
21
10. The 4x large M5 screws on the underside of the upper case assembly, hold the
heating assembly to the upper case, remove these screws, and the P clips holding
the cables in place.
11. Lift the upper case away from the heating assembly, carefully, pulling the cables
through the case.
12. With the lid assembly on the bench, remove the 3 M4 screws securing the large
heat sink plate, also disconnect the EARTH connection.
22
MLS_A-SH-e-1020
13. The removal of the plate reveals the micro switches, lid damping spring and hinge
assembly and allows for the PT100 to be removed in full, pull the PT100 cable
through the hinge opening.
14. Replacement is a straight reversal of all disassembly operations, care must be
taken to ensure no cables are trapped, and that the cables are correctly routed
under the heat sink plate.
15. Once reassemble the earth continuity should be confirmed, either by using a PAT
tester or by checking the continuity with a multi-meter. Only qualified testers should
use the PAT tester. If the multi-meter is used check continuity between the outer
reflector and the earth pin on the mains chord.
MLS_A-SH-e-1020
23
9 Temperature Calibration with Temperature Calibration Set
We recommend sometimes to check the temperature value of the device using the
optional temperature calibrating set MLS-A04. Before you do this, allow the device
to cool down for at least 3 hours after the last heating phase. Push the probe as
closely as possible to the thermal sensor of the MLS. The temperature is measured
at two points and it is possible to correct it at both temperature points.
Preparation:
Ö Push fixing clip under the cover of the weighing chamber according to
illustration.
Ö Insert the probe into the clip. Push the probe as closely as possible to the
thermal sensor of the MLS. Fix the position using the side screw.
Ö Close cover, as shown on illustration.
24
•
Sample dishes must be in place.
•
Use the
button to cancel the calibration process at any time.
MLS_A-SH-e-1020
Ö In weighing mode press the
button, the first menu item „SERIAL“ is displayed.
Ö Press arrow keys Ð Ï repeatedly until „CALIBRATE“ is displayed.
Ö Confirm by pressing the
button.
Ö Use the arrow keys Ð Ï to select „CAL TEMP“ and confirm using
button.
Ö Calibration starts. Every minute sounds the acoustic signal in order to display the
permanent calibration.
Ö Temperature calibration of first point will take 10 min after which you will hear an
acoustic signal. The display for entering the first temperature point will appear.
MLS_A-SH-e-1020
25
Ö Read temperature on the MLSA-04. Enter the temperature value using arrow keys
Ð Ï, the active position flashes.
Ö Confirm by pressing the
button. Calibration of the second point will start.
Heating up to approx. 150°C.
Ö Temperature calibration of the second point will finish approx 20 min, then you will
hear an acoustic signal. Press the
temperature point will appear.
button, the display for entering the second
Ö Read temperature on the MLS-A04. Enter the temperature value using arrow
keys Ð Ï and confirm with
Otherwise press the
26
button. The appliance returns to weighing mode.
key.
•
The 10-minutes heating-up phase of the first temperature point can
be reduced using the MENU button, if the temperature constancy is
reached before. Then enter the temperature value as described
before.
•
With the error message „TEMP CAL FAIL“ or inadmissible
temperature inputs the appliance returns to weighing mode.
Calibration will be interrupted, repeat calibration procedure.
•
If the temperature value for the second point is not entered within 30
minutes, the calibration will be interrupted.
MLS_A-SH-e-1020
10 Error Messages
Symptom / Error Message
Probable Cause / Remedy
ERROR TEMP
Temp. sensor fault
Check connector or sensor short circuit
ERROR --- ZERO ---
Pan not fitted or load cell damaged
ERROR TEMP --- HIGH ---
Temperature sensing over 160 deg C
Either PT100 fault or solid state relay not
switching lamps OFF
LID OPEN
When lid is closed
Micro switch failed
TEMP FAIL
While carrying out a temp. calibration
The calibration is cancelled
“TEMP FAIL” will be displayed and neither
new figures will be stored
------accompanied by an audible BLEEP
MLS_A-SH-e-1020
Indicates overload at the pan or load cell
damaged
27
11 Load Cell
If the results have been unreliable or not repeating, or the display is unstable when
showing weight, the problem may be associated with the load cell.
First thing to check is that there is nothing to interfere with the movement of the load cell,
the wires and cables are not touching the pan support, the pan is lined up with the opening
in the case, the stainless steel shield under the pan is installed correctly and not rubbing
on the bottom of the pan.
If this is all OK then go to the Dealer Menu, Section 6.2 and select ADC counts.
The ADC counts should be stable within 3-5 counts regardless of weight on the pan.
If the counts are less than about 100,000 divisions with no load on the pan, or greater than
about 1 million with 50grams load on the pan, may mean the load cell has been damaged
and the offset voltage is out of specification. The ADC counts do vary as it depends upon
the individual load cell and ADC converter.
If the load cell has been damaged it will not be stable for weighing or it may exhibit
excessive drifting during a heating test.
11.1 Test Method
A method to test the performance of the load cell while heating the chamber.
Set up a test method with the following settings:
1. Moisture Result
2. Single heat
3. Single 160º
4. Interval 05 seconds
5. Time Stop
6. Stop Time 30 minutes
7. Manual Start
8. Print Test On
9. Format Comp.
Set the RS232 parameters to do a continuous printout at 5 seconds.
Interface the analyzer with a terminal program (HyperTerminal for example) to view the
results of the test.
28
MLS_A-SH-e-1020
Place a sample pan on the pan support and tare the weight.
Place a metallic object of approximately 5grams (coin for example) on the pan support
observe the weight on the PC.
Begin a timed test.
The analyzer will output the weight to the PC, observe the weight during the time of the
test. The weight should be constant within about 50mg during the time the test is running.
If the drift is much worse than this it is an indication the load cell has been damaged.
If the drift is excessive but less than about 100mg it may be the sample pan or coin has
some moisture on it that was driven off. It would be wise to repeat the test before making a
decision to replace the load cell.
11.2 Replacing the Load Cell
The load cell used in the MLS-A has been especially selected for low drift performance.
It should only be replaced with another load cell supplied by KERN.
CAUTION:
The load cell is very fragile due to the fine resolution requires and therefore it can be
damaged very easily.
Do not use excessive force to remove or replace screws.
Do not press down on the screws to remove or install them.
To remove the load cell it is necessary to remove the pan support (2 screws) then the
cover over the load cell (2 screws).
Unsolder the wires, noting the colour at each connection.
Remove the load cell support from the base. Handle the support by the casting only, not
the load cell. The load cell is most vulnerable when it is being handled in this way.
Remove the load cell from the casting.
Before installing the new load cell, loosen the overload stop screws and lower the stops a
few turns. This prevents them from putting a load on the load cell accidentally during the
reassembly.
Reassemble in the opposite order being very careful not to stress the load cell while
tightening screws or handling the support.
Before the load cell and pan support are secured place the cover over the base to make
sure the pan support aligns with the hole in the weighing chamber. This hole must align or
the pan may rub on the sides of the cover, causing incorrect weight to be shown.
MLS_A-SH-e-1020
29
Secure the load cell, solder the wires and retest by observing the ADC counts as described
above.
After the load cell is secure, the overload stops can be set.
It is not necessary to have the analyzer operating during this process.
Place the pan support in place, and put a sample pan on it. Add a mass equal to the
capacity of the analyzer.
Carefully raise the overload stops until they just touch the plastic pan support, then back
off ¼ turn. Lock in place with the lock nut.
Repeat for the opposite side.
Reassemble the cover to allow the display and keypad to work. Apply power to the
analyzer.
Verify the stops are not touching by moving the mass around the pan, front back, right and
left while watching the weight display. There should be no signs the pan support is rubbing
against the stops or hitting the stops prematurely.
30
MLS_A-SH-e-1020
12 Electronics
DISPLAY PCB
The display is a custom LCD designed for the purpose.
If the display should be replaced it is only necessary to plug the new display into the cable
and mount the display.
MAIN PCB
The main PCB has an analog section consisting of the analog to digital converter (ADC)
connected directly to the load cell inputs, digital microprocessor section, input/outputs for
the keypad and display, RS232 interface and a power supply section.
If a PCB replacement is required contact KERN to order the correct PCB to use. It will be
sent already programmed into the PCB. It will require the user to simply replace the old
PCB with the new and then do the Dealer calibration as described in section 6.2.2.1.
OTHER ELECTRONIC PARTS
The only other parts of note are the Solid State Relay (SSR). This relay is controlled by the
main microprocessor to turn the heater on and off at the correct times to control the heat.
If a SSR should require replacement it should be replaced with a SSR supplied by KERN.
TEMPERATURE SENSOR, PT100
The temperature sensor inside the weighing chamber is a PT100 type resistance
temperature sensor. The PT100 sensor has a nominal resistance of 100 ohm at 0ºC,
increasing with temperature.
To test the sensor simply measure the resistance of the sensor, it should be near 110 ohm
at room temperature and increase as you warm it.
MLS_A-SH-e-1020
31
13 System Diagram
32
MLS_A-SH-e-1020
MLS_A-SH-e-1020
33
14 Spare Parts
34
Part number
Description
309109310
Load Cell
307009582
Bulb
307409458
PT 100 Sensor
301486095
Display PCB
3074810390
Main PCB
307409493
Power Cable- Euro
3074010528
Internal Transformer
3074089489
Mains Input Filter
307409487
Relay
307569617
Keypad
301207064
Leveling Foot
3071410204
Top Pan support
301007061
Spirit Level
MLS_A-SH-e-1020