1
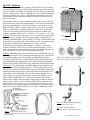
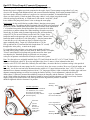
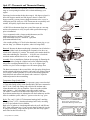
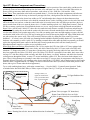
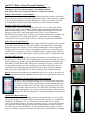
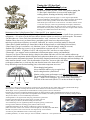
Tuning the 1.9 Liter Opel
Part II: Opel GT Cooling System
As the next section to OMC’s June 2006 guide to tuning the
1.9 liter Opel, what follows is an overview on the Opel
cooling system, focusing exclusively on the Opel GT.
(The same principles generally apply to 1.9 liter engine Opel Mantas,
Asconas and Kadettes, although these larger vehicles generally feature more
effective stock cooling systems, which do not suffer as much from
under-hood space-restriction as in the stock GT. The main variation on the
1.9 was the 1975 style, used on original fuel-injection Opels, which had a
6-blade white-colored plastic fan and a fan clutch (which quickly wore out
the attached 1975-only water pumps, due to the extra weight on their internal
bearings) and a different thermostat & housing).
Maintenance of the Cooling System of the 1.9 Liter Opel GT, is an “ongoing” process
In general, when you first acquire an Opel, it’s a good idea to flush all the coolant, then to install all new common-use
components — It’s easier to just do this once, than to drain the coolant over and over, to perform repairs. This means:
-Fan Belt (there are 2 sizes; check lower alternator bracket: “early” cast iron or “late” aluminum)
-Radiator Hoses (best to use pre-formed hoses, particularly on the lower hose, than universal types,
and always replace hoses when they are cracked, “ballooned” in a section, or not firm (mushy) to the touch
-Heater Hoses (should install the pre-formed hose with the 90-degree bend, to avoid kinking universal hose)
-Water Pump (if its age is not known, or is older than 4 years, or when the pump is starting to wear out)
-Radiator Cap (if rubber ring is worn, or if cap cannot hold on a pressure test of 13 to 14 lbs.)
-Coolant (install about 1 1/2 gallons of a 50% “old-style green color” anti-freeze to water mixture)
-Thermostat* * (see separate section on thermostat, on thermostat options, testing, and installation)
-Pressure-Test System: This means having a shop test the radiator and heater core for leaks, and the radiator cap
Additional related components include inspection and replacement (about twice a year, or when otherwise warranted) of
the motor mounts and transmission mount. Also check the alternator mount brackets and upper and lower bushings, and
either install an internal “screen” (like the aftermarket “Gano filter,” shown at right, sold online)
on the upper radiator hose, or clean out dirty rust from the heater valve about twice a year.
Keep date/mileage records when installing parts, to determine component wear rates.
When changing head gaskets,
always install the rubber o-ring on engine block
before setting down the cylinder head!
“Gano filter” screen
Monitor cooling system performance on the GT temperature gauge:
The needle should read between 1/3 to 1/2 of the way to the red part of the
gauge — About 176 to 190 degrees. Or, in other words, almost always
to the left of the center mark (Stock GT’s run best at about 185 degrees).
@176F
@194F
@212F
Notes:
-An effective cooling system is particularly required on the 1973 model-year GT (which had a 12-bolt cylinder head design
that was prone to internal cracking between the #2 and #3 exhaust valve seats when it overheated).
-When major service is performed, also back-flush the cooling system to remove internal rust.
Installing the “Prestone” brand flush-and-fill kit plastic tee fitting hardware, makes back-flushing the heater core much easier.
-Always quickly clean up coolant leaks: Fluid puddles attract animals, and when ingested causes severe kidney damage & death.
-Recycle anti-freeze, in an environmentally safe manner
-Although there is an engine block drain plug, which has a square head
located on the passenger side rear of the engine, it usually rusts too
solid to safely try to remove (the head usually just twists off)..
-Air Conditioning on a GT significantly affects fan pulley spacing, radiator hose
routing, and the condenser mounting greatly affects radiator access.
Additional information on the ARA air conditioning system in the Opel GT
GT with
(ARA’s auto trans. interior A/C console is shown at right) is in the May 1995 OMC Blitz;
ARA A/C
the GM A/C system is well covered in the 1973 Opel factory service manual.
-An index of prior OMC Blitz articles on the cooling system
(including the heater) is on the “tech tips” section of OMC’s website at: www.opelclub.com
www.opelclub.com (10/2006)
Opel GT: Radiator
Stock 1.9 Opel GT’s were factory-equipped with a 2-row core brass radiators,
which performed well in Opel’s native Europe, but have proved only adequate
for some conditions in Summer in North America. The factory GT radiator did
not have a drain “petcock” valve, so draining and removal required detachment
of the lower radiator hose. On GT’s with automatic transmissions, the lower
radiator tank also had a transmission fluid cooler accessed via two screw-in
ports for flex hoses.
Upper Tank
It is important to have a very good condition radiator with very good flow and
good contact to the metal on the internal surfaces. Over time, the internal rows
get clogged, and the brittle exterior fins trap debris or get bent when the car
battery is removed. When a radiator can no longer be serviced (by a chemical
flush at a radiator shop), or a higher-performance engine or air-conditioning
system is to be installed, then replacement of the stock-sized radiator core
should be considered (approx @13 3/4” tall by 12 3/4” across by 1 3/4” wide).
Upgrades: Include a heavy-duty “denser” brass core (with more fins per square
inch and 3 rows of “dimpled” tubes) for greater cooling. Unfortunately, no
aftermarket aluminum tanks are made for the GT, so only a custom build could
be installed (never mix brass tanks with aluminum cores). Any upgrade should
fit within the dimensions of the upper and lower “tanks” to avoid
contact with the spinning fan, and installation of a “petcock” for drainage
should be considered. There is also a firewall-mounted triangular “pressure
bottle” system enlarger, connected by hoses to the upper tank and heater ports
of fuel-injected GT’s, that is sold on the aftermarket in Europe.
Mounting: Radiators require connection of the lower mount bracket (using the
stock 13mm-head bolt) to prevent the fan from clipping the fins. There are also
2 side rubber bushings and a lower bushing, to hold its bracket in place.
To remove, detach lower bolt, swing the lower bracket, and lift radiator out.
The under-hood rubber weatherstrips, help to direct airflow through radiator.
Drape the thin overflow tube down & away from nearby front suspension arms.
Core
Lower Tank
Heavier-Duty Radiator Cores, with greater fin
density and a 3rd row, for greater cooling
Fan Shroud: GT’s originally had a detachable black plastic fan shroud (some
reproductions are done in fiberglass) with a 15” wide opening. Shrouds cool
about 10 to 20 degrees, but require annual inspection of the motor mounts and
transmission mount (to prevent tips of moving fan blades from striking the interior surfaces of the fan shroud). Make sure the shroud is upright; there’s a
central “mark” on top, and the part number is at the bottom. When a 14” fan
blade cannot be aligned within a 15” shroud, also check the motor mount
brackets (the passenger-side bracket has a slightly longer mount hole location
than the driver’s; about 5” from centerline to engine block on pass side compared to about 4 5/8” on driver’s side). An intact front grille on the car also
helps screen road debris from lodging in the radiator fins. An coolant overflow
tank is also recommended, especially for GT’s with air-conditioning systems.
Above: GT Radiator Mounting Hardware
shown (images not to scale)
Left: Opel GT Radiator Shroud
(Provides greater cooling when installed)
Above: Cooling System Enlarger, for
higher-performance Opel GT engine applications
(From Europe)
www.opelclub.com (10/2006)
Opel GT: Water Pump & Connected Components
The water pump is the “heart” of the Opel GT Cooling System.
Because they turn at a higher speed ratio compared to the engine, Opel GT water pumps average about 3 to 5 years
of service life. Damaged and unbalanced fans, and worn-out alternator bushings, are the main premature killers of
Opel water pumps. When the antifreeze is neglected, or corrosion accumulates, its internal bearing seal
wears even more quickly. If the front shaft of the pump “shakes” easily (when you grab the center
of the fan and tug up and down), or if fluid starts to leak out the “weep hole” (at the
lower middle of the pump shaft), then it’s time to change the water pump.
Replacement: On the road (following a sudden failure), changing a water pump
can be a challenge. The radiator shroud (if equipped with one) needs to be unscrewed,
and unless you have nimble hands and an offset 13mm wrench to work within about
1” of clearance between the fan and the radiator fins to loosen the 4 fan bolts,
you also have to pull the radiator first. When installing, all surfaces need to be
clean & dry, for gasket sealer (Permatex high-tack works well immediately,
as does RTV if you can wait 24 hours) to take hold. The 3 longer 11mm
head bolts attach on the passenger side of the pump, and the 3 shorter 11mm
head bolts attach on the driver’s side of the pump — Start the bottom short
11mm bolt first, as it’s the hardest to align (it’s behind a lip of the
upper crankshaft pulley). Torque all 11mm head bolts to 11 ft lbs.
Line up and bolt the 4 13mm head fan bolts (length about 7/8” overall)
through holes in the pulley, to attach to the pump.
It’s a good idea to buy and keep a new water pump on hand at all times
(to avoid delivery delays, when you really need it). When a choice is available,
“Closed” round-impeller style pumps may produce more flow than “open”
star-shaped styles. Aluminum pumps are preferred over iron pumps,
as they do not promote a mixed-metal electrolysis reaction at the gasket.
Fans: Two fan styles were originally installed: Early GT’s had 5-blades & later GT’s (1971-73) had 7-blades.
Both were black plastic, about 14” tip-to-tip, and lightweight (10 to 15 ounces). (Some aftermarket fans had
6 blades, as did 1975’s EFI clutch fan). Generally, the more blades, the noisier the fan is, but better cooling is also provided.
Belt: The fan belt drives the water pump, but if it is excessively loose, the car may overheat. There were 2 fan belt lengths, with
the “early” size for the cast-iron lower alternator bracket (with its 6 1/4” upper bracket) and the “later” (1971-73) size for an
aluminum lower alternator mounting bracket (with its 5 3/4” long upper bracket). Often overlooked, the rubber upper and lower
alternator mounting bushings are critical to securing the fan belt correctly. Correct adjustment is when the belt will
deflect about 1/2 inch total, measured about halfway between the fan pulley and the alternator. To do this, the 13mm nuts
on the 2 bolts holding the alternator to the brackets should be loosened, and the alternator carefully levered away from the
engine (a long rod or crowbar works well, when pivoted on the engine block), then the 13mm nuts
should be tightened while the alternator is in position.
Fan pulley
Alternator
Bushing
Fan Belt Adjustment
Tighten Fan Belt, to a maximum
1/2” deflection (1/4” in either
direction) at the midpoint,
between the fan pulley and the
alternator pulley
Upper Adjustment
Pivot and 13mm Nut
Alternator
(Arrows
Indicate
direction of
rotation of
crank pulley
and belt)
Lower Adjustment
Pivot and 13mm Nut
Alternator
Bushings
www.opelclub.com (10/2006)
Opel GT: Thermostat and Thermostat Housing
Thermostat installation and operation is critical, as an incorrect heat
range or a non-opening thermostat will overheat and damage your
engine!
Experience has shown that the best heat range is 160 degrees (when it is
above 80F degrees outside) and 180 degrees (when it is under 50F
degrees outside), so many owners change thermostats twice a year, in
each Spring and Fall. (Only use 192F Thermostats in exceptionally cold
weather, and quickly replace them when weather warms up).
Gasket
-ALWAYS test thermostat (drop into a pan of hot water on a stovetop,
and use a thermometer to verify it opens within specified heat range)
prior to installation!
-Never compromise with a cheaper model thermostat, and for
additional protection consider a “fail-safe” type
(from motoradusa.com) or a “balanced” type (from
performanceunlimited.com).
Thermostat
-Also consider drilling a 1/8” hole in the thermostat’s outer ring, so system can “burp” (to eliminate air pockets, when it is being filled).
Removal: Because the thermostat housing is aluminum, but is bolted to a
cast-iron cylinder head, the attaching bolts frequently seize due to an
mixed-metal “electrolysis” reaction. This means great caution should be
taken when unbolting the 13mm bolts — it’s best to use a slow backand-forth motion until the bolt is free, to avoid breakage.
Housing
Assembly : Prior to installation, eliminate heat warpage by flattening the
mounting surface (facing the cylinder head) of the aluminum housing,
using either a straight aluminum file in a vise, or do “figure eight”
motions on a piece of fine sandpaper on a flat cement garage floor.
The thermostat mounts in the recessed hole, with the spring facing down
and the pointed side facing up, then the “universal” type gasket is placed
over its edges. Another good idea is to clean all the rust and gunk from
the bolt threads and coat the bolt threads with “anti-seize” liquid for
additional protection when assembling.
Temp Gauge Sender
Temperature Gauge Sender Units:
There was an “early” style (1968-69) temperature gauge sensor that had
a 17mm wide fitting (with a 14mm threaded hole), but more common for
the GT is the 13mm wide fitting (with a black color insulator and a
10mm threaded hole). (Do not install the 13mm size sender with the
white insulator — that’s the Manta’s non-rallye model sender).
The sender is connected to the blue/white striped wire to the dash.
Some thermostat housings for aftermarket side-draft carburetors and the
ARA air condition system, added a 1” spacer to raise the “cap” piece.
Styles: The “early” (1968-1972) thermostat housings had 3 attaching
bolts, and “later” (1973+) thermostat housings had 2 bolts, according
to a 1973 Opel technical service bulletin.
Both styles of gaskets are interchangeable and work well, and Silicone/
RTV sealer works great here, if you can wait about 24 hours for it to dry.
If using Silicone/RTV, snug bolts into position, but don’t fully tighten
until sealer has had 24 hours to dry.
www.opelclub.com (10/2006)
Early 3-bolt, and Later 2-bolt
Thermostat Housing Gasket styles
Opel GT: Heater Components and Connections:
A functioning heater system requires correct hose connections, full motion operation of the control cables, and the need to
periodically clean out rust and dirt build-up from the heater valve and heater core. (See Also: Prior OMC Blitz articles on
heaters, which go into more detail on these procedures, such as those of Nov. 2000, Dec. 1996 and Oct. 1994).
Heater Tubes: These metal tubes to the heater core protrude about 1 –2 inches into the engine compartment, and often rust
from the inside out. If a leak develops on the interior passenger side floor, check gaskets from the tubes to the heater core.
Heater Hoses: As shown below, heater hose widths are 5/8” and aftermarket hose clamps work better than rusted-out
original clamps. The hose to the heater valve should be measured (about 7 inches, including an inch over the end of the metal
tube to the heater core) and cut, so that the control cable to the lever on the heater valve will fully open and close (the lever
moves towards front of the car to open the heater valve) . Consider installing a plastic “tee” fitting from Prestone’s Flush &
Fill Kit, to connect a garden hose to back-flush the heater core, to use water pressure to dislodge internal rust and debris.
Heater Valve: (All but early 1968-69 GT’s have this valve under the hood). Remove carefully: Press down and pull out the
cable retainer clip (make sure not to break the retainer tab), then remove from the attached hoses and work lever carefully
over the cable end (the ’bent’ portion snaps easily). In a sink, use running warm water and light tapping, to remove dirt and
rust from the inside of the valve. Use a SOS type scouring pad, to clean off the exterior plunger rod. Spray WD40 inside and
out, and test that valve moves easily. Then verify motion of the inner cable, by sliding the lower control lever on the
dashboard — if it doesn’t move, the brittle rear mounting bracket behind the dash has probably broken off. You can adjust
the heater valve manually, or add a “quick fix” by installing a manual choke cable under the dash, but eventually you should
replace the original plastic heater control on the dash with a metal reproduction (which will last virtually forever).
Reproduction heater control lever cables are now available as well.
Water Choke Hoses and Fittings (When Installed): The 1.9 Liter engine Opel GTs from 1968 to 1972 were equipped with
Solex 32DIDTA carburetors which had a water choke, and which connected by thin 5/16” hoses (such as fuel line) and 2
aluminum “T” fittings to the main 5/8” heater hoses. Because they ran poorly after being subject to heat, most Solex carbs
have been replaced by the Weber 32/36 DGV series. The Weber 32/36 DGAV version had a water choke, but it came with a
too-large 5/8” wide hose fitting (which was bulky and didn’t fit the factory “tee fitting” hardware, and which also decreased
coolant pressure through the heater), so many GT owners installed the smaller 5/16” hose sized water choke adaptor in its
place. There is little advantage to operating a water choke on an Opel GT (except, where air temperatures when driving are
frequently below 45F degrees). One advantage to the electric choke Weber 32/36 DGEV carb is that there are less hoses under
the hood, and it is suggested that the “tee fittings” be removed from the heater hoses (to increase coolant fluid pressure to the
heater, and to give a cleaner under-the-hood appearance).
Try to avoid confusing heater hoses, with engine vacuum hoses — See also OMC’s “Vacuum System Operation” Guide,
as included in the June 2006 OMC Blitz (or online, as part of “Engine Tune-Up” Tech Tips, at www.opelclub.com)
Carb Water Choke
(hose and tee
connections, when
installed)
90-degree elbow, on
upper 5/8” heater hose.
(Use a pre-formed hose
here, to prevent kinks)
To Upper Radiator Hose
Thermostat Housing
Heater Valve (on upper 5/8” heater hose)
Heater Control Cable & Lever on Valve
(Valve is open, when lever is toward front of car)
Water Pump
Metal Tubes
to Heater Core
Notes: Drawing Not to Scale. Arrows indicate direction of coolant flow.
www.opelclub.com (10/2006)
Opel GT: “Better Living Through Chemistry”:
Sometimes, you just don’t have time to perform a complete repair.
Sometimes, you can live with the results, of just adding a chemical
from a bottle. Here are a few products that we’ve found, that can help.
Redline “Water Wetter” Coolant Additive
Available from better-stocked parts retailers, and from performance vendors such as PAW,
this is a surfactant which treats internal cooling system surfaces. Opel owners have reported
a 10 to 20 degree temperature drop after adding this to coolant. It’s not cheap, one bottle
costs about $8.00, and needs to be replaced whenever coolant is flushed or changed.
Permatex “High Tack” Gasket Sealer
Available almost everywhere, the advantage to this sealer is it is so sticky, that it holds
gaskets in place (while you are fumbling around, trying to thread small metric bolts into
hard-to-reach and unseen holes). This is especially helpful, when doing side-of-the-road
emergency repairs (like a water pump replacement). True, it’s not as expansive as
Silicone/RTV, but you don’t have to wait for up to 24 hours for that sealer to complete cure
either. Only drawback: This sealer drips and leaves “spiderwebs” of gooey burgundycolored traces where you work. Wipe off quickly, with rag or a paper towel and WD-40.
(Silver Can) of “Engine Restorer”
This stuff worked really great, on a 4-cylinder engine which had 2 cylinders with very worn
piston rings. Compression rose in the lowest cylinders, from about 90psi to about 140psi,
which was almost even with the 2 “good” cylinders on that engine. Do the Compression
Checks, to make sure you don’t have a valve problem, to make sure it’s worn piston rings,
and this $7.00 can could give you 1000’s of additional miles on engines that are otherwise
toast. (Warning: Check for THICK engine oil, when you buy Opels—It could be this stuff)
Sta-Lube 140W Gear Oil
You can’t just buy a rebuilt Opel 4speed manual transmission or a rebuilt Opel rear axle
anymore. In fact, with the UPS costs of shipping these heavy items, sometimes you’re better
off just finding a way to keep your used (but still functioning) gearboxes and differentials
still running. Consider the Sta-Lube 140W gear oil. Sold by NAPA stores, it mates to the
accessory pump hardware, and once you manage to force quarts of this honey-goo in, it
significantly quiets the whining and howling of worn gears. Don’t mistake the common
multi-viscosity 85-140W (which doesn’t work as well), go for the straight 140W only!
Rain-X (Not Shown) Smear this on your windshield, once every 2 weeks. You can drive in
the rain, without turning on the windshield wipers (which never worked that well anyways).
“Polytuflon”/“Green Grease” Polyurethane Lubricant
Sometimes, your polyurethane bushings in your front suspension squeak, but
you don’t feel like removing them again (to re-coat with Teflon). Back in the
70’s Quickor Garage of Oregon, used a paint-can shaker machine attached to
some front end control arms, to develop a goopy green grease, that they said
outlasts all other lubricants on poly. We used it when re-installing some front
end poly bushings and so far, it works well with no squeaks. Costs about $10 +
shipping, from Ebay ID “Suspenstech” or by email at: quickor (at) comcast.net
“Brainwash” Mental Lubricant
Sometimes, when the stress of chasing down obscure mechanical issues on a 30+ year old
car becomes too great, it’s time to re-boot your consciousness. For that, try a cold bottle of
“Brainwash” (by Skeleteens of L.A.). We’re not sure exactly what’s in it (“mad dog
weed”?), but the label assures us “this may be your only way out.” We have observed that
just a drop spilt will ruin clothing (and porcelain) items permanently, and that it seems to
also color-dye your entire intestinal tract. Not for the faint of heart! Use only as directed,
and if you somehow manage to choke down the entire bottle, your mind WILL be changed!
OPEL MOTORSPORTS CLUB
OMC is an independent US-based auto club, that
specializes in German- made 1968-1975 Opels.
OMC was founded in 1980 by Opel enthusiasts
who wanted to share information and promote their
marque in motorsports. A newsletter was established
to promote Opel events, report Opel-related news,
provide technical tips, discuss vehicle upgrades,
and give members a free place to advertise.
New “Full Memberships” receive:
A year of bi- monthly print issues of OMC newsletter “The Blitz,” a roster of club members, an OMC decal
and a window emblem. Members can also participate in local OMC chapter activities, held all over the USA.
OMC Newsletters: “THE BLITZ”
(Print version black/white; Online in color)
OMC Activities & Annual Meeting
Opel Motorsport Club is the longest-established Opel club in the U.S.A. Members travel great distances
to attend the OMC Annual Meeting, a mid-Summer gathering and display of classic and restored Opels.
Benefits of membership also include information from other Opel owners on the maintenance and
improvement of their Opel(s), and the ability to contact fellow members on their common interests.
Opel Motorsport Club funds help maintain our website (with helpful Opel information) at: www.opelclub.com
OMC’s peer-reviewed technical information helps owners avoid common and costly errors on Opel repair jobs!
OMC is officially recognized by the Opel factory of Russelsheim, Germany, and OMC “SOLO II” racing
activities are also sanctioned by the SCCA (Sports Car Club of America) for racing nationwide in the USA.
“Full” U.S. Membership: $45.00 (Includes bi-monthly b/w print issues of The Blitz, postage & benefits listed above)
“Online-Only” Member: $20.00 (Includes downloadable Acrobat .pdf version of The Blitz, for home color printing)
To Join: Send your name & address, with check/money order payable to “Opel Motorsports Club” by mail to:
OMC Treasurer, 3824 Franklin Street, La Crescenta CA 91214-1607
OR: Send $47 for Full US Membership or $22 for Online Membership,
via PayPal to: [email protected]
(International Members: Please Add $10. for Full Membership, to cover additional postage costs )