1
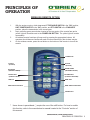
Service and Operations Manual
JVLT
Combination Jet/Vac Trailer
117 Industry Rd.
Marietta, Ohio 45750
Toll-free phone: 800-638-1901
www.obrienmfg.com
TABLE OF CONTENTS
PRE-DELIVERY INSPECTION FORM
customer training form/DELIVERY CHECKLIST
message to new owner
warnings
section 1 operations
I. principles of operation
Pre Operation Procedures
Pendant Control
Side Operator’s Station
Rear Operator’s Station
Rear Reel Controls
Clod Weather Blowout
Internal Tank Flush Option
Hydro Excavation Hose Reel Option
Wireless Remote Option
Tank Dumping Procedure
Controls and Instrumentation
Helpful Hints
Special Instructions
section 2 service
I. Customer Service and Parts Orders
Ordering and Processing of Parts Orders
Contacting the Service Department
Sales Terms
II. warranty information
Limited Product Warranty
Design Modifications
Major Components
Limitations and Exclusions to Warranty
III. TroubleShooting Guide
General Maintenance Schedule
Storage
Trouble Shooting Common Problems
JVLT Standard Unit Lubrication Points
JVLT Standard Unit Lubrication Points Intervals
JVLT Standard Unit Water Pump, Exhauster, PTO, and Hydraulic System Lubrication Intervals
O’BRIEN OPERATIONS, SERVICE AND PARTS MANUAL
section 3 parts
Note: Some of the parts information contained in this manual, has been provided by the original parts manufacturer and should only
be used as a visual reference when ordering. For an accurate listing of part numbers and components please refer to the parts index
section of this manual.
I. controls
System Components
Vendor Manuals
II. pOWERTRAIN
System Components
Vendor Manuals
III. wATER SYSTEM
System Components
Water Schematic
Vendor Manuals
IV. VACUUM SYSTEM
System Components
Vendor Manuals
v. hydraulic system
System Components
Hydraulic Schematic
Vendor Manuals
vI. PNEUMATIC SYSTEM
System Components
Pneumatic Schematic
Vendor Manuals
vii. eLECTRICAL sYSTEM
Electrical Schematic
viii. body
Body Components
Boom Assembly Drawing
ix. STANDARD EQUIPMENT
System Components
x. OPTIONAL EQUIPMENT
As Listed
Accessories
Note: .The descriptions and instructions in this manual cover the standard design of the equipment and any common deviations when
possible. This manual does not cover all design details and variations nor does it provide for every possible contingency which may be
encountered. When information cannot be found in this manual, contact your nearest Authorized O’Brien Dealer or contact the HI-Vac
Parts and Service Center.
*When ordering parts always specify unit serial number.
O’BRIEN OPERATIONS, SERVICE AND PARTS MANUAL
PRE-DELIVERY
INSPECTION FORM
Customer:
O’BRIEN DISTRIBUTOR:
Unit Model: JVLT
Unit Serial Number:
Upon arrival at destination, the following procedures must be carried out.
(Please initial on lines below)
Prior to delivery to customer
1
Engine, oil, water, fuel, air cleaner, fan belt
____________
2
Inspect exhaust system for clearance problems in and around entire
exhaust system
____________
3
Inspect for loose wires, hoses, cables, and correct as needed
____________
4
Appearance:
•
Wash unit
•
Remove and clean all sight eyes (inside and out)
•
Inspect paint; (touch-up where necessary)
____________
Check fluid levels (see service manual):
•
Exhauster
•
High pressure water pump
•
Hydraulic tank
•
Auxiliary engine: oil,water
____________
Electrical system:
•
Test hose reel operation payout and retrieve as well as hydraulic reel speed
control
•
Test throttle control at operator’s station
•
Test boom pendant and operate each button
•
Test all lights supplied with unit
____________
Body:
•
Door hinges and locks. Adjust if necessary
•
Inspect all body mounting bolts (torque if necessary)
•
Inspect inside of tanks for packed components or foreign objects
•
Raise and lower tank, inspect closure seal
____________
5
6
7
O’BRIEN OPERATIONS, SERVICE AND PARTS MANUAL
1
PRE-DELIVERY
INSPECTION FORM
PAGE 2
8
9
10 Hydraulic system:
•
Operate entire hydraulic system-all functions
•
Check all hoses, connections, and cylinders for leaks
•
Inspect hydraulic motor chain and bolts on hose reel. (torque if necessary).
____________
Check packing slip and unit against customer specifications and report
discrepancies to O’Brien Service Manager immediately!!
____________
Install suction line strainer if removed for shipping. Fill tank and run pump.
Assure all air is purged and the water pressure develops smoothly.
Check the radiator coolant level. The unit has been filled with anti-freeze/Water
solution at the factory. However, shipping may have altered the contents to the point where
additional coolant may be required. Fill only to the level
indicated on the radiator tank. NOTE: If temperatures are below freezing,
test the radiator contents after running the unit. Refer to engine manual
recommendations for best results.
12
Check packing slip and unit against customer specifications. Report any discrepancies
to Hi-Vac Customer Service Manager immediately!!
____________
11
____________
____________
Check for leaks. If unit is delivered during cold weather, refer to cold weather preparation.
THIS INSPECTION WAS PERFORMED BY:
SIGNATURE:_____________________________________ _ DATE:_______________________ _ TITLE:________
comments_________________________________________________________________________
O’BRIEN OPERATIONS, SERVICE AND PARTS MANUAL
2
customer training
FORM/DELIVERY CHECKLIST
Customer:
O;BRIEN DISTRIBUTOR:
Unit Model: JVLT
Unit Serial Number:
Operator and service personnel must be thoroughly instructed of the following: (Please initial on lines below)
Engine
•
Maximum operating speed
____________
•
How to engage and disengage
____________
•
Hydraulic pump location, belt adjustment and alignment
____________
•
Oil level
____________
Hydraulic system
•
Oil level inspection and time interval
____________
•
Location of filter and service
____________
•
Manual override
____________
•
Location of flow control valves and explanation of adjustments
____________
•
Location of hydraulic pressure gauge
____________
•
Boom system operation
____________
•
Tank Tipping
____________
•
Progressive cavity pump (optional)
____________
•
Reel drive system and service
____________
•
Reel speed control
____________
Electrical System
•
Location of fuses and Circuit Breaker
____________
Water system
•
Water tank inspection and repair
____________
•
Epoxy Coating and Service
____________
•
Drain valve
____________
•
Water pump drive system and lubrication
____________
•
Oil level inspection, time interval
____________
•
Packing lubrication, time interval
____________
•
Water “on/off” controls
____________
•
Pressure relief valve and operation (NO ADJUSTMENTS)
____________
•
Return line ball valve setting and service
____________
O’BRIEN OPERATIONS, SERVICE AND PARTS MANUAL
3
CUSTOMER TRAINING
FORM/DELIVERY CHECKLIST
PAGE 2
•
Cold weather storage
____________
•
Water pressure operation
____________
•
Removal of ice from system
____________
•
Suction line strainer
____________
•
Vacuum system and debris tank
____________
•
Debris tank inspection
____________
•
Door gasket cleaning
____________
•
Exhauster lubricating oil level
____________
•
Vacuum gauge
____________
•
Pressure relief valve and operation (NO ADJUSTMENT)
____________
•
Exhauster drive system and controls
____________
•
Rear door operation and controls
____________
•
Rear door keeper
____________
•
Tank tipping operation, controls, lubrication
____________
•
Tank prop
____________
•
With strainer open - explain cleaning and un-clogging
____________
•
Water draining system
____________
•
Cold weather operation
____________
•
Storage-draining all water from systems
____________
•
Handgun operation
____________
Accessories supplied with unit
•Nozzles
____________
•Hose guide ____________
•Handgun assembly
•
____________
Review all available accessories
____________
Options
•Tank Flush
____________
•Proper nozzles to match volume/pressure
____________
THIS INSPECTION WAS PERFORMED BY: SIGNATURE:_____________________________________ _ DATE:_______________________ _ TITLE:________
comments:_________________________________________________________________________
O’BRIEN OPERATIONS, SERVICE AND PARTS MANUAL
4
INTRODUCTION
Message to new owner
Thank you for purchasing your O’Brien unit, the most advanced American made sewer cleaning
machine. Our design will assure you the greatest return on your equipment investment.
Please consult this owner’s manual as the first step to resolving questions you may have about the operation or service of your machine. If you are not able to find the answers, then consult with your selling dealer. Finally, we at the factory will be happy to provide operating information that this manual
or your dealer are unable to provide.
Our warranty spells out all your rights and expectations with regard to this equipment. Please consult it
for a full definition of what is covered.
Thank you again for selecting the equipment preferred by industry professionals throughout the
world.
Your new O’Brien unit incorporates the very latest in pipe cleaning technology. An economical cleaning
machine for manholes, catch basins, lift stations, wet wells, pits and tanks. The JVLT utilizes a positive
displacement exhauster for vacuuming underwater or semi-dry materials without liquids.
The vacuum system provided is superior to any other method available. It is capable of both wet and
dry operation.
To achieve maximum results, the operators must become thoroughly familiar with the operation of the
machine and completely understand correct nozzle selection and cleaning accessory use.
We are a company that is committed to continually striving to build an even better product. Many ideas
for improvements in previous models have come from users in the field. If you or any of your operators
have an idea on how we might make this sewer cleaner even better, please give our Customer Service
or Engineering departments a call.
O’BRIEN OPERATIONS, SERVICE AND PARTS MANUAL
5
WARNINGS
o’brien COMBINATION JET/VAC UNIT
O’Brien machines are designed to clean sewer pipe, both sanitary and storm, in an underground environment. These
systems operate under high pressure conditions. Therefore, operators of these systems must be aware of possible
hazards. This is not a complete list of all possible hazards, but represents typical hazards and types of hazards. At all
times, the operator is responsible for the proper use of the machine. Make certain that all operators have thoroughly
read the operating instructions, maintenance, set up procedures and safety precautions found in this manual, before
attempting to operate the sewer cleaner. The operators must also understand all control functions and accessories in
order to develop a proper operating technique and insure a long machine life.
Operators of O’Brien machines should be aware of the following safety warnings:
•
•
•
•
•
•
•
•
•
•
•
•
•
•
•
•
•
•
Using this machine for purposes other than cleaning sewer pipe are not recommended.
A handgun accessory is provided for the operator’s use when cleaning external areas of the sewer system. The handgun is designed to shut off automatically when the actuator handle is released.
Water hose that is damaged into the braided lining must be repaired or replaced.
Never operate the machine in a stationary position without first setting the brakes. Always use wheel chocks.
When operating the hose reel, do not place hands or arms near the hose reel. Injury could occur from the rotating reel.
Never transport unit with transport keepers unfastened.
Use extreme caution while applying pressure to a nozzle that is being inserted into a very large diameter pipe or a sewer section that is full of water. It is possible for the nozzle to deflect or turn around causing it to come back up and out of the manhole. This can cause very serious injury to persons nearby.
Never force a nozzle or hose forward. It must move under its own power using the water pressure provided.
Always use a leader hose at the end of a sewer cleaning hose.
Never move the vehicle with the boom in a raised or otherwise unsecured position.
Failure to follow the instructions outlined in the ‘Preoperation Procedures’ outlined in this manual could result in damages to the equipment or injuries to the operator.
Exercise caution when filling the fuel tank. Do not refuel with the engine running. Fumes or spill may ignite causing injury or equipment damage.
Do not make adjustments or perform any service to the unit while the engine is running.
To avoid possible explosion or fire, disconnect and remove the battery when servicing the electrical system.
Keep the unit clean and free of oil, grease and fuel accumulation. This is especially important in the engine area.
While operating the unit, observe the engine coolant temperature and oil pressure gauge readings. If overheating occurs, shut the unit down immediately. This could prevent costly damage to the unit and possible injury to the operator.
Add radiator coolant to the engine only after the engine has been given sufficient time to cool down. Units are shipped with anti-freeze adequate for temperatures to -20°F. The coolant in the radiator is pressurized. To avoid burns or scalding, do not remove the radiator fill cap while the engine is running or immediately after operating the unit. To release the presure in the radiator, slowly turn the radiator fill cap to the right, allow pressure to escape before removing the cap completely.
Do not remove hydraulic hoses or components while or immediately after unit has been operated. The oil will be very hot and may be pressurized. Service the hydraulic system only after an appropriate length of time allowed for cool down.
O’BRIEN OPERATIONS, SERVICE AND PARTS MANUAL
6
WARNINGS
• To avoid possible injury or equipment damage, do not service the high pressure water system while it is under pressure. Be sure that the water pressure gauge reads “0” before attempting any service operation.
• Keep all personnel clear of the sewer cleaner hose when lowering it through a sewer or manhole.
• Always use a lower manhole hose guide when inserting a hose into sewer line.
• To avoid accidental start-up, remove the ignition key when equipment is being serviced.
• To avoid hazards to motorists and personnel, place appropriate flags and barriers around the equipment while in operation.
• Never inflate the tires beyond the recommended tire pressure. Leaks or punctures should be investigated immediately.
• Adjust transport speed when towing to match road and weather conditions.
• Use only O’Brien recommended service and repair parts. Our factory warehouse has a complete line of replacement parts and service kits necessary to maintain the performance level of all O’Brien machines. In order to avoid possible hazards and damage that could occur from the use of parts that may appear similar but are not recommended by Hi-Vac, we urge our customers accept no substitutions.
• Never enter a manhole, which contains stagnant water or gases.
• When entering a manhole proceed as recommended by the APWA and OSHA handbook on safety.
• When not in use, store the JVLT in a heated building or follow the winter operations instructions. Be sure to drain the water system.
• To avoid freeze-ups when operating in temperatures that are below (32 degrees F or 0 degrees c), the engine should be allowed to run continuously. This will enable the water system to recirculate water throughout the system.
• Check the water hoses and water system for leaks and worn or weak areas. Repair and replace as needed.
• In conditions where temperatures may approach freezing (32 degrees F or 0 degrees C), the following steps should be taken:
a) Connect end hose to transport fitting.
b) With engine idle, turn water valve to the “ON” position and allow the water to run for a sufficient length of time. This will remove any ice that may have formed in the system.
c) Carefully examine the nozzle to be sure it is clear of ice and/or other obstructions before attaching to the hose.
• In cold weather, keep nozzles and handguns in the truck cab to prevent freezing.
• NEVER USE A TRUCK TO PULL A SEWER CLEANING HOSE FROM A LINE! If the hose cannot be retrieved using the hydraulic system, excavation or another form of mechanical removal may be necessary.
O’BRIEN OPERATIONS, SERVICE AND PARTS MANUAL
7
WARNINGS
BEFORE GOING TO THE WORKSITE
This manual includes a general overview of safety precautions and operating procedures that should be observed
while operating your O’Brien Sewer Cleaner. It is NOT a complete guide to all safety procedures and does NOT
provide the user with instructions for every application.
Do the following before leaving for the worksite:
• Perform the required unit maintenance as indicated in the unit maintenance schedule.
• When not in use, all switches should remain in the “OFF” position. This will prevent unnecessary heat
build up and prolong the life of the components.
• Be certain to secure all tools and latch all doors, etc.
• Secure the sewer hose in the travel position by fastening the transport keeper.
hydraulic system:
Any mechanical equipment may present possible hazards to the operator. Specifically, Hi-Vac recommends
regular maintenance of all hydraulic and high pressure water systems to ensure safe operation at all times. Care
must be taken to properly support any component which has been lifted from its base, eg. the debris tank or door, to
protect against possible hydraulic failure which may cause a component to suddenly descend. Likewise, the operator must be aware of clear pathways before swinging the hydraulic vacuum boom or the articulating rear reel.
Operators, in short, should always exercise prudent caution when operating this or any other mechanical equipment. Bystanders should be warned to stay well back from operating equipment, and helpers must be aware of the likely
operation of components while the machine is being used.
vacuum system:
The vacuum system of this equipment utilizes very powerful air forces to convey solid material through the 4" boom
hose and into the debris tank. Keep clear of the end of the 4" boom hose and all connected tubes while the unit is in
operation. Never put your hand or other body part near this opening while the machine is in operation. If using the
system in reverse to provide power evacuation, keep clear of all exhaust ports while the unit is in operation.
WATER system:
The high pressure water system is designed for underground use only. For cleaning operations, the unit is supplied with a handgun assembly which uses regulated water pressure and a spring-loaded handle for operation.
Always check the condition of the high pressure hose before use, and while retrieving the hose from the sewer.
Repair or replace any damaged hose before its next use. Always match the volume of the nozzle being used with
the volume rating of the system. Never operate at higher pressure than is stated in this manual or as posted on the
machine.
drive system:
Always stay clear of moving parts when this machine is in operation. Never attempt adjustments to components while
they are in motion. Do not operate this unit with safety guards removed. Loose clothing can be caught in moving
chains or belts. Always inspect for loose clothing before working around or near moving parts.
O’BRIEN OPERATIONS, SERVICE AND PARTS MANUAL
8
WARNINGS
HIGH PRESSURE SEWER CLEANING HOSE
High pressure sewer hose is constructed from three separate layers of specially developed materials to
ensure greatest strength to the hose, and greatest safety to the operator. In order to guarantee this safety it is
very important to keep a close watch on the condition of the hose whenever it is being used.
The central core of the hose is constructed of a material called “polyolefin”. This seamless layer of the hose
provides approximately 30% of the total hose strength.
Inner Layer
Outer Jacket
Middle Layer
Bonded to the inner core is a band of high tensile polyester braid. This braid provides approximately 45% of the
total hose strength.
The outer jacket of the hose, bonded to the polyester braid, is an abrasion resistant polyetherurethane material.
It is designed to become very slippery when wet and provide as frictionless a surface as possible when travelling through the pipeline. This outer jacket provides the final 25% of the total hose strength.
The maximum burst rating of a hose is approximately 2.5 times its rated working pressure. That is, a hose rated
for 2000 psi has a maximum burst rating of about 5000 psi.
If the outer jacket is torn or abraded to the point where the braided band is exposed, there has been a 25%
loss of the maximum burst rating, or 1250 psi. Although this is a serious loss from the maximum strength of the
hose, there is enough “cushion” in the design to compensate.
However, if both the outer jacket and the inner braid have become badly damaged, then 65% of the hose
strength has been lost, or about 3250 psi. Under ideal conditions, this leaves only 1750 psi as the burst rating
of the hose now.
Clearly, as an operator using this hose, or a technician repairing the
machine, your safety depends on safe hose. Always inspect the hose
every time you use it. If it becomes badly abraded, repair it or replace
it.
If you must install new hose fittings, use only those specified by the
manufacturer for the hose supplied. Fittings have a color-coded band
to identify the hose they may be used with. Never use an incorrect fitting, or a hydraulic hose fitting “off the shelf”.
Proper swaging, the squeezing process which attaches a new fitting to
the end of the hose, is very important. All tooling, including dies, must
be inspected regularly to assure the correct swage has been made.
Caution: We do not recommend splicing or repair of ruptured hose. We recommend replacement only. If
hose is spliced or repaired, we recommend you contact the hose manufacturer for proper instructions and
correct compatible splicing tools and mendors.
O’BRIEN OPERATIONS, SERVICE AND PARTS MANUAL
9
PRINCIPLES OF
OPERATION
PRE OPERATION PROCEDURES
1)
Observe and obey all traffic and safety regulations when operating this unit at the work site.
2)
Open hydrant (or water supply) and flush clean before connecting water supply line to tank. Note: Always maintain ample water supply in the water tank. Never operate the water pump without an adequate water supply.
3)
Next, position reel at the down stream manhole (from the stoppage of section to be cleaned), approximately at the center of the manhole.
4)
Check exhauster oil level and strainer.
5)
Check that the water control valve is in the “OFF” or recirculating position.
6)
Open rear door and check ball check in tank to be sure it is free of obstructions and that it seats properly.
7)
Close rear door. Be sure all gaskets are seated and doors closed tightly.
8)
Close gate valve on rear door.
9)
Check sight eyes. Be sure hand wheels are tight and that gaskets are in place.
10)
Check suction tube “O” rings in all connections to be sure they are in place.
11)
Check the hydraulic fluid sight gauge, inspect the hydraulic fluid level in the hydraulic reservoir (located in the engine compartment). The fluid level should be visible in the sight gauge.
12) Remove vacuum strainer and check for foreign objects or materials. Clean and replace.
13)
Engine speed is controlled by the electric throttle actuator. Note: if machine is equipped with automatic cut-off switches, the bypass, or “Murphy” switch must also be depressed and held until proper oil pressure is established, otherwise engine will not continue to run.
14)
Allow engine to warm up at a brisk idle for a few minutes. Adjust choke to lean out fuel mixture.
15)
The control panel contains gauges to monitor engine rpms, water pressure in the jetting system and vacuum in the exhauster system. Check engine gauges before proceeding. If any readings are not suitable for operation, shut engine down immediately and consult engine manual.
16)
Attach the appropriate nozzle to the end of the hose and hand tighten. Do not use a pipe wrench. Always check holes in nozzle to make sure they are clear of ice or debris and not worn before installing.
17)
Insert hose into the manhole roller, or flexible hose guide, to prevent hose chafing. It is recommended that a 10-foot long wire reinforced hose leader be used to help start the hose in the line. An added benefit of using a hose leader is that when retrieving the hose the operator can tell when the nozzle is approaching the manhole. See attached accessory brochure.
18)
While engine is still idling, move reel directional control valve switch to hose “payout” position. Unwind enough hose to insert about 2 or 3 feet of hose into the sewer line against the normal flow of the sewer.
19)
With the engine idling and the water control valve in the “OFF” or recirculating position, engage the clutches by switching the water pump and exhauster control switch to the “on or engaged” position. This causes the engine to engage the water pump and/or exhauster.
20)
Water is controlled by the water control lever which directs water directly from the water pump to the hose reel in the on position and through the return system to the water tank in the off position. Place the water control valve in the “ON” position. Water will flow through the hose to the nozzle.
21)
Unlock boom. Place 4” aluminum intake tube on boom hose. End of tube must be able to reach bottom of manhole. Use extension, if necessary.
O’BRIEN OPERATIONS, SERVICE AND PARTS MANUAL
PRINCIPILES OF OPERATION 1
PRINCIPLES OF
OPERATION
22)
Increase engine RPM to maximum allowable water pressure. The hose will begin moving up the line taking up slack.
23)
Move the hose reel directional control valve to payout. The hose will travel up the sewer line as fast as the reel will payout. It is
recommended that in payout, the reel be allowed to move as fast as possible. If the hose stops, retrieve the hose a few feet and payout again until the nozzle “jumps” any obstruction. sides of the pipe and flush it back to the manhole. Slow retrieval is achieved by turning the knob on the directional control valve (PN 382711). This action controls the amount of oil passing through the valve and thereby controls the speed of the reel motor.
24)
Let the nozzle proceed up the line approximately 1/3 the distance between manholes or until the length of hose limits
further travel. Once the nozzle moves up the line and as the operator gains experience; adjust the water pressure to permit fastest possible hose travel. This will conserve water and maximize thrust. Retrieve the hose and nozzle, at a reduced speed flushing debris into the manhole. Proceed forward approximately 2/3 of the manhole distance and retrieve. Then complete cleaning until the nozzle reaches the upper manhole. Line is clean when water in sewer runs clear.
25)
Good practice dictates that hose travel up the line be allowed at fastest possible speed and that retrieving the hose be done at a sufficiently slow speed to allow the jetting action of the nozzle to break the debris loose from the sides of the pipe and flush it back to the manhole. Slow retrieval is achieved by turning the knob on the directional control valve (P/N 382711). This action controls the amount of oil passing through the valve and thereby controls the speed of the reel motor.
c a u tion :
Stand Clear of inlet. do not place hands or
feet near suction inlet. hold boom or
suction hose securely.
26)
The hose level wind or hose guide is used to wind the hose on the reel evenly to ensure long hose life.
27)
Note: Do not allow the debris to continue into the next section. The use of manhole traps (shown in the attached accessory brochure) will permit water to flow down the line while blocking solids at the manhole.
28)
Good results may be obtained by only cleaning a short section of a heavily obstructed or clogged line at one time. This means, run the hose up the line a short distance and then return the nozzle back to the manhole. Repeat this procedure but go further up the line each time.
29)
When retrieving the nozzle from the line, stop the reel while the nozzle is approximately 5 to 10 feet from the manhole. Allow the nozzle to flush out any debris which may have accumulated in the end of the line. Then, return the engine to idle, position the water control valve in the “OFF” or recirculate position and wind the hose on the reel. Using a hose leader will enable an operator to predict accurately, when the nozzle is returning to the manhole. See the attached accessory brochure.
30)
When winding the hose back onto the reel, it is recommended that an even consistent wrap be achieved. By using the supplied level wind to guide the hose as it winds onto the reel, the operator can ensure that the hose wraps evenly in rows. This will allow maximum use of the reel capacity, keep the hose from jamming or kinking on the
reel and increase hose life.
O’BRIEN OPERATIONS, SERVICE AND PARTS MANUAL
PRINCIPILES OF OPERATION 2
PRINCIPLES OF
OPERATION
31)
Continue to pick up both liquids and solids until the liquids reach the level of the top sight eye.
32)
Final cleanup is accomplished by connecting the hand gun to the quick disconnect and wash down the manhole. *Note: When using the handgun, set engine RPM at 1400 RPM maximum so as not to exceed 800 psi maximum pressure at the gun. Hose spray can be adjusted easily by changing the position of the vertical handle forward or back as the gun is spraying. Wide area and solid stream spraying is possible.
33)
Caution: Do not direct hand gun spray onto passing motorists, pedestrians or co-workers. Use this equipment sensibly.
34)
Select proper pump operating pressure based on the following:
a)
Diameter of pipe-generally, larger diameter pipes require higher pressure for more efficient cleaning.
b)
Age, condition and type of pipe-caution must be exercised in using higher pressure in older pipes with mortar joints and with pipes showing deterioration from hydrogen sulfide gas.
c)
Amount and type of debris to be removed - during the initial cleaning program higher pressures will be required to remove larger amounts of debris. After system has been cleaned once, it is usually not necessary to use full operating pressure for preventive maintenance.
d)
Operator experience - until the operator is fully experienced in the operation of the equipment, it is recommended that the machine not be operated at maximum pressure. Experienced operators will select water pump pressure and hose retrieve speeds adequate to do a thorough cleaning job. Although this machine is designed for continuous duty at maximum rating, it is considered good practice to utilize only that water required to do a good cleaning job and to avoid needless over-speeding of engine or over-pressurization of the pump.
e)
Age of Sewer Jet hose – the age and condition of the sewer cleaning hose must always be considered when selecting working pressures. Remove and replace hose when worn, or cut.
35)
A good place to start is to select a retrieval speed of approximately 30% of full reel speed.
Note: Check the sight tube frequently to ensure an adequate supply of water exists in the tank.
O’BRIEN OPERATIONS, SERVICE AND PARTS MANUAL
PRINCIPILES OF OPERATION 3
PRINCIPLES OF
OPERATION
PENDANT CONTROL
The pendant control is a yellow rectangular box with black push buttons.
The multi-wire cable is long enough to allow the operator to carry the
pendant to the work area. A pendant connection located on the side operator’s panel allows the operator to disconnect the pendant control
from the panel and store the pendant when not in use.
The pendant operates the boom. It lowers and raises the boom, it telescopes the boom in and out, and rotates the boom right and left. Each
function is controlled by a push button control. Pressing a button carries
out a function, releasing a button stops a function.
When transporting the unit, the pendant should be stored in a safe
place. Because the control is rugged and can withstand some abuse, if
dropped repeatedly, or run over by the unit, the case will become cracked
or crushed. This may cause some or all of the functions of the pendant
control to cease operation and allow water to leak inside.
Each operator should spend as much time as necessary to become
completely comfortable with each Function of the pendant control so
that the operation of the boom becomes almost natural.
SIDE OPERATOR’S STATION
There is an operator’s station on the side of the unit to allow the
operator to control the tank dumping system. It is at this operator’s
station, as well, that the pendant control is connected. There is also
a unit control box with toggle switches. The box contains a switch for:
the throttle, boom functions, door lock/unlock, door open/close and an
emergency stop button. The throttle control at this station allows the
operator to control engine speed, and therefore hydraulic pressure.
Operate engine at 1500 rpm during tank dumping and lock operating
functions. Plastic labels at each control indicate the correct manipulation of the switch for the function it performs. Consult the
labeling to be sure you are operating the controls correctly. If the
labels become unreadable or are inadvertently removed, consult the
illustration for switch operation. The hydraulic tank is also at the side
operator’s station. A sight glass near the top of the tank indicates the
correct oil level. The oil level must be above 80 on the sight eye scale.
It also contains a thermometer to measure hydraulic oil temperature.
Oil temperature should not exceed 180 degrees.
O’BRIEN OPERATIONS, SERVICE AND PARTS MANUAL
PRINCIPILES OF OPERATION 4
PRINCIPLES OF
OPERATION
Caution: Although the water pump may be run for a short time without water, prolonged operation of the water pump without
water will cause overheating and damage to the packings and other internal components of the water pump. Refer to the pump
manufacturer’s section included in this manual for further information.
REAR OPERATOR’S STATION
There are actually two operator’s stations, depending on the function being
performed. For operating the jetting and vacuum functions of the machine,
the operator will use the rear operator’s station, located on the hose reel
frame at the rear of the unit. The operator’s station is equipped with an
electronic throttle switch to control the engine speed, a tachometer to view
the engine’s speed, a water pressure gauge to view the water pressure in
the jetting system, and a vacuum gauge to view the performance of the
vacuum system and switches to turn water pump and blower on and off.
There may also be a water warning light on the rear station control panel.
The two buttons on the lower part of the panel control the articulation of the
hose reel assembly. It is possible to articulate this hose reel 180º around
to the side of the machine so that the hose reel and operator’s station is all
the way to the passenger side of the machine. This allows the operator to
be completely away from the flow of traffic if practical. It also allows direct
access to manholes which are located on the tree lawn or sidewalk, while
the truck can be parked along the curb-side. One button will cause the hose
reel assembly to articulate out away from the tank door, and the other will
bring the hose reel assembly back to rest on the door stop pad.
Caution: Always move the hose reel away from the door stop pad whenever
the hose reel will be operated. Failure to do so may cause the door stop pad
to be torn away from the reel
There is also a toggle switch which controls the engine speed. Pushing up
the switch increases the engine speed, while pushing it down decreases
the engine speed.
THE REAR REEL CONTROLS
In addition to the controls at the rear operator’s station, several valves and
controls are also mounted directly to the rear reel assembly at the back of
the machine. This is where most of the work is done. When work is done
at the side of the machine, all the controls and the operator’s station come
with the reel as it articulates. Among the controls at the rear reel is the
water valve handle to turn water on at the hose reel. Plastic labels indicate
which position turns water on to the hose reel and which returns water to
the water tanks. When in the hose reel position, the water flow is directed
to the hose reel and through the water hose. Be sure the hose is fitted with
a proper nozzle and in a working position before turning the valve to the
hose reel position.When in the tank return position, water flows through
the control valve and returns to the water tanks. This is the normal position
for the valve whenever the machine is not being used for jetting.
O’BRIEN OPERATIONS, SERVICE AND PARTS MANUAL
PRINCIPILES OF OPERATION 5
PRINCIPLES OF
OPERATION
COLD WEATHER BLOWOUT
The “Schrader Air Valve”, located on the discharge side of the water pump and on the water manifold, is used to purge the pump and water piping of any trapped water and return it to the water
tanks. By connecting an air supply to the “Schrader Air Valve”, air is then introduced at the valve
and water is blown back to tank.
Schrader Air Valve
Schrader Air Valve
O’BRIEN OPERATIONS, SERVICE AND PARTS MANUAL
PRINCIPILES OF OPERATION 6
PRINCIPLES OF
OPERATION
INTERNAL TANK FLUSH OPTION
The control for the internal tank flush is on the water manifold above the water pump. The control is the lever on
the ball valve. Normally the valve is left in the “Down” or “Off” position. When the valve is placed in the “Up”
or “On” position, the water flow is sent to the internal tank nozzles in the debris tank, allowing high pressure
flushing of the debris tank. When dumping the debris tank, it is desirable to use the internal tank flush system to
thoroughly clean the interior of the tank without requiring the operator to manually wash it down.
Do not operate this system while the exhauster system is running, or at speeds in excess of posted
speed and gear range!
To operate this system, perform the following steps:
1. Place the “Tank Flush” Valve in the “Up” or “On” position.
2. Assure “Hose Reel” and “Hydro Excavation Reel” Valves are in the “Down” or “Off” position.
3. Engage the water system.
4. Open the rear door approximately half way. Follow instructions for dumping the debris tank, outlined in
this manual.
5. To increase the tank flushing capability increase the engine RPM.
6. Adjust the level of the rear door so that the jet spray from the internal nozzles is striking the middle of the
door for maximum cleaning.
7. Operate system until the tank is completely clean or the water supply is depleted.
Hydro Excavation
Reel
Tank Flush
Hose Reel
O’BRIEN OPERATIONS, SERVICE AND PARTS MANUAL
PRINCIPILES OF OPERATION 7
HYDRO EXCAVATION HOSE REEL OPTION
The control for the Hydro-Excavation Hose Reel is on the water manifold above the water pump. The control is
the lever on the ball valve. Normally the valve is left in the “Down” or “Off” position. When the valve is placed in
the “Up” or “On” position, the water flow is sent to the hose reel.
To operate this system, perform the following steps:
1. Assure the exhauster and water pump are turned off.
2. Disconnect the Hydro-Excavation hose from the “Quick Connector” and attach the Hydro-Excavation
handgun (not shown).
3. Place the “Hydro Excavation Reel” Valve in the “Up” or “On” position.
4. Assure “Hose Reel” and “Tank Flush” Valves are in the “Down” or “Off” position.
5. Engage the water system.
6. Pull the trigger on the Hydro-Excavation handgun. This will allow air to escape from the Hydro-Excavation
hose.
8. Throttle up the engine.
Note: At this point, you should have adequate water flow at the Hydro-Excavation handgun. You can now use the trigger of the Hydro-Excavation handgun as an “On-Off” for the water.
9.
Use the water from the Hydro-Excavation handgun to break up soil and the vacuum hose/tubes to remove the loose soil/debris.
10. To shutdown the system, reverse the start-up procedures.
Hydro Excavation
Reel
Tank Flush
Quick Connector
Hose Reel
O’BRIEN OPERATIONS, SERVICE AND PARTS MANUAL
PRINCIPILES OF OPERATION 8
PRINCIPLES OF
OPERATION
WIRELESS REMOTE OPTION
1.With the engine running, clutch depressed, PTO ENABLE SWITCH in the “ON” position, UNIT POWER SWITCH in the “ON” position, and PTO SWITCH in the “ENGAGED” position, place the transmission in the correct gear.
2. Next, press the green power button located on the top center of the remote face and a yellow light will illuminate next to the POWER ON BUTTON. The yellow light will remain momentarily.
3. All wireless remote functions will now work by pressing the appropriate buttons. All operators should become familiar with each function controlled by the wireless remote.
4. On the wireless remote, press the red button on the bottom of the remote to turn off the remote.
POWER ON
E-STOP
*(E-STOP)
E-STOP
*(E-STOP)
BOOM UP
*(WATER ON/OFF)
BOOM DOWN
*(BLOWER ON/OFF)
BOOM LEFT
*(THROTTLE UP)
BOOM RIGHT
*(THROTTLE DOWN)
REEL IN
REEL OUT
REEL ARTICULATE IN
REEL ARTICULATE OUT
POWER OFF
* . Items shown in parenthesis ( ) require the use of the shift button. For how to enable
this function, refer to the manufacturer’s manual located in the “Controls” section of
this manual.
O’BRIEN OPERATIONS, SERVICE AND PARTS MANUAL
PRINCIPILES OF OPERATION 9
PRINCIPLES OF
OPERATION
tank dumping procedure
The following procedure is to be followed to raise and lower the debris tank.
1.
Unit must be attached to towing vehicle.
2.
Set wheel chocks in front and behind wheels.
3.
Unpin and swing hose reel to the side. Repin.
4.
Open rear dump valve and drain off liquid.
5.
Open rear door lock and swing door to full open position.
6.
Assure boom is lowered in travel cradle.
7.
Raise tank to full upright position and dump load.
8.
Reverse procedure to lower tank.
O’BRIEN OPERATIONS, SERVICE AND PARTS MANUAL
PRINCIPILES OF OPERATION 10
PRINCIPLES OF
OPERATION
CONTROLS AND INSTRUMENTATION
1) 2) 3) 4) 5)
6) 7) 8) 9) 10)
11) 12) 13)
Ignition key switch - Off / On: Turn to the right to open battery circuit to gauges and starter switch.
Start Switch (engine): Momentary contact. Press the start switch to rotate the engine to start.
Ammeter: Indicates the current that’s charging the battery from the alternator.
Oil pressure gauge (engine): Indicates engine oil pressure while engine is running. (Note): gauge should read 40 psi at idle to 60 psi at 2000 rpm. CAUTION: If oil pressure reading is below these operating limits, STOP THE ENGINE IMMEDIATELY! Check the oil level and refer to the engine manual section to determine the cause of the malfunction.
Water temperature gauge (engine): Indicates engine operating temperature, (Note): Gauge reading should never exceed 190º F. If the temperature rises above this mark, STOP THE ENGINE IMMEDIATELY! Inspect for leaks in the radiator and hoses.
Bypass (Murphy) Switch: On units equipped with a low oil pressure, automatic cut-off switch. This switch must be depressed when starting the engine. If the unit should shut down due to high water temperature or low oil pressure, DO NOT use this switch to continue operating the unit. Continued operation may damage the engine. Check the water and oil levels. If the problem is not determined, refer to the trouble shooting section of this manual or contact the factory.
*Fuel Gauge: Indicates fuel level in fuel tank.
Throttle: The toggle switch at the operator’s station is used to control the electric actuator located at the engine compartment.
Tachometer: Registers engine operating speed.
Vacuum Gauge: Indicates the vacuum at the blower inlet. (Note: Vacuum should not exceed 15” Hg.)
Water pressure gauge: Indicates the water pump operating pressure for the water supply. (Note: The pressure should not exceed the maximum pressure indicated on the pump identification plate).
Hydraulic oil pressure gauge: Indicates the pump operating pressure for the hydraulic fluid supply.
(Note: The pressure should not exceed 2500 psi. Pressure will only register on gauge when the hose is being retrieved).
Water control valve: When the lever is moved to the “ON” position, water from pump is directed to the jet hose on the 14)
15)
16)
17)
reel. When the lever is moved to the “OFF” position, the pressurized water is no longer directed to the hose, but will recirculate water from the valve back to the tank.
Reel speed control knobs: Controls the speed at which the hose will pay out or retrieve the nozzle. Clockwise rotation will increase the speed. Counter-clockwise rotation will decrease the speed.
Reel directional control switch: To pay out hose, push the switch down. To retrieve hose, pull switch up. Center position stops the rotation of the reel.
Blower and water pump clutch controls: Engages the blower or water pump. These switches are located at the lower section of the rear control panel. This should only be done with the engine running at a low or idle speed with the water control valve in the ‘OFF” position.
Visual water level sight glass tube: The red ball float indicates the water level in the water tank. Once again, do not allow the water supply to run out while the water pump is running.
O’BRIEN OPERATIONS, SERVICE AND PARTS MANUAL
PRINCIPILES OF OPERATION 11
PRINCIPLES OF
OPERATION
HELPFUL HINTS FOR USING YOUR O’BRIEN CLEANER
WHERE TO START YOUR CLEANING PROGRAM
Cleaning operations should begin at the outer reaches of the network, proceed to trunk lines and
then to interceptors. Deposits must be removed by the crew as cleaning proceeds. The 15o nozzle
is recommended for optimum cleaning of the tile in sections where accumulations are light or pipe
diameters do not exceed 12 inches. If accumulations are heavy, the 35o nozzle is recommended.
WATER LEVEL INDICATORS
It is important to pay attention to the amount of water remaining in the fresh water tanks when using
the hose reel. There are two ways of determining the amount of water remaining:
1. The sight level tube located on the water tanks which shows water level in both tanks.
2. Low water shut down, will disengage water pump clutch when water has been expended.
COLD WEATHER STORAGE
The following procedure is required to prevent damage to the water pump and water system during
cold weather conditions.
1. Open the drain in the water tank. Leave the drain cap off until the machine is ready to be used.
2. Remove the suction line filter, gasket and cover.
3. Turn on ball valve at rear reel water manifold.
4. Engage water pump in accordance with normal procedure and run pump approximately 15 seconds.
5. Apply 75 to 100 PSI of air pressure, from an external source, to the air valve on the water pump to
force the water from the water pump and hose reel. Do this until a solid stream of water no longer
comes out of hose.
6. Tie or wire the sewer cleaning hose end securely to reel and rotate clock-wise as if retrieving the
hose from sewer. Make certain the nozzle is removed. Rotate until water no longer comes out.
7. Open valve for handgun and push ball on male quick connect.
Caution: The implementation of this procedure must be performed immediately after jetting operation or cold weather recirculation operation.
Caution: If general circumstances lead to the interruption of the procedure and there is a presumption of ice formation in the system, move the unit to a heated
garage immediately, let thaw out, and then proceed with the above steps.
O’BRIEN OPERATIONS, SERVICE AND PARTS MANUAL
PRINCIPILES OF OPERATION 12
PRINCIPLES OF
OPERATION
SPECIAL INSTRUCTIONS FOR HEAVILY LOADED LINES
In pipelines heavily loaded with sand or gravel, it is advisable to perform the cleaning operation in
a progressive manner, first propelling the cleaning nozzle 50 to 100 feet into the line and slowly
withdrawing, then 100 to 200 feet, etc. When the withdrawal of the nozzle fails to bring additional
deposits to the manhole, the line is clean. If the line is large and deposits are heavy, the speed of
withdrawal of the hose should be reduced. Special sand and penetrating nozzles are available for
complete blockages. (See Nozzle Selection guide in Accessory Catalog)
Caution: All high velocity sewer cleaners will cause small amounts of water and sewer gas to enter buildings which do not have toilet vents or, have toilet vents that are clogged.
OPENING STOPPAGES
In the case of a line stoppage, the hose should be introduced into the manhole below the stoppage
and worked upstream. The 35o and/or 15o nozzle, lance nozzle, stub lance, rocket nozzle or nozzle
with a front orifice are recommended.
UNEVEN JOINT IN SEWER LINES
It is recommended that nozzle guards, ellipse nozzle or centralizer be used, to ease cleaning operations by preventing the nozzle from becoming caught on joints.
CULVERTS, DRAIN TILE, 18" AND LARGER PIPE
When cleaning such lines, it is advisable to insert the hose 4 to 5 feet into the line before delivering
water to the cleaning nozzle. The single storm, double storm, Sting ray or Torpedo nozzle is recommended for this application since these will bore through large pipe and heavy accumulations best.
ROOT AND GREASE REMOVAL
The O’BRIEN root cutter system, employing either root saws, root cutter blades or brushes, may be
used to cut out roots, encrusted grease and detergent buildup. Spin clean nozzles work most effectively on grease and detergent buildup. Special instructions accompany these nozzles. Please refer
to these instructions for proper operation and care of specialty nozzles.
O’BRIEN OPERATIONS, SERVICE AND PARTS MANUAL
PRINCIPILES OF OPERATION 13
SERVICE
CUSTOMER SERVICE AND PARTS ORDER
Hi-Vac Corporation is committed to customer satisfaction. In addition to our Authorized
Dealer network throughout the world, we maintain a full stock of parts and accessories at
our factory in Marietta, Ohio. In the event you need parts or service, first call your nearest Authorized Dealer. Their name and number should be shown on the unit information sheet located at the front of this manual.
To assure prompt delivery and processing of your parts orders, please have the following
information available, when you place your order:
1. Type and serial numbers for the unit. This information is also located on the Identification Sheet.
2. The part number(s) of the required items, along with the quantity desired.
3. SHIPPING INSTRUCTIONS, whether your parts are to be shipped next day air, second day air, truck, ocean freight, etc. When left unspecified, orders are shipped UPS,
or truck freight if necessary due to weight restrictions. We must have your street
address: we cannot ship to P.O. Box numbers.
4. When placing orders - FIRST: Contact your nearest Authorized O’Brien Dealer. If they
are unable to assist you, contact the Hi-Vac Customer Service Department at:
Phone: 740-374-2306
Fax: 740-374-5447
Every effort is made to ship all in-stock parts on the same day the order is received, when
the order is placed before noon, Eastern Time. Orders received after noon are shipped
the next business day.
SALES TERMS:
The descriptions and instructions included in this manual cover the standard design of
the equipment and any common deviations when possible. This manual does not cover
all design details and variations nor does it provide for every possible contingency which
may be encountered.
When information cannot be found in this manual, contact your nearest Authorized
O’Brien Dealer or phone the Hi-Vac Customer Service Department.
All specifications given have been calculated at sea level. All designs and specifications
are subject to change without notice.
No material returns will be accepted unless accompanied by our Material Return
Authorization form. A restocking charge of 20% applies to all Return Goods.
O’BRIEN OPERATIONS, SERVICE AND PARTS MANUAL
SERVICE 1
SERVICE
STANDARD LIMITED PRODUCT WARRANTY
Hi-Vac Corporation, hereinafter called the Company, warrants for a period of twelve (12) months from
the date this product is accepted by the purchaser, that all design and material of its own manufacture
shall be free from defects. The company agrees to repair or replace, at its sole discretion, such defects to
assure the product performs according to its published specifications at time of manufacture.
This warranty will not cover any part or service subject to normal wear or adjustment as described in the
Operator’s Manual supplied with the product. This warranty will not cover failure caused by purchaser’s failure to perform normal maintenance by abuse, or by purchaser’s use of product for purposes not intended
by design. Alterations or modifications to product without the express written permission of the Company
may void this warranty. Use of replacement parts not supplied by the Company may void this warranty. All
parts supplied under the provisions of this warranty are F.O.B. Marietta, Ohio.
This warranty shall be the only warranty in effect, and no one shall have the authority to supersede or
modify its provisions except in writing by the Company, or as provided in these terms.
WARRANTY EXTENSIONS
The Company may wish to offer an extension to this warranty, at a price it may determine and publish. This
extension will act to increase the period over which these terms may apply, but will not modify any of the
terms except as may be expressly stated in writing by the Company.
MAJOR COMPONENT WARRANTY
Components provided as part of this product, but those which are not manufactured by the Company, shall
have whatever warranty and terms as are offered by the original manufacturer and shall not be covered
by these provisions except where specifically stated. These warranties shall be provided upon request.
The Company shall make good faith efforts on behalf of the purchaser to enforce any applicable warranty
offered by its vendors.
SPECIAL WATER TANK WARRANTY
The Company warrants its water tanks to be free from leaks, and agrees to cover repairs or replacements
of defective tanks according to the following schedule:
MILD STEEL TANKS PRO-RATED WARRANTY (Except SJR tanks)
1st year — No charge repair or replacement f.o.b. factory
2nd year — 65% of list price, f.o.b. factory is allowed
3rd year — 50% of list price, f.o.b. factory is allowed
4th year — 40% of list price, f.o.b. factory is allowed
5th year — 20% of list price, f.o.b. factory is allowed
STAINLESS STEEL TANKS PRO-RATED WARRANTY (Except SJR tanks)
First 5 years — No charge repair or replacement f.o.b. factory
6th year — 65% of list price, f.o.b. factory is allowed
7th year — 50% of list price, f.o.b. factory is allowed
8th year — 40% of list price, f.o.b. factory is allowed
9th year — 20% of list price, f.o.b. factory is allowed
POLYGRAPHITE TANKS
10 year warranty on all polygraphite water tanks. The company guarantees for the lifetime of the tanks
against failure from corrosion or rust through.
SJR TANKS
10 year no charge repair or replacement against rust through or leaks, f.o.b. factory, provided terms of
inspection as outlined in Operator’s Manual are met.
O’BRIEN OPERATIONS, SERVICE AND PARTS MANUAL
SERVICE 2
SERVICE
DESIGN MODIFICATIONS
The Company reserves the right to make modifications to its design and specifications which shall in no way
infer that previous designs and specifications are not fit for their originally intended purpose, and shall in no
way obligate the Company to perform such modifications to products manufactured before these changes
were adopted.
WARRANTY INITIATION
The warranty shall begin at the date the product is accepted by the purchaser which shall be documented
by the “Delivery Check List” included in the operating manual for the machine, properly filled out by the delivering dealer, and signed by the purchaser. If this form is not returned to Hi-Vac, the warranty shall begin in 30
days after shipment from the factory.
Any product which has been used as a demonstration unit will, upon sale to the purchaser, have the full
warranty as provided for in these terms, subject to the conditions as stated herein. The Company must be
notified by the delivering dealer in the same way as any newly manufactured machine.
LIMITATIONS / EXCLUSIONS TO WARRANTY
The company shall not be held liable, under the terms of this warranty, for any losses, damages or
expense charges incurred by purchaser, or its agents, representatives or employees, as a result of any failure of the product to perform. Other than those expressly stated herein, there are no other warranties of any
kind, express or implied, and specifically excluded but not by way of limitation, are the implied warranties of
fitness for a particular purpose and merchantability.
The following are specifically, though not exclusively, precluded from the terms of this warranty except as
already stated:
Water pump
Auxiliary engines
Exhauster/vacuum pump
Drive belts
High pressure water hose
Truck chassis
Hydraulic pumps, motors and valves
Power Take-Off
Electrical components
Suction hoses and tubes
Batteries
Axles, tires
CLAIMS PROCEDURE
Warranty claims against the Company shall be made by the delivering dealer in accordance with the
terms set forth in the “Warranty Request Claim” policy statement as set forth at the latest effective date.
All parts are supplied F.O.B. by the factory in Marietta, Ohio. No freight allowances are made. No travel
time allowances are made. The purchaser shall agree to these terms by virtue of acceptance of the machine
or purchased part.
REPLACEMENT PART WARRANTY
Parts replaced during the warranty period will be warranted only during the term of the original warranty.
No extension of warranty is made by installation of the new part.
Replacement parts purchased after the warranty period will carry a thirty (30) day warranty against
defects in material or workmanship, or whatever warranty shall be offered and be enforceable upon the
original manufacturer, whichever is longer. Labor costs incurred to replace defective parts are specifically
excluded from this warranty.
The purchaser shall be responsible for payment of the replacement part until such time as the original
manufacturer shall offer warranty replacement to the Company, at which time credit will be issued to the
purchaser. All such defective parts must be returned to the factory, freight pre-paid, for evaluation and determination of warranty by the original manufacturer. Requests for return will be made at the discretion of the
Company. No part shall have been previously disassembled or tampered with in any way so as to void the
manufacturer’s warranty.
The Company’s sole responsibility under these terms shall be the timely return of the defective part to the
original manufacturer for warranty consideration, and for such reasonable follow-up action as may be necessary to expedite the claim. The original manufacturer’s decision shall be final and binding on both purchaser
and the Company.
O’BRIEN OPERATIONS, SERVICE AND PARTS MANUAL
SERVICE 3
SERVICE
general maintenance schedule (Daily)
•
•
•
•
•
•
Engine oil and fuel level
Exhauster oil level
Clean sight eyes
Clean strainer and primary check ball
Check for loose bolts on engine and exhauster mounting
Check belt tension for exhauster drive
• Check belt tension for water pump.
• Water pump oil level
• Check engine per manufacturer’s information
weekly maintenance: (30 hours unit operation)
• Check air brake system.
• Inspect tires for cuts and bruises and proper inflation.
• Check all bolts on unit and tighten as required, especially the bolts mounting the engine and exhauster
and on running gear.
• Perform all necessary engine maintenance procedures as set forth in the engine manufacturer’s information.
• Clean ball check in manhole
• Check Battery level
Check tank coating and recoat, if necessary
lubrication:
• Refer to Engine, Exhauster and Water Pump Manual
every six months:
• The axle bearings should be disassembled, cleaned and repacked with CLEAN bearing grease and
reassembled.
O’BRIEN OPERATIONS, SERVICE AND PARTS MANUAL
SERVICE 4
SERVICE
STORAGE OF O’BRIEN JVLT UNIT:
(If not operated for ninety days or more)
1. Wash out exhauster as detailed in Maintenance Schedule. Follow washout with one quart clean engine oil
and shut exhauster down with oil remaining in exhauster.
2. Change engine oil.
3. Drain fuel tank.
4. Disconnect battery cables. Clean and recharge battery every ninety days.
5. Drain water pump system.
6. Service blower engine and water pump per manufacturer’s recommendation for long term storage.
O’BRIEN OPERATIONS, SERVICE AND PARTS MANUAL
SERVICE 5
SERVICE
TROUBLESHOOTING COMMON PROBLEMS
The following is a list of possible problems which may be encountered during the life of this machine.
Probable causes are listed in this section together with recommended solutions to these problems. If
the resolution of these problems or any other problems are not readily apparent, contact your local
authorized Aquatech dealer.
WATER SYSTEM
CONDITION: LOSS OF WATER PRESSURE. THIS IS THE SINGLE MOST COMMON
PROBLEM WITH ALL HIGH PRESSURE SEWER CLEANERS.
PROBABLE CAUSES
REMEDIES
Worn nozzle orifices.
Replace orifice or nozzle.
Wrong nozzle.
Change to correct nozzle.
Inadequate engine speed.
Adjust throttle cable and consult engine manual. Check
for correct gear.
Open valve.
Gate valve in suction line partly
closed.
Leaks in the high pressure water
system.
Water control valve leakage
bypassing or recirculating water
back to the water tank.
Relief valve leaks or otherwise
malfunctions.
Locate and eliminate as required.
Clean, or replace seals.
Gauge is inaccurate.
Replace. Note valves are set at the factory and adjustment by inexperienced people could result in damage to
equipment or possible injury to personnel.
Clean suction line and hose of obstructions, replace suction hose if it leaks or is collapsed.
Clean suction line strainer. Open gate valve.
Adjust, consult chassis manual, check automatic transmission fluid level.
Replace gauge.
Worn valves or valve components.
Replace components as required.
Pump starved for water.
Transmission slipping.
CONDITION: WATER PRESSURE TOO HIGH
PROBABLE CAUSES
REMEDIES
Clogged nozzle.
Clean jets.
Incorrect nozzle.
Replace with correct nozzle.
Incorrect gear.
Shift to proper gear.
Overspeeding engine.
Reduce speed.
O’BRIEN OPERATIONS, SERVICE AND PARTS MANUAL
SERVICE 6
SERVICE
WATER SYSTEM (Continued)
CONDITION: HAMMERING NOISE IN WATER PUMP.
PROBABLE CAUSES
REMEDIES
Pump starved for water.
Valve stuck open with debris.
Clean suction line and hose obstructions, replace suction
hose if it leaks or is collapsed. Clean suction line strainer.
Open gate valve.
Disassemble and remove debris.
Worn valves or seals.
Inspect and replace as required.
Low oil level in water pump.
Check oil level and fill to proper level. If pump has been
operating with inadequate lubrication, inspect bearings.
Bleed off air through blowout valves. Remove nozzle
from hose, pump water through until it flows at a smooth
steady stream.
Air in pump.
CONDITION: HOSE FAILS TO MOVE UP THE SEWER LINE OR FAILS TO REACH THE
NEXT MANHOLE, BUT SHOWS ADEQUATE PRESSURE.
PROBABLE CAUSES
REMEDIES
Clogged nozzle.
Clean.
Incorrect nozzle.
Replace with correct nozzle.
Pressure gauge reading incorrect.
Remove gauge and test. If gauge reading is not correct,
replace.
Remove hose from reel, inspect for kinks, collapsed
sections, etc. Hose may be pinched on reel. For best
operation always pressurize hose when winding on reel.
Clean, or replace valve seals.
Restriction in hose.
Water control valve leaking
therefore bypassing or recirculating
water back to tank.
Sewer line is dry or too much fall in
line.
A.) Introduce water into the upstream manhole and/or
jump the hose by rapidly opening and closing the water
control valve at maximum pressure.
B.) In sewer lines with steep grades, usually 3% or
more, the propulsion of the nozzle and hose up the line
will be affected. Specific performance cannot be
guaranteed in sewer lines with pronounced grade.
Understanding, it is normally not necessary to clean lines
with steep grades. In this situation, maintenance and
cleaning must be performed in the down stream sewer
line or with mechanical means.
Reel speed valve turned down too
low.
Speed up valve.
O’BRIEN OPERATIONS, SERVICE AND PARTS MANUAL
SERVICE 7
SERVICE
HYDRAULIC SYSTEM
CONDITION: HOSE REEL WILL NOT RETRIEVE HOSE FROM SEWER.
PROBABLE CAUSES
REMEDIES
Loose or broken chain on hydraulic
motor.
Hydraulic level too low in reservoir.
Repair or replace.
Leaking hoses or fittings.
Repair or replace as required.
Fill to sight eye center dot.
Hydraulic relief valve relieving at too Tighten pressure relief set screw. Relief should occur at
low a pressure.
2000 PSI.
Hydraulic valve problem.
Disassemble and clean valve. If this does not cure
problem either rebuild or replace the valve.
Hydraulic pump or motor problem.
Disassemble and clean. If problem is not cured, rebuild
or replace.
VACUUM SYSTEM
CONDITION: LOSS OF VACUUM
PROBABLE CAUSES
REMEDIES
Debris tank is full and check ball is
closed.
Boom turret plugged.
Drain or recycle water in debris tank. Dump debris tank.
Vacuum system leak.
Loose exhauster pump drive belt.
Inspect vacuum system for leaks, normally a high pitched
sound is heard. Some areas to check first are: Rear door
seal, tank closure seal, intake tube O-rings, portal gasket.
Check to see that gate valves are closed, such as rear
drain, and valves on the recycling system.
Disengage exhauster pump and evacuate the vacuum
from the tank. Inspect intake tubes. Remove the primary
check valve cover and inspect the ball check. Lower the
boom all the way to allow material to drop out through the
hose. Pressure discharge through boom hose.
Check engine tachometer, adjust throttle cable, consult
engine manual. Check for correct gear.
Tighten.
Faulty vacuum reading.
Replace gauge.
Exhauster pump malfunction.
Consult exhauster pump manual.
Sticking vacuum relief valves.
Check to determine if they open at 15” Hg.,
Clean/lubricate/replace if necessary.
Blockage in the intake hose.
Inadequate engine speed.
Remove turret and clear blockage.
O’BRIEN OPERATIONS, SERVICE AND PARTS MANUAL
SERVICE 8
SERVICE
ELECTRICAL SYSTEM
IMPORTANT!
Do not attempt to remedy any electrical problems without first examining the schematic wiring diagram
and control wiring circuit drawing (see Electrical Section). Check truck chassis battery and cell condition. Use proper instrumentation for current and continuity test results.
(A) Continuity- Use OHM scale recorder or battery powered continuity test light.
(B) Current- The circuit must be opened to obtain current reading with the volt- meter; therefore, it is
more convenient to use a 12 VDC test light.
CONDITION
PROBABLE CAUSES
REMEDIES
Turn ignition/unit power
switch “on”.
BOOM VALVE NOT WORKING
Check for voltage at
solenoid. Replace.
FUSE BLOWN
1. Frayed or broken harness
1. Repair or replace.
(#1 TERMINAL BLOCK,
wire.
2. Check for pinched or
#2 AMP REPLACEMENT).
2. Short circuit in solenoid(s)
bare wire connections.
wiring connection.
3. Secure terminal to
3. Switch terminal arcing within post connections on
housing.
switch.
PTO WON’T RE-ENGAGE DRIVE Switches turned off in wrong
Unit power must be last
AXLE.
sequence.
switch turned off.
PTO DOES NOT DISENGAGE
Faulty solenoid valve
Check for voltage at soleDRIVE AXLE.
noid. Replace
PENDANT BOOM SWITCHES
1. Push button, switch terminals 1. Tighten or reconnect.
FUNCTION ERRATICALLY.
loose or disconnected.
2. Replace switch unit.
2. Push button switch contacts
3. Dry out pendant conburned or disconnected.
trol and seal leaks.
3. Water in pendant
FLAPPER VALVE INTAKE
1. Pneumatic valve solenoid coil 1. Test and replace if
CYLINDER ON BOOM
burned out.
necessary.
INOPERATIVE.
2. Valve spool stuck or
2. Disassemble, clean, or
unsealed.
replace.
3. Wiring from valve to control
3. Repair and replace.
box broken or disconnected.
NO POWER
Ignition/unit power switch not
“on”.
Faulty solenoid valve.
O’BRIEN OPERATIONS, SERVICE AND PARTS MANUAL
SERVICE 9
SERVICE
JVLT STANDARD UNIT LUBRICATION POINTS
Note: For item descriptions and lubrication intervals, refer to the “JVLT Standard Unit Lubrication Points Intervals” located within the “Service” section of this manual.
1
2
BOOM TURRET GEAR
3
BOOM WORM DRIVE
REAR DOOR HINGE PINS
6
5
4
REEL SWIVEL BEARING
REEL BEARINGS
REEL CHAIN
O’BRIEN OPERATIONS, SERVICE AND PARTS MANUAL
SERVICE 10
SERVICE
JVLT STANDARD UNIT LUBRICATION POINTS
Note: For item descriptions and lubrication intervals, refer to the “JVLT Standard Unit Lubrication Points Intervals” located within the “Service” section of this manual.
8
7
9
TANK TIPPING CYLINDER
DEBRIS TANK PIVOT PINS
REAR DOOR LOCK WEDGE
12
11
10
VACUUM TUBE O-RING
LEVEL WIND PIVOT ARM
REEL PIVOT ARM
O’BRIEN OPERATIONS, SERVICE AND PARTS MANUAL
SERVICE 11
SERVICE
Item #
JVLT STANDARD UNIT LUBRICATION POINTS INTERVALS
Item Description
# Points
Inspect
Interval
Qty.
Lubricant
100
HOURS
1-2
SHOTS
LITHIUM #2
SHORT FIBER
COAT
LIGHTLY
LITHIUM #2
SHORT FIBER
1
BOOM WORM DRIVE
3
MONTHLY
2
BOOM TURRET GEAR
1
MONTHLY WEEKLY
3
REAR DOOR HINGE PINS
2
MONTHLY
100
HOURS
1-2
SHOTS
LITHIUM #2
SHORT FIBER
4
REEL SWIVEL BEARING
1
MONTHLY
100
HOURS
1-2
SHOTS
LITHIUM #2
SHORT FIBER
5
REEL BEARINGS
2
MONTHLY
100
HOURS
1-2
SHOTS
LITHIUM #2
SHORT FIBER
6
REEL CHAIN
1
MONTHLY
100
HOURS
COAT
LIGHTLY
LITHIUM #2
SHORT FIBER
7
DEBRIS TANK PIVOT PINS
2
MONTHLY
100
HOURS
1-2
SHOTS
LITHIUM #2
SHORT FIBER
8
REAR DOOR LOCK WEDGES
2
MONTHLY
100
HOURS
COAT
LIGHTLY
LITHIUM #2
SHORT FIBER
9
TANK TIPPING CYLINDER
1
MONTHLY
100
HOURS
1-2
SHOTS
LITHIUM #2
SHORT FIBER
10
REEL PIVOT ARM
2
MONTHLY
100
HOURS
1-2
SHOTS
LITHIUM #2
SHORT FIBER
11
LEVEL WIND PIVOT ARM
1
MONTHLY
100
HOURS
1-2
SHOTS
LITHIUM #2
SHORT FIBER
12
VACUUM TUBE O-RING (AQUATECH STYLE TUBE)
1
MONTHLY
100
HOURS
COAT
LIGHTLY
LITHIUM #2
SHORT FIBER
O’BRIEN OPERATIONS, SERVICE AND PARTS MANUAL
SERVICE 12
SERVICE
JVLT STANDARD UNIT WATER PUMP, EXHAUSTER, and HYDRAULIC SYSTEM
LUBRICATION INTERVALS
Item Description
Inspect
Interval
Qty.
Lubricant
WATER PUMP
CRANKSHAFT OIL
(GENERAL HF SERIES)
DAILY
REFER
TO
MANUFACTURER’S
MANUAL
2.13
QUARTS
REFER
TO
MANUFACTURER’S
MANUAL
HYDRAULIC SYSTEM
OIL RESERVOIR
DAILY
ANNUALLY
7
GALLONS
S1 M 46 HYDRAULIC
O’BRIEN OPERATIONS, SERVICE AND PARTS MANUAL
SERVICE 13
CONTROLS
REAR OPERATOR’S PANEL
1
2
Key Switch
Throttle Control
Tachometer
Toggle Switches
Tattletale
E-Stop
ITEM
1
2
PART #
A131790
A131782
DESCRIPTION
GAUGE,VACUUM PRESSURE,BOTTOM MOUNT
GAUGE,PRESSURE,0-5M PSI,BOTTOM MOUNT
O’BRIEN OPERATIONS, SERVICE AND PARTS MANUAL
QTY
1
1
CONTROLS 1
CONTROLS
SIDE OPERATOR’S PANEL
Toggle Switches
E-Stop
Pendant
Connection
O’BRIEN OPERATIONS, SERVICE AND PARTS MANUAL
CONTROLS 2
CONTROLS
PENDANT CONTROL ASSEMBLY WITH LOCK
PART # A122026
Boom Up
Boom Down
Boom Left
Boom Right
O’BRIEN OPERATIONS, SERVICE AND PARTS MANUAL
CONTROLS 3
CONTROLS
WIRELESS REMOTE
PART # A387079
O’BRIEN OPERATIONS, SERVICE AND PARTS MANUAL
CONTROLS 4
POWERTRAIN
ENGINE,KUBOTA,TIER III,TURBO,95HP
PART #A381160
CLUTCH,PNEUMATIC,NEXEN H-1000 SERIES
PART #A381053 (2)
O’BRIEN OPERATIONS, SERVICE AND PARTS MANUAL
POWERTRAIN 1
WATER
WATER FILL LINE ASSEMBLY
2” Y-STRAINER, PVC, 20 MESH
PART #A240029
O’BRIEN OPERATIONS, SERVICE AND PARTS MANUAL
WATER SYSTEM 1
WATER
WATER PUMP AND RELIEF VALVES
3
2
1
ITEM
1
2
3
PART #
A381048
22973C
DESCRIPTION
PUMP,WATER,GENERAL HF25A,RH SHAFT
VALVE,UNLOADER,3/4”,26.4GPM/4060PSI MAX
A381069
VALVE,RELIEF,1/2”FNPT,PRE-SET 3100PSI
QTY
1
1
1
O’BRIEN OPERATIONS, SERVICE AND PARTS MANUAL
WATER SYSTEM 2
REEL,HOSE,1/2”,RETRACTABLE,4000 PSI
PART # A130560-RETRACT
O’BRIEN OPERATIONS, SERVICE AND PARTS MANUAL
WATER SYSTEM 3
VACUUM
ASSEMBLY,STRAINER,JVLT
A384543
2
3
8
7
6
ITEM
1
2
3
4
5
6
7
8
PART #
A238035
10-0204
10-0212
A154080
A190230
A381748
A381747
A154090
4
5
1
DESCRIPTION
STRAINER SCREEN (LOCATED INSIDE ASSEMBLY)
CAMLOCK,4” MALE X 4”FNPT,TYPE A ALUM
CAMLOCK,4” FEMALE X 4”FNPT,TYPE D,ALUM
COVER,PORTAL,12” CAST
GASKET,PORTAL,12”
HAND WHEEL 5/8-11
ROD END 5/8-11
BAR,PORTAL
QTY
1
1
1
1
1
1
1
1
O’BRIEN OPERATIONS, SERVICE AND PARTS MANUAL
VACUUM SYSTEM 1
VACUUM
1
3
ITEM
1
2
3
PART #
16-0189
03-0319
A382890
2
DESCRIPTION
QTY
1
1
1
VALVE,RELIEF,3”,(16”HG)
BLOWER,ROOTS,68 U-RAI,LH,CCW,BOTTOM DISC
SILENCER,DISCHARGE,5”MPT,XL-800
O’BRIEN OPERATIONS, SERVICE AND PARTS MANUAL
VACUUM SYSTEM 2
HYDRAULIC
1
4
2
3
ITEM
1
2
3
4
PART #
A381065
A131786
A110120
A234287-1
DESCRIPTION
PUMP,HYD,VICKERS,PVQ13A2LSE320C2112
GAUGE,PRESSURE,0-5K PSI, W/FLANGE,STAB
FILTER,INLINE RETURN,3/4” PORTS
TANK,HYDRAULIC,7 GAL.,SJ600P
QTY
1
1
1
1
O’BRIEN OPERATIONS, SERVICE AND PARTS MANUAL
HYDRAULIC SYSTEM 1
HYDRAULIC
1
2
ITEM
1
2
PART #
A384201
A111072-3
DESCRIPTION
VALVE,TANK TIPPING,JVLT
CYLINDER,TIPPING,DBL ACTING,61” STROKE
QTY
1
1
O’BRIEN OPERATIONS, SERVICE AND PARTS MANUAL
HYDRAULIC SYSTEM 2
HYDRAULIC
2
4
1
5
3
ITEM
1
2
3
PART #
A384774
A110280
A383241
4
S148510R
5
6
A110260
A384200
6
DESCRIPTION
MOTOR,HYDRAULIC HOSE REEL, JVLT-TOR
VALVE,NEEDLE,HYD. FLOW CONTROL
ACTUATOR,HYDRAULIC,RACK & PINION,10/07
QTY
1
2
1
WORM DRIVE, 14”
1
CYLINDER,HYDRAULIC,BOOM LIFT,6” JVLT
MANIFOLD,VALVE,HYD,5 STATION
1
1
O’BRIEN OPERATIONS, SERVICE AND PARTS MANUAL
HYDRAULIC SYSTEM 3
HYDRAULIC
1
2
ITEM
1
2
PART #
A246523-P
A110360
DESCRIPTION
CYLINDER & WEDGE ASSY,UPPER & LOWER
QTY
2
1
CYLINDER,HYD,4” DIA. X 6” STROKE
O’BRIEN OPERATIONS, SERVICE AND PARTS MANUAL
HYDRAULIC SYSTEM 4
PNEUMATIC
1
2
3
ITEM
1
PART #
23-0103
2
A111135
3
13-1791
4
A383733
4
DESCRIPTION
QTY
1
COMPRESSOR,AIR,1/3HP,12VDC,200/400 SERIES
FILTER/REGULATOR,AIR,3/8” W/GAUGE
SWITCH,PRESSURE,A/C ON-OFF @65-150 PSI
VALVE SECTION,SINGLE,SPR RETURN,4WAY,AIR
1
1
2
O’BRIEN OPERATIONS, SERVICE AND PARTS MANUAL
PNEUMATIC SYSTEM 1
PNEUMATIC
1
2
3
ITEM
1
2
3
PART #
A383133
U1003-0015
A383134
DESCRIPTION
QTY
1
1
1
AIR TANK,JVLT
VALVE,AIRTANK DRAIN
LOAD GENIE,AIR UNLOADER
O’BRIEN OPERATIONS, SERVICE AND PARTS MANUAL
PNEUMATIC SYSTEM 2
BODY
SIGHT EYE ASSEMBLY
(2) REQUIRED
ITEM
1
2
3
4
5
PART #
A153013
A153000
A153014
A152890
A153012
DESCRIPTION
HAND WHEEL, SIGHT EYE
FRAME, SIGHT EYE, THREADED, 1/2” x 13
PRESSURE PAD, SIGHT EYE, CAST
SIGHT GLASS
GASKET, SIGHT EYE, RUBBER
O’BRIEN OPERATIONS, SERVICE AND PARTS MANUAL
QTY
1
1
1
1
1
BODY 1
STANDARD
EQUIPMENT
ASSEMBLY,LEVEL WIND,WELDMENT,JVLT
PART #A386047
O’BRIEN OPERATIONS, SERVICE AND PARTS MANUAL
STANDARD EQUIPMENT 1
ACCESSORIES
Part No. Name
131632 Adjustable Hand Gun
LENGTH 24” APPROX. WT. 4 lbs.
Hand Gun
This unique exclusive handgun is the best quality gun ever manufactured for sewer cleaning
machines. It allows adjustment from a fine, broad spray to a pinpoint blast simply by moving
the front grip forward and back. The trigger features “ instant off” to help prevent misapplied
water.
Part No. Size Hose Length
176150 2-1/2” Diameter
25’
APPROX. WT. 18 lbs.
Part No. Name
220330 Hydrant Wrench
LENGTH 18” APPROX. WT. 4 lbs.
Fill Hose and Hydrant Wrench
No sewer cleaner is complete without these accessories. Hydrant hose is complete with national
fire thread male and female swivel ends. The hydrant wrench is adjustable and fits most fire
hydrants.
O’BRIEN OPERATIONS, SERVICE AND PARTS MANUAL
ACCESSORIES 1