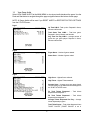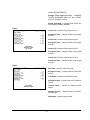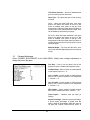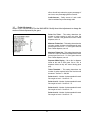
1
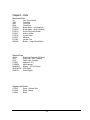
OWNERS AND SERVICE MANUAL INNOVATIVE CONCEPTS IN ENTERTAINMENT INC. OWNERS AND SERVICE MANUAL Fishin’ Time © Innovative Concepts in Entertainment Inc. 10123 Main Street, Clarence, NY 14031 i Table of Contents CHAPTER 1 – SAFETY AND WARNINGS .......... 2 CHAPTER 2 – GAME SETUP AND FEATURES . 3 Player Controls ............................................................. 3 Start/Fish Button ........................................................ 3 Playing The Game ........................................................ 3 Coins .......................................................................... 3 Tickets ........................................................................ 3 Time Limit ................................................................. 3 Ticket Payout ............................................................. 3 Credit Amount............................................................ 3 Payout Percentage ...................................................... 4 Points Per Ticket ........................................................ 4 1.3 View Coin Audits ............................................. 9 1.4 Game Adjustments .......................................... 9 1.5 Coinage Adjustments..................................... 10 1.6 Ticket Adjustments ........................................ 11 1.7 Clear Audits .................................................... 12 CHAPTER 4 – TROUBLESHOOTING ............... 13 CAUTION ................................................................... 13 Game Is Non-Functional ........................................... 13 Control Switches .......................................................... 4 Volume Up ................................................................. 4 Volume Down ............................................................ 4 Diagnostics Button ..................................................... 4 Monitor Is Non-Functional ....................................... 14 Sound Is Non-Functional........................................... 14 Coin Meters................................................................... 4 Game Controls Are Non-Functional ........................ 14 CHAPTER 3 – DIAGNOSTIC, ADJUSTMENT AND AUDIT MENU SYSTEM ............................... 5 CHAPTER 5 – PARTS ....................................... 15 Mechanical Parts ........................................................ 15 Menu System ................................................................ 5 Electrical Parts ........................................................... 15 Starting The Menu System.......................................... 5 Graphics and Decals .................................................. 15 Navigating The Menu .................................................. 5 1.0 Main Menu.............................................................. 5 1.1 System Test Menu ............................................ 6 1.2 View Game Audits ........................................... 7 i Chapter 1 – Safety and Warnings BEFORE YOU BEGIN WARNING: WHEN INSTALLING THIS GAME, A GROUNDED A.C. RECEPTACLE MUST BE USED. FAILURE TO DO SO COULD RESULT IN INJURY TO YOURSELF OR OTHERS. FAILURE TO USE A GROUNDED RECEPTACLE COULD ALSO CAUSE IMPROPER GAME OPERATION, OR DAMAGE TO THE ELECTRONICS. DO NOT DEFEAT OR REMOVE THE GROUNDING PRONG ON THE POWER CORD FOR THE SAME REASON AS GIVEN ABOVE. USING AN IMPROPERLY GROUNDED GAME COULD VOID YOUR WARRANTY. HAVE A QUALIFIED ELECTRICIAN CHECK YOU’RE A.C. RECEPTACLE TO BE SURE THE GROUND IS FUNCTIONING PROPERLY. INSTALLATION The game comes ready to play with just a few simple things to keep in mind. 1. Plug the game into the A.C. outlet and turn on power to the game. The switch for the game is located on a power module on the outside rear of the game. THIS GAME IS DESIGNED TO DISSIPATE STATIC ELECTRICITY THROUGH THE GROUNDING PLANE OF THE GAME. IF THE A.C. GROUND DOES NOT WORK, THE GAME COULD DISCHARGE STATIC ELECTRICITY THROUGH THE GAME CIRCUITRY, WHICH COULD CAUSE DAMAGE. 2. Make sure the game is level after installation. It is necessary to make sure the game is level for safety concerns. 3. Place the game into its final location and use the adjusting feet to level the game. 4. Check that the A.C. voltage rating on the back of the game matches the A.C. voltage of your location. THE POWER SUPPLY IS NOT VOLTAGE ADJUSTABLE. TO OPERATE THE GAME AT VOLTAGES OTHER THAN THOSE IT WAS DESIGNED FOR. PLEASE CONTACT OUR SERVICE DEPARTMENT FOR VOLTAGE CONVERSION INFORMATION. WARNING DO NOT remove any of the components on the main board (e.g. compact flash and eproms) while the game is powered on. This may cause permanent damage to the parts and the main board. Removing any main board component part while powered on will void the warranty. NOTE: THIS GAME IS INTENDED FOR INDOOR USE ONLY. ON THE BACK PANEL OF THE GAME: WARNING: SHOCK HAZARD - DO NOT OPEN. REFER SERVICING TO SERVICE PERSONNEL. 2 Chapter 2 – Game Setup and Features Player Controls Start/Fish Button The Start/Fish button is used to start a game once the proper number of credits has been inserted. Once a game has been started, the Start/Fish button is used to drop the hook in order to catch fish. There are two Start/Fish buttons, one for the left player and one for the right player. Playing The Game The objective of the game is to catch as many fish as possible within the game time in order to accumulate points and tickets. Fish come out on 4 different levels with the highest points being awarded for the fish on the bottom level. There are other bonus items such as: treasure chest – awards jackpot amount, blow fish – multiplies fish amounts X 2 for the remainder of the game, and time bonus – awards more time. In addition, there are junk items (tire, boot, license plate and can) that award no points. Initial Game Setup The game is setup at the factory with the recommended factory settings. The following outlines the important adjustments an operator may adjust during initial game setup. For more detailed instructions on setting these adjustments, see Chapter 3. Coins Set the number of credits required to start the game. Also set the number of credits for each coin inserted in coin mechanism 1, coin mechanism 2 and the DBV. These settings are adjusted in the COINAGE ADJUSTMENTS menu. Tickets Setup the points per ticket, minimum tickets paid, maximum tickets paid and ticket threshold. Also, setup whether tickets should be dispensed while playing or at the end of the game. These settings are adjusted in the TICKET ADJUSTMENTS menu. Time Limit Set the amount of game time for each start. These settings are adjusted in the GAME ADJUSTMENTS menu. Ticket Payout Set the value per ticket (in Dollars). This will be used to calculate the Total Ticket Payout and Average Ticket Payout Per Play. Credit Amount Set the amount that each credit is worth (in Dollars). This will be used to calculate the payout percentage. 3 Payout Percentage Set the maximum payout percentage. If actual payout percentage is greater than this setting, game will automatically adjust the output of fish, blow fish, treasure chest and time bonus. In effect, this will help reduce the payout percentage. If set to Zero, auto percentage will be turned off. Points Per Ticket Set the number of points required to earn one ticket. Control Switches The control switches are inside the front coin door. Volume Up Press the volume up button to increase the volume in the game and the attract mode. Pressing this button when playing the game will increase the game volume. Pressing this button when the game is in the attract mode will increase the attract mode volume. Volume Down Press the volume down button to decrease the volume in the game and the attract mode. Pressing this button when playing the game will decrease the game volume. Pressing this button when the game is in the attract mode will decrease the attract mode volume. Diagnostics Button Press this button to go into the diagnostics MAIN MENU. Coin Meters The game has two mechanical meters. The left meter will be incremented by 1 each time a coin is dropped into the coin mechanisms. The right meter will be incremented by 1 each time a ticket is dispensed. 4 Chapter 3 – Diagnostic, Adjustment and Audit Menu System Menu System The game’s menu system is a series of on screen menus that allow the operator to setup and adjust the settings. Each menu item leads to another menu, a list of data or provides the ability to modify the adjustment. Starting The Menu System Press the Diagnostics control switch inside the coin door to access the on screen menu system. Navigating The Menu Use the following buttons to navigate the menu system: • Left Start/Fish button to move the cursor. • Right Start/Fish button to select. • Once an item has been selected, use the Left Start/Fish button to change the settings. Once an item has been changed, press the Right Start/Fish button to save the desired setting. 1.0 Main Menu All system tests, audits and game adjustments are accessible from the MAIN MENU. 5 1.1 System Test Menu Select SYSTEMS TEST at the MAIN MENU. Switch Input Test - Select SWITCH INPUT TEST to manually test all of the switch inputs. When in this screen, activate the start button, select button, test button, volume up, volume down, ticket sensor 1, ticket sensor 2, coin 1, coin 2, game control pad 1 and game control pad 2 to determine if the game recognizes input from each. Video Screen Tests - Select VIDEO SCREEN TESTS to test the following: Screen Color, Screen Size, Red Color, Green Color, Blue Color, and White Color. Sound Test - Select SOUND TEST to test various game sounds and songs. Watchdog Test - The watchdog automatically restarts the game in the event it locks up. Select WATCHDOG TEST to determine if the watchdog is functioning properly. Color Adjustment – Displays multiple colors for screen color adjustment. Screen Size Adjustment – Displays grid for screen size adjustments. Red Screen – Displays full red for screen color adjustments. Green Screen - Displays full green for screen color adjustments. Blue Screen - Displays full blue for screen color adjustments. White Screen - Displays full white for screen color adjustments. 6 1.2 View Game Audits Select VIEW GAME AUDITS at the MAIN MENU to view import audit data about the game. Use the Pads and Start button to navigate through the page navigation items at the bottom of each page. NOTE: All Game Audits will be reset if you RESET AUDITS or RESTORE FACTORY SETTINGS from the UTILITIES menu. Page 1 Up Time H:M:S - Total up time. Reported in Hours, Minutes and Seconds. Total Game Time H:M:S – Total time game. Reported in Hours, Minutes and Seconds. Avg Time Per Play H:M:S – Average amount of game time per game played. Reported in Hours, Minutes and Seconds. Page 2 Player Starts – Number of games started. Game Overs – Number of games ended. Page 3 High Score – Highest Score achieved. High Ticket – Highest Tickets awarded. Average Score – Average score per game played. Use this setting to help determine ticket settings from the TICKET UTILITIES menu. D1 Total Tickets Dispensed – Total tickets dispensed from dispenser 1. D2 Total Tickets Dispensed – Total tickets dispensed from dispenser 2. Average Tickets Dispensed Per Play – Average tickets dispensed per game. Total Ticket Payout – Total tickets dispensed times TICKET PAYOUT (TICKET PAYOUT is set in 7 COINAGE ADJUSTMENTS) Average Ticket Payout Per Play – AVERAGE TICKETS DISPENSED PER PLAY times TICKET PAYOUT. (Display is in cents) Payout Percentage – Average Ticket Payout Per Play divided by CREDIT AMOUNT Page 4 Level 1 Fish – Number of fish caught on level 1. Average Per Play – Average number of fish caught on level 1. Level 2 Fish – Number of fish caught on level 2. Average Per Play – Average number of fish caught on level 2. Level 3 Fish – Number of fish caught on level 3. Average Per Play – Average number of fish caught on level 3. Level 4 Fish – Number of fish caught on level 4. Average Per Play – Average number of fish caught on level 4 Page 5 Blow Fish – Number of Blow fish caught. Average Per Play – Average number of Blow fish caught. Time Bonus – Number of Time Bonus caught. Average Per Play – Average number of Time Bonus caught. Treasure Chest – Number of Treasure Chests caught. Average Per Play – Average number of Treasure Chests caught. Watchdogs – Number of game resets. 8 1.3 View Coin Audits Select VIEW COIN AUDITS at the MAIN MENU to view coin data about the game. Coin 1 – Number of coins inserted in coin mechanism 1. Coin 2 – Number of coins inserted in coin mechanism 2. DBV – Number of bills inserted in DBV mechanism. Paid Credits – Number of coins inserted in all coin devices. Lifetime Coin Count – Number of coins inserted in all coin devices since the game has been installed. This WILL NOT be reset by CLEAR COIN COUNTERS or RESTORE FACTORY SETTINGS from the UTILITIES menu. 1.4 Game Adjustments Select GAME ADJUSTMENTS at the MAIN MENU. Modify these game adjustments to change the way the game functions. Minimum Volume – Minimum volume setting for the game. Set from 0 – 255. The higher the setting the higher the volume. Game Volume – Volume setting for the game. Set from Minimum Volume – 255. The higher the setting the higher the volume. Attract Mode Volume – Volume setting for the attract mode. Set from Minimum Volume – 255. The higher the setting the higher the volume. Time Limit – Game Time. Maximum time = 15 seconds, Maximum = 90 seconds. Junk Frequency –. Frequency of Junk coming out. Settings are Common, Rare, Very Rare, None. Blow Fish –. Frequency of the Blow Fish coming out. Settings are Common, Rare, Very Rare, None. Treasure Chest – Frequency of the Treasure Chest coming out. Settings are Common, Rare, Very Rare, None. Time Bonus – Frequency of the Time Bonus coming out. Settings are Common, Rare, Very Rare, None. Treasure Chest Value – Number of points for catching the Treasure Chest. 9 Time Bonus Amount – Amount of additional time given for catching the time bonus icon. Hook Type – The game play style of how the hook functions. Hover – When fish button held down, hook goes down to the bottom and returns to the top. If fish button is released, hook returns to the top. Hook always goes to Minimum Depth when held down or touched. Once hook reaches Minimum Depth, hook can be bobbed up and down by the player. No Hover - When fish button held down, hook goes down to the bottom and returns to the top. If fish button is released, hook returns to the top. Hook always goes to Minimum Depth when held down or touched. Hook must return to the top before it can be sent down again. Minimum Depth – For Hover and No Hover, hook will go to at least this depth setting before returning to the top. 1.5 Coinage Adjustments Select COINAGE ADJUSTMENTS at the MAIN MENU. Modify these coinage adjustments to change the price of the game. Free Play – If set to ‘Yes’ the game is set on free play and no coins or credits will be required to play. Credits to Start – Set the number of credits required to start a game. Set from 1 – 9. Coin 1 Credits – Set the number of credits received when a coin or token is inserted in coin mechanism 1. Set from 1 – 8. Coin 2 Credits – Set the number of credits received when a coin or token is inserted in coin mechanism 2. Set from 1 – 8. DBV Credits – Set the number of credits received when a bill is inserted in the DBV. Set from 1 – 20. Ticket Payout – Indicates value per ticket (in Dollars) Payout Percentage – Maximum payout percentage. If actual payout percentage is greater than this setting, game will automatically adjust the output of ish, blow fish, treasure chest and time bonus. In 10 effect, this will help reduce the payout percentage. If set to zero, auto percentaging will be turned off. Credit Amount – Dollar amount of each credit. Used to calculate Payout Percentage audit. 1.6 Ticket Adjustments Select TICKET ADJUSTMENTS at the MAIN MENU. Modify these ticket adjustments to change the number of tickets dispensed by the game. Points Per Ticket – This setting determines the number of points required to earn one ticket. Set from 0 – 100,000. If the game does not have a ticket dispenser, set to 0. Minimum Tickets Out – This setting determines the minimum number of tickets to be dispensed for each game played. Set from 0 – 10. If the game does not have a ticket dispenser, set to 0. Maximum Tickets Out – This setting determines the maximum number of tickets to be dispensed for each game played. Set from 0 – 50. If the game does not have a ticket dispenser, set to 0. Dispense While Playing – Set to ‘No’ to dispense tickets at the end of each game. Set to ‘Yes’ to dispense tickets as they are earned during game play. Ticket Threshold – This setting determines the number of points required before the first ticket will be earned. Set from 0 – 300,000 Points Level 1 – Number of points awarded for each fish caught on level 1. Set from 0 – 75. Points Level 2 – Number of points awarded for each fish caught on level 2. Set from 0 – 75. Points Level 3 – Number of points awarded for each fish caught on level 3. Set from 0 – 75. Points Level 4 – Number of points awarded for each fish caught on level 4. Set from 0 – 75. 11 1.7 Clear Audits Select CLEAR AUDITS at the MAIN MENU. Modify these ticket adjustments to change the number of tickets dispensed by the game. Clear Credits – This will clear the credits currently in the game. Clear Coin Counters – This will clear all of the coin counters in the game. Clear Game Audits – This will clear all the game audits. Reset High Scores – This will reset the high score tables. Reset Tickets – This will reset the ticket counter. Default Adjustments – This will reset the game using all of the default adjustments. Default Adjustments are as follows: 12 Game Adjustments: Minimum Volume Game Volume Attract Volume Time Limit Junk Frequency Blow Fish Frequency Treasure Chest Freq. Time Bonus Frequency Treasure Chest Value Time Bonus Amount Hook Type Minimum Depth 30 130 160 30 None Very Rare Very Rare Very Rare 200 30 Hover 1 Coin Adjustments: Freeplay Credits to Start Coin 1 Coin 2 DBV Ticket Payout Payout Percentage Credit Amount No 1 1 1 4 .01 .40 .25 Tickets Adjustments: Points Per Ticket Minimum Tickets Maximum Tickets Dispense While Playing Ticket Threshold Points Level 1 Points Level 2 Points Level 3 Points Level 4 15 1 50 Yes 0 5 8 10 15 Factory Settings – This will reset the game using all of the default settings above and clear credits, game audits, coin audits, ticket counter and reset high scores. It will NOT reset the Lifetime Coin Counter. Chapter 4 – Troubleshooting CAUTION This game uses complex electronic components that are very sensitive to static electricity. Observe precautions below before handling these electronics. Failure to do so may void the warranty and damage electronic assemblies. Before servicing electronics, turn off AC power to the game. Wait for capacitors to discharge. DO NOT remove any of the components on the main board (e.g. compact flash and eproms) while the game is powered on. This may cause permanent damage to the parts and the main board. Before touching or handling electronic assemblies, discharge static electricity on your body. To discharge this static, begin by connecting the line cord to a grounded outlet. Don’t turn on the game. Next, touch the safety ground stud of the power supply chassis. Store electronic assemblies in an anti-static area. Use anti-static bags to store or transport the game circuit boards. Don’t remove or connect electronic assemblies when cabinet power is on. Otherwise, you’ll damage electronic assemblies and void the game’s warranty. After you complete maintenance or service, replace ground wires, shields, safety covers and install and tighten ground and mounting screw. Video game monitors generate and store potentially high voltages. Avoid touching any part of the monitor until power has been off for some time. A picture tube can maintain a hazardous charge for up to several days. Only qualified technicians should service monitors. Game Is Non-Functional 1. 2. 3. 4. 5. Verify that the game power switch is turned on. Verify that the line cord connector is firmly and correctly seated into the power entry module of AC power chassis. Verify that correct AC line voltage is present at the outlet Verify that the JAMMA wire harness connector is firmly and properly seated to the mating JAMMA PCB edge connector. DO NOT remove or install JAMMA connector when power is turned on. Doing so will damage the CPU assembly and void the warranty. Verify that the DC power supply voltages at the game CPU assembly are set as follows. The following voltages should be set when the game CPU assembly is connected and the game is powered on. +5V: +4.9V - +5.1V /// +12V: +11.5V - +12.5V //// -5V:-4.75V - -5.25V 13 6. 7. 8. Verify that the non-JAMMA connectors are attached at the proper location and are firmly seated. Verify that the game DIP switches are set properly. Inspect CPU board under low-light conditions. LED’s glow if processor circuits receive voltage. These indications prove presence of some DC from power supply. Still, voltages or signals may not be present. Monitor Is Non-Functional 1. 2. 3. 4. 5. 6. Verify that the cabinet AC line voltage cable is firmly and properly connected to mating AC connector on monitor. Verify that the cabinet video signal cable connector is firmly and properly connected to the mating video signal input connector of the monitor. Verify that the monitor remote adjustment board is properly installed and connected to the monitor chassis. Verify monitor is operating properly by replacing with know good unit. Verify that brightness and contrast are set above their minimum levels. Verify that the game is using a low-res monitor. Sound Is Non-Functional 1. 2. 3. 4. Verify the cabinet wiring is correct. Ensure that the speakers are properly connected to the audio wires from the JAMMA connector. Verify that the power is providing: +5V: +4.9V - +5.1V +12V: +11.5V - +12.5V -5V: -4.75V - -5.25V Verify that the above listed voltages are present at the correct JAMMA connector pins. Verify that the game volume has been turned up. Game Controls Are Non-Functional 1. 2. Verify that the each individual switch is working by doing the SWITCH INPUT TEST under the SYSTEM TESTS MENU. Verify that the each individual signal wire for each switch is connected. 14 Chapter 5 – Parts Mechanical Parts 211 1024 5001 5008 FG3004 FG3005 FG3014 FG3027 FG7012 FG7027 FP1004 MZ2005 Low Ticket Switch Ticket Bin Coin Door Ticket Door Button Base – Left (Starfish) Button Base – Right (Starfish) Acrylic Ring Light Holder Monitor Glass Control Panel Marquee Leveler Foot Button – Large Round White Electrical Parts 2033X 2133 8716 FG2007 FG2052X MON29CF RN2034FGX WA2010 Rope Light Controller PC Board Rope Light – Blue, Chasing Flash Card - Compact Speaker 6” X 9” Main Harness Monitor – 29” Flat Screen PCB (Main) Power Supply Graphics and Decals FG7001 FG7005 FG9010 Decal – Cabinet Side Decal – Button Bezel 15