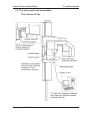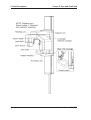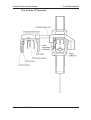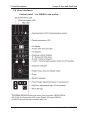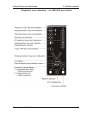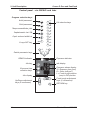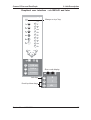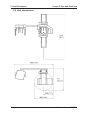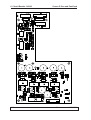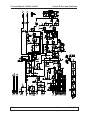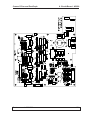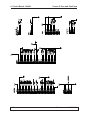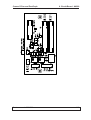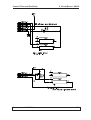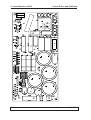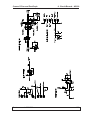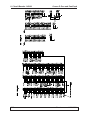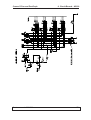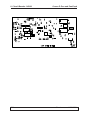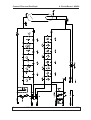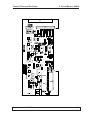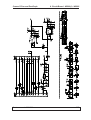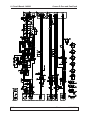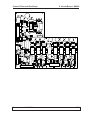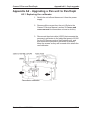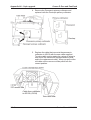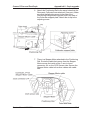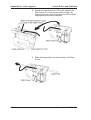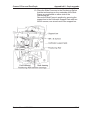
1
Service Manual for all versions of the Cranex D and Cranex D Ceph Dental X-ray Unit 8201086 rev. 2 (0905) Eng Cranex D Pan and Pan/Ceph Contents Service Manual for all versions of the Cranex D and Cranex D Ceph Dental X-ray Units Medical Device Directive 93/42/EEC Code 8201086 rev.2 (0905) Manufactured by SOREDEX P.O. BOX 148 FIN-04301 TUUSULA, FINLAND Tel. +358 (0)10 270 2000 Fax. + 358 9 701 5261 Service manual 8201086 I Contents Cranex D Pan and Pan/Ceph Soredex endeavours to produce product documentation that is accurate and up to date. However, our policy of continual product development may result in changes to products that are not reflected in the product documentation. Therefore, this document should not be regarded as an infallible guide to current product specifications. Soredex maintains the right to make changes and alterations without prior notice. II Service manual 8201086 Cranex D Pan and Pan/Ceph Contents Contents 1. General Information ........................................................................................... 1 1.1 Introduction ..................................................................................................... 1 1.2 Unit versions ................................................................................................... 1 1.3 Associated documentation ............................................................................. 1 1.4 Service warnings and precautions .................................................................. 1 Servicing precautions....................................................................................... 1 Radiation Safety .............................................................................................. 2 Mechanical safety ............................................................................................ 2 Electrical Safety ............................................................................................... 2 Electrostatic discharge .................................................................................... 3 Explosion Hazard ............................................................................................. 3 1.5 Operating warnings and precautions .............................................................. 4 1.6 Unauthorized Modifications ............................................................................ 5 1.7 Disclaimer ...................................................................................................... 6 2. Unit description .................................................................................................. 7 2.1 The Cranex D and Cranex D Ceph ................................................................. 7 2.2 Unit versions ................................................................................................... 8 2.3 The main parts and assemblies ...................................................................... 9 The Cranex D Pan............................................................................................ 9 The Cranex D Pan/ceph ................................................................................. 11 2.4 User interfaces ............................................................................................. 12 Control panel - s/n B81642 and earlier ........................................................... 12 Graphical user interface - s/n B81642 and earlier .......................................... 13 Control panel - s/n B91643 and later .............................................................. 14 Graphical user interface - s/n B91643 and later ............................................. 15 2.5 Unit dimensions ............................................................................................ 16 2.6 CCD Image Receptors (Sensors) ................................................................ 17 2.7 The link to the PC ......................................................................................... 17 Unit versions with s/n B81642 and earlier....................................................... 17 Unit version with s/n B91643 and later............................................................ 17 2.8 Mechanical description ................................................................................. 18 2.9 Electrical description .................................................................................... 20 Circuit board names and locations ................................................................. 20 Power supply ................................................................................................. 26 Unit control ..................................................................................................... 26 Motors and motor control................................................................................ 26 Exposure logic ............................................................................................... 27 Position control .............................................................................................. 29 A overview of the Imaging Chain .................................................................... 30 Service manual 8201086 III Contents Cranex D Pan and Pan/Ceph Block Diagram ............................................................................................... 32 Wiring diagram - general................................................................................ 33 Wiring diagram - Z-carriage ........................................................................... 34 Wiring diagram - upper shelf .......................................................................... 35 Wiring diagram - rotating unit 1 ...................................................................... 36 Wiring diagram - rotating unit 2 ...................................................................... 37 Wiring diagram - ceph 1 ................................................................................. 38 Wiring diagram - ceph 2 ................................................................................. 39 3. Covers and Cover Removal ............................................................................ 40 3.1 Rotating unit covers ...................................................................................... 40 3.2 Support Arm Covers ..................................................................................... 42 3.3 Column Cover .............................................................................................. 43 3.4 Z-Carriage Covers ....................................................................................... 44 3.5 Ceph Head Covers....................................................................................... 45 4. Service Programs ............................................................................................ 46 4.1 Introduction ................................................................................................... 46 Unit versions with s/n B81642 and earlier....................................................... 46 Unit versions with s/n B91643 and later .......................................................... 46 4.2 Accessing service programs - s/n B81642 and earlier ................................. 47 Using the unit control panel............................................................................. 47 Using the GUI ................................................................................................. 49 4.3 Ur Service Programs .................................................................................... 49 Ur 01 PUS - Power Up Settings ..................................................................... 49 Ur 02 rES - Not in use .................................................................................... 50 Ur 03 Arn - Not in use ..................................................................................... 50 Ur 04 ASt - Auto Set kV .................................................................................. 50 Ur 05 bEP - Beeper sound ............................................................................. 51 Ur 6 CLC - Clear exposure counter ................................................................ 52 Ur 7 Err - Last Error ........................................................................................ 53 4.4 Sr Service Programs .................................................................................... 53 Sr10 InS - Install program ............................................................................... 53 Sr 11 EPS - eps program ............................................................................... 55 Sr 12 PUP - Warmup program ....................................................................... 56 Checking the kV/mA Feedback Reference Voltages ..................................... 58 Sr 13 Prh - Preheat program .......................................................................... 59 Manually selecting the Preheat level ............................................................... 60 Sr 14 FrE - Head/nasion support frequencies ................................................ 61 Sr 15 SUP - line voltage check ....................................................................... 62 Sr 16 Clr - Not in use ...................................................................................... 62 Sr 17 CEP - Not in use ................................................................................... 62 Sr 19 POS - Not in use ................................................................................... 62 Sr 20 dnL - sw download program .................................................................. 62 I/O check program .......................................................................................... 63 IV Service manual 8201086 Cranex D Pan and Pan/Ceph Contents 4.5 Accessing the service programs - s/n B91643 and later ............................... 67 Using the unit control panel ............................................................................. 67 Using the GUI ................................................................................................. 68 4.6 Ur Settings ................................................................................................... 69 Ur 01 PUS - Power Up Settings ..................................................................... 69 Ur 02 rES - Not in use .................................................................................... 70 Ur 03 Arn - Not in use ..................................................................................... 70 Ur 04 ASt - Auto Set kV .................................................................................. 70 Ur 05 bEP - Beeper sound ............................................................................. 71 Ur 6 CLC - Clear exposure counter ................................................................ 72 Ur 7 Err - Last Error ........................................................................................ 73 4.7 Sr Programs ................................................................................................. 74 Sr10 InS - Install program ............................................................................... 74 Sr 11 EPS - eps program ............................................................................... 75 Sr 12 PUP - Warmup program ....................................................................... 76 Checking the kV/mA Feedback Reference Voltages ..................................... 78 Sr 13 Prh - Preheat program .......................................................................... 79 Manually selecting the Preheat level ............................................................... 80 Sr 14 FrE - Head/nasion support frequencies ................................................ 81 Sr 15 SUP - line voltage check ....................................................................... 82 Sr 16 CrL - Not in use ..................................................................................... 82 Sr 17 CEP - Not in use ................................................................................... 82 Sr 18 FSt - Fast exposure time ..................................................................... 82 Sr 19 POS - Not in use ................................................................................... 83 Sr 20 dnL - sw download program .................................................................. 83 I/O check program .......................................................................................... 83 5. Cranex D software ........................................................................................... 88 5.1 Downloading software - s/n B81642 and earlier ........................................... 88 Using the C167 SW Loader - s/n B81642 and earlier .................................... 88 Using the PaloDEx SWDL Tool - s/n B81642 and earlier ............................... 91 5.2 Downloading software - s/n B91643 and later .............................................. 95 Using the PaloDEx SWDL Tool - s/n B91643 and later................................... 95 5.3 PCI board driver ........................................................................................... 98 5.4 Graphical User Interface (GUI) ...................................................................... 98 Service manual 8201086 V Contents Cranex D Pan and Pan/Ceph 6. Circuit Boards .................................................................................................. 99 N3000 PCI Board ............................................................................................... 99 N3100 Rotation Connector Board .................................................................... 100 N3200 Filament Control Board ......................................................................... 109 N3300 / N3301 Inverter Board .......................................................................... 115 N3500 Motor Controller board .......................................................................... 121 N3600 / N3700 - N3601 / N3701 Control Panel ............................................... 132 N3800 Rotation Position Sensor ...................................................................... 139 N4100 Position Lights ...................................................................................... 142 N4200 Ceph Connector Board ......................................................................... 143 Adjusting the frequency of the ceph head support ........................................ 143 N4355 Ceph filter position board...................................................................... 150 N4600 Y-layer Sensor ....................................................................................... 153 N4700 Power Supply ....................................................................................... 156 N5000 Optocoupler board ................................................................................ 161 N5100/5101 Core Module ................................................................................ 165 Updating the software ........................................................................... 165 Changing the Core Module ................................................................... 165 N5200 Digital I/O board .................................................................................... 175 N5300 Top Rack board .................................................................................... 191 Adjusting the frequency of the pan head support .......................................... 191 N5400 Tubehead board ................................................................................... 202 N5500 Collimator sensor board ....................................................................... 204 N5600 Sensor connector board ....................................................................... 207 N5700 DIB connector board ............................................................................. 210 N5800 Data Interface board ............................................................................. 212 N5900(1) / N5905 Terminal board .................................................................... 220 Adjusting the frequency of the ceph nasion support ...................................... 221 N6000 Ceph Head board ................................................................................. 230 N6100 Beam Alignment board ......................................................................... 238 N6200 Movement Detect board ....................................................................... 242 7. Error Codes and Trouble Shooting .............................................................. 244 7.1 Warnings and precautions .......................................................................... 244 Warning - X-rays .......................................................................................... 244 Warning - Electric shock ............................................................................... 244 Warning - High voltage ................................................................................. 244 Caution - Static discharge ............................................................................ 244 7.2 Trouble shooting principles ......................................................................... 245 Circuit boards .............................................................................................. 245 Indicator LEDs ............................................................................................. 245 Test pins ....................................................................................................... 245 Checking cables .......................................................................................... 245 VI Service manual 8201086 Cranex D Pan and Pan/Ceph Contents Bad quality images ...................................................................................... 246 Incorrect patient positioning .................................................................. 246 A badly aligned unit ............................................................................... 246 Image filtering settings .......................................................................... 246 Power supply problems ................................................................................ 247 Display problems ......................................................................................... 247 7.3 Error codes and what they mean ................................................................ 247 The unit selftest ............................................................................................ 247 Error codes .................................................................................................. 247 List of error codes ........................................................................................ 248 PC1 NC (only on the User’s Interface) ................................................. 248 E2 CAS ............................................................................................... 248 E3 CoL (Pan/Ceph units only) .............................................................. 248 E4 CoL (Pan/Ceph units only) .............................................................. 248 E7 rEL ................................................................................................. 249 E8 MoE ............................................................................................... 249 E9 (***) (the WAIT time will appear in seconds) ................................... 249 E10 dor ............................................................................................... 249 E12 cCo .............................................................................................. 250 E16 PoS ............................................................................................. 250 E18 dCh .............................................................................................. 250 E19LbL ............................................................................................... 253 C1 HHo ............................................................................................... 253 C2 (***) (the mains voltage is displayed).............................................. 253 C3 gEn ................................................................................................ 253 C4 Inu C5 FIL ................................................................................................. 254 C6 EEP ............................................................................................... 254 C7 Por ................................................................................................. 254 C8 PoC ............................................................................................... 255 C9 PoL ................................................................................................ 255 C10 PoU ............................................................................................. 255 C11 Poc .............................................................................................. 255 C12 SEn ............................................................................................. 255 C13 (***) (the wait time will appear in seconds) ................................... 256 C14 Cba ............................................................................................. 256 C15nPC .............................................................................................. 256 C40 rAM .............................................................................................. 257 C42 Lin................................................................................................ 257 C43 FIL ............................................................................................... 257 C44 InP ............................................................................................... 259 C46 cPu .............................................................................................. 259 C51 UIb (Only PC user’s interface) ...................................................... 259 Service manual 8201086 VII Contents Cranex D Pan and Pan/Ceph 7.4 Other problems ........................................................................................... 260 The soft tissue filter does not work ........................................................ 260 Patient positioning lights do not come on.............................................. 260 The Vertical-carriage does not move when the up/down keys are pressed. ......................................................................................... 260 Sensor, detector or microswitch problems ............................................ 261 Nothing happens when the unit is switched on ...................................... 261 7.5 CCD problems ........................................................................................... 261 CCD sensor LEDs ............................................................................... 262 Debugging software ............................................................................. 264 8. Replacing Parts .............................................................................................. 265 8.1 Replacing the tube head ............................................................................. 265 8.2 Adjusting the panoramic slit collimator ........................................................ 266 8.3 Releasing a jammed Z-motor ..................................................................... 267 9. Annual Service ............................................................................................... 268 9.1 mA test ....................................................................................................... 268 9.2 kV test ........................................................................................................ 269 9.3 Exposure time test (pan/ceph units only) ..................................................... 270 9.4 Motor Movements ....................................................................................... 270 9.5 Position Detectors ...................................................................................... 271 9.6 Image receptor detection ............................................................................ 271 9.7 Panoramic Alignment ................................................................................. 271 9.8 Cephalometric Alignment ........................................................................... 272 9.10 Soft Filter Alignment ................................................................................. 273 9.11 Patient Positioning Lights ......................................................................... 273 9.12 Covers and Labels ................................................................................... 273 9.13 Other checks ............................................................................................ 274 10. Image Appearance - s/n B81642 and earlier only ...................................... 275 10.1 Using the 16-bit format ............................................................................. 275 10.2 Setting 16-bit filtering and changing filter parameters ............................... 275 Appendix A1 - Technical Information ............................................................ A1 - 1 Appendix A2 - Upgrading a Pan unit to Pan/Ceph....................................... A2 - 1 A2.1 Replacing the collimator ................................................................... A2 - 1 A2.2 Installing the cephalometric unit ......................................................... A2 - 7 A2.3 Electrical modifications ..................................................................... A2 - 7 A2.4 Software modifications ..................................................................... A2 - 7 A2.5 Checking the alignment of the unit .................................................... A2 - 8 Appendix A3 - Software Versions ................................................................. A3 - 1 VIII Service manual 8201086 Cranex D Pan and Pan/Ceph 1. General information 1. General Information 1.1 Introduction This manual describes how to service all versions of the Cranex D and Cranex D Ceph. 1.2 Unit versions The are two versions of the unit: - versions 1 and 2 have the original "dark blue" control panel and GUI. Serial numbers B81642 and earlier. - version 3 have the "light grey" control panel and GUI. Serial numbers B91643 and later. 1.3 Associated documentation The Cranex D Pan/Ceph User's manual. The Cranex D Pan/Ceph Installation manual. The Cranex D Pan/Ceph Spare-parts manual. 1.4 Service warnings and precautions Servicing precautions Only Soredex trained and approved service personnel are allowed to service the Cranex D and Cranex D Ceph. Before attempting to service the unit make sure that you know how to operate it. Read the Cranex D user's manual. Only use original Soredex spare parts when repairing the unit or replacing parts. The unit is factory set to operate using either a 230VAC power supply or a 115VAC power supply. Never try to operate the unit using a power supply different to the voltage marked on the unit. Service manual 8201086 1 1. General Information Cranex D Pan and Pan/Ceph Radiation Safety Before servicing the unit familiarise yourself with local and national radiation safety standards and requirements relating to dental x-ray equipment. If you need to take test exposures you MUST take adequate steps to protect yourself from radiation. Use a lead apron or stand behind a suitable radiation shield. In addition, when taking an exposure stand at least two metres (six feet) from the unit. Mechanical safety Switch the main power supply off before repairing or replacing mechanical parts. Be careful when operating the unit not to get body parts or clothing trapped between moving parts. The aperture plate in the collimator is made of lead (Pb) which is a toxic material. Do not touch it with your bare hands. During operation some surfaces may become hot. When working on the unit take suitable precautions to avoid burning yourself. DO NOT open the tube head. There are no serviceable parts, mechanical or electrical, inside the tube head. Electrical Safety Switch the main power supply off before repairing or replacing parts. When leaving the service area during service, always disconnect the unit from mains to protect any extraneous persons from electric shock. Live electrical terminals are deadly. Be sure that power switch is OFF and that precautions have been taken before opening access doors, removing enclosures and panels, or attaching accessories. 2 Service manual 8201086 Cranex D Pan and Pan/Ceph 1. General information This equipment should be used only in areas that are provided with a protective earth connection to ensure an equipotential ground connection. Before cleaning or disinfecting the unit switch the main power supply off. Electrostatic discharge Electrostatic Discharge (ESD) can damage or destroy electronic components. When servicing the unit take proper precautions to avoid electrostatic build up and discharge (ESD). Follow the recommendations for the prevention of ESD that are used in the country in which you are working. If no recommendations are available follow the guide lines below. Before handling any electrical parts or components make sure that any static electricity charge that has built up in you body is discharged. When handling electrical parts or components use an elasticated wrist wrap which is connected to a ground point through a 1 Mohm current limiting cable. For a ground point use water pipes, radiators or other objects that are known to be connected to the ground. Also use a cable to connect the unit to the same ground potential as the wrist wrap. If an antistatic mat is used, connect the wrist wrap to the mat and the mat to the ground potential. Wash the wrist wrap and check that it is in good condition frequently. Explosion Hazard Certain disinfectants and cleaning agents may vaporize to form an explosive vapour. If such chemicals are used the vapour should be allowed to disperse before switching the unit on. Service manual 8201086 3 1. General Information Cranex D Pan and Pan/Ceph 1.5 Operating warnings and precautions Also refer to the Warnings and precautions in the Cranex D /Cranex D Ceph User's manual. The Soredex Cranex D x-ray unit must only be used to take dental, TMJ and cephalometric (optional) x-ray exposures. It must not be used for any other purpose. The unit or its accessories must not be modified, altered or remanufactured in any way. Repairing shall be performed by Soredex authorized service only. The x-ray unit may be dangerous to both patient and operator unless safe exposure values are used and correct operating procedures are observed. When taking exposures operators must protect themselves from radiation by using a lead apron or by standing behind a suitable radiation shield. When taking exposures operators must stand at least two metres (six feet) from the patient. Operators must be able to see and hear the patient during an exposure. Operators must be able to see the exposure warning lights and hear the exposure warning signal during exposures. If the X-ray unit is located in such a position that the operator cannot see the exposure warning lights, an external exposure warning light must be used. As radiation safety and protection requirements vary from country to country and state to state it is the responsibility of the operator to ensure that all local and national radiation safety and protection requirements are met. Avoid taking exposures of pregnant women. 4 Service manual 8201086 Cranex D Pan and Pan/Ceph 1. General information The use of ACCESSORY equipment not complying with the equivalent safety requirements of this equipment may lead to a reduced level of safety of the resulting system. Consideration relating to the choice shall include: – use of the accessory in the PATIENT VICINITY – evidence that the safety certification of the ACCESSORY has been performed in accordance to the appropriate IEC 601-1 or IEC 950 and/or IEC 601-11 harmonized national standard. – for units with serial number B81642 and earlier use the RS-232C serial interface cable, provided by the manufacturer shall be used. NOTE: units with serial number B91643 and later DO NOT require the RS-232C serial interface cable. If this device will be used with 3rd party imaging application software not supplied by SOREDEX, the 3rd party imaging application software must comply with all local laws on patient information software. This includes, for example, the Medical Device Directive 93/42/EEC and/or FDA if applicable. 1.6 Unauthorized Modifications Unauthorized changes or modifications to any part of the unit or its equipment can have hazardous consequences. Changes or modifications must not be made unless specifically authorized by Soredex. When properly assembled with a compatible beamlimiting device, the diagnostic source assembly will fully meet the United States of America Federal Performance Standards for Diagnostic X-Ray Systems and Their Components (21 CFR 1020. 30-32) provided no components or parts are removed from the unit and no unauthorized adjustments are made to the beam-limiting device or tube housing assembly. Never remove or remanufacture any part of the tube housing assembly or beam-limiting device. Never adjust any part of the beam-limiting device unless under the direction of Soredex or their authorized distributor. Service manual 8201086 5 1. General Information Cranex D Pan and Pan/Ceph 1.7 Disclaimer Soredex shall have no liability for consequential damages, personal injury, loss, damage or expense directly or indirectly arising from the use of its products. No agent, distributor or other party is authorized to make any warranty or other liability on behalf of Soredex with respect to its products. 6 Service manual 8201086 Cranex D Pan and Pan/Ceph 2. Unit Description 2. Unit description 2.1 The Cranex D and Cranex D Ceph The Cranex D Pan and Cranex D Pan/Ceph are digital extraoral x-ray units designed to take exposures of the dento-maxillofacial region. The units cannot be used to take x-ray exposures of any other part of the human anatomy. The Cranex D Pan unit is used to take panoramic, sinus and TMJ images. Cranex D Pan/Ceph unit is used to take panoramic, sinus, TMJ and cephalometric images. The Cranex D Pan/Ceph unit can be supplied with the ceph arm mounted on either the left- or right-hand side of the column. NOTE: The ceph arm is also available as a retrofit kit that can be installed to a pan unit that was not originally fitted with a ceph arm. An optional adaptor allow carpel images to be taken (not available in the USA) All units are factory set to operate using either a 230 VAC power supply or a 115 VAC power supply. The voltage setting CANNOT be changed. The Cranex D Pan and Cranex D Pan/Ceph are used with a PC in which Digora for Window or any other MDD approved dental imaging software is installed. Service Manual 8201086 7 2. Unit Description Cranex D Pan and Pan/Ceph 2.2 Unit versions The unit version can be identified from the unit type label is located at the rear of the unit next to the main power cable. PP 1 0 1 2 - 0 1 2 Product identification Country or language code 00 General (English) 01 UK only 02 German 03 USA 05 France 06 Finland and Sweden 07 Russia 08 Italy 09 Spain 2X OEM version 3X OEM version X-ray tube type 0 OPX/105 1 DE 100/15ö 2 D-051 4 KL5 Type of unit 0 Pan unit only/ no ceph unit 7 Left-hand ceph - digital unit 8 Right-hand ceph - digital unit 0 Cassette unit (not used) 1 Digital unit (removable sensors) The production version 0 Pilot production version 1 1st production version 2 2nd production version, s/n B81642 and earlier 3 3rd production version (facelift) s/n B91643 and later 8 Service Manual 8201086 Cranex D Pan and Pan/Ceph 2. Unit Description 2.3 The main parts and assemblies The Cranex D Pan Service Manual 8201086 9 2. Unit Description 10 Cranex D Pan and Pan/Ceph Service Manual 8201086 Cranex D Pan and Pan/Ceph 2. Unit Description The Cranex D Pan/ceph Service Manual 8201086 11 2. Unit Description Cranex D Pan and Pan/Ceph 2.4 User interfaces Control panel - s/n B81642 and earlier The Hidden keys are active only when Test Connector (SERVICESW 4801744) is connected to X90 on the Digital I/O board (N5200). ALWAYS remove the test connector after use. 12 Service Manual 8201086 Cranex D Pan and Pan/Ceph 2. Unit Description Graphical user interface - s/n B81642 and earlier Service Manual 8201086 13 2. Unit Description Cranex D Pan and Pan/Ceph Control panel - s/n B91643 and later Program selection keys Adult panoramic 85 Child panoramic kV KV selection keys 81 77 Temporomandibular joint 73 Cephalometric Lat / PA 70 66 Ceph. reduced width Lat T X-rays OFF key 63 60 57 Partial panoramic keys Exposure indicator READY indicator Info key Exposure time selection keys E mA s D L S+ S- Info display Up/Down adjustment keys (Z-movement) 14 Z Y mA display Exposure values display S = Exposure time (sec) 2 D = Dose (mGycm ) L = Focal trough position (mm) in PIO position Focal trough adjustment keys (Y-movement) RETURN key Service Manual 8201086 Cranex D Pan and Pan/Ceph 2. Unit Description Graphical user interface - s/n B91643 and later Cranex D - x “Always on top” key 85 kV 81 77 73 70 66 63 T 60 57 ! 10.0 mA S+ 10.8 s S- 1.3 mGycm Error code display 2 Info key Scroll up/down keys Service Manual 8201086 ! E 7 rEL 15 2. Unit Description Cranex D Pan and Pan/Ceph 2.5 Unit dimensions 16 Service Manual 8201086 Cranex D Pan and Pan/Ceph 2. Unit Description 2.6 CCD Image Receptors (Sensors) The Cranex D Pan and Cranex D Pan/Ceph use CCD sensors as the image receptor. Two versions of the CCD sensor are available: - CCD Image Receptor PP1-1 (sensor type 1) - CCD Image Receptor PP1-2 (sensor type 2) CCD Image Receptor PP1-1 (sensor type 1) can ONLY be used with the Cranex D Pan. This sensor can only be used to take panoramic images CCD Image Receptor PP1-2 (sensor type 2) can be used with BOTH the Cranex D Pan and the Cranex D Pan/ Ceph. This sensor can be used to take panoramic and cephalometric images. 2.7 The link to the PC Unit versions with s/n B81642 and earlier A RS232 serial interface cable (part number 4801742) is used to link the unit to the PC. The serial interface protocol is: 8 databits, 1 stop bit, no parity, 4800 Bd. Fibre optic cable (4801743). Unit version with s/n B91643 and later Fibre optic cable (4801743) ONLY. Service Manual 8201086 17 2. Unit Description Cranex D Pan and Pan/Ceph 2.8 Mechanical description The Cranex comprises a column, a Z-carriage (Verticalcarriage), a support arm, a rotating unit and a patient support assembly. The column rests on the floor and is fixed to the wall using two wall brackets. If the unit needs to be free standing it can be attached to a stand (part no. 9802666) The Z-carriage (vertical carriage) is attached to the column and can slide up and down the column (Z-movement, for unit height adjustment). The Support Arm is attached to the top of the vertical carriage. The rotating unit, which comprises the tubehead and collimator assembly and the sensor holder, is attached to the underside of the support arm. The rotating unit is able to slide backwards and forwards along the support arm (Y-movement, for patient positioning and panoramic/ceph exposures), and is also able to rotate (R-movement - for panoramic/ceph exposures) . 18 Service Manual 8201086 Cranex D Pan and Pan/Ceph 2. Unit Description Inside the tube head there is the x-ray tube. It is a fixed tungsten anode type with a focal spot of 0.5. The maximum anode voltage is 85kV and maximum current is 10mA. X-ray beam filtration is 2.5 mm Al minimum. The patient support assembly is attached to the bottom of the vertical carriage. It comprises handles for the patient to hold and a lower jaw support device The patient is held in position with a four-point support system. The head support holds the patient's temples and the forehead, and the patient support assembly supports the patients lower jaw, either using a chin or lip support. There are three patient positioning lights, midsagittal plane, horizontal plane and focal trough. The optional cephalostat can be mounted either on the left or right-hand side of the column depending upon what was specified when the unit was ordered. Service Manual 8201086 19 2. Unit Description Cranex D Pan and Pan/Ceph 2.9 Electrical description Circuit board names and locations NOTE: A complete description of all the circuit boards, including circuit diagrams and component layouts can be found in Section 6. Circuit Board Description. PCI - N3000 Upper shelf - N4700 Power Supply Board - N5300 Top Rack Connector Board - N4600 Y-layer Sensor Z-carriage (Vertical carriage) - N3500 Motor Controller - N3600 Control Panel (< s/n B81642) - N3601 Control Panel (> s/n B91643) IMPORTANT NOTE: N3600 and N3601 are NOT interchangeable. - N3700 Display Board (< s/n B81642) - N3701 Display Board (> s/n B91643) IMPORTANT NOTE: N3700 and N3701 are NOT interchangeable. - N4100 Frankfurt Light - N5000 Insulation Board (Optocoupler) - N5100 C167 Core Module (CPU) (< s/n B81642) - N5101 C167 Core Module (CPU) (> s/n B91643) IMPORTANT NOTE: N5100 and N5101 are NOT interchangeable. - N5200 Digital I/O board 20 Service Manual 8201086 Cranex D Pan and Pan/Ceph 2. Unit Description Rotating unit (image receptor side) - N3100 Rotation Connector Board - N3800 Rotation Position Sensor - N4100 Y-Layer Light (focal trough light) - N5700 DIB Sensor Connector Board (Pan sensor) - N5800 Data Interface Board - N5900 Pan Terminal Board (< s/n B81642) - N5901 Pan Terminal Board (> s/n B91643) IMPORTANT NOTE: N5900 and N5901 are NOT interchangeable. Rotating unit (tubehead side) - N3200 Filament Control Board - N3300 Inverter Board (tubehead s/n 90-----) - N3301 Inverter Board (tubehead s/n 91-----) IMPORTANT NOTE: N3300 and N3301 are NOT interchangeable. - N5400 Tubehead Board (Inside tubehead) - N5500 Slit board (Collimator position) CCD Sensor - N5600 CAM (CCD sensor) Connector Board - None Pan/Ceph Camera (CCD Sensor board) (No information provided) Service Manual 8201086 21 2. Unit Description Cranex D Pan and Pan/Ceph Ceph head - N4200 Ceph Connector Board - N4355 Ceph Filter Position - N5905 Ceph terminal Board - N6000 Ceph Head Board - N6100 Beam Alignment Board - N6200 Movement detector board 22 Service Manual 8201086 Cranex D Pan and Pan/Ceph Service Manual 8201086 2. Unit Description 23 2. Unit Description 24 Cranex D Pan and Pan/Ceph Service Manual 8201086 Cranex D Pan and Pan/Ceph Service Manual 8201086 2. Unit Description 25 2. Unit Description Cranex D Pan and Pan/Ceph Power supply Mains voltage (230VAC or 115VAC) is supplied to the unit through the N3500 board (Motor Controller). From the N3500 board power is routed to the N4700 board (Power Supply) which is a linear mode power supply. The N4700 board generates the low-voltage power supplies (±25V and +34V) for all the boards in the unit. The lowvoltage power supplies are distributed to the other boards via the N5300 board (Top Rack Connector Board). The N4700 board also supplies mains voltage, (230VAC or 115VAC), directly to the tube head. The x-ray generator comprises the N3300 board (Inverter Board) and the N5400 board (Tubehead Board). The N5400 board is located inside the tubehead and cannot be accessed. Unit control The unit is controlled by a microprocessor on the N5100 / N5101 board (Core Module) that continually monitors and controls the operation of the unit. A serial peripheral interface communication protocol (SPI - RS485) and direct digital I/O are used to monitor most of the unit functions. The microprocessor: - monitors the optosensors and microswitches - monitors control panel keys - controls unit movements during exposures - starts, controls and stops x-ray generation - monitors the safety interlocks - controls the digital imaging chain The necessary unit settings and parameters for all the imaging programs are stored in the memory circuit which is also located on the N5100 / N5101 board. Motors and motor control There are three stepper motors and one AC-motor in the Cranex D Pan. One stepper motor moves the rotating unit towards and away from the column, the Y-movement. Another stepper motor rotates the rotating unit, the R movement. During exposures these motors are controlled by the N3500 board (Motor Controller). Note that if the rotating unit is moved during exposure setup it will automatically return to the PIO position. 26 Service Manual 8201086 Cranex D Pan and Pan/Ceph 2. Unit Description The third stepper motor selects the primary collimator and is controlled by the N3500 board. The AC-motor is used to adjust the height of the unit, the Z movement, and this motor is activated directly by the N3500 board and controlled by the unit software through the N5100 / 5101 and N5200 board. To activate the Zmotor it must receive a control signal from the N5100 / 5101 board and a separate control (enable) signal from the Z-movement (up/down) keys. The unit is also provided with an emergency switch on the front of unit which will disable the z-movement when activated (pressed). The Cranex D Pan/Ceph has an additional stepper motor in the ceph head that drives the collimator and the primary slit. Exposure logic A exposure can only be taken when the unit is in the ready state and the exposure button is pressed. The Filament and Inverter boards receive the correct kV and mA references from the CPU. When the exposure button is pressed it takes 800ms to start preheat and preheat release. After 1100ms Rg1 starts to charge the large rectifier capacitors through a charging resistor. After 1700ms the rectifier capacitors are charged and Rg2 will bypass the charging resistor. 1800ms after pressing the exposure button ExpEna will come on and preheat will be stopped. The tubehead will receive power and the filament and inverter boards will start to regulate the mA and kV according to the mA- and kV- feedbacks. Service Manual 8201086 27 2. Unit Description 28 Cranex D Pan and Pan/Ceph Service Manual 8201086 Cranex D Pan and Pan/Ceph 2. Unit Description Position control The positions of the mechanical assemblies are monitored by optosensors and microswitches. The optosensors only respond to start or stop positions and do not control unit movements. The optosensors ensure that the mechanical assemblies are in the correct PIO (Patient in/out) or start position for the required exposure. The statuses of the optosensors are monitored continually by the unit software. The position of the primary aperture (the selected slot) is monitored, by sensors mounted on the N5500 board (Slit brd). NOTE: The N5500 board is only in Pan/Ceph units. The C-arm rotation position is monitored by optosensors on the N3800 board (Rotation sensors) . The position of the CCD sensor holder is monitored by optosensors on N6200 board (Movement Detection Board). The positions of the mirror, the vertical carriage (upper and lower limits) and the ceph PA/LAT positions are all monitored by microswitches. Service Manual 8201086 29 2. Unit Description Cranex D Pan and Pan/Ceph A overview of the Imaging Chain This description assumes that the unit is ready to take an exposure. Image acquisition is controlled by a software component(s) installed in the PC. For unit versions with s/n B81642 and earlier it is the DICC (digital imaging capture component) For unit versions with s/n B91643 and later they are the DICC (digital imaging capture component) and the DSD (Digora Scanora Driver). The DICC sends a message to the Cranex D that tells it what type of CCD sensor(s) are attached to the unit, type 1 and/or type 2. The embedded software on the unit CPU (main control software) continuously sends “OK” messages to the DICC driver (PC). After pressing the exposure button the CPU sends a so-called label which contains imaging parameters (—kV/—mA/ —s) and an imaging program identifier. 30 Service Manual 8201086 Cranex D Pan and Pan/Ceph 2. Unit Description The CPU then sends a PPOWER (pan) or CPOWER (ceph) signal. This activates the switching regulators on the data interface board (DIB) which then produces the power supply voltages for the CCD sensor. The IMAGE signal is activated (the exposure button is pressed) to enable clocking of the pixels. Derivation of several CCD clock signals from the TDI clock is done by the pan/ceph sensor. The CLOCK-signal is used to clock out the pixels. Scanning movement of the unit follows the X-ray beam. The scintillation of the pan/ceph sensor converts radiation to visible light which is detected by the CCD cell. A binning procedure is carried out on individual pixels, i.e. two adjacent pixels in a row and column (2 x 2 binning) forms one large pixel (96μm x 96μm). The output voltage of the CCD is fed to a 14-bit A/D converter. The CCD sensor board sends image data (now 12 bits) to the Data Interface board for differential conversion. In a more noise tolerant shape the image information is transferred to the Terminal board. The Terminal board is a bridge between electrical and optical communication. Parallel format data is converted into serial format. The image information is transferred to the PC via a high speed optical link (160 Mbit/s). In the PC there is a PCI card with optical interface. Its function is to convert image information back to electrical and parallel format. After this the DICC preprocess the raw image, for example it interpolate gaps between CCD chips, does dark current correction and gain correction (The pixels do not have equal characteristics). Service Manual 8201086 31 32 MOVE SENSOR CEPH LAT/PA SENSOR kV PRESET CEPH CCD-CEPH SENSOR EMERGENCY SWITCH MAINS INPUT CONTROL PANEL CONNECTOR RS232 C BUTTON CONNECTOR EXPOSURE EXPOSURE LOCK CEPH MOTOR N5600 Ccd sensor connector board Ccd sensor board N4355 Ceph filter position N5700 Dib connector board N5800 Data interface board N5905 Ceph terminal board N6000 Ceph head board N6100 Beam alignment board N6200 Movement detector board Circuit boards: N4200 Ceph connector board CEPH HEAD BEAM SENSOR Y-LAYER MOTOR Y-LAYER SENSOR kV PRESET PAN N5100/N5101 C167 Core module (CPU) N3500 Motor Controller board N3600/N3601 and N3700/N3701 Control panel N4100 Position light (2pcs) N5000 Isolation board Circuit boards: N5200 Digital I/O board Z-CARRIAGE Circuit boards: N4700 Power supply board N5300 Top rack connector board N4600 Y-layer board UPPER SHELF Z-MOVE SENSOR CONNECTOR OPTICAL FIBER SENSOR MIRROR Z-MOTOR FRONT LIGHT LIGHT FRANKFORT MOTOR COLLIMATOR CHILD PANORAMA SOLENOID CCD-PAN SENSOR TUBE HEAD N5600 Ccd sensor connector board Ccd sensor board SLIT POSITION SENSOR Y-LAYER LIGHT N3100 Rotation connector board N3200 Filament control board N3300 Inverter board N3800 Rotation position sensor N4100 Position light N5500 Slit board N5400 Tube head board N5700 Dib connector board N5800 Data interface board N5900/N5901 Pan terminal board Circuit boards: ROTATION POSITION SENSOR ROTATION UNIT ROTATION MOTOR CHILD PANORAMA SENSOR 2. Unit Description Cranex D Pan and Pan/Ceph Block Diagram Service Manual 8201086 Service Manual 8201086 N4200 N4355 N5600 N5700 N5800 N5905 N6000 N6100 N6200 Ceph Head PGND 4801699 4801695 MOLEX 5576-26 1 +5V_CPU 2 GND_CPU 3 (LAT-/PA) 4 CEPHROK5 CEPHCOK6 CEPHLOK7 CEPHMIDSW 8 CEPHLIMSW 9 CEPHENA 10 CEPHDIR 11 (PAECRFRQ) 12 CPROJTRIG13 FILT5 14 CAECRFRQ 15 NC 16 NC 17 CEPHUP18 CEPHDOWN19 +5V_CPU 20 GND_CPU 21 CPOWER22 CIMAGE23 CEPHCLK 24 CDETCLK 25 CLASLIT 26 GND_CPU J4205 4801694 26 10 4801700 MOLEX 5576-26BGS1 1 KVMA7 2 KVMA6 3 KVMA5 4 KVMA4 5 KVMA3 6 KVMA2 7 KVMA1 8 KVMA0 9 PREHREL 10 PREH 11 EXPENA 12 KVMASEL 13 KVMACLK 14 TEMPFAIL 15 KVOK 16 MAOK 17 IN1 18 SOLOK19 MIRROR20 (IN4) 21 MAFRQ 22 GND1 23 GND1 24 TUBEFAIL 25 GND1 26 GND1 X4 N3500 N3600/N3601 N3700/N3701 N4100 N5000 N5100/N5101 N5200 Z-carriage MOLEX 5576-26BGS1 1 +5V_CPU 2 GND_CPU 3 LAT-/PA 4 CEPHROK5 CEPHCOK6 CEPHLOK7 CEPHMIDSW 8 CEPHLIMSW 9 CEPHENA 10 CEPHDIR 11 (PAECRFRQ) 12 CPROJTRIG13 FILT5 14 CAECRFRQ 15 NC 16 NC 17 CEPHUP18 CEPHDOWN19 +5V_CPU 20 GND_CPU 21 CPOWER22 CIMAGE23 CEPHCLK 24 CDETCLK 25 CLASLIT 26 GND_CPU X8 J3506 MOLEX 5576-26BGS1 1 CAS1 2 CAS2 3 CAS3 4 CAS4 5 LIN1 6 LIN2 7 LIN3 8 LIN4 9 ROT1 10 ROT2 11 ROT3 12 ROT4 13 14 15 16 17 PROJLIT 18 MIRROR19 20 21 +34V 22 GND 23 +34V 24 GND 25 +34V 26 GND 4801670 AC voltage 4801652 AC1 AC2 26 4801663 J3511 J3512 20 20 26 4801664 4801665 MOLEX 5576-20BGS1 1 PANCASSW 2 GND 3 CASLIMSW 4 GND 5 CASMIDSW 6 GND 7 LINMIDSW 8 GND 9 LINLIMSW 10 GND 11 RACKMIDSW 12 GND 13 RACKLIMSW 14 GND 15 COL1SW 16 COL2SW 17 COL3SW 18 SOLENA 19 KV_FRQ_ENA 20 OUT3 X6 4801713 16 4801651 6 4801666 MOLEX 5566-06A 1 +25V 2 GND 3 GND 4 MAINS 5 RG1 6 RG2 X2 sip/sop (rs232) PGND MOLEX 5576-16BGS1 1 PDETCLK 2 PPOWER3 PIMAGE4 +5V 5 TXD2 6 RXD2 7 +5V 8 GND 9 GND 10 GND 11 (TPOWER) 12 NC 13 (TIMAGE) 14 NC 15 NC 16 KV_FRQ X12 MOLEX 5576-20BGS1 1 ROT4SW 2 GND 3 ROT3SW 4 GND 5 ROT2SW 6 GND 7 ROT1SW 8 GND 9 ZLIMSW 10 GND 11 ZMIDSW 12 GND 13 +5V 14 GND 15 PNLEXPSW 16 GND 17 NC 18 GND 19 NC 20 GND X9 PAN_TxD J3502 MOLEX 5576-10BGS1 1 GND 2 +34V 3 GND 4 +34V 5 ESTOP1_5V 6 ESTOP_5V 7 ZENA18 9 10 PAN_RxD CEPH_RxD PC_RxD PC_TxD N3000 CEPH_TxD MOLEX 5576-10 1 GND 2 +34V 3 GND 4 +34V 5 ESTOP1_5V 6 ESTOP_5V 7 ZENA18 9 10 J4206 PC optical fiber 4801615 J5313 Upper Shelf N4600 N4700 N5300 MOLEX 5576-26BGS1 1 KVMA7 2 KVMA6 3 KVMA5 4 KVMA4 5 KVMA3 6 KVMA2 7 KVMA1 8 KVMA0 9 PREHREL 10 PREH 11 EXPENA 12 KVMASEL 13 KVMACLK 14 TEMPFAIL 15 KVOK 16 MAOK 17 IN1 18 SOLOK19 MIRROR20 (IN4) 21 MAFRQ 22 GND1 23 GND1 24 TUBEFAIL 25 GND1 26 GND1 J5319 MOLEX 5576-26BGS1 1 CAS1 2 CAS2 3 CAS3 4 CAS4 5 LIN1 6 LIN2 7 LIN3 8 LIN4 9 ROT1 10 ROT2 11 ROT3 12 ROT4 13 14 15 16 17 PROJLIT 18 MIRROR19 20 21 +34V 22 GND 23 +34V 24 GND 25 +34V 26 GND J5322 MOLEX 5576-20BGS1 1 ROT4SW 2 GND 3 ROT3SW 4 GND 5 ROT2SW 6 GND 7 ROT1SW 8 GND 9 ZLIMSW 10 GND 11 ZMIDSW 12 GND 13 +5V 14 GND 15 (PNLEXPSW) 16 GND 17 NC 18 GND 19 NC 20 GND J5314 MOLEX 5576-16BGS1 1 PDETCLK 2 PPOWER3 PIMAGE4 +5V 5 TXD2 6 RXD2 7 +5V 8 GND 9 GND 10 GND 11 (TPOWER) 12 NC 13 (TIMAGE) 14 NC 15 NC 16 KV_FRQ J5310 MOLEX 5219-03A X21 MOLEX 5576-20BGS1 1 PANCASSW 2 GND 3 CASLIMSW 4 GND 5 CASMIDSW 6 GND 7 LINMIDSW 8 GND 9 LINLIMSW 10 GND 11 RACKMIDSW 12 GND 13 RACKLIMSW 14 GND 15 COL1SW 16 COL2SW 17 COL3SW 18 SOLENA 19 KV_FRQ_ENA 20 OUT3 J5302 MOLEX 5566-06A 1 +25V 2 GND 3 GND 4 MAINS 5 RG1 6 RG2 J5320 4801704 J5316 AMP MODII-2X8M PANCASSW 1 CASLIMSW 2 CASMIDSW 3 RACKMIDSW 4 RACKLIMSW 5 COL1SW 6 +5V 7 COL3SW 8 SOLENA 9 10 GND 11 OUT3 12 ROT1SW 13 ROT2SW 14 ROT3SW 15 ROT4SW 16 MOLEX 5576-26BGS1 KVMA7 1 KVMA6 2 KVMA5 3 KVMA4 4 KVMA3 5 KVMA2 6 KVMA1 7 KVMA0 8 PREHREL 9 10 PREH 11 EXPENA 12 KVMASEL 13 KVMACLK 14 TEMPFAIL 15 KVOK 16 MAOK 17 18 19 20 21 MAFRQ 22 GND1 23 GND1 24 TUBEFAIL 25 GND1 26 GND1 J5306 AMP MODII-1X8M 1 CAS1 2 CAS2 3 CAS3 4 CAS4 5 ROT1 6 ROT2 7 ROT3 8 ROT4 J5309 AMP MODII-2X8M 1 +5V 2 GND 3 SOLOK4 5 PROJLIT 6 IN1 7 KV_FRQ 8 GND 9 TXD2 10 RXD2 11 GND 12 PDETCLK 13 GND 14 PPOWER 15 PIMAGE 16 GND +34V GND +34V GND +25V GND -25V GND 16 8 26 16 8 310VGND MOLEX 5219-02A X23 +310VDC 1 2 3 4 5 6 7 8 MOLEX 5566-08A J5303 +34V GND +34V GND +25V GND -25V GND ROT1 ROT2 ROT3 ROT4 CAS1 CAS2 CAS3 CAS4 4801607 X30 MOLEX 5219-02A 1 2 3 4 N3100 N3200 N3300 N3800 N4100 N5400 MODII-1X4WM J14 1 2 3 4 MODII-1X4WM J15 1 2 3 4 5 6 7 8 J3111 MOLEX 5566-08A J3107 1 2 3 4 5 6 7 8 9 10 11 12 13 14 15 16 OUT3 COL3SW SOLENA- PANCASSW CASLIMSW CASMIDSW SSSENS2 SSSENS1 COL1SW N5500 N5600 N5700 N5800 N5900/N5901 1 2 3 4 5 6 7 8 9 10 11 12 13 14 15 16 MODII-2X8M J3108 PROJLIT IN1 AEC_FRQ_TO_CPU GND TXD2 RXD2 GND PDETCLK GND PPOWERPIMAGEGND +5V GND SOLOK- MODII-2X8M MAFRQ GND1 GND1 TUBEFAIL GND1 GND1 KVMA7 KVMA6 KVMA5 KVMA4 KVMA3 KVMA2 KVMA1 KVMA0 PREHREL PREH EXPENA KVMASEL KVMACLK TEMPFAIL KVOK MAOK MOLEX 5576-26 X38 1 2 3 4 5 6 Rotation Unit +5V ROT1SW ROT2SW ROT3SW ROT4SW GND MODII-1X6M J11 1 2 3 4 5 6 7 8 9 10 11 12 13 14 15 16 17 18 19 20 21 22 23 24 25 26 Cranex D Pan and Pan/Ceph 2. Unit Description Wiring diagram - general 33 4801718 4801682 4800992 J4205 26 10 PGND EXPOSURE BUTTOM CONNECTOR EXPOSURE LOCK (text) GND_ISO EXPSW-_ISO 2 1 1 2 PGND 4801611 FILTER TXD2_ISO RXD2_ISO GND_ISO GND_ISO TXD1_ISO RXD1_ISO J5001 MOLEX 5576-10BGS1 D9 DISPLAY BOARD N3700 4801546 N3701 200743 CONTROL PANEL N3600 4801545 N3601 200741 USER INTERFACE 1 2 3 4 5 6 7 8 9 10 3200176 4801684 4801685 20 14 4801648 MAINS SWITCH J5002 RS232 C CONNECTOR assembly facelift 200745 assembly 4801683 J5004 MODI-1X2M J5003 MODI-1X2M 2 3 5 6 7 8 PGND_POINT2 J3502 MOLEX 5576-10BGS1 1 GND 2 +34V 3 GND 4 +34V 5 ESTOP1_5V 6 ESTOP_5V 7 ZENA18 9 10 INSULATION BOARD N5000 4801554 N L 4801676 PGND MAINS INPUT RS cable 4801742 (not used in facelift unit) 4801695 POWER SUPPLY CORD 4801694 4801700 3800501 PAN RXD 4801717 CEPH RXD CEPH HEAD PART J4209 (text) PC RXD PAN TXD PC TXD CEPH TXD J3515 J3516 (J3513_pgnd) L 4801609 N 4801610 (text) 4801743 4801614 GND GND EMERGENCY SWITCH 4801686 J3503 MODI-1X2M X3 MOLEX 5576-14BGS1 1 PNLCLK 2 PNLOUT 3 PNLA0 4 PNLA1 5 PNLIN 6 PNLEXPSW 7 GND 8 GND 9 WARNLIGHT 10 GND 11 GND 12 GND 13 +25V 14 +25V X1 MOLEX 5576-10BGS1 1 TXD1 2 RXD1 3 GND 4 TXD2 5 RXD2 6 GND 7 EXPSW 8 GND 9 +25V 10 GND X7 MOLEX 5576-20BGS1 1 +5V 2 PILLED 3 CENLED 4 PATLED 5 PATWARD ZENA16 7 PILWARD 8 PROJTRIG 9 START 10 GND 11 (NC) 12 (NC) 13 CASUP 14 ZUP 15 (NC) 16 (NC) 17 ZDOWN 18 CASDOWN 19 SIDE 20 GND pan: X8/1--X8/13 4801715 1 2 3 X8 4801670 X10 26 ferrite GND X5 GND MOLEX 5576-26BGS1 1 +5V 2 GND 3 LINDIR 4 LINENA 5 CASDIR 6 CASENA 7 ROTENA 8 ROTDIR 9 XENA 10 XDIR 11 LINCLK 12 CASCLK 13 ROTCLK 14 ZENA 15 ZDIR 16 RACKENA 17 RACKDIR 18 PROJLIT 19 WARNLIGHT 20 XRAYLIT 21 LASLIT 22 OUT4 23 OUT5 24 ZENA125 GND 26 GND 4801667 J3505 MOLEX 5576-26BGS1 1 +5V 2 GND 3 LINDIR 4 LINENA 5 CASDIR 6 CASENA 7 ROTENA 8 ROTDIR 9 XENA 10 XDIR 11 LINCLK 12 CASCLK 13 ROTCLK 14 ZENA 15 ZDIR 16 RACKENA 17 RACKDIR 18 PROJLIT 19 WARNLIGHT 20 XRAYLIT 21 LASLIT 22 OUT4 23 OUT5 24 ZENA125 GND 26 GND C167 CORE MODULE N5100 4801539 N5101 201030 MOLEX 5576-26BGS1 +5V_CPU 1 GND_CPU 2 LAT-/PA 3 CEPHROK4 CEPHCOK5 CEPHLOK6 CEPHMIDSW 7 CEPHLIMSW 8 CEPHENA 9 10 CEPHDIR 11 (PAECRFRQ) 12 CPROJTRIG13 FILT5 14 CAECRFRQ 15 NC 16 NC 17 CEPHUP18 CEPHDOWN19 +5V_CPU 20 GND_CPU 21 CPOWER22 CIMAGE23 CEPHCLK 24 CDETCLK 25 CLASLIT 26 GND_CPU Z-MOTOR CAPACITOR MOTOR 4801669 J3508 MODI-1X8M 6 1 3 PGND J3514 MODI-1X2M 4801673 MIRROR SENSOR MOTOR CONTROLLER N3500 4801544 J3504 MODI-1X2M 4801616 FRONT LIGHT N4100 4801550 DIGITAL I/O BOARD N5200 4801591 PGND_POINT1 PGND J3507 MODI-1X2M 4801617 FRANKFORT LIGHT N4100 4801550 +5V ESTOP1_5V 4801727 J3517 J3518 J3509 J3510 L 4801612 N 4801613 AC1 AC2 1a 2a 1 2 MIRRORGND 34 br blk blue N3000 PCI BOARD 60187 MOLEX 5576-26BGS1 KVMA7 1 KVMA6 2 KVMA5 3 KVMA4 4 KVMA3 5 KVMA2 6 KVMA1 7 KVMA0 8 PREHREL 9 10 PREH 11 EXPENA 12 KVMASEL 13 KVMACLK 14 TEMPFAIL 15 KVOK 16 MAOK 17 IN1 18 SOLOK19 MIRROR20 (IN4) 21 MAFRQ 22 GND1 23 GND1 24 TUBEFAIL 25 GND1 26 GND1 X4 ferrite X9 MOLEX 5576-20BGS1 1 ROT4SW 2 GND 3 ROT3SW 4 GND 5 ROT2SW 6 GND 7 ROT1SW 8 GND 9 ZLIMSW 10 GND 11 ZMIDSW 12 GND 13 +5V 14 GND 15 PNLEXPSW 16 GND 17 NC 18 GND 19 NC 20 GND J3506 MOLEX 5576-26BGS1 1 CAS1 2 CAS2 3 CAS3 4 CAS4 5 LIN1 6 LIN2 7 LIN3 8 LIN4 9 ROT1 10 ROT2 11 ROT3 12 ROT4 13 14 15 16 17 PROJLIT 18 MIRROR19 20 21 +34V 22 GND 23 +34V 24 GND 25 +34V 26 GND X6 MOLEX 5576-20BGS1 NC 1 GND 2 NC 3 GND 4 NC 5 NC 6 LINMIDSW 7 GND 8 LINLIMSW 9 10 GND 11 NC 12 GND 13 NC 14 GND 15 COL1SW 16 COL2SW 17 COL3SW 18 SOLENA 19 KV_FRQ_ENA 20 OUT3 X12 ferrite MOLEX 5576-16BGS1 1 PDETCLK 2 PPOWER3 PIMAGE4 +5V 5 TXD2 6 RXD2 7 +5V 8 GND 9 GND 10 GND 11 (TPOWER) 12 NC 13 (TIMAGE) 14 NC 15 NC 16 KV_FRQ J3511 J3512 X2 MOLEX 5566-06A 1 +25V 2 GND 3 GND 4 MAINS 5 RG1 6 RG2 AC1 AC2 PGND 4801652 4801663 4801664 4801665 4801666 4801651 4801713 4801615 26 20 20 16 6 26 J5319 J5313 J5314 J5310 J5302 J5322 J5319 2. Unit Description Cranex D Pan and Pan/Ceph Wiring diagram - Z-carriage Service Manual 8201086 UPPER SHELF PART Z-MOVE BOTTOM SENSOR 4801713 26 J3511 J3512 N5200/X12 N5200/X2 16 6 PGND 4801652 AC1 AC2 4801666 4801651 4801663 4801665 20 20 4801664 GND ZLIMSW J3506 N5200/X4 26 N5200/X9 N5200/X6 Z-CARRIAGE GND ZMIDSW 4801615 GND_POINT2 4801618 4801619 1 2 X21 2 X24 MOLEX 5566-08A MOLEX 5576-26BGS1 1 CAS1 2 CAS2 3 CAS3 4 CAS4 5 LIN1 6 LIN2 7 LIN3 8 LIN4 9 ROT1 10 ROT2 11 ROT3 12 ROT4 13 14 15 16 17 PROJLIT 18 MIRROR19 20 21 +34V 22 GND 23 +34V 24 GND 25 +34V 26 GND X25 MOLEX 5566-10A 2800120 TRANSFORMER TF2 2800121 Terminal block X27 4801704 MOLEX 5566-06A 4801705 MODII-1X6M AMP 5576-26BGS1 KVMA7 1 KVMA6 2 KVMA5 3 KVMA4 4 KVMA3 5 KVMA2 6 KVMA1 7 KVMA0 8 PREHREL 9 10 PREH 11 EXPENA 12 KVMASEL 13 KVMACLK 14 TEMPFAIL 15 KVOK 16 MAOK 17 18 19 20 21 MAFRQ 22 GND1 23 GND1 24 TUBEFAIL 25 GND1 26 GND1 MOLEX J5320 N4600 4801555 AMP MODII-2X8M 1 +5V 2 GND 3 SOLOK4 5 PROJLIT 6 IN1 7 KV_FRQ 8 GND 9 TXD2 10 RXD2 11 GND 12 PDETCLK 13 GND 14 PPOWER 15 PIMAGE 16 GND J5309 J5312 4801662 Y-LAYER SENSOR J5316 AMP MODII-2X8M 1 2 3 4 5 COL1SW 6 7 +5V COL3SW 8 SOLENA 9 10 11 OUT3 12 ROT1SW 13 ROT2SW 14 ROT3SW 15 ROT4SW 16 GND MOLEX 5566-14A J5304 X22 MOLEX 5219-04A X26 MOLEX 5566-14A 1 2 4 4801706 TOP RACK CONNECTOR BOARD N5300 4801592 MOLEX 5576-16BGS1 1 PDETCLK 2 PPOWER3 PIMAGE4 +5V 5 TXD2 6 RXD2 7 +5V 8 GND 9 GND 10 GND 11 (TPOWER) 12 NC 13 (TIMAGE) 14 NC 15 NC J5301 16 KV_FRQ MOLEX 5566-06A J5310 MOLEX 5576-26BGS1 1 KVMA7 2 KVMA6 3 KVMA5 4 KVMA4 5 KVMA3 6 KVMA2 7 KVMA1 8 KVMA0 9 PREHREL 10 PREH 11 EXPENA 12 KVMASEL 13 KVMACLK 14 TEMPFAIL 15 KVOK 16 MAOK 17 IN1 18 SOLOK19 MIRROR20 (IN4) 21 MAFRQ 22 GND1 23 GND1 24 TUBEFAIL 25 GND1 26 GND1 MODII-1X4M AMP J5305 4801656 Y-LAYER MOTOR J5319 Terminal block TRANSFORMER TF1 4801703 MOLEX 5219-03A 1 S1,S2 MOLEX 5566-16A J5318 J5322 MODII-1X2M AMP 1 2 MOLEX 5576-20BGS1 1 NC 2 GND 3 NC 4 GND 5 NC 6 NC 7 LINMIDSW 8 GND 9 LINLIMSW 10 GND 11 NC 12 GND 13 NC 14 GND 15 COL1SW 16 COL2SW 17 COL3SW 18 SOLENA 19 KV_FRQ_ENA 20 OUT3 J5313 MODII-1X2M AMP POWER SUPPLY BOARD N4700 4801542 MOLEX 5566-06A 1 +25V 2 GND 3 GND 4 MAINS 5 RG1 6 RG2 J5302 MOLEX 5576-20BGS1 1 ROT4SW 2 GND 3 ROT3SW 4 GND 5 ROT2SW 6 GND 7 ROT1SW 8 GND 9 ZLIMSW 10 GND 11 ZMIDSW 12 GND 13 +5V 14 GND 15 (PNLEXPSW) 16 GND 17 NC 18 GND 19 NC 20 GND J5314 J5317 1 2 3 4 5 6 7 8 +34V GND +25V GND -25V GND 1 2 3 4 5 6 Z-MOVE TOP SENSOR 8 +5V YSENS1YSENS2YSENS3GND GND +25V GND +34V PAN RXD J5321 4801708 MODII-1X4M PGND +310VDC +155VDC 310VGND kV PRESET J5303 MOLEX 5566-08A 1 +34V 2 GND 3 +34V 4 GND 5 +25V 6 GND 7 -25V 8 GND J5306 AMP MODII-1X8M 1 CAS1 2 CAS2 3 CAS3 4 CAS4 5 ROT1 6 ROT2 7 ROT3 8 ROT4 4801737 8 26 16 16 8 X30a J3111 N3200/X38 J3108 and J3801 J3107 J14 and J15 4801717 PAN RXD PAN TXD ROTATION PAN TXD 10 1 2 3 4 5 1 2 3 4 5 6 TF1/br1 TF1/blk1 TF1/br TF1/blk TF2/br1 TF2/blk1 TF2/br TF2/blk 1 2 3 4 5 6 7 8 LIN1 LIN2 LIN3 LIN4 1 2 3 4 GND 1 2 3 4 5 6 RG2 RG1 MAINS GND GND +25V GND 1 2 3 4 5 6 7 8 9 10 11 12 13 14 1 2 3 4 +1.0V HEAD_SIZE_SLIDE 0.5V A B C Service Manual 8201086 TF2/gr TF2/bl TF2/red TF2/ye TF1/red TF1/ye Cranex D Pan and Pan/Ceph 2. Unit Description Wiring diagram - upper shelf 35 UPPER SHELF J5320 N4700/X22 J5306 J5309 J5316 J5303 26 8 16 16 8 4801737 PGND 1 2 3 4 5 6 7 8 9 10 11 12 13 14 MODII-1X4WM CAS1 CAS2 CAS3 CAS4 MODII-1X4F J15 J14 MODII-1X4F ROT1 ROT2 ROT3 ROT4 MODII-1X6M 1 +5V 2 ROT1SW 3 ROT2SW 4 ROT3SW 5 ROT4SW 6 GND J3801 MOLEX 5566-08A 1 +34V 2 GND 3 +34V 4 GND 5 +25V 6 GND 7 -25V 8 GND J3111 +5.7V +5.7V VSP_+5V GND GND GND GND GND GND VAP_+18V VCC_+5V 4801655 4801760 COLLIMATOR MOTOR (only ceph) ROTATION MOTOR ROTATION POSITION SENSOR N3800 4801547 J3108 MODII-2X8M 1 2 3 4 5 COL1SW 6 7 COL3SW 8 SOLENA9 10 11 OUT3 12 13 14 15 16 J3107 J3105 Y-LAYER LIGHT 4801674 MODII-1X2M (9802252) N4100 4801550 N3100 4801540 ROTATION CONNECTOR BOARD MODII-2X8M 1 +5V 2 GND 3 SOLOK4 5 PROJLIT 6 IN1 7 AEC_FRQ_TO_CPU 8 GND 9 TXD2 10 RXD2 11 GND 12 PDETCLK 13 GND 14 PPOWER15 PIMAGE16 GND J3102 MOLEX 5576-10 1 PDETCLK 2 (CEPHMID_TO_CPU) 3 PPOWER4 PIMAGE5 SPARE1 6 RXD2 7 TXD2 8 (CEPHLIM_TO_CPU) 9 SPARE2 10 AEC_FRQ_TO_CPU MOLEX 5566-14A N5901/X226 10 4801722 J3106 14 4801721 MODII-1X4WM N5901/X225 X226 MOLEX 5576-10 1 (SHEET2) 2 J3104 MOLEX 5566-06A J3112 MODII-1X8M J3104 1 2 3 4 5 6 MODII-1X8M 4801653 1 2 3 4 MOLEX 5566-06A X35 4801608 +5V GND SOL_VOLTAGE GND SOLOKSSENS1 SSENS2 GND 1 2 3 4 5 6 7 8 9 10 11 12 13 14 15 16 17 18 19 20 21 22 23 24 25 26 1 2 3 4 4801671 N5500 4801601 MAFRQ GND1 GND1 TUBEFAIL GND1 GND1 MOLEX 5576-26 KVMA7 KVMA6 KVMA5 KVMA4 KVMA3 KVMA2 KVMA1 KVMA0 PREHREL PREH EXPENA KVMASEL KVMACLK TEMPFAIL KVOK MAOK X38 CEPH 4801671 X37 X30a 2 3 1 +25VREL GND FILA1 FILGND 1 2 3 4 +155VDC 310VGND +310VDC MOLEX 5566-04A X36 MOLEX 5576-20 4801672 +15V GND TMPFAIL KVMA0 KVMA1 KVMA2 KVMA3 KVMA4 KVMA5 KVMA6 KVMA7 KVMASEL KVMACLK EXPENA KVOK TUBEFAIL MAFB GND GND GND 1 2 3 4 5 6 7 8 9 10 11 12 13 14 15 16 17 18 19 20 X32 +310VDC X30 1 2 310VGND MOLEX 5219-02A MOLEX 5566-04A X33 CAPACITORS 9802516 (4801707) 4 3 2 1 X31 INVERTER BOARD N3300 4801585 N3301 203181 X34 MOLEX 5576-20 CHILD PANORAMA SOLENOID CHILD PANORAMA SENSOR FILAMENT CONTROL BOARD N3200 4801541 1 2 3 4 PAN CHILD PANORAMA SOLENOID CHILD PANORAMA SENSOR MODII-1X4F J5502 MODII-1X4WM SOL_VOLTAGE GND SOLOKGND +34V GND +25V GND -25V GND 1 2 3 4 5 6 7 8 3 4 5 8 1 6 2 7 J5501 TO/FROM PAN TERMINAL BOARD 4801647 J5502 X225 MOLEX 5566-14A 4801650 36 +34V 1 2 3 4 5 6 7 8 4 1 MAFB KVFB FILGND FILA1 FBGND TEMPGND GND TMPFAIL 4801678 HP2 HP1 12 PGND 4 2 3 8 7 1 5 11 5 7 6 1 2 8 4 J5401 J5402 J5403 N5400 4801600 TUBEHEAD BOARD TUBE HEAD 2. Unit Description Cranex D Pan and Pan/Ceph Wiring diagram - rotating unit 1 Service Manual 8201086 14 10 J3102 4801722 TO/FROM ROTATION CONNECTOR BOARD 4801721 (SHEET 1) Service Manual 8201086 J3106 4801717 PAN TXD PAN RXD TXD RXD X226 MOLEX 5576-10 1 CCLOCK 2 CEPHMID_TO_CPU 3 CPOWER4 CIMAGE5 SPARE1 6 RXD 7 TXD 8 CEPHLIM_TO_CPU 9 SPARE2 10 AEC_FRQ_TO_CPU X225 MOLEX 5566-14A 1 2 3 VSP_+5V 4 GND 5 GND 6 GND 7 GND 8 GND 9 GND 10 VAP_+18V 11 VCC_+5V 12 13 +5.7V 14 +5.7V 1 2 3 4 5 6 7 8 9 10 11 12 13 14 15 16 17 18 19 20 VV_RS232 AEC_RS232 TDICLKTDICLK+ HLHL+ DSDS+ D5D5+ D4D4+ D3D3+ D2D2+ D1D1+ D0D0+ MOLEX 5576-20 X223 MOLEX 5576-26 1 CRDX_RS232 CTDX_RS232 2 GND 3 LOOP_5V 4 GND 5 LOOP_SENSE 6 GND 7 NC 8 NC 9 10 VSP_+5V 11 NC 12 IMAGEQ 13 NC 14 NC 15 KVOK 16 MAOK 17 CAM_PERMANENT_+5V 18 CAM_PERMANENT_+5V 19 VCC_+5V 20 VAP_+18V 21 NC 22 NC 23 NC 24 NC 25 NC 26 NC X224 PAN TERMINAL BOARD N5900 4801587 N5901 200877 26 4801719 20 4801720 MOLEX 5576-20 J5801 MOLEX 5576-26 J5802 1 2 3 4 5 6 7 8 9 10 11 12 13 14 15 16 17 18 19 20 21 22 23 24 25 26 27 28 29 30 31 32 33 34 35 36 37 38 39 40 CAM_+3.3V GND CAM_+15VA GND CAM_+6VA GND CAM_-8VA LOOP_5V_CEPH CAM_+5VA LOOP_SENSE_CEPH D0 GND D1 GND D2 GND D3 GND D4 GND D5 GND HL GND VV_TTL GND AEC_TTL GND IMAGE_TTL TDICLK PPOWER DS CRDX_TTL CTDX_TTL RESETQ GND INVERTED_IMAGE LOOP_5V_PAN LOOP_SENSE_PAN UC_+3.3V J5805 DATA INTERFACE BOARD N5800 4801586 J5701 AMP 179135-1 AMP 72_pin_90 1 RESETQ 2 PPOWER 3 INVERTED_IMAGE GND 4 5 IMAGE_TTL GND 6 7 HL 8 LOOP_SENSE_CEPH 9 10 GND 11 D4 12 LOOP_5V_CEPH 13 D2 14 D1 15 CAM_+5VA 16 CAM_+5VA 17 CAM_+6VA 18 CAM_+6VA 19 GND 20 DS 21 GND 22 TDICLK 23 GND 24 25 GND 26 CRDX_TTL 27 VV_TTL 28 29 AEC_TTL 30 D5 31 D3 32 GND 33 D0 34 GND 35 CAM_+15VA 36 CAM_+15VA 37 LOOP_5V_PAN 38 LOOP_SENSE_PAN 39 UC_+3.3V 40 41 42 43 GND 44 45 46 47 48 49 50 51 GND 52 GND 53 GND 54 55 CTDX_TTL 56 UC_+3.3V 57 58 59 60 61 GND 62 GND 63 GND 64 65 CAM_-8VA 66 CAM_-8VA 67 68 69 GND 70 71 CAM_+3.3V 72 CAM_+3.3V J5702 DIB CONNECTOR BOARD N5700 4801604 AMP 353902-1 AMP 72_pin J5601 LA16 2mm J5603 LA40 2mm J5602 CAM CONNECTOR BOARD N5600 4801603 40 4801729 16 4801728 UC_+3.3V UC_+3.3V GND GND GND GND CEPH CAM DET PAN CAM DET GND GND D0 D1 D2 D3 D4 D5 D6 D7 HL VV AEC_TTL IMAGE TDICLK PPOWER NC GND DS GND GND WCLK GND CRDX_TTL CTDX_TTL RESETQ IMAGEQ NC NC NC LA16 2mm 1 GND 2 GND 3 GND 4 GND 5 CAM_+3.3V 6 CAM_+3.3V 7 CAM_+15VA 8 CAM_+15VA 9 CAM_+6VA 10 CAM_+6VA 11 CAM_-8VA 12 CAM_-8VA 13 CAM_+5VA 14 CAM_+5VA 15 GND 16 GND X191 1 2 3 4 5 6 7 8 9 10 11 12 13 14 15 16 17 18 19 20 21 22 23 24 25 26 27 28 29 30 31 32 33 34 35 36 37 38 39 40 LA40 2mm X190 (CPOS) PAN/CEPH SENSOR BOARD Cranex D Pan and Pan/Ceph 2. Unit Description Wiring diagram - rotating unit 2 37 J3502 Z-CARRAGE N5200/X8 10 4801700 4801695 26 4801694 (text) MOLEX 5576-10 1 GND 2 +34V 3 GND 4 +34V 5 ESTOP1_5V 6 ESTOP_5V 7 ZENA18 9 10 J4206 ferrite PGND 4801718 4801699 MOLEX 5576-26 1 +5V_CPU 2 GND_CPU 3 (LAT-/PA) 4 CEPHROK5 CEPHCOK6 CEPHLOK7 CEPHMIDSW 8 CEPHLIMSW 9 CEPHENA 10 CEPHDIR 11 (PAECRFRQ) 12 CPROJTRIG13 FILT5 14 CAECRFRQ 15 NC 16 NC 17 CEPHUP18 CEPHDOWN19 +5V_CPU 20 GND_CPU 21 CPOWER22 CIMAGE23 CEPHCLK 24 CDETCLK 25 CLASLIT 26 GND_CPU J4205 ferrite CEPH TXD CEPH RXD OPTICAL FIBER MODII-1X4M J4207 Z-MOVE SWITCH 4801714 J4301 MOLEX 5566-06A J4204 CEPHUPCEPHDOWN+5V_CPU GND_CPU CPOWER CIMAGE CEPHCLK CDETCLK CLASLIT GND_CPU CAECRFRQ CPROJTRIG- +5V_CPU GND_CPU LAT-/PA CEPHROKCEPHCOKCEPHLOKCEPHMIDCEPHLIMCEPHENA CEPHDIR MOLEX 5576-26 J4201 MODII-1X6M 1 +1V 2 HEAD_SIDE_SLIDE 3 +0.5V 4 5 +5V 6 GND J4208 4801681 J4302 N4355 4801712 CEPH FILTER POSITION kV_PRESET_CEPH CEPH CONNECTOR BOARD N4200 4801551 1 2 3 4 38 ZUP2GND ZDOWN2ZENA1- 3 4801702 CEPH PA-MICROSW 4801692 4801725 4801711 1 2 3 4 5 6 1 2 3 4 5 6 7 8 9 10 11 12 13 14 15 16 17 18 19 20 21 22 23 24 25 26 GND GND +34V GND X240 10 4801696 N6100 4801589 X231 MOLEX 5566-14A 1 VSN_-5V 2 VDD_+26V 3 VSP_+5V 4 GND 5 GND 6 GND 7 GND 8 GND 9 GND 10 VAP_+18V 11 VCC_+5V 12 VAN_-18V 13 +6.1V 14 +6.1V X235 MOLEX 5566-08A 14 N5905/X226 N5905/X225 4801691 14/10 4801693 N5905/X221 CEPH MOTOR 4801739 4 X232 MOLEX 5576-14 1 CCLOCK 2 CEPHMID_SW 3 CPOWER4 IMAGE5 GND 6 CPU_TXD7 DATA_FROM_TERM 8 CEPHLIM_SW 9 GND 10 CEPH_AEC 11 NC 12 NC 13 NC 14 NC X233 MOLEX 5576-10 1 VSN_-5V 2 GND 3 VSP_+5V 4 GND 5 +5V 6 LASER_ON7 CEPHL8 CEPHC9 CEPHR10 GND BEAM ALIGNMENT BOARD X237 MOLEX 5566-06A CEPHUPCEPHDOWN+5V_CPU GND_CPU CPOWER CIMAGE CEPHCLK CDETCLK CLASLIT GND_CPU CAECRFRQ CPROJTRIG- X236 MOLEX 5576-26 +5V_CPU GND_CPU LAT-/PA CEPHROKCEPHCOKCEPHLOKCEPHMIDCEPHLIMCEPHENA CEPHDIR X234 MOLEX 90136-1208 1 LAT/PA-_SW 2 GND 3 CEPHUP_SW4 CEPHDOWN_SW5 GND 6 CPROJTRIG_SW7 NC 8 NC CEPH HEAD BOARD N6000 4801588 TXD RXD 2. Unit Description Cranex D Pan and Pan/Ceph Wiring diagram - ceph 1 Service Manual 8201086 3 TO/FROM CEPH HEAD BOARD 10/14 N6000/X232 4801691 (SHEET 1) 4801693 14 N6000/X231 4801702 J4301 (text) CEPH TXD CEPH RXD 4801718 MOLEX 5576-10 1 CCLOCK 2 CEPHMID_TO_CPU 3 CPOWER4 CIMAGE5 SPARE1 6 RXD7 TXD 8 CEPHLIM_TO_CPU 9 SPARE2 10 AEC_FRQ_TO_CPU X226 MOLEX 5566-14A 1 2 3 VSP_+5V 4 ANALOG_GND 5 ANALOG_GND 6 GND 7 GND 8 GND 9 GND 10 VAP_+18V 11 VCC_+5V 12 13 +6.1V 14 +6.1V X225 X221 MOLEX 90136-0143 1 +2V 2 POT.SLIDE 3 +1V TXD RXD 1 2 3 4 5 6 7 8 9 10 11 12 13 14 15 16 17 18 19 20 MOLEX 5576-20 VV_RS232 AEC_RS232 TDICLKTDICLK+ HLHL+ DSDS+ D5D5+ D4D4+ D3D3+ D2D2+ D1D1+ D0D0+ X223 MOLEX 5576-26 1 CRDX_RS232 CTDX_RS232 2 GND 3 LOOP_5V 4 GND 5 LOOP_SENSE 6 GND 7 NC(van_-18V) 8 NC(vsn_-5V) 9 10 VSP_+5V 11 NC(vdd_+26V) 12 IMAGEQ 13 CEPHLIM 14 CEPHMID 15 IMAGE_RS232 16 RESET-(spare3) 17 CAM_PERMANENT_+5V 18 CAM_PERMANENT_+5V 19 VCC_+5V 20 VAP_+18V 21 NC 22 NC 23 NC 24 NC 25 NC 26 NC X224 CEPH TERMINAL BOARD N5905 4801723 4801697 20 20 MOLEX 5576-20 J5801 MOLEX 5576-26 J5802 J5806 MOVEMENT DETECTION BRD N6200 4801590 X211 4801734 1 2 3 4 5 6 7 8 9 10 11 12 13 14 15 16 17 18 19 20 21 22 23 24 25 26 27 28 29 30 31 32 33 34 35 36 37 38 39 40 CAM_+3.3V GND CAM_+15VA GND CAM_+6VA GND CAM_-8VA LOOP_5V_CEPH CAM_+5VA LOOP_SENSE_CEPH D0 GND D1 GND D2 GND D3 GND D4 GND D5 GND HL GND VV_TTL GND AEC_TTL GND IMAGE_TTL TDICLK PPOWER DS CRDX_TTL CTDX_TTL RESETQ GND INVERTED_IMAGE LOOP_5V_PAN LOOP_SENSE_PAN UC_+3.3V J5805 DATA INTERFACE BOARD N5800 4801586 4 3 2 1 CEPHLIM CEPHMID GND LOOP_5V_CEPH Service Manual 8201086 1 2 3 4 J5701 1 2 3 4 5 6 7 8 9 10 11 12 13 14 15 16 17 18 19 20 21 22 23 24 25 26 27 28 29 30 31 32 33 34 35 36 37 38 39 40 41 42 43 44 45 46 47 48 49 50 51 52 53 54 55 56 57 58 59 60 61 62 63 64 65 66 67 68 69 70 71 72 CAM_+3.3V CAM_+3.3V GND CAM_-8VA CAM_-8VA GND GND GND GND GND CTDX_TTL UC_+3.3V GND GND AEC_TTL D5 D3 GND D0 GND CAM_+15VA CAM_+15VA LOOP_5V_PAN LOOP_SENSE_PAN UC_+3.3V GND CRDX_TTL VV_TTL LOOP_SENSE_CEPH GND D4 LOOP_5V_CEPH D2 D1 CAM_+5VA CAM_+5VA CAM_+6VA CAM_+6VA GND DS GND TDICLK GND RESETQ PPOWER INVERTED_IMAGE GND IMAGE_TTL GND HL AMP 179135-1 AMP 72_pin_90 J5702 DIB CONNECTOR BOARD N5700 4801604 LA16 2mm J5603 LA40 2mm J5602 AMP 353902-1 AMP 72_pin J5601 CAM CONNECTOR BOARD N5600 4801603 40 4801729 16 4801728 UC_+3.3V UC_+3.3V GND GND GND GND CEPH CAM DET PAN CAM DET GND GND D0 D1 D2 D3 D4 D5 D6 D7 HL VV AEC_TTL IMAGE TDICLK PPOWER NC GND DS GND GND WCLK GND CRDX_TTL CTDX_TTL RESETQ IMAGEQ NC NC NC LA16 2mm 1 GND 2 GND 3 GND 4 GND CAM_+3.3V 5 CAM_+3.3V 6 CAM_+15VA 7 CAM_+15VA 8 CAM_+6VA 9 10 CAM_+6VA 11 CAM_-8VA 12 CAM_-8VA 13 CAM_+5VA 14 CAM_+5VA 15 GND 16 GND X191 1 2 3 4 5 6 7 8 9 10 11 12 13 14 15 16 17 18 19 20 21 22 23 24 25 26 27 28 29 30 31 32 33 34 35 36 37 38 39 40 LA40 2mm X190 (CPOS) PAN/CEPH SENSOR BOARD Cranex D Pan and Pan/Ceph 2. Unit Description Wiring diagram - ceph 2 39 3. Covers and cover removal Cranex D Pan and Pan/Ceph 3. Covers and Cover Removal During repair and and maintentance the unit covers must be removed. This section describes how to remove the covers. 3.1 Rotating unit covers 40 Service manual 8201086 Cranex D Pan and Pan/Ceph Service manual 8201086 3. Covers and cover removal 41 3. Covers and cover removal Cranex D Pan and Pan/Ceph 3.2 Support Arm Covers 42 Service manual 8201086 Cranex D Pan and Pan/Ceph 3. Covers and cover removal 3.3 Column Cover Service manual 8201086 43 3. Covers and cover removal Cranex D Pan and Pan/Ceph 3.4 Z-Carriage Covers 44 Service manual 8201086 Cranex D Pan and Pan/Ceph 3. Covers and cover removal 3.5 Ceph Head Covers Service manual 8201086 45 4. Service Programs Cranex D Pan and Pan/Ceph 4. Service Programs 4.1 Introduction The service programs allow you to configure the unit settings and to check and test the unit. There are two types of service program: - Ur settings (User settings), these are user preferences and used for configuring the unit during installation and set up. - Sr programs (Service programs) programs, these are used for checking and testing the operation of the unit. The Ur settings and Sr programs can be accessed either from the unit control panel or the GUI. Unit versions with s/n B81642 and earlier Before the service programs can be accessed a Test Connector (SERVICESW 4801744) must be connected to N5200 Digitl I/O board. Only SOREDEX trained service personnel should access the service programs. IMPORTANT NOTE: Remember to remove the Test Connector from N5200 Digitl I/O board to prevent unauthorizes persons accessing the service programs Unit versions with s/n B91643 and later No Test Connector is required. 46 Service manual 8201086 Cranex D Pan and Pan/Ceph 4. Service Programs - < s/n B81642 4.2 Accessing service programs - s/n B81642 and earlier Using the unit control panel 1. Switch the unit off and remove the Z-carriage front cover (6 screws) The cover supports the mirror. 2. Attach the Test Connector (SERVICESW 4801744) to connector X90 on the Digital I/O board (N5200). 3. Switch the unit on and wait for it to complete the self test. The unit is ready when the LEDs stop flashing and exposure values appear on the control panel displays. 4. Press and hold down the E-key until you hear a four beeps and service program code appears on the control panel displays. The service program type, Ur (User settings) or Sr (Service programs), will appear on the kVdisplay. The service program number will appear on the mA-display and an abbreviation (three characters) of the service program name will appear on the exposure time-display . The unit is now in the Service Program mode. 5. Press the Up/Down hidden keys to scroll through the service programs. Service manual 8201086 47 4. Service Programs - < s/n B81642 Cranex D Pan and Pan/Ceph NOTE Note the segment configurations for the characters s, S and 5. 6. When you reach the required Service Program, briefly press the E-key to enter the parameter selection mode for that program. 7. The different parameters or settings for that Service Program can be selected by pressing the Left/Right hidden keys. 8. When you have selected the required parameter or setting briefly press the E-key to return to the Service Program Mode, the Service Program information will reappear on the display. 9. Press and hold down the E-key to exit the Service Program Mode and return to the user mode. NOTE: If you switch the unit off BEFORE exiting the Service Program Mode, the new settings will NOT be saved IMPORTANT NOTE! Remove the Test Connector from the Digital I/O board (N5200) after use to prevent unauthorized persons accessing the service programs. 48 Service manual 8201086 Cranex D Pan and Pan/Ceph 4. Service Programs - < s/n B81642 Using the GUI 1. Press and hold down simultaneously the Ctrl, Alt, Shift keys and then press the P key. The Service Mode window will open. There are several tabbed pages on the Service Mode window that show the configuration of the unit and allow and unit settings to checked and changed. NOTE: After parameters or settings have been changed, the unit must be restarted for the new parameters or settings to be activated. IMPORTANT NOTE! Remove the Test Connector from the N5200 Digital I/O board after use to prevent unauthorized persons accessing the service programs. 4.3 Ur Service Programs Ur 01 PUS - Power Up Settings Sets the imaging program that will be automatically selected when the unit is switched on. The Test Mode can also be selected. Using the control panel 1. Select Ur 01 PUS and press the E-key. The LED for imaging program that is automatically selected when the unit is switched on will start to flash. 2. Press the Left or Right hidden key to select a different imaging program. The LED for the newly selected program will start to flash. If you also wish the unit to start in the TEST mode, press T-key so the LED comes on. 3. Exit the Service Program mode, and then restart the unit to activate the change. Service manual 8201086 49 4. Service Programs - < s/n B81642 Cranex D Pan and Pan/Ceph Using the GUI 1. Click the Settings tab. 2. From the PUS (Ur 01 PUS) list box select the imaging program that you want to be selected whenever the unit is switched on. The Options are: - Standard (Adult panoramic) - Pediatric (Child Panoramic) - TMJ - Cephalo - Film standard (NOT USED) - Film pediatric (NOT USED) - Film cephalo (NOT USED) If you also wish the unit to start in the TEST mode, also click the Test mode On: check box to activate it. 3. Click the Set button and then restart the unit to activate the change. Ur 02 rES - Not in use Ur 03 Arn - Not in use Ur 04 ASt - Auto Set kV Selects whether automatic kV selection is activated or not. Refer to the user's manual for more information about automatic kV selection. Using the control panel 1. Select Ur 04 Ast and press the E key. On the time (s) display either OFF or on will appear. 2. Press the Left or Right hidden key to change the selection. 3. Exit the Service Program mode, and then restart the unit to activate the change. 50 Service manual 8201086 Cranex D Pan and Pan/Ceph 4. Service Programs - < s/n B81642 Using the GUI 1. Click the Settings tab. 2. From the ASt (Ur 04 Ast) list box select either on or OFF. 3. Click the Set button and then restart the unit to activate the change. Ur 05 bEP - Beeper sound Selects whether the control panel key tones are activated or not. Using the control panel 1. Select Ur 05 bEP and press the E key. On the time display either OFF or on will appear. 2. Press the Left or Right hidden key to change the selection. 3. Exit the Service Program mode, and then restart the unit to activate the change. Using the GUI 1. Select the Settings tab. 2. From the bEP (Ur 05 bEP) list box select either on or OFF. 3. Click the Set button and then restart the unit to activate the change. Service manual 8201086 51 4. Service Programs - < s/n B81642 Cranex D Pan and Pan/Ceph Ur 6 CLC - Clear exposure counter Resets the exposure counter to zero. Using the control panel 1. Select Ur 06 CLC and press the E key. The number of exposures taken since the last time the exposure counter was cleared will appear on the display(s). 2. To reset the exposure counter to zero, after for example, changing the tubehead, press the Left hidden key. A 0 will appear on the display. NOTE: If you wish to display the number on the exposure counter again, press the Right hidden key. 3. Exit the Service Program mode, and then restart the unit to activate any change. Using the GUI 1. Select the Counters tab to display the usage counters. 2. NOTE: Only the User counter works correctly. To zero the User counter or give it a different value, enter 0 or a new value into the text box next to the current counter value. 3. Click the Set button next to the text box and then restart the unit to activate the change. 52 Service manual 8201086 Cranex D Pan and Pan/Ceph 4. Service Programs - < s/n B81642 Ur 7 Err - Last Error Shows error messages stored in the memory. Only C error messages, except for C1 *** and C 6 EEP, are stored in the memory. NOTE: New units may have error messages in the memory. This is not abnormal. Using the control panel 1. Select Ur 07 Err and press the E key. The Last error message will appear on the display. If there are no error codes stored in the memory, three dashes, — — —, will appear on the display. Using the GUI 1. Click the Counters tab to display the error counters and the Last error. 4.4 Sr Service Programs Sr10 InS - Install program The functions in this program are used during unit installation and when checking the x-ray beam alignment. NOTE: The functions in this program are only active when the power is on. When the power is switched off the unit will return to the normal (program OFF) mode. Using the control panel 1. Select Sr 10 InS and press the E key. The text OFF will appear on the display. 2. Press the left or right hidden key to select the required function. The functions are as follows: Service manual 8201086 53 4. Service Programs - < s/n B81642 Cranex D Pan and Pan/Ceph Mode OFF Function Normal operation. Default setting when the unit is switched on. nPc No PC check (no fibre optic connection) Exposures can be taken even if the PC is not in the image receiving mode (i.e. the Image Capture button in DfW does not need to be pressed). This function will also work if the PC is not connected. Imaging programs and techique factors can be selected as in the user mode. NOTE: This function is is useful in situations, such as exhibtions, where there is no optical cable connection to the PC. nCo No collimator check. No collimator check when taking and exposure. nCs Not in use. nCh No checks at all. Exposures can be taken without without the collimator position being checked. Also the 15 s wait period between exposures is not monitored. Imaging programs and technique factors can be selected as in the user mode. nrA Disables x-rays. No HW feedback. non Disables all the above checks and x-rays. (nCh and nrA combined). Using the GUI 1. Click the Settings tab. 2. From the Ins (Sr 10 Ins) list box select the required function. The functions are listed above in the "Using the control panel". 54 Service manual 8201086 Cranex D Pan and Pan/Ceph 4. Service Programs - < s/n B81642 Sr 11 EPS - eps program WARNING: X-rays are generated when this program is used. When this program is selected the stepper motors do not operate and exposures can be taken with unit movements. This program is used during alignment, electrical troubleshooting and calibration. NOTE When this program is selected, the kVOK and mAOK signals are not monitored. Therefore C4 Inu and C5 FIL error codes are not enabled. Only the C3 gEn error code is monitored. Using the control panel 1. Select Sr 11 EPS and press the E key. The current technique factors will appear on the display. 2. Press the left or right hidden key to select the different technique factors, kV, mA and exposure time. 3. Test exposures can now be taken, but there are no imaging movements during the exposure. 4. IMPORTANT Exit programming without switching the power off. Using the GUI 1. Select the Settings tab. 2. Click the EPS (Sr 11 EPS) radio button to activate it. 3. From the list box select the program type. The options are: - Still panoramic - Still Cephalo - No movement (panoramic) - No movement cephalo. Service manual 8201086 55 4. Service Programs - < s/n B81642 Cranex D Pan and Pan/Ceph Preselected technique factors for the selected option will appear in the Imaging Parameters group box. 4. If you wish to change the preselected technique factors enter new values in the appropriate fields in the Imaging Parameters group box (press the up/down keys to change the time), and press the Set key. 5. Test exposures can now be taken, but there are no imaging movements during the exposure. 6. IMPORTANT Exit programming without switching the power off. Sr 12 PUP - Warmup program WARNING: X-rays are generated when this program is used. This program is used to: - determine if the tube head assembly is defective. - warm up a replacement of tube head. It is also recommended that this program is used to warm up the tube head of any unit that has not been used for 3 months or more. Using the control panel 1. Select Sr 12 PUP and press the E key. Technique factors 20kv, 5.0mA and 3.2s will appear on the display. 2. Protect yourself from radiation and and take an exposure. After the exposure the kV will automatically increase to the next level. 3. Immediately take another exposure at the new value. 4. Continue to take exposures each time the kV value increases. You do not have to wait between exposures. When the maximum kV value is reached the mA value will start to increase. Continue to take exposures until until the maximum technique factors are reached, 85kV and 10mA and the text End appear on the display 56 Service manual 8201086 Cranex D Pan and Pan/Ceph 4. Service Programs - < s/n B81642 NOTE: If the tube arcs or malfunctions during an exposure the program will be terminated and an error message will appear. Clear the error message and restart the test by pressing the E key twice. If arcing and/or malfunctions occur repeatedly check the kV and mA references at PUP. This is described after Using the GUI. 5. After completing the test, exit the service program, set the unit for normal operation and take a panoramic exposure using the maximum technique factors to check that the unit is functioning correctly. Using the GUI 1. Click the Settings tab. 2. Click the PUP (Sr 12 PUP) radio button to activate it. 3. Click the Select key. Technique factors 20kv, 5.0mA and 3.2s will appear in the Imaging Parameters field. 4. Now follow the same procedure, steps 2 to 5, as described in Using the control panel. Service manual 8201086 57 4. Service Programs - < s/n B81642 Cranex D Pan and Pan/Ceph Checking the kV/mA Feedback Reference Voltages Checking the kV/mA Feedback Reference Voltages at PUP is done as follows: To check the kV feedback reference voltage connect the +ve probe of a multimeter to TP 19 on N3300 and the -ve prove to GROUND. To check the mA feedback reference voltage connect the + probe of a multimeter to TP 4 on N3200 and the - probe to GROUND. Carry out the test described previously. The kV/mA Feedback Reference Voltages at PUP are listed below: NOTE The tolerance of the VkVref is ±0.18 and the tolerance of the VmAref is ± 10%. KV 20 30 40 50 54 57 60 63 66 70 73 77 81 85 85 85 85 85 85 85 85 85 85 58 mA 5.0 5.0 5.0 5.0 5.0 5.0 5.0 5.0 5.0 5.0 5.0 5.0 5.0 5.0 6.0 6.5 7.2 7.7 8.0 8.5 9.0 9.5 10.0 s 3.2 3.2 3.2 3.2 3.2 3.2 3.2 3.2 3.2 3.2 3.2 3.2 3.2 3.2 3.2 3.2 3.2 3.2 3.2 3.2 3.2 3.2 3.2 (VkVref) (1.00 V) (1.50 V) (2.00 V) (2.50 V) (2.70 V) (2.85 V) (3.00 V) (3.15 V) (3.30 V) (3.50 V) (3.65 V) (3.85 V) (4.05 V) (4.25 V) (4.25 V) (4.25 V) (4.25 V) (4.25 V) (4.25 V) (4.25 V) (4.25 V) (4.25 V) (4.25 V) (VmAref) (1.22 V) (1.22 V) (1.22 V) (1.22 V) (1.22 V) (1.22 V) (1.22 V) (1.22 V) (1.22 V) (1.22 V) (1.22 V) (1.22 V) (1.22 V) (1.22 V) (1.94 V) (2.43 V) Service manual 8201086 Cranex D Pan and Pan/Ceph 4. Service Programs - < s/n B81642 Sr 13 Prh - Preheat program WARNING: X-rays are generated when this program is used. This program automativally sets the preheat level of the tube head filament. This must be done when the tube head or Filament board are changed. The preheat level can also be set manually. Using the control panel 1. Select Sr 13 Prh and press the E key. On the control panel displays numbers will appear: 73 on the kV display, 10 on the mA display, 1 (not calibrated), or xxx (the last set preheat level), on the exposure values display. 2. Protect yourself from radiation and press and hold down the exposure button to take an exposure. During the exposure, the preheat level will start to rise. At the same time the unit will also check the mA value. When the desired mA value is reached the program will automatically stop the exposure. The new preheat level is usually between 80 and 120. 3. Press the E key to store the preheat level in the EEPROM. 4. Press hold the E key to exit the service mode and save the preheat level. Service manual 8201086 59 4. Service Programs - < s/n B81642 Cranex D Pan and Pan/Ceph Using the GUI 1. Click the Settings tab. 2. Click the Prh (Sr 13 Prh) radio button to activate it. 3. Protect yourself from radiation and press and hold down the exposure button to take an exposure. During the exposure, the preheat level will start to rise. At the same time the unit will also check the mA value. When the desired mA value is reached the program will automatically stop the exposure. The new preheat level is normally between 80 and 120 and will apear in the active text box next to the Prh radio button. 4. Click the Set button to store the preheat level in the EEPROM. 5. Press hold the E key to exit the service mode and save the preheat level. Manually selecting the Preheat level 1. Select the Settings tab. 2. Click the Prh (Sr 13 Prh) radio button to activate it. 3. In the empty text box next to the Set key, key in the preheat level you require. 4. Click the Set button to store the preheat level in the EEPROM. 60 Service manual 8201086 Cranex D Pan and Pan/Ceph 4. Service Programs - < s/n B81642 Sr 14 FrE - Head/nasion support frequencies This service program displays the frequency information that corresponds to the position of the panoramic head supports and the positions of the cephalometric head and nasion support. This service program can only be accessed using the control panel. Using the control panel only 1. Make sure that the fibre optic link is active. 2. Select Sr 14 Fre and press the E key. The frequency, in kHz, will appear on the display. 3. Press the up or down hidden key to select the kV or mA displays and then the left or right hidden key to select the option. The options are: - na, nasion support frequency - HE, head support frequency - PA, panoramic head support frequency - CE, cephalometric head support frequency NOTE: If na and PA are select no value will appear on the display as the position of the nasion support (nA) on the panoramic head support (PA) is not monitored. When the nasion / head supports are manually moved the frequencies will change. The frequencies ranges are shown below: Cephalometric nasion (CE + nA) Cephalometric head support (CE + HE) Panoramic head support (HE + PA) (nA + PA) 700 - 3400 Hz (±100 Hz) 2100 - 4000 Hz (±100 Hz) 2100 - 4000 Hz (±100 Hz) --- To adjust the frequencies refer to: N4200 for cephalometric head support N5300 for panoramic head support N5905 for cephalometric nasion. Service manual 8201086 61 4. Service Programs - < s/n B81642 Cranex D Pan and Pan/Ceph Sr 15 SUP - line voltage check Displays the the line voltage. The line voltage is monitored by measuring the incoming +25V supply on the Filament Control Board. This service program can only be accessed using the control panel. Using the control panel only 1. Select Sr 15 SUP and press the E key. The voltage will appear on the time display. 2. Press the E key to return to the service program mode. Sr 16 Clr - Not in use Sr 17 CEP - Not in use Sr 19 POS - Not in use Sr 20 dnL - sw download program This program allows the CPU to be switched so that it can download SW from the PC terminal program. If this program is started accidentally turn the unit off, wait few seconds and then turn it on again. The unit should start normally. Instructions on how to download software are in Section 5.1 Downloading software from a PC. 62 Service manual 8201086 Cranex D Pan and Pan/Ceph 4. Service Programs - < s/n B81642 I/O check program This program allows the states of the CPU inputs and outputs to be checked without removing covers from the unit. It is useful when trouble shooting CPU input signal problems, eg. the various micro switches and optocouplers. The program shows whether or not signals from switches reach the CPU. This service program can only be accessed using the GUI. Using the GUI only 1. Select the I/O ports tab. The window shows the signals to and from the CPU. The signals are as follows: 0 1 2 3 4 5 6 7 8 9 10 11 12 13 14 15 Proj Lit SolenaKV_frq_ena n/a n/a n/a n/a n/a n/a n/a n/a n/a Z Dir Z Ena n/a n/a Service manual 8201086 SPI out 0 Projector light enable (lights off) Child aperture solenoid enable Pan head width freq. enable (Auto kV) Not used Not used Not used Not used Not used Not used Not used Not used Not used Z-carriage (0=up, 1=down) Z-carriage movement enable (1) Not used Not used 63 4. Service Programs - < s/n B81642 64 Cranex D Pan and Pan/Ceph SPI out 1 Collimator direction Collimator movement enable Rotation movement direction Rotation movement enable Cepd CCD direction Cepd CCD enable Linear movement direction Linear movement enable Pan CCD power on Pan CCD image capture on Ceph CCD on Ceph CCD capture on Not used Not used Ceph head width freq. enable (Auto kV) Not used 0 1 2 3 4 5 6 7 8 9 10 11 12 13 14 15 Cas Dir Cas Ena Rot Dir Rot Ena Ceph Dir Ceph Ena Lin Dir Lin Ena P Power P Image C Power C Image n/a n/a Clas Lit n/a 0 1 2 3 4 5 6 7 8 Exp Sw Instru Ma OK n/a Exh Sw In 3 Mains In 2 Tube Fail 9 10 11 12 13 14 15 n/a n/a n/a Lin Mid Sw Lin Lim Sw Sec. Slit Mid Sw Sec. Slit Mid Sw Port 5 Exposure switch (pressed) R & D jumper installed Tube current OK Not used Option (exhibition) switch on Mirror (1=closed) N4700 S1 or S2 (S1=1, S2=0) Child solenoid on Tube head high voltage breakdown. (no breakdown) Not used Not used Not used Linear (Y) movement position Linear (Y) movement position Secondary slit position Secondary slit position Service manual 8201086 Cranex D Pan and Pan/Ceph 4. Service Programs - < s/n B81642 0 1 2 3 4 5 6 7 8 9 10 11 12 13 14 15 Port 6 Flash Flash Sram SRAM n/a Not Used n/a Not Used WD Watchdog E2Prom CS EEProm chip select SPI CS 1 SPI chip select n/a Not used n/a Not used n/a Not connected n/a Not connected n/a Not connected n/a Not connected n/a Not connected n/a Not connected n/a Not connected 0 1 2 3 4 5 6 7 8 9 10 11 12 13 14 15 n/a n/a Pil Ward Zena Yforw Temp Fail Service Sw n/a S sens1 S sens2 S sens2 n/a Return n/a Z Down Z Up Service manual 8201086 SPI in 0 Not Used Not Used Y-movement to left (towards the column) Zena (from z-buttons) Y-movement to right Tube head temperature switch Service switch Not Used Collimator position (same as SSens 1) Collimator pos. (SSens 2 or gnd) Collimator pos (SSens 2) Not used Return button Not used Z-carriage DOWN button Z-carriage UP button 65 4. Service Programs - < s/n B81642 0 1 2 3 4 5 6 7 8 66 Cranex D Pan and Pan/Ceph SPI in 1 Ceph Lok Ceph ccd position Ceph Cok Ceph ccd position Ceph Rok Ceph ccd position Ceph Lat Pa Ceph patient head position Ceph L No ceph or ceph on the left (ceph on the left) Ceph R No ceph or ceph on the right (ceph on the right) n/a Not used n/a Not used Rot 1 Sw Rotation movement position PIO Stop PanStart Rot 1 1 1 1 9 Rot 2 Sw Rotation movement position PIO Stop PanStart Rot 2 1 0 0 10 Rot 3 Sw Rotation movement position PIO Stop PanStart Rot 3 0 0 0 11 Rot 4 Sw Rotation movement position PIO Stop PanStart Rot 4 1 0 1 12 13 14 15 Z Mid Sw Z Lim Sw Ceph Mid Sw Ceph Lim Sw 0 1 2 3 4 5 6 7 8 9 10 11 12 13 14 15 CP Buttons CP Button OK Control panel OK button CP Button R Control panel Right button CP Button L Control panel Left button CP Button D Control panel Down button CP Button U Control panel Up button CP Button T Control panel Test button n/a Not used n/a Not used n/a Not used n/a Not used n/a Not used n/a Not used n/a Not used n/a Not used n/a Not used n/a Not used Z-carriage in upper limit Z-carriage in either limit Ceph movement detector (start or end) n) Ceph movement detector (in the middle) Service manual 8201086 Cranex D Pan and Pan/Ceph 4. Service Programs - > s/n B91643 4.5 Accessing the service programs - s/n B91643 and later Using the unit control panel 1. Make sure that the unit and PC are on. 2. You can access either the Ur settings only or both the Ur settings and Sr programs. E To access the Ur settings press and hold down the E-key until you hear four beeps and the letters Ur appear on the info display. You are now in the Ur settings mode. To access the both the Ur settings and Sr programs, make sure that you are in the Ur settings mode (described above), and then press and hold down the left partial panoramic key and then press and hold the right partial panoramic key. Release the left partial panoramic key and then the right partial panoramic. You will hear an audible signal which indicates that the unit is now in the combined Ur setting and Sr programs mode. E S+ mA s D L In both modes the setting/program numbers will appear on the mA-display and an abbreviation of the setting/program name (three characters) will appear on the exposure values display. S- S+ 3. Press the Ceph exposure time selection keys to scroll through the settings/programs. S- Service manual 8201086 67 4. Service Programs - > s/n B91643 Cranex D Pan and Pan/Ceph 4. When you reach the setting/program you wish to change, briefly press the E-key to enter the mode where the setting/program can be changed. The changes that can be made are described in, 4.6 Ur Settings and 4.7 Sr Programs. 5. When you have changed the setting/program briefly press the E-key to return to the unit settings mode. 6. Press and hold down the E-key to exit the settings/programs mode and return to the user mode. Using the GUI 1. Make sure that the GUI is active. 2. Press and hold down simultaneously the Ctrl, Alt, Shift keys and then press the P key. The Service Mode window will open. There are several tabbed pages on the Service Mode window that show the configuration of the unit and allow and unit settings to checked and changed. NOTE: After parameters or settings have been changed, the unit must be restarted for the new parameters or settings to be activated. 68 Service manual 8201086 Cranex D Pan and Pan/Ceph 4. Service Programs - > s/n B91643 4.6 Ur Settings Ur 01 PUS - Power Up Settings Sets the imaging program and kV value that will be automatically selected when the unit is switched on. Using the control panel E mA s D L S+ 1. Select 01 PUS and press the E-key to enter the mode where the setting can be changed. S- 85 kV 2. Select the imaging program and kV value that you want to be selected when the unit is switched on. If you want the unit to start in the TEST mode, press the T-key. 3. Press the E-key to accept the new imaging program and kV value. Press and hold down the E-key to exit the unit settings mode. The new settings will be used the next time the unit is restarted. Using the GUI 1. Click the Settings tab. 2. From the PUS (Ur 01 PUS) list box select the imaging program that you want to be selected whenever the unit is switched on. Service manual 8201086 69 4. Service Programs - > s/n B91643 Cranex D Pan and Pan/Ceph The Options are: - Standard (Adult panoramic) - Fast standard - Pediatric (Child Panoramic) - Fast Pediatric - TMJ - Cephalo If you also wish the unit to start in the TEST mode, also click the Test mode On: check box to activate it. 3. Click the Set button and then restart the unit to activate the change. Ur 02 rES - Not in use Ur 03 Arn - Not in use Ur 04 ASt - Auto Set kV Selects whether automatic kV selection is activated or not. It is recommended that this setting is left on. Refer to the user's manual for more information about automatic kV selection. Using the control panel 1. Select 04 ASt and press the E key. The current setting, either on (automatic kV is selected) or OFF (automatic kV is not selected), will appear on the exposure values display. 2. Press the appropriate upper Partial panoramic key to change the setting. 3. Press the E-key to accept the new setting and then press and hold down the E-key to to return to the user mode. 70 Service manual 8201086 Cranex D Pan and Pan/Ceph 4. Service Programs - > s/n B91643 Using the GUI 1. Click the Settings tab. 2. From the ASt (Ur 04 Ast) list box select either on or OFF. 3. Click the Set button and then restart the unit to activate the change. Ur 05 bEP - Beeper sound Selects whether the control panel key tones are on or off. 1. Select 05 bEP and press the E key. The current setting, either on (key tones on) or OFF (key tones off), will appear on the exposure values display. 2. Press the appropriate upper Partial panoramic key to change the setting. 3. Press the E-key to accept the new setting and then press and hold down the E-key to to return to the user mode. Using the GUI 1. Select the Settings tab. 2. From the bEP (Ur 05 bEP) list box select either on or OFF. 3. Click the Set button and then restart the unit to activate the change. Service manual 8201086 71 4. Service Programs - > s/n B91643 Cranex D Pan and Pan/Ceph Ur 6 CLC - Clear exposure counter Resets the exposure counter to zero. Using the control panel 1. Select 06 CLC and press the E key. The number of exposures taken since the last time the exposure counter was cleared will appear on the display(s). 2. Press either Partial panoramic -key to clear the exposure counter. The number 0 will appear on the display. If you press either Partial panoramic -key a second time, the the original exposure number will reappear. 3. Press the E-key to accept the change and then press and hold down the E-key to to return to the user mode. Using the GUI 1. Select the Counters tab to display the usage counters. 2. To zero a counter or give it a different value, enter 0 or a new value into the text box next to the current counter value. 3. Click the Set button next to the text box and then restart the unit to activate the change. 72 Service manual 8201086 Cranex D Pan and Pan/Ceph 4. Service Programs - > s/n B91643 Ur 7 Err - Last Error Shows error messages stored in the memory. Only C error messages, except for C1 *** and C 6 EEP, are stored in the memory. NOTE: New units may have error messages in the memory. This is normal. Using the control panel 1. Select 07 Err and press the E key. The Last error message will appear on the display. If there are no error codes stored in the memory, three dashes, — — —, will appear on the display. 2. Press the E-key to return to the user settings mode and then press and hold down the E-key to to return to the user mode. Using the GUI 1. Click the Counters tab to display the Error counters and the Last error. Service manual 8201086 73 4. Service Programs - > s/n B91643 Cranex D Pan and Pan/Ceph 4.7 Sr Programs Sr10 InS - Install program The functions in this program are used during unit installation and when checking the x-ray beam alignment. NOTE: The functions in this program are only active when the power is on. When the power is switched off the unit will return to the normal (program OFF) mode. Using the control panel 1. Select Sr 10 InS and press the E key. The text OFF will appear on the display. 2. Press the appropriate upper Partial panoramic key to select the required function. The functions are as follows: 74 Mode OFF Function Normal operation. Default setting when the unit is switched on. nPc No PC check (no fibre optic connection) Exposures can be taken even if the PC is not in the image receiving mode (i.e. the Image Capture button in DfW does not need to be pressed). This function will also work if the PC is not connected. Imaging programs and techique factors can be selected as in the user mode. NOTE: This function is is useful in situations, such as exhibtions, where there is no optical cable connection to the PC. nCo No collimator check. No collimator check when taking and exposure. nCS Not in use. nCh No checks at all. Exposures can be taken without without the collimator position being checked. Also the 15 s wait period between exposures is not monitored. Imaging programs and technique factors can be selected as in the user mode. nrA Disables x-rays. No HW feedback. non Disables all the above checks and x-rays. (nCh and nrA combined). Service manual 8201086 Cranex D Pan and Pan/Ceph 4. Service Programs - > s/n B91643 Using the GUI 1. Click the Settings tab. 2. From the Ins (Sr 10 Ins) list box select the required function. The functions are listed above in the "Using the control panel". Sr 11 EPS - eps program WARNING: X-rays are generated when this program is used. When this program is selected the stepper motors do not operate and exposures can be taken with unit movements. This program is used during alignment, electrical troubleshooting and calibration. NOTE When this program is selected, the kVOK and mAOK signals are not monitored. Therefore C4 Inu and C5 FIL error codes are not enabled. Only the C3 gEn error code is monitored. Using the control panel 1. Select Sr 11 EPS and press the E key. The current technique factors will appear on the display. 2. Press the S+ or S- key to scroll throught the technique factors, kV, mA and exposure time. 3. Press the left or right upper Partial panoramic key to change the value of the selected technique factor. 4. Test exposures can now be taken, but there are no imaging movements during the exposure. 5. IMPORTANT: Exit programming without switching the power off. Service manual 8201086 75 4. Service Programs - > s/n B91643 Cranex D Pan and Pan/Ceph Using the GUI 1. Select the Settings tab. 2. Click the EPS (Sr 11 EPS) radio button to activate it. 3. From the list box select the program type. The options are: - Still panoramic - Still Cephalo - No movement (panoramic) - No movement cephalo. Preselected technique factors for the selected option will appear in the Imaging Parameters group box. 4. If you wish to change the preselected technique factors enter new values in the appropriate fields in the Imaging Parameters group box (press the arrow up/down keys to change the time), and press the Set key. 5. Test exposures can now be taken, but there are no imaging movements during the exposure. 6. IMPORTANT: Exit programming without switching the power off. Sr 12 PUP - Warmup program WARNING: X-rays are generated when this program is used. This program is used to: - determine if the tube head assembly is defective. - warm up a replacement of tube head. It is also recommended that this program is used to warm up the tube head of any unit that has not been used for 3 months or more. Using the control panel 1. Select Sr 12 PUP and press the E key. Technique factors 5.0mA, 3.2s and 20kV will appear on the display. 76 Service manual 8201086 Cranex D Pan and Pan/Ceph 4. Service Programs - > s/n B91643 2. Protect yourself from radiation and and take an exposure. After the exposure the kV will automatically increase to the next level. 3. Immediately take another exposure at the new value. 4. Continue to take exposures each time the kV value increases. You do not have to wait between exposures. When the maximum kV value is reached the mA value will start to increase. Continue to take exposures until until the maximum technique factors are reached, 85kV and 10mA and the text End appear on the display. NOTE: If the tube arcs or malfunctions during an exposure the program will be terminated and an error message will appear. Clear the error message and restart the test by pressing the E key twice. If arcing and/or malfunctions occur repeatedly check the kV and mA references at PUP. This is described after Using the GUI. 5. After completing the test, exit the service program, set the unit for normal operation and take a panoramic exposure using the maximum technique factors to check that the unit is functioning correctly. Using the GUI 1. Click the Settings tab. 2. Click the PUP (Sr 12 PUP) radio button to activate it. 3. Click the Select key. Technique factors 20kv, 5.0mA and 3.2s will appear in the Imaging Parameters field. 4. Now follow the same procedure, steps 2 to 5, as described in "Using the control panel". Service manual 8201086 77 4. Service Programs - > s/n B91643 Cranex D Pan and Pan/Ceph Checking the kV/mA Feedback Reference Voltages Checking the kV/mA Feedback Reference Voltages at PUP is done as follows: To check the kV feedback reference voltage connect the +ve probe of a multimeter to TP 19 on N3301 and the -ve prove to TP 17 GND. To check the mA feedback reference voltage connect the +ve probe of a multimeter to TP 4 on N3200 and the -ve probe to TP 1 GND. Carry out the test described previously. The kV/mA Feedback Reference Voltages at PUP are listed below: NOTE The tolerance of the VkVref is ±0.18 and the tolerance of the VmAref is ± 10%. KV 20 30 40 50 54 57 60 63 66 70 73 77 81 85 85 85 85 85 85 85 85 85 85 78 mA 5.0 5.0 5.0 5.0 5.0 5.0 5.0 5.0 5.0 5.0 5.0 5.0 5.0 5.0 6.0 6.5 7.2 7.7 8.0 8.5 9.0 9.5 10.0 s 3.2 3.2 3.2 3.2 3.2 3.2 3.2 3.2 3.2 3.2 3.2 3.2 3.2 3.2 3.2 3.2 3.2 3.2 3.2 3.2 3.2 3.2 3.2 (VkVref) (1.00 V) (1.50 V) (2.00 V) (2.50 V) (2.70 V) (2.85 V) (3.00 V) (3.15 V) (3.30 V) (3.50 V) (3.65 V) (3.85 V) (4.05 V) (4.25 V) (4.25 V) (4.25 V) (4.25 V) (4.25 V) (4.25 V) (4.25 V) (4.25 V) (4.25 V) (4.25 V) (VmAref) (1.22 V) (1.22 V) (1.22 V) (1.22 V) (1.22 V) (1.22 V) (1.22 V) (1.22 V) (1.22 V) (1.22 V) (1.22 V) (1.22 V) (1.22 V) (1.22 V) (1.94 V) (2.43 V) Service manual 8201086 Cranex D Pan and Pan/Ceph 4. Service Programs - > s/n B91643 Sr 13 Prh - Preheat program WARNING: X-rays are generated when this program is used. This program automativally sets the preheat level of the tube head filament. This must be done when the tube head or Filament board are changed. The preheat level can also be set manually. Using the control panel 1. Select Sr 13 Prh and press the E key. On the control panel displays numbers will appear: 73 on the kV display, 10 on the mA display, 1 (not calibrated), or xxx (the last set preheat level), on the exposure values display. 2. Protect yourself from radiation and press and hold down the exposure button to take an exposure. During the exposure, the preheat level will start to rise. At the same time the unit will also check the mA value. When the desired mA value is reached the program will automatically stop the exposure. The new preheat level is usually between 80 and 120. 3. Press the E key to store the preheat level in the EEPROM. 4. Press hold the E key to exit the service mode and save the preheat level. Service manual 8201086 79 4. Service Programs - > s/n B91643 Cranex D Pan and Pan/Ceph Using the GUI 1. Click the Settings tab. 2. Click the Prh (Sr 13 Prh) radio button to activate it. 3. Protect yourself from radiation and press and hold down the exposure button to take an exposure. During the exposure, the preheat level will start to rise. At the same time the unit will also check the mA value. When the desired mA value is reached the program will automatically stop the exposure. The new preheat level is normally between 80 and 120 and will apear in the active text box next to the Prh radio button. 4. Click the Set button to store the preheat level in the EEPROM. 5. Press hold the E key to exit the service mode and save the preheat level. Manually selecting the Preheat level 1. Select the Settings tab. 2. Click the Prh (Sr 13 Prh) radio button to activate it. 3. In the empty text box next to the Set key, key in the preheat level you require. 4. Click the Set button to store the preheat level in the EEPROM. 80 Service manual 8201086 Cranex D Pan and Pan/Ceph 4. Service Programs - > s/n B91643 Sr 14 FrE - Head/nasion support frequencies This service program displays the frequency information that corresponds to the position of the panoramic head supports and the positions of the cephalometric head and nasion support. This service program can only be accessed using the control panel. Using the control panel only 1. Make sure that the fibre optic link is active. 2. Select Sr 14 FrE and press the E key. The frequency, in kHz, will appear on the display. 3. Press the S+ or S- key to select the upper or lower display fields (ma / kV) and then left or right upper Partial panoramic key to change the option in the selected display field. In the upper display field you can select: - PA, panoramic head support frequency - CE, cephalometric head support frequency and in the lower: - nA, nasion support frequency - hE, head support frequency NOTE: If nA and PA are select no value will appear on the display as the position of the nasion support (nA) on the panormic head support (PA) is not monitored. When the nasion / head supports are manually moved the frequencies will change. The frequencies ranges are shown below: Cephalometric nasion (CE + nA) Cephalometric head support (CE + hE) Panoramic head support (hE + PA) (nA + PA) 0.7 - 3.4 kHz (±0.1 kHz) 2.1 - 4.0 kHz (±0.1 kHz) 2.1 - 4.0 kHz (±0.1 kHz) --- To adjust the frequencies refer to: N4200 for cephalometric head support N5300 for panoramic head support N5905 for cephalometric nasion. Service manual 8201086 81 4. Service Programs - > s/n B91643 Cranex D Pan and Pan/Ceph Sr 15 SUP - line voltage check Displays the the line voltage. The line voltage is monitored by measuring the incoming +25V supply on the Filament Control Board. This service program can only be accessed using the control panel. Using the control panel only 1. Select Sr 15 SUP and press the E key. The voltage will appear on the time display. 2. Press the E key to return to the service program mode. Sr 16 CrL - Not in use Sr 17 CEP - Not in use Sr 18 FSt - Fast exposure time Allows the exposure time to be selected. Using the control panel 1. Select 18 FSt and press the E key. The current setting, either USr (fast and slow exposure times, user selectable), on (fast exposure time only) or OFF (normal exposure time only), will appear on the exposure values display. 2. Press the appropriate upper Partial panoramic key to change the setting. 3. Press the E-key to accept the new setting and then press and hold down the E-key to to return to the user mode. 82 Service manual 8201086 Cranex D Pan and Pan/Ceph 4. Service Programs - > s/n B91643 Sr 19 POS - Not in use Sr 20 dnL - sw download program This program allows the CPU to be switched so that it can download SW from the PC terminal program. If this program is started accidentally turn the unit off, wait few seconds and then turn it on again. The unit should start normally. Instructions on how to download software are in Section 5.1 Downloading software from a PC. I/O check program This program allows the states of the CPU inputs and outputs to be checked without removing covers from the unit. It is useful when trouble shooting CPU input signal problems, eg. the various micro switches and optocouplers. The program shows whether or not signals from switches reach the CPU. This service program can only be accessed using the GUI. Using the GUI only 1. Select the I/O ports tab. The window shows the signals to and from the CPU. The signals are as follows: 0 1 2 3 4 5 6 7 8 9 10 11 12 Proj Lit SolenaKV_frq_ena n/a n/a n/a n/a n/a n/a n/a n/a n/a Z Dir Service manual 8201086 SPI out 0 Projector light enable (lights off) Child aperture solenoid enable Pan head width freq. enable (Auto kV) Not used Not used Not used Not used Not used Not used Not used Not used Not used Z-carriage (0=up, 1=down) 83 4. Service Programs - > s/n B91643 84 13 14 15 Z Ena n/a n/a 0 1 2 3 4 5 6 7 8 9 10 11 12 13 14 15 Cas Dir Cas Ena Rot Dir Rot Ena Ceph Dir Ceph Ena Lin Dir Lin Ena P Power P Image C Power C Image n/a n/a Clas Lit n/a 0 1 2 3 4 5 6 7 8 Exp Sw Instru Sw Ma OK n/a Exh Sw In 3 Mains In 2 Tube Fail 9 10 11 12 Pan Cas Sw Cas Lim Sw Cas Mid Sw Lin Mid Sw Cranex D Pan and Pan/Ceph Z-carriage movement enable (1) Not used Not used SPI out 1 Collimator direction Collimator movement enable Rotation movement direction Rotation movement enable Cepd CCD direction Cepd CCD enable Linear movement direction Linear movement enable Pan CCD power on Pan CCD image capture on Ceph CCD on Ceph CCD capture on Not used Not used Ceph head width freq. enable (Auto kV) Not used Port 5 Exposure switch (pressed) Not used Tube current OK Not used Option (exhibition) switch on Mirror (1=closed) N4700 S1 or S2 (S1=1, S2=0) Child solenoid on Tube head high voltage breakdown. (no breakdown) Not used Not used Collimator Linear (Y) movement position Service manual 8201086 Cranex D Pan and Pan/Ceph 13 14 15 Lin Lim Sw Sec. Slit Mid Sw Sec. Slit Lin Sw 0 1 2 3 4 5 6 7 8 9 10 11 12 13 14 15 Flash Sram n/a n/a WD E2Prom CS SPI select n/a SPI CS 1 n/a n/a n/a n/a n/a n/a n/a 0 1 2 3 4 5 6 7 8 n/a n/a Pil Ward Zena Yforw Temp Fail Service Sw n/a S sens1 9 S sens2 10 S sens2 11 12 13 14 15 n/a Return n/a Z Down P Z Up P Service manual 8201086 Port 6 4. Service Programs - > s/n B91643 Linear (Y) movement position Secondary slit position Secondary slit position Flash SRAM Not Used Not Used Watchdog EEProm chip select SPI chip select Not used SPI chip select Not connected Not connected Not connected Not connected Not connected Not connected Not connected SPI in 0 Not Used Not Used Y-movement to left (towards the column) Zena (from z-buttons) Y-movement to right Tube head temperature switch Service switch Not Used Collimator position (same as SSens 1) Pan 1 Ceph 0 Collimator pos. (SSens 2 or gnd) Pan 0 Ceph 1 Collimator pos (SSens 2) Pan 0 Ceph 1 Not used Return button Not used Z-carriage DOWN, pan button Z-carriage UP, pan button 85 4. Service Programs - > s/n B91643 0 1 2 3 4 5 6 7 8 86 Cranex D Pan and Pan/Ceph SPI in 1 Ceph Lok Ceph ccd position Ceph Cok Ceph ccd position Ceph Rok Ceph ccd position Ceph Lat Pa Ceph patient head position Ceph L No ceph or ceph on the left (ceph on the left) Ceph R No ceph or ceph on the right (ceph on the right) Z Down C Z-carriage down, ceph button Z Up C Z-carriage up, ceph button Rot 1 Sw Rotation movement position PIO Stop PanStart Rot 1 1 1 1 9 Rot 2 Sw Rotation movement position PIO Stop PanStart Rot 2 1 0 0 10 Rot 3 Sw Rotation movement position PIO Stop PanStart Rot 3 0 0 0 11 Rot 4 Sw Rotation movement position PIO Stop PanStart Rot 4 1 0 1 12 13 14 15 Z Mid Sw Z Lim Sw Ceph Mid Sw Ceph Lim Sw 0 1 2 3 4 5 6 7 8 9 10 11 12 13 14 15 CP Buttons Btn S + Control panel S + button Btn Section 1 Control panel partial exp. 1 button Btn Ltd. Ceph Control panel reduced ceph button Btn S Control panel S - button Btn E Control panel E button Btn T Control panel Test button Btn 57 kV Control panel 57 kV button Btn Section 5 Control panel partial exp. 5 button Btn Adult Pan Control panel adult pan button Btn Child Pan Control panel child pan button Btn TMJ Control panel TMJ button Btn Ceph Control panel ceph button Btn Section 4 Control panel partial exp. 4 button Btn Section 3 Control panel partial exp. 3 button Btn Section 2 Control panel partial exp. 2 button n/a Not used Z-carriage in upper limit Z-carriage in either limit Ceph movement detector (start or end) n) Ceph movement detector (in the middle) Service manual 8201086 Cranex D Pan and Pan/Ceph 0 1 2 3 4 5 6 7 8 9 10 11 12 13 14 15 Btn 85 kV Btn 81 kV Btn 77 kV Btn 73 kV Btn 70 kV Btn 66 kV Btn 63 kV Btn 60 kV -MIRROR SLOK n/a n/a n/a n/a n/a n/a Service manual 8201086 4. Service Programs - > s/n B91643 CP Buttons Control panel 85 kV button Control panel 81 kV button Control panel 77 kV button Control panel 73 kV button Control panel 70 kV button Control panel 66 kV button Control panel 63 kV button Control panel 60 kV button Mirror position Solenoid for child pan collimator Not used Not used Not used Not used Not used Not used 87 5. Cranex D software Cranex D Pan and Pan/Ceph 5. Cranex D software 5.1 Downloading software - s/n B81642 and earlier Using the C167 SW Loader - s/n B81642 and earlier The RS232 serial interface cable (part number 4801742) that links the unit to the PC is used to download the Cranex D software. The serial interface protocol is: 8 databits, 1 stop bit, no parity, 4800 Bd. 1. Switch the unit off and remove the Z-carriage front cover. (6-screws). 2. Connect Test Connector (SERVICESW 4801744) to connector X90 and the jumper to connector X14 on the digital I/O board (N5200). 3. Press and hold down the E-key until you hear four beeps and service program code appears on the control panel displays. The service program type, Ur for User or Sr for Service, will appear on the kV-display. The service program number will appear on the mAdisplay and an abbreviation (three characters) of the service program name will appear on the exposure time-display . The unit is now in the Service Program mode. 4. Press the Up/Down hidden keys and scroll through the service programs until you reach service program Sr 20 dnl. 5. Briefly press the E-key to enter the parameter selection mode for that program. 6. Press the Left/Right hidden keys to select dnl, download (no = no download) and then press E to activate download, dnl will stop blinking. 88 Service Manual 8201086 Cranex D Pan and Pan/Ceph 5. Cranex D software 7. Switch on the PC and close the GUI if it is open. Insert the Cranex D service CD into the PC and copy c167swdl_pack folder and the binary file .hex (software update) onto the PC hard drive. 8. Start the program C167Ldr. Click the Configure serial ... file paths button. 9. The RS and file configuration window will appear. In the Port settings section select Port COM1 and Baudrate 57600. Service Manual 8201086 89 5. Cranex D software Cranex D Pan and Pan/Ceph In the Application file paths... section click the Enable box next to the Node 1 field to activate it. Click Change and select the software to be updated (.hex-file). Disable the other options. Click OK to exit. 10. The C167LSW Loader window will reappear. Click the Program flash button. NOTE: You must change the port setting if you did not select COM 1 and COM 2 ports. For example if you used COM 5 and COM 6 ports, select COM 5. 11. The C167LSW Software Load window will appear. 90 Service Manual 8201086 Cranex D Pan and Pan/Ceph 5. Cranex D software Click Start transmit to start download. After a while stand alone node present text will appear in the Messages box. The Flash progress bar will start to move. After a few minutes the Cranex D will automatically start and the checksum will appear in the Messages field. 12. Close the C167 loader application. Using the PaloDEx SWDL Tool - s/n B81642 and earlier NOTE: The fibre optic cable that links the unit to the PC is used to download the Cranex D software. 1. Close DfW and the Cranex D GUI. 2. Stop the OPCC service from the Windows Services (Control panel \ Administrative Tools \ Services \ OPCC). 3. Switch the unit off and remove the Z-carriage front cover. (6-screws). 4. Connect Test Connector (SERVICESW 4801744) to connector X90 and the jumper to connector X14 on the digital I/O board (N5200). 5. Switch the unit on. 6. Press and hold down the E-key until you hear four beeps and service program code appears on the control panel displays. The service program type, Ur for User or Sr for Service, will appear on the kV-display. The service program number will appear on the mAdisplay and an abbreviation (three characters) of the service program name will appear on the exposure time-display . The unit is now in the Service Program mode. Service Manual 8201086 91 5. Cranex D software Cranex D Pan and Pan/Ceph 7. Press the Up/Down hidden keys and scroll through the service programs until you reach service program Sr 20 dnl. 8. Briefly press the E-key to enter the parameter selection mode for that program. 9. Press the Left/Right hidden keys to select dnl, download (no = no download) and then press E to activate download, dnl will stop blinking. 10. Launch the Software Download Tool. the PaloDEx SWDL Tool window will appear. 11. In the PaloDEx SWDL Tool window click the Configure button. The Dialog window will appear. Cranex D R1.XX 2009-02-02T16:43:19/FW2251600 Cranex D R1.XX COM 1 From the Unit Connection dialog box select Fibre optic link and then press OK. 92 Service Manual 8201086 Cranex D Pan and Pan/Ceph 5. Cranex D software 12. From the PaloDEx SWDL Tool select the software package to be downloaded into the unit. Cranex D R1.XX 2009-02-02T16:43:19/FW2251600 Cranex D R1.XX Click the Download button to start SW download. 13. The Software Download Tool Downloading ... window will appear during the software downloading process. WARNING! Do not operate with the unit or PC while downloading the software. Do not interrupt the software update process once it is launched. Interrupting the downlaoding process may cause the unit Core Module to become unstable. Service Manual 8201086 93 5. Cranex D software Cranex D Pan and Pan/Ceph 14. When the download process is successfully completed the results window will appear. Click OK to displayed some additional information about the new software version. 15. Restart the OPCC or restart the PC. 16. Restart the unit and make sure that it is working properly. 17. It is recommended to take test images (pin and ball phantom) to assure the alignment and functionality of the unit. 94 Service Manual 8201086 Cranex D Pan and Pan/Ceph 5. Cranex D software 5.2 Downloading software - s/n B91643 and later Using the PaloDEx SWDL Tool - s/n B91643 and later NOTE: The fibre optic cable that links the unit to the PC is used to download the Cranex D software. 1. Close DfW and the Cranex D GUI. 2. Stop the OPCC service from the Windows Services (Control panel \ Administrative Tools \ Services \ OPCC). 3. Enter the service mode. First press and hold down the E key (3 seconds) until you hear a beep, the unit is now in the unit settings mode (unit settings have the prefix Ur). Then press and hold down the top Left partial panoramic key and then press and hold down the top Right partial panoramic key. Release the Left key and then release the Right key. You will hear a beep and the unit will enter the service programs mode (service programs have the prefix Sr). No particular service program needs to be selected. 4. Launch the Software Download Tool. The PaloDEx SWDL Tool window will appear. Service Manual 8201086 95 5. Cranex D software Cranex D Pan and Pan/Ceph 5. In the PaloDEx SWDL Tool window click the Configure button. The Dialog window will appear. From the Unit Connection dialog box select Fibre optic link and then press OK. 6. From the PaloDEx SWDL Tool select the software package to be downloaded into the unit. Click the Download button to start SW download. 96 Service Manual 8201086 Cranex D Pan and Pan/Ceph 5. Cranex D software 7. The Software Download Tool Downloading ... window will appear during the software downloading process. WARNING! Do not operate with the unit or PC while downloading the software. Do not interrupt the software update process once it is launched. Interrupting the downlaoding process may cause the unit Core Module to become unstable. 8. When the download process is successfully completed the results window will appear. Click OK to displayed some additional information about the new software version. Service Manual 8201086 97 5. Cranex D software Cranex D Pan and Pan/Ceph 9. Restart the OPCC or restart the PC. 10. Restart the unit and make sure that it is working properly. 11. It is recommended to take test images (pin&ball phantom) to assure the alignment and functionality of the unit. 5.3 PCI board driver PCI board driver software is installed during the unit installation. If it has to be reinstalled, use the Cranex D Installation CD to reinstall it. The PCI driver is a software component that enables the PCI card electronics to be accessed by with Windows operating system. 5.4 Graphical User Interface (GUI) The GUI is the Cranex D user interface panel on the PC screen. This software in PC is provided to communicate with the Cranex D to set and display kV, imaging mode and exposure time. GUI consist also a special PP1 Service Assistant software which can be used to service and debug the unit. See section 4. Service Programs for more information. GUI is installed during Cranex D installation. 98 Service Manual 8201086 Cranex D Pan and Pan/Ceph 6. Circuit Boards - N3000 6. Circuit Boards N3000 PCI Board N3000 Location Inside the PC. N3000 Field replaceable parts None. N3000 Description The board is a bridge between the optical / serial ( from main CPU) and the electrical / parallel PCI bus. It sorts incoming image and control data according to the address attached to the data. The board includes an FPGA based logic “series to parallel converter”, a 16MHz oscillator and internal 10multiplier for the Link clock (160MHz). The length of the optical fibre cable that connects the PC to the unit is 10m and the data transmission speed is 160 Mbps. N3000 Indicator LEDs LED H1 H2 H3 H4 H5 Colour Green Red Green Green Red Service manual 8201086 Description LINK_OK EPROM failure +3.3V +5V Local reset 99 6. Circuit Boards - N3100 Cranex D Pan and Pan/Ceph N3100 Rotation Connector Board N3100 Location Inside the sensor holder side of the rotating unit. To access, remove the CCD sensor, the sensor holder cover and then the inner cover from the receptor side of the rotating unit. N3100 Field replaceable parts None. N3100 Description There are numerous connectors on this board. The purpose of this board is to transfer the signals passing through the main cable (the large cable bundle) to the electronics in the rotating unit. The other end of the main cable is goes to the Top Rack Connector Board. The Rotation Connector Board also includes solenoid control electronics which are needed for the child panorama program. The solenoid control electronics are activated on the descending edge of “solena-” –signal. The circuit board also generates various supply voltages: VCC_+5V, VAP_+18V, VSP_+5V and +5.7V. All these are derived from a +34V-voltage supply using swiching regulators. N3100 Indicator LEDs LED H1 H2 H3 H4 H5 H6 H7 H8 100 Colour green green green green green green green green Description +5V VCC_+5V VSP_+5V VAP_+18V +5.7V +34V -25V +25V Service manual 8201086 Cranex D Pan and Pan/Ceph 6. Circuit Boards - N3100 N3100 Test points Pin TP1 TP2 TP3 TP4 TP5 TP6 TP7 TP8 Signal GND VCC_+5V VAP_+18V VSP_+5V +5.7V GND +34V GND Description Analog +18VDC (used on Data Interface Board) Voltage (+5.7VDC) (used on Terminal Board). Incoming supply voltage (+34V) - N3100 Connectors Connector J3102 Pin 1 2 3 4 5 6 7 8 9 10 Signal Description PDETCLK CCD detector clock Not used PPOWERPan-ccd power enable PIMAGEPan-ccd image enable NC Not used RDX2 Receive data signal TXD2 Transmit data signal Not used Not used AEC_FRQ_TO_CPU Frequency line to CPU Connector J3103 Not Used Connector J3104 Pin 1 2 3 4 5 6 7 8 Signal +5V GND SOL_VOLTAGE GND SOLOKSSENS1 SSENS2 GND Service manual 8201086 Description Power supply voltage Ground Solenoid voltage Ground Solenoid ok Slit position sensor 1 Slit position sensor 2 Ground 101 6. Circuit Boards - N3100 Cranex D Pan and Pan/Ceph Connector J3105 Pin 1 2 Signal +34V Description Power supply voltage Patient position light enable Connector J3106 Pin 1-2 3 4 5 6 7 8 9 10 11 12 13 14 Signal Not used VSP_+5V GND GND GND GND GND GND VAP_+18V VCC_+5V +5.7V +5.7V Description Power supply voltage (CCD) Ground Ground Ground Ground Ground Ground Power supply voltage (CCD) Power supply voltage (CCD) Not used Power supply voltage (CCD) Power supply voltage (CCD) Connector J3107 Pin 1 2 3 4 5 6 7 8 9 10 11 12 13 14 15 16 102 Signal Description +5V Power supply voltage GND Ground SOLOKSolenoid ok Not used PROJLIT Patient position light enable IN1 Not used AEC_FRQ_TO_CPU AEC-frequency GND Ground TXD2 Transmit data signal RDX2 Receive data signal GND Ground PDETCLK CCD detector clock GND Ground PPOWERPan-ccd power active PIMAGEPan-ccd image active GND Ground Service manual 8201086 Cranex D Pan and Pan/Ceph 6. Circuit Boards - N3100 Connector J3108 Pin 1 2 3 4 5 6 7 8 9 10 11 12 13 14 15 16 Signal COL1SW COL3SW SOLENA- Description Not used Not used Not used Not used Not used Slit position sensor1 Not used Slit position sensor2 Solenoid enable Not used Not used Not used Not used Not used Not used Not used Connector J3109 Not used Connector J3111 Pin 1 2 3 4 5 6 7 8 Signal +34V GND +34V GND +25V GND -25V GND Description Power supply voltage Ground Power supply voltage Ground Power supply voltage Ground Power supply voltage Ground Connector J3112 Pin 1 2 3 4 5 6 Signal +34V GND +25V GND -25V GND Service manual 8201086 Description Power supply voltage Ground Power supply voltage Ground Power supply voltage Ground 103 6. Circuit Boards - N3100 104 Cranex D Pan and Pan/Ceph Service manual 8201086 Cranex D Pan and Pan/Ceph Service manual 8201086 6. Circuit Boards - N3100 105 6. Circuit Boards - N3100 106 Cranex D Pan and Pan/Ceph Service manual 8201086 Cranex D Pan and Pan/Ceph Service manual 8201086 6. Circuit Boards - N3100 107 6. Circuit Boards - N3100 108 Cranex D Pan and Pan/Ceph Service manual 8201086 Cranex D Pan and Pan/Ceph 6. Circuit Board - N3200 N3200 Filament Control Board N3200 Location Inside the rotating unit, tubehead side. To access, remove the tubehead cover, head support assembly and rotating unit inner cover. N3200 Field replaceable parts None. N3200 Description The Filament Control Board produces a filament voltage for tube head using a current reference from the CPU and current feedback from the Tube Head Board. It also produces frequency information on current feedback, current reference, line voltage feedback and 5V during the different operating stages. The board produces its power supply voltages, ±15V, from the ±25V supply. LEDs H1, H2, H3 and H4 should be on when power is on. During stand by the board measures the line voltage, 24V, and the frequency information goes to the digital I/O board. When an exposure begins, the filament is preheated for a short period and then the current can be controlled. Frequency information is also sent to the CPU. N3200 Indicator LEDs LED H1 H2 H3 H4 H5 H6 H7 H8,H9 H10-11 H12 Colour green green green green red red red red red red Service manual 8201086 Description +25V power supply +15V power supply +34V power supply -15V power supply mAok, on when mAfb is higher than mAref prehrel, on when preheat relay is on preh, on when preheat is on Pulse2, on when filament transformer is driven Pulse1, on when filament transformer is driven Tube temperature, on when overheated 109 6. Circuit Boards - N3200 Cranex D Pan and Pan/Ceph N3200 Test points TP TP1 TP2 TP4 TP5 TP6 TP7 TP8 TP9 TP10 TP11 TP13 Signal GND MAFB MAREF PREH PREHREL EXPENA -15V +15V +25V +34V GND Description Ground Current feedback Current reference Preheat Preheat relay Exposure enable Power supply voltage Power supply voltage Power supply voltage Power supply voltage Ground N3200 Connectors Connector X35 Pin 1 2 3 4 5 6 Signal +34V gnd +25V GND -25V GND Description Power supply voltage Ground Power supply voltage Ground Power supply voltage Ground Connector X36 Pin 1 2 Signal +25Vrel GND Description Preheat relay controlled power supply voltage Ground Connector X37 Pin 1 2 3 4 5 6 7 8 9 10 11 12 110 Signal +15V GND Tempfail kVmA0 kVmA1 kVmA2 kVmA3 kVmA4 kVmA5 kVmA6 kVmA7 kVmAsel Description Power supply voltage Ground Temperature too high Digital kV and mA references Digital kV and mA references Digital kV and mA references Digital kV and mA references Digital kV and mA references Digital kV and mA references Digital kV and mA references Digital kV and mA references Select kV or mA Service manual 8201086 Cranex D Pan and Pan/Ceph 6. Circuit Board - N3200 Connector X38 Pin 1 2 3 4 5 6 7 8 9 10 11 12 13 14 15 16 17 18 19 20 21 22 23 24 25 26 Signal kVmA7 kVmA6 kVmA5 kVmA4 kVmA3 kVmA2 kVmA1 kVmA0 Prehrel Preh Expena kVmAsel kVmAclk Tempfail kVok mAok mAfrq GND GND Tubefail GND GND Service manual 8201086 Description Digital kV and mA references Digital kV and mA references Digital kV and mA references Digital kV and mA references Digital kV and mA references Digital kV and mA references Digital kV and mA references Digital kV and mA references Preheat relay control Preheat control Exposure enable Select kV or mA Clock Temperature too high KV control is ok MA control is ok Not used Not used Not used Not used current to frequency information Ground Ground Failure in tube head Ground Ground 111 6. Circuit Boards - N3200 112 Cranex D Pan and Pan/Ceph Service manual 8201086 Cranex D Pan and Pan/Ceph Service manual 8201086 6. Circuit Board - N3200 113 6. Circuit Boards - N3200 114 Cranex D Pan and Pan/Ceph Service manual 8201086 Cranex D Pan and Pan/Ceph 6. Circuit Board - N3300 / N3301 N3300 / N3301 Inverter Board N3300 - for tubehead s/n 90-----. N3301 - for tubehead s/n 91-----. IMPORTANT NOTE: N3300 and N3301 are NOT interchangeable. N3300 / N3301 Location Inside the rotating unit, in the tubehead side. To access remove the tubehead cover, head support assembly and the inner cover of the rotating unit. N3300 / N3301 Field replaceable parts Fuse F1 10AT/250VAC 6.3 x 32mm (UL C/A, code 3600008). WARNING Replace only with the same type and rating of fuse. N3300 / N3301 Description The Inverter Board produces the high frequency voltage for the tubehead. This is done by chopping the incoming 310Vdc with an H-bridge and driving it to a high frequency transformer on the Tubehead Board. The transformer multiplies the voltage. The tubehead voltage is controlled with voltage reference from the CPU and voltage feedback from the Tubehead Board. The H-bridge is controlled by comparing the voltage reference from the CPU and the feedback from the Tubehead Board and adjusting the difference to zero. Driving the high voltage H-bridge is done with half bridge drivers and high frequency transformers. The operating frequency depends on the power and it is between 35-88 kHz so that higher power is at a lower frequency. The board also has a shutdown function if something goes wrong. Service manual 8201086 115 6. Circuit Board - N3300 / N3301 Cranex D Pan and Pan/Ceph N3300 Indicator LEDs LED H1 H2, H3 H4 H5 H6 H7 H8, H9 H10-11 Colour green red red green red green red red Description +310Vdc H-bridge current kVok +15V on Exposure +25V on H-bridge pulses a H-bidge pulses b N3300 Test points TP TP1 TP2 TP3 TP4 TP13 TP14 TP15 TP16 TP17 TP18 TP19 TP20 TP21 TP22 TP23 TP24 Signal Description +310VGND +310Vdc H-bridge output 2 H-bridge output 1 H-bridge pulses a Shutdown H-bridge pulses b GND GND Voltage feedback Voltage reference GND H-bridge driver 2 high H-bridge driver 2 low H-bridge driver 1 high H-bridge driver 1 low N3300 Connectors Connector X30 Pin 1 2 Signal +310Vdc +310VGND Description Power supply voltage Ground for +310Vdc Connector X31 Pin 1 2 3 4 116 Signal 1 2 3 4 Description H-bridge output 2 H-bridge output H-bridge output 1 H-bridge output 1 Service manual 8201086 Cranex D Pan and Pan/Ceph 6. Circuit Board - N3300 / N3301 Connector X32 Pin 1 2 3 4 5 6 7 8 Signal mAfb kVfb GND GND GND Tmpfail Description Current feedback Voltage feedback Not used Not used Ground Ground Ground Temperature too high Connector X33 Pin 1 2 3 4 Signal FilGND Fila1 GND +25V Description Filament ground Filament transformer control Ground Power supply voltage Connector X34 Pin 1 2 3 4 5 6 7 8 9 10 11 12 13 14 15 16 17 18 19 20 Signal +15V GND Tmpfail kVmA0 kVmA1 kVmA2 kVmA3 kVmA4 kVmA5 kVmA6 kVmA7 kVmAsel kVmAclk Expena kVok Tubefail mAfb GND GND GND Service manual 8201086 Description Power supply voltage Ground Temperature too high Digital kV and mA references Digital kV and mA references Digital kV and mA references Digital kV and mA references Digital kV and mA references Digital kV and mA references Digital kV and mA references Digital kV and mA references Select kV or mA Clock Exposure enable KV control is ok Failure in tubehead Current feedback Ground Ground Ground 117 6. Circuit Board - N3300 / N3301 118 Cranex D Pan and Pan/Ceph Service manual 8201086 Cranex D Pan and Pan/Ceph Service manual 8201086 6. Circuit Board - N3300 / N3301 119 6. Circuit Board - N3300 / N3301 120 Cranex D Pan and Pan/Ceph Service manual 8201086 Cranex D Pan and Pan/Ceph 6. Circuit Board - N3500 N3500 Motor Controller board N3500 Location Inside the vertical carriage. To access remove the vertical carriage front cover. If needs to be removed, remove also the plastic decoration on the rear of upper shelf and the z-carriage right hand side cover. N3500 Field replaceable parts Z-motor fuse (6.3mm x 32mm, UL C/A) - 2AT, 250Vac at 230Vac mains, code 3600031 - 4AT, 250Vac at 115Vac mains, code 3600065 Mains fuse F1 and F2 (6.3mm x 32mm, UL C/A): - 8AT, 250Vac at 230Vac mains, code 3600013 - 15AT, 250Vac at 115Vac mains, code 20045 WARNING Replace fuses only with the same type and rating of fuses. WARNING: HIGH VOLTAGE The board is connected to the main power supply. Disconnect the main power supply before touching the board. If plastic shield on the board is removed, make sure that it is replaced. N3500 Description Motor Controller Board includes the control electronics for stepper motors (rotation, collimator and y - layer) and AC z-motor . The board includes also a mains fuse and mains overvoltage protection varistors. Service manual 8201086 121 6. Circuit Board - N3500 Cranex D Pan and Pan/Ceph N3500 Indicator LEDs LED D1 - 4 D10 D11 D12 D23 D24 D25 D35 - D36, D38 - D39 D50-53 Colour green green green green green green green Description Collimator motor drive pulses Incoming supply voltage +34V +15V Incoming supply voltage +5V zena1 (from z-buttons) zena (from cpu) estop_5v green green Linear motor drive pulses Rotation motor drive pulses N3500 Test points TP TP1 TP2 TP3 TP4 TP5 TP6 TP7 TP8 TP9 TP10 TP11 TP12 TP13 TP14 TP15 TP16 TP17 Signal +15V GND casclk casdir casena linclk lindir linena rotclk rotdir rotena zdir zena zena1 GND Description Incoming supply voltage +34V Incoming supply voltage +5V Collimator stepper motor clock Collimator stepper motor direction Collimator stepper motor enable Y-layer stepper motor clock Y-layer stepper motor direction Y-layer stepper motor enable Rotation stepper motor clock Rotation stepper motor direction Rotation stepper motor enable Z-motor direction Z-motor enable Z-motor enable N3500 Jumpers 122 JP1 Selects emegency stop. - Jumper = pan unit, - No jumper = pan/ceph unit JP2 Z-movement selection. Factory set on pins 2 and 3. DO NOT MOVE. Service manual 8201086 Cranex D Pan and Pan/Ceph 6. Circuit Board - N3500 N3500 Connectors Connector J3502 Pin 1 2 3 4 5 6 7 8 9 10 Signal GND +34V GND +34V ESTOP1_5V ESTOP_5V ZENA1- Description Ground Power supply voltage Ground Power supply voltage Estop-voltage loop to/from ceph head Estop-voltage loop to/from ceph head Z movement enable1 Not used Not used Not used Connector J3504 Pin 1 2 Signal +34V Description Power supply voltage Patient position light enable Connector J3505 Pin 1 2 3 4 5 6 7 8 9 10 11 12 13 14 15 16 17 18 19 Signal +5V GND LINDIR LINENA CASDIR CASENA ROTENA ROTDIR LINCLK CASCLK ROTCLK ZENA ZDIR PROJLIT WARNLIGHT Service manual 8201086 Description Power supply voltage Ground Linear movement direction Linear movement enable Collimator movement direction Collimator movement enable Rotation movement enable Rotation movement direction Not used Not used Linear movement clock Collimator movement clock Rotation movement clock Z-movement enable Z-movement direction Not used Not used Patient position light enable Exposure warning light 123 6. Circuit Board - N3500 20 21 22 23 24 25 26 Cranex D Pan and Pan/Ceph XRAYLIT OUT4 OUT5 ZENA1GND GND Exposure warning light Not used Not used Not used Z movement enable1 Ground Ground Connector J3506 Pin 1 2 3 4 5 6 7 8 9 10 11 12 13 14 15 16 17 18 19 20 21 22 23 24 25 26 124 Signal CAS1 CAS2 CAS3 CAS4 LIN1 LIN2 LIN3 LIN4 ROT1 ROT2 ROT3 ROT4 PROLIT MIRROR+34V GND +34V GND +34V GND Description Phase1 for collimator movement motor Phase2 for collimator movement motor Phase3 for collimator movement motor Phase4 for collimator movement motor Phase1 for Y-layer movement motor Phase2 for Y-layer movement motor Phase3 for Y-layer movement motor Phase4 for Y-layer movement motor Phase1 rotation movement motor Phase2 rotation movement motor Phase3 rotation movement motor Phase4 rotation movement motor Not used Not used Not used Not used Patient position light enable Patient mirror locked Not used Not used Power supply voltage Ground Power supply voltage Ground Power supply voltage Ground Service manual 8201086 Cranex D Pan and Pan/Ceph 6. Circuit Board - N3500 Connector J3507 Pin 1 2 Signal +34V Description Power supply voltage Patient position light enable Connector J3508 Pin 1 2 3 4 5 6 7 8 Signal Z_MOVE1 Z_AC2 Description Z_MOVE2 Z_AC2 Not used Not used Not used Connector J3509 Pin 1 Signal AC1 Description AC-voltage Connector J3510 Pin 1 Signal AC2 Description AC-voltage Connector J3511 Pin 1 Signal AC1 Description AC-voltage Connector J3512 Pin 1 Signal AC2 Description AC-voltage Connector J3514 Pin 1 2 Signal MIRRORGND Service manual 8201086 Description Patient mirror locked Ground 125 6. Circuit Board - N3500 Cranex D Pan and Pan/Ceph Connector J3515 Pin 1 Signal L Description AC-voltage Connector J3516 Pin 1 Signal N Description AC-voltage Connector J3517 Pin 1 Signal L Description AC-voltage Connector J3518 Pin 1 126 Signal N Description AC-voltage Service manual 8201086 Cranex D Pan and Pan/Ceph Service manual 8201086 6. Circuit Board - N3500 127 6. Circuit Board - N3500 128 Cranex D Pan and Pan/Ceph Service manual 8201086 Cranex D Pan and Pan/Ceph Service manual 8201086 6. Circuit Board - N3500 129 6. Circuit Board - N3500 130 Cranex D Pan and Pan/Ceph Service manual 8201086 Cranex D Pan and Pan/Ceph Service manual 8201086 6. Circuit Board - N3500 131 6. Circuit Boards - N3600(1) / N3700(1) Cranex D Pan and Pan/Ceph N3600 / N3700 - N3601 / N3701 Control Panel N3600 / N3700 - versions with s/n B81642 and earlier. N3601 / N3701 - versions with s/n B91643 and later. IMPORTANT NOTE: N3600 / N3700 and N3601 / N3701 are NOT interchangeable. N3600(1) / N3700(1) Location In the vertical-carriage. To access, remove the z-carriage front cover and the lefthand-side cover. N3600(1) / N3700(1) Field replaceable parts None. N3600(1) / N3700(1) Description Control Panel serves as a link between the user and the CPU board. It consist of a Max 6954 circuit which controls the 7-segment displays on the attached N3700 Display board, the indicator LEDs and switches of N3700 board. The control panel allows the user to operate the panoramic unit and aso displays the status of the unit. The Control Panel is monitored and controlled from the CPU Board by a serial link (3 input lines and one output line). NOTE: The control panel also includes four non-visible service buttons that only function when the service connector is in place. N3600(1) / N3700(1) Connectors: Connector J3601 Pin 1 2 4 5 6 7 8 9 10 132 Signal PNLCLK PNLOUT PNLIN GND GND WARNLIGHT GND Description Control panel clock Ccntrol panel enable Not used Control panel data in Not used Ground Ground Exposure warning light Ground Service manual 8201086 Cranex D Pan and Pan/Ceph 11 12 13 14 GND GND +25V +25V 6. Circuit Boards - N3600(1) / N3700(1) Ground Ground Power supply voltage Power supply voltage Connector J3602 Pin 1 2 3 4 5 6 7 8 9 10 11 12 13 14 15 16 17 18 19 20 Signal +5V YFORW ZENA1YBACK RETURN GND ZUP ZDOWN GND Service manual 8201086 Description Power supply voltage Not used Not used Not used Y-layer movement forward Z movement enable1 Y-layer movement back Not used Return Ground Not used Not used Not used Z movement up Not used Not used Z movement down Not used Not used Ground 133 6. Circuit Boards - N3600(1) / N3700(1) 134 Cranex D Pan and Pan/Ceph Service manual 8201086 Cranex D Pan and Pan/Ceph Service manual 8201086 6. Circuit Boards - N3600(1) / N3700(1) 135 6. Circuit Boards - N3600(1) / N3700(1) 136 Cranex D Pan and Pan/Ceph Service manual 8201086 Cranex D Pan and Pan/Ceph Service manual 8201086 6. Circuit Boards - N3600(1) / N3700(1) 137 6. Circuit Boards - N3600(1) / N3700(1) 138 Cranex D Pan and Pan/Ceph Service manual 8201086 Cranex D Pan and Pan/Ceph 6. Circuit Board - N3800 N3800 Rotation Position Sensor N3800 Location Inside the rotating unit (C-arm). To access remove the pan head support assembly and rotating unit lower covers covers beneath the rotating unit. N3800 Field replaceable parts None. N3800 Description The N3800 board comprises three optosensors that are used to detect the rotational position of the C-arm. The signals from the three sensors are RSENS1*- RSENS3*. Each optosensor comprises a transmitter LED, and a receiver, or base. The sensor signals remain on as long as the base receives light from the LED. If the light beam to the base is cut off, for example by the positioning rail, the sensor signal is switched off. N3800 Connectors Connector J3801 Pin 1 2 3 4 5 6 Signal +5V ROT1SW ROT2SW ROT3SW ROT4SW GND Service manual 8201086 Description Power supply voltage Rotation movement sensor1 Rotation movement sensor2 Rotation movement sensor3 Rotation movement sensor4 Ground 139 6. Circuit Board - N3800 140 Cranex D Pan and Pan/Ceph Service manual 8201086 Cranex D Pan and Pan/Ceph Service manual 8201086 6. Circuit Board - N3800 141 6. Circuit Board - N4100 Cranex D Pan and Pan/Ceph N4100 Position Lights N4100 Location There are three N4100 boards in the unit. They are attached to the z-carriage (horizontal light, center light) and one in the rotating part (focal trough=layer light). N4100 Field serviceable parts None N4100 Description Position lights board consists of 3 LEDs in series. N4100 Indicator LEDS None. N4100 Test pins None. 142 Service manual 8201086 Cranex D Pan and Pan/Ceph 6. Circuit Board - N4200 N4200 Ceph Connector Board N4200 Location On the ceph head. To access remove ceph head cover. N4200 Field replaceable parts None. N4200 Description The Ceph Connector Board includes connectors that allow the ceph head be removed easily from the ceph arm and electronics to convert the patient's head size to a frequency that the CPU can use to select the correct kV (Auto-kV). The measurement of the patient's head size is implemented using a AD654 V/f-converter. The circuit allows a min. 4 volts lower voltage in its input than the supply voltage (+5V). Because of this, there is an emitter follower that generates the required voltage (+1V). A potentiometer slider is used to swing the input voltage (+0.5V … +1.0V). The output frequency of the AD654 depends on the position of the slider. Adjusting the frequency of the ceph head support Use service program Sr 14 FrE to check the frequency of the pan head support. The frequency can be adjusted with two trimmers (Trim1 and Trim2). The frequency limits are 2100Hz and 4000Hz. The higher frequency (4000Hz +- 100Hz) must be adjusted before the lower frequency (2100Hz +- 100Hz). Service manual 8201086 143 6. Circuit Board - N4200 Cranex D Pan and Pan/Ceph N4200 Connectors Connector J4201 Pin 1 2 3 4 5 6 7 8 9 10 11 12 13 14 15 16 17 18 19 20 21 22 23 24 25 26 Signal +5V GND LAT-/PA CEPHROKCEPHCOKCEPHLOKCEPHMIDSW CEPHLIMSW CEPENA CEPHDIR CPPROJTRIGFILT5 CAECRFRQ CEPHUPCEPHDOWN+5V GND CPOWERCIMAGECEPHCLK CDETCLK CLASLIT GND Description Power supply voltage Ground Lateral or PA image in cephalo Ceph cassette sensor Ceph movement sensor Ceph movement sensor Ceph stepper motor drive enable Ceph stepper motor drive direction Not used Ceph (nasion/head size) frequency Not used Not used Z movement up Z movement down Power supply voltage Ground Ceph-CCD power active Ceph-CCD image active Ceph stepper motor clock CCD detector clock Enables head size measurement Ground Connector J4202 Pin 1 2 Signal - Description Jumper connection Jumper connection Connector J4203 Pin 1 2 144 Signal Description CEPHCOK- Cephalo cassette sensor GND Ground Service manual 8201086 Cranex D Pan and Pan/Ceph 6. Circuit Board - N4200 Connector J4204 Pin 1 2 3 4 5 6 Signal +34V GND GND GND Description Power supply voltage Ground Not used Ground Not used Ground Connector J4205 Pin 1 2 3 4 5 6 7 8 9 10 11 12 13 14 15 16 17 18 19 20 21 22 23 24 25 26 Signal +5V GND LAT-/PA CEPHROKCEPHCOKCEPHLOKCEPHMIDSW CEPHLIMSW CEPENA CEPHDIR CPPROJTRIGFILT5 CAECRFRQ CEPHUPCEPHDOWN+5V GND CPOWERCIMAGECEPHCLK CDETCLK CLASLIT GND Service manual 8201086 Description Power supply voltage Ground Lateral or PA image in cephalo Cephalo cassette sensor Ceph movement sensor Ceph movement sensor Ceph stepper motor drive enable Ceph stepper motor drive direction Not used Connected to +5v Ceph frequency Not used Not used Z movement up Z movement down Power supply voltage Ground Ceph-CCD power active Ceph-CCD image active Cephalo stepper motor clock CCD detector clock Enables head size measurement Ground 145 6. Circuit Board - N4200 Cranex D Pan and Pan/Ceph Connector J4206 Pin 1 2 3 4 5 6 7 8 9 10 Signal GND +34V GND +34V ESTOP1_5V ESTOP_5V ZENA1- Description Ground Power supply voltage Ground Power supply voltage Estop-voltage loop to/from ceph Estop-voltage loop to/from ceph Z movement enable1 Not used Not used Not used Connector J4207 Pin 1 2 3 4 Signal CEPHUPGND CEPHDOWNZENA1- Description Z movement up Ground Z movement down Z movement enable1 Connector J4208 Pin 1 2 3 4 5 6 146 Signal Description +1V HEAD_SIDE_SLIDE +0.5V Not used +5V Power supply voltage GND Ground Service manual 8201086 Cranex D Pan and Pan/Ceph Service manual 8201086 6. Circuit Board - N4200 147 6. Circuit Board - N4200 148 Cranex D Pan and Pan/Ceph Service manual 8201086 Cranex D Pan and Pan/Ceph Service manual 8201086 6. Circuit Board - N4200 149 6. Circuit Board - N4355 Cranex D Pan and Pan/Ceph N4355 Ceph filter position board N4355 Location In Cranex D ceph head support. To access, remove ceph head top cover and the head support from the ceph head and remove the head support lower cover. N4355 Field replaceable parts None. N4355 Description There are potentiometers on the board that measure the width of the patient's head and the position of nasion support. The "head size" voltage signal is fed to the N4200 board where it is converted into frequency and the nasion position signal is fed to the N5900 board where it is also converted into frequency. Both these frequency signals are utilized by the CPU to automatically set the kV (the "head size" frequency) and control the soft tissue filtering (the nasion position frequency adjusted using N4200). N4355 Connectors Connector J4301 Pin 1 2 3 Signal +2V POT_SLIDE +1V Description Connector J4302 Pin 1 2 3 4 5 6 150 Signal Description +1V HEAD_SIDE_SLIDE Head size dependant kV +0.5V Not used +5V Power supply voltage GND Ground Service manual 8201086 Cranex D Pan and Pan/Ceph Service manual 8201086 6. Circuit Board - N4355 151 6. Circuit Board - N4355 152 Cranex D Pan and Pan/Ceph Service manual 8201086 Cranex D Pan and Pan/Ceph 6. Circuit Board - N4600 N4600 Y-layer Sensor N4600 Location In upper shelf. To access, remove top covers N4600 Field replaceable parts None. N4600 Description The N4600 board is used to detect linear movement positions. The board comprises three optical switches that generate sensor signals YSENS1*- YSENS2* according to the deteted position. YSENS2 is connected to LINMIDSW and one of the signals YSENS1/YSENS3 is connected to LINLIMSW. These conections are selected with a jumper on the Top Rack board. L indicates left-hand ceph (when looking at the unit from the front) and R right-hand ceph. The jumper must be in correct position for the appropriate ceph unit. Each optosensor consists of two parts, a transmitter LED, and a receiver or base. The sensor signals remain on as long as the base receives light from the LED. If the light beam to the base is cut off, for example by the positioning rail, the sensor signal is switched off. N4600 Connectors Connector J4601 Pin 1 2 3 4 5 6 Signal +5V YSENS1YSENS2YSENS3GND Service manual 8201086 Description Power supply voltage Linear movement sensor1 Linear movement sensor2 Linear movement sensor3 Not used Ground 153 6. Circuit Board - N4600 154 Cranex D Pan and Pan/Ceph Service manual 8201086 Cranex D Pan and Pan/Ceph Service manual 8201086 6. Circuit Board - N4600 155 6. Circuit Boards - N4700 Cranex D Pan and Pan/Ceph N4700 Power Supply N4700 Location In upper shelf. To access, remove top covers N4700 Field replaceable parts Fuses F1 10AT/250 Vac (UL C/A, code 3600008) F2 6.3AT/250 Vac (UL C/A, code 3600017) F3 2AT/250 Vac (UL C/A, code 3600031) All fuses are 6.3 mm x 32 mm. WARNING Always replace with the same type and rating of fuse. N4700 Description Power supply board provides rectified operating voltages of +310V, +34V, ±25V and also 12VAC (not used at present). The +310VDC has its own ground potential but all the other operating voltages are connected to a single ground potential. A jumper allows the main voltage for the board to be selected. If the jumper is connected to connector S2 the main voltage is 230V and if it is connected to S1 the main voltage 110V. IMPORTANT NOTE The main voltage CANNOT be converted to other mains voltage in the field because the z-motor must be of different type depending on the mains voltage. Board has three fuses, 6.3A for +34V, 2A for ±25V and 10A for 12VAC. The 310VDC output is relay controlled. N4700 Indicator LEDs LED LA1 LA2 H1 H2 H5 H6 H7 H8 156 Colour orange orange red red green green green green Indicates primary voltage on +310Vdc on relay on for +310Vdc relay on for +310Vdc +34V on +25V on -25V on 12Vac on Service manual 8201086 Cranex D Pan and Pan/Ceph 6. Circuit Boards - N4700 N4700 Test points TP TP1 TP2 TP3 TP5 TP6 TP7 TP8 TP9 TP10 TP11 TP12 TP13 Signal Description +310Vdc +155Vdc 310V GND Primary voltage (110/230Vac) Primary voltage (110/230Vac) RG2 relay control (0-24Vdc) RG1 relay control (0-24Vdc) +34V +25V -25V 12Vac GND N4700 Connectors Connector X21 Pin 1 2 3 Signal 110/230V 110/230V - Description Power line voltage Power line voltage Not used Connector X22 Pin 1 Signal 310Vdc 2 3 155Vdc 310VGND Description Power supply to inverter board and capacitors Power supply to capacitors Ground for 310Vdc power supply Connector X24 Pin 1 2 3 4 5 6 7 8 Signal 110V-T1-1 100V-T1-2 110V-T1-3 110V-T1-4 110V-T2-1 110V-T2-2 110V-T2-3 110V-T2-4 Service manual 8201086 110V 110V 110V 110V 110V 110V 110V 110V Description transformer primary 1-1 transformer primary 1-2 transformer primary 2-1 transformer primary 2-2 transformer primary 3transformer primary 3-2 transformer primary 4-1 transformer primary 4-2 157 6. Circuit Boards - N4700 Cranex D Pan and Pan/Ceph Connector X25 Pin 1 2 3 4 5 6-9 10 Signal 12Vac1 18Vac2 18Vac1 24Vac2 24Vac1 GND 12Vac2 Description 12V transformer secondary 1-1 18V transformer secondary 2-2 18V transformer secondary 2-1 24V transformer secondary 3-2 24V transformer secondary 3-1 Ground 12V transformer secondary 1-2 Connector X26 Pin 1 2 3 4 5 6 7 8 9 10 11 12 13 14 Signal GND GND +25V GND +34V RG2 RG1 Mains GND GND +25V GND Description Ground Ground Power supply voltage Ground Power supply voltage Not used Not used 310Vdc relay control 310Vdc relay control 110/230V information Ground Ground Power supply voltage Ground Connector X27 Pin 1 2 3 4 5 6 158 Signal +34V GND +25V GND -25V GND Description Power supply voltage Ground Power supply voltage Ground Power supply voltage Ground Service manual 8201086 6. Circuit Boards - N4700 “Rg2” RG 8 Cranex D Pan and Pan/Ceph 8 9 Service manual 8201086 159 6. Circuit Boards - N4700 160 Cranex D Pan and Pan/Ceph Service manual 8201086 Cranex D Pan and Pan/Ceph 6. Circuit Boards - N5000 N5000 Optocoupler board N5000 Location In the z-carriage. To access remove z-carriage front cover and z-carriage side cover, left. N5000 Field replaceable parts None. N5000 Description Optocoupler board isolates the accessible electronics of the panoramic unit from the PC and vice versa. It isolates all voltages inside the device from outside of the device. Isolated signals are serial port 1 and 2, signals (TxD and RxD) and exposure button signals. The board has its own floating power supply. N5000 Connectors Connector J5001 Pin 1 2 3 4 5 6 7 8 9 10 Signal TXD1 RXD1 GND TXD2 RXD2 GND EXPSW GND +25V GND Service manual 8201086 Description Serial interface 1 (transmit) Serial interface 1 (receive) Ground Serial interface 2 (transmit) Serial interface 2 (receive) Ground Exposure Ground Power supply voltage Ground 161 6. Circuit Boards - N5000 Cranex D Pan and Pan/Ceph Connector J5002 Pin 1 2 3 4 5 6 7 8 9 Signal TXD2_ISO RXD2_ISO Not used GND_ISO GND_ISO TXD1_ISO RXD1_ISO - Description Not used Isolation serial interface (transmit) Isolation serial interface (receive) Not used Connector J5003 Pin 1 2 Signal EXPSW-_ISO EXPSW1 Description Exposure Connector J5004 Pin 1 2 162 Signal EXPSW-_ISO GND_ISO Description Service manual 8201086 Cranex D Pan and Pan/Ceph Service manual 8201086 6. Circuit Boards - N5000 163 6. Circuit Boards - N5000 164 Cranex D Pan and Pan/Ceph Service manual 8201086 Cranex D Pan and Pan/Ceph 6. Circuit Boards - N5100 N5100/5101 Core Module N5100 - unit versions with s/n B81642 and earlier. N5101 - unit versions with s/n B91643 and later. IMPORTANT NOTE: Core module is the same but the S/W on N5100 and N5101 is NOT interchangeable. N5100/5101 Location Attached to the IO board, in the z-carriage. To access, remove z-carriage front cover N5100/5101 Field replaceable parts None N5100/5101 Description The Core Module is the main controller of the unit. It comprises an Infineon C167CR-LM microcontroller (16-bit), Flash-, SRAM- and EEPROM memories and an I/O interface (CAN, UART, SPI). The unit software is stored on the Flash-memory. The user settings are stored on the EEPROM. There is a 10-bit on-chip A/D converter on the microcontroller. This is not used. When the reset button S1 is pressed, LED H2 will come on briefly. In the normal operation mode only LED H1 will come on. Low-Dropout Voltage Regulator (ICA1) regulates the +5V supply voltage from the incoming higher input voltage. This circuit board module is connected, via connector X902, to the digital I/O board (N5200). Updating the software Software can be updated by downloading it through the RS-connection or fibre optic cable. It is not necessary to change the Core Module to update the software. Changing the Core Module Before replacing the Core Module make a note of the preheat level of the existing tube. The existing preheat level can be found via the service mode (Sr 13 Prh). Service manual 8201086 165 6. Circuit Boards - N5100 Cranex D Pan and Pan/Ceph Use this preheat level with the new Core Module. The preheat level can be entered via the service mode (Sr 13 Prh) into the new Core Module If you replace a faulty Core Module run the preheat program (Sr 13 Prh) to reset the preheat value. N5100/5101 Switches/Jumpers S1 Reset button S2 1 2 3 4 5 6 7 8 ON ON ON ON OFF OFF OFF OFF N5100/5101 Indicator leds Led H1 H2 Colour Red Green Indicates CPURSTOUTPOWER ON N5100/5101 Test points TP TP1 TP3 TP4 TP5 TP7 TP9 TP10 TP11 TP12 TP13 TP14 TP15 166 Signal CPURSTOUTCLKOUTWD RSTVref CANH CANL Vin GND VCC GND EHM Description Reset out from the CPU Clock out from the CPU Watchdog input Reset Ref voltage for CPU’s A/D Can Bus Signal Can Bus Signal Input voltage +5V supply voltage - Service manual 8201086 Cranex D Pan and Pan/Ceph Service manual 8201086 6. Circuit Boards - N5100 167 6. Circuit Boards - N5100 168 Cranex D Pan and Pan/Ceph Service manual 8201086 Cranex D Pan and Pan/Ceph Service manual 8201086 6. Circuit Boards - N5100 169 6. Circuit Boards - N5100 170 Cranex D Pan and Pan/Ceph Service manual 8201086 Cranex D Pan and Pan/Ceph Service manual 8201086 6. Circuit Boards - N5100 171 6. Circuit Boards - N5100 172 Cranex D Pan and Pan/Ceph Service manual 8201086 Cranex D Pan and Pan/Ceph Service manual 8201086 6. Circuit Boards - N5100 173 6. Circuit Boards - N5100 174 Cranex D Pan and Pan/Ceph Service manual 8201086 Cranex D Pan and Pan/Ceph 6. Circuit Boards - N5200 N5200 Digital I/O board N5200 Location In the z-carriage. To access, remove z-carriage front cover N5200 Field replaceable parts None N5200 Description The digital I/O board works as an interface between the core module (main controller) and the “outside world”. There are a large number of 74HC245 buffers to drive various signals. Some of the I/O signals are also optoisolated. The TTL/RS-232 conversion circuit (ICD33) is needed for the connection to the PC. N5200 Switch S1 1 2 3 4 5 6 7 8 ON OFF OFF OFF OFF OFF OFF ON N5200 Jumpers B - s/n B81642 and earlier JP1 pin 2 and 3 JP2 pin 2 and 3 JP3 - X 11 A - s/n B91643 and later JP1 pin 1 and 2 JP2 pin 1 and 2 JP3 pin 2 and 3 JP1 pin 3 and JP2 pin 3 Normal and exhibition use When the jumper is connected to "OFF-OPTION" pins the unit operates normally and x-rays are generated, factory setting. When the jumper is connected to the "ON-OPTION" pins the unit operates normally but NO x-rays are generated. This feature can be used, for example, to demonstrate the unit in exhibitions. Service manual 8201086 175 6. Circuit Boards - N5200 X 13 X 14 X 15 / L X 15 / R Cranex D Pan and Pan/Ceph Program options Cephalostat on left side Cephalostat on right side N5200 Indicator leds Led H1 H2 H3 H4 H5 Colour green green green green green Indicates +25V +5V +6V TXD1 - COM 1 TXD2 - COM 2 N5200 Test points 176 TP TP1 TP2 TP3 TP4 TP5 TP6 TP7 TP8 TP9 TP10 TP11 TP12 Signal LINDIR LINENA CASDIR CASENA PREHREL PREH ROTENA ROTDIR XENA XDIR LINCLK CAS/DETCLK TP13 TP14 TP15 TP16 TP17 TP18 TP19 TP20 TP21 TP22 TP23 TP24 TP25 TP26 ROTCLK ZENA ZDIR RACKENA RACKDIR GND GND1 +5V +25V CEPHCLK OUT5 PROJLIT OUT4 LASLIT Description Direction of y-layer movement Enable of y-layer movement Direction of collimator movement Enable of collimator movement Enable of rotation movement Direction of rotation movement Clock signal of y-layer movement Clock signal of collimator/CCD detector clock Clock signal of rotation movement Z-movement enable signal Z-movement direction signal Clock signal of ceph CCD movement Service manual 8201086 Cranex D Pan and Pan/Ceph TP27 TP28 TP29 TP30 TP31 TP32 TP33 TP34 TP35 TP36 TP37 TP38 TP39 TP40 TP41 TP42 6. Circuit Boards - N5200 GND1 AECFRQ frequency (head size) MAFRQ mA-frequency GND1 +6V CANL CAN-bus signal CANH CAN-bus signal EXPENA Exposure enable RG2 310V relay control RG1 310V relay control GND1 SYSTEM_CLK_OUTPUT SYSTEM_CLK_OUTPUT/2 RXD0 Receive data RXD2 Receive data from terminal board TXD2 Transmit data to terminal board N5200 Connectors Connector X1 Pin 1 2 3 4 5 6 7 8 9 10 11 12 13 14 Signal PNLCLK PNLOUT PNLA0 Not used PNLIN GND GND WARNLIGHT GND GND GND +25V +25V Description Control panel clock Control panel data out Control panel enable Control panel data in Not used Ground Ground Exposure warning light Ground Ground Ground Power supply voltage Power supply voltage Connector X2 Pin 1 2 3 4 5 6 Signal +25V GND GND RG2 RG1 MAINS Service manual 8201086 Description Power supply voltage Ground Ground 310Vdc relay control 310Vdc relay control 110/230V information 177 6. Circuit Boards - N5200 Cranex D Pan and Pan/Ceph Connector X3 Pin 1 2 3 4 5 6 7 8 9 10 Signal TXD1 RXD1 GND TXD2 RXD2 GND EXPSW GND +25V GND Description Ground Ground Exposure Ground Power supply voltage Ground Connector X4 Pin 1 2 3 4 5 6 7 8 9 10 11 12 13 14 15 16 17 18 19 20 21 22 23 24 25 26 178 Signal kVmA7 kVmA6 kVmA5 kVmA4 kVmA3 kVmA2 kVmA1 kVmA0 Prehrel Preh Expena kVmAsel kVmAclk Tempfail kVok mAok SOLOKMIRRORmAfrq GND GND Tubefail GND GND Description Digital kV and mA references Digital kV and mA references Digital kV and mA references Digital kV and mA references Digital kV and mA references Digital kV and mA references Digital kV and mA references Digital kV and mA references Preheat relay control Preheat control Exposure enable Select kV or mA Clock Temperature too high KV control is ok MA control is ok Not used Patient mirror closed Not used current to frequency information Ground Ground Failure in tube head Ground Ground Service manual 8201086 Cranex D Pan and Pan/Ceph 6. Circuit Boards - N5200 Connector X5 Pin 1 2 3 4 5 6 7 8 9 10 11 12 13 14 15 16 17 18 19 20 21 22 23 24 25 26 Signal +5V GND LINDIR LINENA CASDIR CASENA ROTENA ROTDIR LINCLK CASCLK ROTCLK ZENA ZDIR PROJLIT WARNLIGHT XRAYLIT Not used OUT4 OUT5 ZENA1GND GND Description Power supply voltage Ground Linear movement direction Linear movement enable Collimator movement direction Collimator movement enable Rotation movement enable Rotation movement direction Not used Not used Linear movement clock Collimator movement clock Rotation movement clock Z movement enable Z movement direction Not used Not used Patient position light enable Exposure warning light Exposure warning light Not used Not used Z movement enable1 Ground Ground Connector X6 Pin 1 2 3 4 5 6 7 8 9 10 11 12 13 Signal PANCASSW GND Description Collimator position sensor Ground GND Ground GND Ground GND Ground GND Ground Service manual 8201086 179 6. Circuit Boards - N5200 14 15 16 17 18 19 20 Cranex D Pan and Pan/Ceph GND Ground SOLENA KV_FRQ_ENA Solenoid enable Connector X7 Pin 1 2 3 4 5 6 7 8 9 10 11 12 13 14 15 16 17 18 19 20 Signal +5V YFORW ZENA1YBACK RETURN GND ZUP ZDOWN GND Description Power supply voltage Not used Not used Not used Linear movement forward Z movement enable1 Linear movement back Not used Return Ground Not used Not used Not used Z movement up Not used Not used Z movement down Not used Not used Ground Connector X8 Pin 1 2 3 4 5 6 7 8 9 10 180 Signal +5V GND LAT-/PA CEPHROKCEPHCOKCEPHLOKCEPHMIDSW CEPHLIMSW CEPENA CEPHDIR Description Power supply voltage Ground Lateral or PA image in cephalo Cephalo cassette sensor Cephalo movement sensor Cephalo movement sensor Cephalo stepper motor drive enable Ceph stepper motor drive direction Service manual 8201086 Cranex D Pan and Pan/Ceph 11 12 13 14 15 16 17 18 19 20 21 22 23 24 25 26 Not used CPPROJTRIGFILT5 CAECRFRQ CEPHUPCEPHDOWN +5V GND CPOWERCIMAGECEPHCLK CDETCLK CLASLIT GND 6. Circuit Boards - N5200 Cephalo frequency Not used Not used Z movement up Z movement down Power supply voltage Ground Ceph-CCD power active Ceph-CCD image active Cephalo stepper motor clock CCD detector clock Enables head size measurement Ground Connector X9 Pin 1 2 3 4 5 6 7 8 9 10 11 12 13 14 15 16 17 18 19 20 Signal ROT4SW GND ROT3SW GND ROT2SW GND ROT1SW GND ZLIMSW GND ZMIDSW GND +5V GND GND GND GND Service manual 8201086 Description Rotation movement sensor4 Ground Rotation movement sensor3 Ground Rotation movement sensor2 Ground Rotation movement sensor1 Ground Z-movement sensor (bottom) Ground Z-movement sensor (top) Ground Power supply voltage Ground Not used Ground Not used Ground Not used Ground 181 6. Circuit Boards - N5200 Cranex D Pan and Pan/Ceph Connector X12 1 2 3 4 5 6 7 8 9 10 11 12 13 14 15 16 182 PDETCLK PPOWERPIMAGE+5V TXD2 RXD2 +5V GND GND GND NC NC NC NC NC KV_FRQ CCD detector clock Pan-CCD power enable Pan-CCd image enable Power supply voltage Transmit data signal Receive data signal Power supply voltage Not used Not used Not used Not used Not used kVpreset-frequence Service manual 8201086 Cranex D Pan and Pan/Ceph Service manual 8201086 6. Circuit Boards - N5200 183 6. Circuit Boards - N5200 184 Cranex D Pan and Pan/Ceph Service manual 8201086 Cranex D Pan and Pan/Ceph Service manual 8201086 6. Circuit Boards - N5200 185 6. Circuit Boards - N5200 186 Cranex D Pan and Pan/Ceph Service manual 8201086 Cranex D Pan and Pan/Ceph Service manual 8201086 6. Circuit Boards - N5200 187 6. Circuit Boards - N5200 188 Cranex D Pan and Pan/Ceph Service manual 8201086 Cranex D Pan and Pan/Ceph Service manual 8201086 6. Circuit Boards - N5200 189 6. Circuit Boards - N5200 190 Cranex D Pan and Pan/Ceph Service manual 8201086 Cranex D Pan and Pan/Ceph 6. Circuit Boards - N5300 N5300 Top Rack board N5300 Location In upper shelf. To access, remove upper shelf plastic cover by removing the four screws on the top and the the metal cover exposed by removing the 10 screws.. N5300 Field replaceable parts None. N5300 Description TheTop Rack board comprised a number of connectors. The main purpose of the board is to connect the signals that pass through the cables in the large cable bundle to the electronics in the Z-carriage. The other end of the cable bundle is located on the Rotation Connector board. The measurement of a patient's head size is implemented using a AD654 V/f-converter. The circuit allows a lower imput voltage (minimum 4 volts) than the supply voltage (+5V). An emitter follower generates the required additional voltage (+1V). A potentiometer slider has been used to swing the input voltage (+0.5V … +1.0V). The frequency in the output of AD654 depends on the position of the slider. Adjusting the frequency of the pan head support Use service program Sr 14 FrE to check the frequency of the pan head support. The frequency can be adjusted adjusted using trimmers Trim1 and Trim2. The frequency limits are 2100Hz and 4000Hz. The full scale frequency (4000Hz ±100Hz) must be adjusted before the low scale frequency (2100Hz ±100Hz). N5300 Indicator leds None Service manual 8201086 191 6. Circuit Boards - N5300 Cranex D Pan and Pan/Ceph N5300 Test points TP TP1 Signal GND - Description N5300 Jumpers JP1 1-2 2-3 Right cephalo Left cephalo N5300 Connectors Connector J5301 Pin 1 2 3 4 5 6 Signal +34V GND +25V GND -25V GND Description Power supply voltage Ground Power supply voltage Ground Power supply voltage Ground Connector J5302 Pin 1 2 3 4 5 6 Signal +25V GND GND RG2 RG1 MAINS Description Power supply voltage Ground Ground 310Vdc relay control 310Vdc relay control 110/230V information Connector J5303 Pin 1 2 3 4 5 6 7 8 192 Signal +34V GND +34V GND +25V GND -25V GND Description Power supply voltage Ground Power supply voltage Ground Power supply voltage Ground Power supply voltage Ground Service manual 8201086 Cranex D Pan and Pan/Ceph 6. Circuit Boards - N5300 Connector J5304 Pin 1 2 3 4 5 6 7 8 9 10 11 12 13 14 Signal GND GND +25V GND +34V 12VacGND 12Vac1 RG2 RG1 Mains GND GND +25V GND Description Ground Ground Power supply voltage Ground Power supply voltage Ground Power supply voltage 310Vdc relay control 310Vdc relay control 110/230V information Ground Ground Power supply voltage Ground Connector J5305 Pin 1 2 3 4 Signal LIN1 LIN2 LIN3 LIN4 Description Phase1 for y-layer movement motor Phase2 for y-layer movement motor Phase3 for y-layer movement motor Phase4 for y-layer movement motor Connector J5306 Pin 1 2 3 4 5 6 7 8 Signal CAS1 CAS2 CAS3 CAS4 ROT1 ROT2 ROT3 ROT4 Service manual 8201086 Description Phase1 for collimator movement motor Phase2 for collimator movement motor Phase3 for collimator movement motor Phase4 for collimator movement motor Phase1 rotation movement motor Phase2 rotation movement motor Phase3 rotation movement motor Phase4 rotation movement motor 193 6. Circuit Boards - N5300 Cranex D Pan and Pan/Ceph Connector J5309 Pin 1 2 3 4 5 6 7 8 9 10 11 12 13 14 15 16 Signal Description +5V Power supply voltage GND Ground SOLOKSolenoid ok PROJLIT Patient position light enable AEC_FRQ_TO_CPU Frequency GND Ground TXD2 Transmit data signal RDX2 Receive data signal GND Ground PDETCLK CCD detector clock GND Ground PPOWERPan-CCD power active PIMAGEPan-CCD image active GND Ground Connector J5310 Pin 1 2 3 4 5 6 7 8 9 10 11 12 13 14 15 16 194 Signal PDETCLK PPOWERPIMAGE+5V TXD2 RXD2 +5V GND GND GND KV_FRQ Description CCD detector clock Pan-CCD power enable Pan-CCd image enable Power supply voltage Transmit data signal Receive data signal Power supply voltage kVpreset-frequence Service manual 8201086 Cranex D Pan and Pan/Ceph 6. Circuit Boards - N5300 Connector J5312 Pin 1 2 3 4 5 6 Signal +5V YSENS1YSENS2YSENS3GND Description Power supply voltage Y-layer movement sensor1 Y-layer movement sensor2 Y-layer movement sensor3 Ground Connector J5313 Pin 1 2 3 4 5 6 7 8 9 10 11 12 13 14 15 16 17 18 19 20 Signal GND GND LINMID Sw GND LINLIM Sw GND GND GND COL1 Sw COL2 Sw COL3 Sw SOLENA KV_FRQ_ENA - Description Ground Ground Z-movement sensor (top) Ground Z-movement sensor (bottom) Ground Ground Ground Collimator sensor 1 In normal use = COL3 Sw Collimator sensor 3 (JP2 normal position) Solenoid enable - Connector J5314 Pin 1 2 3 4 5 6 7 8 9 10 Signal ROT4SW GND ROT3SW GND ROT2SW GND ROT1SW GND ZLIMSW - Service manual 8201086 Description Rotation movement sensor4 Ground Rotation movement sensor3 Ground Rotation movement sensor2 Ground Rotation movement sensor1 Ground Z-movement sensor (bottom) - 195 6. Circuit Boards - N5300 11 12 13 14 15 16 17 18 19 20 Cranex D Pan and Pan/Ceph ZMIDSW GND +5V GND GND GND GND Z-movement sensor (top) Ground Power supply voltage Ground Ground Not used Ground Ground Connector J5316 Pin 1 2 3 4 5 6 7 8 9 10 11 12 13 14 15 16 Signal - Description - COL1SW +5V COL13W SOLENAGND ROT1SW ROT2SW ROT3SW ROT4SW - Collimator sensor1 Power supply voltage Collimator sensor2 Solenoid enable Ground Not used Rotation movement sensor1 Rotation movement sensor2 Rotation movement sensor3 Rotation movement sensor4 - Connector J5317 Pin 1 2 Signal GND ZLIMSW Description Ground Z-movement sensor (bottom) Connector J5318 Pin 1 2 196 Signal GND ZMIDSW Description Ground Z-movement sensor (top) Service manual 8201086 Cranex D Pan and Pan/Ceph 6. Circuit Boards - N5300 Connector J5319 Pin 1 2 3 4 5 6 7 8 9 10 11 12 13 14 15 16 17 18 19 20 21 22 23 24 25 26 Signal kVmA7 kVmA6 kVmA5 kVmA4 kVmA3 kVmA2 kVmA1 kVmA0 Prehrel Preh Expena kVmAsel kVmAclk Tempfail kVok mAok SOLOKMIRRORmAfrq GND GND Tubefail GND GND Description Digital kV and mA references Digital kV and mA references Digital kV and mA references Digital kV and mA references Digital kV and mA references Digital kV and mA references Digital kV and mA references Digital kV and mA references Preheat relay control Preheat control Exposure enable Select kV or mA Clock Temperature too high KV control is ok MA control is ok Patient mirror closed current to frequency information Ground Ground Failure in tube head Ground Ground Connector J5320 Pin 1 2 3 4 5 6 7 8 9 10 11 12 13 14 15 Signal kVmA7 kVmA6 kVmA5 kVmA4 kVmA3 kVmA2 kVmA1 kVmA0 Prehrel Preh Expena kVmAsel kVmAclk Tempfail kVok Service manual 8201086 Description Digital kV and mA references Digital kV and mA references Digital kV and mA references Digital kV and mA references Digital kV and mA references Digital kV and mA references Digital kV and mA references Digital kV and mA references Preheat relay control Preheat control Exposure enable Select kV or mA Clock Temperature too high KV control is ok 197 6. Circuit Boards - N5300 16 17 18 19 20 21 22 23 24 25 26 Cranex D Pan and Pan/Ceph mAok mAfrq GND GND Tubefail GND GND MA control is ok current to frequency information Ground Ground Failure in tube head Ground Ground Connector J5321 Pin 1 2 3 4 Signal Description +1V HEAT_SIDE_SLIDE +0.5V - Connector J5322 Pin 1 2 3 4 5 6 7 8 9 10 11 12 13 14 15 16 17 18 19 20 21 22 23 24 25 26 198 Signal CAS1 CAS2 CAS3 CAS4 LIN1 LIN2 LIN3 LIN4 ROT1 ROT2 ROT3 ROT4 Not used PROLIT MIRROR+34V GND +34V GND +34V GND Description Phase1 for collimator movement motor Phase2 for collimator movement motor Phase3 for collimator movement motor Phase4 for collimator movement motor Phase1 for linear movement motor Phase2 for linear movement motor Phase3 for linear movement motor Phase4 for linear movement motor Phase1 rotation movement motor Phase2 rotation movement motor Phase3 rotation movement motor Phase4 rotation movement motor Patient position light enable Patient mirror closed Power supply voltage Ground Power supply voltage Ground Power supply voltage Ground Service manual 8201086 Cranex D Pan and Pan/Ceph Service manual 8201086 6. Circuit Boards - N5300 199 6. Circuit Boards - N5300 200 Cranex D Pan and Pan/Ceph Service manual 8201086 Cranex D Pan and Pan/Ceph Service manual 8201086 6. Circuit Boards - N5300 201 6. Circuit Boards - N5400 Cranex D Pan and Pan/Ceph N5400 Tubehead board N5400 Location In the tubehead. Can not be accessed. N5400 Field replaceable parts None N5400 Description The Tubehead board is sealed inside the tubehead and cannot be accessed. The board supplies the high voltage and high current to the tube. On the board there is a high voltage and high frequency transformer which is driven by an inverter board. The high voltage is multiplied by 16 using two diode-capacitor multiplying circuits. The tubehead voltage can be adjusted between 57-85kV. The cathode end of the tube is connected to a filament transformer and the filament board drives the current through it. The Tubehead board also has a thermistor which will open if the oil in the tubehead becomes too hot. Usually it will take a couple of hours for the oil to cool sufficiently for the termistor to close and tubehead to return to its normal state. N5400 Indicator leds None N5400 Test points None 202 Service manual 8201086 Cranex D Pan and Pan/Ceph Service manual 8201086 6. Circuit Board - N5400 203 6. Circuit Board - N5500 Cranex D Pan and Pan/Ceph N5500 Collimator sensor board N5500 Location In collimator in front of the tubehead. To access it remove tubehead cover. N5500 Field replaceable parts None N5500 Description The N5500 board is used to detect the collimator positions N5500 Indicator leds /Test points None N5500 Connectors Connector J5501 Pin 1 2 3 4 5 6 7 8 Signal +5V GND +25V solenasolokcol1sw col3sw GND Description Enable the child aperture solenoid Child aperture on selected L=pan, H=ceph H=ceph, L=pan Connector J5502 Pin 1 2 3 4 Signal +25V solenasolokGND Description Enable the child aperture solenoid Child aperture on selected Connector J5503 Pin 1 2 204 Signal col1sw GND Description Service manual 8201086 Cranex D Pan and Pan/Ceph Service manual 8201086 6. Circuit Board - N5500 205 6. Circuit Board - N5500 206 Cranex D Pan and Pan/Ceph Service manual 8201086 Cranex D Pan and Pan/Ceph 6. Circuit Board - N5600 N5600 Sensor connector board N5600 Location Inside the CCD sensor N5600 Field replaceable parts None N5600 Description The N5600 board serves as a connector between the CCD sensor and the unit (sensor holder) and allows the CCD sensor to be removed from the unit. N5600 Indicator leds /Test points None Service manual 8201086 207 6. Circuit Board - N5600 208 Cranex D Pan and Pan/Ceph Service manual 8201086 Cranex D Pan and Pan/Ceph Service manual 8201086 6. Circuit Board - N5600 209 6. Circuit Board - N5700 Cranex D Pan and Pan/Ceph N5700 DIB connector board N5700 Location Inside the CCD sensor holder in rotating part and in ceph head. N5700 Field replaceable parts None N5700 Description The N5700 board serves as a connector between the CCD sensor and the unit (sensor holder) and allows the CCD sensor to be removed from the unit. N5700 Indicator leds /Test points None 210 Service manual 8201086 Cranex D Pan and Pan/Ceph Service manual 8201086 6. Circuit Board - N5700 211 6. Circuit Board - N5800 Cranex D Pan and Pan/Ceph N5800 Data Interface board N5800 Location In the rotating unit and in ceph head. To access remove the CCD sensor holder covers and with the ceph head also remove the metal cover shield on the board. N5800 Field replaceable parts None. N5800 Description Data interface board (DIB) serves as an interface between the terminal board and CCD detector. Image data signals from the CCD are converted into a differential mode while passing to the terminal board. TTL/RS-232 conversion is done to produce the control signals. Control signals from the terminal are converted back to TTL. The DIB also generates various supply voltages for the CCD: +3VA, +15VA, -9VA, +5VA, +3.3 V. The +3VA, +15VA, -9VA voltages are taken from the +18 V input. There are two jumpers on the N5800 board, JP1 and JP2. Depending on where the DIB has been assembled, the jumpers will either be in the to PAN or CEPH position. N5800 Test points TP TP1 TP2 TP3 TP4 TP5 TP6 TP7 J5804.6 J5804.8 J5804.10 J5804.12 J5804.14 212 Signal uC+3.3V GND CTXD_RS232 CRXD_RS232 GND GND GND +3.3V +15VA +3VA -8VA +5VA Description Permanent +3.3VDC for CCD TXD signal, RS-232 level RXD signal, RS-232 level +3.3VDC Analog +15VA for the CCD Analog phase voltage (+3VA) for the CCD Analog phase voltage 8VA) for the CCD Analog +5VA for the CCD Service manual 8201086 Cranex D Pan and Pan/Ceph 6. Circuit Board - N5800 N5800 Connectors Connector J5801 Pin 1 2 3 4 5 6 7 8 9 10 11 12 13 14 15 16 17 18 19 20 Signal VV_RS232 AEC_RS232 TDICLKTDICLK+ HLHL+ DSDS+ D5D5+ D4D4+ D3D3+ D2D2+ D1D1+ D0D0+ Description VV, RS 232 level AEC, RS 232 level HL-signal, differential mode DS-signal, differential mode D5-signal, differential mode D4-signal, differential mode D3-signal, differential mode D2-signal, differential mode D1-signal, differential mode D0-signal, differential mode Connector J5802 Pin 1 2 3 4 5 6 7 8 9 10 11 12 13 14 15 16 17 18 19 20 21-26 Signal Description CR_RS232 RXD signal, RS 232 level CT_RS232 TXD signal, RS 232 level GND Ground LOOP_5V GND Ground LOOP_SENSE GND Ground Not used Not used VSP_+5V Power supply voltage (CCD) Not used IMAGEQ CEPHLIM CEPHMID IMAGE_RS232 Image data RS 232 level RESET CAM_PERMANENT_+5V CAM_PERMANENT_+5V VCC_+5V Power supply voltage (CCD) VAP_+18V Power supply voltage (CCD) Not used Service manual 8201086 213 6. Circuit Board - N5800 214 Cranex D Pan and Pan/Ceph Service manual 8201086 Cranex D Pan and Pan/Ceph Service manual 8201086 6. Circuit Board - N5800 215 6. Circuit Board - N5800 216 Cranex D Pan and Pan/Ceph Service manual 8201086 Cranex D Pan and Pan/Ceph Service manual 8201086 6. Circuit Board - N5800 217 6. Circuit Board - N5800 218 Cranex D Pan and Pan/Ceph Service manual 8201086 Cranex D Pan and Pan/Ceph Service manual 8201086 6. Circuit Board - N5800 219 6. Circuit Board - N5900(1) / N5905 Cranex D Pan and Pan/Ceph N5900(1) / N5905 Terminal board N5900 / N5905 - unit versions s/n B81642 and earlier. N5901 / N5905 - unit versions s/n B91643 and later. IMPORTANT NOTE: N5900 and N5901 are NOT interchangeable. N5900(1) / N5905 Location Inside the rotating unit (N5900, N5901). To access remove the CCD sensor cover and the inner, lower cover from sensor side. On the ceph head (N5905). To access remove the ceph head cover. N5900(1) / N5905 Field replaceable parts EPROM can be upgraded. For N5900, eprom version T1 is for the panoramic programs For N5901, eprom version T1 V1.4 is for the panoramic programs For N5905, eprom version T2 is for cephalometric programs. N5900(1) / N5905 Description Two identical boards except for the flash eprom. This board serves as a bridge between the optical (towards the PC) and electrical communications. It sends control messages from the PCI Board to the CPU Board and the CCD sensor according to the address. The board combines control data (from the CPU and the CCD sensor) with the image data from the CCD sensor and then sends this information to the PC via PCI Board. The RS422 and RS232 voltage level shifts. Signals PPOWER, PIMAGE, PDETCLK (from the CPU) control image acquisition. 220 Service manual 8201086 Cranex D Pan and Pan/Ceph 6. Circuit Board - N5900(1) / N5905 Adjusting the frequency of the ceph nasion support Use service program Sr 14 FrE to check the frequency of the ceph nasion support. The frequency can be adjusted using a frequency meter as follows: Connect the probes of a frequency meter to the Ceph Terminal board test points TP52 (NASIO FRQ) and TP60 (GND). Slide the nasion support as far out as possible (away from the ear posts). Adjust trimmer R109 until you get a reading of 3.4 kHZ (25 Hz) on the frequency meter. Slide the nasion support in as far as it will go (towards the ear posts). Adjust trimmer R146 the until you get a reading of 0.7 kHz (24 Hz) on the frequency meter. Check the readings again and repeat the adjustment if necessary. N5900(1) / N5905 Indicator LEDs LED H1 H2 H3 H4 H5 H6 H7 H8 H9 Colour green green red green green green green red green Service manual 8201086 Description PLD Core +2.5V PLD I/O +3.3V EPROM Failure CAM +5V IMAGE +5V Link OK Reset Nasio reference voltage +2V 221 6. Circuit Board - N5900(1) / N5905 Cranex D Pan and Pan/Ceph N5900(1) / N5905 Test points TP TP1 TP2 TP3 TP4 TP5 TP6 TP7 TP8 TP9 TP10 TP11 TP12 TP13 TP25 TP26 TP27 TP28 TP29 TP32 TP33 TP34 TP35 TP36 TP37 TP38 TP39 TP40 TP41 TP42 TP43 TP44 TP45 TP46 TP46 TP50 TP51 TP52 TP54 TP55 TP56 TP57 TP58 TP59 TP60 222 Signal Description TXD_TO_CAM_TTL Transmit Data to Sensor(TTL) CAM +5V +6.1V CAM_SHDN-Sensor Shutdown TDI TDI clock GND PLD CORE +2.5V +5V PLD IO +3.3V SPARE2 SPARE1 CCD_POWERCPOWER, activates voltage sources for the CCD AEC_FRQ +2V Nasio pot +2V ref voltage LOOP_5V Used to recognize if there is a CCD sensor LOOP_SENSE attached (both LOOPs) SPARE3 +5V CAM_RXD2 CAM_RXD1 VVValid video IMAGEQ Inv. IMAGE-signal SSH/LHigh/Low- byte DS Data Strobe IMAGE5 Image Data Signal 5 IMAGE4 Image Data Signal 4 IMAGE3 Image Data Signal 3 IMAGE2 Image Data Signal 2 VCC(RXD) ECLINECLIN COPPER_TEST+ COPPER_TESTVCC (ECL-TTL) EN_NASIO_FRQ Enable Nasio Frequency NASIO_FRQ Nasio Frequency IMAGE1 Image Data Signal 1 IMAGE0 Image Data Signal 0 VCC(TXD) +1V Nasio pot +1V ref voltage NASIO_POSITION_SLIDE Nasion position +2V Nasio pot +2V ref voltage GND - Service manual 8201086 Cranex D Pan and Pan/Ceph 6. Circuit Board - N5900(1) / N5905 N5900(1) / N5905 Connectors Connector X223 Pin 1 2 3 4 5 6 7 8 9 10 11 12 13 14 15 16 17 18 19 20 Signal VV_RS232 AEC_RS232 TDICLKTDICLK+ HLHL+ DSDS+ D5D5+ D4D4+ D3D3+ D2D2+ D1D1+ D0D0+ Description VV, RS 232 level AEC, RS 232 level HL-signal, differential mode Connector X224 Pin 1 2 3 4 5 6 7 8 9 10 11 12 13 14 15 16 17 18 19 20 21-26 Signal Description CRDX_RS232 CTDX_RS232 GND Ground LOOP_5V GND Ground LOOP_SENSE GND Ground Not used Not used VSP_+5V Power supply voltage (CCD) Not used IMAGEQ Not used Not used KVOK MAOK CAM_PERMANENT_+5V CAM_PERMANENT_+5V VCC_+5V Power supply voltage (CCD) VAP_+18V Power supply voltage (CCD) Not used Service manual 8201086 223 6. Circuit Board - N5900(1) / N5905 Cranex D Pan and Pan/Ceph Connector X225 Pin 1-2 3 4 5 6 7 8 9 10 11 12 13 14 Signal Not used VSP_+5V GND GND GND GND GND GND VAP_+18V VCC_+5V +5.7V +5.7V Description Power supply voltage (CCD) Ground Ground Ground Ground Ground Ground Power supply voltage (CCD) Power supply voltage (CCD) Not used Power supply voltage (CCD) Power supply voltage (CCD) Connector X226 Pin 1 2 3 4 5 6 7 8 9 10 Signal Description PDETCLK CCD detector clock Not used PPOWERPan-ccd power enable PIMAGEPan-ccd image enable NC Not used RDX2 Receive data signal TXD2 Transmit data signal Not used Not used AEC_FRQ_TO_CPU Frequency line to CPU ICD13 ICD15 Fiber obtic RXD Fiber obtic TXD Only N5905 Ceph Connector X221 Pin 1 2 3 224 Signal +2V POT.SLIDE +1V Service manual 8201086 Cranex D Pan and Pan/Ceph Service manual 8201086 6. Circuit Board - N5900(1) / N5905 225 6. Circuit Board - N5900(1) / N5905 226 Cranex D Pan and Pan/Ceph Service manual 8201086 Cranex D Pan and Pan/Ceph Service manual 8201086 6. Circuit Board - N5900(1) / N5905 227 6. Circuit Board - N5900(1) / N5905 228 Cranex D Pan and Pan/Ceph Service manual 8201086 Cranex D Pan and Pan/Ceph Service manual 8201086 6. Circuit Board - N5900(1) / N5905 229 6. Circuit Board - N6000 Cranex D Pan and Pan/Ceph N6000 Ceph Head board N6000 Location On the Cranex D ceph head . To access remove the ceph head cover. N6000 Field replaceable parts None N6000 Description This board includes the stepper motor controller for the ceph motor to allow CEPH imaging movements. It also supplies power to the CCD sensor when it is attached to the ceph head. N6000 Jumpers J1 OFF in normal use, ON enables exposure without Beam Alignment Board (it ignores the CEPHC-signal) for service purposes. N6000 Indicator LEDs LED H1 H2 H3 H4 H5 H6 H7 H8 H9 H10 H11 H12 H13 230 Colour green red red red red red green green green green green green green Description +34V(permanent) SCAN1 SCAN2 +5V (permanent) SCAN3 5SCAN4 +18V (VAP) -5V (VSN) +26V (VDD) +5 (VPS) +6.1V (permanent) -18V (VAN) +5V (VCC) Service manual 8201086 Cranex D Pan and Pan/Ceph 6. Circuit Board - N6000 N6000 Test points TP TP1 TP3 TP6 TP7 TP8 TP9 TP10 TP11 TP12 TP15 TP17 TP18 TP20 TP21 TP22 TP23 TP24 TP25 TP26 TP27 TP28 TP29 TP30 TP31 TP32 TP33 TP34 TP35 TP36 Signal CLASLITCEPHDIRCEPHLIMGND(CPU) CAECFRQ CEPHMIDCPU_RXD +5V CPROJTRIGLAT/PA+34V CPOWERCEPHDOWNCCLOCK IMAGECEPHUPGND CPROGTRIG_ GND +5V VAP VSN –5V VDD +26V GND VSP +5V +6.1V VAN –18V GND VCC +5V Service manual 8201086 Description Enables head size measurement Cephalo stepper motor diection Cephalo movement sensor Cephalo Frequency Cephalo movement sensor Serial communication (CPU) Head support in Lat or PA Supply voltage +34V Enables power for the CCD sensor TDI clock for the ceph detector Enables the CCD outputs SW+18V Analog +18VDC (CCD sensor) Not used Not used Analog +5VDC (CCD detector) Used in N5900 for supply voltages Not used Digital +5VDC (CCD detector) 231 6. Circuit Board - N6000 Cranex D Pan and Pan/Ceph N6000 Connectors Connector X231 Pin 1-2 3 4 5 6 7 8 9 10 11 12 13 14 Signal Not used VSP_+5V GND GND GND GND GND GND VAP_+18V VCC_+5V +5.7V +5.7V Description Power supply voltage (CCD) Ground Ground Ground Ground Ground Ground Power supply voltage (CCD) Power supply voltage (CCD) Not used Power supply voltage (CCD) Power supply voltage (CCD) Connector X232 Pin 1 2 3 4 5 6 7 8 9 10 Signal Description PDETCLK CCD detector clock Not used PPOWERPan-ccd power enable PIMAGEPan-ccd image enable NC Not used RDX2 Receive data signal TXD2 Transmit data signal Not used Not used AEC_FRQ_TO_CPU Frequency line to CPU Connector X233 Pin 1 2 3 4 5 6 7 8 9 10 232 Signal Description VSN_-5V Power supply GND Ground VSP_+5V Power supply GND Ground +5V Not used LASER_ON Not used CEPHL_ Left CEPHC_ Central CEPHR_ Right GND Ground Service manual 8201086 Cranex D Pan and Pan/Ceph 6. Circuit Board - N6000 Connector X236 Pin 1 2 3 4 5 6 7 8 9 10 11 12 13 14 15 16 17 18 19 20 21 22 23 24 25 26 Signal +5V GND LAT-/PA CEPHROKCEPHCOKCEPHLOKCEPHMIDSW CEPHLIMSW CEPENA CEPHDIR CPPROJTRIGFILT5 CAECRFRQ CEPHUPCEPHDOWN+5V GND CPOWERCIMAGECEPHCLK CDETCLK CLASLIT GND Description Power supply voltage Ground Lateral or PA image in cephalo Ceph cassette sensor Ceph movement sensor Ceph movement sensor Ceph stepper motor drive enable Ceph stepper motor drive direction Not used Ceph (nasion/head size) frequency Not used Not used Z movement up Z movement down Power supply voltage Ground Ceph-CCD power active Ceph-CCD image active Ceph stepper motor clock CCD detector clock Enables head size measurement Ground Connector X237 Pin 1 2 3 4 5 6 Signal +34V GND GND GND Service manual 8201086 Description Power supply voltage Ground Not used Ground Not used Ground 233 6. Circuit Board - N6000 Cranex D Pan and Pan/Ceph Connector X234 Pin 1 2 3 4 5 6 7 8 Signal Lat/PA-_SW GND CEPHUP_SW_ CEPHDOWN_SW_ GND CPPROJTRIG_SW_ - Connector X235 Pin 1 2 3 4 234 Signal Stepper1 Stepper2 Stepper3 Stepper4 Service manual 8201086 Cranex D Pan and Pan/Ceph Service manual 8201086 6. Circuit Board - N6000 235 6. Circuit Board - N6000 236 Cranex D Pan and Pan/Ceph Service manual 8201086 Cranex D Pan and Pan/Ceph Service manual 8201086 6. Circuit Board - N6000 237 6. Circuit Board - N6100 Cranex D Pan and Pan/Ceph N6100 Beam Alignment board N6100 Location In the ceph head on ceph aperture. To access remove the ceph aperture covers. N6100 Field replaceable parts None N6100 Description The alignment of the CEPH x-ray beam is controlled by the main CPU throughout the exposure. The position of the CEPH X-ray beam in relation to the secondary collimator is monitored by the Beam Alignment board that uses three detection channels (CEPHL, CEPHR& CEPHC). If either the CEPHL or CEPHR -signal becomes active the main CPU accelerates or decelerates the rotation and linear movements, i.e. the movement of the X-ray beam. If CEPHC -signal becomes passive the exposure is terminated (CbA, Alignment error). Beam Alignment Monitoring - Sensitivity Adjustment 1. Make sure that radiation beam is positioned so that it strikes in the middle of secondary slot. 2. Press the RETURN-key to drive the unit to the ceph PIO position (secondary slot and the CCDsensor are in the "middle" position). If the ceph head does not go to the PIO position first press the RETURN-key in PAN mode and then select the CEPH mode and press the RETURN-key again. 3. Take exposures in the EPS mode at 57kV/2mA and adjust the center channel (CEPHC) sensitivity using trimmer R10 on the N6100 board so that it detects radiation, LED H2 will come on. Turn trimmer R10 counter-clockwise (CCW) to increase the sensitivity and clockwise (CW) to decrease the sensitivity. In Germany and other countries where the prufkörper test method is used, use 0.8 mm copper filtration and 85kV/8mA instead of the values stated above. 238 Service manual 8201086 Cranex D Pan and Pan/Ceph 6. Circuit Board - N6100 4. Move the Ceph secondary collimator by hand (use the cogged belt) so that it moves 10mm to the left from the PIO position. Adjust the right channel (CEPHR) sensitivity using trimmer R16 on the N6100 board until LED H3 comes on. Use the EPS mode 60kV/2.5mA. 5. Move the Ceph secondary collimator by hand (use the cogged belt) so that it moves 10mm to the right from PIO position. Adjust the left channel (CEPHL) sensitivity using trimmer R4 until LED H1 comes on. Use the EPS mode 60kV/ 2.5mA. NOTE! Normally during steps 3-5 only one LED at time will come on. Decrease sensitivities so that conditions in 3-5 are met. N6100 Indicator LEDs LED LED H1 H2 H3 H4 Colour Colour Green Green Green Green Description Description CEPHL CEPHC CEPHR +5V N6100 Test points None N6100 Connectors Connector X240 Pin 1 2 3 4 5 6 7 8 9 10 Signal VSN_-5V GND VSP_+5V GND +5V LASER_ON CEPHL_ CEPHC_ CEPHR_ GND Service manual 8201086 Description Power supply Ground Power supply Ground Not used Not used Left Central Right Ground 239 6. Circuit Board - N6100 240 Cranex D Pan and Pan/Ceph Service manual 8201086 Cranex D Pan and Pan/Ceph Service manual 8201086 6. Circuit Board - N6100 241 6. Circuit Boards - N6200 Cranex D Pan and Pan/Ceph N6200 Movement Detect board N6200 Location In the ceph head. To access remove the ceph head cover. N6200 Field replaceable parts None N6200 Description The N6200 board includes optosensors that are used to detect the position of the Ceph movement. The signals from the two sensors are CEPHLIMSW and CEPHMIDSW . Each optosensor comprises a transmitter LED, and a receiver, or base. The sensor signal remains on as long as the base receives light from the LED. If the light beam to the base is cut off, for example, by the positioning rail, the sensor signal is switched off. N6200 Indicator LEDs/ Test points None N6200 Connectors Connector X211 Pin 1 2 3 4 242 Signal CEPHPIO CEPHLIM GND LOOP_5V Description Service manual 8201086 Cranex D Pan and Pan/Ceph Service manual 8201086 6. Circuit Board - N6200 243 7. Error Codes and Trouble Shooting Cranex D Pan and Pan/Ceph 7. Error Codes and Trouble Shooting 7.1 Warnings and precautions Warning - X-rays When checking and testing the operation of the unit always protect yourself from radiation generated by the Xray tube. Warning - Electric shock Switch the unit off and isolate it from the main power supply before handling or replacing any of the circuit boards in the unit. Warning - High voltage Before handling or replacing any of the boards switch the unit off, isolate it from the main power supply and wait 10 minutes for the capacitors on these boards to discharge. Caution - Static discharge Always take adequate precautions when handling circuit boards to prevent static discharge. Leave all new or replacement circuit boards in their protective packaging until the boards are needed. When handling the boards hold them by their edges and do not touch any connectors or components. Static discharge can destroy board components. 244 Service Manual 8201086 Cranex D Pan and Pan/Ceph 7. Error Codes and Trouble Shooting 7.2 Trouble shooting principles Circuit boards Circuit boards cannot be repaired in the field. If a board is found to be faulty the quickest way to get the unit working again is to replace the faulty board with a new one or one that is known to be working correctly. Indicator LEDs On most of the circuit boards there are indicator LEDs. These are described in the section Circuit Board Description. Test pins On some of the circuit boards there are test pins that allow the board to be checked to see if it is functioning correctly. These are also described in the section Circuit Board Description. When checking voltages a digital multimeter (DMM) must be used. Checking cables The procedure for checking the cables is as follows: 1. Make sure that the connectors on the cables are correctly plugged in to their respective connectors on the circuit boards. The connectors must be squarely positioned and must not be loose or crooked. If the connector has a locking mechanism make sure that it is locked. If the connector looks out of position, remove the connector, check the pins (see 2, below). If the pins are okay reconnect the connector. 2. Disconnect the connectors from the boards and make sure that there are no bent, broken or missing pins. If there is damage that can be easily repaired, for example straightening a pin, repair the damage and reconnect the connector. If the damage cannot be repaired replace the cable. Service Manual 8201086 245 7. Error Codes and Trouble Shooting Cranex D Pan and Pan/Ceph 3. Visually check the cable for cuts, wear, damaged insulation and kinks. If there is obvious mechanical damage to the cable it must be replaced. If there is no obvious mechanical damage use a digital multimeter (DMM) to check the resistance of the different wires within the cable. An undamaged wire will have no resistance (0 ohm), a damaged wire will have a resistance value. Bad quality images Bad quality images can be due to one or more of the following: - incorrect patient positioning - a badly aligned unit - image filtering settings Incorrect patient positioning If the unit is producing bad quality images, first make sure that the user is positioning the patient correctly. For information on how to position the patient refer to the User's Manual. A badly aligned unit If patient positioning is correct, check that the alignment of the unit. For information on how to align the unit refer to the Installation and set-up manual. Image filtering settings If patient positioning and unit alignment are correct, refer to section Image Appearance. 246 Service Manual 8201086 Cranex D Pan and Pan/Ceph 7. Error Codes and Trouble Shooting Power supply problems Power supply problems are usually due to blown fuse on the power supply board. By checking the status of the indicator lights on the power supply board and verifying the condition of fuses, most power supply problems can be solved. See N4700, Power Supply. Display problems If the display remains blank when the unit is switched on it is either because the unit is not receiving power or because there is a problem with the display. 7.3 Error codes and what they mean The unit selftest When the unit is switched on, it carries out a selftest. During the test the software the SPI communication, control panel and some circuit boards are tested. If the unit is functioning correctly software version information will appear briefly on the kV, mA and s display of control panel. Error codes Error codes appear on the control panel, for example: E 13 dor An error code (or codes) will appear if the unit malfunctions during operation or if the unit is not ready to take an exposure when the exposure button is pressed. The unit cannot be operated if there is an error message on the display. Error codes are cleared by pressing the E key. If the error is not corrected, the error code will keep reappearing. Service Manual 8201086 247 7. Error Codes and Trouble Shooting Cranex D Pan and Pan/Ceph List of error codes PC1 NC (only on the User’s Interface) CAUSE X-ray unit not switched on and/or there is no connection between the PC and the Unit. SOLUTION Switch the unit on and/or check that the cable between the PC and the UNIT is connected properly. E2 CAS PROBLEM Service jumper connected to N5200 board. SOLUTION Remove the service jumper. (The jumper must only be used for service purposes) E3 CoL (Pan/Ceph units only) CAUSE The primary slot has not moved to the correct position. Ceph primary slot has been selected for a panoramic program exposure. SOLUTION Check that the collimator motor is functioning correctly. Check that the optosensors are functioning correctly. E4 CoL (Pan/Ceph units only) CAUSE The primary slot has not moved to the correct position. Panoramic primary slot has been selected for a ceph exposure. SOLUTION Check that the collimator motor is functioning correctly. Check that the optosensors are functioning correctly. 248 Service Manual 8201086 Cranex D Pan and Pan/Ceph 7. Error Codes and Trouble Shooting E7 rEL CAUSE The exposure button was released during an exposure. SOLUTION Operator error. If the exposure failed while the exposure button was still being pressed, check the exposure switch by taking a test exposure without patient to see if the exposure button is defective or not. If the same problem occurs again, replace the exposure button. E8 MoE CAUSE The exposure button was pressed when one of the Y/Z keys was being pressed. SOLUTION Do not press the exposure button while the Y/Z buttons are being pressed. E9 (***) (the WAIT time will appear in seconds) CAUSE The WAIT time (cooling time between exposures) has not yet elapsed. SOLUTION Wait until the WAIT time elapses. E10 dor CAUSE The patient positioning mirror is open. SOLUTION Operator error. Close the mirror. Service Manual 8201086 249 7. Error Codes and Trouble Shooting Cranex D Pan and Pan/Ceph E12 cCo CAUSE The primary collimator has not changed to the child panoramic size. SOLUTION Press the E key to clear the error message. Then press the RETURN key to drive the unit to the PIO position, and then press the key again to drive it to the START position. If the error message reappears, call service. NOTE Exposures of children can be taken with the adult panoramic program. Note ,however, that the height and width of the exposed area is not reduced. E16 PoS CAUSE i. The rotating unit is not in the PIO or START position. ii The mirror is open. SOLUTION i. Press the E key to clear the error and then press the RETURN key to drive the rotating unit to the right position. ii. Close the mirror. E18 dCh CAUSE i. There is no connection to the PC. The "Link OK" LED on the PCI is off. ii. or DfW (not in USA), or the dental imaging software you are using or the User Interface are not on iii. or the CCD sensor is not attached to the sensor holder iv. or the CCD sensor is attached to the wrong sensor holder (pan/ceph units only) v. or the CCD sensor is not fully locked in position 250 Service Manual 8201086 Cranex D Pan and Pan/Ceph 7. Error Codes and Trouble Shooting SOLUTION i. Switch the PC on and start DfW (not in USA), or the dental imaging software you are using and start the User Interface program ii. Start DfW (and press the Image Capture button) (not in USA) and the User Interface. iii. Attach the CCD sensor to the sensor holder. iv. Attach the CCD sensor to the correct pan or ceph sensor holder. v. Make sure that the CCD sensor locking lever is pushed fully to the left, the locked position. vi. If the error message keeps reappearing, make sure that the file "dicc.ini" C:/ Program Files/Soredex/ includes the correct devices. If the unit is a Pan only it should state "Devices=PP1PAN" If the unit is a Pan/Ceph it should state "Devices=PP1PAN,PP1CEPH". Service Manual 8201086 251 7. Error Codes and Trouble Shooting 252 Cranex D Pan and Pan/Ceph Service Manual 8201086 Cranex D Pan and Pan/Ceph 7. Error Codes and Trouble Shooting E19LbL CAUSE The PC acknowledges the image identification data, but the data is corrupted. SOLUTION Check that the cables between the PC and unit are connected. C1 HHo CAUSE The thermal switch in the tube head has been activated because the unit has over heated because of extended continuous use. SOLUTION Wait at least one hour for the tube head to cool down. Note that you will not be able to clear the error message until the tube head has cooled to the correct temperature. If the error message appears even if the unit has not been used a lot, switch the unit off and then on again. If the error message reappears the thermal switch may be defective. The N5200 board or the tubehead may be faulty and have to be replaced. C2 (***) (the mains voltage is displayed) CAUSE The mains voltage out of allowed tolerances. SOLUTION Check that mains power supply is correct (115/230V, refer type label). On N4700, N3200 and N3300 check that the +25V LEDS are on. If not, check the fuses on N4700. Also measure the voltages from N4700. C3 gEn CAUSE Tube fail signal activated. Tube head or generator defected. SOLUTION This error code may also appear when the exposure button is released too early. Therefore, press the Return key to see if there is another error code, E 7 Rel (exposure button released during exposure). If there is nor second error code, the kV or mA were too low or too high. Check that all connections from N3300 to tubehead are correct and then take another exposure. Possible faults lie in N3300, N3200 or the tubehead. Service Manual 8201086 253 7. Error Codes and Trouble Shooting Cranex D Pan and Pan/Ceph C4 Inu CAUSE N3300 defect. The voltage of the tube does not increase during an exposure. SOLUTION Check that the fuse in N3300 is okay and that during an exposure the LED H1 (310V) comes on. Make sure that all power supply LEDs are on. Check that all the connectors from N3300 to the tubehead are okay. Check that the large capacitors are connected and that they look normal. Possible faults in N3300 or the tubehead. C5 FIL CAUSE Filament defect. mA does not increase during exposure. SOLUTION Check that preheat is set correctly (approximately 80 - 120). If it is not set correctly reset it (service program Sr 13 Prh). Make sure that LEDs H8, H9, H10 and H11 on N3200 are on at the start of an exposure. Make sure that all LEDs on N4700 are on. Check the mA reference voltage is correct. See section 4. Service Programs Checking the kV/mA Feedback Reference Voltages. Check from Inverter board that the +25V LED on N3300 comes on at the start of an exposure. C6 EEP CAUSE EEPROM defect. SOLUTION The content of the EEPROM is corrupted or the EEPROM is damaged. All the configuration data (Ur and Sr settings) may have been lost. Reset the correct values (tube preheat level, Power Up Settings and tube current) and reboot the unit. Replace N5100 if this does not help. C7 Por CAUSE R movement error. Rotation movement time out. The rotating unit has not reached the position sensors within the required time period. SOLUTION Check the unit operation by using the I/0 check program. See section 4. Service Programs - I/0 check program. Check the wiring of the sensors. 254 Service Manual 8201086 Cranex D Pan and Pan/Ceph 7. Error Codes and Trouble Shooting C8 PoC CAUSE Ceph receptor movement error. Receptor movement time out. The ceph receptor has not reached the position sensors within the required time period. SOLUTION Check the operation and wiring of the sensors. C9 PoL CAUSE Linear (Y) movement error. Linear movement time out. The rotating unit has not reached the linear position sensors within the required time period. SOLUTION Check the operation and wiring of the sensors. C10 PoU CAUSE Z movement error. Z movement time out. The vertical carriage has not reached the position sensors within the required time period. SOLUTION Check the operation and wiring of the sensors. C11 Poc CAUSE Cephalo movement error. Cephalo movement time out. The cephalo has not reached the position sensors within the required time period. SOLUTION Check the operation and wiring of the sensors C12 SEn CAUSE CCD sensor base frequency failing. SOLUTION Restart unit. Try with another CCD sensor. Service Manual 8201086 255 7. Error Codes and Trouble Shooting Cranex D Pan and Pan/Ceph C13 (***) (the wait time will appear in seconds) CAUSE Stepping motors over heated. Stepper motors have overheated because of overuse. SOLUTION Allow the wait time to elapse. Then clear the error and continue. C14 Cba CAUSE Cephalo beam misaligned. The sensor on N6100 does not detect x-rays. SOLUTION Check that x-ray beam hits secondary collimator. Check also that the N6100 is correctly adjusted readjust if necessary. Refer to Circuit Boards - N6100. Other possible causes may be: - incorrect beam alignment of the unit (refer installation manual for information on how to align the beam) or - obstacle in the front of the x-ray source or - damaged sensor on N6100 or - fault in N6100 wiring or - unit does not generate x-rays. C15nPC CAUSE No connection to PC or PC does not acknowledge the image identification data. SOLUTION Check that the cables between the PC and unit are connected. 256 Service Manual 8201086 Cranex D Pan and Pan/Ceph 7. Error Codes and Trouble Shooting C40 rAM CAUSE RAM defect. The RAM memory is damaged. SOLUTION Reboot the unit. If error message reappears, replace N5100. C42 Lin CAUSE Mains voltage selector in wrong position. SOLUTION Place the voltage selector connector on N4700 in the correct position. C43 FIL CAUSE Preheat circuit not functioning/preheat not calibrated on N3200. The mAfreq-signal is missing or not within the allowable range due to: - Preheat circuit not functioning - Connector X8 not connected to N5200 (supply voltage to optoisolators) SOLUTION Recalibrate the unit. Check that all cables from the rotating unit are connected to N5300. Check that there is a connector going to X8 and verify that the signal Filt15 exists. Run preheat program, see section 4. Service Programs - Sr 13 Prh - Preheat program. Make sure that the preheat value is somewhere between 70-120. Service Manual 8201086 257 7. Error Codes and Trouble Shooting 258 Cranex D Pan and Pan/Ceph Service Manual 8201086 Cranex D Pan and Pan/Ceph 7. Error Codes and Trouble Shooting C44 InP CAUSE A key is held or stuck down. A control panel key or the exposure switch is held down during start-up. SOLUTION Check that no control panel keys or that exposure button are stuck down. Restart the unit. Replace the control panel board and/or the exposure switch. C46 cPu CAUSE CPU defect. SOLUTION N5100 is damaged, replace it. C51 UIb (Only PC user’s interface) CAUSE User Interface busy. The unit is in the “service” mode. SOLUTION Reset error codes from control panel. Service Manual 8201086 259 7. Error Codes and Trouble Shooting Cranex D Pan and Pan/Ceph 7.4 Other problems The soft tissue filter does not work Check that N4355 receives supply voltages from N4200. If it does not, replace N4355. Check also that nasio frequency is adjusted correctly. See section Circuit Board description - N5900/N5905 Terminal board - Nasion Support Frequency Adjustment. Patient positioning lights do not come on If one of the positioning lights does not work, replace the appropriate N4100 board. If none of the positioning lights come on when you activate them (opening the mirror, adjusting the focal through or driving the unit vertically), Check that N3500 and N5200 are functioning by measuring the "Projlit" signal. Replace any board that is not functioning correctly. The Vertical-carriage does not move when the up/down keys are pressed. 1. Make sure that the emergency stop button is not pressed down. 2. Check that the unit has not run into the mechanical ends of the z-movement. This is unlikely but if the zmovement end-switches are broken or disconnected it could happen. If the unit is at either mechanical end, release the jammed Z-motor see 8.3 Releasing a jammed Zmotor and repair the end-switches. 3. Check that emergency switch is not pressed or it is disconnected from N3500. The ESTOP LED must be on if this is OK. 4. Check that when the UP/DOWN buttons are pressed LEDs ZENA and ZENA1- come on. 5. If the unit is a Pan make sure that jumper J1 is connected to N3500. If the unit is a Pan/Ceph make sure that there is NO jumper. 260 Service Manual 8201086 Cranex D Pan and Pan/Ceph 7. Error Codes and Trouble Shooting 6. If all the signals are correct, disconnect the unit from the mains and check the motor fuse on N3500. If the fuse is blown replace with same the same type and rating. 7. Connect the unit to the mains. Use a DVM to measure the AC voltage fed to the AC-motor. Press the UP/ DOWN key and check that there is an AC-voltage. Note that you need to connect the DVM differently when running the unit in the Up direction and in the Down direction. 8. Disconnect the unit from mains. Remove the column front cover and check that the cable from N3500 to the motor is in good condition. Sensor, detector or microswitch problems If you suspect that a sensor, detector or microswitch is faulty, you can check the state of it using the Service mode. See section 4. Service Programs - I/O check program. If possible, activate the sensor, detector or microswitch you think is faulty (by manually moving the appropriate part of unit), and check that the I/O-signal state changes accordingly. Nothing happens when the unit is switched on If the control panel does not light up when the unit is switched on check the following: - mains power cable is connected to main power supply. - the main power supply is on. - disconnect the unit from mains and check the condition of the mains fuses, see section 6. Circuit board description - N3500 Motor Controller board. - reconnect the unit to the main power supply. Remove the upper shelf covers. Check that the LEDs on N4700 that indicate supply voltages are on. - verify that all connectors are properly connected. 7.5 Manual CCD problems Service 8201086 261 7. Error Codes and Trouble Shooting Cranex D Pan and Pan/Ceph CCD sensor LEDs On the rear of the CCD sensor there are a number LEDs the indicate the status of the CCD sensor. 262 - CCD status LED (three colour) It indicates that the CCD is connected, all the software has been downloaded and it is ready to take and. Green, in stand-by mode (power signal not active). Green flashing, mode conflict, e.g. a pan exposure has been selected but the CCD sensor is attached to the ceph head. Yellow, image capture mode (power on). Red, in position but not yet ready, SW is being loaded. Red flashing, fatal SW error / communication routine failure after an image has been taken. NOTE! The LED will flash red when using service program Sr 11 EPS. - CCD TxD and CCD RxD LEDs (yellow) serial communication. In normal operation they flash intermittently. They indicate communication activity. If CCD RxD is off (passive CCD sensor), CCD TxD will also be off. If CCD TxD is off, CCD RxD is on and the CCD status LED flashes during and after image capture it indicates that the CCD sensor tried to receive the image, but the transmit communication routine failed. - Power Supply LEDs (yellow) indicate the different voltages required by the CCD sensor. The IC in the CCD sensor monitors the voltages and activates the LEDs accordingly. The software set limits for the various supply voltages. The LEDs come on during image capture. Service Manual 8201086 Cranex D Pan and Pan/Ceph 7. Error Codes and Trouble Shooting LED 1. +3.3V and +1.8V LEDs Supply voltages for the CCD clock controlling FPGA. The +3.3V is generated in DIB from VCC_+5V. The +1.8V step down is generated in camera board from +3.3V (from DIB). LIMITS: +3.3V between +3.0 and +3.6V +1.8V between +1.71V and +1.89V. LED 2. Analog +5V LED DIB generates this voltage from VSP_+5V Supply voltage for AD-converters LIMITS between +4.5V and +5.5V LED 3. +15V, +3V and –9V LED DIB generates these voltages from VAP_+18V CCD gate voltages LIMITS: +15V between +13.5V to +16.5V +3V between +2.4V and +3.6V -9V between -9.92V and -9.17V Another required voltage is cam_permanent_+5V (signal name on the DIB board). It is used to power the IC. If this voltage is missing all the LEDs will be off. Service Manual 8201086 - TDI clk LED (yellow). Indicates that the clocking frequency of CCD is available. LED Off - TDI frequency is between 0...50Hz LED On - TDI frequency is between 100 Hz...1kHz LED Flashing - TDI frequency is between 50...100Hz or above 1kHz. - Image LED (yellow). Indicates pimage/cimage signal activity. It tells camera A/D-converter to sample image data according to the TDI frequency. - Power LED (yellow) Indicates that ppower/cpower signal is active. Switching regulators of DIB board are enabled after ppower/cpower signal becoming active. 263 7. Error Codes and Trouble Shooting Cranex D Pan and Pan/Ceph Debugging software The Debug View software (on the Service CD) allows the serial communication between the CPU, CCD-sensor and PC (DICC driver) to be debugged. When the unit is ready to take an exposure, press the exposure button and the imaging program ID, the selected parameters (kV/mA/s) will appear in the debug view window. 264 Service Manual 8201086 Cranex D Pan and Pan/Ceph 8. Replacing Parts 8. Replacing Parts 8.1 Replacing the tube head IMPORTANT NOTE: Tubeheads with s/n 9102000 use N3301 Tubeheads with s/n 9000000 to 9001999 use N3300 Removing the tube head 1. Remove the tube head cover. See 3. Covers and cover removal. Remove also the small, metal cover beneath the tubehead. 2. Remove the pan head support and rotating part inner upper cover. See section 3. Covers and cover removal. 3. Disconnect the tube head ground lead. It is screwed to the rotating unit frame. Disconnect the tubehead cables from N3300 / N3301 board. 4. The tubehead is fixed to the rotating unit with two screws in the top of the tubehead front, two nuts in the middle of the tubehead front and two pins in the top of tubehead front. Remove the screws and loosen the nuts. Tubehead will stay in place with the pins. 5. Remove the tubehead by first pulling it outwards in order to depart it from the pins and then slowly letting it to slide down from its place. WARNING: Tubehead weights 4 kg. Be careful NOT to let it drop on floor or on your feet. NOTE: When sliding the tubehead downwards from its position be careful not to damage any tubehead or collimator assembly parts Service Manual 8201086 265 8. Replacing Parts Cranex D Pan and Pan/Ceph Installing a new tube head 1. Lift the tubehead upwards into its correct position behind the collimator assembly and slide it into the pins, attach it in place with screws (two on the upper part of tubehead front) and two nuts (in the middle of tubehead front). 2. If necessary replace N3300 with N3301. 3. Insert the tubehead connectors into the connectors of Inverter (N3300 / N3301) board. Connect the ground wire of tubehead into the rotating part. 4. Run the tube warming up procedure before using the tubehead for panoramic exposures. To warm up the tubehead - switch on the unit - activate service program Sr 12 PUP, see 4. Service programs. (use service connector in X90 of IO-board). - protect yourself from radiation and press exposure button and let the unit warm up the tubehead automatically. 5. Adjust the tube preheat level in the following way. - switch on the unit - select sevice program Sr 13 Prh, see 4. Service programs. - protect yourself from radiation and press exposure button and let the unit calibrate the preheat level automatically 6. 266 preheat level is now adjusted When tubehead is changed the position of focal spot is changed slightly and therefore the alignment of xray beam may not be correct. Adjust the alignment of the unit, see installation manual how to do this Service Manual 8201086 Cranex D Pan and Pan/Ceph 8. Replacing Parts 8.2 Adjusting the panoramic slit collimator Note! Normally it should not be necessary to touch the moving slit width at all. Do not adjust unless the slit width is incorrect. The slit width is adjusted when the rotating part is in PIO position (=perpendicular to the upper shelf) 1. Loosen the 2mm set (allen) screw in the slit shaft (just above the slit). Leave the allen key in place to prevent the shaft from turning during adjustment. 2. Adjust the slit width by turning the adjustment cone from below. A flat screwdriver slot is found in the adjustment cone. Use a thin and long screwdriver. When you turn CW the slit width decreases and vice versa. 3. Correct adjustment is achieved when the slit is 0.9mm. Use a feeler gauge to define the slit width. The feeler gauge should be placed between the whole length of the slit. Note that slit is made of lead which is a soft material. Do not scratch or damage the inner slit surface. Damage may be seen on images. 4. Tighten the set screw. 8.3 Releasing a jammed Z-motor Z-motor (up/down) may get jammed if z-micro switches are out of order. 1. If z-carriage is jammed in the topmost position remove the column front cover (see cover removal). Use a wrench to turn the z-motor shaft (as close as the motor as possible) CCW unitl the motor releases. Replace covers. 2. If z-carriage is jammed in the lowermost position loosen the nuts holding the column front cover in place and pull the cover down. Note the cover will not come off, it will only move downwards to the floor. Locate the z-motor shaft. From above use a extra long 8mm allen key and turn the motor CW until motor releases. Replace covers. Service Manual 8201086 267 9. Annual Service Cranex D Pan and Pan/Ceph 9. Annual Service The following tests and inspections must be carried out annually by an authorized service person to verify that the Cranex D X-ray unit meets the specifications and performance criteria essential for correct operation. When taking measurements that require a multimeter, always use a calibrated digital multimeter (DMM). 9.1 mA test WARNING: X-rays are generated when this test is carried out. 1. Connect the +probe of a DMM to test pin TP2 and the -probe to TP 1 on the Filament board (N3200). 2. Select service program Sr11 EPS, 85kV, 1.6s. 3. Protect yourself from radiation and take exposures using first 8mA and then 10mA. Check the feedback values from the DMM. The feedback values must be within the tolerances shown. Selected mA 8 10 mAfb1 (V) 1.94 2.43 Tolerance (V) ±0.16 (1.78 - 2.1) ±0.2 (2.23 - 2.63) If the either of the values are not with the recommended tolerances, there may be a problem with the Filament board (N3200) and/or the tubehead. 268 Service manual 8201086 Cranex D Pan and Pan/Ceph 9. Annual Service 9.2 kV test WARNING: X-rays are generated when this test is carried out. 1. Connect the +probe of a DMM to test pin TP18 and the -probe to TP16 on the Inverter board (N3300). 2. Select service program Sr11 EPS, 85kV, 10 or 8 mA, depending on the setting of the unit, and an exposure time of 1.6s. 3. Protect yourself from radiation and take exposures using the kV values listed in the table below. Check the feedback values from the DMM. The feedback values must be within the tolerances shown. Selected kV 57 70 85 kVfb1 (V) 2.85 3.50 4.25 Tolerance (V) ±0.18 (2.67 - 3.13) ±0.18 (3.32 - 3.68) ±0.18 (4.07 - 4.43) If the values are not within the recommended tolerances, there may be a problem with the N3300 board, the N3200 board or the tubehead. Service manual 8201086 269 9. Annual Service Cranex D Pan and Pan/Ceph 9.3 Exposure time test (pan/ceph units only) WARNING: X-rays are generated when this test is carried out. 1. Select any cephalometric program. 2. Connect the +probe of a storage oscilloscope to test pin TP24 and the -probe to TP29 on the Filament board (N3200). 3. Protect yourself from radiation and take exposures using the exposure times listed in the table below. Check the times from the oscilloscope. The times must be within the tolerances shown. Time selected 8 sec 20 sec Tolerance ±0.6 sec (7.4 - 8.6) ±1.6 sec (18.4 - 21.6) 9.4 Motor Movements Switch the unit off and then manually check that all the stepper motors move freely and without any looseness: – rotate the C-arm to check the R-motor – push the rotating unit in and out to check the Y-motor Also turn the x-rays off and take various exposures to check that the motors operate smoothly and without any noise. Press the up/down keys to check the Z-motor (vertical carriage movement). The motor must operate smoothly and without any noise. 270 Service manual 8201086 Cranex D Pan and Pan/Ceph 9. Annual Service 9.5 Position Detectors Z-Movement Sensors Press the up key and drive the unit up. Make sure that the unit stops moving at its uppermost position. Press the down key and drive the unit down. Make sure that the unit stops moving at its lowermost position. 9.6 Image receptor detection Panoramic Remove the CCD sensor. Switch the unit on and check that an error message appears. This indicates that the unit cannot take a panoramic exposure because the CCD sensor is not in position. Now replace the CCD sensor, clear the error message and check that the unit is now ready to take a panoramic exposure. Cephalometric Repeat the above procedure but this time with the ceph head and any cephalometric program. 9.7 Panoramic Alignment WARNING: X-rays are generated when this test is carried out. 1. Set the unit and dental imging software you are using to take a normal panoramic exposure. Set the layer position to 0 (press the arrow keys) and select the lowest kV value 63 (refer to the installation manual). 2. Place the ball phantom into the chin support. Service manual 8201086 271 9. Annual Service Cranex D Pan and Pan/Ceph 3. Protect yourself from radiation and take a panoramic exposure of the ball phantom. The exposed area on the screen must not extend beyond any of the edges of the active area of the CCD sensor. The balls must also be round. If exposed area extends beyond the edges of the active area of the CCD sensor, the height of the x-ray field must be adjusted. If the balls are not round (the difference between the height and the width is more than 20%), the rotation axis must be readjusted. Refer to the installation manual for information on how to carry out these adjustments. 9.8 Cephalometric Alignment 1. Set the unit and dental imaging software you are using to take a normal cephalometric exposure. Pull the nasion support out as far as it will go so that there is NO soft tissue filtering. Select the lowest kV value, 63, and the shortest exposure time. 2. Protect yourself from radiation and take a cephalometric exposure. The exposed area on the screen must not extend beyond any of the edges of the active area of the CCD sensor. If exposed area extends beyond the edges of the active area of the CCD sensor, the ceph head will have to be realigned. Refer to the installation manual for information on how to do this. 272 Service manual 8201086 Cranex D Pan and Pan/Ceph 9. Annual Service 9.10 Soft Filter Alignment 1. Set the unit and dental imaging software you are using to take a normal cephalometric exposure. Position the nasion support in the middle of its adjustable range. 2. Protect yourself from radiation and take a cephalometric exposure. Check that the edge of the filter (where the exposed field gets darker) coincides with the image of the nasion support. The accuracy is ±10mm. Soft tissue filtering is carried out by software which increases kV/mA so that the soft tissue to be seen on the image. The point at which the kV/mA are increased is based the position (frequency) of the nasion support. If the nasion support frequency is not correctly positioned, it must be adjusted. See section 4 (N5900) for information on how to do this. 9.11 Patient Positioning Lights Use the ball phantom to check the operation and alignment of the patient positioning lights. Refer to installation manual for information on how to do this. 9.12 Covers and Labels Check that all covers are correctly installed and in good condition. Also check that all the labels are attached to the unit and that they are all legible. Service manual 8201086 273 9. Annual Service Cranex D Pan and Pan/Ceph 9.13 Other checks WARNING: Disconnect the unit from the mains before carring out the next test. Check the safety ground continuity by measuring the grounding resistance between the PE connector of the mains cord and any touchable metallic part of the unit chassis. It MUST be <0.2 ohm. Check that oil is not leaking from the tubehead. WARNING: Disconnect the unit from the mains before carring out the next test. Vacuum clean all visible dust from inside the unit. Check the condition of mains cord and replace if not in perfect condition. 274 Service manual 8201086 Cranex D Pan and Pan/Ceph 10. Image Appearance - 10. Image Appearance s/n B81642 and earlier only The images are stored into the DfW database using 16 bits. The filtering parameters which are used when opening the image can be changed to improve image quality. 10.1 Using the 16-bit format This method is based on the system register settings of Digora for Windows. All 16-bit images are stored in a database as technical images (i.e. a raw image only processed with gain correction, dark current removal and removal of 2-pixel-wide gaps between sensor chips). The image does not look optimal at this phase. When an image is opened, the image is automatically filtered to get the optimum gray scale distribution. This filtering operation is performed on all image types (pan, child, TMJ, Ceph Lateral, Ceph PA/AP and partial panoramic) when the image is opened. 10.2 Setting 16-bit filtering and changing filter parameters NOTE! 16-bit storage and filtering in ON by default. If image quality needs to be modified, that can be done by changing the filter parameters. Run the program Regedit from Microsoft® Windows® Operating System and open the registry of: \HKEY_LOCAL_MACHINE\Software\Soredex\Digora\Dicc\ Ther are configurable register keys on the main level (decimal values for register keys in all cases): - UseIIFilter3 When the value is 1 (default), filtering is used when opening the images from the database (the raw images that were stored in 16-bit format) When the value is 0, the images are not filtered when they are opened. DO NOT USE the 0 value. Service Manual 8201086 275 10. Image Appearance Cranex D Pan and Pan/Ceph - Gamma No functionality, reserved for future use. - Start Value should be set to 1. Sub-folders of \HKEY_LOCAL_MACHINE\Software\Soredex\Digora\Dicc\ includes: - P1sdxPan - P2sdxChild - P3sdxTMJ - P4sdxCephLAT - P5sdxCephPA These sub-folders include the program specific filter parameters. GammaFactor, (default depends on program ) the higher the value the lighter the images will appear. Range 0…100. OffsetParam=0 (default depends on program) This can be used to increase the image contrast by ignoring the areas that have received direct radiation . Range 0....100. Increasing the value will "over-exposed" the image at certain points. BottomMargin LeftMargin TopMargin RightMargin These register keys define how great an area of the edge(s) (percentage) will be ignored before the image histogram is calculated (gray scale distribution). Value between 0…100. 276 Service Manual 8201086 Cranex D A1. Technical Information Appendix A1 - Technical Information A1.1 Technical specifications Model PP1 Classification IEC class I, type B, IP20. Conforms with the standards EN 60601-1, EN60601-1-3, EN 60601-2-7 and EN 60601-1-2 (Group 1, class B). Conforms with the regulations of DHHS Radiation Performance Standard, 21CFR Subchapter J. The unit must be installed within a protected clinical area. Protection against electric shock - Class 1. Degree of protection - Type B applied parts with no conductive connection to patient. Protection against ingress of liquids - IPX 0 Disinfection methods: • mild soapy water • non-alcholic based disinfectant for the chin rest • disposable plastic covers for bite piece/chin support For use in environments where no flammable anaesthics and/or flammable cleaning agents are present. Mode of operation - continuous operation/intermittent loading Unit description Dental panoramic and panoramic/cephalometric x-ray units with a high frequency switching mode x-ray generator. The panoramic version takes panoramic exposures. The panoramic/cephalometric version takes panoramic and cephalometric exposures. The unit uses a CCD sensor as image receptor. X-ray generator TUBE - OPX/105, or equivalent FOCAL SPOT - 0.5 mm IEC 336 TARGET ANGLE - 5º TARGET MATERIAL - Tungsten Service Manual 8201086 A1 - 1 A1. Technical Information Cranex D OPERATING TUBE POTENTIAL - Panoramic imaging 57 - 85 kV (±4 kV) - Cephalometric imaging 60-85 kV (±4 kV) OPERATING TUBE CURRENT - 10 mA (±1 mA) at 0.5 FS MAXIMUM TUBE CURRENT - 11 mA MAXIMUM OUTPUT POWER - 945 W nominal FILTRATION - minimum filtration 2.7 mm Al BEAM QUALITY - HVL over 3.05 mm Al @ 85 kV OUTER SHELL TEMPERATURE - +50ºC (122ºF) maximum DUTY CYCLE - controlled by the software of the unit Power requirements INPUT VOLTAGE - 230 or 115 VAC (±10%), 50/60 Hz, single phase, grounded socket MAXIMUM LINE CURRENT - 7 A (@85 kV/10mA, 230 VAC mains) MAXIMUM LINE RESISTANCE - 1 ohm MAXIMUM LINE FUSING - 10 A /20A slow @ 230/115 VAC (main fuse 8A/16A slow in the device) LINE SAFETY SWITCH (when required) - Approved type, min. 10 A 250 VAC EARTH LEAKAGE CIRCUIT BREAKER (when required) - Approved type, min. 16 A 250 VAC, breaker activation leakage current in accordance with local regulations. Mechanical parameters PANORAMIC - Source to Image layer Distance (SID) 520 mm (±10 mm) - Magnification factor 1.34 CEPHALOMETRIC - Source to Image layer Distance (SID) 1721 mm ±20 mm - Source to Object Distance (SOD) 1500mm -Magnification factor 1.15 WEIGHT - Panoramic unit 120 kg - Panoramic/cepahlometric unit 165 kg A1 - 2 Service Manual 8201086 Cranex D A1. Technical Information DIMENSIONS - Panoramic unit (H x W x D) 2320 x 1200 x 1000 mm - Panoramic/cephalometric unit (H x W x D) 2320 x 1200 x 1900 mm VERTICAL HEIGHT OF CHIN REST - 950 - 1750 mm (+- 10 mm) Digital image receptor Only the CCD sensors specifically designed for Cranex D unit can be used. PIXEL SIZE - 96 micrometres Timer PANORAMIC EXPOSURE TIMES - Normal 17.6 s (±15%) - Child 16 s (±15%) - Partial 1.9 s - 3 s - 9.2 s - 3 s - 1.9 s Can be freely selected and combined, overlapping approx. 0.3 s. - TMJ 3.3 + 3.3 s (±15%) Max 240 mAs CEPHALOMETRIC EXPOSURE TIMES - 8 - 20 s scanning times, 5 steps according to R’10 series (ISO) BACK-UP TIMER - 23.5 s (±1.5s) Leakage technique factors PANORAMIC - 85 kV, 2400 mAs/h (85 kV, 10 mA, duty cycle 1:15) CEPHALOMETRIC - 85 kV, 1800 mAs/h (85 kV, 10 mA, duty cycle 1:20) Measurement bases kV and mA values can be verified with a specified digital multimeter according to separate measurement instructions. The exposure times can be measured as the duration of radiation in the primary radiation beam. Exposed field size in cephalometry - 22 x 26 cm for lateral projections - 22 x 22 cm for PA and AP projections - Automatic filtration of soft tissues for lateral projections controlled by software. Service Manual 8201086 A1 - 3 A1. Technical Information Cranex D Operating ambient conditions - Operating temperature - Relative humidity 10 - 40ºC 0 - 85 RH% Storage ambient conditions - Storage temperature - Relative humidity 0 - 40ºC 0 - 85 RH% Minimum computer requirements The values in (brackets) are recommended values. OPERATING SYSTEM - Windows XP Professional / Home / SP1 or SP2 - Windows 2000 Professional / SP4 CPU - Pentium 4 or Athlon XP or equivalent (1.5 GHz or better recommended) RAM - 256 MB (512 MB recommended) HDD - 20 GB (single user) VIDEO RAM - 16 MB (or more) NETWORK CONNECTION - 10/100 Mbit/s Ethernet NIC DISPLAY - 1280 x 1024 x 24-bit Tru Color, 85Hz display (19" CRT or 17” TFT LCD recommended) PCI slot - one free for N3000 COM 1 and COM 2 - free s/n B81642 and earlier Connection to the PC must meet EN60601-1 requirements. The use of ACCESSORY equipment not complying with the equivalent safety requirements of this equipment may lead to a reduced level of safety of the resulting system. Consideration relating to the choice shall include: - use of the accessory in the PATIENT VICINITY - evidence that the safety certification of the ACCESSORY has been performed in accordance to the appropriate IEC 601-1 and/or IEC 601-1-1 harmonized national standard - the fibre optic cable, provided by the manufacturer, shall be used, s/n B91643 and later. - only RS 232C interface cable and fibre cable, provided by the manufacturer, shall be used, s/n B81642 and earlier. A1 - 4 Service Manual 8201086 Cranex D A1. Technical Information Tube housing assembly cooling characteristics OPX/105 and KL5 Service Manual 8201086 A1 - 5 A1. Technical Information Cranex D A1.2 Unit dimensions A1 - 6 Service Manual 8201086 Cranex D A1. Technical Information A1.3 Symbols that appear on the unit This symbol indicates that the waste of electrical and electronic equipment must not be disposed as unsorted municipal waste and must be collected separately. Please contact an authorized representative of the manufacturer for information concerning the decommissioning of your equipment. Service Manual 8201086 A1 - 7 A1. Technical Information Cranex D Guidance and manufacturer’s declaration – electromagnetic emissions The PP1 is intended for use in the electromagnetic environment specified below. The customer or the user of the PP1 should assure that it is used in such an environment. Emissions test Compliance Electromagnetic environment - guidance RF emissions Group 1 The PP1 uses RF energy only for its internal function. CISPR 11 Therefore, its RF emissions are very low and are not likely to cause any interference in nearby electronic equipment. RF emissions Class B The PP1 is suitable for use in all establishments, CISPR 11 including domestic establishments and those directly connected to the public low-voltage power supply Class A Harmonic network that supplies buildings used for domestic emissions purposes. IEC 61000-3-2 Voltage Complies fluctuations/ flicker emissions IEC 61000-3-3 A1 - 8 Service Manual 8201086 Cranex D A1. Technical Information Guidance and manufacturer’s declaration – electromagnetic immunity The PP1 is intended for use in the electromagnetic environment specified below. The customer or the user of the PP1 should assure that it is used in such an environment. Immunity test IEC 60601 test level Compliance level Electromagnetic environment - guidance Floors should be wood, Electrostatic ±6 kV contact ±6 kV contact concrete or ceramic tile. discharge (ESD) If floors are covered with IEC 61000-4-2 ±8 kV air ±8 kV air synthetic material, the relative humidity should be at least 30 %. Mains power quality Electrical fast ±2 kV for power ±2 kV for power supply should be that of a transients/bursts supply lines lines typical commercial or IEC 61000-4-4 ±1 kV for ±1 kV for input/output hospital environment. input/output lines lines Mains power quality Surge ±1 kV differential mode ±1 kV differential should be that of a IEC 61000-4-5 mode ±2 kV common mode typical commercial or ±2 kV common hospital environment. mode <5 % UT <5 % UT Voltage dips, Mains power quality (>95 % dip in UT) (>95 % dip in UT) short should be that of a interruptions and typical commercial or for 0.5 cycle for 0.5 cycle voltage variations hospital environment. If 40 % UT 40 % UT on power supply user of the PP1 requires (60 % dip in UT) (60 % dip in UT) lines continued operation for 5 cycles for 5 cycles IEC 61000-4-11 during power mains interruptions, it is 70 % UT 70 % UT recommended that the (30 % dip in UT) (30 % dip in UT) PP1 be powered from for 25 cycles for 25 cycles an uninterruptible power supply or a battery. <5 % UT <5 % UT (>95 % dip in UT) (>95 % dip in UT) for 5 sec for 5 sec Power frequency 3 A/m 3 A/m Power frequency (50/60 Hz) magnetic field should be magnetic field at levels characteristic IEC 61000-4-8 of a typical location in a typical commercial or hospital environment. NOTE UT is the a.c. mains voltage prior to application of the test level. Service Manual 8201086 A1 - 9 A1. Technical Information Cranex D Guidance and manufacturer’s declaration – electromagnetic immunity The PP1 is intended for use in the electromagnetic environment specified below. The customer or the user of the PP1 should assure that it is used in such an environment. Immunity IEC 60601 test Compliance Electromagnetic environment - guidance test level level Portable and mobile RF communications equipment should be used no closer to any part of the PP1, including cables, than the recommended separation distance calculated from the equation applicable to the frequency of the transmitter. Conducted RF IEC 610004-6 Radiated RF IEC 610004-3 3 Vrms 150 kHz to 80 MHz 3 V/m 80 MHz to 2.5 GHz 3V 3 V/m Recommended separation distance d = 1.2 P d = 1.2 P 80 MHz to 800 MHz d = 2.3 P 800 MHz to 2.5 GHz where P is the maximum output power rating of the transmitter in watts (W) according to the transmitter manufacturer and d is the recommended separation distance in metres (m). Field strengths from fixed RF transmitters, as determined by an electromagnetic site survey, a should be less than the compliance level in b each frequency range. Interference may occur in the vicinity of equipment marked with the following symbol: NOTE 1 At 80 MHz and 800 MHz, the higher frequency range applies. NOTE 2 These guidelines may not apply in all situations. Electromagnetic propagation is affected by absorption and reflection from structures, objects and people. a Field strengths from fixed transmitters, such as base stations for radio (cellular/cordless) telephones and land mobile radios, amateur radio, AM and FM radio broadcast and TV broadcast cannot be predicated theoretically with accuracy. To assess the electromagnetic environment due to fixed RF transmitters, an electromagnetic site survey should be considered. If the measured field strength in the location in which the PP1 is used exceeds the applicable RF compliance level above, the PP1 should be observed to verify normal operation. If abnormal performance is observed, additional measures may be necessary, such as reorienting of relocating the PP1. b Over the frequency range 150 kHz to 80 MHz, field strengths should be less than 3 V/m. A1 - 10 Service Manual 8201086 Cranex D A1. Technical Information Recommended separation distances between portable and mobile RF communications equipment and the PP1. The PP1 is intended for use in an electromagnetic environment in which radiated RF disturbances are controlled. The customer or the user of the PP1 can help prevent electromagnetic interference by maintaining a minimum distance between portable and mobile RF communications equipment (transmitters) and the PP1 as recommended below, according to the maximum output power of the communications equipment. Rated maximum Separation distance according to frequency of transmitter m output power of 80 MHz to 800 MHz 800 MHz to 2.5 GHz 150 kHz to 80 MHz transmitter W d = 1.2 P d = 2.3 P d = 1.2 P 0.01 0.12 0.12 0.23 0.1 0.38 0.38 0.73 1 1.2 1.2 2.3 10 3.8 3.8 7.3 100 12 12 23 For transmitters rated at a maximum output power not listed above, the recommended separation distance d in meters (m) can be estimated using the equation applicable to the frequency of the transmitter, where P is the maximum output power rating of the transmitter in watts (W) according to the transmitter manufacturer. NOTE 1. At 80 MHz and 800 MHz, the separation distance for the higher frequency range applies. NOTE 2. These guidelines may not apply in all situations. Electromagnetic propagation is affected by absorption and reflection from structures, objects and people. Service Manual 8201086 A1 - 11 A1. Technical Information A1 - 12 Cranex D Service Manual 8201086 Cranex D Pan and Pan/Ceph Appendix A2 - Ceph upgrade Appendix A2 - Upgrading a Pan unit to Pan/Ceph A2.1 Replacing the collimator 1. Switch the unit off and disconnect it from the power supply. 2. Remove all the covers from the unit. (Refer to the Cranex D Service Manual, section 3. Covers and cover removal for information on how to do this). 3. Disconnect the short cable (J5502) that connects the panoramic collimator to the cable that goes to N3100 (on the CCD sensor side of the Rotating unit), and then remove the panoramic collimator (4 screws). Keep the screws as they will be need ed to attach the new collimator. Service Manual 8201086 A2 - 1 Appendix A2 - Ceph upgrade Cranex D Pan and Pan/Ceph 4. Remove the Panoramic primary collimator and replace it with the Pan/ceph primary collimator. 5. Replace the cable that connects the panoramic collimator to N3100 with the new cable supplied. To make cable routing easier tie a piece of string to one end of the cable to be replaced and the other end to the replacement cable. When you pull out the old cable out the new one will be pulled into the correct position. A2 - 2 Service Manual 8201086 Cranex D Pan and Pan/Ceph Appendix A2 - Ceph upgrade 6. Attach the Positioning Rail to the same holes that the Panoranic Collimator was attached (3 screws). Make sure that the Adjusting screw in the side of the Positioning Rail goes through the hole in the side of the Colimator support plate. Attach the circlip to the adjusting screw. 7. There is a Stepper Motor attached to the Positioning Rail. Route the cable that comes from the Stepper Motor across the inside of the C-arm to loose connector J14 on the CCD Sensor side. Secure the Stepper Motor cable to the other cables with cable ties. Service Manual 8201086 A2 - 3 Appendix A2 - Ceph upgrade Cranex D Pan and Pan/Ceph 8. Attach the Ceph Aperture CCD to the inside of the Side Frame, if it is not already attached (M4 x 8). Note that the side of the Ceph Aperture CCD with the large aperture must face outwards. 9. Slide the Support Bar into the bearings in the Slide Frame. A2 - 4 Service Manual 8201086 Cranex D Pan and Pan/Ceph Appendix A2 - Ceph upgrade 10. Place the Slide Frame on to the Positioning Rail so that the two bearings on the underside of the Slide Frame are positioned on either side of the Positioning rail. Secure the Slide Frame in position by securing the support bar to the Collimator Support Plate with two M4 x 8 screws, one at each end of the support bar. Service Manual 8201086 A2 - 5 Appendix A2 - Ceph upgrade Cranex D Pan and Pan/Ceph 11. Insert the Toothed bar into the small hole in the side of the Slide Frame. Position the Toothed Bar so that it engages fully with the motor gear wheel when the Slide Frame is slid to the left as far as it will go. Also make sure that there is no play between the Tooth Bar and the gear wheel. If necessary eliminate play by adjusting the position of the motor. When the Toothed Bar is in the correct position secure in position with the M4 x 6 grub screw. 12. Connect the cable that comes from the solenoid on the Slide Frame to N5500 (J5502). Also connect the new cable from N3100 to N5500 (J5501). Use cable ties to secure the cables so that they cannot interfer with the collimator movement. A2 - 6 Service Manual 8201086 Cranex D Pan and Pan/Ceph Appendix A2 - Ceph upgrade A2.2 Installing the cephalometric unit 1. Follow the instructions given in section 3.5 Option Installing a cephalonmetric unit, in the Installation Manual. A2.3 Electrical modifications 1. On N55300 connect the jumper to JP1 either to the position R (right hand side ceph) or the L position, depending on the ceph being installed. 2. On N5200 (Digital IO board) connect jumper X15 either to the position R (right hand side ceph) or the L position, depending on the ceph being installed. 3. Remove the jumper from JP1 in N3500 (Motor controller). A2.4 Software modifications 1. The DfW 2.5 folder name should be altered according to the DfW software supplied. The Ceph option must be added to DfW. To do this, open the file Dicc.ini ( /Soredex/DfW 2.5/ ) using Notepad, and from the line beginning with "Devices" add the text ",PP1CEPH" (< s/n B81642), "CranexCeph" (> s/n B91643) and save the file. Service Manual 8201086 A2 - 7 Appendix A2 - Ceph upgrade Cranex D Pan and Pan/Ceph A2.5 Checking the alignment of the unit NOTE: A pan/ceph sensor (Type 2) must be used to produce ceph images. The Type 2 sensor is not part of the upgrade kit and must be ordered separately. The Gain Files for the new CCD sensor (on the Cranex D Installation CD) must be installed in the PC. To do this copy the contents of the CD's folder "Gainfiles" to folder /Soredex/DfW 2.5/Dicc/Ortho/Gainfiles. 1. Reconnect the power supply to the unit and switch the unit on. 2. Align the unit, pan and ceph, according to the instructions given in the installation manual. IMPORTANT NOTE! Perform all the alignment steps. NOTE: When you level the ceph arm, you may have to adjust the position of the stiffening brackets (one on each side of the Z-carriage) to which the ceph arm is attached. This can be done by loosening the nuts (A) that hold the stiffening brackets in position, levelling the arm, and then retightening the these nuts as well as the Ceph arm nuts (B). 3. When the unit has been aligned replace all the covers. 4. Take test exposures using every program to verify that the device works correctly. A2 - 8 Service Manual 8201086 Cranex D Pan and Pan/Ceph Appendix A3 - SW Versions Appendix A3 - Software Versions Version 1.10L and 1.10R Unit versions with seial numbers B81642 and earlier Version 2.01 Unit versions with seial numbers B81643 and later Service Manual 8201086 A3 - 1 Appendix A3 - SW Versions A3 - 2 Cranex D Pan and Pan/Ceph Service Manual 8201086