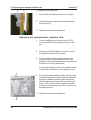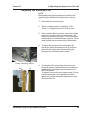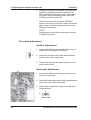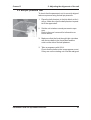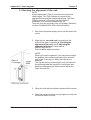
1
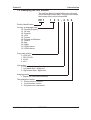
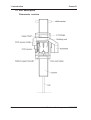
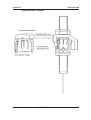
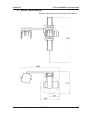
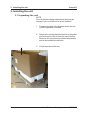
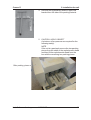
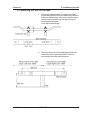
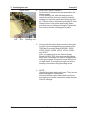
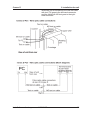
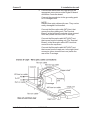
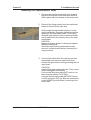
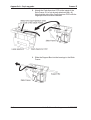
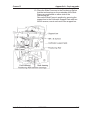
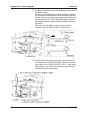
CRANEX D
Installation and set-up manual
8201085 rev. 405 (0609)
EN
CRANEX D
Installation and set-up manual
Medical Device Directive
93/42/EEC
Cranex Installation and setup Manual
8201085 rev. 405 (0609)
Original approved English language version
(Document 8201085-SDX1TPH-1 rev. 4)
Soredex
P.O.Box 148
04301 Tuusula, FINLAND
Tel. +358 45 7882 2000
Fax +358 9 701 5261
I
Soredex endeavours to produce product documentation that is accurate and
up to date. However, our policy of continual product development may result in
changes to products that are not reflected in the product documentation.
Therefore, this document should not be regarded as an infallible guide to
current product specifications. Soredex maintains the right to make changes
and alterations without prior notice.
II
Contents
1. Introduction ................................................................................... 1
1.1 Introduction .............................................................................................. 1
1.2 Associated documentation ....................................................................... 1
1.3 Warnings and precautions ........................................................................ 2
1.4 Identifying the unit version ......................................................................... 3
1.5 Unit description ........................................................................................ 4
Panoramic version ................................................................................. 4
Cephalometric option ............................................................................. 5
2. Pre-installation requirements ...................................................... 6
2.1 The Unit ................................................................................................... 6
2.1 Space requirements ................................................................................. 7
2.3 The PC .................................................................................................... 8
2.4 Installation tools, setup tools and installation hardware ..............................
Hardware ...............................................................................................
Standard tools ........................................................................................
Special tools ..........................................................................................
9
9
9
9
3. Installing the unit ......................................................................... 10
3.1 Unpacking the unit .................................................................................. 10
3.2 Attaching the unit on the wall ................................................................... 13
3.3 Installing the rotating unit ........................................................................ 17
3.4 Levelling the unit..................................................................................... 23
3.5 Option - Installing a cephalometric unit ....................................................
Installing the cephalometric arm ............................................................
Installing the cephalometric head ..........................................................
3.6 Connecting the unit to a power supply.....................................................
24
24
27
28
3.7 Installing a remote exposure warning light (optional) ............................... 30
3.8 Running the z-carriage without the Rotating unit ...................................... 31
III
4. Checking the alignment of the unit ........................................... 32
4.1 The service mode ..................................................................................
Entering the service mode ....................................................................
Selecting service programs and parameters ........................................
Exiting the service mode ......................................................................
4.2 Checking the rotation center ...................................................................
32
32
32
33
34
4.3 Checking the positions of the lights ........................................................ 36
4.4 Checking the panoramic radiation field .................................................. 37
4.5 Option - Checking the cephalometric head .............................................
Checking the ceph radiation field .........................................................
Checking the position of the CCD sensor .............................................
Checking the position of the ceph head support....................................
39
39
39
40
5. Adjusting the alignment of the unit ........................................... 41
5.1 Primary slit ............................................................................................. 41
5.2 Adjusting the rotation center ................................................................... 42
5.3 Adjusting the positioning lights ............................................................... 45
5.4 Adjusting the position of the radiation field .............................................. 45
5.5 Option - Aligning the cephalostat ............................................................
Levelling the ceph components .............................................................
Adjusting the cephalometric radiation field ............................................
Adjusting the secondary slit ..................................................................
Ear posts adjustment ............................................................................
47
47
48
49
50
Vertical adjustment ................................................................................................ 50
Horizontal adjustment ............................................................................................ 50
5.6 Ball/pin phantom test .............................................................................. 51
5.7 Changing the serial port numbers ........................................................... 52
6. Technical Information................................................................. 54
6.1 Symbols, markings that appear on the unit ............................................. 54
6.2 Technical Specifications ......................................................................... 55
Appendix A - Upgrading a Pan unit to Pan/Ceph ...................... A-1
IV
Cranex D
1. Introduction
1. Introduction
1.1 Introduction
This manual explains how to install and set up the
Cranex D digital panoramic dental x-ray unit and
the optional cephalometric device.
You will need to operate the unit during the set up
procedure. Make sure that you know how to operate
the unit before starting the set up procedure.
It is also required that person installing and setting
up the unit should have attended manufacturer's
service training course.
1.2 Associated documentation
The Cranex D User's manual.
The Cranex D Service manual.
Digora for Windows 2.5 rev 1 (or above) User's
manual
Digora for Windows 2.5 rev 1 (or above) Installation,
configuration and administration manual.
Installation and set-up manual 8201085
1
1. Introduction
Cranex D
1.3 Warnings and precautions
When installing the unit always observe local and
national safety regulation concerning the installation
and use of dental x-ray equipment.
Failure to install the unit in an approved location
according to these installation instructions may
cause the device to be dangerous to both patient
and operator.
Do not install the unit in environments where there
are corrosive or explosive vapours.
When checking the alignment of the radiation beam
take the necessary steps to protect yourself from the
radiation.
The aperture plate in the collimator is made of lead
(Pb) which is a toxic material. Do not touch it with
your bare hands.
Be careful when working on the unit when the covers
have been removed. Some mechanical parts have
sharp edges that can cause injuries if mishandled.
Some electric components are high voltage and can
be lethal if touched. Whenever possible disconnect
the unit from the main power supply when working
on it with the covers off.
NOTE
Also read and familiarize yourself with the warnings
and precautions in the User's Manual.
Also advise operators to familiarize themselves with
the warnings and precautions in the User's Manual.
If the CRANEX D will be used with a 3rd party
imaging application software not produced by
SOREDEX, the 3rd party imaging software must
comply with all applicable local laws and regulations on patient information software. This includes
for example the Medical Device Directive 93/42/
EEC and / or FDA is applicable.
2
Installation and set-up manual 8201085
Cranex D
1. Introduction
1.4 Identifying the unit version
The unit type label is located at the rear of the unit
next to the main power cable. The type code allows
the version of the unit to be identified.
PP 1
1 2 3 - 4 5 6
Product identification
Country or language code
00 General (English)
01 UK only
02 German
03 USA
05 France
06 Finland and Sweden
07 Russia
08 Italy
09 Spain
2X OEM version
3X OEM version
X-ray tube version
0 OPX/105
1 DE 100/15ö
2 D-051
4 KL5
Unit version
0 Pan unit only/ no ceph unit
7 Left-hand ceph - digital unit
8 Right-hand ceph - digital unit
Imaging media
1 Digital unit (removable sensors)
The production version
0 Pilot production version
1 1st production version
2 2nd production version etc.
Installation and set-up manual 8201085
3
1. Introduction
Cranex D
1.5 Unit description
Panoramic version
4
Installation and set-up manual 8201085
Cranex D
1. Introduction
Cephalometric option
Installation and set-up manual 8201085
5
2. Pre-installation requirements
Cranex D
2. Pre-installation requirements
2.1 The Unit
The room in which the unit is to be installed and the
position from where the user will take exposures
must be correctly shielded from the radiation that is
generated when the unit is operated. Since radiation safety requirements vary from country to country
and state to state it is the responsibility of the installer to ensure that all safety regulations are met.
The unit is supplied in one box:
Length
185 cm
(73 in)
Width
80 cm
(32 in)
Height
100 cm
(40 in)
WARNING
The installed unit weighs 150 kg (330 lb).
Make sure that the floor in the room where the
unit is to be used can support the weight
of the unit.
Also make sure that the wall to which the unit
is attached and the fixing hardware used to
attach the unit to the wall can withstand a
continuous pull-out force of at least 300 kg
(660 lb).
The unit MUST be attached to a wall.
Panoramic units (NOT PAN/CEPH) can also be
attached to the show stand (pt. no. 9802666).
Use 8 mm (5/16 in) minimum diameter fixing hardware (NOT SUPPLIED) to attach the unit to the wall.
The type and length of hardware must be suitable for
the wall to which the unit will be fixed.
Note that if the wall is made of thin material, you may
have to use a reinforcing backing plate on the rear
of the wall to hold the securing screws, bolts or nuts.
6
Installation and set-up manual 8201085
Cranex D
2. Pre-installation requirements
2.1 Space requirements
The main dimensions of the unit are shown below.
Installation and set-up manual 8201085
7
2. Pre-installation requirements
Cranex D
When installing the unit make sure that there is
enough space at the front and sides of the unit to
allow patient entry and exit. Patients using wheelchairs will require more space around the cephalometric unit than standing patients.
Note that units with the ceph mounted on the lefthand side require more space than units with the
ceph mounted on the right-hand side.
NOTE
The height of the unit is 2.32 m (91"). If the ceiling in
the room where the unit is to be installed is lower
than this the height of the unit must be reduced by
shortening the leg.
2.3 The PC
The PC that is to be used with the unit must be
installed in a location that meets all local and national safety requirements with regards the connection of a PC to an x-ray device.
The PC must not be used as a server.
The connection of the unit to the PC must meet
EN60601-1 requirements.
The use of ACCESSORY equipment not complying
with the equivalent safety requirements of this equipment may lead to a reduced level of safety of the
resulting system. Consideration relating to the
choice shall include:
- use of the accessory in the PATIENT VICINITY
8
-
evidence that the safety certification of the
ACCESSORY has been performed in accordance to the appropriate IEC 601-1 and/or IEC
601-1-1 harmonized national standard
-
only RS 232C interface cable and fibre optic
cable, provided by the manufacturer, shall be
used.
Installation and set-up manual 8201085
Cranex D
2. Pre-installation requirements
2.4 Installation tools, setup tools and installation hardware
The following tools and hardware are required to
install and set up the unit.
NOTE: THESE ARE NOT INCLUDED IN THE
DELIVERY OF THE UNIT, UNLESS OTHERWISE
STATED.
Hardware
4 x 8 mm (5/16 in) fixing hardware for attaching the
wall bracket and leg to the wall. (Not required if you
are using the show stand (pt. no. 9802666).
Standard tools
-
Electric drill
-
Spanners (wrenches) 5.5, 7, 8, 10, 13, 17mm.
Also a longer (10cm min) extension socket is
needed.
-
Allen keys (Hexagon socket wrenches) 1.5 8mm, including a 12 cm long (min) 3 mm allen
key
-
Flat blade screwdriver
-
Torx screwdrivers T20, (T25, T30)
-
Spirit level
-
Pliers and wire cutters
-
Scissors
-
Alignment tool (part number 6904590)
-
Ball phantom (part number 6904580)
-
Service connector (4801744)
-
Prüfkörper test tools for countries where the
method is used
Special tools
Installation and set-up manual 8201085
9
3. Installing the unit
Cranex D
3. Installing the unit
3.1 Unpacking the unit
NOTE
Save all the packaging materials as they may be
needed if you move the unit to a new location.
1. Transport the box to the location where the unit
is to be unpacked / installed.
2. Remove the straps that hold the box to the pallet
and then remove the lid from the top of the box.
Remove as much packing material as possible
and all accessible accessories.
3. Lift off the sides of the box.
10
Installation and set-up manual 8201085
Cranex D
3. Installation the unit
4. Remove the leg assembly and the upper wall
bracket from the side of the packing material.
5. CAUTION - HEAVY OBJECT
A minimum of two persons are required for the
following task(s).
NOTE
If the unit is a pan/ceph remove the two packing
pieces from the sides of the cephalometric head
and then lift the cephalometric head from the
box with the remaining two packing pieces.
Side packing pieces
Installation and set-up manual 8201085
11
3. Installing the unit
Cranex D
Remove the packing material from the top of the
rotating unit and place this packing material on
the floor.
Lift the rotating unit from the box (DO NOT lift it
by holding the head holder and do not damage
the head holder) and carefully place it on to the
packing material.
6. Remove all the remaining accessories from the
box.
Also remove the CCD sensor package that it
under the rotating unit. Open the package and
carefully remove the sensor/s. Always handle
them with care.
NOTE:
Before starting to install the unit, check that you
have all the parts in accordance with the packing list.
12
Installation and set-up manual 8201085
Cranex D
3. Installation the unit
3.2 Attaching the unit on the wall
1. Check the leg assembly. The extension bars
should be positioned in the middle of the slots in
the lower wall bracket. Also check that the lower
wall bracket is positioned mid way along the
extension bar threads.
If not adjust accordingly.
2. Place the leg on the floor and against the wall
where the unit is to be attached. Position it
according to the dimensions below.
Installation and set-up manual 8201085
13
3. Installing the unit
Cranex D
NOTE:
If the height of the unit with leg (2.32 m / 91") is
too high for the room in which it is to be installed, reduce the height of the unit by shortening the leg.
Level the lower wall bar and then use it as a
template to mark the position of the fixing holes.
Drill appropriate size holes for the fixing hardware to be used and then attach the lower wall
bracket and leg to the wall.
2. Remove the upper cover from the upper shelf
(4 screws), and then remove the plastic film from
the column
Upper cover
3. Place some packaging material on the floor to
support the column and Z-carriage.
If possible place the packaging material just in
front of the wall bracket and leg.
4. CAUTION - HEAVY OBJECT
A minimum of two persons are required for the
following task.
Lift the column and Z-carriage from the box (DO
NOT lift it by holding the patient support handle),
and place them on to the packaging material on
the floor.
14
Installation and set-up manual 8201085
Cranex D
3. Installation the unit
5. Remove the two M10 screws and washers from
the horizontal bar on the leg.
Horizontal bar
6. CAUTION - HEAVY OBJECT
A minimum of two persons are required for the
following task.
Lift the column and Z-carriage and turn them
over so that the upper shelf is pointing towards
the floor. Attach the lower part of the column to
the horizontal bar on the leg with the two M10
screws. Rest the upper shelf on a piece of
packaging material on the floor.
M10 screws
7. Remove the two transport supports from the rear
of column. Replace the M4 screws.
NOTE:
If the unit is to be used in an exhibition, mark the
position of the transportation supports before
removing them. The mark will make it easy to
replace the transportation supports as the Zcarriage can be driven to the same transportation position.
Transportation support
8. On the upper wall bracket check that the extension bars are positioned in the middle of the
slots in the wall bracket. Also check that the wall
bracket is positioned mid way along the extension bar threads.
If not adjust accordingly.
Installation and set-up manual 8201085
15
3. Installing the unit
Upper wall bracket
Cranex D
9. Attach the upper wall bracket on the top of
column.
10. CAUTION - HEAVY OBJECT
A minimum of two persons are required for the
following task.
Lift the column up (the column pivots on the
lower leg) until the upper bracket touches the
wall. Level the upper bracket and then mark the
position of the fixing holes on the wall.
Lower the column.
Drill appropriate size holes for the fixing hardware to be used and then lift the column up
again and attach the upper wall bracket to the
wall.
11. Place a spirit level on the upper shelf, and level
the unit in the left/right direction and in the forwards/backwards direction.
The slots in the wall brackets allow the unit to be
levelled in the left/right direction and the nuts on
the extension bars in the forwards/backwards
direction.
When unit is levelled tighten all fixing nuts.
16
Installation and set-up manual 8201085
Cranex D
3. Installation the unit
3.3 Installing the rotating unit
1. Remove the metal cover from the upper shelf
(10 Torx screws).
Metal cover
2. Remove the cover from the top of the Z-carriage.
Cover
Z-carriage
3. Loosen the four nuts that will be used to hold the
rotating unit in position.
Nuts
Installation and set-up manual 8201085
17
3. Installing the unit
Upper shelf
Nut
Slot
Cranex D
4. CAUTION - HEAVY OBJECT
A minimum of two persons are required for the
following task.
Lift the rotating unit, with the linear motor towards the column, and very carefully slide the
rotating unit onto the upper shelf as far as it will
go. The four slots in the rotating unit MUST slide
under the four nuts on the upper shelf. Make
sure that none of cables are caught. Tighten the
four nuts to hold the rotating part in place.
Rotating unit
5. Connect all the cables that come from the rotating unit to the corresponding connectors of the
Top Rack Connector Board (N5300), J5303,
J5305, J5306, J5309, J5312, J5316, J5320
and J5321.
Also, one cable goes to the Power Supply
Board (N4700), X22. Also connect the ground
wires from Z-carriage and Power Supply Board
in the ground wire connection screw at the front
of upper shelf. The rotating unit ground wire is
already connected to this grounding screw.
6. NOTE:
Handle fibre optic cables with care. They can be
easily damaged if mishandled.
Connect the fibre optic cables that come from
the rotating unit to the connectors inside the rear
of the Z-carriage.
18
Installation and set-up manual 8201085
Cranex D
3. Installation the unit
When the unit is viewed from the rear the cable
with text (TX) goes to the left-hand connector
and the cable with NO text goes to the righthand connector.
Installation and set-up manual 8201085
19
3. Installing the unit
Cranex D
7. Attach the CCD-sensor to the panoramic sensor
holder. Refer to the Users Manual for information
on how to do this.
NOTE:
CCD Image Receptor PP1-1 (sensor type 1)
can ONLY be used with the panoramic sensor
holder.
CCD Image Receptor PP1-2 (sensor type 2)
can be used with both the panoramic and the
cephalometric sensor holders.
8. Install the Cranex Graphical User Interface and
the PCI Interface Board Driver into the PC to be
used with the unit.
These are on Cranex D Installation CD supplied
with the unit. From the disk run SETUP.EXE and
both the GUI and the PCI driver will be installed
simultaneously.
9. Install DfW 2.5 rev1 (or later) software into the
PC. During the installation when the Select
Features window appears, make sure that you
select the CRANEX D option.
Refer to the Digora for Windows 2.5 rev 1 (or
above) Installation, configuration and administration manual.
NOTES:
- If the PC has hyperthreading it must be set so
that it is OFF.
- If the Cranex D is the ONLY device being used
with the PC, it is recommended that the
enhancement Matrix Size be set to between 19 25, refer to the DfW User's Manual, section 11
Options, Enhancement tab. If other devices are
being used, leave the setting as recommended
in the DfW User's Manual (7).
- If a DfW single user's version is being used,
images must be stored in a separate folder, not
inside the database (refer to the DfW Installation
and setup manual).
20
Installation and set-up manual 8201085
Cranex D
3. Installation the unit
10. Switch the PC off and install the PCI-Interface
Board.
When the PC is switched on again it should
automatically find the previously installed PCI
Interface Board Driver. If not, reinstall the driver,
from the Cranex D Installation CD.
11. NOTE:
Handle fibre optic cables with care. They can be
easily damaged if mishandled.
Connect the fibre optic cables (part number
4801743) between the PCI board in the PC and
unit.
To the PCI Board:
- connect the cable WITH text on to the "TX"
connector.
- connect the cable WITHOUT text to "RX" connector.
To the rear of the unit (Z-carriage):
- connect the cable WITH text to the right-hand
connector.
- connect the cable WITHOUT text to the lefthand connector.
When routing the fibre optic make sure that it is
not lying on the floor where it can be trodden on
and damaged. Also do not bend the cables
around radiuses less the 15cm.
12. Connect the serial interface (RS) cable (part
number 4801742) between the serial ports of
PC and unit.
To the rear of the unit:
- connect the male "D" connector (nine pin) to
the appropriate female connector at the rear of
the unit. Secure the connector in place with the
holding screws.
To the PC:
- connect the female connectors to the male "D"
connectors (COM1 and COM2) at the rear of the
Installation and set-up manual 8201085
21
3. Installing the unit
Cranex D
PC. Secure the connectors in place with the
holding screws.
If the PC only has one COM port (COM1), you
can use either a USB/RS adaptor or PCI-card
(RS-card) to make a second COM port (COM2).
See section 5.7 Changing the serial port numbers, for information on how to do this.
NOTE
Only use the cables supplied by the manufacturer.
13. From the Cranex D Installation CD install the
CCD Sensor Gain Files into the PC.
To do this copy the contents of the CD's folder
"Gainfiles" to folder /Soredex/DfW 2.5/Dicc/
Ortho/Gainfiles.
Note! DfW 2.5 folder name should be altered
according to the DfW software supplied.
When DfW is installed it will support a Pan/Ceph
unit . If you are installing a Pan only unit, you
must remove the Ceph option from DfW.
To do this, open the file Dicc.ini ( /Soredex/DfW
2.5/ ) using Notepad, and from the line beginning with "Devices" remove the text
",PP1CEPH" and save the file.
22
Installation and set-up manual 8201085
Cranex D
3. Installation the unit
3.4 Levelling the unit
If you are installing a Pan unit, the unit must now be
levelled. If you are installing a Pan/Ceph unit, level
the unit after the Ceph arm and head have been
installed.
1. To level the unit in the front/back direction, place
a spirit level on the upper shelf so that it is perpendicular to the front of the unit.
Level the unit by adjusting the position of the
nuts (loosening and tightening them) on the
extension bars at the top of the column.
2. To level the unit in the left/right direction place a
spirit level across the upper shelf so that it is
parallel to the front of the unit. Level the unit by
slightly loosening the nuts that hold the unit to the
top wall bracket and then pushing the column to
the left or right.
3. Check that the unit is level in both directions and
then tighten all the adjusting and securing nuts.
Installation and set-up manual 8201085
23
3. Installing the unit
Cranex D
3.5 Option - Installing a cephalometric unit
Installing the cephalometric arm
If you are installing a ceph unit, the ceph arm must
now be installed.
1. Remove the front cover (6 screws under the
mirror) and side covers (2 screws at the front
and 4 at the rear) from the z-carriage.
Front
cover
Side
cover
Nuts and
Washers
Ceph arm
24
2. Remove all packing material, the nuts and washers from the ceph arm.
Lift the ceph arm up behind the unit to where it is
to be attached.
CAUTION:
Handle fibre optic and other cables with care.
They can be easily damaged if mishandled.
Carefully route the cables through the hole in the
back of the Z-carriage to the front of it and then
secure the arm in place with the washers/nuts
(4).
Cables
Installation and set-up manual 8201085
Cranex D
3. Installation the unit
3. Connect the cables from the ceph arm to the
appropriate connectors on the Digital IO board
and Motor Controller board.
Connect the ground wire to the grounding point
on Z-carriage frame.
NOTE:
Handle fibre optic cables with care. They can be
easily damaged if mishandled.
Connect the fibre optic cable WITH text, that
comes from the rotating unit (The Terminal
Board), to the left-hand connector (when viewed
from rear) inside the rear of the Z-carriage.
Connect the fibre optic cable WITHOUT text,
that comes from the rotating unit (The Terminal
Board), to the fibre optic cable WITH text that
comes from the ceph arm.
Connect the fibre optic cable WITHOUT text,
that comes from the ceph arm, to the right-hand
connector (when viewed from rear) inside the
rear of the Z-carriage.
Installation and set-up manual 8201085
25
3. Installing the unit
Cranex D
4. NOTE:
Handle fibre optic cables with care. They can be
easily damaged if mishandled.
Connect the fibre optic cables (part number
4801743) between the PCI board in the PC and
unit.
To the PCI Board:
- connect the cable WITH text on to the "TX"
connector.
- connect the cable WITHOUT text to "RX" connector.
26
Installation and set-up manual 8201085
Cranex D
3. Installation the unit
Installing the cephalometric head
1. Remove the ceph head carefully from its package and remove the ceph head cover which is
held in place with four screws on the under side.
2. Remove four fixing screws from the ceph head
holder at the end of the ceph arm.
Lift the ceph head and slide it partly on to the
ceph head holder. Route the cables through the
opening in the ceph head holder. Continue to
slide the ceph head on to the ceph head holder
until it reaches the line (factory set) on the ceph
head holder.
CAUTION:
Make sure that no wires or cables get trapped
between metal parts.
When the ceph head is positioned correctly,
secure it in position with the four screws previously removed.
3. Connect the cables from the ceph arm to their
appropriate connectors in ceph head. Also
connect the ground wire in the grounding point in
ceph head.
CAUTION:
Handle fibre optic cables with care. They can be
easily damaged if mishandled.
Connect the fibre optic cable WITH text on it to
the connector marked TX (ICD15).
Connect the fibre optic cable WITHOUT text on
it to RX connector (ICD13). Both connectors are
on the N5905 Terminal Board, on the top of the
ceph head.
Installation and set-up manual 8201085
27
3. Installing the unit
Cranex D
3.6 Connecting the unit to a power supply
The units are manufactured for EITHER 230 VAC or
115 VAC mains voltage. The voltage setting CANNOT be modified in the field.
IMPORTANT NOTE
If x-ray unit is ever moved to a new location CHECK
that the voltage at the new location is the same to
the mains voltage which appears on the unit type
label. NEVER connect a unit to a mains voltage that
is not specified on the type label.
1. Before connecting the unit to the power supply
make sure that the voltage is 230 VAC (or 115
VAC) ±10% depending on the voltage rating on
the type label of the unit.
Also make sure that the power supply is fitted
with a 10 A (230 VAC) or a 20A (115 VAC) slow
blow fuse.
The power supply must also be equipped with
proper circuit breaker.
2. Switch the main power supply off.
3. Connect the power supply cable from the x-ray
unit to the power supply.
Also observe any national and local requirements with regards the connection of dental xray equipment to a power supply.
4. Switch the main power supply on and then
switch the unit on with the on/off switch that is
located on the right-hand side of the unit. Make
sure that the exposure switch is not locked.
Refer to the User's Guide for information on
locking and unlocking the exposure switch.
28
Installation and set-up manual 8201085
Cranex D
3. Installation the unit
5. Check that the unit control panel lights come on.
Test all the buttons and functions of the unit, but
do not take any exposures yet.
6. Start Cranex D Graphical User Interface (GUI)
from PC by double clicking the icon.
Check that there is a connection from the PC to
unit by selecting different programs using the
GUI.
If there is no connection an error message will
appear. If this happens first check that the serial
ports connections are correct. Refer to Section
"5.7 Changing the serial port numbers".
7. Take test exposures in test (T) mode to see that
the unit moves correctly. Refer to the Cranex D
user's manual for information on how to do this.
Switch the unit off.
Installation and set-up manual 8201085
29
3. Installing the unit
Cranex D
3.7 Installing a remote exposure warning light (optional)
If you plan to install a remote exposure warning/
ready state light, it must be connected to connector
J5301 on the Motor Controller board (on the Zcarriage) and the cable routed out through the rear
of the Z-carriage (there is a punch hole above the
exposure switch).
Use a grommet to protect the cable.
The warning light assembly must be positioned
outside the room in which the x-ray is used in the
location where it can be clearly seen. For further
information on how to install the remote exposure
warning light, refer to the instructions supplied with
the light and the relevant circuit diagram in the unit
service manual .
30
Installation and set-up manual 8201085
Cranex D
3. Installation the unit
3.8 Running the z-carriage without the Rotating unit
If you need to drive the Z-carriage up or down when
the rotating unit has not been installed, it can be
done as follows:
- Connect service connectors (not supplied) to X90
and X14 on the Digital IO Board (N5200), on the Zcarriage.
NOTE, CEPH UNITS:
A jumper must be connected to JP1 on the Motor
controller board (N3500).
- Enter the service mode and select the program "rd
our" (See section "4.1 The service mode").
- Press and hold down the L or R key until
"C 43 FiL" appears on the display.
- Press the "up" button and then the R button.
- Press the E key to select this and then press and
hold down the E key to exit the service mode.
The Z-carriage can now be driven up and down.
NOTE:
The Z-movement microswitches do not function in
this mode, so make sure that you do not drive the Zcarriage to the mechanical end stops, which will
cause the Z-motor to jam.
NOTE:
Remove the service connectors from the unit to
avoid accidental access to service programs.
Installation and set-up manual 8201085
31
4. Checking the alignment of the unit
Cranex D
4. Checking the alignment of the unit
After checking the alignment and making any necessary adjustments (See section 5 Adjusting the Alignment of the Unit) replace all the covers that were
removed.
WARNING:
Protect yourself from radiation when taking x-ray
exposures.
4.1 The service mode
To check the alignment you will need to enter the
service mode and select the appropriate service
program.
Entering the service mode
1. Switch the unit off.
2. Open the mirror and remove the front cover from
the Z-carriage and insert service connector (part
no 4801744) into connector X90 (on the IOboard).
3. Switch the unit on.
Press and hold down the E key (3 seconds) until
you hear a triple beep, the unit is now in the
service mode.
Selecting service programs and parameters
1. There are four unmarked buttons on the control
panel, left / right / up / down.
The up and down buttons select the service
programs, and the right and left buttons change
service program parameter values.
Refer to the Service Manual for information
about all the service programs.
32
Installation and set-up manual 8201085
Cranex D
4. Checking the alignment of the unit
Exiting the service mode
1. If you are in the parameter selection level press
the E key once to go up to the service program
selection level.
2. Press and hold down the E key (3 seconds) until
you hear a triple beep, the unit is now in the
normal mode.
3. Switch the unit off, remove the service connector
(part no 4801744) and replace all the covers.
Installation and set-up manual 8201085
33
4. Checking the alignment of the unit
Cranex D
4.2 Checking the rotation center
1. Open the mirror and remove the front cover from
the Z-carriage. Insert service connector to X90.
2. Switch the unit on.
3. Attach the CCD sensor to the panoramic sensor
holder. See the Cranex D User's Manual for
information on how to do this.
4. Switch the PC on and open the Cranex GUI and
DfW. Select the panoramic program.
5. Enter the service mode and select service
program EPS.
6. Select exposure values of 70kV, 10 mA,
0.32sec from the unit control panel (or from
GUI).
7. Press the RETURN key to drive the rotating unit
to the ready/PIO (the rotating unit will be parallel
to the wall).
34
Installation and set-up manual 8201085
Cranex D
4. Checking the alignment of the unit
Alignment tool
8. Place the chin support onto the holder and then
place the alignment tool into the bite piece hole
so that is pointing away from the column.
Make sure that the rotating part is perpendicular
to upper shelf (parallel to the wall).
Chin support
WARNING
Radiation
9. Protect your self from radiation and press the
exposure switch.
Check the position of the radiation beam. If it
strikes the O line (accuracy ±1 mm) on the
alignment tool, the beam is correctly positioned.
If it does not, then the beam must be adjusted.
See "5.2 Adjusting the rotation center".
10. Manually turn the rotating unit 90° so that it is
parallel to the upper shelf. Reposition the alignment tool so that it is parallel to the column.
Installation and set-up manual 8201085
35
4. Checking the alignment of the unit
WARNING
Radiation
Cranex D
11. Protect your self from radiation and press the
exposure switch.
Check the position of the radiation beam. If it
strikes the M line (accuracy ±1 mm) on the
alignment tool, the beam is correctly positioned.
If it does not, then the position of the beam must
be adjusted. See "5.2 Adjusting the rotation
center".
4.3 Checking the positions of the lights
1. Exit the service mode.
2. Select the panoramic program and then press
the RETURN key to drive the unit to the PIO
position. Reposition the alignment tool so that it
is pointing away from the column.
3. Press either Up / Down arrow keys or open the
mirror to switch the patient positioning lights on.
36
Installation and set-up manual 8201085
Cranex D
4. Checking the alignment of the unit
Midsagittal light, tool
parallel to column
Focal trough light, tool
parallel to upper shelf
4. When the alignment tool is parallel to the upper
shelf, the focal trough light beam must coincide
with the F line (±1 mm accuracy) on the alignment tool.
When the alignment tool is parallel to the column, the midsagittal light beam must coincide
with the M line (±1 mm accuracy) on the alignment tool.
If the light beams do not coincide with their
respective light beams, they must be adjusted.
(See "5.3 Adjusting the positioning lights").
4.4 Checking the panoramic radiation field
CCD sensor
Slot
1. Place the alignment tool in the slot in the front of
the CCD sensor, and slide the alignment tool
down as far as it will go.
Alignment tool
Installation and set-up manual 8201085
37
4. Checking the alignment of the unit
Cranex D
2. Enter the service mode and select service
program EPS.
3. Select exposure values of 70kV, 10 mA,
0.32sec from the unit control panel (or from
GUI).
WARNING
Radiation
4. Protect yourself from radiation and press the
exposure switch.
Check the position of the radiation beam.
If it is between the outermost vertical lines, is
vertical (not tilted) and the bottom of the beam is
level with the M (±2 mm) line on the alignment
tool, then the beam is correctly positioned.
If it does not, then the position of the beam must
be adjusted. See 5.4 Adjusting the position of
the radiation field.
38
Installation and set-up manual 8201085
Cranex D
4. Checking the alignment of the unit
4.5 Option - Checking the cephalometric head
Checking the ceph radiation field
1. Take a lateral ceph exposure and check that
there are (1 -10mm) unexposed borders around
the exposed area.
If not the ceph radiation field must be adjusted.
See section 5.5 Option - Aligning the
cephalostat
Checking the position of the CCD sensor
CCD sensor
Slot
1. Place the alignment tool in the slot in the CCD
sensor and slide it down as far as it will go.
2. Press the the RETURN key to drive the unit to
the Ceph PIO position. The secondary collimator, ear posts and CCD sensor must line up.
3. Enter the service mode and select service
program EPS,
Alignment tool
4. Select the lateral ceph program and exposure
values 70kV, 10 mA.
5. Check the position of the radiation beam.
If it is between the outermost vertical lines, is
vertical (not tilted) on the alignment tool, then the
beam is correctly positioned.
If it does not, then the position of the beam must
be adjusted. See "5.5 Option - Aligning the
cephalostat".
Installation and set-up manual 8201085
39
4. Checking the alignment of the unit
Cranex D
Checking the position of the ceph head support
1. From the previously taken lateral ceph exposure
check that the two rings inside the ear posts are
concentric on the image.
If the rings are not concentric, then the head
support must be adjusted. See section 5.5
Option - Aligning the cephalostat
40
Installation and set-up manual 8201085
Cranex D
5. Adjusting the alignment of the unit
5. Adjusting the alignment of the unit
5.1 Primary slit
NOTE:
The primary slit DOES NOT have to be adjusted
during installation. However, this procedure may be
needed later.
Before making any alignment adjustments check
that the panoramic primary slit is 0.9 mm wide when
the unit is in the PIO position. To do this:
1. Manually rotate the rotating unit to the PIO position (parallel to the column).
2. Carefully measure the width of the slit with, for
example, a feeler gauge.
NOTE:
The primary slit is made of lead and is very soft.
Be careful not to scratch or damage the sides of
slit.
If the width of the slit needs to be adjusted do it as
follows:
1. Loosen the fixing screw (A) in the upper part of
slit adjusting cone.
Use screwdriver to turn the cone (B) from below
until the correct slit width is achieved. Tighten
the fixing screw.
Installation and set-up manual 8201085
41
5. Adjusting the alignment of the unit
Cranex D
5.2 Adjusting the rotation center
1. Press the RETURN key to drive the unit to the
PIO position (parallel to the column).
Top of upper shelf
2. With a marker pen, place marks on the pulley
and the pulley holder that are located on the top
of the upper shelf near the front.
The marks will help you reposition the rotating
unit in the same front / back direction when you
turn the rotating unit to check the rotation center.
3. Place the alignment tool (parallel to the upper
shelf) in the chin support.
Pulley and pulley
holder with marks
4. Enter the service mode and select service
program EPS.
5. Select exposure values of 70kV, 10 mA, 1 sec
from the unit control panel (or from GUI).
WARNING
Radiation
42
6. Protect yourself from radiation and press the
exposure switch. Move the slider on the alignment tool to mark the position of the beam.
Installation and set-up manual 8201085
Cranex D
5. Adjusting the alignment of the unit
7. Turn the rotating unit 180°. Make sure that the
black marks, previously placed on the pulley and
pulley holder are in the same place. This ensures that the rotating unit has not moved in the
backwards / forwards direction.
8. Press the exposure switch and check where the
beam strikes. The distance between the first
position, marked with the slider, and the second
position shows how much the rotating center
needs to be adjusted.
9. To adjust the position of the rotation center
loosen the three fixing screws (A) (one shown in
the picture) that hold the collimator guide in
position and turn the set screw (B) in the required direction.
Tighten the fixing screws and then check the
beam position again (steps 6 - 8). Readjust if
necessary.
10. Now adjust the beam so that it strikes the O line.
Push the rotating unit towards the column and
then press the RETURN button to drive the unit
to the PIO position.
11. On top of the rotating unit, loosen the two nuts
(B) that hold the Y-sensor in place. Turn screw
(A) to adjust the position of the interrupt plate
which will change the position where the rotating
unit stops in the PIO position, and thus change
the position of the beam.
Repeat steps 10 and 11 until the beam coincides with the O line.
Installation and set-up manual 8201085
43
5. Adjusting the alignment of the unit
Cranex D
12. Now turn the rotating unit so that it is parallel to
upper shelf.
WARNING
Radiation
13. Protect your self from radiation and press the
exposure switch.
Check how far the radiation beam is away from
the M line on the alignment tool.
Adjustment fixing screw
14. To get the beam in the correct position, on the M
line, the position of the chin rest holder must be
adjusted.
Do this by removing the chin rest holder, it is
held in place with one screw that can be
accessed from the under side of the patient
handle.
15. Loosen the adjustment fixing screw that holds
the long set screw in position and turn the long
set screw to adjust the position of the chin rest
holder (Turn the screw clockwise to move the
chin rest to the left).
Tighten the fixing screw when adjusted.
16. Recheck the position of the beam and readjust if
necessary.
A
44
17. NOTE:
If the chin rest holder was adjusted by more that
1mm, you will have to adjust the head holder.
(NOTE: the midsagittal light MUST be adjusted
first).
To adjust the chin rest holder:
- remove the head holder lower cover.
- loosen screws (A).
- move the head holder sideways until the midsagittal beam hits the middle of the forehead
support.
- Tighten all the screws.
Installation and set-up manual 8201085
Cranex D
5. Adjusting the alignment of the unit
5.3 Adjusting the positioning lights
The midsagittal light is adjusted by loosening two
nuts that hold the light assembly in place and then
sliding the assembly sideways until the light strikes
the M line (center of the bite block) on the adjusting
tool when the alignment tool is positioned parallel to
column.
The focal trough light is adjusted by loosening two
screws that hold the light assembly in place and the
sliding the assembly sideways until the light strikes
the F line on the adjusting tool when the alignment
tool is positioned parallel to upper shelf.
Before making any adjustments, the rotating unit
MUST be in the PIO position.
5.4 Adjusting the position of the radiation field
1. Place the alignment tool in the slot in the front of
the CCD sensor and slide it down as far as it
will go.
2. Enter the service mode and select service
program EPS.
3. Select exposure values of 70kV, 10 mA, 1 sec
from the unit control panel (or from GUI).
WARNING
Radiation
4. Protect yourself from radiation and press the
exposure switch.
Installation and set-up manual 8201085
45
5. Adjusting the alignment of the unit
Cranex D
Check how much the radiation beam is out of
alignment.
(It should be between the outermost vertical
lines, vertical (not tilted) and the bottom of the
beam level with the M line on the alignment tool.
5. To get the radiation beam in the correct horizontal position, the CCD holder assembly must be
moved sideways.
Loosen the four fixing screws that hold the CCD
holder assembly in place, and then use the two
set screws to move it side ways in the direction
required.
Adjusting screws
Fixing screws
6. Recheck the position and readjust accordingly.
Tighten all screws when correctly positioned.
7. The height of the radiation beam is adjusted by
moving the adult/child aperture.
Loosen first the fixing screw (A) that holds the
adult/child aperture in place and the moving it
vertically with the set screw (B).
8. Recheck the position and readjust accordingly.
Tighten the fixing screws when correctly positioned.
46
Installation and set-up manual 8201085
Cranex D
5. Adjusting the alignment of the unit
5.5 Option - Aligning the cephalostat
Levelling the ceph components
Note! The ceph components (ceph arm, secondary
slit and CCD sensor holder) must be levelled before
adjusting the beam alignment.
Ceph arm is in level (factory set) when the unit is
delivered with the ceph.
If, however, it needs to be levelled do it as follows.
M17 nuts
M10 nuts 1. Remove Z-carriage front and side covers.
Slightly loosen the M17 nuts that hold the ceph
arm in place.
2. Loosen the M10 nuts, two on both sides of Zcarriage that hold the L-shaped adjustment
plates in place.
3. Use a spirit level to level the arm. When level
tighten M10 nuts and then the M17. Check that
the arm is level. Readjust is necessary.
B
The CCD sensor holder and the secondary slit must
also be adjusted so that they are vertical.
To adjust the CCD sensor holder:
1. Loosen the sensor holder screws (A) (2pcs).
2. Adjust the position with adjustment screw (B).
3. Tighten all fixing screws when adjusted.
A
Installation and set-up manual 8201085
47
5. Adjusting the alignment of the unit
D
C
Cranex D
To adjust the secondary slit:
1. Loosen the secondary slit screws (C) (2pcs)
2. Adjust the position with the vertical adjustment
set screws (D).
3. Tighten all screws when adjusted
Adjusting the cephalometric radiation field
1. Place the adjusting tool into the slot in CCD
sensor and slide it downwards as far as it will
go.
2. Disconnect the N610 board, and then remove
the ceph secondary slit (2 screws)
3. To move ceph head horizontally loosen four
fixing screws on top the ceph head and then
slide the ceph head backwards or forwards until
the beam is correctly positioned.
The correct position is when the radiation beam
is within the vertical lines on the alignment tool.
4. To move the ceph radiation field vertically loose
the two fixing screws (A) that hold the collimator
slit plate in position and then adjust the plate
with the adjustment screws (B) next to the collimator. The correct position is when the radiation beam coincides with the M line (±2 mm) on
the alignment tool.
5. Tighten all screws when adjusted
48
Installation and set-up manual 8201085
Cranex D
5. Adjusting the alignment of the unit
Adjusting the secondary slit
NOTE:
Before adjusting the secondary slit, position the
cephalometric radiation field (previous section).
1. Assemble the secondary slit
2. Take an ceph exposure, (ceph PIO, 73kV,
10mA, 1 s, alignment tool on CCD sensor).
3. If the radiation field cannot be seen on the alignment tool, move the tool to the secondary slit,
attach it in position with tape. The correct alignment is when the radiation beam (approx.16mm
wide) strikes the secondary slit symmetrically.
4. To adjust the position of the secondary slit
loosen the pulley clamping screw (A) and turn
the shaft with screwdriver while holding the
timing pulley and timing belt in place.
Pulley clamping screw
D
C
5. The height of the secondary slit must be adjusted so that the radiation beam coincides the
marking M on the alignment tool when it is on
the CCD-sensor.
To adjust it loosen the two fixing screws (C) that
hold the secondary slit in position and then
adjust the position using the adjustment screw
(D) above the slit.
Installation and set-up manual 8201085
49
5. Adjusting the alignment of the unit
Cranex D
6. When secondary slit is adjusted and all screws
tightened, manually move the rotating unit so
that it is parallel to the upper shelf, exit the service mode, select panoramic mode, press RETURN to move the unit in PIO.
Select the ceph mode and press RETURN
again to move the unit into the ceph PIO position
again. Now check that the alignment is correct.
Readjust if necessary.
NOTE:
Adjustments to the ceph must always be made
in ceph PIO position.
Ear posts adjustment
Vertical adjustment
1. Loosen the M6 fixing screw behind the motor (it
allows the head support to be tilted).
2. Adjust the vertical position with the adjustment
screw on the top of ceph head.
3. Tighten the fixing screws when rings are on the
same vertical level.
Horizontal adjustment
C
1. Loosen the adjustment fixing screw at the rear/
top of the ceph head.
2. Adjust the horizontal position with the adjustment
lever at the front of the ceph head.
3. Tighten the screws when rings are on the same
horizontal level.
B
50
A
Installation and set-up manual 8201085
Cranex D
5. Adjusting the alignment of the unit
5.6 Ball/pin phantom test
To check that the panoramic unit is correctly aligned
take an exposure using the ball pin phantom.
1. Place the ball phantom in the bite block as far it
will go. Make sure that the ball phantom is parallel to the upper shelf.
2. Set the unit to take a normal panoramic exposure,
Refer to the user's manual for information on
how to do this.
3. Make sure that the focal through light coincides
with the two balls in the frontal area and the
notch on the side of the ball phantom.
3. Take an exposure with 60 kV.
Check that the balls on the image appear round.
If they are not the rotating unit must be realigned
Installation and set-up manual 8201085
51
5. Adjusting the alignment of the unit
Cranex D
5.7 Changing the serial port numbers
If Cranex D User Interface cannot connect to the xray unit check to see that the serial ports are
configured correctly.
Cranex D GUI uses serial ports COM1 and COM2
by default but these might not be available in all
systems.
If this is the case the Cranex GUI’s configuration file
(“opcc.conf”) must be changed.
The configuration is located in the same directory
where Cranex GUI was installed.
1. Check the numbers of used serial ports from
Windows Device Manager.
2. Open Cranex GUI’s configuration file
(SOREDEX PP_GUI /) with text editor such as
Notepad (or Microsoft Word).
The configuration file contains two lines, which
specify the serial ports used.
Correct line identifiers are “op” and “serialdicc”.
After the line identifiers there are Unix type
device identifiers that specify the used serial
port.
Port number starts from 0 so that “/dev/ttyS0”
means COM1 and so on.
For example:
op
/dev/ttyS0
serialdicc /dev/ttyS1
specifies Cranex GUI will use serial ports COM1
and COM2,
and:
op
/dev/ttyS4
serialdicc /dev/ttyS7
specifies Cranex GUI will use serial ports COM5
and COM8.
52
Installation and set-up manual 8201085
Cranex D
5. Adjusting the alignment of the unit
Make changes according to your system settings and save configuration file
NOTE:
When using Microsoft Word, make sure to save
file in Text Only format.
Restart the Cranex D GUI for changes to take
effect.
Installation and set-up manual 8201085
53
6. Technical Information
Cranex D
6. Technical Information
6.1 Symbols, markings that appear on the unit
54
Installation and set-up manual 8201085
Cranex D
6. Technical Information
6.2 Technical Specifications
Model
PP1
Classification
IEC class I, type B, IP20
Conforms with the standards EN 60601-1, EN60601-1-3, EN 60601-2-7 and EN
60601-1-2 (Group 1, class B)
Conforms with the regulations of DHHS Radiation Performance Standard, 21CFR
Subchapter J.
The unit must be installed within a protected clinical area.
Protection against electric shock - Class 1.
Degree of protection - Type B applied parts with no conductive connection to patient.
Protection against ingress of liquids - IPX 0
Disinfection methods:
• mild soapy water
• non-alcholic based disinfectant for the chin rest
• disposable plastic covers for bite piece/chin support
For use in environments where no flammable anaesthics and/or flammable cleaning
agents are present.
Mode of operation:Continuous operation with intermittent loading.
Unit description
Dental panoramic and panoramic/cephalometric x-ray units with a high frequency
switching mode x-ray generator. The panoramic version takes panoramic exposures.
The panoramic/cephalometric version takes panoramic and cephalometric
exposures. The unit uses a CCD sensor as image receptor.
X-ray generator
TUBE
- OPX/105, or equivalent
FOCAL SPOT
- 0.5 mm IEC 336
TARGET ANGLE
- 5º
TARGET MATERIAL
- Tungsten
Installation and set-up manual 8201085
55
6. Technical Information
Cranex D
OPERATING TUBE POTENTIAL
- Panoramic imaging 57 - 85 kV (±4 kV)
- Cephalometric imaging 60 - 85 kV (±4 kV)
OPERATING TUBE CURRENT
- 10 mA (±1 mA) at 0.5 FS
MAXIMUM TUBE CURRENT
- 11 mA
MAXIMUM OUTPUT POWER
- 945 W nominal at 85kV, 11 mA
FILTRATION
- minimum filtration 2.7 mm Al
BEAM QUALITY
- HVL over 3.05 mm Al @ 85 kV
OUTER SHELL TEMPERATURE
- +50ºC (122ºF) maximum
DUTY CYCLE
- controlled by the software of the unit
Power requirements
INPUT VOLTAGE
- 230 or 115 VAC (±10%), 50/60 Hz, single phase, grounded socket
MAXIMUM LINE CURRENT
- 8 A (@ 85 kV/10mA, 230 VAC mains)
MAXIMUM LINE RESISTANCE
- 1 ohm
MAXIMUM LINE FUSING
- 10 A /20A slow @ 230/115 VAC (main fuse 8A/16A slow in the device)
LINE SAFETY SWITCH (when required)
- Approved type, min. 10 A 250 VAC
EARTH LEAKAGE CIRCUIT BREAKER (when required)
- Approved type, min. 16 A 250 VAC, breaker activation leakage current in
accordance with local regulations.
Mechanical parameters
PANORAMIC
- Source to Image layer Distance (SID) 520 mm (±10 mm)
- Magnification factor 1.34
CEPHALOMETRIC
- Source to Image layer Distance (SID) 1721 mm ±20 mm
- Source to Object Distance (SOD) 1500mm
-Magnification factor 1.15
WEIGHT
- Panoramic unit 120 kg
- Panoramic/cepahlometric unit 165 kg
DIMENSIONS
- Panoramic unit (H x W x D) 2320 x 1200 x 1000 mm
- Panoramic/cephalometric unit (H x W x D) 2320 x 1200 x 1900 mm
VERTICAL HEIGHT OF CHIN REST
- 950 - 1750 mm (±10 mm)
56
Installation and set-up manual 8201085
Cranex D
6. Technical Information
Digital image receptor
Only the CCD sensors specifically designed for Cranex D unit can be used.
PIXEL SIZE
- 96 micrometres
RESOLUTION
- PAN: 6.9lp/mm (theor)
- CEPH: 5.9lp/mm (theor)
IMAGE SIZE
- PAN: 9.5 MB
- CEPH: 13.3 MB
Timer
PANORAMIC EXPOSURE TIMES
- Normal
17.6 s (±15%)
- Child 16 s (±15%)
- Partial
1.9 s - 3 s - 9.2 s - 3 s - 1.9 s
Can be freely selected and combined,
overlapping approx. 0.3 s.
- TMJ 3.3 + 3.3 s (±15%)
Max 240 mAs
CEPHALOMETRIC EXPOSURE TIMES
- 8 - 20 s scanning times, 5 steps according to R’10 series (ISO)
BACK-UP TIMER
- 23.5 s (±1.5s)
Leakage technique factors
PANORAMIC
- 85 kV, 2400 mAs/h (85 kV, 10 mA, duty cycle 1:15)
CEPHALOMETRIC
- 85 kV, 1800 mAs/h (85 kV, 10 mA, duty cycle 1:20)
Measurement bases
kV and mA values can be verified with a specified digital multimeter according to
separate measurement instructions. The exposure times can be measured as the
duration of radiation in the primary radiation beam.
Exposed field size in cephalometry
- 22 x 26 cm for lateral projections
- 22 x 22 cm for PA and AP projections
- Automatic filtration of soft tissues for lateral projections controlled by
software.
Installation and set-up manual 8201085
57
6. Technical Information
Cranex D
Operating ambient conditions
- Operating temperature
- Relative humidity
10 - 40ºC
0 - 85 RH%
Storage ambient conditions
- Storage temperature
- Relative humidity
0 - 40ºC
0 - 85 RH%
Minimum computer requirements
The values in (brackets) are recommended values.
OPERATING SYSTEM
- Windows XP Professional / Home / SP1 or SP2
- Windows 2000 Professional / SP4
CPU
- Pentium 4 or Athlon XP or equivalent (1.5 GHz or better recommended)
RAM
- 256 MB (512 MB recommended)
HDD
- 20 GB (single user)
VIDEO RAM
- 16 MB (or more)
NETWORK CONNECTION
- 10/100 Mbit/s Ethernet NIC
DISPLAY
- 1280 x 1024 x 24-bit Tru Color, 85Hz display
(19" CRT or 17” TFT LCD recommended)
COM 1 and COM 2 available (free)
Connection to the PC must meet EN60601-1 requirements.
The use of ACCESSORY equipment not complying with the equivalent safety requirements of this equipment may lead to a reduced level of safety of the resulting
system. Consideration relating to the choice shall include:
- use of the accessory in the PATIENT VICINITY
- evidence that the safety certification of the ACCESSORY has been performed in
accordance to the appropriate IEC 601-1 and/or IEC 601-1-1 harmonized national
standard
- only RS 232C interface cable and fibre cable, provided by the manufacturer, shall
be used.
58
Installation and set-up manual 8201085
Cranex D
6. Technical Information
Tube housing assembly cooling characteristics
OPX/105 and KL5
Installation and set-up manual 8201085
59
6. Technical Information
Cranex D
Unit dimensions
60
Installation and set-up manual 8201085
Cranex D
6. Technical Information
Guidance and manufacturer’s declaration – electromagnetic emissions
The PP1 is intended for use in the electromagnetic environment specified below. The
customer or the user of the PP1 should assure that it is used in such an environment.
Emissions test
Compliance
Electromagnetic environment - guidance
RF emissions
Group 1
The PP1 uses RF energy only for its internal function.
CISPR 11
Therefore, its RF emissions are very low and are not
likely to cause any interference in nearby electronic
equipment.
The PP1 is suitable for use in all establishments,
RF emissions
Class B
including domestic establishments and those directly
CISPR 11
connected to the public low-voltage power supply
Class A
Harmonic
network that supplies buildings used for domestic
emissions
purposes.
IEC 61000-3-2
Complies
Voltage
fluctuations/ flicker
emissions
IEC 61000-3-3
Installation and set-up manual 8201085
61
6. Technical Information
Cranex D
Guidance and manufacturer’s declaration – electromagnetic immunity
The PP1 is intended for use in the electromagnetic environment specified below. The customer
or the user of the PP1 should assure that it is used in such an environment.
Immunity test
IEC 60601 test level
Compliance level
Electromagnetic
environment guidance
Electrostatic
Floors should be wood,
±6 kV contact
±6 kV contact
discharge (ESD)
concrete or ceramic tile.
IEC 61000-4-2
If floors are covered with
±8 kV air
±8 kV air
synthetic material, the
relative humidity should
be at least 30 %.
Electrical fast
Mains power quality
±2 kV for power supply
±2 kV for power
transients/bursts
should be that of a
lines
supply lines
IEC 61000-4-4
typical commercial or
±1 kV for input/output
±1 kV for
hospital environment.
lines
input/output lines
Surge
Mains power quality
±1 kV differential mode ±1 kV differential
IEC 61000-4-5
should be that of a
mode
±2 kV common mode
typical commercial or
±2 kV common
hospital environment.
mode
<5 % UT
<5 % UT
Mains power quality
Voltage dips,
(>95 % dip in UT)
(>95 % dip in UT)
should be that of a
short
for 0.5 cycle
for 0.5 cycle
typical commercial or
interruptions and
hospital environment. If
voltage variations
40 % UT
40 % UT
user of the PP1 requires
on power supply
(60 % dip in UT)
(60 % dip in UT)
continued operation
lines
for 5 cycles
for 5 cycles
during power mains
IEC 61000-4-11
interruptions, it is
70 % UT
70 % UT
recommended that the
(30 % dip in UT)
(30 % dip in UT)
PP1 be powered from
for 25 cycles
for 25 cycles
an uninterruptible power
supply or a battery.
<5 % UT
<5 % UT
(>95 % dip in UT)
(>95 % dip in UT)
for 5 sec
for 5 sec
Power frequency
3 A/m
3 A/m
Power frequency
(50/60 Hz)
magnetic field should be
magnetic field
at levels characteristic
IEC 61000-4-8
of a typical location in a
typical commercial or
hospital environment.
NOTE UT is the a.c. mains voltage prior to application of the test level.
62
Installation and set-up manual 8201085
Cranex D
6. Technical Information
Guidance and manufacturer’s declaration – electromagnetic immunity
The PP1 is intended for use in the electromagnetic environment specified below. The customer
or the user of the PP1 should assure that it is used in such an environment.
Immunity
IEC 60601 test Compliance
Electromagnetic environment - guidance
test
level
level
Portable and mobile RF communications
equipment should be used no closer to any
part of the PP1, including cables, than the
recommended separation distance calculated
from the equation applicable to the frequency
of the transmitter.
Conducted
RF
IEC 610004-6
Radiated
RF
IEC 610004-3
3 Vrms
150 kHz to
80 MHz
3 V/m
80 MHz to
2.5 GHz
3V
3 V/m
Recommended separation distance
d = 1.2 P
d = 1.2
P
80 MHz to 800 MHz
d = 2.3
P
800 MHz to 2.5 GHz
where P is the maximum output power rating
of the transmitter in watts (W) according to the
transmitter manufacturer and d is the
recommended separation distance in
metres (m).
Field strengths from fixed RF transmitters, as
determined by an electromagnetic site survey,
a
should be less than the compliance level in
b
each frequency range.
Interference may occur in the vicinity of
equipment marked with the following symbol:
NOTE 1 At 80 MHz and 800 MHz, the higher frequency range applies.
NOTE 2 These guidelines may not apply in all situations. Electromagnetic propagation is
affected by absorption and reflection from structures, objects and people.
a
Field strengths from fixed transmitters, such as base stations for radio (cellular/cordless)
telephones and land mobile radios, amateur radio, AM and FM radio broadcast and TV
broadcast cannot be predicated theoretically with accuracy. To assess the electromagnetic
environment due to fixed RF transmitters, an electromagnetic site survey should be considered.
If the measured field strength in the location in which the PP1 is used exceeds the applicable
RF compliance level above, the PP1 should be observed to verify normal operation. If abnormal
performance is observed, additional measures may be necessary, such as reorienting of
relocating the MINRAY.
b
Over the frequency range 150 kHz to 80 MHz, field strengths should be less than 3 V/m.
Installation and set-up manual 8201085
63
6. Technical Information
Cranex D
Recommended separation distances between portable and mobile RF communications
equipment and the PP1.
The PP1 is intended for use in an electromagnetic environment in which radiated RF
disturbances are controlled. The customer or the user of the PP1 can help prevent
electromagnetic interference by maintaining a minimum distance between portable and
mobile RF communications equipment (transmitters) and the PP1 as recommended below,
according to the maximum output power of the communications equipment.
Rated maximum
Separation distance according to frequency of transmitter m
output power of
150 kHz to 80 MHz
80 MHz to 800 MHz
800 MHz to 2.5 GHz
transmitter W
d = 1.2 P
d = 1.2 P
d = 2.3 P
0.01
0.12
0.12
0.23
0.1
0.38
0.38
0.73
1
1.2
1.2
2.3
10
3.8
3.8
7.3
100
12
12
23
For transmitters rated at a maximum output power not listed above, the recommended
separation distance d in meters (m) can be estimated using the equation applicable to the
frequency of the transmitter, where P is the maximum output power rating of the transmitter
in watts (W) according to the transmitter manufacturer.
NOTE 1. At 80 MHz and 800 MHz, the separation distance for the higher frequency range
applies.
NOTE 2. These guidelines may not apply in all situations. Electromagnetic propagation is
affected by absorption and reflection from structures, objects and people.
64
Installation and set-up manual 8201085
Cranex D
Installation and set-up manual 8201085
6. Technical Information
65
Cranex D
Appendix A - Ceph upgrade
Appendix A - Upgrading a Pan unit to Pan/Ceph
1. Replacing the collimator
1. Switch the unit off and disconnect it from the power
supply.
2. Remove all the covers from the unit. (Refer to the
Cranex D Service Manual, section 3. Covers and
cover removal for information on how to do this).
3. Disconnect the short cable (J5502) that connects the
panoramic collimator to the cable that goes to N3100
(on the CCD sensor side of the Rotating unit), and
then remove the panoramic collimator (4 screws).
Keep the screws as they will be need ed to attach the
new collimator.
Installation and set-up manual 8201085
A-1
Appendix A - Ceph upgrade
Cranex D
4. Remove the Panoramic primary collimator and
replace it with the Pan/ceph primary collimator.
5. Replace the cable that connects the panoramic
collimator to N3100 with the new cable supplied.
To make cable routing easier tie a piece of string to
one end of the cable to be replaced and the other
end to the replacement cable. When you pull out the
old cable out the new one will be pulled into the
correct position.
A-2
Installation and set-up manual 8201085
Cranex D
Appendix A - Ceph upgrade
6. Attach the Positioning Rail to the same holes that the
Panoranic Collimator was attached (3 screws). Make
sure that the Adjusting screw in the side of the
Positioning Rail goes through the hole in the side of
the Colimator support plate. Attach the circlip to the
adjusting screw.
7. There is a Stepper Motor attached to the Positioning
Rail. Route the cable that comes from the Stepper
Motor across the inside of the C-arm to loose
connector J14 on the CCD Sensor side. Secure the
Stepper Motor cable to the other cables with cable
ties.
Installation and set-up manual 8201085
A-3
Appendix A - Ceph upgrade
Cranex D
8. Attach the Ceph Aperture CCD to the inside of the
Side Frame, if it is not already attached (M4 x 8).
Note that the side of the Ceph Aperture CCD with the
large aperture must face outwards.
9. Slide the Support Bar into the bearings in the Slide
Frame.
A-4
Installation and set-up manual 8201085
Cranex D
Appendix A - Ceph upgrade
10. Place the Slide Frame on to the Positioning Rail so
that the two bearings on the underside of the Slide
Frame are positioned on either side of the
Positioning rail.
Secure the Slide Frame in position by securing the
support bar to the Collimator Support Plate with two
M4 x 8 screws, one at each end of the support bar.
Installation and set-up manual 8201085
A-5
Appendix A - Ceph upgrade
Cranex D
11. Insert the Toothed bar into the small hole in the side of
the Slide Frame.
Position the Toothed Bar so that it engages fully with
the motor gear wheel when the Slide Frame is slid to
the left as far as it will go. Also make sure that there is
no play between the Tooth Bar and the gear wheel. If
necessary eliminate play by adjusting the position of
the motor.
When the Toothed Bar is in the correct position
secure in position with the M4 x 6 grub screw.
12. Connect the cable that comes from the solenoid on
the Slide Frame to N5500 (J5502). Also connect the
new cable from N3100 to N5500 (J5501). Use cable
ties to secure the cables so that they cannot interfer
with the collimator movement.
A-6
Installation and set-up manual 8201085
Cranex D
Appendix A - Ceph upgrade
2. Installing the cephalometric unit
1. Follow the instructions given in section 3.5 Option Installing a cephalonmetric unit, in this manual.
3. Electrical modifications
1. On N55300 connect the jumper to JP1 either to the
position R (right hand side ceph) or the L position,
depending on the ceph being installed.
2. On N5200 (Digital IO board) connect jumper X15
either to the position R (right hand side ceph) or the L
position, depending on the ceph being installed.
3. Remove the jumper from JP1 in N3500 (Motor
controller).
4. Software modifications
1. The DfW 2.5 folder name should be altered according
to the DfW software supplied.
The Ceph option must be added to DfW.
To do this, open the file Dicc.ini ( /Soredex/DfW 2.5/ )
using Notepad, and from the line beginning with
"Devices" add the text ",PP1CEPH" and save the
file.
Installation and set-up manual 8201085
A-7
Appendix A - Ceph upgrade
Cranex D
5. Checking the alignment of the unit
NOTE:
A pan/ceph sensor (Type 2) must be used to produce
ceph images. The Type 2 sensor is not part of the
upgrade kit and must be ordered separately. The Gain
Flies for the new CCD sensor (on the Cranex D
Installation CD) must be installed in the PC.
To do this copy the contents of the CD's folder "Gainfiles"
to folder /Soredex/DfW 2.5/Dicc/Ortho/Gainfiles.
1. Reconnect the power supply to the unit and switch the
unit on.
2. Align the unit, pan and ceph, according to the
instructions given in sections 4. Checking the
alignment of the unit, and 5. Adjusting the
alignment of the unit, in this manual.
IMPORTANT NOTE!
Perform all the alignment steps.
NOTE:
When you level the ceph arm, you may have to adjust
the position of the stiffening brackets (one on each
side of the Z-carriage) to which the ceph arm is
attached.
This can be done by loosening the nuts (A) that hold
the stiffening brackets in position, levelling the arm,
and then retightening the these nuts as well as the
Ceph arm nuts (B).
3. When the unit has been aligned replace all the covers.
4. Take test exposures using every program to verify that
the device works correctly.
A-8
Installation and set-up manual 8201085