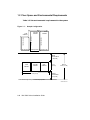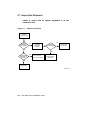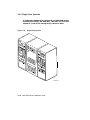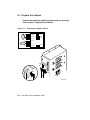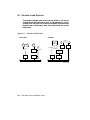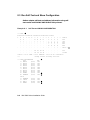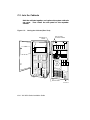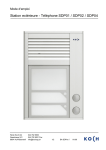
1
VAX 6000 Series Installation Guide
Order Number EK–600EB–IN.002
This guide is intended for use by Digital customer
service engineers and self-maintenance customers
installing a VAX 6000 series system.
digital equipment corporation
maynard, massachusetts
First Printing, October 1990
Revised, November 1991
The information in this document is subject to change without notice and should not be
construed as a commitment by Digital Equipment Corporation.
Digital Equipment Corporation assumes no responsibility for any errors that may appear in
this document.
The software, if any, described in this document is furnished under a license and may be used
or copied only in accordance with the terms of such license. No responsibility is assumed
for the use or reliability of software or equipment that is not supplied by Digital Equipment
Corporation or its affiliated companies.
Copyright ©1990, 1991 by Digital Equipment Corporation.
All Rights Reserved.
Printed in U.S.A.
dt
The following are trademarks of Digital Equipment Corporation:
DEC
DEC LANcontroller
DECnet
DECUS
DWMVA
PDP
ULTRIX
UNIBUS
VAX
VAXBI
VAXcluster
VAXELN
VMS
XMI
FCC NOTICE: The equipment described in this manual generates, uses, and may emit
radio frequency energy. The equipment has been type tested and found to comply with the
limits for a Class A computing device pursuant to Subpart J of Part 15 of FCC Rules, which
are designed to provide reasonable protection against such radio frequency interference when
operated in a commercial environment. Operation of this equipment in a residential area
may cause interference, in which case the user at his own expense may be required to take
measures to correct the interference.
Contents
Preface
xi
Chapter 1 Site Preparation
1.1
1.2
1.3
1.4
1.5
Customer Pre-Installation Checklist . . . . . . . .
Floor Space and Environmental Requirements
Cabinet Sizes . . . . . . . . . . . . . . . . . . . . . . . . . .
Power Requirements . . . . . . . . . . . . . . . . . . . .
AC Power Cable and Connectors . . . . . . . . . . .
.
.
.
.
.
.
.
.
.
.
.
.
.
.
.
.
.
.
.
.
.
.
.
.
.
.
.
.
.
.
.
.
.
.
.
.
.
.
.
.
.
.
.
.
.
.
.
.
.
.
. 1–2
. 1–4
. 1–8
. 1–10
. 1–12
.
.
.
.
.
.
.
.
.
.
.
.
.
.
.
.
.
.
.
.
.
.
.
.
.
.
.
.
.
.
.
.
.
.
.
.
.
.
.
.
.
.
.
.
.
.
.
.
.
.
.
.
.
.
.
.
.
.
.
.
.
.
.
.
.
.
.
.
.
.
.
.
.
.
.
.
.
.
.
.
.
.
.
.
.
.
.
.
.
.
.
.
.
.
.
.
2–2
2–4
2–6
2–8
2–10
2–12
2–14
2–16
.
.
.
.
.
.
.
.
.
.
.
.
.
.
.
.
.
.
.
.
.
.
.
.
.
.
.
.
.
.
.
.
.
.
.
.
.
.
.
.
.
.
.
.
.
.
.
.
.
.
.
.
.
.
.
.
.
.
.
.
.
.
.
.
.
.
.
.
.
.
.
.
.
.
.
.
.
.
.
.
.
.
.
.
.
.
.
.
.
.
.
.
.
.
.
.
3–2
3–4
3–6
3–8
3–10
3–12
3–14
3–16
Chapter 2 Unpacking
2.1
2.2
2.3
2.4
2.5
2.6
2.7
2.8
Inspect the Shipment . . . . . . . . . . . . .
Collect Tools and Resources . . . . . . . .
Remove Carton and Packing Material
Remove from the Pallet . . . . . . . . . . .
Leveling the Cabinet . . . . . . . . . . . . .
Connect the Console Terminal . . . . . .
Connect the Ethernet Cable . . . . . . . .
Connect the FDDI Cable . . . . . . . . . .
.
.
.
.
.
.
.
.
.
.
.
.
.
.
.
.
.
.
.
.
.
.
.
.
.
.
.
.
.
.
.
.
.
.
.
.
.
.
.
.
.
.
.
.
.
.
.
.
Chapter 3 Connecting to a DSSI Subsystem
3.1
3.2
3.3
3.4
3.4.1
3.4.2
3.4.3
3.4.4
DSSI Installation Overview . . . . . . . . .
Storage Architecture and Options . . . .
DSSI and CI VAXclusters Compared . .
DSSI Basics . . . . . . . . . . . . . . . . . . . . .
KFMSA Adapter . . . . . . . . . . . . . . .
Integrated Storage Elements (ISEs) .
SF7x Enclosure Box . . . . . . . . . . . . .
SF2xx Storage Array Cabinet . . . . .
.
.
.
.
.
.
.
.
.
.
.
.
.
.
.
.
.
.
.
.
.
.
.
.
.
.
.
.
.
.
.
.
.
.
.
.
.
.
.
.
iii
3.4.5
Single-Host Systems . . . . . . . . . . . . . . . . . . . . . . . . . . . . .
3.4.6
Dual- and Tri-Host Systems . . . . . . . . . . . . . . . . . . . . . . . .
3.4.7
Cables . . . . . . . . . . . . . . . . . . . . . . . . . . . . . . . . . . . . . . . .
3.5
Configure the DSSI Subsystem . . . . . . . . . . . . . . . . . . . . . . .
3.5.1
Install DSSI Cables to ISEs . . . . . . . . . . . . . . . . . . . . . . . .
3.5.2
Set Node IDs . . . . . . . . . . . . . . . . . . . . . . . . . . . . . . . . . . .
3.6
Configure DSSI Subsystem with EVCXF . . . . . . . . . . . . . . . .
3.6.1
Example: Boot the VAX Diagnostic Supervisor . . . . . . . . .
3.6.2
Example: Run the Autosizer . . . . . . . . . . . . . . . . . . . . . . .
3.6.3
Example: Run EVCXF . . . . . . . . . . . . . . . . . . . . . . . . . . . .
3.6.4
Example: Changing the KFMSA Node ID at the I/O Panel
3.6.5
Example: Changing the KFMSA Node ID with EVCXF . . .
3–18
3–20
3–22
3–24
3–26
3–28
3–30
3–32
3–34
3–36
3–38
3–40
Chapter 4 Connecting to a CI VAXcluster
4.1
CI Adapter Overview . . . . . . . . . . . . . . . . . . . . . . . . . .
4.2
CIXCD Installation Configuration Rules . . . . . . . . . . .
4.3
Setting CIXCD Parameters . . . . . . . . . . . . . . . . . . . . .
4.3.1
Setting the VAXcluster Node Address (Mandatory) .
4.3.2
Verify Quiet Slot DELTA Time = 10 (Mandatory) . .
4.3.3
Setting Boot Time (Optional) . . . . . . . . . . . . . . . . . .
4.3.4
Setting Extend Header, ACK Timeout, and Disable
Arbitration (Optional) . . . . . . . . . . . . . . . . . . . . . . .
4.3.5
Setting Cluster Size (Optional) . . . . . . . . . . . . . . . .
4.4
Setting CIBCA Parameters . . . . . . . . . . . . . . . . . . . . .
4.4.1
Setting the VAXcluster Node Address (Mandatory) .
4.4.2
CIBCA Jumper Locations and Settings . . . . . . . . . .
4.5
Cabling the System to a Star Coupler (SC008) . . . . . .
.
.
.
.
.
.
.
.
.
.
.
.
.
.
.
.
.
.
.
.
.
.
.
.
. 4–2
. 4–4
. 4–6
. 4–8
. 4–10
. 4–12
.
.
.
.
.
.
.
.
.
.
.
.
.
.
.
.
.
.
.
.
.
.
.
.
.
.
.
.
.
.
4–14
4–16
4–18
4–20
4–22
4–24
Architecture . . . . . . . . . . . . . . . . . . . . . . . . . . . . . . . . . . . . . .
Cabling TU Tape Drives . . . . . . . . . . . . . . . . . . . . . . . . . . . . .
Cabling RA Disk or TA Tape Drives . . . . . . . . . . . . . . . . . . . .
5–2
5–4
5–6
Chapter 5 Connecting to Tapes and Disks
5.1
5.2
5.3
iv
Chapter 6 Powering Up the System
6.1
6.2
6.3
6.4
6.5
6.5.1
6.5.2
6.5.3
Prepare the Cabinet . . . . . . . . . . . . . . . . . . . .
Check the Transformer (50 Hz Systems Only)
Check the Power . . . . . . . . . . . . . . . . . . . . . .
Turn on Power and Check Indicators . . . . . . .
Operating the Control Panel . . . . . . . . . . . . .
Upper and Lower Key Switches . . . . . . . . .
Restart Button . . . . . . . . . . . . . . . . . . . . . .
Status Indicator Lights . . . . . . . . . . . . . . .
.
.
.
.
.
.
.
.
.
.
.
.
.
.
.
.
.
.
.
.
.
.
.
.
.
.
.
.
.
.
.
.
.
.
.
.
.
.
.
.
.
.
.
.
.
.
.
.
.
.
.
.
.
.
.
.
.
.
.
.
.
.
.
.
.
.
.
.
.
.
.
.
.
.
.
.
.
.
.
.
.
.
.
.
.
.
.
.
.
.
.
.
.
.
.
.
6–2
6–4
6–6
6–8
6–10
6–12
6–14
6–16
Enable the System and Check Status LEDs . . . . . . . . . . . . .
Check the Self-Test Display . . . . . . . . . . . . . . . . . . . . . . . . . .
Sample Self-Test Display with VAXBI Adapter . . . . . . . . . . .
7–2
7–4
7–6
Chapter 7 System Self-Test
7.1
7.2
7.3
Chapter 8 Verification
8.1
8.2
8.3
8.4
8.4.1
8.4.2
8.5
8.6
8.6.1
8.6.2
8.6.3
8.7
8.8
8.9
8.10
Console Load Devices . . . . . . . . . . . . . . . . . .
Verification Overview . . . . . . . . . . . . . . . . . .
Run Self-Test and Show Configuration . . . . .
Verify Console Load Device Path . . . . . . . . .
Verify Ethernet Adapter and Loopback . .
Run ROM-Based Diagnostics for the Tape
Boot Commands for Verification . . . . . . . . . .
Boot Diagnostics (for Models 300 and 400) . .
Boot VAX/DS from a CD Server . . . . . . . .
Select CD Server and Service . . . . . . . . . .
Boot VAX/DS from Tape Drive . . . . . . . . .
Run the Autosizer and Multiprocessor Tests
Set Boot Devices . . . . . . . . . . . . . . . . . . . . .
Record System Parameters . . . . . . . . . . . . .
Verify System Under Operating System . . . .
.
.
.
.
.
.
.
.
.
.
.
.
.
.
.
.
.
.
.
.
.
.
.
.
.
.
.
.
.
.
.
.
.
.
.
.
.
.
.
.
.
.
.
.
.
.
.
.
.
.
.
.
.
.
.
.
.
.
.
.
.
.
.
.
.
.
.
.
.
.
.
.
.
.
.
.
.
.
.
.
.
.
.
.
.
.
.
.
.
.
.
.
.
.
.
.
.
.
.
.
.
.
.
.
.
.
.
.
.
.
.
.
.
.
.
.
.
.
.
.
.
.
.
.
.
.
.
.
.
.
.
.
.
.
.
.
.
.
.
.
.
.
.
.
.
.
.
.
.
.
.
.
.
.
.
.
.
.
.
.
.
.
.
.
.
.
.
.
.
.
.
.
.
.
.
.
.
.
.
.
.
.
.
.
.
.
.
.
.
.
.
.
.
.
.
8–2
8–4
8–6
8–8
8–8
8–10
8–12
8–14
8–14
8–16
8–18
8–20
8–22
8–24
8–26
v
Appendix A Digital Remote Services Console Installation
Appendix B Module Handling
B.1
B.2
Handling Modules . . . . . . . . . . . . . . . . . . . . . . . . . . . . . . . . .
Inserting Modules . . . . . . . . . . . . . . . . . . . . . . . . . . . . . . . . .
B–2
B–4
Appendix C Installing an Expander Cabinet
C.1
C.2
C.3
C.4
C.5
Prepare the Cabinets . . . . . . . . . . .
Join the Cabinets . . . . . . . . . . . . . .
Install the DWMBB/A Module and
XMI-to-VAXBI Adapter Cables . . . .
Connect the DEC Power Bus Cable
DWMBB Cabling . . . . . . . . . . . . . .
.......
.......
Connect
.......
.......
.......
....
....
the
....
....
....
.........
.........
C–2
C–4
. . . . . . . . . C–6
. . . . . . . . . C–8
. . . . . . . . . C–10
Appendix D DSSI Configuration Sheets
Index
Examples
3–1
3–2
3–3
3–4
7–1
7–2
8–1
8–2
8–3
8–4
8–5
8–6
8–7
vi
Running Standalone VAX/DS . . . . . . . . . . . . . . . . .
Running the Autosizer . . . . . . . . . . . . . . . . . . . . . .
Running EVCXF . . . . . . . . . . . . . . . . . . . . . . . . . .
Changing KFMSA Node ID with EVCXF . . . . . . . .
Self-Test Results . . . . . . . . . . . . . . . . . . . . . . . . . .
Self-Test Results: TYP, STF, and XBI Lines . . . . . .
Self-Test and SHOW CONFIGURATION . . . . . . . .
TK ROM-Based Diagnostic . . . . . . . . . . . . . . . . . .
Boot VAX/DS from a CD Server . . . . . . . . . . . . . . .
Boot VAX/DS from a CD Server, continued . . . . . .
Booting the VAX Diagnostic Supervisor from Tape
Running the Multiprocessor Diagnostic . . . . . . . . .
Setting the Default Boot Device . . . . . . . . . . . . . . .
.
.
.
.
.
.
.
.
.
.
.
.
.
.
.
.
.
.
.
.
.
.
.
.
.
.
.
.
.
.
.
.
.
.
.
.
.
.
.
.
.
.
.
.
.
.
.
.
.
.
.
.
.
.
.
.
.
.
.
.
.
.
.
.
.
.
.
.
.
.
.
.
.
.
.
.
.
.
.
.
.
.
.
.
.
.
.
.
.
.
.
.
.
.
.
.
.
.
.
.
.
.
.
.
3–32
3–34
3–36
3–40
7–4
7–6
8–6
8–10
8–14
8–16
8–18
8–20
8–22
8–8
8–9
Record System Parameters . . . . . . . . . . . . . . . . . . . . . . . . . . 8–24
Running UETP . . . . . . . . . . . . . . . . . . . . . . . . . . . . . . . . . . . 8–26
Figures
1–1
1–2
1–3
1–4
1–5
1–6
2–1
2–2
2–3
2–4
2–5
2–6
2–7
2–8
3–1
3–2
3–3
3–4
3–5
3–6
3–7
3–8
3–9
3–10
3–11
3–12
3–13
3–14
3–15
3–16
4–1
4–2
Sample Configuration . . . . . . . . . . . . . . . . . . . . . . . .
Airflow Pattern . . . . . . . . . . . . . . . . . . . . . . . . . . . . .
Sample System . . . . . . . . . . . . . . . . . . . . . . . . . . . . .
Sample Configuration with Expander Cabinet . . . . . .
Location of Power Modules (Rear View) . . . . . . . . . . .
AC Power Connectors . . . . . . . . . . . . . . . . . . . . . . . . .
Hardware Flowchart . . . . . . . . . . . . . . . . . . . . . . . . .
Packing Material . . . . . . . . . . . . . . . . . . . . . . . . . . . .
Preparation and Removal from Pallet . . . . . . . . . . . .
Leveler Foot Adjustment . . . . . . . . . . . . . . . . . . . . . .
Cabinet Door Lock and Key . . . . . . . . . . . . . . . . . . . .
I/O Panel—Console Terminal Port . . . . . . . . . . . . . . .
I/O Panel—Ethernet Port . . . . . . . . . . . . . . . . . . . . . .
I/O Panel—FDDI Port . . . . . . . . . . . . . . . . . . . . . . . .
System Architecture with KFMSA . . . . . . . . . . . . . . .
XMI Adapters . . . . . . . . . . . . . . . . . . . . . . . . . . . . . .
CI and DSSI Compared . . . . . . . . . . . . . . . . . . . . . . .
KFMSA LEDs . . . . . . . . . . . . . . . . . . . . . . . . . . . . . .
ISEs for the DSSI Storage Bus . . . . . . . . . . . . . . . . .
SF7x Enclosure Box . . . . . . . . . . . . . . . . . . . . . . . . . .
SF2xx Cabinet . . . . . . . . . . . . . . . . . . . . . . . . . . . . . .
Single-Host System . . . . . . . . . . . . . . . . . . . . . . . . . .
Sample Single-Host Configuration . . . . . . . . . . . . . . .
Examples of Dual-Host Configurations . . . . . . . . . . .
I/O Ports for DSSI Cables . . . . . . . . . . . . . . . . . . . . .
Sample DSSI Configuration Sheet . . . . . . . . . . . . . . .
I/O Port for DSSI Cables . . . . . . . . . . . . . . . . . . . . . .
Setting the KFMSA Node ID on the I/O Panel . . . . . .
Verification of the KFMSA . . . . . . . . . . . . . . . . . . . . .
Changing the KFMSA Node ID at the I/O Panel . . . .
Adapters . . . . . . . . . . . . . . . . . . . . . . . . . . . . . . . . . .
CIXCD Jumper to Set Quiet Slot DELTA Time to 10 .
.
.
.
.
.
.
.
.
.
.
.
.
.
.
.
.
.
.
.
.
.
.
.
.
.
.
.
.
.
.
.
.
.
.
.
.
.
.
.
.
.
.
.
.
.
.
.
.
.
.
.
.
.
.
.
.
.
.
.
.
.
.
.
.
.
.
.
.
.
.
.
.
.
.
.
.
.
.
.
.
.
.
.
.
.
.
.
.
.
.
.
.
.
.
.
.
.
.
.
.
.
.
.
.
.
.
.
.
.
.
.
.
.
.
.
.
.
.
.
.
.
.
.
.
.
.
.
.
.
.
.
.
.
.
.
.
.
.
.
.
.
.
.
.
.
.
.
.
.
.
.
.
.
.
.
.
.
.
.
.
.
.
.
.
.
.
.
.
.
.
.
.
.
.
.
.
.
.
.
.
.
.
.
.
.
.
.
.
.
.
.
.
1–4
1–6
1–8
1–9
1–10
1–12
2–2
2–6
2–8
2–10
2–11
2–12
2–14
2–16
3–4
3–5
3–6
3–10
3–12
3–14
3–16
3–18
3–19
3–20
3–22
3–24
3–26
3–28
3–30
3–38
4–2
4–4
vii
4–3
4–4
4–5
4–6
4–7
XMI Backplane Segments D and E . . . . . . . . . . . . . . . . . . .
Jumper Locations for CI Port Address . . . . . . . . . . . . . . . . .
Set Quiet Slot DELTA Time Jumpers . . . . . . . . . . . . . . . . .
Jumper Locations for Boot Time . . . . . . . . . . . . . . . . . . . . .
Jumper Pins for Extend Header, Extend ACK Timeout, and
Disable Arbitration . . . . . . . . . . . . . . . . . . . . . . . . . . . . . . .
4–8 Cluster Size Jumpers . . . . . . . . . . . . . . . . . . . . . . . . . . . . . .
4–9 VAXBI Backplane Segments D and E . . . . . . . . . . . . . . . . .
4–10 Address and Address Complement Pins . . . . . . . . . . . . . . . .
4–11 CIBCA Jumpers on VAXBI Backplane . . . . . . . . . . . . . . . . .
4–12 I/O Panel—VAXcluster Port . . . . . . . . . . . . . . . . . . . . . . . . .
5–1 Architecture . . . . . . . . . . . . . . . . . . . . . . . . . . . . . . . . . . . . .
5–2 Tape Subsystem—Interface Cabling . . . . . . . . . . . . . . . . . . .
5–3 Disk Subsystem—Interface Cabling . . . . . . . . . . . . . . . . . . .
6–1 Preparing the System Cabinet . . . . . . . . . . . . . . . . . . . . . . .
6–2 50 Hz Transformer Cable Connections . . . . . . . . . . . . . . . . .
6–3 Measuring System Power . . . . . . . . . . . . . . . . . . . . . . . . . . .
6–4
H7206-B Diagnostic LEDs . . . . . . . . . . . . . . . . . . . . . . . . .
6–5 International and English Control Panels . . . . . . . . . . . . . .
6–6 Control Panel Symbols . . . . . . . . . . . . . . . . . . . . . . . . . . . . .
6–7 Control Panel Key Switches . . . . . . . . . . . . . . . . . . . . . . . . .
6–8 Restart Button . . . . . . . . . . . . . . . . . . . . . . . . . . . . . . . . . . .
6–9 Control Panel Status Indicator Lights . . . . . . . . . . . . . . . . .
7–1 Control Panel Lights and Location of Module LEDs . . . . . .
7–2 XMI Card Cage Slot Numbers (Front View) . . . . . . . . . . . . .
8–1 Console Load Devices . . . . . . . . . . . . . . . . . . . . . . . . . . . . . .
8–2 Verification Procedure . . . . . . . . . . . . . . . . . . . . . . . . . . . . .
8–3 DEBNI/DEMNA LEDs . . . . . . . . . . . . . . . . . . . . . . . . . . . . .
8–4 CD Server BOOT Commands for VAX/DS . . . . . . . . . . . . . .
8–5 Loading a CD-ROM . . . . . . . . . . . . . . . . . . . . . . . . . . . . . . .
A–1 Remote Console Cable Connections . . . . . . . . . . . . . . . . . . .
B–1 Holding 6000 Series Processor Modules . . . . . . . . . . . . . . . .
B–2 Inserting the Scalar Processor in an XMI Card Cage . . . . . .
B–3 Inserting the Vector Processor in an XMI Card Cage . . . . . .
C–1 System Side Panel Removal (Front View) . . . . . . . . . . . . . .
C–2 Top Cover Removal (Rear View) . . . . . . . . . . . . . . . . . . . . . .
viii
. 4–6
. 4–8
. 4–10
. 4–12
.
.
.
.
.
.
.
.
.
.
.
.
.
.
.
.
.
.
.
.
.
.
.
.
.
.
.
.
.
.
.
4–14
4–16
4–18
4–20
4–22
4–24
5–2
5–4
5–6
6–2
6–4
6–6
6–8
6–10
6–11
6–12
6–14
6–16
7–2
7–4
8–2
8–4
8–8
8–12
8–13
A–1
B–2
B–4
B–4
C–2
C–3
C–3
C–4
C–5
C–6
C–7
D–1
D–2
Joining the Cabinets (Rear View) . . . . . . . . . . . .
XMI-to-VAXBI Adapter Cable Connections . . . .
DEC Power Bus Cable Connections (Rear View)
DEC Power Bus Cabling . . . . . . . . . . . . . . . . . .
DWMBB/A Slots for Additional Card Cages . . . .
KFMSA/DSSI Single-Host Configuration Sheet .
KFMSA/DSSI Dual-Host Configuration Sheet . .
.
.
.
.
.
.
.
.
.
.
.
.
.
.
.
.
.
.
.
.
.
.
.
.
.
.
.
.
.
.
.
.
.
.
.
.
.
.
.
.
.
.
.
.
.
.
.
.
.
.
.
.
.
.
.
.
.
.
.
.
.
.
.
. C–4
. C–6
. C–8
. C–9
. C–10
. D–2
. D–3
.
.
.
.
.
.
.
.
.
.
.
.
.
.
.
.
.
.
.
.
.
.
.
.
.
.
.
.
.
.
.
.
.
.
.
.
.
.
.
.
.
.
.
.
.
.
.
.
.
.
.
.
.
.
.
.
.
.
.
.
.
.
.
.
.
.
.
.
.
.
.
.
.
.
.
.
.
.
.
.
.
.
.
.
.
.
.
.
.
.
.
.
.
.
.
.
.
.
.
.
.
.
.
.
.
.
.
.
.
.
.
.
.
.
.
.
.
.
.
.
.
.
.
.
.
.
.
.
.
.
.
.
.
.
.
.
.
.
.
.
.
.
.
.
.
.
.
.
.
.
.
.
.
.
.
.
.
.
.
.
.
.
.
.
.
.
.
.
.
.
.
.
.
.
.
.
.
.
.
.
.
.
.
.
.
.
.
.
.
.
.
.
.
.
.
.
.
.
.
.
.
.
.
.
.
.
.
.
.
.
.
.
.
.
.
.
.
.
.
.
.
.
.
.
.
.
.
.
.
.
.
.
.
.
.
.
.
.
.
.
.
.
.
.
.
.
.
.
.
.
.
.
.
.
.
.
.
.
.
.
.
.
.
.
.
.
.
.
.
.
Tables
1
2
3
1–1
1–2
1–3
1–4
1–5
2–1
3–1
3–2
3–3
3–4
3–5
3–6
3–7
4–1
4–2
4–3
4–4
4–5
4–6
4–7
5–1
6–1
6–2
6–3
VAX 6000 Series Documentation . . . . . . . . . . .
VAX 6000 Model Level Documentation . . . . . .
Associated Documents . . . . . . . . . . . . . . . . . . .
VAX 6000 Series Adapters . . . . . . . . . . . . . . . .
Environmental Requirements . . . . . . . . . . . . .
Cabinets: Dimensions and Weights . . . . . . . . .
AC Input Voltage . . . . . . . . . . . . . . . . . . . . . . .
Power Requirements . . . . . . . . . . . . . . . . . . . .
Tools and Resources . . . . . . . . . . . . . . . . . . . . .
DSSI Documentation . . . . . . . . . . . . . . . . . . . .
DSSI Installation . . . . . . . . . . . . . . . . . . . . . . .
VAXcluster and Network Options . . . . . . . . . . .
DSSI Concepts . . . . . . . . . . . . . . . . . . . . . . . . .
KFMSA Options . . . . . . . . . . . . . . . . . . . . . . . .
DSSI Cable Kits . . . . . . . . . . . . . . . . . . . . . . . .
VAX/DS File Names . . . . . . . . . . . . . . . . . . . . .
Adapters for CI Connection . . . . . . . . . . . . . . .
CI Port True Address . . . . . . . . . . . . . . . . . . . .
CI Port Complement Address . . . . . . . . . . . . . .
Quiet Slot Time Backplane Jumpers . . . . . . . .
Boot Time Backplane Jumpers . . . . . . . . . . . . .
Cluster Size Backplane Jumpers . . . . . . . . . . .
CIBCA Address Jumpers on VAXBI Backplane
Adapters Connecting Tapes and Disks . . . . . . .
H7206-B Diagnostic LEDs . . . . . . . . . . . . . . .
Upper Key Switch . . . . . . . . . . . . . . . . . . . . . .
Lower Key Switch . . . . . . . . . . . . . . . . . . . . . .
.
.
.
.
.
.
.
.
.
.
.
.
.
.
.
.
.
.
.
.
.
.
.
.
.
.
.
xiii
xiv
xiv
1–3
1–5
1–9
1–10
1–11
2–4
3–2
3–3
3–5
3–8
3–23
3–23
3–33
4–3
4–9
4–9
4–11
4–13
4–17
4–23
5–3
6–9
6–13
6–13
ix
6–4
6–5
7–1
8–1
8–2
8–3
8–4
C–1
x
Restart Button . . . . . . . . . . . . . . . . . .
Control Panel Status Indicator Lights
LEDs After Self-Test . . . . . . . . . . . . .
BOOT Commands for VAX/DS . . . . . .
VAX/DS File Names . . . . . . . . . . . . . .
Multiprocessor File Names . . . . . . . . .
Record System Parameters . . . . . . . .
Cable Connections . . . . . . . . . . . . . . .
.
.
.
.
.
.
.
.
.
.
.
.
.
.
.
.
.
.
.
.
.
.
.
.
.
.
.
.
.
.
.
.
.
.
.
.
.
.
.
.
.
.
.
.
.
.
.
.
.
.
.
.
.
.
.
.
.
.
.
.
.
.
.
.
.
.
.
.
.
.
.
.
.
.
.
.
.
.
.
.
.
.
.
.
.
.
.
.
.
.
.
.
.
.
.
.
.
.
.
.
.
.
.
.
.
.
.
.
.
.
.
.
.
.
.
.
.
.
.
.
.
.
.
.
.
.
.
.
.
.
.
.
.
.
.
.
.
.
.
.
.
.
.
.
6–15
6–17
7–3
8–12
8–19
8–21
8–25
C–7
Preface
Intended Audience
This manual is written for Digital customer service engineers and selfmaintenance customers installing a VAX 6000 series system.
Document Structure
This manual uses a structured documentation design. There are many
topics, organized into small sections for efficient reference. Each topic
begins with an abstract. You can quickly gain a comprehensive overview
by reading only the abstracts. Next is an illustration or example, which
also provides quick reference. Last in the structure are descriptive text
and syntax definitions.
This manual has eight chapters and four appendixes, as follows:
•
Chapter 1, Site Preparation, provides pre-installation requirements
and guidelines for the VAX 6000 series.
•
Chapter 2, Unpacking, gives instructions on how to inspect and
unpack the system cabinet.
•
Chapter 3, Connecting to a DSSI Subsystem, explains how to cable
and connect TF tapes and RF disks.
•
Chapter 4, Connecting to a CI VAXcluster, explains how to select
required operating modes on certain XMI and VAXBI bus adapters.
•
Chapter 5, Connecting to Tapes and Disks, explains how to cable
TK tapes and RA disks to the system.
•
Chapter 6, Powering Up the System, gives the power-up procedure
and a functional description of the control panel switches and
indicators.
•
Chapter 7, System Self-Test, shows what to check to see if self-test
was successful.
•
Chapter 8, Verification, explains how to verify the system and how
to set and save system parameters.
xi
•
Appendix A, Digital Remote Services Console Installation,
explains how to connect the remote services console to the system.
•
Appendix B, Module Handling Procedures, explains how to handle
modules.
•
Appendix C, Installing an Expander Cabinet, explains how to join
an expander cabinet to the system cabinet.
•
Appendix D, DSSI Configuration Sheets, provides single- and dualhost configuration sheets for use during installation.
Conventions Used in This Document
The icons shown below are used in illustrations for designating part
placement in VAX 6000 series systems. A shaded area in the icon shows
the location of the component or part being discussed.
FRONT
REAR
VAX 6000 Series Documents
There are two sets of documentation: manuals that apply to all VAX 6000
series systems and manuals that are specific to one VAX 6000 model.
Table 1 lists the manuals in the VAX 6000 series documentation set.
xii
Table 1: VAX 6000 Series Documentation
Title
Order Number
Operation
VAX 6000 Series Owner’s Manual
EK–600EB–OM
VAX 6000 Series Vector Processor Owner’s Manual
EK–60VAA–OM
VAX 6000 Vector Processor Programmer’s Guide
EK–60VAA–PG
Service and Installation
VAX 6000 Platform Technical User’s Guide
EK–600EA–TM
VAX 6000 Series Installation Guide
EK–600EB–IN
VAX 6000 Installationsanleitung
EK–600GB–IN
VAX 6000 Guide d’installation
EK–600FB–IN
VAX 6000 Guia de instalacion
EK–600SB–IN
VAX 6000 Platform Service Manual
EK–600EA–MG
Options and Upgrades
VAX 6000: XMI Conversion Manual
EK–650EB–UP
VAX 6000: Installing MS65A Memories
EK–MS65A–UP
VAX 6000: Installing the H7236-A Battery Backup Option
EK–60BBA–IN
VAX 6000: Installing the FV64A Vector Option
EK–60VEA–IN
VAX 6000: Installing the VAXBI Option
EK–60BIA–IN
Manuals specific to models are listed in Table 2.
xiii
Table 2: VAX 6000 Model Level Documentation
Title
Order Number
Model 600
VAX 6000 Model 600 Mini-Reference
EK–660EA–HR
VAX 6000 Model 600 Service Manual
EK–660EA–MG
VAX 6000 Model 600 System Technical User’s Guide
EK–660EA–TM
VAX 6000: Installing Model 600 Processors
EK–660EA–UP
Model 500
VAX 6000 Model 500 Mini-Reference
EK–650EA–HR
VAX 6000 Model 500 Service Manual
EK–650EA–MG
VAX 6000 Model 500 System Technical User’s Guide
EK–650EA–TM
VAX 6000: Installing Model 500 Processors
EK–KA65A–UP
Models 200/300/400
VAX 6000 Model 300 and 400 Service Manual
EK–624EA–MG
VAX 6000: Installing Model 200/300/400 Processors
EK–6234A–UP
Associated Documents
Table 3 lists other documents that you may find useful.
Table 3: Associated Documents
Title
Order Number
System Hardware Options
VAXBI Expander Cabinet Installation Guide
EK–VBIEA–IN
VAXBI Options Handbook
EB–32255–46
xiv
Table 3 (Cont.): Associated Documents
Title
Order Number
System I/O Options
CIBCA User Guide
EK–CIBCA–UG
CIXCD Interface User Guide
EK–CIXCD–UG
DEC LANcontroller 200 Installation Guide
EK–DEBNI–IN
DEC LANcontroller 400 Installation Guide
EK–DEMNA–IN
InfoServer Installation Guide
EK–DIS1K–IN
KDB50 Disk Controller User’s Guide
EK–KDB50–UG
KDM70 Controller User Guide
EK–KDM70–UG
KFMSA Module Installation and User Manual
EK–KFMSA–IM
KFMSA Module Service Guide
EK–KFMSA–SV
RRD40 Disc Drive Owner’s Manual
EK–RRD40–OM
RA90/RA92 Disk Drive User Guide
EK–ORA90–UG
RF31/RF72 Integrated Storage Element Installation Manual for
BA200–Series Enclosures
EK–RF72D–IM
RF31/RF72 Integrated Storage Element User Guide
EK–RF72D–UF
RF31/RF72 Integrated Storage Element Service Guide
EK–RF72D–SV
SA70 Enclosure User Guide
EK–SA70E–UG
SF200 Storage Array Installation Guide
EK–SF200–IG
SF72 Storage Enclosure and SF200 Storage Array Cabinet
Service Guide
EK–SF72S–SG
TF85 Cartridge Tape Subsystem Owner’s Manual
EK–TF85–OM
TF857 Magazine Tape Subsystem Service Manual
EK–TF857–OM
xv
Table 3 (Cont.): Associated Documents
Title
Order Number
Operating System Manuals
Guide to Maintaining a VMS System
AA–LA34A–TE
Guide to Setting Up a VMS System
AA–LA25A–TE
Introduction to VMS System Management
AA–LA24A–TE
ULTRIX–32 Guide to System Exercisers
AA–ME96B–TE
VMS Networking Manual
AA–LA48A–TE
VMS System Manager’s Manual
AA–LA00A–TE
VMS Upgrade and Installation Supplement: VAX 6000 Series
AA–LB36C–TE
VAXclusters and Networking
DECbridge 500 Installation Guide
EK–DEFEB–IN
DEMFA Installation Guide
EK–DEMFA–IN
Fiber Distributed Data Interface Description
EK–DFSLD–SD
Guidelines for VAXcluster System Configurations
EK–VAXCS–CG
H4000 Digital Ethernet Transceiver Installation Manual
EK–H4000–IN
HSC Installation Manual
EK–HSCMN–IN
VAXcluster Principles
EK–VAXCP–TM
VAX 6000/VAX 4000–300 SF200 System Manual
TBD
VMS VAXcluster Manual
AA–LA27B–TE
xvi
Table 3 (Cont.): Associated Documents
Title
Order Number
Peripherals
Installing and Using the VT420 Video Terminal
EK–VT420–UG
RV20 Optical Disk Owner’s Manual
EK–ORV20–OM
SC008 Star Coupler User’s Guide
EK–SC008–UG
TA78 Magnetic Tape Drive User’s Guide
EK–OTA78–UG
TA90 Magnetic Tape Subsystem Owner’s Manual
EK–OTA90–OM
TK70 Streaming Tape Drive Owner’s Manual
EK–OTK70–OM
TU81/TA81 and TU/81 PLUS Subsystem User’s Guide
EK–TUA81–UG
VAX Manuals
VAX Architecture Reference Manual
EY–3459E–DP
VAX Systems Hardware Handbook — VAXBI Systems
EB–31692–46
VAX Vector Processing Handbook
EC–H0739–46
xvii
Chapter 1
Site Preparation
This chapter provides site planning guidelines, space and environmental
requirements, cabinet sizes, and system power requirements.
Sections include:
•
Customer Pre-Installation Checklist
•
Floor Space and Environmental Requirements
•
Cabinet Sizes
•
Power Requirements
•
AC Power Cable and Connectors
Site Preparation 1–1
1.1 Customer Pre-Installation Checklist
Suggested site planning guidelines and tasks are listed
below. The tasks can be completed before system delivery.
To facilitate the installation process, it is recommended that
the customer plan ahead and coordinate site planning and
scheduling details with Digital.
Planning the Site
•
Plan the physical layout of the system cabinet, disk or tape cabinet,
console terminal, and other system units.
•
Plan to place all equipment away from heavy traffic centers.
•
Determine number, type, and location of required AC power receptacles
and circuit breakers.
•
Determine system power consumption to calculate the input line power
requirements.
•
Obtain cabinet weights and dimensions to check against floor loading
restrictions.
•
Determine environmental cooling requirements.
Checking the Delivery Route
•
Check the height, width, and location of doors and passageways.
•
Check floor loading requirements and protective covering along
passageways.
•
If applicable, check the size, capacity, and availability of the elevator.
1–2 VAX 6000 Series Installation Guide
A VAX 6000 system works as a standalone system or as a member of a
VAXcluster. The system supports a full set of VAX applications and allows
for processor, memory, and I/O expansion. These I/O options are available
through adapters to the XMI bus. In addition, the XMI-to-VAXBI adapter
(DWMBB) enables access to I/O options connected to a VAXBI bus, and the
XMI-to-VME adapter (DWMVA) enables access to a VME bus. Table 1–1
lists the I/O options supported on the XMI bus.
Table 1–1: VAX 6000 Series Adapters
Adapter
XMI
Slots
CIXCD
1
CI port interface;
pler.
DEMFA
1
FDDI (fiber optic) port interface; connects a system to a local area network.
DEMNA
1
Ethernet port interface; connects a system to a local area network.
DWMBB
1
XMI-to-VAXBI interface, a two-module set.
The DWMBB/
A is in the XMI card cage; the DWMBB/B is installed in the VAXBI
card cage.
DWMVA
1
XMI-to-VMEbus interface, a two-module set.
The DWMVA/
A is in the XMI card cage; the DWMVA/B is installed in a VMEbus expansion cabinet.
KDM70
2
Disk adapter; enables connection to RA disk drives.
KFMSA
1
DSSI adapter; enables connection to TF tape drives and to RFxx
disk drives.
Function
connects the system to a Star Cou-
Site Preparation 1–3
1.2 Floor Space and Environmental Requirements
Table 1–2 lists environmental requirements for the system.
Figure 1–1: Sample Configuration
154 CM (60.5 IN)
154 CM (60.5 IN)
104 CM (41.5 IN)
56 CM (22 IN)
DISK
CABINET
SYSTEM
CABINET
TAPE
CABINET
78 CM (30.5 IN)
53 CM (21 IN)*
REAR
CLEARANCE
1 M (39 IN)
TAPE
CABINET
SYSTEM
CABINET
DISK
CABINET
WIDTH*
1.9 M (74 IN)
.9 M
(36 IN)
DEPTH
2.9 M (114 IN)
FRONT
CLEARANCE
1 M (39 IN)
* The SF200 storage array cabinet is 5 cm (2 in) wider.
msb-0119-C-91
1–4 VAX 6000 Series Installation Guide
Table 1–2: Environmental Requirements
)
Condition
Temperature
Relative Humidity
Altitude
System tape in use
15o C to 32o C
59o F to 90o F
20% to 80%
0 to 2.4 km
0 to 8000 ft
System tape not in use
10o C to 40o C 1
50o F to 104o F
10% to 90%
0 to 2.4 km
0 to 8000 ft
Storage
–40o C to 70o C
–40o F to 151o F
10% to 95%
0 to 9 km
0 to 30,000 ft
1 Model
600 range: 15o C–32o C (59o F)–90o F
The minimum amount of clearance space for the front and rear of the VAX
6000 is 1 meter (39 inches) as shown in Figure 1–1.
Air is taken in through the front and rear doors by the two blowers located
in the lower half of the cabinet. The air is circulated up through the card
cages and power regulators as shown in Figure 1–2. If there are in-cabinet
devices such as disk drives, air enters through the bottom grill.
If you are installing a system on a raised floor, ensure that a proper airflow
path is provided. If the floor has perforated tiles, position one or two tiles
in areas where air will enter the cabinet. If the floor has aluminum grills,
position two grills under the area where air enters the cabinet.
Site Preparation 1–5
Figure 1–2: Airflow Pattern
POWER
REGULATORS
CARD CAGES
BLOWERS
EXTERNAL
FRONT VIEW
FRONT
REAR
INTERNAL
SIDE VIEW
1–6 VAX 6000 Series Installation Guide
msb-0008R-89
1.3 Cabinet Sizes
Plan for all cabinets and peripherals when designing the
installation site. A sample system could include a main
cabinet, mass storage cabinets, and a console terminal and
printer.
Figure 1–3: Sample System
SYSTEM
CABINET
OPTIONAL
STORAGE
DEVICE
VT400 SERIES
TERMINAL
LA75
PRINTER
MANUALS
1–8 VAX 6000 Series Installation Guide
msb-0251A-91
Table 1–3: Cabinets: Dimensions and Weights
Cabinet
Height
cm (in)
Width
cm (in)
Depth
cm (in)
Weight
kg (lb)
Processor (60 Hz)
154 (60.5)
78 (30.5)
76 (30)
318 (700)
Processor (50 Hz)
154 (60.5)
78 (30.5)
76 (30)
333 (740)
Expander (60 Hz)
154 (60.5)
76 (30)
76 (30)
245 (540)
Expander (50 Hz)
154 (60.5)
76 (30)
76 (30)
308 (680)
SA Storage Cabinets
154 (60.5)
54 (21)
91 (36)
402 (885)
SF Storage Cabinets
154 (60.5)
59 (23)
91 (36)
402 (885)
H9643 Disk/Tape
104 (41.5)
54 (21)
76 (30)
—
Figure 1–4: Sample Configuration with Expander Cabinet
REAR
CLEARANCE
1 M (39 IN)
TAPE
CABINET
SYSTEM
CABINET
WIDTH
2.6 M (104 IN)
EXPANDER
CABINET
DISK
CABINET
DEPTH
2.9 M (114 IN)
FRONT
CLEARANCE
1 M (39 IN)
msb-0189-89
Site Preparation 1–9
1.4 Power Requirements
The 60 Hz power system includes the H405-E AC power
controller and accepts three-phase input power from a 208V
AC source. The 50 Hz power system, which includes the
H405-F AC power controller and step-down transformer,
accepts input power from a 380V or 416V AC source.
Figure 1–5: Location of Power Modules (Rear View)
H7214, H7215, AND
H7242 POWER
REGULATORS
H7206-B
POWER AND
LOGIC UNIT
H7236-A
BATTERY BACKUP
UNIT (OPTIONAL)
H405-E/F
AC POWER
CONTROLLER
msb-0308-90
Table 1–4: AC Input Voltage
Model No.
Phases
Input
Voltage
Surge
Current
Frequency
Range
H405-E (60 Hz)
3
208V RMS
60 A
47–63 Hz
H405-F (50 Hz)
3
380V RMS
60 A
47–63 Hz
H405-F (50 Hz)
3
416V RMS
60 A
47–63 Hz
1–10 VAX 6000 Series Installation Guide
Table 1–5: Power Requirements
Cabinet
AC Volts
Maximum
Amps 1
Maximum
Watts
Maximum Heat
Dissipation (Btu/hr)
System
(60 Hz)
208
7.0/ph
1650
5570
System
(50 Hz)
380
3.9/ph
1650
5570
System
(50 Hz)
416
3.5/ph
1650
5570
1 This
data includes power and cooling requirements for the system cabinet only.
The VAX 6000 power system has the following modules:
•
H405-E/F AC power controller
•
H7206-B power and logic unit
•
One H7214 DC power regulator
•
One H7215 DC power regulator
•
One H7242 DC power regulator
•
Optional H7236-A battery backup unit
•
Transformer (50 Hz systems only)
Most of the power modules are visible from the rear of the cabinet (see
Figure 1–5). For more information on these modules, refer to the VAX 6000
Platform Service Manual.
All systems have two unswitched IEC 320 receptacles located on the H405
AC power controller. The receptacles are fused at 10 amps for 60 Hz
systems and at 6 amps for 50 Hz systems. They are reserved for disk drives
or the H7236-A battery backup unit. All systems have one unswitched
IEC 320 receptacle fused at 2 amps, but it is not used in current VAX
6000 systems. For expander cabinet power requirements, see the VAXBI
Expander Cabinet Installation Guide.
Site Preparation 1–11
1.5 AC Power Cable and Connectors
The AC power cable is 4.6 m (15 ft) in length. It consists of
three-phase leads (X, Y, and Z) plus neutral (W/N) and ground
(G). AC power connectors for 60 Hz and 50 Hz systems are
shown below. See Section 6.3.
CAUTION: Neutral and ground lines must both be connected from
the bulk three-phase power to complete the Wye configuration.
Otherwise, power components may be damaged. Power must not
be connected to the site source until the power checks of Chapter 6
are performed.
Figure 1–6: AC Power Connectors
PLUG
G
X
RECEPTACLE
Y
W
208 V
3-PHASE Y
HUBBELL # 2511
NEMA # L21-20P
DEC # 12-11209-00
PLUG
380 V OR 416 V
3-PHASE Y
X
G
W
Z
Z
1–12 VAX 6000 Series Installation Guide
Y
Z
RECEPTACLE
Y
G
Z
Y
X
N
HUBBELL # 516P6W
DEC # 12-14379-04
# 2510
L21-20R
12-11210-11
N
X
# 516R6W
12-14378-04
G
Chapter 2
Unpacking
Unpacking steps are:
•
Inspect the Shipment
•
Collect Tools and Resources
•
Remove Carton and Packing Material
•
Remove from the Pallet
•
Leveling the Cabinet
•
Connect the Console Terminal
•
Connect the Ethernet Cable
•
Connect the FDDI Cable
Unpacking 2–1
2.1 Inspect the Shipment
Check to ensure that all system equipment is at the
installation site.
Figure 2–1: Hardware Flowchart
CHECK EQUIPMENT
AGAINST
SHIPPING LIST
MISSING
OR INCORRECT
EQUIPMENT
YES
YES
CUSTOMER
CONTACTS
CARRIER
CARRIER
HAS EQUIPMENT
INSTALLATION
CONTINUES
NO
NO
CONTAINERS
DAMAGED OR
OPENED
YES
ENTER IN LARS REPORT
NOTIFY CUSTOMER
NOTIFY UNIT MANAGER
CONTACT UNIT
MANAGER
NO
CONTINUE
UNPACKING
msb-0023-90
2–2 VAX 6000 Series Installation Guide
If you find a damaged container or package, notify the customer. Wait until
the customer contacts the insurance company and gives you permission to
continue unpacking.
It is important to record information on damaged or opened containers on
the Labor Activity Reporting System (LARS) form.
Unpacking 2–3
2.2 Collect Tools and Resources
You will need the items listed in Table 2–1 to unpack and
install the system cabinet. The removal of the cabinet from
the pallet requires at least two people.
Table 2–1: Tools and Resources
Item
Use
Packing slip
To verify that all hardware has been delivered
Digital voltmeter
To verify power requirements at installation site
7/16 inch wrench
To remove shipping carton brackets
9/16 inch wrench
To remove pallet brackets and to lower leveler feet
Level
To verify that the cabinet is properly leveled
2–4 VAX 6000 Series Installation Guide
Review Chapter 1 (Site Preparation) for power, environmental, and space
requirements for the system.
Since the cabinet is heavy and has a high center of gravity, removing it
from the pallet requires at least two people.
If the system includes an expander cabinet, you will need the following
tools during installation.
Tool
Use
7/16 inch socket wrench
To remove side panel bolts
3/8 inch nutdriver
To remove rear door ground strap
Large Phillips screwdriver
To remove top cover
Unpacking 2–5
2.3 Remove Carton and Packing Material
Take off the carton and packing material to prepare the
system cabinet for removal from the pallet.
Figure 2–2: Packing Material
6
7
4
5
msb-0145-88
2–6 VAX 6000 Series Installation Guide
Use the following procedure to unpack the system cabinet.
1. Cut the shipping straps from the carton.
2. Remove the top cap.
3. Using a 7/16 inch wrench, remove the four screws and metal closures
that hold the carton together.
4. Remove the ramp kit from the front of the cabinet and open it. See
Figure 2–2, .
$
5. Remove the loose piece box from the rear of the cabinet and open it.
Use the packing slip to inventory the items in the box. See .
&.
Remove the plastic bag. See '.
%
6. Remove the inner cap. See
7.
8. Remove the two control panel keys. The keys are tie-wrapped to the
cabinet’s rear grill.
Unpacking 2–7
2.4 Remove from the Pallet
Check the cabinet for external damage. Remove the four
shipping brackets that attach the cabinet to the pallet.
Insert the ramps on the front of the pallet and remove the
cabinet.
WARNING: At least two people are required to remove the cabinet
from the pallet.
Figure 2–3: Preparation and Removal from Pallet
4
2
msb-0025-89
2–8 VAX 6000 Series Installation Guide
1. Check the cabinet sides, top, and front and rear doors for damage. If
the cabinet is damaged, do the following:
a. Enter the location and extent of the damage on the LARS report.
b. Notify the customer and your unit manager.
c.
Stop unpacking until the customer gives you permission to
continue.
2. Using a 9/16 inch wrench, remove the four bolts and shipping brackets
that hold the cabinet to the pallet (see Figure 2–3, ).
"
3. Check the leveler feet. They should be in the uppermost position, away
from the floor.
WARNING: Serious personal injury may result if the cabinet is
improperly handled or proper safety conditions are not met. During
the unpacking procedure, personnel should wear safety glasses. Inspect
the ramps, the ramp side rails, and metal hardware for defects described
in the following list.
•
Cracks more than 25 percent of the ramp depth, either across or
lengthwise on the ramp.
•
Knots or knotholes going through the thickness of the ramp and
greater than 50 percent of the ramp width.
•
Loose, missing, or broken ramp side rails.
•
Loose, missing, or bent metal hardware. If any of these conditions
exist, DO NOT USE THAT RAMP. Investigate alternate means of
removing the cabinet and/or order a new ramp.
4. Attach the ramps by fitting the prongs into the holes on the front of the
pallet. Place the ramps so that the runners are on the inside. Align
the arrows on the ramps and pallet. See .
$
5. With two people working together, slowly roll the cabinet off the pallet
and down the ramps.
6. Move the cabinet into position.
Unpacking 2–9
2.5 Leveling the Cabinet
To level the cabinet, adjust the feet and check the cabinet
with a bubble level. Finally, check the seating of all modules
in the card cages.
Figure 2–4: Leveler Foot Adjustment
LOCKNUT
LEVELER
HEXNUT
LEVELER
FOOT
2–10 VAX 6000 Series Installation Guide
msb-0484-90
1. Using a 9/16 inch or adjustable wrench, lower and adjust the leveler
feet. (A shipping bracket can also be used to lower the leveler feet. The
bracket cutout and leveler feet hexnuts are the same size.)
2. Using a bubble level, check to see if the cabinet is properly leveled.
3. Unlock and open the front and rear doors (see Figure 2–5).
4. At the front of the cabinet, visually check to see that all processor,
memory, and I/O modules are seated properly.
5. At the rear of the cabinet, check I/O bulkhead connections for tight
connections. CIXCD and DEMFA connections use active headers and
their connections may have loosened in shipment. Tighten as needed.
Figure 2–5: Cabinet Door Lock and Key
KEY
HOLE
KEY OR
HEX WRENCH
msb-0485-90
Unpacking 2–11
2.6 Connect the Console Terminal
After unpacking and positioning all other equipment,
connect the console terminal to the system cabinet.
Figure 2–6: I/O Panel—Console Terminal Port
A
REAR
A
B
B
CONSOLE
TERMINAL
PORT
msb-0523-90
2–12 VAX 6000 Series Installation Guide
1. Unpack the console terminal. The console terminal signal cable is
shipped in the loose piece box. The cable number is BC22D–25. If
you are installing a remote services console, see Appendix A.
2. Unpack the printer. Connect the BC16E–10 signal cable to the printer
and to the console terminal. Plug in the printer.
3. Attach the BC22D–25 signal cable to the console terminal and to the
system I/O panel (see Figure 2–6). Plug in the console terminal.
4. Set the following terminal characteristics. See the console terminal
user’s guide for more information.
NOTE: The system cabinet’s baud rate is factory set at 1200.
•
8 data bits, 1 stop bit
•
No parity
Unpacking 2–13
2.7 Connect the Ethernet Cable
If the system includes an Ethernet, connect the Ethernet
cable to the system I/O panel and to the Ethernet
transceiver.
Figure 2–7: I/O Panel—Ethernet Port
A
REAR
A
B
B
ETHERNET
PORT
msb-0524-90
2–14 VAX 6000 Series Installation Guide
The DEC LANcontroller 400 (DEMNA) adapter connects to the Ethernet
via a BNE3x or BNE4x transceiver cable.
1. Connect the transceiver cable to the Ethernet port on the system I/O
panel (see Figure 2–7).
2. Connect the other end of the cable to the Ethernet transceiver. See the
appropriate Ethernet transceiver manual for more information.
Unpacking 2–15
2.8 Connect the FDDI Cable
If the system includes an FDDI, connect the FDDI cable
to the system I/O panel and to the DECbridge 500 which
connects to the Ethernet.
Figure 2–8: I/O Panel—FDDI Port
DECbridge 500
AP
NI
FI
QM
REAR
ETHERNET
FDDI
PORT
A
A
FDDI
PORT
B
B
msb-0524A-91
2–16 VAX 6000 Series Installation Guide
The DEMFA adapter connects to the DECbridge 500, which connects to the
Ethernet.
1. Connect the cable to the FDDI port on the system I/O panel (see
Figure 2–8).
2. Connect the other end of the cable to the DECbridge 500. See the
DECbridge 500 Installation Guide for more information.
Unpacking 2–17
2–18 VAX 6000 Series Installation Guide
Chapter 3
Connecting to a DSSI Subsystem
VAX 6000 systems connect to tape and disk drives using several adapters.
This chapter describes the concepts of connecting to TF tape and RF disk
drives (known as integrated storage elements or ISEs) using the Digital
Storage System Interconnect (DSSI) bus supported by the KFMSA adapter.
Installation instructions are referenced in this chapter. For information on
connecting to TU, TK, and TA tapes, or RA disks, see Chapter 5, and for
connecting to a CI VAXcluster, see Chapter 4.
If your system has a CI adapter, complete the DSSI subsystem installation
before you begin the CI installation. Sections in this chapter include:
•
DSSI Installation Overview
•
Storage Architecture and Options
•
DSSI and CI VAXclusters Compared
•
DSSI Basics
KFMSA Adapter
Integrated Storage Elements (ISEs)
SF7x Enclosure Box
SF2xx Storage Array Cabinet
Single-Host Systems
Dual- and Tri-Host Systems
Cables
•
Configure the DSSI Subsystem
Install DSSI Cables to ISEs
Set Node IDs
•
Configure DSSI Subsystem with EVCXF
Example:
Example:
Example:
Example:
Example:
Boot the VAX Diagnostic Supervisor
Run the Autosizer
Run EVCXF
Changing the KFMSA Node ID at the I/O Panel
Changing the KFMSA Node ID with EVCXF
Connecting to a DSSI Subsystem 3–1
3.1 DSSI Installation Overview
This chapter provides guidelines for installation. Please
refer to the manuals listed in Table 3–1 for complete
installation instructions. The main steps in installation
include cabling, terminating the DSSI bus, setting node IDs
for the bus, and changing parameters on ISEs as required
(see Table 3–2).
Table 3–1: DSSI Documentation
Title
!tion Guide
DSSI VAXcluster Installa(EK–DVCLU–IN)
"and KFMSA
Module Installation
User Manual (EK–KFMSA–
IM)
#(EK–KFMSA–SV)
KFMSA Module Service Guide
$Storage
VAX 6000/SF2xx Embedded
Installation Guide (EK–
EMBED–IN)
%
Description
Multi-host mixed DSSI VAXcluster systems.
Includes configuration rules, supported ISEs, and installation instructions.
For installing KFMSA adapters into existing VAX 6000
systems. Describes setting termination and node IDs
for the adapters using EVCXF.
Troubleshooting and diagnostics for the KFMSA
adapter. Includes configuration information.
For single-host systems or DSSI VAXclusters with embedded storage. Gives acceptance procedures, setting node ID and ISE parameters, discusses disk stripping.
SF7x Storage Enclosure and
SF2xx Storage Array Cabinet Service Guide (EK–SF72S–SG)
Fault isolation and troubleshooting guidelines for the
SF7x enclosure boxes and SF2xx storage array cabinets.
SF2xx Storage Array Installation Guide (EK–SF200–IG)
Installing an SF2xx storage array cabinet, including cabling, configuration, acceptance, setting node IDs.
&
' TF85 Cartridge Tape Subsystem Owner’s Manual (EK–TF85–
Operation and user instructions for the TF85 tape
drive.
OM)
((EK–TF85B–OV)
TF85B Tape Subsystem Overview
Overview of the embedded TF85 tape subsystem including configuration rules, booting, and fieldreplaceable units.
3–2 VAX 6000 Series Installation Guide
Table 3–2: DSSI Installation
Location
Single-Host Configuration1 DSSI VAXcluster
1
Cable Installation
ISE in VAX 6000
ISE in SF2xx
storage array cabinet
No change. All cables are factory installed.
$%
Attach cables from SF7x to ad†
ditional host systems.
Attach cables from host system to SF2xx cabinet.
&
2
Bus Termination
Host I/O bulkhead
SF7X Enclosure Box
on each unused connector as neces! termination
"
Install termination on each unused connector on rear panel, as necessary. $ &
Install
sary.
Node ID Settings
!"
KFMSA
No change. Leave at factory setting of node ID 7.
Set second host node ID to 6
3
and third host to 5.
ISEs
No change. Should be correctly set at factory.
Tapes are set to node ID 0; through-bus SF7x boxes are
node IDs 1 to 4. split-bus SF7x boxes (for single- and dualhost) are node IDs 5 and 6.
ISE Parameter Changes
ISEs
"
See KFMSA Module Installation and User Manual for explicit directions on changing parameters.
Adding Hosts to Existing DSSI Subsystems
New and original hosts
!
Reconfigure DSSI storage bus, setting node IDs, termination, and possibly changing split-bus.
1 Assumes
a new installation only; does not apply to add-on configurations.
the SF2xx Installation Manual for complete cabling instructions.
3 See the KFMSA Module Installation and User Manual for changing node IDs.
†These callouts refer to the manuals listed in Table 3–1.
2 See
Connecting to a DSSI Subsystem 3–3
3.2 Storage Architecture and Options
VAX 6000 systems have multiple paths for CI, DSSI, and
Ethernet connections. Table 3–3 shows VAXcluster and
network communications options.
Figure 3–1: System Architecture with KFMSA
XMI BUS
KDM70
DWMBB
VAXBI BUS
KFMSA
TF TAPE &
RF DISKS
TBK70
KLESI-B
ONE
TK TAPE
ONE
TU TAPE
KDB50
TA TAPES &
RA DISKS
RA DISKS
msb-0321J-91
VAX 6000 systems have several choices of VAXcluster adapters and
communication interconnects. Figure 3–1 shows a system architecture, and
Table 3–3 lists the adapters and configuration limits.
3–4 VAX 6000 Series Installation Guide
Table 3–3: VAXcluster and Network Options
Adapter
Maximum Configuration
VAXcluster Options
CI
1
CIXCD
Up to 4 (1 XMI slot each)
CIBCA
Up to 4 (2 VAXBI slots each plus DWMBB adapter)
DSSI
KFMSA
Up to 6 KFMSAs in a VAX 6000. One XMI slot, providing two DSSI buses per module.
Ethernet
DEMNA
Up to 6 (1 XMI slot each)
DEBNA
One VAXBI slot plus DWMBB adapter
1
Network Interconnects
CI
Ethernet
FDDI
CIXCD
Up to 4 (1 XMI slot each)1
CIBCA
Up to 4 (2 VAXBI slots each plus DWMBB adapter)1
DEMNA
Up to 6 (1 XMI slot each)2
DEBNI
Up to 6 (1 VAXBI slot plus DWMBB adapter)
DEMFA
Up to 2 (1 XMI slot each)
1 CIXCD
2 Power
and CIBCA cannot be configured together on the same system.
connection is provided for one H4005 transceiver.
Figure 3–2: XMI Adapters
XMI
DEMNA
DWMBB/A
DEMFA
CIXCD
KFMSA
KDM70
DWMVA/A
msb-0316B-91
Connecting to a DSSI Subsystem 3–5
3.3 DSSI and CI VAXclusters Compared
The Digital Storage System Interconnect (DSSI) bus is
supported on VAX 6000 systems using the KFMSA adapter. It
is a daisy-chained multi-drop bus that connects up to eight
nodes. Logically, each DSSI bus is equivalent to a small CI,
including the associated logical Star Coupler. A CI storage
unit and HSC is equivalent to a DSSI ISE (see Figure 3–3).
Figure 3–3: CI and DSSI Compared
NI -- Ethernet
VAX
VAX
NI
Adapter
VAX
NI
Adapter
CI
Adapter
VAX
NI
Adapter
CI
Adapter
NI
Adapter
KFMSA
KFMSA
DSSI
HSC
CI
Tape/Disk
Controller
Controller
Tape/Disk
Tape/Disk
ISE
ISE
DSSI
Tape/Disk
CI Equivalent
of DSSI's ISE
3–6 VAX 6000 Series Installation Guide
msb-0748-91
On both CI and DSSI, all nodes directly connect to each other. The DSSI
bus requires electrical terminators at both ends to ensure signal integrity
because it is DC-coupled (the CI bus does not require physical termination).
Logically, each DSSI bus is equivalent to a small CI with its Star Coupler.
The RF/TF devices on the DSSI are functionally equivalent to a combination
of HSC and RA/TA devices on the CI. Like the HSC, each ISE controller
can communicate with multiple VAX hosts on DSSI and order disk seeks.
ISEs do not have to share an HSC like CI devices, so each additional ISE
linearly increases I/O throughput and bandwidth.
DSSI can be implemented in single-, dual-, or tri-host mode. In singlehost, one system has access to integrated storage elements (ISEs) across
the DSSI storage bus. In dual- and tri-host configurations, the systems
remain functionally independent while their common DSSI storage bus,
together with VAXcluster software, makes the ISEs available to each
system, providing multiple data paths for access to the ISEs.
Dual- and multi-host systems can include multiple VAX 6000 systems and
VAX 4000 Model 300 systems (see Section 3.4.6).
FOR MORE INFORMATION
Primary reference:
KFMSA Module Installation and User Manual
Secondary reference:
SF2xx Storage Array Installation Guide
Connecting to a DSSI Subsystem 3–7
3.4 DSSI Basics
If you are familiar with DSSI terminology and concepts, go
to Section 3.5 and continue the installation. For additional
information on DSSI, see Table 3–4.
•
VAX 6000 systems support DSSI subsystems in single-, dual-, or tri-host
configurations, using the KFMSA adapter.
•
Each KFMSA adapter has two buses, each of which can attach seven
additional nodes (ISEs or another KFMSA adapter).
•
ISEs can be RF disk or TF tape devices.
•
RF ISEs are housed in SF7x enclosure boxes installed either in the
system cabinet or in an SF2xx storage array cabinet.
•
TF85 ISEs are housed in VAX 6000 cabinets and TF857 drive loaders
are housed in SF2xx storage array cabinets.
Table 3–4: DSSI Concepts
Term
Reference
Definition
DSSI
Section 3.3
Digital Storage System Interconnect.
A DSAbased storage interconnect used by the KFMSA
adapter and the RF and TF series integrated storage elements to transfer data and to communicate with each other.
Dual-host
Section 3.4.6
Storage configuration where ISEs are shared between two DSSI adapters on a DSSI subsystem with two host systems.
ISE
Section 3.4.2
Integrated storage element.
On the DSSI storage bus, all RF and TF storage devices are ISEs.
KFMSA
Section 3.4.1
XMI adapter for RF disks and TF tapes; enables connection to these devices.
MSCP
Section 3.4.2
Mass storage control protocol. An application layer protocol used by the host to perform disk I/O operations and I/O control functions.
3–8 VAX 6000 Series Installation Guide
Table 3–4 (Cont.): DSSI Concepts
Term
Reference
Definition
Node name
Section 3.5.2
A 6-character (maximum) value assigned to each ISE.
The node name of each ISE must be unique across the
system topology.
OCP
Section 3.5.2
Operator control panel. An enclosure interface that allows remote control of DSSI node ID selection and ISE
operating status.
SF7x
Section 3.4.3
A storage enclosure that houses either two or four
RF disk drives. Can be installed in a system cabinet or in an SF2xx storage array cabinet. Current models are SF72 and SF73.
SF2xx
Section 3.4.4
DSSI storage array cabinet that houses up to
six SF7x enclosures and up to two TF857 magazine tape loader subsystems.
Single-host
Section 3.4.5
Storage configuration where ISEs are connected to only
one host system.
Split-bus
Section 3.4.3
A mode of operation where the bus servicing the ISEs
on right side of an SF7x enclosure is different bus from
the bus servicing the ISEs on the left side of the enclosure.
Through-bus
Section 3.4.3
A mode of operation where all the ISEs in an SF7x enclosure are on the same DSSI bus.
Tri-host
See DSSI VAXcluster Installation Guide. Three host systems sharing ISEs on the DSSI storage bus. Host systems can be VAX 6000 and VAX
4000 Model 300 systems.
Connecting to a DSSI Subsystem 3–9
3.4.1 KFMSA Adapter
VAX 6000 systems support DSSI using the KFMSA adapter
installed in the XMI card cage. Each KFMSA supports or
has two DSSI buses. The KFMSA has diagnostic LEDs and
reports status to system self-test display.
Figure 3–4: KFMSA LEDs
YELLOW
SELF-TEST
LED
DSSI
FAULT
LEDs,
PORT 1
DSSI
FAULT
LEDs,
PORT 2
ON-BOARD
REMOVABLE
TERMINATION
msb-0750A-91
3–10 VAX 6000 Series Installation Guide
The KFMSA runs a self-test during power-up and reports results to the
system self-test display. The yellow LED on the KFMSA lights to indicate
that self-test passed.
If a KFMSA fails self-test, check the diagnostic LEDs on the board. Two
sets of four red LEDs report status for each of the logical ports associated
with the two physical buses. See the KFMSA Module Installation and
User Manual chapter, Power-On Self-Test, for details on the KFMSA LED
readout.
In addition to the KFMSA adapter self-test status, each ISE has its own
self-test. To check status of ISEs, for disks, check the status LEDs on the
operator control panel of the SF7x enclosure box. For TF857 tapes, check
the front panel of the tape loader.
The KFMSA-AA adapter has bus termination on the board, and supports
single- and dual-host systems. The KFMSA-BA adapter has removable
termination; with the termination present on the board, it supports singleand dual-host subsystems, and with the termination removed supports
multi-host.
Each of the two DSSI buses per KFMSA has eight data lines: 1 parity
line and 7 control lines. Transmission on the DSSI bus is packet-oriented.
Of the eight nodes configured between any two terminators on KFMSA
adapters, one to three nodes can be KFMSA adapters. The remaining
nodes can be RF disk or TF tape integrated storage elements (ISEs). See
Section 3.4.2.
The level 3 diagnostic, EVCXF, reports ISE node IDs and connection on
each bus (described in Section 3.6.3).
FOR MORE INFORMATION
Primary reference:
KFMSA Module Installation and User Manual
Secondary reference:
KFMSA Module Service Guide
Connecting to a DSSI Subsystem 3–11
3.4.2 Integrated Storage Elements (ISEs)
Of the eight nodes available between any two terminators
on a DSSI bus, a maximum of three nodes can be KFMSA
adapters, the rest ISEs. ISEs are the RF disks and TF tapes
that populate up to seven nodes on any DSSI bus. Each ISE
has a controller and a disk or tape drive.
Figure 3–5: ISEs for the DSSI Storage Bus
Single-Host
VAX 6000
ISE
0
ISE
1
ISE
2
ISE
3
ISE
4
ISE
5
ISE
6
ISE
4
ISE
5
ISE
6
XMI
7
DSSI Bus 1
KFMSA
DSSI Bus 2
7
ISE
0
ISE
1
ISE
2
ISE
3
VAX 6000
Host System 1
VAX 6000
Host System 2
ISE
0
ISE
1
ISE
2
ISE
3
ISE
4
XMI
XMI
7
DSSI Bus 1
6
DSSI Bus 2
6
KFMSA
KFMSA
7
ISE
0
ISE
1
ISE
2
ISE
3
3–12 VAX 6000 Series Installation Guide
ISE
4
msb-0749-91
Each DSSI bus has a limit of eight physical addresses: one, two, or three
adapters (KFMSAs) and from one to seven ISEs (RF disks or TF tapes).
Each ISE has a controller in the physical (tape or disk) drive which uses
the mass storage control protocol (MSCP) or tape MSCP. ISEs are located
in a VAX 6000 cabinet, a VAX 4000 Model 300 cabinet, or an SF2xx storage
cabinet.
Each connection has an initiator and a target node. Any node on the bus can
act as either an initiator or a target. The actual communications are limited
to two nodes at a time. Arbitration mechanisms accommodate multiple
dialogues on the DSSI bus.
The ISE receives a complete packet of information requesting a task to be
done. The controller interprets the packet and performs the task without
any further communication from other DSSI nodes. The controller has a
command queue and handles access requests. It can start and monitor an
internal diagnostic, and provide status of the storage element.
VAX 6000 DSSI subsystems support RF72 and RF73 disks, TF85 tape drives
in cabinet, and TF837 and TF857 tapes in SF2xx storage cabinets.
FOR MORE INFORMATION
Primary reference:
SF2xx Storage Array Installation Guide
Secondary references:
VAX 6000/SF2xx Embedded Storage Installation Guide
SF7x Storage Enclosure and SF2xx Storage Array Cabinet Service Guide
TF85 Cartridge Tape Subsystem Owner’s Manual
DSSI VAXcluster Installation Guide
Connecting to a DSSI Subsystem 3–13
3.4.3 SF7x Enclosure Box
Two or four RF disks are installed in an SF7x enclosure box
(SF72 or SF73). Two SF7x enclosures can be installed in a
VAX 6000 system cabinet, with a total of eight RF disks in
the cabinet. Additionally, up to six SF7x enclosures can be
installed in an SF2xx storage array cabinet, for an additional
24 RF disks.
Figure 3–6: SF7x Enclosure Box
msb-0754-91
3–14 VAX 6000 Series Installation Guide
A VAX 6000 cabinet can have one TF tape in the system control assembly
(in the upper left front of the cabinet) and two SF7x enclosures in the base
of the system cabinet. Each SF7x enclosure houses two or four RF drives.
Total in-cabinet ISE capacity is a maximum of eight RF drives and one TF
tape drive.
SF2xx storage array cabinets can have up to six SF7x enclosures, each with
a maximum of four RF disks for a total capacity of 24 disks in each SF2xx.
An SF7x enclosure can be configured either in split-bus or through-bus
mode. Split-bus mode connects the ISEs in the right side of the SF7x
enclosure to a different DSSI bus from those on the left side. Through-bus
mode connects all the ISEs in the enclosure to the same DSSI bus.
On single- and dual-host systems, SF7x enclosures can be cabled as either
split-bus or through-bus. On multi-host systems, all SF7xs are set throughbus (no split-bus is allowed).
FOR MORE INFORMATION
Primary reference:
SF2xx Storage Array Installation Guide
Secondary reference:
SF7x Storage Enclosure and SF2xx Storage Array Cabinet Service Guide
Connecting to a DSSI Subsystem 3–15
3.4.4 SF2xx Storage Array Cabinet
The SF2xx storage array cabinet houses a maximum of six
SF7x storage enclosures, each of which can hold four RF
drives, for a total of 24 RF drives. The second level from the
top is reserved for TF857 devices.
Figure 3–7: SF2xx Cabinet
LEVEL 4
LEVEL 3
LEVEL 2
LEVEL1
msb-0755-91
3–16 VAX 6000 Series Installation Guide
A full SF2xx houses 24 RF disks (in six SF7x enclosure boxes) and two
TF857 tape loaders (see Figure 3–7). SF2xx cabinets can be ordered with
fewer disks and be upgraded in the field as the customer needs require.
The SF2xx has four levels: levels 1, 2, and 4 house RF disks in SF7x
enclosure boxes (two or four disks per SF7x). Level 3 is reserved for tapes
and can hold two TF857 tape loaders.
The number of buses needed to support a full SF2xx cabinet varies,
depending on how the SF7x enclosures are configured: split- or throughbus.
FOR MORE INFORMATION
Primary reference:
SF2xx Storage Array Installation Guide
Secondary reference:
VAX 6000/SF2xx Embedded Storage Installation Guide
SF7x Storage Enclosure and SF2xx Storage Array Cabinet Service Guide
Connecting to a DSSI Subsystem 3–17
3.4.5 Single-Host Systems
A single-host configuration consists of one VAX 6000 system
connected to ISEs on the DSSI bus. The ISEs can be in the
cabinet or in an SF2xx storage array cabinet or both.
Figure 3–8: Single-Host System
msb-0753-91
3–18 VAX 6000 Series Installation Guide
For embedded storage, a VAX 6000 can have a maximum of eight RF drives
and a TF tape drive in the system control assembly box. A full system
cabinet can be connected with one or two KFMSA adapters.
A single-host system can connect to a maximum of two SF2xx storage array
cabinets. See Figure 3–8. One full SF2xx storage array cabinet requires
two KFMSA adapters to connect to a single host. If you have two full
SF2xxs, then four KFMSA adapters are required.
On single-host systems, SF7x enclosures can be cabled as either split-bus
or through-bus.
Figure 3–9: Sample Single-Host Configuration
ISE
0
ISE
1
ISE
2
ISE
3
ISE
4
ISE
5
ISE
6
ISE
4
ISE
5
ISE
6
XMI
7
DSSI Bus 1
KFMSA
DSSI Bus 2
7
ISE
0
ISE
1
ISE
2
ISE
3
msb-0749A-91
FOR MORE INFORMATION
Primary reference:
KFMSA Module Installation and User Manual
Secondary references:
DSSI VAXcluster Installation Guide
SF2xx Storage Array Installation Guide
Connecting to a DSSI Subsystem 3–19
3.4.6 Dual- and Tri-Host Systems
The DSSI can connect VAX 6000 systems, VAX 4000 Model 300
systems, and ISEs.
Figure 3–10: Examples of Dual-Host Configurations
Host 1
XMI
ISE
0
7
ISE
1
ISE
2
ISE
3
ISE
4
ISE
5
ISE
4
ISE
5
KFMSA
7
Host 2
DSSI Bus 1
XMI
DSSI Bus 2
6
KFMSA
ISE
0
6
Host 1
ISE
0
ISE
1
ISE
1
ISE
2
ISE
2
ISE
3
ISE
4
XMI
ISE
3
Host 2
XMI
7
DSSI Bus 1
6
DSSI Bus 2
6
KFMSA
KFMSA
7
ISE
0
ISE
1
ISE
2
ISE
3
3–20 VAX 6000 Series Installation Guide
ISE
4
msb-0749C-91
Figure 3–10 shows a dual-host configuration with one KFMSA in each
system. For DSSI VAXclusters, each system can have up to six KFMSA
adapters. Host systems can be VAX 6000s or VAX 4000 Model 300 systems.
The ISEs can be in either of the host systems or in SF2xx storage array
cabinets. This manual covers installation of single- and dual-host systems
only.
Dual- and tri-host systems must have:
•
Two or more VAX 6000 or VAX 4000 systems
•
Software licenses of
First System
Additional Systems
VMS
VMS
VAXcluster
VAXcluster
DECnet full-function
DECnet end-node
1
1 On
any cluster, the maximum difference in VMS revision levels between any two systems cannot be greater than one.
•
DSSI adapters (KFMSA adapters for VAX 6000 systems)
•
Ethernet hardware
•
No more than six ISEs on each DSSI bus
FOR MORE INFORMATION
Primary reference:
DSSI VAXcluster Installation Guide
Secondary reference:
SF2xx Storage Array Installation Guide
KFMSA Module Installation and User Manual
Connecting to a DSSI Subsystem 3–21
3.4.7 Cables
Each KFMSA module has two separate DSSI buses (ports)
cabled from the XMI backplane. The cable from section D
(upper section) is designated as bus 1, and the cable from
section E is bus 2. These cables connect to the system I/O
bulkhead at a DSSI connector.
Figure 3–11: I/O Ports for DSSI Cables
MULTI-HOST I/O PANEL
2
1
0
2
3 4 5
6
7
Off
2
1
0
2
3 4 5
6
7
Off
1
KFMSA NODE ID
SELECT KNOB
1
SINGLE- OR DUAL-HOST I/O PANEL
DSSI
CONNECTOR
2
1
msb-0757C-91
3–22 VAX 6000 Series Installation Guide
The DSSI buses are configured physically by the cable. Check your cables
before beginning installation. If you need additional cables, see Table 3–5.
The overall physical bus length is limited. Therefore, systems and devices
on the DSSI bus must reside close to each other. One external DSSI cable is
required for each bus connection between systems; two cables are required
to connect two systems and an SF2xx cabinet.
Table 3–5: KFMSA Options
Option
Board P/N
Contents
KFMSA-AA
T2036-AA
The KFMSA adapter with bus termination on the module; supports single- and dual-host systems.
KFMSA-BA
T2036-BA
The KFMSA adapter with removable termination on the module; supports single-host when termination is present, or
multi-host when termination is removed.
Table 3–6: DSSI Cable Kits
P/N
Qty—Length
Function
CK-SF200-LM
1 108" (2.7m)
1 70" (1.8m)
For VAX to SF connections. Contains two cables (BC21Q-09 and BC21R-5L). One kit is required for each DSSI bus used (maximum of two
kits per KFMSA).
CK-KFMSA-LJ
2
48" (1.21m)
Internal cable set, connecting XMI backplane at KFMSA adapter to the I/O bulkhead on the host system.
Used when the
host is the end node of a DSSI subsystem.
CK-KFMSA-LN
2
48" (1.21m)
Internal cable set, connecting XMI backplane at KFMSA adapter to the I/O bulkhead on tri-host systems.
Used when the
host is not an end node of a DSSI subsystem.
CK-KFMSA-LR
1 120" (3.04m)
1 48" (1.21m)
Internal cable set, connecting TF85 tape controller and the KFMSA XMI backplane connections to the host I/O bulkhead.
Connecting to a DSSI Subsystem 3–23
3.5 Configure the DSSI Subsystem
Each component in the DSSI subsystem has an address. Part
of the address is determined by cabling the component to a
DSSI bus, and part of the address is set during installation.
Use a configuration sheet when you are setting parameters
(see Figure 3–12).
Figure 3–12: Sample DSSI Configuration Sheet
KFMSA XMI Node # ________
Bus 1
DSSI ID # ____
Device Type ____
DSSI ID # ____
Node Name ____
ALLO_CLASS ____
SF200 Box # ____
____
UNITNUM
System ID __________________
Device Type ____
DSSI ID # ____
Node Name ____
ALLO_CLASS ____
SF200 Box # ____
____
UNITNUM
System ID __________________
Device Type ____
DSSI ID # ____
Node Name ____
ALLO_CLASS ____
SF200 Box # ____
____
UNITNUM
System ID __________________
Device Type ____
DSSI ID # ____
Node Name ____
ALLO_CLASS ____
SF200 Box # ____
____
UNITNUM
System ID __________________
Device Type ____
DSSI ID # ____
Node Name ____
ALLO_CLASS ____
SF200 Box # ____
____
UNITNUM
System ID __________________
Device Type ____
DSSI ID # ____
Node Name ____
ALLO_CLASS ____
SF200 Box # ____
____
UNITNUM
System ID __________________
Device Type ____
DSSI ID # ____
Node Name ____
ALLO_CLASS ____
SF200 Box # ____
____
UNITNUM
System ID __________________
Bus 2
DSSI ID # ____
Device Type ____
DSSI ID # ____
Node Name ____
ALLO_CLASS ____
SF200 Box # ____
____
UNITNUM
System ID __________________
Device Type ____
DSSI ID # ____
Node Name ____
ALLO_CLASS ____
SF200 Box # ____
____
UNITNUM
System ID __________________
Device Type ____
DSSI ID # ____
Node Name ____
ALLO_CLASS ____
SF200 Box # ____
____
UNITNUM
System ID __________________
Device Type ____
DSSI ID # ____
Node Name ____
ALLO_CLASS ____
SF200 Box # ____
____
UNITNUM
System ID __________________
Device Type ____
DSSI ID # ____
Node Name ____
ALLO_CLASS ____
SF200 Box # ____
____
UNITNUM
System ID __________________
Device Type ____
DSSI ID # ____
Node Name ____
ALLO_CLASS ____
SF200 Box # ____
____
UNITNUM
System ID __________________
Device Type ____
DSSI ID # ____
Node Name ____
ALLO_CLASS ____
SF200 Box # ____
____
UNITNUM
System ID __________________
msb-0751r-91
3–24 VAX 6000 Series Installation Guide
To configure a DSSI subsystem, start with a configuration sheet.
Appendix D has sheets for single- and dual-host configurations. Record
all system information for each ISE as you cable and set the node IDs.
To configure a DSSI VAXcluster, follow this procedure:
1. If you have a dual- or tri-host system, change the node ID of the KFMSA
on the second and third host systems.
2. Cable the SF2xx I/O bulkhead to a specific KFMSA (bus 1 or 2).
3. If required, set the ISE node ID using the operator control panel on
the SF7x enclosure. The IDs should be factory set to acceptable values
already.
4. Run the VAX Diagnostic Supervisor.
5. Run the autosizer.
6. Run the EVCXF diagnostic to confirm all node information.
FOR MORE INFORMATION
Primary reference:
KFMSA Module Installation and User Manual
Secondary reference:
SF2xx Storage Array Installation Guide
Connecting to a DSSI Subsystem 3–25
3.5.1 Install DSSI Cables to ISEs
Each KFMSA module has two separate DSSI buses (ports).
Attach ISEs to the DSSI bus by cabling them to the system
I/O bulkhead at the appropriate DSSI connector. Record bus
and node ID on configuration sheets. See Figure 3–13.
Figure 3–13: I/O Port for DSSI Cables
KFMSA NODE ID
SELECT KNOB
2
1
0
2
3 4 5
6
7
Off
2
1
0
2
3 4 5
1
6
7
Off
1
msb-0757-91
3–26 VAX 6000 Series Installation Guide
1. XMI Node Number
Locate the XMI slot of the KFMSA by either looking in the XMI card
cage, reading the XMI module use label on the cabinet frame by the card
cage, or at the console prompt, issuing a SHOW CONFIGURATION
command. The XMI node number and physical slot number are the
same.
2. DSSI Bus Number
Each KFMSA module has two separate DSSI buses (ports) cabled from
XMI backplane sections D and E. The cable from section D (upper
section) is designated as bus 1, and the cable from section E is bus
2. Each bus presents a discrete set of registers to the host. For
communication to occur, the host software must identify which DSSI
bus is attached to which ISE. Use the color-coded labels at each
connector end of a cable to make maintenance easier. Record the label
colors on the configuration sheet.
When attaching cables to the SF2xx, at the rear of the SF cabinet:
1. Open the door.
2. For each populated bus, install one external cable to one of the KFMSA
disk controller ports. DSSI cables are packaged in the bottom of the
SF2xx storage cabinet. Tighten the two screws that secure each cable
to the I/O panel.
3. If the system has more than one KFMSA adapter, install additional
DSSI cables to the I/O panel, as above.
FOR MORE INFORMATION
Primary reference:
KFMSA Module Installation and User Manual
Secondary references:
SF2xx Storage Array Installation Guide
SF7x Storage Enclosure and SF2xx Storage Array Cabinet Service Guide
Connecting to a DSSI Subsystem 3–27
3.5.2 Set Node IDs
Node IDs are factory set and usually do not require
changing. If required, set the KFMSA node ID on the I/O
bulkhead or using the level 3 diagnostic EVCXF. Set the
DSSI node IDs for the ISEs using the switches on each SF7x
operator control panel. Record the IDs on the configuration
sheet.
Figure 3–14: Setting the KFMSA Node ID on the I/O Panel
2
1
0
3 4 5
6
7
Off
KFMSA NODE ID
SELECT KNOB
2
0
2
3 4 5
6
7
Off
2
1
0
2
1
3 4 5
6
7
Off
1
msb-0757A-91
3–28 VAX 6000 Series Installation Guide
The node IDs for KFMSA modules are factory set with both ports having
the node ID of 7. KFMSA node IDs for single-host systems do not have to
be changed. For a dual-host system, the second host system’s KFMSA node
ID must be set to 6. On a tri-host system, the third host system’s KFMSA
node ID must be set to 5.
If the second and third hosts have multi-host I/O panels (as shown in
Figure 3–14), use the KFMSA select knob to change the KFMSA node ID.
Otherwise, use the diagnostic tool EVCXF described in Section 3.6.3.
If required, set the DSSI node IDs for the ISEs in each SF7x enclosure
using the switches on the SF7x operator control panel. A LED display next
to the switchpack shows the values selected.
NOTE: The new ISE node IDs are not in effect until each device is turned off
then on (power-cycled). After power-cycling, the node IDs have been changed
at the ISE level. To integrate at the system level, run EVCXF under VAX/DS
in standalone mode.
In addition to the physical address requirements, the ISEs and operating
system generate additional parameters to communicate with the host:
system ID, node name, MSCP/TMSCP unit numbers, allocation class, and
force name. See the KFMSA Module Installation and User Manual for
complete description.
FOR MORE INFORMATION
Primary reference:
KFMSA Module Installation and User Manual
Secondary reference:
SF2xx Storage Array Installation Guide
Connecting to a DSSI Subsystem 3–29
3.6 Configure DSSI Subsystem with EVCXF
To configure the ISE devices in software, run VAX/DS,
the autosizer, and the EVCXF diagnostic. This must be
completed before any CI VAXcluster installation.
See
Figure 3–15.
Figure 3–15: Verification of the KFMSA
Power Up System.
Self-Test Runs.
Yes
KFMSA
in system
Boot VAX/DS
1
Run Autosizer
2
No
Go to
Section
8.9
3
Run EVCXF
msb-0684B-91
3–30 VAX 6000 Series Installation Guide
!
"
#
After self-test ends, configure the DSSI subsystem with software that
runs under VAX/DS.
When you run VAX/DS programs, run the autosizer program or an
attach sequence for the KFMSA adapters.
After the autosizer has completed running, run EVCXF to configure the
DSSI devices.
FOR MORE INFORMATION
Primary reference:
KFMSA Module Installation and User Manual
Secondary reference:
SF2xx Storage Array Installation Guide
Connecting to a DSSI Subsystem 3–31
3.6.1 Example: Boot the VAX Diagnostic Supervisor
Example 3–1 shows an example of running VAX/DS from the
in-cabinet console load device. You must run VAX/DS in
standalone mode to run EVCXF.
Example 3–1: Running Standalone VAX/DS
>>> BOOT/R5:10 CSA1
!
[self-test results print]
Loading system software.
"
#
!
!
!
!
Enter BOOT command designating the
CSA1 drive as the input device; /R5:10
is the boot flag indicating the VAX/DS
program.
VAX DIAGNOSTIC SOFTWARE
PROPERTY OF
DIGITAL EQUIPMENT CORPORATION
***CONFIDENTIAL AND PROPRIETARY***
Use Authorized Only Pursuant to a Valid Right-to-Use License
Copyright, Digital Equipment Corporation, 1991. All Rights Reserved.
DIAGNOSTIC SUPERVISOR.
DS>
$
ZZ-EXSAA-X14.7-001
31-DEC-1991 00:00:14
! System boots VAX/DS
! and displays banner.
3–32 VAX 6000 Series Installation Guide
Run VAX/DS in standalone mode. EVCXF is run only in standalone mode
because it is a level 3 diagnostic.
In this example the diagnostic tape containing the VAX/DS program was
loaded into the console tape drive. To run VAX/DS from an InfoServer, refer
to Sections 8.6.1 and 8.6.2 for instructions on loading and booting from a
CD.
!
At the console prompt, boot VAX/DS from tape as shown in Example 3–1
using the command:
BOOT /R5:10
"
#
$
CSA1
where CSA1 is the name for the console tape drive, and /R5:10 is the
boot flag designating the VAX/DS program.
The system executes self-test and reports results.
Next, VAX/DS is loaded and the program banner appears.
The VAX/DS prompt indicates that the Diagnostic Supervisor has been
successfully loaded.
Table 3–7: VAX/DS File Names
Model Number
File Name
Model 600
EXSAA
Model 500
EMSAA
Model 400
ERSAA
Model 300
ELSAA
Connecting to a DSSI Subsystem 3–33
3.6.2 Example: Run the Autosizer
Example 3–2 shows running the autosizer program EVSBA.
Certain conditions cause the generation of an unexpected
trap or interrupt.
The method shown avoids these
conditions.
Example 3–2: Running the Autosizer
DS> RUN EVSBA
!
*********************************************************************
Copyright Digital Equipment Corporation
1981, 1989, 1990, 1991.
All Rights Reserved.
*********************************************************************
.. Program: EVSBA - AUTOSIZER level 3, revision 7.65, 3 tests
at 00:00:31.51.
.. End of run, 0 errors detected, pass count is 1,
time is 31-DEC-1991 00:03:03.76
"
! Program attaches all devices.
! Program lists all attached devices.
DS> SEL ALL
DS> SHOW SELECT
_PAA0
#
KFMSA HUB 61880000
XMI Node Number (1 to E)=00000001(X) PORT
_DIA1
RF72
_PAA0
61880000 DSSI NODE (0
_DIA2
RF72
_PAA0
61880000 DSSI NODE (0
_DIA3
RF72
_PAA0
61880000 DSSI NODE (0
_DIA4
RF72
_PAA0
61880000 DSSI NODE (0
_PAB0 KFMSA HUB 61880000
XMI Node Number (1 to E)=00000001(X) PORT
_DIA1
RF72
_PAB0
61880000 DSSI NODE (0
_DIA2
RF72
_PAB0
61880000 DSSI NODE (0
_DIA3
RF72
_PAB0
61880000 DSSI NODE (0
_DIA4
RF72
_PAB0
61880000 DSSI NODE (0
#
_PAC0
$
$
Number (1,2)=00000001(X)
- 7)=1.
- 7)=2.
- 7)=3.
- 7)=4.
Number (1,2)=00000002(X)
- 7)=1.
- 7)=2.
- 7)=3.
- 7)=4.
KFMSA HUB 61900000
XMI Node Number (1 to E)=00000002(X) PORT Number (1,2)=00000001(X)
_PAD0 KFMSA HUB 61900000
XMI Node Number (1 to E)=00000002(X) PORT Number (1,2)=00000002(X)
3–34 VAX 6000 Series Installation Guide
The autosizer program EVSBA takes several minutes to execute, but will
save you time as you proceed with other tests.
!
"
#
$
Run EVSBA to identify the hardware on your system and build a
database for VAX/DS. The autosizer eliminates the need for you to type
in the name and characteristics of the hardware you intend to test
under VAX/DS with level 3 diagnostic programs. A run of EVSBA can
require 2 to 3 minutes. See Example 3–2.
Select all devices.
You can issue a SHOW SELECT command. Here, a partial listing shows
what information is reported on KFMSA devices. This system has two
KFMSAs attached, with RF devices configured on the first KFMSA.
In this example, the second KFMSA is empty. You would encounter
this example when a KFMSA has not been cabled to ISEs or problems
exist on the bus. In this example the cables were loose on these buses;
the operator reseated the cables and ran the software again. All ISEs
were shown.
Connecting to a DSSI Subsystem 3–35
3.6.3 Example: Run EVCXF
Example 3–3 shows the EVCXF program configuring the
storage devices connected to the KFMSA. The program
prompts you for information needed to complete the
installation. Run EVCXF after booting VAX/DS and the
autosizer.
Example 3–3: Running EVCXF
DS> LOAD EVCXF
!
[banner prints]
DS> ST/SEC=TEST2
"
.. Program: ZZ-EVCXF DSSI Configuration & DUP Diagnostic,
revision 1.2, 4 tests, at 00:05:04.12.
Testing: _PAA0 _PAB0 _PAC0 _PAD0
#
Initiating KFMSA self-test, wait 10 seconds... #
CONFIG> SIZE
$
DSSI sizing underway, please wait...
Initiating KFMSA self-test, wait 10 seconds...
DSSI ID
0
1
2
3
4
5
6
7
XMI node 04
Bus 1/UUN
*****
RF72
1
RF72
2
RF72
3
RF72
4
*****
*****
KFMSA
XMI node 04
Bus 2/UUN
*****
RF72
5
RF72
6
RF72
7
RF72
8
*****
*****
KFMSA
XMI node 05
Bus 1/UUN
TF857
*****
*****
*****
RF72
9
*****
*****
KFMSA
3–36 VAX 6000 Series Installation Guide
&
XMI node 05
Bus 2/UUN
*****
*****
*****
*****
*****
*****
*****
KFMSA
%
The VAX 6000 diagnostic media includes the EVCXF test. The customer
version of the program EVCXF is EXCXE, which has reduced tests. When
installing, use the EVCXF which has the full suite of tests.
This example shows eight RF disks in SF7x enclosures in an SF2xx
cabinet, configured to two KFMSAs using only three of the four DSSI buses
available.
!
"
#
$
%
&
Load EVCXF; the program’s banner is displayed.
Enter the START/SECTION=TEST2 command. If you enter HELP at
the DS> prompt, all available commands will be displayed for you.
The system initiates self-test on each KFMSA. In this example, two
KFMSAs are installed. The program prints this message as each
KFMSA begins its self-test.
Enter the SIZE command.
When sizing is complete, the program prints out this listing of all
attached devices. Check the DSSI node IDs against those you set and
recorded on your configuration sheets.
If a device is missing from the printout, or does not appear where you
expect it, check the cabling and the node ID setting, and then reissue
the SIZE command.
In this example, the first time the diagnostic was run the operator
expected to see a TF857 in this spot. None appeared. A cable connection
was tightened, the command reissued, and the TF appeared here in the
display.
FOR MORE INFORMATION
Primary reference:
KFMSA Module Installation and User Manual
Secondary reference:
SF2xx Storage Array Installation Guide
Connecting to a DSSI Subsystem 3–37
3.6.4 Example: Changing the KFMSA Node ID at the I/O
Panel
KFMSA node IDs are factory set to 7. In dual- and tri-host
systems, you must change the second host system’s ID to 6,
and the third host system’s KFMSA ID to 5. If you have a
multi-host I/O panel, change the IDs using the KFMSA node
select knob (see Figure 3–16). Otherwise, use EVCXF (see
Example 3–4).
Figure 3–16: Changing the KFMSA Node ID at the I/O Panel
2
1
0
3 4 5
6
7
Off
KFMSA NODE ID
SELECT KNOB
2
0
2
3 4 5
6
7
Off
2
1
0
2
1
3 4 5
6
7
Off
1
msb-0757A-91
3–38 VAX 6000 Series Installation Guide
Figure 3–16 shows the multi-host I/O panel. At the I/O bulkhead of the
host system whose KFMSA node ID you need to change, turn the KFMSA
node ID select knob to the new ID number. The I/O panel’s ID input has
priority over any software changes. If you have access to a multi-host I/O
panel, change the second host’s KFMSA node ID to 6 and the third host ID
to 5. Usually, both buses for each KFMSA are set to the same node ID.
If your system does not have a multi-host I/O panel, change the node ID
using EVCXF (see Section 3.6.5).
FOR MORE INFORMATION
Primary reference:
KFMSA Module Installation and User Manual
Secondary reference:
SF2xx Storage Array Installation Guide
Connecting to a DSSI Subsystem 3–39
3.6.5 Example: Changing the KFMSA Node ID with EVCXF
In dual- and tri-host systems, you must change the second
host system’s ID to 6, and the third host system’s KFMSA ID
to 5. If you have a multi-host I/O panel, change the IDs using
the KFMSA node select knob (see Figure 3–16). Otherwise,
use EVCXF (see Example 3–4).
Example 3–4: Changing KFMSA Node ID with EVCXF
[Continuing from Example 3-3, EVCXF is still running.]
DS>
! VAX/DS prompt returns
!
DS> SET NODEID XMI NODE 5,
DS> SET NODEID XMI NODE 5,
"
DSSI BUS 2,$
DSSI BUS 1,
3–40 VAX 6000 Series Installation Guide
#
NEW DSSI NODE ID 6
NEW DSSI NODE ID 6
Run the VAX Diagnostic Supervisor, and then load and run EVCXF.
Enter the START/SECTION=TEST2 and the SIZE commands, as shown
in Example 3–3. Then proceed to change the node ID with the information
as shown in Example 3–4 with the command string
DS> SET NODEID XMI NODE 5,
DSSI BUS 1,
NEW DSSI NODE ID 6
where:
!
"
#
$
5 is the XMI node and slot where the KFMSA resides that is going to
have its node ID changed.
1 is the bus on the KFMSA whose node ID is going to be changed
6 is the new value being entered for the node ID of bus 1 on the KFMSA
residing in XMI slot 5.
This string repeats the node ID change to 6 for bus 2 on the same
KFMSA.
FOR MORE INFORMATION
Primary reference:
KFMSA Module Installation and User Manual
Secondary reference:
SF2xx Storage Array Installation Guide
Connecting to a DSSI Subsystem 3–41
Chapter 4
Connecting to a CI VAXcluster
VAX 6000 series systems interface with various devices and systems
through XMI bus adapters. For information on connecting to TU, TK, and
TA tapes, or RA disks, see Chapter 5. If your system connects to a DSSI
subsystem, this installation must be done before the CI connections (see
Chapter 3).
Sections in this chapter include:
•
Adapter Overview
•
CIXCD Installation Configuration Rules
•
Setting CIXCD Parameters
Setting the VAXcluster Node Address (Mandatory)
Verify Quiet Slot DELTA Time = 10 (Mandatory)
Setting Boot Time (Optional)
Setting Extend Header, ACK Timeout, and
Disable Arbitration (Optional)
Setting Cluster Size (Optional)
•
Setting CIBCA Parameters
Setting the VAXcluster Node Address (Mandatory)
CIBCA Jumper Locations and Settings
•
Cabling the System to a Star Coupler (SC008)
Connecting to a CI VAXcluster 4–1
4.1 CI Adapter Overview
The system can connect to a cluster using one of two
adapters: the CIXCD connects through the XMI bus, and the
CIBCA connects to a cluster through the VAXBI bus. The
CIXCD and the CIBCA require some XMI backplane jumper
selections to configure to a cluster.
Figure 4–1: Adapters
XMI
CIXCD
DWMBB
VAXBI
CIBCA
STAR
COUPLER
STAR
COUPLER
msb-0321B-91
4–2 VAX 6000 Series Installation Guide
Figure 4–1 shows the options for connecting to a CI. You can use a CIXCD
adapter from the XMI bus or a CIBCA adapter off the optional VAXBI bus.
When you connect to a CI using either adapter, you must set the VAXcluster
node address for the system you are connecting. In addition, when you
connect using a CIXCD, you must set the Quiet Slot DELTA Time to 10 on
all systems (see Section 4.3.2).
Table 4–1 lists the adapters used in connecting to a CI.
Table 4–1: Adapters for CI Connection
Adapter
CIXCD
CIBCA
1
Standard or
Optional
Function
O
XMI-to-CI interface
O
VAXBI-to-CI interface
1 The
CIBCA resides on the VAXBI bus (see Figure 4–1). The DWMBB adapter connects the VAXBI and XMI buses and is a two-module set. The DWMBB/A is in the XMI card
cage; the DWMBB/B is in the VAXBI card cage.
Connecting to a CI VAXcluster 4–3
4.2 CIXCD Installation Configuration Rules
If you are installing a CIXCD adapter, follow these
configuration rules for the HSC, adapters on other CI nodes,
and for the CIXCD itself. The key parameter is Quiet Slot
DELTA Time; you must use jumpers or switches to set this
parameter to 10, rather than accepting the default value of
7.
Figure 4–2: CIXCD Jumper to Set Quiet Slot DELTA Time to 10
1 2
D
E
SLOT
1
2
3
XMI
4
5
6
31
01
32
02
33
03
34
04
35
05
36
06
37
07
38
08
39
09
40
10
41
11
42
12
43
13
W28
44
14
W29
45
15
W30
Change
QUIET SLOT
DELTA Time
SECTION E
msb-0594A-91
4–4 VAX 6000 Series Installation Guide
To install a system with a CIXCD adapter into an existing cluster, there are
mandatory steps. The first four steps apply to the VAXcluster configuration.
1. Ensure that the LINK module on the HSC has a Quiet Slot
DELTA Time of 10.
If it does not, you must change it to 10 using a switch, wire, or board
replacement and switch, depending on the model of the HSC. Check the
HSC Installation Guide for details.
2. Set the Quiet Slot DELTA Time to 10 on all nodes installed on
the cluster.
Every other CI node must have Quiet Slot DELTA Time set to 10. For
systems connected with CIBCA adapters, you install a jumper on the
VAXBI backplane similar to the CIXCD’s XMI backplane jumper. See
the Section 4.3 or refer to the CIBCA User Guide.
3. Check that the VMS version running on all nodes is compatible
with the new version of VMS being installed.
Check the VMS versions against the Software Product Description
(SPD), or the required VMS version for your system.
4. Check the HSC microcode and LINK module against required
versions in the Cluster Revision Matrix.
Update to the required version level as needed.
5. Set the Quiet Slot DELTA Time on the CIXCD to 10. Install a
jumper between pins E15 and E45 on the XMI backplane’s CIXCD
segment. The Quiet Slot DELTA time must be set to 10 on all systems
in the cluster. See Section 4.3.2 and Figure 4–5.
CAUTION: Failure to follow these configuration rules may result in
unreliable operation.
Connecting to a CI VAXcluster 4–5
4.3 Setting CIXCD Parameters
To set parameters for the CIXCD (XMI-to-CI VAXcluster)
adapter to other than default values, you must install
jumpers on the backplane. Note that the jumpers are only
placed in segments D2 and E2.
If you are setting parameters for the CIBCA adapter, go to
Section 4.4.
Figure 4–3: XMI Backplane Segments D and E
1 2
D
REAR
E
SLOT
1
2
3
4
5
6
msb-0030C-91
4–6 VAX 6000 Series Installation Guide
Refer to Figure 4–4 to determine which jumper corresponds to which
backplane pin. The XMI backplane pin numbering is exactly the same as
the VAXBI backplane pin numbering. There are 29 possible pins that may
need jumpers on the backplane, in sections D and E. The corresponding
jumpers are denoted W1 through W30, with W9 being reserved.
The module functions that must be modified by jumper placement are the
following:
Set CI port address (mandatory)
Set Quiet Slot DELTA Time to 10 (mandatory)
In addition, you can modify the following characteristics:
Boot time
Disable arbitration
Extend header
Cluster size
Extend ACK timeout
The general procedure for installing jumpers is as follows:
1. Open the rear cabinet door.
2. Find the XMI backplane slot corresponding to the CIXCD module. The
internal cables are connected to the pins on the leftmost section of the
module as seen from the rear. The jumpers are installed on the pins of
the rightmost segment of the module.
3. Insert jumpers between backplane pins to set the desired module
parameters. Specific pins for desired parameters are described in
sections that follow.
4. Close the cabinet door.
You cannot use the default configuration. You must change the Quiet Slot
DELTA Time to 10. The default configuration for a system with no jumpers
installed would be:
CI Node Address = 0
Quiet Slot DELTA Time is at 7,
and must be set to 10 on all systems in the cluster
Boot Time = 1500 seconds
Normal CI Arbitration
Normal Header systems in the cluster
Cluster Size = 16
Short ACK Timeout
Connecting to a CI VAXcluster 4–7
4.3.1 Setting the VAXcluster Node Address (Mandatory)
The CI port address is obtained from the CIXCD port
adapter module’s backplane slot, with both the CI port
address and its complement configured exactly the same. To
configure the jumpers for the port address, see Table 4–2 and
Table 4–3.
Figure 4–4: Jumper Locations for CI Port Address
1 2
31
01
W1
32
02
W2
33
03
W3
34
04
W4
35
05
W5
36
06
W6
37
07
W7
31
01
W16
38
08
W8
32
02
W17
D
E
SLOT
1
2
3
4
XMI
5
6
Complement
CI Node
Address
39
09
33
03
W18
40
10
34
04
W19
41
11
35
05
W20
42
12
36
06
W21
43
13
37
07
W22
44
14
38
08
W23
45
15
39
09
40
10
41
11
42
12
43
13
44
14
45
15
SECTION D
SECTION E
4–8 VAX 6000 Series Installation Guide
True
CI Node
Address
msb-0593-90
Table 4–2: CI Port True Address
CI Node
W16
Addr(10) E1/31
W17
E2/32
W18
E3/33
W19
E4/34
W20
E5/35
W21
E6/36
W22
E7/37
W23
E8/38
0
OUT
OUT
OUT
OUT
OUT
OUT
OUT
OUT
1
OUT
OUT
OUT
OUT
OUT
OUT
OUT
IN
2
OUT
OUT
OUT
OUT
OUT
OUT
IN
OUT
IN
IN
IN
.
.
.
.
.
.
223
IN
IN
OUT
IN
IN
Table 4–3: CI Port Complement Address
CI Node
W1
Addr(10) D1/31
W2
D2/32
W3
D3/33
W4
D4/34
W5
D5/35
W6
D6/36
W7
D7/37
W8
E8/38
0
OUT
OUT
OUT
OUT
OUT
OUT
OUT
OUT
1
OUT
OUT
OUT
OUT
OUT
OUT
OUT
IN
2
OUT
OUT
OUT
OUT
OUT
OUT
IN
OUT
IN
IN
IN
.
.
.
.
.
.
223
IN
IN
OUT
IN
IN
NOTE: CI node addresses 224 through 255 are reserved for Digital.
Connecting to a CI VAXcluster 4–9
4.3.2 Verify Quiet Slot DELTA Time = 10 (Mandatory)
The Quiet Slot DELTA Time must be set to 10. Check the
backplane at segment E. Jumper these pins if they are not
already jumpered. These bits force the LINK module to
increase the basic Quiet Slot DELTA Time. See Table 4–4.
Figure 4–5: Set Quiet Slot DELTA Time Jumpers
1 2
D
E
SLOT
1
2
3
XMI
4
5
6
31
01
32
02
33
03
34
04
35
05
36
06
37
07
38
08
39
09
40
10
41
11
42
12
43
13
W28
44
14
W29
45
15
W30
Change
QUIET SLOT
DELTA Time
SECTION E
msb-0594A-91
4–10 VAX 6000 Series Installation Guide
NOTE: The Quiet Slot DELTA Time must be set to 10 on all systems in a
cluster when any one system uses a CIXCD adapter. This is required.
For new systems just being installed, manufacturing should have jumpered
pins E45 and E15. Check the backplane at segment E. Jumper these pins if
they are not already jumpered.
Table 4–4: Quiet Slot Time Backplane Jumpers
Quiet
Slot Count
W28
E13/43
W29
E14/44
W30
E15/45
7
OUT
OUT
OUT
10
OUT
OUT
IN
Reserved
OUT
IN
OUT
Reserved
OUT
IN
IN
Reserved
IN
OUT
OUT
Reserved
IN
OUT
IN
Reserved
IN
IN
OUT
Programmable
IN
IN
IN
Connecting to a CI VAXcluster 4–11
4.3.3 Setting Boot Time (Optional)
Boot time is the length of time the port waits after power-up
to exit the UNINIT state. See Table 4–5. The default setting
has all jumpers set to out, with 1500 seconds as the boot
time.
Figure 4–6: Jumper Locations for Boot Time
1 2
D
E
SLOT
1
2
3
XMI
4
5
31
01
32
02
33
03
34
04
35
05
6
36
06
37
07
38
08
39
09
W24
40
10
W25
41
11
W26
W27
Boot Time
42
12
43
13
44
14
45
15
SECTION E
msb-0595-91
4–12 VAX 6000 Series Installation Guide
The default boot time is 1500 seconds.
Table 4–5: Boot Time Backplane Jumpers
Time
(seconds)
W24
E9/39
W25
E10/40
W26
E11/41
W27
E12/42
1500
OUT
OUT
OUT
OUT
1400
OUT
OUT
OUT
IN
1300
OUT
OUT
IN
OUT
1200
OUT
OUT
IN
IN
1100
OUT
IN
OUT
OUT
1000
OUT
IN
OUT
IN
0900
OUT
IN
IN
OUT
0800
OUT
IN
IN
IN
0700
IN
OUT
OUT
OUT
0600
IN
OUT
OUT
IN
0500
IN
OUT
IN
OUT
0400
IN
OUT
IN
IN
0300
IN
IN
OUT
OUT
0200
IN
IN
OUT
IN
0100
IN
IN
IN
OUT
0000
IN
IN
IN
IN
Connecting to a CI VAXcluster 4–13
4.3.4 Setting Extend Header, ACK Timeout, and Disable
Arbitration (Optional)
Each of these parameters is set by the absence or presence
of a single jumper. The specific jumpers are detailed in this
module.
Figure 4–7: Jumper Pins for Extend Header, Extend ACK Timeout, and
Disable Arbitration
1 2
31
01
32
02
33
03
34
04
35
05
36
06
D
E
SLOT
1
2
3
4
XMI
5
6
37
07
38
08
39
09
40
10
W10
Disable ARB
41
11
W11
Extend Header
W12
Extend ACK TO
42
12
43
13
44
14
45
15
SECTION D
msb-0594-91
4–14 VAX 6000 Series Installation Guide
Extend Header Selection
Jumper W11 (D11/41) controls the extend header bit, which when
set, allows the LINK module to extend the number of bit-synchronous
characters in the header.
Jumper OUT
=
Normal header (default)
Jumper IN
=
Extended header
Extend ACK Timeout Selection
The extend ACK timeout bit forces the LINK module to increase the timeout
period for an ACK return. The jumper representing this bit is W12 (D12/
42).
Jumper OUT
=
Short timeout (default)
Jumper IN
=
Long timeout
Disable Arbitration Selection
The disable arbitration bit when set, defeats the normal arbitration
sequence and allows the LINK module to transmit after waiting only one
basic Quiet Slot DELTA Time. The jumper that controls this bit is W10
(D10/40).
Jumper OUT
=
Allow normal CI arbitration (default)
Jumper IN
=
Disable normal CI arbitration
Connecting to a CI VAXcluster 4–15
4.3.5 Setting Cluster Size (Optional)
The cluster size bits cause the arbitration logic to arbitrate
for more than 16 nodes (which is the default). See Table 4–6.
Figure 4–8: Cluster Size Jumpers
1 2
D
E
SLOT
1
2
3
4
5
6
31
01
32
02
33
03
34
04
35
05
XMI
36
06
37
07
38
08
39
09
40
10
41
11
42
12
43
13
W13
44
14
W14
45
15
W15
Cluster
Size
SECTION D
msb-0594B-91
4–16 VAX 6000 Series Installation Guide
The default cluster size is 16.
Table 4–6: Cluster Size Backplane Jumpers
Node Count
(decimal)
W13
D13/43
W14
D14/44
W15
D15/45
16
OUT
OUT
OUT
32
OUT
OUT
IN
64
OUT
IN
OUT
128
OUT
IN
IN
224
IN
OUT
OUT
Reserved
IN
OUT
IN
Reserved
IN
IN
OUT
Reserved
IN
IN
IN
Connecting to a CI VAXcluster 4–17
4.4 Setting CIBCA Parameters
To set the parameters of the CIBCA to other than default
values, you must install jumpers on the VAXBI backplane.
Refer to Figure 4–11 to determine which jumpers correspond
to which backplane pins.
Figure 4–9: VAXBI Backplane Segments D and E
C
1 2
D
REAR
E
SLOT
1
2
3
4
5
6
msb-0030B-90
4–18 VAX 6000 Series Installation Guide
If you will use an XMI adapter for the VAXcluster, go to Section 4.3.
You must set the VAXcluster node address when connecting to a CI. In
addition, you can modify the following module functions:
Boot time
Disable arbitration
Extend header
Alter DELTA time
Cluster size
Extend ACK timeout
The general procedure for installing jumpers is as follows:
1. Open the rear cabinet door.
2. Find the VAXBI backplane slot corresponding to the CIBCA controller
module (T1045). The two CIBCA modules occupy adjacent slots. The
controller module is the leftmost module as seen from the rear.
3. Insert jumpers between backplane pins to set the desired parameters.
4. Close the cabinet door.
A system with no jumpers installed would be configured in the following
way:
CI Node Address = 0
Boot Time = 1500 seconds
Normal CI Arbitration
Normal Header
Quiet Slot DELTA Time = 7
Cluster Size = 16
Short ACK Timeout
CAUTION: Check cluster parameters. If any system in the cluster has Quiet
Slot DELTA Time of 10 (such as a system with a CIXCD adapter), you must
change this CIBCA’s Quiet Slot DELTA Time to 10. Failure to do so may
result in unreliable operation.
Connecting to a CI VAXcluster 4–19
4.4.1 Setting the VAXcluster Node Address (Mandatory)
Install jumpers on the VAXBI backplane to set the system’s
VAXcluster node address. The CIBCA adapter’s backplane
slot with the address (NODE A) and its complement (CNODE
A) determine the address. See Figure 4–10.
Figure 4–10: Address and Address Complement Pins
1 2
C
D
E
SLOT
1
2
3
4
5
6
46
16
47
17
48
18
33
03
49
19
34
04
50
20
35
05
CNODE A 2
51
21
36
06
CNODE A 2
6
CNODE A 2
5
52
53
54
22
23
24
31
01
32
02
37
38
39
07
08
09
7
CNODE A 2
CNODE A 2
55
25
40
10
CNODE A 2
56
26
41
11
CNODE A 2
57
27
42
12
CNODE A 2
58
28
43
13
CLUSSIZE 1
59
29
44
14
CLUSSIZE 0
60
30
45
15
46
16
31
01
NODE A 2
7
4
47
17
32
02
NODE A 2
6
3
48
18
33
03
NODE A 2
5
2
49
19
34
04
NODE A 2
4
50
20
35
05
NODE A 2
51
21
36
06
NODE A 2 2
52
22
37
07
NODE A 2
53
23
38
08
NODE A 2
54
24
39
09
1
0
55
25
40
10
56
26
41
11
57
27
42
12
58
28
43
13
59
29
44
14
60
30
45
15
3
1
0
SECTION D
SECTION E
4–20 VAX 6000 Series Installation Guide
msb-0031A-90
1. Open the rear cabinet door.
2. Find the VAXBI backplane slot corresponding to the CIBCA controller
module (T1045). The two CIBCA modules occupy adjacent slots;
the controller module is the leftmost module as seen from the rear.
(Typically the controller is in the VAXBI cage on the left, fourth slot
from the left as seen from the rear.)
3. Insert jumpers between backplane pins to set the cluster node address,
as follows. You set the address twice—once on VAXBI segment D and
once on segment E (see Figure 4–9).
4. The address is a binary number, for which you insert a jumper to
represent each bit that is "one" (see Figure 4–10).
5. Table 4–7 shows jumper settings for the first 24 node addresses. For
example, assume you are installing this VAX 6000 system as VAXcluster
node 9 (binary 1001). You would insert jumpers on segment D between
pins 9–39 and 12–42. You would also insert jumpers on segment E
between pins 5–35 and 8–38.
D5–35
D6–36
D7–37
D8–38
D9–39
D10–40
D11–41
D12–42
E1–31
E2–32
E3–33
E4–34
E5–35
E6–36
E7–37
E8–38
OUT
OUT
OUT
OUT
IN
OUT
OUT
IN
6. If there are more than 16 nodes in the VAXcluster, also insert a jumper
in D30–D60. You may also need to install additional jumpers for
VAXcluster parameters. See the CIBCA User Guide.
7. Close the cabinet door.
Connecting to a CI VAXcluster 4–21
4.4.2 CIBCA Jumper Locations and Settings
When joining the system to a VAXcluster, see Figure 4–11 and
Table 4–7 for CIBCA jumper locations and settings.
Figure 4–11: CIBCA Jumpers on VAXBI Backplane
1 2
C
D
46
16
31
01
47
17
32
02
03
48
18
33
E
49
19
34
04
SLOT
50
20
35
05
CNODE A 2
51
21
36
06
CNODE A 2
6
1
2
3
4
5
6
7
52
22
37
07
CNODE A 2
5
53
23
38
08
CNODE A 2
4
54
24
39
09
CNODE A 2
55
25
40
10
CNODE A 2
56
26
41
11
CNODE A 2
57
27
42
12
CNODE A 2
58
28
43
13
CLUSSIZE 1
59
29
44
14
CLUSSIZE 0
60
30
45
15
SECTION D
46
16
31
01
47
17
32
02
NODE A 2
6
48
18
33
03
NODE A 2
5
4
3
2
NODE A 2
7
49
19
34
04
NODE A 2
50
20
35
05
NODE A 2
51
21
36
06
NODE A 2 2
52
22
37
07
NODE A 2
53
23
38
08
NODE A 2
54
24
39
09
55
25
40
10
56
26
41
11
57
27
42
12
1
3
0
58
28
43
13
59
29
44
14
60
30
45
15
1
0
SECTION E
msb-0031-91
4–22 VAX 6000 Series Installation Guide
Table 4–7: CIBCA Address Jumpers on VAXBI Backplane
D5–35
CI Node
Address E1–31
D6–36
D7–37
D8–38
D9–39
D10–40 D11–41
E2–32
E3–E33 E4–34
E5–35
E6–36
E7–37
D12–42
E8–38
0
OUT
OUT
OUT
OUT
OUT
OUT
OUT
OUT
1
OUT
OUT
OUT
OUT
OUT
OUT
OUT
IN
2
OUT
OUT
OUT
OUT
OUT
OUT
IN
OUT
3
OUT
OUT
OUT
OUT
OUT
OUT
IN
IN
4
OUT
OUT
OUT
OUT
OUT
IN
OUT
OUT
5
OUT
OUT
OUT
OUT
OUT
IN
OUT
IN
6
OUT
OUT
OUT
OUT
OUT
IN
IN
OUT
7
OUT
OUT
OUT
OUT
OUT
IN
IN
IN
8
OUT
OUT
OUT
OUT
IN
OUT
OUT
OUT
9
OUT
OUT
OUT
OUT
IN
OUT
OUT
IN
10
OUT
OUT
OUT
OUT
IN
OUT
IN
OUT
11
OUT
OUT
OUT
OUT
IN
OUT
IN
IN
12
OUT
OUT
OUT
OUT
IN
IN
OUT
OUT
13
OUT
OUT
OUT
OUT
IN
IN
OUT
IN
14
OUT
OUT
OUT
OUT
IN
IN
IN
OUT
15
OUT
OUT
OUT
OUT
IN
IN
IN
IN
16
OUT
OUT
OUT
IN
OUT
OUT
OUT
OUT
17
OUT
OUT
OUT
IN
OUT
OUT
OUT
IN
18
OUT
OUT
OUT
IN
OUT
OUT
IN
OUT
19
OUT
OUT
OUT
IN
OUT
OUT
IN
IN
20
OUT
OUT
OUT
IN
OUT
IN
OUT
OUT
21
OUT
OUT
OUT
IN
OUT
IN
OUT
IN
22
OUT
OUT
OUT
IN
OUT
IN
IN
OUT
23
OUT
OUT
OUT
IN
OUT
IN
IN
IN
Connecting to a CI VAXcluster 4–23
4.5 Cabling the System to a Star Coupler (SC008)
Attach two pairs of BNCIA cables to the I/O panel allocated
for the VAXcluster connection.
Figure 4–12 shows the
transmit cable connectors and the receive cable connectors
on the VAXcluster port.
Figure 4–12: I/O Panel—VAXcluster Port
TRANSMIT
CONNECTORS
REAR
A
B
A
B
RECEIVE
CONNECTORS
msb-0032A-91
4–24 VAX 6000 Series Installation Guide
This procedure applies to all VAX 6000 systems. It does not change if the
adapter is in the XMI card cage or the VAXBI card cage.
At the rear of the system cabinet:
1. Open the door.
2. Attach the cables to the VAXcluster port by hand. Screw the TNC type
connectors into the receptacles and label the cables.
3. Route the cables to the SC008. See the SC008 Star Coupler User’s
Guide for cable installation instructions.
BNCIA cables can be ordered in three lengths:
BNCIA-10 (32 feet)
BNCIA-20 (65 feet)
BNCIA-45 (145 feet)
Connecting to a CI VAXcluster 4–25
4–26 VAX 6000 Series Installation Guide
Chapter 5
Connecting to Tapes and Disks
VAX 6000 systems connect to tape and disk drives using several adapters.
This chapter describes connecting to tape or disk using the TBK70, KDB50,
KDM70, and KLESI-B adapters. For information on connecting a DSSI
subsystem using a KFMSA adapter, see Chapter 3, and for connecting to a
CI VAXcluster, see Chapter 4.
Sections in this chapter include:
•
Architecture
•
Cabling TU Tape Drives
•
Cabling RA Disk or TA Tape Drives
Connecting to Tapes and Disks
5–1
5.1 Architecture
The system can connect to tapes and disks through the
XMI bus using the KFMSA and KDM70, and through the
VAXBI bus using the TBK70, KLESI-B, or KDB50 adapters.
For information on connecting with a KFMSA adapter, see
Chapter 3. Figure 5–1 shows the architecture.
Figure 5–1: Architecture
Bus XMI
KFMSA
KDM70
DWMBB
Bus VAXBI
Cintas TF &
Discos RF
TBK70
KLESI-B
Una Cinta
TK
Una Cinta
TU
KDB50
Cintas TA &
Discos RA
Discos RA
msb-0321K-91
5–2 VAX 6000 Series Installation Guide
Systems can include tape or disk drives housed in a sTorage cabinet.
Several adapters offer connections to a variety of disks and tapes. Table 5–1
lists adapters and the sections of this book that give their installation
instructions. See also Figure 5–1.
Table 5–1: Adapters Connecting Tapes and Disks
Adapter
Bus
Installation
Instructions
KDM70
XMI
Section 5.3
TA tape and RA/ESE20 disk drives; a maximum of eight devices with a limit of two
tape drives and two ESE20s
KDB50
VAXBI
Section 5.3
Up to four RA disk drives
KFMSA
XMI
Chapter 3
RF disks or SF7x enclosures or TK tapes in
SF2xx or system cabinet
KLESI-B
VAXBI
Section 5.2
One TU tape drive
TBK70
VAXBI
—
One TK tape drive in the system cabinet
Connects to
If your system has in-cabinet storage, no additional cabling is needed.
Connecting to Tapes and Disks
5–3
5.2 Cabling TU Tape Drives
You can cable a TU tape drive to a VAX 6000 system only
if the system has a VAXBI card cage and KLESI-B adapter.
Figure 5–2 shows the cable connections from the TU tape
drive cabinet to the system I/O panel.
Figure 5–2: Tape Subsystem—Interface Cabling
SIGNAL
CABLE
POWER CABLE
msb-0450-91
5–4 VAX 6000 Series Installation Guide
First unpack the TU tape drive cabinet. Then position the TU cabinet next
to the system cabinet (the tape cabinet can be positioned on either side of
the system cabinet, depending on the customer’s configuration). Install the
signal cables and power cable.
At the rear of the system cabinet:
1. Open the door.
2. Insert the tape unit signal cable into the designated I/O panel and
secure it with two screws.
3. Plug the tape unit power cord into the appropriate receptacle.
4. Refer to the TU81/TA81 and TU/81 PLUS Subsystem User’s Guide for
operating instructions.
The KLESI-B adapter runs a self-test during power-up. A yellow LED on
the module lights to indicate that the module passed self-test. The system
self-test display reports the status of all controllers (see Section 7.2 and
Section 7.3). For troubleshooting information, refer to the KLESI-B Module
User and Installation Guide.
Connecting to Tapes and Disks
5–5
5.3 Cabling RA Disk or TA Tape Drives
The KDM70 and KDB50 adapters support RA disk drives.
Additionally, the KDM70 can support up to two TA tape
drives and up to two ESE20 solid-state disk drives.
Figure 5–3 shows the cable connections from the disk
cabinet to the system I/O panel.
Figure 5–3: Disk Subsystem—Interface Cabling
SYSTEM
CABINET
STORAGE
ARRAY CABINET
DISK
CONTROLLER
PORT
msb-0451A-91
5–6 VAX 6000 Series Installation Guide
The KDM70 and KDB50 adapters support RA disk drives. The KDM70
can support eight devices, with a maximum of two of these being TA tape
drives. The KDB50 supports up to four RA disks. Cabling is the same for
both adapters.
At the rear of the main cabinet:
1. Open the door.
2. For each RA or ESE20 disk, install one external SDI cable to one of the
disk controller ports (see Figure 5–3). SDI cables are packaged in the
bottom of the disk cabinet. Using a small Phillips screwdriver, install
the two screws that secure each cable to the I/O panel.
The adapters run self-test during power-up. A yellow LED on the module
lights to indicate that the module passed self-test. The system self-test
display reports the status of all controllers (see Section 7.2 and Section 7.3).
For troubleshooting information, refer to the KDM70 Controller User Guide
or the KDB50 Disk Controller User’s Guide.
Connecting to Tapes and Disks
5–7
5–8 VAX 6000 Series Installation Guide
Chapter 6
Powering Up the System
This chapter provides the power-up procedure for VAX 6000 systems and a
functional description of the control panel switches and indicators.
Sections include:
•
Prepare the Cabinet
•
Check the Transformer (50 Hz Systems Only)
•
Check the Power
•
Turn on Power and Check Indicators
•
Operating the Control Panel
Upper and Lower Key Switches
Restart Button
Status Indicator Lights
Powering Up the System 6–1
6.1 Prepare the Cabinet
Prepare the cabinet for checking system power by verifying
that no power is applied to the cabinet.
Figure 6–1: Preparing the System Cabinet
0
Standby
Run
Enable
Battery
Secure
Fault
Update
Halt
Auto Start
Restart
ON
OFF
msb-0033-91
6–2 VAX 6000 Series Installation Guide
1. Pull out the main circuit breaker T-handle on the H405-E/F AC power
controller (see Figure 6–1).
2. At the control panel, turn the upper key switch to 0.
3. Turn the lower key switch to Halt.
The main circuit breaker controls power to the system. For normal
operation, the circuit breaker T-handle should be in the On position, which
is pressed in. To trip the main circuit breaker, pull the T-handle out.
A current overload causes the main circuit breaker to automatically move
to the Off position, so that power to the system is turned off.
If an overtemperature condition or an airflow blockage occurs, a contactor
in the AC power controller is opened and the system powers down.
Powering Up the System 6–3
6.2 Check the Transformer (50 Hz Systems Only)
For 50 Hz systems only, check that the transformer’s power
input cable connection matches the customer’s power source
(380V AC or 416V AC). The transformer is located on the floor
of the cabinet, directly below the H7206-B power and logic
unit.
Figure 6–2: 50 Hz Transformer Cable Connections
FRONT
INPUT
OUTPUT
380 V
J1
J1
416 V
INPUT
J2
INPUT
J2
380 V
INPUT
J3
208 V
OUTPUT
J3
OUTPUT
416 V
J1
J2
J3
msb-0035A-90
6–4 VAX 6000 Series Installation Guide
WARNING: To avoid high voltage shock, a round, threaded cap is provided
to cover the unused power input connector. When replacing, rewiring, or
reconnecting the transformer, make sure that the cap is properly installed.
The cap fits onto either the 380V AC (J2) or the 416V AC (J1) power input
connector. Always ensure that power is off and that the power cable is
unplugged before working on the transformer.
1. Open the cabinet front door. Transformer cable connections can be
viewed through the open space between the H7206-B power and logic
unit and the sheet metal panel below the H7206-B.
2. Visually check to see if the power input cable connection matches the
customer’s power source (either 380V AC or 416V AC). See Figure 6–2.
Complete procedure steps 3 through 6 if the cable requires reconnection.
3. Remove the sheet metal panel located below the H7206-B power and
logic unit. Use a flat screwdriver to remove the six screws securing the
sheet metal panel.
4. Remove the threaded cap and unplug the power input cable.
5. Reconnect the cable to the correct power input connector and replace
the threaded cap on the unused connector.
6. Replace the sheet metal panel.
Powering Up the System 6–5
6.3 Check the Power
With a digital multimeter in the proper range and setting,
check power supplied at the installation site.
Figure 6–3: Measuring System Power
2
V
V
1
V
2
PHASE X
NEUTRAL
PHASE Y
V
D
GN
PHASE Z
3
60 Hz (208 V NOMINAL)
1
V
PHASE Z
PHASE Y
NEUTRAL
PHASE X
GND
V
3
50 Hz (380 V OR 416 V NOMINAL)
msb-0034-91
6–6 VAX 6000 Series Installation Guide
1. Check that the receptacle provided is correct (see Section 1.5).
2. Measure voltages between all three phases, each phase to neutral, and
ground to neutral (see Figure 6–3).
Voltage
Measurement
! Phase-to-phase
" Phase-to-neutral
# Ground-to-neutral
208V Nominal
380V Nominal
416V Nominal
180–220V
331–407V
360–443V
104–128V
190–235V
208–256V
1V maximum
1V maximum
1V maximum
3. Plug the power cord into the receptacle.
Powering Up the System 6–7
6.4 Turn on Power and Check Indicators
Power up the system by pushing in the handle on the H405
power controller (see Figure 6–1). Then monitor the LED
indications on the H7206-B power and logic unit.
Figure 6–4:
H7206-B Diagnostic LEDs
9
8
7
6
FRONT
5
4
3
2
1
J1
14V BIAS
LED
6–8 VAX 6000 Series Installation Guide
RED
LEDs
GREEN
LED
RESET
SWITCH
The nine LEDs visible through the slot on the H7206-B panel provide fault
indications for the power regulators and for certain other faults such as
overtemperature.
LEDs 2 through 6 are latching and therefore detect momentary faults.
These LEDs are reset to Off by cycling the key switch to Off then back to
Standby or Enable. These LEDs can also be reset by pressing and releasing
the reset switch located beneath the LED indicators.
If a LED does not turn off after one of these reset procedures, then you
have not corrected the problem that is causing the LED to light.
Table 6–1 lists the meaning of each of the indicators.
Table 6–1:
H7206-B Diagnostic LEDs
LED
Condition
Color
Meaning
1
On
Green
+14V bias is okay
2
On
Red
XMI—H7215 fault
3
On
Red
XMI—H7214 fault
4
On
Red
XMI—H7242 fault
5
On
Red
VAXBI—H7215 fault
6
On
Red
VAXBI—H7214 fault
7
On
Red
H7214 or H7242 installed incorrectly
8
On
Red
XMI-1 module in the XMI-2 card cage
9
On
Red
Fault (airflow, interlock, overtemperature)
Powering Up the System 6–9
6.5 Operating the Control Panel
The control panel, located in the upper left front of the
cabinet, contains upper and lower key switches, status
lights, and a Restart button. The upper and lower switches
are operated by a key.
Figure 6–5: International and English Control Panels
0
FRONT
EEPROM
2
1
0
Standby
Run
Enable
Battery
Secure
Fault
Update
Halt
KEY
Auto Start
Restart
msb-0037A-91
6–10 VAX 6000 Series Installation Guide
Labels for the control panel’s upper and lower key switches can be in
English or in international symbols. Figure 6–6 gives the relationship
between the international symbols and English equivalents.
Figure 6–6: Control Panel Symbols
Location
English
International Symbol
Upper key switch
O
O (Off)
Standby
Enable
Secure
Lower key switch
Status indicators
Update
EEPROM
Halt
2
Auto Start
1
Run
Battery
Fault
Restart button
Restart
(None, blank)
msb-0575A-91
Powering Up the System 6–11
6.5.1 Upper and Lower Key Switches
The control panel’s upper key switch regulates power going
into the system. The lower key switch controls system
operation.
Figure 6–7: Control Panel Key Switches
0
Standby
Run
Enable
Battery
Secure
Fault
Update
Halt
Auto Start
Restart
msb-0038-91
6–12 VAX 6000 Series Installation Guide
Table 6–2: Upper Key Switch
Position
Effect
Light Color
O (Off)
Removes all power, except to the battery backup unit and
optional storage.
No light
Standby
Supplies power to XMI backplane, blowers, and incabinet console load device.
Red
Enable
Supplies power to whole system; console terminal is enabled. Used for console mode or restart, and to start selftest.
Yellow
Secure
(Normal Position)
Prevents entry to console mode; position used while machine is executing programs. Disables Restart button and causes the lower key switch to have the effect of Auto Start, regardless of its setting.
Green
Table 6–3: Lower Key Switch
Position
Effect
Light Color
Update
Enables writing to CPUs and adapters. Halts boot processor in console mode on power-up or when Restart
button is pressed. Used for updating parameters stored
in EEPROMs, (upper key switch must be set to Enable). Prevents an auto restart.
Red
Halt
Prevents an auto restart if a failure or transient power outage occurs.
Yellow
Auto Start
Allows restart or reboot. Uses the default boot specifi(Normal Position) cation to boot the system from power-up. Used for normal operation of the system.
Green
Powering Up the System 6–13
6.5.2 Restart Button
The Restart button begins self-test, reboot, or both
depending on the position of the upper and lower key
switches.
Figure 6–8: Restart Button
0
Enable
Auto Start
Restart
msb-0123-91
6–14 VAX 6000 Series Installation Guide
The upper key switch controls the effect of the Restart button. If the upper
key switch is in the Enable position, the Restart button is operative. If
the upper key switch is not in the Enable position, the Restart button is
ignored.
Table 6–4: Restart Button
Upper Key Switch
Lower Key Switch
Restart Button Function
Enable
Update or Halt
Runs self-test, then halts.
Enable
Auto Start
Runs self-test, and attempts a restart.
If the restart fails, then it reboots the operating system using the
boot specification designated as the default. If the reboot fails, control returns to the console.
Standby
or Secure
Any position
Does not function.
When you press the Restart button, the system runs self-test. For the
Restart button to reboot the operating system, the upper key switch must be
set to Enable and the lower key switch must be set to Auto Start. Figure 6–8
shows the control panel with upper and lower key switches in position for
using the Restart button to reboot. If the system fails self-test, the processor
does not reboot the operating system.
Powering Up the System 6–15
6.5.3 Status Indicator Lights
The control panel has three status indicator lights: Run,
Battery, and Fault. These lights indicate the operating
status of the system.
Figure 6–9: Control Panel Status Indicator Lights
0
Run
Battery
Fault
msb-0124-91
6–16 VAX 6000 Series Installation Guide
Table 6–5: Control Panel Status Indicator Lights
Light
Color
State
Meaning
Run
Green
On
System is executing operating system instructions on
at least one processor.
Off
System is in console mode, is set to Standby, or is
turned off.
On
Battery backup unit is charged to 98% of full capacity or battery backup unit is supplying power to the system.
Flashing
1 x/sec
Battery backup unit is charging.
Flashing
10 x/sec
Battery backup unit requires service. Call your Digital customer service enigneer.
Off
Either system does not have a battery backup unit or
the battery backup unit is turned off.
On
Self-test in progress. If light does not turn off, system has a hardware fault. See the VAX 6000 Series Owner’s Manual for self-test information.
Off
Self-test has completed, or the system is turned off.
Battery
Fault
Green
Red
Three status indicator lights on the control panel show the state of system
execution (Run), the presence of a battery backup unit (Battery), and
hardware errors (Fault).
Figure 6–9 shows a system that is in operation, with a charged battery
backup unit installed. For more information on the battery backup unit, see
the VAX 6000 Platform Service Manual. Table 6–5 describes the conditions
indicated by the status indicator lights.
Powering Up the System 6–17
6–18 VAX 6000 Series Installation Guide
Chapter 7
System Self-Test
On power-up, the system runs an automatic self-test. Self-test results are
indicated by module LEDs, the self-test display at the console terminal,
and the Fault light on the control panel.
CAUTION: Take extreme care when handling modules. You must wear the
antistatic wrist strap attached to the cabinet when you handle any modules.
See Appendix B.
Sections in this chapter include:
•
Enable the System and Check Status LEDs
•
Check the Self-Test Display
•
Sample Self-Test Display with VAXBI Adapter
System Self-Test 7–1
7.1 Enable the System and Check Status LEDs
Before the VAX 6000 module status LEDs can be checked, the
control panel switch must be set to Enable.
Figure 7–1: Control Panel Lights and Location of Module LEDs
0
Standby
Run
Enable
Battery
Secure
Fault
Update
Halt
Auto Start
Restart
FRONT
XMI
CORNER
GREEN
POWER-ON
LED
SELF-TEST
LED
DEBUG
LED
RED
AUXILIARY
LEDs
YELLOW
SELF-TEST
LED
RED ERROR
SUMMARY
LED
(Model 500)
RED ERROR
SUMMARY
LED
XMI-TO-VAXBI
ADAPTER
SELF-TEST
LED (Model 600
only)
MEMORY
VECTOR
7–2 VAX 6000 Series Installation Guide
CPU
msb-0452D-91
1. Turn the upper key switch to Enable. The following should occur:
a. The red Fault indicator lights on the control panel. This indicator
should turn off within 60 seconds.
b. The green lights on the five power regulators go on. The lights are
visible from the rear of the cabinet.
c.
The blowers turn on.
d. The module LEDs go on.
e.
The console terminal prints the results of self-test for the XMI.
The results printed should be similar to Example 7–1. If an
optional VAXBI is installed, the printed results should be similar
to Example 7–2.
2. Table 7–1 lists each module’s LED status indicating self-test passed or
self-test failed.
Table 7–1: LEDs After Self-Test
Module
Self-Test Passed
Self-Test Failed
Boot processor
Yellow ON, top two red ON
for Models 500 and 600;
only top red ON
for all other models
Yellow OFF
Some red ON
Yellow ON
Yellow OFF
Secondary processor(s)
Yellow ON, top two and bottom red ON
for Models 500 and 600;
top and bottom red ON
for all other models
Yellow OFF
Some red ON
Memory
Yellow ON
Green ON
Yellow ON
Green ON
VAXBI adapter
Yellow ON
Yellow OFF
Vector processor(s)
2
1
3
1 CPU
modules have seven or eight red LEDs. This group of LEDs is used to display the number of the test that failed.
On the Model 500 module, an additional red LED, the error summary, lights if any test failure results in any hardware error bits being set. Refer to your system’s service manual for more information.
2 Vectors available on Models 400 and 500 only.
3 The yellow indicator on the memory module is used to indicate only that self-test has completed.
System Self-Test 7–3
7.2 Check the Self-Test Display
On power-up, self-test results are displayed at the console
terminal.
Example 7–1: Self-Test Results
!
#123456789 0123456789 0123456789 0123456789 012345#
F
E
D
C
B
A
9
8
7
6
5
4
3
2
1
A
+
.
.
.
.
.
A
+
.
.
.
.
.
.
.
.
.
.
.
.
.
.
.
.
.
.
.
.
.
.
.
.
.
.
M
+
.
.
.
A4
64
M
+
.
.
.
A3
64
M
+
.
.
.
A2
64
M
+
.
.
.
A1
64
.
.
.
.
.
.
.
.
.
.
.
.
.
.
P
+
E
+
E
.
.
P
+
E
+
E
.
.
P
+
B
+
B
.
.
Console = V1.00
RBDs = V1.00
EEPROM = 1.00/1.00
>>>
Figure 7–2: XMI Card Cage Slot Numbers (Front View)
XMI CARD CAGE
E
D C B A 9
8
7 6 5 4 3
2
1
msb-0396-90
7–4 VAX 6000 Series Installation Guide
0
NODE #
TYP
STF
BPD
ETF
BPD
ILV
256 Mb
"
#$
SN = SG01234567
!
The first line shown in Example 7–1 is the progress trace line and, if
complete, shows that the CPU in slot 1 passed all testing. If the final
# sign is missing, the last number shown is the number of the failing
test. This line of numbers is displayed only by the processor in slot 1,
and only when this processor undergoes power-up or a system reset.
This processor is not always the boot processor.
For example, when the system is reset or the INITIALIZE command is
issued, the progress trace line might show:
"
#
$
#123456789 01234567
! Test #17 (decimal) failed.
The NODE # line lists the node numbers on the XMI bus. The nodes
on this line are numbered in hexadecimal and reflect the position of the
XMI slots as you view the XMI from the front of the cabinet.
The TYP line in the printout indicates the type of module at each XMI
node:
An I/O adapter (A)
A scalar processor (P)
A vector processor (V, on Models 400 and 500 only)
A memory module (M)
A period indicates that the slot is not populated or that the module
is not reporting and may be dead.
The STF line shows the results of self-test. This information is taken
from the self-test fail bit in the XBER register of each module. The
entries are:
+ (pass)
– (fail)
o (device is not tested at this step in the sequence)
You can enter HELP SELFTEST_OUTPUT at the console prompt for more
information on the self-test display lines. Or refer to the VAX 6000 Series
Owner’s Manual.
System Self-Test 7–5
7.3 Sample Self-Test Display with VAXBI Adapter
The self-test printout contains an additional line when an
optional VAXBI card cage or expander cabinet is part of the
system configuration. The XBI line provides information on
the node numbers and self-test status for modules in the
VAXBI card cages, which are connected to the XMI through
DWMBB adapters.
Example 7–2: Self-Test Results: TYP, STF, and XBI Lines
#123456789 0123456789 0123456789 0123456789 012345#
F
.
E
D
C
B
A
9
8
7
6
5
4
3
2
1
A
o
.
.
.
A
+
.
.
.
.
.
.
.
.
.
.
.
.
.
.
.
.
.
.
M
+
.
.
.
M
+
.
.
.
M
+
.
.
.
M
+
.
.
.
.
.
.
.
.
.
.
.
.
.
P
+
E
+
E
P
+
E
+
E
P
+
B
+
B
.
.
.
.
.
.
.
.
+
.
+
+
+
+
.
.
.
.
.
.
.
.
.
.
A4
64
A3
64
A2
64
A1
64
.
.
.
.
.
.
.
.
.
.
Console = V1.00
RBDs = V1.00
EEPROM = 1.00/1.00
>>>
7–6 VAX 6000 Series Installation Guide
0
NODE #
TYP
STF
BPD
ETF
BPD
.
!"
#
XBI E +
ILV
256 Mb
SN = SG01234567
!
"
#
The TYP line in this printout indicates that adapters in this
configuration are in XMI slots D and E. Slot E was chosen as the slot
for the DWMBB/A adapter module.
Because the DWMBB adapter does not have a module-resident self-test,
its entry for the STF line will always be "o".
The test results for the DWMBB/A and DWMBB/B modules are
indicated on the XBI line, at the far right. In this example, the DWMBB
modules have passed self-test (XBI E +). The results of the VAXBI I/O
adapter self-tests are shown in columns 0 through F, which stand for
the VAXBI node numbers; in this configuration, node numbers 1, 2, 3,
4, and 6 are used. All VAXBI modules have passed.
Note that XMI entries use only slots 1 through E, while the VAXBI can
have entries in slots 0 through F. An XMI slot and node number are the
same; VAXBI slot and node numbers are not identical. Node plugs (labeled
1 to 12) in the backplane of the VAXBI are used to identify the number of
a node.
System Self-Test 7–7
7–8 VAX 6000 Series Installation Guide
Chapter 8
Verification
After the system passes self-test, you must verify system operation. First,
verify the boot device load path. After the path is verified, you can run
diagnostics under the VAX Diagnostic Supervisor or load the operating
system and verify it.
Sections in this chapter include:
•
Console Load Devices
•
Verification Overview
•
Run Self-Test and Show Configuration
•
Verify Console Load Device Path
Verify Ethernet Adapter and Loopback
Run ROM-Based Diagnostics for the Tape
•
Boot Commands for Verification
•
Boot Diagnostics (for Models 300 and 400)
Boot VAX/DS from a CD Server
Select CD Server and Service
Boot VAX/DS from Tape Drive
Run the Autosizer and Multiprocessor Tests
•
Set Boot Devices
•
Record System Parameters
•
Verify System Under Operating System
Verification 8–1
8.1 Console Load Devices
The system console load device can be either a CD server
accessed over the Ethernet or a TF or TK tape drive. If your
system does not have one of these load paths and cannot be
booted from a VAXcluster, stop here and install one of the
load paths.
Figure 8–1: Console Load Devices
TK/TF TAPE
CD-ROM
VAXBI
TF85 TF857
CD
SERVER
TK70
DEBNI
DWMBB
ETHERNET
DSSI
TBK70
VAXBI
DECbridge
500
FDDI
KFMSA
DWMBB
XMI
DEMNA
DEMFA
XMI
msb-0317A-91
8–2 VAX 6000 Series Installation Guide
Your system must have at least one of the console load devices. If the
system has an in-cabinet tape drive, it is in the upper left front of the
system cabinet. A TF857 tape loader in an SF2xx cabinet can be connected
by the KFMSA adapter.
To locate an InfoServer compact disk server (with one or two CD drives),
ask the system manager for the location of the nearest CD server. If no CD
server is installed and the system does not have a tape drive, stop here and
install one of these console load devices.
If you are using a CD server for verification, use the diagnostic CD-ROM
with the following part number:
AG-PDWW*-RE - VAX 6000 CMPLT DIAG CD-ROM
^
|
+---- Revision letter in this position
(initial revision=A)
If you are using a TF or TK tape drive for verification, use the diagnostic
tape with the following part number:
AQ-PDWX*-DE - VAX 6000 CMPLT DIAG TK50
^
|
+---- Revision letter in this position
(initial revision=A)
Verification 8–3
8.2 Verification Overview
The verification process is similar for all console load
devices. Additional tests are required for Model 300 and 400
systems. See Figure 8–2.
Figure 8–2: Verification Procedure
1
Power Up System.
Self-Test Runs.
2
Enter SHOW
CONFIGURATION
3
Check Ethernet Adapter
Self-Test & Lights
Models 300/400:
Yes
Model 3/400
Multiprocessor
Run VAX/DS:
Autosizer & MP Tests
No
6
KFMSA
in System
4
Load and Boot
Diagnostics CD
Yes
5
Run EVCXF
No
7
Save System
Parameters
8
Boot Operating
System and Verify
msb-0608A-91
8–4 VAX 6000 Series Installation Guide
!
"
#
When the VAX 6000 powers up, self-test runs. The self-test for Models
500 and 600 includes a multiprocessor test. For Models 300 and 400,
self-test does not include the multiprocessor test; it must be run in a
separate step.
Issue the SHOW CONFIGURATION command. For CD server booting,
locate the Ethernet or FDDI adapter node address. For tape booting,
locate the tape adapter node address. See Section 8.3.
Check the console load device hardware. Check the Ethernet adapter by
examining the self-test results and the green test light on the module,
which reports the results of Ethernet loopback tests (see Section 8.4.1).
For tape, run ROM-based diagnostics (see Section 8.4.2).
If you are installing a Model 500 or 600, go to step
a Model 300 or 400, do steps
and .
$
%
&. If you are installing
For Models 300 and 400:
$
&
'
(
1
%
For CD server booting, load and boot the VAX 6000 diagnostic CDROM, part number AG–PDWW*–RE, labeled VAX 6000 CMPLT
DIAG CD-ROM (see Section 8.6.1).
For booting from tape, load and boot the VAX 6000 diagnostic tape,
part number AQ–PDWX*–DE, labeled VAX 6000 CMPLT DIAG
TK50 (see Section 8.6.3).
Run VAX/DS, the autosizer, and multiprocessor tests.
If the system has a KFMSA adapter, go to Section 3.4.1 and follow the
directions to run EVCXF under VAX/DS at this point in the verification
procedure.
Set and store system parameters.1 Record system parameters using:
For Models 500 and 600: SHOW ALL and SHOW FIELD
For Models 300 and 400: SHOW ALL
For TK systems only (not for TF tape): SAVE EEPROM
Load and boot the operating system CD-ROM. Refer to operating system
installation manuals. Verify the system under the installed operating
system.
Store printout in the maintenance envelope on the back door of the cabinet and in your
Site Management Guide.
Verification 8–5
8.3 Run Self-Test and Show Configuration
Gather adapter self-test and address information using selftest results and SHOW CONFIGURATION printout.
Example 8–1: Self-Test and SHOW CONFIGURATION
>>> INIT
!
#123456789 0123456789 0123456789 0123456789 012345#
F
.
E
D
C
B
A
9
8
7
6
5
4
3
2
1
A
o
.
.
.
A
+
.
.
.
.
.
.
.
.
.
.
.
.
.
.
.
.
.
.
M
+
.
.
.
M
+
.
.
.
M
+
.
.
.
M
+
.
.
.
.
.
.
.
.
P
+
E
+
E
P
+
E
+
E
P
+
E
+
E
P
+
B
+
B
.
.
.
.
.
.
.
.
+
.
+
.
+
+
.
.
.
.
.
.
.
.
.
.
A4
64
A3
64
A2
64
A1
64
.
.
.
.
.
.
.
.
.
.
Console = V1.00
>>>
RBDs = V1.00
0
TYP
STF
BPD
ETF
BPD
.
XBI
1+
2+
4+
6+
E
DWMBB/B
CIBCA
TBK70
DEBNI
(2002)
(0108)
(410B)
(0118)
XBI E +
ILV
256 Mb
EEPROM = 1.00/1.00 SN = SG01234567
! Prompt returns following self-test.
>>> SHOW CONFIGURATION
Type
1+ KA66A
(8087)
2+ KA66A
(8087)
3+ KA66A
(8087)
4+ KA66A
(8087)
6+ MS65A
(4001)
7+ MS65A
(4001)
8+ MS65A
(4001)
9+ MS65A
(4001)
D+ DEMNA
(0C03)
E+ DWMBB/A
(2002)
NODE #
Rev
0001
0001
0001
0001
0084
0084
0084
0084
0600
0001
0001
0001
0001
0300
#
$
%
&
'
8–6 VAX 6000 Series Installation Guide
"
!
Power up the system and check self-test results. Section 7.2 discusses
details of self-test. Entering the INITIALIZE command at the console
prompt also generates self-test, as shown in Example 8–1.
Check the STF line to see that all XMI modules passed self-test. Check
the ETF line to see that all CPUs passed the extended test.
"
#
$
For Model 500 and 600 systems, the multiprocessor tests are run
every time self-test is generated. The multiprocessor tests are not run
for Models 300 and 400. So, for these systems, during installation
verification, you must run the multiprocessor tests separately.
Check the XBI line for self-test results for VAXBI modules, and note
the DWMBB/A module’s XMI node number. Example 8–1 shows the
DWMBB/A in node E—see
and . You need this information for the
boot command.
"
%
Enter SHOW CONFIGURATION at the console prompt. This generates
a more detailed listing of modules.
If you are booting using a CD server, find the DEMNA, DEBNI, or
DEMFA node number. Example 8–1 shows both a DEMNA and DEBNI,
for example only; this is an unlikely configuration. Here the DEMNA
is XMI node D ( ); the DEBNI is VAXBI node 6 ( ).
$
'
% Shows the position of the DWMBB/A module (see " above for details).
& Shows the position of the TBK70 adapter for the in-cabinet TK tape
drive. In this example the TBK70 is VAXBI node 4.
'
For a TF tape, a KFMSA adapter on the XMI would support the incabinet tape drive or a TF857 in the SF2xx cabinet. When there is
more than one KFMSA in a system, determine which KFMSA supports
the TF in one of two ways: check the cabling from the XMI backplane
to the TF drive, or run the level 3 diagnostic EVCXF and check the
printout (see Section 3.6.3).
Shows the position of the DEBNI (see
$ above for details).
Verification 8–7
8.4 Verify Console Load Device Path
If your console load device is a CD server, check the Ethernet
adapter’s loopback path (see Section 8.4.1). If you are using
a tape, use the Z command and run RBDs on the tape drive
(see Section 8.4.2).
8.4.1 Verify Ethernet Adapter and Loopback
Check the Ethernet adapter’s self-test results. Open the
cabinet front door and check the green External Loopback
LED.
Figure 8–3: DEBNI/DEMNA LEDs
SELF-TEST OK LED
CONNECTOR
EDGE
EXTERNAL
LOOPBACK LED
msb-0134A-90
8–8 VAX 6000 Series Installation Guide
Check the Ethernet adapter’s self-test results. The SHOW CONFIGURATION printout is the most convenient display of the results. A "+" indicates
the adapter passed self-test.
Independent of the module’s internal self-test is an external loopback test.
The loopback test runs independently at power-up and its results are not
included in the self-test. That is, a DEBNI or DEMNA could pass self-test
but fail the external loopback testing. The results of the external loopback
testing are reported by the External Loopback LED on the module. It is a
green LED below the yellow Self-Test OK LED.
Open the front cabinet door. Noting the adapter’s card cage position
from the SHOW CONFIGURATION printout, locate the module in the
appropriate card cage and slot.
If the External Loopback LED is lit, the module passed the test. If this
LED is not lit, the module failed.
For more troubleshooting of the Ethernet adapter, see the DEC
LANcontroller 200 Installation Guide (DEBNI) or the DEC LANcontroller
400 Installation Guide (DEMNA).
Verification 8–9
8.4.2 Run ROM-Based Diagnostics for the Tape
If you have a TF tape, verify the console load path to the
TF in the system cabinet or the TF857 in the SF2xx cabinet
using EVCXF (see Section 3.6). If you have a TK tape, use
the Z command to "attach" to the TK controller. Run a
ROM-based test to verify that the load path works properly.
Return the console to the boot processor.
Example 8–2: TK ROM-Based Diagnostic
!">>> SHOW CONFIGURATION
Type
1+
2+
3+
4+
6+
7+
8+
9+
D+
E+
KA66A
KA66A
KA66A
KA66A
MS65A
MS65A
MS65A
MS65A
DEMNA
DWMBB/A
(8087)
(8087)
(8087)
(8087)
(4001)
(4001)
(4001)
(4001)
(0C03)
(2002)
Rev
0001
0001
0001
0001
0084
0084
0084
0084
0600
0001
XBI
1+
2+
4+
E
DWMBB/B
CIBCA
TBK70
(2002)
(0108)
(410B)
0001
41C1
0307
"
"
#>>>
Z/BI:4 E
?0033 Z connection successfully started.
$ T/R
%RBD4> D2/TR/T=6/C
;T1035_TK
1.00
;T06
6
410B 00000001
;
P
;00000000 00000000 00000000 00000000 00000000 00000000 00000000
RBD4> QUIT
^P
?0031 Z connection terminated by ^P
>>>
'
(
&
8–10 VAX 6000 Series Installation Guide
!
"
#
$
%
&
'
(
Put a blank cartridge in the TK drive. Check that it is not writeprotected. The blank tape is required for proper running of the RBDs.
(If you are unfamiliar with the tape drives, see the VAX 6000 Series
Owner’s Manual.)
In this example, the DWMBB adapter is XMI node E. The TK
controller (TBK70) is VAXBI node 4.
Enter the Z command, using the /BI qualifier. The system console
communicates with the module at VAXBI node 4 on the VAXBI whose
adapter is at XMI node E. The system responds to the Z command with
a message.
Enter the command T/R to invoke the module’s ROM-based diagnostic
monitor.
The diagnostic monitor prompt is RBD4>, where 4 is the VAXBI node
number. Enter the command D2/TR/T=6/C. The diagnostic performs a
read/write test.
The diagnostic prints out several lines of information. Check for a P
in the first field of the diagnostic completion message, which indicates
that the test passed.
Enter QUIT, which stops execution of the ROM diagnostic monitor and
resets the controller.
Enter CTRL/P, which reattaches the console to the boot processor. The
system responds to CTRL/P with a message.
Verification 8–11
8.5 Boot Commands for Verification
For TK or TF booting, use BOOT CSA1. For CD server
booting, use the BOOT commands shown in Figure 8–4.
Table 8–1: BOOT Commands for VAX/DS
Adapter
Models 500 and 600
Models 300 and 400
TBK70
BOOT /R5:10 CSA1
BOOT /R5:10 CSA1
KFMSA
(for TF)
BOOT /R5:10 CSA1
BOOT /R5:10 CSA1
DEMFA
BOOT /R5:10 /XMI:m /FILENAME:ISL_ BOOT /R5:110 /XMI:m FX0
LVAX_x FX0
DEMNA
BOOT /R5:10 /XMI:m /FILENAME:ISL_ BOOT /R5:110 /XMI:m EX0
LVAX_x EX0 1
DEBNI
BOOT /R5:10 /XMI:m /FILENAME:ISL_ BOOT /R5:110 /XMI:m /BI:n ET0
LVAX_x/BI:n ET0 1
1 Where
x is the version letter.
Figure 8–4: CD Server BOOT Commands for VAX/DS
FA
00
/6
00
DEMN
A
l5
EX0
DE
M
I
BN
BOOT /XMI:m
e
od
FX0
DEM
/R5:10 /FILENAME:ISL_LVAX_x
el
od
M
/BI:n
ET0
EX0
M
s
DE
ISL_LVAX_x
/BI:n
ET0
I
N
EB
D
0
40
0/
30
R5:110
NA
msb-0441E-91
8–12 VAX 6000 Series Installation Guide
Boot VAX/DS from a CD Server
Ask the system manager for the location of the closest CD server. Load
the diagnostic compact disk into the CD drive, part number AG-PDWW*RE, "VAX 6000 CMPLT DIAG CD-ROM" (see Figure 8–5). To boot a CD
server, use the information gathered in Section 8.3 for the boot command
qualifiers.
Figure 8–5: Loading a CD-ROM
msb-0483B-90
Boot VAX/DS from Tape Drive
To boot from a TK, load the diagnostic tape, part number AQ-PDWX*-DE,
"VAX 6000 CMPLT DIAG TK50," into the tape drive, and at the console
prompt enter the boot command:
BOOT /R5:10 CSA1
where R5:10 chooses the VAX Diagnostic Supervisor, VAX/DS. CSA1 is
defined as the console load device, so the system will boot from the tape in
the cabinet or a TF857 tape in an SF2xx storage cabinet.
Verification 8–13
8.6 Boot Diagnostics (for Models 300 and 400)
8.6.1 Boot VAX/DS from a CD Server
Models 500 and 600 and single-processor systems do not need
this step; for these models, go to Section 8.8. After you enter
the BOOT command string for your system from Table 8–1,
you must connect to the CD server using menus to select
your service.
Example 8–3: Boot VAX/DS from a CD Server
! >>> BOOT /XMI:E /BI:6 /R5:110 ET0
Initializing system
[Self-test display prints]
Loading system software
FILENAME: ISL_LVAX_B
"
! where B is the revision level
! of the CD you will boot from
* Initializing adapter
* Specified adapter initialized successfully
* "Request Program" MOP message sent - waiting for
service from remote node
* Remote service link established
* Reading boot image from remote node
* Passing control to transfer address
Network Initial System Load Function
Version 1.1
FUNCTION
ID
1
2
3
4
5
-
FUNCTION
Display Menu
Help
Choose Service
Select Options
Stop
Enter a function ID value: 3
#
#
8–14 VAX 6000 Series Installation Guide
!
"
#
Use a BOOT command from Table 8–1. System responds with message
Initializing system and displays self-test results.
In this example, we are using the configuration shown in Example 8–1,
where the DWMBB/A is XMI node E and the DEBNI is VAXBI node 6.
We are booting the file ISL_LVAX_B, where B is the revision level of
the CD we are booting. The system loads software and displays the
Ethernet function menu.
System prompts, Enter a function ID value: Enter 3 to choose service.
Verification 8–15
8.6.2 Select CD Server and Service
After you locate the servers, display loaded services (CDROMs), and select your service.
Example 8–4: Boot VAX/DS from a CD Server, continued
OPTION
ID
1
2
OPTION
-
Find Services
Enter known Service Name
Enter an Option ID value: 1
$
Working
Servers found:: 6
Service Name Format:
Service Number
Service Name
Server Name
Ethernet ID
#1
VMSI054
ESS_08002B15FCE1
08-00-2B-15-FC-E1
#2
BOOKREADER_MAR91
ESS_08002B15FCE1
08-00-2B-16-07-C0
%
#3
6000_DIAG_A
ESS_0800XXCGH321
08-00-2B-16-04-D4
%
#4
CONS_DIAG_B
INFO1
08-00-2B-18-A9-75
Enter a Service Number or < CR > for more: 4
[Diagnostic Supervisor banner prints]
DS>
8–16 VAX 6000 Series Installation Guide
&
$
%
Enter 1 to select Find Services. Software locates available Ethernet
services and displays them.
If you are certain of the diagnostic CD’s name and revision number,
you could choose 2 here (Enter Known Service Name. The system will
prompt you for the service name (diagnostic CD volume label), and then
boot. However, to display all available services, choose 1 and proceed
with the following steps.
System prints out services loaded in the CD servers. One of the services
will show the diagnostic CD-ROM you loaded in the CD drive.
This example shows two CD servers: one server with the name of ESS_
0800XXCGH321 with Ethernet address 08-00-2B-16-04-D4 has service
#3 with the diagnostic tape 6000_DIAG_A, at revision A; server with
name INFO1 (a name set at InfoServer installation) with Ethernet
address 08-00-2B-18-A9-75 has service #4 with the diagnostic tape
CONS_DIAG_B, at revision B.
&
Enter the number of the service, which is the diagnostic CD-ROM. If
more than one copy of the "VAX 6000 CMPLT DIAG CD-ROM" is shown
as loaded in the CD drives, choose the drive where the revision letter
is the highest in the service name. In this example, service #4 has the
most recent diagnostic tape.
System prompts for service number. In this example, choose service #4
since it contains the most recent version of the diagnostic media.
Verification 8–17
8.6.3 Boot VAX/DS from Tape Drive
Model 500 and 600 systems and single-processor systems do
not need this step; for these models, go to Section 8.8. The
VAX Diagnostic Supervisor (VAX/DS) allows you to run level
2, 2R, and 3 diagnostics. You can boot VAX/DS from tape
before loading and running the processor diagnostics.
Example 8–5: Booting the VAX Diagnostic Supervisor from Tape
!"
>>> BOOT /R5:10 CSA1
#
#123456789 0123456789 0123456789 0123456789 012345#
F
.
E
D
C
B
A
9
8
7
6
5
4
3
2
1
A
o
.
.
.
A
+
.
.
.
.
.
.
.
.
.
.
.
.
.
.
.
.
.
.
M
+
.
.
.
M
+
.
.
.
M
+
.
.
.
M
+
.
.
.
.
.
.
.
.
P
+
E
+
E
P
+
E
+
E
P
+
E
+
E
P
+
B
+
B
.
.
.
.
.
.
.
.
+
.
+
.
+
+
.
.
.
.
.
.
.
.
.
.
A4
64
A3
64
A2
64
A1
64
.
.
.
.
.
.
.
.
.
.
Console = V1.00 RBDs = V1.00
Loading system software.
EEPROM = 1.00/1.00
0
NODE #
TYP
STF
BPD
ETF
BPD
.
XBI E +
ILV
256 Mb
SN = SG01234567
#
VAX DIAGNOSTIC SOFTWARE
PROPERTY OF
DIGITAL EQUIPMENT CORPORATION
***CONFIDENTIAL AND PROPRIETARY***
Use Authorized Only Pursuant to a Valid Right-to-Use License
Copyright, Digital Equipment Corporation, 1991. All Rights Reserved.
#
DIAGNOSTIC SUPERVISOR.
DS>
ZZ-ERSAA
$-XXX.XX-XXX
8–18 VAX 6000 Series Installation Guide
31-DEC-1991
09:44:40
"
!
If you are using tape for verification, use the diagnostic tape, part
number:
AQ-PDWX*-DE - VAX 6000 CMPLT DIAG TK50
^
|
+---- Revision letter in this position
(initial revision=A)
"
If you have more than one tape, use the one with the most recent
revision level. Insert the diagnostic tape in the tape drive, writeprotected.
Enter the BOOT command as shown in Example 8–5.
The /R5:10 qualifier selects the VAX Diagnostic Supervisor program.
#
$
CSA1 is a special boot specification for the console device (TF or TK).
CSA1 is defined on all VAX 6000 systems to look first for a console load
device in the cabinet and then for a TF857 tape in an SF2xx storage
cabinet.
The self-test display and VAX Diagnostic Software banner appear,
followed by the Diagnostic Supervisor banner. Then the VAX Diagnostic
Supervisor runs and issues its prompt.
Different file names appear here, depending on the VAX 6000 model
number.
Table 8–2: VAX/DS File Names
Model Number
File Name
Model 600
EXSAA
Model 500
EMSAA
Model 400
ERSAA
Model 300
ELSAA
Verification 8–19
8.7 Run the Autosizer and Multiprocessor Tests
Model 500 and 600 systems and single-processor systems do
not need this step; for these models, go to Section 8.8. First
run the standalone autosizer (EVSBA), which attaches all
processors for the VAX Diagnostic Supervisor.
Example 8–6: Running the Multiprocessor Diagnostic
!
DS> RUN EVSBA
.. Program: EVSBA - AUTOSIZER
at 00:25:05.10.
"#
$
level 3 X6.6, revision 6.6, 3 tests,
.. End of run, 0 errors detected, pass count is 1,
time is 31-DEC-1991 00:27:42.34
DS> SET TRACE
DS> SELECT ALL
DS> RUN ERKMP
.. Program: ERKMP -- KA64A MP Exerciser, revision 1.0, 10 tests,
at 00:29:19.81.
Testing:
__KA0__KA1
Booting Secondary Processor #02
Test
Test
Test
Test
Test
Test
Test
1:
2:
3:
4:
5:
6:
7:
Memory Interlock Test
Interprocessor Interrupt Test
Write Error Interrupt Test
Cache Invalidate Test
XMI Bus Arbitration Test
XMI Bus Arbiter Collision Test
XMI Lockout Test
Only 2 CPU(s) selected for testing...
XMI LOCKOUT can only be verified with 6 CPUs selected.
continuing...
Test 8: Cache Coherency Test
Test 9: XMI Suppress Test
Only 2 CPU(s) selected for testing...
XMI SUPPRESS can only be verified with 4 or more CPUs selected.
continuing...
Test 10: Multiprocessor Exerciser
.. End of run, 0 errors detected, pass count is 1,
time is 31-DEC-1991 00:33:49.77
DS> EXIT
>>>
%
8–20 VAX 6000 Series Installation Guide
!
"
#
$
%
Run the standalone autosizer (EVSBA); then you do not need to attach
each processor explicitly.
Issuing a SET TRACE command generates a more detailed printout of
the multiprocessor test.
Issue the SELECT ALL command to test all processors in the system.
Run the multiprocessor test which tests the interprocessor interrupts
and cache functions for the model number of the system. You only have
to run the multiprocessor test once; it’s not necessary to change boot
processors.
Exit VAX/DS.
Table 8–3: Multiprocessor File Names
Model Number
1
File Name
Model 400
ERKMP
Model 300
ELKMP
1 Model
500 and 600 systems run the multiprocessor test as part of the system selftest; does not need to be separately invoked.
For additional information on these tests, see the VAX 6000 Models 300
and 400 Service Manual.
Verification 8–21
8.8 Set Boot Devices
Before you load the operating system, set the default boot
devices. Set the lower key switch to Update when setting
or changing EEPROM parameters. Use SET BOOT once to
define the default boot device. Then you can boot from the
default boot device by entering BOOT without qualifiers.
Example 8–7: Setting the Default Boot Device
!">>>SHOW CONFIGURATION
Type
1+
2+
3+
4+
6+
7+
8+
9+
D+
E+
KA66A
KA66A
KA66A
KA66A
MS65A
MS65A
MS65A
MS65A
DEMNA
DWMBB/A
(8087)
(8087)
(8087)
(8087)
(4001)
(4001)
(4001)
(4001)
(0C03)
(2002)
Rev
0001
0001
0001
0001
0084
0084
0084
0084
0600
0001
XBI
1+
2+
4+
6+
E
DWMBB/B
CIBCA
KDB50
DEBNI
(2002)
(0108)
(010E)
(0118)
0001
0001
0001
0300
>>>SET BOOT DEFAULT
#
$
%/XMI:E &/BI:2 '/NODE:0405 (/R5:40000000 )DU0
+>>>>SET BOOT LOC /XMI:E /BI:4 DU1
8–22 VAX 6000 Series Installation Guide
!
"
#
$
%
&
'
(
)
+>
Set the lower key switch to Update.
Enter the console command SHOW CONFIGURATION.
In this example the DWMBB/A adapter is XMI node E. The self-test
display shows the VAXBI devices attached through node E.
The VAXcluster controller (CIBCA) is shown in the second column. The
CIBCA device type is 0108. In this example the controller is VAXBI
node 2, shown in the first column.
Qualifier /XMI specifies XMI node E.
Qualifier /BI specifies VAXBI node 2.
Qualifier /NODE specifies the CI node number of the HSC controller.
In this example the system disk is dual-ported to two HSC controllers
at nodes 04 and 05. A disk ported to only one HSC has a qualifier
like /NODE:04. See Chapter 4, Connecting to a CI VAXcluster, for
instructions on setting VAXcluster nodes and numbers.
Qualifier /R5 is used to load register R5 with the number of the root
directory for the operating system. In this example the root is SYS4.
Note that the root directory number must be in the high-order four bits.
In this example the system disk is unit number 0 on the HSC controller.
You can now boot from the VAXcluster path by issuing the BOOT
command.
The second SET command defines a path for booting from a local disk
instead of from the VAXcluster. The boot name LOC is arbitrary. The
path is disk unit number 1 on the disk controller whose VAXBI node
number is 4. (Refer to the SHOW CONFIGURATION display; the
KDB50 is node 4 of the VAXBI. The DWMBB/A adapter is node E on
the XMI bus.)
You can now boot from the local disk by issuing the BOOT LOC
command.
When you are finished setting EEPROM parameters, turn the lower key
switch to Halt or Auto Start.
Verification 8–23
8.9 Record System Parameters
Using a hardcopy console printer (or TK tape if available),
save system parameters. This step is especially important
for single-processor systems.
Example 8–8: Record System Parameters
! Saved
>>> SHOW FIELD
boot specifications:
DEFAULT /R5:00000010 /XMI:E
DU0
Console terminal parameters:
/SCOPE
/SPEED: 9600 /NOBREAK
Console error message language mode:
English
Memory configuration:
F
E
D
C
B
A
9
.
.
.
.
.
A1
.
.
.
.
.
64
/CONSOLE_LIMIT:00100000
/INTERLEAVE:DEFAULT
8
7
6
5
4
3
2
1
.
.
.
.
.
.
.
.
.
.
.
.
.
.
.
.
Power system: C
System serial number: SG01234567
" >>> SHOW ALL
[system prints parameters]
# >>> SAVE EEPROM
Proceed with save to tape? (Y or N) >>> Y
?006C EEPROM saved to tape successfully.
8–24 VAX 6000 Series Installation Guide
0
NODE #
ILV
64 Mb
For future troubleshooting and maintenance, save system parameters. This
step is especially important for single-processor systems. If the system does
not have a TK tape drive, use hardcopy printout and save the printout in
two places: the maintenance envelope attached to the back door of the
cabinet and in your Site Management Guide. (You can save parameters to
tape with the TK tape drive only; the TF tape drive reads media but does
not record system parameters to tape.)
Table 8–4: Record System Parameters
System
Method
Models 500 and 600
SHOW FIELD command
Models 300 and 400
SHOW ALL command
Models with TK only
(not TF)
SAVE EEPROM
! SHOW FIELD (Models 500 and 600)
Enter SHOW FIELD command at the console prompt. The system displays
information, including system serial number, power system, and memory
configuration.
" SHOW ALL (Models 300 and 400)
Enter SHOW ALL command at the console prompt. The system displays
two pages of information. For details of this printout, see the VAX 6000
Series Owner’s Manual, Chapter 5, Console.
# SAVE EEPROM (TK Tape only)
1. Put a blank cartridge in the tape drive, write-enabled. The cartridge is
supplied with the system.
#
2. Enter the command SAVE EEPROM (see ). The console program
queries you. Enter Y to save the EEPROM to tape. The console program
then confirms that the save operation has completed successfully.
3. Label the cartridge and store on site. Leave the TK cartridge with
the system manager, in case EEPROM contents become corrupted and
must be restored.
NOTE: Use this TK cartridge with this system only. TK tapes are not
transferable.
Verification 8–25
8.10 Verify System Under Operating System
After VMS is installed, run UETP (User Environment Test
Package). First log in and check the devices. Then start the
tests.
Example 8–9: Running UETP
! Username:
SYSTEST
Password:
" $ @UETP
#
Welcome to VAX/VMS UETP Version V5.x
Run "ALL" UETP phases or a "SUBSET" [ALL]?
How many passes of UETP do you wish to run [ 1 ]?
How many simulated user loads do you want [145]?
Do you want Long or Short report format [Long]?
UETP starting at 31-DEC-1991 13:12:23.00 with parameters:
DEVICE LOAD DECNET CLUSTER phases, 1 pass, 145 loads, long report.
8–26 VAX 6000 Series Installation Guide
!
"
#
Enter SYSTEST as the username. Obtain the password from the
system manager. After you log in, check all devices.
Enter the command @UETP to start the program.
The VAX/VMS UETP banner appears and UETP prompts you with
questions. The default answer for each question is in square brackets.
Press Return if you wish to enter the default answer. UETP testing
begins when the final question is answered. For more information,
refer to VMS Upgrade and Installation Supplement: VAX 6000 Series.
Verification 8–27
Appendix A
Digital Remote Services Console
Installation
The Remote Services Console (RSC) allows customer services to
troubleshoot VAX 6000 systems from a Digital Service Center. The system
console terminal port (see Figure 2–6) is used to connect the RSC to a VAX
6000 system. If the system has a DMB32 or a DHB32 option, a port can
be used to connect a telephone line to the RSC. See Figure A–1.
The Digital Service Center can run a series of diagnostics to verify the RSC
connection to the system. For more information see the Remote Services
Console Field Service Manual, the Remote Services Console User’s Guide,
and the DF112 Modem Family User’s Guide.
Figure A–1: Remote Console Cable Connections
VAX CPU
COMM
PORT
CONSOLE TERMINAL
PORT
CONSOLE
TERMINAL
A1
A2
REMOTE SERVICES
CONSOLE
B1
B2
MODEM
REMOTE
STATION
msb-0046-88
Digital Remote Services Console Installation A–1
A–2 VAX 6000 Series Installation Guide
Appendix B
Module Handling
This appendix gives detailed instructions on handling scalar and vector
processor modules for VAX 6000 systems. The sections include:
•
Handling Modules
•
Inserting Modules
Module Handling
B–1
B.1 Handling Modules
Handle the processor modules with care. The technology
used on the 6000 series modules is more vulnerable to static
than past technology. Also, these modules have 25 mil leads
to the chips; these leads are very small, close together, and
easily bent.
Figure B–1: Holding 6000 Series Processor Modules
msb-0228-90
B–2 VAX 6000 Series Installation Guide
The 6000 series modules require careful handling. Prepare yourself and
the work area before handling these modules. Roll up your sleeves and
remove any jewelry. Figure B–1 shows the proper way to hold the module.
Follow these handling procedures to avoid damaging the processor modules:
1. Always wear an antistatic wrist strap.
2. Before removing the module from its ESD box, place the box on a clean,
stable surface.
Be sure the box will not slide or fall. Never place the box on the floor.
And be sure no tools, papers, manuals, or anything else that might
damage the module is near it. Some components on this module can
be damaged by a 600-volt static charge; paper, for example, can carry
a charge of 1000 volts.
3. Hold the module only by the edges, as shown in Figure B–1.
Do not hold the module so that your fingers touch any 25 mil devices,
leads, or XMI fingers. Be sure you do not bend the module as you are
holding it.
4. Be sure nothing touches the module surface or any of its components.
If anything touches the module, components or leads can be damaged.
This includes the antistatic wrist strap, clothing, jewelry, cables,
components on other modules, and anything in the work area (such
as tools, manuals, or loose papers).
Module Handling
B–3
B.2 Inserting Modules
Figure B–2: Inserting the Scalar Processor in an XMI Card Cage
msb-0219R-90
Figure B–3: Inserting the Vector Processor in an XMI Card Cage
msb-0372R-90
B–4 VAX 6000 Series Installation Guide
You must take special precautions when moving the processor modules in
or out of the XMI card cage.
1. Be sure, when inserting a module in or removing it from the XMI card
cage, that no part of the module comes in contact with another module
or a cable.
2. When you swap out a module, place it in an ESD box or on an ESD mat
before you install the new module.
If you place the module on an ESD mat, make sure the mat is on a
stable, uncluttered surface, with side 1 of the module facing up (the side
with the heat sinks). Do not put it on the top of the system cabinet. And
never slide the module across any surface. The leads on the components
are fragile and can be damaged by contact with fingers or any surface.
3. Hold the XMI card cage handle while removing or inserting the module.
If it is not held in place, the handle can spring down and damage the
module.
4. When inserting a module in the card cage, grasp it as shown in
Figure B–2 or in Figure B–3, being careful not to touch any 25 mil
devices, and slide it slowly and gently into the slot.
5. Do not attach the repair tag to the module.
Place the repair tag in the plastic bag attached to the bottom of the
ESD box. Allowing the repair tag to come in contact with the module
can cause damage to a component.
Module Handling
B–5
B–6 VAX 6000 Series Installation Guide
Appendix C
Installing an Expander Cabinet
Expansion must be to the right of the system cabinet (as you view the
cabinet from the front). See Figure 1–4 which shows a system, expander,
disk, and tape cabinet configuration. First unpack the expander cabinet.
Remove the system cabinet’s side panel and top cover. Then bolt the
expander and system cabinets together. Finally, install the DWMBB/A
module (if required) and connect the interface cables according to the
system configuration. For more information on the expander cabinet,
see the VAXBI Expander Cabinet Installation Guide or the H9657–EU
Installation Guide.
Sections in this appendix include:
•
Prepare the Cabinets
•
Join the Cabinets
•
Install the DWMBB/A Module and Connect the XMI-to-VAXBI Adapter
Cables
•
Connect the DEC Power Bus Cable
•
DWMBB Cabling
Installing an Expander Cabinet C–1
C.1 Prepare the Cabinets
First unpack the expander cabinet and position it next to
the system cabinet. Then power down the system cabinet
and remove the rear door, top cover, and side panel.
Figure C–1: System Side Panel Removal (Front View)
SIDE
PANEL
KEPNUTS
msb-0041-88
C–2 VAX 6000 Series Installation Guide
For all system configurations, expansion will be to the right of the system
cabinet.
1. Refer to the VAXBI Expander Cabinet Installation Guide for unpacking
instructions. Allow for adequate work space when you position the
expander cabinet next to the system cabinet.
2. Perform an orderly shutdown of the system.
3. Turn the upper key switch on the front control panel to the Off position.
4. Pull the H405 circuit breaker to the Off position.
5. Open the front door.
6. Open the rear door. You can remove the door for easier access to the
side panel bolts. Remove the ground strap from the rear door; use a
3/8 inch nutdriver to remove the strap from the door or a screwdriver
to remove the strap from the cabinet. Remove the door by lifting it off
the hinges.
7. Using a 7/16 inch socket wrench, remove the system cabinet’s side panel
by removing the 12 kepnuts from the bolts on the side panel studs (see
Figure C–1).
8. Using a nutdriver or ratchet set, remove the two 5/16 inch bolts (see
Figure C–2). Pull the top cover toward you and lift it off.
Figure C–2: Top Cover Removal (Rear View)
TOP COVER
SCREWS
msb-0147-89
Installing an Expander Cabinet C–3
C.2 Join the Cabinets
Bolt the cabinets together and replace the system cabinet’s
top cover. Then install the side panel on the expander
cabinet.
Figure C–3: Joining the Cabinets (Rear View)
EXPANDER
FRAME
XMI-TO-VAXBI
ADAPTER CABLES
SHIELD PANEL
msb-0146-88
C–4 VAX 6000 Series Installation Guide
The RF shielding is shipped mounted to the H9657-EC cabinet by two bolts
and kepnuts. Remove these bolts before aligning the cabinets.
1. Position the expander cabinet against the system cabinet. The four
corner bolts require flat washers on both sides of the cabinets. Run the
other eight bolts through the mounting holes on the system cabinet,
expander frame, shield panel, and expander cabinet. These eight bolts
do not require washers. Add a kepnut to each bolt but do not tighten.
2. If necessary, align the cabinets by adjusting the expander cabinet
leveler feet. Use a 9/16 inch wrench or one of the shipping brackets. A
bubble level can be used to check the alignment.
3. Using a 7/16 inch socket wrench, tighten each kepnut.
4. Check the RF seal between the expander frame and the two cabinets
by inserting a strip of paper in each seam. If you can move the paper,
the seam will not provide an effective RF seal. Adjust the seam until a
proper seal is attained.
5. Replace the system cabinet’s top cover.
6. Install the side panel (removed from the system cabinet) onto the open
side of the expander cabinet.
Installing an Expander Cabinet C–5
C.3 Install the DWMBB/A Module and Connect the
XMI-to-VAXBI Adapter Cables
You must install a DWMBB/A module when adding the
expander option to a previously installed VAX 6000 series
system. After you install the DWMBB/A module, connect the
XMI to expander adapter cables.
Figure C–4: XMI-to-VAXBI Adapter Cable Connections
VAXBI
EXPANDER CABINET
REAR
EXPANDER
XMI IN THE
SYSTEM CABINET
REAR
CABINET
D1 D2
D1 D2
E1 E2
E1 E2
SLOT 1
C–6 VAX 6000 Series Installation Guide
SLOT 1
msb-0043A-90
Typically, the DWMBB/A modules for an expansion cabinet are installed in
slots 1 through 3 of the XMI card cage (although they can be placed in any
slot except slots 6 through 9).
Two 15-foot cable assemblies (17-01897-01) are used to connect the DWMBB
modules. Each cable assembly consists of two ribbon cables bundled
together. See Section C.5 for DWMBB/A slot allocation in the XMI card
cage. The cables connect to the expander card cage backplane at slot 1.
CAUTION: You must wear the antistatic wrist strap attached to the
cabinet when you handle any modules.
1. Remove the clear plastic door in front of the XMI card cage and install
the DWMBB/A module in slot 1. Replace the door.
2. Check to see that the AC OK/DC OK cable, 17-01920-01, is installed in
the VAXBI backplane at slot 1, segment C1.
3. Lay the four cables out flat. Mark each end, as shown in Table C–1.
NOTE: Install the cable so that the red stripe on each cable is up, away
from the bottom of the card cage.
4. At slot 1 of the expander cabinet backplane, connect the cables as
you have marked them. Insert cables 1 and 2 into segments D2 and
D1; insert cables 3 and 4 into segments E2 and E1, respectively (see
Figure C–4).
5. Route the cables through the wave guide slot and into the system
cabinet (see Figure C–3).
6. At the XMI backplane, connect the cables to segments D and E as you
have marked them (see Table C–1 and step 3 above).
Table C–1: Cable Connections
Cable
From VAXBI Expander
Connection
To XMI Connection
Cable 1
D1
D2
Cable 2
D2
D1
Cable 3
E1
E2
Cable 4
E2
E1
Installing an Expander Cabinet C–7
C.4 Connect the DEC Power Bus Cable
Connect the DEC power bus cable from the expander
cabinet’s H405 AC power input box to the system cabinet’s
H405 AC power controller.
Figure C–5: DEC Power Bus Cable Connections (Rear View)
REAR
msb-0453A-90
C–8 VAX 6000 Series Installation Guide
1. Insert one cable connector into the power bus outlet located on the
expander cabinet’s H405 AC power input box (see Figure C–6).
2. Insert the other cable connector into the DEC power bus outlet located
on the system cabinet’s H405 AC power controller.
CAUTION: For reliable operation, AC power should come from the same
bulk distribution panel that supplies power to the system cabinet. This
ensures that ground references for the VAXBI expander cabinet are at
the same potential as the system cabinet.
3. Plug in the AC power cable.
4. Replace the cabinet doors.
5. See the VAXBI Expander Cabinet Installation Guide for power-up
instructions.
Figure C–6: DEC Power Bus Cabling
EXPANDER
CABINET
SYSTEM
CABINET
H405 AC
POWER
CONTROLLER
H405 AC
INPUT BOX
REAR VIEW
DEC POWER
BUS CABLE
msb-0044-89
Installing an Expander Cabinet C–9
C.5 DWMBB Cabling
In the XMI card cage, slots 1 through 4 are allocated in that
order for DWMBB/A modules cabled to DWMBB/B modules
in the VAXBI expander cabinet.
Figure C–7: DWMBB/A Slots for Additional Card Cages
XMI CARD CAGE
E
D C B A 9
IN-CABINET
VAXBI
CAGE
8
7 6 5 4 3
FOURTH
VAXBI
EXPANDER
CAGE
2
1
THIRD
VAXBI
EXPANDER
CAGE
FIRST
VAXBI
EXPANDER
CAGE
SECOND
VAXBI
EXPANDER
CAGE
msb-0045A-90
C–10 VAX 6000 Series Installation Guide
Appendix D
DSSI Configuration Sheets
Each component in the DSSI subsystem has an address. Part of the
address is determined by the physical location of the component in the
DSSI subsystem, and part of the address is set during the KFMSA module
installation. Use a configuration sheet when you are setting parameters
(see Chapter 3).
The next two figures are intended for your use as DSSI configuration sheets,
in case you do not have one with your installation information from the
integrated storage elements (ISE). Chapter 3 describes the procedures for
using the configuration sheets.
DSSI Configuration Sheets
D–1
Figure D–1: KFMSA/DSSI Single-Host Configuration Sheet
KFMSA XMI Node # ________
Bus 1
DSSI ID # ____
Device Type ____
DSSI ID # ____
Node Name ____
ALLO_CLASS ____
SF200 Box # ____
____
UNITNUM
System ID __________________
Device Type ____
DSSI ID # ____
Node Name ____
ALLO_CLASS ____
SF200 Box # ____
____
UNITNUM
System ID __________________
ALLO_CLASS ____
SF200 Box # ____
____
UNITNUM
System ID __________________
Bus 2
DSSI ID # ____
Device Type ____
DSSI ID # ____
Node Name ____
System ID __________________
Device Type ____
DSSI ID # ____
Node Name ____
Device Type ____
DSSI ID # ____
Node Name ____
Device Type ____
DSSI ID # ____
Node Name ____
Device Type ____
DSSI ID # ____
Node Name ____
Device Type ____
DSSI ID # ____
Node Name ____
ALLO_CLASS ____
SF200 Box # ____
____
UNITNUM
System ID __________________
Device Type ____
DSSI ID # ____
Node Name ____
ALLO_CLASS ____
SF200 Box # ____
____
UNITNUM
System ID __________________
Device Type ____
DSSI ID # ____
Node Name ____
ALLO_CLASS ____
SF200 Box # ____
____
UNITNUM
System ID __________________
ALLO_CLASS ____
SF200 Box # ____
____
UNITNUM
System ID __________________
Device Type ____
DSSI ID # ____
Node Name ____
ALLO_CLASS ____
SF200 Box # ____
____
UNITNUM
System ID __________________
ALLO_CLASS ____
SF200 Box # ____
____
UNITNUM
ALLO_CLASS ____
SF200 Box # ____
____
UNITNUM
System ID __________________
ALLO_CLASS ____
SF200 Box # ____
____
UNITNUM
System ID __________________
Device Type ____
DSSI ID # ____
Node Name ____
ALLO_CLASS ____
SF200 Box # ____
____
UNITNUM
System ID __________________
Device Type ____
DSSI ID # ____
Node Name ____
ALLO_CLASS ____
SF200 Box # ____
____
UNITNUM
System ID __________________
Device Type ____
DSSI ID # ____
Node Name ____
ALLO_CLASS ____
SF200 Box # ____
____
UNITNUM
System ID __________________
msb-0751-91
D–2 VAX 6000 Series Installation Guide
Figure D–2: KFMSA/DSSI Dual-Host Configuration Sheet
KFMSA XMI Node # ________
Bus 1
DSSI ID # ____
Device Type ____
DSSI ID # ____
Node Name ____
ALLO_CLASS ____
SF200 Box # ____
____
UNITNUM
System ID __________________
Device Type ____
DSSI ID # ____
Node Name ____
ALLO_CLASS ____
SF200 Box # ____
____
UNITNUM
Bus 2
DSSI ID # ____
Device Type ____
DSSI ID # ____
Node Name ____
ALLO_CLASS ____
SF200 Box # ____
____
UNITNUM
System ID __________________
Device Type ____
DSSI ID # ____
Node Name ____
System ID __________________
Device Type ____
DSSI ID # ____
Node Name ____
ALLO_CLASS ____
SF200 Box # ____
____
UNITNUM
System ID __________________
Device Type ____
DSSI ID # ____
Node Name ____
System ID __________________
Device Type ____
DSSI ID # ____
Node Name ____
ALLO_CLASS ____
SF200 Box # ____
____
UNITNUM
ALLO_CLASS ____
SF200 Box # ____
____
UNITNUM
System ID __________________
Bus 1
DSSI ID # ____
ALLO_CLASS ____
SF200 Box # ____
____
UNITNUM
System ID __________________
Device Type ____
DSSI ID # ____
Node Name ____
System ID __________________
Device Type ____
DSSI ID # ____
Node Name ____
ALLO_CLASS ____
SF200 Box # ____
____
UNITNUM
ALLO_CLASS ____
SF200 Box # ____
____
UNITNUM
System ID __________________
Device Type ____
DSSI ID # ____
Node Name ____
ALLO_CLASS ____
SF200 Box # ____
____
UNITNUM
System ID __________________
Bus 2
DSSI ID # ____
KFMSA XMI Node # ________
Color Code
on Cables _____
Color Code
on Cables _____
msb-0752 -91
DSSI Configuration Sheets
D–3
Index
A
AC input voltage, 1–10
AC power cable, 1–12
Adapters, 4–1 to 4–3
Autosizer, 3–34 to 3–35, 8–20
B
BNCIA cables, 4–24
Booting from a CD server, 8–14,
8–17
Booting from a TF tape, 8–18
Booting from a TK tape, 8–18
Booting VAX/DS, 8–12, 8–19
for Models 300 and 400, 8–14
from a CD server, 8–13
from a TK tape, 8–13
Boot time, 4–12
C
Cabinet specifications, 1–9
Cabling to a disk subsystem, 3–22
to 3–23, 3–26 to 3–27
SA600 cabinet, 5–6
SDI cables, 5–6
Cabling to a tape subsystem, 3–22
to 3–23, 3–26 to 3–27
H9643 cabinet, 5–4
CD server, 8–3
loading, 8–13
CIBCA adapter, 3–5, 4–3
CIBCA controller module, 4–21
CI compared with DSSI, 3–6 to 3–7
CI port address, 4–8
Circuit breaker, 6–2
operation, 6–3
CIXCD adapter, 3–5, 4–3
Cluster size, 4–16
Connecting the console terminal,
2–12 to 2–13
setting console terminal
characteristics, 2–13
Connecting to an Ethernet, 2–14 to
2–15
Connecting to FDDI, 2–16 to 2–17
Console commands
INITIALIZE, 8–6
SAVE EEPROM, 8–24
SET BOOT, 8–22
SHOW ALL, 8–24
SHOW CONFIGURATION, 8–6,
8–10, 8–22
and self-test results, 7–7
SHOW FIELD, 8–24
Console load device, 8–2 to 8–3
and CSA1, 8–12
and DEBNI, 8–8
and DEMNA, 8–8
loopback test, 8–8
TF tape, 8–10
TK tape, 8–10
T/R, 8–10
verify Ethernet adapter, 8–8
verify path, 8–8
Console terminal characteristics,
2–13
Control panel, 6–10 to 6–17
keys, 2–7
lower key switch, 6–12
Restart button, 6–14
status indicator lights, 6–16
upper key switch, 6–12
CSA1, 8–12
Index–1
D
DEBNA adapter, 3–5
DEBNI adpater, 3–5
DEC power bus cable, C–8
DELTA time, 4–10
DEMFA adapter, 3–5
DEMNA adapter, 3–5
Diagnostic CD-ROM, 8–3
Diagnostic LEDs on H7206-B, 6–8
Diagnostic monitor, 8–11
Diagnostic TF tape, 8–3
Diagnostic TK tape, 8–3
Digital Storage System Interconnect.
See DSSI
Disable arbitration, 4–14
DSSI, 3–1 to 3–41
buses, 3–11
bus limitations, 3–13
cable kits, 3–23
cables, 3–22 to 3–23, 3–26 to
3–27
compared with CI, 3–6 to 3–7
configuration, 3–12
description, 3–6
documentation, 3–2
install manuals, 3–2
install overview, 3–2
DSSI subsystem
configuration, 3–24 to 3–25
configuration procedure, 3–25
configuration sheet, 3–25
Dual-host, 3–7, 3–8, 3–20 to 3–21
software requirements, 3–21
DWMBB, C–8
cable connections, C–8
cabling rules, C–10
installing module, C–6 to C–8
E
EEPROM
saving parameters, 8–25
setting parameters, 8–25
ELKMP (multiprocessor test), 8–21
Index–2
Embedded storage, 3–19
Environmental requirements, 1–4
to 1–6
altitude, 1–6
relative humidity, 1–6
temperature, 1–6
Equipment damage, 2–3
ERKMP (multiprocessor test), 8–21
Ethernet transceiver cables, 2–15
Ethernet verification, 8–8
EVCXF, 3–36 to 3–37
EVCXF diagnostic, 3–11, 3–25, 3–30
to 3–41
EVSBA (standalone autosizer), 3–34
to 3–35, 8–21
Expander cabinet, C–1 to C–10
Extend ACK timeout, 4–14
Extend header, 4–14
External loopback testing, 8–9
F
FDDI cables, 2–17
Floor space required, 1–4
H
H405 AC power controller
main circuit breaker, 6–3
H7206-B diagnostic LEDs, 6–8
H9643 cabinet, 5–4
50 Hz transformer, 6–4
I
InfoServer, 8–3
Installation
DSSI overview, 3–2 to 3–3
Integrated storage element. See ISE
ISE, 3–1, 3–8, 3–12 to 3–13
controllers, 3–13
self-tests, 3–11
K
KDB50 adapter, 5–6
KDM70 adapter, 5–6
KFMSA adapter, 3–5, 3–8, 3–10 to
3–11
bus locations, 3–27
cabling, 3–27
LEDs, 3–10
node IDs, 3–28 to 3–29, 3–38 to
3–41
on-board termination, 3–11
options, 3–23
self-test, 3–10
KLESI-B adapter, 5–5
L
LARS form, 2–3
LEDs after self-test, 7–3
M
Mixed-host, 3–7, 3–20 to 3–21
Module handling, B–3
Multiprocessor tests, 8–20
N
Network options, 3–4
Node ID, 3–9, 3–38 to 3–41
changing value, 3–29
Node name, 3–8
O
Operating the control panel, 6–10
to 6–17
ISE operator control panels, 3–9
P
Power modules, 1–11
Power plugs and receptacles, 1–12
Power requirements, 1–10
Power-up procedure, 6–1 to 6–8
and verification, 8–7
checking power at site, 6–7
checking the 50 Hz transformer,
6–4
Power-up procedure (Cont.)
enabling the system, 7–2
H405-E indicator lights, 6–8
H7206-B diagnostic LEDs, 6–8
Processor modules
handling, B–3
inserting into card cage, B–5
Q
Quiet slot DELTA time, 4–10
R
Remote services console, A–1
RF disk drives, 3–17
ROM-based diagnostic for tape drive,
8–10
Running UETP, 8–26
Running VAX/DS standalone, 3–32
S
SA600 disk cabinet, 5–6
SDI cables, 5–7
Self-test, 7–3, 8–6
and module indicator lights, 7–3
display, 7–4
explanation of sample
configuration, 7–5
line
ETF, 8–7
STF, 8–7
XBI, 7–6 to 7–7, 8–7
sample results, 7–4 to 7–5
VAXBI module test results, 7–7
SF2xx, 3–16 to 3–17
components, 3–17
configuration, 3–17
definition, 3–9
levels, 3–17
upgrading, 3–17
SF7x, 3–14 to 3–15
configuration, 3–15
definition, 3–9
Index–3
SHOW CONFIGURATION
command, 8–6
Single-host, 3–7, 3–18 to 3–19
Split-bus, 3–9, 3–15, 3–17
System I/O panel
Ethernet port, 2–15
FDDI port, 2–17
System parameters, record, 8–24
System verification, 8–2 to 8–27
T
Terminal
cabling, 2–13
setting console parameters, 2–13
Termination
on-board, 3–11
removable, 3–11
TF857 tape loader, 3–17
TF tape drive, 8–3
Through-bus, 3–9, 3–15, 3–17
TK tape drive, 8–3
Tools
for expander cabinet installation,
2–5
for system cabinet installation,
2–4
Transformer, 6–4
Tri-host, 3–7, 3–9, 3–20 to 3–21
software requirements, 3–21
U
UETP (User Environment Test
Package), 8–26 to 8–27
Unpacking system cabinet, 2–1 to
2–11
checking for damage, 2–11
removing cabinet from pallet,
2–11
tools required, 2–4
V
VAXBI card cage
node numbers, 7–5
Index–4
VAXBI card cage (Cont.)
slot numbers, 7–4
VAXBI expander cabinet
installation, C–1 to C–10
VAXBI modules
self-test, 7–7
VAXcluster, 4–1 to 4–25
BNCIA cabling, 4–24
cabling to an SC008, 4–25
CIBCA jumper locations and
settings, 4–22
installing jumpers, 4–20
port, 4–24
setting a node address, 4–20
VAXcluster options, 3–4
VAX Diagnostic Supervisor, 3–30,
3–32 to 3–33, 3–41, 8–12,
8–13, 8–14, 8–18, 8–19
file names, 3–33
Verification, 8–2 to 8–27
Voltages, measuring, 6–7
X
XBI
self-test results, 7–7
XMI card cage
node numbers, 7–5
slot numbers, 7–4
XMI-to-VAXBI adapter
cables, C–1
self-test results, 7–7