1
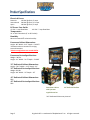
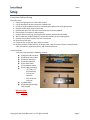
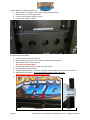
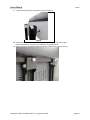
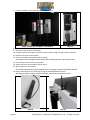
Setup and Operation
Service Manual
For use with:
Panorama Cabinet
32” and 42” Dedicated Cabinets
Revision HD-1.29-9.25-1
Big Buck HD® Copyright 2012 Play Mechanix™ Inc.
This software is based in part on the work of the Independent JPEG Group.
This product includes software developed by the OpenSSL Project for use in the OpenSSL Toolkit. (http://www.openssl.org/)
This product includes cryptographic software written by Eric Young ([email protected])
Table of Contents
Safety ............................................................................................................................................................ 3
Product Specifications................................................................................................................................... 5
Setup ............................................................................................................................................................. 6
Panorama Cabinet Setup .......................................................................................................................... 6
32” or 42” Dedicated Cabinet Setup ....................................................................................................... 13
Big Buck HD® Setup Wizard ........................................................................................................................ 14
Maintenance ............................................................................................................................................... 17
Diagnostic Menu System............................................................................................................................. 19
Menu Screens and Descriptions ............................................................................................................. 20
Adjustments ................................................................................................................................ 20
Audits .......................................................................................................................................... 24
Online .......................................................................................................................................... 25
Resets .......................................................................................................................................... 30
System Information..................................................................................................................... 30
Tests ............................................................................................................................................ 33
Utilities ........................................................................................................................................ 36
CoinUp®....................................................................................................................................................... 40
Troubleshooting .......................................................................................................................................... 48
Parts ............................................................................................................................................................ 52
Electrical Wiring .......................................................................................................................................... 61
Contact Information.................................................................................................................................... 62
Copyright © 2012 Play Mechanix™ Inc. All rights reserved.
Page 2
OPERATION
Before operating game, read this manual. Failure to properly install and operate this game could result in
malfunction or accident. Operate the game in accordance with the manual.
TRANSPORTING
Cabinet is very heavy and contains fragile components. Use appropriate care when moving or transporting cabinet.
Avoid rough handling.
HANDLING COMPONENTS
Many components are extremely sensitive to handling, environmental and Electrostatic Discharge (ESD) events—
especially the computer. Do not handle it roughly. Before servicing, call your distributor and inquire about the PC
warranty. Use proper ESD procedures when servicing. Protect components from harmful environmental
conditions, such as extreme temperatures, excessive moisture or other damaging effects.
DISCONNECT POWER
Always turn off power and unplug the unit before servicing or making adjustments, unless otherwise instructed.
Installing or repairing components while power is on can damage the components and void the warranty.
GROUNDING
Avoid electrical shock. Do not plug in AC power until you have inspected and properly grounded the unit. Only plug
into a grounded, three-wire outlet. Do not use a “cheater” plug or cut off the ground pin on the line cord.
ELECTRICAL SHOCKS
There is no isolation transformer in the cabinet. Disconnect AC power before servicing. However, be aware that
lethal voltages can remain in the electronic components even when AC power is disconnected. Use extreme
caution when servicing. Verify that there is a working ground connection. If the unit sustains water damage, cease
using it immediately and unplug AC power.
MONITOR
Extremely high voltages exist in the monitor at all times. These high voltages exist even when the monitor is off
and the AC line cord is disconnected. These voltages are extremely lethal and will cause death. The monitor
contains no user serviceable parts. Do not attempt to service the monitor.
POWER SELECTOR
Before installing game, ensure the voltage on the PC is set properly. There is a 115/230 VAC selector switch that
must be set for the correct voltage for your site. Verify the fluorescent lamp rating. The rating must match the line
voltage at the installation site.
CONNECTORS
Ensure all connectors mate properly. If connectors do not slip in easily, do not force them. Connectors are often
keyed and only connect one way. Check for correct orientation.
Page 3
Big Buck HD® is a trademark of PlayMechanix™ Inc. All rights reserved.
Safety
COMPUTER
The computer contains sensitive components, including a hard drive. Do not handle it roughly. Call your distributor
before servicing its internal components. Ask about warranty information as it relates to the PC.
Do not turn the PC power switch on or off. It should remain permanently in the ON position.
Cycle AC power on or off with the cabinet power switch.
A dongle has been inserted into one of the USB ports. This is required for game play.
Do not remove the dongle except for troubleshooting purposes.
POWER CORD
If the power cord is damaged or lost, replace it with an identical cord as supplied by the manufacturer or an
authorized service agent.
WATER JETS
Do not install or operate game within operating perimeter of a water jet. Do not clean equipment using water jet.
HAZARD TO EPILEPTICS
A small portion of the population has an epileptic condition that may cause seizures. Affected persons experience
seizure while watching some television pictures or playing certain video games. People who have not had seizures
may still have an undetected epileptic condition. If anyone in your family has experienced epilepsy symptoms
(seizures or loss of awareness), consult your physical before using video games. While children play video games, a
parent should observe. Be alert to the following symptoms: dizziness, altered vision, eye or muscle twitching,
involuntary movements, loss of awareness, disorientation or convulsions. If you or your child experiences these
symptoms, discontinue use immediately and consult your physician.
MANUAL
Keep this manual available and ready for use. If the game fails to function properly, turn off the machine and
unplug the AC line cord. Contact your local distributor. Your warrantee, when applicable, lasts 60 days from your
purchase date. You may not reproduce this document or any of its contents without written authorization from
Raw Thrills™, Inc. or PlayMechanix™ Inc.
SPECIFICATIONS
For reasons such as performance, this product’s specifications may change without notice. Federal patent,
copyright and other intellectual property laws protect the content, devices and design of the game and its
equipment.
Copyright © 2012 Play Mechanix™ Inc. All rights reserved.
Page 4
Electrical Power
Domestic
International
Japan
120 VAC @ 60 Hz, 5 amps
240 VAC @ 50 Hz, 2.5 amps
100 VAC @ 50 Hz, 5 amps
DC Power Fuse Guide
+5 VDC - 2 amp Slow Blow
+12 VDC - 7 amp Slow Blow
Temperature
32° to 100° Fahrenheit (0° to 38° Celsius)
Humidity
Must not exceed 95% relative humidity
Panorama Cabinet Dimensions
Height - 86” Width – 31.5” Depth – 51.694” *
*Dimensions do not account for varying
screen dimensions
*Monitor weight does not exceed 120 lbs
Panorama Carton Specifications
Weight: 287 lbs
Height – 41” Width – 31.5” Depth – 51.694”
32” Dedicated Cabinet Dimensions
Height – 78.5” Width – 32.5” Depth – 32”
32” Dedicated Carton Specifications
Weight: 350 lbs
Height – 80” Width – 35” Depth – 35”
42” Dedicated Cabinet Dimensions
TBD
42” Dedicated Carton Specifications
TBD
Panorama Cabinet
with Operator
supplied monitor
32” Dedicated Cabinet
*42” Dedicated Cabinet not pictured
Page 5
Big Buck HD® is a trademark of PlayMechanix™ Inc. All rights reserved.
Setup
Panorama Cabinet Setup
Unpack Carton
1. Place the shipping crate on a flat stable surface.
2. Cut the banding straps and remove the cardboard lid.
3. Lift off the large cardboard container surrounding the cabinet and any shipping cleats.
4. Remove the two steel monitor stanchions.
5. Remove both guns from the carton situated on top of cabinet pedestal.
6. Place the guns in holsters on cabinet bezel.
7. Remove carton containing mounting bracket assembly and marquee assembly.
8. With at least two people and a dolly, remove the cabinet from the shipping pallet.
9. Remove the coin door key from the coin return chute.
10. Open the top coin door.
11. Locate the key for the back door and the cash box.
12. Remove the items inside cash box: AC power cable, a bag of screws and tools, marquee power
cable, this manual, registration packet, and cell antenna mount
Verify Contents
Verify you have received the following contents.
(1) Big Buck HD® marquee
(1) Marquee Power Cable
(2) Monitor Stanchion
(1) Mounting Bracket
(1) AC Power Cable
(1) Cell Antenna mount
(1) Parts Bag Containing:
o (4) ¼-20 x 3.5”
flat-head bolts
o (4) ¼-20 x 3”
Hex bolts
o (8) ¼-20 elastic
stop nuts
(1) HDMI Cable*
(1) Mounting Screw Bag *
*Not pictured
NOT INCLUDED:
Monitor
Copyright © 2012 Play Mechanix™ Inc. All rights reserved.
Page 6
Purchase a Monitor
Monitor selection is vital to game performance. This is due not only to visual quality but more
importantly due to input latency. A high input latency can cause a noticeable delay between a player’s
input and its effect onscreen. It is advisable to avoid using low end models or older models. They may
be cheaper, but the price can come at a cost in performance. Similarly, high end models may have
additional features that negatively impact input latency. Look for a display built with gaming in mind,
such as those with a game mode setting. Consult with the manufacturer and/or vendor to find a
suitable low input latency monitor. Consult monitor manual and/or manufacturer to setup and
configure display for low input latency.
At minimum, monitor should be a 1080p flat panel ranging from 42” to 55” with HDMI input.
It is strongly recommended to use a display with a game mode.
Note – Not all monitors have GAME MODE. Refer to monitor manual for confirmation.
Note – Not all monitors with GAME MODE have acceptable input latency.
Requirements
1080p
HDMI input
Monitor weight does not exceed 120 lbs
A list of approved monitors can be found at http://rawthrills.com/
Consult your distributor for further assistance in finding an acceptable monitor.
Mounting Screws
As VESA mount point thread sizes vary from monitor to monitor, you will need 4 of these screws, if
your selected monitor does not include them.
A selection of the most commonly sized mounting screws has been included.
(4) 6MM X 16MM machine screws
(4) 6MM X 30MM machine screws
(4) 8MM-1.25 X 16MM machine screws
(4) 8MM-1.25 X 30MM machine screws
Page 7
Big Buck HD® is a trademark of PlayMechanix™ Inc. All rights reserved.
Setup
Setup Cabinet Pedestal
1. Using a wheeled cart and at least one assistant, transport the cabinet to a suitable playing area.
Proximity to Neon Lights
Neon lights may reduce the ability of the IR sensors to accurately track the guns.
Place the cabinet far away from neon lights or turn off any nearby neon lights.
2. Ensure the game cabinet is level and stable.
With at least one assistant, adjust the leg levelers.
3. Check the AC line cord for visible signs of damage.
Pay particular attention to the plug and line cord insulation.
4. Check for shipping damage to the following:
Gun assembly: Left and right guns, gun holders, and cables
Cabinet Marquee
Cabinet back door
Cabinet coin door
Cabinet and gun decals
Setup Monitor Stanchions
1. Place the stanchions in each of the mounting voids with cabinet-bolt holes at the bottom.
Center hole should be facing inside of cabinet as pictured.
2. Facing the back of the game, route Marquee power cable through right stanchion. 6-pin
connector should remain at top. Locate and connect trio of connectors at the bottom.
Step 1
Copyright © 2012 Play Mechanix™ Inc. All rights reserved.
Step 2
Page 8
3. Connect HDMI cable to PC and connect monitor power cable inside cabinet.
4. Route the monitor HDMI and monitor power cables through the left stanchion tube.
Start routing at bottom of stanchion. Route cables to midpoint opening with 12” slack exposed.
*Note: Some monitor power cables are fixed to the monitor. In such a case, cable must be
routed through stanchion after hanging monitor.
Step 4
5. Locate hardware bag provided in the marquee box.
6. Using (4) ¼-20 x 3.5” flat-head bolts and (4) ¼-20 elastic stop nuts, secure stanchions.
Step 6
Page 9
Big Buck HD® is a trademark of PlayMechanix™ Inc. All rights reserved.
Setup
Attach Mounting Bracket to Stanchions
1. Locate Mounting Bracket in the marquee box.
2. Position mounting bracket to use 3rd hole set from the top of the stanchions.
3. Slide (4) ¼-20 x 3” hex bolts into mounting bracket from rear of stanchions.
4. Secure bolts with (4) ¼-20 elastic stop nuts at the front of the stanchions.
Mounting Bracket as seen from front of cabinet
Attach Monitor Mounts
1. Locate monitor mounts in the marquee box.
2. Locate VESA mount holes on the back of your selected monitor.
3. Position mounts in line with VESA mount holes.
Make sure to center the mounts vertically within the height of your monitor.
4. Fasten the monitor mounts to the back of the monitor.
As VESA mount point thread sizes vary from monitor to monitor, be sure to use the correct size
of screws from the included assortment, if they are not provided by your selected monitor.
Copyright © 2012 Play Mechanix™ Inc. All rights reserved.
Page 10
Attach Monitor to Mounting Bracket
1. With at least one assistant, raise monitor above cabinet pedestal.
2. Slide monitor on to mounting bracket.
3. Connect monitor power cable to monitor
4. Connect hdmi cable to monitor
Setup Marquee Assembly
1. Remove marquee assembly from box.
2. With at least one assistant, raise marquee assembly above stanchions.
3. Slide marquee down onto stanchions.
Be careful not to pinch cables.
4. Route IR and marquee cables through marquee mounts.
5. Rest marquee on top of monitor.
6. Adjust horizontal position of monitor. Marquee tab should be centered within monitor face.
7. Adjust depth of marquee. Be sure centering tab overlaps front of monitor.
Marquee tab should be flush against monitor face.
8. Secure marquee depth and height by tightening (4) marquee bolts.
Step 6 and 7
Page 11
Step 8
Big Buck HD® is a trademark of PlayMechanix™ Inc. All rights reserved.
Setup
9. Connect IR marquee 6-pin connector at top of stanchion.
Step 9
10. Verify monitor is centered relative to marquee by sliding monitor left or right.
Centering monitor is critical for gun calibration and performance.
11. Secure monitor to bracket by tightening the set screws on the monitor mounts.
Copyright © 2012 Play Mechanix™ Inc. All rights reserved.
Page 12
32” or 42” Dedicated Cabinet Setup
1.
2.
3.
4.
5.
6.
7.
8.
9.
Place the shipping crate on a flat stable surface.
Cut the banding straps and remove the cardboard lid.
Lift off the large cardboard container surrounding the cabinet and any shipping cleats.
With at least two people and a dolly, remove the cabinet from the shipping pallet.
Remove the coin door key from the coin return chute.
Open the top coin door.
Locate the key for the back door and the cash box.
Remove the items inside cash box: AC line cord, a bag of screws and tools, and a warranty card.
Using a wheeled cart and at least one assistant, transport the cabinet to a suitable playing area.
Proximity to Neon Lights
Neon lights may reduce the ability of the IR sensors to accurately track the guns.
Place the cabinet far away from neon lights or turn off any nearby neon lights.
10. Remove packing material from the guns.
11. Ensure the game cabinet is level and stable.
With at least one assistant, adjust the leg levelers.
12. Check the AC line cord for visible signs of damage.
Pay particular attention to the plug and line cord insulation.
13. Check for shipping damage to the following:
Gun assembly: Left and right guns, gun holders, and cable
Cabinet glass: Marquee and monitor
Cabinet back door
Cabinet coin door
Cabinet and gun decals
Verify Cabinet Functionality
1.
2.
3.
4.
5.
6.
7.
8.
9.
10.
11.
12.
13.
Page 13
Verify the voltage in the nearest AC outlet.
Verify the AC outlet ground connection is present and working.
Open the back door of the cabinet.
Near the AC power transformer, verify the voltage selector switch is set for the correct AC
voltage.
Remove the marquee front plate.
Verify the fluorescent fixture in the marquee is set for the correct voltage.
Replace the marquee front plate
Plug the line cord into the AC outlet.
Replace the back door.
Turn the power switch to ON.
Verify that the cooling fans on the cabinet are working.
If not, turn off AC power and disconnect line cord. Contact Betson service
Check that no component is excessively hot or emitting foul odors.
If so, turn off AC power and disconnect line cord. Contact Betson service.
Once software loads, you will be asked to setup the cabinet software.
Big Buck HD® is a trademark of PlayMechanix™ Inc. All rights reserved.
Big Buck HD® Setup Wizard
®
The Big Buck HD® Setup Wizard provides a step-by-step setup procedure.
Gun Calibration
Panorama Cabinet
1. Pull the trigger on the left gun to indicate that it is Player 1.
2. Stand directly in front of the gun pedestal; aim at the dot above the screen and shoot.
3. Continue to aim and shoot targets as instructed.
4. The targeting reticle indicates the spot where the gun is aimed.
Verify accuracy by pointing at different areas of the screen.
5. Accept calibration by pressing start button.
6. Repeat steps 2-5 for right gun.
7. Press Start button when finished.
32” and 42” Dedicated Cabinets
1. Pull the trigger on the left gun to indicate that it is Player 1.
2. Stand directly in front of the gun pedestal; aim at the dot center screen and shoot.
3. The targeting reticle indicates the spot where the gun is aimed.
Verify accuracy by pointing at different areas of the screen.
4. Accept calibration by pressing start button.
5. Repeat steps 2-4 for right gun.
6. Press Start button when finished.
Copyright © 2012 Play Mechanix™ Inc. All rights reserved.
Page 14
Monitor Latency Test
1.
2.
3.
4.
5.
Only part of Setup Wizard for Panorama Cabinets
Press start button to begin test
Watch the demo video or press test to skip.
Aim down the site and move gun left and right across the screen.
Determine monitor latency level.
If reticle stays in the GREEN zone while moving left/right, monitor has acceptable latency.
If reticle enters a RED zone, monitor has unacceptable latency.
Press test when done.
Consult distributor, monitor manual, and/or manufacturer for settings to help reduce latency.
Color & Brightness
Adjust color, contrast, brightness and other monitor settings for best picture quality.
Operator Registration
1. If you already have an existing account, login with your Operator id and pin.
2. To register as a new operator, follow the step-by-step instruction to create an account.
Cabinet Registration
Select or setup a location for the cabinet. This will provide tracking/management functionality through
coinup.com. It will also allow players to locate the game through bigbuckhd.com.
Connectivity Wizard
Accept cell contract or reconfigure connection.
Page 15
Big Buck HD® is a trademark of PlayMechanix™ Inc. All rights reserved.
Big Buck HD® Setup Wizard
Verify Input and Output Functionality
See the Diagnostic Section for further information.
1.
2.
3.
4.
5.
6.
7.
Enter the SWITCH TEST menu and verify all switches function.
Enter the SCREEN TEST menu and verify that video is acceptable.
Enter the SOUND TEST menu and verify the audio works and is not distorted.
Enter the COIN METER TEST and verify the operation of the coin meter.
Enter the START BUTTON LAMPS menu and verify that the lamps of the buttons work correctly.
Enter the WATCHDOG TEST menu, which re-boots the game.
Upon a successful re-boot, you are ready to make adjustments to pricing, volume and other
functions found in the Diagnostic Section.
Verify Cabinet Connectivity
See Diagnostic Section for further information
1.
2.
3.
4.
Select ONLINE and run test connection
If any of the tests result in FAILURE, consult troubleshooting section.
Return to ONLINE and enter Cellular Information.
If connection is not optimal, consult connectivity guide.
Copyright © 2012 Play Mechanix™ Inc. All rights reserved.
Page 16
Regular Gun Maintenance Procedure
Big Buck HD® is equipped with two state-of-the-art custom-designed gun controllers. In order to
maximize income potential, keep the guns in optimal working order by performing the following fivestep procedure every time you empty the cash box.
1. Check the camera lens
Observe the tinted lens at the tip of the gun to ensure it has no cracks, scratches or dirt.
Clean or replace the lens, if necessary.
2. Visually and manually inspect gun cable connections
Open the coin door to see them. Reach in and ensure the cables are fully connected and are not
pinched by any components.
3. Verify switch functionality
Press the Test button on the service panel, select Tests, select Input Tests, and then select
Switch Test (described earlier in this manual) to ensure all the gun switches are functioning
properly. Switches in the gun include
Trigger
Pump
4. Calibrate, calibrate, calibrate
Return to the Main Menu screen and select Gun Calibration. Follow the instructions earlier in
this manual or on screen to recalibrate both guns.
5. Check IR sensors
The IR sensors are directly below and above the printed marquee on the monitor assembly.
From the Main Menu, select Tests, select Input Tests, and select IR Gun Sensor Test. See pg 20
Recalibrate the guns any time the game is moved or the guns are repaired, replaced or swapped.
Note: It is not advisable to replace or swap guns while power is on. Shut AC power off before connecting
or disconnecting any components. If, for some reason, guns are changed while power is on, shut off AC
power and reboot after the guns are connected again. Failure to do so may confuse the system so it
does not recognize the guns.
Following These Procedures Is Critical To
Maintaining Guns and Maximizing Revenue.
Perform regular gun maintenance to keep your
game in top working order.
Page 17
Big Buck HD® is a trademark of PlayMechanix™ Inc. All rights reserved.
Maintenance
Hard Drive Recovery
Hard Drive Recovery is used to update your game with new software or return the game to factory
Symptoms requiring hard drive recovery include:
File Test reports bad or missing files
Game fails to finish loading during startup
After resetting the AC power, an error is reported
You are prompted to insert a boot DVD
Erratic Game or Attract Mode
The following screen:
WARNING!
DATA Files Corrupted.
(Game Operation May Become Unstable.)
Use “Test” Switch to Enter Test Mode
and Run “File Test”
Press Start to Continue
COMPUTER
The computer contains sensitive components, including a hard drive. Do not handle roughly. Call your distributor
before servicing its internal components. Ask about warranty information as it relates to the PC.
Do not use the PC on/off switch. Turn AC power on or off with the cabinet power switch.
1.
2.
3.
4.
5.
6.
7.
8.
9.
10.
11.
12.
13.
With game and PC on, insert recovery DVD, marked as Disc 1, into DVD-ROM drive tray.
Close tray and Turn cabinet AC power switch to OFF.
Disconnect all USB devices from the PC.
Wait 30 seconds, then turn AC power switch to ON. Recovery begins automatically.
If recovery fails to begin, check that disc is seated properly in DVD-ROM drive tray.
Initial software loading may take several minutes. Check progress periodically.
Do not interrupt power or reset the game during recovery.
At some point, the game will eject Disc 1 and prompt you to insert Disc 2.
Swap discs and close the tray. Do not interrupt power or reset the game.
At some point, the game will eject Disc 2 and prompt you to insert Disc 3.
Swap discs and close the tray. Do not interrupt power or reset the game.
When software has finished loading, a message indicates that restore is complete.
When instructed to remove Disc 3, open DVD-ROM drive tray and remove disk.
Reconnect all USB devices. Turn cabinet power switch off.
After 30 seconds, turn cabinet power switch on.
After game restarts, it will enter calibration mode. Re-calibrate guns.
Copyright © 2011 Play Mechanix™ Inc. All rights reserved.
Page 18
14. Settings will now be factory defaults – make changes as desired.
Diagnostic Menu Interface
The Service Panel should have four buttons. Pressing the TEST button at any point while the game is
running will enter the diagnostic menu. This menu can be navigated with the service panel or the gun.
An on-screen message acknowledges changes or when you exit a selection without making a change.
At the bottom of each screen, there is a brief description of the highlighted menu option.
For clarity, all menu screens in this manual omit the header, background image, and control instructions.
Navigating with Service Panel Switches
Volume
UP
TEST
SERVICE
Volume
DOWN
TEST
SERVICE
VOLUME DOWN
VOLUME UP
enters diagnostic system or select highlighted menu option
exit current menu
moves down through menu or setting choices
moves up through menu or setting choices
Navigating with Gun
The menu interface can be navigated with the gun by aiming and shooting.
Shooting the right side options will perform the indicated action.
Shoot scroll up or scroll down to highlight menu options.
Shoot select to enter the highlighted menu or perform the highlighted option.
Shoot exit to return to the prior menu or exit the diagnostic system.
Page 19
Big Buck HD® is a trademark of PlayMechanix™ Inc. All rights reserved.
Diagnostic Menu System
Menu Screens and Descriptions
Main Menu
MAIN MENU
Setup Wizard
Adjustments
Audits
Online
Resets
System Information
Tests
Utilities
Setup Wizard
Adjustments
Audits
Online
Resets
Information
Tests
Utilities
pg 14 - will only appear if setup wizard has not been completed
pg 20 - modify various game settings
pg 24 - view various tracking statistics
pg 25 - setup and manage online functionality
pg 30 - used to restore game to factory defaults
pg 30 - view various hardware and software information
pg 33 - execute various diagnostic and maintenance tests
pg 36 - contains tools for managing game performance
Main Menu
Adjustments
These menus control gameplay, coinage and sound adjustments.
ADJUSTMENTS
Coin Adjustments
Alternative Payment Adjustments
Online System Adjustments
Game Adjustments
Hardware Adjustments
Sound Adjustments
Player Cost Adjustments
You can improve earnings by customizing performance with game adjustments. Each variable on an
adjustment menu changes an aspect of game play or appearance. Optimizing these settings can
maintain or increase player interest. Monitor the effects of adjustments by comparing audit
information and earnings before and after changes.
Copyright © 2011 Play Mechanix™ Inc. All rights reserved.
Page 20
Main Menu
Adjustments
Coin Adjustments
COIN ADJUSTMENTS
Currency Type
Coin Base Unit
Coin 1 Value
Coin 2 Value
DBV Pulse Value
Service Credit Value
Setting
Dollar
$0.25
$0.25
$0.25
$0.25
$0.25
Description
Default
Choices
Yen, Won, Ruble, Real,
Peso, Krona, Guilder,
Franc, Can. Dollar,
Coins, Euro, NZ Dollar,
Rand, Pound, Aus.
Dollar
$0.25 - $63.75 in $0.01
increments
$0.25 - $63.75
incrementing by
coin base unit setting
$0.25 - $63.75
incrementing by
coin base unit setting
Currency Type
Changing currency type resets coin door values. The
denomination symbol changes on screen with each
currency
Dollar
Coin Base Unit
Changes the amount by which monetary values increment
$0.25
Coin 1 Value
Sets the coin slot pricing
$0.25
Coin 2 Value
Sets the coin slot pricing
$0.25
The bill validator (DBV) translates bills into electronic
pulses. This setting determines how much game credit is
awarded per pulse. With default setting of $0.25, every $1
bill will award $1 in game credit. Set to $0.50, every $1 bill
will award $2 in game credit.
$0.25
$0.25 - $63.75
incrementing by
coin base unit setting
Set the amount of credit given by the service button
$0.25
$0.25 - $63.75
incrementing by
coin base unit setting
DBV Pulse
Value
Service Credit
Value
DBV PULSE VALUE
DBV must be set to award four pulses per dollar. Consult DBV for dipswitch settings or programming instructions.
Main Menu
Adjustments
Alternative Payment Adjustments
This menu allows control over accepting alternative payment.
ALTERNATIVE PAYMENT ADJUSTMENTS
Cash Card
Setting
Cash Card
Page 21
ON
Description
Accept payment with cash cards
Default
ON
Choices
ON/OFF
Big Buck HD® is a trademark of PlayMechanix™ Inc. All rights reserved.
Diagnostic Menu System
Main Menu
Adjustments
Online System Adjustments
ONLINE SYSTEM ADJUSTMENTS
Online Maintenance Hour
DB Server Port
File Server Port
Setting
Online
Maintenance
Hour
DB Server
Port
File Serve
Port
4:00 am-5:00 am
Automatic
Automatic
Description
Default
Choices
The 60-minute period during which online-enabled
games contact the server to check for software
updates and synchronize with the game database.
4:00 am
5:00 am
24 hours in one
hour increments
Adjusts the ports used to connect to the DB server.
Automatic
Adjusts the ports used to connect to the File server.
Automatic
Automatic, 21, 80,
443, 7686
Automatic, 21, 80,
443, 8080, 8686
Main Menu
Adjustments
Game Adjustments
GAME ADJUSTMENTS
Trail Guides
Setting
Trail Guides
On
Description
Toggles the appearance of the female trail guides
Default
ON
Choices
ON/OFF
Main Menu
Adjustments
Hardware Adjustments
HARDWARE ADJUSTMENTS
Monitor Size
Setting
Monitor Size
On
Description
Changes the brightness of IR array LEDs
to accommodate bigger screens
Copyright © 2011 Play Mechanix™ Inc. All rights reserved.
Default
40-55”
Choices
Less than 40”/40-55”/56-65”/6674”/75” or larger
Page 22
Main Menu
Adjustments
Sound Adjustments
Outside of diagnostic mode, pressing the Service Panel Vol + and Vol – buttons will adjust settings
depending on if operator is within game or attract mode.
SOUND ADJUSTMENTS
Game Volume
Attract Volume
Attract Sound Frequency
Setting
Game
Volume
Attract
Volume
Attract Sound
Frequency
50
25
Frequently
Description
Default
Choices
Modifies volume during game play
50
0-100
Modifies volume during attract mode
25
0-100
Determines how often attract mode music
will be played
Frequently
Off, Occasionally,
Frequently, or Always
Main Menu
Adjustments
Player Cost Adjustments
PLAYER COST ADJUSTMENTS
Freeplay
Trek Cost
Adventure Cost
Bonus-Only Cost
Showdown Cost
OFF
$1.00
$3.00
$1.00
$2.00
Setting
Description
Default
Choices
Freeplay
Allows play without money
OFF
Trek Cost
5 sites and one bonus game
$1.00
15 sites and three bonus games
$3.00
Four bonus games
$1.00
Networked head to head game over 2 treks
$2.00
OFF / ON
$0.00 - $63.75 incrementing by
coin base unit setting
$0.00 - $63.75 incrementing by
coin base unit setting
$0.00 - $63.75 incrementing by
coin base unit setting
$0.00 - $63.75 incrementing by
coin base unit setting
Adventure
Cost
Bonus-Only
Cost
Showdown
Cost
Page 23
Big Buck HD® is a trademark of PlayMechanix™ Inc. All rights reserved.
Diagnostic Menu System
Main Menu
Audits
Audit screens help assess game performance, find intermittent problems, decide whether to adjust
game difficulty and free game award and help maximize game earnings.
AUDITS
Coin Audits
System Audits
Gameplay Audits
Main Menu
Audits
Coin Audits
COIN AUDITS
Total Money In
$0.00
Coins in Left Coin Slot
Money in Left Coin Slot
0
$0.00
Coins in Right Coin Slot
Money in Right Coin Slot
0
$0.00
Number of DBV Pulses
Money in DBV
0
$0.00
Number of Credit Card Swipes
Credit Card Money
0
$0.00
Service Switch Presses
Service Credit Money
0
$0.00
Main Menu
Audits
System Audits
SYSTEM AUDITS
Watchdogs
Exceptions
Bad Traps
0
0
0
Copyright © 2011 Play Mechanix™ Inc. All rights reserved.
Page 24
Main Menu
Audits
Game Audits
GAME AUDITS
1-Player Turn-Based Games
2-Player Turn-Based Games
3-Player Turn-Based Games
4-Player Turn-Based Games
Shootout Games
Showdown Games
Total Player Starts
Total Player Continues
Total Continues Offered
Total: 0,
Total: 0,
Total: 0,
Total: 0,
Total: 0,
0
0
0
0
1-Trek: 0,
1-Trek: 0,
1-Trek: 0,
1-Trek: 0,
1-Trek: 0,
3-Trek: 0
3-Trek: 0
3-Trek: 0
3-Trek: 0
3-Trek: 0
Main Menu
Online
These menus cover all online interaction with CoinUp®.
ONLINE
Connection Details and Test
Cellular Information
Wi-Fi Information
Online Synchronization
Connection Wizard
Cabinet Location/Registration
Software Update
Online Debug
Main Menu
Online
Connection Details and Test
Use the Test Connection button to refresh the ping results.
CONNECTION DETAILS AND TEST
Connection Interface
Connection IP Info
Server Info
File Server Info
Test Results
Server Ping
Database Ping
File Server Ping
Queued Messages
Last Successful DB Query
Last Successful DB Query
Last Failed DB Query
Page 25
Wired (Ethernet)
eth0 00:18:d3:ff:c2:d6
10.0.1.2
255.255.255.0
10.0.1.1
games.playmechanix.net
files.playmechanix.net
0
295
840
ms
ms
ms
0
04.05.2012 10:57:13
04.05.2012 10:58:13
Never
67.217.33.153
67.217.33.153
80
443
Success
Success
Success
Last Successful FS Transfer
Last Successful FS Connection
Last Failed FS Connection
04.05.2012 10:57:13
04.05.2012 10:57:13
Never
Big Buck HD® is a trademark of PlayMechanix™ Inc. All rights reserved.
Diagnostic Menu System
Main Menu
Online
Cellular Information
Cellular Information provides all relevant information if a cell modem is being used.
CELLULAR INFORMATION
Device Model
Service Provider
ESN
Mobile Number
Mobile Line
Connection Status
Roaming
Signal Strength
Not Found
N/A
N/A
N/A
Unknown
Not Connected
No
Bar Graph (0.0dBm)
Main Menu
Online
WI-FI Information
Wi-Fi Information provides all relevant information if a wireless device is being used.
WI-FI INFORMATION
Adapter Model
Adapter MAC Address
SSID
Connection Status
Access Point MAC Address
Signal Strength
Not Found
N/A
N/A
Not Connected
N/A
Bar Graph
Main Menu
Online
Online Synchronization
This option executes synchronization with the online database. It will try to update the system
clock, game registration, advertisements, tournaments, and other online features. This
synchronization is also executed when the game is rebooted. Use this option to force any
changes that have been made via coinup.com.
Main Menu
Online
Connection Wizard
The Connection Wizard is a step by step setup process for selecting and configuring the game’s
internet connection.
Copyright © 2011 Play Mechanix™ Inc. All rights reserved.
Page 26
Main Menu
Online
Cabinet Location/Registration
This option displays current registration status for the machine. It allows the operator to
register the machine to a location or change the registered location of the game. Game
registration allows a variety of helpful interactions with coinup.com and online gameplay.
Main Menu
Online
Software Update
This option contacts database and file servers to check for new software updates.
Main Menu
Online
Online Debug
ONLINE DEBUG
Tournament Information
Add-on Tourney Information
Add-on Tourney Template Info
Advertisement Info
View Online Permissions
Server Details
Certificate Details
Activate Cell Modem
Purge Query Cache
Main Menu
Online
Online Debug
Tournament Information
Displays various information regarding any classic tournaments assigned to the machine.
TOURNAMENT INFORMATION
Count
Total – 0 – Complete – 0 – Active 0
Name
Info
Dates
Ldrbds
Page 27
Big Buck HD® is a trademark of PlayMechanix™ Inc. All rights reserved.
Diagnostic Menu System
Main Menu
Online
Online Debug
Add-on Tourney Information
This screen displays information for the machine’s add-on tournaments.
Tournament ID: Unique identifier combining Animal, date, and an incrementing number
Adv: Identifier related to the animal
Treks: Indicates how many treks are played
Max: Indicates maximum number of entrants
Buy: Indicates entry cost per entrant
Lbd: Indicates current number of entrants
Timestamp: Indicates the last time the tournament was updated
ADD-ON TOURNEY INFORMATION
Count
Total: 1
Info
Info
Elk 3/11/12-1 – Adv: 10200 – Treks: 1 – Max: 10 – Buy: $1.00 – Lbd: 4, 05.11.12
Main Menu
Online
Online Debug
Add-on Tourney Template Info
This page displays information regarding eligible add-on tournament types.
ADD-ON TOURNEY TEMPLATE INFO
Count
Total: 10 – Active 10
1 – Adv: 10100 – Treks: 1 – Max: 10 – Buy: $1.00 – Pztbl: 3 – Actv: 1 – 5.11.12
2 – Adv: 10200 – Treks: 1 – Max: 10 – Buy: $1.00 – Pztbl: 3 – Actv: 1 – 5.11.12
3 – Adv: 10300 – Treks: 1 – Max: 10 – Buy: $1.00 – Pztbl: 3 – Actv: 1 – 5.11.12
4 – Adv: 10400 – Treks: 1 – Max: 10 – Buy: $1.00 – Pztbl: 3 – Actv: 1 – 5.11.12
5 – Adv: 10500 – Treks: 1 – Max: 10 – Buy: $1.00 – Pztbl: 3 – Actv: 1 – 5.11.12
6 – Adv: 10100 – Treks: 3 – Max: 10 – Buy: $1.00 – Pztbl: 4 – Actv: 1 – 5.11.12
7 – Adv: 10200 – Treks: 3 – Max: 10 – Buy: $1.00 – Pztbl: 4 – Actv: 1 – 5.11.12
8 – Adv: 10300 – Treks: 3 – Max: 10 – Buy: $1.00 – Pztbl: 4 – Actv: 1 – 5.11.12
9 – Adv: 10400 – Treks: 3 – Max: 10 – Buy: $1.00 – Pztbl: 4 – Actv: 1 – 5.11.12
10 – Adv: 10500 – Treks: 3 – Max: 10 – Buy: $1.00 – Pztbl: 4 – Actv: 1 – 5.11.12
Main Menu
Online
Online Debug
Advertisement Info
This page displays information regarding downloaded advertisements.
Copyright © 2011 Play Mechanix™ Inc. All rights reserved.
Page 28
Main Menu
Online
Online Debug
View Online Permissions
This page displays information regarding permitted online activity.
VIEW ONLINE PERMISSIONS
Online:
Registered:
Full Connection:
Active Connection:
Credit Cards:
Add-on Tournaments:
Classic Tournaments:
Showdown:
Showdown Tournaments:
Trophy Club:
Buck Points:
Guest Login:
Quick Switch:
ENABLED
ENABLED
ENABLED
ENABLED
ENABLED
ENABLED
ENABLED
ENABLED
ENABLED
ENABLED
ENABLED
DISABLED
DISABLED
Main Menu
Online
Online Debug
Server Details
Displays server name, IP, and port for both database and file servers.
Main Menu
Online
Online Debug
Certificate Details
Displays the client’s authorization certificate.
Main Menu
Online
Online Debug
Activate Cell Modem
Activates the cell modem line for use.
Page 29
Big Buck HD® is a trademark of PlayMechanix™ Inc. All rights reserved.
Diagnostic Menu System
Main Menu
Online
Online Debug
Purge Query Cache
Purging the query cache will clear any online information stored locally forcing the game to
pull down the most current information.
PURGE QUERY CACHE
QUERY CACHE PURGED
Main Menu
Resets
This menu allows for clearing of various settings and information.
Factory Reset clears everything and restores the machine to factory defaults.
RESET
Reset Coin Audits
Factory Reset
Reset Adjustments
Reset Credits
Reset Gameplay Audits
Main Menu
System Information
SYSTEM INFORMATION
System Details
Hardware Monitoring
View Game Log
Gun Information
Cellular Information
Wi-Fi Information
Copyright © 2011 Play Mechanix™ Inc. All rights reserved.
Page 30
Main Menu
Information
System Details
SYSTEM DETAILS
BIOS
Kernel
Processor
Memory
G5 Rev
Library Rev
Engine version
I/O lib
IR Track
SDL
Sound Lib
RIO
Card Reader
Game Version
Vendor: Dell Inc. Version: A06
Date: 03/27/12
2.6.39-jl2
Intel® Celleron® CPU G530 @ 2.40GHz
2051176 kb
27523
1079
01.20.01
01.01.05
03.02.35
1.2.14
1.2.11
HW: FFFC SW: 0.14
1.6.3
1.29
Main Menu
Information
Hardware Monitoring
HARDWARE MONITORING
Page 31
System Uptime:
Connection Audits Since:
4 days, 07 hours, 39 minutes
7.27.2012 12:00:00
IO Board Connection:
IO Board Disconnects:
IO Board Last Disconnect:
Pass
0
Left (Green) Gun Connection:
Left (Green) Gun Disconnects:
Left (Green) Gun Last Disconnect:
Pass
0
Right (orange) Gun Connection:
Right (orange) Gun Disconnects:
Right (orange) Gun Last Disconnect:
Pass
0
Card Reader Connection:
Card Reader Disconnects:
Card Reader Last Disconnect:
Pass
0
Big Buck HD® is a trademark of PlayMechanix™ Inc. All rights reserved.
Diagnostic Menu System
Main Menu
Information
View Log
This page displays any logged events or errors that occur during the game.
Main Menu
Information
Gun Information
GUN INFORMATION
Number of Attached Guns 2
Serial #’s
Left (Green) Gun Info:
Connected
Serial #
Firmware Version
Firmware Checksum
Trigger
Pump
Right(Orange) Gun Info:
Connected
Serial #
Firmware Version
Firmware Checksum
Trigger
Pump
Advanced Gun Info:
Last LED Message
# seconds
Last LED Message
# seconds
Last Status Message
# seconds
Last Status Message # seconds
Good Camera Frames (last 5 sec)
Good Camera Frames (last 5 sec)
Stuck Bits
Stuck Bits
N/A
N/A
Main Menu
Information
Cellular Information
See pg 26 – same screen as in Online Menu
Main Menu
Information
Wi-Fi Information
See pg 26 – same screen as in Online Menu
Copyright © 2011 Play Mechanix™ Inc. All rights reserved.
Page 32
Main Menu
Tests
These various tests check cabinet and game functionality.
They are divided into submenus for input and output tests.
TESTS
Input Tests
Video Tests
Coin Meter Test
Sound Tests
Lamp Test
File Test
Watchdog Test
Main Menu
Tests
Input Tests
TESTS
Switch Tests
Card Reader Test
Gun Camera Test
Main Menu
Tests
Input Tests
Switch Tests
This checks input switch performance. By default, all switches should indicate inactive.
When a switch is pressed, it should indicate active and be highlighted on screen.
SWITCH TESTS
Coin Slot 1
Coin Slot 2
DBV
Player 1 Start
Player 2 Start
Vol +
Vol -
Inactive
Inactive
Inactive
Inactive
Inactive
Inactive
Inactive
Service
Test
Gun 1 Trigger
Gun 1 Pump
Gun 2 Trigger
Gun 2 Pump
Inactive
Inactive
Inactive
Inactive
Inactive
Inactive
Numpad 1
Numpad 2
Numpad 3
Numpad 4
Numpad 5
Numpad 6
Numpad 7
Numpad 9
Numpad 0
Numpad #
Numpad *
Inactive
Inactive
Inactive
Inactive
Inactive
Inactive
Inactive
Inactive
Inactive
Inactive
Inactive
The Switch Test menu has a unique exit procedure, because it checks the switches normally
used for navigation. To exit the switch test menu, press the test button five times.
Page 33
Big Buck HD® is a trademark of PlayMechanix™ Inc. All rights reserved.
Diagnostic Menu System
Main Menu
Tests
Input Tests
Card Reader Test
On swipe, card reader should read the card type and indicate success/failure for track 1 & 2.
If results indicate failure, that card might be worn. If results indicate failure across several
cards, card reader might be faulty.
CARD READER TEST
Card Type:
Track 1 Data:
Track 2 Data:
Total # of Swipes:
# of Successful Swipes:
# of Failed Swipes:
Player Card
Success
Success
0
0
0
Swipe Card At Any Time.
Main Menu
Tests
Input Tests
Gun Camera Test
This test displays the IR array information as interpreted by the gun’s camera. This will be
displayed onscreen as two rows of dots. If these dots do not display, there may be a
problem with the camera or IR array boards. If any grouping of dots is not present or
flickers, IR board should be replaced.
Main Menu
Tests
Video Tests
VIDEO TESTS
Screen Color Test
Screen Color Calibration
Video Latency Test
Copyright © 2011 Play Mechanix™ Inc. All rights reserved.
Page 34
Main Menu
Tests
Video Tests
Screen Color Test
Screen Color test provides a full screen of a solid color. Press start button to cycle colors.
Main Menu
Tests
Video Tests
Screen Color Calibration
Screen test provides a static picture and color bars to assist in adjusting monitor settings.
Main Menu
Tests
Video Tests
Video Latency Test
This test checks the video response time of the display.
Main Menu
Tests
Coin Meter Test
Press a start button to increment the coin meter.
Main Menu
Tests
Sound Tests
This checks sound volume and quality. Missing sounds indicated digital flaws. Distorted
sounds suggest analog flaws. Lack of sound suggests disconnected or bad cables or speakers.
SOUND TESTS
1000 Hz – Stereo (Both Left and Right Channels)
1000 Hz – Left Channel Only
1000 Hz – Right Channel Only
100 Hz – Stereo (Both Left and Right Channels)
100 Hz – Left Channel Only
100 Hz – Right Channel Only
100 and 1000 Hz tests generate specific frequency sounds on the indicated channel.
Cancel these sounds by selecting another test or exiting the menu.
Page 35
Big Buck HD® is a trademark of PlayMechanix™ Inc. All rights reserved.
Diagnostic Menu System
Main Menu
Tests
Lamp Test
This test checks for burned-out start button lamps. Test lights left, right, then both buttons.
Main Menu
Tests
File Test
This tests the integrity of the contents of the hard drive, searching for corrupt or missing game
files. Damaged or missing files register as failed and are listed. The only solution to this problem
is to restore the system from the DVD-ROM, as described in the Restore the Hard Drive section.
Main Menu
Tests
Watchdog Test
This tests the Watchdog circuit, which protects the game against screen freezes (infinite loops).
After a countdown, the game resets. To exit before the reset, press either Start or Volume
button, squeeze a trigger or pump a gun. If the test succeeds, the game resets normally. If the
test fails, the reset process loops or ends abnormally. See the Troubleshooting Chapter to
diagnose and correct this problem.
Main Menu
Utilities
UTILITIES
Gun Calibration
Cabinet Suspend
Collection
Main Menu
Utilities
Gun Calibration
This is the same procedure described earlier in the Gun Calibration section pg14.
Main Menu
Utilities
Cabinet Suspend
This option toggles a suspended state for maintenance to avoid online service changes.
Copyright © 2011 Play Mechanix™ Inc. All rights reserved.
Page 36
Main Menu
Utilities
Collection
COLLECTION
Take Collection
View Cash Card Details
View Player Account Details
View Service Credit Details
View Credit Card Fee Details
View Coinup Service Details
Main Menu
Utilities
Collection
Take Collection
TAKE COLLECTION
Date of Last Collection:
01.10.2012 (0.0 days)
Gross Collection
$0.00
Cash
$0.00
Cash Card
$0.00
Credit Card
$0.00
Player Account
$0.00
Service Credits
$0.00
Balance (Cash Card not included)
$0.00
Credit Card Fees
- $0.00
CoinUp Fees
- $0.00
Net Collection
$0.00
Operator Split
(50.0%)
$0.00
Location Split
(50.0%)
$0.00
Send Collections Message contacts the server and delivers the latest collections information.
Operator and location splits can be adjusted.
Page 37
Big Buck HD® is a trademark of PlayMechanix™ Inc. All rights reserved.
Diagnostic Menu System
Main Menu
Utilities
Collections
View Cash Card Details
VIEW CASH CARD DETAILS
Turn Based Play
Shootout Play
Bonus Only Play
Add On Trny Fees
National Trny Play
National Trny Funding
Custom Trny Play
Custom Trny Funding
Showdown Play
Showdown Trny Fees
Total Cash Card Usage
$0.00
$0.00
$0.00
$0.00
$0.00
$0.00
$0.00
$0.00
$0.00
$0.00
$0.00
Main Menu
Utilities
Collections
View Player Account Details
VIEW PLAYER ACCOUNT DETAILS
Turn Based Play
Shootout Play
Bonus Only Play
Add On Trny Fees
National Trny Play
National Trny Funding
Custom Trny Play
Custom Trny Funding
Showdown Play
Showdown Trny Fees
Total Player Account Usage
Copyright © 2011 Play Mechanix™ Inc. All rights reserved.
$0.00
$0.00
$0.00
$0.00
$0.00
$0.00
$0.00
$0.00
$0.00
$0.00
$0.00
Page 38
Main Menu
Utilities
Collections
View Service Credit Details
VIEW SERVICE CREDIT DETAILS
Turn Based Play
Shootout Play
Bonus Only Play
Add On Trny Fees
National Trny Play
National Trny Funding
Custom Trny Play
Custom Trny Funding
Showdown Play
Showdown Trny Fees
Total Player Account Usage
$0.00
$0.00
$0.00
$0.00
$0.00
$0.00
$0.00
$0.00
$0.00
$0.00
$0.00
Main Menu
Utilities
Collections
View Credit Card Details
VIEW CREDIT CARD DETAILS
Attempted Credit Transactions
0
Successful Credit Transaction
0
Total Charged
$0.00
Transaction Fees
$0.00
Main Menu
Utilities
Collections
View Coinup Service Details
VIEW COINUP FEE DETAILS
Online Subscription Service
Cell Modem Charge
Add On Trny Funding
Showdown Trny Funding
National Trny Funding
Operations Charge
Custom Trny Funding
Total Coinup Service
Page 39
(0.0 days)
(0.0 days)
(0.0 days)
$0.00
$0.00
$0.00
$0.00
$0.00
$0.00
$0.00
$0.00
Big Buck HD® is a trademark of PlayMechanix™ Inc. All rights reserved.
CoinUp®
®
Operation Overview
Having your game connected to CoinUp® allows easy access to software updates and permits game
health and earnings to be monitored via coinup.com.
There are three ways to connect: wired, cellular, or wireless.
Operator Registration
New operators may register directly at the game. Simply follow the steps during the Setup Wizard.
You will need a valid credit card to complete registration. Card will charged $0.01; this charge is
immediately voided and will not appear on your monthly statement.
Be sure to note your assigned operator id number and your pin. These numbers distinguish operators
and are used to login to the game during unit registration.
Alternatively, complete the follow steps.
1. Open a bank debit account.
2. Complete CoinUp® Operator Registration Packet.
Fill out the CoinUp® Authorization Agreement for Automated Payments.
Read and sign the CoinUp® Participating Operator Agreement.
Read and sign the CoinUp® Operator Registration Form.
3. To become an authorized operator, fax the forms to (630) 348-2099 or mail them to:
Play Mechanix™
800 Roosevelt Road, Suite D-103
Glen Ellyn, IL 60137
Authorization occurs in just a few days. Login information will be sent via email.
Unit Registration
During the setup wizard, you will be prompted to register the game. This links the game to the operator
and ties it to a specific location. Unit registration permits monitoring and management via coinup.com.
Follow the on-screen prompt to login and add/select a location to complete registration.
Access CoinUp® Operator Center
The CoinUp® Operator Center tracks the performance of your games. For example, you can compare
performance of different machines at the same location, or even across locations. To access CoinUp®
and view your pages, follow the steps below. From there, the site provides guidance. You follow easy
prompts and navigate to the statistic, accounting, bookkeeping or performance data that you need.
1.
2.
3.
4.
Access the CoinUp® Web site at www.coinup.com.
Enter the account e-mail address and password to login.
(Optional) To change login information, use the Profile tab.
Select locations or products to view.
FCC Compliance You are solely responsible for FCC compliance on installations.
Copyright © 2011 Play Mechanix™ Inc. All rights reserved.
Page 40
Network Configurations
Wired Connection – Ethernet Cable
1. Set up DSL or cable modem service through an ISP.
2. Turn off AC power, unplug the power cord, and open the back door.
3. Run the Ethernet cable to the cabinet.
4. Route the Ethernet cable through the mouse hole in the back door.
5. Inside the cabinet, dress the Ethernet cable away from other cables and metallic parts.
6. Connect the Ethernet cable to the RJ45 jack on the PC.
7. Close the back door.
8. Plug in power cord and turn on AC power.
Cellular Connection - Cell Modem
A cell modem and antenna comes preinstalled and preconfigured with the cabinet. The antenna is
located beneath cabinet bezel. However, other antenna positions may provide improved connectivity.
Follow recommended guidelines and procedure to reposition the antenna.
Antenna Location Guidelines
•
Keep the antenna vertical.
•
Avoid mounting an antenna near power lines.
•
Avoid areas where people could trip on a cable.
•
Don’t tempt vandals: If possible, keep the antenna out of plain sight.
Changing Antenna Location
1. Turn off AC power, unplug the power cord, and open the back door.
2. Remove 4 screws at front of bezel.
Step 2
Page 41
Big Buck HD® is a trademark of PlayMechanix™ Inc. All rights reserved.
CoinUp®
3. Remove 2 screws from each side of cabinet.
4. Remove 2 screws at the back of the bezel *not pictured.
5. Lift and prop up cabinet bezel.
Be careful to avoid damaging start buttons, card reader, or keypad connections.
Step 3
Step 5
6. Unscrew antenna from the cabinet.
Step 6
Copyright © 2011 Play Mechanix™ Inc. All rights reserved.
Page 42
7. Locate cell modem and mounting bracket inside cabinet.
Step 7: Dongle, Wi-Fi Adapter, Cell Modem
8.
9.
10.
11.
12.
13.
14.
15.
16.
Remove cell modem mounting bracket from the cabinet.
Disconnect antenna from cell modem.
Facing the back of the cabinet, route the antenna cable through the right monitor stanchion.
Reconnect antenna to cell modem.
Secure cell modem mounting bracket to cabinet.
Be careful to correctly align antenna cable within mounting bracket. Do not pinch cable.
Close the back door and turn on AC power.
Attach antenna to the included antenna mount.
Move antenna to new location.
Use Cellular Information (pg 26) in diagnostic menu to gauge reception to find best location.
Secure mounting plate to new location using the attached double stick tape.
Warning: Once tape backing is removed and set, tape cannot be moved or reused.
Step 14
Page 43
Step 12
Step 16
Big Buck HD® is a trademark of PlayMechanix™ Inc. All rights reserved.
CoinUp®
Wireless Connection - Wi-Fi Adapter
A Wi-Fi adapter comes preinstalled and preconfigured with the cabinet.
Connection Wizard
The connection wizard provides a step-by-step guide to configuring an internet connection.
Select a connection type and follow the on screen instructions.
Wired Configuration
Dynamic will automatically try to assign an IP address to the game machine
Static allows the game machine to be set with a fixed IP address
Cellular Configuration
Game will try to dynamically configure cellular connection.
Wireless Configuration
Prepare for Setup
1. Log into wireless access point or router.
2. Write down Wi-Fi network information on a sheet of paper:
• SSID (network name)
• Broadcast Channel
• Encryption Type (WEP 64-bit, WEP 128-bit, WEP 256-bit, WPA-PSK + TKIP encryption, WPAPSK + AES encryption, WPA2)
• Encryption Key (Different encryption types require different keys. See below for examples)
Encryption Type
Key Details
Credit Card - PCI Compliant
None/Open
None
NO
WEP
10, 26, or 58 hexadecimal characters
NO
WPA or WPA2
8-63 character ASCII pass phrase
YES
Note: PCI Compliance is required for credit card usage. Game will only allow credit card use if
wireless network is encrypted with WPA/WPA2 standards.
Enter Network SSID
1. Start Connection Wizard from Online option in diagnostics menu.
2. Select Wireless. The game will try to scan for available networks.
3. Scroll through the detailed list to locate your network.
Depending on settings, networks may not broadcast their SSID. These networks are displayed as
**HIDDEN**. To use a hidden network, select it, and enter the SSID manually when prompted.
4. If network does not appear in list, select rescan to refresh list of available networks.
Alternatively, select Enter Manually: enter SSID, encryption type, key and broadcast channel.
Select Encryption Type
This section only appears if Enter Manually was selected.
1. Shoot options to select None, WEP, or WPA/WPA2.
2. Shoot Select Encryption Type to continue.
Copyright © 2011 Play Mechanix™ Inc. All rights reserved.
Page 44
Enter Encryption Key
If the encryption type is disabled/open, skip this section, because there is no key.
1. Shoot onscreen keyboard to enter security key/passphrase.
Broadcast Channel
This section applies only if the SSID was entered manually.
1. Scroll through the list and shoot to select the appropriate channel.
2. If you are unsure of the correct broadcast channel, select Auto.
3. Shoot Select Channel to continue.
Confirm Wi-Fi Info
This section only appears if Enter Manually was selected.
1. Verify that information on the confirmation screen is correct.
2. If the information is incorrect, select Prev to return to prior sections of Wi-Fi setup.
3. If the information is correct, select OK to store the information.
Select Dynamic or Static
Dynamic will automatically try to assign an IP address to the game machine
Static allows the game machine to be set with a fixed IP address
Checking the Connection
Cell or Wi-Fi Users
1. Enter Diagnostic mode by pressing the TEST service button.
2. Select Online – select Cellular Information or Wi-Fi Information.
3. Connection Status should indicate Connected
4. Note the signal strength, which appears as a set of colored bars. Green bars indicate strength.
A strong signal is 5/5; a weak signal is 1/5 or 2/5.
5. If strength is below 3/5, reposition and recheck signal strength.
All Users
1. Enter Diagnostic mode by pressing the TEST service button.
2. Select Online then select Connection Details and Test.
3. Execute Test Connection to verify:
•
It can obtain a valid IP address.
•
It can contact the CoinUp® server.
•
It can access the CoinUp® database.
•
It can access the CoinUp® file server.
4. The test results section reports: SUCCESS or FAILURE.
If any ping results in FAILURE, see the Troubleshooting chapter or call your distributor.
Page 45
Big Buck HD® is a trademark of PlayMechanix™ Inc. All rights reserved.
CoinUp®
Game Registration
After the first reboot with a network connection, you will be prompted to register your location. You can
also register by entering the Diagnostic menu, select Online, then select Cabinet Location/Registration.
1.
2.
3.
4.
5.
6.
7.
8.
Login by swiping operator card or manually with operator id and pin.
Set Cabinet Location screen appears, downloading locations from CoinUp® automatically.
Scroll through the list and highlight the appropriate location.
Shoot the location to continue.
After location is chosen, a confirmation screen is displayed.
Shoot Use this Location to continue.
If the location is not on the list, shoot Add New Location to continue.
When adding a new location, follow step-by-step instructions to provide needed information.
Online Operation
1. Ensure game remains connected to the CoinUp® network.
2. The hard drive stores data about the game location. If the hard drive is removed from the PC,
important data will be lost. Do not swap or replace drives without authorization from CoinUp®.
3. Keep game location data accurate. Before moving a game, have the PC communicate with the
server, then unregister the game. Re-register the game with updated information at the new
location.
Collection Procedure
The CoinUp® server tracks various book-keeping statistics including collections. To see them, log on to
the CoinUp® Operator Center page at www.coinup.com and go to the Reports section.
1. During a normal collection, enter Diagnostic mode - select Utilities – select Collection.
2. Detailed breakdowns for Cash Cards, Player Account, Credit Cards, and CoinUp® can be seen in
their respective menus.
3. Select Take Collection and Review the entire report.
The system calculates Gross Collection from the last time the report screen was cleared.
This figure and the actual collection should agree.
4. Shoot DO COLLECTION to send collection information.
5. After sending the collections, coin related audits are automatically reset.
This allows coin audits to accurately reflect earnings since the last collection. If you don’t send
collections, the next collection won’t match the figures on the Collections screen and you will
not be able to view your collections on www.coinup.com.
If you wish to reset the other game audits, go to Reset Menu and select Reset Game Audits.
6. Split collection with location as usual.
CoinUp® debits your account for its portion.
Copyright © 2011 Play Mechanix™ Inc. All rights reserved.
Page 46
CoinUp® Fee Schedule
Pricing is subject to change without notice.
For online features, CoinUp® collects a monthly subscription. Additional fees are collected by CoinUp®,
but are passed along. Cellular Service fees are passed along to cellular provider, credit card fees are
passed along to credit card companies, and tournament prize funding paid for by the players is passed
along to any winners. The Operator portion can be adjusted as noted, using coinup.com - under the
Game Machines section, or at the game – in Diagnostic menu system, within Operator Adjustments, in
Player Cost. Adjustments should be made to each individual game.
Service
Operator
Portion
Who Pays
Additional Information
Basic Play
1-Trek (5 sites 1 bonus)
$1.00
Player, at game
Operator portion is adjustable
Adventure (3-Treks)
$3.00
Player, at game
Operator portion is adjustable
Shootout (1-trek or adv)
x2
Player, at game
Operator portion is adjustable
Showdown (2-Treks)
$2.00
Player, at game
Operator portion is adjustable
Bonus Only (4 bonuses)
$1.00
Player, at game
Operator portion is adjustable
Classic Tournament
Operator Created Trny
*
Player, at game
Custom created via coinup.com
*Operator is free to customize length of tournament, cost, and prizes.
Service
Operator
Portion
®
CoinUp
Portion
Who Pays
Additional Information
CoinUp® Sponsored Content
Add-on Trny Prize Fund
*
+$1.00
Player, at game
Added to 1-Trek or Adventure cost
Showdown Trny Fund
*
+$1.00
Player, at game
Added to Showdown cost
National Trny (1-trek)
$1.00
$0.00**
Player, at game
Operator portion NOT adjustable
National Trny (2-trek)
$2.00
$0.00**
Player, at game
Operator portion NOT adjustable
National Trny (3-trek)
$3.00
$0.00**
Player, at game
Operator portion NOT adjustable
*Operator portion remains per basic play above. CoinUp® portion is collected to fund prize table; this funding fee is passed
directly on to winning players.
**CoinUp® does not collect a funding fee for national tournaments. Prize table is completely funded by CoinUp®.
Service
Cost
Who Pays
Additional Information
CoinUp® Service - Per unit
Online Subscription*
$24.99
Operator
Taxes may apply
Cellular Service **
$18.00
Operator
Pass through service fees
Credit Card Fees***
4% + fixed fees
Operator
Pass through service fees
Tournament Funding
****
Player, at game Pass through prize funding
*This is the monthly service fee to CoinUp® which is accrued at a rate of $0.82 per day.
** Cellular Service is collected by CoinUp®, passed along to cellular provider, accrued at a rate of $0.59 per day.
***This is a flat percent of monthly usage plus a fixed fee per transaction, collected by CoinUp®, passed along to the credit
card companies.
****Tournament Funding will vary based on monthly gameplay and usage.
Accounting Guidelines
After the close of each billing cycle, the monthly CoinUp® billing statement, itemizing the costs of online
services, is viewable through the operator account at www.coinup.com.
The statement shows the approximate date of the automatic debit, allowing time to deposit appropriate
funds. The automatic debit charges the bank account submitted on your debit account form.
CoinUp® honors company checks but must receive them three or more business days before the debit
date. Late or delinquent deposits may exclude a game from access to online features and incur late fees.
Page 47
Big Buck HD® is a trademark of PlayMechanix™ Inc. All rights reserved.
Troubleshooting
Warning: Review safety chapter before making any adjustments to game.
General Troubleshooting
Problem
Game will not power up
Possible Cause
Game not plugged in.
Game not turned on.
Solution
Plug game into outlet.
Turn on main power switch.
Game fuse is blown.
Check and replace fuse.
No power to receptacle.
PC BIOS set incorrectly.
Test outlet and plug game into
powered outlet.
Turn PC power switch on. Ensure
IEC cable tightly plugged in. Trace
cable back to source to ensure
continuity.
See BIOS Settings chapter.
Screen not powering on with game
TV Auto On not set
Consult TV manual for details.
NO VIDEO message
Video cables not plugged in properly
Faulty video cable
PC not turned on.
Reattach and/or tighten video cable
to monitor.
Reattach and/or tighten video cable
to PC.
Replace video cable
Turn PC power switch on.
No sound
Bad Connection
Check connection to speakers.
Game does not load
Hard drive test reports “bad” or
“missing” files.
Game fails to finish loading.
Hard drive failure
Recover hard drive.
PC not turned on.
After resetting, game still reports an
error.
Game suggests inserting a boot
DVD.
Erratic game mode or attract mode.
WARNING!
Data Files Corrupted.
(Game Operation May Become
Unstable.)
Use “Test” Switch to Enter Test
Mode
and Run “File Test.”
Press Start To Continue.
Game resets
See procedure on pg 18.
Bad file.
Copyright © 2011 Play Mechanix™ Inc. All rights reserved.
Run File Test. Restore hard drive.
Page 48
Message
Guns won’t register, or function
poorly
Coin meter does not click during
Test
Possible Cause
Solution
Bad calibration
Calibrate guns.
Dirty/damaged lens
Gun disconnected
Clean gun lens.
Check USB connections.
No pulse to meter
Check all wiring from meter to I/O
board
Replace coin meter
Faulty meter
Exits Test Mode every 3 seconds
Test button stuck in ON position
Slide or toggle button off after Test
Menu appears
Dongle Not Present
Dongle missing or disconnected
Find dongle usb connection and
reseat in USB port
Connect dongle to another USB port
Faulty USB port
Connect I/O Board or
I/O Board Missing
USB cable disconnected
Blown fuse
No power to RIO board
Bad RIO Board
Page 49
Check USB connection from PC to
I/O board
Try connecting to a different USB
port
Verify 5V and 12V fuses are not
blown
Check for proper voltage
(+5V, +12V) at RIO P2 connector
Replace RIO board with known
functional board
Big Buck HD® is a trademark of PlayMechanix™ Inc. All rights reserved.
Troubleshooting
Connection to CoinUp® Troubleshooting
General Connection Troubleshooting
Problem
Connection Details and Test has IP
address but Test Connection reports
Database Ping failure or File Server
Ping failure.
Possible Cause
Firewall is blocking communication
with server.
Database or File Server is down
Ethernet Connection Troubleshooting
Problem
Possible Cause
Game cannot connect to CoinUp®
server.
No IP address appears under
Connection Details and Test
Solution
Read firewall documentation.
Ensure configuration allows ICMP
Echo.
If router has built-in firewall, check
router configuration.
Enable communication on ports 80,
443, 7786, and 7787.
Wait 30 minutes and revisit Test
Connection screen.
If still reporting failure, call CoinUp®
service.
Solution
No broadband internet service
Contact a local ISP to setup either
cable modem or DSL service.
Wrong router configuration
Configure router for DHCP (Dynamic
Host Configuration Protocol).
Check that Ethernet cables are
tightly connected at both ends. An
audible click confirms tightness.
Reboot game. In Diagnostic mode,
select Online, then Test Connection.
Confirm that IP address appears. The
phrase eth0 must follow IP address.
Test cable by connecting it from
another PC into router or wall jack.
Replace cable if faulty.
Plug Ethernet cable into a different
jack.
Contact ISP.
Plug Ethernet cable into different
jacks in router. Plug Ethernet cable
directly into DSL or cable modem
instead of router.
Replace router if faulty.
Call CoinUp® service
Disconnected Ethernet cable
Faulty Ethernet cable
Faulty Ethernet wall jack.
Broadband service is down.
Faulty router
Faulty network card
Copyright © 2011 Play Mechanix™ Inc. All rights reserved.
Page 50
Cellular Connection Troubleshooting
Problem
Game cannot connect to CoinUp®
server
Possible Cause
Poor connection between cell
modem and PC.
No IP address appears in Connection
Details and Test
Connection Details and Test reports
failures
Faulty cell modem
Cell modem connection is good and
IP address appears at Test
Connection screen. Under Cell
Modem Details, signal is weak or
nonexistent.
Poor antenna location
Change placement of antenna
and/or cabinet.
Faulty connection
Check connections between cell
modem and antenna. Replace
antenna if it appears damaged.
Wi-Fi Connection Troubleshooting
Problem
Wi-Fi Details status is Not
Connected or Adapter is Not
Found.
Wi-Fi Details status is Not
Connected, but a supported
adapter is connected.
Page 51
Solution
Check that USB connections at cell
modem and PC are tight. Turn off
cabinet AC power. Wait 30 seconds
and reboot game.
If still not connected, enter Diag,
select Online, and then select
Cellular Information.
If message is No Modem Found or
Collecting Data, call CoinUp®
service.
Ensure PWR LED on cell modem
glows green, which means PC is
providing modem with power.
If no power, swap with working
modem. Check modem for obvious
damage (dents, burns, smoke
damage, broken connectors)
If modem seems fine, call CoinUp®
service.
Possible Cause
A supported USB Wi-Fi adapter is
not connected.
Solution
Faulty USB port
Connect a supported Wi-Fi adapter.
Turn cabinet AC power off for a
minute and reboot.
Connect device to another USB port
Wi-Fi network information is
incorrect
Run connection wizard and select
Wireless. Enter required information.
Wireless access point or router is
off or disconnected.
Ensure access point has power.
Ensure it is connected to router.
Restart access point. Ensure router
has power and is connected to
cable/DSL modem.
Big Buck HD® is a trademark of PlayMechanix™ Inc. All rights reserved.
Parts
BBHD Vacform Assembly
Item
Part No.
Description
QTY
1
2
3
4
5
6
7
8
9
702-00008-01
702-00007-01
606-00680-01
606-00683-01
CR-PHMS 0.164-32x0.5x0.5-N
603-00567-01
600-00888-01
813-00006-01
MSHXNUT 0.112-40-S-N
ORANGE ROUND ILLUM PB
GREEN ROUND ILLUM PB
DECAL- C’PANNEL-BBHD
DECAL-KEYPAD-BBHD
8-32 X .50 BUT-HD-BLK-BOLT
VACFORM-C’PANEL-BBHD
PLATE-KEYPAD
KEYPAD-ATM STYLE – KEY TEK
4-40 – NYLOCK NUT
1
1
1
1
4
1
1
1
4
Monitor Mounting Screws
Item
Part No.
Description
QTY
1
2
3
4
5
6
7
8
31-MSM06-01-002
31-MSM06-01-004
31-MSM08-03-003
31-MSM08-03-004
3-102
4-748
3-400-25
3-400-31
6MM X 30 MM LG H.H.M.S. STL-ZINC
6MM X 16 MM LG H.H.M.S. STL-ZINC
8MM-1.25 X 16MM LG H.H.M.S STL-ZINC
8MM-1.25 X 30MM LG H.H.M.S STL-ZINC
WASHER 5/16ID X .750OD X 1/16THK STL-ZINC
PLASTIC SPACER - .75 OD X .325 ID X .50 THK
1/4 EXTERNAL TOOTH LOCKWASHER
5/16 EXTERNAL TOOTH LOCKWASHER
4
4
4
4
4
4
4
4
Copyright © 2011 Play Mechanix™ Inc. All rights reserved.
Page 52
Panorama Cabinet Assembly
Page 53
Big Buck HD® is a trademark of PlayMechanix™ Inc. All rights reserved.
Parts
Panorama Cabinet Assembly Part Numbers
Item
Part No.
Description
QTY
1
2
3
4
5
6
7
8
9
10
11
12
13
14
15
16
17
18
19
20
21
22
23
24
25
26
27
28
29
30
31
32
33
34
35
36
37
38
39
40
41
42
43
44
45
46
47
601-00577-01
601-00579-01
BBHD-42LCD-STAND-ASSY
BBHD-VACFORM-ASSY
CARD-SWIPE-ASSY
800-00005-01
BETSON 47-4450-XX
600-00772-01
SX-RIO ASSY
807-00003-00
2-1-02-00-00-017
820-00001-00
800-00001-00
2-1-10-00-00-000
Optiplex 390 Assy
810-00053-01
820-00018-00
820-00019-00
600-00901-01
Foam-pc-.5x8x14.5
87425k76 (56” LG)
29705K76 (FEMALE)
29705K76 (MALE)
606-00676-01
606-00677-01
606-00678-01
606-00685-01
606-00696-01
IN-HWMS 0.19-32X0.75X0.75-N
Regular FW 0.138
CR-PHMS 0.138-32X1.25X1-N
FHTS 0.112-24-AB-0.8125-N
PANHTS 0.112-24-TYPE 1-BP-0.8125-N
BB142090UHD
MSHXNUT 0.250-20-S-N
CR-PHMS 0.164-32X1.625X1-N
MSHXNUT 0.164-32-S-N
RHSNBOLT 0.19-24X1.5X.75-N
Regular FW 0.19
MSHXNUT 0.190-24-S-N
IN-HWMS 0.138-32X0.5X0.5-N
CR-PHMS 0.25-20X0.75X0.75-N
CR-PHMS 0.25-20X0.75X0.75-N
Regular LW 0.25
HFBOLT 0.25-20X1X0.75-N
FHTS 0.112-24-BP-0.8125-N
CR-PHMS 0.19-24X0.625X0.625-N
BBHD-42-WOOD-CAB-ASSY
ASSY-REAR DOOR - 42 BBHD
BBHD-42LCD-STAND-ASSY
BBHD-VACFORM-ASSY
CARD-SWIPE-ASSY
MID-WIDTH COINDOOR - BBHD
GUN MOUNTING PLATE
GRILL-SPEAKER-BBHD
SX-RIO PCB ASSY - BBHD
SPEAKER-6.5 INCH WOOFER-8OHM
APS_POWER_SUPPLY_WITH_BRACKET 90-AP-188
FAN-120MM-120VAC-15/19W
GUARD-FAN-WIRE-120MM
5.25 Full Range Speaker
Optiplex 390 Assy-BBHD
TEST SERVICE BUTTON ASSY
BBHD-COMPLETE GUN-ORANGE
BBHD-COMPLETE GUN-GREEN
BRACKET-PC STRAP MOUNT
FOAM-PC-.5X8X14.5 - POLYETHYLENE PLANK
NYLON STRIP 0.075" THICK, 1" WIDTH, BLACK (56" LG)
PLASTIC BUCKLE FOR 1"WEB, NO SEW RELEASE - FEMALE
PLASTIC BUCKLE FOR 1"WEB, NO SEW RELEASE - MALE
DECAL-LEFT SIDE PANEL
DECAL-RIGHT SIDE PANEL
DECAL-TOP CAB
DECAL-VINYL-FRONT PANEL
DECAL-OVAL GUN-BBHD
10-32 X .75LG HWH MACHINE SCREW
#6 FLAT WASHER - BLACK
6-32 X 1.25LG TP-BH MACHINE SCREW - BLACK
#8 X .75LG WOOD SCREW
#8 TP-BH WOOD SCREW - BLACK
1/4-20 X 3.547LG DEC.HEAD JOINT BOLT (STAFAST)
1/4-20 NYLOCK NUT
8-32 X 2.25LG PHILIPS HEAD MACHINE SCREW
8-32 NYLOCK NUT
10-24 X 1.25LG CARRAIGE BOLT - BLACK
#10 FLAT WASHER
10-24 NYLOCK NUT
#8 X .50LG SHEET METAL SCREW
1/4-20 X 1.25LG TP-BH-BOLT-BLACK
1/4-20 X .75LG TP-BH-BOLT-BLACK
1/4" SPLIT LOCK WASHER
1/4-20 X .75LG HH BOLT
#8 X .75LG WOOD SCREW
#10 X .63LG WOOD SCREW
1
1
1
1
1
1
2
1
1
1
1
1
1
2
1
1
1
1
2
1
2
2
2
1
1
1
1
4
5
4
4
8
3
4
4
4
4
6
10
6
2
6
4
3
3
4
8
Copyright © 2011 Play Mechanix™ Inc. All rights reserved.
Page 54
32” Cabinet Assembly
Page 55
Big Buck HD® is a trademark of PlayMechanix™ Inc. All rights reserved.
Parts
32” Cabinet Assembly Part Numbers
Item
Part No.
Description
QTY
1
2
3
4
5
6
7
8
9
10
11
12
13
14
15
16
17
18
19
20
21
22
23
24
25
26
27
28
29
30
31
32
33
34
35
36
37
38
39
601-00565-01
601-00566-00
601-00568-01
BBHD-VACFORM-ASSY
Optiplex 390 Assy
SX-RIO ASSY
CARD-SWIPE-ASSY
BETSON 47-4450-XX
600-00896-01
606-00719-01
600-00901-01
87425K76 (56” LG)
FOAM-PC-.5X8X14.5
2-1-02-00-00-017
820-00001-00
800-00001-00
800-00005-01
807-00003-00
820-00018-00
820-00019-00
606-00696-01
29705K76 (FEMALE)
29705K76 (MALE)
RHFNBOLT 0.19-24X1.25X.75-N
Preferred Narrow FW 0.19
MSHXNUT 0.190-32-S-N
FHTS 0.112-24-AB-0.8125-N
CR-PHMS 0.138-32X1.25X1-N
Preferred Narrow FW 0.138
CR-PHMS 0.164-32x1.625x1-N
MSHXNUT 0.164-32-S-N
Regular LW 0.25
IN-HWMS 0.25-20X0.75X0.75-N
CR-PHMS 0.25-20X1.25X1-N
Preferred Narrow FW 0.25
CR-PHMS 0.25-20X0.75X0.75-N
BB142070UHD
CR-PHMS 0.19-24X0.625X0.625-N
CR-PHMS 0.19-32X0.75X0.75-N
ASSY-WOOD-32” CAB-BBHD
ASSY-REAR DOOR - 32"CAB-BBHD
ASSY-WOOD-32"LCDBOX-BBHD
BBHD-VACFORM-ASSY
Optiplex 390 Assy-BBHD
SX-RIO PCB ASSY - BBHD
CARD-SWIPE-ASSY
GUN MOUNTING PLATE
SINTRA-GRAPHICS PANEL
DECAL- GRAPHICS PANEL (LOWER BLOCKER)
BRACKET-PC STRAP MOUNT
NYLON STRIP 0.075" THICK, 1" WIDTH, BLACK (56" LG)
FOAM-PC-.5X8X14.5 - POLYETHYLENE PLANK
APS_POWER_SUPPLY_WITH_BRACKET 90-AP-188
FAN-120MM-120VAC-15/19W
GUARD-FAN-WIRE-120MM
MID-WIDTH COINDOOR - BBHD
SPEAKER-6.5 INCH WOOFER-8OHM
BBHD-COMPLETE GUN-ORANGE
BBHD-COMPLETE GUN-GREEN
DECAL-OVAL GUN-BBHD
PLASTIC BUCKLE FOR 1"WEB, NO SEW RELEASE - FEMALE
PLASTIC BUCKLE FOR 1"WEB, NO SEW RELEASE - MALE
10-32 X 1.25LG CARRAIGE BOLT - BLK
#10 FLAT WASHER - ZINC
10-32 NYLOCK NUT
#8 X .75LG WOOD SCREW
6-32 X 1.25LG TP-BH-MS-BLK
#6 FLAT WASHER - BLK
8-32 X 2.25LG TP-BH-MS-BLK
8-32 NYLOCK NUT
1/4" SPLIT LOCK WASHER
1/4-20 X .75LG HH-BOLT
1/4-20 X 1.25LG TP-BH-MS-BLK
1/4" FLAT WASHER - BLK
1/4-20 X .75LG TP-BH-MS-BLK
1/4-20 X 2.756LG DEC HEAD JOINT BOLT (STAFAST)
#10 X .63"LG WOOD SCREW
10-32 X .75LG HWH MACHINE SCREW
1
1
1
1
1
1
1
2
1
1
2
2
1
1
1
1
1
1
1
1
4
2
2
6
10
6
7
4
4
4
4
3
3
8
12
4
4
5
5
Copyright © 2011 Play Mechanix™ Inc. All rights reserved.
Page 56
32” Monitor Assembly
Page 57
Big Buck HD® is a trademark of PlayMechanix™ Inc. All rights reserved.
Parts
32” Monitor Assembly Part Numbers
Item
Part No.
Description
QTY
1
2
3
4
5
6
7
8
9
10
11
12
13
14
15
16
17
18
19
20
21
22
23
24
25
26
27
28
29
30
31
32
33
601-00568-01
ASSY-32"OEM-LCD-WOOD
ASSY-BTM-LED-ARRAY-32"BBHD
ASSY-TOP-LED-ARRAY-32"BBHD
White LED Strip-30
820-00001-00
800-00001-00
2-1-10-00-00-000
600-00745-01
600-00772-01
600-00820-01
600-00747-01
600-00748-01
600-00755-01
600-00775-01
600-00818-01
606-00702-01
606-00701-01
600-00898-01
600-00907-01
RHFNBOLT 0.19-24x1x.75-N
MSHXNUT 0.190-32-S-N
IN-HWMS 0.164-32x0.75x0.75-N
CR-PHMS 0.164-32x0.5x0.5-N
CR-PHMS 0.164-32x1x1-N
Preferred Narrow FW 0.164
PANHTS 0.164-19-type I-AB-1.25-N
PANHTS 0.138-20-type I-AB-1-N
PANHTS 0.19-16-type I-AB-1.375-N
BB142070UHD
MSHXNUT 0.164-32-S-N
CR-PHMS 0.164-32x1.625x1-N
CR-PHMS 0.164-32x0.75x0.75-N
ASSY-WOOD-32"LCDBOX
ASSY-32"OEM-LCD-WOOD
ASSY-BTM-LED-ARRAY-32"BBHD
ASSY-TOP-LED-ARRAY-32"BBHD
30" LG WHITE LED STRIP
FAN-120MM-120VAC-15/19W
GUARD-FAN-WIRE-120MM
5.25 Full Range Speaker
TUBE-42"LCD MOUNT-BBHD
GRILL-SPEAKER-BBHD
BLOCKER-SINTRA-TOP MARQ
RETAINER-GLASS-32"LCD
BRACKET-32"LCD-WOOD MOUNT
GLASS-32"LCD-WOOD-MOUNT
PLEX-MARQUEE-32" BBHD
PLEX-SMOKED-32"MARQUEE-BBHD
TRANSLITE-32" MARQUEE-BBHD
DECAL-32" BLOCKER-BBHD
PLATE- LOWER IR RETENTION
PLATE- TOP IR RETENSION
10-32 X 1.00", CARRAIGE BOLT-BLK
10-32 KEP NUT
8-32 X 1.00LG HEX WASHER HEAD-MS-ZINC
8-32 X .50LG-TP-BH-BLK-MS
8-32 X 1.00LG-TP-BH-BLK-MS
#8 BLK WASHER
#8 X .75LG TP-WOOD SCREW - BLK
#8 X .50LG PHIL-WOOD SCREW-ZINC
#8 X 1.25LG PHIL - MS - BLK
1/4-20 X 2.756LG DEC.HEAD JOINT BOLT (STAFAST
8-32 NYLOCK NUT
8-32 X 2.25LG PHIL-MS-BLK
8-32 X .75LG - TP-BH-BLK-MS
1
1
1
1
2
1
1
2
2
1
1
1
2
1
1
2
1
1
1
1
4
4
4
10
2
8
6
8
1
6
10
4
3
Copyright © 2011 Play Mechanix™ Inc. All rights reserved.
Page 58
BBHD Gun Assembly
Green Gun Parts and Assembly
Page 59
Big Buck HD® is a trademark of PlayMechanix™ Inc. All rights reserved.
Parts
Orange Gun Parts and Assembly
Copyright © 2011 Play Mechanix™ Inc. All rights reserved.
Page 60
Cabinet Wiring Diagram
Page 61
Big Buck HD® is a trademark of PlayMechanix™ Inc. All rights reserved.
Contact Information
For an authorized distributor near you, check the Raw Thrills website at www.rawthrills.com
Contact Betson Enterprise Headquarters or your local Betson office for sales, technical information,
warranty or repair. Betson can be reached at (800) 524-2343 Fax (201) 438-4837 www.betson.com
CoinUp® Service
PlayMechanix™ www.playmechanix.com
800 Roosevelt Road, Suite D-103
Glen Ellyn, IL 60137
(866) 646-1975 fax (630) 942-1073
Betson Enterprises Headquarters
303 Paterson Plank Rd.
Carlstadt, NJ 07072
(800) 524-2343 or (201) 438-1300
fax (201) 438-4837
Copyright © 2011 Play Mechanix™ Inc. All rights reserved.
Page 62