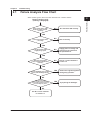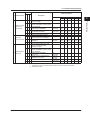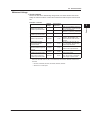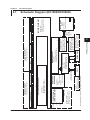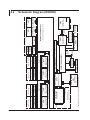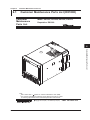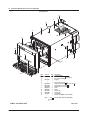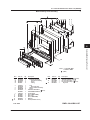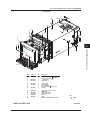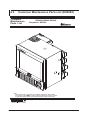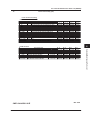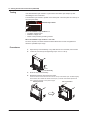
1
Service Manual Daqstation DX1000/DX1000N/DX2000 SM 04L41B01-01E Yokogawa Electric Corporation 4th Edition Important Notice to the User • This manual contains information for servicing YOKOGAWA’s DX1000, DX1000N, and DX2000. Check the serial number to confirm that this is the correct service manual for the instrument to be serviced. Do not use the wrong manual. • Before any maintenance and servicing, read all safety precautions carefully. • Only properly trained personnel may carry out the maintenance and servicing described in this service manual. • Do not disassemble the instrument or its parts, unless otherwise clearly permitted by this service manual. • Do not replace any part or assembly, unless otherwise clearly permitted by this service manual. • In principle, Yokogawa Electric Corporation (YOKOGAWA) does not supply parts other than those listed in the customer maintenance parts list in this service manual (mainly modules and assemblies). Therefore if an assembly fails, the user should replace the whole assembly and not components within the assembly (see “Note”). If the user attempts to repair the instrument by replacing individual components within the assembly, YOKOGAWA assumes no responsibility for any consequences such as defects in instrument accuracy, functionality, reliability, or user safety hazards. • YOKOGAWA does not offer more detailed maintenance and service information than that contained in this service manual. • All reasonable efforts have been made to assure the accuracy of the content of this service manual. However, there may still be errors such as clerical errors or omissions. YOKOGAWA assumes no responsibility of any kind concerning the accuracy or contents of this service manual, nor for the consequences of any errors. • All rights reserved. No part of this service manual may be reproduced in any form or by any means without the express written prior permission of YOKOGAWA. The contents of this manual are subject to change without notice. Note YOKOGAWA instruments have been designed in a way that the replacement of electronic parts can be done on an assembly (module) basis by the user. YOKOGAWA instruments have also been designed in a way that troubleshooting and replacement of any faulty assembly can be done easily and quickly. Therefore, YOKOGAWA strongly recommends replacing the entire assembly over replacing parts or components within the assembly. The reasons are as follows: • The instruments use high-performance microprocessors, large scale CMOS gate arrays, and surface-mount components to provide state-of-the-art performance and functions. • Repair of components can only be performed by specially trained and qualified maintenance personnel with special highly-accurate tools, including costly ones. • When taking the service life and cost of the instruments into consideration, the replacement of assemblies offers the user the possibility to use YOKOGAWA instruments more effectively and economically with a minimum in downtime. Trademark Revisions • Adobe, Acrobat, and PostScript are trademarks of Adobe System Incorporated. • For purposes of this manual, the ™ and ® symbols do not accompany their respective trademark names or registered trademark names. • Company and product names that appear in this manual are trademarks or registered trademarks of their respective holders. 1st Edition: Apr. 2006 4th Edition: Jun. 2010 2nd Edition: May 2007 3rd Edition: Mar. 2009 4th Edition: June 2010 (YK) All Rights Reserved, Copyright © 2006 Yokogawa Electric Corporation SM 04L41B01-01E Introduction This manual contains information for servicing YOKOGAWA’s DX1000, DX1000N, and DX2000. WARNING This service manual is to be used by properly trained personnel only. To avoid personal injury, do not perform any servicing unless you are qualified to do so. Refer to the safety precautions prior to performing any servicing. Even if servicing is carried out according to this service manual, or by qualified personnel, YOKOGAWA assumes no responsibility for any result occurring from that servicing. Safety Standards and EMC Standards The DX conforms to IEC safety class I (provided with terminal for protective grounding), Installation Category II, Measurement Category II (CAT II), and EN61326-1 (EMC standard), class A (use in a commercial, industrial, or business environment). The DX is designed for indoor use. Safety Precautions The general safety precautions described here must be observed during all phases of operation. If the DX is used in a manner not described in this manual, the protection provided by the DX may be impaired. Yokogawa Electric Corporation assumes no liability for the customer’s failure to comply with these requirements. WARNING • Use the Correct Power Supply Ensure that the source voltage matches the voltage of the power supply before turning ON the power. In the case of a desktop type, ensure that it is within the maximum rated voltage range of the provided power cord before connecting the power cord. • Use the Correct Power Cord and Plug (Desktop Type) To prevent electric shock or fire, be sure to use the power cord supplied by YOKOGAWA. The main power plug must be plugged into an outlet with a protective ground terminal. Do not disable this protection by using an extension cord without protective earth grounding. • Connect the Protective Grounding Terminal Make sure to connect the protective grounding to prevent electric shock before turning ON the power. The power cord that comes with the desktop type is a three-prong type power cord. Connect the power cord to a properly grounded three-prong outlet. • Do Not Impair the Protective Grounding Never cut off the internal or external protective grounding wire or disconnect the wiring of the protective grounding terminal. Doing so invalidates the protective functions of the instrument and poses a potential shock hazard. • Do Not Operate with Defective Protective Grounding Do not operate the instrument if the protective grounding might be defective. Also, make sure to check them before operation. ii SM 04L41B01-01E • Do Not Operate in an Explosive Atmosphere Do not operate the instrument in the presence of flammable liquids or vapors. Operation in such an environment constitutes a safety hazard. Prolonged use in a highly dense corrosive gas (H2S, SOx, etc.) will cause a malfunction. • Do Not Remove Covers The cover should be removed by YOKOGAWA’s qualified personnel only. Opening the cover is dangerous, because some areas inside the instrument have high voltages. • Ground the Instrument before Making External Connections Connect the protective grounding before connecting to the item under measurement or control unit. • Damage to the Protection Operating the instrument in a manner not described in this manual may damage the instrument’s protection. • Pull Out the Inner Instrument Correctly Pull out the inner instrument correctly according the instructions given in “Pulling Out the Inner Instrument (DX1000N)” in this manual. Safety Symbols Used on Equipment and in Manual “Handle with care.” To avoid injury and damage to the instrument, the operator must refer to the explanation in the manual. Protective ground terminal Functional ground terminal (do not use this terminal as a protective ground terminal.) Alternating current Direct current ON (power) OFF (power) Conventuins Used in Manual WARNING CAUTION SM 04L41B01-01E Calls attention to actions or conditions that could cause serious or fatal injury to the user, and precautions that can be taken to prevent such occurrences. Calls attentions to actions or conditions that could cause light injury to the user or damage to the instrument or user’s data, and precautions that can be taken to prevent such occurrences. iii Overview of This Manual This manual is meant to be used by qualified personnel only. Make sure to read the safety precautions at the beginning of this manual as well as the warnings and cautions contained in the chapters relevant to any servicing you may be carrying out. This manual contains the following chapters. Chapter 1 Principles of Operation Describes the principles of operation of the instrument. Chapter 2 Troubleshooting Lists problems that can occur and gives corrective actions. Chapter 3 Testing Gives procedures for testing the characteristics of the instrument. Chapter 4 Adjustments Explains how to adjust the instrument. Chapter 5 Schematic Diagram Provides a system configuration diagram. Chapter 6 Customer Maintenance Parts List Contains exploded views and a list of replaceable parts. Chapter 7 Replacing Parts Describes how to replace parts. Also explains how to pull out the Inner Instrument of the DX1000N. Specifications are not included in this manual. For specifications, refer to the DX1000/ DX1000N User’s Manual (IM 04L41B01-01E) and the DX2000 User’s Manual (IM 04L42B01-01E). Revision History Edition 2 3 4 iv Description Addition and improvements to functionality: 24 VDC/AC power supply (/P1 option) Addition and improvements to functionality: PROFIBUS-DP (/CP1 option) and others Change of parts : LCD for the DX2000, CF assembly The size of the CF card supplied has been changed to 128 MB. Compatible with CMPL04L41B01-01E 11th Edition, CMPL04L42B01-01E 11th Edition, and CMPL04L43B01-01E 11th Edition. SM 04L41B01-01E Contents 1 Important Notice to the User...............................................................................................................i Trademark...........................................................................................................................................i Revisions............................................................................................................................................i Introduction........................................................................................................................................ ii Safety Standards and EMC Standards.............................................................................................. ii Safety Precautions............................................................................................................................. ii Safety Symbols Used on Equipment and in Manual......................................................................... iii Conventuins Used in Manual............................................................................................................ iii Overview of This Manual.................................................................................................................. iv 2 3 4 Chapter 1 Principles of Operation 1.1 Principles of Operation......................................................................................................... 1-1 Chapter 2 Troubleshooting 2.1 Failure Analysis Flow Chart.................................................................................................. 2-1 2.2 Troubleshooting Checklist..................................................................................................... 2-4 5 6 Chapter 3 Testing 3.1 Acceptance Test .................................................................................................................. 3-1 3.2 Self Diagnostic Test.............................................................................................................. 3-2 3.3 Performance Test.................................................................................................................. 3-3 Test Environment.................................................................................................................. 3-3 Test Instruments................................................................................................................... 3-3 Instrument Operation............................................................................................................ 3-3 Tests..................................................................................................................................... 3-3 3.4 Test Procedures.................................................................................................................... 3-4 Insulation Resistance............................................................................................................ 3-4 Protective Grounding............................................................................................................ 3-4 Withstand Voltage................................................................................................................. 3-5 Measurement Accuracy........................................................................................................ 3-6 Reference Junction Compensation Accuracy....................................................................... 3-8 Battery Backup..................................................................................................................... 3-8 Pulse Input Function............................................................................................................. 3-9 Chapter 4 Adjustments 4.1 Before Making Adjustments.................................................................................................. 4-1 Environment.......................................................................................................................... 4-1 Instrument Operation............................................................................................................ 4-1 Note...................................................................................................................................... 4-1 4.2 Adjusting the A/D Converters................................................................................................ 4-2 Chapter 5 Schematic Diagram 5.1 Schematic Diagram (DX1000/DX1000N)............................................................................. 5-1 5.2 Schematic Diagram (DX2000).............................................................................................. 5-2 SM 04L41B01-01E 7 Contents Chapter 6 Customer Maintenance Parts List 6.1 Customer Maintenance Parts List (DX1000)........................................................................ 6-1 6.2 Customer Maintenance Parts List (DX1000N).................................................................... 6-10 6.3 Customer Maintenance Parts List (DX2000)...................................................................... 6-20 Chapter 7 Replacing Parts 7.1 Introduction........................................................................................................................... 7-1 Replaceable Parts................................................................................................................ 7-1 If Servicing is Required......................................................................................................... 7-1 7.2 Recommended Replacement Periods for Worn Parts.......................................................... 7-2 7.3 Pulling Out the Inner Instrument (DX1000N)........................................................................ 7-3 Notes.................................................................................................................................... 7-3 Testing.................................................................................................................................. 7-4 Procedures........................................................................................................................... 7-4 vi SM 04L41B01-01E Chapter 1 Principles of Operation 1.1 Principles of Operation 1 Principles of Operation The following explains the principles of operation of the DX. 2 Block Diagram CPU 3 Data storage functions Input section Input terminal Scanner A/D External storage Internal memory Display 5 Key Easy text entry function 4 (optional) 6 Calculation function Alarm Communication function Remote control (optional) Pulse input (optional) Relay contact (optional) Transmitter power supply (optional) USB port (optional) 7 Input Terminal Section For connecting the measurement input signal wires. The terminals can be used for DC voltage, thermocouple, resistance temperature measurement, and contact input. • The reference junction compensation circuit for thermocouples is built in. • Proven transistor method for measuring the temperature of the terminals. • Metal core construction used in the internal printed circuit boards to equalize temperature. • Input terminals removable. Scanner Section Switches the measured input signal (channel). The input signal switching section uses highly reliable solid state relays (SSR). A/D Conversion Section Converts analog signals to digital signals. It is a PWM (pulse width modulation) type converter. A/D converter calibration data is stored in an EEPROM. For the correspondence between input channels and A/D converters, see “Measurement Accuracy” on page 3-6. SM 04L41B01-01E 1-1 1.1 Principles of Operation Saving Data The capacity of the internal memory is either 80 MB (standard memory) or 200 MB (expansion memory). The CF card can be used as an external memory medium. Display/Keys/Easy Text Entry The DX uses an LCD display. You can control the DX with key operations. With Easy Text Entry (optional), you can control input by the remote control terminal. Calculation Alarms Other Functions You can calculate the difference between two measurement inputs, perform linear scaling, square roots, calibration correction, and other computations. Alarm functions include upper limit alarm and lower limit alarm. Serial/Ethernet Communication The DX can communicate with other instruments via the Ethernet interface or the serial communication interface (optional). Remote Control/Pulse Input Record start and other operations can be controlled using external signals (with the optional remote control function). Counts the number of pulses for each measruement (with the pulse input option). Relay Output The DX can output alarms or FAIL/Status (optional). Transmitter Power Supply Output The DX can output 24 VDC for use as a power supply for transmitters (optional). USB Port Allows connection with USB keyboard and USB flash memory devices (optional). 1-2 SM 04L41B01-01E Chapter 2 Troubleshooting 2.1 Failure Analysis Flow Chart 1 When a failure occurs, refer to the flow chart below for corrective actions. 2 Troubleshooting Doesn’t function at all (nothing is displayed) 3 Is the power switch* ON? Does the switch operate normally? NO Turn the switch ON correctly. 4 YES Is the power supply wired correctly? NO 5 Wire it correctly. YES Is an appropriate power supply being input? 6 NO Supply power of voltage and frequency that conforms to the specifications. 7 YES Other than the display, is the instrument functioning normally? NO See No. 1 of the checklist in section 2.2. YES Restore the original brightness through key operation. YES Has the backlight gone out due to the LCD’s backlight saver? NO Has the instrument been operated longer than the recommended replacement period for the backlight (5 years)? YES Try replacing the backlight. NO See No. 5 of the checklist in section 2.2. SM 04L41B01-01E 2-1 2.1 Failure Analysis Flow Chart Keys do not operate correctly Is the key lock set? YES Release the key lock setting. NO See No. 4 of the checklist. If there is a problem with a display screen or other function Have measures against external noise been taken? NO YES See No. 2, 3, 7, 9, and 10 of the checklist in section 2.2. • Keep measurement input, communication, and other wires and cables away from noise sources. • Be sure to ground all instruments. • Use shielded cables for wiring measurement input, communication, and other circuits. • Use isolation transformers on power supply lines. • Insert filters on power supply lines. • If inductive loads are used on alarm lines, insert surge absorbers in the lines. Note If menu items required for screen menus or FUNC key menus are not displayed, check menu customization settings. Malfunction of external medium (CF card) Is the memory medium (CF card) working normally? Is it a recommended device? NO Replace the memory medium (CF card) with a new one. YES See No. 8 of the checklist in section 2.2. 2-2 SM 04L41B01-01E 2.1 Failure Analysis Flow Chart 1 Problems related to measurement Does the input meet the input specifications? NO Are the range, span, and other input settings appropriate? NO YES Have appropriate measures against noise been taken? NO YES Is a constant ambient temperature maintained? NO YES Is the input wiring correct? NO YES Are other instruments connected in parallel? YES NO Are the RJC settings and TC, RTD type settings correct? NO Troubleshooting YES 2 Ensure that the input specifications are met. • Enter range, span, and other input settings that are appropriate. • When using the calibration correction function, check the settings for the calibration correction. 3 4 • Keep input wires and cables away from noise sources. • Be sure to ground the recorder. • Ground the measured object properly. • For thermocouple measurement, insulate points of contact between the measured object and thermocouple. • Use shielded cables for input wiring. • Change the integral time setting of the A/D converter. • Use moving average on the input. • Attach input terminal covers. • To avoid temperature changes in the vicinity of input terminals, keep fan ventilation holes clear, and keep hot objects away. • Ensure correct polarity when wiring. • Check that terminal wires are securely connected. • Do not ground RTDs. • Replace broken thermocouples. • Do not connect other instruments with thermocouples in parallel. If you must connect it in parallel, consider using a double element thermocouple, refraining from using burnout detection, or implementing other measures. • Use one earth connection when connecting the DX to another instrument. Set them correctly. YES See No. 6 of the checklist in section 2.2. SM 04L41B01-01E 2-3 5 6 7 2.2 Troubleshooting Checklist The table below describes the most common types of failures and their corrective actions. Action Replace Adjust Check No. Phenomenon Refer to Chapter 6 Description Part Name *1 1 2 The instrument doesn’t start even though the power is ON FAIL state Power supply cable connection/wiring 4 5 6-23 6-23 6 18 SUB BOARD ASSEMBLY Sub PBA EXP. BOOT 6-4 13 6-13 15 6-23 19 MAIN BOARD ASSEMBLY Main PBA 6-4 12 6-13 14 6-23 18 SUB BOARD ASSEMBLY Sub PBA EXP. BOOT 6-4 13 6-13 15 6-23 19 6-6 4 6-16 4 6-26 14, 17 20, 23 6-4 14 6-13 16 6-23 20 - - - - - - Main PBA 6-4 12 6-13 14 6-23 18 Sub PBA EXP. BOOT 6-4 13 6-13 15 6-23 19 - - - - - - 6-3 14 6-12 20 6-22 4 6-3 6-4 6 12 6-12 6-13 7 14 6-23 18 - - - - - - Main PBA 6-4 12 6-13 14 6-23 18 Sub PBA EXP. BOOT 6-4 13 6-13 15 6-23 19 6-3 6 6-12 7 - - 6-3 3 6-12 4 6-22 3 6-3 3 6-12 4 6-22 1 - - - - - - - - - - - - - - - - - - - - - - - - - - - - 6-4 22 6-13 26 6-23 40, 41 42, 43 - - - - - - - - - - - - - - Battery connection Battery voltage (must be +3.0 V or more) MAIN BOARD ASSEMBLY Check the FFCs for key wiring (whether pulled out or damaged) CONNECTION BOARD ASSEMBLY MAIN BOARD ASSEMBLY Check the FFCs*2 for key wiring (whether pulled out or damaged) MAIN BOARD ASSEMBLY CONNECTION BOARD ASSEMBLY Back Light Unit of LCD ASSEMBLY 6 Large measurement error Temperature measurement abnormal LCD & INVERTER UNIT Keep input wires away from noise sources (through distance and shielding, etc.) Check that the input terminals are not disconnected from the instrument Check that the input terminal cover is not loose Check that the RJC (INT/EXT) setting is correct AD SCANNER BOARD ASSEMBLY 7 2-4 Fluctuation in measured values - 3 14 SUB BOARD ASSEMBLY LCD display not normal - 6-13 6-13 SW & Sensor BOARD ASSEMBLY - 4 12 *2 Key operation abnormality - 6-4 6-4 SUB BOARD ASSEMBLY - Power PBA Main PBA 3 - MAIN POWER BOARD ASSEMBLY MAIN BOARD ASSEMBLY OPTION TERMINAL ASSEMBLY Abnormal functioning of memory (backup) - DX1000 DX1000N DX2000 Page Item Page Item Page Item Does the integral time setting of the A/D converter match the power supply frequency? Keep input wires away from noise sources (through distance and shielding, etc.) Option Terminal Assembly Battery Assembly - Key Case Assembly CONN. PBA Main PBA - CONN. PBA Back Light Unit LCD AD-STD/ ISO SM 04L41B01-01E 2.2 Troubleshooting Checklist 1 Action Replace Adjust Check No. Phenomenon Refer to Chapter 6 Description Part Name *1 8 External media functioning abnormally 9 Abnormal communication USB operation 10 abnormal - - - - - - - - - - - - - - MEDIA BOARD ASSEMBLY CF Assembly 6-4 26 - - 6-23 45 SUB BOARD ASSEMBLY Sub PBA EXP. BOOT 6-4 13 6-13 15 6-23 19 Main PBA - 6-4 - 12 - 6-13 - 14 - 6-23 - 18 - - - - - - - MAIN BOARD ASSEMBLY Check communication settings Check communication wiring/cables (whether pulled out or damaged) POWER TERM & COMM BOARD ASSEMBLY MAIN BOARD ASSEMBLY Are connected USB devices (USB memory and USB keyboard) operating normally? Check the FFC*2 for the MEDIA BOARD ASSEMBLY (whether pulled out or damaged) MEDIA BOARD ASSEMBLY (front panel) POWER TERM & COMM BOARD ASSEMBLY (rear panel) S/I-PWR Terminal Main PBA 6-6 8, 17 6-16 8 6-26 27, 38 6-4 12 6-13 14 6-23 18 - - - - - - - - - - - - - - 6-4 26 - - 6-23 45 8 6-26 27, 38 CF Assembly S/I-PWR Terminal 6-6 8, 17 6-16 SUB BOARD ASSEMBLY Sub PBA EXP. BOOT 6-4 13 6-13 15 6-23 19 MAIN BOARD ASSEMBLY Main PBA 6-4 12 6-13 14 6-23 18 *1: The table shows only the specific parts that must be replaced. When actually carrying out replacement, the entire assembly that contains a part may have to be replaced. *2: Flexible Flat Cable SM 04L41B01-01E 2-5 2 Troubleshooting Is the memory medium (CF card) working normally? Check the FFC*2 for the MEDIA BOARD ASSEMBLY (whether pulled out or damaged) DX1000 DX1000N DX2000 Page Item Page I tem Page Item 3 4 5 6 7 Chapter 3 3.1 Testing Acceptance Test 1 This section describes the procedure to perform the acceptance test. 2 1. Read the preface to the user’s manual, “Checking the Contents of the Package” and verify that you have all of the contents. 2. Make sure to understand the operating procedures as described in the user’s 3 3. Check each function using the user’s manual. Testing manual. 4. Read and implement section 3.2, “Self Diagnostic Test.” 4 5. Read and implement section 3.3, “Performance Test.” 5 6 7 SM 04L41B01-01E 3-1 3.2 Self Diagnostic Test The DX is provided with complete self diagnostic functions to enhance reliability in measurement and serviceability. When you turn ON* the power, the DX will automatically execute the following types of diagnoses alternately and display the results. After these tests are completed, the recorder is ready for use. * The DX1000N power supply switch is located inside the bezel. Disconnect then reconnect the power supply, or open the bezel and operate the power supply switch (see section 7.3). 1. Main program (Flash ROM) test 2. Main RAM write/read test 3. A/D and A/D EEPROM test 4. Memory acquisition test (write test from Flash) 5. Ethernet module test The table below shows the results of the self diagnostic tests when a problem is detected. Display upon Error 901 902 910 921 930 ROM failure. RAM failure. A/D memory failure for all input channels. A/D calibration value error. Memory acquisition failure. Likely Cause Connection between MAIN BOARD ASSEMBLY and SUB BOARD ASSEMBLY Replace the SUB BOARD ASSEMBLY or MAIN BOARD ASSEMBLY Connection between AD SCANNER BOARD ASSEMBLY and MAIN BOARD ASSEMBLY Replace the AD SCANNER BOARD ASSEMBLY or MAIN BOARD ASSEMBLY Connection between MAIN BOARD ASSEMBLY and SUB BOARD ASSEMBLY Replace the SUB BOARD ASSEMBLY or MAIN BOARD ASSEMBLY Replace the internal CF card 940 3-2 The Ethernet module is down. Check communication settings Connection between POWER TERM & COMM BOARD ASSEMBLY and MAIN BOARD ASSEMBLY Check the communication cables and LINK LED illumination Replace the MAIN BOARD ASSEMBLY or POWER TERM & COMM BOARD ASSEMBLY Refer to Chapter 6 DX1000 DX1000N DX2000 Part Name Page Item Page Item Page Item – – – – – – Sub PBA EXP.BOOT 6-4 13 6-13 15 6-23 19 Main PBA 6-4 12 6-13 14 6-23 18 – – – – – – 6-4 22 6-13 26 6-23 40, 41, 42, 43 6-4 12 6-13 14 6-23 18 – – – – – – 6-4 13 6-13 15 6-23 19 6-4 12 6-13 14 6-23 18 6-4 26 – – 6-23 47 – – – – – – – – – – – – – – – – – – – – 6-4 12 6-13 14 6-23 18 8,17 6-16 8 6-26 27,38 – AD-STD/ ISO Main PBA – Sub PBA EXP.BOOT Main PBA CF Assembly – Main PBA S/I-PWR Terminal 6-6 SM 04L41B01-01E 3.3 Performance Test 1 Read the warning and cautions below before beginning tests. 2 Test Environment Item Ambient temperature Relative humidity Atmospheric pressure Power supply frequency Power supply waveform DC power supply ripple Vibration Position Interference*1 Electrical field Magnetic field Atmospheric pollutants Other external effects*2 *1 Interference refers to common mode noise, series mode noise, power supply noise, and other phenomena in the signal line. *2 Other external effects include luminance, draft, ultrasonic waves, and radiation. Specifications Accuracy: ±0.005% of setting + 1 µV Accuracy: ±0.005% of rdg + 1 µV Accuracy: 0.01% + 2 mΩ or better 500 VDC 500 to 2300 VAC, 1000 VDC Accuracy: ±20ppm of setting for 100 Hz Accuracy: ±0.05°C Calibrated Instrument Operation For operating procedures in setting mode and basic setting mode, see the following manuals. • DX1000/DX1000N Operation Guide (IM 04L41B01-02E) • DX1000/DX1000N User’s Manual (IM 04L41B01-01E) • DX2000 Operation Guide (IM 04L42B01-02E) • DX2000 User’s Manual (IM 04L42B01-01E) Tests SM 04L41B01-01E 4 5 6 7 Test Instruments Instrument DC voltage generator DMM Variable resistors Insulation tester Withstand voltage tester Function generator 0°C standard temperature device Thermocouple (Type T) 3 Testing Power supply voltage Conditions 23 ±5°C 20 to 80% RH 86 kPa-106 kPa AC power supply 90 to 132 VAC, 180 to 250 VAC 24 V power supply 21.6 to 26.4 VAC/DC (/P1 option) Nominal frequency ±1% Distortion factor of 5% or less Content ratio of 0.1% or less A value having negligible effects on the instrument Within ±3% of the specified position A value that does not affect the measured results A value that does not affect the measured results A value that does not affect the measured results Levels of corrosive gasses, vapors, salts, and dust that do not affect the measured results. A value that does not affect the measured results The following tests are explained. • Insulation Resistance • Reference Junction Compensation Accuracy • Protective Grounding • Battery Backup • Withstand Voltage • Pulse Input Function (Option) • Measurement Accuracy 3-3 3.4 Test Procedures Insulation Resistance ● Test Procedures Perform a measurement with an insulation resistance meter and check whether the results satisfy the reference values. Perform the measurement with the power switch turned ON. Reference Value Terminals Measured Between the power and protective ground terminal Between the input and protective ground terminal Between the Ethernet and protective ground terminal Between RS-422/485 SG and RS-422/485 FG terminals Reference Value Condition 100 MΩ or more Short the L and N terminals. 100 MΩ or more Short all input terminals. 100 MΩ or more Short all pins of the Ethernet terminal. 100 MΩ or more With the /C3 option. Protective Grounding ● Test Procedures Perform a resistance measurement with a DMM (digital multimeter), and check whether the results satisfy the reference values. Reference Value Measured Location Between the protective ground terminal and bezel attachment screw (left side) Reference Value 0.2 Ω or less DX1000/DX1000N USB CF CARD Do not remove the cover. Repair by trained personnel only. Protective ground terminal NO. Bezel attachment screw (left side) DX2000 POWER USB CF CARD Protective ground terminal 3-4 Bezel attachment screw (left side) SM 04L41B01-01E 3.4 Test Procedures Withstand Voltage 1 ● Test Procedures Perform the test with a withstanding voltage tester, and check whether the results satisfy the reference values. Perform the measurement with the power switch turned ON. 2 Test time: 1 minute Tested Terminals Between the input and protective ground terminals Between input terminals Between relay contact output and protective ground terminals Between the remote control input and protective ground terminals Between pulse input and protective ground terminals Between 24 V transmitter power supply output and protective ground terminals Maximum Allowable Leakage Current 2.3 kVAC 10 mA 0.5 KVAC 10 mA 1.5 kVAC 2 mA 1.0 kVAC 1 mA 1.6 kVAC 2 mA 1.0 kVDC 2 mA 1.0 kVDC 2 mA 500 VAC 10 mA Condition When /P1 not installed (100–240 VAC). Short the L and N terminals. With /P1 (24 VAC/DC). Short the L (+) and N (–) terminals. Short all input terminals. Short the odd and even channels of the A/+, B/- terminals*, and measure between odd and even channels. With the /A1, /A2, /A3, /A4, /A5 /F1, or /F2 option. Short all relay contact output terminals. With the /R1 option. Short all remote control input terminals. With the /PM1 option. Short all pulse input terminals. With the /TPS2, /TPS4, or /TPS8 option. Short all 24 V transmitter power supply output terminals. * The b terminals on the following models are independent on all channels. Short the odd and even channels of the A/+, B/-, and b terminals, and measure between odd and even channels. • DX1002, DX1002N, DX1004, DX1004N, DX2004, DX2008 • With the /N1 or /N2 option. SM 04L41B01-01E 3-5 3 Testing Between the power and protective ground terminals Applied Voltage 4 5 6 7 3.4 Test Procedures Measurement Accuracy ● Overview The measurement accuracy is tested using two different* integral times. * But only one integral time is used when using the DX2000 with the /MC1 option. The measurement accuracy test is performed in one of the following ways. • One representative channel for each A/D converter is tested, and the channel-tochannel error between the representative channel and other channels is tested (see next page). * Choose any channel number for each A/D from those listed in the A/D converter configuration table. Ex.: With the DX1004, set channels 1 and 3 as representative channels. • The measuring accuracy of all channels is tested separately. ● A/D Converter Configuration Models DX1002/DX1002N DX1004/DX1004N DX1006/DX1006N DX1012/DX1012N DX2004 DX2008 DX2010 DX2020 DX2030 DX2040 DX2048 Measurement Interval 125 ms 125 ms 1s 1s 125 ms 125 ms 1s 1s 1s 1s 1s Number of Channels 2CH 4CH 6CH 12CH 4CH 8CH 10CH 20CH 30CH 40CH 48CH No. of A/Ds 1 2 1 1 2 4 1 2 3 4 4 Channel Number by A/D 1-2 1-2, 3-4 1-6 1-12 1-2, 3-4 1-2, 3-4, 5-6, 7-8 1-10 1-10, 11-20 1-10, 11-20, 21-30 1-10, 11-20, 21-30, 31-40 1-12, 13-24, 25-36, 37-48 ● Test Instruments Instrument DC voltage generator DMM Variable resistors Specifications Accuracy: ±0.005% of setting + 1 µV Accuracy: ±0.005% of rdg + 1 µV Accuracy: 0.01% + 2 mΩ or better ● Setup Set the input range of the channels under test, and the test range. ● Test Procedures Warm up the instrument for thirty minutes before performing the test. Enter the input value determined for each range. Check whether the displayed measured values satisfy the reference values. DC voltage generator + − To the input terminals Variable resistors The resistance of three lead wires must be equal. 3-6 SM 04L41B01-01E 3.4 Test Procedures 1 Reference Value (Integral Time: 20 ms (50 Hz)/16.7 ms (60 Hz)) Range 20 mV 60 mV 200 mV 6V 20 V 50 V Pt100 TC-T TC-K Cu10 (GE) Pt50 +20.000 mV 0.000 mV –20.000 mV +60.00 mV 0.00 mV –60.00 mV +200.00 mV 0.00 mV –200.00 mV +2.0000 V 0.0000 V –2.0000 V +6.000 V 0.000 V –6.000 V +20.000 V 0.000 V –20.000 V +50.00 V 0.00 V –50.00 V –200°C: 18.52 Ω 0°C: 100.00 Ω 600°C: 313.71 Ω 0°C: 0.000 mV 0°C: 0.000 mV –200°C: 1.326 Ω 0°C: 9.036 Ω 300°C: 20.601 Ω –200°C: 8.57 Ω 0°C: 50.00 Ω 550°C: 150.40 Ω ±18 digits ±10 digits ±18 digits ±5 digits ±2 digits ±5 digits ±10 digits ±2 digits ±10 digits ±18 digits ±10 digits ±18 digits ±5 digits ±2 digits ±5 digits ±10 digits ±2 digits ±10 digits ±4 digits ±2 digits ±4 digits ±0.4°C ±0.2°C ±0.9°C ±0.4°C ±0.5°C ±1.4°C ±0.8°C ±1.7°C ±0.8°C ±0.4°C ±1.8°C Accuracy Specification Note (0.05% of rdg + 12 digits) 2 (0.05% of rdg + 3 digits) 3 (0.05% of rdg + 3 digits) Testing 2V Input Value Range Allowed by Test (0.05% of rdg + 12 digits) 4 (0.05% of rdg + 3 digits) 5 (0.05% of rdg + 3 digits) 6 (0.05% of rdg + 3 digits) (0.15% of rdg + 0.3°C) (0.15% of rdg + 0.5°C) (0.15% of rdg + 0.7°C) (0.4% of rdg + 1.0°C) (0.3% of rdg + 0.6°C) 7 EXT RJC mode EXT RJC mode Performed when the /N1 option is specified. Performed when the /N3 option is specified. Reference Value (Integral Time: 1.67 ms (600 Hz)) Range 2V Input Value +2.0000 V 0.0000 V –2.0000 V Range Allowed by Test ±57 digits ±32 digits ±57 digits Accuracy Specification (0.1% of rdg + 40 digits) * Not tested for the DX2000 with the /MC1 option. SM 04L41B01-01E 3-7 3.4 Test Procedures Reference Junction Compensation Accuracy ● Test Procedures Measure 0°C on all channels, and check that the display is within the reference values below. Set all channels to thermocouple type T. Reference value: ±0.5°C Calibrated thermocouple wires 0°C standard temperature device (Model: ZC114 from Coper Electronics Co., Ltd. or equivalent) +/A –/B Input terminals • Use a calibrated thermocouple, and wires of 0.5 diameter or less without terminal tips. Also, be sure to take the level of thermocouple error into consideration during testing. • Monitor the 0°C standard temperature device at all times, and confirm that it is within 0°C ±0.05°C. • When using a 0°C standard temperature device, ensure that the tip of the thermocouple floats about 10 mm off the bottom. • Perform the test in a stable environment. If drafts are present and may influence the results, position the equipment to avoid them. • After connecting the thermocouple, allow a warm-up time of 30 minutes or more before begging measurement. • Always use terminal covers. • If the quality is found to be sufficiently stable, perform a test on one representative channel for each AD converter*. * Choose any channel number for each A/D from those listed in the “A/D Converter Configuration” in section 3.4, “Measurement Accuracy.” Ex.: With the DX1004, set channels 1 and 3 as representative channels. • Raise the DX at least 20 mm off the surface (stand) where it is positioned, and place nothing under the terminal block. Nothing under the terminal block Stand Battery Backup 20 mm or more ● Test Procedures 1. Set the date and time. Also, set an arbitrary channel to the 20 mV range. 2. Turn OFF* the power switch. * The DX1000N power supply switch is located inside the bezel. Disconnect then reconnect the power supply, or open the bezel and operate the power supply switch (see section 7.3). 3. Turn ON the power after approximately one minute, then check that the set date, time, and range are not initialized. 3-8 SM 04L41B01-01E 3.4 Test Procedures 1 Pulse Input Function ● Overview This test performed when the /PM1 option is specified. Enter calculation settings, input a pulse signal, and perform the test. 2 ● Test Instruments Instrument Function generator Specifications Accuracy: ±20ppm of setting for 100 Hz 3 Testing ● Setup 1. Press the MENU key, then choose Math channel > Calculation expression 4 (Expression). 2. Enter the following expressions. Press the ESC key to return to the setting menu. • 101CH: Q06 (span: 0-100) • 102CH: Q07 (span: 0-100) • 103CH: Q08 (span: 0-100) 5 3. Select Group set, then set CH set to 101-103. 4. Press the ESC key twice to return to operation mode. 6 ● Test Procedures Input a pulse signal of 100 Hz and 0-5 V to input pulse terminals 6, 7, and 8, then perform the test. 7 Reference value: 100 ±1 SM 04L41B01-01E 3-9 Chapter 4 4.1 Adjustments Before Making Adjustments 1 This chapter explains how to perform adjustments to the DX1000/DX1000N/DX2000. Environment 2 See section 3.3, “Test Environment.” 3 Instrument Operation For operating procedures in setting mode and basic setting mode, see the following manuals. • DX1000/DX1000N Operation Guide (IM 04L41B01-02E) • DX1000/DX1000N User’s Manual (IM 04L41B01-01E) • DX2000 Operation Guide (IM 04L42B01-02E) • DX2000 User’s Manual (IM 04L42B01-01E) Adjustments Note 4 5 Adjustments are to be made after warming up the recorder for at least thirty minutes. 6 7 SM 04L41B01-01E 4-1 4.2 Adjusting the A/D Converters ● Overview The number of included A/D converters differs depending on the instrument model. For all of the A/D converters, input a predetermined value for each range and take measurements, then save the calibration values. ● Instruments Used Instrument DC voltage generator Variable resistors Specifications Accuracy: ±0.005% of setting + 1 µV or better Accuracy: 0.01% + 2 mΩ or better ● Calibration Calibrated Channels Model DX1002/DX1002N DX1004/DX1004N DX1006/DX1006N DX1012/DX1012N DX2004 DX2008 DX2010 DX2020 DX2030 DX2040 DX2048 A/D No. 1 Zero Full CH1 CH2 CH1 CH2 CH1 CH2 CH1 CH2 CH1 CH2 CH1 CH2 CH1 CH2 CH1 CH2 CH1 CH2 CH1 CH2 CH1 CH2 A/D No. 2 Zero Full CH3 CH4 CH3 CH4 CH3 CH4 CH11 CH12 CH11 CH12 CH11 CH12 CH13 CH14 A/D No. 3 Zero Full CH5 CH6 CH21 CH22 CH21 CH22 CH25 CH26 A/D No. 4 Zero Full CH7 CH8 CH31 CH32 CH37 CH38 Input Value Input Type Range 20 mV 60 mV 200 mV 1V 2V 6V 20 V 50 V Pt100 Cu10 DC voltage RTD Zero Full Remarks 0 mV 20 mV 0 mV 60 mV 0 mV 200 mV 0 mV 1V 0 mV 2V 0 mV 6V 0 mV 20 V No adjustment needed 0Ω 300 Ω 0Ω 200 Ω With the /N1 or /N3 option. Connection UUA UUA When DC range When RTD or CU range – + Channel 1 (CH1) b B A Channel 1 (CH1) – + Channel 2 (CH2) b B A Channel 2 (CH2) Short these three wires. (Zero value) DC Voltage generator H DC Voltage generator H Variable resistors (Full value) L (Zero value) L (Full value) UUA: Unit Under Adjustment 4-2 SM 04L41B01-01E 4.2 Adjusting the A/D Converters 1 ● Calibration Procedure 1. Press the UP arrow key while turning ON* the power. The instrument starts up in Calibration Mode, and the A/D No. are displayed. * The DX1000N power supply switch is located inside the bezel. Disconnect then reconnect the power supply, or open the bezel and operate the power supply switch (see section 7.3). 2 2. Select the A/D No. to calibrate with a soft key, then press the DISP/ENTER key. DX1000/DX1000N DX2000 3 4 Adjustments 5 3. Press the Cal/Exec #2 soft key. DX1000/DX1000N 6 DX2000 7 Shows the day the A/D most recently adjusted Inputting a Reference Signal 4. Input the zero value of the range to be adjusted to the zero channel of the A/D No., and the full value to the Full channel. See the calibration channels and input values on the previous page. Ex.: To adjust the 20 mV range of A/D No. 1, input 0 mV to CH1, and 20 mV to CH2. Executing the Adjustment 5. Select the soft key of the range to adjust, then press the DISP/ENTER key. DX1000/DX1000N DX2000 Shows the A/D No. being calibrated Select the Range to Calibrate A message is displayed, and adjustment executes automatically. M550 The A/D calibration is being executed... 6. Repeat steps 4 and 5 to adjust all ranges. When finished, press the ESC key. SM 04L41B01-01E 4-3 4.2 Adjusting the A/D Converters 7. Press the End #4 soft key. DX1000/DX1000N DX2000 Saving Adjusted Values 8. Use the left or right arrow key to choose Yes (save calibration values) or No (do not save), then press the DISP/ENTER key. DX1000/DX1000N DX2000 9. Repeat steps 2 – 8 to adjust all A/D No. When finished, press the ESC key. Concluding Adjustments 10.Turn OFF the power switch. Note After adjusting the DX1000N, turn ON the power switch then close the bezel. If the power switch is OFF when you close the bezel, you will have to open it again the next time you use the instrument. 4-4 SM 04L41B01-01E SM 04L41B01-01E CN6 CN7 RS-422 RS-232 CN8 CN15 CN1 CN3 CN4 CN2 POW INP POW INP SCREW INLET CN1 The parentheses ( ) contain the descriptions from chapter 6. (LCD) DX1000: page 6-3, item 3 DX1000N: page 6-12, item 4 CN1 (FFC) CN3 CN5 CN1 CN1 CN4 DX1000: page 6-3, item 8 DX1000N: page 6-12, item 9 LCD & INVERTER UNIT CN2 SW & Sensor BOARD ASSY CN3 (CONN. PBA) DX1000: page 6-3, item 6 DX1000N: page 6-12, item 7 CN2 CN1 CN1 PULSE MAIN BOARD ASSY PULSE SUB BOARD ASSY CN1 CN100 USB CF-CARD CN3 CN2 CF-CARD (CF Assembly) DX1000: page 6-4, item 26 MEDIA BOARD ASSY (Mother PBA) DX1000: page 6-6, item 26 DX1000N: page 6-16, item 19 MOTHER BOARD ASSY (FFC) DX1000: page 6-4, item 27 DX1000N: page 6-13, item 46 CN3 (Key Case Assembly) DX1000: page 6-3, item 14 DX1000N: page 6-12, item 20 BATTERY ASSY (Battery Assembly) DX1000: page 6-4, item 14 DX1000N: page 6-13, item 16 CN2 (Sub PBA EXP. BOOT) DX1000: page 6-4, item 13 DX1000N: page 6-13, item 15 CN1 TPS 4CH BOARD ASSY SUB BOARD ASSY (Main PBA) DX1000: page 6-4, item 12 DX1000N: page 6-13, item 14 CN1 TPS 2CH BOARD ASSY MAIN BOARD ASSY ALARM BOARD ASSY CONNECTION BOARD ASSY (FFC) DX1000: page 6-3, item 10 DX1000N: page 6-12, item 10 (Power PBA) DX1000: page 6-4, item 4 DX1000N: page 6-13, item 3 MAIN POWER BOARD ASSY CN1 CN1 (AD-STD/ISO) DX1000: page 6-4, item 22 DX1000N: page 6-13, item 26 (S/I-PWR Terminal) DX1000: page 6-6, items 8, 17 DX1000N: page 6-16, item 8 CN5 USB CN4 CN14 RJC BOARD ASSY AD SCANNER BOARD ASSY CN3 CN13 POWER TERM. & COMM BOARD ASSY CN2 CN3 CN2 CN12 CN1 CN5 ETHERNET CN1 CN11 TERMINAL ASSY (Option Terminal Assembly) DX1000: page 6-6, item 4 DX1000N: page 6-16, item 4 5.1 Schematic Diagram (Input Terminal Assembly) DX1000: page 6-6, item 1 DX1000N: page 6-16, item 1 Chapter 5 Schematic Diagram Schematic Diagram (DX1000/DX1000N) 1 2 3 4 5 6 7 5-1 5-2 CN2 CN12 CN3 CN13 CN4 CN14 CN1 CN21 CN6 USB CN25 CN1 (AD STD/ISO nn CH) page 6-23, item 41 AD SCANNER BOARD ASSY (S/I-PWR Terminal) page 6-26, items 27, 38 CN1 RS-422 RS-232 POW INP POW INP SCREW INLET CN8 CN2 CN3 CN4 POWER TERM. BOARD ASSY CN1 CN3 CN7 CN4 CN24 CN2 CN1 CN1 CN21 CN2 CN22 CN3 CN23 CN4 CN24 (Bezel Assembly) page 6-22, item 1 (AD STD/ISO nn CH) page 6-23, item 43 AD SCANNER BOARD ASSY CN25 CN1 page 6-23, item 38 MAIN BOARD ASSY LCD CN2 page 6-22, item 1 (Bezel Assembly) page 6-22, item 1 INVERTER UNIT CN4 CN12 CN30 CN1 CN6 ALARM BOARD ASSY CN1 VGA OUT (VGA Cable) page 6-26, item 45 CN5 CN1 CN1 CN9 USB CN100 CN3 CF-CARD CN2 CF-CARD (CF Assembly) page 6-23, item 47 MEDIA BOARD ASSY (Key Case Assembly) page 6-22, item 4 (Battery Assembly) page 6-23, item 20 (FFC) page 6-23, item 44 BATTERY ASSY CN2 SW & Sensor BOARD ASSY CN3 (Sub PBA EXP. BOOT) page 6-23, item 19 CN3 CN1 ALARM BOARD ASSY (Main Mother PBA) page 6-23, item 30 SUB BOARD ASSY CN2 CN1 CN1 CN8 ALARM BOARD ASSY CN1 TPS 4CH BOARD TPS 4CH BOARD ASSY ASSY MAIN MOTHER BOARD ASSY CN1 CN7 ALARM BOARD ASSY (Main PBA) page 6-23, item 18 CONNECTION BOARD ASSY CN1 CN3 CN4 CN1 (AD-Main Mother Cable) page 6-23, item 36 (AD STD/ISO nn CH) page 6-23, item 42 POW-SW BOARD ASSY CN1 CN4 CN14 AD SCANNER BOARD ASSY (Power PBA) page 6-23, item 6 CN2 CN3 CN13 CN15 CN1 MAIN POWER BOARD ASSY CN11 CN30 CN2 CN12 TERMINAL ASSY AD MOTHER BOARD ASSY 2 (AD Mother n Slot PBA) CN1 CN11 TERMINAL ASSY The parentheses ( ) contain the descriptions from chapter 6. CN5 ETHERNET CN3 CN23 (AD Mother n Slot PBA) page 6-23, item 37 CN2 CN22 (AD-Main Mother Cable) page 6-23, item 36 (AD STD/ISO nn CH) page 6-23, item 40 AD SCANNER BOARD ASSY CN15 CN1 AD MOTHER BOARD ASSY 1 CN1 CN11 TERMINAL ASSY CN1 CN5 RJC BOARD ASSY TERMINAL ASSY CN1 CN5 RJC BOARD ASSY CN1 CN5 RJC BOARD ASSY RJC BOARD ASSY CN1 CN5 (Input Terminal Assembly) (Input Terminal Assembly) page 6-26, item 7 page 6-26, item 10 (Input Terminal Assembly) (Input Terminal Assembly) page 6-26, item 1 page 6-26, item 4 (Option Terminal Assembly) page 6-26, items 14, 17, 20, and 23 PULSE MAIN BOARD ASSY PULSE SUB BOARD ASSY 5.2 Schematic Diagram (DX2000) SM 04L41B01-01E Chapter 6 6.1 Customer Maintenance Parts List Customer Maintenance Parts List (DX1000) Customer Maintenance Parts List 1 2 Model DX1002, DX1004, DX1006, DX1012 Daqstation DX1000 3 R 4 C A A AM V 0V 40 10 -2 z N 0 H 10 /60 50 L X 5 6 Customer Maintenance Parts List na e in Chi Mad H STY S . O N 08 26 U R . L O DE N MO TA G TA G IX . FF C O SU LE S R N 17 Y -0122 . SU PP EQ LY UE NC O FR N 0 G N2 0 TA 7 2007 1 2 3 4 5 6 7 8 9 10 11 12 DIS TEP/ R EN Note: Parts marked with a symbol are Customer Maintenance Parts (CMP). The contents of this CMPL are subject to change without prior notice as a result of continuing improvements to the instrument's performance and functions. Copyright Dec. 2005 (YK). 11th Edition: Apr. 2010 (YK) SM 04L41B01-01E CMPL 04L41B01-01E 6-1 6.1 Customer Maintenance Parts List (DX1000) 2 Complete Set 8 M X A 6 A 0V 10 N / 50 C VA z H 60 L 40 0-2 10 7 9 na e in Chi Mad LY PP SU IX 20 LE S R M U O S DE 08 R C 17 26 L SU FF N CY 4 0 H STY F NO REQU . EN 1 TA G 2 1-2 7-0 200 . NO TA G . NO TA G . NO 14 2 12 11 9 CF 3 CA RD 10 13 Item 1 2 3 4 5 Part No. B8705FY - Qty 1 1 1 1 - 6 7 8 9 B9900BP B8705AD B8705AW B9968AT 1 1 1 4 Name Plate (not /H5 ) *1 Tag Plate (Customer Option) (not /H5 ) *1 Name Plate (not /P1 /H5 ) *1 Name Plate ( /P1 not /H5 ) *1 Sheet 10 11 12 13 14 B9968AK B8705AC B8705AH B8705FA - 2 1 1 1 1 Sheet Name Plate Name Plate FFC Protect Name Plate (WEEE & China-RoHS) Description Case Assembly Bezel Assembly (see page 3) Key Case Assembly Packing - Note : *1 /H5 : /H5 /H5D /H5F /H5H /H5J /H5M /H5R (CMP) CMPL 04L41B01-01E 6-2 Mar. 2007 SM 04L41B01-01E 6.1 Customer Maintenance Parts List (DX1000) Bezel and Key Case Assembly 3 1 1 2 2b 2c 3 4 5 8 6 9 10 2 5 7 2a 3 11 4 5 7 6 14 Customer Maintenance Parts List 15 7 1 2 2c 5 6 9 10 DIS TEP/ R EN 2b 12 13 Note: *1 not /KB1 /KB2 *2 /KB1 or /KB2 (CMP) Item 1 2 2a 2b 2c Part No. B8705BA B8705BD B8705BB B8705FK B8705FL Qty 1 1 1 2 2 Description Bezel Assembly Sub Bezel Assembly Sub Bezel Assembly Screw O-Ring 3 A1078VA B8703KB B8705BF B9988DM B8705RD B8705SD 1 1 1 6 1 1 LCD Back Light Unit Display Bracket Assembly Screw CONN.W.O.OPT.PBA *1 (select) CONN.REM OPT.PBA *2 Y9305LB B8706MJ B8705BJ B8705MF B9543SQ B8705AG 2 1 1 1 1 1 Screw (M3x5) FFC (0.5MM-120MM) FPC Cover FFC (0.5MM-50MM) NRP-345 Sheet (TAG Plate Cover) 4 5 6 7 8 9 10 11 12 Feb. 2008 SM 04L41B01-01E Item 13 14 15 Part No. B8705AE B8705AF B8705BM B8705BY B8705BR Qty 1 1 1 1 1 Description TAG Plate (DX1002,1004) (select) TAG Plate (DX1006,1012) Key Case Assembly *1 (select) Key Case Assembly *2 Key Plate CMPL 04L41B01-01E 6-3 6.1 Customer Maintenance Parts List (DX1000) 4 Main Assembly (1/2) 33 2 11 15 13 14 12 17 16 17 17 5 4 10 9 3 6 10 10 7 32 8 10 33 34 20 18 19 60VA z 0H 50/6 MAX 37 G TA G TA G TA G TA G TA G TA . NO . NO . NO . NO . NO E YL S ST H . NO 36 22 -01- 2007 DEL MO R IX SUFF US LY Y 8 SUPP UENC C 260 EQ FR 17 O. de in ina Ch Ma N 35 00 N2 21b 21a 28 1 31 31 30 29 27 US B CF CA RD 25 24 23 22 26 Note: (CMP) CMPL 04L41B01-01E 6-4 Nov. 2008 SM 04L41B01-01E 6.1 Customer Maintenance Parts List (DX1000) 3 4 5 6 7 8 9 10 11 12 13 23 24 25 26 27 28 29 30 31 32 33 34 35 36 37 Note : *1 *2 *3 *4 Apr. 2010 SM 04L41B01-01E DX1012 DX1006 Model DX1004 1 1 1 1 1 1 1 1 1 1 1 1 1 1 1 1 1 1 1 1 1 1 1 1 1 1 1 1 1 1 1 1 3 3 3 3 6 6 6 6 2 2 2 2 1 1 1 1 1 1 1 1 1 1 1 1 7 7 7 7 10 10 10 10 1 1 1 1 1 1 1 1 1 1 1 1 1 1 1 1 1 1 1 1 1 1 1 1 1 1 1 1 1 1 1 1 4 4 4 4 1 1 1 1 1 1 1 1 2 2 2 2 1 1 1 1 1 1 1 1 - - 1 - - - 1 1 - - - 1 - - - 1 - - - 1 1 1 1 1 1 1 1 1 3 3 3 3 1 1 1 1 1 1 1 1 1 1 1 1 1 1 1 1 1 1 1 1 1 1 1 1 1 1 1 1 1 1 1 1 2 2 2 2 2 2 2 2 4 4 4 4 1 1 1 1 2 2 2 2 - - - 1 1 1 1 1 1 1 1 1 1 1 1 - - - 1 1 1 1 Description Case Assembly Power Board Assembly (not /P1) (select) Power Assembly (24VAC/DC) ( /P1) Power Cover (not /P1) (select) Power Cover ( /P1) Power PBA (not /P1) (select) Power PBA ( /P1) Power Base Heat Sink (not /P1) (select) Heat Sink ( /P1) Clamp (not /P1) (select) Clamp ( /P1) Thermal Sheet ACS Heat Sink (not /P1) Screw (not /P1) (select) Screw ( /P1) Main Assembly (not /USB1) (select) Main Assembly ( /USB1) Main PBA Sub PBA EXP. Boot (not /USB1) (select) Sub PBA EXP. Boot ( /USB1) Battery Assembly CPU Bracket Shield Finger Screw (M3x5) GEL Sheet Heat Sink Screw (M3x5) SW Lever Assembly Spring AD-STD 6CH (not /N1 /N2) AD-STD 12CH (not /N1 /N2) AD-ISO 2CH (select) AD-ISO 4CH AD-ISO 6CH ( /N1 or /N2) AD-ISO 12CH ( /N1 or /N2) Clamp PCB Plate Screw (M3x5) CF Assembly (128 MB, not /USB1) *1 CF Assembly (128 MB, /USB1) *1 CF Assembly (256 MB, not /USB1) *2 (select) CF Assembly (256 MB, /USB1) *2 CF Assembly (512 MB, not /USB1) *3 CF Assembly (512 MB, /USB1) *3 FFC (0.5MM-90MM) Cover Assembly F. Foot R. Foot Screw (M3x6) Handle Screw (M4x12) ( /H5 ) (select) *4 Adhesive Name Plate ( not /P1) Name Plate ( /P1) Name Plate Tag Plate (Customer Option) Name Plate (WEEE & China-RoHS) Standard Memory Large Memory Standard Memory (400 MB) /H5 : /H5 /H5D /H5F /H5H /H5J /H5M /H5R (CMP) 1 2 3 4 5 6 Customer Maintenance Parts List 14 15 16 17 18 19 20 21a 21b 22 Part No. B8705CA B8705DA B8705EA B8706DC B8706EC B8705RF B8705RQ B8705DB A1252EH A1252EH B1007BL B1007BL S9763VK A1258EH Y9305LB Y9305LB B8705DD B8705ED B8706RA B8705NC B8705PC B9900BR B8706DE B9968GU Y9305LB B8706FW B8706DF Y9305LB B8705CN B9900FH B8706RP B8706TP B8706RR B8706SR B8706RS B8706TS A9088KY B8705CK Y9305LB B8705DE B8705EE B8705DF B8705EF B8705DG B8705EG B8705ME B8705CW B9961BR B9961BS Y9306LS B9961BQ Y9412ES C1024FC B8705AX B8705AW B9900BP - DX1002 Item 1 2 5 Main Assembly (2/2) Qty 7 CMPL 04L41B01-01E 6-5 6.1 Customer Maintenance Parts List (DX1000) 6 Terminal Assembly (1/3) 22 23 17 24 19 20 18 21 21 23 25 15 16 12 13 8 9 10 14 11 14 16 4 5 6 26 28 27 29 3 2 1 CMPL 04L41B01-01E 6-6 7 Note: (CMP) Apr. 2006 SM 04L41B01-01E 6.1 Customer Maintenance Parts List (DX1000) 7 Terminal Assembly (2/3) Qty 1 1 1 1 1-6 Description Input Terminal Assembly (select) *1 Cover Assembly (not /H2) (select) Cover Assembly ( /H2) Name Plate (select) *2 Connector ( /H2) (select) 4 5 6 7 B9968DF B9968DN 1 1 1 1 Option Terminal Assembly (select) *3 Cover Assembly Name Plate (select) *4 CONN Cover Assembly (select) *3 8 9 10 11 12 13 14 15 16 E9655FX B8706FE Y9310LB Y9306EB B9900SG 1 1 3 1 1 1 2 1 2 S-Power Terminal (select) *5 POW TERM SCR. (select) *6 Screw (ETO Screw) Plate Plate (select) *7 Plate (select) *8 Screw (M3x10) Screw (M3x6) Screw 17 18 19 20 21 22 23 Y9310LB Y9306EB B9900SG 1 1 1 1 2 1 2 I-PWR Terminal (select) *9 POW TERM INL. (select) *10 Plate (select) *11 Plate (select) *12 Screw (M3x10) Screw (M3x6) Screw 24 25 Y9405LB Y9401WL 1 1 Screw (M4x5) Washer 26 27 28 29 B8705RC Y9305LB B8705CH Y9305LB 1 5 1 4 Mother PBA Screw (M3x5) Rear Panel Screw (M3x5) 2 3 4 5 6 Customer Maintenance Parts List 3 30 Part No. B9968DF B8705FF A1923JT Item 1 2 7 1 ( /H2) 3 2 30 Note : *1 to 12 see next page. (CMP) Jul. 2007 SM 04L41B01-01E 1 CMPL 04L41B01-01E 6-7 6.1 Customer Maintenance Parts List (DX1000) 8 Terminal Assembly (3/3) Input Terminal Assembly MODEL DX1002 DX1004 DX1006 DX1012 MS CODE (OPTION) AND OR NOT /H2 /H2 /H2 /H2 /H2 /N1 /N2 /N1 /N2 /H2 /H2 /N1 /N2 /H2 /N1 /N2 /H2 /N1 /N2 /N1 /N2 /H2 /H2 /N1 /N2 /H2 /N1 /N2 Option Terminal Assembly *1 Item 1 B9968LL B8706JN B9968LJ B8706JP B9968LD B9968LM B8706HR B8706JQ B9968LH B9968LR B8706HW B8706JW *2 Item 3 B9967FD B9968JH B9968FV B9968JJ B9967FA B9967FE B9968JL B9968JM B9967FB B9967FF B9968JN B9968JP AND MS CODE (OPTION) /A1 /A2 /A3 /A1 /R1 /A2 /R1 /A3 /R1 OR /A1 /A2 /A3 /F1 /PM1 /TPS2 /TPS4 /PM1 /R1 /PM1 /R1 /A1 /A2 /A3 /PM1 /R1 /R1 /A1 /F1 /A2 /F1 /F1 /A1 /F1 /R1 /A2 /F1 /R1 /F1 /R1 /A1 /PM1 /A2 /PM1 /A1 /F1 /PM1 /PM1 /F1 /PM1 /A1 /TPS2 /A1 /R1 /TPS2 /TPS4 /TPS2 /R1 /TPS2 /R1 /TPS4 /A1 /A2 /A3 /PM1 /A2 /F1 /A1 /F1 /A1 /A2 /F1 /A1 /A2 /PM1 /R1 /PM1 /PM1 /R1 /A1 /PM1 /R1 /A1 /PM1 /A1 /A2 /A3 /F1 /R1 /PM1 /TPS2 /TPS4 Power Terminal Assembly S-PWR TERMINAL AND /C2 /C3 /CP1 /USB1 /C2 /USB1 /C3 /USB1 /CP1/USB1 /P1 /C2 /P1 /C3 /P1 /CP1/P1 /P1 /USB1 /C2 /P1 /USB1 /C3 /P1 /USB1 /CP1/P1/USB1 OR /H5 /H5 /H5 /H5 /H5 /H5 I-PWR TERMINAL AND /C2 /C3 /CP1 /USB1 /C2 /USB1 /C3 /USB1 /CP1/USB1 MS CODE (OPTION) NOT /C2 /C3 /H5 /H5D /H5F /H5H /H5J /H5M /H5R /P1 /USB1 /C3 /H5 /H5D /H5F /H5H /H5J /H5M /H5R /P1 /USB1 /C2 /H5 /H5D /H5F /H5H /H5J /H5M /H5R /P1 /USB1 /C2 /C3 /H5 /H5D /H5F /H5H /H5J /H5M /H5R /P1 /USB1 /C2 /C3 /H5 /H5D /H5F /H5H /H5J /H5M /H5R /P1 /C3 /H5 /H5D /H5F /H5H /H5J /H5M /H5R /P1 /C2 /H5 /H5D /H5F /H5H /H5J /H5M /H5R /P1 /C2 /C3/H5 /H5D /H5F /H5H /H5J /H5M /H5R /P1 /C2 /C3 /USB1 /C3 /USB1 /C2 /USB1 /C2 /C3/H5 /H5D /H5F /H5H /H5J /H5M /H5R /USB1 /C2 /C3 /C3 /C2 /C2 /C3/H5 /H5D /H5F /H5H /H5J /H5M /H5R MS CODE (OPTION) OR /H5D /H5F /H5H /H5J /H5M /H5R /H5D /H5F /H5H /H5J /H5M /H5R /H5D /H5F /H5H /H5J /H5M /H5R /H5 /H5D /H5F /H5H /H5J /H5M /H5R /H5D /H5F /H5H /H5J /H5M /H5R /H5D /H5F /H5H /H5J /H5M /H5R /H5D /H5F /H5H /H5J /H5M /H5R /H5 /H5D /H5F /H5H /H5J /H5M /H5R NOT /C2 /C3 /P1 /USB1 /C3 /P1 /USB1 /C2 /P1 /USB1 /C2 /C3 /P1 /USB1 /C2 /P1 /C3 /C3 /P1 /C2 /P1 /C2 /C3/P1 NOT /F1 /PM1 /R1 /TPS2 /F1 /PM1 /R1 /PM1 /R1 /F1 /PM1 /TPS2 /F1 /PM1 *3 Item 4 B9968KA B9968KC B9968KE B9968KB B9968KD B9968KJ *4 Item 6 B9968EW B9968EY B9968FA B9968EX B9968EZ B9968FE B9968KK B9968FF B9968KL B9968KN B9968FH B9968FK B9968KQ B9968FM B9968KM B9968KP B9968KR B8703FA B8703FB B8703FC B8703FD B8703FE B9968KT B9968KU B9968KW B9968KX B9968KY B9968KV B9968FJ B9968FL B9968FN B8703AL B8703AM B8703AN B8703AP B8703AQ B9967FM B9967FL B9968FP B9967FK B9967FJ B9967FN B9968DN *5 Item 8 B8706DN B8706DP B8706DQ B8706HD B8706EN B8706EP B8706EQ B8706JD B8706HA B8706HB B8706HC B8706HF B8706JA B8706JB B8706JC B8706JF *6 Item 9 B8706RL B8706RM B8706SM B8706RY B8706SL B8706RN B8706SN B8706SY B8706PL B8706PM B8706QM B8706PY B8706QL B8706PN B8706QN B8706QY *7 Item 12 B8706DW B8706DW B8706DX B8706DW B8706DW B8706DW B8706DX B8706DW B8706DW B8706DW B8706DX B8706DW B8706DW B8706DW B8706DX B8706DW *8 Item 13 B8706FF B8706FH B8706FJ B8706FT B8706FG B8706FK B8706FL B8706FU B8706FF B8706FH B8706FJ B8706FT B8706FG B8706FK B8706FL B8706FU *9 Item 17 B8706DR B8706DS B8706DT B8706HE B8706ER B8706ES B8706ET B8706JE *10 Item 18 B8706TL B8706TM B8706UM B8706TY B8706UL B8706TN B8706UN B8706UY *11 Item 19 B8706DW B8706DW B8706DX B8706DW B8706DW B8706DW B8706DX B8706DW *12 Item 20 B8706FF B8706FH B8706FJ B8706FT B8706FG B8706FK B8706FL B8706FU Note: (CMP) CMPL 04L41B01-01E 6-8 Nov. 2008 SM 04L41B01-01E 6.1 Customer Maintenance Parts List (DX1000) Standard Accessories 9 1 2 1 2 12 3 4 4 13 3 5 5 14 6 7 Customer Maintenance Parts List 6 7 15 9 10 8 16 11 Item 1 2 3 4 5 Part No. B9991AD B8706ZZ E9655FX B8706FX Qty 1 1 5 2 6 7 8 9 10 11 B9900BX B8706NQ B8702EA A1070EB B8702AE B8702AD 2 1 1 2 1 1 Bracket Assembly (not /H5 /H5 ) CF Card 128 MB (The size and model may change.) Remote Controller ( /KB1) Battery ( /KB1) Name Plate ( /KB1) Name Plate ( /KB1) 12 13 14 15 16 A1006WD A1009WD A1054WD A1024WD A1064WD 1 1 1 1 1 Power Supply Code (UL /CSA standard) *1,*2 Power Supply Code (VDE standard) *3 (not /P1) (select) Power Supply Code (BS standard) *4 Power Supply Code (AS standard) *5 Power Supply Code (GB standard) *6 Apr. 2010 SM 04L41B01-01E Description CD for DAQSTANDARD CD-ROM for Manuals Manuals B.H.Screw (M4x6) Door Lock Key Note: *1 DX1 *2 DX1 *3 DX1 *4 DX1 *5 DX1 *6 DX1 -/H5M -/H5D -/H5F -/H5J -/H5R -/H5H (CMP) CMPL 04L41B01-01E 6-9 6.2 Customer Maintenance Parts List (DX1000N) Customer Maintenance Parts List Model DX1002N, DX1004N DX1006N, DX1012N Daqstation DX1000N C A A AM V 0V 00 24 1 N 0- 0Hz 0 6 1 / 50 L X R na e in Chi Mad . S O N 08 26 U R 1-22 2007 -0 O TA G TA G N O . L . DE O MO C N 17 LE S R N SU FF IX SU PP EQ LY UE NC Y G N FR TA . H STY 20 0 1 2 3 4 5 6 7 8 9 10 11 12 DIS TEP/ R EN Note: Parts marked with a symbol are Customer Maintenance Parts (CMP). The contents of this CMPL are subject to change without prior notice as a result of continuing improvements to the instrument's performance and functions. Copyright Dec. 2005 (YK). 11th Edition: Apr. 2010 (YK) 6-10 CMPL 04L43B01-01E SM 04L41B01-01E 6.2 Customer Maintenance Parts List (DX1000N) 2 1 Complete Set 50 100 L /60H-240 z1 V 0 A N 0VA MC AX 11 12 13 2 e in 14 ina Ch Mad E L S 20 SU 8 U 60 M R 2 17 L IX DE S FF O SU TA G C 22 -01- 2007 NO . TA G . NO TA G . NO 7 N LY R PP 0 T S H CY 6 3 Y 10 F NO REQU . EN 9 16 4 7 1 5 4 5 6 Customer Maintenance Parts List 15 7 14 8 3 Item 1 2 3 4 5 Part No. B8705AH B8705AC Qty 1 1 1 1 6 7 8 9 10 B8705JQ Y9305LB B8705FY 1 2 1 1 1 Upper Guide Screw (M3x5) Inside Assembly Case Assembly Packing 11 12 13 B9900BP B8705AD B8705AW B9968AT B9968AK - 1 1 1 4 2 1 Tag Plate (Customer Option) Name Plate Name Plate (not /P1) Name Plate ( /P1) Sheet Sheet Name Plate (WEEE & China-RoHS) 14 15 16 CMPL 04L43B01-01E SM 04L41B01-01E Description Bezel Assembly Key Case Assembly Name Plate Name Plate (see page 3) (see page 4) Note: (CMP) Mar. 2007 6-11 6.2 Customer Maintenance Parts List (DX1000N) 3 Bezel and Key Case Assembly 1 12 13 11 7 9 16 15 10 6 8 13 12 2 3b 3c 3 3a 4 5 22 16 6 20 6 21 14 1 2 5 6 17 9 10 DIS 3c TEP/ R EN 3b 18 19 Item 1 2 3 3a 3b 3c Part No. B8705GA B8705FH B8705BD B8705BB B8705FK B8705FL Qty 1 1 1 1 2 2 4 A1078VA B8703KB B8705HC B9988DM B8705RD B8705SD 1 1 1 6 1 1 LCD Back Light Unit DISP Bracket Assembly Screw CONN.W.O.OPT.PBA (not /KB1 /KB2) (select) CONN.REM.OPT.PBA ( /KB1 /KB2) Y9305LB B8706MJ B8705MF B8705HL B8705HH B8705HM B8705HG B8705HK 2 1 1 1 2 4 1 3 Screw (PBA and FPC Cover) (M3x5) FFC (0.5MM-120MM) FFC (0.5MM-50MM) FPC Cover DISP ARM ARM Guide Stay DISP Boss 5 6 7 8 9 10 11 12 13 14 15 Feb. 2008 6-12 Description Bezel Assembly Plate Sub Bezel Assembly Sub Bezel Assembly Screw O-Ring Note: *1 not /KB1 /KB2 *2 /KB1 /KB2 (CMP) Item 16 17 18 19 20 21 22 Part No. Y9305LB B8705AR B8705AG B8705AE B8705AF B8705BM B8705BY B8705BR B9543SQ Qty 3 1 1 1 1 1 1 1 1 Description Screw (M3x5) Name Plate Sheet (TAG Plate Cover) TAG Plate (DX1002N, DX1004N) (select) TAG Plate (DX1006N, DX1012N) Key Case Assembly *1 (select) Key Case Assembly *2 Key Plate NRP-345 CMPL 04L43B01-01E SM 04L41B01-01E 6.2 Customer Maintenance Parts List (DX1000N) 1 Case and Inside Assembly (1/3) 4 13 1 11 10 22 19 24 23 17 16 14 15 20 21 19 18 2 9 4 2a 3 8 6 5 9 6 7 9 2b 3 10b 10a 4 5 34 28 28 26 32 35 33 6 25 38 41 40 39 37 44 36 43 42 45 31 30 27 29 US B CF CA RD 50 46 47 48 49 Note: (CMP) CMPL 04L43B01-01E SM 04L41B01-01E Nov. 2008 6-13 Customer Maintenance Parts List 12 7 6.2 Customer Maintenance Parts List (DX1000N) 5 Case and Inside Assembly (2/3) 4 5 6 7 8 9 B8705RF B8705RQ B8705DJ A1252EH A1252EH B1007BL B1007BL S9763VK A1258EH Y9305LB Y9305LB DX1012N 3 DX1006N 2b DX1004N 2a Part No. B8705DH B8705EH B8708GD B8706EC B8708GM Model Item 1 DX1002N Qty 1 1 1 1 1 1 1 1 1 1 1 1 1 1 1 1 1 1 1 1 1 1 1 3 6 1 1 1 3 6 1 1 1 3 6 1 1 1 3 6 2 2 2 2 1 1 1 1 1 1 1 1 1 1 1 1 7 7 7 7 10 10 10 10 Description Power Assembly (not /P1) (select) Power Assembly (24VAC/DC) ( /P1) Power Cover (not /P1) (select) Power Cover ( /P1) Sheet (not /P1) (select) Power PBA (not /P1) (select) Power PBA ( /P1) Power Base Heat Sink (not /P1) (select) Heat Sink ( /P1) Clamp (not /P1) (select) Clamp ( /P1) Thermal Sheet ACS Heat Sink (not /P1) Screw (M3x5) (not /P1) (select) Screw (M3x5) ( /P1) 10 10a 10b 11 12 B8705GX B8705GY B9967BQ A9049ZG Y9305LB 1 1 1 1 2 1 1 1 1 2 1 1 1 1 2 1 1 1 1 2 SW Lever Assembly SW Lever Knob Knob Screw (M3x5) 13 B8705DL B8705EL B8706RA B8705NC B8705PC 1 1 1 1 1 1 1 1 1 1 1 1 1 1 1 1 1 1 1 1 Main Assembly (not /USB1) (select) Main Assembly ( /USB1) Main PBA Sub PBA EXP. Boot (not /USB1) (select) Sub PBA EXP. Boot ( /USB1) 16 17 18 19 20 B9900BR B8706DE B9968GU Y9305LB B8706FW 1 1 1 8 1 1 1 1 8 1 1 1 1 8 1 1 1 1 8 1 Battery Assembly CPU Bracket Shield Finger Screw (M3x5) GEL Sheet 21 22 23 24 B8706DF B8705FJ Y9406LB B8705HR 1 1 2 1 1 1 2 1 1 1 2 1 1 1 2 1 Heat Sink Handle Screw (M4x6) Handle Bracket 25 B8705DY B8705DZ B8705EW B8705EX B8705EY B8705EZ 14 15 26 27 28 29 30 31 32 B8706RP B8706TP B8706RR B8706SR B8706RS B8706TS B8705DV Y9305LB B8705FJ Y9406LB B8705HU B8705HV 1 1 1 1 1 1 1 4 1 2 1 1 1 1 4 1 2 1 1 1 1 4 1 2 1 1 1 1 AD Assembly 6CH (not /N1 /N2) AD Assembly 12CH (not /N1 /N2) AD Assembly 2CH AD Assembly 4CH AD Assembly 6CH ( /N1 /or /N2) AD Assembly 12CH ( /N1 /or /N2) (select) 1 AD-STD 6CH (not /N1 /N2) AD-STD 12CH (not /N1 /N2) AD-ISO 2CH (select) AD-ISO 4CH AD-ISO 6CH ( /N1 /or /N2) AD-ISO 12CH ( /N1 /or /N2) 1 4 1 2 1 1 AD Bracket Screw (M3x5) Handle Screw (M4x6) AD Plate AD Bracket 2 1 (CMP) Jul. 2008 CMPL 04L43B01-01E 6-14 SM 04L41B01-01E 6.2 Customer Maintenance Parts List (DX1000N) 6 1 Case and Inside Assembly (3/3) Part No. DX1004N DX1006N DX1012N 33 34 B9900FW B8705DP B8705DQ B8705DR B8705EP B8705EQ B8705ER 1 1 1 1 1 1 1 1 1 1 1 1 1 1 1 1 1 1 1 1 1 1 1 1 1 1 1 1 35 36 37 38 39 40 41 42 43 44 45 B8705GL B8705JA B8705JY B8705JW B8705JZ Y9410LE B9900RM B8705JR Y9305LB B8705FJ Y9406LB 1 1 2 1 2 2 1 1 2 1 2 1 1 2 1 2 2 1 1 2 1 2 1 1 2 1 2 2 1 1 2 1 2 1 1 2 1 2 2 1 1 2 1 2 46 47 48 49 50 B8705ME B8705GQ B8705JT Y9305LB B8705GH 1 2 1 2 1 1 2 1 2 1 1 2 1 2 1 1 2 1 2 1 Model Item DX1002N Qty 2 Description Screw Inside Assembly (128 MB, not /USB1) *1 Inside Assembly (256 MB, not /USB1) *2 Inside Assembly (512 MB, not /USB1) *3 Inside Assembly (128 MB, /USB1) *1 Inside Assembly (256 MB, /USB1) *2 Inside Assembly (512 MB, /USB1) *3 3 (select) Inside Case Assembly Frame Assembly Lever Boss 1 Lever Lever Boss 2 Screw (M4x10) Spring Lower Guide Screw (M3x5) Handle Screw (M4x6) 4 5 FFC (0.5MM-90MM) Frame Guide Back Cover Screw (M3x5) Case Assembly 6 Customer Maintenance Parts List 7 Note: *1 Standard Memory *2 Large Memory *3 Standard Memory (400 MB) (CMP) CMPL 04L43B01-01E SM 04L41B01-01E Apr. 2010 6-15 6.2 Customer Maintenance Parts List (DX1000N) 7 Terminal Assembly (1/3) 17 18 15 16 12 13 8 9 10 14 11 14 16 4 5 6 19 20 1 ( /H2) 3 21 2 23 3 22 2 1 7 Note: (CMP) Jul. 2007 6-16 CMPL 04L43B01-01E SM 04L41B01-01E 6.2 Customer Maintenance Parts List (DX1000N) 8 1 Terminal Assembly (2/3) 2 3 23 4 5 6 7 Part No. B9968DF B8705FF A1923JT B9968DF B9968DN Qty 1 1 1 1 1-6 1 1 1 1 8 9 10 11 12 13 14 15 16 17 18 E9655FX B8706FE Y9310LB Y9306EB B9900SG Y9405LB Y9401WL 1 1 3 1 1 1 2 1 2 1 1 S-Power Terminal (select) *5 POW TERM SCR. (select) *6 Screw (ETO Screw) Plate Plate (select) *7 Plate (select) *8 Screw (M3x10) Screw (M3x6) Screw Screw (M4x5) Washer 4 19 20 21 22 B8705RC Y9305LB B8705CH Y9305LB 1 5 1 4 Mother PBA Screw (M3x5) Rear Panel Screw (M3x5) 6 Item 1 2 Description Input Terminal Assembly (select) *1 Cover Assembly (not /H2) (select) Cover Assembly ( /H2) Name Plate (select) *2 Connector ( /H2) (select) Option Terminal Assembly (select) *3 Cover Assembly Name Plate (select) *4 CONN Cover Assembly (select) *3 3 5 Customer Maintenance Parts List 7 Note : *1 to 8 see next page. (CMP) CMPL 04L43B01-01E SM 04L41B01-01E Nov. 2008 6-17 6.2 Customer Maintenance Parts List (DX1000N) 9 Terminal Assembly (3/3) Input Terminal Assembly MODEL DX1002N DX1004N DX1006N DX1012N MS CODE (OPTION) AND OR NOT /H2 /H2 /H2 /H2 /H2 /N1 /N2 /N1 /N2 /H2 /H2 /N1 /N2 /H2 /N1 /N2 /H2 /N1 /N2 /N1 /N2 /H2 /H2 /N1 /N2 /H2 /N1 /N2 Option Terminal Assembly *1 Item 1 B9968LL B8706JN B9968LJ B8706JP B9968LD B9968LM B8706HR B8706JQ B9968LH B9968LR B8706HW B8706JW *2 Item 3 B9967FD B9968JH B9968FV B9968JJ B9967FA B9967FE B9968JL B9968JM B9967FB B9967FF B9968JN B9968JP AND MS CODE (OPTION) /A1 /A2 /A3 /A1 /R1 /A2 /R1 /A3 /R1 /R1 /A1 /F1 /A2 /F1 /F1 /A1 /F1 /R1 /A2 /F1 /R1 /F1 /R1 /A1 /PM1 /A2 /PM1 /A1 /F1 /PM1 /PM1 /F1 /PM1 /A1 /TPS2 /A1 /R1 /TPS2 /TPS4 /TPS2 /R1 /TPS2 /R1 /TPS4 OR NOT /F1 /PM1 /R1 /TPS2 /F1 /PM1 /R1 /PM1 /R1 /F1 /PM1 /TPS2 /F1 /PM1 /A1 /A2 /A3 /F1 /PM1 /TPS2 /TPS4 /PM1 /R1 /PM1 /R1 /A1 /A2 /A3 /PM1 /R1 /A1 /A2 /A3 /PM1 /A2 /F1 /A1 /F1 /A1 /A2 /F1 /A1 /A2 /PM1 /R1 /PM1 /PM1 /R1 /A1 /PM1 /R1 /A1 /PM1 /A1 /A2/ A3 /F1 /R1 /PM1 /TPS2 /TPS4 *3 Item 4 B9968KA B9968KC B9968KE B9968KB B9968KD B9968KJ *4 Item 6 B9968EW B9968EY B9968FA B9968EX B9968EZ B9968FE B9968KK B9968FF B9968KL B9968KN B9968FH B9968FK B9968KQ B9968FM B9968KM B9968KP B9968KR B8703FA B8703FB B8703FC B8703FD B8703FE B9968KT B9968KU B9968KW B9968KX B9968KY B9968KV B9968FJ B9968FL B9968FN B8703AL B8703AM B8703AN B8703AP B8703AQ B9967FM B9967FL B9968FP B9967FK B9967FJ B9967FN B9968DN Power Terminal Assembly AND MS CODE (OPTION) /C2 /C3 /CP1 /USB1 /C2 /USB1 /C3 /USB1 /CP1 /USB1 /P1 /C2 /P1 /C3 /P1 /CP1/ P1 /P1 /USB1 /C2 /P1 /USB1 /C3 /P1 /USB1 /CP1 /P1 /USB1 OR NOT /C2 /C3 /P1 /USB1 /C3 /P1 /USB1 /C2 /P1 /USB1 /C2/C3 /P1 /USB1 /C2 /C3 /P1 /C3 /P1 /C2 /P1 /C2 /C3 /P1 /C2 /C3 /USB1 /C3 /USB1 /C2 /USB1 /C2 /C3 /USB1 /C2 /C3 /C3 /C2 /C2 /C3 *5 Item 8 B8706DN B8706DP B8706DQ B8706HD B8706EN B8706EP B8706EQ B8706JD B8706HA B8706HB B8706HC B8706HF B8706JA B8706JB B8706JC B8706JF *6 Item 9 B8706RL B8706RM B8706SM B8706RY B8706SL B8706RN B8706SN B8706SY B8706PL B8706PM B8706QM B8706PY B8706QL B8706PN B8706QN B8706QY *7 Item 12 B8706DW B8706DW B8706DX B8706DW B8706DW B8706DW B8706DX B8706DW B8706DW B8706DW B8706DX B8706DW B8706DW B8706DW B8706DX B8706DW *8 Item 13 B8706FF B8706FH B8706FJ B8706FT B8706FG B8706FK B8706FL B8706FU B8706FF B8706FH B8706FJ B8706FT B8706FG B8706FK B8706FL B8706FU (CMP) Nov.2008 6-18 CMPL 04L43B01-01E SM 04L41B01-01E 6.2 Customer Maintenance Parts List (DX1000N) 10 1 Standard Accessories 2 1 3 2 4 4 5 3 5 6 Customer Maintenance Parts List 7 7 6 9 10 8 Item 1 2 3 4 5 Part No. B9991AD B8706ZZ E9655FX B8706FX Qty 1 1 5 2 6 7 8 9 10 11 B9900BX B8706NQ A8702EA A1070EB B8702AE B8702AD 2 1 1 2 1 1 11 Description CD for DAQSTANDARD CD-ROM for Manuals Manuals B.H.Screw (M4x6) Door Lock Key Bracket Assembly CF Card 128 MB (The size and model may change.) Remote Controller ( /KB1) Battery ( /KB1) Name Plate ( /KB1) Name Plate ( /KB1) (CMP) CMPL 04L43B01-01E SM 04L41B01-01E Apr. 2010 6-19 6.3 Customer Maintenance Parts List (DX2000) Customer Maintenance Parts List Model DX2004,DX2008,DX2010,DX2020 DX2030,DX2040,DX2048 Daqstation DX2000 M A X R A 0V N 10 z 0-2 10 C VA 40 0H /6 50 L de in ina Ch Ma E S IX R 17 2 8 60 O O. M US DE L SU FF 00 C LY EN PP U SU EQ FR . O N Y H STYL N2 GN R C TA 22 -01- 2007 O. GN TA O. GN TA 1 2 3 4 5 6 7 8 9 10 11 12 13 14 15 16 17 18 19 20 21 22 23 24 25 26 27 28 29 30 DIS TEP/ R EN Note: Parts marked with a symbol are Customer Maintenance Parts (CMP). The contents of this CMPL are subject to change without prior notice as a result of continuing improvements to the instrument's performance and functions. © Copyright Dec. 2005 (YK). 11th Edition: Apr. 2010 (YK) 6-20 CMPL 04L42B01-01E SM 04L41B01-01E 6.3 Customer Maintenance Parts List (DX2000) 2 1 Complete Set 10 de in 9 ina Ch Ma 0 20 N C LY EN PP U SU EQ FR . O N 2 O C 08 US M 26 R 11 17 DE L SU FF IX R Y T S H Y E L S 50 100L /60H 240V z 10 A N 0VA MC AX 8 O. GN TA O. GN TA 13 O. GN TA 22 -01- 2007 3 4 1 5 4 3 6 y. nl NO. PO 12V 7 6368 21 WE 926 R 2 11 5 7 6 Item 1 2 3 4 5 Part No. B8706BA B8705AH B8705AC Y9414LB Qty 1 1 1 1 3 6 B8706AE B8706AF B8706AG B8706AH B9900BP 1 1 1 1 - Tag Plate (DX2004, DX2008) Tag Plate (DX2010, DX2020, DX2030) (select) Tag Plate (DX2040, DX2048) Sheet Tag Plate (Customer Option) (not /H5 ) *1 B8706AD B8706GW B9968AT B9968AK - 1 1 1 4 4 - Name Plate (not /H5 ) *1 Name Plate (not /P1 /H5 ) *1 Name Plate ( /P1 not /H5 ) *1 Sheet Sheet Name Plate (WEEE & China-RoHS) 7 8 9 10 11 12 13 Description Bezel Assembly (see Page 3) Key Case Assembly Name Plate Name Plate Screw (M4x14) Note: *1 /H5 : /H5 /H5D /H5F /H5H /H5J /H5M /H5R (CMP) CMPL 04L42B01-01E SM 04L41B01-01E Customer Maintenance Parts List r. l o ve ne co on e rs th e e dp ov e m ain t re y tr no b o ir D epa R 12 Apr. 2010 6-21 6.3 Customer Maintenance Parts List (DX2000) Bezel and Key Case Assembly Item 1 2 3 Part No. B8706BA B8706BB B9968PA A1048VZ Qty 1 1 1 1 4 B8706BM B8706BY B8706BR 1 1 1 5 Apr. 2010 6-22 Description Bezel Assembly Sub Bezel Assembly Back Light Unit (NEC) Back Light Unit (KYOCERA) 3 (select) Key Case Assembly (for English) Key Case Assembly (for Japanese) Key Plate (select) CMPL 04L42B01-01E SM 04L41B01-01E 6.3 Customer Maintenance Parts List (DX2000) 4 1 Main Assembly (1/3) 4 8 12 9 12 13 16 14 16 15 16 2 12 1 5 3 3 2 4 11 6 12 7 12 10 6 Customer Maintenance Parts List 17 25 26 18 24 20 19 22 21 27 23 5 29 28 7 36 30 39 32 32 30 36 37 32 40 35 38 41 33 42 32 35 39 43 32 44 46 31 CMPL 04L42B01-01E SM 04L41B01-01E 34 45 46 35 32 Apr. 2010 6-23 6.3 Customer Maintenance Parts List (DX2000) 5 Main Assembly (2/3) 5 6 7 8 9 10 11 12 DX2030 DX2040 DX2048 1 1 1 1 1 1 1 1 1 1 1 1 1 1 1 1 1 1 1 1 1 1 1 1 1 1 1 1 1 1 1 1 1 1 1 1 1 1 1 1 1 1 1 1 1 1 1 1 1 1 1 1 1 1 1 1 1 1 1 1 1 1 1 1 1 1 1 1 1 1 3 3 3 3 3 3 3 6 6 6 6 6 6 6 2 2 2 2 2 2 2 1 1 1 1 1 1 1 1 1 1 1 1 1 1 1 1 1 1 1 1 1 9 9 9 9 9 9 9 12 12 12 12 12 12 12 Description Case Assembly Clamp Packing Power Assembly (not /P1) (select) Power Assembly (24VAC/DC) ( /P1) Power Cover (not /P1) (select) Power Cover ( /P1) Power PBA (not /P1) (select) Power PBA ( /P1) Power Base Heat Sink (not /P1) (select) Heat Sink ( /P1) Clamp (not /P1) (select) Clamp ( /P1) Thermal Sheet ACS Heat Sink (not /P1) Screw (M3x5) (not /P1) (select) Screw (M3x5) ( /P1) 13 14 15 16 B8706EE A9089KY B9622FW Y9305LB 1 1 1 5 1 1 1 5 1 1 1 5 1 1 1 5 1 1 1 5 1 1 1 5 1 1 1 5 Top Bracket Clamp Fastener Screw (M3x5) 17 20 21 22 23 24 25 26 27 B8706DD B8706ED B8706RA B8706NC B8706PC B9900BR B8706DE Y9305LB B9968GU B8706FW B8706DF Y9305LB Y9305LB 1 1 1 1 1 1 1 4 1 1 1 2 1 1 1 1 1 1 1 1 4 1 1 1 2 1 1 1 1 1 1 1 1 4 1 1 1 2 1 1 1 1 1 1 1 1 4 1 1 1 2 1 1 1 1 1 1 1 1 4 1 1 1 2 1 1 1 1 1 1 1 1 4 1 1 1 2 1 1 1 1 1 1 1 1 4 1 1 1 2 1 Main Assembly (not /USB) (select) Main Assembly ( /USB) Main PBA Sub PBA EXP. Boot (not /USB) (select) Sub PBA EXP. Boot ( /USB) Battery Assembly CPU Bracket Screw (M3x5) Shield Finger GEL Sheet Heat Sink Screw (M3x5) Screw (M3x5) 28 29 B8706RE Y9305LB 1 7 1 7 1 7 1 7 1 7 1 7 1 7 Main Mother PBA Screw (M3x5) 30 31 32 B8706EB A9088KY Y9305LB 1 1 4 1 1 4 1 1 4 1 1 4 2 1 8 2 1 8 2 1 8 AD Guide (select) Clamp Screw (M3x5) (select) 33 34 35 B8706EF B9968GU Y9305LB 1 1 6 1 1 6 1 1 6 1 1 6 1 1 8 1 1 8 1 1 8 Bottom Bracket Shield Finger Screw (M3x5) (select) 36 37 B8706MF B8706SD B8706RD B8706SD B8706RD Y9305LB 1 1 1 1 1 1 1 1 1 1 1 1 2 1 1 2 2 1 1 2 2 1 1 2 AD-Main Mother Cable (select) AD Mother 1Slot PBA (select) AD Mother 2Slot PBA AD Mother 1Slot PBA (select) AD Mother 2Slot PBA Screw (M3x5) (select) 18 19 38 39 Apr.2010 6-24 DX2020 B8706DA B8706EA B8706DC B8706EC B8706RK B8706RQ B8706DB A1252EH A1252EH B1007BL B1007BL S9763VK A1258EH Y9305LB Y9305LB DX2010 4 DX2008 Part No. B8706CA A9088KY B8706FY DX2004 Item 1 2 3 Model Qty CMPL 04L42B01-01E SM 04L41B01-01E 6.3 Customer Maintenance Parts List (DX2000) 1 Main Assembly (3/3) 6 DX2010 DX2020 DX2030 DX2040 DX2048 1 - 1 1 - 1 1 - 1 1 - 1 1 - 1 1 Description AD STD 10Ch (not /N1 /N2) AD STD 12Ch (not /N1 /N2) (select) AD ISO 4Ch AD ISO 10Ch (or /N1 /N2) AD ISO 12Ch (or /N1 /N2) B8706SP B8706TP B8706SR B8706SS B8706TS - 1 - - 1 1 - 1 1 - 1 1 - 1 1 AD STD 10Ch (not /N1 /N2) AD STD 12Ch (not /N1 /N2) (select) AD ISO 4Ch AD ISO 10Ch (or /N1 /N2) AD ISO 12Ch (or /N1 /N2) B8706SP B8706TP B8706SS B8706TS - - - - 1 1 - 1 1 - 1 1 AD STD 10Ch (not /N1 /N2) AD STD 12Ch (not /N1 /N2) (select) AD ISO 10Ch (or /N1 /N2) AD ISO 12Ch (or /N1 /N2) B8706SP B8706TP B8706SS B8706TS - - - - - 1 1 - 1 1 AD STD 10Ch (not /N1 /N2) AD STD 12Ch (not /N1 /N2) (select) AD ISO 10Ch (or /N1 /N2) AD ISO 12Ch (or /N1 /N2) 44 B8706MH 1 1 1 1 1 1 1 FFC (0.5MM-170MM) 45 B8706DG B8706EG B8706DH B8706EH B8706DM B8706EM Y9305LB 1 1 1 1 1 1 2 CF Assembly (128 MB, not /USB1) *1 CF Assembly (128 MB, /USB1) *1 CF Assembly (256 MB, not /USB1) *2 CF Assembly (256 MB, /USB1) *2 CF Assembly (512 MB, not /USB1) *3 CF Assembly (512 MB, /USB1) *3 Screw (M3x5) 41 42 43 46 Part No. B8706SP B8706TP B8706SR B8706SS B8706TS 1 1 1 1 1 1 2 1 1 1 1 1 1 2 1 1 1 1 1 1 2 1 1 1 1 1 1 2 1 1 1 1 1 1 2 1 1 1 1 1 1 2 3 4 5 6 Customer Maintenance Parts List DX2008 2 1 - Item 40 Model DX2004 Qty 7 (select) Note : *1 Standard Memory *2 Large Memory *3 Standard Memory (400 MB) CMPL 04L42B01-01E SM 04L41B01-01E Apr. 2010 6-25 6.3 Customer Maintenance Parts List (DX2000) 7 Terminal Assembly (1/4) 36 37 to Rear Panel 53 52 34 35 29 31 32 33 30 33 28 53 35 27 47 26 49 48 51 20 22 21 44 38 43 41 46 45 23 40 42 39 42 44 57 25 24 X A AC A M 0V 0V 24 10 0 Hz 10 /60 50 - 7 9 8 10 12 11 16 15 14 50 19 18 17 ( /H2) 1,4,7,10 2,5,8,11 3,6,9,12 54 3 2 58 1 51 55 54 56 55 6 5 4 Apr. 2010 6-26 56 13 CMPL 04L42B01-01E SM 04L41B01-01E 6.3 Customer Maintenance Parts List (DX2000) Qty 1 1 1 1 1 1 1 1 Description Input Terminal Assembly (select) *1 Cover Assembly (not /H2) (select) Cover Assembly ( /H2) Name Plate (select) *2 Input Terminal Assembly (select) *3 Cover Assembly (not /H2) (select) Cover Assembly ( /H2) Name Plate (select) *4 12 58 13 B9968DF B8705FF B9968DF B8705FF A1923JT B9968DN 1 1 1 1 1 1 1 1 - Input Terminal Assembly (select) *5 Cover Assembly (not /H2) (select) Cover Assembly ( /H2) Name Plate (select) *6 Input Terminal Assembly (select) *7 Cover Assembly (not /H2) (select) Cover Assembly ( /H2) Name Plate (select) *8 Connector ( /H2) (select) Conn Cover Assembly (select) *9 14 15 16 B9968DF - 1 1 1 Option Terminal Assembly (select) *10 Cover Assembly Name Plate (select) *11 17 18 19 B9968DF - 1 1 1 Option Terminal Assembly (select) *12 Cover Assembly Name Plate (select) *13 20 21 22 B9968DF - 1 1 1 Option Terminal Assembly (select) *14 Cover Assembly Name Plate (select) *15 23 24 25 26 B9968DF B9968DN 1 1 1 - Option Terminal Assembly (select) *16 Cover Assembly Name Plate (select) *17 Conn Cover Assembly (select) *18 27 28 29 30 31 32 33 34 35 E9655FX B8706FE Y9310LB Y9306EB B9900SG 1 1 3 1 1 1 2 1 2 S-PWR Terminal (select) *19 POW TERM SCREW (select) *20 Screw (ETO Screw) Plate Plate (select) *21 Plate (select) *22 Screw (M3x10) Screw (M3x6) Screw 36 37 Y9405LB Y9401WL 1 1 Screw (M4x5) Washer 38 39 40 41 42 43 44 Y9310LB Y9306EB B9900SG 2 1 2 I-PWR Terminal (select) *23 POW TERM INL (select) *24 Plate (select) *25 Plate (select) *26 Screw (M3x10) Screw (M3x6) Screw 45 46 47 48 B9968MN B9968HS B9968EK B9968HT 1 1 1 1 VGA Cable (select) ( /D5) Plate (select) ( /D5) Cap (select) (not /D5) Name Plate (select) ( /D5) 49 50 51 52 53 B8706CW B8706CZ Y9304LB B9961BQ Y9412ES C1024FC A9055ZB B9805KS Y9414LB B8706GX B8706GW 1 1 7 1 2 4 4 4 1 1 Cover Assembly Bracket Screw (M3x4) Handle Screw (M4x12) ( /H5 ) (select) *27 Adhesive Case Accessories Bumper Screw (M4x14) Name Plate (not /P1) Name Plate ( /P1) 3 4 5 6 7 8 9 10 11 54 55 56 57 CMPL 04L42B01-01E 2 3 4 5 6 Customer Maintenance Parts List Part No. B9968DF B8705FF B9968DF B8705FF - Item 1 2 SM 04L41B01-01E 1 Terminal Assembly (2/4) 8 7 Note: *1 to *18 see page 9 *19 to *26 see page 10 *27 /H5 : /H5 /H5D /H5F /H5H /H5J /H5M /H5R Apr. 2010 6-27 6.3 Customer Maintenance Parts List (DX2000) 9 Terminal Assembly (3/4) Input Terminal Assembly MS CODE (OPTION) OR NOT AND /H2 /H2 /H2 /H2 /H2 /N1 /N2 /N1 /N2 /H2 /H2 /N1 /N2 /H2 /N1 /N2 /H2 /N1 /N2 /N1 /N2 /H2 /H2 /N1 /N2 /H2 /N1 /N2 /H2 /N1 /N2 /N1 /N2 /H2 /H2 /N1 /N2 /H2 /N1 /N2 /H2 /N1 /N2 /N1 /N2 /H2 /N1 /N2 /H2 /N1 /N2 /H2 /H2 /N1 /N2 /N1 /N2 /H2 /N1 /N2 /H2 /N1 /N2 /H2 MODEL DX2004 DX2008 DX2010 DX2020 DX2030 DX2040 DX2048 INP Terminal 1 *1 *2 Item 1 Item 3 B9968LJ B9968FV B8706JP B9968JJ B9968LJ B9968FV B8706JP B9968JJ B9968LE B9968EP B9968LN B9968FS B8706HS B9968JQ B8706JS B9968JR B9968LE B9968EP B9968LN B9968FS B8706HS B9968JQ B8706JS B9968JR B9968LE B9968EP B9968LN B9968FS B8706HS B9968JQ B8706JS B9968JR B9968LE B9968EP B9968LN B9968FS B8706HS B9968JQ B8706JS B9968JR B9968LH B9967FB B9968LR B9967FF B8706HW B9968JN B8706JW B9968JP INP Terminal 2 *3,*9 *4 Item 4 Item 6 B9968DN B9968DN B9968LK B9968FW B8706JR B9968JK B9968DN B9968DN B9968DN B9968DN B9968EQ B9968LF B9968LP B9968FT B8706HT B9968JS B8706JT B9968JT B9968LF B9968EQ B9968LP B9968FT B8706HT B9968JS B8706JT B9968JT B9968LF B9968EQ B9968LP B9968FT B8706HT B9968JS B8706JT B9968JT B8706HM B8706AK B8706JJ B8706AP B8706HX B8706AT B8706JX B8706AX INP Terminal 3 *5,*9 *6 Item 7 Item 9 B9968DN B9968DN B9968DN B9968DN B9968DN B9968DN B9968DN B9968DN B9968DN B9968DN B9968DN B9968DN B9968LG B9968ER B9968LQ B9968FU B8706HU B9968JU B8706JU B9968JV B9968LG B9968ER B9968LQ B9968FU B8706HU B9968JU B8706JU B9968JV B8706HN B8706AL B8706JK B8706AQ B8706HY B8706AU B8706JY B8706AY INP Terminal 4 *7,*9 *8 Item 10 Item 12 B9968DN B9968DN B9968DN B9968DN B9968DN B9968DN B9968DN B9968DN B9968DN B9968DN B9968DN B9968DN B9968DN B9968DN B9968DN B9968DN B8706HL B8706AJ B8706JH B8706AN B8706HV B8706AS B8706JV B8706AW B8706HP B8706AM B8706JL B8706AR B8706HZ B8706AV B8706JZ B8706AZ Option Terminal Assembly OPT Terminal 1 AND /A1 /A2 /A1 /R1 /A2 /R1 /A3 /R1 /A4 /R1 /A5 /R1 /R1 /A1 /F1 /A2 /F1 /A3 /F1 /A4 /F1 /F1 /A1 /F1 /R1 /A2 /F1 /R1 /A3 /F1 /R1 /A4 /F1 /R1 /A1 /PM1 /A2 /PM1 /A1 /F1 /PM1 /PM1 /PM1 /F1 /PM1 /F2 /F2 /R1 Apr. 2010 *10,*18 Item 14 B9968KA B9968KC B9968KE B9968KB B9968KD *11 Item 16 B9968EW B9968EY B9968FA B9968EX B9968EZ /F1 /PM1 B9968KJ B9968FE /A1 /A2 /A3 /A4 /A5 /F1 /F2 /PM1 /PM1 /R1 /PM1 /R1 /PM1 /R1 /PM1 /R1 /A1 /A2 /A3 /A4 /A5 /PM1 /R1 B9968KK B9968FF B9968KL B9968KN B9968FH B9968FK /PM1 /PM1 /PM1 /A1 /A2 /A3 /A4 /A5 /PM1 /A2 /F1 /A1 /F1 /F1 /R1 6-28 OPT Terminal 2 MS CODE (OPTION) OR NOT /F1 /PM1 /R1 /F1 /PM1 /R1 /F1 /PM1 /R1 /A3 /A4 /A5 /F1 /PM1 /F1 /PM1 /A3 /A4 B9968KQ B9968FM B9968KM B9968KP B9968FJ B9968FL B9968KR B9968FN B8703FA B8703FB B8703FC B8703AL B8703AM B8703AN /F1 B8703FD /A1 /A2 /A3 /A4 /F1 B8703FE /A1 /A2 B9968KN /R1 B9968KP /A1 /A2 /A3 /A4 /A5 B9968DN /F1 /F2 /PM1 /R1 AND /A3 MS CODE (OPTION) OR NOT /F1 /PM1 /A4 /A5 /F2 /A3 /A4 /A5 /F1 /F2 /PM1 *12,*18 Item 17 *13 Item 19 B9968KF B9968FB B9968DN OPT Terminal 3 AND /A4 /TPS8 MS CODE (OPTION) OR NOT /F1 /PM1 /A5 /F2 /A4 /A5 /F1 /F2 /PM1 /TPS8 *14,*18 Item 20 *15 Item 22 B9968KG B9968FC B9968KW B9968FP B9968DN OPT Terminal 4 AND /TPS4 /TPS8 MS CODE (OPTION) OR NOT /A5 /F2 /A5 /F2 /TPS4 /TPS8 *16,*18 Item 23 B9968KH *17 Item 25 B9968FD B9968KW B9968FP B9968DN B8703AP B8703AQ B9968FK B9968FL CMPL 04L42B01-01E SM 04L41B01-01E 6.3 Customer Maintenance Parts List (DX2000) 1 Terminal Assembly (4/4) 10 Power Terminal Assembly S-PWR Terminal AND /C2 /C3 /CP1 /USB1 /C2 /USB1 /C3 /USB1 /CP1 /USB1 /P1 /C2 /P1 /C3 /P1 /CP1 /P1 /P1 /USB1 /C2 /P1 /USB1 /C3 /P1 /USB1 /CP1 /P1 /USB1 OR /H5 /H5 /H5 /H5 /H5 /H5 2 MS CODE (OPTION) NOT /C2 /C3 /H5 /H5D /H5F /H5H /H5J /H5M /H5R /P1 /USB1 /C3 /H5 /H5D /H5F /H5H /H5J /H5M /H5R /P1 /USB1 /C2 /H5 /H5D /H5F /H5H /H5J /H5M /H5R /P1 /USB1 /C2 /C3 /H5 /H5D /H5F /H5H /H5J /H5M /H5R /P1 /USB1 /C2 /C3 /H5 /H5D /H5F /H5H /H5J /H5M /H5R /P1 /C3 /H5 /H5D /H5F /H5H /H5J /H5M /H5R /P1 /C2 /H5 /H5D /H5F /H5H /H5J /H5M /H5R /P1 /C2 /C3 /H5 /H5D /H5F /H5H /H5J /H5M /H5R /P1 /C2 /C3 /USB1 /C3 /USB1 /C2 /USB1 /C2 /C3 /H5 /H5D /H5F /H5H /H5J /H5M /H5R /USB1 /C2 /C3 /C3 /C2 /C2 /C3 /H5 /H5D /H5F /H5H /H5J /H5M /H5R I-PWR Terminal /C2 /C3 /CP1 /USB1 /C2 /USB1 /C3 /USB1 /CP1 /USB1 CMPL 04L42B01-01E SM 04L41B01-01E NOT /C2 /C3 /P1 /USB1 /C3 /P1 /USB1 /C2 /P1 /USB1 /C2 /P1 /USB1 /C2 /C3 /P1 /C3 /P1 /C2 /P1 /C2 /C3 /P1 *20 Item 28 B8706RL B8706RM B8706SM B8706RY B8706SL B8706RN B8706SN B8706SY B8706PL B8706PM B8706QM B8706PY B8706QL B8706PN B8706QN B8706QY *21 Item 31 B8706DW B8706DW B8706DX B8706DW B8706DW B8706DW B8706DX B8706DW B8706DW B8706DW B8706DX B8706DW B8706DW B8706DW B8706DX B8706DW *22 Item 32 B8706FF B8706FH B8706FJ B8706FT B8706FG B8706FK B8706FL B8706FU B8706FF B8706FH B8706FJ B8706FT B8706FG B8706FK B8706FL B8706FU *23 Item 38 B8706DR B8706DS B8706DT B8706HE B8706ER B8706ES B8706ET B8706JE *24 Item 39 B8706TL B8706TM B8706UM B8706TY B8706UL B8706TN B8706UN B8706UY *25 Item 40 B8706DW B8706DW B8706DX B8706DW B8706DW B8706DW B8706DX B8706DW *26 Item 41 B8706FF B8706FH B8706FJ B8706FT B8706FG B8706FK B8706FL B8706FU Mar. 2009 6-29 3 4 5 6 Customer Maintenance Parts List AND MS CODE (OPTION) OR /H5D /H5F /H5H /H5J /H5M /H5R /H5D /H5F /H5H /H5J /H5M /H5R /H5D /H5F /H5H /H5J /H5M /H5R /H5 /H5D /H5F /H5H /H5J /H5M /H5R /H5D /H5F /H5H /H5J /H5M /H5R /H5D /H5F /H5H /H5J /H5M /H5R /H5D /H5F /H5H /H5J /H5M /H5R /H5 /H5D /H5F /H5H /H5J /H5M /H5R *19 Item 27 B8706DN B8706DP B8706DQ B8706HD B8706EN B8706EP B8706EQ B8706JD B8706HA B8706HB B8706HC B8706HF B8706JA B8706JB B8706JC B8706JF 7 6.3 Customer Maintenance Parts List (DX2000) 11 Standard Accessories 1 2 12 4 13 3 5 14 7 6 15 9 10 8 Item 1 2 3 4 5 Part No. B9991AD B8706ZZ E9655FX B8706FX Qty 1 1 1 5 2 6 7 8 9 10 11 B9900BX B8706NQ A8702EA A1070EB B8702AE B8702AD 2 1 1 2 1 1 Bracket Assembly (not /H5 /H5 ) CF Card 128 MB (The size and model may change.) Remote Controller ( /KB1) Battery ( /KB1) Name Plate ( /KB1) Name Plate ( /KB1) 12 13 14 15 16 A1006WD A1009WD A1054WD A1024WD A1064WD 1 1 1 1 1 Power Supply Code (UL /CSA standard) *1,*2 Power Supply Code (VDE standard) *3 (not /P1) (select) Power Supply Code (BS standard) *4 Power Supply Code (AS standard) *5 Power Supply Code (GB standard) *6 Apr. 2010 6-30 11 Description CD for DAQSTANDARD CD-ROM for Manuals Manuals B.H.Screw (M4x6) Door Lock Key 16 Note: *1 DX2 *2 DX2 *3 DX2 *4 DX2 *5 DX2 *6 DX2 -/H5M -/H5D -/H5F -/H5J -/H5R -/H5H CMPL 04L42B01-01E SM 04L41B01-01E Chapter 7 7.1 Replacing Parts Introduction 1 This section describes replacing parts necessary for maintenance and repair. Replaceable Parts 2 When it becomes necessary to replace parts, it is recommended to replace entire assemblies rather than specific parts within assemblies. If you plan on replacing parts yourself, please refer to the Customer Maintenance Parts List (CMPL) in chapter 6 for a list of parts supplied by Yokogawa. Parts not on this list are not available through Yokogawa. The CMPL uses the following column titles. • Number • Part No. • Q’ty • Description 3 4 5 If Servicing is Required If servicing is required, contact your nearest Yokogawa dealer with the following information. • Address • Contact name and phone number • Product model name, suffix code, and option codes • Description of the problem, measured results, displayed error messages, and any other pertinent information. 7 Replacing Parts SM 04L41B01-01E 6 7-1 7.2 Recommended Replacement Periods for Worn Parts To preserve the reliability of the DX and to use the DX in a good condition for an extended time, it is recommended that periodic replacements be made on parts. The replacement parts may change to accommodate preventive maintenance over extended time. Be sure to check with your nearest YOKOGAWA dealer. The following table shows the recommended replacement period for expendable parts. The replacement period shown here applies when the DX is used under standard operating conditions. For the actual replacement period, consider the actual conditions of use. Replacement of parts will be carried out by a YOKOGAWA engineer or an engineer certified by YOKOGAWA. Contact your nearest YOKOGAWA dealer when such replacement is necessary. DX1000/DX1000N Item LCD Battery Dust and water proof rubber strip Aluminum electrolytic capacitor Replacement period Name Part No. Quantity Used 5 years 10 years 5 years 5 years 5 years Back Light Unit Battery Assembly Packing Key Case Assembly Key Case Assembly B8703KB B9900BR B8705FY B8705BM B8705BY 1 1 1 1 1 5 years* Power supply Assembly – 1 5 years* AD Assembly Notes Without /KB1 or /KB2 With /KB1 or /KB2 Depends on the model * Replacement Period at the Upper Limit of the Normal Operating Temperature (50°C) The replacement period varies depending on the temperature in which the instrument is operated, and the instrument’s specifications. If the instrument is used in a 30°C environment, it may be operational for 10 years or more. DX2000 Replacement period Item LCD 5 years Battery Dust and water proof rubber strip Aluminum electrolytic capacitor Name Part No. Quantity Used B9968PA 1 A1048VZ 1 1 1 1 1 Back Light Unit 10 years 5 years 5 years 5 years Battery Assembly Packing Key Case Assembly Key Case Assembly B9900BR B8706FY B8706BM B8706BY 5 years* Power supply Assembly – 5 years* AD Assembly Notes Before instrument number S5J402213 2009. Instrument number S5J402213 2009 and later. English specifications Japanese specifications 1 Depends on the model * Replacement Period at the Upper Limit of the Normal Operating Temperature (50°C) The replacement period varies depending on the temperature in which the instrument is operated, and the instrument’s specifications. If the instrument is used in a 30°C environment, it may be operational for 10 years or more. Note • The LCD should be replaced when the brightness of the LCD is reduced by half its original brightness. The brighter the display, the shorter the “half-life” of the LCD. Reductions in brightness vary depending on operating conditions, and is a subjective determination. The actual replacement period should be determined based on these considerations. • The LCD screen may start to yellow over time. The brighter the screen, the faster such changes may progress. 7-2 SM 04L41B01-01E 7.3 Notes Pulling Out the Inner Instrument (DX1000N) 1 This section explains how to pull out the inner instrument. Refer to these instructions as well when reinstalling. 3 WARNING • When reinstalling the inner instrument, check that no foreign objects are inside the case, that the connector pins are not bent, and that no other abnormalities exist. These can be causes of fire, electric shock, and damage to instruments. • Always turn OFF the power switch when pulling out the inner instrument. • Certain locations inside the instrument carry high voltages, and are dangerous. • Pulling out PCBs while the power is ON can damage electronic components. • Circuit patterns of the printed circuit board are exposed. Be careful when handling so that hands or fingers are not injured by the protruding pins. Bezel Incorrect • Push in the bezel so that it is vertical before tightening the screws. If the bezel is at an angle when the screws are tightened, screws can be damaged. SM 04L41B01-01E 5 7-3 7 Replacing Parts • Do not disassemble the inner instrument. When replacing components such as the power supply assembly, or when any structural changes are made, you must perform tests of the insulation resistance, withstand voltage, and protective grounding function (see chapter 3). • Tighten the screw to a torque within the specified range. • If the bezel screw is tightened to less than the specified torque, the protective grounding function may not function normally. • Tightening the screw to a torque above the specified range can damage the screw. • When releasing the bezel latches, the bezel can break if the bottom is pulled out forcefully. Do not forcefully pull towards you until the latches are released. • Circuit patterns of the printed circuit board are exposed. If other metalic materials touch these patterns, electrical shorting will occur, causing the circuit to be damaged or burnt. • The internal circuitry is vulnerable to damage from static electricity. Take appropriate measures to ensure that static electricity is not applied to the internal circuits. • When securing the bezel, note the following points: • Make sure the packing is properly and completely affixed around the bezel. If not properly affixed, screws can be damaged, and the water and dust proof capability may be impaired. Correct 4 6 CAUTION 2 7.3 Pulling Out the Inner Instrument (DX1000N) Testing If the DX hardware style number is 1, perform the tests below (see chapter 3) after reinstalling the inner instrument. The hardware style number is printed on the name plate. The name plate is on the top of the case (outer side). MODEL STYLE H S SUFFIX Hardware style number SUPPLY FREQUENCY NO. When the hardware style number is 1 • Insulation resistance test • Withstand voltage test • Check of the protective grounding function When the hardware style number is 2 or later No test is required, but check whether the bezel attachment screws are tightened to within the specified torque range. Procedures 1. Open the Key Case Assembly. If any USB devices are connected, remove them. 2. Loosen the 2 screws (screw tightening torque: 0.6 to 0.7 N·m). Screw Screw Key Case Assembly 3. Close the Key Case Assembly. 4. Release the latches, then pull out the bezel. There are latches that connect with the case on the top of the bezel. Open the bezel slightly at the bottom, then release the latches at the top as you lift the entire bezel upwards. Be sure to read the cautions on the previous page. Release the latch Pull out the bezel 7-4 SM 04L41B01-01E 7.3 Pulling Out the Inner Instrument (DX1000N) 1 5. Open the bezel upward, then fix in the upright position with the side stay. 2 3 Stay 6. Turn OFF the power switch. Turn ON when reinstalling the inner instrument. 4 Power switch 5 2 3 4 1 Fastening Torque 6 0.4 N.m 7. Loosen the screw. (Screw tightening torque: 0.4 to 0.5 N·m). 3 4 Replacing Parts 7 Screw 1 Fastening Torque 0.4 N.m 5 CF CARD USB 8. Pull out the handles in the order handle 2, handle 3, then handle 4. The handles pull out approximately 8 mm. Handle 2 2 3 5 USB Handle 3 1 Fastening Torque 0.4 4 N.m Handle 4 CF CARD 9. Pull on handle 2 while pushing the lock release lever to the left, then pull out the inner instrument. 3 4 1 Fastening Torque 0.4 N.m Lock release lever 5 USB SM 04L41B01-01E CF CARD 7-5 7.3 Pulling Out the Inner Instrument (DX1000N) 7-6 SM 04L41B01-01E