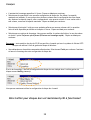
1
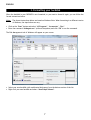
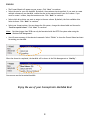
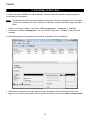
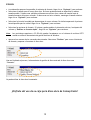
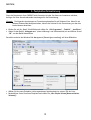
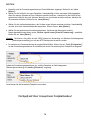
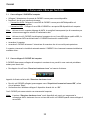
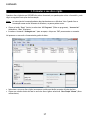
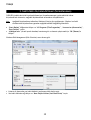
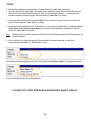
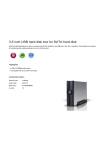
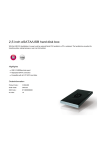
NEDERLANDS
Conceptronic CHD3UES versie 2.0
Gebruiksaanwijzing
Gefeliciteerd met uw nieuwe
Conceptronic eSATA & USB Harddisk Box
In deze gebruiksaanwijzing vindt u stap-voor-stap instructies voor de installatie van de Conceptronic eSATA
& USB Harddisk Box op uw computer.
Bij problemen kunt u het beste naar onze support-site gaan (www.conceptronic.net - klik op 'Support').
Daar vindt u een database met veel gestelde vragen (FAQ).
Als u een vraag over dit product heeft die niet op onze website wordt beantwoord, kunt u ons e-mailen op
[email protected].
Ga voor meer informatie over Conceptronic producten naar de Conceptronic website:
www.conceptronic.net.
De hieronder beschreven software kan enigszins afwijken, afhankelijk van uw computer. Dit hangt samen
met de gebruikte versie van Windows.
1. Inhoud verpakking
U vindt de volgende items in de verpakking van de Conceptronic Harddisk Box:
•
•
•
•
•
•
•
Conceptronic CHD3UES Harddisk Box
Netvoeding (12 V, 1,5 A)
USB-kabel
eSATA-kabel
Productstandaard
Deze meertalige gebruiksaanwijzing
Garantiekaart en boekje CE-verklaring
1
NEDERLANDS
2. Harddiskbox gebruiken
2.1
CHD3UES op uw computer aansluiten
• Sluit de netvoeding aan op de CHD3UES en op een stopcontact.
• Bepaal welke interfacekabel u wilt gebruiken:
o eSATA aansluiten: Sluit de eSATA-kabel aan op de CHD3UES en op een eSATA-aansluiting van uw
computer.
o USB aansluiten:
Sluit de USB-kabel aan op de CHD3UES en op een USB-aansluiting van uw
computer.
NB:
NB:
Wanneer uw computer is voorzien van eSATA, kunt u het beste gebruikmaken van deze aansluiting
voor een snellere gegevensoverdracht.
Als de CHD3UES gelijktijdig via de USB-kabel en de eSATA-kabel op uw computer wordt
aangesloten, wordt de eSATA-verbinding uitgeschakeld en werkt de CHD3UES via USB.
• Zet uw computer aan.
• Zet de CHD3UES aan met de aan/uitschakelaar aan de achterkant.
De CHD3UES wordt automatisch herkend en geïnstalleerd door de computer. Installatie van
stuurprogramma's is niet nodig.
2.2
CHD3UES van uw computer loskoppelen
Om gegevensverlies te voorkomen, moet de CHD3UES veilig worden verwijderd voordat u hem van de
computer loskoppelt.
• Dubbelklik op het pictogram 'Veilig verwijderen' in het systeemvak.
Nu verschijnt het venster 'Hardware veilig verwijderen'.
• Klik op de aangesloten CHD3UES (vaak aangegeven als 'USB-apparaat voor massaopslag') en klik op de
knop 'Stoppen'.
• Klik op 'OK' om het verwijderen te bevestigen.
De CHD3UES is nu veilig verwijderd van uw computer. U kunt de CHD3UES nu loskoppelen.
NB:
De optie 'Hardware veilig verwijderen' is niet beschikbaar wanneer u de eSATA-aansluiting
gebruikt. Let op dat u de eSATA-kabel niet verwijdert zolang er nog gegevens naar de CHD3UES
worden geschreven.
2
NEDERLANDS
3. Harddiskbox gebruiken
Als de harde schijf in uw CHD3UES niet geformatteerd is, of als u de schijf opnieuw wilt formatteren, kunt
u de onderstaande instructies volgen.
NB:
De onderstaande formatteerinstructies zijn gebaseerd op Windows Vista. Wanneer u een andere
Windows-versie gebruikt, kunnen de stappen afwijken.
• Klik op de Start-knop van Windows en selecteer 'Alle programma's', 'Bureau-accessoires', 'Uitvoeren'.
• Geef de opdracht 'diskmgmt.msc' in (zonder de aanhalingstekens) en klik op 'OK' om de opdracht uit te
voeren.
Het venster Schijfbeheer verschijnt op uw scherm.
• Selecteer in het onderste gedeelte van het venster uw nieuwe harde schijf (met niet-toegewezen
ruimte).
• Klik met de rechter muisknop op uw nieuwe harde schijf en selecteer 'Nieuw eenvoudig volume'.
3
NEDERLANDS
• De formatteerwizard verschijnt op uw scherm. Klik op 'Volgende' om door te gaan.
• Selecteer de grootte voor uw nieuwe schijf. Standaard is de maximale grootte geselecteerd. Als u meer
schijfvolumes op uw harddisk wilt maken, moet u de grootte van uw eerste volume kleiner maken. Als u
1 volume wilt maken, kunt u de maximale grootte zo laten. Klik op 'Volgende' om door te gaan.
• Selecteer de schijfletter die u aan het nieuwe volume wilt geven. Standaard wordt de eerste
beschikbare letter getoond. Klik op 'Volgende' om door te gaan.
• Selecteer uw formatteeropties. U kunt het bestandssysteem en de volumenaam wijzigen en kiezen voor
'Snelformatteren'. Klik op 'Volgende' om door te gaan.
NB:
Partities van meer dan 32 GB kunnen met Windows schijfbeheer alleen worden geformatteerd met
het NTFS-bestandssysteem.
• Nu ziet u een overzicht van de gekozen opdrachten. Selecteer 'Voltooien' om het venster van de
formatteerwizard te sluiten en het schijfvolume te formatteren.
Na afloop van het formatteren wordt het schijfvolume in het venster Schijfbeheer aangeduid met 'In
orde'.
U kunt de geformatteerde schijf nu gebruiken.
Veel plezier met uw Conceptronic Harddisk Box!
4
ENGLISH
Conceptronic CHD3UES Version 2.0
User Manual
Congratulations on the purchase of your
Conceptronic eSATA & USB Harddisk Box.
This User Manual gives you a step-by-step explanation of how to install and use the Conceptronic eSATA &
USB Harddisk Box on your computer.
When problems occur, we advise you to go to our support-site (go to www.conceptronic.net and click
‘Support’). Here you will find the Frequently Asked Questions Database.
When you have other questions about your product and you cannot find it at our website then you can
contact us by e-mail: [email protected]
For more information about Conceptronic products, please visit the Conceptronic Web Site:
www.conceptronic.net
The software description below may be slightly different from the installation on your computer. This
depends on the Windows version you are using.
1. Package contents
The following items are present in the package of the Conceptronic Harddisk Box:
•
•
•
•
•
•
•
Conceptronic CHD3UES Harddisk Box
Power supply (12V, 1.5A)
USB cable
eSATA cable
Product stand
This multilanguage user manual
Warranty card & CE declaration booklet
5
ENGLISH
2. Using your harddisk box
2.1
Connect the CHD3UES to your computer
• Connect the power supply to the CHD3UES and to a free wall outlet.
• Decide which interface cable you will use:
o eSATA connection: Connect the eSATA cable to the CHD3UES and to a free eSATA port on your
computer.
o USB connection:
Connect the USB cable to the CHD3UES and to a free USB port on your computer.
Note : When your computer is equipped with eSATA, it is advised to use this connection to achieve higher
data transfer speeds.
Note : If the CHD3UES is connected to your computer with both the USB and eSATA cable, the eSATA
connection will be disabled and the CHD3UES will operate in USB mode.
• Turn on your computer.
• Turn on the CHD3UES with the power switch on the backside.
The computer will automatically recognize and install the CHD3UES. No driver installation is required.
2.2
Disconnect the CHD3UES from your compute
The CHD3UES must be removed safely before you disconnect it from your computer, in order to prevent
data loss.
• Double click on the “Safely Remove Hardware” icon in your system tray.
The “Safely Remove Hardware” window will be shown.
• Click on the connected CHD3UES (often listed as “USB Mass Storage Device”) and click the “Stop”
button.
• Confirm the disconnection by clicking “OK”.
The CHD3UES is now safely removed from your computer. You can now disconnect the CHD3UES.
Note : The “Safely Remove Hardware” option is not available when you use the eSATA connection. Make
sure there is no data written to the CHD3UES when you disconnect the eSATA cable.
6
ENGLISH
3. Formatting your harddisk
When the harddisk in your CHD3UES is not formatted, or you want to format it again, you can follow the
format instructions below.
Note : The format instructions below are based on Windows Vista. When formatting in a different version
of Windows, the steps below can vary.
• Click on the “Start” button and select “All Programs”, “Accessories”, “Run”.
• Enter the command “diskmgmt.msc” (without the quotes) and click “OK” to run the command.
The Disk Management tool of Windows will appear on your screen.
• Select your new harddisk (with unallocated disk space) from the bottom section of the list.
• Right click your new harddisk and select “New Simple Volume”.
7
ENGLISH
• The Format Wizard will appear on your screen. Click “Next” to continue.
• Select the size for your new harddisk. By default, the maximum size is specified. If you want to create
multiple volumes on your harddisk, reduce the size to the required size of your first volume. If you
want to create 1 volume, keep the maximum size. Click “Next” to continue.
• Select which drive letter you want to assign to the new volume. By default, the first available drive
letter is shown. Click “Next” to continue.
• Select your format options. You can change the file system, change the volume label and choose for
“Perform a quick format”. Click “Next” to continue.
Note : Partitions bigger than 32GB can only be formatted with the NTFS file system when using the
Windows Disk Management.
• You will see a summary of the selected commands. Select “Finish” to close the Format Wizard and start
formatting your harddisk.
When the format is completed, the harddisk will be shown in the Disk Management as “Healthy”.
You can now use the formatted harddisk.
Enjoy the use of your Conceptronic Harddisk Box!
8
ESPAÑOL
CHD3UES Versión 2.0 de Conceptronic
Manual del usuario
Felicidades por la compra de su
caja para disco duro eSATA y USB de Conceptronic.
Este manual de usuario le orientará paso a paso sobre cómo instalar y utilizar su nueva caja para disco
duro eSATA y USB de Conceptronic.
En caso de surgir cualquier problema, visite nuestra página web de asistencia técnica (haga clic en el
apartado “Soporte” de www.conceptronic.net. Aquí encontrará la base de datos de las preguntas más
frecuentes o FAQ).
Si tiene otras preguntas sobre su producto y no las encuentra en nuestro sitio web, póngase en contacto
con nosotros por correo electrónico: [email protected]
Si desea información adicional sobre los productos de Conceptronic, visite nuestro sitio web:
www.conceptronic.net
Los pasos de instalación del software que se detallan a continuación pueden diferir ligeramente de los
pasos a seguir en su ordenador en función de la versión de Windows que utilice.
1. Contenido del paquete
El paquete de la caja para disco duro de Conceptronic incluye los elementos siguientes:
•
•
•
•
•
•
•
Caja CHD3UES para disco duro de Conceptronic
Fuente de alimentación (12V, 1,5A)
Cable USB
Cable eSATA
Soporte del producto
Este manual de usuario en varios idiomas
Tarjeta de garantía y folleto de declaración de conformidad CE
9
ESPAÑOL
2. Utilización de la caja para disco duro
2.1
Conectar el CHD3UES a su ordenador
• Conecte la fuente de alimentación al CHD3UES y a una toma de corriente libre de pared.
• Decida qué interfaz utilizará:
o Conexión eSATA:
Conecte el cable eSATA al CHD3UES y a un puerto eSATA libre de su ordenador.
Conecte el cable USB al CHD3UES y a un puerto USB libre de su ordenador.
o Conexión USB:
Nota:
Nota:
Si su ordenador dispone de conexión eSATA, se recomienda utilizar este tipo de conexión ya que
proporciona una mayor velocidad de transferencia de datos.
En caso de que el CHD3UES esté conectado a su ordenador con el cable USB y con el cable eSATA a
la vez, la conexión eSATA se desactivará y el CHD3UES funcionará en modo USB.
• Encienda el ordenador.
• Encienda el CHD3UES con el interruptor de encendido situado en la parte trasera.
El ordenador detectará e instalará automáticamente el CHD3UES. No se necesita instalar ningún driver.
2.2
Desconectar el CHD3UES de su ordenador
El CHD3UES debe ser desconectado de forma segura antes de desconectarlo físicamente del ordenador
para evitar la pérdida de datos.
• Haga doble clic en el icono “Quitar hardware con seguridad” de la bandeja de sistema.
Se mostrará el recuadro de “Quitar hardware con seguridad”.
• Haga clic en el CHD3UES (normalmente mostrado como “Dispositivo de almacenamiento masivo USB”)
y haga clic en el botón “Detener”.
• Confirme la desconexión haciendo clic en “Aceptar”.
En ese momento el CHD3UES se encontrará correctamente desconectado de su ordenador. Ahora ya puede
desconectar físicamente el CHD3UES.
Nota:
La opción “Quitar hardware con seguridad” no está disponible cuando se utiliza la conexión
eSATA. Asegúrese de que no se están escribiendo datos en el CHD3UES en el momento de
desconectar el cable eSATA.
10
ESPAÑOL
3. Formatear el disco duro
Si el disco duro de su CHD3UES no está formateado, o desea formatearlo de nuevo, siga las siguientes
instrucciones de formateado.
Nota:
Las siguientes instrucciones para formatear el disco duro se basan en Windows Vista. Si formatea
el disco duro utilizando una versión diferente de Windows, los pasos que deben seguirse pueden
variar.
• Haga clic en el botón “Inicio” y seleccione “Todos los programas”, “Accesorios” y “Ejecutar”.
• Introduzca el comando “diskmgmt.msc” (sin las comillas) y haga clic en “Aceptar” para ejecutar el
comando.
A continuación aparecerá en pantalla la herramienta de gestión de disco de Windows.
• Seleccione su nuevo disco duro (con espacio de disco sin asignar) de la sección inferior de la lista.
• Haga clic con el botón derecho del ratón en su nuevo disco duro y seleccione “Nuevo volumen simple”.
11
ESPAÑOL
• A continuación aparecerá en pantalla el asistente de formato. Haga clic en “Siguiente” para continuar.
• Seleccione el tamaño para el nuevo disco duro. De forma predeterminada se especifica el máximo
tamaño posible. Si desea crear múltiples volúmenes en su disco duro, reduzca el tamaño hasta el
tamaño necesario del primer volumen. Si desea crear un único volumen, mantenga el tamaño máximo.
Haga clic en “Siguiente” para continuar.
• Seleccione la letra de la unidad que desea asignar al nuevo volumen. Por defecto aparecerá la primera
letra disponible para la unidad. Haga clic en “Siguiente” para continuar.
• Seleccione las opciones de formato. Si lo desea, puede cambiar el sistema de archivos, la etiqueta del
volumen y “Realizar un formato rápido”. Haga clic en “Siguiente” para continuar.
Nota:
Las particiones superiores a 32 GB sólo pueden formatearse con el sistema de archivos NTFS
cuando se utiliza la herramienta de gestión de disco de Windows.
• Aparecerá un resumen de los comandos seleccionados. Seleccione “Finalizar” para cerrar el Asistente
de formato y empezar a formatear el disco duro.
Una vez finalizado el proceso, la herramienta de gestión de disco mostrará el disco duro como
“Correcto”.
Ya puede utilizar el disco duro formateado.
¡Disfrute del uso de su caja para disco duro de Conceptronic!
12
DEUTSCH
Conceptronic CHD3UES Version 2.0
Benutzerhandbuch
Wir gratulieren Ihnen zum Kauf Ihrer
Conceptronic eSATA- & USB-Festplattenbox.
In diesem Benutzerhandbuch wird Ihnen Schritt für Schritt gezeigt, wie die Conceptronic eSATA- & USBFestplattenbox auf Ihrem Computer installiert und verwendet werden muss.
Wenn Probleme auftreten sollten, besuchen Sie unsere Support-Seite (unter www.conceptronic.net) und
klicken Sie auf ‚Support’. Dort steht Ihnen unsere FAQ-Datenbank mit den häufig gestellten Fragen zur
Verfügung.
Wenn Sie weitere Fragen zu Ihrem Produkt haben, die Sie auf unserer Webseite nicht beantworten können,
senden Sie uns eine E-Mail an: [email protected].
Detaillierte Informationen über Conceptronic Produkte finden Sie auf unserer Webseite:
www.conceptronic.net
Möglicherweise weicht die Softwareinstallation auf Ihrem Computer von der im Folgenden beschriebenen
etwas ab. Dies hängt vom Windows-Betriebssystem ab, das Sie verwenden.
1. Packungsinhalt
In der Verpackung der Conceptronic Festplattenbox ist Folgendes enthalten:
•
•
•
•
•
•
•
Conceptronic CHD3UES Festplattenbox
Netzteil (12V, 1,5A)
USB-Kabel
eSATA-Kabel
Produktständer
Dieses mehrsprachige Benutzerhandbuch
Garantiekarte & Broschüre mit CE-Erklärung
13
DEUTSCH
2. Verwendung der Festplattenbox
2.1
Anschluss der CHD3UES am Computer
• Schließen Sie das Stromkabel an der CHD3UES und an einer freien Steckdose an.
• Sie haben zwei Möglichkeiten für den Anschluss des Geräts am Computer:
o eSATA-Anschluss: Schließen Sie das eSATA-Kabel an der CHD3UES und an einen freien eSATA-Port
Ihres Computers an.
Schließen Sie das USB-Kabel an der CHD3UES und an einen freien USB-Port Ihres
o USB-Anschluss:
Computers an.
Hinweis: Wenn Ihr Computer über einen eSATA-Anschluss verfügt, empfehlen wir, diesen Anschluss zu
verwenden, um schnellere Datenübertragungsgeschwindigkeiten zu erreichen.
Hinweis: Wenn die CHD3UES sowohl mit dem USB- als auch dem eSATA-Kabel an Ihren Computer
angeschlossen ist, wird die eSATA-Verbindung deaktiviert und die CHD3UES arbeitet im USBModus.
• Schalten Sie Ihren Computer ein.
• Schalten Sie die CHD3UES über den Power-Schalter auf der Rückseite des Geräts ein.
Der Computer erkennt und installiert die CHD3UES automatisch. Keine Treiberinstallation erforderlich.
2.2
Trennen der CHD3UES vom Computer
Die CHD3UES muss zuerst sicher entfernt werden, bevor Sie sie von Ihrem Computer trennen, um
Datenverlust zu vermeiden.
• Doppelklicken Sie auf das-Symbol „Hardware sicher entfernen“ in der Kontrollleiste.
Daraufhin erscheint das Fenster „Hardware sicher entfernen”.
• Klicken Sie auf die angeschlossene CHD3UES (meistens als „USB Massenspeichergerät” aufgeführt) und
dann auf die Schaltfläche „Stop”.
• Bestätigen Sie das Entfernen durch Klicken auf „OK”.
Damit ist die CHD3UES sicher von ihrem Computer entfernt. Jetzt können Sie die CHD3UES von Ihrem
Computer trennen.
Hinweis: Die Option „Hardware sicher entfernen” ist nur verfügbar, wenn Sie die eSATA-Verbindung
benutzen. Stellen Sie sicher, dass nicht gerade Daten auf die CHD3UES geschrieben werden, wenn
Sie das eSATA-Kabel ausstecken.
14
DEUTSCH
3. Festplattenformatierung
Wenn die Festplatte in Ihrer CHD3UES nicht formatiert ist oder Sie diese neu formatieren möchten,
befolgen Sie bitte die nachstehenden Anweisungen für die Formatierung.
Hinweis: Die folgenden Anweisungen zur Formatierung beziehen Sie auf Windows Vista. Wenn Sie ein
anderes Windows-Betriebssystem haben, können die Schritte für die Formatierung von den hier
beschriebenen abweichen.
• Klicken Sie auf die „Start”-Schaltfläche und wählen Sie „Alle Programme”, „Zubehör”, „Ausführen”.
• Geben Sie den Befehl „diskmgmt.msc” (ohne Anführungs- und Schlusszeichen) ein und klicken Sie auf
„OK”, um den Befehl auszuführen.
Daraufhin erscheint das Windows Disk Management [Datenträgerverwaltung] auf Ihrem Bildschirm.
• Wählen Sie Ihre neue Festplatte (nicht zugeordneter Speicherplatz) im unteren Teil der Liste.
• Rechtsklicken Sie auf Ihre neue Festplatte und wählen Sie „New Simple Volume [Neues einfaches
Volumen]“.
15
DEUTSCH
• Daraufhin wird der Formatierungsassistent auf Ihrem Bildschirm angezeigt. Klicken Sie auf „Next
[Weiter]“.
• Wählen Sie die Größe für Ihre neue Festplatte. Standardmäßig wird die maximale Größe angegeben.
Wenn Sie mehrere Volumen auf Ihrer Festplatte erstellen möchten, reduzieren Sie die Größe auf die
gewünschte Größe für das erste Volumen. Wenn Sie nur ein Volumen erstellen möchten, behalten Sie
die maximale Größe bei. Klicken Sie auf „Next [Weiter]“.
• Wählen Sie den Laufwerksbuchstaben, den Sie dem neuen Volumen zuordnen möchten. Standardmäßig
wird der erste freie Laufwerksbuchstabe zugeordnet. Klicken Sie auf „Next [Weiter]“.
• Wählen Sie die gewünschten Formatierungsoptionen. Sie können das Dateisystem und die
Datenträgerbezeichnung ändern sowie „Perform a quick format [Schnelle Formatierung]“ auswählen.
Klicken Sie auf „Next [Weiter]“.
Hinweis: Partitionen, die größer sind als 32GB, können bei Verwendung von Windows Disk Management
[Datenträgerverwaltung] nur mit dem NTFS-Dateisystem formatiert werden.
• Es erscheint eine Zusammenfassung der ausgewählten Befehle. Klicken Sie auf „Finish [Fertigstellen]”,
um den Formatierungsassistenten zu schließen und mit der Formatierung Ihrer Festplatte zu beginnen.
Sobald die Formatierung abgeschlossen ist, wird die Festplatte im Disk Management
[Datenträgerverwaltung] als „Healthy [Fehlerfrei]“ angezeigt.
Jetzt können Sie die formatierte Festplatte verwenden.
Viel Spaß mit Ihrer Conceptronic Festplattenbox!
16
FRANÇAIS
CHD3UES Version 2.0 de Conceptronic
Manuel d’utilisation
Nous vous félicitons pour l’achat de votre
boîtier pour disques durs eSATA/USB de Conceptronic.
Le présent guide d’installation vous explique étape par étape comment installer et utiliser le boîtier pour
disques durs eSATA / USB de Conceptronic sur votre ordinateur.
En cas de problème, nous vous conseillons de consulter notre site web de support technique (en allant
sur www.conceptronic.net et en cliquant sur « Support »). Vous y trouverez les réponses aux questions les
plus fréquentes (FAQ).
Pour toute autre question au sujet de notre produit, ou si vous ne trouvez pas l’information dont vous
avez besoin sur notre site web, vous pouvez nous contacter par mail : [email protected]
Pour de plus amples informations sur les produits Conceptronic, merci de visiter notre site web :
www.conceptronic.net
L’installation du logiciel décrite ci-dessous peut être légèrement différente de l’installation qui se fera sur
votre ordinateur. Tout dépend de la version de Windows que vous utilisez.
1. Contenu du paquet
Le paquet de ce boîtier pour disques durs de Conceptronic doit contenir les éléments suivants :
•
•
•
•
•
•
•
Boîtier CHD3UES pour disques durs de Conceptronic
Alimentation électrique (12V, 1.5A)
Câble USB
Câble eSATA
Suport du produit
Le présent manuel d’utilisation multilingue
Carte de garantie & brochure de déclaration de conformité CE
17
FRANÇAIS
2. Utilisation de votre boîtier pour disques durs
2.1
Connectez le CHD3UES à votre ordinateur
• Connectez l’alimentation électrique au CHD3UES et à une prise murale.
• Déterminez quel câble d’interface sera utilisé :
o Connexion eSATA : branchez le câble eSATA au boîtier CHD3UES et à un port eSATA disponible de
votre ordinateur.
o Connexion USB :
branchez le câble USB au boîtier CHD3UES et à un port USB disponible de votre
ordinateur.
Remarque : Si votre ordinateur dispose d’une connexion eSata, nous vous conseillons d’utiliser ce type de
connexion car vous obtiendrez une plus grande vitesse de transfert de données
Remarque : Si le boîtier CHD3UES est connecté à votre ordinateur à la fois avec un câble USB et un câble
eSATA, la connexion eSATA sera désactivée et le boîtier fonctionnera en mode USB.
• Allumez votre ordinateur.
• Allumez le boîtier CHD3UES à l’aide de l’interrupteur électrique situé sur sa face arrière.
L’ordinateur reconnaîtra et installera automatiquement le CHD3UES. Aucun driver n’est à installer.
2.2
Déconnectez le CHD3UES de votre ordinateur
Le CHD3UES doit être retiré en toute sécurité avant de le déconnecter de votre ordinateur, et ce afin
d’éviter des pertes de données.
• Faites double clic sur l’icône “Safely Remove Hardware” (retirer le hardware en toute sécurité) de la
barre d’état inférieure.
La fenêtre “Safely Remove Hardware” apparaîtra.
• Cliquez sur le CHD3UES (qui apparaît souvent comme “USB Mass Storage Device”<périphérique de
stockage de masse USB>) et cliquez sur le bouton “Stop”.
• Confirmez la déconnexion en cliquant sur “OK”.
Le CHD3UES peut maintenant être retiré en toute sécurité de votre ordinateur. Vous pouvez à présent
débrancher le CHD3UES.
Remarque : L’option “Safely Remove Hardware” (retirer le hardware en toute sécurité) n’est pas
disponible quand on utilise la connexion eSata. Assurez-vous qu’aucune donnée ne s’enregistre sur
le CHD3UES au moment de débrancher le câble eSATA.
18
FRANÇAIS
3. Formatage de votre disque dur
SI le disque dur dans votre CHD3UES n’est pas formaté, ou si vous souhaitez le reformater, veuillez suivre
les instructions de formatage suivantes.
Remarque : les instructions de formatage indiquées ci-dessous correspondent au système d’exploitation
Windows Vista. Si vous formatez depuis une autre version de Windows, la procédure peut être
différente.
• Cliquez sur Démarrage et sélectionner Tous les programmes, Accessoires, Exécuter.
• Saisissez la commande « diskmgmt.msc » (sans les guillemets) et cliquez sur OK pour l’exécuter.
L’outil de gestion de disque de Windows apparaîtra à l’écran.
• Sélectionnez votre nouveau disque dur (avec l’espace de disque à déterminer) depuis la partie
inférieure de la liste.
• Cliquez avec la touche de droite de la souris et sélectionnez “New Simple Volume”.
19
FRANÇAIS
• L’assistant de formatage apparaîtra à l’écran. Cliquez sur Next pour continuer.
• Sélectionnez la capacité de votre nouvelle configuration de disque dur. Par défaut, la capacité
maximale est indiquée. Si vous voulez créer plusieurs volumes dans la configuration de votre disque
dur, diminuer la capacité jusqu’à celle correspondant à votre premier volume. Si vous voulez créer 1
seul volume, conservez la capacité maximale. Cliquez sur Next pour continuer.
• Sélectionnez la lettre de l’unité que vous souhaitez affecter au nouveau volume créé. La première
lettre d’unité disponible par défaut est indiquée à l’écran. Cliquez sur Next pour continuer.
• Sélectionnez vos options de formatage. Vous pouvez modifier le système de fichiers, le nom du volume
et choisir l’option Perform a quick format (Effectuer un formatage rapide). Cliquez sur Next pour
continuer.
Remarque : toute partition de plus de 32 GB ne peut être formatée qu’avec le système de fichiers NTFS
lorsque vous utilisez l’outil de gestion de disque de Windows.
• Vous obtiendrez un résumé des commandes sélectionnées. Sélectionnez Finish pour refermer l’assistant
et lancer le formatage de votre configuration de disque dur.
À la fin du formatage, l’état de la configuration de disque dur sera indiqué dans l’outil de gestion de
disque comme Healthy (correct).
Vous pouvez maintenant utiliser la configuration du disque dur formaté.
Votre boîtier pour disques durs est maintenant prêt à fonctionner!
20
ITALIANO
Conceptronic CHD3UES Versione 2.0
Manuale d’uso
Vi ringraziamo per aver acquistato il
Box per hard disk eSATA e USB di Conceptronic.
Il presente Manuale d’uso spiega passo a passo come installare e usare il Box per hard disk eSATA e USB di
Conceptronic.
In caso di problemi, vi consigliamo di visitare il nostro sito di supporto (collegandovi su
www.conceptronic.net e facendo clic su “Support”), dove si trova il database delle FAQ (Risposte alle
domande più frequenti).
In caso di domande di altro tipo riguardanti il prodotto, che non appaiono nel nostro sito web, vi
preghiamo di mettervi in contatto con noi attraverso l”indirizzo di posta elettronica:
[email protected]
Per ulteriori informazioni sui prodotti Conceptronic, potete visitare il sito web Conceptronic:
www.conceptronic.net
L’installazione del software così come viene descritta qui di seguito potrebbe essere leggermente diversa
da quella del computer utilizzato, poiché ciò dipenderà dalla versione di Windows in uso.
1. Contenuto della confezione
La confezione contenente il Box per hard disk di Conceptronic è composta dai seguenti elementi:
•
•
•
•
•
•
•
Box per hard disk CHD3UES di Conceptronic
Alimentatore di corrente (12V, 1.5A)
Cavo USB
Cavo eSATA
Supporto prodotto
Il presente Manuale d’uso multilingue
Scheda di garanzia e Dichiarazione CE
21
ITALIANO
2. Come usare il Box per hard disk
2.1
Come collegare il CHD3UES al computer
• Collegare l’alimentatore di corrente al CHD3UES e a una presa a muro disponibile.
• Decidere il tipo di cavo interfaccia da usare:
o Connessione eSATA: Collegare il cavo eSATA al CHD3UES e a una porta eSATA disponibile nel
computer.
o Connessione USB: Collegare il cavo USB al CHD3UES e a una porta USB disponibile nel computer.
Nota:
Nel caso in cui il computer disponga di eSATA, si consiglia di usare questo tipo di connessione per
ottenere una maggiore velocità di trasferimento dati.
Nota:
Nel caso in cui il CHD3UES sia collegato al computer sia con il cavo USB che con quello eSATA, la
connessione eSATA verrà disattivata e il CHD3UES funzionerà in modalità USB.
• Accendere il computer.
• Accendere il CHD3UES attraverso l’interruttore di accensione che si trova nella parte posteriore.
Il computer riconoscerà e installerà automaticamente il CHD3UES. Non è necessaria nessuna installazione
mediante driver.
2.2
Come scollegare il CHD3UES dal computer
Il CHD3UES deve essere scollegato dal computer in maniera sicura, perché in caso contrario potrebbero
andare persi alcuni dati.
• Fare doppio clic sull’icona “Rimozione hardware sicura” nel vassoio di sistema.
Apparirà la finestra relativa alla “Rimozione hardware sicura”.
• Fare clic sul CHD3UES collegato (spesso appare come “Dispositivo di memoria di massa USB”) e fare
clic sul pulsante “Stop”.
• Confermare che si desidera scollegare il dispositivo facendo clic su “OK”.
Ora il CHD3UES può essere estratto con sicurezza dal computer.
Nota:
L’opzione “Rimozione hardware sicura” non è disponibile nel caso in cui venga usata la
connessione eSATA. Assicurarsi che non ci siano dati scritti sul CHD3UES quando viene scollegato il
cavo eSATA.
22
ITALIANO
3. Come formattare il disco rigido
Quando il disco rigido del CHD3UES non è formattato, o nel caso in cui si desideri formattarlo di nuovo,
basta attenersi alle istruzioni riportate qui di seguito:
Nota:
Le istruzioni di formattazione riportate qui di seguito prendono come riferimento Windows Vista.
Se viene usata una versione di Windows diversa per la formattazione, i passi riportati qui in basso
potrebbero essere diversi.
• Fare clic sul pulsante “Start” e selezionare “Tutti i programmi”, “Accessori”, “Esegui”.
• Introdurre il comando “diskmgmt.msc” (senza le virgolette) e fare clic su “OK” per eseguirlo.
Sullo schermo apparirà lo strumento di Gestione disco di Windows (Disk Management).
• Selezionare il nuovo disco rigido (con lo spazio disco non allocato) dalla sezione inferiore dell’elenco.
• Fare clic con il tasto destro sul nuovo disco rigido dopo di che selezionare “New Simple Volume”.
23
ITALIANO
• Sullo schermo apparirà il Programma di Formattazione Assistita. Fare clic su “Next” per continuare.
• Selezionare le dimensioni del nuovo disco rigido. Per default, vengono specificate le dimensioni
massime. Se si desidera creare volumi molteplici sul disco rigido, ridurre le dimensioni a quelle
richieste dal primo volume. Se invece si desidera creare un solo volume, mantenere le dimensioni
massime. Fare clic su “Next” per continuare.
• Selezionare la lettera di unità che si desidera assegnare al nuovo volume. Per default verrà mostrata la
prima lettera disponibile. Fare clic su “Next” per continuare.
• Selezionare le opzioni di formattazione. È possibile modificare il file system, cambiare l’etichetta del
volume e selezionare l’opzione di formattazione veloce “Perform a quick format”. Fare clic su “Next”
per continuare.
Nota:
Le partizioni con più di 32GB si possono formattare esclusivamente mediante il file system NTFS
quando viene usato il software di Gestione disco di Windows.
• Apparirà un sunto dei comandi selezionati. Selezionare “Finish” per chiudere il Programma di
Formattazione Assistita e iniziare con la procedura di formattazione della configurazione del disco
rigido.
Dopo aver terminato il processo di formattazione, il disco rigido verrà mostrato nel programma di
Gestione disco come “Healthy”.
Ora è possibile usare la configurazione del disco rigido formattata.
Divertitevi usando il Box per hard disk di Conceptronic!
24
PORTUGUÊS
Conceptronic CHD3UES Versão 2.0
Manual do utilizador
Parabéns pela compra da sua
caixa para disco rígido com interfaces USB e eSATA da Conceptronic.
Este manual do utilizador fornece-lhe uma explicação passo-a-passo sobre como instalar e usar no seu
computador a caixa para disco rígido com interfaces USB e eSATA da Conceptronic.
Quando tiver algum problema, aconselhamo-lo a consultar a nossa página de suporte (vá a
www.conceptronic.net e clique em ‘Support’ (Suporte)). Aí vai encontrar a Base de Dados das Perguntas
Mais Frequentes.
Quando tiver outras questões sobre o seu produto e não encontrar resposta para elas na nossa página,
pode contactar-nos por e-mail: [email protected]
Para mais informações sobre os produtos da Conceptronic, visite a página web da Conceptronic em:
www.conceptronic.net
A descrição do software tal como se descreve a seguir pode ser ligeiramente diferente da instalação no
seu computador. Depende da versão do Windows que estiver a usar.
1. Conteúdo da embalagem
Existem os seguintes elementos na embalagem da caixa para disco rígido da Conceptronic:
•
•
•
•
•
•
•
Caixa para disco rígido CHD3UES da Conceptronic
Fonte de alimentação (12 V, 1,5 A)
Cabo USB
Cabo eSATA
Suporte do produto
Este manual de utilizador multilingue
Cartão de garantia e brochura de declaração CE
25
PORTUGUÊS
2. Usar a caixa para disco rígido
2.1
Ligue o CHD3UES ao seu computador
• Ligue o cabo de alimentação ao CHD3UES e a uma tomada de parede livre.
• Decida qual o cabo de interface que vai usar:
o Ligação eSATA:
Ligue o cabo eSATA ao CHD3UES e a uma porta eSATA livre do seu computador.
Ligue o cabo USB ao CHD3UES e a uma porta USB disponível do seu computador.
o Ligação USB:
Nota:
Nota:
Quando o seu computador estiver equipado com eSATA, é aconselhável usar esta ligação para
conseguir velocidades de transferência de dados superiores.
Se o CHD3UES estiver ligado ao seu computador com ambos os cabos USB e eSATA, a ligação eSATA
é desactivada e o CHS3UES vai funcionar em modo USB.
• Ligue o seu computador.
• Ligue o CHD3UES accionando o interruptor de alimentação situado na parte de trás.
O computador vai detectar e instalar automaticamente o CHD3UES. Não é necessária a instalação de
qualquer controlador.
2.2
Desligar o CHD3UES do seu computador
O CHD3UES deve ser retirado em segurança do seu computador de modo a prevenir perdas de dados.
• Faça um duplo clique no ícone Safely Remove Hardware” (Remover com segurança) na sua bandeja de
sistema.
A janela “Safely Remove Hardware” (Remover com segurança) aparece.
• Clique no CHD3UES ligado (aparece muitas vezes como “USB Mass Storage Device” (Dispositivo de
armazenamento de massa USB)) e clique no botão “Stop” (Parar).
• Confirme a desconexão clicando em “OK”.
O CHD3UES foi então removido em segurança do seu computador. Já pode desligar o CHD3UES.
Nota:
A opção "Safe Remove Hardware" (Remoção segura do hardware) não está disponível quando usar
a ligação eSATA. Assegure-se de que não há dados escritos no CHD3UES quando desligar o cabo
eSATA.
26
PORTUGUÊS
3. Formatar o seu disco rígido
Quando o disco rígido do seu CHD3UES não estiver formatado, ou quando quiser voltar a formatá-lo, pode
seguir as seguintes instruções de formatação.
Nota:
As instruções de formatação abaixo descritas baseiam-se no Windows Vista. Quando fizer a
formatação numa versão diferente do Windows, os passos podem variar.
• Clique no botão “Start” (Iniciar) e seleccione “All Programs” (Todos os programas), “Accessories”
(Acessórios), “Run” (Executar).
• Introduza o comando “diskmgmt.msc” (sem as aspas) e clique em “OK” para executar o comando.
Vai aparecer no seu ecrã a ferramenta de gestão do disco.
• Seleccione o seu novo disco rígido (sem espaço em disco atribuído) na parte de baixo da lista.
• Clique com o botão direito do rato no seu novo disco rígido e seleccione “New Simple Volume” (Novo
volume único).
27
PORTUGUÊS
• Vai aparecer no seu ecrã o Assistente de Formatação. Clique em “Next” (Seguinte) para continuar.
• Seleccione o tamanho para o seu novo disco rígido. Por defeito, é especificado o tamanho máximo. Se
quiser criar múltiplos volumes no seu disco rígido, reduza o tamanho para o tamanho que desejar do
primeiro volume. Se quiser criar 1 volume, mantenha o tamanho máximo. Clique em “Next” (Seguinte)
para continuar.
• Seleccione qual a letra da unidade que quer atribuir ao novo volume. Por defeito, é mostrada a
primeira letra de unidade disponível. Clique em “Next” (Seguinte) para continuar.
• Seleccione as suas opções de formatação. Pode mudar o sistema de ficheiros, mudar a etiqueta de
volume e pedir uma “Perform a quick format” (Realizar formatação rápida). Clique em “Next”
(Seguinte) para continuar.
Nota:
As partições com mais de 32 GB só podem ser formatadas com o sistema de ficheiros NTFS quando
se usar a ferramenta de Gestão de Disco do Windows.
• Vai poder ver um resumo dos comandos seleccionados. Seleccione “Finish” (Terminar) para fechar o
Assistente de Formatação e começar a formatar o seu disco rígido.
Quando a formatação estiver concluída, o disco rígido aparece na Gestão de Discos como “Healthy” (em
bom estado).
Pode agora usar o disco rígido que formatou.
Aproveite bem a sua caixa para disco rígido da Conceptronic!
28
MAGYAR
Conceptronic CHD3UES 2.0 verzió
Használati utasítás
Köszönjük, hogy a Conceptronic eSATÁ-s
és USB-s HD-dobozát választotta.
Ez a használati utasítás lépésről lépésre elmagyarázza, miként kell a Conceptronic eSATÁ-s és USB-s HDdobozát számítógépre telepítenie és használnia.
Ha probléma jelentkezne, azt tanácsoljuk, hogy keresse fel terméktámogatást nyújtó webhelyünket
(látogasson el a www.conceptronic.net honlapra, majd kattintson a „Support”-ra). Ott található ugyanis a
gyakran ismétlődő kérdések (GYIK) adatbázisa.
Ha a termékkel kapcsolatban további kérdése volna, és arra választ honlapunkon nem talál, e-mailben is
fordulhat hozzánk: [email protected]
A Conceptronic termékekkel kapcsolatos további tájékozódás végett látogasson el a Conceptronic
honlapjára: www.conceptronic.net
A szoftvernek az alábbiakban ismertetett telepítése kicsit eltérhet az adott számítógépre történő
telepítéstől. Mindez függ az éppen használt Windows-verziótól.
1. A csomag tartalma
A Conceptronic HD-dobozát tartalmazó csomagban az alábbiak találhatók:
•
•
•
•
•
•
•
Conceptronic CHD3UES HD-doboz
Tápegység (12 V, 1,5 A)
USB-kábel
eSATA-kábel
Terméktartó állvány
Ez a többnyelvű használati utasítás
A jótállási jegyet és a CE-nyilatkozatot tartalmazó könyvecske
29
MAGYAR
2. A HD-doboz használata
2.1
A CHD3UES csatlakoztatása számítógéphez
• Csatlakoztassa a tápegységet a CHD3UES-hez, valamint szabad falicsatlakozóhoz.
• Döntse el, milyen csatlakoztató kábelt használ:
o eSATA-csatlakozás: Csatlakoztassa az eSATA-kábelt a CHD3UES-hez és a számítógép valamelyik
szabad eSATA-portjához.
o USB-csatlakozás: Csatlakoztassa az USB-kábelt a CHD3UES-hez és a számítógép valamelyik szabad
USB-portjához.
Megjegyzés: Ha a számítógép eSATÁ-val van felszerelve, tanácsos ezt a csatlakozást használni a nagyobb
adatátviteli sebesség elérése érdekében.
Megjegyzés: Ha a CHD3UES a számítógéphez mind USB-, mind eSATA-kábellel csatlakozik, az eSATAcsatlakozás letiltódik, és a CHD3UES USB-üzemmódban működik.
• Kapcsolja be a számítógépet.
• Kapcsolja be a CHD3UES-t a hátoldalon lévő tápkapcsolóval.
A számítógép automatikusan felismeri és telepíti a CHD3UES-t. Ehhez nincs szükség semmilyen
illesztőprogram telepítésére.
2.2
A CHD3UES leválasztása a számítógépről
A CHD3UES-t biztonságosan el kell távolítani, mielőtt leválasztaná a számítógépről, hogy az adatvesztést
megelőzhesse.
• Duplán kattintson a „Safely Remove Hardware” ikonra a tálcán.
Megjelenik a „Safely Remove Hardware” ablak.
• Kattintson a csatlakoztatott CHD3UES-re (gyakran a listán „USB Mass Storage Device”-ként jelenik
meg), majd kattintson a „Stop” gombra.
• Erősítse meg a leválasztást az „OK”-ra kattintva.
A CHD3UES most már biztonságosan eltávolítható a számítógépről. Ezt követően a CHD3UES leválasztható.
Megjegyzés: A „Safely Remove Hardware” opció akkor is rendelkezésre áll, ha az eSATA-csatlakozást
használja. Az eSATA-kábel kihúzásakor meg kell bizonyosodni arról, hogy nincs semmilyen
beírt adat a CHD3UES-en.
30
MAGYAR
3. A merevlemez formázása
Ha a CHD3UES merevlemeze még nincs formázva, vagy azt ismét formázni kívánja, kövesse az alábbi
formázási utasításokat.
Megjegyzés: Az alábbi formázási utasítások a Windows Vistára vonatkoznak. Ha más Windows-verzióban
történik a formázás, az alábbi lépések esetében eltérés mutatkozhat.
• Kattintson a „Start” gombra, majd jelölje ki a következőket: „All Programs”, „Accessories”, „Run”.
• Írja be a „diskmgmt.msc” parancsot (idézőjel nélkül), majd a parancs futtatásához kattintson az „OK”ra.
A képernyőn a Windowsnak a Disk Management (lemezkezelő) eszköze jelenik meg.
• A lista alsó részén jelölje ki az új merevlemezt (kiosztatlan lemeztérrel).
• Az egér jobb oldali gombjával kattintson az új merevlemezre, majd jelölje ki a „New Simple Volume”ot.
31
MAGYAR
• A formázó varázsló jelenik meg a képernyőn. A folytatáshoz kattintson a „Next”-re.
• Jelölje ki az új merevlemez méretét. Alapértelmezésben a maximális méret van előírva. Ha több
kötetet kíván előállítani a merevlemezen, csökkentse a méretet az 1. kötet esetében szükséges
méretre. Ha egy kötetet kíván előállítani, tartsa meg a maximális méretet. A folytatáshoz kattintson a
„Next”-re.
• Jelölje ki, milyen meghajtó-betűjelet kíván hozzárendelni az új kötethez. Alapértelmezésben az első
szabad meghajtó-betűjel jelenik meg. A folytatáshoz kattintson a „Next”-re.
• Jelölje ki a formázási opciókat. Megváltoztathatja az állományrendszert, megváltoztathatja a
kötetcímét, illetve választhatja a „Perform a quick format”-ot. A folytatáshoz kattintson a „Next”-re.
Megjegyzés: A 32 GB-nál nagyobb partíciók csak az NTFS-állományrendszerrel formázhatók, ha a
Windows Disk Management-jét használja.
• A kijelölt parancsok összesítése jelenik meg. A formázóvarázsló bezárásához jelölje ki a „Finish”-t,
majd kezdje meg a merevlemez formázását.
Amikor a formázás befejeződött, a merevlemez „Healthy”-ként jelenik meg a Disk Management-nél.
Mostantól fogva a formázott merevlemez használható.
Kívánjuk, hogy örömmel használja a Conceptronic HD-dobozát!
32
TÜRKÇE
Conceptronic CHD3UES Sürüm 2.0
Kullanıcı Kılavuzu
Conceptronic eSATA ve USB Sabit Disk Kutusu
Satın Aldığınız İçin Tebrikler.
Bu Kullanıcı Kılavuzu, Conceptronic eSATA ve USB Sabit Disk Kutusu kurulumunun bilgisayarınıza adım adım
nasıl yapılacağı ve kullanımı konusunda bilgi vermektedir.
Problem ortaya çıkması halinde, destek sitemize gitmenizi (www.conceptronic.net adresine gidin ve
‘Support’ bölümüne tıklayın) tavsiye ederiz. Burada Sıkça Sorulan Sorular Veritabanını bulacaksınız.
Ürününüzle ilgili başka sorularınız varsa ve bunların yanıtlarını web sitemizde bulamıyorsanız, bize e-posta
ile ulaşın: [email protected]
Conceptronic ürünleri ile ilgili daha fazla bilgi için, lütfen Conceptronic Web Sitesini ziyaret edin:
www.conceptronic.net
Aşağıda açıklanan yazılım yüklemesi bilgisayarınızdaki yüklemeden biraz daha farklı olabilir. Bu durum
kullandığınız Windows sürümüne bağlıdır.
1. Paket içeriği
Conceptronic Sabit disk kutusu paketinin içeriği aşağıdaki gibidir:
•
•
•
•
•
•
•
Conceptronic CHD3UES Sabit Disk Kutusu
Güç kaynağı (12V, 1.5A)
USB kablo
eSATA kablosu
Ürün ayaklığı
Bu çok dilli kullanıcı kılavuzu
Garanti belgesi ve CE uygunluk beyanı
33
TÜRKÇE
2. Sabit disk kutusunun kullanımı
2.1
CHD3UES’in bilgisayara bağlanması
• Güç kaynağını CHD3UES’e ve boş bir prize takın.
• Hangi arayüz kablosunu kullanacağınıza karar verin:
o eSATA bağlantısı: eSATA kablosunu CHD3UES’e ve bilgisayarınızdaki boş bir eSATA portuna takın.
USB kabloyu CHD3UES’e ve bilgisayarınızda boş bir USB porta bağlayın.
o USB bağlantı:
Not:
Not:
Bilgisayarınız eSATA ile donatıldığında bu bağlantının yüksek veri iletimi hızlarına erişmek için
kullanılması tavsiye edilir.
CHD3UES hem USB hem de eSATA kablosu ile bilgisayarınıza bağlı ise eSATA bağlantısı devre dışı
bırakılır ve CHD3UES USB modunda çalışır.
• Bilgisayarınızı açın.
• Arka tarafta bulunan güç anahtarı ile CHD3UES’i açın.
CHD3UES bilgisayar tarafından otomatik olarak algılanacak ve kurulumu yapılacaktır. Sürücü kurulumu
gerektirmez.
2.2
CHD3UES’in bilgisayardan kaldırılması
Veri kaybını önlemek için CHD3UES’in bilgisayar bağlantısını çıkarmadan önce güvenli bir şekilde
kaldırılması gerekir.
• Sistem tepsisindeki “Safely Remove Hardware (Donanımı Güvenle Kaldır)” simgesi üzerine çift
tıklayın.
“Safely Remove Hardware (Donanımı Güvenle Kaldır)” penceresi ekrana gelir.
• Bağlı CHD3UES üzerine [genellikle “USB Mass Storage Device (USB Yığın Depolama Aygıtı)” olarak
listelenir] ve “Stop (Durdur)” düğmesine tıklayın.
• Kaldırma işlemini “OK (Tamam)” düğmesine tıklayarak onaylayın.
CHD3UES bilgisayarınızdan güvenli bir şekilde kaldırılmış olur. Artık CHD3UES’in bilgisayar bağlantısını
çıkarabilirsiniz.
Not:
eSATA bağlantısı kullandığınızda “Safely Remove Hardware (Donanımı Güvenle Kaldır)” seçeneği
kullanılır değildir. eSATA kablosunun bağlantısını söktüğünüz anda CHD3UES’e veri yazılmadığından
emin olun.
34
TÜRKÇE
3. Sabit diskin biçimlendirilmesi (formatlanması)
CHD3UES içindeki sabit disk biçimlendirilmemişse (formatlanmamışsa) ya da sabit diski tekrar
biçimlendirmek isterseniz, aşağıdaki biçimlendirme talimatlarını izleyebilirsiniz.
Not:
Aşağıdaki biçimlendirme talimatları Windows Vista’ya göre açıklanmıştır. Windows’un farklı
sürümlerinde biçimlendirme yaparken aşağıdaki adımlar değişiklik gösterebilir.
• “Start (Başlat)” düğmesine tıklayın ve “All Programs (Tüm Programlar)”, “Accessories (Aksesuarlar)”,
“Run (Çalıştır)”ı seçin.
• “diskmgmt.msc” (tırnak işareti olmadan) komutunu girin ve komutu çalıştırmak için “OK (Tamam)”a
tıklayın.
Windows Disk Management (Disk Yönetimi) aracı ekrana gelir.
• Listenin alt kısmından yeni sabit diskinizi (ayrılmamış disk alanlı) seçin.
• Yeni sabit diskinize sağ tıklayın ve “New Simple Volume (Yeni Basit Birim)”i seçin.
35
TÜRKÇE
• Biçimlendirme Sihirbazı ekrana gelecektir. Devam etmek için “Next (İleri)”ye tıklayın.
• Yeni sabit diskinizin boyutunu seçin. Varsayılan olarak, maksimum boyut belirtilir. Sabit disk üzerinde
birkaç birim oluşturmak isterseniz boyutu ilk birim için gerekli boyuta düşürün. 1 birim oluşturmak
isterseniz maksimum boyutu koruyun. Devam etmek için “Next (İleri)”ye tıklayın.
• Yeni birime hangi sürücü harfini atamak istediğinizi seçin. Varsayılan olarak, mevcut ilk sürücü harfi
atanır. Devam etmek için “Next (İleri)”ye tıklayın.
• Biçimlendirme seçeneklerinizi seçin. Dosya sistemini, birim etiketini değiştirebilir ve “Perform a quick
format (Hızlı bir biçimlendirme gerçekleştir)”i seçerek hızlı biçimlendirme yapabilirsiniz. Devam
etmek için “Next (İleri)”ye tıklayın.
Not:
Windows Disk Yönetimini kullanırken 32GB’tan büyük disk bölümleri sadece NTFS dosya sistemi ile
biçimlendirilebilir.
• Seçili komutların bir özetini göreceksiniz. Biçimlendirme Sihirbazını kapatmak ve sabit diski
biçimlendirmeye başlamak için “Finish (Son)”u seçin.
Biçimlendirme tamamlandığında, sabit disk, Disk Yönetiminde “Healthy (Sağlıklı)” olarak gösterilecektir.
Artık biçimlendirilen sabit diski kullanabilirsiniz.
Conceptronic Sabit Disk Kutusu kullanmanın keyfini çıkarın!
36