1
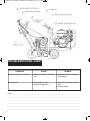
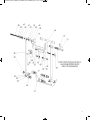
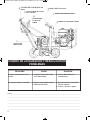
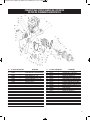
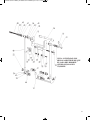
HD Manual SCH12-24 ENES_HD Manual SCH12-24 ENES.qxd 7/15/10 3:36 PM Page A
HYDRO-DRIVE SOD CUTTER
Model SCH-18 shown
Modelo SCH-18 ilustrado
OPERATOR’S/PARTS MANUAL
SCH-12/5.5 - S.N. 000101 & UP; SCH-12/8.0 - S.N. 000101 & UP
SCH-16/5.5 - S.N. 000101 & UP; SCH-16/8.0 - S.N. 000101 & UP
SCH-18/5.5 - S.N. 000101 & UP; SCH-18/8.0 - S.N. 000101 & UP
SCH-20/5.5 - S.N. 000101 & UP; SCH-20/8.0 - S.N. 000101 & UP
SCH-24/8.0 - S.N. 000101 & UP
CORTADOR DE TEPE MANUAL
DEL OPERADOR/PIEZAS
SCH-12/5.5 - S.N. 000101 Y SIG; SCH-12/8.0 - S.N. 000101 Y SIG
SCH-16/5.5 - S.N. 000101 Y SIG; SCH-16/8.0 - S.N. 000101 Y SIG
SCH-18/5.5 - S.N. 000101 Y SIG; SCH-18/8.0 - S.N. 000101 Y SIG
SCH-20/5.5 - S.N. 000101 Y SIG; SCH-20/8.0 - S.N. 000101 Y SIG
SCH-24/8.0 - S.N. 000101 Y SIG
Schiller Grounds Care, Inc.
1028 Street Road • Southampton, PA 18966
Telephone: 1-800-366-6268 • Teléfono: + (877) 596 6337
HD Manual SCH12-24 ENES_HD Manual SCH12-24 ENES.qxd 7/15/10 3:36 PM Page B
TABLE OF CONTENTS
ÍNDICE
INTRODUCTION . . . . . . . . . . . . . . . . . . . . . . . . . . . . . . . . . . 1
Thank You. . . . . . . . . . . . . . . . . . . . . . . . . . . . . . . . . . . . . 1
Read This Manual . . . . . . . . . . . . . . . . . . . . . . . . . . . . . . 1
Warranty . . . . . . . . . . . . . . . . . . . . . . . . . . . . . . . . . . . . . . 1
Measurements. . . . . . . . . . . . . . . . . . . . . . . . . . . . . . . . . . 1
Serial Numbers . . . . . . . . . . . . . . . . . . . . . . . . . . . . . . . . . 1
Directions . . . . . . . . . . . . . . . . . . . . . . . . . . . . . . . . . . . . . 1
INTRODUCCIÓN . . . . . . . . . . . . . . . . . . . . . . . . . . . . . . . . . 11
Gracias . . . . . . . . . . . . . . . . . . . . . . . . . . . . . . . . . . . . . . 11
Lea este manual . . . . . . . . . . . . . . . . . . . . . . . . . . . . . . . 11
Garantía . . . . . . . . . . . . . . . . . . . . . . . . . . . . . . . . . . . . . 11
Mediciones . . . . . . . . . . . . . . . . . . . . . . . . . . . . . . . . . . . 11
Números de serie . . . . . . . . . . . . . . . . . . . . . . . . . . . . . . 11
Instrucciones. . . . . . . . . . . . . . . . . . . . . . . . . . . . . . . . . . 11
OWNER’S RECORD . . . . . . . . . . . . . . . . . . . . . . . . . . . . . . . 1
REGISTRO DEL PROPIETARIO. . . . . . . . . . . . . . . . . . . . . 11
PRE-DELIVERY CHECK LIST. . . . . . . . . . . . . . . . . . . . . . . 1
LISTA DE COMPROBACIÓN ANTERIOR A LA ENTREGA . . 11
DELIVERY CHECK LIST . . . . . . . . . . . . . . . . . . . . . . . . . . . 1
LISTA DE COMPROBACIÓN DE ENTREGA. . . . . . . . . . 11
SAFETY . . . . . . . . . . . . . . . . . . . . . . . . . . . . . . . . . . . . . . . . . 2
Handle Fuel Safely - Avoid Fires . . . . . . . . . . . . . . . . . . . 2
Read Safety Signs. . . . . . . . . . . . . . . . . . . . . . . . . . . . . . . 2
Operate Safely . . . . . . . . . . . . . . . . . . . . . . . . . . . . . . . . . 2
Protect Children . . . . . . . . . . . . . . . . . . . . . . . . . . . . . . . . 2
Avoid Tipping . . . . . . . . . . . . . . . . . . . . . . . . . . . . . . . . . . 2
Operate Safely On Slopes . . . . . . . . . . . . . . . . . . . . . . . . 2
Practice Safe Maintenance . . . . . . . . . . . . . . . . . . . . . . . . 2
Start Engine Safely. . . . . . . . . . . . . . . . . . . . . . . . . . . . . . 2
SEGURIDAD . . . . . . . . . . . . . . . . . . . . . . . . . . . . . . . . . . . . 12
Manipule el combustible con cuidado – Evite los
incendios . . . . . . . . . . . . . . . . . . . . . . . . . . . . . . . . . 12
Lea los letreros de seguridad . . . . . . . . . . . . . . . . . . . . . 12
Haga funcionar de forma segura . . . . . . . . . . . . . . . . . . 12
Proteja a los niños . . . . . . . . . . . . . . . . . . . . . . . . . . . . . 12
Evite los vuelcos. . . . . . . . . . . . . . . . . . . . . . . . . . . . . . . 12
Haga funcionar de forma segura en pendientes . . . . . . 12
Practique un mantenimiento seguro . . . . . . . . . . . . . . . . 12
Arranque el motor de forma segura . . . . . . . . . . . . . . . . 12
ENGINE STARTING PROCEDURES . . . . . . . . . . . . . . . . . . 2
Engine Oil Level Check . . . . . . . . . . . . . . . . . . . . . . . . . . 2
Transmission Oil Level Check . . . . . . . . . . . . . . . . . . . . . 2
Hydro Reservoir Level Check . . . . . . . . . . . . . . . . . . . . . 2
Starting Engine . . . . . . . . . . . . . . . . . . . . . . . . . . . . . . . . . 2
Stopping Engine . . . . . . . . . . . . . . . . . . . . . . . . . . . . . . . . 3
OPERATING THE SOD CUTTER. . . . . . . . . . . . . . . . . . . . . 3
Preparation . . . . . . . . . . . . . . . . . . . . . . . . . . . . . . . . . . . . 3
Operating . . . . . . . . . . . . . . . . . . . . . . . . . . . . . . . . . . . . . 3
GENERAL MAINTENANCE . . . . . . . . . . . . . . . . . . . . . . . . 3
PROCEDIMIENTOS DE ARRANQUE DEL MOTOR . . . . 12
Compruebe el nivel de aceite del motor. . . . . . . . . . . . . 12
Compruebe el nivel de aceite de la transmisión. . . . . . . 12
Compruebe el nivel del aceite en el depósito hidrostático . . . 12
Arranque del motor . . . . . . . . . . . . . . . . . . . . . . . . . . . . 12
Parada del motor. . . . . . . . . . . . . . . . . . . . . . . . . . . . . . . 13
CÓMO HACER FUNCIONAR EL CORTADOR DE TEPE. . 13
Preparación . . . . . . . . . . . . . . . . . . . . . . . . . . . . . . . . . . . 13
Operación . . . . . . . . . . . . . . . . . . . . . . . . . . . . . . . . . . . . 13
TROUBLESHOOTING CHART . . . . . . . . . . . . . . . . . . . . . . 4
MANTENIMIENTO GENERAL . . . . . . . . . . . . . . . . . . . . . 13
SOD CUTTER PARTS MANUAL . . . . . . . . . . . . . . . . . . . . . 5
Main Frame . . . . . . . . . . . . . . . . . . . . . . . . . . . . . . . . . . . 6
Power Train Assembly . . . . . . . . . . . . . . . . . . . . . . . . . . . 7
Handle Assembly . . . . . . . . . . . . . . . . . . . . . . . . . . . . . . . 8
TABLA DE LOCALIZACIÓN Y RESOLUCIÓN DE
PROBLEMAS . . . . . . . . . . . . . . . . . . . . . . . . . . . . . . . . . . . . 14
TWO YEAR LIMITED WARRANTY . . . . . . . . . . . . . . . . . 10
MANUAL DE PIEZAS DEL CORTADOR DE TEPE . . . . 15
Bastidor principal . . . . . . . . . . . . . . . . . . . . . . . . . . . . . . 16
Conjunto del sistema de transmisión . . . . . . . . . . . . . . . 17
Conjunto de manillar . . . . . . . . . . . . . . . . . . . . . . . . . . . 18
GARANTÍA LIMITADA DE DOS AÑOS. . . . . . . . . . . . . . 20
HD Manual SCH12-24 ENES_HD Manual SCH12-24 ENES.qxd 7/15/10 3:36 PM Page 1
INTRODUCTION
THANK YOU
Thank you for purchasing the Classen Model SCH-12,
SCH-16, SCH-18, SCH-20 or SCH-24 sod cutter.
PRE-DELIVERY CHECK LIST
Check the following before you deliver the sod cutter to the
customer.
1.
Guards and shields fastened in place.
2.
Decals fastened and legible.
3.
Gas lever on engine turned on.
4.
All seven lubrication points greased.
5.
2:1 gearbox oil level.
This manual should be considered a permanent part of your
sod cutter and should remain with it if you sell it.
6.
Engine oil level.
7.
Air cleaner.
WARRANTY
8.
Touch up scratches.
Refer to back page.
9.
Chain tight.
READ THIS MANUAL
Read this manual carefully to learn how to operate sod cutter
correctly. Failure to do so could result in personal injury or
equipment damage.
MEASUREMENTS
U.S. units of measure are used in this manual.
SERIAL NUMBERS
Write frame and engine serial numbers, plus model numbers in
"Owners Record" section below. Your dealer needs these
numbers when you order parts. The serial number is located on
a sticker on the center section of the frame.
10. Engine belt tight.
11. Levers working properly.
12. All controls.
13. Add fuel, start engine, test run.
DATE SET UP __________/__________/__________
DIRECTIONS
"Right Hand" and "Left Hand" sides of the sod cutter are
determined by facing the back of the sod cutter as you would
operate the machine.
DELIVERY CHECK LIST
Review the operators manual with the customer.
Explain the following:
1.
Classen warranty.
OWNER’S RECORD
2.
Safe operation and service.
3.
How to use controls.
DATE PURCHASED _________________________________
4.
Operating the machine correctly.
5.
Transporting the sod cutter.
6.
Correct fuel and lubricants.
7.
Daily and periodic inspections.
8.
Changing oil after break-in period.
9.
Servicing the sod cutter regularly and correctly.
SOD CUTTER MODEL NUMBER______________________
SOD CUTTER SERIAL NUMBER______________________
ENGINE MODEL NUMBER __________________________
ENGINE SERIAL NUMBER___________________________
10. Classen parts and service.
11. Give the customer the operators manual and
encourage customer to read it.
DATE DELIVERED __________/__________/__________
SIGNATURE _______________________________________
1
HD Manual SCH12-24 ENES_HD Manual SCH12-24 ENES.qxd 7/15/10 3:36 PM Page 2
ENGINE STARTING
PROCEDURES
SAFETY
HANDLE FUEL SAFELY - AVOID FIRES
Handle gasoline with care; it is highly flammable. Use an
approved gasoline container.
DO NOT remove gas cap if engine is running.
NOTICE: There are two locations on this engine that require
oil, both the crankcase and the transmission
(gearbox). Running the engine or gearbox with a low
oil level can cause engine damage. Refer to the
engine manual for complete engine information
and recommendations.
READ SAFETY SIGNS
ENGINE OIL LEVEL CHECK
Fill the fuel tank outdoors.
DO NOT fill tank completely full.
DO NOT smoke while you fill fuel tank.
Carefully read and follow all caution stickers.
1.
BEFORE CHECKING ENGINE:
• make certain the engine is level
• the engine switch is in the OFF position
• the sod cutter blade is NOT engaged
• the drive wheels are disengaged.
2.
Remove the filler cap/dipstick and wipe it clean.
3.
Insert and remove the dipstick without screwing it
into the filler neck. Check the oil level shown on the
dipstick.
4.
If the oil level is low, fill to the edge of the oil filler
hole with the recommended oil. SAE 10W-30 is
recommended for general use. Refer to engine oil
recommendations in engine manual for other
viscosities and information.
5.
Screw in the filler cap/dipstick securely.
WARNING
ALL GUARDS MUST BE IN PLACE
WHILE MACHINE IS IN OPERATION
WARNING
KEEP HANDS & FEET AWAY
FROM MOVING PARTS
OPERATE SAFELY
Carefully read this manual and operate sod cutter correctly.
TRANSMISSION OIL LEVEL CHECK
1.
Check the transmission oil level with the engine
stopped and in a level position.
2.
Remove the filler cap/dipstick and wipe it clean.
3.
Insert and remove the dipstick without screwing it
into the filler hole. Check the oil level shown on the
dipstick.
4.
If the oil level is low, add oil to reach the upper limit
mark on the dipstick. Use the same oil that is
recommended for the engine, SAE 10W-30.
5.
Screw in the filler cap/dipstick securely.
PROTECT CHILDREN
Keep children and pets out of the area where you are cutting
sod.
AVOID TIPPING
Make sure you do not get too close to sharp drop-offs to avoid
tipping sod cutter over.
OPERATE SAFELY ON SLOPES
You may cut sod any direction on slopes, however, make sure
you do this carefully. Cutting on slopes can be dangerous. To
avoid any accidents, make sure to leave yourself room to
correct the problem if one arises. Always park your sod cutter
on level ground.
PRACTICE SAFE MAINTENANCE
Keep all machine parts in good condition and fastened in
place. Fix damages immediately. Replace worn or broken
parts. Whenever you work on the sod cutter, disconnect spark
plug wire.
HYDROSTATIC TRANSMISSION CHECK
1.
Check the hydrostatic transmission level with the
engine stopped and in a level position.
2.
Visually inspect to see if level is low.
3.
If oil level is low, add oil to reach upper limit mark
on reservoir.
4.
Use 20W 50 Oil.
STARTING ENGINE
START ENGINE SAFELY
1.
Turn fuel cock to the "open" position.
Make sure hands and feet are out of the way of moving parts
when starting engine.
2.
Turn choke on (closed).
3.
Turn ignition switch to "on".
2
4.
Move throttle lever on engine to half throttle position.
5.
Pull recoil starter rope until engine starts.
6.
After engine is warm, turn off choke (open).
HD Manual SCH12-24 ENES_HD Manual SCH12-24 ENES.qxd 7/15/10 3:36 PM Page 3
7.
Allow engine to run one minute before cutting sod.
8.
Check engine rpm setting before operating. DO NOT
exceed 3600 rpm.
STOPPING ENGINE
1.
Turn throttle to "slow" position.
2.
Turn off ignition switch.
OPERATING THE
SOD CUTTER
PREPARATION
1.
Police lawn area for obstacles and debris (i.e.
sprinklers, hoses, toys, etc.). Remove all items.
2.
Make sure underground sprinkler heads and other
hidden obstacles are marked to prevent damage.
3.
Mark other areas where sod cutting will be a problem
or too risky (i.e. mud, tree roots, steep hills).
GENERAL MAINTENANCE
To keep the sod cutter in good operating condition, perform
the following:
•
Keep blade sharp; a sharp blade cuts cleaner, faster and
more uniformly and places less load on the machine.
Sharpen cutting edge on bevel or top side only.
•
Keep drive belt at proper tension and free of oil and
dirt at all times.
•
Check engine oil level and air filter element daily.
•
Check for loose bolts and connections.
•
All grease fittings are pressurized type. Use a good
grade Lithium Base Grease or equivalent. Grease
eccentric arms sparingly every 4 hours of service, all
others daily. Wipe off all grease fittings before and after
each greasing (there are a total of 7 grease fittings).
•
To make sure the chain on the front drive wheels is
tight, you will need to remove the chain guard to
check this. If tightening is required, loosen nuts and
bolts on the 3/4" pillow block bearings and push the
bearings toward the back of the sod cutter until chain
is tight. Make sure both bearings go back evenly to
keep jackshaft running even with the frame. After
doing this, retighten nuts and bolts on the bearing and
replace the chain guard.
OPERATING
1.
Start the engine. CAUTION: To avoid injury, do not
place your feet or other body parts under the blade
while starting the engine.
2.
Push shifter handle into neutral position.
3.
Select the correct cutting depth desired up to 2 1/2
inches. Loosen the tee handle from the depth gauge
plate, located under the height adjustment bar, (#3 on
illustration) and put it to the correct height setting.
Tighten the tee handle.
4.
Raise the main handle upward so the front nose of the
sod cutter rests on the ground.
5.
Loosen the 1/2" handle nut (#2 on illustration) and
lower the height adjustment bar to rest on the depth
gauge. Now tighten the 1/2" handle nut securely so it
will not loosen with the vibration of the machine.
6.
Go to the back of the machine and lower the handle
until the cutting blade rests on the ground. You are
now ready to cut sod.
7.
Push shifter handle into sod cutting position.
8.
Pull the throttle to the desired operating speed
(#6 on illustration). Maximum engine rpm is
recommended for smooth operation.
9.
After cutting a short distance, stop machine by letting
the twist grip throttle control go back to its original
position. Check thickness of cut and adjust if necessary.
•
Engine (refer to Honda owner’s manual).
•
Check chain tension on chain on left side of
hydrostatic unit. If this needs to be tightened, loosen
bolt and nut on sprocket and move in slot to tighten
chain and re-tighten bolt and nut.
SAFETY WARNING
DO NOT STORE GASOLINE (FUEL)
UNNECESSARILY OVER LONG PERIODS OF
TIME. TO PREVENT POSSIBLE EXPLOSION,
STORE ONLY IN AN APPROVED "SAFE"
CONTAINER. TO PREVENT EXPLOSION OF
VAPORIZED FUEL, DO NOT STORE MACHINE
WITH FUEL IN TANK OR CARBURETOR IN AN
ENCLOSURE WITH OPEN FLAME.
(EXAMPLE: FURNACE OR WATER HEATER
PILOT LIGHT.)
10. At the end of each cutting pass, lift up on the handle
bar to clear the cutting blade from the sod. Retard the
throttle control and turn machine around into the
position for the next cut.
11. When finished cutting sod, reverse steps 6 through 3,
leaving the wheel drive handle in transportation
position.
3
HD Manual SCH12-24 ENES_HD Manual SCH12-24 ENES.qxd 7/15/10 3:36 PM Page 4
TROUBLESHOOTING CHART
PROBLEM
CAUSE
REMEDY
Blade will not stay in ground
a. Bottom of blade is rounded
off
a. Blade should be sharpened
or replaced
Belts jump off
a. Wrong type of belt
b. Pulley misalignment
a. Use only the special factory
belt
b. Realign pulley
NOTES:____________________________________________________________________________________________________
___________________________________________________________________________________________________________
___________________________________________________________________________________________________________
___________________________________________________________________________________________________________
___________________________________________________________________________________________________________
___________________________________________________________________________________________________________
4
HD Manual SCH12-24 ENES_HD Manual SCH12-24 ENES.qxd 7/15/10 3:36 PM Page 5
HYDRO-DRIVE SOD CUTTER
PARTS MANUAL
SCH-12/5.5
SCH-16/5.5
SCH-18/5.5
SCH-20/5.5
SCH-12/8.0
SCH-16/8.0
SCH-18/8.0
SCH-20/8.0
SCH-24/8.0
–
–
–
–
–
–
–
–
–
S.N.
S.N.
S.N.
S.N.
S.N.
S.N.
S.N.
S.N.
S.N.
000101
000101
000101
000101
000101
000101
000101
000101
000101
&
&
&
&
&
&
&
&
&
UP
UP
UP
UP
UP
UP
UP
UP
UP
5
HD Manual SCH12-24 ENES_HD Manual SCH12-24 ENES.qxd 7/15/10 3:36 PM Page 6
HYDRO-DRIVE SOD CUTTER MAIN FRAME
KEY
1
2
3
4
5
6
7
8
9
10
11
12
13
14
15
16
17
18
19
6
PART NO.
C400246
C400247
C500101
C500115
C500140
C500083
C300002
C100017
C500016
C400248
C500219
C400234
C500130
C500129
C100010
C500042
C500091
C100021
C500001
QTY/PER SHEET
1
1
1
8
7
1
1
1
2
1
1
1
6
5
2
7
2
2
1
DESCRIPTION
SOD CUTTER FRAME
SMALL GUARD
5/16" NUT
5/16" LOCK WASHER
5/16" X 3/4" BOLT
5/16" FLAT WASHER
AXLE PIN
TIRE AND WHEEL ASSEMBLY, 9x350x4
5/32" X 1-1/2" COTTER PIN
CHAIN GUARD
5/16" X 5" BOLT
LARGE GUARD
3/8" LOCK WASHER
3/8" NUT
IDLER PULLEY
3/8" FLAT WASHER
3/8" X 2" BOLT
BRASS BUSHING
GREASE FITTING, 1/4"-28
KEY
20
21
22
23
24
25
26
27
28
29
30
31
32
33
34
35
36
37
38
PART NO.
C400010
C500043
C100074
C100496
C100069
C100096
C100489
C100501
C400251
C100106
C100073
C400237
C400011
C500133
C300133
C500142
C300047
C400188
C100502
QTY/PER SHEET
1
2
1
1
1
1
1
1
1
1
1
1
2
12
2
6
2
2
1
DESCRIPTION
CLUTCH ARM
3/8" X 1" BOLT
DECAL, "CLASSEN"
DECAL, "SCH-18"
DECAL, "DANGER"
DECAL, "ALL GUARDS" (NOT SHOWN)
DECAL “HYDRO-DRIVE “ (NOT SHOWN)
3/8" VLIER PIN
NETURAL HANDLE
DECAL, SERIAL NUMBER (NOT SHOWN)
LUBRICATION TAG (NOT SHOWN)
BUMPER
12" BLADE ADAPTOR
5/16" X 1" BOLT
16" BLADE ADAPTOR
5/16" X 2" BOLT
20" BLADE ADAPTOR
24" BLADE ADAPTOR
3/8” SNAP RING
HD Manual SCH12-24 ENES_HD Manual SCH12-24 ENES.qxd 7/15/10 3:36 PM Page 7
HYDRO-DRIVE SOD CUTTER POWER TRAIN ASSEMBLY
KEY
1
1
2
3
3
4
5
6
7
8
9
10
11
12
13
14
15
16
17
18
19
20
21
22
PART NO.
C100005
C100114
C100028
C100491
C100503
C500011
C200054
C100492
C500174
C200044
C500004
C500130
C500129
C100513
C500003
C700002
C100004
C600003
C500034
C500006
C500106
C200002
C500181
C100043
QTY/PER SHEET
1
1
1
1
1
1
1
1
8
1
1
4
4
1
4
2
4
1
8
16
16
1
2
1
DESCRIPTION
HONDA 5.5 HP ENGINE W/ DEFLECTOR
HONDA 8.0 HP ENGINE W/ DEFLECTOR
PULLY W/ HUB AND BOLTS, 4" X 22MM
B55 V-BELT 5HP
B58 V-BELT 8HP
3/16" X 1-3/4" SQUARE KEY
2BK62H SHEAVE AND 15MM HUB
SPRING PLUNGER
1/2" X 1-3/4" BOLTS
13 TOOTH SPROCKET
1/4" X 1" SQUARE KEY
3/8" LOCK WASHER
3/8" NUT
B38 V-BELT
1/4" X 7/8" HALF MOON KEY
ECCENTRIC HUB
1" PILLOW BLOCK WITH COLLAR
ECCENTRIC SHAFT
1/2" FLAT WASHER
1/2" LOCK WASHER
1/2" NUT
6" PULLEY WITH 1" HUB
1/4" X 1-1/2" SQUARE KEY
IDLER SPROCKET
KEY
23
24
25
26
27
28
29
30
31
32
33
34
35
36
37
38
39
40
41
42
43
44
45
PART NO.
C500147
C100013
C500083
C500115
C500101
C100493
C100495
C100025
C500158
C700024
C300001
C600004
C500136
C500137
C100027
C500157
C500146
C200001
C100311
C500168
C500074
C100494
C200056
QTY/PER SHEET
4
2
8
8
8
1
1
2
8
4
1
1
2
2
1
2
4
1
1
2
2
1
1
DESCRIPTION
5/16" X 1-1/2" BOLT
3/4" PILLOW BLOCK WITH COLLAR
5/16" FLAT WASHER
5/16" LOCK WASHER
5/16" NUT
#40 X 54 WELDED SPROCKET AND HUB
#40 CHAIN X 50 ROLLER
CHAIN CONNECTING LINK
1/2" X 3-1/2" BOLT
DRIVE WHEEL (TWO WHEELS ON SC-12)
DRIVE SHAFT SPACER
DRIVE SHAFT
1/4" NUT
1/2" LOCK WASHER
THROTTLE SPRING
1/4" X 3-1/2" BOLT
3/8" X 1-1/2" BOLT
DRIVE SHAFT SPROCKET
HYDRO-GEAR
5/16 X 4-1/2 BOLT
5/16 X 1-3/4 BOLT
#40 CHAIN X 76 ROLLER
#40X12X3/4 SPROCKET AND SHAFT
7
HD Manual SCH12-24 ENES_HD Manual SCH12-24 ENES.qxd 7/15/10 3:36 PM Page 8
HYDRO-DRIVE SOD CUTTER HANDLE ASSEMBLY
KEY
1
2
3
4
5
6
7
8
9
10
11
12
13
14
14
14
14
14
15
16
17
18
19
20
21
22
23
24
25
26
27
8
PART NO.
C100018
C400243
C300138
C500043
C100486
C500041
C500118
C500136
C500137
C100007
C400008
C500019
C500139
C100029
C100416
C100016
C100110
C100329
C500154
C500042
C400250
C500025
C500026
C500134
C500146
C500133
C500101
C500115
C100134
C500001
C400490
QTY/PER SHEET
2
1
1
6
1
6
1
1
1
4
1
1
1
1
1
1
1
1
1
2
1
2
3
3
1
7
8
7
1
6
1
DESCRIPTION
HANDLE GRIP
MAIN HANDLE
HANDLE BRACE
3/8" X 1" BOLT
THUMB THROTTLE AND CABLE
3/8" LOCK NUT
1/4" X 1-3/4" BOLT
1/4" NUT
1/4" LOCK WASHER
RUBBER GRIP
HANDLE ENGAGEMENT
SMALL HANDLE SPRING
1/4" LOCK NUT
12" CUTTING BLADE
16" CUTTING BLADE
18" CUTTING BLADE
20" CUTTING BLADE
24" CUTTING BLADE
3/8" X 2-1/2" BOLT
3/8" FLAT WASHER
SHIFTER ARM
3/8" FINE NUT
3/8" CLEVIS YOKE
3/8" X 1-1/4" BOLT
3/8" X 1-1/2" BOLT
5/16" X 1" BOLT
5/16" NUT
5/16" LOCK WASHER
DECAL, "WHEEL DRIVE" (NOT SHOWN)
GREASE FITTING, 1/4"-28
DECAL, “HYDRO MANUAL ROLL” (NOT SHOWN)
KEY
28
29
30
31
32
33
34
35
36
37
38
39
40
41
42
43
44
45
46
47
48
49
50
51
52
53
54
55
56
57
PART NO.
C500130
C500129
C400007
C500007
C500006
500034
C400001
C400238
C300039
C400239
C200005
C200004
C500106
C500152
C500151
C100001
C100002
C600001
C800001
C100003
C800002
C400488
C500241
C500132
C500065
C400253
C400249
C500242
C100132
C100133
QTY/PER SHEET
6
7
1
1
3
14
1
1
1
1
1
1
7
2
2
12
12
6
2
6
2
1
2
1
1
1
1
1
1
1
DESCRIPTION
3/8" LOCK WASHER
3/8" NUT
CUTTING BLADE ADJUSTMENT ARM
1/2" HANDLE NUT
1/2" LOCK WASHER
1/2" FLAT WASHER
HEIGHT ADJUSTMENT BAR
PITCH ADJUSTMENT BAR
DEPTH GUAGE
1/4" THREADED T-HANDLE
HEIGHT ADJUSTMENT BOLT
PITCH ADJUSTMENT BOLT
1/2" NUT
1/2" X 2-3/4" BOLT
1/2" X 3" FINE BOLT
3/4" NYLON WASHER
SEAL
STEEL SLEEVE
ECCENTRIC ARM
BEARING
BLADE ARM
DECAL, “HYDRO SPEED” (NOT SHOWN)
1/2" X 1" BOLT
1/2" X 4" BOLT
SPRING
3/8" LINKAGE ARM
CLUTCH ARM
#10 X 3/4" SOCKET HEAD BOLT
DECAL, "CUTTER BLADE" (NOT SHOWN)
DECAL, "SLOW/FAST" (NOT SHOWN)
HD Manual SCH12-24 ENES_HD Manual SCH12-24 ENES.qxd 7/15/10 3:36 PM Page 9
9
HD Manual SCH12-24 ENES_HD Manual SCH12-24 ENES.qxd 7/15/10 3:36 PM Page 10
Schiller Grounds Care, Inc.
1028 Street Road • Southampton, PA 18966
Telephone: 1-800-366-6268
TWO YEAR LIMITED WARRANTY
Effective April 1, 2007
For the period of two years from the date of purchase, CLASSEN MFG., INC. will repair or replace for the original purchaser free
of charge, any part or parts found upon the examination of our factory authorized service station, or by the factory in Norfolk,
Nebraska, to be defective in material or workmanship. All transportation charges on parts submitted for repair or replacement under
this warranty shall be borne by the purchaser.
This warranty does not include engines or engine parts, tires, batteries, or gearboxes that are covered under separate warranties
furnished by their manufacturer or supplier, nor does it include normal maintenance parts, including but not limited to, spark plugs,
points, filters, blades, and lubricants.
All service under this warranty will be furnished or performed by our factory authorized service stations.
There is no other expressed warranty. Implied warranties, including those of merchantability and fitness for a particular purpose, are
limited to two years from the date of purchase and to the extent permitted by law, any and all implied warranties are excluded. The
above remedy of repair and replacement of defective parts is the purchaser’s exclusive remedy for any defect, malfunction or breach
of warranty. Liability for incidental or consequential damages under any and all warranties is excluded to the extent permitted
by law.
NORMAL RESPONSIBILITIES OF THE SELLER AND THE USER
1.
The Distributor or Dealer is responsible for the proper assembly and preparation of the product for delivery to the end user.
2.
The User is responsible for reading the Manual and Instructions.
3.
The User is responsible for proper operation and maintenance as described in the manual.
4.
The User is responsible for the replacement of wear items such as blades, belts, tires, batteries, etc.
5.
The User is responsible for damage due to improper operation and maintenance, as well as abuse.
All claims must be received by the factory 30 days after the end of the warranty period to receive warranty consideration.
© 2009 Schiller Grounds Care, Inc. All Rights Reserved.
10
07/10
HD Manual SCH12-24 ENES_HD Manual SCH12-24 ENES.qxd 7/15/10 3:36 PM Page 11
INTRODUCCIÓN
GRACIAS
Gracias por comprar el cortador de tepe Classen modelo
SCH-12, SCH-16, SCH-18, SCH-20 o SCH-24.
LISTA DE COMPROBACIÓN ANTERIOR A LA ENTREGA
Compruebe lo siguiente antes de entregar el cortador de tepe al
cliente.
1.
Protectores y pantallas sujetos en posición.
2.
Calcomanías sujetas y legibles.
3.
Palanca de gasolina del motor en la posición
encendida.
4.
Los ocho puntos de lubricación engrasados.
5.
Nivel de aceite de la caja de engranajes 2:1
Este manual debe considerarse parte permanente de su cortador
de tepe y debe permanecer con el mismo si lo vende.
6.
Nivel de aceite del motor.
7.
Filtro de aire.
GARANTÍA
8.
Retoque las rayaduras.
Consulte la última página.
9.
Cadena tensada.
LEA ESTE MANUAL
Lea detenidamente este manual para aprender el
funcionamiento correcto del cortador de tepe. De no hacer
esto se pueden producir lesiones personales o daños en los
equipos.
MEDICIONES
En este manual se usan unidades de medida de EE.UU.
NÚMEROS DE SERIE:
Escriba los números de serie del bastidor y del motor, más los
números de modelo en la sección de “Registro del propietario”.
Su distribuidor necesita estos números al pedir piezas. El
número de serie está ubicado en un adhesivo en la sección
central del bastidor.
INSTRUCCIONES
Los lados “derecho” e “izquierdo” del cortador de tepe vienen
determinados haciendo frente a la “parte trasera” de la
máquina como si estuviera haciendo funcionar máquina.
REGISTRO DEL PROPIETARIO
FECHA DE COMPRA ________________________________
N° DE MODELO DEL CORTADOR DE TEPE ____________
N° DE SERIE DEL CORTADOR DE TEPE _______________
NÚMERO DE MODELO DEL MOTOR__________________
NÚMERO DE SERIE DEL MOTOR_____________________
10. Correa del motor tensada.
11. Palancas funcionando debidamente.
12. Todos los controles.
13. Añada combustible, arranque el motor, haga una
prueba de funcionamiento.
FECHA DE CONFIGURACIÓN _______/_______/_______
LISTA DE COMPROBACIÓN DE ENTREGA
Revise el manual del operador con el cliente.
Explique lo siguiente:
1.
Garantía de Classen.
2.
Operación y servicio seguros.
3.
Cómo usar los controles.
4.
Funcionamiento correcto de la máquina.
5.
Transporte del cortador de tepe.
6.
Combustible y lubricantes correctos.
7.
Inspecciones diarias y periódicas.
8.
Cambio de aceite después del período de rodaje.
9.
Cómo efectuar el servicio del cortador de tepe de
forma regular y correcta.
10. Piezas y servicio de Classen.
11. Dé el manual del operador al cliente y anímele a que
lo lea.
FECHA DE ENTREGA
__________/__________/__________
FIRMA ___________________________________________
11
HD Manual SCH12-24 ENES_HD Manual SCH12-24 ENES.qxd 7/15/10 3:36 PM Page 12
SEGURIDAD
MANIPULE EL COMBUSTIBLE CON
CUIDADO – EVITE LOS INCENDIOS
Manipule la gasolina con cuidado, ya que es muy inflamable.
Use un recipiente de gasolina aprobado.
Llene el depósito de combustible al aire libre.
NO llene el depósito completamente.
NO fume mientras llene el depósito de combustible.
NO quite la tapa de la gasolina con el motor en
funcionamiento.
LEA LOS LETREROS DE SEGURIDAD
Lea detenidamente y siga las instrucciones de todas las
calcomanías de precaución.
ADVERTENCIA
LOS PROTECTORES DEBEN ESTAR EN POSICIÓN
MIENTRAS LA MÁQUINA ESTÉ EN
FUNCIONAMIENTO
PROCEDIMIENTOS DE
ARRANQUE DEL MOTOR
AVISO: Hay dos lugares en este motor que requieren aceite: el
cárter y la transmisión (caja de engranajes).El
funcionamiento del motor o de la caja de engranajes con
un bajo nivel de aceite puede causar daños en el motor.
Consulte el manual del motor para obtener información
completa y recomendaciones del motor.
COMPRUEBE EL NIVEL DE ACEITE DEL
MOTOR
1.
•
•
•
2.
3.
4.
ADVERTENCIA
NO ACERQUE LAS MANOS Y LOS PIES A LAS
PIEZAS MÓVILES
HAGA FUNCIONAR DE FORMA SEGURA
Lea detenidamente este manual y haga funcionar el cortador de
tepe correctamente.
5.
COMPRUEBE EL NIVEL DE ACEITE DE LA
TRANSMISIÓN
1.
PROTEJA A LOS NIÑOS
2.
No deje que se acerquen los niños y los animales al área donde
esté cortando tepe.
3.
EVITE LOS VUELCOS
Asegúrese de no acercarse demasiado a los desniveles grandes
para evitar que se vuelque el cortador de tepe.
HAGA FUNCIONAR LA UNIDAD CON
SEGURIDAD EN LAS PENDIENTES
Puede cortar tepe en cualquier dirección en las pendientes, no
obstante, asegúrese de hacerlo con cuidado. El corte en
pendientes puede ser peligroso. Para evitar accidentes,
asegúrese de dejarse sitio para corregir el problema en caso de
que surja un problema. Estacione siempre el cortador de tepe
sobre un terreno horizontal.
PRACTIQUE EL MANTENIMIENTO SEGURO
Mantenga todas las piezas de la máquina en buenas
condiciones y sujetas en posición. Arregle los daños de
inmediato. Reemplace las piezas desgastadas o rotas. Siempre
que trabaje en el cortador de tepe, desconecte el cable de la
bujía.
ARRANQUE EL MOTOR DE FORMA
SEGURA
Asegúrese de no acercar las manos y los pies a las piezas
móviles al arrancar el motor.
4.
5.
Compruebe el nivel de aceite de la transmisión con el
motor parado y en posición horizontal.
Quite la tapa del tubo de llenado/varilla indicadora de
nivel y límpiela.
Introduzca y saque la varilla indicadora de nivel sin
atornillarla en el agujero del tubo de llenado. Compruebe
el nivel de aceite mostrado en la varilla indicadora.
Si el nivel de aceite es bajo, eche aceite hasta alcanzar la
marca del límite superior en la varilla indicadora de
nivel. Use el mismo aceite que se recomienda para el
motor SAE 10W-30.
Atornille bien la tapa del tubo de llenado/varilla
indicadora de nivel.
COMPRUEBE LA TRANSMISIÓN HIDROSTÁTICA
1.
Compruebe el nivel de aceite de la transmisión
hidrostática con el motor parado y en posición nivelada.
2. Inspeccione visualmente si el nivel es bajo.
3. Si el nivel de aceite es bajo, añada aceite hasta alcanzar la
marca del límite del depósito.
4. Use aceite 20W 50.
ARRANQUE DEL MOTOR
1.
2.
3.
4.
5.
6.
12
asegúrese de que el motor esté horizontal
el interruptor del motor está en la posición APAGADA
la hoja del cortador de tepe NO esté conectada
las ruedas de impulsión estén desconectadas.
Quite la tapa del tubo de llenado/varilla indicadora de
nivel y límpiela.
Introduzca y saque la varilla indicadora de nivel sin
atornillarla en el cuello del tubo de llenado. Compruebe
el nivel de aceite mostrado en la varilla indicadora.
Si el nivel de aceite es bajo, llene hasta el borde del
agujero de llenado de aceite con el aceite recomendado.
Se recomienda aceite SAE 10W-30 para uso general.
Consulte las recomendaciones de aceite del motor en el
manual del motor para averiguar otras viscosidades e
información.
Atornille bien la tapa del tubo de llenado/varilla
indicadora de nivel.
Gire la llave de paso de combustible a la posición
“abierta”.
Active el estrangulador (cerrado).
Ponga el interruptor de arranque en “encendido”.
Mueva la palanca del acelerador del motor a la posición
semiabierta.
Tire de la cuerda del motor de arranque hasta que
arranque el motor.
Desactive el estrangulador (abierto) después de que se
haya calentado el motor.
HD Manual SCH12-24 ENES_HD Manual SCH12-24 ENES.qxd 7/15/10 3:36 PM Page 13
7.
8.
Deje que funcione el motor durante un minuto antes de
empezar a cortar tepe.
Compruebe el ajuste de las rpm del motor antes de
hacerlo funcionar. NO supere las 3600 rpm.
PARADA DEL MOTOR
1.
2.
Gire el acelerador a la posición “lenta”.
Ponga el interruptor de arranque en apagado.
OPERACIÓN DEL
CORTADOR DE TEPE
PREPARACIÓN
1.
2.
3.
Observe el área del césped para ver si hay obstáculos
y objetos sueltos (por ejemplo, aspersores, mangueras,
juguetes, etc). Quite todos los componentes.
Asegúrese de que las cabezas de los aspersores
subterráneos y otros obstáculos ocultos estén
marcados para impedir daños.
Marque otras áreas en que el corte de tepe pueda ser
un problema o demasiado arriesgado (por ejemplo,
barro, raíces de árboles, cuestas inclinadas).
OPERACIÓN
1.
Arranque el motor. PRECAUCIÓN: Para evitar
lesiones, no ponga los pies ni ninguna otra parte del
cuerpo debajo de las hojas al arrancar el motor.
2.
3.
Empuje la palanca de cambio a la posición neutra.
Seleccione la profundidad de corte correcta deseada
hasta 2 1/2”. Afloje el asa en te de la placa del calibre
de profundidad, ubicada debajo de la barra de ajuste
de altura, (N° 3 de la ilustración) y póngalo en el
ajuste de altura correcto. Apriete el asa en T.
4. Suba el manillar principal de modo que la punta
delantera del cortador de tepe quede apoyada sobre el
terreno.
5. Afloje la tuerca del manillar de 1/2” (N° 2 en la
ilustración) y baje la barra de ajuste de altura para que
se apoye en el calibre de profundidad. Apriete bien
ahora la tuerca del manillar de 1/2” de modo que no
se afloje con las vibraciones de la máquina.
6. Vaya a la parte trasera de la máquina y baje el
manillar hasta que la hoja de corte quede apoyada en
el terreno. Ahora estará listo para cortar tepe.
7. Empuje la palanca de cambio a la posición de corte.
8. Jale el acelerador hasta la velocidad de operación
deseada (N.º 6 en la ilustración). Se recomiendan rpm
máximas del motor para lograr una operación
uniforme.
9. Después de cortar una pequeña distancia, pare la
máquina dejando que el control de giro del acelerador
vuelva a su posición original. Compruebe el espesor
del corte y ajústelo si es necesario.
10. Al final de cada pasada de corte, levante la barra del
manillar para sacar la hoja de corte del tepe. Retrase
el control del acelerador y dé la vuelta a la máquina
para colocarla para el próximo corte.
11. Cuando haya terminado de cortar el tepe, invierta los
pasos 6 a 3, dejando el manillar de transmisión de las
ruedas en la posición de transporte.
MANTENIMIENTO GENERAL
Realice lo siguiente para mantener el cortador de tepe en
buenas condiciones de operación:
• Mantenga la hoja afilada; una hoja afilada produce
cortes más limpios, más rápidos y de manera más
uniforme y somete a la máquina a menos carga. Afile
la cuchilla por el lado biselado o lado superior
solamente.
• Mantenga la correa de impulsión a la tensión
adecuada y sin aceite ni suciedad en todo momento.
• Compruebe a diario el nivel de aceite del motor y el
elemento del filtro de aire.
• Compruebe si hay pernos y conexiones sueltos.
• Todas las graseras son del tipo a presión. Use una
buena grasa a base de litio o equivalente. Engrase
ligeramente los brazos excéntricos cada 4 horas de
servicio y los demás a diario. Limpie las graseras
antes y después de engrasarlas (hay un total de 8
graseras).
• Para asegurarse de que esté ajustada la cadena de las
ruedas de impulsión delanteras, tendrá que quitar el
protector de la cadena para comprobarlo. Si es
necesario tensar, afloje las tuercas y los pernos de las
chumaceras de 3/4” y empuje éstas hacia la parte
trasera del cortador de tepe hasta que se tense la
cadena. Asegúrese de que ambas chumaceras lleguen
hasta el fondo por igual para que el eje intermedio
funcione de modo uniforme con el bastidor. Después
de hacer esto, vuelva a apretar las tuercas y los pernos
en la chumacera y vuelva a colocar el protector de la
cadena.
• Motor (consulte el manual del propietario de Honda).
•
Compruebe la tensión de la cadena del lado izquierdo
de la unidad hidrostática. Si necesita tensionarla,
afloje el perno y la tuerca de la rueda de cadena y
coloque la cadena en la ranura para tensionarla, luego
vuelva a apretar el perno y la tuerca.
ADVERTENCIA DE SEGURIDAD
NO GUARDE LA GASOLINA (COMBUSTIBLE) DE
FORMA INNECESARIA DURANTE PERÍODOS
LARGOS PARA IMPEDIR UNA POSIBLE
EXPLOSIÓN, GUARDE SOLAMENTE EN UN
RECIPIENTE APROBADO “SEGURO”. PARA
IMPEDIR LA EXPLOSIÓN DE COMBUSTIBLE
VAPORIZADO, NO GUARDE LA MÁQUINA CON
COMBUSTIBLE EN EL DEPÓSITO O EN EL
CARBURADOR EN UN RECINTO CON UNA
LLAMA ABIERTA. (EJEMPLO: LUZ PILOTO DE
UNA CALDERA O UN CALENTADOR DE AGUA).
13
HD Manual SCH12-24 ENES_HD Manual SCH12-24 ENES.qxd 7/15/10 3:36 PM Page 14
CONTROL DEL ACELERADOR DE
DEDO
MANILLAR DE TRACCIÓN
DE LA RUEDA
TUERCA DEL MANILLAR
MANILLAR DE
LA HOJA DE
CORTE
PERNO DE AJUSTE DE ALTURA
BARRA DE AJUSTE DE ALTURA
VÁLVULA DE
DERIVACIÓN
CUADRO DE LOCALIZACIÓN Y RESOLUCIÓN DE
PROBLEMAS
PROBLEMA
CAUSA
SOLUCIÓN
La hoja no permanece en el
terreno
a. La parte inferior de la hoja
está redondeada
a. La hoja debe afilarse o
reemplazarse
Las correas saltan y se salen
a. Tipo de correa equivocado
b. Polea desalineada
a. Use solamente la correa de
fábrica especial
b. Vuelva a alinear la polea
NOTAS:____________________________________________________________________________________________________
___________________________________________________________________________________________________________
___________________________________________________________________________________________________________
___________________________________________________________________________________________________________
___________________________________________________________________________________________________________
___________________________________________________________________________________________________________
14
HD Manual SCH12-24 ENES_HD Manual SCH12-24 ENES.qxd 7/15/10 3:36 PM Page 15
MANUAL DE PIEZAS DE LA
CORTADORA DE TEPE
TRANSMISIÓN
HIDROSTÁTICA
SCH-12/5.5
SCH-16/5.5
SCH-18/5.5
SCH-20/5.5
SCH-12/8.0
SCH-16/8.0
SCH-18/8.0
SCH-20/8.0
SCH-24/8.0
–
–
–
–
–
–
–
–
–
N/S
N/S
N/S
N/S
N/S
N/S
N/S
N/S
N/S
000101
000101
000101
000101
000101
000101
000101
000101
000101
y
y
y
y
y
y
y
y
y
sig.
sig.
sig.
sig.
sig.
sig.
sig.
sig.
sig.
15
HD Manual SCH12-24 ENES_HD Manual SCH12-24 ENES.qxd 7/15/10 3:36 PM Page 16
BASTIDOR PRINCIPAL DE LA CORTADORA DE TEPE TRANSMISIÓN HIDROSTÁTICA
N.°
1
2
3
4
5
6
7
8
9
10
11
12
13
14
15
16
17
18
19
16
N.° DE PIEZA. CANT./POR HOJA
C400246
1
C400247
1
C500101
1
C500115
8
C500140
7
C500083
1
C300002
1
C100017
1
C500016
2
C400248
1
C500219
1
C400234
1
C500130
6
C500129
5
C100010
2
C500042
7
C500091
2
C100021
2
C500001
1
DESCRIPCIÓN
BASTIDOR DEL CORTADOR DE TEPE
PROTECTOR PEQUEÑO
TUERCA DE 5/16”
ARANDELA DE TRABA DE 5/16”
PERNO DE 5/16” x 3/4”
ARANDELA PLANA DE 5/16”
PASADOR DE EJE
CONJUNTO DE NEUMÁTICO Y RUEDA DE 9 x 350 x 4
PASADOR DE ALETA DE 5/32” X 1 1/2”
PROTECTOR DE CADENA
PERNO DE 5/16” X 5”
PROTECTOR GRANDE
ARANDELA DE TRABA DE 3/8”
TUERCA DE 3/8”
POLEA LOCA
ARANDELA PLANA DE 3/8”
PERNO DE 3/8” X 2”
MANGUITO DE LATÓN
GRASERA DE 1/4”-28
N.°
20
21
22
23
24
25
26
27
28
29
30
31
32
33
34
35
36
37
38
N.° DE PIEZA CANT./POR HOJA
C400010
1
C500043
2
C100074
1
C100496
1
C100069
1
C100096
1
C100489
1
C100501
1
C400251
1
C100106
1
C100073
1
C400237
1
C400011
2
C500133
12
C300133
2
C500142
6
C300047
2
C400188
2
C100502
1
DESCRIPCIÓN
BRAZO DEL EMBRAGUE
PERNO DE 3/8” X 1”
CALCOMANÍA “CLASSEN”
CALCOMANÍA “SC-18”
CALCOMANÍA DE “PELIGRO”
CALCOMANÍA DE “TODOS LOS PROTECTORES” (NO SE MUESTRA)
CALCOMANÍA DE “TRANSMISIÓN HIDROSTÁTICA” (NO SE MUESTRA)
PERNO VLIER DE 3/8"
PALANCA DE NEUTRAL
CALCOMANÍA DE “NÚMERO DE SERIE” (NO SE MUESTRA)
ETIQUETA DE LUBRICACIÓN (NO SE MUESTRA)
PARACHOQUES
ADAPTADOR DE HOJA DE 12”
PERNO DE 5/16” X 1”
ADAPTADOR DE HOJA DE 16”
PERNO DE 5/16” X 2”
ADAPTADOR DE HOJA DE 20”
ADAPTADOR DE HOJA DE 24”
ANILLO DE RESORTE DE 3/8”
HD Manual SCH12-24 ENES_HD Manual SCH12-24 ENES.qxd 7/15/10 3:36 PM Page 17
CONJUNTO DEL TREN DE FUERZA DEL CORTADOR
DE TEPE DE TRANSMISIÓN HIDROSTÁTICA
N.°
1
1
2
3
3
4
5
6
7
8
9
10
11
12
13
14
15
16
17
18
19
20
21
22
N.° DE PIEZA CANT./POR HOJA
C100005
1
C100114
1
C100028
1
C100491
1
C100503
1
C500011
1
C200054
1
C100492
1
C500174
8
C200044
1
C500004
1
C500130
4
C500129
4
C100513
1
C500003
4
C700002
2
C100004
4
C600003
1
C500034
8
C500006
16
C500106
16
C200002
1
C500181
2
C100043
1
DESCRIPCIÓN
MOTOR HONDA DE 5.5 HP CON DEFLECTOR
MOTOR HONDA DE 8.0 HP CON DEFLECTOR
POLEA CON CUBO Y PERNOS DE 4” x 22 mm
CORREA TRAPECIAL B55 - 5 HP
CORREA TRAPECIAL B58 - 8 HP
CHAVETA CUADRADA DE 3/16” x 1 3/4”
RUEDA DE POLEA 2BK62H Y CUBO DE 15MM
ÉMBOLO DEL MUELLE
PERNOS DE 12 x 1 -3/4”
RUEDA DENTADA DE 13 DIENTES
CHAVETA CUADRADA DE 1/4” X 1”
ARANDELA DE TRABA DE 3/8”
TUERCA DE 3/8”
CORREA TRAPECIAL B38
CHAVETA DE MEDIA LUNA DE 1/4” x 7/8”
CUBO EXCÉNTRICO
CHUMACERA DE 1” CON COLLAR
EJE EXCÉNTRICO
ARANDELA PLANA DE 1/2”
ARANDELA DE TRABA DE 1/2”
TUERCA DE 1/2”
POLEA DE 6” CON CUBO DE 1”
CHAVETA CUADRADA DE 1/4” x 1 1/2”
RUEDA DENTADA LOCA
N.°
23
24
25
26
27
28
29
30
31
32
33
34
35
36
37
38
39
40
41
42
43
44
45
N.° DE PIEZA CANT./POR HOJA
C500147
4
C100013
2
C500083
8
C500115
8
C500101
8
C100493
1
C100495
1
C100025
2
C500158
8
C700024
4
C300001
1
C600004
1
C500136
2
C500137
2
C100027
1
C500157
2
C500146
4
C200001
1
C100311
1
C500168
2
C500074
2
C100494
1
C200056
1
DESCRIPCIÓN
PERNO DE 5/16” x 1 1/2”
CHUMACERA DE 3/4” CON COLLAR
ARANDELA PLANA DE 5/16”
ARANDELA DE TRABA DE 5/16”
TUERCA DE 5/16”
RUEDA DENTADA #40 X 54 SOLDADA Y CUBO
CADENA N.º 40 X RODILLO DE 50
ESLABÓN DE CONEXIÓN CON LA CADENA
PERNO DE 1/2” x 3 1/2”
RUEDA DE TRACCIÓN (2 RUEDAS EN SC-12)
ESPACIADOR DEL EJE DE IMPULSIÓN
EJE DE IMPULSIÓN
TUERCA DE 1/4”
ARANDELA DE TRABA DE 1/2”
RESORTE DEL ACELERADOR
PERNO DE 1/4” x 3 1/2”
PERNO DE 3/8” x 1 1/2”
RUEDA DENTADA DEL EJE DE TRACCIÓN
MECANISMO HIDROSTÁTICO
PERNO DE 5/16 X 4 1/2”
PERNO DE 5/16 X 1 3/4”
CADENA N.º 40 X RODILLO DE 76
RUEDA DENTADA Y EJE #40X12X3/4
17
HD Manual SCH12-24 ENES_HD Manual SCH12-24 ENES.qxd 7/15/10 3:37 PM Page 18
CONJUNTO DEL MANILLAR DEL CORTADOR DE TEPE
DE TRANSMISIÓN HIDROSTÁTICA
N.°
1
2
3
4
5
6
7
8
9
10
11
12
13
14
14
14
14
14
15
16
17
18
19
20
21
22
23
24
25
26
27
18
N.° DE PIEZA CANT./POR HOJA
C100018
2
C400243
1
C300138
1
C500043
6
C100486
1
C500041
6
C500118
1
C500136
1
C500137
1
C100007
4
C400008
1
C500019
1
C500139
1
C100029
1
C100416
1
C100016
1
C100110
1
C100329
1
C500154
1
C500042
2
C400250
1
C500025
2
C500026
3
C500134
3
C500146
1
C500133
7
C500101
8
C500115
7
C100134
1
C500001
6
C400490
1
DESCRIPCIÓN
ASIDEROS DEL MANILLAR
MANILLAR PRINCIPAL
TIRANTE DEL MANILLAR
PERNO DE 3/8” X 1”
ACELERADOR DE DEDO Y CABLE
TUERCA DE TRABA DE 3/8”
PERNO DE 1/4” x 1 3/4”
TUERCA DE 1/4”
ARANDELA DE TRABA DE 1/4”
ASIDERO DE CAUCHO
ACCIONADOR DEL MANILLAR
RESORTE DE MANILLAR PEQUEÑO
TUERCA DE TRABA DE 1/4”
HOJA DE CORTE DE 12”
HOJA DE CORTE DE 16”
HOJA DE CORTE DE 18”
HOJA DE CORTE DE 20”
HOJA DE CORTE DE 24”
PERNO DE 3/8” x 2 1/2”
ARANDELA PLANA DE 3/8”
BRAZO DEL CAMBIADOR
TUERCA FINA DE 3/8”
HORQUILLA DE 3/8”
PERNO DE 3/8” x 1 1/4”
PERNO DE 3/8” x 1 1/2”
PERNO DE 5/16” X 1”
TUERCA DE 5/16”
ARANDELA DE TRABA DE 5/16”
CALCOMANÍA DE “TRACCIÓN EN LAS RUEDAS” (NO SE MUESTRA)
GRASERA DE 1/4-28
CALCOMANÍA DE “RODILLO HIDROSTÁTICO MANUAL” (NO SE
N.°
28
29
30
31
32
33
34
35
36
37
38
39
40
41
42
43
44
45
46
47
48
49
50
51
52
53
54
55
56
57
N.° DE PIEZA CANT./POR HOJA
C500130
6
C500129
7
C400007
1
C500007
1
C500006
3
500034
14
C400001
1
C400238
1
C300039
1
C400239
1
C200005
1
C200004
1
C500106
7
C500152
2
C500151
2
C100001
12
C100002
12
C600001
6
C800001
2
C100003
6
C800002
2
C400488
1
C500241
2
C500132
1
C500065
1
C400253
1
C400249
1
C500242
1
C100132
1
C100133
1
DESCRIPCIÓN
ARANDELA DE TRABA DE 3/8”
TUERCA DE 3/8”
BRAZO DE AJUSTE DE LA HOJA DE CORTE
TUERCA DE MANILLAR DE 1/2”
ARANDELA DE TRABA DE 1/2”
ARANDELA PLANA DE 1/2”
BARRA DE AJUSTE DE ALTURA
BARRA DE AJUSTE DE INCLINACIÓN
MEDIDOR DE PROFUNDIDAD
ASA EN T ROSCADA DE 1/4”
PERNO DE AJUSTE DE ALTURA
PERNO DE AJUSTE DE INCLINACIÓN
TUERCA DE 1/2”
PERNO DE 1/2” x 2 3/4”
PERNO FINO DE 1/2” x 3”
ARANDELA DE NILÓN DE 3/4”
SELLO
MANGUITO DE ACERO
BRAZO EXCÉNTRICO
COJINETE
BRAZO DE LA HOJA
CALCOMANÍA DE “TRANSMISSIÓN HIDROSTÁTICA” (NO SE MUESTRA)
PERNO DE 1/2” X 1”
PERNO DE 1/2” X 4”
RESORTE
BRAZO DE ARTICULACIÓN DE 3/8”
BRAZO DEL EMBRAGUE
PERNO CON CABEZA DE DADO #10 X 3/4"
CALCOMANÍA “HOJA DE CORTE” (NO SE MUESTRA)
CALCOMANÍA “LENTO/RÁPIDO” (NO SE MUESTRA)
HD Manual SCH12-24 ENES_HD Manual SCH12-24 ENES.qxd 7/15/10 3:37 PM Page 19
NOTA: AL INSTALAR LOS
SELLOS ASEGÚRESE DE QUE
EL LADO DEL RESORTE
QUEDE ALEJADO DEL
COJINETE.
19
HD Manual SCH12-24 ENES_HD Manual SCH12-24 ENES.qxd 7/15/10 3:37 PM Page 20
Schiller Grounds Care, Inc.
1028 Street Road • Southampton, PA 18966
Teléfono: + (877) 596 6337
DOS AÑOS DE GARANTÍA LIMITADA
En vigor el 1 de abril de 2007
Durante el período de dos años contado a partir de la fecha de compra, CLASSEN MFG., INC. reparará o reemplazará al comprador
original de forma gratuita, cualquier pieza o piezas que después de examinarlas en nuestra estación de servicio autorizada de nuestra
fábrica, o en la fábrica de Norfolk, Nebraska, tenga defectos de materiales o fabricación. Los costos de transporte de las piezas
enviadas para su reparación o reemplazo, según los términos de esta garantía, deberán correr a costa del comprador.
Esta garantía no incluye los motores o piezas de motor, neumáticos, baterías o cajas de engranajes cubiertos por garantías separadas
suministradas por su fabricante o proveedor, ni incluye las piezas de mantenimiento normales, incluidas bujías, puntas, filtros, hojas
y lubricantes, pero sin limitarse a éstas.
Todos el servicio según esta garantía será suministrado o efectuado por nuestras estaciones de servicio autorizadas de fábrica.
No existe ninguna otra garantía explícita. Las garantías implícitas, incluidas las de comerciabilidad e idoneidad para un cierto fin,
están limitadas a dos años contado a partir de la fecha de compra en la medida que lo permita la ley, se excluyen todas y cada una de
las garantías implícitas. El remedio anterior de reparación y reemplazo de piezas defectuosas es el remedio exclusivo por cualquier
defecto, funcionamiento defectuoso o violación de garantía. En la medida que lo permita la ley, se excluye la responsabilidad por
daños emergentes o concomitantes según cualquiera y todas las garantías.
RESPONSABILIDADES NORMALES DEL VENDEDOR Y DEL USUARIO
1.
El distribuidor o el concesionario es responsable del montaje y de la preparación apropiados del producto para su entrega al
usuario final.
2.
El usuario es responsable de leer el manual de instrucciones.
3.
El usuario es responsable de la operación y el mantenimiento apropiados según se describe en el manual
4.
El usuario es responsable de reemplazar los artículos que se desgasten como hojas, correas, neumáticos, baterías, etc.
5.
El usuario es responsable de los daños debidos al funcionamiento y al mantenimiento indebidos, así como a los abusos.
Todas las reclamaciones deben ser recibidas por la fábrica 30 días después del final del período de garantía para que sean
consideradas según la garantía.
© 2010 Schiller Grounds Care, Inc. Todos los derechos reservados.
07/10