1
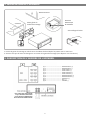
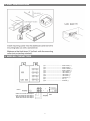
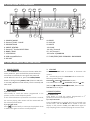
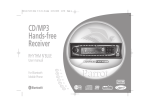
LAR-11 1 6 MANUEL D’UTILISATION USER MANUAL Lire attentivement la notice avant d’utiliser l’appareil Before operating this product, please read user manual completely 1 INTRODUCTION 1. PRECAUTIONS Lire attentivement ce guide de l’utilisateur avant installation et utilisation. Cher Client, En choisissant cet appareil, vous avez fait le premier pas vers le plaisir de l’écoute musicale. Maintenant, c’est le moment de vous dévoiler comment optimiser les fonctions de cet équipement. Tout d’abord, il est important de savoir comment écouter de la musique à un niveau sonore sans danger, suffisamment fort et clair, non tonitruant et sans distorsion – et surtout un son qui n’abîme pas l’ouïe. Le son peut être trompeur. Au fil du temps, votre "niveau de confort auditif" s'adapte à des volumes plus élevés. Ce qui parait être un «niveau sonore normal» peut s’avérer être trop fort et nuisible. AVERTISSEMENT: POUR REDUIRE LE RISQUE DE CHOC ELECTRIQUE, NE PAS ENLEVER LE COUVERCLE (OU L'ARRIERE). AUCUNE PIECE N'EST NÉCESSAIRE À L’UTILISATEUR. CONTACTER UNE PERSONNE QUALIFIEE POUR TOUTE REPARATION 1. Maintenez le volume au plus faible afin de rester concentrer sur le trafic sur les conditions routières pour une meilleure sécurité de conduite. 2. Ne pas ouvrir le couvercle et ne pas toucher les composants exposés à l’extérieur de l’appareil, seuls des techniciens qualifiés peuvent le faire. 3. Ne pas exposer l’appareil à la lumière directe du soleil ou près d’objets qui dégagent de la chaleur pour éviter d’endommager l’appareil. 4. Si votre voiture a été exposée au soleil pendant un certain temps, veuillez baisser la température de l'intérieur du véhicule avant de faire fonctionner l’appareil. 5. Si la batterie est débranchée, déchargée ou changé la mémoire sera effacée et doit être reprogrammée. L’appareil doit être installé en position horizontale pour de meilleure performance d’utilisation. 6. Ne pas placer l’appareil dans un endroit humide qui pourrait affecter le capteur de l’appareil. 7. L'appareil ne doit pas être exposé à des gouttes ou des éclaboussures. 8. Nettoyer le panneau et le boîtier à l'aide d'un chiffon doux et sec uniquement, n’appliquer aucun type de solvant, d’alcool et de vaporisateurs. Pour avoir un niveau de son sans danger : Réglez la commande de volume à un niveau bas Augmentez doucement le son jusqu’à l’entendre de façon claire et confortable, sans distorsion. SUR CE MANUEL Ce produit est doté de nombreuses fonctions qui facilitent son utilisation et assurent une bonne réception. Cependant elles ne sont pas toutes évidentes. Ce guide d’utilisation est conçu pour vous aider à profiter pleinement du potentiel de ce produit. Nous vous recommandons de vous familiariser avec les fonctions et leur manipulation en lisant entièrement ce manuel avant de commencer à utiliser l’appareil. Il est particulièrement important de lire et respecter les "précautions" indiquées sur la page suivante et dans les autres paragraphes. IMPORTATEUR EXCLUSIF Ce produit a été importé par la Société LEMA S.A.S. Pour toute question relative à la conformité du produit, merci d’envoyer votre demande à : LEMA S.A.S. 28, Boulevard Zéphirin Camélinat 92230 GENNEVILLIERS FRANCE 1 2. INSTALLATION DE L’APPAREIL Tableau de bord REGLETTE Faites glisser le châssis de montage METALLIQUE DE FIXATION Verrouillage du levier 1. Insérez la gaine de montage en métal contre le tableau de bord & plier les pattes avec un tournevis 2. Assurez-vous que le levier de blocage est au niveau de la gaine de montage (sans dépasser vers l'extérieur). 3. DESCRIPTION DE L’ARRIERE DE L’APPAREIL (A) 1 (A) 2 (A) 3 (A) 4 (A) 5 (A) 6 (A) 7 (A) 8 (B) 4 (B) 7 (B) 8 Blanc: SORTIE RCA AVANT GAUCHE Rouge: SORTIE RCA AVANT DROIT Rouge: SORTIE RCA ARRIERE DROIT Blanc: SORTIE RCA ARRIERE GAUCHE 2 --------------------------------------------------------------------------------------------------------------------------------------------------------------------------------------------------------------------------------------------------------------------------------------------------------------------------------------------------------------------------------------- ARRIERE DROIT (+) ARRIERE DROIT (-) AVANT DROIT (+) AVANT DROIT (-) AVANT GAUCHE (+) AVANT GAUCHE (-) ARRIERE GAUCHE (+) ARRIERE GAUCHE (-) POWER B+(+) ACC (+) GROUND (-) 4. DESCRIPTION DE L’APPAREIL 2 3 4 5 7 6 1 8 17 9 10 16 15 14 13 11 12 1. Bouton POWER /MODE 2. Présélection 1/ Lecture -Pause 3. Bouton Sélection & Volume 4. Présélection 2/INTRO 5. Présélection 3 / Touche REPETITION 6. Touche BANDE DE FREQUENCE / AMS 7. Écran LCD 8. Port compatible USB 9. Fente compatible CARTE SD 10. RESET (REMISE A ZERO) 11. Entrée AUXILIAIRE 12. Touche SOURDINE 13. Touche HORLOGE 14. TOUCHE +10 / Présélection 6 15. TOUCHE -10 / Présélection 5 16. Présélection 4 /lecture Aléatoire 17. BOUTONS Syntonisation, Recherche avant ou arrière / Saut avant/arrière 5. FONCTIONS DES COMMANDES 1. Bouton POWER /MODE Volume pour augmenter ou diminuer le volume. Appuyez successivement sur le bouton de VOLUME pour accéder aux réglages audio suivants : BALANCE- FADER – EQUALIZER (EQ OFF – FLAT- POPROCK- CLASS) LOUDNESS (ON/OFF) LOC (ON/OFF) STEREO/MONOVOLUME Puis tournez le bouton de VOLUME pour effectuer les réglages. Appuyez sur la touche POWER pour allumer l’appareil, appuyez longuement pour l’éteindre. Lorsque l’appareil est sous tension, appuyer sur la touche MODE pour sélectionner le mode souhaité RADIO- AUX IN – USB –SD. Vous pourrez accéder au mode USB ou SD une fois que l’appareil détecte la connexion du périphérique souhaité. 2. Touche PRESELECTION 1/ LECTURE -PAUSE 4. Présélection 2/ Fonction INTRO a) En mode radio: Appuyez brièvement afin de rappeler une station programmée. Appuyez longuement sur cette touche permet de mémoriser la station en cours. b) En mode SD ou USB: Appuyez brièvement sur la touche pour mettre en pause la lecture de la carte mémoire SD ou de la clé USB. Appuyez de nouveau pour reprendre la lecture normale. a) En mode radio: Appuyez brièvement afin de rappeler la station programmée en 2ème position sur la bande de fréquence en cours. b) En mode USB/SD Appuyez sur le bouton INT pour activer la fonction INTRO et écouter les 10 premières secondes de chaque piste. L’indicateur INT s’affiche sur l'écran LCD. Appuyez de nouveau sur le bouton INT pour désactiver la fonction. 3. Bouton de SELECTION & VOLUME En mode lecture RADIO, USB ou SD tournez le bouton 3 5. Présélection 3 / Touche REPETITION mode réglage de l’horloge. Les heures clignotent, utilisez les touches / pour régler les heures. Appuyez sur la touche HORLOGE pour valider et passer au réglage des minutes, utilisez les touches / pour régler les minutes. Appuyez une nouvelle fois sur CLK pour valider les réglages. Appuyez brièvement sur la touche CLK pour afficher l’heure actuelle. a) En mode radio: Appuyez brièvement afin de rappeler la station programmée en 3ème position sur la bande de fréquence en cours. b) En mode USB/SD Appuyez sur la touche RPT (REPETITION) pour répéter la piste en cours de lecture, RPT s’affiche à l'écran. 14. TOUCHE +10 / Présélection 6 a) En mode radio: Appuyez brièvement pour rappeler la station programmée en 6ème position sur la bande de fréquence en cours. b) En mode USB/SD Appuyez sur cette touche pour sauter de 10 pistes vers l’avant. Lorsque le nombre total de pistes est inférieur à 10, les deux touches sont inactives. 6. Touche BANDE DE FREQUENCE / AMS En mode radio: a) Appuyez brièvement sur cette touche pour sélectionner la bande radio que vous souhaitez écouter. Les bandes de fréquences s’affichent successivement comme suit: F1->F2->F3b) Appuyez longuement sur la touche AMS pour activer la recherche automatique de stations radio. L’appareil balaye les 3 bandes de fréquence en mémorisant 6 stations de radio pour chaque bande de fréquence dont la force de signal est la plus forte et les mémorise dans les numéros de présélection. 15. TOUCHE -10 / Présélection 5 a) En mode radio: Appuyez brièvement afin de rappeler la station programmée en 5ème position sur la bande de fréquence en cours. b) En mode USB/SD Appuyez sur cette touche pour sauter de 10 pistes vers l’arrière. Lorsque le nombre total de pistes est inférieur à 10, les deux touches sont inactives. 7. Écran LCD 8. Port compatible USB Pour lire un périphérique USB, insérer la prise USB dans le port USB. Le système se met en mode USB automatiquement et la lecture du premier fichier démarre. 16. Présélection 4 /Lecture Aléatoire a) En mode radio: Appuyez brièvement afin de rappeler la station programmée en 4ème position sur la bande de fréquence en cours. b) En mode USB/SD Appuyez sur le bouton RDM (RANDOM/ LECTURE ALEATOIRE) pour lire toutes les pistes contenues dans votre port USB ou dans votre carte SD dans un ordre aléatoire, et l’indicateur RDM s’affiche sur l'écran LCD. Appuyez une nouvelle fois pour désactiver la fonction. 9. Fente compatible CARTE SD Pour lire les fichiers contenus dans une carte SD, insérez la carte SD dans la fente pour carte SD. Le système se met automatiquement en mode SD et la lecture du premier fichier démarre. 10. RESET (REMISE A ZERO) Avant la première utilisation de cet appareil, après remplacement de la batterie du véhicule ou après changement des branchements, l’appareil doit être réinitialisé. Appuyer sur ce bouton avec un objet pointu. Cette opération efface le réglage de l’horloge et certaines données enregistrées. 17. BOUTONS Syntonisation, Recherche avant ou arrière / Saut avant/arrière A) En mode RADIO: Appuyer sur la touche ou brièvement pour lancer la recherche automatique des fréquences les plus puissantes. Appuyer sur ou plus de 2 secondes ( le mot MANUAL va s’afficher sur l’écran LCD) pour rechercher manuellement une station en avant ou en arrière, fréquence par fréquence. B) En mode SD & PORT USB Appuyer brièvement sur la touche pour mettre en lecture le ficher suivant. Appuyer brièvement sur la touche pour mettre en lecture le ficher précédent. 11. Entrée AUXILIAIRE Appuyez sur le bouton MODE pour sélectionner le mode de lecture par entrée auxiliaire. Il est possible de brancher un équipement audio par la fiche AUX. Ajuster le volume avec le bouton de volume. 12. Touche SOURDINE Appuyez brièvement sur la touche MUTE afin d’activer le mode SOURDINE: le son est coupé. Pour rétablir le son, appuyez de nouveau sur la touche. 13. Touche HORLOGE Appuyez longuement sur la touche CLK pour entrer en 4 7. GUIDE DE DEPANNAGE Pas d’alimentation Pas de son Le contact de la voiture n’est pas mis. Mettez le contact. Le fusible a grillé. Changer le fusible. Le volume est au minimum. Régler le niveau du volume. Le branchement n’est pas correctement Vérifier le branchement. effectué. La radio ne fonctionne Le câble antenne est mal branché Vérifier le branchement du câble pas Les signaux sont trop faibles Réglez une station de radio avec un signal plus fort. LECTURE USB/SD Vous avez mal connecté votre périphérique Insérez une nouvelle fois votre périphérique Votre périphérique SD, USB ou les fichiers Essayer avec une autre carte SD / ou clé USB sont endommagés contenant des fichiers MP3 IMPOSSIBLE 8. SPECIFICATIONS TECHNIQUES Alimentation Fusible Puissance maximal de sortie Gamme de Fréquences FM Dimensions de l'appareil Poids 12 V DC. Negative à la masse 5A 4x45W (Max) 87.5MHz – 108MHz L178 X H50 X P97 0.7 KG IMPORTANT : Si vous désirez laisser votre clé USB ou votre carte SD insérée dans l’appareil, il est IMPERATIF d’éteindre ce dernier avant de couper le contact, au risque de ne plus avoir de son. En cas de coupure de son, veuillez réinitialiser l’appareil en appuyant sur la touche RESET (voir les instructions de REINITIALISATION dans la notice d’utilisation). 5 the manual before you begin using this product. It is especially important that you read and observe the «precaution «on the next page and in other sections. In this operation manual, the Basic Operation for each sound source is outlined at the beginning of its explanation, covering simple operation for that source, such as merely playing music. Dear Customer, Selecting fine audio equipment such as the unit you have just purchased is only the start of your musical enjoyment. Now it is time to consider how you can maximize the fun and excitement your equipment offers. We want you to get the most out of your equipment by playing it at a safe level. One that lets the sound come through loud and clear without annoying blaring or distortion - and, most importantly, without affecting your sensitive hearing. Sound can be deceiving. Over time your “hearing comfort level” adapts to higher volumes of sound. So what sounds “normal” can actually be loud and harmful to your hearing. Guard against this by setting your equipment at a safe level BEFORE your hearing adapts. 1. PRECAUTIONS Read through this instruction manual before installation and use. CAUTION: TO REDUCE THE RISK OF ELECTRIC SHOCK, DO NOT REMOVE COVER (OR BACK). NO USER SERVICEABLE PARTS INSIDE. REFER SERVICING TO QUALIFIED SERVICE PERSONNEL. 1. Keep the volume at the lowest level to maintain concentration on traffic & road conditions for enhanced driving safety. 2. Do not touch the power plug with wet hand. 3. If your car has been exposed to the sun for a while, please lower the temperature inside the vehicle before operating the unit. 4. If the battery is disconnected, discharged or changed the memory will be erased and must be reprogrammed. The appliance must be installed in a horizontal position for better performance use. 5. Do not open the cover or touch any of the components exposed out of the unit, only for qualified technicians. 6. Do not expose the unit under direct sunlight or nearby objects that radiate heat to avoid damage to the unit. 7. Do not place the unit in moist and humid conditions, which affect the pick-up of the unit. 8. Clear the panel and case with soft dry cloth only, do not apply any kind of thinner, alcohol or sprays. To establish a safe level: . Start your volume control at a low setting . Slowly increase the sound until you can hear it comfortably and clearly, and without distortion we want you listening for a lifetime. Once you have established a comfortable sound level: set the dial and leave it there. About this manual This product features a number of sophisticated functions ensuring superior reception and operation. All are designed for the easiest possible use, but many are not self-explanatory. This operation manual is intended to help you benefit fully from their potential and to maximize your listening enjoyment. We recommend that you familiarize yourself with the functions and their operation by reading through EXCLUSIVE IMPORTER This product was imported by the Company: LEMA S.A.S. For any questions concerning the conformity of the product, thank you to send your request to: LEMA S.A.S. 28, Boulevard Zéphirin Camélinat 92230 GENNEVILLIERS FRANCE 6 2. UNIT INSTALLATION 3. WIRING CONNECTION (A) 1 (A) 2 (A) 3 (A) 4 (A) 5 (A) 6 (A) 7 (A) 8 (B) 4 (B) 7 (B) 8 --------------------------------------------------------------------------------------------------------------------------------------------------------------------------------------------------------------------------------------------------------------------------------------------------------------------------------------------------------------------------------------- RADIO White: Front Left CH RCA Output Red: Front Right CH RCA Output Red: Rear Right CH RCA Output White: Rear Left CH RCA Output WIRE 7 RIGHT REAR (+) RIGHT REAR (-) RIGHT FRONT (+) RIGHT FRONT (-) LEFT FRONT (+) LEFT FRONT (-) LEFT REAR (+) LEFT REAR (-) POWER B+(+) ACC (+) GROUND (-) 4. LOCATION OF CONTROLS 2 3 4 5 7 6 1 8 17 7 9 10 0 16 15 14 11 13 3 12 1. POWER /MODE 2. Preset 1/ PLAY - PAUSE 3. VOLUME knob 4. PRESET 2/INTRO 5. Preset 3 / Touche REPETITION 6. BAND / AMS 7. LCD DISPLAY 8. USB compatible Port 9. SD SLOT 10. RESET 11. AUX IN 12. MUTE 13. CLOCK 14. +10 / Preset 6 15. -10 / Preset 5 16. Preset 4 /RANDOM 17. TUNE/SEEK /SKIP FORWARD - BACKWARD 5. FUNCTIONS OF THE CONTROLS 1. POWER /MODE 3. VOLUME Press the POWER button to turn on the unit. When the unit is power on, press and hold the power button for more than 0.5 seconds, the unit goes into power off mode. When the unit is on, press the POWER/MODE button to change among RADIO, USB (when an USB stick is inserted), SD (when an SD memory card is inserted) and AUX mode. Turn the VOLUME knob to increase or decrease the volume. 4. Successively press the VOLUME knob to access the following audio settings: BALANCE FADER EQUALIZER (EQ OFF FLAT-POP-ROCK-CLASS) LOUDNESS (ON/OFF) LOC (ON/OFF) STEREO/MONOVOLUME; then turn the VOLUME knob to adjust. 2. Preset 1/ PLAY-PAUSE a) In Radio mode Press briefly to recall the station programmed in 1st position on the current frequency band. If one of these buttons is pressed for more than 2 seconds, the current playing radio station will be memorized into the selected preset button. b) In SD/USB mode Press button briefly to interrupt the playback of SD or USB. Press again to resume normal playback. 3. PRESET 2/INTRO a) In Radio mode Press briefly to recall the station programmed in 5th position on the current frequency band. b) In SD/USB mode Press the INT button to sample the first 10 seconds part of each track, and the INTRO will be visible on the LCD display. In the process of INT, press INT button again to stop sampling and to continue playing the current track. 8 5. Preset 3 / REPETITION volume. a) In Radio mode Press briefly to recall the station programmed in 3rd position on the current frequency band. b) In SD/USB mode Press the RPT button once to play the current track repeatedly, and the RPT indicator will be visible on the LCD display. 12. MUTE Press MUTE to activate the MUTE function: the sound is cut. To restore the sound, press MUTE again. 13. CLOCK Press and hold the CLK button to enter clock setting mode. The hours flash, use the / buttons to set the hours. Press CLOCK button to confirm and to set minutes, use the key / to set the minutes. Press CLK again to confirm the settings. Briefly press the CLK button to display the current time. 6. BAND / AMS A) In Radio mode Press BAND/AMS button briefly to select the radio broadcasting band you would like to hear. The FM band is toggled cyclically through the tuning bands: F1F2F3 b) In SD/USB mode Press and hold BAND/AMS button for more than 1 second, the radio searches from the current frequency and checks the signal strength level until 6 stations are found. And then the 6 stations frequencies are preset to the corresponding preset memory numbered bank. The auto-storage operation is implemented in the each selected band. When the auto-storage operation is finished, the radio executes the Preset Scan. 14. +10 / Preset 6 a) In RADIO mode: press briefly to recall the station programmed in 6TH position on the current frequency band. b) In SD/USB mode: press this buttons to move up 10 tracks at a time. When the remained total tracks are lack of 10, the both buttons are inactively. 15.-10 / Preset 5 a) In RADIO mode: press briefly to recall the station programmed in 5TH position on the current frequency band. b) In SD/USB mode: press this buttons to move down 10 tracks at a time. When the remained total tracks are lack of 10, the both buttons are inactively. 7. LCD DISPLAY 8. USB compatible Port In order to play the file in the USB stick, turn over the plastic cover cap then insert the USB stick into the USB socket. The system will change into the USB mode automatically, and then play the first file in the USB. 16. Preset 4 /RANDOM a) In RADIO mode: press briefly to recall the station programmed in 4TH position on the current frequency band. b) In SD/USB mode: press the RDM button to play all tracks on disc in random order, and the RANDOM will be visible on the LCD display. In the process of RDM, press RDM button again to stop playing in random order and the LCD will display OFF. 9. SD SLOT When you need to play the file in the SD card, insert the SD card into the SD card slot. The system will change into the SD mode automatically, and then play the first file in the MMC/SD. 10. RESET Before operating the unit for the first time, or after replacing the car battery or changing the connections, you must reset the unit. Press this button with a cuspidal object. This operation will erase the clock setting and some stored contents. 17. TUNE/SEEK /SKIP FORWARD - BACKWARD a) In RADIO mode: press the or button briefly to automatically tune up/down for the radio station frequency of the strongest signal. Press and hold the or button for longer than 2 seconds, to manual tune up/down for the desired radio station frequency step by step. b) In USB /SD playback mode: press the button briefly to play next track and press the button briefly to play the previous track. 11. AUX IN Press the mode button to select auxiliary input playing mode. Then you can connect any matched external audio device to this socket. Use the volume knob to adjust 9 6. TROUBLE SHOOTING The car’s ignition switched off NO POWER OR NO SOUND MUCH NOISE IN BROADCASTS PRESET STATION IS RESET USB or SD CARD IS CONNECTING BUT NO SOUND Cable is not correctly connected. If the power supply is properly connected to the car accessory, switch your ignition key to ACC or ON Check connection. Fuse is burnt Station or signal is too weak. Replace the fuse. Select other stations of stronger signal level. Battery cable is not correctly connected. Connect the battery cable to the terminal that is always live. USB or SD card connection is not good. USB or SD car is damaged or no music file inside. Take it out and insert again. Change to another USB or SD or record music inside it. 7. TECHNICAL SPECIFICATIONS Supply Voltage Current Consumption Power Output FM Frequency range Unit Dimensions Net weight DC 12 V. Negative Ground 5A 4x 45Watts 87.5MHz -108MHz 178[W] X 165[D] X 50[H] mm. 0.7kg IMPORTANT: If you want to leave your USB stick or memory card connected to your car audio, it is IMPORTANT to switch off the device before turning off the ignition key of your car otherwise sometimes the sound will be cut off. In case no sound; please reset your car radio by folloing the RESET instruction (see RESET operating instructions in the manual). 10