1
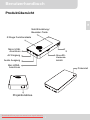
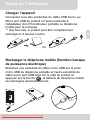
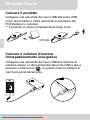
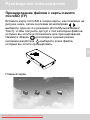
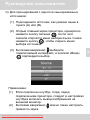
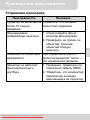
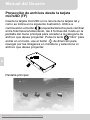
User’s Manual Care and Safety Information 1. Keep the device and packaging materials out of the reach of infants and children. 2. Avoid subjecting the power adapter and other contacts to dripping or splashing water and dry your hands before you use it. Do not place objects filled with liquids such as vases, etc. on or near the device. 3. Make sure that the used power outlet is always readily available and never hidden. In case of emergency, use the power adapter to separate the device from the power network. 4. Keep your device away from all flames such as candles and do not set them up in the vicinity of the device. 5. Keep the unit at least 10 cm away from other objects. Make sure the ventilation is not covered by newspapers, tablecloths, curtains, etc. 6. For your own safety, do not use the projector during thunderstorms or lightning. 7. Relative Humidity is 5~35°C, 80% (Max.), non-condensing. 8. The battery is integrated with the device. Do not dissemble and modify. The battery should be replaced by qualified service staff only. 9. Ensure that the ambient room temperature is within -10~55°C 10. During the operation, this product may heat lightly, which is normal. 11. Wait before using if the device has been moved from a cold location into a warm one. Any condensation that has formed may in certain circumstances destroy the device. As soon as the device has reached room temperature it can be used without risk. 12. Handle the product with care. Avoid contact with sharp objects. Keep device away from metallic objects. 13. Place the projector on a flat surface. Any collision or falling to the ground is likely to damage the product. 14. Do not drop or disassemble the product otherwise the warranty voids. Opening or removing covers may expose you to dangerous voltage or other hazards. Refer all servicing to qualified service personnel. 15. Use only the accessories supplied by the manufacturer. 16. Both product and user’s manual are subject to further improvement or supplement without further notice. 17. Avoid facing directly into the projector’s lens. Downloaded From projector-manual.com Aiptek Manuals I User’s Manual Sicherheitshinweise: 1. Das Gerät und das Verpackungsmaterial außerhalb der Reichweite von Kindern halten. 2. Das Netzteil nicht in Kontakt mit tropfendem oder fließendem Wasser kommen lassen und Hände vor der Benutzung abtrocknen. Keine mit Flüssigkeiten gefüllte Gegenstände, wie z.B. Vasen usw. auf oder in die Nähe des Gerätes stellen. 3. Stellen Sie sicher, dass die verwendete Steckdose immer verfügbar und niemals blockiert ist. Verwenden Sie im Notfall das Netzteil, um das Gerät vom Stromnetz zu trennen. 4. Das Gerät von Flammen, wie z.B. Kerzen fernhalten und diese nicht in der Nähe des Gerätes aufstellen. 5. Das Gerät mindestens 10 cm von anderen Gegenständen entfernt halten. Stellen Sie sicher, dass die Lüftungsschlitze nicht durch Zeitungen, Tischdecken, Vorhänge usw. blockiert werden. 6. Den Projektor zu Ihrer eigenen Sicherheit nicht während eines Gewitters oder Blitzschlages verwenden. 7. Relative Luftfeuchtigkeit liegt bei 5 bis 35°C, 80% (max.), nicht kondensierend. 8. Der Akku ist im Gerät integriert. Nicht auseinander nehmen oder ändern. Der Akku sollte nur von einer Fachkraft ausgetauscht werden. 9. Stellen Sie sicher, dass die Raumtemperatur innerhalb von -10 ist ~ 55°C liegt. 10. Dieses Produkt kann während des Betriebes etwas warm werden, was normal ist. 11. Warten Sie mit der Verwendung des Geräts etwas, wenn das es von einem kalten an einen warmen Ort gebracht wurde. Kondenswasser kann das Gerät unter bestimmten Umständen zerstören. Sobald das Gerät Raumtemperatur erreicht hat, kann es ohne Risiko verwendet werden. 12. Produkt mit Vorsicht handhaben. Kontakt mit scharfen Gegenständen vermeiden. Von Gegenständen aus Metall fernhalten. 13. Den Projektor auf eine flache Unterlage stellen. Stöße oder ein Herunterfallen auf den Boden führt wahrscheinlich zu Schäden des Produktes. 14. Das Produkt nicht fallen lassen oder auseinander nehmen, da sonst die Gewährleistung erlischt. Das Öffnen oder Entfernen von Abdeckungen kann sie gefährlichen Spannungen und anderen Risiken aussetzen. Alle Wartungsarbeiten von Fachpersonal durchführen lassen. 15. Nur vom Hersteller empfohlenes Zubehör verwenden. 16. Sowohl das Produkt als auch das Benutzerhandbuch unterliegen fortlaufenden Verbesserungen oder Ergänzungen ohne vorherige Mitteilung. 17. Nicht direkt in das Objektiv des Projektors sehen. Downloaded From projector-manual.com Aiptek Manuals II User’s Manual Entretien et précaustion d’emploi (FR) 1. Attention - Evitez de vous placer en face de la lentille du vidéo projecteur. 2. Evitez tout contact avec de l’eau, et gardez vos mains sèches lors de l’utilisation. 3. Assurez-vous que la température de la pièce est comprise entre -10 et 55°C 4. Le taux d’humidité relative doit être de 80% au maximum entre 5 et 35°C, sans condensation. 5. Ne pas faire tomber, frapper ou démonter cet appareil ; sinon la garantie sera annulée. Informazioni sulla cura e sulla sicurezza (IT) 1. Attenzione - Non guardare l’obiettivo in modo diretto. 2. Evitare il contatto con liquidi e utilizzare con mani asciutte. 3. Assicurarsi che la temperatura ambiente della stanza sia compresa tra -10 e 55°C ° 4. L’umidità relativa deve essere compresa tra 5 e 35 C, all’80% (max.), senza condensazione. 5. Non far cadere, non colpire e non smontare il dispositivo; in caso contrario la garanzia verrà annullata. Información de seguridad (ES) 1. Advertencia - Evite ponerse directamente en frente de las lentes del proyector. 2. Avite cualquier contacto con el agua. Mantenga sus manos secas durante su uso. 3. Asegúrese de que la temperatura ambiente de la sala sea de -10~55°C 4. Humedad relativa de 5~35°C, 80% (Máx.), no-condensada. 5. No caiga, golpee o desmonte el dispositivo, ya que de lo contrario se invalidaría la garantía. ΔϳΎϋήϟϭ Δϣϼγϟ ΕΎϣϭϠόϣ (AR) .νέόϟ ίΎϬΟ ΔγΩόϟ έηΎΑϣ ϝϛηΑ νέόΗϟ ΏϧΟΗ -έϳΫΣΗ .ϡΩΧΗγϻ ˯ΎϧΛ ϥϳΗϓΎΟ ϙϳΩϳ ϰϠϋ υΎϔΣϟϭ ˬ˯ΎϣϟΎΑ ίΎϬΟϟ ϝΎλΗ ΏϧΟΗ .Δϳϭϣ ΔΟέΩ 55 ϰϟ· 10 ϥϳΑ Ύϣ ΔρϳΣϣϟ Δϓέϐϟ ΓέέΣ ΔΟέΩ ϥ ϥϣ Ωϛ΄Ηϟ έϳϏ ˬ(ϰλϗ ΩΣΑ) %80 ϝΩΎόϳ ΎϣΑ ˬΔΟέΩ 35 ϰϟ· 5 ϥϣ ΔϳΑγϧϟ ΔΑϭρέϟ ϥϭϛΗ ϥ .ΔϔΛϛϣ .ϥΎϣοϟ ϕΣ ϝρΑ ϻ·ϭ ˭ίΎϬΟϟ ϙϔΑ ϡϭϘΗ ϭ ΏϘΛΗ ϭ ρϘγΗ ϻ Downloaded From projector-manual.com Aiptek Manuals III .1 .2 .3 .4 .5 User’s Manual FCC Compliance Statement: This device complies with Part 15 of the FCC Rules. Operation is subjected to the following two conditions: (1) this device may not cause harmful interference, and (2) this device must accept any interference received, including interference that may cause undesired operation. This equipment has been tested and found to comply with limits for a Class B digital device, pursuant to Part 15 of the FCC rules. These limits are designed to provide reasonable protection against harmful interference in residential installations. This equipment generates, uses, and can radiate radio frequency energy, and if not installed and used in accordance with the instructions, may cause harmful interference to radio communications. However, there is no guarantee that interference will not occur in a particular installation. If this equipment does cause interference to radio or television equipment reception, which can be determined by turning the equipment off and on, the user is encouraged to try to correct the interference by one or more of the following measures: - Reorient or relocate the receiving antenna. - Move the equipment away from the receiver. - Plug the equipment into an outlet on a circuit different from that to which the receiver is connected. - Consult the dealer or an experienced radio/television technician for additional suggestions. You are cautioned that any change or modifications to the equipment not expressly approved by the party responsible for compliance could void your authority to operate such equipment. (EN) If the time arises to throw away your product, please recycle all the components possible. Batteries and rechargeable batteries are not to be disposed in your domestic waste! Please recycle them at your local recycling point. Together we can help to protect the environment. Downloaded From projector-manual.com Aiptek Manuals IV User’s Manual (DE) Wenn die Lebensdauer des Produkts zu Ende kommt, lassen Sie bitte möglichst alle Komponenten recyceln. Bitte recyceln Sie dieses Produkt ordnungsgemäß, wenn es nicht mehr verwendet werden kann. Es kann nicht als Haushaltsmüll behandelt werden. Es muss separat über die verfügbaren Rücknahme- und Sammelsysteme entsorgt werden. (FR) Si il est temps de jeter votre produit, veuillez recycler tous les composants possibles. Si ce produit est arrivé en fin de vie, veuillez s’il vous plait le recycler correctement. Il ne peut pas être traité comme les ordures ménagères. Il doit être être apporté à un point de collecte approprié pour le recyclage. (IT) Al momento di buttare via il prodotto, riciclare il maggior numero di componenti. Se questo prodotto giunge alla fine del suo ciclo di vita, lo ricicli correttamente. Non può essere trattato come rifiuto urbano. Deve essere smaltito separatamente attraverso l’appropriato sistema di reso e di raccolta. (ES) Si ha llegado la hora de deshacerse del producto, recicle todos los componentes que pueda. Si ha finalizado la vida útil de este producto, recíclelo adecuadamente. Debe deshacerse del mismo de forma separada a través de los sistemas de recogida disponibles. (AR) .Δϧϛϣϣϟ ˯ίΟϷ ΔϓΎϛ έϳϭΩΗ ΓΩΎϋ· ˯ΎΟέϟ ˬΞΗϧϣϟ ϥϣ ιϠΧΗϟ Εϗϭ ϥΎΣ Ϋ· ϥΣηϟ ΓΩΎϋϹ ΔϠΑΎϘϟ ΕΎϳέΎρΑϟϭ ΕΎϳέΎρΑϟ ϥϣ ιϠΧΗϟ ϡΗϳ ϻ ΓΩΎϋ· ίϛέϣ ϯΩϟ ΎϫέϳϭΩΗ ΓΩΎϋ· ˯ΎΟέϟ! Δϳϟίϧϣϟ ΕΎϔϠΧϣϟ ϥϣο .ϙϳΩϟ ϲϠΣϣϟ έϳϭΩΗϟ ˱ .ΔϳΑϟ ΔϳΎϣΣ ϲϓ ΓΩϋΎγϣϟ Ύϧϧϛϣϳ Ύόϣ (NL) Als het einde van de levensduur van het product is bereikt, moet u alle mogelijke componenten recyclen. Batterijen en oplaadbare batterijen mogen niet bij het huishoudelijke afval worden gegooid. Lever ze af bij uw lokale dienst voor recycling. Samen kunnen we helpen bij de bescherming van het milieu. (BPT) Se você decidir descartar o produto, faça-o de modo que seja possível a reciclagem de todos os componentes. As baterias e pilhas recarregáveis não devem ser descartadas em seu lixo doméstico! Favor reciclá-las em seu ponto de reciclagem local. Juntos, podemos ajudar a proteger o meio ambiente. Downloaded From projector-manual.com Aiptek Manuals V User’s Manual EN Product Overview Power/Setting/ Exit button 5-way function button USB port Micro USB port MicroSD card slot AV in port Audio out port Mini HDMI port Focus wheel Projection Lens Downloaded From projector-manual.com Aiptek Manuals 1 User’s Manual EN Charging the product Connect one end of the bundled USB cable to the micro USB port of the product and the other end to PC / Notebook or Mobile phone power adapter for charging. ** The Product can be fully charged around 5 hrs from empty OR Charging the mobile phone (Power bank function) Connect one micro USB end of the mobile phone USB cable to the mobile phone and the other USB plug end to the product USB port on the side and press power key then the mobile phone battery will be charged automatically. Downloaded From projector-manual.com Aiptek Manuals 2 , User’s Manual EN Turning on/off the Projector Press the power key for 3 sec., and wait for around 6 sec., the projector will be turned on then Press the power key for 3 second in operation, the projector will be turned off. Adjusting the Focus Adjust the focus by using the focus wheel on the bottom side to get a sharper image. Setting language Press the power button shortly, it will pop-up menu setting, then select “language” item and use the direction key to select the wanted language, press the center “enter” button to confirm. Downloaded From projector-manual.com Aiptek Manuals 3 Project the files from microSD (TF) card Insert the microSD card into the card slot as below illustration indication,, then use the left/right button to switch the photo/music/video/text, 4 kinds of mode in the main menu screen to access the file category you want to project. Press the “enter” key to enter the mode, then use the direction button to navigate the thumbnails and select the file you the file you want to project. Main screen Downloaded From projector-manual.com Aiptek Manuals 4 EN User’s Manual User’s Manual EN Projecting the files from PC/NB or other media devices A) Connect PC/NB, or other media source devices via HDMI cable or AV cable HDMI cable A to C type (mini type) connection between the source device and projector: AV out and AV in cables connection between the source device and projector: * HDMI cable and AV in cable are optional accessories B) Connect the USB drive Insert the USB drive into the USB port: Downloaded From projector-manual.com Aiptek Manuals 5 C) To make projection from the mentioned source device: (1) Connect the source device as above (A) or (B) instruction. (2) In the main screen of projector, press the power button once, it will enter the language setting first, then press again, it will enter the source setting menu. (3) Use the direction up/down button to select the interface you are connecting, then press “enter” button to confirm. Note: (1) If connect to Notebook PC, you need to switch the Notebook PC screen to the external screen first while connecting projector. (2) You could adjust the volume by using the direction up/down button . Downloaded From projector-manual.com Aiptek Manuals 6 EN User’s Manual User’s Manual EN Projecting media files from external memory (microSD card, USB drive) Enter the file list page to select the files you want to project by using direction key and then press “enter” button to enter the single file. Operation instruction in single file display Button Result Display previous or next file Adust volume level Return Pop up menu bar for the other operation Button operation during menu setting: Move the setting item Confirm Close the menu bar Downloaded From projector-manual.com Aiptek Manuals 7 User’s Manual EN Troubleshooting Symptom Check Point The projector still can’t be Ensure the battery is fully turned on after 10 charged. seconds of waiting. The projecting image is 1. Adjust the focus by using too blurry. focus wheel. 2. Check if the projection lens is clean or not, clean it if dirty. The temperature of the projector’s surface is warm. The projector does not work when connecting to a notebook PC. It is normal for this projector to generate moderate heat during operation. 1. Check if the HDMI cable is plugged correctly. 2. Make sure the PC has been switched to projector display. Downloaded From projector-manual.com Aiptek Manuals 8 User’s Manual EN Product specifications Item Description Optical Technology LCOS Light Source RGB LED Resolution 960 x 540 Pixels (Q1080p) Luminous Flux Effective 12 lumens Projection Image Size 12.7 cm ~ 127 cm (5” ~ 50” Diagonal) Projection Distance 10.7 cm ~ 167 cm Projection Source microSD card, USB drive, HDMI, AV in Playback format Photo: JPEG, BMP Video: MP4, AVI, RMVB Music: MP3, WMA Text: TXT Power Input 5V / 1A Power Output 5V / 1A Battery Type Embedded 1850 mAh, Li-polymer rechargeable battery Battery Life Up to 90 min Power Consumption 4.5W Operation Temperature 5 °C ~ 35 °C Dimension (L x W x H) 112 mm x 58 mm x 16 mm Weight 180 g Package Content Pico Projector, USB cable, User Manual * All specifications are subject to change without notice. Downloaded From projector-manual.com Aiptek Manuals 9 Benutzerhandbuch DE Produktübersicht Netz/Einstellung/ Beenden-Taste 5-Wege Funktionstaste Micro USBAnschluss S MicroSDKartenste AV Eingang kplatz Audio Ausgang Mini HDMIAnschluss Fokusrad Projektionslinse Downloaded From projector-manual.com Aiptek Manuals 1 Benutzerhandbuch Aufladen des Produktes DE Verbinden Sie ein Ende des beigelegten USB-Kabels mit dem Micro USB-Anschluss am Produkt und das andere Ende mit dem Netzteil eines PC/Notebook oder Mobiltelefons zum Aufladen. ** Das Produkt kann innerhalb von 5 Stunden von leer vollständig aufgeladen werden ODER Das Mobiltelefon aufladen (Ladegerätfunktion) Verbinden Sie ein micro-USB Ende des USB-Kabels des Mobiltelefons mit dem Mobiltelefon und das andere Ende des USB-Kabels mit dem USB-Port des Produktes an der Seite und drücken Sie auf die Ein/Aus-Taste . Der Akku des Mobiltelefons wird anschließend automatisch geladen. Downloaded From projector-manual.com Aiptek Manuals 2 Benutzerhandbuch Projektor ein- und ausschalten DE Drücken Sie 3 Sek. lang auf die Netztaste und warten Sie ca. 6 Sek. bis sich der Projektor einschaltet Drücken Sie während des Betriebs 3 Sekunden lang auf die Netztaste , um den Projektor auszuschalten. Scharfstellen Stellen Sie den Fokus durch Benutzung des Fokusrades an der Unterseite ein, um ein schärferes Bild zu erhalten. Sprache einstellen Drücken Sie kurz auf die Netztaste zum Aufruf des Einstellungsmenüs. Wählen Sie anschließend die Option „Sprache“ und verwenden Sie die Richtungstaste zur Auswahl der gewünschten Sprache. Drücken Sie in der Mitte die „Eingabe“ Taste zum Bestätigen. Downloaded From projector-manual.com Aiptek Manuals 3 Benutzerhandbuch Projektion von Dateien von einer microSD (TF) Karte DE Setzen Sie die microSD-Karte in den Kartensteckplatz wie unten gezeigt ein. Benutzen Sie anschließend die Links/Rechts-Tasten zum Wechsel zwischen den 4 verschiedenen Modi Foto/Musik/Video/Text im Hauptmenü, um auf die Dateikategorie zuzugreifen, die Sie projizieren möchten. Drücken Sie auf die „Eingabe“ Taste , um den Modus aufzurufen. Benutzen Sie anschließend die Richtungstaste zum Navigieren durch die Miniaturbilder und wählen Sie die Datei aus, die Sie projizieren möchten. Hauptfenster Downloaded From projector-manual.com Aiptek Manuals 4 Benutzerhandbuch A) Schließen Sie den PC/NB oder anderen Mediengeräte über ein HDMI-Kabel oder AV-Kabel an HDMI-Kabel A auf C Typ (Mini-Typ) Verbindung zwischen dem Quellgerät und dem Projektor: AV Ausgang und AV Eingang Kabelverbindung zwischen dem Quellgerät und dem Projektor: * Das HDMI-Kabel und AV-Eingangskabel sind optionales Zubehör B) Anschluss des USB-Laufwerks an den USB-Port: Downloaded From projector-manual.com Aiptek Manuals 5 DE Dateien von PC/NB oder anderen Mediengeräten projizieren Benutzerhandbuch C) Vom genannten Quellgerät projizieren: DE (1) Verbinden Sie das Quellgerät wie oben (A) oder (B) beschrieben. (2) Drücken Sie im Hauptfenster des Projektors ein Mal auf die Netztaste . Zuerst wird die Spracheinstellung aufgerufen. Drücken Sie anschließend erneut auf , um das Quelleneinstellungsmenü aufzurufen. (3) Verwenden Sie die Richtung Nach Oben/Unten Tasten zur Auswahl der Schnittstelle, mit der Sie sich verbinden und drücken Sie anschließend zur Bestätigung auf die „Eingabe“ Taste . Anmerkung: (1) Wenn Sie sich mit einem Notebook PC verbinden, müssen Sie die Anzeige des Notebook PC auf externen Bildschirm einstellen, wenn Sie den Projektor anschließen (2) Sie können die Lautstärke über die Richtungstasten Nach Oben/Unten anpassen. Downloaded From projector-manual.com Aiptek Manuals 6 Benutzerhandbuch Rufen Sie die Dateilistenseite zur Auswahl der Dateien aus, die Sie projizieren möchten, indem Sie die Richtungstaste verwenden, und drücken Sie anschließend auf die „Eingabe“ Taste , um Aufruf einer einzelnen Datei. Bedienung bei Einzeldateianzeige Taste Effekt Anzeige der vorherigen oder nächsten Datei Lautstärke anpassen Zurück Popup-Menüleiste für andere Aktionen Tastenaktion im Einstellungsmenü: Einstellungsoption ändern Bestätigen Menüleiste schließen Downloaded From projector-manual.com Aiptek Manuals 7 DE Mediendateien von externem Speicher (microSD-Karte, USB-Laufwerk) projizieren Benutzerhandbuch Fehlerbehebung Symptom DE Der Projektor kann auch nach 10 Sekunden Wartezeit nicht eingeschaltet werden. Zu prüfende Punkte Stellen Sie sicher, dass der Akku vollständig aufgeladen ist. Das projizierte Bild ist zu 1. Stellen Sie den Fokus dunkel. mithilfe des Fokusrades ein. 2. Prüfen Sie, ob die Projektionslinse sauber ist. Reinigen Sie sie, wenn sie schmutzig ist. Die Oberfläche des Projektors ist warm. Es ist normal, dass dieser Projektor während des Betriebs mäßig warm wird. Der Projektor funktioniert 1. Prüfen Sie, dass das HDMI-Kabel richtig nicht, wenn er an ein angeschlossen ist. Notebook oder PC angeschlossen wird. 2. Stellen Sie sicher, dass der PC auf die Projektoranzeige gestellt wurde. Downloaded From projector-manual.com Aiptek Manuals 8 Benutzerhandbuch Produktbeschreibung Beschreibung Optische Technologie LCOS Lichtquelle RGB LED Auflösung 960 x 540 Pixel (Q1080p) Lichtstärke Effektiv 12 Lumen Projizierte Bildgröße 12,7 cm ~ 127 cm (5” ~ 50” Diagonale) Projektionsabstand 10,7 cm ~ 167 cm Projektionsquelle microSD-Karte, USB-Laufwerk, HDMI, AV Eingang Wiedergabeformat Bild: JPEG, BMP Video: MP4, AVI, RMVB Musik: MP3, WMA Text: TXT Leistungsaufnahme 5V / 1A Ausgangsleistung 5V / 1A Akkutyp Integrierter 1850 mAh, Li-Polymer Akku Akku Betriebszeit Bis zu 90 Min Stromverbrauch 4,5W Betriebstemperatur 5 °C ~ 35 °C Abmessungen (L x B x H) 112 mm x 58 mm x 16 mm Gewicht 180 g Paketinhalt Pico-Projektor, USB-Kabel, Benutzerhandbuch * Technische Daten können sich ohne Vorankündigung ändern. Downloaded From projector-manual.com Aiptek Manuals 9 DE Element Guide de l’utilisateur Présentation du produit FR Bouton Marche/ Configuration/Sortie Touche de fonction 5 positions Port USB Port Micro USB Logement de carte MicroSD AV in port Audio out port Mini Port HDMI Roues de mise au point Projet Len Downloaded From projector-manual.com Aiptek Manuals 1 Guide de l’utilisateur Connectez l’une des extrémités du câble USB fourni, au Micro port USB du produit et l’autre extrémité à l’adaptateur d'un PC/ordinateur portable ou téléphone mobile pour la recharge. ** Une fois vide, le produit peut être complètement rechargé en 5 heures environ OU Recharger le téléphone mobile (fonction banque de puissance électrique) Branchez une extrémité du câble micro USB sur la prise micro USB du téléphone portable et l'autre extrémité du câble sur le port USB situé sur le côté du produit et appuyez sur la touche , la batterie du téléphone mobile se rechargera automatiquement. Downloaded From projector-manual.com Aiptek Manuals 2 FR Charger l’appareil Guide de l’utilisateur Allumer/éteindre le Projecteur Appuyez sur la touche de puissance 3 sec., et attendre environ 6 sec., le projecteur se met alors en marche FR Pressez la touche alimentation électrique 3 secondes lors du fonctionnement, le projecteur sera alors éteint. Réglage de la mise au point Ajustez la mise au point en utilisant la molette de mise au point sur le bas côté pour obtenir une image plus nette. Paramétrer la langue Pressez le bouton d'alimentation électrique quelques secondes, le menu des paramètres s'affiche, puis sélectionner l'option "langue" et utiliser la touche de direction pour sélectionner la langue désirée, pressez le bouton du centre "entrer" pour confirmer. Downloaded From projector-manual.com Aiptek Manuals 3 Guide de l’utilisateur Insérez la carte microSD dans la fente de la carte come indique sur l'illustration ci-dessous, puis utilisez le bouton gauche/droite pour passer de photo/musique/ vidéo/texte, 4 sortes de mode dans le menu principal d'écran pour accéder à la catégorie de fichier que vous voulez projeter. Pressez la touche "entrer" pour entrer dans le mode, puis utilisez le bouton direction pour parcourir les vignettes et sélectionnez le fichier que vous voulez projeter. Écran principal Downloaded From projector-manual.com Aiptek Manuals 4 FR Projeter les fichiers depuis une carte microSD (TF) Guide de l’utilisateur Projection des fichiers depuis PC/NB ou autres périphériques multimédia A) Connectez un PC/OP, ou autres dispositifs de source multimédias via un câble HDMI ou un câble AV FR Câble HDMI de type A à C pour connexion (type mini) entre l'appareil source et le projecteur : Sortie AV et AV en connexion de câbles entre l'appareil source et le projecteur : * Câble HDMI et AV en câble sont des accessoires optionnels B) Connectez le lecteur USB Insérez le pilote USB dans le port USB : Downloaded From projector-manual.com Aiptek Manuals 5 Guide de l’utilisateur C) Pour faire une projection depuis le dispositif source mentionné : (2) Sur l'écran principal du projecteur, pressez sur le bouton d'alimentation une fois, les paramètres de langue s'affichent d'abord, puis pressez de nouveau , le menu source des paramètres s'affiche alors. (3) Utilisez le bouton de direction haut/bas pour sélectionner l'interface à laquelle vous vous connectez, puis pressez sur le bouton "entrer" pour confirmer. Note : (1) Si vous connecter à un PC portable, vous devez passer l'écran du PC portable à l'écran externe tout d'abord lors de la connexion au projecteur. (2) Vous pouvez régler le volume à l'aide du bouton de direction haut/bas . Downloaded From projector-manual.com Aiptek Manuals 6 FR (1) Branchez le périphérique source (A) ou (B) suivant instructions ci-dessus. Guide de l’utilisateur Projection de fichiers multimédias depuis la mémoire externe (carte microSD, lecteur USB) FR Accédez à la page de liste de fichiers pour sélectionner les fichiers que vous voulez projeter à l'aide de la touche de direction , puis pressez sur "entrer" pour entrer dans un fichier. Instruction de fonctionnement dans l'affichage d'un fichier Bouton Résultat Afficher l'image précédente ou suivante Ajustez le niveau de volume Retour Affichage barre de menu pour d'autres opérations Le fonctionnement des boutons pendant le réglage/paramétrage du menu : Déplacer l'élément de réglage/paramétrage Confirmez Fermez la barre de menus Downloaded From projector-manual.com Aiptek Manuals 7 Guide de l’utilisateur Dépannage Symptôme Assurez vous que la batterie est complètement chargée. FR Le projecteur ne peut toujours pas être allumé après 10 secondes d'attente. Point de contrôle L’image de projection est 1. Ajustez la mise au point en trop floue. utilisant la molette de mise au point. 2. Vérifiez si la lentille de projection est propre ou pas, si sale, nettoyez-la. La température de la surface du projecteur est chaude. Le projecteur ne fonctionne pas lors de la connexion à un PC portable. Il est normal que le projecteur génère une chaleur modérée lors du fonctionnement. 1. Vérifiez si le câble HDMI est correctement branché. 2. Assurez-vous que le PC soit prêt pour l’affichage de projecteur. Downloaded From projector-manual.com Aiptek Manuals 8 Guide de l’utilisateur Spécifications du produit Elément Description FR Technologie optique LCOS Source lumineuse RGB LED Résolution 960 x 540 Pixels (Q1080p) Flux lumineux Effet 12 lumens Dimension de l’image projetée 12.7 cm ~ 127 cm (5 ~ 50 pouces Diagonale) Distance de projection 10.7 cm ~ 167 cm Source de projection Carte microSD, USB, HDMI, entrée AV Format de lecture Image : JPEG, BMP Vidéo : MP4, AVI, RMVB Musique : MP3, WMA Text : TXT Entrée d’Alimentation électrique 5V / 1A Sortie d’Alimentation électrique 5V / 1A Type de batterie Batterie rechargeable Li-polymère de 1850 mAh incorporée Durée de vie de la batterie Jusqu’à 90 min Consommation électrique 4.5W Température de fonctionnement 5 °C ~ 35 °C Dimension (L x l x H) 112 mm x 58 mm x 16 mm Poids 180 g Contenu de l’emballage Pico projecteur, Câble USB, Manuel de l'utilisateur * Toutes les spécifications sont sujettes à modifications sans préavis. Downloaded From projector-manual.com Aiptek Manuals 9 Manuale Utente Panoramica prodotto Alimentazione/Impostazioni/ Tasto d’uscita IT Tasto a 5 funzioni Porta USB Porta Micro USB Alloggio scheda MicroSD Porta entrata AV Porta uscita audio Mini Porta HDMI Rotella messa a fuoco Lente proiettore Downloaded From projector-manual.com Aiptek Manuals 1 Manuale Utente Caricare il prodotto Collegare una estremità del cavo USB alla porta USB micro del prodotto e l’altra estremità al caricatore del PC/Notebook o cellulare. ** Il prodotto si carica completamente dopo 5 ore IT OPPURE Caricare il cellulare (funzione immagazzinamento energetico) Collegare una estremità del cavo USB del cellulare al cellulare stesso e l’altra estremità alla porta USB a lato e premere il interruttore , in questo modo la batteria si caricherà automaticamente. Downloaded From projector-manual.com Aiptek Manuals 2 Manuale Utente Accendere/spegnere il proiettore Premere il tasto d’accensione per 3 sec e aspettare circa 6 sec, il proiettore è ora acceso per 3 sec. e il Regolare la messa a fuoco Regolare la messa a fuoco usando l’apposita rotella in alto per ottenere un’immagine più definita. Impostare la lingua Premere brevemente il tasto , apparirà il menu delle impostaioni, poi selezionare “lingua” e usare le frecce direzionali per selezionare la lingua seiderata, premere il tasto centrale “enter” per confermare. Downloaded From projector-manual.com Aiptek Manuals 3 IT Premere il tasto d’accensione proiettore si spegnerà. Manuale Utente Prioettare file da scheda microSD (TF) Inserire la scheda microSD nell’apposita sede come illustrato sotto, poi usare il tasto destra/sinistra per scegliere tra foto/musica/video/testo, 4 tipi di modalità nel menu principale per accedere alla categoria del file che si desidera proiettare. Premere il tasto “enter” per scegliere la modalità, con il tasto direzionale per navigare tra i diversi thumbnails e selezionare il file che si desidera proiettare. IT Proiettore principale Downloaded From projector-manual.com Aiptek Manuals 4 Manuale Utente Proiettare i file da dispositivi PC/NB o altri tipi A) Collegare PC/NB o altri dispositivi via cavo HDMI o AV IT Connessione con cavo HDMI tipo A con tipo C (tipo mini) tra proiettore e dispositivo: Cavi di uscita e entrata AV per la connessione tra dispositivo e proiettore: * Cavo HDMI e entrata AV sono accessori opzionali B) Collegare il drive USB inserendolo nella porta USB: Downloaded From projector-manual.com Aiptek Manuals 5 Manuale Utente C) Per attivare la proiezione dalla risorsa menzionata: (1) Collegare la fonte come sopra (A) o (B). (2) Nello schermo principale del proiettore, premere il tasto d’alimentazione una volta, si aprirà il menu delle impostazioni della lingua, poi premere di nuovo e apparirà il menu delle impostazioni della fonte. IT (3) Usare le frecce direzionali su/giù per selezionare l’interfaccia da connettere, poi premere il tasto “enter” per confermare. Nota: (1) In caso di connessione ad un notebook PC, bisogna passare da schermo Notebook PC ad uno schermo esterno durante la connessione. (2) Si può regolare il volume usando i tasti direzionali su/giù. Downloaded From projector-manual.com Aiptek Manuals 6 Manuale Utente Proiettare file media da una memoria esterna (scheda microSD, drive USB) Entrare nella pagina con i file da selezionare per la proiezione usando i tasti direzionali e poi premere “enter” per aprire il singolo file. Tasto Risultato Mostra il file precedente o il prossimo Regola il livello del volume Ritorna Barra menu pop up per altre operazioni Tasto operazione per le impostazioni del menu: Spostare gli elementi impostazioni Conferma Chiudere la barra menu Downloaded From projector-manual.com Aiptek Manuals 7 IT Istruzioni per vedere il singolo file Manuale Utente Risoluzione dei problemi Sintomi Il proiettore non può essere acceso dopo un’attesa di 10 secondi. L’immagine proiettata è troppo mossa. IT La temperatura della superficie del proiettore è calda. Il proiettore non funziona quando connesso ad un notebook PC. Punti di controllo Controllare che la batteria sia completamente carica. 1. Regolare la messa a fuoco usando l’apposita rotella. 2. Controllare che la lente sia ben pulita,altrimenti pulirla. E’ normale per il proiettore che venga generato calore durante il suo funzionamento. 1. Controllare che il cavo HDMI sia connesso correttamente. 2. Assicurarsi che il PC sia in modalità visualizzazione proiettore. Downloaded From projector-manual.com Aiptek Manuals 8 Manuale Utente Caratteristiche del prodotto Descrizione Tecnologia ottica LCOS Sorgente luminosa RGB LED Risoluzione 960 x 540 Pixel (Q1080p) Luminous Flux 12 lumen effettivi Dimensioni imagine proiettata 12.7 cm ~ 127 cm (5” ~ 50” Diagonale) Distanza di proiezione 10.7 cm ~ 167 cm Superficie di proiezione Scheda microSD, drive USB, HDMI, ingresso AV Formato di riproduzione Foto: JPEG, BMP Video: MP4, AVI, RMVB Musica: MP3, WMA Testo: TXT Ingresso alimentazione 5V / 1A Uscita alimentazione 5V / 1A Tipo di Batteria Batteria ricaricabile al litio integrata 1850 mAh Durata batteria Fino a 90 min Comsumo elettrico 4.5W Temperatura operativa 5 °C ~ 35 °C Dimensione (L x P x H) 112 mm x 58 mm x 16 mm Peso 180 g La scatola contiene Proiettore Pico, Cavo USB, manuale utente * Tutte le specifiche sono soggette a modifica senza preavviso. Downloaded From projector-manual.com Aiptek Manuals 9 IT Voce Ɋɭɤɨɜɨɞɫɬɜɨɩɨɥɶɡɨɜɚɬɟɥɹ Ɉɛɳɢɣɜɢɞɭɫɬɪɨɣɫɬɜɚ Ʉɧɨɩɤɚɉɢɬɚɧɢɟ ɇɚɫɬɪɨɣɤɚȼɵɯɨɞ 5-ɤɧɨɩɨɱɧɵɣɞɠɨɣɫɬɢɤ ɉɨɪɬUSB RU ɉɨɪɬ0LFUR USB ɉɨɪɬ$9-IN Ƚɧɟɡɞɨɤɚɪɬɵ MicroSD ɉɨɪɬ ɚɭɞɢɨɜɵɜɨɞɚ ɉɨɪɬ0LQL HDMI Ʉɨɥɟɫɨ ɮɨɤɭɫɢɪɨɜɤɢ ɉɪɨɟɤɰɢɨɧɧɵɣ ɨɛɴɟɤɬɢɜ Downloaded From projector-manual.com Aiptek Manuals 1 Ɋɭɤɨɜɨɞɫɬɜɨɩɨɥɶɡɨɜɚɬɟɥɹ Ɂɚɪɹɞɤɚ ɭɫɬɪɨɣɫɬɜɚ Ⱦɥɹɡɚɪɹɞɤɢɩɨɞɫɨɟɞɢɧɢɬɟɨɞɢɧɪɚɡɴɟɦɩɪɢɥɚɝɚɟɦɨɝɨ ɤɚɛɟɥɹUSB ɤɩɨɪɬɭMicro USB ɭɫɬɪɨɣɫɬɜɚɚɞɪɭɝɨɣ ɪɚɡɴɟɦɤɉɄɧɨɭɬɛɭɤɭɢɥɢɤɚɞɚɩɬɟɪɭɩɢɬɚɧɢɹ ɦɨɛɢɥɶɧɨɝɨɬɟɥɟɮɨɧɚ ** Ɋɚɡɪɹɠɟɧɧɭɸɛɚɬɚɪɟɸɭɫɬɪɨɣɫɬɜɚɦɨɠɧɨɩɨɥɧɨɫɬɶɸ ɡɚɪɹɞɢɬɶɩɪɢɛɥɢɡɢɬɟɥɶɧɨɡɚɱɚɫɨɜ RU ʸʰʥʽ Ɂɚɪɹɞɤɚɦɨɛɢɥɶɧɨɝɨɬɟɥɟɮɨɧɚɮɭɧɤɰɢɹ ɡɚɪɹɞɧɨɝɨɚɤɤɭɦɭɥɹɬɨɪɚ ɉɨɞɫɨɟɞɢɧɢɬɟɪɚɡɴɟɦ0LFUR-86%ɤɚɛɟɥɹ86% ɦɨɛɢɥɶɧɨɝɨɬɟɥɟɮɨɧɚɤɦɨɛɢɥɶɧɨɦɭɬɟɥɟɮɨɧɭɚ ɞɪɭɝɨɣɪɚɡɴɟɦ86%ɤɛɨɤɨɜɨɦɭ86%-ɩɨɪɬɭɷɬɨɝɨ ɭɫɬɪɨɣɫɬɜɚɢɧɚɠɦɢɬɟɤɧɨɩɤɭɩɢɬɚɧɢɹ ɉɨɫɥɟ ɷɬɨɝɨɛɚɬɚɪɟɹɦɨɛɢɥɶɧɨɝɨɬɟɥɟɮɨɧɚɚɜɬɨɦɚɬɢɱɟɫɤɢ ɧɚɱɧɟɬɡɚɪɹɠɚɬɶɫɹ Downloaded From projector-manual.com Aiptek Manuals 2 Ɋɭɤɨɜɨɞɫɬɜɨɩɨɥɶɡɨɜɚɬɟɥɹ ȼɤɥɸɱɟɧɢɟɜɵɤɥɸɱɟɧɢɟɩɪɨɟɤɬɨɪɚ ɉɪɢɠɦɢɬɟɤɧɨɩɤɭɩɢɬɚɧɢɹ ɧɚɫɟɤɉɨɫɥɟɷɬɨɝɨ ɩɪɢɛɥɢɡɢɬɟɥɶɧɨɱɟɪɟɡɫɟɤɩɪɨɟɤɬɨɪɜɤɥɸɱɢɬɫɹ ɑɬɨɛɵɜɵɤɥɸɱɢɬɶɩɪɨɟɤɬɨɪɜɨɜɪɟɦɹɪɚɛɨɬɵ ɩɪɢɠɦɢɬɟɤɧɨɩɤɭɩɢɬɚɧɢɹ ɧɚɫɟɤ Ɋɟɝɭɥɢɪɨɜɤɚ ɮɨɤɭɫɚ RU Ⱦɥɹɪɟɝɭɥɢɪɨɜɤɢɮɨɤɭɫɚɩɨɜɟɪɧɢɬɟɤɨɥɟɫɨ ɮɨɤɭɫɢɪɨɜɤɢɫɧɢɠɧɟɣɫɬɨɪɨɧɵɭɫɬɪɨɣɫɬɜɚɞɨ ɩɨɥɭɱɟɧɢɹɪɟɡɤɨɝɨɢɡɨɛɪɚɠɟɧɢɹ ɇɚɫɬɪɨɣɤɚɹɡɵɤɚ Ʉɪɚɬɤɨɧɚɠɦɢɬɟɤɧɨɩɤɭɩɢɬɚɧɢɹ ɱɬɨɛɵɨɬɤɪɵɬɶ ɜɫɩɥɵɜɚɸɳɟɟɦɟɧɸɧɚɫɬɪɨɣɤɢȼɵɛɟɪɢɬɟɩɭɧɤɬ ©əɡɵɤªɤɧɨɩɤɚɦɢɞɠɨɣɫɬɢɤɚɜɵɛɟɪɢɬɟɧɭɠɧɵɣɹɡɵɤ ɢɫɪɟɞɧɟɣɤɧɨɩɤɨɣ©ȼɜɨɞª ɩɨɞɬɜɟɪɞɢɬɟɜɵɛɨɪ Downloaded From projector-manual.com Aiptek Manuals 3 Ɋɭɤɨɜɨɞɫɬɜɨɩɨɥɶɡɨɜɚɬɟɥɹ ɉɪɨɟɰɢɪɨɜɚɧɢɟɮɚɣɥɨɜɫɤɚɪɬɵɩɚɦɹɬɢ microSD (TF) RU ȼɫɬɚɜɶɬɟɤɚɪɬɭmicroSD ɜɝɧɟɡɞɨɤɚɪɬɵɤɚɤɩɨɤɚɡɚɧɨɧɚ ɪɢɫɭɧɤɟɧɢɠɟɡɚɬɟɦɤɧɨɩɤɚɦɢɜɥɟɜɨɜɩɪɚɜɨ ɜɵɛɟɪɢɬɟɨɞɢɧɢɡ-ɯɪɟɠɢɦɨɜɎɨɬɨɆɭɡɵɤɚȼɢɞɟɨ Ɍɟɤɫɬɱɬɨɛɵɩɨɥɭɱɢɬɶɞɨɫɬɭɩɤɬɨɣɤɚɬɟɝɨɪɢɢɮɚɣɥɨɜ ɤɨɬɨɪɵɟɜɵɯɨɬɢɬɟɢɫɩɨɥɶɡɨɜɚɬɶɞɥɹɩɪɨɟɰɢɪɨɜɚɧɢɹ ɇɚɠɦɢɬɟ©ȼɜɨɞª ɞɥɹɜɯɨɞɚɜɧɭɠɧɵɣɪɟɠɢɦ ɤɧɨɩɤɚɦɢɞɠɨɣɫɬɢɤɚ ɜɵɛɟɪɢɬɟɷɫɤɢɡɮɚɣɥɚ ɤɨɬɨɪɵɣɜɵɯɨɬɢɬɟɩɪɨɟɰɢɪɨɜɚɬɶ Ƚɥɚɜɧɵɣɷɤɪɚɧ Downloaded From projector-manual.com Aiptek Manuals 4 Ɋɭɤɨɜɨɞɫɬɜɨɩɨɥɶɡɨɜɚɬɟɥɹ ɉɪɨɟɰɢɪɨɜɚɧɢɟɮɚɣɥɨɜɫɉɄɇȻɢɞɪɭɝɢɯ ɦɟɞɢɚ-ɭɫɬɪɨɣɫɬɜ A) ɉɨɞɫɨɟɞɢɧɢɬɟɉɄɧɨɭɬɛɭɤɢɥɢɞɪɭɝɨɟ ɦɟɞɢɚ-ɭɫɬɪɨɣɫɬɜɨɱɟɪɟɡɤɚɛɟɥɶHDMI ɢɥɢAV ɉɨɞɤɥɸɱɟɧɢɟɤɚɛɟɥɹHDMI ɬɢɩɚɦɢɧɢA—Cɤ ɩɪɨɟɤɬɨɪɭɢɦɟɞɢɚ-ɭɫɬɪɨɣɫɬɜɭ RU ɉɨɞɤɥɸɱɟɧɢɟɤɚɛɟɥɟɣAV-out ɢAV-in ɤɩɪɨɟɤɬɨɪɭɢ ɦɟɞɢɚ-ɭɫɬɪɨɣɫɬɜɭ * HDMI-ɤɚɛɟɥɶAV-OUT ɢAV-IN ɧɟɜɯɨɞɹɬɜɤɨɦɩɥɟɤɬ ɩɨɫɬɚɜɤɢ B) ɉɨɞɫɨɟɞɢɧɢɬɟ USB-ɧɚɤɨɩɢɬɟɥɶ ȼɫɬɚɜɶɬɟ USB-ɧɚɤɨɩɢɬɟɥɶɜ USB-ɩɨɪɬ Downloaded From projector-manual.com Aiptek Manuals 5 Ɋɭɤɨɜɨɞɫɬɜɨɩɨɥɶɡɨɜɚɬɟɥɹ C) Ⱦɥɹɩɪɨɟɰɢɪɨɜɚɧɢɹɫɨɞɧɨɝɨɢɡɜɵɲɟɭɤɚɡɚɧɧɵɯ ɢɫɬɨɱɧɢɤɨɜ (1) ɉɨɞɫɨɟɞɢɧɢɬɟɢɫɬɨɱɧɢɤɤɚɤɭɤɚɡɚɧɨɜɵɲɟɜ ɩɭɧɤɬɟAɢɥɢB). (3) Ʉɧɨɩɤɚɦɢɜɜɟɪɯɜɧɢɡ ɜɵɛɟɪɢɬɟ ɩɨɞɤɥɸɱɚɟɦɵɣɢɧɬɟɪɮɟɣɫɢɤɧɨɩɤɨɣ©ȼɜɨɞª ɩɨɞɬɜɟɪɞɢɬɟɜɵɛɨɪ. ɉɪɢɦɟɱɚɧɢɟ: (1) ȿɫɥɢɩɨɞɤɥɸɱɟɧɧɨɭɬɛɭɤɬɨɝɞɚɩɟɪɟɞ ɩɨɞɤɥɸɱɟɧɢɟɦɩɪɨɟɤɬɨɪɚɫɥɟɞɭɟɬɜɧɚɫɬɪɨɣɤɚɯ ɧɨɭɬɛɭɤɚɜɤɥɸɱɢɬɶɜɵɜɨɞɢɡɨɛɪɚɠɟɧɢɹɧɚ ɜɧɟɲɧɢɣɦɨɧɢɬɨɪ. (2) Ʉɧɨɩɤɚɦɢɜɜɟɪɯɜɧɢɡ ɦɨɠɧɨɬɚɤɠɟɧɚɫɬɪɨɢɬɶ ɝɪɨɦɤɨɫɬɶɡɜɭɤɚ Downloaded From projector-manual.com Aiptek Manuals 6 RU (2) Ɉɬɤɪɵɜɝɥɚɜɧɵɣɷɤɪɚɧɩɪɨɟɤɬɨɪɚɨɞɧɨɤɪɚɬɧɨ ɧɚɠɦɢɬɟɤɧɨɩɤɭɩɢɬɚɧɢɹ ɩɨɫɥɟɱɟɝɨ ɫɧɚɱɚɥɚɨɬɤɪɨɟɬɫɹɦɟɧɸɜɵɛɨɪɚɹɡɵɤɚɋɧɨɜɚ ɧɚɠɦɢɬɟɤɧɨɩɤɭ ɱɬɨɛɵɨɬɤɪɵɬɶɦɟɧɸ ɜɵɛɨɪɚɢɫɬɨɱɧɢɤɚ. Ɋɭɤɨɜɨɞɫɬɜɨɩɨɥɶɡɨɜɚɬɟɥɹ ɉɪɨɟɰɢɪɨɜɚɧɢɟɦɟɞɢɚ-ɮɚɣɥɨɜɢɡɜɧɟɲɧɟɣ ɩɚɦɹɬɢɫɤɚɪɬɵmicroSD, USB-ɧɚɤɨɩɢɬɟɥɹ Ɉɬɤɪɨɣɬɟɫɩɢɫɨɤɜɵɛɨɪɚɮɚɣɥɨɜɤɧɨɩɤɚɦɢɜɜɟɪɯ ɜɧɢɡ ɜɵɛɟɪɢɬɟɮɚɣɥɞɥɹɩɪɨɟɰɢɪɨɜɚɧɢɹɢ ɤɧɨɩɤɨɣ©ȼɜɨɞª ɩɨɞɬɜɟɪɞɢɬɟɜɵɛɨɪɨɬɞɟɥɶɧɨɝɨ ɮɚɣɥɚ. Ɉɩɟɪɚɰɢɢɜɪɟɠɢɦɟɩɪɨɫɦɨɬɪɚɨɞɧɨɝɨɮɚɣɥɚ Ʉɧɨɩɤɚ Ɋɟɡɭɥɶɬɚɬ RU Ɉɬɨɛɪɚɠɟɧɢɟɩɪɟɞɵɞɭɳɟɝɨ ɫɥɟɞɭɸɳɟɝɨɮɚɣɥɚ Ɋɟɝɭɥɢɪɨɜɤɚɝɪɨɦɤɨɫɬɢ ȼɨɡɜɪɚɬ Ɉɬɤɪɵɜɚɟɬɫɬɪɨɤɭɦɟɧɸɫ ɞɨɩɨɥɧɢɬɟɥɶɧɵɦɢɤɨɦɚɧɞɚɦɢ Ɉɩɟɪɚɰɢɢɜɦɟɧɸɧɚɫɬɪɨɣɤɢ: ȼɵɛɨɪɩɭɧɤɬɚ ɧɚɫɬɪɨɣɤɢ ɉɨɞɬɜɟɪɠɞɟɧɢɟ Ɂɚɤɪɵɜɚɟɬɫɬɪɨɤɭɦɟɧɸ Downloaded From projector-manual.com Aiptek Manuals 7 Ɋɭɤɨɜɨɞɫɬɜɨɩɨɥɶɡɨɜɚɬɟɥɹ ɍɫɬɪɚɧɟɧɢɟɧɟɩɨɥɚɞɨɤ ɉɪɨɜɟɪɤɚ ɉɪɨɟɤɬɨɪɧɟɜɤɥɸɱɚɟɬɫɹ ɍɛɟɞɢɬɟɫɶɱɬɨɛɚɬɚɪɟɹ ɩɨɫɥɟɫɟɤɭɧɞ ɩɨɥɧɨɫɬɶɸɡɚɪɹɠɟɧɚ ɨɠɢɞɚɧɢɹ ɉɪɨɟɰɢɪɭɟɦɨɟ 1. Ɉɬɪɟɝɭɥɢɪɭɣɬɟɮɨɤɭɫ ɢɡɨɛɪɚɠɟɧɢɟɧɟɱɟɬɤɨɟ ɤɨɥɟɫɨɦɮɨɤɭɫɢɪɨɜɤɢ 2. ɉɪɨɜɟɪɶɬɟɧɟɝɪɹɡɟɧɥɢ ɨɛɴɟɤɬɢɜȽɪɹɡɧɵɣ ɨɛɴɟɤɬɢɜɫɥɟɞɭɟɬ ɨɱɢɫɬɢɬɶ ɉɨɜɟɪɯɧɨɫɬɶɩɪɨɟɤɬɨɪɚ ɉɪɢɧɨɪɦɚɥɶɧɨɣɪɚɛɨɬɟ ɧɚɝɪɟɜɚɟɬɫɹ ɩɪɨɟɤɬɨɪɜɵɞɟɥɹɟɬɬɟɩɥɨ— ɷɬɨɧɨɪɦɚɥɶɧɨɟɹɜɥɟɧɢɟ ɉɪɨɟɤɬɨɪɧɟɪɚɛɨɬɚɟɬ 1. ɉɪɨɜɟɪɶɬɟɩɪɚɜɢɥɶɧɨɥɢ ɩɪɢɩɨɞɤɥɸɱɟɧɢɢɤ ɩɨɞɤɥɸɱɟɧɤɚɛɟɥɶHDMI. ɧɨɭɬɛɭɤɭ 2. ɍɛɟɞɢɬɟɫɶɱɬɨɤɨɦɩɶɸɬɟɪ ɩɟɪɟɤɥɸɱɟɧɜɪɟɠɢɦ ɜɢɞɟɨɜɵɜɨɞɚɧɚɩɪɨɟɤɬɨɪ Downloaded From projector-manual.com Aiptek Manuals 8 RU ɇɟɢɫɩɪɚɜɧɨɫɬɶ Ɋɭɤɨɜɨɞɫɬɜɨ ɩɨɥɶɡɨɜɚɬɟɥɹ ɏɚɪɚɤɬɟɪɢɫɬɢɤɢ ɢɡɞɟɥɢɹ ɏɚɪɚɤɬɟɪɢɫɬɢɤɚ Ɉɩɢɫɚɧɢɟ RU Ɉɩɬɢɱɟɫɤɚɹ ɬɟɯɧɨɥɨɝɢɹ LCOS ɂɫɬɨɱɧɢɤ ɫɜɟɬɚ RGB LED Ɋɚɡɪɟɲɟɧɢɟ 960 x 540 ɩɢɤɫɟɥɨɜ (Q1080p) ɋɜɟɬɨɜɨɣ ɩɨɬɨɤ ɗɮɮɟɤɬɢɜɧɵɣ ɩɨɬɨɤ — 12 ɥɸɦɟɧ Ɋɚɡɦɟɪ ɩɪɨɟɰɢɪɭɟɦɨɝɨ ɢɡɨɛɪɚɠɟɧɢɹ 12,7 ɫɦ ~ 127 ɫɦ (5 ~ 50 ɞɸɣɦɨɜ, ɞɢɚɝɨɧɚɥɶ) ɉɪɨɟɤɰɢɨɧɧɨɟ ɪɚɫɫɬɨɹɧɢɟ 10,7 ɫɦ ~ 167 ɫɦ ɂɫɬɨɱɧɢɤ ɩɪɨɟɰɢɪɭɟɦɨɝɨ ɢɡɨɛɪɚɠɟɧɢɹ Ʉɚɪɬɚ microSD, USB-ɧɚɤɨɩɢɬɟɥɶ, HDMI, AV-IN ȼɨɫɩɪɨɢɡɜɨɞɢɦɵɟ ɮɨɪɦɚɬɵ Ɏɨɬɨ: JPEG, BMP ȼɢɞɟɨ: MP4, AVI, RMVB Ɇɭɡɵɤɚ: MP3, WMA Ɍɟɤɫɬ: TXT ȼɯɨɞ ɩɢɬɚɧɢɹ 5V / 1A ȼɵɯɨɞ ɩɢɬɚɧɢɹ 5V / 1A Ɍɢɩ ɛɚɬɚɪɟɢ ȼɫɬɪɨɟɧɧɵɣ ɩɟɪɟɡɚɪɹɠɚɟɦɵɣ ɥɢɬɢɣ-ɩɨɥɢɦɟɪɧɵɣ ɚɤɤɭɦɭɥɹɬɨɪ, 1850 ɦȺɱ ȼɪɟɦɹ ɪɚɛɨɬɵ ɛɚɬɚɪɟɢ Ⱦɨ 90 ɦɢɧ ɗɧɟɪɝɨɩɨɬɪɟɛɥɟɧɢɟ 4,5W Ɍɟɦɩɟɪɚɬɭɪɚ ɷɤɫɩɥɭɚɬɚɰɢɢ 5 °C ~ 35 °C Ɋɚɡɦɟɪɵ (Ⱦ x ɒ x ȼ) 112 ɦɦ x 58 ɦɦ x 16 ɦɦ ȼɟɫ 180 ɝ ɋɨɞɟɪɠɢɦɨɟ ɭɩɚɤɨɜɤɢ ɉɢɤɨɩɪɨɟɤɬɨɪ, ɤɚɛɟɥɶ USB, ɪɭɤɨɜɨɞɫɬɜɨ ɩɨɥɶɡɨɜɚɬɟɥɹ * ȼɫɟ ɯɚɪɚɤɬɟɪɢɫɬɢɤɢ ɦɨɝɭɬ ɛɵɬɶ ɢɡɦɟɧɟɧɵ ɛɟɡ ɩɪɟɞɜɚɪɢɬɟɥɶɧɨɝɨ ɭɜɟɞɨɦɥɟɧɢɹ. Downloaded From projector-manual.com Aiptek Manuals 9 Manual del Usuario Vista general del producto Botón de encendido/ ajustes/salida Botón de función de 5 pasos Puerto USB Puerto Micro USB Ranura para tarjetas MicroSD Puerto Entrada AV ES Puerto Salida de Audio Puerto mini HDMI Rueda de enfoque Lente del proyector Downloaded From projector-manual.com Aiptek Manuals 1 Manual del Usuario Carga del producto Para cargar la batería del producto, conecte un extremo del cable USB suministrado en el puerto Micro USB del producto y el conecte el otro extremo al ordenador, portátil o adaptador de fuente de alimentación para teléfonos móviles. ** Se puede cargar el producto por completo en 5 horas O BIEN ES Carga del teléfono móvil (función banco de alimentación) Conecte la punta del cable del micro USB para teléfonos móviles al teléfono móvil y conecte la otra punta del USB al puerto USB del producto en el lateral y presione el interruptor , y el batería del teléfono móvil comenzará a cargarse automáticamente. Downloaded From projector-manual.com Aiptek Manuals 2 Manual del Usuario Encendido y apagado del proyector Pulse la tecla de encendido durante 3 segundos y espere unos 6 segundos hasta que se encienda el proyector Pulse la tecla de encendido apagará el proyector. durante 3 segundos y se Ajustar el enfoque ES Ajuste el enfoque usando la rueda de enfoque ubicada en el lateral inferior para obtener una imagen más nítida. Configuración del idioma Pulse rápidamente el botón de encendido y aparecerán los ajustes del menú. Seleccione el elemento “Idioma”, use la tecla de dirección para seleccionar el idioma deseado y pulse el botón “Intro” para confirmarlo. Downloaded From projector-manual.com Aiptek Manuals 3 Manual del Usuario Proyección de archivos desde la tarjeta microSD (TF) Inserte la tarjeta microSD en la ranura de la tarjeta tal y como se indica en la siguiente ilustración. Utilice a continuación el botón izquierda/derecha para cambiar entre foto/música/vídeo/texto, las 4 formas del modo en la pantalla del menú principal para acceder a la categoría de archivo que desee proyectar. Pulse la tecle “Intro” para entrar en el modo, use el botón de dirección para navegar por las imágenes en miniatura y seleccione el archivo que desee proyectar. ES Pantalla principal Downloaded From projector-manual.com Aiptek Manuals 4 Manual del Usuario Proyección de archivos desde un ordenador/portátil u otro dispositivo multimedia A) Conecte el ordenador/portátil u otro dispositivo multimedia a través del cable HDMI o cable AV Conexión de cables Salida AV y Entrada AV entre el dispositivo fuente y el proyector: * El cable HDMI y el cable AV entrada son accesorios opcionales B) Conecte la unidad USB en el puerto USB: Downloaded From projector-manual.com Aiptek Manuals 5 ES Conexión con cable HDMI tipo A a C (tipo mini) entre el dispositivo fuente y el proyector: Manual del Usuario C) Para realizar la proyección desde el dispositivo fuente mencionado: (1) Conecte el dispositivo fuente tal y como se muestra en las instrucciones (A) o (B). (2) En la pantalla principal del proyector, pulse el botón de encendido una vez y aparecerá primero los ajustes de idioma; pulse de nuevo y entrará en el menú de ajuste de fuente. (3) Use el botón de dirección arriba/abajo para seleccionar la interfaz a la que se va a conectar y pulse el botón “Intro” para confirmarlo. ES Nota: (1) Si lo conecta a un portátil, necesitará cambiar primero la pantalla del portátil a una pantalla externa mientras lo conecta al proyector. (2) Podría ajustar el volumen usando el botón de dirección arriba/abajo. Downloaded From projector-manual.com Aiptek Manuals 6 Manual del Usuario Proyección de archivos multimedia desde memoria externa (tarjeta microSD, unidad USB) Entre en la página de la lista de archivos para seleccionar los archivos que desee proyectar usando la tecla de dirección y pulse el botón “Intro” para entrar en un archivo. Instrucciones de funcionamiento en la proyección de un archivo Botón Resultado Ajusta el nivel de volumen Volver Aparece la barra de menú para otra función Botón de funcionamiento estando en el ajuste de menú: Ir al elemento de ajuste Confirmar Cerrar la barra de menú Downloaded From projector-manual.com Aiptek Manuals 7 ES Proyecta el archivo anterior o siguiente Manual del Usuario Resolución de problemas más frecuentes Síntoma Comprobación El proyector no se puede Asegúrese de que la batería encender aún habiendo esté completamente cargada. pasado 10 segundos. La imagen proyectada es 1. Ajuste el enfoque usando la demasiado borrosa. rueda de enfoque. 2. Compruebe que las lentes de proyección estén limpias; si no lo está, límpielas. ES La temperatura de la superficie del proyector es un poco alta. El proyector no funciona cuando se conecta a un ordenador portátil. Es normal que el proyector genere algo de calor durante el funcionamiento. 1. Compruebe que el cable HDMI esté conectado correctamente. 2. Asegúrese de que el ordenador haya sido configurado al modo de visualización de proyector. Downloaded From projector-manual.com Aiptek Manuals 8 Manual del Usuario Especificaciones del producto Elemento Descripción Tecnología óptica LCOS Fuente luminosa RGB LED Resolución 960 x 540 Píxeles (Q1080p) Flujo luminoso 12 lúmenes efectivas Tamaño de la imagen de proyección 12.7 cm ~ 127 cm (5” ~ 50” Diagonal) Distancia de proyección 10.7 cm ~ 167 cm Fuente de proyección Tarjeta microSD card, unidad USB, HDMI, Entrada AV Formato de reproducción Foto: JPEG, BMP Música: MP3, WMA Texto: TXT Entrada de la fuente de alimentación 5V / 1A Salida de la fuente de alimentación 5V / 1A Tipo de batería Batería recargable de polímeros de litio de 1850 mAh integrado Duración de la batería Hasta 90 min Consumo eléctrico 4.5W Temperatura de funcionamiento 5 °C ~ 35 °C Dimensiones (L x P x A) 112 mm x 58 mm x 16 mm Peso 180 g Contenido del paquete Pico Proyector, Cable USB, Manual de usuario * Todas las especificaciones están sujetas a cambios sin previo aviso. Downloaded From projector-manual.com Aiptek Manuals 9 ES Vídeo: MP4, AVI, RMVB ℎ䚷㏚⌙ 䚱♐嬞㧋 榔䡽 尹㞝 ⋘ⴇ㐏姢 LCOS ⋘䀟 RGB LED 孲㤟〵 960 x 540 ≞亯(Q1080p) ⋘憩捞 12 (㢘㛗㻐㞝) 㐤⪶ 12.7 ⋻⎕~ 127 ⋻⎕(5 咀▚~ 50 咀▚ 孡) 㐤彬桱 10.7 ⋻⎕~ 167 ⋻⎕ 㐤ℕ䀟 microSD ⓰ҷUSB 䩐䨮ҷHDMIҷAV 惇⋴ 㘼㛍㧋ゞ ⢥䏖處JPEGҷBMP 䏖處MP4ҷAVIҷRMVB 概㮑處MP3ҷWMA 㜖⳦處TXT TC 梊䀟惇⋴ 5V / 1A 梊䀟惇⎉ 5V / 1A 梊㷯槭⤚ ⋶ら 1850 mAh ╾⋔梊摿梊㷯 梊㷯梊捞 朆懣 90 ⎕斧 冦梊捞 4.5W 㙜⃫䀺〵 5 °C ~ 35 °C ⪥⤚ⷉⶇ(朆 x x 汧) 112 ⋻损 x 58 ⋻损 x 16 ⋻损 捜捞 180 ⋻⋚ ⒔婬⋶ⵈ ㄽ⤚㐤㯮ҷUSB 憲㔴佩ҷℎ䚷㏚⌙ * 嬞㧋呴㢘崙㢃虇ᾜ╵姛憩䥴Ҹ Downloaded From projector-manual.com Aiptek Manuals 9 ϡΪΨΘδϤϟϞϴϟΩ ΞΘϨϤϟϰϠϋΔϣΎϋΓήψϧ ΝϭήΨϟ/ΩΪϋϹ/ΔϗΎτϟέί ϒΎχϭΔδϤΧ ϭΫέί USBάϔϨϣ Micro USBάϔϨϣ MicroSDΔϗΎτΑΔΤΘϓ AV ϝΎΧΩ· άϔϨϣ ΕϮμϟΝήΧάϔϨϣ ήϴϐμϟ HDMIάϔϨϣ AR ΔϠΠϋ ΓέΆΒϟ έϮΘϜϴΟϭήΒϟΔγΪϋ Downloaded From projector-manual.com Aiptek Manuals 1 ϡΪΨΘδϤϟϞϴϟΩ ΞΘϨϤϟϦΤη ˬΞΘϨϤϠϟ Micro USBάϔϨϤΑϡϭΰΤϤϟ USBϞΒϛϦϣΪΣϭϑήσϞϴλϮΘΑϢϗ ϝϮϤΤϣϒΗΎϫϭϱήΘϓΩήΗϮϴΒϤϛ/ϲμΨηήΗϮϴΒϤϛΔϗΎσϝϮΤϤΑήΧϵϑήτϟϭ .ϦΤθϠϟ .Ύ˱ϏέΎϓ ϥϮϜϳΎϤϨϴΣΕΎϋΎγ 5ϲϟϮΣϲϓΎ˱ϣΎϤΗΞΘϨϤϟϦΤηϦϜϤϳ ** ϭ (ΔϗΎτϟϚϨΑΔϔϴχϭ)ϝϮϤΤϤϟϒΗΎϬϟϦΤη ϝϮϤΤϤϟϒΗΎϬϟΎΑιΎΨϟ USBϞΑΎϛϲϓϦϳήϴϐμϟ USB˰ϟϲϓήσΪΣϞλϭ ϰϠϋΩϮΟϮϤϟ USBάϔϨϤΑ USBβΑΎϗϦϣήΧϵϑήτϟϭˬϝϮϤΤϤϟϒΗΎϬϟΎΑ ϝϮϤΤϤϟϒΗΎϬϟΔϳέΎτΑϦΤηϢΘϴγˬ ΔϗΎτϟέίϰϠϋςϐοϭΞΘϨϤϟΐϧΎΟ .έϮϔϟϰϠϋ AR Downloaded From projector-manual.com Aiptek Manuals 2 ϡΪΨΘδϤϟϞϴϟΩ έϮΘϜϴΟϭήΒϟϞϴϐθΗϑΎϘϳ·/ϞϴϐθΗ ϞϴϐθΗϢΘϴγˬ˳ϥϮΛ 6ϲϟϮΣήψΘϧϭˬ˳ϥϮΛ 3ΓΪϤϟ ΔϗΎτϟΡΎΘϔϣςϐο ϢΛˬέϮΘϜϴΟϭήΒϟ ϞϴϐθΗϑΎϘϳ·ϢΘϴγˬϞϤόϟ˯ΎϨΛ˳ϥϮΛ 3ΓΪϤϟ ΔϗΎτϟΡΎΘϔϣςϐο .έϮΘϜϴΟϭήΒϟ ΓέΆΒϟςΒο AR ϰϠϋϝϮμΤϠϟϲϠϔδϟΐϧΎΠϟϲϓΓΩϮΟϮϤϟΓέΆΒϟΔϠΠϋϡΪΨΘγΎΑΓέΆΒϟςΒο .οϭΓέϮλ ΔϐϠϟςΒο ήΘΧˬΕΩΪϋϹΎΑΔϘΜΒϨϣΔϤΎϗήϬψΘγˬΓήϴμϗΓήΘϔϟ ΔϗΎτϟέίςϐο έΰϟςϐοˬΎϬΑΐϏήΗϲΘϟΔϐϠϟέΎϴΘΧϻϩΎΠΗϻΡΎΘϔϣϡΪΨΘγϭ "Δϐϟ"ήμϨόϟ .Ϊϴϛ΄ΘϠϟ ϒμΘϨϤϟϲϓ "ϝΎΧΩ·" Downloaded From projector-manual.com Aiptek Manuals 3 ϡΪΨΘδϤϟϞϴϟΩ microSD (TF) ΔϗΎτΑ ϦϣΕΎϔϠϤϟνήϋ ϲΤϴοϮΘϟϢγήϟϲϓοϮϣϮϫΎϤϛΔϗΎτΒϟΔΤΘϓϲϓ microSDΔϗΎτΑϞΧΩ /ϰϘϴγϮϤϟ/ΓέϮμϟϞϳϮΤΘϟ έΎδϴϠϟ/ϦϴϤϴϠϟέΰϟϡΪΨΘγϢΛˬϩΎϧΩ ϲϓΐϏήΗϱάϟϒϠϤϟΔΌϓϰϟ·ϝϮλϮϠϟΔΤϔμϟΔηΎηϲϓωΎοϭ 4ˬκϨϟ/ϮϳΪϴϔϟ έίϡΪΨΘγϢΛˬωΎοϭϷΪΣϰϟ·ϝϮΧΪϠϟ "ϝΎΧΩ·"ΡΎΘϔϤϟςϐο .Ϫοήϋ .ϪοήϋΪϳήΗϱάϟϒϠϤϟέΎϴΘΧϭΓήϐμϤϟέϮμϟϦϴΑϞϘϨΘϠϟ ΕΎϫΎΠΗϻ ΔϴδϴήϟΔηΎθϟ AR Downloaded From projector-manual.com Aiptek Manuals 4 ϡΪΨΘδϤϟϞϴϟΩ ϦϣΎϫήϴϏϭϱήΘϓΩίΎϬΟ/ϲμΨθϟήΗϮϴΒϤϜϟϦϣΕΎϔϠϤϟνήϋ ςΎγϮϟΓΰϬΟ έΪμϣΓΰϬΟϷϦϣϩήϴϏϭˬϱήΘϓΪϟίΎϬΠϟ/ϲμΨθϟήΗϮϴΒϤϜϟϞϴλϮΘΑϢϗ (A AVϞΑΎϛϭ HDMIϞΑΎϛήΒϋςΎγϮϟ ίΎϬΠϟϦϴΑ (ήϴϐμϟωϮϨϟ) "Ν"ϰϟ· ""ωϮϨϟϦϣ HDMIϞΑΎϛϞϴλϮΗ :έϮΘϜϴΟϭήΒϟϭέΪμϤϟ AR :έϮΘϜϴΟϭήΒϟϭέΪμϤϟίΎϬΠϟϦϴΑ AVΝήΧϭϞΧΩΕϼΑΎϛϞϴλϮΗ ΔϳέΎϴΘΧΕΎϘΤϠ˵ϣϲϫ AVϞΧΩϞΑΎϛϭ HDMIϞΑΎϛ * ϞΧΩ USBιήϗϙήΤϣϞϴλϮΗ (B άϔϨϣϲϓ USBιήϗϙήΤϣ :USB Downloaded From projector-manual.com Aiptek Manuals 5 ϡΪΨΘδϤϟϞϴϟΩ :έϮϛάϤϟέΪμϤϟίΎϬΠϟϦϣνήόϠϟ (C "Ώ"ϭ ""ΕΩΎηέϹϲϓοϮϣϮϫΎϤϛέΪμϤϟίΎϬΠϟϞϴλϮΘΑϢϗ (1) .ϩϼϋ Γήϣ ΔϗΎτϟέίϰϠϋςϐοˬέϮΘϜϴΟϭήΒϠϟΔϴδϴήϟΔηΎθϟϲϓ (2) ˬϯήΧ˱Γήϣ ςϐοϢΛˬ˱ϻϭΔϐϠϟΕΩΪϋ·ϰϟ·ϞΧΪϴγˬΓΪΣϭ .έΪμϤϟΕΩΪϋϹΔϤΎϗϰϟ·ϞΧΪϴγ ˬΎϬΑϞμΘΘγϲΘϟΔϬΟϮϟέΎϴΘΧϻ ϞϔγϷ/ϰϠϋϷϩΎΠΗϻέίϡΪΨΘγ (3) Ϊϴϛ΄ΘϠϟ "ϝΎΧΩ·"έΰϟςϐοϢΛ AR :ΔψΣϼϣ ίΎϬΠϟΔηΎηϞϳϮΤΗϰϟ·ΔΟΎΤΑΖϧ΄ϓˬϱήΘϓΩίΎϬΠΑ˱ϼμΘϣΖϨϛΫ· (1) .έϮΘϜϴΟϭήΒϟϞϴλϮΗ˯ΎϨΛ˱ϻϭΔϴΟέΎΧΔηΎηϰϟ·ϱήΘϓΪϟ . ϞϔγϷ/ϰϠϋϷϩΎΠΗϻέίϡΪΨΘγΎΑΕϮμϟςΒοϚϨϜϤϳ (2) Downloaded From projector-manual.com Aiptek Manuals 6 ϡΪΨΘδϤϟϞϴϟΩ ϙήΤϣˬmicroSDΔϗΎτΑ)ΔϴΟέΎΧΓήϛΫϦϣςΎγϮϟΕΎϔϠϣνήϋ (USBιήϗ έίϡΪΨΘγΎΑΎϬοήϋϲϓΐϏήΗϲΘϟΕΎϔϠϤϟέΎϴΘΧϻΕΎϔϠϤϟΔϤΎϗΔΤϔλϞΧΩ .Ϧ˷ϴό˵ϣϒϠϣϝϮΧΪϟ "ϝΎΧΩ·"έΰϟςϐοϢΛˬ ΕΎϫΎΠΗϻ ΪΣϮϟϒϠϤϟνήϋϲϓϞϴϐθΘϟΕΩΎηέ· ΔΠϴΘϨϟ έΰϟ ϲϟΎΘϟϭϖΑΎδϟϒϠϤϟνήϋ ΕϮμϟϯϮΘδϣςΒο ΓΩϮόϟ ϯήΧϷΔϴϠϤόϠϟΔϘΜΒϨϤϟϢϮϘϟςϳήη :ΔϤΎϘϟΕΩΪϋ·ϝϼΧέΰϟϞϤϋ AR ΕΩΪϋϹήμϨϋϞϘϧ Ϊϴϛ΄Θϟ ϢϮϘϟςϳήηϕϼϏ· Downloaded From projector-manual.com Aiptek Manuals 7 ϡΪΨΘδϤϟϞϴϟΩ ΎϬϠΣΔϟϭΎΤϣϭϝΎτϋϷϑΎθΘϛ κΤϔϟΔτϘϧ ν˴ή˴όϟ .ϞϣΎϜϟΎΑΔϧϮΤθϣΔϳέΎτΒϟϥΪϛ΄Η ΪόΑέϮΘϜϴΟϭήΒϟϞϴϐθΗϦϜϤϳϻ .˳ϥϮΛ 10ΓήΘϔϟέΎψΘϧϻ .ΓέΆΒϟΔϠΠϋϡΪΨΘγΎΑΰϴϛήΘϟςΒο .1 ϢϟΫ·ϭˬΔϔϴψϧνήόϟΔγΪϋϥϦϣΪϛ΄Η .2 .ΎϬϔϴψϨΘΑϢϘϓˬϚϟάϛϦϜΗ έϮΘϜϴΟϭήΒϟίΎϬΟϦϋΞΘϨϳϥϲϬϳΪΒϟϦϣ .ϞϴϐθΘϟ˯ΎϨΛΔϟΪΘόϣΓέήΣάϫ ϰϠϋΔοϭήόϤϟΓέϮμϟ .ΔϳΎϐϠϟΔϤΎϏέϮΘϜϴΟϭήΒϟ ίΎϬΟτγΓέήΣΔΟέΩ .ΔΌϓΩέϮΘϜϴΟϭήΒϟ .HDMI ϞΑΎϜϟϞϴλϮΗΔΤλϦϣϖϘΤΗ .1 ϪϠϴλϮΗΪϨϋϞϤόϳϻέϮΘϜϴΟϭήΒϟ .ϝϮϤΤϣήΗϮϴΒϤϜΑ ϰϟ·ϲμΨθϟήΗϮϴΒϤϜϟϞϳϮΤΗϦϣΪϛ΄Η .2 .έϮΘϜϴΟϭήΒϟνήϋ AR Downloaded From projector-manual.com Aiptek Manuals 8 ϡΩΧΗγϣϟ ϝϳϟΩ ΞΗϧϣϟ ΕΎϔλϭϣ ϑλϭ έλϧόϟ LCOS ΔϳέλΑϟ ΔϳϧϘΗϟ RGB LED ϳΑΎλϣ ˯ϭοϟ έΩλϣ (Q1080p) ϝγϛϳΑ 960 x 540 νέόϟ ΔϗΩ ˯ϲοϣ ϕϓΩΗ 50 ϰϟ· ΕΎλϭΑ 5 ϥϣ) ϡγ 127 ϰϟ· ϡγ 12.7 ϥϣ (ϱέρϗ ΔλϭΑ Δοϭέόϣϟ Γέϭλϟ ϡΟΣ ϡγ 167 ~ ϡγ 10.7 νέόϟ ΔϓΎγϣ ϝΑΎϛ ˬUSB ιέϗ ϙέΣϣ ˬmicroSD ΔϗΎρΑ AV ϝΧΩ ϝΑΎϛ ˬHDMI νέόϟ έΩλϣ JPEG, BMP :Γέϭλ RMVB ,AVI ,MP4 :ϭϳΩϳϓ WMA ,MP3 :ϰϘϳγϭϣϟ TXT :ιϧϟ ϝϳϐηΗϟ ϕϳγϧΗ έϳΑϣ 1/ Εϟϭϓ 5 ΔϗΎρϟ ϝΧΩ έϳΑϣ 1/ Εϟϭϓ 5 ΔϗΎρϟ ΝέΧ ϲϓ έϳΑϣ ΎΟϳϣ 1850 ΓέΩϘΑ ˬέϣϳϟϭΑ-ϲϟ ΔΟϣΩϣ ΔϳέΎρΑ ϥΣηϟ ΓΩΎϋϹ ΔϠΑΎϗ ΔϋΎγϟ ΔϳέΎρΑϟ ωϭϧ ΔϘϳϗΩ 90 ϰϟ· ϝλϳ ΔϳέΎρΑϠϟ ϲοέΗϓϻ έϣόϟ ρϭ 4.5 ΔϗΎρϟ ϙϼϬΗγ Δϳϭϣ ΔΟέΩ 35 ϰϟ· Δϳϭϣ ΔΟέΩ 5 ϥϣ ϝϳϐηΗϟ ΓέέΣ ΔΟέΩ ϡϠϣ 16 × ϡϠϣ 58 × ϡϠϣ 112 (ωΎϔΗέϻ×νέόϟ× ϝϭρϟ) ΩΎόΑ ϡέΟ 180 ϥίϭϟ ϝϳϟΩϭ ˬUSB ϝΑϛϭ ˬPico έϭΗϛϳΟϭέΑϟ ίΎϬΟ ϡΩΧΗγϣϟ ΓϭΑόϟ ΕΎϳϭΗΣϣ AR ϝΎόϓ ϥϣϭϟ 12 .ϕΑγϣ έΎρΧ· ϥϭΩ έϳϳϐΗϠϟ Δοέ˵ϋ ΕΎϔλϭϣϟ ϊϳϣΟ * Downloaded From projector-manual.com Aiptek Manuals 9 䝴䞊䝄䞊䝬䝙䝳䜰䝹 〇ရᵝ 㡯┠ ㄝ᫂ ගᏛᢏ⾡ LCOS ග※ RGB LED ゎീᗘ 960 x 540 䝢䜽䝉䝹(Q1080p) ග᮰ ຠᯝⓗ䛺 12 䝹䞊䝯䞁 ᢞᙳ䝃䜲䝈 12.7 cm ~ 127 cm (5” ~ 50”ᑐゅ⥺) ᢞᙳ㊥㞳 10.7 cm ~ 167 cm ᢞᙳ䝋䞊䝇 microSD 䜹䞊䝗䚸USB 䝗䝷䜲䝤䚸HDMI䚸AV ධ ຊ ⏕䝣䜷䞊䝬䝑䝖 ┿䠖JPEG, BMP 䝡䝕䜸䠖MP4, AVI, RMVB 㡢ᴦ䠖MP3, WMA 䝔䜻䝇䝖䠖TXT JP ධຊ㟁※ 5V / 1A 㟁※ฟຊ 5V / 1A 䝞䝑䝔䝸䞊䝍䜲䝥 1850 mAh, Li 䝫䝸䝬䞊㟁ᘧ䝞䝑䝔䝸䞊ෆ ⶶ 䝞䝑䝔䝸䞊ᑑ ᭱ 90 ศ ᾘ㈝㟁ຊ 4.5W ືస ᗘ 5 °C ~ 35 °C ᑍἲ(L x W x H) 112 mm x 58 mm x 16 mm 㔜㔞 180 g 䝟䝑䜿䞊䝆ෆᐜ Pico 䝥䝻䝆䜵䜽䝍䚸USB 䜿䞊䝤䝹䚸䝴䞊䝄䞊 䝬䝙䝳䜰䝹 * 䛩䜉䛶䛾ᵝ䛿䚸๓䛾ண࿌䛺䛧䛻ኚ᭦䛥䜜䜛䛣䛸䛜䛒䜚䜎䛩䚹 Downloaded From projector-manual.com Aiptek Manuals 9 ㇠㟝G ㉘⮹㉐ 㥐䖼 ㇠㛅 䚡⯝ ㉘⮹ ṅ䚍 ὤ㍔ LCOS ṅ㠄 RGB LED 䚨ㇵ⓸ 960 x 540 䙱㉴ (Q1080p) 㦤⓸ 䟜Ḱ㤵㢬 12 ⨜⮌ 䍠㇠ 㢨㫴 䆠ὤ 12.7 cm ~ 127 cm (5” ~ 50” ᴵ㉔ ὤ㨴) 䍠㇠ ᶤ⫠ 10.7 cm ~ 167 cm 䍠㇠ ㋀㏘ microSD 㾨☐, USB ☐⢰㢨⽀, HDMI, AV 㢹⥙ 㣠㈑ 䔠⬫ ㇠㫸: JPEG, BMP ┍㜵ㇵ: MP4, AVI, RMVB 㢀㙹: MP3, WMA 㤸㠄 㢹⥙ 5V / 1A 㤸㠄 㻐⥙ 5V / 1A ⵤ䉤⫠ 䇴㢹 㢸ⷔ♈☐ 1850 mAh ⫠䏠-䔨⫠⭬ 㣠㻝㤸 ᴴ⏙ ⵤ䉤⫠ ⵤ䉤⫠ ㍌⮹ 㺐 90 min ㋀⽸ 㤸⥙ 4.5W ┍㣅 㝜⓸ 5 °C ~ 35 °C 䆠ὤ (L x W x H) 112 mm x 58 mm x 16 mm 㩅⣽ 180 g 䔠㣙 ㇵ㣄 ⇨㟝Ɒ 䙰䂈 䘸⦐㥑䉤, USB 䀴㢨⽈, ㇠㟝㣄 ㉘⮹㉐ * ⯜☔ ἐᷝ㡴 㜼Ḕ 㛺㢨 ⷴᷱ╔ ㍌ 㢼㏩⏼␘. Downloaded From projector-manual.com Aiptek Manuals 9 KO 䊁㏘䏬: TXT