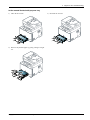
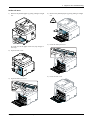
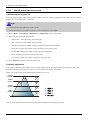
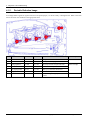
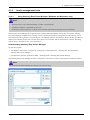
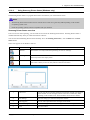
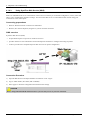
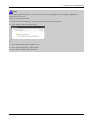
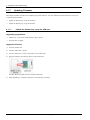
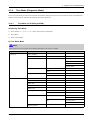
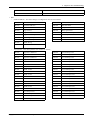
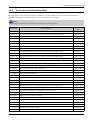
1
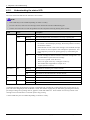
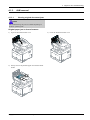
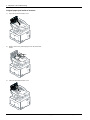
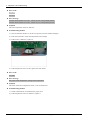
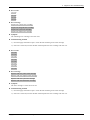
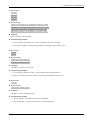
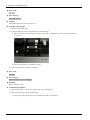
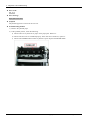
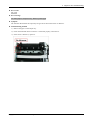
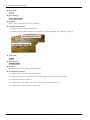
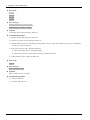
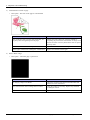
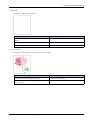
4. Alignment and Troubleshooting
4. Alignment and Troubleshooting
4.1. Alignment and Adjustments
This chapter describes the main functions for service, such as the product maintenance method, the test output related to
maintenance and repair, Jam removing method, and so on. It includes the contents of user guide.
4.1.1.
Control panel
NOTE
•
This control panel may differ from your machine depending on its model. There are various types of control panels.
•
Some features and optional goods may not be available depending on model or country.
•
Some buttons may not work depending on the mode (copy, fax, or scan).
Type A (CLX-419xN/ CLX-419xFN)
1
2
3
21
20
19
4
18
5
17
6
16
8
7
15
6
9
10
14
11
12
13
1
Darkness
Adjusts the brightness level to make a copy for easier reading, when the original
contains faint markings and dark images.
2
ID Copy*
Allows you to copy both sides of an ID card like a driver’s license on a single
side of paper.
Scan to**
Sends scanned data.
3
Display Screen
Shows the current status and prompts during an operation.
4
Fax*
Switches to Fax mode.
5
Copy*
Switches to Copy mode.
6
Arrows
Scroll through the options available in the selected menu, and increase or
decrease values.
7
OK
Confirms the selection on the screen.
8
Numeric Keypad
Dials a number or enters alphanumeric characters.
9
Address Book
Allows you to store frequently used fax numbers or search for stored fax numbers.
10
Redial/Pause*
Redials the recently sent fax number or received caller ID in ready mode, or
inserts a pause(-) into a fax number in edit mode.
Copyright© 1995-2012 SAMSUNG. All rights reserved.
4-1
4. Alignment and Troubleshooting
11
Stop/Clear
Stops current operation.
12
Power/Wake up
Turns the power on or off, or wakes up the machine from the power save mode. If
you need to turn the machine off, press this button for more than three seconds.
13
Start
Color
Begins a printing job in color mode.
Black
Begins a printing job in black and white mode.
14
On Hook Dial*
When you press this button, you can hear a dial tone. Then enter a fax number.
It is similar to making a call using speaker phone.
15
Back
Sends you back to the upper menu level.
16
Menu
Enters Menu mode and scrolls through the available menus.
17
Scan*
Switches to Scan mode.
18
Toner Colors
Show the status of each toner cartridge. If the toner cartridge is low or needs to be
replaced, the Status LED turns red and the display shows the message. However,
the arrow mark shows which color toner is of concern or may be installed with
a new cartridge.
19
Status LED
Indicates the status of your machine.
20
Eco
Turn into eco mode to reduce toner consumption and paper usage when
pc-printing and copying only.
21
Direct USB
Allows you to directly print files stored on a USB memory device when it is
inserted into the USB port on the front of your machine.
* CLX-419xFN series only.
** CLX-419xN series only.
Type B (CLX-419xFW)
4-2
1
Display screen
Shows the current status and displays prompts during an operation.
2
Numeric keypad
Dials a number or enters alphanumeric characters.
3
Clear
Deletes characters in the edit area.
4
Stop/Clear
Stops an operations at any time.
5
Power/Wake up
Turns the power on or off, or wakes up the machine from the power save
mode. If you need to turn the machine off, press this button for more than
three seconds.
6
Start
Starts a job in black or color mode.
7
On Hook Dial
When you press this button, you can hear a dial tone. Then enter a fax number.
It is similar to making a call using speaker phone
8
Help
Gives detailed information about this machine’s menus or status.
Copyright© 1995-2012 SAMSUNG. All rights reserved.
4. Alignment and Troubleshooting
9
Reset
Resets the current machine’s setup.
10
Wireless LED
Shows the current status of the wireless network connection.
11
Status LED
Indicates the status of your machine.
Copyright© 1995-2012 SAMSUNG. All rights reserved.
4-3
4. Alignment and Troubleshooting
4.1.2.
Understanding the status LED
The color of the LED indicates the machine's current status.
NOTE
•
Some LEDs may not be available depending on model or country.
•
To resolve the error, look at the error message and its instructions from the troubleshooting part.
•
You also can resolve the error with the guideline from the computers’s Samsung Printing Status window.
LED
Status
Description
Status
Off
The machine is off-line.
Green
Red
Blinking
On
•
The machine is on-line and can be used.
Blinking
•
A minor error has occurred and the machine is waiting for the error to
be cleared. Check the display message. When the problem is cleared,
the machine resumes.
•
Small amount of toner is left in the cartridge. The estimated cartridge
life* of toner is close. Prepare a new cartridge for replacement. You
may temporarily increase the printing quality by redistributing the
toner.
•
A toner cartridge has almost reached its estimated cartridge life*. It is
recommended to replace the toner cartridge.
•
The cover is opened. Close the cover.
•
There is no paper in the tray. Load paper in the tray.
•
The machine has stopped due to a major error.
•
A paper jam has occurred.
On
Wireless**
Blue
Power/Wake
up
Blue
Eco
Green
When the backlight blinks, the machine is receiving or printing data.
Blinking
The machine is connecting to a wireless network.
On
The machine is connected to a wireless network.
Off
The machine is disconnected from a wireless network.
On
The machine is in power save mode.
Off
The machine is in ready mode or machine’s power is off.
On
Eco mode is on.
Off
Eco mode is off.
* Estimated cartridge life means the expected or estimated toner cartridge life, which indicates the average capacity of
print-outs and is designed pursuant to ISO/IEC 19798. The number of pages may be affected by operating environment,
percentage of image area, printing interval, graphics, media and media size. Some amount of toner may remain in the
cartridge even when red LED is on and the printer stops printing.
** Some LEDs may not be available depending on model or country.
4-4
Copyright© 1995-2012 SAMSUNG. All rights reserved.
4. Alignment and Troubleshooting
4.1.3.
JAM removal
4.1.3.1.
Clearing original document jams
NOTE
This troubleshooting may not be available depending on
model or optional goods
Original paper jam in front of scanner
1) Open the document feeder cover.
3) Close the document feeder cover.
2) Gently remove the jammed paper from the document
feeder.
Copyright© 1995-2012 SAMSUNG. All rights reserved.
4-5
4. Alignment and Troubleshooting
Original paper jam inside of scanner
1) Open the document feeder cover.
2) Gently remove the jammed paper from the document
feeder.
3) Close the document feeder cover.
4-6
Copyright© 1995-2012 SAMSUNG. All rights reserved.
4. Alignment and Troubleshooting
Original paper jam in exit area of scanner
1) Remove any remaining pages from the document feeder.
0
2) Open the Stacker up.
3) Gently remove the jammed paper from the document
feeder.
0
4) Close the Stacker.
Copyright© 1995-2012 SAMSUNG. All rights reserved.
4-7
4. Alignment and Troubleshooting
4.1.3.2.
Clearing paper jams
NOTE
To avoid tearing the paper, pull the jammed paper out slowly
and gently.
In tray1
1) Take off the cassette.
3) Reinstall the cassette.
2) Remove the jammed paper by gently pulling it straight
out.
4-8
Copyright© 1995-2012 SAMSUNG. All rights reserved.
4. Alignment and Troubleshooting
In the manual feeder/multi-purpose tray
1) Take off the cassette.
3) Reinstall the cassette.
2) Remove the jammed paper by gently pulling it straight
out.
Copyright© 1995-2012 SAMSUNG. All rights reserved.
4-9
4. Alignment and Troubleshooting
Inside the machine
CAUTION
2) Remove the jammed paper by gently pulling it straight
out.
The fuser area is hot. Take care when removing paper
from the machine.
1) Open the rear cover.
3) Close the rear cover.
4-10
Copyright© 1995-2012 SAMSUNG. All rights reserved.
4. Alignment and Troubleshooting
In the exit area
1) Remove the jammed paper by gently pulling it straight
out.
4) Remove the jammed paper by gently pulling it straight
out.
0
If you do not see the paper in this area, stop and go to
next step:
2) Open the rear cover.
0
5) Close the fuser jam cover.
0
0
6) Close the rear cover.
3) Open the fuser jam cover.
0
Copyright© 1995-2012 SAMSUNG. All rights reserved.
4-11
4. Alignment and Troubleshooting
4.1.4.
Useful menu item for service
1) Monitoring the supplies life
If you experience frequent paper jams or printing problems, check the number of pages the machine has printed or scanned.
Replace the corresponding parts, if necessary.
NOTE
•
Accessing menus may differ from model to model
•
It may be necessary to press OK to navigate to lower-level menus for some models.
1) Select “Menu > System Setup > Maintenance > Supplies Life” on the control panel.
2) Select the option you want and press OK.
•
Supplies Info.: Prints the supply information page.
•
Total: Displays the total number of pages printed.
•
ADF Scan: Displays the number of pages printed by using the document feeder.
•
Platen Scan: Displays the number of pages scanned by using scanner glass.
•
Transfer Belt: Displays the number of pages by using transfer belt.
•
Fuser: Displays the number of pages by using fuser.
•
Tray1 Roller: Displays the number of pages by using tray1 roller.
3) Press “Stop/Clear” button to return to ready mode.
2) Altitude adjustment
Print quality is affected by atmospheric pressure, which is determined by the height of the machine above sea level. The
following information will guide you on how to set your machine for the best print quality.
Before you set the altitude value, determine the altitude where you are.
4,000 m
(13,123 ft)
1
3,000 m
(9,842 ft)
2
2,000 m
(6,561 ft)
3
1,000 m
(3,280 ft)
4
0
1
2
3
4
High 3
High 2
High 1
Normal
You can set the altitude value from Device Settings in Samsung Easy Printer Manager program.
4-12
Copyright© 1995-2012 SAMSUNG. All rights reserved.
4. Alignment and Troubleshooting
• For Windows and Macintosh users, you set from Samsung Easy Printer Manager > Switch to advanced mode
> Device Settings.
NOTE
•
If your machine is connected to the network, you can set the altitude via SyncThru™ Web Service.
•
You can also set the altitude in System Setup option on the machine’s display.
-
Menu > System Setup > Machine Setup > Altitude Adjustment (CLX-4195N / 4195FN)
-
Setup > Altitude Adjustment (CLX-4195FW)
3) Checking the firmware version
This menu shows the product’s firmware version.
Select the menu item.
• Press “Setup > Machine Setup > Next > Initial Setup > Firmware Version” on the touch screen. (CLX-4195FW)
4) Auto Color Reg.
The machine virtually prints certain patterned image to calibrate the color printing position. This feature enhances the colored
image sharper and clearer, which means the machine prints the colored image on the paper more like the one in the monitor.
NOTE
If you have moved the machine, it is strongly recommended to operate this menu manually.
Select the menu item.
• Press “Setup > Machine Setup > Auto CR” on the touch screen. (CLX-4195N/ 4195FN)
• Or press “Setup > Machine Setup > Next > Initial Setup > Auto CR” on the touch screen. (CLX-4195FW)
5) Printing a machine report
This product provides several printable reports for maintenance purposes.
These reports can be used to aid the diagnosis of print quality problems.
To print the report :
• Press “Menu > System Setup > Report” on the control panel. (CLX-4195N/ 4195FN)
• Or press “Setup > Machine Setup> Next > Reports” on the touch screen. (CLX-4195FW)
Copyright© 1995-2012 SAMSUNG. All rights reserved.
4-13
4. Alignment and Troubleshooting
4.1.5.
Periodic Defective Image
If an image defects appears at regular intervals on the printed-paper, it is due to a faulty or damaged roller. Refer to the table
below and check the condition of the appropriate roller.
Roller
Period
Period
Phenomenon
Defective part
Fuser Unit
1
Pressure Roller
20 mm
62.8 mm
Background
2
Heat Roller
24.3 mm
76.3 mm
Black spot and image ghost
3
Charging Roller
8.5 mm
26.7 mm
Black Spot and line and periodic band
4
OPC Drum
24 mm
75.4 mm
White and Black Spots
5
Developing Roller
12 mm
37.7 mm
White spot, Horizontal black band
6
Supply Roller
11.3 mm
35.5 mm
Periodic Band by little difference of density
7
Transfer Roller
8 mm
25.1 mm
Ghost, Damaged image by abnormal
transfer
4-14
Toner Cartridge
Transfer roller
Copyright© 1995-2012 SAMSUNG. All rights reserved.
4. Alignment and Troubleshooting
4.1.6.
Useful management tools
4.1.6.1.
Using Samsung Easy Printer Manager (Windows and Macintosh only)
NOTE
•
This feature may not be available depending on model or optional goods.
•
Available for Windows or Macintosh OS users only.
•
For Windows, Internet Explorer 6.0 or higher is the minimum requirement for Samsung Easy Printer Manager.
Samsung Easy Printer Manager is an application that combines Samsung machine settings into one location. Samsung
Easy Printer Manager combines device settings as well as printing environments, settings/actions and launching. All of
these features provide a gateway to conveniently use your Samsung machine. Samsung Easy Printer Manager provides two
different user interfaces for the user to choose from: the basic user interface and the advanced user interface. Switching
between the two interfaces is easy: just click a button.
Understanding Samsung Easy Printer Manager
To open the program:
• For Windows, Select Start > Programs or All Programs > Samsung Printers > Samsung Easy Printer Manager >
Samsung Easy Printer Manager.
• For Macintosh, Open the Applications folder > Samsung folder > Samsung Easy Printer Manager.
The Samsung Easy Printer Manager interface is comprised of various basic sections as described in the table that follows:
NOTE
The screenshot may differ depending on operating system you are using.
Copyright© 1995-2012 SAMSUNG. All rights reserved.
4-15
4. Alignment and Troubleshooting
No
Area
Description
1
Printer List
The printer list displays the installed printer icons on your computer.
2
Printer Information
This area gives you general information about your machine. You can check
information, such as the machine’s model name, IP address (or Port name),
and machine status.
NOTE
Troubleshooting button: This button opens Troubleshooting Guide when an
error occurs. You can directly open the necessary section in the user’s guide.
3
Application Information
Includes links for changing to the advanced settings, preference, help, and
about.
4
Quick links
Displays Quick links to machine specific functions. This section also includes
links to applications in the advanced settings.
5
Contents Area
Displays information about the selected machine, remaining toner level,
and paper. The information will vary based on the machine selected. Some
machines do not have this feature.
6
Order Supplies
Click on the Order button from the supply ordering window. You can order
replacement toner cartridge(s) from online.
Advanced settings user interface overview
The advanced user interface is intended to be used by the person responsible for managing the network and machines.
• Device Settings
You can configure various machine settings such as machine setup, paper, layout, emulation, network, and print
information.
• Scan to PC Settings
This menu includes settings to create or delete scan to PC profiles.
-
Scan Activation : Determines whether or not scanning is enabled on the device.
Profile : Displays the scanning profiles saved on the selected device.
Basic tab : Contains settings related general scan and device settings.
Image tab : Contains settings related to image altering.
• Fax to PC settings
This menu includes settings related to the basic fax functionality of the selected device.
- Disable : If Disable is On, incoming faxes will not be received on this device.
- Enable Fax Receiving from Device : Enables faxing on the device and allow more options to be set.
• Alert Settings
This is menu includes settings related to error alerting.
- Printer Alert : Provides settings related to when alerts will be received.
- Email Alert : Provides options relating to receiving alerts via email.
- History Alert : Provides a history of device and toner related alerts.
• Job Accounting
Provides querying of quota information of the specified job accounting user. This quota information can be created and
applied to devices by job accounting software such as SyncThru™ or CounThru™ admin software.
4-16
Copyright© 1995-2012 SAMSUNG. All rights reserved.
4. Alignment and Troubleshooting
4.1.6.2.
Using Samsung Printer Status (Windows only)
The Samsung Printer Status is a program that monitors and informs you of the machine status.
NOTE
•
The Samsung Printer Status window and its contents shown in this user’s guide may differ depending on the machine
or operating system in use.
•
Check the operating system(s) that are compatible with your machine.
Samsung Printer Status overview
If an error occurs while operating, you can check the error from the Samsung Printer Status. Samsung Printer Status is
installed automatically when you install the machine software.
You can also launch Samsung Printer Status manually. Go to the Printing Preferences , click the Basic tab > Printer
Status button.
These icons appear on the Windows task bar:
Icon
Mean
Description
Normal
The machine is in ready mode and experiencing no errors or warnings.
Warning
The machine is in a state where a soft error has occurred. For example, a toner low status,
which may lead to toner empty status.
Error
The machine has at least one hard error, such as out of paper, fuser error, etc. Machine
does not have ability to come to ready without customer intervention.
1
Toner Level
You can view the level of toner remaining in each toner cartridge. The machine
and the number of toner cartridge(s) shown in the above window may differ
depending on the machine in use. Some machines do not have this feature.
2
Alert Settings
Select the settings you want from the options window.
3
Order Supplies
You can order replacement toner cartridge(s) from online.
4
Troubleshooting
You can directly open the troubleshooting section in the user’s guide.
5
Close
Close the window.
Copyright© 1995-2012 SAMSUNG. All rights reserved.
4-17
4. Alignment and Troubleshooting
4.1.6.3.
Using SyncThru Web Service (SWS)
SWS is an embedded web server in the machine. This web server informs you of machine configuration, version, status and
allows you to customize the machine’s settings. You can contact this server via wired and wireless network using your
web browser in the remote place.
Connecting preparations
• Wired or Wireless Network connection is established.
• Browser (Ex> Internet Explorer) Program on your PC network connected
SWS overview
SyncThru Web Service (SWS)
• accepts HTTP request via port 80 as normal web servers.
• provides interface to users information of networked printers and allow to configure the setting of printers.
• is able to provide more complicated options than Local UI for printer configuration.
Connection Procedure
1) Open the Web-browser and input IP address of machine. Click “Login”.
2) Log-in Admin Mode. (ID: admin, PW: sec00000)
3) Select pages to check the configuration and customize the settings.
CAUTION
Please, change SWS Default ID and Password for system security in case of your first connection.
4-18
Copyright© 1995-2012 SAMSUNG. All rights reserved.
4. Alignment and Troubleshooting
NOTE
If the machine supports ‘Direct Print’, you can enable this function using the SWS menu. The default configuration is
‘Disabled’ for your security.
Firstly, you have to login to SWS.
1) Click ‘Direct Print Configuration’ in the pop up windows when clicking ‘Direct Print’.
2) In the ‘Services’ Menu, check ‘Direct Print’.
Or,
1) Click ‘System Security’ in the ‘Security’ menu.
2) Select ‘Feature Management’ in the left frame.
3) In the ‘Services’ Menu, check ‘Direct Print’.
Copyright© 1995-2012 SAMSUNG. All rights reserved.
4-19
4. Alignment and Troubleshooting
4.1.7.
Updating Firmware
This chapter includes instructions for updating the printer firmware. You can update the printer firmware by using one
of the following methods :
• Update the firmware by using the USB port.
• Update the firmware by using the Network.
4.1.7.1.
Update the firmware by using the USB port
Upgrading preparations
• usblist2.exe : Tool which sends firmware data to printer.
• Firmware file to update.
Upgrade Procedure
1) Turn the machine off.
2) Connect USB cable to printer.
3) Turn the machine on. Check if the printer is the ready status.
4) Drag the firmware file and Drop down on the usblist2.exe.
And then firmware update will be started automatically.
5) When upgrading is completed, machine is automatically re-booting.
4-20
Copyright© 1995-2012 SAMSUNG. All rights reserved.
4. Alignment and Troubleshooting
4.1.7.2.
Update the firmware by using the network
Upgrading preparations
• Wired or Wireless Network connection is established.
• Firmware file to update
Upgrade Procedure
1) Open the Web-browser and input IP address of machine. Click “Login”.
2) Log-in Admin Mode. (ID: admin, PW: sec00000)
3) Select Maintenance menu and click “upgrade wizard”
Copyright© 1995-2012 SAMSUNG. All rights reserved.
4-21
4. Alignment and Troubleshooting
4) Select firmware file using “browser” button and press next button.
5) SyncThru will check verify firmware file and compare version and press next button.
6) Machine starts upgrading. SyncThru will return home page after upgrading is completed.
4-22
Copyright© 1995-2012 SAMSUNG. All rights reserved.
4. Alignment and Troubleshooting
4.1.8.
Tech Mode (Diagnostic Mode)
In service (tech) mode, the technician can check the machine and perform various test to isolate the cause of a malfunction.
While in Tech mode, the machine still performs all normal operations.
4.1.8.1.
Tech Mode (CLX-4195N_4195FN)
a) Entering Tech Mode
1) Press “Menu > # > 1 > 9 > 3 > 4 ” on the control panel continuously.
2) Press Menu.
3) Select “Tech Mode”.
b) Tech Mode Menu
NOTE
Some menu items may not appear on the display depending on the options or models.
Depth 1
Depth 2
Data Setup
Clear All Mem.
Depth 3
Toner Low Level
[1-30]% : 10
Clear Counts
Enter Passcode [????]
Depth 4
Fuser
Pickup Roller
Torque Limiter
Transfer Roller
Engine Footer
On
Off *
Dial Tone
On
Off
Machine Test
Switch Test
Test Param Set
Dram Test
Rom Test
Pattern Test
Shading Test
Shading&Print
Print
EDC Mode
Copier
Nvm Read Write
Test Routines
Fax
Nvm Read Write
Test Routines
Restart Machine
Copyright© 1995-2012 SAMSUNG. All rights reserved.
4-23
4. Alignment and Troubleshooting
Depth 1
Depth 2
Report
Fax Protocol Dump
Depth 3
Depth 4
Menu Map
Supplies Info
Configuration
Error Info
Usage Counter
Auto Color Reg.
Auto Toning
c) Data Setup
• Clear All Memory
The function resets the system to factory default settings. This function is used to reset the system to the initial value
when the product is functioning abnormally . All the values are returned to the default values, and all the information,
which was set by the user, will be erased.
NOTE
Always perform a memory clear after replacing the main board. Otherwise, the system may not operate properly.
• Toner Low Level
The function is to set up the time to inform toner low status. This function can provide user convenience for replacing
the toner cartridge.
• Clear Count
This function resets the count value you select.
• Engine Footer
This function is for monitoring of the engine status. If you perform this function, at printing, the setting value for engine
is shown on the bottom of the printed page.
d) Machine Test
• Switch Test
Use this feature to test all keys on the operation control panel. The result is displayed on the LCD window each
time you press a key.
• Dram Test
Use this feature to test the machine’s DRAM. The result appears in the LCD display.
• Shading Test
The function is to get the optimum scan quality by the specific character of the CIS (Contact Image Sensor). If the copy
image quality is poor, perform this function to check the condition CIS unit.
• EDC Mode
- Copier > NVM Read/Write : This menu changes a configuration value for engine firmware.
Depth 1
Depth 2
105-Charger
0030-MHV DC Black
0031-MHV DC Color
4-24
Copyright© 1995-2012 SAMSUNG. All rights reserved.
4. Alignment and Troubleshooting
Depth 1
Depth 2
106-Developer
0000-Deve DC Yellow
0010-Deve DC Magenta
0020-Deve DC Cyan
0030-Deve DC Black
0121-Yellow Blade DC
0122-Magenta Blade DC
0123-Cyan Blade DC
0124-Black Blade DC
107-Transfer
0030-STransfer1 High Voltage
0080-Transfer2 High Voltage
109-Fixing
0010-Run Temperature offset
110-LSU
0040-LD Power Yellow
0050-LD Power Magenta
0060-LD Power Cyan
0070-LD Power Black
- Copier > Test Routines : This menu performs test routines for the engine.
Depth 1
Depth 2
100-Motor
0051-YMCK OPC Motor
0052-YMCK OPC Motor Rdy
0072-YMCK DEV Motor
0073-YMCK DEV Motor Rdy
0260-SMPS Fan
0340-Feed Mot
0360-ITB Tension Release Motor
101-Clutch
0010-Tray1 Pickup
0050-Registration
0171-Front cover open
0190-OutBin Full
0240-DR Nip Release
0250-Knock Up Plate
0251-Fuser Gap Enable
102-Paper Handling
0010-Tray1 Empty
0360-Regi Sens
0370-Exit Sens
0680-ITB Tension Home Sensor
105-Charger
0030-K MHV Bias
0031-Color MHV Bias
Copyright© 1995-2012 SAMSUNG. All rights reserved.
4-25
4. Alignment and Troubleshooting
106-Developer
0000-Y Dev Bias
0010-M Dev Bias
0020-C Dev Bias
0030-K Dev Bias
0040-Black OPC Home Sensor
0050-Color OPC Home Sensor
0060-DR Nip Home Sensor
0070-Yellow Blade DC
0080-Magenta Blade DC
0090-Cyan Blade DC
0100-Black Blade DC
107-Transfer
0071-YMCK THV Bias
0072-YMCK THV Bias R
0073-YMCK THV- Bias
0080-THV +
0090-THV + R
0160-Erase Lamp
109-Fixing
0000-Temp A
0011-LSU Temperature
0012-Inner Temperature
0013-Outer Temperature
0014-Huminity
0020-Fuser Fan Rdy
0040-Fuser Fan Run
110-LSU
0000-LSU Motor1 Rdy
0060-LSU Motor1 Run
0080-LD Power1
0090-LD Power2
0100-LD Power3
0110-LD Power4
111-Toner
0080-ID Sensor
0090-ID Sensor Chk
- Fax > NVM Read/Write : This menu changes a configuration value for fax firmware.
4-26
0200-Pause Dial Time
0420-DTMF Timing
0210-Dial Pul. M/B
0500-Dial Mode
0220-AutoDial P-Time
0520-Error Rate
0300-Ring On Time
0530-Dial tone detect
0310-Ring Off Time
0540-Loop cur. det.
0320-Ring Det. Freq
0550-Busy sngl det.
0400-DTMF H-Freq Lv
0700-LineMon. Setting
0410-DTMF L-Freq Lv
0800-Modem Speed
Copyright© 1995-2012 SAMSUNG. All rights reserved.
4. Alignment and Troubleshooting
0810-Fax Trans. Lv
0830-AutoDialTimeout
- Fax > Test Routines : This menu performs test routines for the fax.
0012-Sngl T 1100 L1
0044-V.29 9600 L1
0014-Sngl T 1650 L1
0045-V.17 7200 L1
0015-Sngl T 1850 L1
0046-V.17 9600 L1
0016-Sngl T 2100 L1
0047-V.17 12000 L1
0020-DTMF # Line1
0048-V.17 14400 L1
0021-DTMF * Line1
0049-V.34 2400 L1
0022-DTMF 0 Line1
0050-V.34 4800 L1
0023-DTMF 1 Line1
0051-V.34 7200 L1
0024-DTMF 2 Line1
0052-V.34 9600 L1
0025-DTMF 3 Line1
0053-V.34 12000 L1
0026-DTMF 4 Line1
0054-V.34 14400 L1
0027-DTMF 5 Line1
0055-V.34 16800 L1
0028-DTMF 6 Line1
0056-V.34 19200 L1
0029-DTMF 7 Line1
0057-V.34 21600 L1
0030-DTMF 8 Line1
0058-V.34 24000 L1
0031-DTMF 9 Line1
0059-V.34 26400 L1
0040-V.21 300 Ln1
0060-V.34 28800 L1
0041-V.27ter2400L1
0061-V.34 31200 L1
0042-V.27ter4800L1
0062-V.34 33600 L1
0043-V.29 7200 L1
e) Report
• Supplies Info
Supplies Information Report shows toner cartridge information such as toner remaining, toner capacity, toner product
date etc.
• Configuration
Configuration report shows the status of the user-selectable options. You may print this list to confirm your changes
after changing settings. This page provides useful information for service.
• Error Info
Error Information Report shows error records.
Copyright© 1995-2012 SAMSUNG. All rights reserved.
4-27
4. Alignment and Troubleshooting
4.1.8.2.
Tech Mode (CLX-4195FW)
a) Entering Tech Mode
To enter the service mode, press 1,2,3 number keys simultaneously. When the password dialog box appears, enter “1934”
and press the “OK” button.
b) Tech Mode Menu
Depth 1
Depth 2
Depth 3
Information
General
Machine Serial Number
Depth 4
Network IP Address
Software Version
Set Version
Main Controller
User Interface
Network Controller
Report
Fax Protocol Dump
Configuration
Supplies Information
Usage Counter
Error Information
Auto Color Registration
Job Duty
Auto Toning History
Test Routine
Copier
NVM Read/Write
Test Routine
Fax
NVM Read/Write
Test Routine
Protocol Report
Others
Shading Test
Shade and Print Report
Print last shade report
Memory Clear
Country
Toner Low Level
[1-30]% : 10
Counter Reset
Fuser
Pickup Roller
Retard Roller
Torque Limiter
Transfer Roller
Scan
Engine Footer
Off
On
4-28
Copyright© 1995-2012 SAMSUNG. All rights reserved.
4. Alignment and Troubleshooting
c) Information
• General
This menu displays the machine’s serial number, assigned IP address.
• Software Version
This menu displays all the version of the software installed in the system in detail.
• Report
You can print the various report that is stored in system.
d) Machine Test
• Copier
- NVM Read/Write : This menu changes a configuration value for engine firmware.
Depth 1
Depth 2
105-0030
MHV DC Black
105-0031
MHV DC Color
106-0000
Deve DC Yellow
106-0010
Deve DC Magenta
106-0020
Deve DC Cyan
106-0030
Deve DC Black
106-0121
Yellow Blade DC
106-0122
Magenta Blade DC
106-0123
Cyan Blade DC
106-0124
Black Blade DC
107-0030
Transfer1 High Voltage(THV) Black
107-0080
Transfer2 High Voltage(THV2)
109-0010
Run Temperature offset
110-0040
LD Power Yellow
110-0050
LD Power Magenta
110-0060
LD Power Cyan
110-0070
LD Power Black
- Test Routines : This menu performs test routines for the engine.
Depth 1
Depth 2
100-0051
OPC Motor
100-0052
OPC Motor Ready
100-0072
DEV Motor
100-0073
DEV Motor Ready
100-0260
SMPS Fan Run
100-0340
Feed Motor
100-0360
ITB Tension Release Motor
101-0010
T1 Pick-Up Clutch
101-0050
Registration Clutch
Copyright© 1995-2012 SAMSUNG. All rights reserved.
4-29
4. Alignment and Troubleshooting
4-30
101-0171
Cover Open Sensor
101-0190
Out-Bin Full Sensor
101-0240
DR Nip Release
101-0250
Knock Up Plate
101-0251
FuserGapEnable
102-0010
T1 Paper Empty Sensor
102-0360
Regi. Sensor
102-0370
Exit Sensor
102-0680
ITB Tension Home Sensor
105-0030
Black MHV Bias
105-0031
Color MHV Bias
106-0000
Yellow Dev Bias
106-0010
Magenta Dev Bias
106-0020
Cyan Dev Bias
106-0030
Black Dev Bias
106-0040
Black OPC Home Sensor
106-0050
Color OPC Home Sensor
106-0060
DR Nip Home Sensor
106-0070
Yellow Blade DC
106-0080
Magenta Blade DC
106-0090
Cyan Blade DC
106-0100
Black Blade DC
107-0071
THV Bias
107-0072
THV Bias Read
107-0073
THV(-) Bias
107-0080
iTHV(+) Bias
107-0090
iTHV Bias Read
107-0160
Erase Lamp1
109-0000
Fuser Temperature A
109-0011
LSU Temperature
109-0012
Inner Temperature
109-0013
Outer Temperature
109-0014
Huminity
109-0020
Fuser Fan Run Ready
109-0040
Fuser Fan Run
110-0000
LSU Motor1 Run Ready
110-0060
LSU Motor1 Run
110-0080
LSU LD Power1
110-0090
LSU LD Power2
110-0100
LSU LD Power3
110-0110
LSU LD Power4
Copyright© 1995-2012 SAMSUNG. All rights reserved.
4. Alignment and Troubleshooting
111-0080
ID Sensor
111-0090
ID Sensor Check
• Fax
- NVM Read/Write : This menu changes a configuration value for fax firmware.
020-200
Pause Dial Time
020-520
Error Rate
020-210
Dial Pulse M/B ratio
020-530
Dial tone detect
020-220
Auto Dial Start Pause Time
020-540
Loop current detect
020-300
Ring On Time
020-550
Busy signal detect
020-310
Ring Off Time
020-700
Line Monitor Setting
020-320
Ring Detection Freq
020-800
Modem Speed
020-400
DTMF High-Freq Level
020-810
Fax Transmission Level
020-410
DTMF Low-Freq Level
020-830
Auto Dial Timeout
020-420
DTMF Timing
020-500
Dial Mode
- Test Routines : This menu performs test routines for the fax.
020-012
Sngl Tone 1100Hz Ln1
020-044
V.29 9600 bps Line1
020-014
Sngl Tone 1650Hz Ln1
020-045
V.17 7200 bps Line1
020-015
Sngl Tone 1850Hz Ln1
020-046
V.17 9600 bps Line1
020-016
Sngl Tone 2100Hz Ln1
020-047
V.17 12000 bps Line1
020-020
DTMF # Line1
020-048
V.17 14400 bps Line1
020-021
DTMF * Line1
020-049
V.34 2400 bps Line1
020-022
DTMF 0 Line1
020-050
V.34 4800 bps Line1
020-023
DTMF 1 Line1
020-051
V.34 7200 bps Line1
020-024
DTMF 2 Line1
020-052
V.34 9600 bps Line1
020-025
DTMF 3 Line1
020-053
V.34 12000 bps Line1
020-026
DTMF 4 Line1
020-054
V.34 14400 bps Line1
020-027
DTMF 5 Line1
020-055
V.34 16800 bps Line1
020-028
DTMF 6 Line1
020-056
V.34 19200 bps Line1
020-029
DTMF 7 Line1
020-057
V.34 21600 bps Line1
020-030
DTMF 8 Line1
020-058
V.34 24000 bps Line1
020-031
DTMF 9 Line1
020-059
V.34 26400 bps Line1
020-040
V.21 300 bps Line1
020-060
V.34 28800 bps Line1
020-041
V.27ter 2400 bps Line1
020-061
V.34 31200 bps Line1
020-042
V.27ter 4800 bps Line1
020-062
V.34 33600 bps Line1
020-043
V.29 7200 bps Line1
Copyright© 1995-2012 SAMSUNG. All rights reserved.
4-31
4. Alignment and Troubleshooting
e) Report
• Shading Test
This function is to check quality of scanned images, especially defect in optical devices, including lens, mirror, lamp,
and etc, are suspected.
• Memory Clear
The function resets the system to factory default settings. This function is used to reset the system to the initial value
when the product is functioning abnormally . All the values are returned to the default values, and all the information,
which was set by the user, will be erased.
• Toner Low Level
The function is to set up the time to inform toner low status. This function can provide user convenience for replacing
the toner cartridge.
• Counter Reset
This function resets the count value you select.
• Engine Footer
This function is for monitoring of the engine status. If you perform this function, at printing, the setting value for engine
is shown on the bottom of the printed page.
4-32
Copyright© 1995-2012 SAMSUNG. All rights reserved.
4. Alignment and Troubleshooting
4.2. Troubleshooting
4.2.1.
Procedure of checking the symptoms
Before attempting to repair the printer first obtain a detailed description of the problem from the customer.
Power On
OPE LED
ON?
OPE LED
Green OK?
- No Power
- Power Module error
- Main PBA
Red LED on /
Error message
is displayed.
See the troubleshooting
for error code
Print (test page)
Printing
quality is
nomal?
Refer to "Solution
of Image Problem"
END
Copyright© 1995-2012 SAMSUNG. All rights reserved.
4-33
4. Alignment and Troubleshooting
4.2.1.1.
Basic Check List
1) Check the Power.
•
Check that the power switch is turned on.
•
Check that the power cable is plugged into the outlet and the printer.
•
Check the voltage of the power outlet.
2) Check the LED of Panel.
•
Is there OPE LED ON?
›
•
If not check power cable, switch SMPS or Main board.
Is the abnormal Lamp?
›
Check the Main board and cable harness.
3) Check the Paper Path
•
Is there a Paper Jam?
›
•
Remove any paper fragments caught in the paper path.
Paper Jam occurs repeatedly at a specific point in the Paper Path
›
Open the fuser cover, Jam clear.
›
Dismantle the machine and carefully inspect the region where the jam occurs.
(Especially, check if paper fragments are caught in the Fuser
4) Print the Information Page (Configuration).
•
Try printing a test page from a computer.
›
If there is an error check cables and driver installation.
5) Check the Print Quality.
•
Is there are a Print Quality Problem?
›
Refer to image quality problem section.
6) Check consumables (toner etc.).
•
Using the keys print the Test Pattern.
›
4-34
Expected life of various consumable parts, compare this with the figures printed and replace as required
Copyright© 1995-2012 SAMSUNG. All rights reserved.
4. Alignment and Troubleshooting
4.2.2.
Error Code and Troubleshooting
Messages appear on the control panel display to indicate the machine’s status or errors. Refer to the tables below to
understand the messages’ and their meaning, and correct the problem, if necessary.
NOTE
Some messages may not appear on the display depending on the options or models.
Error Code
Error Message
Troubleshooting
Page
A1-1210
Actuator Motor Failure : #A1-1210. Call for service if the problem persists.
Page 4–38
A1-2112
Actuator Motor Failure : #A1-2112. Call for service if the problem persists.
Page 4–39
A1-3612
Actuator Motor Failure : #A1-3612. Call for service if the problem persists.
Page 4–39
A1-4111
Actuator Motor Failure : #A1-4111. Call for service if the problem persists.
Page 4–40
A1-4112
Actuator Motor Failure : #A1-4112. Call for service if the problem persists.
Page 4–40
A1-4310
Actuator Motor Failure : #A1-4310. Call for service if the problem persists.
Page 4–40
A2-1210
Actuator Fan Failure : #A2-1210. Call for service if the problem persists.
Page 4–41
A2-2110
Actuator Fan Failure : #A2-2110 . Call for service if the problem persists.
Page 4–41
A3-3211
Actuator Sensor Failure #A3-3211: Call for service if the problem persists.
Page 4–41
A3-3212
Actuator Sensor Failure #A3-3212: Call for service if the problem persists.
Page 4–41
A3-3311
Actuator Sensor Failure #A3-3311: Call for service if the problem persists.
Page 4–42
A3-3312
Actuator Sensor Failure #A3-3312: Call for service if the problem persists.
Page 4–42
A3-3320
Not proper room temperature. Change room temperature.
Page 4–42
C2-2110
Prepare new yellow toner cartridge.
Page 4–43
C2-2120
Replace with new yellow toner cartridge.
Page 4–43
C2-2150
Replace with new yellow toner cartridge.
Page 4–43
C2-2320
Yellow Toner Failure: #C2-2320. Install yellow toner cartridge again.
Page 4–44
C2-2410
Install yellow toner cartridge.
Page 4–44
C2-2512
Yellow toner cartridge is not compatible. Check user's guide.
Page 4–45
C2-3110
Prepare new magenta toner cartridge.
Page 4–43
C2-3120
Replace with new magenta toner cartridge.
Page 4–43
C2-3150
Replace with new magenta toner cartridge.
Page 4–43
C2-3320
Magenta Toner Failure: #C2-3320. Install magenta toner cartridge again.
Page 4–44
C2-3410
Install magenta toner cartridge.
Page 4–44
C2-3512
Magenta toner cartridge is not compatible. Check user's guide.
Page 4–45
C2-4110
Prepare new cyan toner cartridge.
Page 4–43
C2-4120
Replace with new cyan toner cartridge.
Page 4–43
C2-4150
Replace with new cyan toner cartridge.
Page 4–43
C2-4320
Cyan Toner Failure: #C2-4320. Install cyan toner cartridge again.
Page 4–44
C2-4410
Install cyan toner cartridge.
Page 4–44
C2-4512
Cyan toner cartridge is not compatible. Check user's guide.
Page 4–45
C2-5110
Prepare new black toner cartridge.
Page 4–43
C2-5120
Replace with new black toner cartridge.
Page 4–43
Copyright© 1995-2012 SAMSUNG. All rights reserved.
4-35
4. Alignment and Troubleshooting
Error Code
Error Message
Troubleshooting
Page
C2-5150
Replace with new toner cartridge.Replace with black new toner cartridge.
Page 4–43
C2-5320
Black Toner Failure: #C2-5320. Install black toner cartridge again.
Page 4–44
C2-5410
Install black toner cartridge.
Page 4–44
C2-5512
Black toner cartridge is not compatible. Check user's guide.
Page 4–45
C5-1110
Prepare new transfer belt unit.
Page 4–45
C5-1120
Replace new transfer belt unit.
Page 4–45
C5-1310
Install image transfer belt unit.
Page 4–45
C5-1410
Image transfer belt unit is not compatible. Check users guide.
Page 4–46
C5-1710
Sensor Failure: #C5-1710. Turn off then on.
Page 4–46
C6-1110
Prepare new fuser unit.
Page 4–46
C6-1120
Replace with new fuser unit.
Page 4–46
C7-1110
Waste toner container is almost full. Order new one.
Page 4–46
C7-1311
Waste toner containrt is not installed. Install it.
Page 4–47
C9-1112
Replace with new Tray1 pickup roller.
Page 4–47
C9-1116
End of life, Replace with new Tray1 retard roller.
Page 4–47
M1-1110
Paper jam in tray 1.
Page 4–48
M1-5112
Paper is empty in tray 1. Load paper.
Page 4–48
M2-1110
Paper jam inside of machine.
Page 4–49
M2-1116
Paper jam or empty in tray.
Page 4–49
M3-1110
Paper jam in exit area
Page 4–50
M3-2130
Too much paper in output bin tray. Remove printed paper
Page 4–51
S2-4120
Door is open. Close it.
Page 4–52
S3-3121
Scanner locked or another problem occurred.(No Switch Case)Scanner is locked.
Page 4–52
S4-2111
Fax Memory is almost full. Print or remove received fax Job
Page 4–53
S4-2112
Fax memory is full. Print or remove received fax Job
Page 4–53
S4-3111
Fax System Failure: #S4-3111. Install fax modem card again..
Page 4–53
S5-3110
UI System Failure: #S5-3110. Call for service
Page 4–53
S6-3123
This IP address conflicts with that of other system. Check it.
Page 4–54
S6-3128
802.1x authentication failed. Please Contact the System Administrator
Page 4–54
U1-2132
Fuser Unit Failure #U1-2132: Turn off then on.
Page 4–54
U1-2315
Fuser Unit Failure: #U1-2315.Turn off then on.
Page 4–54
U1-2320
Fuser Unit Failure #U1-2320: Turn off then on.
Page 4–54
U1-2330
Fuser Unit Failure #U1-2330: Turn off then on.
Page 4–54
U1-2334
Fuser Unit Failure: #U1-2334. Turn off then on
Page 4–54
U1-2340
Fuser Unit Failure : #U1-2340.Turn off then on.
Page 4–54
U1-234H
Fuser Unit Failure: #U1-234H. Please turn off then on.
Page 4–54
U2-6122
LSU Failure: #U2-6122. Please turn off then on.
Page 4–55
U2-6142
LSU Failure: #U2-6142. Please turn off then on.
Page 4–55
U3-3113
Original paper jam in front of scanner.
Page 4–56
U3-3114
Original paper jam in front of scanner.
Page 4–56
4-36
Copyright© 1995-2012 SAMSUNG. All rights reserved.
4. Alignment and Troubleshooting
Error Code
Error Message
Troubleshooting
Page
U3-3313
Original paper jam inside of scanner.
Page 4–56
U3-3314
Original paper jam inside of scanner.
Page 4–56
U3-4110
Door of scanner is open.
Page 4–56
Copyright© 1995-2012 SAMSUNG. All rights reserved.
4-37
4. Alignment and Troubleshooting
► Error Code
A1-1210
► Error message
Actuator Motor Failure : #A1-1210. Call for service if the problem persists.
► Symptom
The fuser motor does not operate. / The fuser motor is operating but is recognized as stop status.
► Troubleshooting method
1) Turn the machine off then on. If the error persists, turn the machine off again.
2) Remove the rear and right cover.
3) Check if there are any obstacles or paper around the fuser unit.
4) Check if the connection between main board and fuser motor are correct.
5) If the connection is OK, replace the fuser motor.
6) If the problem persists, replace the main board.
4-38
Copyright© 1995-2012 SAMSUNG. All rights reserved.
4. Alignment and Troubleshooting
► Error Code
A1-2112
A1-3612
► Error message
Actuator Motor Failure : #A1-2112. Call for service if the problem persists.
Actuator Motor Failure : #A1-3612. Call for service if the problem persists.
► Symptom
The OPC/Deve motor does not operate. / The OPC/Deve motor is operating but is recognized as stop status.
► Troubleshooting method
1) Turn the machine off then on. If the error persists, turn the machine off again.
2) Remove the right cover.
3) Check if the connection between main board and OPC/Deve motor are correct.
4) If the connection is OK, replace the OPC/Deve motor.
5) If the problem persists, replace the main board.
Copyright© 1995-2012 SAMSUNG. All rights reserved.
4-39
4. Alignment and Troubleshooting
► Error Code
A1-4111
A1-4112
► Error message
Actuator Motor Failure : #A1-3612. Call for service if the problem persists.
► Symptom
The transfer roller can’t move the engage/disengage position.
► Troubleshooting method
1) Turn the machine off then on. If the error persists, turn the machine off again.
2) Remove the right cover.
3) Check if the connection between main board and Feed drive unit are correct.
4) If the connection is OK, replace the step motor of the Feed drive unit.
5) If the problem persists, replace the main board.
► Error Code
A1-4310
► Error message
Actuator Motor Failure : #A1-4310. Call for service if the problem persists.
► Symptom
The motor for ITB unit does not operate normally.
► Troubleshooting method
1) Turn the machine off then on. If the error persists, turn the machine off again.
2) Remove the right cover.
3) Check if the connection between main board and the main drive unit are correct.
4) If the connection is OK, replace the main drive unit.
5) If the problem persists, replace the main board.
4-40
Copyright© 1995-2012 SAMSUNG. All rights reserved.
4. Alignment and Troubleshooting
► Error Code
A2-1210
A2-2110
► Error message
Actuator Fan Failure : #A2-1210. Call for service if the problem persists.
Actuator Fan Failure : #A2-2110. Call for service if the problem persists.
► Symptom
The SMPS fan or Fuser fan does no operate normally.
► Troubleshooting method
1) Turn the machine off then on. If the error persists, turn the machine off again.
2) Remove the right cover.
3) Check if the connection between main board and the related fan is correct.
4) If the connection is OK, replace the defective fan.
► Error Code
A3–3211
A3–3212
► Error message
Actuator Sensor Failure #A3-3211: Call for service if the problem persists.
Actuator Sensor Failure #A3-3212: Call for service if the problem persists.
► Symptom
The inner temperature sensor is defective.
► Troubleshooting method
1) Turn the machine off then on. If the error persists, turn the machine off again.
2) Enter the tech mode. Check the temperature sensor output.
3) If the sensor is defective, replace it.
4) If the temperature sensor is OK, replace the main board.
Copyright© 1995-2012 SAMSUNG. All rights reserved.
4-41
4. Alignment and Troubleshooting
► Error Code
A3–3311
A3–3312
► Error message
Actuator Sensor Failure #A3-3311: Call for service if the problem persists.
Actuator Sensor Failure #A3-3312: Call for service if the problem persists.
► Symptom
The outer temperature sensor is defective.
► Troubleshooting method
1) Turn the machine off then on. If the error persists, turn the machine off again.
2) Enter the tech mode. Check the temperature sensor output.
3) If the sensor is defective, replace it.
4) If the temperature sensor is OK, replace the main board.
► Error Code
A3–3320
► Error message
Not proper room temperature. Change room temperature.
► Symptom
The value of the outer temperature sensor is out of normal area.
► Troubleshooting method
1) Check if the machine is installed in the proper area.
2) If the temperature sensor is defective, replace it.
4-42
Copyright© 1995-2012 SAMSUNG. All rights reserved.
4. Alignment and Troubleshooting
► Error Code
C2-2110
C2-3110
C2-4110
C2-5110
► Error message
Prepare new yellow toner cartridge.
Prepare new magenta toner cartridge.
Prepare new cyan toner cartridge.
Prepare new black toner cartridge.
► Symptom
The remaining toner cartridge is less than 10%
► Troubleshooting method
1) Print the supply information report. Check the life remaining of the toner cartridge.
2) If its life is at the end, turn the machine off and replace the toner cartridge with new one.
► Error Code
C2-2120
C2-2150
C2-3120
C2-3150
C2-4120
C2-4150
C2-5120
C2-5150
► Error message
Replace with new yellow toner cartridge.
Replace with new magenta toner cartridge.
Replace with new cyan toner cartridge.
Replace with new black toner cartridge.
► Symptom
The toner cartridge is at the end of its life.
► Troubleshooting method
1) Print the supply information report. Check the life remaining of the toner cartridge.
2) If its life is at the end, turn the machine off and replace the toner cartridge with new one.
Copyright© 1995-2012 SAMSUNG. All rights reserved.
4-43
4. Alignment and Troubleshooting
► Error Code
C2-2320
C2-2410
C2-3320
C2-3410
C2-4320
C2-4410
C2-5320
C2-5410
► Error message
Yellow Toner Failure: #C2-2320. Install yellow toner cartridge again.
Install yellow toner cartridge.
Magenta Toner Failure: #C2-3320. Install magenta toner cartridge again.
Install magenta toner cartridge.
Cyan Toner Failure: #C2-4320. Install cyan toner cartridge again.
Install cyan toner cartridge.
Black Toner Failure: #C2-5320. Install black toner cartridge again.
Install black toner cartridge.
► Symptom
The toner cartridge is not installed or the CRUM has some problem.
► Troubleshooting method
1) Check if the toner cartridge is installed properly. Turn the machine off then on.
2) If the error message is not disappear, remove the toner cartridge. Thoroughly roll the cartridge five or six times to
distribute the toner evenly inside the cartridge. And reinstall the toner cartridge.
3) If the problem persists, check that the CRUM contact area is contaminated. Clean it.
4) If the problem persists, replace the toner cartridge with new one.
4-44
Copyright© 1995-2012 SAMSUNG. All rights reserved.
4. Alignment and Troubleshooting
► Error Code
C2-2512
C2-3512
C2-4512
C2-5512
► Error message
Yellow toner cartridge is not compatible. Check user's guide.
Magenta toner cartridge is not compatible. Check user's guide.
Cyan toner cartridge is not compatible. Check user's guide.
Black toner cartridge is not compatible. Check user's guide.
► Symptom
Toner cartridge is not compatible.
► Troubleshooting method
1) Print the supply information report. Check information of the toner cartridge.
2) If the toner cartridge is not a Samsung genuine toner cartridge, replace with new one.
► Error Code
C5-1110
C5-1120
► Error message
Prepare new transfer belt unit.
Replace new transfer belt unit.
► Symptom
The ITB Unit is at the end of its life.
► Troubleshooting method
1) Print the supply information report. Check the life remaining of the ITB unit.
2) If its life is at the end, turn the machine off and replace the ITB unit with new one.
► Error Code
C5-1310
► Error message
Install image transfer belt unit.
► Symptom
The ITB Unit is not installed properly.
► Troubleshooting method
1) Turn the machine off. Remove and reinstall the ITB unit.
2) Turn the machine on. If the problem persists, replace the ITB unit.
Copyright© 1995-2012 SAMSUNG. All rights reserved.
4-45
4. Alignment and Troubleshooting
► Error Code
C5-1410
► Error message
Image transfer belt unit is not compatible. Check users guide.
► Symptom
The ITB unit is not compatible.
► Troubleshooting method
1) Print the supply information report. Check information of the ITB Unit.
2) If the toner cartridge is not a Samsung genuine ITB Unit, replace with new one.
► Error Code
C5-1710
► Error message
Sensor Failure: #C5-1710. Turn off then on.
► Symptom
The ITB home position sensor has the problem.
► Troubleshooting method
1) Turn the machine off. Replace the ITB Unit.
► Error Code
C6-1110
C6-1120
► Error message
Prepare new fuser unit.
Replace with new fuser unit.
► Symptom
The fuser unit is at the end of its life.
► Troubleshooting method
1) Print the supply information report. Check the life remaining of the fuser unit.
2) If its life is at the end, turn the machine off and replace the fuser unit with new one.
► Error Code
C7-1110
► Error message
Waste toner container is almost full. Order new one.
► Symptom
The waste toner container is at the end of its life.
► Troubleshooting method
1) Print the supply information report. Check the life remaining of the waste toner container.
2) If its life is at the end, turn the machine off and replace the waste toner container with new one.
4-46
Copyright© 1995-2012 SAMSUNG. All rights reserved.
4. Alignment and Troubleshooting
► Error Code
C7-1311
► Error message
Waste toner container is not installed. Install it.
► Symptom
The waste toner container is not installed
► Troubleshooting method
1) Check if the waste toner container is installed properly.
2) Remove and reinstall the waste toner container.
► Error Code
C9-1112
C9-1116
► Error message
Replace with new Tray1 pickup roller.
End of life, Replace with new Tray1 retard roller.
► Symptom
The pick up roller or reverse roller is at the end of its life.
► Troubleshooting method
1) Turn the machine off.
2) Replace the pick up roller Assy and reverse roller Assy.
Copyright© 1995-2012 SAMSUNG. All rights reserved.
4-47
4. Alignment and Troubleshooting
► Error Code
M1–1110
► Error message
Paper jam in tray 1.
► Symptom
The jammed paper has occurred in the tray1.
► Troubleshooting method
1) Remove the jammed paper.
2) If the jammed paper occurs continually, check the followings.
a) Check if the pick up/forward/reverse roller are worn out or contaminated. Clean the contaminated part
or replace it.
b) Check if the actuator is assembled correctly.
3) If the pick up clutch is defective, replace it.
► Error Code
M1–5112
► Error message
Paper is empty in tray 1. Load paper.
► Symptom
Paper is empty in Tray1
► Troubleshooting method
1) Take off the cassette. If there is no paper on the tray, load the paper.
2) If the problem persists, check the following.
a) Check if the paper empty sensor is contaminated or defective. Replace it.
4-48
Copyright© 1995-2012 SAMSUNG. All rights reserved.
4. Alignment and Troubleshooting
► Error Code
M2–1110
M2–1116
► Error message
Paper jam inside of machine.
Paper jam or empty in tray.
► Symptom
The jammed paper has occurred inside machine.
► Troubleshooting method
1) Remove the jammed paper.
2) If the problem persists, check the following.
a) Check if there is any obstacles or paper on the paper path. Remove it.
b) Check if the FRAME-RETARD unit is assembled properly.
c) Check if the pick up clutch, regi clutch, feed drive unit are working normally. If there is a defective part,
replace it.
Copyright© 1995-2012 SAMSUNG. All rights reserved.
4-49
4. Alignment and Troubleshooting
► Error Code
M3–1110
► Error message
Paper jam in exit area.
► Symptom
The jammed paper has occurred in the exit area.
► Troubleshooting method
1) Remove the jammed paper.
2) If the problem persists, check the following.
a) Check if there is any obstacles or paper on the paper path. Remove it.
b) Check if the fuser unit is assembled properly. If the fuser unit is defective, replace it.
c) Check if the FRAME-EXIT unit has any defective parts. Replace the FRAME-EXIT.
4-50
Copyright© 1995-2012 SAMSUNG. All rights reserved.
4. Alignment and Troubleshooting
► Error Code
M3–2130
► Error message
Too much paper in output bin tray. Remove printed paper
► Symptom
The machine detected that the output tray has got full or the bin-full sensor is defective.
► Troubleshooting method
1) Remove the paper on the output tray.
2) Check if the Bin-full Sensor connector is connected properly. Reconnect it.
3) If the sensor is defective, replace it.
Copyright© 1995-2012 SAMSUNG. All rights reserved.
4-51
4. Alignment and Troubleshooting
► Error Code
S2–4120
► Error message
Door is open. Close it.
► Symptom
Door is open or the cover open switch is defective.
► Troubleshooting method
1) Check if the front cover is closed perfectly.
2) If the error persists, check that the cover-open sensor is working normally. If it is defective, replace it.
► Error Code
S3–3121
► Error message
Scanner is locked.
► Symptom
Scanner lock error has occurred. CIS does not move.
► Troubleshooting method
1) Check if the CIS unit is moving when power on.
2) Check if the at cable is connected to the CIS unit properly. Re-connect or replace the cable.
3) If the CIS is defective, replace it.
4) Check if there is any defective part in the scanner unit. (Gear, Belt, Motor etc.)
5) If the problem persists, replace the main board.
4-52
Copyright© 1995-2012 SAMSUNG. All rights reserved.
4. Alignment and Troubleshooting
► Error Code
S4–2111
S4–2112
► Error message
Fax Memory is almost full. Print or remove received fax Job.
Fax memory is full. Print or remove received fax Job.
► Symptom
The fax memory is almost full.
► Troubleshooting method
1) Print or remove the received fax job.
► Error Code
S4–3111
► Error message
Fax System Failure: #S4-3111. Install fax modem card again.
► Symptom
The fax board is not installed or defective.
► Troubleshooting method
1) Check if the fax board is installed properly.
2) If the fax board is defective, replace it.
3) If the problem persists, replace the main board.
► Error Code
S5–3110
► Error message
UI System Failure: #S5-3110. Call for service.
► Symptom
The communication error between main board and OPE board has occurred.
► Troubleshooting method
1) Turn the machine off then on.
2) If the problem persists, check the followings.
a) Check the connection between main board and OPE board. Reconnect the harness.
b) If the connection is OK, replace the main board or OPE board.
Copyright© 1995-2012 SAMSUNG. All rights reserved.
4-53
4. Alignment and Troubleshooting
► Error Code
S6–3123
S6–3128
► Error message
This IP address conflicts with that of other system. Check it.
802.1x authentication failed. Please Contact the System Administrator.
► Symptom
IP address conflicts with that of other system.
► Troubleshooting method
1) Change the machine’s IP address.
2) Check the setting-up for 802.1x confirmation server.
► Error Code
U1–2132
U1–2315
U1–2320
U1–2330
U1–2334
U1–2340
U1–234H
► Error message
Fuser Unit Failure #U1-2132: Turn off then on.
Fuser Unit Failure #U1-2315: Turn off then on.
Fuser Unit Failure #U1-2320: Turn off then on.
Fuser Unit Failure #U1-2330: Turn off then on.
Fuser Unit Failure #U1-2334: Turn off then on.
Fuser Unit Failure #U1-2340: Turn off then on.
Fuser Unit Failure #U1-234H: Turn off then on.
► Symptom
The temperature control of fuser unit is abnormal.
► Troubleshooting method
1) Check if the input voltage is normal.
2) Turn the machine off. Remove and reinstall the fuser unit. Be careful when connecting the AC-connector and
Thermistor connector.
3) Turn the machine on. Is the error message is disappeared?
4) Check the followings. If the fuser unit has any problem, replace it.
a) Check if the fuser connector is connected properly.
b) Check if the halogen lamp voltage is normal.
c) Check if the thermistor is contaminated or twisted.
5) If the problem persists, replace the main board or SMPS board.
4-54
Copyright© 1995-2012 SAMSUNG. All rights reserved.
4. Alignment and Troubleshooting
► Error Code
U2-6122
U2-6142
► Error message
LSU Failure: #U2-6122. Please turn off then on.
LSU Failure: #U2-6142. Please turn off then on.
► Symptom
LSU Motor does not work normally. / LSU Hsync signal is abnormal.
► Troubleshooting method
1) Check if the LSU harness on the main board is connected properly.
2) If it is OK, check that the LSU harness on LSU board is connected properly.
3) Check if the LSU harness is defective.
4) If the problem persists, replace the LSU.
5) If the problem persists after replacing LSU, replace the main board.
Copyright© 1995-2012 SAMSUNG. All rights reserved.
4-55
4. Alignment and Troubleshooting
► Error Code
U3-3113
U3-3114
U3-3313
U3-3314
► Error message
Original paper jam in front of scanner.
Original paper jam inside of scanner.
► Symptom
A document jam was detected in the ADF unit.
► Troubleshooting method
1) Remove the jammed paper from ADF unit.
2) If the error persists, turn the machine off then on.
3) If the document jam occurs continually, open the ADF cover-top. Check if the ADF pick up roller is contaminated
or worn out. Clean or replace it.
4) If the pick up roller is OK, check the followings.
a) Check if the ADF motor is working normally.
b) Check if the connector on the ADF joint board is connected correctly.
5) If the problem persists, replace the ADF unit.
► Error Code
U3-4110
► Error message
Door of scanner is open.
► Symptom
ADF or ADF top cover is opened.
► Troubleshooting method
1) Close the ADF unit.
2) Close the ADF top cover.
4-56
Copyright© 1995-2012 SAMSUNG. All rights reserved.
4. Alignment and Troubleshooting
4.2.3.
Image quality problems
1) Vertical Black Line and Band
•
Description : Straight thin black vertical line occurs in the printed image.
Cause and Check Point
Solution
Check if the surface of the charge roller is scratched or
contaminated.
Replace the toner cartridge and test again.
Check if there are grooves on the circumference of the
OPC drum.
Replace the toner cartridge and test again.
Check if the cleaning blade is damaged
Replace the toner cartridge and test again.
Check if paper transfer belt is damaged or contaminated.
Replace the ITB unit and test again.
2) Vertical White Line
•
Description : White vertical voids in the image.
Cause and Check Point
Solution
Check if the LSU window or internal lenses of LSU is
contaminated.
Clean the LSU window with recommended cleaner(IPA).
Clean the window with a clean cotton swab. If dirt is
inside the LSU, replace the LSU.
Check if there are scratches on the circumference of the
OPC drum.
Replace the toner cartridge and test again.
Check if there are scratches on the circumference of the
developing roller.
Replace the toner cartridge and test again.
Check if paper transfer belt is damaged or contaminated.
Replace the ITB unit and test again.
Copyright© 1995-2012 SAMSUNG. All rights reserved.
4-57
4. Alignment and Troubleshooting
3) Contamination on back of page
•
Description : The back of the page is contaminated.
Cause and Check Point
Solution
Dirty registration roller, pressure roller, feed roller, etc.
Any dirty rollers through the path of the paper.
Identify the roller which may cause the problem by
comparing the period of the contamination on images with
the size of rollers. Clean any dirt from the roller or replace
the dirty roller.
Check if the transfer roller is damaged or contaminated.
Replace the transfer roller and test again.
Check if paper transfer belt is damaged or contaminated.
Replace the ITB unit and test again.
4) Dark or Black image
•
4-58
Description : The black page is printed out.
Cause and Check Point
Solution
No charging voltage in the HVPS.
Check the connecting state between the Main PBA and
HVPS. Reconnect the harness.
Poor contact between toner cartridge and set contacts.
Clean the contacts as necessary. Replace any deformed
or damaged contacts.
HVPS is defective.
Replace the HVPS.
Copyright© 1995-2012 SAMSUNG. All rights reserved.
4. Alignment and Troubleshooting
5) Blank Page
•
Description : Blank page is printed.
Cause and Check Point
Solution
Bad contacts from OPC drum and/or toner cartridge to
ground.
Check the terminal of Ground-OPC.
Not working the LSU.
Check the connector of LSU.
Not working the developing bias voltage on HVPS.
Replace the HVPS.
6) Uneven Density
•
Description : Print Density is uneven between left and right.
Cause and Check Point
Solution
The life of the Toner Cartridge has expired.
Replace the toner cartridge.
The pressure force in the left and right springs of the ITB
unit is not even.
Replace the ITB Unit
Copyright© 1995-2012 SAMSUNG. All rights reserved.
4-59
4. Alignment and Troubleshooting
7) Horizontal Bands
•
Description : Dark or white horizontal stripes appear in the page. (These may occur at regular intervals down the
page.)
Cause and Check Point
Solution
The developing roller, OPC drum or other rollers in the
toner cartridge may be contaminated or deformed.
Replace the toner cartridge.
Bad contacts of HV terminals of the toner cartridge with
high voltage terminals from printer set.
Clean all HV terminals in the cartridge and on the set
frame. Ensure all toner or paper dust, particles are
removed.
8) Poor Fusing
•
4-60
Description : Toner is not properly fixed on paper.
Cause and Check Point
Solution
The media doesn’t meet specification
Use the proper media in specifications.
Fuser is defective
Replace the fuser unit.
Copyright© 1995-2012 SAMSUNG. All rights reserved.
4. Alignment and Troubleshooting
4.2.4.
Other errors
1) Multi-feeding
• Description : Multiple sheet of paper are fed at once.
Check and cause
Solution
Pick clutch or Regi clutch does not work properly.
Replace the defective clutch if necessary.
Pick up/ Forward / Retard roller is worn out or contaminated.
Clean or replace the defective roller.
2) No-Power
• Description : When system power is turned on, LED and LCD on the operator panel do not come on.
Check and cause
Solution
The connection between main board and OPE board is bad.
Reconnect or replace the harness.
HVPS/SMPS output is abnormal.
Replace the HVPS/SMPS board.
3) Calibrating the touch screen (Touch screen model only)
• Description : Touch screen does not operate properly.
Check and cause
Solution
The linearity value for touch panel has changed due to using
a machine long hours or surroundings.
1) Turn off the machine.
2) While pressing the number 0 on numeric keys, turn the
machine on. Wait until calibration screen appears.
3) Press centre of mark + following order 1~9. Use your
finger. Perform 2 times.
4) If there is no problem, “Complete” will appear on LCD
and reboot the machine. When making a mistake, start
again from the step 1.
Copyright© 1995-2012 SAMSUNG. All rights reserved.
4-61