1
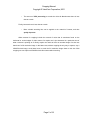
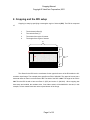
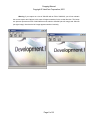
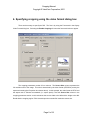
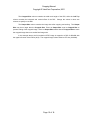
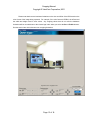
Cropping User’s Manual
Version 2.0
ViewCast Corporation
Osprey Video Division
Cropping Manual
Copyright © ViewCast Corporation, 2001
1.
CROPPING: WHAT IS IT AND WHY WOULD ONE USE IT? ............................................ 4
2.
CROPPING AND THE ROI SETUP .......................................................................................... 6
3.
CROPPING AND SCALING ....................................................................................................... 7
4.
SPECIFYING CROPPING USING THE VIDEO FORMAT DIALOG BOX ....................... 9
5.
SPECIFYING CROPPING USING THE CROPPING APPLICATION .............................. 11
6.
SPECIFYING CROPPING USING THE SDK ........................................................................ 14
7.
CROPPING LIMITATIONS ..................................................................................................... 15
8.
USING HARDWARE CROPPING WITH WINDOWS MEDIA TOOLS............................ 17
Page 2 of 18
Cropping Manual
Copyright © ViewCast Corporation, 2001
Page 3 of 18
Cropping Manual
Copyright © ViewCast Corporation, 2001
1. Cropping: What is it and why would one use it?
Cropping is a method for specifying a region of interest within a video source and discarding
video data outside of this region. A typical use of cropping is capturing video that is in a letterbox
format. Letterbox material usually contains what appear to be black bars at the top and bottom of the
video content.
640
360
480
In the above illustration, the video source that would normally be captured is 640x480 in size.
However, the video material of interest is letterboxed and is actually 640x360 in size. The notion of
cropping is to crop out the black bars such that only 640x360 is captured.
Why would one want to do this? In the case of letterbox material the answer is fairly simple.
By removing unwanted material from what is captured, the amount of captured data is significantly
less. If saving to disk, this means
•
Less disk space is required for saving the material of interest.
•
The throughput, both on capture and saving to disk, is smaller and thus capture is
less demanding on the host machine.
If encoding the material, either live or the previously saved AVI file:
Page 4 of 18
Cropping Manual
Copyright © ViewCast Corporation, 2001
•
The amount of CPU processing to encode the video is less because there is less
data to encode.
Finally, because there is less data to encode:
•
More valuable encoding bits can be applied to the material of interest, and thus
quality improves.
Other reasons for cropping include the removal of noise that is sometimes found on the
horizontal or vertical edges of video content. Or maybe one is just interested in a particular area of
what a camera is pointing at. Or finally, maybe one needs to have an unscaled image of a size less
than that of a full resolution image. In this latter case, without cropping the only way to capture, say a
256x256 sized image, would have been to scale the full resolution image down to this size. With
cropping one can capture a 256x256 sized video stream without scaling.
Page 5 of 18
Cropping Manual
Copyright © ViewCast Corporation, 2001
2. Cropping and the ROI setup
Cropping is setup by specifying a rectangular region of interest (ROI). The ROI is composed
of:
1.
The horizontal offset (X)
2.
The vertical offset (Y)
3.
The width of the region of interest
4.
The height of the region of interest
640
55
(X,Y)
Width
360
Height
480
65
The offsets for the ROI are the coordinates for the upper-left corner of the ROI within the fullresolution sized image. The example above specifies an ROI of 640x360. The upper-left corner has a
horizontal offset of 0 and a vertical offset of 55. The width of the ROI is 640. The height of the ROI is
360. Thus the ROI is said to have an offset of (0,55) and a size of (640,360). When cropping has
been setup and enabled, the resultant video, if not further scaled, will be 640x360 in size and, in this
example, will not contain black bars at the top and bottom of the image.
Page 6 of 18
Cropping Manual
Copyright © ViewCast Corporation, 2001
3. Cropping and Scaling
On the Osprey cards, cropping is performed in hardware before scaling. This is why the
setup of cropping is always applied to a full resolution base size. The base size depends on whether
video has been configured for a CCIR601 resolution or a Standard/Square-Pixel resolution. Refer to
the Osprey User’s manual for details on these two resolutions and how they are selected.
In the example used thus far an ROI of (0,55)/(640,360) has been setup based on a square
pixel resolution. When cropping is enabled, the ROI size becomes the base size for video capture.
Scaling may only be performed to reduce the image size so trying to capture video sizes larger than
the ROI size will fail.
In the NTSC space, the size 640x480 is generally accepted to be full resolution at square
aspect ratio. It follows that the size 320x240 is also well known and used as well. The 320x240 size
represents a horizontal and vertical downscale of 2. Most video hardware, when asked for a 240 or
less sized height, usually provides a single field to the application instead of truly scaling down from
the full resolution source (480 in height) because this would introduce unwanted interlacing artifacts.
This same notion can be applied to scaling a cropped area. The cropped area, or ROI, is
based upon a full resolution area. So if you have been capturing 320x240-sized video, then in this
example, you would want to capture a size of 320x180. This represents a scale down of 2 of the ROI
in the vertical and horizontal direction.
Page 7 of 18
Cropping Manual
Copyright © ViewCast Corporation, 2001
Warning: if you capture at a size of 320x240 with an ROI of 640x360, you will not maintain
the correct aspect ratio! Objects in this case will appear stretched in the vertical direction. The below
two pictures represent an ROI of 640x360 that was scaled to 320x240 (the left image) and 320x180
(the right image). Note how the left image appears stretched vertically.
Page 8 of 18
Cropping Manual
Copyright © ViewCast Corporation, 2001
4. Specifying cropping using the video format dialog box
There are three ways to specify the ROI. The first is by using the Format tab in the Osprey
Video Format dialog box. Selecting the Enable Cropping will cause the format tab below to appear.
The cropping parameters consist of four columns. The Source Size column represents the
full resolution size of the image. This size is determined by the video format (NTSC/PAL) and by the
aspect ratio setting (the Proportion box shown above). In this example, the video format is NTSC and
the aspect ratio is selected as standard (i.e. square pixels). Thus the Source Size column in the
cropping parameter section on this tab shows the source width to be 640 and the height to be 480.
Recall that the cropping region / ROI is based upon the unscaled full resolution source size.
Page 9 of 18
Cropping Manual
Copyright © ViewCast Corporation, 2001
The Cropped Size column contains the width and height of the ROI, while the Left Top
column contains the horizontal and vertical offset of the ROI.
Change the values in these two
columns to specify a new ROI.
The Output Size column contains the image size after cropping and scaling. The Output
Size may be no larger than the Cropped Size. Enter an Output Size equal to Cropped Size to
prevent scaling of the cropped image. Enter an Output Size smaller than the Cropped Size to scale
the cropped image down to a smaller final image size.
In the example above, the full resolution NTSC image is cropped to a ROI of 400x400 with
the upper-left corner of the ROI at (40,0). The cropped image is then scaled to CIF size (320x240).
Page 10 of 18
Cropping Manual
Copyright © ViewCast Corporation, 2001
5. Specifying cropping using the cropping application
The second method for setting cropping is the easiest since it involves using a visual tool to
set the ROI.
Page 11 of 18
Cropping Manual
Copyright © ViewCast Corporation, 2001
Above is a snapshot of the cropping application. The Reference Image section on the bottom
left is read-only and specifies the base full resolution source size. This size is determined by the video
format (NTSC/PAL) and by the aspect ratio. In this example, the video format is NTSC and the aspect
ratio is selected as square. Thus the reference image has a width of 640 and a height of 480. Recall
that the cropping region / ROI is based upon the unscaled full resolution source size. To change the
video format, aspect ratio or input port (i.e. composite, svideo, etc) bring-up the video driver format
dialog by pressing that button on the right hand side of the crop app.
The crop application shows a live, full resolution preview of the selected video port. Notice
the outline of a rectangle overlaid in this video. This is the ROI rectangle. With a mouse a user can
move the rectangle around by dragging at the center of the rectangle. The user can also stretch (in or
out) the four sides by pointing and dragging the edges. Or the user can also use the entries (textual
and arrow buttons) in the Cropping Parameters section to set or fine-tune the ROI parameters.
The Enable button causes the application to display the resulting cropped view using the
current settings. When this button is pressed its name is changed to Disable and video now
previewed live is the full resolution ROI. Once the ROI values are set, the Set button saves these
values for the corresponding device / board for use by other applications.
Page 12 of 18
Cropping Manual
Copyright © ViewCast Corporation, 2001
Please note that there are hardware limitations on the size and offset of the ROI based on the
color format of the image being captured. For example, if the color format is RGB16, the offsets and
the width and height must be even values. Any cropping values that do not meet the hardware
limitations will be rounded down to the closest legal value when you select the Set or Enable buttons.
See the section later in this document on cropping limitations.
Page 13 of 18
Cropping Manual
Copyright © ViewCast Corporation, 2001
6. Specifying cropping using the SDK
The last method for setting the ROI for cropping is using the SDK. For this you must refer to
the SDK documentation.
Page 14 of 18
Cropping Manual
Copyright © ViewCast Corporation, 2001
7. Cropping limitations
The following are limitations on how cropping may be used:
-
The sum of the width and offset in either direction may not exceed the original base video fullresolution size. For most of the examples above, the base size has been 640x480. Thus one
cannot set an ROI of width 640 and a horizontal offset greater than 0. If you attempt to give
values that exceed the original image size, the offset will be reduced to the difference
between the original image size and the ROI size.
-
The output image size may not exceed the ROI. Remember, once the ROI has been set, the
ROI size becomes the full / maximum resolution that can be captured. If you attempt to
specify an output image size greater than the ROI, the output image size will be modified to
be the same of the ROI.
-
Be aware that changing the Proportions setting between CCIR601 and Square will affect the
original image size. Because of the limitations above, this may result in a change of the
cropping values. For example, start with CCIR601 and a ROI of (600,400) at offset (60,40).
If you change to square pixels, the ROI violates the first restriction above. As a result, the
ROI offset will be automatically changed to (40,40).
-
There are hardware limitations on values that can be used for the cropping parameters. The
limitations are based on the color format being captured.
For example, when capturing
RGB16 format, the offsets and the width and height must be even numbers. The table below
lists the limitations for various color formats. Any illegal cropping parameters will be rounded
down to the closest legal value.
Color Format
Horizontal
Vertical
RGB32
none
even
Page 15 of 18
Cropping Manual
Copyright © ViewCast Corporation, 2001
RGB24
multiple of 4
even
RGB16,RGB15
even
even
RGB8,GRAY8
multiple of 4
even
YUY2 (4:2:2 packed)
even
even
I420 (YUV12 planar)
multiple of 16
even
YVU9 (YVU9 planar)
multiple of 16
multiple of 4
Page 16 of 18
Cropping Manual
Copyright © ViewCast Corporation, 2001
8. Using hardware cropping with Windows Media Tools
The key to using the hardware cropping capabilities today with the Windows Media encoding
tools is to keep in mind that:
•
Windows Media tools request a specific size from video capture devices
Part of the process of starting a Windows Media encoding session is selecting a profile that
defines the encoding parameters. One set of these parameters happens to be the size of the video to
encode. A simple procedure to follow for encoding using hardware cropping is to:
1) Setup the ROI and note the final Width and Height
2) Create a new Windows Media Encoding Profile by copying one that closely
matches the general desired bitrate and resolution but change the width and
height to the appropriate scaled width and height based on the info from 1.
For example, the Video for broadband NTSC (384 Kbps Total) is setup to use video at
320x240. The letterbox example used earlier has an ROI of 640x360. In this case one would go
through the process of managing/editing profiles in the Windows Media Encoder application to copy
the “Video for broadband NTSC (384 Kbps Total)” profile. The new copy could be called “Video for
broadband NTSC (384 Kbps Total at 320x180)”. Once copied and named the profile needs to be
edited and the video size set to 320x180. That’s it. When the session is now started the Windows
Media Encoding application will request a video size of 320x180 from the Osprey card. Since an ROI
has been set and enabled (at 640x360), the Osprey will hardware crop the incoming video (assumed
here to be NTSC at a square aspect ratio = 640x480) to 640x360 at the horizontal and vertical offsets
setup for the ROI and will scale this ROI down ½ to 320x180. (Actually, the Osprey drivers will scale
horizontally by ½ to get 320 in width but will only return a single field to yield 180 vertical lines. It does
this instead of scaling the 360 vertical lines down to 180 because that would introduce interlace
artifacts).
The same notion can be applied to the Video for broadband NTSC (1500 Kbps Total) profile.
This profile normally encodes 640x480. But why do that with letterbox content? Using the hardware
cropping to setup an ROI, for example, of 640x360 and then copying the standard profile and
Page 17 of 18
Cropping Manual
Copyright © ViewCast Corporation, 2001
changing the new one’s resolution from 640x480 to 640x360 will result in a significantly improved
encoded result.
Encoding from an AVI file: If you set and enable an ROI and capture to an AVI file, when
you go to encode from this AVI file you will still have to set up a custom profile as described above.
Otherwise, the encoder will scale the video in the AVI file to the size specified in the profile.
Page 18 of 18