1
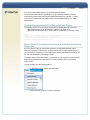
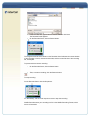
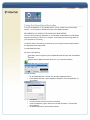
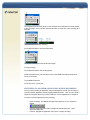
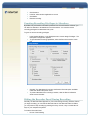
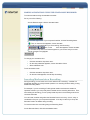
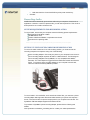
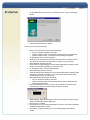
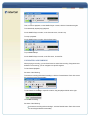
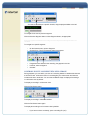
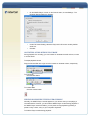
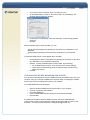
WebExTM Recorder and Player User's
Guide for TrainingCenter
InterCall, a subsidiary of West Corporation, in partnership with WebEx Communications,
Inc provides TrainingCenter web conferencing services. Because TrainingCenter is
powered by WebEx, this guide makes several references to the company name, platform
and features. This guide assumes that you have a TrainingCenter user account and are
set up to host sessions.
For more information:
877.333.2666
www.intercall.ca
Introducing the WebEx Recorder and Player
Use the WebEx Recorder to create a video recording of all screen activity on your
computer including mouse movements and annotations. You can also capture audio in a
recorded session such as the audio from an InterCall audio conference.
The WebEx Recorder is available in these versions:
Integrated session recorder
Standalone recorder
ABOUT THE INTEGRATED SESSION RECORDER
The integrated session recorder is available during a TrainingCenter session. This
recorder captures screen activity and audio in a session and then saves the recorded
data in a recording file on your computer.
Use the integrated recorder to capture all audio that plays through your computer. You
can also capture audio from an InterCall audio conference using a phone recording
adapter, which connects your phone to your computer.
ABOUT THE STANDALONE RECORDER
The standalone recorder is only available offline - that is, outside of a web conference.
This recorder lets you record all screen activity in any application on your computer and
then saves it in a recording file on your computer.
Use the standalone recorder to create software demonstrations, tutorials, sales
presentations, etc. To capture audio in a recording, simply connect a microphone to you
computer.
You can download the standalone recorder from the TrainingCenter website
(www.intercallcenters.ca/trainingcentersite) or from your branded website by entering:
http://companyname.webex.com/companyname/tool/record/record_play.php. If you do
not know your branded site URL please contact your site administrator or your sales
representative.
ABOUT THE WEBEX PLAYER
To play any recording in the WebEx Recording Format (.wrf) you must use the WebEx
Player. Using WebEx Player, you can play a recording that resides on your computer, a
server on your local network or a website on the Internet.
Last modified on: 6/6/2007
You can download WebEx Player from the TrainingCenter website
(www.intercallcenters.ca/trainingcentersite) or on your branded website by entering:
http://companyname.webex.com/companyname/tool/record/record_play.php. If you do
not know your branded site URL please contact your site administrator or your sales
representative.
System Requirements For Recorder and Player
The following are the minimum system requirements for WebEx Recorder and Player:
Microsoft Windows 95, 98, Me (Millennium Edition), XP, 2000, or NT
Microsoft Internet Explorer 4.x or a later version, or Netscape 4.x or a later version
NOTE:
By default, only the host and the presenter can record an online training session. Attendees can record an online
training session only if a presenter grants recording privileges to them.
To record audio, ensure that your computer meets the system requirements and you set up the appropriate audio
input device. For details, see the “Recording Audio” section.
Recording a TrainingCenter Session with the Integrated
Recorder
Once you start recording an online training session, the integrated Recorder begins
saving the recording to a file on your computer. Ensure that you have enough space on
your hard disk for a recording. For information about file size estimates for recordings, see
the “File Size Estimates for Recordings” section.
To capture audio in a recorded session, you must set up your computer’s sound card and
attach the appropriate audio input device. For more information, see the “Recording
Audio” section.
To start recording an online training session:
1
On the Session menu, choose Start Recording.
2
Choose a location at which to save the recording.
3
4
In the File name box, type a name for the file and then click Save.
The Recorder Panel appears.
On the Recorder Panel, click the Record button.
The Progress and File Size indicator on the Recorder Panel indicates the current duration
of the recording, in hours, minutes and seconds; and the current file size of the recording
file, in kilobytes.
To pause and then resume recording:
1
On the Recorder Panel, click the Pause button.
2
Then, to resume recording, click the Resume button.
To stop recording:
On the Recorder Panel, click the Stop button.
Or, alternatively, use the Tools drop down menu to stop the recording.
WebEx Recorder saves your recording to a file in the WebEx Recording Format, which
has a .wrf extension.
Using the Standalone Recorder
To record an application on your desktop offline – that is, outside of an online training
session – you must use the standalone version of the WebEx Recorder.
RECORDING AN APPLICATION OR YOUR DESKTOP
Once you start recording an application on your desktop, the standalone recorder begins
saving the recording to a file on your computer. Ensure that you have enough space on
your hard disk for a recording.
To capture audio in a recording, you must set up your computer’s sound card and attach
the appropriate audio input device.
To start WebEx Recorder:
Do either of the following:
Click Start, point to Programs, point to WebEx Recorder & Player then click WebEx
Recorder.
Double-click the WebEx Recorder shortcut on your computer’s desktop.
The WebEx Recorder console appears.
To start recording:
1
2
On the WebEx Recorder console, click the Open Application button.
In the WebEx Recorder – Open Application dialog box, select an application on
your desktop.
3
4
5
Click Select.
Choose a location at which to save the recording.
In the File Name box, type a name for the file then click Save. The Recorder
Panel appears.
On the Recorder Panel, click the Record button.
6
The Progress and File Size indicator on the Recorder Panel indicates the current duration
of the recording in hours, minutes and seconds and the current size of the recording file in
kilobytes.
To pause and then resume recording:
On the Recorder Panel, click the Pause button.
To resume recording, click the Pause button again.
To stop recording:
On the Recorder Panel, click the Stop button.
WebEx Recorder saves your recording to a file in the WebEx Recording Format which
has a .wrf extension.
To quit WebEx Recorder:
On the File menu, choose Exit.
SWITCHING TO ANOTHER APPLICATION DURING RECORDING
Once you start recording an application using the standalone recorder you can switch to
recording another application without stopping WebEx Recorder. Thus, you can create a
single recording that captures your actions with two or more applications in a sequence.
To switch to another application during recording:
1
2
3
4
Pause recording. The WebEx Recorder button appears on your computer’s
taskbar.
Click the WebEx Recorder button to display the WebEx Recorder – Open
Application dialog box.
In the list, highlight the application that you are currently recording.
5
6
7
8
Click Unselect.
In the list, select another application to record.
Click Select.
Resume recording.
Granting Recording Privileges to Attendees
By default, only the session host and the presenter can record a session. However, you
can allow an attendee or all attendees to record a session. You can also remove
recording privileges from attendees at any time.
To grant or remove recording privileges:
1
2
3
4
In the Session Window, on the Participant menu choose Assign Privileges. The
Participant Privileges box appears.
To give attendees recording capabilities, select the Record the session check
box.
Click OK. The Attendees will now have the Session Recorder option available
under their Session drop down menu.
To prevent attendees from recording a session, clear the Record a Session
check box and click OK.
Hiding the Recorder Panel During Recording
Normally, the Recorder Panel appears on your screen during recording. However, before
you begin recording, you can hide the Recorder Panel. If the Recorder Panel is hidden,
you can pause or stop recording by pressing a hot key—that is, a key or combination of
keys on your computer’s keyboard.
To hide the Recorder Panel:
1 Do one of the following:
a.
b.
If you are using the integrated Recorder, on the Session menu in the
Session window, point to Recorder Privileges and then choose Recorder
Settings. Choose the Recorder Panel tab.
If you are using the standalone Recorder, on the Recorder console, on the
Settings menu, choose Recorder Panel.
The WebEx Recorder Settings dialog box appears.
2
3
4
Under Recorder Panel, select the Hide the Recorder panel during recording
check box. Default hot keys appear in the Pause/Resume and Stop boxes. While
recording, you can press the appropriate hot key to stop or pause recording.
Optional: To specify your own hot keys, click in the Pause/Resume or Stop boxes
and then do one of the following:
a. Hold down the Control or Shift key and then press another key.
b. Hold down both the Control and Shift keys and then press another key.
Click OK.
To show the Recorder Panel after it is hidden:
During recording, press the hot keys that you specified to either pause or stop recording.
The default hot keys are the following:
Pause recording—Ctrl+Alt+P key combination
Stop recording—Ctrl+Alt+S key combination.
Recording Annotations
While recording, you can use the highlighter tool to make annotations. Your annotations
appear in the recording during playback.
MAKING ANNOTATIONS WHILE RECORDING A SESSION
When using the integrated recorder to record a TrainingCenter session, you can use the
annotation tools available in the session. For example, if you are sharing an application,
any annotations you or other participants make using the annotation tool on the Tools
panel will appear in your recoding.
MAKING ANNOTATIONS USING THE STANDALONE RECORDER
To make annotations using the standalone recorder:
Do any one of the following:
On the Recorder panel, click the Annotate button.
In the lower-right corner of your computer’s task bar, click the Recording button.
Then, on the menu that appears, choose Annotate.
In the title bar of the application you are recording, click Recording.
Then, on the
menu that appears, choose Annotate.
An annotation drop down menu button appears on your screen and your mouse
pointer changes to a highlighter.
To change your annotation color:
1
2
3
Click the Annotation drop-down menu.
On the color palette that appears, choose Annotation Colors.
Select a different color.
To exit annotation mode:
1
2
Click the Annotation drop-down menu.
On the menu that appears, choose Stop Annotating.
Inserting Markers into a Recording
During recording, you can insert one or more markers into a recording. A marker is a
placeholder that lets you quickly located a position in a recording file when editing it using
WebEx Recording Editor.
For example, if you are recording a TrainingCenter session and someone makes an
important comment, you can quickly insert a marker into the recording at that time. Then,
when editing the recording, you can quickly locate the point in the recording at which the
comment was made.
You can insert a marker using either the Recorder Panel or a hot key – that is, a key or
combination of keys on your computer’s keyboard. A hot key is useful if you set up the
Recorder Panel to be hidden during recording.
To insert a marker into a recording using the Recording Panel:
On the Recorder Panel, click the Insert Marker button.
To insert a marker into a recording using a hot key:
1
Do either of the following:
a. If you are using the integrated recorder, on the Session menu in the Session
window, choose Recorder Settings > Recorder Panel. he WebEx Recorder
Settings dialog box appears. On the Recorder Markers tab, a hotkey
appears in the box. While recording, you can press this hot key to insert a
marker.
b.
If you are using the standalone recorder, on the Recorder console, on the
Settings menu, choose WebEx Recorder Settings.
The WebEx Recorder Settings dialog box appears. On the Recorder Markers Settings, a
default hot key appears in the box. While recording, you can press this hot key to insert a
marker.
2
Optional – To specify your own hot key, click in the box then do one of the
following:
a. Hold down the Control or Shift key then press another key.
3
b. Hold down both the Control and Shift keys then press another key.
Click OK.
Recording Audio
WebEx Recorder automatically synchronizes audio with your sequence of actions in an
application or session. In order to capture audio, you will need a phone line. This can be a
direct phone line or an audio conference line.
SYSTEM REQUIREMENTS FOR RECORDING AUDIO
To record audio, ensure that your computer meets the following system requirements:
Intel Pentium III 667 MHz or faster
128 MB RAM or more
Creative Labs Sound Blaster or equivalent sound card
Input device for capturing audio
NOTE: Use an input device that is appropriate for the type of audio that you want to capture.
SETTING UP YOUR SOUNDCARD FOR RECORDING AUDIO
To record an audio conference for an online training session, you must connect the
recording computer to a telephone using one of the following:
Phone recording adapter—Connects your phone to your computer’s sound card. A
phone recording adapter captures all audio in a teleconference. The following two
phone recording adapters from DynaMetric, Inc. are compatible with WebEx
Recorder: TLP-102 Telephone Logger Patch and TMP-636 Transmit and Receive
Patch. To connect a phone recording adapter to your computer’s sound card,
follow the instructions that DynaMetric provides.
To record audio in rich media files, such as audio and video files, you must use a phone
recording dapter that supports bi-directional audio between your phone and computer—
that is, connects to both the input and output jacks for your computer’s sound card. The
DynaMetric TMP-636 adapter supports bi-directional audio.
To purchase a DynaMetric phone recording adapter, please visit the following web
addrss:
www.dynametric.com/webex_purchasing.html or contact your sales representative.
Universal multimedia amplifier—Connects your telephone to a headset and your
computer’s sound card. You can use a universal multimedia amplifier as a phone
recording adapter to capture all audio in an audio conference. Using a universal
multimedia amplifier is ideal if you often speak an audio conference, Internet phone
conferences and standalone recording sessions, because it allows you to switch
between a phone headset and a computer headset.
The following universal amplifier is known to be compatible with WebEx Recorder:
Plantronics MX10 Universal Amplifier.
To record audio in shared files, such as UCF rich media files, you must use a universal
multimedia
amplifier that supports bi-directional audio between your phone and computer—that is,
connects to both the input and output jacks for your computer’s sound card. The
Plantronics MX10 Universal Amplifier supports bi-directional audio.
To purchase a Plantronics universal multimedia amplifier, please visit the following web
address:
www.plantronics.com
Conference phone with RCA output jack
To capture audio using a conference phone or speakerphone, connect the phone’s
RCA audio output jack to the microphone input jack on your computer’s sound
card.
NOTE: For better audio quality and convenience, use a phone headset when recording an audio conference.
SETTING UP YOUR SOUNDCARD FOR RECORDING AUDIO
Before you start recording audio, do the following to set up your computer’s sound card:
1
2
3
Select sound card —Select the sound card that you want to use for recording
and playing sound, if your computer has multiple sound cards.
Adjust audio volume
a. Adjust the audio input volume for your microphone or phone, which
determines the sensitivity of WebEx Recorder when capturing audio.
b. Adjust the audio output volume for your speakers or earphones.
Specify microphone settings
a. For recording, ensure that the microphone input setting is either selected or
not muted, depending on your sound card, and that all other input controls
are either muted or not selected.
b. For playback, ensure that the microphone input setting is either not selected
or muted, depending on your sound card.
You can set up your computer’s sound card in either of two ways:
Use the Audio Setup Wizard, which is available in the standalone WebEx Recorder
only. The wizard automatically specifies the correct recording and playback settings
for your microphone.
Use your sound card’s volume controls and Windows Sound Recorder to manually
set up your sound card.
To use the Audio Setup Wizard to set up your sound card:
1
On the WebEx Recorder console, on the Settings menu, choose Audio Setup
Wizard.
2
Follow the instructions in the wizard.
To set up your sound card manually:
1
Open your sound card’s volume controls as follows:
a. On your computer’s desktop, click Start.
b. Point to Programs, point to Accessories, and then point to Entertainment.
c. Choose Volume Control. The Volume Control dialog box appears.
2 On the Options menu, choose Properties.
3 Optional. If your computer has more than one sound card, in the Mixer device
drop-down list, select the sound card that you want to use for recording.
4 Select Playback and then click OK.
5 In the Volume Controls dialog box, ensure that the Microphone setting is either
muted or not selected, depending on your sound card.
6 On the Options menu, choose Properties again.
7 Select Recording and then click OK.
8 In the Recording Control dialog box, ensure that the Microphone setting is either
selected or not muted, depending on your sound card. Leave the Recording
Control dialog box open on your screen.
9 Start Windows Sound Recorder, as follows:
a. On your computer’s desktop, click Start.
b. Point to Programs, point to Accessories and then point to Entertainment.
c. Choose Sound Recorder.
10 Use Sound Recorder to record your voice as you speak into the audio input
device that you want to use when making the actual recording.
11 While speaking, adjust the Microphone volume as necessary using the Volume
slider in the Recording Control dialog box.
12 Play back your recording.
13 If the audio is too low, increase the Microphone volume. If the audio is distorted,
decrease the Microphone volume.
14 If necessary, continue recording your voice and adjusting the Microphone
volume.
File Size Estimates for Recordings
Without audio, WebEx Recorder captures approximately 10 MB of video data per hour of
recording.
However, when recording frequent actions in an application or session, WebEx Recorder
may capture significantly more data.
When recording audio, the rate at which WebEx Recorder captures data depends on the
audio sampling rate that you select. The following are estimates of the data that WebEx
Recorder captures for the available audio sampling rates.
IF YOU SET WEBEX RECORDER TO
THIS AUDIO SAMPLING RATE:
G.723 at 8 KHz
IT CAPTURES APPROXIMATELY THIS
AMOUNT OF AUDIO AND VIDEO DATA
PER HOUR:
15 MB
PCM at 8 KHz
70 MB
PCM at 22 KHz
170 MB
PCM at 44 KHz
325 MB
Distributing Your Recordings
Once you complete a recording, you can distribute it in the following ways:
Publish your recording on your TrainingCenter website. Each TrainingCenter site
has 1 GB space available to store recordings.
Ask your company’s Webmaster to publish your recording on your organization’s
website. Once a visitor to your site clicks a link for a recording, a playback server
automatically downloads the WebEx Player software to the visitor’s computer, if
necessary, then streams the recording to the visitor’s computer. By streaming
recordings, you allow visitors to play recordings without the need to download the
recordings onto their computers. For more information about streaming a
recording, please go to www.intercallcenters.ca/trainingcentersite.
Provide your recording file directly to the people whom you want to view it. If they
do not have the WebEx Player, they can download the WebEx Player installation
program from the Recording and Playback page on
www.intercallcenters.ca/trainingcentersite.
Using WebEx Player
Using WebEx Player, you can play back any recording that was made using WebEx
Recorder—that is, a WebEx Recording Format (.wrf) file.
INSTALLING WEBEX PLAYER
If you do not yet have WebEx Player, or want to download the WebEx Player installer for
users to whom you want to provide a recording, you can download it from
www.intercallcenters.ca/trainingcentersite.
SYSTEM REQUIREMENTS FOR LISTENING TO AUDIO IN A
RECORDING
You can listen to audio in a WebEx Recording Format (.wrf) file, if your computer has the
following:
a Creative Labs Sound Blaster or equivalent sound card
speakers, or headphone jack and headphones
PLAYING A RECORDING
You can play a recording that resides on your computer or that is published on a Web
site.
To start WebEx Player:
Do either of the following on your computer’s desktop:
Click Start, point to Programs, point to WebEx Recorder & Player, and then click
WebEx Player.
Double-click the WebEx Player shortcut on your computer’s desktop.
The WebEx Player console appears.
To play a recording that resides on your computer:
Do either of the following:
Double-click a WebEx Recording Format (.wrf) file. WebEx Player starts and plays
the recording automatically.
On the WebEx Player console, click the Open button, and then select a recording.
Then, on the WebEx Player console, click the Play button.
To play a recording that is published on a website:
Go to the web page on which the recording is published, and then click the link for the
recording. WebEx Player plays the recording automatically.
To pause and then resume playback:
To pause playback, on the WebEx Player console, click the Pause button.
Then, to resume playback, on the WebEx Player console, click the Pause button again.
To automatically repeat (loop) playback:
On the WebEx Player console, on the Controls menu, choose Loop.
To stop a playback:
On the WebEx Player console, click the Stop button.
To quit WebEx Player:
On the WebEx Player console, on the File menu, choose Exit.
NAVIGATING A RECORDING
When playing a recording, you can fast forward or rewind the recording. If segments were
defined in the recording, you can navigate to a specific segment.
To fast forward playback:
Do either of the following:
To browse a recording while fast forwarding it, click the Forward button. Each click moves
the recording forward incrementally.
To fast forward a recording to a specific location, drag the playback slider to the right.
To rewind a recording:
Do either of the following:
To browse a recording while rewinding it, click the Rewind button. Each click moves
the recording backward incrementally.
To rewind a recording to a specific location, drag the playback slider to the left.
To navigate to the next or previous segment:
Click the Previous Segment button or Next Segment button, as appropriate.
NOTE: If no segments were defined in the recording, the Previous Segment and Next Segment buttons are
unavailable.
To navigate to a specific segment:
1
2
On the Controls menu, point to Segment.
Choose Go to. The Go to Segment dialog box appears.
3
4
5
If segments were defined in the recording, they appear in the list.
In the list, select a segment.
Click OK.
CONTROLLING FULL-SCREEN VIEW OF PLAYBACK
During playback, you can switch your view of a recording between a standard window and
a full-screen view. A full-screen view of a recording fits your entire screen and does not
include a title bar or scroll bars. You can also set WebEx Player to display all recordings
in a full-screen view by default.
To display a recording in a full-screen view:
Click the Full Screen button.
To display a recording in a standard window:
Click the Full Screen button again.
To display all recordings in a full-screen view by default:
1
If you have not done so already, open a recording file (.wrf).
2
On the WebEx Player console, on the Controls menu, choose Settings. The
Playback Settings dialog box appears.
3
Under Full Screen Setting, select the Play back in full screen mode by default
check box.
Click OK.
4
ADJUSTING AUDIO DURING PLAYBACK
During playback of a recording, you can increase or decrease the audio volume, or mute
or unmute audio.
To adjust playback volume:
Drag the Volume slider to the right or left to increase or decrease volume, respectively.
To mute audio:
Click the Mute button.
To unmute audio:
Click the Unmute button.
HIDING OR SHOWING THE PLAYER CONSOLE
Normally, the WebEx Player console appears on your screen when you are playing a
recorded session. However, you can hide the WebEx Player console during playback. If
the WebEx Player console is hidden, you can pause or stop playback by pressing a
preset hot key—that is, a key on your computer's keyboard.
To hide the Player console during playback:
1
2
If you have not done so already, open a recording file (.wrf).
On the WebEx Player console, on the Controls menu, choose Settings. The
Playback Settings dialog box appears.
3
Under Player console settings, select the Hide Player console during playback
check box.
Click OK.
4
While the WebEx Player console is hidden, you can:
pause and resume playback by pressing the Ctrl+Alt+P key combination on your
keyboard
stop playback by pressing the Ctrl+Alt+S key combination on your keyboard
To make the WebEx Player console appear after it is hidden:
1
2
3
During playback, pause or stop playback by pressing the Ctrl+Alt+P or Ctrl+Alt+S
key combination on your keyboard, respectively.
Optional - To keep the WebEx Player console visible, do the following:
a. On the WebEx Player console, on the Controls menu, choose Settings.
b. Under Player Console Settings, clear the Hide the Player Console during
playback check box.
Click OK.
UNINSTALLING WEBEX RECORDER AND PLAYER
You can remove the standalone version of WebEx Recorder and WebEx Player from your
computer, using your computer’s Add/Remove Programs utility. Uninstalling the software
does not remove any recordings that reside on your computer.
To uninstall WebEx Recorder and Player:
1
2
3
4
5
Open the Windows Add/Remove Programs utility on your computer.
In the list of programs, select WebEx.
Click Change/Remove.
In the Uninstall WebEx Software dialog box, select Session Manager.
Click Uninstall.
For additional information about the WebEx Recorder and Player capabilities with
TrainingCenter, please contact InterCall Professional Services at 800-721-3919 or 706634-8375. You may also email questions to [email protected].