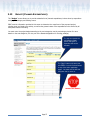
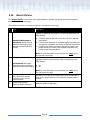
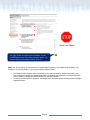
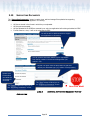
1
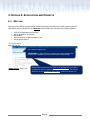
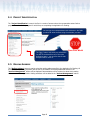
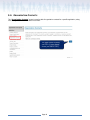
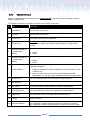
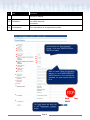
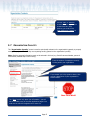
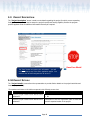
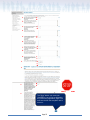
GRANTS AND CONTRIBUTIONS ONLINE SERVICES: USER GUIDE (PROJECT INTAKE) DECEMBER 2013 TABLE OF CONTENTS INTRODUCTION ........................................................................... 4 Did you know? ....................................................................................................................................... 4 The GCOS Has 3 Modules ...................................................................................................................... 4 Important Things To Remember........................................................................................................... 5 A. B. C. D. E. F. G. GCOS Has A Tim e Out Feature: R em em ber To Save Often ...................................................... 5 W eb B row ser Com patibility ....................................................................................................... 5 Account Validation ...................................................................................................................... 5 Current M anual Signature P rocesses Still Apply ...................................................................... 6 Supporting Docum ents: There Are Upload Restrictions .......................................................... 6 M ake Sure to Use Y our P rogram Specific Applicant Guide ...................................................... 6 Contact Us ................................................................................................................................... 6 Acronyms Used Throughout this Document....................................................................................... 10 1. MODULE 1: ACCOUNT MANAGEMENT ....................................... 11 1.1 Home Page / Log in ................................................................................................................... 11 1.2 Creating Your GCOS Account .................................................................................................... 12 1.2.1 1.2.2 1.2.3 1.2.4 1.2.4.1 1.2.5 1.2.6 1.2.7 Before You Start ................................................................................................................ 13 Term s of Use ...................................................................................................................... 14 Notice to Applicants .......................................................................................................... 15 Register .............................................................................................................................. 15 Account Validation ......................................................................................................... 18 Changing P assw ord ........................................................................................................... 19 Forget P assw ord ................................................................................................................ 22 Security Question .............................................................................................................. 23 1.3 Organization Profile ...................................................................................................................... 24 1.3.1 1.3.2 1.3.3 1.3.4 1.3.5 1.3.6 1.3.7 1.3.7.1 1.3.7.2 1.3.7.3 Organization I dentification .............................................................................................. 24 Signatories ......................................................................................................................... 25 Organization Address ........................................................................................................ 26 Organization M ailing Address ........................................................................................... 27 Organization’s M andate .................................................................................................... 29 Supporting Docum ents ..................................................................................................... 30 Representatives ................................................................................................................ 32 Add Representatives ..................................................................................................... 33 Assigning Responsibilities to Delegates ...................................................................... 36 View ing Roles and Responsibilities .............................................................................. 37 Page 2 2. MODULE 2: APPLICATION AND PROJECTS ................................ 39 2.1 Welcome ..................................................................................................................................... 39 2.2 Applications and Projects .......................................................................................................... 40 2.3 Program Selection...................................................................................................................... 41 2.4 Project Identification ................................................................................................................ 43 2.5 Mailing Address .......................................................................................................................... 43 2.6 Organization Contacts ............................................................................................................... 44 2.7 Organization Capacity ............................................................................................................... 47 2.8 Amounts Due .............................................................................................................................. 48 2.8.1 2.9 Adding an Am ount Due (Am ounts Due Details) .............................................................. 48 Project Description .................................................................................................................... 49 2.10 Project Details ............................................................................................................................ 49 2.11 Project Locations ....................................................................................................................... 53 2.11.1 Location Details ................................................................................................................. 53 2.12 Anticipated Sources of Funding ................................................................................................ 54 2.12.1 Contribution Details .......................................................................................................... 54 2.13 Budget (Planned Expenditures) ................................................................................................ 57 2.14 Budget Details ............................................................................................................................ 58 2.15 Supporting Documents .............................................................................................................. 60 2.15.1 Adding a supporting docum ent for the Application ........................................................ 60 2.16 Review & Submit........................................................................................................................ 61 2.17 Declaration ................................................................................................................................. 62 2.17.1 2.17.2 One signatory .................................................................................................................... 62 M ultiple signatory ............................................................................................................. 62 2.18 Application Confirmation ........................................................................................................... 63 2.18.1 Confirm ation E-m ail .......................................................................................................... 63 Page 3 INTRODUCTION Welcome to your Grants and Contributions Online Services (GCOS) external user guide for the online account registration and the Application for Funding. DID YOU KNOW? The GCOS is a centralized external Web platform for applying for Gs&Cs programs and managing active projects with ESDC. It provides recipients with a safe, secure and user-friendly environment to apply for funding online and to create/view/edit/save/submit/withdraw project management items (claims, Forecasts of Project Expenditures (FPE) and activity reports). It is available from the Funding Programs website, which contains all current and user-friendly information on Gs&Cs programs and funding opportunities. Note: In June 2013, the GCOS will be available to the Skills Link program delivered across Canada. Once fully implemented, all programs accepting applications from external organizations will be able to use the GCOS. THE GCOS HAS 3 MODULES 1. Account Management: Manages access to the GCOS, enables funding applicants to create, validate and modify accounts and manages organization tombstone information, mandate and supporting documentation. 2. Applications and Projects: Manages individual Gs&Cs applications and enables funding applicants to create, modify, submit and view their Standard Application for Funding. 3. Project Management: Manages claims, FPEs, and activity reports as well as enables recipients to create, modify, submit and view Claims, FPEs, and Activity Reports. This module is not available to recipients until their Standard Application for Funding has been approved by ESDC and the funding agreement is signed. Note: For detailed information on Project Management items, contact your ESDC representative to obtain the Grants and Contributions Online Services: External User Guide (Project Management). Page 4 IMPORTANT THINGS TO REMEMBER A. GCOS HAS A TIME OUT FEATURE: REMEMBER TO SAVE OFTEN After twenty (20) minutes of account inactivity, the GCOS will prompt you with a “Message from webpage”. If you do not click the “OK” button, by the time indicated in the “Message from webpage”, the GCOS will timeout after 20 minutes and you will be logged out of your session. GCOS does not automatically save information. Once you log back into your account, you will only have access to information you have previously saved. B. WEB BROWSER COMPATIBILITY The GCOS is compatible with the following Web browsers: • • • • C. Windows Internet Explorer 8; Mozilla Firefox; Google Chrome; and Apple Safari. ACCOUNT VALIDATION ESDC will validate requests for account registration within two (2) business days of submission. If you have not received a response from ESDC within this time frame you must contact: [email protected]. See section 1.2.4.1 of this document for more information on account validation. Note the following: • If a funding program has a deadline, which is within two (2) business days from the time your organization registered for an account, you should follow the paper application process. Page 5 D. CURRENT MANUAL SIGNATURE P ROCESSES STILL APPLY In cases where an online application is approved (and once the Standard Contribution Agreement (SCA) is prepared and ready for signature) the following manual signature process applies: the funding applicant’s authorized representative(s) will sign the Signing Officers Form (validates the representatives identity within their organization in terms of having the authority to sign agreements, cheques, payment claims and reports); the funding applicant’s authorized representative(s) then signs both copies of the Standard Contribution Agreement (SCA) and returns them to the Program Delivery Staff (PDS) (in-person, by fax or by e-mail); ESDC’s delegated representative will sign both copies of the SCA; and PDS will place one (1) signed copy in the paper file and return the second (2nd) copy to the recipient for their own records. • • • • IMPORTANT: The Signing Officers Form is a “Protected” document therefore recipients should confirm with their PDS how this document should be submitted. E. SUPPORTING DOCUMENTS: THERE ARE UPLOAD RESTRICTIONS Each document uploaded to the GCOS cannot exceed 15MB in size. There is no limit to how many documents can be uploaded. F. MAKE SURE TO U SE YOUR P ROGRAM SPECIFIC APPLICANT GUIDE ESDC has developed program specific Applicant Guides to provide you with program specific clarification on the level of detail required to complete your application using the GCOS. This guide is: program specific; specifies the level of information required to complete each section; provides the appropriate Budget Detail Template for that grant or contribution program; stipulates cost categories; outlines eligible costs; and outlines the level of detail required to assess the application. Program specific Applicant Guides are available on the ESDC Funding Programs Web site. You can link to your program specific Applicant Guide from the Program Selection screen in GCOS as well. G. CONTACT US Technical and non-technical questions and/or concerns can be submitted at any time throughout the process. Prior to accessing an account, the “Contact Us” is available at the bottom on the “Log In” screen and will directs you to the main “Contact Us” screen (see p.9). - Non-technical questions are routed to the responsible program at NHQ. - Technical questions are routed to the Online Services team at NHQ. Page 6 Following a successful login to the system, the “Contact Us” is available at the top and the bottom of all screens. Page 7 The numbers and letters in this table correspond to the following screen shot (*required field): # Field Description 1 I would like a response by*: 2 Given Name* The first name of the person submitting the question/concern. 3 Surname* The last name of the person submitting the question/concern. 4 E-mail Address The e-mail address where the individual submitting the question/concern can be reached. 5 Telephone Number A. Area code (the person’s 3-digit area code) B. Telephone number (the person’s 7-digit phone number; e.g. 456-7890) C. Extension (extension of the person’s telephone number) 6 Province/Territory* The province/territory where the person submitting the question/concern is physically located. Indicate the way you wish ESDC to reply to your question/concern A. E-mail B. Telephone Drop down: Choose one of the five (5) options provided: 7 My question is*: 8 Program for which you are applying* • • • • • Application: Financial Application: Non-Financial Technical: System Malfunction Issue Technical: Registration Issue Technical: Error Message Drop down: Choose the program for which you are applying. With as much detail as possible, write your question here. In order to better assess your question, please include if the situation is occurring in the Account Management, Application, Claim, FPE or Activity Report section of GCOS. Also include your role and if you are a Delegate, the responsibilities that are assigned to you (see section 1.3.7.2). 9 Question* 10 Project Number Once your project becomes active, ESDC will provide a project number at such time that your Application for Funding is approved. 11 Online Tracking Number ESDC will provide an online tracking number after you complete and submit your online Application for Funding. This number will appear on the confirmation screen (if available). See section 3.17 for more information. Page 8 1 A B Choose how you would like ESDC to reply to your question/concern. C If you do not enter information into a “required field”, an error message will appear at the top of your screen; this will prohibit your ability to submit (e.g.” Error 1: Required if response by e-mail”). 2 3 4 5 D E Choose one (1) of the five (5) options provided: 6 • • • • • 7 8 9 Application: Financial Application: Non-Financial Technical: System Malfunction Issue Technical: Registration Issue Technical: Error Message The “Submit Question” button will direct you to the “Contact Us Confirmation Page” screen. 10 11 Page 9 ACRONYMS USED THROUGHOUT THIS DOCUMENT ATIA Access to Information Act CEAA Canadian Environmental Assessment Act CRA Canada Revenue Agency CSGC Common System for Grants and Contributions EA Environmental Assessment FPE Forecasts of Project Expenditures Gs&Cs Grants and Contributions GCOS Grants and Contributions Online Services GoC Government of Canada ESDC Employment and Social Development Canada PDS Program Delivery Staff SCA Standard Contribution Agreement NEXT STEP: SETTING UP YOUR ACCOUNT Page 10 1. MODULE 1: ACCOUNT MANAGEMENT The account management module allows funding applicants and recipients to manage their accounts (on behalf of an organization). 1.1 HOME PAGE / LOG IN The GCOS home page/log in screen provides funding applicants and recipients with general information about the GCOS and is a pathway to register and/or log into the system. If you have an existing GCOS account, you must enter your user name and password into the fields provided and then click the “Log In” button. The “Forgot Password” link will direct you to the “Reset Your Password” screen; you must enter your e-mail address (used at registration) and then click the “Submit” button. • You will receive an e-mail containing a link to the GCOS home/login page where your temporary password will be provided. You will then be prompted to change your password after your first login (via the “Change Password” screen; see section 1.3.2). Note: You must have an existing GCOS account to use the “Forgot Password” option. Page 11 1.2 CREATING YOUR GCOS ACCOUNT From the main “Log In” screen, you must click the “Register” link located below the “Log In” button. The “Register” link will direct you to the “Before You Start” page. Page 12 1 .2 .1 B EFOR E Y OU S TA R T The “Before You Start” screen provides a step-by-step description of the registration process. Organizations MUST provide the following information when registering for a GCOS account: • • • • Organization Legal Name; Organization Operating (Common) Name (if different from legal name); Business/Registration Number; and Organization Address. The individual registering the GCOS account on behalf of the organization MUST also provide the following information: • • • • • The “Back” button will return you to the “Home/Log in” screen. The “Next” button will direct you to the “Terms of Use” screen. Page 13 First Name; Last Name; Position Title; Telephone Number; and E-mail Address. 1 .2 .2 T ER M S OF U SE The “Terms of Use” screen details the legal obligations/responsibilities for both ESDC and funding applicants and recipients. It is important to read all the terms carefully. In order to register and access the GCOS, you must select the “agree with the terms” option. This field is required. The “Back” button will return you to the “Before You Start” If you select the “do not agree with the terms” option and click the “Next” button”, you will be directed to the “Do Not Accept Terms of Use” screen (see next image). The “Next” button will direct you to the “Notice to Applicants” screen. If you do not select a radio button and click the “Next” button, an error message will appear at the top of your screen (e.g. Error 1: I have read the Terms of Use is required). Since you did not agree with the Terms of Use for the Grants and Contributions Online Services, you cannot continue with the online application process. If you still wish to submit an application for funding to the Department of Human Resources and Skills Development Canada, please submit a paper application that can be found in the Program specific webpage to which you want to apply: http://www.hrsdc.gc.ca/eng/funding_programs/index.shtml . Thank you! Grants and Contributions Online Services The “Back” button will return you to the “Terms of Use” Page 14 1 .2 .3 N OTI CE TO A P P L I CA N TS The “Notice to Applicants” screen details how the information entered by funding applicants will be used by ESDC. It also indicates that the application is subject to the Access to Information Act (ATIA). The “Next” button will direct you to the “Register” screen. The “Back” button will return you to the “Terms of Use” screen. 1 .2 .4 R EGI STER The person who is registering for a GCOS account must have the authority to act on behalf of their organization, including the authority to sign applications for funding, claims, FPEs and activity reports. They will automatically be assigned the role of the Primary Officer for the organization. As a Primary Officer they will be the main accountholder responsible, on behalf of the organization, for all information entered into and submitted using the GCOS. On the “Register” screen, funding applicants must enter the following information (*required field). The numbers and letters in this table correspond to the following screen shot: # Field 1 Organization Legal Name* 2 Organization Operating (Common) Name (if different from legal name) 3 Business or Registration Number* Description The legal name of the organization requesting the GCOS account. This is usually the name associated to the organization’s Canada Revenue Agency (CRA) registration and will be used for manual validation. The operating (common) name of the organization can be different from the legal name and must be specified in this field. If the operating (common name of your organization} is the same as the legal name, copy and paste the legal name into this field. The 15-digit CRA number uniquely identifies the federally registered organization or the registration number for registered charities and notfor profit. A. 9-digit business number B. 2-letter Program Account Identifier: RT (GST/HST), RP (payroll), RC (corporate income tax), RM (import/export), RR (registered charity), RD (excise duty), RE (excise tax), RN (insurance premium tax), RG (air travellers security charge) and RZ (information returns) Page 15 # Field Description C. 4-digit program account number 4 5 6 7 8 Address 1* Address Line 2 City/Town* Postal Code* Province/Territory* 9 Given Name* 10 Surname* 11 Position Title* 12 E-mail Address* 13 Confirm E-mail Address* 14 Telephone Number* The street address of the organizations physical address. The city/town of the organizations physical address. The postal code portion of the organizations physical address. The province/territory of the organizations physical address. The first name of the individual registering for the GCOS account. This person is the main account holder (Primary Officer), acting on behalf of their organization and they are responsible for all information entered into and submitted using the GCOS. The last name of the individual registering for the GCOS account (on behalf of the organization). The position title of the individual registering for the GCOS account (on behalf of the organization). The e-mail address where the individual registering for the GCOS account (on behalf of the organization)can be reached; this address will be the Primary Officer’s username. This e-mail address must match the address entered in the preceding box. D. Area code* (the main account holder’s 3-digit area code) E. Telephone number* (the main account holder’s 7-digit phone number; e.g. 456-7890) F. Extension (extension of the main account holder’s telephone number) Page 16 1 2 A The business or registration number is validated once. B C *Note: Organizations’ who change their name must notify ESDC immediately and provide all necessary supporting documentation. ESDC will then validate the new information and update GCOS accordingly. 3 4 5 6 7 8 Clicking the “Register” button automatically assigns you the role of the “Primary Officer” for your organization. 9 10 11 12 13 14 D E F Page 17 As a Primary Officer you are the main accountholder responsible, on behalf of your organization, for all information entered into and submitted using the GCOS. 1 .2 .4 .1 Account Validat ion Once your information has been submitted, ESDC will validate it. The result of the validation process will be sent to your e-mail address within two (2) business days. If you do not receive a response from ESDC, you must contact: [email protected]. Your confirmation e-mail will contain the following information: Attention: The information you have provided has been submitted to Human Resources and Skills Development Canada (ESDC) for validation. You will receive the result of the validation process by e-mail within two (2) business days. If you do not receive a response from ESDC, please contact: [email protected] Thank you! Grants and Contributions Online Services https://funding.hrsdc.gc.ca Successful Validation: If the account validation is successful, you will receive an e-mail with the hyperlink to the GCOS Home/Log in page (see section 1.1) and a temporary password (which will need to be changed after login) will be provided. The hyperlink will expire after seven (7) calendar days. If you do not access the hyperlink within the allotted timeframe, the validation process will need to be repeated. Your successful validation e-mail will contain the following information: Attention: Thank you for creating an account with the GCOS! Your information has been validated. By clicking on the link below, you will be directed to the GCOS login page where a temporary password will be provided. You will be prompted to change your password after your first login to access the system. https://funding.hrsdc.gc.ca Please note that you must change your password within 7 calendar days of receipt of this email. If not done within the timeline, you will be required to start the process over. Thank you! Grants and Contributions Online Services https://funding.hrsdc.gc.ca Page 18 Unsuccessful Validation: If the account validation is unsuccessful, next steps and alternate options will be provided in the following e-mail: Attention: We regret to inform you that Human Resources and Skills Development Canada (ESDC) was unable to validate the information you provided. You may re-submit the information to start the process over. You will be required to register again to access the GCOS or download the paper application. Should you have any questions or concerns with this process, please contact: [email protected] Thank you! Grants and Contributions Online Services https://funding.hrsdc.gc.ca 1 .2 .5 C H A N GI N G P A SS W OR D Upon clicking the hyperlink provided in the successful validation e-mail (as mentioned above), the user will be directed to the “Log In” screen where a temporary password will be provided. After a successful log in, the user will be directed to the “Change Password” screen Page 19 Your temporary password will look like this. Your username is your e-mail address. Passwords must meet the following requirements: • • • • • be at least eight (8) characters in length; contain at least one (1) uppercase character (A-Z); contain at least one (1) lowercase character (a-z); contain at least one (1) numeric character (0-9); and contain at least one (1) special character (e.g. #@%^&*!) Page 20 The “Save” button will direct you to the “Confirm Change Password” screen. Page 21 The “OK” button will direct you to the “Security Question” screen (see section 1.2.7) 1 .2 .6 F OR GET P A SS W OR D If at any time after you forget your password, you can obtain a temporary password by using the forget password functionality. The “Forget password” link will direct you to the “Reset Password” screen. By providing your e-mail address, you will be sent a temporary password and section 1.2.5 will need to be completed. Page 22 1 .2 .7 S ECUR I TY Q UES TI ON The system will display a series of five security questions that must be completed by each representative when they create their account. NEXT STEP: ENTER YOUR ORGANIZATION’S INFORMATION. Page 23 1.3 ORGANIZATION PROFILE The first time accessing the account, funding applicants must complete the following screens before they can create an Application for Funding: In future logins, organizations can skip these screens unless they wish to edit the information. 1 .3 .1 O R GA N I ZA TI ON I D EN TI FI CA TI ON The “Organization Identification” screen is pre-populated with the organizations’ legal name, operating (common) name (if different from legal name), and business or registration number. Choose one option from the drop-down list that best reflects your organization (e.g. Private Sector Bank). This screen can be accessed, at any time, by clicking the “Account Management” link at the top of each page. This is the organization’s e-mail address. It does not have to be the same as the one used when you registered for your GCOS account. The “Save” button will direct you to the “Signatories” screen (see section 1.3.2). Page 24 Save Your Work! 1 .3 .2 S I GN A TOR I ES The “Signatories” screen is used to identify the number of signatories required to submit an application for funding, a claim, an FPE and an Activity Report. It can be accessed through the “Account Management” link in the top navigation bar. The number of signatories identified on this screen will need to reflect what will be identified on the Signing Officers Form that will completed at the signing of an Agreement with ESDC. The information on this screen will impact the submission of items to ESDC. Save Your Work! Page 25 1 .3 .3 O R GA N I ZA TI ON A D D R ESS The “Organization Address” screen is used to capture information on the organizations physical locations (for some organizations, the physical address is different from its mailing address). The Primary Officer must review the information below the first time he accesses the account as it is populated with the information submitted when creating the account (*required field). The organization address can be updated at any time, however the address included in applications and projects already submitted to the Department will not be updated. You MUST contact your program delivery staff to provide the updated organization address. The numbers and letters in this table correspond to the following screen shot: # Field Description 1 Address 1* The street address of the organizations physical address. 2 Address Line 2 3 City/Town* The city/town of the organizations physical address. 4 Postal Code* The postal code portion of the organizations physical address. 5 Province/Territory* The province/territory of the organizations physical address. 6 Country* (read-only) The country where the organizations is physically located (default is Canada). 1 2 3 4 Save Your Work! 5 6 Page 26 1 .3 .4 • O R GA N I ZA TI ON M A I LI N G A D D R ESS The “Organization Mailing Address” screen is used to capture information on the organizations mailing address if it is different from its physical address. The Primary Officer must enter the information below. Multiple mailing addresses can be captured on this screen. The organization mailing address can be updated at any time, however the mailing address included in applications and projects already submitted to the Department will not be updated. You MUST contact your program delivery staff to provide the updated organization address. The numbers and letters in this table correspond to the following screen shot. # Field 1 Is the Mailing Address the same as Organization address? Description 2 Address Line 1 3 Address Line 2 4 City/Town The city/town where the organization’s mailing address is. 5 Postal Code The postal code portion of the organization’s mailing address. 6 Province/Territory The province/territory of the organization’s mailing address. 7 Country The country of the organization’s mailing address (default is Canada). When selecting yes, all the fields will be pre-populated based on the information captured in the “Organization Address” screen The street address of the organization’s mailing address. Page 27 1 2 3 4 5 6 7 Page 28 Save Your Work! 1 .3 .5 O R GA N I ZA TI ON ’ S M A N D A TE The “Organization’s Mandate” screen is used to specify the organization’s mandate. Note: Sensitive personal information must not be entered in this box (e.g. Social Insurance Number, finance data, medical and/or work history). The “Save” button will direct you to the “Supporting Documents” screen (see section 1.3.6). The “Back” button will return you to the “Organization Mailing Address” screen (see section 1.3.4). Page 29 1 .3 .6 S UP P OR TI N G D OC UM EN TS The “Supporting Documents” screen allows organization representatives to add files that support the organization’s application. Note: Please refer to the program specific Applicant Guide as it may provide additional information regarding supporting documents related to your organization. The “Add” button will direct you to the “Document Details” screen. Choose one option from the drop-down list that best reflects your document type (e.g. Letters of Incorporation). Browse your file structure and select the document for download. The “Cancel” button will return you to the “Supporting Documents” screen. The “Save” button will direct you to the “Supporting Documents” screen. Page 30 Save Your Work! You can open/view your document (in a new window) by clicking on the “View” link. Click the “Remove” link to remove documents from the list. Click the “Add” button to add documents to the list. Page 31 1 .3 .7 R EP R ESEN TA TI VES The “Representatives” screen, which can be accessed from the “Account Management” link in the top navigation bar, displays all registered Representatives for an organization and their current status as an organization representative. Your name will appear here. The “Add” button will direct you to the “Representative Details” screen (see section 1.3.7.1). Page 32 1 .3 .7 .1 A D D R EP R ESEN TA TI VES When a Representative is added, the “Representative Details” screen will require the following information to be provided (*required field).. The numbers and letters in this table correspond to the following screen shot: # Field Description 1 Individual’s Consent to Disclosure and/or Use of Information (http://wpaz-u.sadeedap.prv/GCOSSELSC/OSR/Content/Files/EMP5545en-CA.pdf) This form MUST be completed and signed by the representative you are adding to the GCOS system prior to saving the information. The consent MUST be kept on file for audit purposes. 2 “I have obtained the written prior consent from the representative to provide you the following information. The consent will be kept on file for audit purposes.” * This checkbox MUST be checked in order to successfully add a Representative. 3 Given Name * The first name of the Representative. 4 Surname* The last name of the Representative. 5 Position Title* The position title of the Representative. 6 E-mail address* 7 Confirm email address* 8 Telephone Number* 9 Representative Role* The e-mail address where the Representative can be reached; this address will be the Representative’s username. Re-enter the email address where the Representative can be reached; this address will be the Representative’s username. A. Area code* (the Representative’s 3-digit area code) B. Telephone number* (the Representative’s 7-digit main phone number; e.g. 456-7890) C. Extension (extension of the Representative’s telephone number) You must first assign a role (see letters A, B or C) to the representative within the Account Management module and for Delegates, you will then assign them responsibilities related to the project(s). D. Primary Officer: The “Primary Officer” is responsible for any transactions related to the organization’s account. The “Primary Officer” can be delegated to another individual including the accountability of the account. This role should be delegated in instances where the Primary Officer is leaving the organization and wants to add his/her replacement. • Add another Primary Officer, Officer or Delegate • Modify organization information • Create and submit Application for Funding, Claim, FPE and Activity Report. Page 33 # Field Description E. Officer: The “Officer” role will provide this representative the same roles and responsibilities as the Primary Officer. The accountability of actions undertaken in the account remains with the Primary Officer. • Add Officer or Delegate • Modify organization information • Create and submit Application for Funding, Claim, FPE and Activity Report. F. Delegate: • View the organization’s information • View Representatives of the account • Create and/or submit Application for Funding, Claim, FPE and/or Activity Report. Page 34 1 2 3 4 5 6 7 8 A B C 9 D E F Save Your Work! When adding a Delegate, the “Save” button will direct you to the “Representative Details – Responsibilities” screen. When you add a Primary Officer or an Officer you will be directed to the “Representatives” screen. Page 35 1 .3 .7 .2 A SSI G N I N G R ESP ON SI B I L I TI ES TO D ELEGA TES Primary Officers’ and Officers’ can assign representative responsibilities via the “Representative Details – Responsibilities” screen. If you do not assign responsibilities to a Delegate they can only view the organization’s information. The “Save” button will direct you to back to the “Representatives” screen. Page 36 Save Your Work! Assigned representatives will receive an e-mail outlining their role. The example below displays what information will contain the e-mail: Attention: NAME OF REPRESENTATIVE You have been registered as an Officer to the Grants and Contributions Online Services (GCOS) by NAME OF PRIMARY OFFICER from NAME OF ORGANIZATION. By clicking on the link below, you will be directed to the GCOS login page to enter your username (your username is the e-mail address used to receive this notification) * and temporary password, which will be available on the login page. You will be prompted to change your temporary password after your first login to access the system. https://funding.hrsdc.gc.ca Please note that you have 7 calendar days from receipt of this e-mail to login in. Should you not access the hyperlink within the allotted timeframe, the registration process will need to be repeated. Visit the Account Management tab (at the top of the GCOS main page) to review your access level and rights at the end. Thank you! Grants and Contributions Online Services https://funding.hrsdc.gc.ca 1 .3 .7 .3 V I EW I N G R OLES AND R ESP ON SI B I LI TI ES The responsibilities assigned to a representative can be viewed by using the View hyperlink on the “Representative” screen which will direct to the “Representative Details” screen where responsibilities assigned to that selected user will be displayed. Page 37 Click on the View hyperlink to see the responsibilities assigned to a representative. Name Name of Primary Officer Name of Officer Name of Delegate Role Status Function Primary Officer Active Edit | Remove | View Officer Pending Activation Edit | Remove | View Delegate De-activated View NEXT STEP: CREATE AND SUBMIT YOUR APPLICATION FOR FUNDING Page 38 2. MODULE 2: APPLICATION AND PROJECTS 2.1 WELCOME Once the Primary Officer has successfully entered all necessary information into GCOS (pertaining to their organization) they are directed to the “Welcome” screen where they can perform the following actions: • • • • • View List of Applications and Projects; Add an Application for Funding; Add a Claim; Add a Forecast of Project Expenditure; and Add an Activity Report. . This screen can be accessed from the Your name will appear here. IMPORTANT: If, when you login, someone else’s name appears here contact ESDC immediately (as the system may be compromised). “Home/Log In” screen (see section 1.1). Representatives must click the “View List of Applications” link to see a complete list of their organization’s applications/projects. This link will direct you to the “Applications and Projects” screen (see section 2.2). Page 39 2.2 APPLICATIONS AND PROJECTS The “Applications and Projects” screen displays a complete list of an organization’s applications and projects by project title, status, tracking number, modified by, dated updated and functions. The numbers and letters in this table correspond to the following screen shot: # Label Description 1 Project Title This is the project title used when the application was initially submitted. Represents the current status of the application/project: Draft: development of the application is in progress; Pending Signatories: the application requires one or more signatories to complete the Declaration to be submitted to ESDC; - Submitted: the application was successfully submitted to ESDC; - Submission failed: the application must be re-submitted; - Withdrawn: the application has been withdrawn; - Pending Re-Submission: the application requires modifications or further details. An ESDC representative will contact you regarding the information required. It will need to be re-submitted to ESDC to be assessed; - Under Assessment: the application is being assessed; - Active: the application is approved. Project management items can be submitted; - Rejected: the application was rejected by ESDC; and - Closed: the project is no longer active. The tracking number of the application. The name of the representative who created the application. The name of the representative who last modified the application. The date the application was last modified. Depending on the status, the functions available are view, edit, manage, action, remove or withdraw. - 2 Status 3 4 5 6 Tracking Number Created By: Modified By: Date Updated 7 Functions Page 40 Click the “Add” button to create a new Application for Funding. Name If you want to access your organization’s applications and project list (when you are in an application or a project) you can click the “Applications and Projects” link in the left side navigation bar. Note: Accessing the information from the navigation bar will not display the most up to date information in the “status” column. 2.3 PROGRAM SELECTION The “Program Selection” screen is the first in a series of screens used to complete the Application for Funding process. You MUST first choose a program group. Once selected a program list will be generated. The “Back” button will direct you to the “Welcome” screen (see section 2.1). Page 41 You MUST then choose a program from the dropdown list. Once you have selected a program, a link to the specific Applicant Guide will be displayed and will open in a separate window for reference. Note: The program guidelines link will direct you to the Applicant Guide specific to the selected program and is displayed as reference only. The “Next” button will direct you to the “Project Identification” screen (see section 2.4). Page 42 2.4 PROJECT IDENTIFICATION The “Project Identification” screen is the first in a series of screens where the representative enters further project information for the program for which they are completing the Application for Funding. You can type the anticipated start and end dates in the fields provided OR select the date using the calendars provided. Save Your Work! The “Save” button only saves your information You will not be directed to any of the other application pages. You must use the left side navigation bar to move on. 2.5 MAILING ADDRESS The “Mailing Address” screen is used to select the mailing address specific to the Application for Funding. All correspondence (including payments) will be sent to this address. All mailing addressed entered in the “Account Management” section will be displayed. Representatives will be required to select which mailing address to use for the application. Mailing addresses can be added in the “Account Management” section. Page 43 2.6 ORGANIZATION CONTACTS The “Organization Contacts” screen is used to add all organization contacts for a specific application, along with some general information about the contact. The “Add” button will direct you to the “Contact Details” screen (see section 2.6.1). Page 44 2 .6 .1 C ON TA CT D ETA I LS When an organization contact is added (on the “Contact Details” screen) the following information must be entered (*required field). The numbers and letters in this table correspond to the following screen shot: # Field Description 1. Given Name* The first name of the person. 2. Surname* The last name of the person. 3. Position Title The contact’s title within the organization 4. Contact Type* Drop down: You MUST identify one Main Application contact. Additional Contacts can be added (e.g. agreement signing authority, project activity contact). 5. Preferred Language of Communication – Written* 6. Preferred Language of Communication – Spoken* The organization contact’s preferred language for written communications A. English B. French The organization contact’s preferred language for spoken communications C. English D. French Indicates whether or not the organization contact’s address is the same as the organization’s address: 7. Contact Address* • • Select the organization’s contact’s address from the drop-down list or add a different one. When you select one from the list, the address fields will populate automatically. You will only need to complete the telephone number fields. 8. Address Line 1* The street address portion of the organization contact’s address. 9. Address Line 2 10. City/Town* The city/town portion of the organization contact’s mailing address. 11. Province/Territory* The province/territory portion of the organization contact’s address. 12. Postal code* The postal code portion of the organization contact’s address. 13. Country Default is Canada. 14. Telephone Number* The organization contact’s telephone area code. The organization contact’s telephone number where they can be reached. The organization contact’s telephone extension number, if one exists, where Page 45 # Field Description they can be reached. 15. Fax Number The organization contact’s fax number. Fax number area code Fax Number. 16. E-mail Address The e-mail address of the organization’s contact. 1 You must have one “Main Application Contact”. If you wish, additional contacts may also be added. 2 3 4 5 A B 6 C D 7 8 When you select “Same as Organization Address” or one the mailing addresses options, fields 8 to 13 are automatically populated. You must complete fields 14 to 15. 9 1 1 1 1 1 1 Save Work! 1 The “Save” button will direct you to the “Organization Contacts” screen. Page 46 Your You can “Edit” or “Remove” contacts from the organization contact list at any time, however, you must have a “Main Application Contact” at all times. 2.7 ORGANIZATION CAPACITY The “Organization Capacity” screen is used to enter details relevant to the organization’s capacity to properly manage the projects for which they are requesting funding (based on the organization’s profile). Note: Sensitive personal information must not be entered in this box (e.g. Social Insurance Number, personal finance data, medical and/or work history). Enter the number of employees currently working within your organization. If you answer yes to the question above, then provide a description of your organization’s transformation. Save Your Work! The “Save” button only saves your information , you will not be directed to any of the other application pages. You must use the left side navigation bar to move on. Page 47 2.8 AMOUNTS DUE The “Amounts Due” screen is used to enter amounts that an organization owes to the Government of Canada (GoC). From this screen, you declare your organization’s amounts owing to the GoC. To add an amount due, click the “Add” button; you will be directed to the “Amounts Due Details” screen (see section 3.8.1). 2 .8 .1 ADDING AN A M OUN T D UE (A M OUN TS D UE D ETA I LS ) If an organization owes any amounts that are in default or in arrears to the GoC, the value for each amount owing in the “Amounts Due Details” screen must be added. Only numbers are permitted in the “Amount Owing” field; no spaces, commas or $ signs. In text form, enter the nature of the amount(s) your organization has in default or in arrears to the GoC. Save Your Work! Page 48 2.9 PROJECT DESCRIPTION The “Project Description” screen is used to enter details regarding the project for which you are requesting funding. This information is used to assess the project’s quality and funding eligibility. Review the program specific Applicant Guide for additional information that may be required. Save Your Work! The “Save” button only saves your information … you will not be directed to any of the other application pages. You must use the left side navigation bar to move on. 2.10 PROJECT DETAILS The “Project Details” screen allows the representative to provide further details on the project’s activities and location (*required field). The numbers and letters in this table correspond to the following screen shot: # Field Description 1. Does the project include Results Measurement indicators?* A. Yes B. No 2. Does the project include Results Measurement indicators? A description of how the organization plans to meet and track the expected results of the project. Page 49 # Field Description 3. Does this proposed project fit with your organization's other activities? * C. Yes D. No 4. If yes, please describe how. A description of how the project fits with other organizational activities. 5. Is your project designed to benefit or involve people in English or French-language minority communities? * E. Yes F. No 6. If 'Yes', please provide an explanation and any details on whether consultations will take place with these communities. Description of how the project is tailored to benefit or involve persons from both English and French communities. 7. Will any other organizations, networks or partners be involved in carrying out the project? * G. Yes H. No 8. If 'Yes', please clearly identify the role(s) and expertise they will bring to the project. Description of how other organizations, networks, individuals, or partners are involved in carrying out the project. 9. Does the project address the program’s national, regional or local priorities?* I. J. 10. If Yes, select all that apply: K. National L. Regional M. Local Yes No Applicants need to verify if their proposed activities are listed under the above Act – Please visit http://www.gazette.gc.ca/rp-pr/p2/2012/2012-07-18/html/sor-dors147-eng.html to access the list of Regulations Designating Physical Activities. If, "no", an Environmental Assessment is not required. 11 12. If "yes", then, as per the Canadian Environmental Assessment Act, 2012, applicant must submit the project description electronically to the CEAA (http://ceaa.gc.ca/default.asp?lang=En&n=63D3D025-1) for further review. The CEAA will determine if an Environmental Assessment (EA) is required based on the project description. ESDC funding will be conditional upon receipt by ESDC of, as the case may be, CEAA confirmation that an EA is not required, or, a copy of the completed EA and confirmation that your organization is equipped to appropriately address the EA findings. Does your project include activities that are listed in the Canadian Environmental Assessment Agency's (CEAA) Regulations Designating Physical Activities established under the Canadian Environmental Assessment Act, 2012?* N. Yes O. No Page 50 # 13. Field Description If "yes", then, as per the Canadian Environmental Assessment Act, 2012, applicant must submit the project description electronically to the CEAA for further review. The CEAA will determine if an Environmental Assessment (EA) is required based on the project description. ESDC funding will be conditional upon receipt by ESDC of, as the case may be, CEAA confirmation that an EA is not required, or, a copy of the completed EA and confirmation that your organization is equipped to appropriately address the EA findings. Page 51 1 A B 2 3 C D 4 5 E F 6 7 G H 8 9 1 I J K L M 1 1 1 N O Save The “Save” button only saves your information. You will not be directed to any of the other application pages. You must use the left side navigation bar to move on. Page 52 Your 2.11 PROJECT LOCATIONS The “Project Locations” screen allows you to list all locations where the project’s activities will occur, if the locations are different than yours. To add new locations (if different than where your organization is located) press the “Add” button. You will be directed to the “Location Details” screen (see section 2.11.1). 2 .1 1 .1 L OCA TI ON D ETA I LS The “Save” button only saves your information. You will not be directed to any of the other application pages. You must use the left side navigation bar to move on. Page 53 Save Your Work! 2.12 ANTICIPATED SOURCES OF FUNDING The “Anticipated Sources of Funding” screen allows you to provide details on how the project will be funded. Note: ESDC's funding Programs generally encourage and/or require funding applicants to seek cash and/or inkind contributions to their proposed project from other sources of funding. Each program has a "stacking limit", that is, a maximum permitted amount of combined funding from federal, provincial, territorial and municipal governments for any one project or initiative. Contributions to the project cannot exceed 100% of eligible expenditures. ESDC will use the information provided in this section to verify that the funding request conforms to any stacking limit or requirement for funding from other sources. "Other sources of funding" includes any source of funding (including your organization) other than the program to which is applying for funding. To specify the amount requested from ESDC you must click the “Enter Requested Amount” link. You will be directed to the “Contribution Details” screen (see screenshot 1 in section 2.12.1). To add new anticipated sources of funding click the “Add” button. You will be directed to the “Contribution Details” screen (see screenshot 2 in section 2.12.1). 2 .1 2 .1 C ON TR I B U TI ON D ETA I LS The “Contribution Details” screen allows you to add or edit the following details regarding the organizations’ anticipated sources of funding (*required field). The numbers and letters in this table correspond to the following screen shot: # 1. Field Source Name* Description When entering an amount for ESDC, this field will be read only and populated with ESDC. The name of the entity providing funding for the project. Page 54 # 2. Field Source Type* Description When entering an amount for ESDC, this field will be read only and populated with ESDC. Drop Down List: The sector type of an entity providing funding for the project. 3. Cash The amount of cash-funding that an entity will be providing for the project. When entering an amount for ESDC, this field will be read only. The amount of in-kind funding that a contributor will be providing for the project. 4. In-Kind ($ Value) In-kind contributions are non-monetary goods or services that may be contributed to the project by your organization or other organizations or partners for which your organization will not be requesting re-imbursement. In-kind support may include donated equipment, services or facilities necessary for the proposed project that would otherwise have to be purchased. To be considered valid, in-kind contributions should contribute to the success of the project and estimated at fair market value. When entering an amount for ESDC, this field will be read only and populated with No. 5. 6. Confirmed Cash Confirmed In-Kind ($ Value) A. Yes B. No Cash contributions should be committed to in writing by the contributing party. When entering an amount for ESDC, this field will be read only and populated with No. C. Yes D. No In-kind contributions should be committed to in writing by the contributing party. When entering the amount requested from ESDC, you only need to enter the cash Page 55 The “Save” button only saves your information. You will not be directed to any of the other application pages. You must use the left side navigation bar to move on. 1 2 3 4 5 6 A B C D Save Your Work! You can “Edit” or “Remove” anticipated sources of contribution funding at any time before your application is submitted to ESDC. Page 56 2.13 BUDGET (PLANNED EXPENDITURES) The “Budget” screen allows you to provide a detailed list of planned expenditures, broken down by expenditure category/sub-category and funding source. ESDC uses the information provided in this screen to determine the overall cost of the proposed project, whether costs are linked to the activity, as well as the general nature of the expenditures to be covered by all anticipated sources of funding. You must enter the project budget according to the cost categories; see the cost-category lexicon for more details on the cost categories; this is a part of the Standard Application for Funding package). The help text beside the cost category fields specify the types of expenses that can be included. The “Save” button only saves your information. You will not be directed to any of the other application pages. You must use the left side navigation bar to move on. Save Your Work! Page 57 2.14 BUDGET DETAILS The “Budget Details” screen allows you to specify details on possible contract values and planned capital assets expenditures for the project. The numbers and letters in this table correspond to the following screen shot: # Field Description Indicate all statements that apply to your planned expenditures of ESDC funding. 1. Associated Businesses or Individuals: Please check all statements that apply to your planned expenditures of ESDC funding. A. Contracts valued at $25,000 or more are part of the planned expenditures. B. Contracts with businesses or individuals legally associated with the applicant organization are among the planned expenditures. C. Contracts with outside providers to manage all or part of the project activities on behalf of the applicant organization are among the planned expenditures. Note: For more information on this field click the “Help” link on the right side of the page. 2. Capital Assets: Will capital assets be among your planned expenditures with ESDC funding? Indicates whether or not the organization has identified the purchase of capital assets among its planned expenditures with ESDC funding. D. Yes E. No Note: For more information on this field click the “Help” link on the right side of the page. 3. If yes, please explain the benefit of the purchase(s) that are necessary to carry out the project activities Description of the benefit of the purchase(s) that are necessary to carry out the project activities, if the purchase of capital assets is needed. 4. Further Budget Details: (Maximum 32000 characters) Additional details (if applicable). Page 58 1 A B C 2 D E 3 Save Your Work! 4 The “Save” button only saves your information. You will not be directed to any of the other application pages. You must use the left side navigation bar to move on. Note: You will be required to summarize your project budget according to the Budget Detail Template. This template is an annex available in your program-specific Applicant Guide. • • The Budget Detail Template, which corresponds to the new cost category structure and lexicon, has been developed to support the Standard Application for Funding and will ensure a consistent approach to the collection of budget information during your application process. To ensure consistency across programs, the Budget Detail Template replaces existing versions of Budget Negotiation Notes. Page 59 2.15 SUPPORTING DOCUMENTS The “Supporting Documents” screen is used to view, add and manage files uploaded as supporting documentation for the Standard Application for Funding. • • • • All files are stored in the format in which they are uploaded. All file types are accepted. All files uploaded in the GCOS are scanned by an anti-virus application before being submitted to ESDC. If a file contains a virus, it will not be submitted to ESDC. You will be able to add documents to support your application in this section. You can select a document related to your organization from the list created in the Account Management (see section 1.3.6). Choose one option from the drop-down list that best reflects your document type (e.g. Letters of Incorporation). Browse your file structure and select the document for download. The “Cancel” button will return you to the “Supporting Documents” screen. The “Save” button will direct you to the “Supporting Documents” screen. Save Your Work! 2 .1 5 .1 A P P L I CA TI ON Page 60 ADDING A S UP P OR TI N G D OCUM EN T FOR TH E 2 .1 5 .2 A D D I N G A S UP P OR TI N G TH E O R GA N I ZA TI ON D OCUM EN T FOR You must select which document (s) you want to attach to the application. The “Save” button will direct you to the “Supporting Documents” screen. 2.16 REVIEW & SUBMIT The “Review & Submit” screen is a full summary of all the information entered into the application. It allows the Funding applicant to review and, if necessary, edit information. It also indicates if a mandatory field is not completed by providing an error message at the top of the screen. When all mandatory fields are complete, each section will be hidden, however can be expanded for review. To submit your application for funding click the “Submit” button. You will be directed to the “Declaration” screen (see section 2.17). Page 61 2.17 DECLARATION In order for an application to be eligible for funding, it must be completed by the official representative(s) of your organization in accordance with the organization's by-laws or other constituting documents. The first paragraph displays how many signatures are required to submit an application for funding. The number indicated is related to the information provided in the Signatories page (see section 1.3.2). 2 .1 7 .1 O N E SI GN A TOR Y When only one signatory has been identified, you will need to complete the declaration and by clicking the "Submit” button you acknowledge that you have read the declarations and are in agreement with their content and you are “signing” the application form that will be submitted to ESDC. Once the information has been successfully submitted, a confirmation message will be displayed (see section 2.19) 2 .1 7 .2 M UL TI P LE SI GN A TOR Y When 2 or more signatories are identified as being required to submit an application for funding to the Department, the first user will need to complete the declaration page. Prior to clicking on the "Submit” button, they will be provided with a table of the representative that have been delegated the right to submit applications for funding. They will have the option the either advise them or not by email. Signatory #1 Signatory #2 Signatory #3 Page 62 When the Submit button is selected, the users will be presented with a confirmation message. Thank you! Your signature has been captured. The submission to ESDC will only be possible once the required number of signatories has been captured. You can view how many signatories are required in the Account Management and how many signatories are outstanding on the left side menu using the Review and Submit screen of the item. An e-mail was sent only to the identified signatories to enable the submission of the item to ESDC. The users that receive the email will be advised that an action is required from them. They will be able to access their own account and look for a project that has a Pending Signatories status. They will be able to review the information prior to submitting the information to the department. Once all signatories have completed the declaration page, the last one will obtain a confirmation message. (see section 2.18) 2.18 APPLICATION CONFIRMATION The “Confirmation” screen displays a visible confirmation that the Application for Funding has been submitted successfully. It also displays a submission confirmation message and number. Your submission confirmation number will be the subject line of your confirmation e-mail from ESDC. 2 .1 8 .1 C ON FI R M A TI ON E- M A I L Your confirmation e-mail will contain the following information: Attention: We are pleased to acknowledge receipt of your Application for Funding. All applications are subject to a review. Your Application for Funding will be assessed in accordance with Terms and Conditions of the program. In any future communication regarding this Application for Funding, please refer to the tracking number noted above. Thank you for your interest in this program. Should you have any questions, please do not hesitate to contact us by e-mail at [email protected] Thank you! Grants and Contributions Online Services https://funding.hrsdc.gc.ca Page 63