1
Norstar
PRELUDE and CINPHONY ACD
User Guide
PRELUDE 3.6
CINPHONY Level I 3.6
CINPHONY Level II 3.6
by CINTECH Solutions, Inc.
Rel. 01
PO994582
V.001.101602.E
Copyright 1995-2002 CINTECH Solutions, Inc.
PRELUDE and CINPHONY are trademarks of
CINTECH Solutions, Inc.
Norstar and Nortel are trademarks of Northern Telecom.
Other brand and product names are trademarks or registered trademarks
of their respective holders.
2
Norstar PRELUDE and CINPHONY ACD 3.6 User Guide
TOC
Table of Contents
Table of Contents
CHAPTER 1: OVERVIEW ........................................................................................................... 7
What is Norstar PRELUDE and CINPHONY ACD? ...............................................................................................8
What does ACD do? ................................................................................................................................................8
How do you navigate through ACD Menus and Screens?................................................................................10
How to Enter ACD? ...............................................................................................................................................15
What is the ACD Security Key?............................................................................................................................15
What are the differences in the ACD Levels?.....................................................................................................16
CHAPTER 2: CONFIGURATION .............................................................................................. 17
Introduction............................................................................................................................................................18
Configuration Directory ........................................................................................................................................24
Agent Configuration..............................................................................................................................................27
Group Configuration .............................................................................................................................................30
Line Configuration.................................................................................................................................................42
Supervisor Configuration .....................................................................................................................................60
Emergency Configuration.....................................................................................................................................62
Recorded Announcement.....................................................................................................................................64
Voice Port Configuration ......................................................................................................................................66
Call Categorization ................................................................................................................................................67
System Wide Parameters......................................................................................................................................69
Update Configuration............................................................................................................................................73
Menu Password .....................................................................................................................................................75
Printer Configuration ............................................................................................................................................76
Wallboard Configuration.......................................................................................................................................78
Infocus Status Display Configuration .................................................................................................................81
CHAPTER 3: USING NORSTAR SETS .................................................................................... 83
Introduction............................................................................................................................................................84
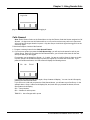
Feature Codes (Main Menu)..................................................................................................................................85
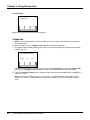
Agent Functions ....................................................................................................................................................86
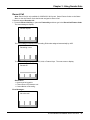
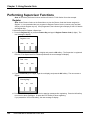
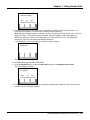
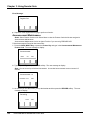
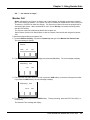
Performing Agent Functions ................................................................................................................................87
Supervisor Functions............................................................................................................................................99
Performing Supervisor Functions .....................................................................................................................100
Using Analog 2500 Station Sets.........................................................................................................................114
CHAPTER 4: STATUS ............................................................................................................ 115
Group Status Display ..........................................................................................................................................116
System Status Display ........................................................................................................................................119
Feature Codes......................................................................................................................................................121
About ACD............................................................................................................................................................122
CHAPTER 5: REPORTS ......................................................................................................... 123
4
Norstar PRELUDE and CINPHONY ACD 3.6 User Guide
Table of Contents
Introduction..........................................................................................................................................................124
Process Data ........................................................................................................................................................125
Common Report Parameters..............................................................................................................................126
Agent Reports ......................................................................................................................................................128
Group Reports .....................................................................................................................................................134
Line Reports.........................................................................................................................................................138
Categorization Reports .......................................................................................................................................145
System Reports ...................................................................................................................................................147
System Configuration Report.............................................................................................................................154
Scheduler .............................................................................................................................................................155
Report/File Maintenance .....................................................................................................................................157
CHAPTER 6: MAINTENANCE ................................................................................................ 159
Introduction..........................................................................................................................................................160
Process Data ........................................................................................................................................................160
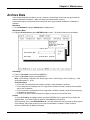
Archive Data.........................................................................................................................................................161
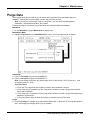
Purge Data............................................................................................................................................................163
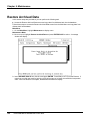
Archive and Purge Data ......................................................................................................................................164
Export Data...........................................................................................................................................................166
Restore Archived Data ........................................................................................................................................168
Recorded Calls.....................................................................................................................................................169
Data Management Parameters ...........................................................................................................................170
CHAPTER 7: ACD CONTROL ................................................................................................ 173
ACD Control .........................................................................................................................................................174
CHAPTER 8: DOS-SHELL...................................................................................................... 177
DOS-Shell .............................................................................................................................................................178
CHAPTER 9: APPENDICES ................................................................................................... 179
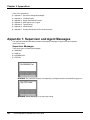
Appendix 1: Supervisor and Agent Messages .................................................................................................180
Appendix 2: Troubleshooting.............................................................................................................................189
Appendix 3: Export Data Record Formats ........................................................................................................190
Appendix 4: ACD Agent Login / Logout............................................................................................................194
Appendix 5: Tips and Hints ................................................................................................................................196
Appendix 6: Virtual Modem ................................................................................................................................198
Appendix 7: Average & Expected QTime Announcements ............................................................................198
GLOSSARY............................................................................................................................. 201
INDEX ...................................................................................................................................... 225
Norstar PRELUDE and CINPHONY ACD 3.6 User Guide
5
Table of Contents
6
Norstar PRELUDE and CINPHONY ACD 3.6 User Guide
Chapter 1
Chapter 1: Overview
Chapter 1: Overview
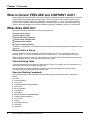
What is Norstar PRELUDE and CINPHONY ACD?
Norstar PRELUDE and CINPHONY ACD is an Automatic Call Distribution system designed for use with the
Norstar Applications Module and the Norstar KSU. There are 3 ACD Levels providing a wide variety of
features and functionality: PRELUDE, CINPHONY I, and CINPHONY II. There are also ACD Add-Ons
you can utilize to further enhance the performance and productivity of all levels: Caller Directed Routing
(CDR), Automated Attendant, Infocus Status Display and Reports, Wallboard, and Voice Port Activation.
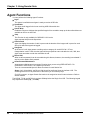
What does ACD do?
ACD performs 6 basic operations for every incoming ACD call:
◗ Directs Call to a Group
◗ Checks Routing Table
◗ Executes Routing Commands
◗ Checks Group Overflow Table
◗ Distributes Call to Agent
◗ Tracks Call Data for Reports
In Chapter 2, Configuration, call distribution directions and call processing parameters are defined for these
operations.
Directs Call to a Group
Incoming telephone lines are assigned to ACD Groups and stored in a Line Configuration Table. For
example, lines 1, 2, 3, and 4 are assigned to Group 1 and lines 5, 6, 7, and 8 are assigned to Group 2.
When an ACD call comes in on a line, ACD checks the Line Configuration Table and directs the call to the
Group assigned to the line. ACD then checks the Routing Table.
Checks Routing Table
A Group's operating hours are stored in a Routing Hours Table. For example, Group 1's operating hours
may be 9:00 am to 5:00 pm, Monday through Friday.
ACD checks the time of day to determine whether the call should be handled by the Day Routing
Command Table or the Night Routing Command Table.
Executes Routing Commands
Day and Night Routing Command Tables direct the call through sequential commands. Commands
include:
◗
◗
◗
◗
◗
◗
◗
◗
◗
◗
◗
◗
◗
◗
◗
8
ALERT
ANNOUNCEMENT
AUTO ATTD
AVERAGE QTIME ANNOUNCEMENT
CDR TABLE
DELAY ANSWER
DISCONNECT
DISTRIBUTE
EXPECTED QTIME ANNOUNCEMENT
FORCED ANNOUNCEMENT
GO TO STEP
GROUP
INCREASE PRIORITY
LINE XFER
LINK XFER
Norstar PRELUDE and CINPHONY ACD 3.6 User Guide
Chapter 1: Overview
◗
◗
◗
◗
NO ANSWER
SET PRIORITY
TRANSFER TO
VMAIL XFER
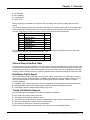
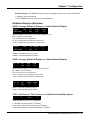
When the Routing Commands are configured, they are listed in the sequence (order) each call will be
routed.
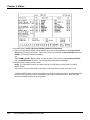
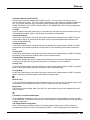
The following sample Day Routing Command Table delays the answering of the call for 10 seconds, plays
announcement #1, distributes the call for 5 seconds, plays announcement #2, distributes the call for 15
seconds, plays announcement #3, returns to step 4, and repeats until call is answered.
STEP
Day Command
Value
01
DELAY ANSWER
00:10
02
ANNOUNCEMENT
1
03
DISTRIBUTE
00:05
04
ANNOUNCEMENT
2
05
DISTRIBUTE
00:15
06
ANNOUNCEMENT
3
07
GO TO STEP
4
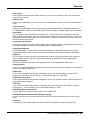
The following sample Night Command Routing Table forces Announcement #8 to inform the caller that
business hours are over, and then disconnects the call.
STEP
Night Command
Value
01
FORCED ANNC.
8
02
DISCONNECT
Checks Group Overflow Table
As ACD executes routing commands, it also tracks how many calls are waiting for the group and how long
each call has been waiting in the queue. You can specify overflow thresholds so that when too many calls
are received by a Group, or calls have remained too long in the queue, they can be distributed to Overflow
Group(s). When overflow is occurring, Agents in original Group or Overflow Group(s) can receive the call.
Distributes Call to Agent
ACD monitors the activity of each Agent in each Group. When a call comes in, it is directed by a routing
command to an Agent. If only one Agent is available, ACD sends the call to that Agent; however, if more
than one Agent is available, ACD refers to the Group's Agent Selection method. There are 3 Agent
Selection methods:
◗ LONGEST IDLE - selects Agent who has been available for the longest time since last handling a call.
◗ ROUND ROBIN - selects first available Agent listed after the Agent handling the last call.
◗ TOP DOWN - selects available Agent starting at top of list.
Tracks Call Data for Reports
ACD monitors system and Agent performance by tracking the following:
◗ The number of incoming calls on each line.
◗ The length of time each call spends in queue.
◗ The number of calls answered by Agents or abandoned by callers before they are answered.
◗ The amount of Agent time spent on various ACD activities.
◗ The number of requests for a Supervisor's assistance.
Refer to the Reports Chapter for a description of the System, Group, and Agent Reports.
Norstar PRELUDE and CINPHONY ACD 3.6 User Guide
9
Chapter 1: Overview
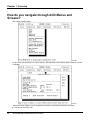
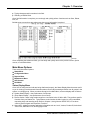
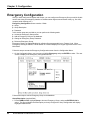
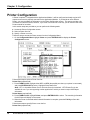
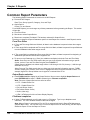
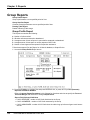
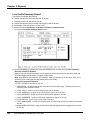
How do you navigate through ACD Menus and
Screens?
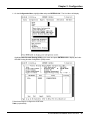
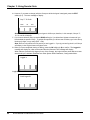
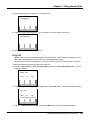
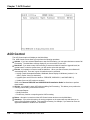
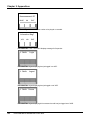
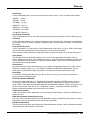
ACD opens to a Main Menu.
Example
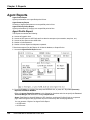
On this menu you can select 1 of 6 menu options. After selecting a menu option, either a menu or a screen
will display.
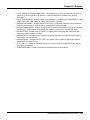
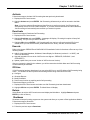
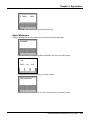
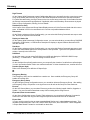
Example
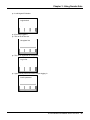
When the screen displays, you will complete the required or optional field information by either:
◗ Selecting an item from a list.
10
Norstar PRELUDE and CINPHONY ACD 3.6 User Guide
Chapter 1: Overview
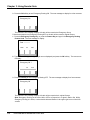
◗ Typing characters and/or numbers in the field.
◗ Selecting a YES/NO field.
Once field information is complete, you can simply and quickly perform functions such as Save, Delete,
Exit, etc.
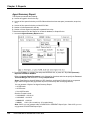
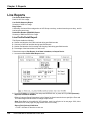
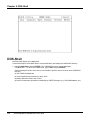
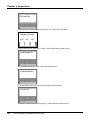
Behind some screens there are subscreens where more information is required.
Example
Once completing the subscreen fields, you can easily and quickly return to the previous screen, option
menus, or to the Main Menu.
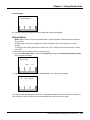
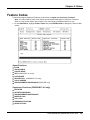
Main Menu Options
There are 6 Main Menu Options:
◗ Status Menu
◗ Configuration Menu
◗ Reports Menu
◗ Maintenance Menu
◗ ACD Control
◗ DOS-Shell
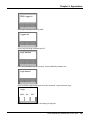
Status Display Menu
Once ACD is configured and calls are being distributed properly, the Status Display Menu becomes useful
to you in viewing up-to-the-second information about current call processing activities over all groups in the
system, or a single group. When you select this option from Main Menu, a screen displays with 4 choices:
◗ System Status Display - view performance of all Groups.
◗ Group Status Display - view performance of one Group.
◗ Feature Codes - these 3-digit codes range from a numerical value of 900 to 999. They perform specific
functions from your Station Set. Typical feature code functions include: logging in, going unavailable,
requesting help, and canceling wrap. Refer to Chapter 3, Using Norstar Station Sets, to use these
codes to perform Agent and Supervisor Functions.
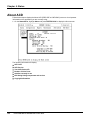
◗ About ACD - displays important application information such as: Level, Version, Product ID, Authorized
Voice Ports, Add-Ons in use, and copyright notice.
Norstar PRELUDE and CINPHONY ACD 3.6 User Guide
11
Chapter 1: Overview
Configuration Menu
Configuring your system completes the installation process. The Configuration screens enable you to add,
edit, and save the required and optional parameters you want to set for the system. This customization of
database records meets the needs of your call center while establishing the information you want to see on
the call reports. When you select this option on the Main Menu, a screen will display with 14 choices:
◗ Agent (required)
◗ Group (required)
◗ Line (required)
◗ Supervisor (required)
◗ Emergency Group
◗ Recorded Announcements
◗ Voice Ports
◗ Call Categorization
◗ System Wide Parameters
◗ Update Configuration
◗ Menu Password
◗ Printer
◗ Wallboard
◗ Infocus Status Display
Refer to Chapter 2, Configuration, and follow the steps to configure these options.
Reports Menu
As ACD handles incoming calls, it is also collecting data for reporting purposes. The data collected
includes:
◗ Agent/Group Data:
• The amount of logged-in time for each Agent, and how that time was spent.
• How many times the Agent requested a Supervisor's help.
• How the Agent performed within a Group.
• How many calls overflowed, and where they were sent.
• The number of calls answered or abandoned.
• The average time a call remained in queue before it was answered or abandoned.
• The total calls for the group.
◗ System Data:
• The number, time, duration, and type (ACD and non-ACD) of calls received on each line.
• The average length of time calls remained in queue.
• The time, number, duration, and percentage of time lines were busy.
• The number, time, duration of calls received on specific lines, and if the call was abandoned.
Refer to Chapter 5, Reports, to perform the steps to generate a report and for a brief description of
each report.
Also included in this menu are 3 operations to enhance Report generation:
◗ Scheduler - schedule Reports, Process Data, and Purge Data.
◗ Process Data - process up-to-date information for Report generation.
◗ Report/File Maintenance - copy, move, print, or view Reports generated to File, data Exported to File,
or Announcements saved to file.
12
Norstar PRELUDE and CINPHONY ACD 3.6 User Guide
Chapter 1: Overview
System Maintenance Menu
This menu allows you to manage the data stored in the database.
There are 7 System Maintenance operations:
◗ Archive Data - copies current database records to floppy disks for backup or later restoration.
◗ Archive and Purge Data - copies current database records to floppy disks and deletes the original
records from the database.
◗ Purge Data - deletes records from the database for a specified time period.
◗ Restore Archived Data - copies previously archived data from floppy disks back into the database on
the Applications Module.
◗ Export Data - creates export files containing quote-delimited fields separated by commas from ACD
databases. Export data contains ACD Call Data based on the ACD Call, Agent, Busy, and Category
reporting information.
◗ Recorded Calls - displays the Agent ID, call #, date, and time of each recorded call and allows you to
delete the recorded call.
◗ Data Management Parameters - automatically processes and purges call data on a daily basis and
allows you to set a data storage period for historical call data.
Refer to Chapter 6, Maintenance for directions to perform these operations.
ACD Control
This menu allows you to perform the following operations:
◗ Activate - select this operation to restart Call Processing after it has been deactivated. When selected,
the Main Menu will display and you can continue to use ACD.
◗ Deactivate - select this operation to stop Call Processing so you can execute an Add-On install,
Upgrade install, Update install, or shut the system down.
◗ Execute - after you have selected Deactivate, you can select this operation to install an Add-On,
Upgrade, or Update. When completed with the install, Call Processing will automatically be activated.
◗ Off-Line - select this operation to start ACD without starting Call Processing. You can perform the
following without being connected to the KSU: Configure, Generate Reports, Modify Scheduler, and
perform any function not requiring active Call Processing.
◗ Return - select this option to exit the ACD Control screen and return to the Main Menu.
◗ Shutdown - select this operation to stop all running programs on the system and power off the
Application Module. A Shutdown would be necessary, for example, if you wanted to move the
Applications Module to a different location or install a DVC or MS-BIC.
DOS-Shell
Enables you to exit ACD but continue Call Processing activity. When you select this option, the
CINPHONY DOS prompt will display - C:\CINPHONY>. To return to the ACD Control screen, you will need
to type in the word EXIT at this prompt and press ENTER.
Norstar PRELUDE and CINPHONY ACD 3.6 User Guide
13
Chapter 1: Overview
Keyboard Use Tables
The following tables list and describes the Function and Special Keys, Cursor Movement Keys, and
Editing Keys you will use.
Function and
Special Keys
Description
F1/CLICK RIGHT
displays a Help screen for highlighted field. ALT-F1 displays full screen help
F1/CLICK RIGHT FROM
HELP SCREEN
displays a keyboard help screen
F2/DBL CLICK
displays a choice list where you can select an item
F10 or ALT-S
saves information or performs the main operation for a screen (e.g., Run Report ALT-R). In Configuration, the saved information is also saved in the ACD
Configuration Directory
ESC or ALT-X
exits to previous screen or menu
ENTER/CLICK
selects field, function, menu item, and list item
LEFT/RIGHT ARROW
moves checkmark between YES and NO fields
ALT
when used in conjunction with a highlighted letter on the function to be performed, it
selects the function (e.g., ALT-S for Save, ALT-X for Exit)
PUSH BUTTONS (Save,
Exit, Delete, OK, Cancel,
etc.)
by selecting a push button on the screen (highlight and press ENTER, or CLICK on
button), you can perform the operation designated on the button
Cursor Movement
Keys
Description
ENTER
moves cursor to next field
TAB
moves cursor to next field
SHIFT TAB
moves cursor to previous field
RIGHT/LEFT ARROWS
moves cursor right/left one character in field, or to next/previous field. Also moves
checkmark to check box option on screen
DOWN/UP ARROWS
moves cursor down/up one field
HOME/END
moves cursor to first/last field on screen
CLICK
click left Mouse button on field you want to highlight
SCROLL BAR
located on right border of screens (vertical) and along bottom (horizontal). You can
use the Scroll Bar with the Mouse left button for Help screens, Report screens, lists
with over 5 choices, and scroll regions
14
Norstar PRELUDE and CINPHONY ACD 3.6 User Guide
Chapter 1: Overview
Editing Keys
Description
DEL
deletes character above cursor in a field
BACKSPACE
deletes character to left of cursor in a field
F6
deletes all characters right of cursor to end of a field
F5
deletes all characters in a field (clear field)
INS ON/OFF
inserts character in field to left of cursor position in field, or types over character in
field
How to Enter ACD?
It is assumed that the Applications Module has been connected properly to the Norstar KSU, all ACD
Hardware and Software has been installed, and the appropriate Verification Key has been entered.
Follow these steps to enter ACD to the Main Menu if Applications Module has been turned off:
1 Turn ON Norstar Applications Module by plugging in power cord.
2 Turn ON SVGA Monitor.
3 Turn ON Printer if connected.
4 When the OS/2 Desktop displays, click on Window List.
5 Click on ACD MASTR.
In a few moments the ACD Main Menu will display. If this is the first time entering ACD, go to the
Configuration Chapter and configure Agent, Group, Supervisor, and Lines to ensure proper operation.
What is the ACD Security Key?
This Input/Output Device is attached to the end of the Printer Cable and is connected to the Applications
Module's Parallel Printer Port. It validates the current ACD Version and ACD Add-Ons currently in use. If
you turn on or reboot ACD and you receive an error message: Invalid Product ID, Invalid Verification
Key, or Security Key Not Found, check the Security Key to make sure of a proper connection.
Norstar PRELUDE and CINPHONY ACD 3.6 User Guide
15
Chapter 1: Overview
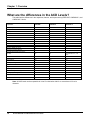
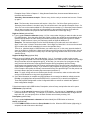
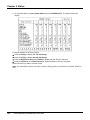
What are the differences in the ACD Levels?
This table lists the differences in the capacities, features, and reports among PRELUDE, CINPHONY I, and
CINPHONY II levels.
Capacities
PRELUDE
CINPHONY I
CINPHONY II
# Active Agents
15
30
80
# Agent IDs
60
120
240
# Groups
3
6
80
# Voice Ports Enabled*
4
8
12
# Overflow Levels
1
3
8
Simultaneous Announcements
# of ACD Voice Ports
# of ACD Voice Ports
# of ACD Voice Ports
Recorded Announcements
240
240
240
Rec. Announcements with Automated Attendant
240
240
240
Maximum Installed Voice Ports
32
32
32
Steps in Routing Table
8
16
16
Routing Tables per Group
2
2
2
Emergency Routing Groups
1
1
Registered Supervisors per Group
1
1
80
120 (with MICS 4.x, 144
lines)
# Lines
30
Features
Agent HELP
No
Yes
Yes
Alert
No
Yes
Yes
Priority Queuing
No
Yes
Yes
Silent Monitor
No
Yes
Yes
Agent Record Call
No
Yes
Yes
Data Export
No
Yes
Yes
DID/DNIS/Target Line Support
Yes
Yes
Yes
Emergency Routing
No
Yes
Yes
No
Yes
Yes
Reports
Destination Number Report
Note: All ACD levels can be expanded via Voice Port Activation Add-On to a maximum of 32 voice
channels.
16
Norstar PRELUDE and CINPHONY ACD 3.6 User Guide
Chapter 2
Chapter 2: Configuration
Chapter 2: Configuration
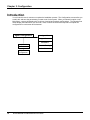
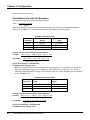
Introduction
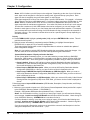
You will use this menu's screens to complete the installation process. The Configuration screens allow you
to add, edit, and save the parameters you want to set for the system. When you select this option on the
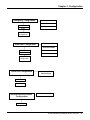
Main Menu, a screen will display with 14 choices (required and optional configurations). The following flow
charts display the fields where you can enter, mark, or select the information required to complete the
configuration for each screen and subscreen:
Agent Configuration
Agent ID
Agent Name
Password
Save
Delete
Answer Forcing
Call on Demand
Update
Configuration
18
Norstar PRELUDE and CINPHONY ACD 3.6 User Guide
Chapter 2: Configuration
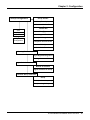
Group Number
Group Configuration
Group Description
Name on Station Set
Transfer DN
Save
Copy
Delete
Update
Configuration
Wrap Type
Auto Logout / Duration
Prompted Categorization
Telephone Service Factor
Priority
Unavailable Duration
Routing Table subscreen
Day & Night Routing Hours
Routing Commands/Values
Agent Selection subscreen
Method of Selection
Agent Selection for Group
Overflow Group subscreen
Group
Calls (maximum in queue)
Time (max length in queue)
Norstar PRELUDE and CINPHONY ACD 3.6 User Guide
19
Chapter 2: Configuration
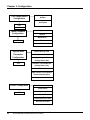
Route Order
Configuration
Line Number
Description
Line Configuration
Routing
Group
Line, Orig.,
Dest.,
Orig/Dest, or
Dest/Orig
Priority
Delay
Update
Configuration
Save
Destination Number
(DNIS/DID)
Configuration
DNIS/DID Number
Description
Group
Save
Routing
Update
Configuration
Priority
Originating Number
(ANI/ICLID)
Configuration
Save
Update
Configuration
Caller Directed
Routing (CDR)
Configuration
Save
ANI/ICLID Number
Description
Routing
Group
Priority
CDR Table Number
Description
Group
Priority
Update
Configuration
Import
20
Norstar PRELUDE and CINPHONY ACD 3.6 User Guide
Chapter 2: Configuration
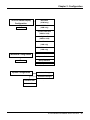
Emergency Configuration
Group Number
Group Description
Save
Delete
Password
Update
Configuration
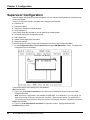
Supervisor Configuration
Supervisor ID
Supervisor Name
Save
Delete
Password
Group Assignment
Update
Configuration
Voice Port Configuration
Record Call
Reserve Ports
Save
Reconfigure
Recorded Announcement
Configuration
Description
Save
Norstar PRELUDE and CINPHONY ACD 3.6 User Guide
21
Chapter 2: Configuration
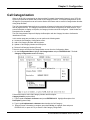
Call Categorization
Configuration
Call Categorization
Number
Call Categorization
Description
Save
Delete
Menu Password
Configuration
Configuration
Reports
Maintenance
Save
ACD Control
DOS-Shell
System Wide
Parameters
Configuration
Save
PRI/ICLID Delay Time
Backup Station Set DN
Login / Logout DN
(Analog Station Set)
Available / Unavailable DN
(Analog Station Set)
Indicator FlashRate 1 & 2
Digit Timeout / Port Timeout
(Automated Attendant)
Display on Station Set
Printer Configuration
Printer Port
Printer Name
Save
Page Length
Form Feed
Condensed Print Codes
Normal Print Codes
22
Norstar PRELUDE and CINPHONY ACD 3.6 User Guide
Chapter 2: Configuration
Configuration
Baud Rate
(COM only)
Save
COM Port
(COM only)
Infocus Status Display
Dynamic Data Rate
(COM or LAN)
Config Data Rate
(COM or LAN)
Name/IP Address
(LAN only)
TCP/IP Port Number
(LAN only)
Wallboard Configuration
Model and Format
System Statistics
Group Statistics
Save
Display Duration
Update Configuration
Activate Changes
Schedule Changes
Schedule Date
Schedule Time
Norstar PRELUDE and CINPHONY ACD 3.6 User Guide
23
Chapter 2: Configuration
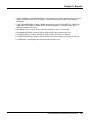
Configuration Directory
A Configuration Directory (C:\CINPHONY\DATBAK) is setup to store all configurations made by you. As
soon as a Configuration screen is updated or edited and the information is saved, ACD automatically
copies this information into the directory. You can copy these configurations saved as .DAT files onto a
floppy disk by following these steps:
y Select DOS-Shell on the ACD Main Menu. The CINPHONY Directory prompt will display C:\CINPHONY>
y Change to the DATBAK Directory (C:\CINPHONY\DATBAK>).
y Insert a floppy disk in the Application Module’s A: Drive.
y Copy all .DAT files from the DATBAK Directory onto the floppy.
C:\CINPHONY\DATBAK>copy *.dat a: ↵.
If the ACD software malfunctions for any reason, or if there is any problem causing ACD to become
unavailable, it may be necessary to reconfigure the system. If so, the Configuration Directory contains all
vital information to Configure the system quickly and accurately.
If the Applications Module is connected via LAN to an Infocus Server PC, a program called Data Retrieval
is provided on the Infocus Installations CD-ROM that enables you to retrieve the contents of the DATBAK
directory from the Infocus Server or Client PC to the hard disk or a floppy disk. Refer to the Infocus
Installation and User Guide for details.
Update Configuration
This utility allows you to complete the configuration process for changes made on Agent, Group, Line,
Supervisor, and Emergency Configuration screens.
After changes are saved on a Configuration screen, you will be returned to the Configuration Menu.
In this section steps are provided so you can perform the following tasks:
◗ Activate updates to configuration immediately.
◗ Schedule updates to configuration to occur at a later time.
24
Norstar PRELUDE and CINPHONY ACD 3.6 User Guide
Chapter 2: Configuration
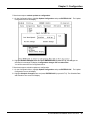
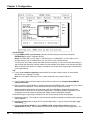
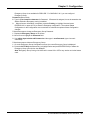
Follow these steps to activate updates to configuration:
1 On the Configuration Menu, highlight Update Configuration and press ENTER/CLICK. The Update
Configuration screen will display.
2 Highlight Activate Changes button and press ENTER/CLICK (or press ALT-A). As changes are
activated, this message will display: Configuration changes will now take effect.
You will be returned to the Configuration Menu.
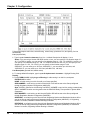
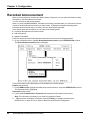
Follow these steps to schedule updates to configuration:
1 On the Configuration Menu, highlight Update Configuration and press ENTER/CLICK. The Update
Configuration screen will display.
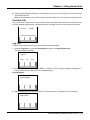
2 Highlight Schedule Changes button and press ENTER/CLICK (or press ALT-S). The Schedule Date
and Schedule Time screen will display.
Norstar PRELUDE and CINPHONY ACD 3.6 User Guide
25
Chapter 2: Configuration
Schedule Date
3 Press the F2 Key to display list of dates. Highlight Date and press ENTER/CLICK. The Schedule Time
field is highlighted.
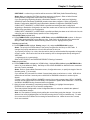
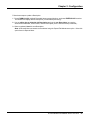
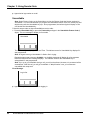
Schedule Time
4 Press the F2 Key to display list of times. Highlight Time and press ENTER/CLICK to select.
5 Press the F10 Key (or highlight OK and press ENTER/CLICK, or press ALT-O) to confirm the Schedule.
The Configuration changes will be updated on the scheduled date and time.
You will be returned to the Configuration Menu.
Note: if you select Cancel, changes will be pending activation or scheduling. You will be returned to
the Update Configuration screen.
While scheduled changes are pending, a message displays on the Main screen advising: “Configuration
changes pending”.
26
Norstar PRELUDE and CINPHONY ACD 3.6 User Guide
Chapter 2: Configuration
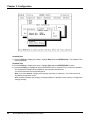
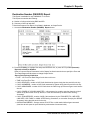
Agent Configuration
When you configure Agents first they will display in the Agent Selection choice list for each Group you
configure. It would be best, therefore, to configure all Agents for all shifts before configuring Groups.
There is 1 screen with 5 fields to complete when configuring an Agent:
◗ Agent Identification Number
◗ Agent's First Name
◗ Agent's Last Name
◗ Agent's Password for ACD login
◗ Answer Forcing for Agents using headsets
◗ Call on Demand
In this section steps are provided so you can perform the following tasks:
◗ Access the Agent Configuration screen.
◗ Add an Agent.
◗ Update existing Agent information.
◗ Delete an Agent.
Notes: When you add an Agent to the database, most of the information you complete for identification
will display on corresponding ACD screens, reports, and certain station sets.
Once Agents have been configured, they must be assigned to Group(s) for the Agents to be able to
login and receive ACD calls.
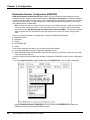
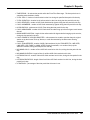
Follow this step to access the Agent Configuration screen from the Configuration Menu:
1 On the Configuration Menu, highlight Agent and press ENTER/CLICK to select. The Agent
Configuration screen will display.
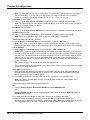
Follow these steps to add an Agent to the database:
ID # (required field)
1 Type in 2, 3, or 4 numeric characters for the Agent's identification number (maximum 9999). Highlight
First Name field.
Norstar PRELUDE and CINPHONY ACD 3.6 User Guide
27
Chapter 2: Configuration
Note: For PRELUDE, you can add up to 60 Agents; for CINPHONY I, you can add up to 120 Agents;
and, for CINPHONY II, you can add up to 240 Agents. For clarity, it is best to use a consistent
numbering system for Agents. For example: 01, 02, 03, etc., or 001, 002, 003, etc..
First Name (required field)
2 Type in up to 15 alphanumeric characters for Agent's first name. Highlight Last Name field.
Note: The first initial of First name and full Last Name display on the Group Status screen, and the full
First and Last Names display on Reports.
Last Name (required field)
3 Type in up to 15 alphanumeric characters for Agent's last name. Highlight Password field (optional).
Password (optional field)
4 Type in up to 8 numeric characters for Agent's password. Highlight Answer Forcing field.
Note: Agent must enter these digits when logging in to ACD (range 0-99999999).
Answer Forcing (required field - YES/NO)
5 Use the Right and Left Arrow keys to move checkmark to YES and NO fields.
Note: YES - forces a call upon the Agent; a zip tone precedes the call. NO - Agent accepts call by
pressing the appropriate station set key when ready. This only applies to those Agents using headsets.
Call on Demand
6 Use the Right and Left Arrow keys to move checkmark to YES and NO fields.
Notes: YES – places an Agent in a “Perpetually Unavailable” state when the Agent logs in. The only
way that an Agent can receive a call in this state is to manually press the Available programmed key on
the station set. The Agent would be momentarily available to receive a call; however, when the Agent
ends the call, the Agent would become Unavailable. This functionality is ideal for a Supervisor or
backup Agent, for example, to retrieve calls when they are reaching capacity until the calls return to a
normal distribution.
NO – places an Agent in an Available state when the Agent logs in.
Call on Demand can not be applied when using Categorization Codes or when using C3050 and C3060
Companion Portable Station Sets.
Save Agent (screen function)
7 When all screen information is complete and you are ready to add the Agent, press the F10 Key (or
highlight Save and press ENTER/CLICK, or press ALT-S). A blank Agent Configuration screen will
display if you want to continue adding Agents.
8 Press ESC (or highlight Exit and press ENTER/CLICK, or press ALT-X) to exit this screen.
Note: If you want to activate these changes or schedule these changes for a later update, select
Update Configuration.
Follow these steps to update existing Agent information:
ID #
1 Type the existing Agent's Identification Number and press ENTER/CLICK.
(or)
Press the F2/DBL CLICK to display all Agents' Identification Numbers, highlight Agent ID and press
ENTER/CLICK to select.
2 All Agent information will display on the screen. Edit any of the fields for this Agent.
3 When all screen information is complete, press the F10 Key (or highlight Save and press
ENTER/CLICK, or press ALT-S) to Save the Agent configuration. Then select Update Configuration on
the Configuration menu to activate or schedule the update of these configuration changes.
28
Norstar PRELUDE and CINPHONY ACD 3.6 User Guide
Chapter 2: Configuration
Follow these steps to delete an Agent from database:
ID #
1 Type the existing Agent's Identification Number and press ENTER/CLICK.
(or)
Press the F2/DBL CLICK to display all Agents' Identification Numbers, highlight Agent ID and press
ENTER/CLICK to select.
2 All Agent information will display on the screen. Press the ALT-D Keys simultaneously (or highlight
Delete and press ENTER/CLICK), confirm YES to delete, and the Agent will be deleted.
Norstar PRELUDE and CINPHONY ACD 3.6 User Guide
29
Chapter 2: Configuration
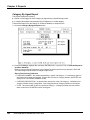
Group Configuration
After all Agents have been configured, you can configure the Groups you will need for your call center.
When Groups are configured they will display in the choice lists when you configure Lines, Emergency
Group, and Supervisors.
Notes: There are instances, however, when you might not assign Agents to a Group. For example: if
you just want to use an Automated Attendant (AUTO ATTD) Routing Command for a Group so that the
Announcement will direct the caller to a different Group or Extension, you can name a Group the Auto
Attd Group to perform this one operation without the intervention of Agents.
You can also configure a Group to handle Caller Directed Routing (CDR) calls. Refer to Caller Directed
Routing Number Configuration found under Line Configuration to setup CDR information in CDR
Tables.
There is 1 screen and 3 subscreens to complete for Group Configuration:
Group Configuration screen
• Routing Table subscreen
• Agent Selection subscreen
• Overflow Group subscreen
Group Configuration screen contains 12 fields to complete:
Group Number
Description
Name on Station Set
Transfer DN
Wrap Type
Wrap Duration
Auto Logout / Duration
Prompted Categorization
Priority
TSF Interval
TSF Threshold
Unavailable Duration
Routing Table subscreen contains 3 fields to complete:
Routing Hours
Day Routing Command
Night Routing Command
Agent Selection subscreen contains 2 fields to complete:
Method of Selection
Agent Selection
Overflow subscreen contains 3 fields to complete:
Overflow Group
Call
Time
Group Configuration
In this section steps are provided so you can perform the following tasks:
Access the Group Configuration screen.
30
Norstar PRELUDE and CINPHONY ACD 3.6 User Guide
Chapter 2: Configuration
Add a Group:
• Complete Group’s Routing Table.
• Select Agents for Group.
• Assign Overflow Group.
• Copy Group information to another Group.
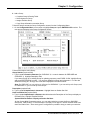
Follow this step to access the Group Configuration screen from the Configuration Menu:
1 On the Configuration Menu, move cursor to highlight Group and press ENTER/CLICK to select. The
next screen to display is the Group Configuration screen.
Follow these steps to add a Group:
Group Number (required field)
1 Type in up to 2 numeric characters (for CINPHONY II; 1 numeric character for PRELUDE and
CINPHONY I). Highlight Description field.
If you want to bring up an existing Group for updating purposes, press F2/DBL CLICK, highlight Group,
and press ENTER/CLICK to select. You can then update this screen and subscreens. You can also
delete this Group (ALT-D keys) once it has been displayed in the same manner.
Note: For PRELUDE, you can add up to 3 Groups; for CINPHONY I, you can add up to 6 Groups; and,
for CINPHONY II, you can add up to 80 Groups.
Description (required field)
2 Type in up to 20 alphanumeric characters. Highlight Name on Station Set field.
Name on Station Set (required field)
3 Type in up to 8 alphanumeric characters that abbreviates the Description of the Group to display on
the Station Set. Highlight Transfer DN field.
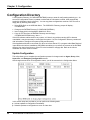
System Wide Parameters / Display on Station Set Note:
On the System Wide Parameters screen, you can select whether you want the Group, DNIS/DID
Description, CDR Number, or CDR Description to display on the Agents' Station Set when ACD Calls
reach the Station Sets. There are 4 types of configurations possible to help you make your selection:
Norstar PRELUDE and CINPHONY ACD 3.6 User Guide
31
Chapter 2: Configuration
• Group is default. When an ACD call has not been routed by Destination Number Configuration
(DNIS) or Caller Directed Routing Number Configuration (CDR), the Group to where the call was
routed will display on the Station Set.
• Select Group or DNIS/DID Description. When an ACD call is routed by Destination Number
Configuration (DNIS/DID) to a Group.
• Select Group, DNIS/DID Description, CDR Number or CDR Description. When an ACD call is
routed by Destination Number Configuration (DNIS/DID) to the CDR Table.
• Select Group, CDR Number, or CDR Description. When an ACD call is routed by Caller Directed
Routing Number Configuration (CDR) to the CDR Table.
Transfer DN (optional field)
4 Type in 2 to 7 numeric characters (range 21-9999999). Highlight Wrap Type field.
Note: Transfer Directory Number is a non-physical Norstar DN allowing calls to be transferred to the
Group being configured. For example, a receptionist answers a call that was not received as an ACD
Call; however, the call can be transferred to ACD by using the Transfer DN. The call then becomes an
ACD Call and enters the queue for the Group.
Wrap Type (required field)
5 Press F2/DBL CLICK to display the 3 ways to specify the length of wrap time allotted to an Agent after
completing an ACD call and being made available for another call:
• AUTOMATIC (if selected, specify duration)
• MANUAL (Agent cancels wrap via the Cancel Wrap feature code)
• NONE (Agent is immediately available after completing ACD call)
Highlight Type and press ENTER/CLICK to select. Highlight Duration field.
Duration (Wrap)
6 If you selected AUTOMATIC as the Wrap Type, you can change the 30 second default time. Type in
the Duration using the format MM:SS (range 00:05 - 59:59). Highlight Auto-Logout Duration field.
Note: If you are using forced categorization, a minimum 10 second wrap is required.
Auto Logout / Duration (required field)
7 Use Right or Left Arrow keys to position checkmark in YES or NO field.
If you want to place Agents in an Unavailable state after the specified duration, select NO. In this
case, Agents will be placed in an Unavailable state after the duration has expired. Type in the Duration
using the format MM:SS (range 00:05-59:59). This feature, for example, allows a multi-tasked user to
attend to a non-telephone related matter without requiring a logout each time. Changing the taste to
unavailable when an Agent cannot answer the set prevents additional calls being sent to the Agent.
When the Agent is ready to accept calls, the Agent needs only to press the Available programmed key.
If you want to place Agents in a Logged Out state after the specified duration, select YES. In this
case, Agents will be logged out after the duration has expired. Type in the Duration using the format
MM:SS (range 00:05-59:59).
Auto Logout Note: It is recommended that Auto Logout to Unavailable or Logged Out should be
configured consistently between Groups, especially if Agents are assigned to multiple Groups. For
example: an Agent is assigned to Groups 1 and 2. Group 1 is set to Auto Logout -Unavailable
(Duration=59 seconds) and Group 2 is set to Auto Logout- Logged Out (Duration=60 seconds). If the
Agent does not answer the phone for 59 seconds, the Agent is placed in an Unavailable state for Group
1; however, one second later the Agent is logged out of all Groups because the Auto Logout Duration
has expired for Group 2.
Delayed Ring Transfer Note: The Norstar has a Delayed Ring Transfer (DRT) that is set in number of
rings. Each ring occurs approximately every 6 seconds; therefore, the Auto-Logout in ACD should be
set less (in seconds) than the number of rings set for the Norstar DRT. For example, if ACD Autologout is set for 30 seconds, the Norstar DRT should be set to at least 6 rings (approximately 36
32
Norstar PRELUDE and CINPHONY ACD 3.6 User Guide
Chapter 2: Configuration
seconds). A DRT shorter than the Auto-Logout Duration results in an Agent being unavailable rather
than logged out.
Prompt Categorization (required field, YES/NO)
8 If you do not want to prompt Agents to enter a Category Code upon completing an ACD call, select NO.
If you want to prompt Agents to enter a Category Code upon completing a call, select YES. Use Right
or Left Arrow keys to position checkmark in YES or NO field. Press ENTER/CLICK to move cursor
down to Priority field.
Note: If NO is selected, Agents can still manually enter Code after completing the call. If Category
Codes are to be entered, Wrap Type must be set to AUTOMATIC or MANUAL.
Priority (required field, CINPHONY I and II only)
9 Press F2/DBL CLICK, highlight Line Priority (1-10), and press ENTER/CLICK to select.
Notes: The Default Priority is the order you set for the lines this Group will be using. For example, calls
received on Lines with higher priority will be distributed to Agents ahead of calls with lower priority
regardless of their length of time in queue. The default is 5 for all lines to make it easier for you to
increase or decrease prioritization. 1 = highest and 10 = lowest priority.
Refer to SET PRIORITY and INCREASE PRIORITY Commands in the Routing Commands section.
TSF Interval
10 To specify TSF Interval, type in up to 2 numeric characters for interval minutes (range 01-99).
Highlight TSF Threshold field.
Note: The Telephone Service Factor is the percentage of calls answered within a Threshold period (in
seconds) for the TSF Interval (in minutes). You can specify the TSF Interval and the Threshold. For
example, during a 10 minute interval how many calls were answered within a 30 second threshold (from
first ring to answer).
11 To specify TSF Threshold, type in up to 3 numeric characters for threshold seconds (range 001-999).
Unavailable Duration
12 Type in the Duration using the format MM:SS (range 00:00-59:59).
Note: Unavailable Duration is the time specified for all Agents in a Group to remain Unavailable before
this status is alerted. When an Agent has exceeded the specified time period, the Unavailable field for
this Agent on the Group Status screen will flash. The flashing terminates when the Agent becomes
Available or if the Unavailable Duration value is increased. If you do not want to set a duration, leave
the field value at 00:00.
13 When completed with all screen and subscreen edits, press F10 key (or highlight Save and press
ENTER/CLICK, or press ALT-S) to save these configurations. Then select Update Configuration on the
Configuration Menu to activate or schedule the update of these configuration changes.
Follow these steps to complete Group’s Routing Table:
1 Highlight Routing button and press ENTER/CLICK to display Routing Table screen.
Norstar PRELUDE and CINPHONY ACD 3.6 User Guide
33
Chapter 2: Configuration
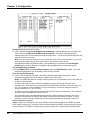
Routing Hours (start time and end time)
2 Type in start time using format HH:MM (range 00:00-24:00). Highlight Routing Hours end time field.
Type in end time using format HH:MM (range 00:00-24:00). Hours within the range specified
constitute Day Hours. Hours outside the range are Night Hours. You can specify the Routing Hour Day
and then the times for that day.
Note: If you do not have business hours on a specific day of the week, specify that day’s hours only as
00:00-00:00 and Night Routing Hours will be used for the complete 24 hour period.
Highlight Day Routing Command field Step 1. Use the Ctrl key in conjunction with Left and Right
Arrow keys to move from Routing Hours region to Day and Night Routing Commands regions.
Day or Night Routing Command
3 Press F2/DBL CLICK, highlight Routing Command, and press ENTER/CLICK to select. The Value
field will be highlighted so you can specify a value for this Command.
Value (for Routing Command)
4 Type in value for Routing Command. See Routing Command and Values listed below. Select
Command and specify Value for all Steps you want to use on this Table.
Notes: For PRELUDE, there are 8 Steps in Routing Table; and, for CINPHONY Levels I & II, there are
16 Steps in Routing Table.
To insert a blank row and add a Command, highlight Command row and press the ALT-I keys
simultaneously. Then add Routing Command. All Commands below inserted row will move down one
row. As you delete or insert commands, it may be necessary to access and change the values of
existing commands (e.g., GO TO STEP).
To delete a Command, highlight Command and press the ALT-D keys simultaneously. All Commands
below the deleted Command will move up one row.
The first blank Routing Command field following the last configured Routing Command will act as a
Distribute Command with an indefinite time period until the call is answered by an Agent. It is best,
therefore, to select a Routing Command for the last step that expedites the answering of each call.
Routing Commands and Values:
ALERT - enables you to assign an alert ring to a Station Set by entering its DN for the ALERT Command
Value. When a call comes in, is routed to this Group, and reaches the ALERT Command; the alert ring will
sound at the DN. The ALERT Command can be used more than once on the Routing Command Table.
34
Norstar PRELUDE and CINPHONY ACD 3.6 User Guide
Chapter 2: Configuration
Value: type in up to 7 numeric characters.
CINPHONY I and II only - 12 DNs can be programmed with ALERT.
Note: Try to minimize the use of Station Sets that are assigned for alert ring. Agents cannot log in on
this Station Set. You cannot enter a Voice Port DN or a Group DN.
ANNOUNCEMENT - plays a recorded announcement. This announcement is interrupted when an Agent
becomes available to take a call.
Value: type in 3 numeric characters for Announcement Number. A maximum of 240 Announcements can
be recorded.
Note: Using Recorded Announcement Configuration, you can add a Description to each Announcement
Number to further identify the Announcement.
AUTO ATTD - if you have installed the Automated Attendant Add-On, you can use this Command to play
an Announcement to the caller and prompt for a caller response indicating their choice of how to direct their
call. The caller presses specified keys on the Station Set keypad to attend to the call.
Note: PRELUDE - maximum of 6 AUTO ATTD Menus and 240 Recorded Announcements can be used;
CINPHONY I - 12 AUTO ATTD Menus and 240 Recorded Announcements can be used; and
CINPHONY II - 80 AUTO ATTD Menus and 240 Recorded Announcements can be used.
You can direct a call with the following Routing Commands:
CDR TABLE - sends call to the specified CDR Table.
Value: select 1.
Note: Make sure that the CDR Table has been previously configured. Refer to Caller Directed Routing
Number Configuration found under Line Configuration.
CONTINUE - go to next Command in Routing Table.
GO TO STEP - go to Step in Routing Table.
GROUP - send call to particular Group to follow that Group’s Routing Commands.
REPLAY - replay AUTO ATTD Announcement. Announcements can be replayed up to 3 times. This
step should not be applied to None and No Port for current Group.
TRANSFER - send call to a Station Set DN.
Values:
• GO TO STEP, type in Routing Command Step
• GROUP, type in Group Number
• TRANSFER TO, type in Station Set DN (Extension).
Norstar PRELUDE and CINPHONY ACD 3.6 User Guide
35
Chapter 2: Configuration
AVERAGE QTIME ANNOUNCEMENT - you can use this command to announce to the caller how long the
caller might have to wait before the call is answered (1 through 10 minutes)". There are two linked
announcements making up this command. The first announcement makes the statement: " The average
time to answer a call today is approximately…". The second announcement provides the calculated time:
"one minute" through "ten minutes or longer". You can select the Pre-Recorded set of Announcements or
select the User-Recorded set of Announcements. If you select User Recorded Announcements, refer to
Chapter 3: Using Norstar Sets, Performing Supervisor Functions, Announcement Maintenance for
directions to record these Announcements.
Follow these steps to configure Average QTime Announcement:
• On a Routing Command Step, select AVG QTIME ANNOUNCEMENT.
• Highlight the Value field to display the Avg QT Annc/Exp QT Annc Value screen.
• In the Language field, press the F2 key to display ENGLISH and FRENCH choices. Highlight the
Language for the Announcements you want callers to hear and press ENTER to select.
• In the Announcement set field, press the F2 key to display PRE-RECORDED and USER-RECORDED
choices. Highlight the Announcement set you want to use and press ENTER to select.
For more information on the calculation criteria and rules of use for Average QTime Announcement, refer
to Appendix 7: Average & Expected QTime Announcements.
EXPECTED QTIME ANNOUNCEMENT - you can use this command to announce to the caller how long a
caller might be expected to wait before the call is answered (1 through 10 minutes). There are two linked
announcements making up this command. The first announcement makes the statement: " The expected
wait time for your call is approximately…". The second announcement provides the calculated time: "one
minute" through "ten minutes or longer". You can select the Pre-Recorded set of Announcements or select
the User-Recorded set of Announcements. If you select User Recorded Announcements, refer to Chapter
3: Using Norstar Sets, Performing Supervisor Functions, Announcement Maintenance for directions to
record these Announcements.
Follow these steps to configure Expected QTime Announcement:
• On a Routing Command Step, select EXP QTIME ANNOUNCEMENT.
• Highlight the Value field to display the Avg QT Annc/Exp QT Annc Value screen.
• In the Language field, press the F2 key to display ENGLISH and FRENCH choices. Highlight the
Language for the Announcements you want callers to hear and press ENTER to select.
36
Norstar PRELUDE and CINPHONY ACD 3.6 User Guide
Chapter 2: Configuration
• In the Announcement set field, press the F2 key to display PRE-RECORDED and USER-RECORDED
choices. Highlight the Announcement set you want to use and press ENTER to select.
For more information on the calculation criteria and rules of use for Expected QTime Announcement, refer
to Appendix 7: Average & Expected QTime Announcements.
CDR TABLE - if you have installed the Caller Directed Routing Add-On, you can use this Command to
send the call to a specified CDR Table. When the call reaches the table, a Primary Announcement is
played to direct the caller to enter a code (digit string) to direct the call to the appropriate Group configured
to handle these calls. Refer to Caller Directed Routing Number Configuration found under Line
Configuration.
Value: type in 1, 2, or 3.
Note: Make sure that the CDR Table has been previously configured. Refer to Caller Directed Routing
Number Configuration found under Line Configuration.
DELAY ANSWER - delays the answering of a call for the time period specified (range - 00:01 to 59:59).
When a call arrives on a Line assigned to a Group, ACD will refrain from answering until either the DELAY
ANSWER time has passed or an Agent becomes available. When used, this Command must be specified
as the first Routing Command. During the Delay Answer duration, the ACD backup set will ring and the
caller will hear ringing.
Value: type in time period using format MM:SS (range 00:01-59:59).
Notes: If ICLID is set to YES and DELAY ANSWER is used as first routing command step, DELAY
ANSWER duration must be greater than the ICLID Delay Time specified in System Wide Parameters.
If ORIG is specified as Line Routing and DELAY ANSWER is used as first routing command step,
DELAY ANSWER duration must be greater than the ICLID Delay Time specified in System Wide
Parameters.
DISCONNECT - ends the call. No entry is required in value field.
DISTRIBUTE - looks for first available Agent in the Group to send call within the time specified.
Value: type in the time using format MM:SS (range 00:01-59:59)
Note: Until an Agent is available, the caller will hear Norstar's hold source (i.e., tones, music, or
silence).
FORCED ANNOUNCEMENT - plays a recorded announcement without interruption, even if Agent is
available.
Value: type in up to 3 numeric characters for Announcement number. A maximum of 240 Announcements
can be recorded.
GO TO STEP - returns caller to previously specified step, executes that step's command, and then repeats
following commands.
Value: type in the Step number (PRELUDE 1-8 Steps and CINPHONY I & II 1-16 Steps).
Note: You cannot go to the previous Step before GO TO command step, to previous GO TO command
step, or any Step following GO TO command Step.
GROUP - sends the call to a different Group to become an ACD call in that Group’s queue.
Value: type in up to 2 numeric characters.
INCREASE PRIORITY - increases the PRIORITY of a call incrementally so that it gets distributed and
answered by first available Agent.
Value: type in 1 numeric character (1-10).
Note: If a LINE DEFAULT PRIORITY is 5, for example, and you set INCREASE PRIORITY to 1, the
new priority becomes 4 and increases by the same incremental value if the call is not answered by the
time it cycles through the commands and back to INCREASE PRIORITY.
LINE XFER - transfers a call to a Line or Line Pool and dials out to the telephone number specified. An
appropriate Command should follow this Command in the event the transfer fails because the line specified
is busy (e.g, a brief DISTRIBUTE and then a GO TO STEP will try the transfer again). Make sure that the
Norstar PRELUDE and CINPHONY ACD 3.6 User Guide
37
Chapter 2: Configuration
Line from which the call is transferred has Norstar Disconnect Supervision function. A maximum of 80 Line
Transfers are allowed.
Value: type in L followed by Line Number (1-9) and a comma, and then type in external number (e.g.,
L1,8612000). Or type in P followed by Pool Line Number (1-9 or A-O) and a comma, and then type in
external number (e.g., PA,8612000). Or type in PRI (Primary Rate Interface) followed by a comma, the 2
digit Norstar Destination Code, and then type in external number (e.g., PRI,778612000). Do not use the #
symbol in a LINE XFER string.
Note: If you are using a NI2 format for PRI, make sure the Norstar is configured with Prime Set= the
Backup Set.
LINK XFER - transfer a call outside the Norstar using a flashhook and dialing a specified telephone
number. Can be used with Norstar DR3 or greater. An appropriate Command should follow this
Command in the event of a transfer failure. A maximum of 80 Link Transfers are allowed.
Value: type in up to 30 characters for string (all digits, #, *, and a comma - for pause).
NO ANSWER - the call continues to ring until caller hangs up. Used as Step 1 only; no entry is required in
Value field.
Note: If call has been transferred to ACD Group and receives a NO ANSWER, the call will return to
originating Norstar step (i.e., receptionist or StarTalk).
SET PRIORITY - re-prioritizes the call so that it gets distributed and moved closer to the beginning of the
queue regardless of length of time in queue, unless the Default Priority is set to 1. A GO TO or
DISTRIBUTE command should follow this command.
Value: type in up to 2 numeric characters (1-10).
Note: When SET PRIORITY is used, it changes the Default Priority of the call to its value although the
call originated or was transferred from a Group with a different priority.
TRANSFER TO - transfers call to a Norstar DN. An appropriate Command should follow this Command in
the event of a transfer failure (e.g., a brief DISTRIBUTE and GO TO STEP to return to the TRANSFER TO
and retry).
Value: type in 2 to 7 numeric characters.
Note: An ACD Call transferred to an extension (DN) is no longer considered an ACD Call.
VMAIL XFER - transfers a call to an initialized and registered mailbox or Custom Call Routing (CCR) Tree
number in a Norstar voice mail application (e.g., StarTalk). An appropriate Command should follow this
Command in the event of a transfer failure (e.g., a brief DISTRIBUTE and GO TO STEP to return to the
VMAIL XFER and retry). A maximum of 80 Voice Mail Transfers are allowed
Value: For Mailbox: type in up to 7 alphanumeric characters. For CCR Tree, type in 1 numeric character
(1, 2, 3, or 4) and a # symbol for the CCR Tree number. Refer to your Norstar Voicemail System
Coordinator for more information on the CCR Tree.
5 When completed with Routing Table, press F10 key (or highlight OK and press ENTER/CLICK, or press
Alt-O) to confirm this subscreen configuration. You will be returned to the Group Configuration screen.
Follow these steps to select Agents for this Group:
1 Highlight the Agent Selection button and press ENTER/CLICK to display the Agent Selection screen
(or press ALT-A).
38
Norstar PRELUDE and CINPHONY ACD 3.6 User Guide
Chapter 2: Configuration
Method of Selection
2 Press F2/DBL CLICK, highlight Method, and press ENTER/CLICK to select. Highlight Agent Selection
field.
LONGEST IDLE - this standard method can be used if you want the call to go to the Agent who has
been available the longest since the last call.
ROUND ROBIN - this advanced method can be used if you want the call to go to the next available
Agent starting with the last Agent logged in.
TOP DOWN - this advanced method can be used if you want the call to go to the first available Agent
closest to top of list (as listed in the order specified on the Agent Selection list).
Agent Selection
3 Press F2/DBL CLICK, highlight Agent to assign to this Group, and press ENTER/CLICK to select.
Notes: To insert an Agent to change order, highlight existing Agent on list and then select new Agent.
This Agent will be inserted above the highlighted Agent.
If you are using the Round Robin or Top Down selection method, select the Agents in the order of the
selection method.
To delete an Agent from list, highlight the Agent and then press the ALT-D keys simultaneously.
PRELUDE - 60 Agents can be configured, 15 can be logged in at one time; CINPHONY I - 120 Agents
can be configured, 30 can be logged in at one time; and CINPHONY II - 240 Agents can be configured,
80 can be logged in at one time.
4 When completed, press F10 key (or highlight OK and press ENTER/CLICK, or press ALT-O) to confirm
this subscreen configuration.
Follow these steps to assign an Overflow Group to this Group:
1 Highlight Overflow Group button and press ENTER/CLICK to display the Overflow Group
Configuration screen.
Norstar PRELUDE and CINPHONY ACD 3.6 User Guide
39
Chapter 2: Configuration
Overflow Group
1 Press F2/DBL CLICK, highlight Group to become Overflow Group for this Group, and press
ENTER/CLICK to select. Highlight Call field.
Notes: For PRELUDE, you can select 1 Overflow Group; for CINPHONY I, you can select up to 3
Overflow Groups; and, for CINPHONY II, you can select up to 8 Overflow Groups.
If a Group has more calls in queue than what has been specified, or if any one call has been waiting in
queue longer than specified; Overflow makes the calls available to the Agents in the Overflow Group(s).
When an overflow call comes to an Agent, it maintains its wrap and force categorization characteristics
of the original Group.
Call
2 Type in up to 2 numeric characters (maximum 80) for number of calls to remain in queue before
Overflow occurs. Highlight Time field.
Note: You can specify Calls and/or Time. If either threshold is met, overflow will occur.
Time
3 Type in length of time a call can remain in queue before overflow occurs using the format MM:SS
(range 00:00-59:59).
4 When completed, press F10 key (or highlight OK and press ENTER/CLICK, or press ALT-O) to confirm
this subscreen configuration. You will be returned to the Group Configuration screen.
When completed with all screen and subscreen edits, press F10 key (or highlight Save and press
ENTER/CLICK, or press ALT-S) to save all configurations. Then select Update Configuration on the
Configuration menu to activate or schedule the update of these configuration changes.
Follow these steps to copy Group information from one Group (source) to this Group (target):
1 Display target Group. This could be a new Group with no fields completed or an existing Group with all
fields completed.
2 Highlight the Copy button (or press ALT-C keys simultaneously). A pop-up screen will display: Copy
From Group ___.
3 Type in source Group Number, or press F2/DBL CLICK, highlight Source Group, and press
ENTER/CLICK to select. The information from the source Group will copy over the target Group. The
40
Norstar PRELUDE and CINPHONY ACD 3.6 User Guide
Chapter 2: Configuration
only fields not to copy are the Description, Name on Station Set, and Transfer DN that you will need to
manually complete.
4 When completed with target Group, press F10 key (or highlight Save and press ENTER/CLICK, or
press ALT-S) to save this copy. Then select Update Configuration on the Configuration Menu, to
activate or schedule the update of these configuration changes.
Notes: If the AUTO ATTD Command is being used by the source Group, Routing Data is not copied to
target Group. If there is Group, Agent, and/or Overflow data already present in the target Group, this
information will be overwritten by the source Group during copy.
You can also delete an entire Group (including subscreen information). Highlight the Delete button and
press ENTER/CLICK, or press the ALT D keys simultaneously.
Norstar PRELUDE and CINPHONY ACD 3.6 User Guide
41
Chapter 2: Configuration
Line Configuration
When Agents and Groups have been configured, you can configure each Line to route calls to a specific
Group. You can also route calls from a particular Line to a Group handling Destination Number Calls
and/or a Group handling Originating Number Calls.
There are 5 Line Configuration choices on this menu:
Route Order Configuration
Line Configuration
Destination Number (DNIS/DID)
Originating Number (ANI/ICLID)
Caller Directed Routing Number (CDR)
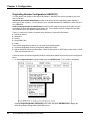
Route Order Configuration
You can specify the order that ANI, DNIS, and CDR matching tables are looked at to route a call to the
appropriate Group. For example, you can route calls via ANI on PRI Lines. Moreover, for ANI, DNIS, or
CDR, you do not have to configure lines. This is most useful when using PRI as all lines are in one pool.
You can also, for example, route calls through a DNIS Table and then route the call through ANI Tables
within a PRI environment.
Example of use: ABC Company wants to organize its Agents into Groups based on regions in the
country and route calls to these Groups based on Area Codes using ANI/ICLID Routing. This company
also uses a PRI connection that handles both ACD and Non-ACD Calls; therefore, destination numbers
are published to the company’s customer base. Route Order Configuration is then used to route these
calls by the DEST/ORIG option. When the calls are sent to Destination Number Table, ANI/ICLID is
configured as the Routing choice. The calls are then sent to the Origination Number Table, and, when
matching ANI/ICLID numbers are found (based on Area Code), the calls are sent to the specified
Groups.
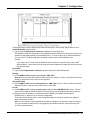
Route Order Configuration allows you to route ACD Calls to the following:
Line – Route Order Configuration is not in effect and calls will be routed by the Routing specified in Line
Configuration.
Origination Number – ACD Calls are sent directly to an Origination Number Table. If a call matches
the configured ANI/ICLID digits, the call is then routed to the specified Group or a CDR Table.
If an ANI/ICLID match is not found for a call, the call is sent to the Line Configuration table where one of
the following will occur:
•
If a Line has not been configured for this arriving call, the call will ring on the configured Backup
Station Set.
•
If the call has arrived on a Line that has been configured and Delay has been set to Yes for this
Line, the call will be routed by what has been specified in the Routing field. If Routing is set to
None, the call will be routed to the specified or default Group or CDR Table.
• If the call has arrived on a Line that has been configured and Delay has been set to No for this Line,
the call will be routed to the specified or default Group or CDR Table.
Destination Number – ACD Calls are sent directly to a Destination Number Table. If a call matches
the configured DNIS/DID digits, the call is then routed to the specified Group or a CDR Table.
If a DNIS/DID match is not found for a call, the call is sent to the Line Configuration table where one of
the following will occur:
42
•
If a Line has not been configured for this arriving call, the call will ring on the configured Backup
Station Set.
•
If the call has arrived on a Line that has been configured and Delay has been set to Yes for this
Line, the call will be routed by what has been specified in the Routing field. If Routing is set to
None, the call will be routed to the specified or default Group or CDR Table.
Norstar PRELUDE and CINPHONY ACD 3.6 User Guide
Chapter 2: Configuration
• If the call has arrived on a Line that has been configured and Delay has been set to No for this Line,
the call will be routed to the specified or default Group or CDR Table.
ORIG/DEST – ACD Calls with both ANI/ICLID and DNIS/DID digits are sent first to an Origination
Number Table. If a call matches the configured ANI/ICLID digits, the call is then routed to the specified
or default Group or CDR Table. If a match is not found, the call is then sent to the Destination Number
Table. If a call matches the configured DNIS/DID digits, the call is then routed to the specified Group or
a CDR Table.
If both ANI/ICLID and DNIS/DID matches are not found for a call, the call is sent to the Line
Configuration table where one of the following will occur:
•
If a Line has not been configured for this arriving call, the call will ring on the configured Backup
Station Set.
•
If the call has arrived on a Line that has been configured and Delay has been set to Yes for this
Line, the call will be routed by what has been specified in the Routing field. If Routing is set to
None, the call will be routed to the specified or default Group or CDR Table.
• If the call has arrived on a Line that has been configured and Delay has been set to No for this Line,
the call will be routed to the specified or default Group or CDR Table.
DEST/ORIG – ACD Calls with both DNIS/DID and ANI/ICLID digits are sent first to a Destination
Number Table. If a call matches the configured DNIS/DID digits, the call is then routed to the specified
or default Group or CDR Table. If a match is not found, the call is then sent to the Origination Number
Table. If a call matches the configured ANI/ICLID digits, the call is then routed to the specified Group or
a CDR Table.
If both DNIS/DID and ANI/ICLID matches are not found for a call, the call is sent to the Line
Configuration table where one of the following will occur:
•
If a Line has not been configured for this arriving call, the call will ring on the configured Backup
Station Set.
•
If the call has arrived on a Line that has been configured and Delay has been set to Yes for this
Line, the call will be routed by what has been specified in the Routing field. If Routing is set to
None, the call will be routed to the specified or default Group or CDR Table.
• If the call has arrived on a Line that has been configured and Delay has been set to No for this Line,
the call will be routed to the specified or default Group or CDR Table.
Follow these steps to access the Route Order Configuration screen and specify a Route Order:
1 On the Configuration Menu, highlight Route Order Configuration and press ENTER/CLICK. The
Line Menu will display.
Norstar PRELUDE and CINPHONY ACD 3.6 User Guide
43
Chapter 2: Configuration
Highlight Route Order Configuration on this menu and press ENTER/CLICK to display the Route
Order Configuration screen.
2 Press F2/DBL CLICK and select either Line, ORIG NUM, DEST NUM, ORIG/DEST, or DEST/ORIG.
3 When all screen information is completed, press the F10 Key (or highlight Save and press
ENTER/CLICK, or press ALT-S) to save this configuration.
44
Norstar PRELUDE and CINPHONY ACD 3.6 User Guide
Chapter 2: Configuration
Then select Update Configuration on the Configuration Menu to activate or schedule the update of
these configuration changes.
Line Configuration
There is 1 screen with 6 fields to complete when configuring a Line:
◗ Line
◗ Line Description
◗ Routing
◗ Group
◗ Priority
◗ Delay
In this section steps are provided so you can perform the following tasks:
◗ Access the Line Configuration screen.
◗ Add a Line and Description, select Routing, select Group or CDR Table, prioritize the Line, and specify if
the Line should delay (Yes or No).
Notes: When you assign a Group to a Line, it becomes an ACD Line. When you prioritize a Line, you
give a priority number to the line that becomes the order in which the call is handled.
If a Line is an ACD Line, a Group or CDR Table must be assigned.
Follow this step to access the Line Configuration screen from the Configuration Menu:
1 On the Configuration Menu, highlight Line and press ENTER/CLICK. The Line Menu will display.
Highlight Line Configuration on this menu and press ENTER/CLICK to display the Line Configuration
screen.
Norstar PRELUDE and CINPHONY ACD 3.6 User Guide
45
Chapter 2: Configuration
Follow these steps to add a Line, select Routing, select Group, prioritize a Line, and specify if a Line
should delay:
Line (required field)
1 Type in up to 3 numeric characters for a Line. A default Description will display - Line n.
Notes: If you are using a Norstar KSU DR5 version or less, you can specify a Line Number range of 180. For a DR6 or greater, you can specify a Line Number range of 1-120. For a MICS 2.0 version, you
can specify a Line Number range of 1-144. For a MICS version less than 2.0, you can specify a Line
Number range of 1-120. For a CICS, you can specify a Line Number range of 1-48.
PRELUDE - you can utilize up to 30 Lines; CINPHONY I - you can utilize up to 80 Lines; and
CINPHONY II - you can utilize up to 120 Lines (with MICS 4.0, 144 lines).
Line Description (optional field, default name)
2 To change default Description, type in up to 20 alphanumeric characters. Highlight Routing field.
Routing
3 Press F2/DBL CLICK, highlight type of Routing for calls coming in on this Line, and press
ENTER/CLICK to select.
NONE - all calls coming in on this Line will go to Group specified.
ORIG NUMBER - a call arriving on this line with ANI or ICLID will be sent to the Group configured
through Originating Number Configuration (ANI/ICLID).
Note: If ORIG is specified as Line Routing and DELAY ANSWER is used as first routing command step,
DELAY ANSWER duration must be greater than the PRI/ICLID Delay Time specified in System Wide
Parameters.
DEST NUMBER - a call arriving on this line with DNIS or DID will be sent to the Group configured
through Destination Number Configuration (DNIS/DID).
ORIG/DEST - a call arriving on this line with both Originating Number and Destination Number will be
sent to the Group configured through Originating Number Configuration (ANI/ICLID). If Originating
Number is not sent, Destination Number Routing is followed.
DEST/ORIG - a call arriving on this line with both Destination Number and Originating Number will be
sent to the Group configured through Destination Number Configuration (DNIS/DID). If Destination
Number is not sent, Originating Number Routing is followed.
46
Norstar PRELUDE and CINPHONY ACD 3.6 User Guide
Chapter 2: Configuration
CDR TABLE - a call arriving on this line will be sent to the CDR Table (Caller Directed Routing).
Notes: Make sure that the CDR Table has been previously configured. Refer to Caller Directed
Routing Number Configuration found under Line Configuration.
If you are specifying Originating Number or Destination Number or both, make sure Originating
(ANI/ICLID) and/or Destination (DNIS/DID) numbers have been configured. Refer to Originating
Number Configuration (ANI/ICLID) and/or Destination Number Configuration (DNIS/DID) screens.
If ORIG, DEST, ORIG/DEST, or DEST/ORIG is specified and nothing has been configured in
Originating or Destination Configuration to match the number sent on the line, the call will be sent to the
default Group specified in Line Configuration.
If ORIG, DEST, ORIG/DEST, or DEST/ORIG is specified and Delay has been set to NO for the Line, the
call will be sent to the default Group specified in Line Configuration.
Group/CDR Table (required field)
4 Press F2/DBL CLICK, highlight Group or CDR Table, and press ENTER/CLICK to select. A Group or
CDR Table can be assigned to more than one Line. Calls coming in on this Line will be sent to this
Group or CDR Table unless a different Routing scheme is in use. Highlight Priority field.
Priority (required field)
5 Press F2/DBL CLICK, highlight Priority (range 1-10), and press ENTER/CLICK to select.
Notes: The priority in this field reflects to the priority configured for the Group or CDR Table. If
changed, the priority selected here is for all calls received on this Line.
If you specify a Priority 1 for a Line, then the calls for that Line will be handled first regardless of length
of time in queue. Each call on the Line will be routed by ACD to the appropriate Group and Agent or
CDR Table.
1 = highest and 10 = lowest priority.
Refer to SET PRIORITY and INCREASE PRIORITY Routing Commands.
Delay (required field)
6 Press F2/DBL CLICK to display the YES/NO fields. Highlight YES or NO and press ENTER/CLICK to
select. No is the default for Delay. Set Delay to YES to allow DNIS/DID or ANI/ICLID to be considered
when the Trunk is evaluated.
Notes: Refer to System Wide Parameters screen, Configuration menu, to specify the length of time for
the delay period (1-10 seconds).
If you selected YES, there will be a default 5 second delay when a call arrives on a Line. ACD will not
answer the call until the 5 seconds pass or ANI/ICLID or DNIS/DID information is received by the
Norstar.
If Delay is set to YES and DELAY ANSWER is used as first routing command step, DELAY ANSWER
duration must be greater than the ICLID Delay Time specified in System Wide Parameters. If set to NO,
the DELAY ANSWER Routing Command will not be applied.
7 When all screen information is completed, press the F10 Key (or highlight Save and press
ENTER/CLICK, or press ALT-S) to save this configuration.
Then select Update Configuration on the Configuration Menu to activate or schedule the update of
these configuration changes.
Note: You can update an existing Line by editing the row and then saving the changes. You can also
delete a Line row by highlighting the Line field and pressing the ALT-D keys simultaneously. To add a
Line, move cursor to the bottom of the existing list and add new Line. When the new Line is saved,
Lines are re-ordered.
Norstar PRELUDE and CINPHONY ACD 3.6 User Guide
47
Chapter 2: Configuration
Destination Number Configuration (DNIS/DID)
DNIS (Dialed Number Identification Service) relates to you the number the caller dialed (the internal
destination number, usually on 800 and 900 numbers). DID (Direct Inward Dial) is an internal destination
number into which a caller can directly dial. If this number has been configured in this table, the call will be
sent to the specified Group. You can configure up to 1000 DNIS Numbers for CINPHONY Levels I and II
and 3 DNIS Numbers for PRELUDE.
Note: The Norstar defines an exact format to recognize “true” DNIS information. Many Central Offices
/ Carriers cannot support this format. If this is the case with your CO or Carrier, refer to the following
topic in this section, DID Routing from CO switches that cannot send DNIS. The directions provided
there will ensure that you will be able to utilize the DNIS feature via this form of DID routing of ACD
Calls.
There is 1 screen with 5 fields to complete when configuring DNIS and DID Numbers:
◗ DNIS/DID Number
◗ Description
◗ Routing
◗ Group/CDR Table
◗ Priority
In this section steps are provided so you can perform the following tasks:
◗ Access the Destination Number Configuration (DNIS/DID) screen.
◗ Add a DNIS/DID Number and Description, select Routing (Group or CDR Table), select Group or CDR
Table, and prioritize the Line.
Follow this step to access the Destination Number Configuration (DNIS/DID) screen from the Configuration
Menu:
1 On the Configuration Menu, highlight Line and press ENTER/CLICK. The Line Menu will display.
Highlight Destination Number (DNIS/DID) on this menu and press ENTER/CLICK to display the
Destination Number Configuration (DNIS/DID) screen.
48
Norstar PRELUDE and CINPHONY ACD 3.6 User Guide
Chapter 2: Configuration
Follow these steps to add a DNIS/DID Number and Description, select Routing, select Group or CDR
Table, and prioritize the Line.
DNIS/DID Number (required field)
1 Type in up to 10 alphanumeric characters. Highlight the Description field.
A DNIS or DID Number is obtained from your Service Provider. The DNIS or DID Number is a string of
digits. These digits are what ACD designates as a Destination
Number (DNIS/DID) Call and will route the Line specified via Destination Number to the specified Group
or CDR Table. You can use the * (asterisk) Wildcard to substitute numbers (same as DOS wildcard
use).
Example: All numbers for a call center
841-3680 - last 4 digits = DNIS Number
841-3681 - last 4 digits = DNIS Number
841-3682
841-3683
841-3690 - last 4 digits = DNIS Number
841-3691 - last 4 digits = DNIS Number
841-3692 - last 4 digits = DNIS Number
841-3693 - last 4 digits = DNIS Number
841-3694 - last 4 digits = DNIS Number
The Service Provider has specified that 841-3680, 841-3681, and all 841-369x numbers are DNIS
Numbers, you would only need to make 3 entries for the 6 numbers:
3680
3681
369*
Wildcard Rules:
y can be used at end of string
y represents any digits 0-9 that are received after the first specified digits.
Norstar PRELUDE and CINPHONY ACD 3.6 User Guide
49
Chapter 2: Configuration
Description
2 Type in up to 8 numeric characters to further identify the DNIS/DID Number.
Notes: When you type in a Description for a DNIS/DID Number, this Description will display on a
Agent’s Station Set when a DNIS Call, routed via Destination Number Configuration, is received.
If the Description field is left blank, the digits in the DNIS/DID Number field will display instead on an
Agent’s Station Set.
When the Description or DNIS/DID Number displays on the Station Set, it replaces the Group Name
and Time in Queue prompt that normally displays when an ACD Call is received.
Routing
3 Press F2/DBL CLICK and select either Group or Origination Table.
Note: Make sure that the Origination Table has been previously configured.
Group/CDR Table
4 Press F2/DBL CLICK and select Group Number or CDR Table from list. When a call arrives with this
DNIS/DID Number, it will be routed to this Group or CDR Table.
Priority
5 Press F2/DBL CLICK, highlight a priority value (1-10), and press ENTER/CLICK to select. This will
prioritize the configured DNIS/DID digits so that calls arriving can be handled at the rate you specify.
6 When all screen information is completed, press the F10 Key (or highlight Save and press
ENTER/CLICK, or press ALT-S) to save this configuration.
Then select Update Configuration on the Configuration Menu to activate or schedule the update of
these configuration changes.
Note: You can update an existing DNIS/DID Number by editing the row and then saving the changes.
You can also delete a DNIS/DID row by highlighting the DNIS/DID Number field and pressing the ALTD keys simultaneously.
System Wide Parameters / Display on Station Set Note:
On the System Wide Parameters screen, you can select whether you want the Group, DNIS/DID
Description, CDR Number, or CDR Description to display on the Agents' Station Set when ACD Calls
reach the Station Sets. There are 4 types of configurations possible to help you make your selection:
• Group is default. When an ACD call has not been routed by Destination Number Configuration
(DNIS/DID) or Caller Directed Routing Number Configuration (CDR), the Group to where the call
was routed will display on the Station Set.
• Select Group or DNIS/DID Description. When an ACD call is routed by Destination Number
Configuration (DNIS/DID) to a Group.
• Select Group, DNIS/DID Description, CDR Number or CDR Description. When an ACD call is
routed by Destination Number Configuration (DNIS/DID) to the CDR Table.
• Select Group, CDR Number, or CDR Description. When an ACD call is routed by Caller Directed
Routing Number Configuration (CDR) to the CDR Table.
DID Routing from CO Switches that cannot send DNIS
Follow these steps to route DID calls from the CO:
Note: The Norstar Installer Password is required to setup this configuration.
• Configure T1 Circuits as Trunk Type:E&M
• Set DNIS Number:N off in Norstar Programming.
• Set Received number length to match the number of digits being sent by the CO.
• Configure a Target Line to match the expected received number.
• Assign the Target Lines to the Backup Set.
50
Norstar PRELUDE and CINPHONY ACD 3.6 User Guide
Chapter 2: Configuration
• Assign a Prime Set to the Target Lines, preferably the Backup Set programmed with as many Intercom
keys as possible. Test calls should ring into this set.
• Once test calls are successful, assign the digits to the ACD in Configuration | Line | Destination Number
| DNIS/DID Number. Do not do this until test calls successfully ring at the Backup Set.
• Do not configure any Lines in your Line list as the system will monitor all Lines in the Norstar.
Configuring PRI Channels in ACD:
PRI configuration within ACD depends on your environment. Review the following information for the SL1
and NI2 environments and follow the directions if applicable to your system.
SL1 Environment
• If the PRI channels are coming from a SL1 environment, the received digits are assigned to target lines
in the Norstar, Prime Set is assigned to the ACD backup Station Set, and the same received digits are
entered on the Destination Number Configuration screen.
• Set Received number length to match the number of digits being sent by the CO.
• Configure a Target Line to match the expected received number.
• Assign the Target Lines to the Backup Set.
Note: Perform this step if you are using MICS 4.0 or less. Do not perform this step if using MICS 5.0.
• Assign a Prime Set to the Target Lines, preferably the Backup Set programmed with as many Intercom
keys as possible. Test calls should ring into this set.
• Once test calls are successful, assign the digits to the ACD in Configuration | Line | Destination Number
| DNIS/DID Number. Do not do this until test calls successfully ring at the Backup Set.
• Do not configure any Lines in your Line list as the system will monitor all Lines in the Norstar.
NI2, 4ESS, and 5ESS Environments
• If the PRI channels are coming from a NI2 environment, the received digits are not assigned to target
lines in the Norstar; but in Trunk/Line Data, the Prime Set is assigned to the ACD Backup Station Set,
and the same received digits are entered on the Destination Number Configuration screen. In Norstar
Programming, DRT is set to "YES". Do not assign the PRI channels to the ACD in Line Configuration.
Norstar PRELUDE and CINPHONY ACD 3.6 User Guide
51
Chapter 2: Configuration
Originating Number Configuration (ANI/ICLID)
You can perform call routing for ANI and ICLID Numbers. ANI/ICLID is a service provided by your local
Service Provider.
ANI (Automatic Number Identification) is when a call arrives and the originating number displays to
inform you of who is calling. You can configure up to 1000 ANI Numbers for CINPHONY I and II and up to
3 for PRELUDE.
ICLID (Incoming Calling Line Identification) is similar to ANI, however the Name of the caller can also
accompany the number and display on the Station Set. If this number has been configured in this table,
the call will be sent to the specified ANI/ICLID Group.
There is 1 screen with 5 fields to complete when configuring ANI and ICLID Numbers:
◗ ANI/ICLID Number
◗ Description
◗ Routing
◗ Group/CDR Table
◗ Priority
In this section steps are provided so you can perform the following tasks:
◗ Access the Originating Number Configuration (ANI/ICLID) screen.
◗ Add an ANI/ICLID Number and Description, select Routing (Group or CDR Table), select Group or CDR
Table, and prioritize the Line.
Follow this step to access the Originating Number Configuration (ANI/ICLID) screen from the Configuration
Menu:
1 On the Configuration Menu, highlight Line and press ENTER/CLICK. The Line Menu will display.
Highlight Originating Number (ANI/ICLID) on this menu and press ENTER/CLICK to display the
Originating Number Configuration (ANI/ICLID) screen.
52
Norstar PRELUDE and CINPHONY ACD 3.6 User Guide
Chapter 2: Configuration
Follow these steps to add an ANI/ICLID Number and Description, select Group, and prioritize the Line.
ANI/ICLID Number (required field)
1 Type in up to 10 alphanumeric characters. Highlight the Description field.
This Number is what ACD designates as an Originating Number (ANI/ICLID) Call and will route the Line
specified by Originating Number to the specified Group. You can configure up to 1000 ANI Numbers.
You can use the * (asterisk) Wildcard to substitute numbers (same as DOS wildcard use).
Example:
If you want to list 513 Area Code as ANI/ICLID routed numbers to a specific Group, type in 513*
Wildcard Rules: can be used at end of string and used to represent any digits 0-9 received after the
first specified digits
Description
2 Type in up to 8 alphanumeric characters to further identify the ANI/ICLID Number.
Routing
3 Press F2/DBL CLICK and select either Group or CDR Table.
Note: Make sure that the CDR Table has been previously configured. Refer to Caller Directed Routing
Number Configuration found under Line Configuration.
Group/CDR Table
4 Press F2/DBL CLICK and select Group Number or CDR Table from list. When a call arrives with this
ANI/ICLID Number, it will be routed to this Group or CDR Table.
Priority
5 Press F2/DBL CLICK, highlight a priority value (1-10), and press ENTER/CLICK to select. This will
prioritize the configured ANI/ICLID digits so that calls arriving can be handled at the rate you specify.
6 When all screen information is completed, press the F10 Key (or highlight Save and press
ENTER/CLICK, or press ALT-S) to save this configuration.
Then select Update Configuration on the Configuration Menu to activate or schedule the update of
these configuration changes.
Note: You can update an existing ANI/ICLID Number by editing the row and then saving the changes.
You can also delete an ANI/ICLID row by highlighting the ANI/ICLID Number field and pressing the
ALT-D keys simultaneously.
Norstar PRELUDE and CINPHONY ACD 3.6 User Guide
53
Chapter 2: Configuration
Caller Directed Routing Number Configuration (CDR)
Caller Directed Routing is an ACD 3.6 Add-On that enables the routing of incoming calls based on DTMF
(Dual Tone Multi-Frequency or "touchtone dialing") digits entered by the caller. When a call is directed to a
CDR Table, a Primary Announcement can be recorded to tell the caller to enter the CDR Number. The
caller can enter up to 16 numeric characters and utilize a wildcard. For example, a CDR Number could be
a credit card number, customer number, account number, order number, or any number used to represent
the person or department the caller is trying to reach. After the CDR Number is entered, the call is then
sent to a Group configured to answer these calls.
This CDR Number is configured in the CDR Table allowing the following parameters:
◗ Table Number
◗ Table Number Description
◗ Caller Input Timeout
◗ Exception Group
◗ Caller Attempts
◗ Transfer DN
◗ Primary Announcement
◗ Secondary Announcement
◗ Digits to Collect
◗ Support No Digit Entry
You can configure 3 CDR Tables with up to 1,000 CDR Numbers per table.
There are several ways a call can reach the appropriate CDR Table:
◗ Line Configuration
All calls coming in on a specified Line (or Lines) can be routed directly to the CDR Table.
◗ Destination Number Configuration
Calls with a DNIS or DID digit string designation can be routed directly to the CDR Table.
◗ Originating Number Configuration
Calls with an ANI or ICLID digit string designation can be routed directly to the CDR Table.
◗ Automated Attendant Routing Command
A Group can be configured to use an Automated Attendant command. In the Automated Attendant
command, the CDR Table command is used as a routing step. When a call comes in on a Line (or
Lines) assigned to this Group, the Automated Attendant's CDR Table Command sends the call to the
specified CDR Table.
An Automated Attendant Group (without Agents) can also be configured to use a CDR Table command
as a routing step. When a call comes in on a Line (or Lines) assigned to this Group, the CDR Table
command sends the call to the specified CDR Table
◗ Group with CDR Table Routing Command
A Group can be configured to use a CDR Table command as a routing step. When a call comes in on a
Line (or Lines) assigned to this Group, the CDR Table command sends the call to the specified CDR
Table.
In this section steps are provided so you can perform the following tasks:
◗ Access the Caller Directed Routing Number Configuration (CDR) screen.
◗ Configure the CDR Table
◗ Add a CDR Number, Description, select a Group, and prioritize the call in queue.
◗ Import CDR information in .CSV format into the CDR Table.
Follow this step to access the Caller Directed Routing Number Configuration (CDR) screen from the
Configuration Menu:
54
Norstar PRELUDE and CINPHONY ACD 3.6 User Guide
Chapter 2: Configuration
1 On the Configuration Menu, highlight Line and press ENTER/CLICK. The Line Menu will display.
Highlight Caller Directed Routing (CDR) on this menu and press ENTER/CLICK to display the Caller
Directed Routing Number Configuration (CDR) screen.
Follow these steps to configure the CDR Table:
Table (required field)
Norstar PRELUDE and CINPHONY ACD 3.6 User Guide
55
Chapter 2: Configuration
1 Press the F2 Key, highlight the Table Number (1, 2, or 3) and press ENTER/CLICK to select. Highlight
the Table Description field.
Table Number Description
2 Type in up to 20 alphanumeric characters describing this Table. Highlight the Caller Input Timeout
field.
Caller Input Timeout (required field)
3 Type in up to 2 numeric characters for the timeout (range - 5 to 45 seconds, default - 20 seconds).
The Caller Input Timeout is the time period a caller is granted to enter the required digits for the current
session starting after the first digit is entered. If this time period expires, the caller can enter the digits
again if Caller Attempts is given a value. Highlight the Exception Group field.
Exception Group (required field)
4 Press F2/DBL CLICK to display the list of configured Groups. Highlight the Group and press
ENTER/CLICK to select. The call is sent to this Exception Group if the caller does not enter the correct
digit string in the first or any additional attempts. Highlight the Caller Attempts field.
Caller Attempts (optional field)
5 Press F2/DBL CLICK to display 1, 2, or 3 as the number of attempts (default - 2). Highlight the number
and press ENTER/CLICK to select. Caller Attempts is the chances a caller has to enter the correct digit
string. After the Primary Announcement, the caller completes the first attempt by entering in the
appropriate digit string. If this is an incorrect digit string, the Secondary Announcement will play telling
the caller to re-enter the digit string. You can, for example, select 3 attempts that would give the caller
two chances to enter the correct digit string. The Secondary Announcement will drive these last two
attempts.
Transfer DN (optional field)
6 Type in from 2 to 7 numeric characters (range 2-9999999). You can assign a Transfer DN to this
CDR Table so that a call, for any reason, can be transferred to this CDR Table and the caller can start
the process of entering a digit string. Highlight the Primary Announcement field.
Primary Announcement (required field)
7 Type in the Announcement Number for this Primary Announcement that was previously recorded on
the Station Set using the Announcement Maintenance feature. The Primary Announcement is
designated as the announcement to give the caller directions to enter the appropriate digit string. Refer
to Chapter 3 - Using Norstar Station Sets, Announcement Maintenance, to record this announcement.
Primary Announcement example without a Digits to Collect maximum: "Thank you for calling ABC
Company, please enter your code and then press the pound key. Your call will be sent to the
appropriate group.".
Primary Announcement example with a Digits to Collect maximum of 7: "Thank you for calling
ABC Company, please enter the seven digits for your code and your call will be sent to the appropriate
group.".
Note: The Primary Announcement will require a Voice Port. If all Voice Ports are busy when a Primary
Announcement is invoked to play, the call will be sent to the specified Exception Group. If the Primary
Announcement is played and the caller enters an incorrect digit string, a Secondary Announcement will
play. Refer to Secondary Announcement below.
Secondary Announcement (optional field)
8 Type in the Announcement Number for this Secondary Announcement that was previously configured
on the Station Set using the Announcement Maintenance feature. The Secondary Announcement is
designated as the announcement to give the caller directions to re-enter the appropriate digit string.
This Secondary Announcement will replay to the number of times you have specified Caller Attempts (2
or 3). If an incorrect digit string is entered for each specified retry, the call will be sent to the specified
56
Norstar PRELUDE and CINPHONY ACD 3.6 User Guide
Chapter 2: Configuration
Exception Group. Refer to Chapter 3 - Using Norstar Station Sets, Announcement Maintenance, to
record this announcement.
Secondary Announcement example: "We are sorry, but the code you entered was incorrect. Please
try again.".
Note: The Secondary Announcement will require a Voice Port. If all Voice Ports are busy when a
Secondary Announcement is invoked to play, the call will be sent to the specified Exception Group. If a
Voice Port can not be made available for a Secondary Announcement or if a Secondary Announcement
has not been recorded, the call will be sent immediately to the specified Exception Group after the
Primary Announcement has played and the caller has entered an incorrect digit string.
Digits to Collect (optional field)
9 Type in up to 2 numeric characters (range 1-16) for a set number of digits you want the caller to enter
for a CDR Number. Once the caller enters this number of digits, the call will be sent immediately to the
specified Group without the caller ending the number sequence by entering the # (pound or number
symbol). If field is left as a 0 (zero), the maximum number of digits will default to 16.
Examples: The maximum length for all of the CDR Numbers your callers will use in this table is 7
digits. In this case, it is best to enter the number 7 in the Digits to Collect field. As soon as the seventh
digit is entered, the call will immediately be sent to the specified Group.
There is no maximum length of CDR Numbers your callers may use. In this case, leave the default 0
(zero) in the Digits to Collect field. When each caller enters their last digit of the CDR Number, they will
also have press the # (pound or number) key to end the digit string and allow the call to be sent to the
specified Group.
Support No Digit Entry (optional field)
10 Move cursor to highlight either Yes or No (default - Yes). If, for example, a caller is using a rotary
(analog) telephone instead of a touch-tone (digital) telephone, the caller will not be able to enter the digit
string to send the call to the appropriate group. In this case, you can select Yes (to support no digit
entry) and the call will be sent to the specified Exception Group immediately after the Primary
Announcement is played and the Digit Timeout period expires (Digit Timeout Period is specified on the
System Wide Configuration screen). If you select No (not to support no digit entry), the call will be sent
to the Exception Group after the Primary Announcement Plays, the specified Digit Time Out period, and
the time it takes to play the Secondary Announcements (maximum 2).
Note: To avoid having calls sent to the Exception Group in this manner, make sure the callers that
receive a CDR Number are using touch-tone telephones.
11 If all Table information is complete and CDR Numbers do not need to be added or edited, press the
F10 Key (or highlight Save and press ENTER/CLICK, or press ALT-S) to save this configuration.
Then select Update Configuration on the Configuration Menu to activate or schedule the update of
these configuration changes.
Follow these steps to add a CDR Number, Description, select a Group, and prioritize the call in queue.
CDR Number (required field)
1 Type in up to 16 numerical characters for the CDR Number. You can use an * (asterisk) as a wildcard
for the last number in the string. For example, if you have ten CDR Numbers that are ten digits and all
begin with 123, you can specify all ten of these numbers at one time by entering 123*.
Description (optional field)
2 Type in up to 8 alphanumeric characters to further identify the CDR Number or Numbers.
Group (optional field)
3 Press F2/DBL CLICK and select the Group Number from list. When the CDR Number (digit string) is
accepted, the call will be sent to this Group.
Norstar PRELUDE and CINPHONY ACD 3.6 User Guide
57
Chapter 2: Configuration
Notes: ACD 3.6 allows up to 80 Groups to be configured. Depending on the size of your Call Center,
each Agent can be assigned to a Group thus making each Agent and Group synonymous. Each
Agent can also be assigned, along with other Agents, to other Groups.
Each Agent assigned as a Group can also be given a specific CDR Number. For example, a Customer
Service Agent is the Group called Maintenance. Customers (callers) are given a CDR Number of 1234.
Notes: When a customer enters 1234, the call is routed to the Maintenance Group and to this one
Agent responsible for maintenance agreements. Your entire Call Center can be set up in such manner.
As there are a maximum of 1000 CDR Numbers that can be configured, you can also assign a CDR
Number to each Agent or Group in your Call Center that could represent their expertise. For example,
your customer base could receive a listing of all CDR Numbers as they correspond to the expertise of
the Agent or Group. The customer could then direct a call to a specific Agent or Group depending on
the service needed.
Priority
4 Press F2/DBL CLICK, highlight a priority value (1-10), and press ENTER/CLICK to select. This will
prioritize the call in queue.
5 When all screen information is completed, press the F10 Key (or highlight Save and press
ENTER/CLICK, or press ALT-S) to save this configuration.
Then select Update Configuration on the Configuration Menu to activate or schedule the update of
these configuration changes.
Note: You can update an existing CDR Number by editing the row and then saving the changes. You
can also delete all of the information from a CDR Table by selecting the Delete button.
System Wide Parameters / Display on Station Set Note:
On the System Wide Parameters screen, you can select whether you want the Group, DNIS/DID
Description, CDR Number, or CDR Description to display on the Agents' Station Set when ACD Calls
reach the Station Sets. There are 4 types of configurations possible to help you make your selection:
• Group is default. When an ACD call has not been routed by Destination Number Configuration
(DNIS/DID) or Caller Directed Routing Number Configuration (CDR), the Group to where the call
was routed will display on the Station Set.
• Select Group or DNIS/DID Description. When you route an ACD call by Destination Number
Configuration (DNIS/DID) to a Group, you have a choice of what is displayed on the set.
• Select Group, DNIS/DID Description, CDR Number or CDR Description. When you route an
ACD call by Destination Number Configuration (DNIS/DID) to the CDR Table, you have a choice of
what is displayed on the set.
• Select Group, CDR Number, or CDR Description. When you route an ACD call by Caller Directed
Routing Number Configuration (CDR) to the CDR Table, you have a choice of what is displayed on
the set.
Follow these steps to Import CDR information (CDR Number, Description, Group Number, and Priority)
into a CDR Table.
1 Make sure your records to import are in .CSV format (Comma Separated Values) and the file is copied
to the CINPHONY Directory (default - C:\CINPHONY>).
Example: CDR Number,Description,Group Number,Priority = 1,Sales,24,1
Notes: If a CDR Number is missing in any line you are trying to import, you will receive the following
error message: Invalid or missing CDR Number and the Import will be cancelled.. Check the log file
in the CINPHONY Directory - CDRIMP.LOG to locate the error line(s).
If a Group Number is missing in any line you are trying to import, you will receive the following error
message: Invalid or missing Group Number and the Import will be cancelled.. Check the log file in
the CINPHONY Directory - CDRIMP.LOG to locate the error line(s)
If you do not provide a Description, make sure you provide the comma for the Description in the line.
Using the example above, the line would be: 1,,24,1.
58
Norstar PRELUDE and CINPHONY ACD 3.6 User Guide
Chapter 2: Configuration
If you do not provide a Priority value, a default value of 5 will be provided. Using the example above,
the line would be: 1,Sales,24,5
2 On the CDR Configuration screen, highlight the Import button and then press ENTER/CLICK. Type in
the name of the .CSV file to be imported and press ENTER. The CDR information will be imported.
Norstar PRELUDE and CINPHONY ACD 3.6 User Guide
59
Chapter 2: Configuration
Supervisor Configuration
When all Agents and Groups have been configured, you can configure the Supervisor(s) to manage these
Groups and Agents.
There is 1 screen with 4 fields to complete when configuring a Supervisor:
◗ Supervisor ID
◗ Supervisor's Name
◗ Supervisor’s Password for ACD Register
◗ Group Assignment
In this section steps are provided so you can perform the following tasks:
◗ Access the Supervisor Configuration screen.
◗ Add a Supervisor.
◗ Update existing Supervisor information.
◗ Delete a Supervisor.
Follow this step to access the Supervisor Configuration screen from the Configuration Menu:
1 On the Configuration Menu, highlight Supervisor and press ENTER/CLICK to select. The Supervisor
Configuration screen will display.
Follow these steps to add a Supervisor to the database:
ID # (required field)
1 Type in 2, 3, or 4 numeric characters for the Supervisor’s identification number (maximum 9999).
Highlight Name field.
Note: Supervisor Configuration is not available for PRELUDE. For CINPHONY I, you can add up to 6
Supervisors, assign 6 Groups to a Supervisor, and have 1 Supervisor per Group. For CINPHONY II,
you can add up to 80 Supervisors, assign 80 Groups to a Supervisor, and have 1 Supervisor per Group.
Name (required field)
2 Type in up to 20 alphanumeric characters for Supervisor’s name. Highlight Password field.
Password (optional field)
60
Norstar PRELUDE and CINPHONY ACD 3.6 User Guide
Chapter 2: Configuration
3 Type in up to 8 numeric characters for Supervisor’s password. Highlight first Group Assignment field
in region.
Note: The Supervisor will be prompted to enter the password when registering (range 0-99999999).
Group Assignment
4 Press F2/DBL CLICK, highlight Group(s) you want to assign to this Supervisor, and press
ENTER/CLICK to select.
Note: While the Supervisor is registered, information and warning messages and help requests can be
received from the Agents in the Groups selected. Refer to Appendix 1 for a complete list of Supervisor
messages.
5 When all screen information is complete and you are ready to add the Supervisor, press the F10 Key
(or highlight Save and press ENTER/CLICK, or press ALT-S) to save this configuration.
Then select Update Configuration on the Configuration Menu to activate or schedule the update of
these Supervisor configuration changes.
Follow these steps to update existing Supervisor information:
ID #
1 Type the existing Supervisor’s Identification Number and press ENTER/CLICK.
(or)
Press the F2/DBL CLICK to display all Supervisors’ Identification Numbers, highlight Supervisor ID
and press ENTER/CLICK to select.
2 All Supervisor information will display on the screen. Edit any of the fields for this Supervisor.
3 When all screen information is complete, press the F10 Key (or highlight Save and press
ENTER/CLICK, or press ALT-S) to Save the Supervisor configuration. Then select Update
Configuration on the Configuration menu to activate or schedule the update of these configuration
changes.
Follow these steps to delete a Supervisor from database:
ID #
1 Type the existing Supervisor Identification Number and press ENTER/CLICK.
(or)
Press the F2/DBL CLICK to display all Supervisors’ Identification Numbers, highlight Supervisor ID
and press ENTER/CLICK to select.
2 All Supervisor information will display on the screen. Hold down the ALT-D Keys simultaneously (or
highlight Delete and press ENTER/CLICK), select YES to confirm deletion, and the Supervisor will be
deleted.
Norstar PRELUDE and CINPHONY ACD 3.6 User Guide
61
Chapter 2: Configuration
Emergency Configuration
After you have configured all Agents and Groups, you can configure an Emergency Group to which all calls
can be sent during an emergency situation or situations when Agents cannot answer calls (e.g., fire drills,
company-wide meetings, etc.).
Emergency Configuration screen contains 3 fields:
◗ Group
◗ Group Description
◗ Password
In this section steps are provided so you can perform the following tasks:
◗ Access the Emergency Setup screen.
◗ Add an Emergency Group to the database.
◗ Change an Emergency Group Password.
◗ Delete an Emergency Group.
Emergency Routing is enabled/disabled by a Station Set programmable key or Feature Code. When
Emergency Routing is enabled, a white asterisk in a red box displays in the upper right hand corner of the
Main Menu.
Follow this step to access the Emergency Configuration screen from the Configuration Menu:
1 On the Configuration Menu, move cursor to highlight Emergency and press ENTER to select. The next
screen to display is the Emergency Configuration screen.
Follow these steps to add an Emergency Group to the database:
Group/Description (required field)
1 Press F2/DBL CLICK, highlight Group to become Emergency Group, and press ENTER/CLICK to
select. The Group Number and Description previously configured in Group Configuration will display.
Highlight Password field.
62
Norstar PRELUDE and CINPHONY ACD 3.6 User Guide
Chapter 2: Configuration
Emergency Group is not available for PRELUDE. For CINPHONY I & II, you can configure 1
Emergency Group.
Password (optional field)
2 Type in up to 8 numeric characters for Password. If Password is assigned, it must be entered at the
Station Set before Emergency routing is enabled.
3
When all screen information is complete, press the F10 Key (or highlight Save and press
ENTER/CLICK, or press ALT-S) to Save the Emergency configuration. Then select Update
Configuration on the Configuration menu to activate or schedule the update of these configuration
changes.
Follow these steps to change an Emergency Group Password:
1 Display the Emergency Group on the screen.
2 Move cursor to highlight the Password field.
3 Use editing keys to delete old Password and then type in new Password (up to 8 numeric
characters).
Follow these steps to delete an Emergency Group:
1 Go to the Emergency Group Configuration screen; the current Emergency Group is displayed.
2 Press the ALT-D Keys simultaneously (or highlight Delete and press ENTER/CLICK) to delete the
Emergency Group (record) from the database.
Note: Emergency Group routing of all ACD calls is turned ON or OFF at any station set via the feature
code.
Norstar PRELUDE and CINPHONY ACD 3.6 User Guide
63
Chapter 2: Configuration
Recorded Announcement
When an Announcement is recorded at a Station Set by a Supervisor, you can utilize this feature to add a
Description to the Recorded Announcement.
You can record up to 240 announcements.
When you use the ANNOUNCEMENT Command on a Routing Command table, you will need to enter the
number of the Recorded Announcement you want to play. A Description facilitates identifying these
Recorded Announcements when you need to enter the Announcement Number.
In this section steps are provided so you can perform the following tasks:
◗ Access the Recorded Announcement screen.
◗ Add a Description.
◗ Update a Description.
Follow this step to access the Recorded Announcement screen from the Configuration Menu:
1 On the Configuration Menu, highlight Recorded Announcement and press ENTER/CLICK to select.
The Recorded Announcement screen will display.
Follow these steps to add a Description to a Recorded Announcement Number:
Number (required field)
1 Press F2/DBL CLICK, highlight Recorded Announcement Number, and press ENTER/CLICK to select.
The Description field is highlighted.
Description (optional field)
2 Type in up to 20 alphanumeric characters that describes the Recorded Announcement.
Note: This information will display on the System Configuration Report.
3
When all screen information is complete, press the F10 Key (or highlight Save and press
ENTER/CLICK, or press ALT-S) to Save the Recorded Announcement configuration.
64
Norstar PRELUDE and CINPHONY ACD 3.6 User Guide
Chapter 2: Configuration
Follow these steps to update a Description:
1 Press F2/DBL CLICK, highlight Recorded Announcement Number, and press ENTER/CLICK to select.
The Number will display with its Description (if it was added previously).
2 Use an editing key to delete the old Description and type in new Description (or enter the
Announcement Number, select Delete, and the Description (not the Announcement) is deleted.).
3 When completed, Save this new Description.
Note: A Recorded Announcement can be deleted using the Report/File Maintenance option. Select this
option from the Reports Menu.
Norstar PRELUDE and CINPHONY ACD 3.6 User Guide
65
Chapter 2: Configuration
Voice Port Configuration
Voice Port DNs are automatically configured by ACD when the processor boots up. If the Voice Port DNs
are changed on the Norstar, you only need to select Reconfigure and the new DNs will display.
There is 1 screen with 1 field to complete to reserve a Voice Port:
Follow these steps to access the Voice Port Configuration screen from the Configuration Menu, and then
reconfigure the Voice Ports reserved for Recorded Calls:
1 On the Configuration Menu, highlight Voice Port and press ENTER/CLICK to select. The Voice Port
Configuration screen will display.
Record Call Reserved Ports (CINPHONY Levels I and II only)
2 Press F2/DBL CLICK, highlight Number, and press ENTER/CLICK to select.
3
When all screen information is complete, press the F10 Key (or highlight Save and press
ENTER/CLICK, or press ALT-S) to save Voice Port configuration.
4 Press Reconfigure.
Notes: If, for example, there are 4 Ports with Directory Numbers and the remaining Ports are UNUSED,
you can only reserve 3 of the Ports for Recorded Calls. One of the DNs must always be reserved for
playing Recorded Announcements.
The number of ports reserved for Recorded Calls are not used to play Announcements. If you have 4
Voice Ports, reserve 3 for recording calls. Only 1 port is used to play announcements to callers. The
other 3 Voice Ports remain IDLE at all times waiting to be used for recording calls.
66
Norstar PRELUDE and CINPHONY ACD 3.6 User Guide
Chapter 2: Configuration
Call Categorization
When an ACD Call is completed by an Agent and the Prompted Categorization feature is set to YES, the
Agent is prompted at the Station Set to enter a Call Category Number. If Prompted Categorization is NO,
the Agent is not prompted but can still use the Station Set feature code to enter this Categorization Number
during Wrap Duration.
The Call Categorization feature allows you to assign a Category Number and a Description to the types of
calls an Agent receives. The Category Code does not have to be configured to be used; however, if you
want a Description to display on Reports, the Category Number should be configured. 10,000 Codes and
Descriptions can be added.
The Call Categorization Report will display the Description with the Category Number to facilitate the
identification of calls.
In this section steps are provided so you can perform the following tasks:
◗ Access the Call Category Configuration screen.
◗ Add a Call Category Number and Description.
◗ Update a Call Category Number and Description.
◗ Delete a Call Category Number (Record).
Follow this step to access the Call Categorization screen from the Configuration Menu:
1 On the Configuration Menu highlight Call Categorization and press ENTER/CLICK. The Call
Category Configuration screen will display.
Follow these steps to add a Call Category Number and Description:
Category Number (required field)
1 Type in up to 12 numeric characters and press ENTER/CLICK. Highlight Description field.
Description (optional field)
2 Type in up 30 alphanumeric characters that describe the Call Category.
3 When all screen information is complete, press the F10 Key (or highlight Save and press
ENTER/CLICK, or press ALT-S) to Save the Call Category configuration.
Norstar PRELUDE and CINPHONY ACD 3.6 User Guide
67
Chapter 2: Configuration
Follow these steps to update a Call Category Number and Description:
1 Type in Call Category Number and press ENTER/CLICK.
(or)
Press F2/DBL CLICK, highlight Category Number, and press ENTER/CLICK to select. The Number
and Description (if specified) will display.
2 Use editing keys to delete Number and/or Description and type in new information.
3 When completed, Save this information.
Follow these steps to delete a Call Category Number (Record):
1 Type in Call Category Number and press ENTER/CLICK.
(or)
Press F2/DBL CLICK, highlight Category Number, and press ENTER/CLICK to select. The Number
and Description (if specified) will display.
2 Press the ALT-D Keys simultaneously (or highlight delete and press ENTER/CLICK), select YES to
confirm deletion, and the Category Number (Record) will be deleted.
68
Norstar PRELUDE and CINPHONY ACD 3.6 User Guide
Chapter 2: Configuration
System Wide Parameters
On the System Wide Parameters screen you can specify the following settings:
◗ PRI/ICLID Delay Time
If Delay on the Line Configuration screen is set to Yes, the time you specify in this field will be the actual
delay time.
◗ Backup Station Set DN
This is the Directory Number you can assign to your Backup Station Set. A Backup Station Set is
required to take incoming calls if ACD becomes unavailable. This Set must have all ACD lines
assigned to it, and it cannot be assigned to an Agent. At least 1 Station Set should be dedicated as
backup.
• M7310 or M7410: can be used for a Call Center with 1-8 lines.
◗
◗
◗
◗
• M7324: if a Call Center utilizes more than 24 lines, this dedicated Set may need a CAP module
attached.
Login/Logout DN and Available/Unavailable DN (Analog Station Set Parameters)
If you are using 2500-Compatible Analog Station Sets, you must specify the DN (Directory Number) you
will use to Login and Logout and the DN you will use to go Available and Unavailable.
Indicator FlashRate 1 and Indicator FlashRate 2
When a call is in queue, the Login Indicator light on the Station Set will flash. There are 3 flash speeds:
Initial Rate, Rate 1, and Rate 2. The Initial Rate changes after the number of calls in queue exceeds
the number specified in Rate 1. Rate 1 changes after the number of calls in queue exceeds Rate 2.
You can set these FlashRate break points.
Digit Timeout and Port Timeout
The Automated Attendant Routing Command Add-On or the Caller Directed Routing Add-On must be
installed before these features can be used.
Digit Timeout is the time a user has to press a key on the Station Set before the AUTO ATTD’s NONE
Step sends call to specified command after the announcement has played completely. The NONE step
and command value are specified with each AUTO ATTD Menu. For Caller Directed Routing, the Digit
Timeout is the time a user has to press a key on the Station Set after the Primary Announcement has
played and, if applicable, after each Secondary Announcement is played.
Port Timeout is the time a caller is kept waiting to hear an AUTO ATTD announcement if no ports are
available to play the announcement. After the time specified, the call is routed according to the No Port
command specified for each Automated Attendant configured and continues to be routed accordingly.
Display on Station Set
You can select whether you want the Group, DNIS/DID Description, CDR Number, or CDR Description
to display on Agents' Station Set when ACD Calls reach the Station Sets. There are 4 types of
configurations possible to help you make your selection:
• Group is default. When an ACD call has not been routed by Destination Number Configuration
(DNIS/DID) or Caller Directed Routing Number Configuration (CDR), the Group to where the call
was routed will display on the Station Set.
• Select Group or DNIS/DID Description. When an ACD call is routed by Destination Number
Configuration (DNIS/DID) to a Group.
• Select Group, DNIS/DID Description, CDR Number or CDR Description. When an ACD call is
routed by Destination Number Configuration (DNIS/DID) to the CDR Table.
• Select Group, CDR Number, or CDR Description. When an ACD call is routed by Caller Directed
Routing Number Configuration (CDR) to the CDR Table.
◗ Duration
Norstar PRELUDE and CINPHONY ACD 3.6 User Guide
69
Chapter 2: Configuration
• You can specify the length of time you want Group, DNIS/DID Description, CDR Number, or CDR
Description to display on Agents’ Station Sets.
In this section steps are provided so you can perform the following tasks:
◗ Access the System Wide Parameters screen
◗ Specify a PRI/ICLID Delay Time
◗ Specify a Backup Station Set DN
◗ Specify Login/Logout DN
◗ Specify Available/Unavailable DN
◗ Specify Indicator FlashRate1 and FlashRate2
◗ Specify Digit Timeout
◗ Specify Port Timeout
◗ Select Group, DNIS/DID Description, CDR Number, or CDR Number Description to display on the
Station Set and the duration you want this information to display.
Follow this step to access the System Wide Parameters screen from the Configuration Menu:
1 On the Configuration Menu highlight System Wide Parameters and press ENTER/CLICK to display
the System Wide Parameters screen.
Follow these steps to specify the PRI/ICLID Delay Time:
1 Highlight the PRI/ICLID Delay Time field.
2 Type in the Time value from 1 to 10 seconds. The default is 5 seconds.
3 If this is the only edit on this screen, Save this information.
Notes: Refer to Line Configuration screen to enable (YES) or disable (NO) Delay for a Line.
70
Norstar PRELUDE and CINPHONY ACD 3.6 User Guide
Chapter 2: Configuration
Although ANI accompanies ICLID as a selection, you are only setting a delay for ICLID Calls when
NONE is specified as Line/Routing.
If ICLID is set to YES and DELAY ANSWER is used as first routing command step, DELAY ANSWER
duration must be greater than the PRI/ICLID Delay Time specified.
If ORIG is specified as Line Routing and DELAY ANSWER is used as first routing command step,
DELAY ANSWER duration must be greater than the PRI/ICLID Delay Time.
Follow these steps to specify the Backup Station Set DN:
1 Highlight the Backup Station Set DN field.
2 Type in the 2 to 7 numeric characters for DN (extension).
3 If this is the only edit on this screen, Save this information.
Note: If you are using more than 1 Backup Station Set, you only need to enter 1 of the DNs in this field.
Follow these steps to specify Login/Logout DN and Available/Unavailable DN:
Login/Logout DN
1 Highlight the Login/Logout DN field.
2 Type in 2 to 7 numeric characters for DN.
Notes: When entering a DN, make sure you do not duplicate a DN used for a Norstar Station Set, a
Group Transfer DN, or a Voice Port.
Refer to this User Guide, Using Norstar Station Sets chapter, Using Analog Station Sets section for
directions on Login, Logout, Available, and Unavailable.
Refer to the Norstar PRELUDE and CINPHONY ACD Installation Guide for directions to install 2500
Analog Station Sets.
Available/Unavailable DN
3 Highlight the Available/Unavailable DN field.
4 Type in 2 to 7 numeric characters for DN.
5 If these are the only fields to edit on this screen, Save this information.
Notes: Refer to Using Analog Station Sets section in the Using Norstar Station Sets Chapter for
directions on Login, Logout, Available, and Unavailable. Refer to your Analog Station Set manual
and/or the ATA manual for directions on using its standard features.
Follow these steps to specify Indicator FlashRate1 and FlashRate2 for calls in queue.
Indicator FlashRate1
1 Highlight Indicator FlashRate1 field. Type in up to 2 numeric characters for medium rate (maximum
80; must be 2 or more). Highlight Indicator FlashRate2 field.
Indicator FlashRate2
2 Type in up to 2 numeric characters for medium rate (maximum 80; must be greater than FlashRate1).
All calls in queue over FlashRate2 will cause the Indicator to flash at the fastest speed.
3 If these are the only fields to edit on this screen, Save this information.
Follow these steps to specify Digit Timeout and Port Timeout:
Digit Timeout
1 Highlight Digit Timeout field. Type in 1 to 2 numeric characters for Digit Timeout (range 1-99 seconds;
default is 5 seconds). Highlight Port Timeout field.
Port Timeout
2 Type in 1 to 2 numeric characters for Port Timeout (range 1-99 seconds; default is 20 seconds).
3 If these are the only fields to edit on this screen, Save this information.
Norstar PRELUDE and CINPHONY ACD 3.6 User Guide
71
Chapter 2: Configuration
Note: If all Ports are busy and you want to send the call to the Routing Table, remember that the Voice
Ports may still be in use; therefore, an ANNOUNCEMENT Command in the Routing Table will hold the
call until a Port is available.
Follow this step to select the information you want to display on all of the Agents' Station Sets:
Group
DNIS/DID Description
CDR Number
CDR Number Description
1 Use the cursor keys to highlight either the Group, DNIS/DID Description, CDR Number, or CDR
Number Description checkbox and then press ENTER to checkmark. Or click on the checkbox to
checkmark. If no selection is made, Group is the default.
There are 4 types of configurations possible to help you make your selection:
• Group is default. When an ACD call has not been routed by Destination Number Configuration
(DNIS/DID) or Caller Directed Routing Number Configuration (CDR), the Group to where the call
was routed will display on the Station Set.
• Select Group or DNIS/DID Description. When an ACD call is routed by Destination Number
Configuration (DNIS/DID) to a Group.
• Select Group, DNIS/DID Description, CDR Number or CDR Description. When an ACD call is
routed by Destination Number Configuration (DNIS/DID) to the CDR Table.
• Select Group, CDR Number, or CDR Description. When an ACD call is routed by Caller Directed
Routing Number Configuration (CDR) to the CDR Table.
Duration
2 Type in the length of time (format – mm:ss) you want Group, DNIS/DID Description, CDR Number,
or CDR Description to appear on Agents’ Station Sets.
72
Norstar PRELUDE and CINPHONY ACD 3.6 User Guide
Chapter 2: Configuration
Update Configuration
This utility allows you to complete the configuration process for changes made to the following
Configuration screens:
◗ Agent
◗ Group
◗ Supervisor
◗ Emergency Group
◗ Line
You can Activate Changes immediately or Schedule Changes for a later date and time.
In this section steps are provided so you can perform the following tasks:
◗ Access the Update Configuration screen.
◗ Activate Configuration changes for update immediately.
◗ Schedule Configuration changes for update at a later date and time.
Follow this step to access the Update Configuration screen from the Configuration Menu:
1 On the Configuration Menu highlight Update Configuration and press ENTER/CLICK to display the
Update Configuration screen.
Follow this step to activate Configuration changes for update immediately:
1 Highlight the Activate Changes button and press ENTER/CLICK. This message will then display:
Configuration changes will now take effect.
Follow these steps to schedule Configuration changes for update at a later date and time:
1 Highlight the Schedule Changes button and press ENTER/CLICK. The Schedule Date and Schedule
Time menu will display.
Norstar PRELUDE and CINPHONY ACD 3.6 User Guide
73
Chapter 2: Configuration
2 Highlight Schedule Date, press F2/DBL CLICK, highlight Date, and press ENTER/CLICK to select.
3 Highlight Schedule Time, press F2/DBL CLICK, highlight Time, and press ENTER/CLICK to select.
4 Highlight OK and press ENTER/CLICK to confirm Date and Time (or press F10 key). You will be
returned to the Configuration Menu and Configuration changes will be scheduled for update.
Note: If you have opted to schedule changes at a later date and time, this message will display on the
Main Menu until changes take effect: “Configuration changes pending”.
74
Norstar PRELUDE and CINPHONY ACD 3.6 User Guide
Chapter 2: Configuration
Menu Password
You can restrict access to the Reports Menu, Configuration Menu, Maintenance Menu, ACD Control,
and DOS-Shell. Once password protecting a menu, you will be asked to type in the Password Name when
you try to access this menu and use the operation at a later date.
In this section steps are provided so you can perform the following tasks:
◗ Access the Password Configuration screen.
◗ Password protect the Reports Menu, Configuration Menu, Maintenance Menu, ACD Control, and DOSShell.
◗ Update a Password.
Note: You may want to first Password protect the Configuration Menu to protect the Password names
you enter on the Password Configuration screen.
Follow this step to access the Password Configuration screen from the Configuration Menu:
1 On the Configuration Menu highlight Menu Password and press ENTER/CLICK to display the
Password Configuration screen.
Follow these steps to add a Password to a Menu and/or Screen:
Menu Selection (required field)
1 Press F2/DBL CLICK, highlight Menu item, and press ENTER/CLICK to select The Password field will
be highlighted.
Password (required field)
2 Type in up to 10 alphanumeric characters for name or number.
3 When you have completed entering a Password, press the F10 Key (or highlight Save and press
ENTER/CLICK, or press ALT-S) to Save the Password. Follow the same steps if you want to continue
to Password protect.
Follow these steps to update a Password:
1 Press F2/DBL CLICK and select Menu item from list.
2 Use editing keys to delete the old Password, and then type in new Password.
3 When completed, Save this information.
Norstar PRELUDE and CINPHONY ACD 3.6 User Guide
75
Chapter 2: Configuration
Printer Configuration
A Printer is optional. If shipped with the Applications Module, it will be configured and ready to print ACD
reports as soon as it is properly connected to the Applications Module. If you decide to use a different
Printer, you must complete the information on the Printer Configuration screen. This screen provides a list
of Printers from which to select; however, if you enter in a Printer not on the list, you will need to refer to the
Printer manual for its codes.
In this section steps are provided so you can perform the following tasks:
◗ Access the Printer Configuration screen.
◗ Select a Printer from list.
◗ Specify a Printer not on list.
Follow this step to access the Printer screen from the Configuration Menu:
1 On the Configuration Menu highlight Printer and press ENTER/CLICK to display the Printer
Configuration screen.
Follow these steps to select a Printer from list:
Printer Port (required field)
1 Press F2/DBL CLICK, highlight either LPT1 or LPT2 (the parallel port where your printer is connected),
and press ENTER/CLICK to select. Highlight Printer Name field.
Note: LPT1 is the default Printer Port to which the Security is attached. LPT2 Printer Port is also
available for use if you are supporting another application to which you want to output ACD Report
information.
Printer Name (required field)
2 Press F2/DBL CLICK, highlight Printer, and press ENTER/CLICK to select. The remaining information
for this Printer will display on the screen.
3 When the Printer is selected and all related information is complete, press the F10 Key to Save this
information.
Follow these steps to specify Printer not on the list:
Printer Port (required field)
76
Norstar PRELUDE and CINPHONY ACD 3.6 User Guide
Chapter 2: Configuration
1 Press F2/DBL CLICK, highlight either LPT1 or LPT2 (the parallel port where your printer is connected),
and press ENTER/CLICK to select. Highlight Printer Name field.
Printer Name (required field)
1 Type in up to 31 alphanumeric characters for name of Printer. Highlight Page Length field.
Page Length (required field)
2 Type in up to 3 numeric characters (range 1-999) and press ENTER/CLICK. Highlight Form Feed
field.
Note: Page Length is the number of lines printed on each page. 60 lines allows for a 1/2 inch top and
bottom margin.
Form Feed (required field, YES/NO)
3 Use Right or Left Arrow keys to move checkmark to YES or NO field, or you can CLICK on YES or
NO field. Highlight Condensed Print Codes field.
Note: YES - If Form Feed is set to YES, Page Length should be set to 60 lines. After the Printer has
printed 60 lines of a Report, it will feed the remaining page and start printing at the top of the next page.
NO - If Form Feed is set to NO, Page Length should be set to 66 lines. After the Printer has printed 66
lines of a Report, it will feed the remaining page and start printing at the top of the next page.
Condensed Print Codes (optional field)
4
Type in up to 3 numeric characters (ASCII decimal value) in each field requiring a code. Highlight
Normal Print Codes field.
Note: Refer to your printer manual to enter codes. ACD sends these codes to the Printer before
printing a Report. These codes are used to define 132-column condensed mode, carriage return, and
line feed.
Normal Print Codes (optional field)
5
Type in up to 3 numeric characters (ASCII decimal value) in each field requiring a code.
Note: Refer to your printer manual to enter codes. ACD sends these codes to the Printer before
printing a Report. These codes are used to reset Printer to normal default settings.
6 When the Printer is selected and all related information is complete, press the F10 Key (or highlight
Save and press ENTER/CLICK, or press ALT-S) to Save this information.
ACD Security Key Note: this is an Input/Output Device attached to the parallel printer port cable. If
you switch printers, make sure this cable and key are connected properly or ACD will not boot up
correctly.
HP LaserJet 6L Printer Note: If you are using this Printer, refer to Appendix 5: Tips and Hints, HP
LaserJet 6L Printer Driver Installation, in this guide for details.
Norstar PRELUDE and CINPHONY ACD 3.6 User Guide
77
Chapter 2: Configuration
Wallboard Configuration
If you have installed the Wallboard Add-On, you will need to configure the Wallboard. Refer to the Norstar
PRELUDE and CINPHONY ACD 3.6 Installation Guide for directions to enable the Wallboard hardware
and software.
Follow these steps to configure the Wallboard:
1 On the Configuration Menu highlight Wallboard and press ENTER/CLICK to display the Wallboard
Configuration screen.
Model
2 Highlight Model and press the F2 Key to display the 3 types of Models: 4200R, 4120R, and 215R.
Highlight the Model and press ENTER/CLICK. If you have previously installed and configured one
Model of Wallboard and now have switched to the other, you need to follow these steps:
• Select new Model on Wallboard Configuration screen and then Save this information.
• On the Main Menu, select ACD Control.
• On the ACD Control Menu, select Deactivate and then Activate.
Models and Description:
• 215R - single line display, 15 characters (Norstar Applications Module only)
• 4120R - double line display, 20 characters(default)
• 4200R - double line display, 32 characters
Format
You can specify the Format of statistics you want to calculate and display on the Wallboard for all
Groups or selected Groups. You can also specify the individual Group statistics you want to calculate
and display. After you select the System or Group, you can specify a Duration (e.g., the time you want
to display statistics for a Group before displaying the next Group).
3 Use the Right and Left Arrow Keys to move checkmark to the Format you want to display: Average
Answer and Average Abandon or Answered and Abandoned. Press ENTER/CLICK to select the
checkmarked format.
4 To select the type of SYSTEM STATISTICS you want displayed, move cursor to highlight the Display
field, press the F2/DBL CLICK, move cursor to highlight YES-CALC ALL GROUPS, YES-CALC
SELECTED GRPS, or NO (for do not display System Statistics) and then press ENTER/CLICK.
Note: YES-CALC ALL GROUPS enables you to display System statistics that include all Groups
configured; YES-CALC SELECTED GRPS enables you to display System statistics for only the Groups
you select to display on the Wallboard Configuration screen. Statistics include: format 1- number of
calls in queue, longest time of call in queue, average time to answer call, and average time to abandon
call; or format 2 - number of calls in queue, longest time of call in queue, number of calls answered and
number of calls abandoned .
5 To select a Group’s Statistics to display on the Wallboard panel, move cursor to highlight the Display
field for the Group, press F2/DBL CLICK, move cursor to highlight YES (or NO) and press
ENTER/CLICK.
6 To specify a Display Duration for the System or Group(s), move the cursor to highlight the Duration
field and type in the number of Seconds (3 to 99). The Duration is the time the statistics for each
group selected displays on the Wallboard before displaying the next selected Group’s statistics.
7 When completed, press the F10 Key to Save this configuration.
Note: The Port Settings field on the screen displays the COM (Serial) Port and Baud Rate required for
the Wallboard.
78
Norstar PRELUDE and CINPHONY ACD 3.6 User Guide
Chapter 2: Configuration
Trouble Shooting: If the Wallboard does not produce a display, make sure you check the following:
• Cabling is connected properly.
• PC and Wallboard power cords are connected properly.
Wallboard Displays (Examples)
4200R - Average Statistical Display and Totals Statistical Display
GROUP
QUE
(GRP NAME)
4
TIQ
0:45
AV-AN
0:32
AV-AB
1:22
GROUP NUMBER or SYSTEM (1st line) GROUP NAME (2nd line)
QUE = Number of Calls in Queue
TIQ = Call in queue for the longest time
AV-AN = Average time it took Agents to answer calls
AV-AB = Average time it took Callers to abandon calls
GROUP
QUE
(GRP NAME)
4
TIQ ANSWD
0:45
67
ABAND
6
ANSWD = Total calls answered by Agents
ABAND = Total calls abandoned by Callers
4120R - Average Statistical Display and Totals Statistical Display
GP
#
QC
4
TIQ
0:45
A-AN
0:32
A-AB
1:22
st
nd
GP (Group) or SY (System) (1 line) Group Number (2
QC = Number of Calls in Queue
TIQ = Call in queue for the longest time
A-AN = Average time it took Agents to answer calls
A-AB = Average time it took Callers to abandon calls
GP
#
QC
4
TIQ
0:45
ANSW
67
line)
ABAN
6
ANSW = Total calls answered by Agents
ABAN = Total calls abandoned by Callers
215R - Calls Queued, Time in Queue, and Number of Unavailable Agents
1
4
0:45
2
Group Number or SY (1st line, 1st position)
0 = Number of Calls in Queue (2nd position)
0:00 = Call in queue for the longest time (3rd position)
0 = Number of Agents currently Unavailable (4th position)
Norstar PRELUDE and CINPHONY ACD 3.6 User Guide
79
Chapter 2: Configuration
(Norstar Applications Module only)
Calculations: Formula and Examples
The System average times will be calculated as follows:
t(sys) = {Σ [N(grp) x t(grp)]}
N(sys)
Where (sys) and (grp) indicate System and Group quantities, N is the number of answered/abandoned
calls, t is the average time to answer/abandon, and the summation (Σ) is over all groups.
Example 1 Answered Calls:
Group
(selected)
Total Calls Answered
N (grp)
Time to Answer
t (grp)
Group 1
100 calls
25 seconds
Group 2
50 calls
32 seconds
Group 3
25 calls
41 seconds
Average Time to Answer Calls for Selected Groups:
Formula: (N(1) x t(1)) + (N(2) x t(2)) + (N(3) x t(3))
N(1) + N(2) + N(3)
Calculation: (100 x 25) + (50 x 32) + (25 x 41)
(100 + 50 + 25)
Avg. Time to Answer = 29.28 Seconds
The Wallboard will display - 0:29
Note: If you selected YES-CALC ALL GROUPS but only selected 2 out of 3 Groups, for example, the
Avg. Time to Answer (and Avg. Time to Abandon) is still calculated over all Groups. If you selected
YES-CALC SELECTED GRPS, the Avg. Time to Answer (and Avg. Time to Abandon) is only calculated
for the selected Groups.
Example 2 Abandoned Calls:
Group
(selected)
Total Calls Abandoned
N (grp)
Time to Abandon
t (grp)
Group 1
5 calls
40 seconds
Group 2
2 calls
36 seconds
Group 3
1 calls
34 seconds
Average Time to Abandon Calls for Selected Groups:
Formula: (N(1) x t(1)) + (N(2) x t(2)) + (N(3) x t(3))
N(1) + N(2) + N(3)
Calculation: (5 x 40) + (2 x 36) + (1 x 34)
(5 + 2 + 1)
Avg. Time to Abandon = 38.25 Seconds
The Wallboard will display - 0:38
80
Norstar PRELUDE and CINPHONY ACD 3.6 User Guide
Chapter 2: Configuration
Infocus Status Display Configuration
If you have installed Infocus Status Display for Windows 95/98/NT/2000 (COM or LAN) Add-On, you will
need to configure Infocus Status Display for the following parameters:
◗ Baud Rate (for use with COM Port installation only)
◗ COM Port (for use with COM Port installation only)
◗ Dynamic Data Rate (for use with COM Port or LAN installation only)
◗ Config Data Rate (for use with COM Port or LAN installation only)
◗ Name/IP Address (for use with LAN installation only)
Note: This Address should not be changed.
◗ TCP/IP Port Number (for use with LAN installation only)
Note: This Port Number should only be changed when another application is using the same Port
Number.
Follow these steps to configure Infocus Status Display:
1 On the Configuration Menu highlight Status Display and press ENTER to display the Infocus Status
Display Configuration screen.
Baud Rate (for use with COM Port installation only)
1 Highlight Baud Rate and press F2 Key to display list of Baud Rates. Highlight the Baud Rate and
press ENTER to select. The default Rate is 19200; however, you can select a higher Rate depending
upon your office environment (e.g., cable length, cable quality, electrical interference, etc.). Test the
quality of each Rate until you find the highest to which data can be sent to the Remote PC without
problem. There are 9 Baud Rates:
• 1200
• 2400
• 4800
• 9600
• 14400
• 19200
Norstar PRELUDE and CINPHONY ACD 3.6 User Guide
81
Chapter 2: Configuration
• 28800
• 38400
• 57600
COM Port (for use with COM Port installation only)
2 Highlight COM Port and press F2 Key to display list of COM Ports. Highlight the COM Port press
ENTER to select. The data cable sending status data from the Applications Module to the Remote PC
is connected to this COM Port. Make sure the COM Port selected is available. There are 4 COM Ports
from which to choose:
• COM1 (default)
• COM2
• COM3
• COM4
Dynamic Data Rate (for use with COM Port or LAN NIC installation only)
3 Type in 2 to 99 seconds for remote update interval that is the rate to send Dynamic Data from the
Applications Module to the Infocus Server PC. Dynamic Data is all of the System, Group, and Agent
Statistics found on the Agent and Group Status screens.
Config Data Rate (for use with COM Port or LAN NIC installation only)
4 Type in 1 to 16 minutes for remote update interval that is the rate to send Config Data from the
Applications Module to the Infocus Server PC. Config Data is Agent Configuration information: Agent
ID, Agent Name, and Group(s) to which the Agent is assigned.
Name/IP Address (for use with LAN NIC installation only)
5 If you need to change this address, type in the new Name/IP Address.
TCP/IP Port Number (for use LAN NIC installation only)
6 If you need to change this address, type in the Port Number.
7 When completed press F10 or select Save and press ENTER to save this Configuration.
If you are an authorized Technician, refer to the Infocus Installation and User Guide for directions to install
the Infocus Status Display hardware and software.
82
Norstar PRELUDE and CINPHONY ACD 3.6 User Guide
Chapter 3
Chapter 3: Using Norstar Sets
Chapter 3: Using Norstar Sets
Introduction
Listed below are the models of Station Sets used by either a Supervisor and/or Agent:
◗ T7100 – Business Terminal and M7100 – Meridian (Agent Sets)
◗ T7208 – Business Terminal and M7208 – Meridian (Agent Sets)
◗ T7316 – Business Terminal and M7310 – Meridian (Agent and Supervisor Sets)
◗ M7410 – Meridian Cordless (Agent and Supervisor)
◗ M7324 – Meridian (Agent and Supervisor)
◗ C3050 – Companion Portable (Agent and Supervisor)
◗ C3060 – Companion Portable (Agent and Supervisor)
Note: Analog 2500-Compatible Station Sets can also be used; however, functions are limited to Login,
Logout, Available, and Unavailable.
T7316, M7310, and M7410 (Cordless) features:
◗ 2 Line LCD (Liquid Crystal Display) screen.
◗ 12/24 programmable dual-memory keys.
◗ 10 programmable memory keys with indicator lights.
◗ 3 Softkeys.
M7324 features:
◗ 2 Line LCD (Liquid Crystal Display) screen.
◗ 24 programmable memory keys with indicator lights.
◗ 3 Softkeys.
Notes: The T7316, M7310, and the M7324 have a 2 line display screen. The first line displays
CINPHONY messages and, to the right of some messages, an area to input information. The second
line displays directions for the Softkeys.
The Softkey directions are uppercase and provide directions such as: BKSP (backspace to delete
characters from right to left), OK (confirm message), EXIT (cancels and/or displays previous message).
T7208 and M7208 features:
◗ 3 Softkeys (T7208 only)
◗ Single Line LCD screen.
◗ 8 programmable memory keys with Indicator lights.
Notes: This Station Set does not have Softkeys. The * on the keypad serves as BKSP (Backspace),
the # on the keypad serves as OK, and the Rls (release) Key serves as EXIT.
Supervisors cannot use the M7208, because a 2 Line LCD is needed for Supervisor features.
C3050 and C3060 features:
◗ 2 Line LCD (Liquid Crystal Display) screen.
◗ 3 Softkeys.
◗ Can only be used with MICS 4.1 (Working Issue 6.13) or greater.
T7100 and M7100 features:
◗ Single Line LCD (Liquid Crystal Display) screen.
84
Norstar PRELUDE and CINPHONY ACD 3.6 User Guide
Chapter 3: Using Norstar Sets
Feature Codes (Main Menu)
Feature Codes are 3 numeric characters ranging from 900 to 999. Each Feature Code performs a specific
function when executed by the Supervisor or Agent. ACD provides a list of these Feature Codes for your
reference.
Note: If configuration changes are being activated in ACD, Station Sets will display a System Busy
message if an Agent or Supervisor tries to execute a feature session.
Follow these steps to display the Feature Code Assignments for Supervisor and Agent Functions:
Main Menu
1 On the Main menu, move cursor to highlight Status to display the choices. Highlight Feature Codes
and press ENTER/CLICK to display the Feature Codes Assignments screen.
2 Press ESC to exit this screen.
There are 7 Agent Functions and 6 Supervisor Functions that can be performed on the Station Sets
(depending on the ACD Level). Group Status, listed under Supervisor Functions, can be used by
Agents or Supervisors. Announcement Maintenance, listed under Supervisor Functions, becomes an
Agent Function if you are using PRELUDE ACD.
To use a Feature Code:
• Press the Feature button on your Station Set.
• Type in the Feature's 3 digit code to perform the function.
You can program Feature Codes into the Memory Keys for the T7316, M7310, M7324, M7410, T7208,
and M7208 Station Sets. You then need only to press the assigned Memory Key to perform the
Feature.
Refer to the Norstar Station Set documentation for directions on programming memory keys.
In PRELUDE, Supervisor Functions are not available; therefore, only the Agent Functions will display on
the screen.
Norstar PRELUDE and CINPHONY ACD 3.6 User Guide
85
Chapter 3: Using Norstar Sets
Agent Functions
You can perform the following Agent Functions:
◗ Login
The system is notified that an Agent is ready to receive ACD Calls.
◗ Unavailable
The Agent is still logged in but is not receiving ACD Calls at this time.
◗ Cancel Wrap
Enables the Agent to eliminate the specified length of time needed to wrap up the last call and become
available to receive an ACD Call.
◗ Help
This Function is only available for CINPHONY I & II Levels.
Agent requests help from the Supervisor.
◗ Calls Queued
Agent can display the number of calls in queue and the duration of the longest call in queue for each
Group into which the Agent has logged.
◗ Categorize
At the end of a call, Agent enters a tracking code or category for each ACD Call. If Force
Categorization is set to YES, then the Agent will be prompted to enter code after the call; if NO, then
Agent must remember to enter the code after the call.
◗ Record Call
When a call is answered it can be recorded using this feature; however, the recording is terminated if
any key on the Station Set is pressed.
◗ Announcement Maintenance
Announcement Maintenance is an agent Function when you are using PRELUDE ACD. For
CINPHONY Levels I and II, it is a Supervisor Function.
There is a recommended layout for these Functions for each Station Set.
Notes: Login, Unavailable, and Record Call should be positioned along the Indicator LCD. The
remaining functions can be positioned on the memory or dual memory keys.
For ACD purposes, an Agent Station Set needs to be assigned at least 2 Intercom buttons. Refer to
Norstar manual.
The M7208, T7100, and M7100 do not have Softkeys below the Single Line LCD. The following keypad
keys replace the Softkeys (#, *, and Rls).
86
Norstar PRELUDE and CINPHONY ACD 3.6 User Guide
Chapter 3: Using Norstar Sets
Performing Agent Functions
Note: All Functions performed in these sections will use the T7316 Station Set as the example.
Login
Note: Select Feature Codes on the Status Menu to view the Feature Code that Norstar assigned to
Login. It is recommended that you program the Login Feature Code to a memory key and label that key
with the Login key cap. Once programmed, the indicator light will display on the LCD beside the Login
Key.
Follow these steps to Login an Agent:
1 Press the Login Key, or press the Feature Key and type in Login Feature Code (3 digits). The next
message to display:
Login: ---BKSP
OK
EXIT
2 Type in Agent ID Number (up to 4 digits).
Note: BKSP (or *) deletes characters right to left; EXIT (or Rls) aborts.
3 Press the OK softkey (or #) to confirm and the Agent is ready to receive calls when the Logged in
message displays. If Supervisor is receiving Information Messages (YES), a tone sounds on the
Supervisor's Station Set.
However, if the Agent's Login is Password protected, the next message to display:
Pwd: --------BKSP
OK
EXIT
4 Type in Password (up to 8 digits, digits do not display), and press the OK softkey (or #) to confirm
(BKSP = * and EXIT = Rls). The Agent is ready to receive calls when the Logged in message displays.
However, if the Agent is assigned to 2 or more Groups, the next message to display:
Assigned Groups
EDIT
OK
EXIT
5 If you do not want to edit any Groups, press the OK softkey (or #). The Agent is ready to receive calls
when the Logged in message displays (EXIT = Rls).
Norstar PRELUDE and CINPHONY ACD 3.6 User Guide
87
Chapter 3: Using Norstar Sets
6 However, if you want to change (edit) the Groups to which the Agent is assigned, press the EDIT
softkey (or *). The next message to display:
Grp: 77 78 79 80
BKSP
OK
EXIT
Note: In CINPHONY II you can assign an Agent to 80 Groups; therefore, in this example, Groups 77,
78, 79, and 80 will display.
7 If you want to delete a Group, press the BKSP softkey (or *) to delete from highest to lowest until you
have deleted the specific Group. To add the Groups back you did not want to delete, type in the Group
Numbers (2 digits, in any order) (EXIT = Rls).
Note: Edits are only effective for the period you are logged in. If you log out and log back in, all Groups
will display in their original lowest to highest order.
8 When you have completed viewing or editing, press the OK softkey (or #) to confirm. The Logged in
message will display for a few moments and then the Date and Time message will display.
When calls are queued for this Agent (for any of the Groups), the Login Indicator arrow flashes at rates
determined by the Indicator FlashRate set under System Wide Parameters, Configuration Menu.
Logged in
Login Errors:
Invalid agent ID
88
Norstar PRELUDE and CINPHONY ACD 3.6 User Guide
Chapter 3: Using Norstar Sets
◗ Invalid Agent ID Number.
Login denied
◗ ID already logged in.
◗ This set is an Alert set.
Unregister first
◗ This set is registered as a Supervisor
Log in first
◗ Agent tried to perform a function without logging in.
Invalid password
Norstar PRELUDE and CINPHONY ACD 3.6 User Guide
89
Chapter 3: Using Norstar Sets
◗ Incorrect Password.
Login aborted
◗ Agent stopped login or was timed out (15 seconds).
Logins exceeded
◗ Agent tries to login when system has reached capacity for Agent logins.
Receiving Calls
When a call is sent to the Agent's Station Set, the abbreviated Group Name displays (up to 8 digits) and
the length of time the call has been in the queue.
xxxxxxxx
99:99
System Wide Parameters / Display on Station Set Note:
On the System Wide Parameters screen, you can select whether you want the Group, DNIS
Description, CDR Number, or CDR Description to display on the Agents' Station Set when ACD Calls
reach the Station Sets. There are 4 types of configurations possible to help you make your selection:
• Group is default. When an ACD call has not been routed by Destination Number Configuration
(DNIS) or Caller Directed Routing Number Configuration (CDR), the Group to where the call was
routed will display on the Station Set.
• Select Group or DNIS Description. When an ACD call is routed by Destination Number
Configuration (DNIS) to a Group.
• Select Group, DNIS Description, CDR Number or CDR Description. When an ACD call is routed
by Destination Number Configuration (DNIS) to the CDR Table.
• Select Group, CDR Number, or CDR Description. When an ACD call is routed by Caller Directed
Routing Number Configuration (CDR) to the CDR Table.
To accept the call:
◗ Handset - pick up receiver.
90
Norstar PRELUDE and CINPHONY ACD 3.6 User Guide
Chapter 3: Using Norstar Sets
◗ Headset - press flashing Intercom Key, unless answer forcing is set. In this case, you will receive a zip
tone and then the call.
Note: If Full Handsfree is set to YES, press the Handsfree Mute Key. You can also pick up the receiver.
Overflow Call
If an overflow call is being sent to you from another Group, the abbreviated name of the Group from which
the call originated displays with a + symbol followed by the length of time the call has been in the queue.
xxxxxxxx
99:99
Log Out
Follow the same steps used for Log In and follow the display messages.
1 Press the Login Key, or press the Feature Key and type in the Login Feature Code.
The next message to display:
Logout ?
BKSP
OK
EXIT
2 Press the OK softkey (or #) to Logout (BKSP = * and EXIT = Rls). A Logout message will display for a
few moments before the Date and Time message displays.
Error Messages:
Logout aborted
◗ Agent stopped logout by pressing the EXIT key or the Rls button, or was timed out (15 seconds).
End call first
Norstar PRELUDE and CINPHONY ACD 3.6 User Guide
91
Chapter 3: Using Norstar Sets
◗ Agent tried to logout when on a call.
Unavailable
Note: Select Feature Codes on the Status Menu to view the Feature Code that Norstar assigned to
Unavailable. It is recommended that you program the Unavailable Feature Code to a memory key and
label that key with the Unavailable key cap. Once programmed, the indicator light will display on the
LCD beside the Unavailable Key.
Follow this step to make an Agent Unavailable to receive calls:
1 Press the Unavailable Key, or press the Feature Key and type in the Unavailable Feature Code (3
digits). The next message to display for 5 seconds:
Unavailable
The next message to display is Date and Time. The Indicator arrow for Unavailable Key displays if it
was programmed.
Note: An Agent cannot go Unavailable if a Station Set is ringing.
Repeat the same step to become Available. An Available message will display for a few moments
before the Date and Time message displays. The Indicator arrow for the Unavailable Key is
extinguished if it was programmed.
Note: If you try to go Unavailable during a call, you will not be allowed; however, the command will be
remembered. After the call, you will go Unavailable. If Wrap Duration is set, you will become
unavailable after wrap ends.
Error Message:
Log in first
◗ Agent tried to perform a function without logging in.
92
Norstar PRELUDE and CINPHONY ACD 3.6 User Guide
Chapter 3: Using Norstar Sets
Cancel Wrap
Note: Select Feature Codes on the Status Menu to view the Feature Code that Norstar assigned to
Cancel Wrap.
Follow this step to Cancel Wrap Duration and free Station Set for next call:
1 Press the Cancel Wrap Key, or press the Feature Key and type in the Cancel Wrap Feature Code.
The Date and Time message reappears. The Agent is ready to receive the next call.
Error Messages:
Cancel unavail
◗ Agent is in wrap and unavailable but tries to cancel wrap before going available.
Log in first
◗ Agent tried to perform a function without logging in.
Help
Note: Select Feature Codes on the Status Menu to view the Feature Code that Norstar assigned to
Help. Help is only available for CINPHONY I & II Levels.
Follow this step to request Help from the Supervisor during an ACD Call:
Line 005
TRANSFER
1 Press the Help Key, or press the Feature Key and type in the Help Feature Code. The next message
to display for a few moments:
Norstar PRELUDE and CINPHONY ACD 3.6 User Guide
93
Chapter 3: Using Norstar Sets
Help sent
The Help sent Message displays on the Agent's Station Set. On the Supervisor's Station Set, a
message displays the first initial of the Agent followed by the last name. For example:
J. Smith
Help
Note: If you request Help when not on a call, a message will display, Dial Supervisor. Dial the
Supervisor's extension.
Error Message:
No Supervisor
◗ Agent tries to request Help from Supervisor, but Supervisor is not registered.
Dial Supervisor
◗ Agent is idle or on Non-ACD Call and tries to request Help from supervisor.
94
Norstar PRELUDE and CINPHONY ACD 3.6 User Guide
Chapter 3: Using Norstar Sets
Log in first
◗ Agent tried to perform a function without logging in.
Calls Queued
Note: Select Feature Codes on the Status Menu to view the Feature Code that Norstar assigned to Call
Queued. An Agent can use this feature while on or off a call to see how many calls are in queue and
which call has the longest duration in queue. Only the Groups in which the Agent has logged in can be
viewed by Agent.
Follow these steps to view the Calls Queued:
1 Program a memory button for the Calls Queued Feature.
2 If you are on a call and you press the Calls Queued key, you will receive the status for calls in your
current Group. Each time you press the Call Queued button, you will receive the status for the next
Group into which you are logged.
For example, you are logged in to Group 1, 2, 3, and 4. You are on a call for Group 2, there are 4 calls
in queue, and one of the calls has been in queue the longest for 2 minutes and 15 seconds. If you
press the Call Queued button, the LCD screen will display the following screen:
G2
Q4
T02:15
If you press the Calls Queued button again, Group 3 status will display. You can view all 4 Groups by
pressing the Calls Queued button.
If you are not on a call and you press the Calls Queued button, you will start at your first Group. In the
example above, Group 1 status would display first; and, each time you pressed the button, the next
Group status would display.
G# = Group Number
Q# = Number of calls in queue
TMM:SS = time of longest call in queue
Norstar PRELUDE and CINPHONY ACD 3.6 User Guide
95
Chapter 3: Using Norstar Sets
Error Message:
Log in first
◗ Agent tried to perform a function without logging in.
Categorize
Note: Select Feature Codes on the Status Menu to view the Feature Code that Norstar assigned to
Call Categorization.
Follow these steps to enter a Category Code after the call has been completed:
1 If Prompted Categorization has been set to YES, you will be prompted by the following message after
releasing the call:
Cat: xxxxxxxxxxxxx
BKSP
OK
EXIT
If Prompted Categorization has been set to NO, press the Categorize Key, or press the Feature Key
and type in the Categorize Feature Code (3 digits). The same message as above will display.
2 Type in the Category Code(s) (up to 12 digits for each code) and press the OK softkey (or #) (BKSP =
* and EXIT = Rls).
Note: 15 seconds is allotted to type in 1 or more codes, or until Wrap Duration (automatic) expires
(whichever is shorter). If Wrap Duration has been set to NONE, you cannot enter a Categorization
Code.
96
Norstar PRELUDE and CINPHONY ACD 3.6 User Guide
Chapter 3: Using Norstar Sets
Record Call
Note: Record Call is only available for CINPHONY I & II Levels. Select Feature Codes on the Status
Menu to view the Feature Code that Norstar assigned to Record Call.
Follow this step to Record a Call:
1 Press the Record Call Key, or press the Feature Key and then type in the Record Call Feature Code.
The next message to display:
Record request
The next message to display is the Recording ID Number assigned automatically by ACD:
Recording: xxxxx
To stop Recording: hang-up, press Rls, Hold, or Feature Keys. The next screen to display:
Record Off
Restrictions:
• Agent must be logged-in.
• Cannot Record a conference call.
• Cannot Monitor a Recording.
Error Messages:
No active call
Norstar PRELUDE and CINPHONY ACD 3.6 User Guide
97
Chapter 3: Using Norstar Sets
◗ Agent is not on a call, or Agent is on conference call.
Log in first
◗ The Agent is not logged in. Log in first.
Record Off
◗ No Voice Port available to record a call - configure voice port, or another Agent is recording.
98
Norstar PRELUDE and CINPHONY ACD 3.6 User Guide
Chapter 3: Using Norstar Sets
Supervisor Functions
Supervisor Functions are only available for CINPHONY I & II Levels.
The following 6 Supervisor Functions you can perform using either the T7316, M7310, M7324, M7410,
C3050, or C3060 Station Sets. The Group Status Function can be used by either an Agent or a
Supervisor:
◗ Register
The system is notified that a Supervisor is registering to perform other functions.
◗ Retrieve Message
The Supervisor can view Informational and/or Warning messages.
◗ Announcement Maintenance
Supervisor can record an announcement or play back an announcement.
◗ Monitor Call (Silent Monitor)
The Supervisor can listen in on an Agent's call and/or join in on the call. This Function cannot be
performed by the M7410 Cordless Set.
◗ Play Call
Supervisor can play back calls recorded by Agents.
◗ Emergency Routing
Anyone can enable the Emergency Group so that all incoming calls will be sent to that Group. An
Agent does not have to be logged in nor does a Supervisor have to be registered to use this function.
Note: Monitor Call (Silent Monitor) and Retrieve Message should be positioned along the Indicator
LCD. The remaining functions can be positioned on the memory or dual memory keys.
◗ Group Status
Anyone can view the status of a Group. An Agent does not have to be logged in nor does a Supervisor
have to be registered to use this function. After specifying a Group, the status screen displays the
Group number, the number of calls currently in queue, and the longest time a call is currently in queue.
Norstar PRELUDE and CINPHONY ACD 3.6 User Guide
99
Chapter 3: Using Norstar Sets
Performing Supervisor Functions
Note: All Functions performed in these sections will use the T7316 Station Set as the example.
Register
Note: Select Feature Codes on the Status Menu to view the Feature Code that Norstar assigned to
Register. It is recommended that you program the Register Feature Code to a memory key and label
that key with the Register key cap. Once programmed, the indicator light will display on the LCD beside
the Register Key.
Follow these steps to Register a Supervisor:
1 Press the Register Key, or press the Feature Key and type in Register Feature Code (3 digits). The
next message to display:
Register: xxxx
BKSP
OK
EXIT
2 Type in Supervisor ID Number (up to 4 digits) and press the OK softkey. The Supervisor is registered.
However, if the Supervisor ID is Password protected, the next message will display:
Pwd: xxxx
BKSP
OK
EXIT
3 Type in Password (up to 8 digits, digits do not display) and press the OK softkey. The next screen to
display:
Warning Msg ?
YES
NO
EXIT
4 Press the YES softkey if you want to receive warning messages after registering. Press the NO softkey
to not receive these messages. Or press the EXIT softkey to abort registering.
If you pressed the YES or NO softkey, the next message to display:
100
Norstar PRELUDE and CINPHONY ACD 3.6 User Guide
Chapter 3: Using Norstar Sets
Information Msg ?
YES
NO
EXIT
5 Press the YES softkey if you want to receive information messages. Press the NO softkey to not
receive these messages. Or press the EXIT softkey to abort registering.
Note: Warning message examples: Overflow occurring, day and night routing change over, no Agents
logged into Group. Information message examples: Agent has logged in, Agent has logged out.
Supervisors will always receive critical messages (e.g., Help) when they occur. See Appendices
Chapter for Supervisor Information and Warning Messages.
If you pressed the YES or NO softkeys, the next message to display:
Registered
The Supervisor is Registered.
To Unregister the Supervisor follow these steps:
1 Press the Register Key, or press the Feature Key and type in the Register Feature Code.
The next message to display:
Unregister ?
BKSP
OK
EXIT
2 Press the OK softkey to Unregister. An Unregistered message will display for a few moments before
the Date and Time message displays.
Norstar PRELUDE and CINPHONY ACD 3.6 User Guide
101
Chapter 3: Using Norstar Sets
Error Messages:
Invalid Spvr ID
◗ Incorrect Supervisor ID Number.
Register first
◗ Supervisor must register before trying to perform a function.
Register denied
◗ Supervisor ID has already been registered.
Invalid password
◗ An incorrect Password was entered.
102
Norstar PRELUDE and CINPHONY ACD 3.6 User Guide
Chapter 3: Using Norstar Sets
Register aborted
◗ Supervisor stopped registering and canceled, or was timed out (15 seconds).
◗ Supervisor stopped unregistering and canceled, or was timed out (15 seconds).
Unregister first
◗ Agent tried to login on Supervisor Station Set.
Retrieve Message
Note: Select Feature Codes on the Status Menu to view the Feature Code that Norstar assigned to
Retrieve Message. It is recommended that you program the Retrieve Message Feature Code to a
memory key and label that key with the Retrieve Message key cap. Once programmed, the indicator
light will display on the LCD beside the Retrieve Message Key.
Follow these steps to Retrieve a Message:
Note: The Indicator arrow for Messages flashes when a message is waiting.
1 Press the Retrieve Message Key, or press the Feature Key and type in the Retrieve Message
Feature Code. The first message will display.
2 Repeat this step until all messages are retrieved and the following message displays for a moment:
No Messages
The Date and Time message will display.
Norstar PRELUDE and CINPHONY ACD 3.6 User Guide
103
Chapter 3: Using Norstar Sets
Error Message:
Register first
◗ Supervisor must register before trying to perform a function.
Announcement Maintenance
Notes: Select Feature Codes on the Status Menu to view the Feature Code that Norstar assigned to
Announcement Maintenance.
Announcement Maintenance is also an Agent Function if you are using PRELUDE ACD.
Follow these steps to Record an Announcement:
1 Press the ANNC MAINT Key, or press the Feature Key and type in the Announcement Maintenance
Feature Code. The next message to display:
Announcement:
BKSP
OK
EXIT
2 Type in up to 2 digits and press the OK softkey. The next message to display:
Note: You can record up to 240 announcements. A recorded announcement must not exceed 15
minutes.
Announcement: xx
RECORD PLAY
EXIT
3 As soon as you see this screen, pick up the handset and then press the RECORD softkey. The next
message to display:
Recording . . .
STOP
104
EXIT
Norstar PRELUDE and CINPHONY ACD 3.6 User Guide
Chapter 3: Using Norstar Sets
4
When you hear the beep, speak into the handset to record Announcement. When completed, press
the STOP softkey. The next screen to display:
Announcement: xx
RECORD PLAY
EXIT
Press RECORD again if you want to re-record announcement. Press PLAY if you want to play the
announcement. Press EXIT to return to the Date and Time message.
Follow these steps to play back an Announcement recorded earlier:
1 Press the ANNC MAINT Key, or press the Feature Key and type in the Announcement Maintenance
Feature Code. The next message to display:
Announcement: 00
BKSP
OK
EXIT
2 Type in the Announcement Number you want to play, and press the OK softkey.
The next message to display:
Announcement: xx
RECORD PLAY
EXIT
3 Press the PLAY softkey, and the next message to display:
Playing . . .
STOP
EXIT
4 Press the STOP softkey if you want to discontinue playing the Announcement, or press the EXIT
softkey to quit.
The Date and Time message will display.
Norstar PRELUDE and CINPHONY ACD 3.6 User Guide
105
Chapter 3: Using Norstar Sets
Error Message:
Register first
◗ Supervisor must register before trying to perform a function.
Recording Average QTime Announcements or Expected QTime Announcements
If you have selected User-Recorded Announcement Set for the Average QTime Announcement and/or
the Expected QTime Announcement Routing Commands, you will use Announcement Maintenance to
record the set of announcements.
Follow the same content for each announcement as provided below. ACD will calculate and match to
these numbers in the minute numbering plan. You can alter the way in which you record
Announcements 241 and 242
User-Recorded Announcements for Average QTime and Expected QTime:
241: "The average time to answer a call today is approximately…"
242: "The expected wait time for your call is approximately…"
243: "… one minute."
244: "… two minutes."
245: "… three minutes."
246: "… four minutes."
247: "… five minutes."
248: "… six minutes."
249: "… seven minutes."
250: "… eight minutes."
251: "… nine minutes."
252: "… ten minutes."
253: "… ten minutes or longer."
Pre-Recorded Announcements for Average QTime and Expected QTime:
267: "The average time to answer a call today is approximately…"
268: "The expected wait time for your call is approximately…"
269: "… one minute."
270: "… two minutes."
271: "… three minutes."
272: "… four minutes."
273: "… five minutes."
274: "… six minutes."
275: "… seven minutes."
276: "… eight minutes."
277: "… nine minutes."
278: "… ten minutes."
106
Norstar PRELUDE and CINPHONY ACD 3.6 User Guide
Chapter 3: Using Norstar Sets
279: "… ten minutes or longer."
Monitor Call
Notes: A Supervisor can monitor an Agent's call via the Headset, the Handset connected to Headset
jack, or the Station Set speaker. Your system can also be modified to disable Monitor Call (contact your
Technician or CINTECH to make this change). The Supervisor's Station Set must be equipped with a
Hands-free Mute button. When the Handset is used, use the Rls Key to terminate monitoring rather
than the EXIT softkey.
This Function cannot be performed by the M7410 Cordless Set.
Select Feature Codes on the Status Menu to view the Feature Code that Norstar assigned to Monitor
Call.
Follow these steps to Monitor an Agent's call:
1 Press the Monitor Call Key, or press the Feature Key and type in the Monitor Call Feature Code.
The next message to display:
Monitor:
BKSP
OK
EXIT
2 Type in Agent's ID Number (up to 4 digits) and press the OK softkey. The next message to display:
Monitoring: xxxx
JOIN
EXIT
3 The Supervisor can either listen to the call or press the JOIN softkey to converse with Agent and caller.
If you press the JOIN softkey, the next message to display:
Monitoring: xxxx
LEAVE
EXIT
4 To return to Monitoring, press the LEAVE softkey. To stop monitoring, press the EXIT, Rls, HOLD, or
Feature Key.
The Date and Time message will display.
Norstar PRELUDE and CINPHONY ACD 3.6 User Guide
107
Chapter 3: Using Norstar Sets
Error Messages:
No active call
◗ Agent is not on a call.
Not authorized
◗ Cannot monitor this Agent.
Register first
◗ Supervisor must register before monitoring a call.
Monitor stopped
◗ Agent has disconnected call while being monitored.
Monitor denied
108
Norstar PRELUDE and CINPHONY ACD 3.6 User Guide
Chapter 3: Using Norstar Sets
◗ Agent is already being monitored, or is recording a call.
Not logged in
◗ Supervisor enters wrong Agent ID, or ID not logged in, and tries to silent monitor call.
Not supported
◗ Norstar does not support Silent Monitoring.
Play Call
Notes: Calls that are recorded are assigned a number by ACD. These numbers are displayed on the
Recorded Calls Maintenance screen under the System Maintenance Menu.
Select Feature Codes on the Main Menu to view the Feature Code that Norstar assigned to Play Call.
Follow these steps to play back an Agent's Recorded Call:
1 Press the Play Call Key, or press the Feature Key and type in the Play Call Feature Code. The next
message to display:
Agent: xxxx
BKSP
OK
EXIT
2 Type in the Agent ID Number (up to 4 digits) and press the OK softkey. The next message to display:
Call: xxxx
BKSP
OK
EXIT
3 Type in the Recorded Call Number and press the OK softkey. The next message to display:
Norstar PRELUDE and CINPHONY ACD 3.6 User Guide
109
Chapter 3: Using Norstar Sets
Playing . . .
EXIT
4 Listen to recording. Press the EXIT softkey if you want to stop. A Terminate message will display for a
few moments before the Date and Time message displays.
Error Messages:
Not available
◗ No Voice Ports are available to play call back at this time - try again.
Not Recorded
◗ Recorded Call Number does not exist. Go to System Maintenance Menu and view calls on Recorded
Calls Maintenance screen.
Register first
■ Not a registered Supervisor.
110
Norstar PRELUDE and CINPHONY ACD 3.6 User Guide
Chapter 3: Using Norstar Sets
Call not found
◗ No call recorded under Call ID.
Terminated
◗ Play call has been canceled.
Emergency Routing
Notes: Select Feature Codes on the Status Menu to view the Feature Code that Norstar assigned to
Emergency Routing.
Emergency Group must have been previously configured.
An Agent does not have to be logged in nor does a Supervisor have to be registered to use this
function.
Follow these steps to turn Emergency Routing ON so all calls will be routed to the Emergency Group:
1 Press the Emergency Routing Key, or press the Feature Key and type in the Emergency Routing
Feature Code. If Password protected, the next message to display:
Pwd: -----------BKSP
OK
EXIT
2 Type in Password (up to 8 digits, digits are not displayed) and press the OK softkey. The next screen
to display:
Emergency On ?
OK
EXIT
Norstar PRELUDE and CINPHONY ACD 3.6 User Guide
111
Chapter 3: Using Norstar Sets
3 Press the OK softkey to turn Emergency Routing ON. The next message to display for a few moments:
Emergency On
The Date and Time message displays. All calls will be routed to the Emergency Group.
Follow these steps to turn Emergency Routing OFF so all calls will be routed to original Groups:
1 Press the Emergency Routing Key, or press the Feature Key and type in the Emergency Routing
Feature Code. The next message to display:
Pwd: -----------BKSP
OK
EXIT
2 Type in Password (up to 8 digits, digits are not displayed) and press the OK softkey. The next screen
to display:
Emergency Off ?
OK
EXIT
3 Press the OK Key to turn Emergency Routing OFF. The next message to display for a few moments:
Emergency Off
The Date and Time message displays. All calls will be routed to their original Groups.
Note: Emergency Routing can be turned ON or OFF at a Supervisor's or Agent's Station Set. While
Emergency Routing is in affect, a red and white diamond flashes in the upper right corner of the ACD
screens.
112
Norstar PRELUDE and CINPHONY ACD 3.6 User Guide
Chapter 3: Using Norstar Sets
Error Message:
Not Configured
◗ Emergency Routing Group has not been configured or has been disabled.
Group Status
Notes: Select Feature Codes on the Status Menu to view the Feature Code that Norstar assigned to
Group Status.
An Agent does not have to be logged in nor does a Supervisor have to be registered to use this
function.
This function can only be performed on Station Sets T7316, M7208, M7310, M7324, M7410, C3050,
and C3060.
Follow these steps to view the status of a specific Group:
1 Press the Group Status Key, or press the Feature Key and type in the Group Status Feature Code.
The next screen to display:
Enter Grp #
BKSP
OK
2 Type in the Group Number and press the OK softkey. The next screen to display:
G1
Q4
T02:15
This status screen will display for 5 seconds. It designates the Group you have specified, the number of
calls currently in queue for this Group, and the longest time a call is currently in queue.
Norstar PRELUDE and CINPHONY ACD 3.6 User Guide
113
Chapter 3: Using Norstar Sets
Using Analog 2500 Station Sets
You can use these Sets with ACD to perform the following Agent functions:
◗ Login
◗ Logout
◗ Available
◗ Unavailable
Note: These are the only functions an Agent can perform using the Analog Sets. The Supervisor can
only perform a Silent Monitor on an Analog Set.
To start, the System Administrator must assign a Login/Logout DN and an Available/Unavailable DN.
Refer to this User Guide, Chapter 2 - Configuration, System Wide Parameters to view the DNs.
Once the DNs are specified, they can be programmed to a button on the Analog Station Set. Refer to the
Analog Station Set manual.
Login/Logout
Follow these steps to Login and Logout an Agent using an Analog Station Set:
Login
1 Pick up the handset, enter the Login/Logout DN, enter your Agent ID, and press the # key.
2 Enter your Password (if any), press the # key, and replace the handset. You are logged in and are
Available to receive ACD calls.
If the Login is successful, you will hear 2 sets of 2 beeps each rising in pitch.
If Login fails because a wrong Login/Logout DN was entered, ACD will ignore the request and the
Norstar will give you a busy signal. Restart Login.
If Login fails because a wrong Agent ID or Password was entered, you will hear 1 long beep. Restart
Login.
Logout
1 Enter the same Login/Logout DN and press the # key. You will hear 2 sets of 2 beeps each falling in
pitch.
If the wrong Login/Logout DN is entered, you will hear 1 long beep. Try Logout again.
Available\Unavailable
Follow these steps to go Unavailable and then Available while you are logged in:
Unavailable
1 Enter the Available/Unavailable DN.
If the wrong Available/Unavailable DN is entered, ACD will ignore the request and the Norstar will give
you a busy signal. Try again to go Unavailable.
Available
1 While Unavailable, enter the Available/Unavailable DN.
If the wrong Available/Unavailable DN is entered, ACD will ignore the request and the Norstar will give
you a busy signal. Try again to go Available.
Notes: If an Agent's Group is using automatic Wrap, an Agent using an Analog Set will receive the
same Wrap duration period. When Wrap Duration has ended, the Agent will be available to receive a
call. An Agent can cancel Wrap by going Unavailable and then back to Available during the automatic
Wrap period.
Refer to your Analog Station Set manual and/or the ATA manual for directions to use the Station Set's
features. The features covered in this guide only pertain when using an Analog Station Set with ACD.
114
Norstar PRELUDE and CINPHONY ACD 3.6 User Guide
Chapter 4
Chapter 4: Status
Chapter 4: Status
There are 4 Status screens you can view:
◗ Group Status Display
◗ System Status Display
◗ Feature Codes
◗ About ACD
Group Status Display
The Group Status Display screen displays real-time Call Processing Statistics for all of the Agents in a
Group. You will be able to monitor Group performances and identify problems as they occur.
The following information will display to identify each Agent in the Group:
◗ ID Number
◗ Current Activity Status
◗ Duration of Current Activity
Call Processing Statistics
◗
◗
◗
◗
◗
◗
◗
◗
◗
◗
◗
Calls Queued - number of calls in queue for this Group.
Longest Queued - length of time (MM:SS) the oldest call has been in queue for this Group.
Calls Overflowed Out - total number of calls overflowing one Group and answered by another.
Calls Answered - total number of calls answered by this Group.
Average Time To Answer - average length of time (MM:SS) each Group of Agents answer calls during
current routing cycle.
T.S.F. % - the Telephone Service Factor is the percentage of calls answered within a Threshold period
(in seconds) for the TSF interval (in minutes). For example, during a 60 minute interval how many calls
were answered within a 30 second threshold (from first ring to answer). This factor is user defined in
System Wide Parameters, Configuration Menu.
Longest Wait – the longest amount of time a call was in the queue before an action occurred (e.g.,
answered, abandoned, disconnected, transferred, etc.). For example, a call spent two minutes and ten
seconds in the queue before it was answered. During that routing period, this was the longest time a
call had been in queue before an action occurred with the call. Another call came into the queue later
on during the same routing period and remained in the queue for two minutes and forty seconds. This
call, while currently in queue, became the Longest Queued call. When this call was finally answered, it
then replaced the previous Longest Wait call of two minutes and ten seconds.
Calls Abandoned - total number of calls abandoned during current routing cycle.
Average Time To Abandon - average length of time (MM:SS) a caller waited in queue before hanging
up. This average is for Group's current routing cycle.
Calls Disconnected - the number of times calls were disconnected for this Group by the DISCONNECT
Routing Command.
Calls Transferred - the number of times calls were transferred out of this Group by the TRANSFER TO,
GROUP, LINK XFER, LINE XFER, CDR TABLE, and VMAIL XFER Routing Commands.
Agent Status
The current status of each Agent in the selected Group displays to the right of the Agent’s Name. There
are 10 Agent states:
◗ Logged Out - Agent is not logged into system.
◗ Available - Agent is available to take ACD calls.
◗ Unavailable - Agent is logged in but not available to take ACD calls.
◗ ACD - Agent is currently on an ACD Call.
◗ ACD (Group xx) - Agent is currently on an ACD Call for a different Group than the Group selected.
116
Norstar PRELUDE and CINPHONY ACD 3.6 User Guide
Chapter 4: Status
◗
◗
◗
◗
◗
ACD Held - Agent currently has an ACD Call on hold.
ACD Conference - Agent is currently on an ACD Conference Call.
Intercom - Agent is currently on an Intercom Call.
Incoming - Agent is currently on a Non-ACD Incoming Call.
Outgoing - Agent is currently on a Non-ACD Outgoing Call.
Selected Group Status
The current status of the Group selected is displayed near the bottom of the screen:
◗ Logged In - number of Agents logged in for this Group.
◗ Logged Out - number of Agents logged out for this Group.
◗ Available - number of Agents available for this Group.
◗ Unavailable - number of Agents unavailable for this Group.
◗ ACD - number of ACD Calls currently being handled by this Group.
◗ ACD (Group) - number of ACD Calls from other Groups beings handled by this Group.
◗ Wrap - number of Agents currently in wrap for this Group.
◗ Intercom - number of Agents on Intercom Calls.
◗ Incoming - number of Agents on Non-ACD Incoming Calls for this Group.
◗ Outgoing - number of Agents on Outgoing Calls for this Group.
Voice Port States
At the bottom of the screen, the current state of each of the 16 Voice Ports is displayed.
There are 8 Voice Port states:
◗ Config - Voice Port is currently being configured. If Voice Port is connected, this state will change to
IDLE; if not, this state will change to UNUSED.
◗ Idle - available but not active.
◗ Recording - a call or an announcement.
◗ Playing - a recorded call or a recorded announcement.
◗ Waiting - in use but holding for user intervention, preparing to play an announcement, or for an ATA to
clear.
◗ Initing - port is trying to reset from an error that occurred.
◗ Disabled - not in use due to failure.
◗ Unused - not connected.
In this section steps are provided so you can perform the following tasks:
◗ Access the Group Status screen.
◗ Select a Group and Display Statistics for that Group.
Follow this step to access the Group Status screen from the Status Menu:
1 On the Status Menu, move cursor to highlight Group Status Display and press ENTER/CLICK. The
next screen to display:
Norstar PRELUDE and CINPHONY ACD 3.6 User Guide
117
Chapter 4: Status
Follow either step to select a Group and display statistics for that Group:
1 When the Group Status Display screen displays, the cursor will be positioned on the Group Number
field at the top center of the screen. Type in up to 2 numeric characters for Group Number and press
ENTER. The Group's Statistics will display.
(or)
Press F2/DBL CLICK to display the list of Group Numbers. Move cursor to highlight Group Number
and press ENTER/CLICK to select. The Group Number and Statistics will display.
Follow either step to display another Group.
Notes: The call statistics reset to zero when a Group's Routing Hours cycle from DAY to NIGHT,
NIGHT to DAY . . .
If you want to view the About ACD screen while on the Group Status screen, press the F7 key.
If an Unavailable Duration value was specified on the Group Configuration screen, the Unavailable field
will flash for an Agent who remains unavailable longer than the specified duration. When the Agent
becomes Available, the field will no longer flash.
118
Norstar PRELUDE and CINPHONY ACD 3.6 User Guide
Chapter 4: Status
System Status Display
The System Status Display screen displays real-time Call Processing Statistics for 8 Groups at a time. You
will be able to monitor Group performances and identify problems as they occur.
Call Processing Statistics
◗
◗
◗
◗
◗
◗
◗
◗
◗
◗
◗
◗
◗
◗
◗
◗
Routing - each Group's Routing Table (DAY or NIGHT).
Logged In - number of Agents logged in to each Group.
Logged Out - number of Agents logged out of each Group.
Available - number of Agents available for ACD calls in each Group.
ACD - number of ACD Calls currently active by each Group.
Wrap - number of Agents currently in wrap for each Group.
Unavailable - number of unavailable Agents for each Group; includes Agents indicating manually their
unavailability and Agents on Non-ACD incoming, outgoing, or intercom calls.
Calls Queued - number of calls in the queue for each Group.
Longest Queued - length of time (MM:SS) the oldest call has been in queue.
Calls Overflowed Out - total number of calls overflowed out of one Group and answered by other
Groups.
Calls Answered - total number of calls answered by each Group.
Average Time To Answer - average length of time (MM:SS) each Group of Agents answer calls during
current routing cycle.
Calls Abandoned - total number of calls abandoned during current routing cycle.
Average Time To Abandon - average length of time (MM:SS) a caller waited in queue before hanging
up. This average is for Group's current routing cycle.
Calls Disconnected - the number of times calls were disconnected for each Group manually and by the
DISCONNECT Routing Command.
Calls Transferred - the number of times calls were transferred for each Group by the TRANSFER TO,
GROUP, LINE XFER, LINK XFER, CDR TABLE, or VMAIL XFER Routing Commands.
Voice Port States
At the bottom of the screen, the current state of each of the 32 Voice Ports is displayed.
There are 8 Voice Port states:
◗ Config -Voice Port is currently being configured. If Voice Port is connected, this state will change to
IDLE; if not, this state will change to UNUSED.
◗ Idle - available but not active.
◗ Recording - a call or an announcement.
◗ Playing - a recorded call or a recorded announcement.
◗ Waiting - in use but holding for user intervention, preparing to play an announcement, or for an ATA to
clear.
◗ Initing - port is trying to reset from an error that occurred.
◗ Disabled - not in use due to failure.
◗ Unused - not connected.
In this section steps are provided so you can perform the following tasks:
◗ Access the System Status screen.
◗ Display Statistics for another set of 8 Groups.
Follow this step to access the System Status screen from the Status Menu:
Norstar PRELUDE and CINPHONY ACD 3.6 User Guide
119
Chapter 4: Status
1 On the Status Menu, highlight System Status and press ENTER/CLICK. The System Status will
display:
To display statistics for all of the Groups:
• Press the F5 Key to display 1st. set of 8 Groups.
• Press the F7 Key to display last set of 8 Groups.
• Press the Right Arrow Key or the Tab Key to display the next Group in sequence.
• Press the Left Arrow or the Shift Tab Key to display the previous Group in sequence.
Press ESC when you want to exit this screen.
Note: The call statistics reset to zero when a Group's Routing Hours cycle from DAY to NIGHT, NIGHT to
DAY . . .
120
Norstar PRELUDE and CINPHONY ACD 3.6 User Guide
Chapter 4: Status
Feature Codes
Follow these steps to display the Features Codes screen for Agent and Supervisor Functions:
Note: You will use these codes at the Station Set when performing Agent or Supervisor Functions.
Refer to Using Norstar Station Sets chapter in this User Guide for detailed directions on use.
1 On the Status Menu, highlight Feature Codes and press ENTER/CLICK to display the Feature Codes
screen.
Agent Functions
◗
◗
◗
◗
◗
◗
◗
◗
LOGIN
UNAVAILABLE
CANCEL WRAP
HELP (CINPHONY I & II only)
CATEGORIZE
RECORD CALL (CINPHONY I & II only)
CALLS QUEUED
ANNOUNCEMENT MAINTENANCE (PRELUDE only)
Supervisor Functions (CINPHONY I & II only)
◗
◗
◗
◗
◗
◗
◗
REGISTER
RETRIEVE MESSAGES
ANNOUNCEMENT MAINTENANCE
MONITOR CALL
PLAY CALL
EMERGENCY ROUTING
GROUP STATUS
Norstar PRELUDE and CINPHONY ACD 3.6 User Guide
121
Chapter 4: Status
About ACD
Follow these steps to display the About ACD (PRELUDE or CINPHONY) screen to view important
information on the application you are currently using:
1 On the Status Menu, highlight About and press ENTER/CLICK to display the About screen.
The following information will display:
◗ ACD Level
◗ ACD Version
◗ Your ACD Product ID
◗ Number of Voice Ports
◗ Add-Ons currently in use
◗ KSU String listing components and version
◗ Copyright information
122
Norstar PRELUDE and CINPHONY ACD 3.6 User Guide
Chapter 5
Chapter 5: Reports
Chapter 5: Reports
Introduction
While ACD distributes calls for your call center, it also collects call data and processes this data so you can
view the results on reports. There are 5 classifications for these Reports:
◗ Agent Reports
Agent Profile Report
Agent Profile Summary Report
Agent Profile by Group Report
◗ Group Reports
Group Profile Report
Group Overflow Report
Routing Table Report
◗ Line Reports
Line Profile Detail Report
Line Profile Summary Report
Busy Report
Destination Number (DNIS/DID) Report (CINPHONY I & II Levels only)
◗ Categorization Reports
Call Categorization Report
Category By Agent Report
◗ System Reports
ACD Call Profile Detail Report
ACD Call Profile Summary Report
Abandoned Report
Monthly Summary Report
System Configuration Report
There are 3 Report utilities you can utilize before and after Report generation:
◗ Process Data - before a Report can be generated, you must Process Data to get up to the minute data
for reporting. Process Data is also required for most of the Maintenance Menu operations.
◗ Scheduler - you can schedule a Report to generate at a later date and time. Every scheduled Report
processes data before generation.
◗ Report/File Maintenance - when you generate a Report to a File (.RPT or .HTM), the Report is listed on
the Report/File Maintenance screen. There you can use this utility to copy or move Report to Drive A:
(disks), print Report, delete Report, and view Report on the screen. When records are exported
(Maintenance Menu operation), they are also listed, and you can copy or move them to Drive A: (disks).
Note: A report generated to a .HTM format can only be deleted in Report/File Maintenance.
124
Norstar PRELUDE and CINPHONY ACD 3.6 User Guide
Chapter 5: Reports
Process Data
Before any Report is be generated, Data should be Processed to update the database to include the
most current call activity.
Follow these steps to access the Process Data screen and Update the database:
Reports Menu
1 On the Reports Menu, highlight Process Data and press ENTER/CLICK to select. The Process Data
screen will display.
2 Highlight the Process button and press ENTER/CLICK to select. (You can also press the F10 key or
the ALT-P keys to process). You will receive a message: Processing Data - X% complete.
Norstar PRELUDE and CINPHONY ACD 3.6 User Guide
125
Chapter 5: Reports
Common Report Parameters
The following Report Parameters are common to all ACD Reports:
◗ From and Thru Ranges
Date, Time, Group, Agent ID, Category, Line, and Topic.
◗ Output Device
Printer, File, and Screen.
For all ACD Reports, you can change any of these parameters before generating the Report. This section
will provide:
◗ From/Thru Rules.
◗ Directions to select Output Device.
◗ Directions to complete File Name if File has been selected for Output Device.
Directions to change the Report Parameters specific to each Report are covered in each Report’s section.
From/Thru Rules
◗ If From and Thru range fields are left blank, all data in entire database is reported unless other ranges
are set.
◗ If From range field is completed and Thru range field is left blank, all data is reported from specified start
to end of database unless other ranges are set.
◗ If Thru range field is completed and From range field is left blank, all data is reported from beginning of
database to specified end unless other ranges are set.
◗ To report on one Parameter (e.g., Date), the variable must display in both the From and Thru fields.
Notes: Some From and Thru fields require that you type in the required information using a specific
format, such as: From and Thru Date using the format MM/DD/YY.
If Date Range is left blank, the default range will be 1/1/80 through 12/31/79 (January 1, 1980 through
December 31, 2079).
Other From and Thru fields require that you either type in the required information, or press F2/DBL
CLICK to display list of choices, move cursor to highlight the choice, and press ENTER to select. For
example, Agent ID or Group Number can be typed in or selected from F2 list.
Output Device selection
◗ Press F2/DBL CLICK to display list of Output Devices. Move cursor to highlight Output Device and
press ENTER/CLICK to select. If FILE is selected, go to Filename completion.
Note: There are 6 Output Devices from which to select:
•
•
•
•
•
•
LPT1 - Parallel Printer Port
LPT2 - Parallel Printer Port
File (with Printer Codes)
File (without Printer Codes)
Screen (view only)
HTML (.HTM format for Infocus Status Display Reports)
File Name completion
◗ If either FILE was selected, you will need to type in a File Name. Type in up to 8 alphanumeric
characters. The .RPT filename extension cannot be changed.
Note: When a Report is generated to File, this File is automatically listed in Report/File Maintenance
(Reports Menu utility). You can then copy or move this Report to the A: Drive (disks), print the Report,
Delete the Report or view the Report on screen.
126
Norstar PRELUDE and CINPHONY ACD 3.6 User Guide
Chapter 5: Reports
HTML completion
◗ If either HTML was selected, you will need to type in a File Name. Type in up to 8 alphanumeric
characters. The .HTM filename extension cannot be changed.
Note: When a Report is generated to HTML, this File is automatically listed in Report/File Maintenance
(Reports Menu utility). You can only delete a HTML Report. Refer to the Infocus Installation and User
Guide for directions to view and print these Web Page Reports (.htm) on the Infocus Server PC or
Infocus Client PC(s).
Norstar PRELUDE and CINPHONY ACD 3.6 User Guide
127
Chapter 5: Reports
Agent Reports
Agent Profile Report
Agent's performance over a specified period of time.
Agent Summary Report
Summary of Agent's performance over a specified period of time.
Agent Profile by Group Report
Agent's performance by Group(s) over a specified period of time.
Agent Profile Report
This Report summarizes the following:
◗ Amount of logged-in time.
◗ Amount of time spent on ACD Calls and how that time was spent (conversation, wrap time, etc.).
◗ Amount of time spent on Non-ACD Calls.
◗ Number of calls answered.
◗ Number of times Supervisor help was requested.
Follow these steps to Run the Report, for all data in database, to Output Device:
1 Access the Agent Profile Report screen.
2 Press the F10 Key (or highlight Run and press ENTER/CLICK, or press ALT-R) to Run (Generate)
Report for all data in database.
Refer to Common Report Parameters in this Chapter for directions and rules to specify the From and
Thru Data Ranges and directions to change Output Device.
Notes: Page Break on Agent ID default is YES; therefore, each Agent Profile will print on a separate
page unless changed to NO (Agent data will print consecutively with normal page breaks).
You can generate 3 Styles of an Agent Profile Report:
• ACD Duration
• ACD Percent
128
Norstar PRELUDE and CINPHONY ACD 3.6 User Guide
Chapter 5: Reports
• Non-ACD Duration
Duration Formats include:
•
•
•
z
HHH:MM:SS = 010:20:30
•
•
•
•
•
LOG DATE - Agent login time period (within From/Thru range) listed in ascending order.
HHH:MM.S = 010:20.5
MMMM:SS = 0620:30
MMMM
= 0621 (30+ rounded up, -30 rounded down)
Note: If ACD, you can generate either a DURATION or PERCENT Report Style. If Non-ACD, you can
only generate a DURATION Report Style.
Report Field (Column) Definitions
ACD DURATION and PERCENT Reports
LOG IN - time of day Agent logged in for time period.
LOG OUT - time of day Agent logged out for time period (* = auto logout, # = active Agent).
LOGIN DURATION - how long Agent was logged in for time period.
AVAILABLE - amount of ACD time, or percentage of time, Agent was active to take calls during time
period.
• TALK - amount of ACD time, or percentage of time, Agent conversed with caller during time period.
• HOLD - amount of ACD time, or percentage of time, ACD callers were placed on hold during time
period.
• WRAP - amount of ACD time, or percentage of time, Agent wrapped-up between calls during time
period.
• UNAVAILABLE MANUAL - amount of ACD time, or percentage of time, Agent was inactive during
time period; and, pressed the Unavailable Key to go inactive.
•
UNAVAILABLE OTHER - amount of ACD time, or percentage of time, Agent was inactive during
time period because of time spent on Non-ACD Calls.
• CALLS ANSWERED - number of ACD calls answered by Agent.
• SUPERVISOR HELP - number of help requests Agent sends to Supervisor by pressing the Help key.
Non-ACD DURATION Report
•
•
•
•
•
•
•
•
•
LOG DATE, LOG IN, LOG OUT - same as ACD.
LOGIN DURATION - same as ACD.
INCOMING DURATION - amount of time Agent was on transferred and incoming Non-ACD Calls.
INCOMING CALLS - number of transferred and incoming Non-ACD Calls.
OUTGOING DURATION - amount of time Agent was on outgoing Non-ACD Calls.
OUTGOING CALLS - number of outgoing Non-ACD Calls.
INTERCOM CALLS - number of intercom calls.
INTERCOM DURATION - amount of time Agent was on the Intercom.
ACD TIME TOTAL DURATION - amount of time Agent spent on ACD activities.
Norstar PRELUDE and CINPHONY ACD 3.6 User Guide
129
Chapter 5: Reports
Agent Summary Report
This Report summarizes the following:
◗ Amount of logged-in time for the day.
◗ Amount of time spent for the day on ACD Calls and how that time was spent (conversation, wrap time,
etc.).
◗ Amount of time spent for the day on Non-ACD Calls.
◗ Number of calls answered for the day.
◗ Number of times Supervisor help was requested for the day.
Follow these steps to Run the Report, for all data in database, to Output Device:
1 Access the Agent Summary Report screen.
2 Press the F10 Key (or highlight Run and press ENTER/CLICK, or press ALT-R) to Run (Generate)
Report for all data in database.
Refer to Common Report Parameters in this Chapter for directions and rules to specify the From and
Thru Data Ranges and directions to change Output Device.
Notes: Page Break on Agent ID default is YES; therefore, each Agent Profile will print on a separate
page unless changed to NO (Agent data will print consecutively with normal page breaks).
You can generate 3 Styles of an Agent Summary Report:
• ACD Duration
• ACD Percent
• Non-ACD Duration
Duration Formats include:
•
•
•
•
HHH:MM:SS = 010:20:30
HHH:MM.S = 010:20.5
MMMM:SS = 0620:30
MMMM
= 0621 (30+ rounded up, -30 rounded down)
Note: If ACD, you can generate either a DURATION or PERCENT Report Style. If Non-ACD, you can
only generate a DURATION Report Style.
130
Norstar PRELUDE and CINPHONY ACD 3.6 User Guide
Chapter 5: Reports
Report Field (Column) Definitions
ACD DURATION and PERCENT Reports
•
•
•
•
•
•
•
•
•
LOG DATE - Agent login time period (within From/Thru range) listed in ascending order.
•
UNAVAILABLE OTHER - amount of ACD time, or percentage of time, Agent was inactive for the day
because of time spent on Non-ACD Calls.
LOG IN - time of day Agent logged in for time period.
LOG OUT - time of day Agent logged out for time period (* = auto logout, # = active Agent).
LOGIN DURATION - how long Agent was logged in for a day.
AVAILABLE - amount of ACD time, or percentage of time, Agent was active to take calls for the day.
TALK - amount of ACD time, or percentage of time, Agent conversed with caller for the day.
HOLD - amount of ACD time, or percentage of time, ACD callers were placed on hold for the day.
WRAP - amount of ACD time, or percentage of time, Agent wrapped-up between calls for the day.
UNAVAILABLE MANUAL - amount of ACD time, or percentage of time, Agent was inactive for the
day; and, pressed the Unavailable Key to go inactive.
• CALLS ANSWERED - number of ACD calls answered by Agent.
• SUPERVISOR HELP - number of help requests Agent sends to Supervisor by pressing the Help key.
Non-ACD DURATION Report
•
•
•
•
•
•
•
•
•
LOG DATE, LOG IN, LOG OUT - same as ACD.
LOGIN DURATION - same as ACD.
INCOMING DURATION - amount of time Agent was on transferred and incoming Non-ACD Calls.
INCOMING CALLS - number of transferred and incoming Non-ACD Calls.
OUTGOING DURATION - amount of time Agent was on outgoing Non-ACD Calls.
OUTGOING CALLS - number of outgoing Non-ACD Calls.
INTERCOM CALLS - number of intercom calls.
INTERCOM DURATION - amount of time Agent was on the Intercom.
ACD TIME TOTAL DURATION - amount of time Agent spent on ACD activities.
Agent Profile By Group Report
This Report summarizes the following:
◗ Amount of logged-in time.
◗ Amount of time spent on ACD Calls and how that time was spent (conversation, wrap time, etc.).
◗ Amount of time spent on ACD Calls for each Group.
◗ Number of calls answered.
◗ Number of times Supervisor help was requested from Agents in the Group.
Follow this step to Run Report, for all data in database, to Output Device:
Main Menu
1 Access the Agent Profile By Group Report screen.
Norstar PRELUDE and CINPHONY ACD 3.6 User Guide
131
Chapter 5: Reports
2 Press the F10 Key (or highlight Run and press ENTER/CLICK, or press ALT-R) to Run (Generate)
Report for all data in database.
Refer to Common Report Parameters in this Chapter for directions and rules to specify the From and
Thru Data Ranges and directions to change Output Device.
Notes: Page Break on Agent ID default is YES; therefore, each Agent Profile by Group will print on its
own page unless changed to NO (Agent data will print consecutively with normal page breaks).
You can generate 2 Styles of an Agent Profile by Group Report:
• ACD Duration
• ACD Percent
Duration Formats include:
•
•
•
•
HHH:MM:SS = 010:20:30
HHH:MM.S = 010:20.5
MMMM:SS = 0620:30
MMMM = 0621 (30+ rounded up, -30 rounded down)
Report Field (Column) Definitions
ACD DURATION and PERCENT Reports
• LOG DATE - Agent login time period (within From/Thru range) for each Group listed in ascending
order.
• LOG IN - time of day Agent logged in for each Group for time period.
• LOG OUT - time of day Agent logged out for each Group for time period (* = auto logout, # = active
Agent).
• LOGIN DURATION - how long Agent was logged in for each Group for time period.
• AVAILABLE - amount of ACD Time, or percentage of time, Agent was active to take calls for each
Group during time period.
• TALK - amount of ACD Time, or percentage of time, Agent conversed with caller for each Group
during time period.
132
Norstar PRELUDE and CINPHONY ACD 3.6 User Guide
Chapter 5: Reports
• ALTERNATE GROUP - amount of ACD Time, or percentage of time, Agent took calls from another
Group.
• HOLD - amount of ACD Time, or percentage of time, ACD callers were placed on hold for each
Group during time period.
• WRAP - amount of ACD Time, or percentage of time, Agent wrapped-up between calls for each
Group during time period.
• UNAVAILABLE MANUAL - amount of ACD time, or percentage of time, Agent was inactive for each
Group during time period; and, pressed the Unavailable Key to go inactive.
• UNAVAILABLE OTHER - amount of ACD time, or percentage of time, Agent was inactive for each
Group during time period because of time spent on Non-ACD Calls.
• CALLS ANSWERED - number of ACD calls answered by Agent for each Group.
• SUPERVISOR HELP - number of help requests Agent sends to Supervisor for each Group by
pressing the Help key.
Norstar PRELUDE and CINPHONY ACD 3.6 User Guide
133
Chapter 5: Reports
Group Reports
Group Profile Report
Group’s performance over a specified period of time.
Group Overflow Report
Overflow Group’s performance over a specified period of time.
Routing Table Report
Details of Routing Table usage.
Group Profile Report
This Report summarizes the following:
◗ Number of calls received.
◗ Whether calls were answered or abandoned.
◗ Average amount of time call spent in queue before answered or abandoned.
◗ Average amount of time spent on various aspects of ACD Calls.
◗ Number of auto-logouts and requests for Supervisor assistance.
Follow these steps to Run the Report, for all data in database, to Output Device:
1 Access the Group Profile Report screen.
2 Press the F10 Key (or highlight Run and press ENTER/CLICK, or press ALT-R) to Run (Generate)
Report for all data in database.
Refer to Common Report Parameters in this Chapter for directions and rules to specify the From and
Thru Data Ranges and directions to change Output Device.
Report Field (Column) Definitions
• CALLS RECEIVED - number of ACD Calls distributed to the Group.
• CALLS ANSWERED - number of ACD Calls answered by the Group
• CALLS ABANDONED - number of ACD Calls when the caller hung up before an Agent could answer
the call.
134
Norstar PRELUDE and CINPHONY ACD 3.6 User Guide
Chapter 5: Reports
• CALLS PICKED UP OR DISCONNECTED - calls answered on a station set other than the original
station set by the Norstar "Pick-up" feature, or calls disconnected by the Disconnect Routing
Command.
• CALLS TRANSFERRED - number of ACD Calls transferred out of ACD by the TRANSFER TO, LINE
XFER, LINK XFER, CDR TABLE, or VMAIL XFER Routing Command.
• AVERAGE ANSWERED - average amount of ACD Time a caller waited before an Agent answered
(total time all calls spent in queue divided by total number of answered calls).
• AVERAGE ABANDONED - average amount of ACD Time caller waited before hanging up (total time
all calls spent in queue before being abandoned divided by total number of abandoned calls).
• AVERAGE TALK - average amount of ACD Time Agents spent conversing with callers (total time
divided by number of answered calls).
• AVERAGE HOLD - average amount of ACD Time Agents kept callers on hold (total time divided by
total number of answered calls).
• AVERAGE WRAP - average amount of ACD Time Agents spent on wrap-up (total time divided by
total number of answered calls).
• AUTO LOGOUT - number of automatic logouts for the Group without the Agents manually logging
out or going unavailable.
• SUPERVISOR HELP - number of requests for Supervisor Help from the Group.
Norstar PRELUDE and CINPHONY ACD 3.6 User Guide
135
Chapter 5: Reports
Group Overflow Report
This Report summarizes the following:
◗ Number of ACD Calls overflowing to other Groups, which Groups received these calls, and the number
of calls received by each Group.
◗ Number of ACD Calls overflowing from other Groups to this Group.
◗ Total number of calls received, answered, and abandoned.
Follow these steps to Run the Report, for all data in database, to Output Device:
1 Access the Group Overflow Report screen.
2 Press the F10 Key (or highlight Run and press ENTER/CLICK, or press ALT-R) to Run (Generate)
Report for all data in database.
Refer to Common Report Parameters in this Chapter for directions and rules to specify the From and
Thru Data Ranges and directions to change Output Device.
Report Field (Column) Definitions
• OUTGOING OVERFLOW GROUPS - The Overflow Group(s) Number is listed in the column
heading. The column lists the number of calls overflowed to this Group(s) from the Subject Group.
The outgoing overflowed calls are totaled at the end of the row.
• INWARD OVERFLOW - total number of calls that overflowed from other Groups to the Subject
Group specified.
• CALLS RECEIVED - number of ACD Calls received by the Subject Group.
• CALLS ANSWERED - number of ACD Calls answered by the Subject Group.
• CALLS ABANDONED - number of ACD Calls when the caller hung up before an Agent could answer
the call.
• PICKED UP OR DISCONNECTED - calls answered on a station set other than the original station
set by the Norstar "Pick-up" feature, or calls disconnected by the Disconnect Routing Command.
• TRANSFERRED - number of ACD Calls for Subject Group transferred by GROUP Command, or by
the TRANSFER TO Command to a Norstar DN, or by the LINK XFER, LINE XFER, CDR TABLE, or
VMAIL XFER Commands.
136
Norstar PRELUDE and CINPHONY ACD 3.6 User Guide
Chapter 5: Reports
Routing Table Report
This Report displays the following:
◗ Step Number, Routing Command, and Value for the Day and Night Routing Tables.
◗ Number and percentage of all calls reaching each Step on the Routing Command Table.
Follow these steps to Run the Report, for all data in database, to Output Device:
1 Access the Routing Table Report screen.
2 Press the F10 Key (or highlight Run and press ENTER/CLICK, or press ALT-R) to Run Report for all
data in database.
Refer to Common Report Parameters in this Chapter for directions and rules to specify the From and
Thru Data Ranges and directions to change Output Device.
Report Field (Column) Definitions
•
•
•
•
STEP - number of the step in the Routing Table.
COMMAND - Routing Command for Step.
VALUE - value for Routing Command.
COUNT - number of calls that reached a Step in the Routing Table. If the GO TO STEP command is
used, the COUNT is incremented because the call is looped back to a step.
• % CALLS - percentage of calls that reached a Step in the Routing Command Table.
Norstar PRELUDE and CINPHONY ACD 3.6 User Guide
137
Chapter 5: Reports
Line Reports
Line Profile Detail Report
Detail of ACD Line usage.
Line Profile Summary Report
Summary of ACD Line usage.
Busy Report
A Summary of when all lines assigned to an ACD Group were busy, at what times they were busy, and for
how long they were busy.
Destination Number (DNIS/DID) Report
Summary of DNIS and DID Line usage.
Line Profile Detail Report
This Report details the following:
◗ Number and duration of all calls received during specified intervals.
◗ Summary of ACD call activities during specified intervals.
◗ Number and duration of all Incoming and Outgoing Calls during specified intervals.
◗ Percentage of the interval that Line was in use.
Follow these steps to Run Report, for all data in database, to Output Device:
1 Access the Line Profile Detail Report screen.
2 Press the F10 Key (or highlight Run and press ENTER/CLICK, or press ALT-R) to Run (Generate)
Report for all data in database.
Refer to Common Report Parameters in this Chapter for directions and rules to specify the From and
Thru Data Ranges and directions to change Output Device.
Note: Page Break on Line default is YES; therefore, each Line will print on its own page. If NO, Lines
will follow on the same page and page breaks will occur normally.
Report Field (Column) Definitions
• DATE - the Date for the data on this row.
138
Norstar PRELUDE and CINPHONY ACD 3.6 User Guide
Chapter 5: Reports
• TIME PERIOD - 30 minute time periods within the From/Thru Date range. The time periods are in
ascending order (earliest to latest).
•
•
•
•
•
•
TOTAL CALLS - number of calls received on the Line during the specified time period for the day.
TOTAL DURATION - duration for all calls received on the Line during the time period for the day.
CALLS RECEIVED - number of ACD Calls distributed to Agents during the time period for the day.
CALLS ANSWERED - number of ACD Calls answered by Agents during the time period for the day.
ACD DURATION - total amount of ACD Time during the time period for the day.
CALLS ABANDONED - number of ACD Calls when the caller hung up before an Agent could answer
the call.
• ABANDONED DURATION - length of time callers waited for Agents before hanging up the receiver,
during the time period for the day.
• CALLS PICKED UP OR DISCONNECTED - calls answered on a station set other than the original
station set by the Norstar "Pick-up" feature, or calls disconnected by the Disconnect Routing
Command.
• CALLS TRANSFERRED - number of ACD Calls transferred, by the TRANSFER TO, LINE XFER,
LINK XFER, CDR TABLE, or VMAIL XFER Routing Commands, or to another Group by the
GROUP Command, during the time period for the day.
• INCOMING CALLS - number of Non-ACD Calls received on this Line, during the time period for the
day.
• INCOMING DURATION - length of time for all Non-ACD Calls received on this Line.
• OUTGOING CALLS - number of Non-ACD Calls received on this Line, during the time period for the
day.
• OUTGOING DURATION - length of time for all Non-ACD Calls received on this Line, during the time
period for the day.
• % TIME BUSY - percentage of the time period that Line was in use.
Norstar PRELUDE and CINPHONY ACD 3.6 User Guide
139
Chapter 5: Reports
Line Profile Summary Report
This Report summarizes the following:
◗ Number and duration of all calls received for the day.
◗ Summary of ACD call activities for the day.
◗ Number and duration of all Incoming and Outgoing Calls for the day.
◗ Percentage of the interval that Line was in use.
Follow these steps to Run Report, for all data in database, to Output Device:
1 Access the Line Profile Summary Report screen.
2 Press the F10 Key (or highlight Run and press ENTER/CLICK, or press ALT-R) to Run (Generate)
Report for all data in database.
Refer to Common Report Parameters in this Chapter for directions and rules to specify the From and
Thru Data Ranges and directions to change Output Device.
Note: Page Break on Line default is YES; therefore, each Line will print on its own page. If NO, Lines
will follow on the same page and page breaks will occur normally.
Report Field (Column) Definitions
• DATE - the Date for the data on this row.
• TIME PERIOD - 30 minute time periods within the From/Thru Date range. The time periods are in
ascending order (earliest to latest).
•
•
•
•
•
•
TOTAL CALLS - number of calls received on the Line for the day.
TOTAL DURATION - duration for all calls received on the Line for the day.
CALLS RECEIVED - number of ACD Calls distributed to Agents for the day.
CALLS ANSWERED - number of ACD Calls answered by Agents for the day.
ACD DURATION - total amount of ACD Time for the day.
CALLS ABANDONED - number of ACD Calls when the caller hung up before an Agent could answer
the call.
• ABANDONED DURATION - length of time callers waited for Agents before hanging up the receiver,
for the day.
140
Norstar PRELUDE and CINPHONY ACD 3.6 User Guide
Chapter 5: Reports
• CALLS PICKED UP OR DISCONNECTED - calls answered on a station set other than the original
station set by the Norstar "Pick-up" feature, or calls disconnected by the Disconnect Routing
Command.
• CALLS TRANSFERRED - number of ACD Calls transferred, by the TRANSFER TO, LINE XFER,
LINK XFER, CDR TABLE, or VMAIL XFER Routing Commands, or to another Group by the
GROUP Command, for the day.
•
•
•
•
•
INCOMING CALLS - number of Non-ACD Calls received on this Line, for the day.
INCOMING DURATION - length of time for all Non-ACD Calls received on this Line.
OUTGOING CALLS - number of Non-ACD Calls received on this Line, for the day.
OUTGOING DURATION - length of time for all Non-ACD Calls received on this Line, for the day.
% TIME BUSY - percentage of the time period that Line was in use.
Norstar PRELUDE and CINPHONY ACD 3.6 User Guide
141
Chapter 5: Reports
Busy Report
This Report displays the following:
◗ The Date, Start Time, End Time, and Duration when all Lines, for an ACD Group, are busy.
◗ The total length of time that all Lines within an ACD Group are busy.
Follow these steps to Run the Report, for all data in database, to Output Device:
1 Access the Busy Report screen.
2 Press the F10 Key (or highlight Run and press ENTER/CLICK, or press ALT-R) to Run (Generate)
Report for all data in database.
Refer to Common Report Parameters in this Chapter for directions and rules to specify the From and
Thru Data Ranges and directions to change Output Device.
Report Field (Column) Definitions
•
•
•
•
•
•
142
GROUP - the targeted Group.
ASSIGNED LINES - the Lines assigned to targeted Group.
DATE - the month, day, and year that all lines assigned to an ACD Group were busy.
START TIME - the time of day that all lines assigned to an ACD Group started being busy.
END TIME - the time of day that all lines assigned to an ACD Group ended being busy.
DURATION ASSIGNED LINES BUSY - length of time (between START and END TIME) that all lines
assigned to an ACD Group were busy.
Norstar PRELUDE and CINPHONY ACD 3.6 User Guide
Chapter 5: Reports
Destination Number (DNIS/DID) Report
This Report is available for only CINPHONY I & II Levels.
This Report summarizes the following:
◗ Number of calls received using DNIS and DID.
◗ Summary of ACD call activities.
Follow these steps to Run Report, for all data in database, to Output Device:
1 Access the Destination Number (DNIS/DID) Report screen.
2 Press the F10 Key (or highlight Run and press ENTER/CLICK, or press ALT-R) to Run (Generate)
Report for all data in database.
Refer to Common Report Parameters in this Chapter for directions and rules to specify the From and
Thru Data Ranges and directions to change Output Device.
Report Field (Column) Definitions
•
•
•
•
•
DATE - the From/Thru Date Range for the data on this row.
TIME - the From/Thru Time.
CALLS RECEIVED - number of ACD Calls distributed to Agents during the time period for the day.
CALLS ANSWERED - number of ACD Calls answered by Agents during the time period for the day.
CALLS ABANDONED - number of ACD Calls when the caller hung up before an Agent could answer
the call.
• CALLS PICKED UP OR DISCONNECTED - calls answered on a station set other than the original
station set by the Norstar "Pick-up" feature, or calls disconnected by the Disconnect Routing
Command.
• CALLS TRANSFERRED - number of ACD Calls transferred, by the TRANSFER TO, LINE XFER,
LINK XFER, CDR TABLE, or VMAIL XFER Routing Commands, or to another Group by the GROUP
Command, during the time period for the day.
• AVERAGE ANSWERED - average amount of ACD Time a caller waited before Agent answered
(total time all calls spent in queue divided by total number of answered calls).
Norstar PRELUDE and CINPHONY ACD 3.6 User Guide
143
Chapter 5: Reports
• AVERAGE ABANDONED - average amount of ACD Time caller waited before hanging up (total time
all calls spent in queue before being abandoned divided by total number of abandoned calls).
• AVERAGE TALK - average amount of ACD Time spent conversing with callers (total time divided by
number of answered calls).
• AVERAGE HOLD - average amount of ACD Time Agents kept callers on hold (total time divided by
total number of answered calls).
• AVERAGE WRAP - average amount of ACD Time Agents spent on wrap-up (total time divided by
total number of answered calls).
144
Norstar PRELUDE and CINPHONY ACD 3.6 User Guide
Chapter 5: Reports
Categorization Reports
Call Categorization Report
A count of all categories used during a specified time period.
Category By Agent Report
A Count of the Categories entered by each Agent within a specified time period.
Call Categorization Report
This Report displays the following:
◗ Number of calls logged for each category within the reporting period.
Follow these steps to Run the Report, for all data in database, to Output Device:
1 Access the Call Categorization Report screen.
2 Press the F10 Key (or highlight Run and press ENTER/CLICK, or press ALT-R) to Generate Report
for all data in database.
Refer to Common Report Parameters in this Chapter for directions and rules to specify the From and
Thru Data Ranges and directions to change Output Device.
Report Field (Column) Definitions
• CATEGORY NUMBER - number assigned to call. Agent enters category number on station set
when call is completed.
• CATEGORY DESCRIPTION - the brief description assigned to the Category Number on the
Categorization Code screen from the Configuration Menu.
• TOTAL - number of calls assigned a Category Code during the specified wrap period.
Norstar PRELUDE and CINPHONY ACD 3.6 User Guide
145
Chapter 5: Reports
Category By Agent Report
This Report displays the following:
◗ Number of calls logged for each Category by Agent during a specified wrap period.
◗ If Category Description was entered during Configuration, it will also display.
Follow these steps to Run the Report, for all data in database, to Output Device:
1 Access the Category By Agent Report screen.
2 Press the F10 Key(or highlight Run and press ENTER/CLICK, or press ALT-R) to Generate Report for
all data in database.
Refer to Common Report Parameters in this Chapter for directions and rules to specify the From and
Thru Data Ranges and directions to change Output Device.
Report Field (Column) Definitions
• CATEGORY NUMBER - the number representing a specific call category. It is entered by Agent on
the Station Set for each call received. If Agent does not enter a Category Number, NO ENTRY will
display in the CATEGORY NUMBER column.
• CATEGORY DESCRIPTION - an alphanumeric description of the Call Category. If entered for the
Category Number during Configuration, it will display beside the Category Number on the Report.
• TOTAL - the total number of calls for a particular Category. If Category Number was not entered,
there will also be a NO ENTRY total for each Agent.
146
Norstar PRELUDE and CINPHONY ACD 3.6 User Guide
Chapter 5: Reports
System Reports
ACD Call Profile Detail Report
A Count by Group of ACD Calls received during specified time period and how long it took to answer,
abandon, or route calls.
ACD Call Profile Summary Report
A Count by Group of ACD Calls received for the day and how long it took to answer, abandon, or route
calls.
Abandoned Call Report
A Count of ACD Calls that were abandoned for a Group and Line during a specified time period, and the
time it took before the call was abandoned.
Monthly Summary Report
Summary of entire system or Group performance for each day of the month.
System Configuration Report
Detailed information of selections made on the Configuration screens.
ACD Call Profile Detail Report
This Report provides the time it took for each ACD Call to be in queue before being answered, abandoned,
picked up and/or disconnected, or transferred. This call data is listed in half hour increments for the time
period specified. This Report displays the following:
◗ Number of answered calls.
◗ Number of abandoned calls.
◗ Number of calls picked up and/or disconnected.
◗ Number of calls transferred.
Follow these steps to Run the Report, for all data in database, to Output Device:
1 Access the ACD Call Profile Detail Report.
2 Press the F10 Key to Run (Generate) Report for all data in database.
Norstar PRELUDE and CINPHONY ACD 3.6 User Guide
147
Chapter 5: Reports
Refer to Common Report Parameters in this Chapter for directions and rules to specify the From and
Thru Data Ranges and directions to change Output Device.
Notes: If Page Break on Group is YES, each Group will print on its own page. If NO, the next Group
will follow on the same page and page breaks will occur normally.
You can generate 2 Styles of an ACD Call Profile Detail Report:
• Count
• Percent
Default Time Intervals for Blocks 1-15 are 5, 10, 15, 20, 25, 30, 40, 50, 60, 75, 90, 120, 150, 180, and
210. These blocks can be changed by the user.
For example, to track number of calls answered every 15 seconds, type 15 in Block 1, 30 in Block 2, 45
in Block 3 ...
Report Field (Column) Definitions
ACD COUNT and PERCENT Reports
• TIME PERIOD - 30 minute time periods within the From/Thru Time range where calls are profiled as
to being abandoned, picked up and disconnected, or transferred. The time periods are in ascending
order (earliest to latest).
• TIME IN SECONDS AND BLOCK # - number of seconds specified for a column (15 blocks of time).
Each block of time displays the number of calls answered, abandoned, picked up and disconnected,
and transferred within its time interval for each 30 minute time period. The time intervals are also in
ascending order.
• ABANDONED - number of ACD Calls in a block for a time period that were abandoned because the
caller hung up before an Agent could answer the call.
• PICKED UP OR DISCONNECTED - calls answered on a station set other than the original station
set by the Norstar "Pick-up" feature, or calls disconnected by the Disconnect Routing Command.
• TRANSFERRED - number of ACD Calls in a block for a time period transferred to a Norstar DN
using the TRANSFER TO, LINE XFER, LINK XFER, CDR TABLE, or VMAIL XFER Routing
Commands, or to another Group by the GROUP Command.
• Telephone Service Factor (T.S.F. %) - percentage of calls answered within the Time in Seconds
interval (block).
148
Norstar PRELUDE and CINPHONY ACD 3.6 User Guide
Chapter 5: Reports
ACD Call Profile Summary Report
This Report provides the time it took for each ACD Call to be in queue before being answered, abandoned,
picked up and/or disconnected, or transferred. This call data is calculated in totals for each time block
within each day specified. This Report displays the following:
◗ Number of answered calls for the day.
◗ Number of abandoned calls for the day.
◗ Number of calls picked up and/or disconnected for the day.
◗ Number of calls transferred for the day.
Follow these steps to Run the Report, for all data in database, to Output Device:
1 Access the ACD Call Profile Summary Report.
2 Press the F10 Key to Run (Generate) Report for all data in database.
Refer to Common Report Parameters in this Chapter for directions and rules to specify the From and
Thru Data Ranges and directions to change Output Device.
Notes: If Page Break on Group is YES, each Group will print on its own page. If NO, the next Group
will follow on the same page and page breaks will occur normally.
You can generate 2 Styles of an ACD Call Profile Summary Report:
• Count
• Percent
Default Time Intervals for Blocks 1-15 are 5, 10, 15, 20, 25, 30, 40, 50, 60, 75, 90, 120, 150, 180, and
210. These blocks can be changed by the user.
For example, to track number of calls answered every 15 seconds, type 15 in Block 1, 30 in Block 2, 45
in Block 3 ...
Report Field (Column) Definitions
ACD COUNT and PERCENT Reports
• TIME IN SECONDS AND BLOCK # - number of seconds specified for a column (15 blocks of time).
Each block of time displays the number of calls answered, abandoned, picked up and disconnected,
and transferred.
Norstar PRELUDE and CINPHONY ACD 3.6 User Guide
149
Chapter 5: Reports
• ABANDONED - number of ACD Calls in a block for a time period that were abandoned because the
caller hung up before an Agent could answer the call.
• PICKED UP OR DISCONNECTED - calls answered on a station set other than the original station
set by the Norstar "Pick-up" feature, or calls disconnected by the Disconnect Routing Command.
• TRANSFERRED - number of ACD Calls in a block of time transferred to a Norstar DN using the
TRANSFER TO, LINE XFER, LINK XFER, CDR TABLE, or VMAIL XFER Routing Commands, or to
another Group by the GROUP Command.
• Telephone Service Factor (T.S.F. %) - percentage of calls answered within a block of time).
150
Norstar PRELUDE and CINPHONY ACD 3.6 User Guide
Chapter 5: Reports
Abandoned Calls Report
This Report summarizes the following:
◗ Group, Date, Line, Time, and Duration of each Call Abandoned during a specified Time Period. If
available, ANI/ICLID and DNIS/DID Numbers will be included.
◗ Total number of abandoned Calls, total length of time that all Calls spent in queue before being
abandoned, and average length of time that all Calls spent in queue before being abandoned.
Follow these steps to Run the Report, for all data in database, to Output Device:
1 Access the Abandoned Calls Report screen.
2 Press the F10 Key (or highlight Run and press ENTER/CLICK, or press ALT-R) to Run (Generate)
Report for all data in database.
Refer to Common Report Parameters in this Chapter for directions and rules to specify the From and
Thru Data Ranges and directions to change Output Device.
Report Field (Column) Definitions
•
•
•
•
•
DATE - month, day, and year the ACD Call was abandoned.
LINE - the Line on which the ACD was received and abandoned.
TIME - time of day that the ACD Call was received on the Line.
DURATION - the length of time an ACD Call spent in queue before being abandoned.
INCOMING NUMBER AND NAME - the ICLID/ANI Number and Name of caller (ICLID only) or
DNIS/DID Number that was abandoned.
Norstar PRELUDE and CINPHONY ACD 3.6 User Guide
151
Chapter 5: Reports
Monthly Summary Report
This Report summarizes the following:
◗ Number of calls received, answered, or abandoned.
◗ Average time spent on various aspects of ACD Calls.
◗ Number of Auto-Logouts and requests for Supervisor help.
◗ Number of incoming, outgoing, and intercom calls made during reporting period.
Follow these steps to Run Report, for all data in database, to Output Device:
1 Access the Monthly Summary Report screen.
Month
2 Type in the full name of the Month and press ENTER.
(or)
Press the F2/DBL CLICK to display the list of Months. Move cursor to highlight Month and press
ENTER/CLICK. Cursor moves to the Year field.
Note: The default is the Current Month and Year.
Year
3 Type in the Year.
Group Range
4 Type in the from Group Number and press ENTER.
(or)
Press the F2/DBL CLICK to display list of Groups. Move cursor to highlight Group and press ENTER
to select.
Follow the same steps for the thru Group Number.
5 Press the F10 Key (or highlight Run and press ENTER/CLICK, or press ALT-R) to Generate Report to
the Output Device specified.
Report Field (Column) Definitions
• DATE - each day of the month specified.
• CALLS RECEIVED - number of ACD Calls per day for the month distributed to the Groups specified.
• CALLS ANSWERED - number of ACD Calls per day for the month answered by Groups specified.
152
Norstar PRELUDE and CINPHONY ACD 3.6 User Guide
Chapter 5: Reports
• CALLS ABANDONED - number of ACD Calls per day for the month because they were not
answered by Agent, the caller hung up, a receptionist answered the call, or an automated system
like voice mail handled the call.
• CALLS PICKED UP OR DISCONNECTED - calls answered on a station set other than the original
station set by the Norstar "Pick-up" feature, or calls disconnected by the Disconnect Routing
Command.
• CALLS TRANSFERRED - number of ACD Calls transferred per day, for the month, by the
TRANSFER TO, GROUP, LINE XFER, LINK XFER, CDR TABLE, or VMAIL XFER Routing
Commands.
• AVERAGE ANSWERED - average amount of ACD Time a caller waited per day for the month before
Agent answered (total time all calls spent in queue divided by total number of answered calls).
• AVERAGE ABANDONED - average amount of ACD Time caller waited per day for the month before
hanging up (total time all calls spent in queue before being abandoned divided by total number of
abandoned calls).
• AVERAGE TALK - average amount of ACD Time spent per day for the month conversing with callers
(total time divided by number of answered calls).
• AVERAGE HOLD - average amount of ACD Time Agents kept callers on hold per day for the month
(total time divided by total number of answered calls).
• AVERAGE WRAP - average amount of ACD Time Agents spent on wrap-up per day for the month
(total time divided by total number of answered calls).
• AUTO LOGOUT - number of automatic logouts for Groups per day for the month without the Agent
logging out or going unavailable.
• SUPERVISOR HELP - number of requests for Supervisor Help from the Groups per day for the
month.
• INCOMING, OUTGOING, INTERCOM - total number of calls for the system.
Norstar PRELUDE and CINPHONY ACD 3.6 User Guide
153
Chapter 5: Reports
System Configuration Report
This Report displays all Configuration information to provide:
◗ Analysis tool so Technical Support can quickly understand your system.
◗ Reference tool so you can view the entire setup of your system.
When you display the System Configuration Report, you can specify if you want to print out all
Category Codes with the Report.
Note: if you are using thousands of Category Codes, you may not want to print out all of the codes
considering the volume.
◗ Use the Right and Left Arrow keys to move checkmark between YES and NO fields.
You will also have to specify the Output Device/Filename fields before running (generating) the Report.
Refer to Common Report Parameters in this Chapter.
154
Norstar PRELUDE and CINPHONY ACD 3.6 User Guide
Chapter 5: Reports
Scheduler
This utility allows you to automatically Generate Reports and perform certain Maintenance operations on a
scheduled Date and Time.
Note: You can Schedule a maximum of 100 Reports. Call data is automatically processed prior to
report generation for all scheduled Reports. At the beginning of every hour, ACD checks the Scheduler
any runs any Report set for that hour. If more than 1 Report is set to run for the same time, all are run
in alphabetical order.
In this section steps are provided so you can perform the following tasks:
◗ Access the Scheduler screen and schedule Report to be generated at a later time.
◗ Delete a Schedule.
Follow these steps to access the Scheduler screen and schedule report to be generated at a later time:
Main Menu
1 On the Main Menu, move cursor to highlight Reports and press ENTER/CLICK to select. The Reports
Menu will display.
Reports Menu
2 Move cursor to highlight Scheduler and press ENTER/CLICK to select. The Scheduler screen will
display:
Description
3 Type in the Name (up to 25 alphanumeric characters) you want for the Report to be generated, or press
F2/DBL CLICK, highlight Report, and press ENTER/CLICK to select. Highlight Date field.
Note: The Description is used to recall the schedule. It does not serve as the Report Name.
Date
4 Press F2/DBL CLICK to display list of days of the week, and other time periods. Move cursor to
highlight Date and press ENTER/CLICK to select. Highlight Time field.
Time
5 Press F2/DBL CLICK to display list of time (hours of the day). Highlight Time and press
ENTER/CLICK to select. Highlight Schedule Type field.
Norstar PRELUDE and CINPHONY ACD 3.6 User Guide
155
Chapter 5: Reports
Schedule Type
6 Press F2/DBL CLICK to display list of Reports. Highlight Report and press ENTER/CLICK to select.
The Report Parameters, default or changed, will display when the Report Name displays.
7 If you want to change the parameters displaying, use the arrow keys to move cursor to each field. Refer
to the Report generation Chapter for this Report to change the field information in the same manner.
Save Schedule
8 Press the F10 Key (or highlight Save and press ENTER/CLICK, or press ALT-S) to Save this Schedule
(Record) and generate the Report on the Date and Time specified.
Follow these steps to delete a Schedule (Record):
1 Make sure Schedule you want to delete is displaying.
2 Press the ALT-D Keys simultaneously (or highlight Delete and press ENTER/CLICK), select YES to
confirm deletion, and the record will be deleted from the database.
Note: You can also delay a Schedule by:
• Make sure Scheduled Report is displaying.
• Move the cursor to highlight the Date field and press the F2 Key to display list of Dates.
• Move cursor to highlight NO EXECUTE and press ENTER. The report will not run until you return to
this Schedule and change the Date field choice.
156
Norstar PRELUDE and CINPHONY ACD 3.6 User Guide
Chapter 5: Reports
Report/File Maintenance
This utility allows you to perform the following tasks on a Report previously generated and saved to a File
(as Output File), a saved Export File, or a saved Recorded Announcement:
◗ Copy Report/File to Drive A:
◗ Move Report/File to Drive A:
◗ View Report on Screen
◗ Print Report
◗ Delete Report/File
In this section steps are provided so you can perform the following tasks:
◗ Access the Report/File Maintenance screen and select Report or File.
◗ Copy Report/File to Drive A:
◗ Move Report/File to Drive A:
◗ View Report.
◗ Print Report.
◗ Delete Report/File.
Follow these steps to access the Report/File Maintenance screen and select Report or File:
Main Menu
1 On the Main Menu, highlight Reports and press ENTER/CLICK to select. The Reports Menu will
display.
Reports Menu
2 Highlight Report/File Maintenance and press ENTER/CLICK to select. The Report/File Maintenance
screen will display:
Report Name
3 Press F2/DBL CLICK to display list of Reports (.RPT or .HTM extension), Export Files (.EXP
extension), and Announcement Files (ANNCE0xx.DAT) that can be backed up to floppy disks using this
feature. Refer to the Maintenance chapter, Export Data Files section for directions on generating
Export Files.
Norstar PRELUDE and CINPHONY ACD 3.6 User Guide
157
Chapter 5: Reports
Notes: A Report generated to HTML (.HTM extension) can only be deleted in Report/File Maintenance.
Exported Files cannot be viewed.
4 Highlight Report, Export File, or Announcement File and press ENTER/CLICK to select.
Follow these steps to copy this Report or Export File to Drive A:
1 Make sure a properly formatted diskette is in Drive A:
2 Highlight the Copy button and press ENTER/CLICK (or press ALT-C) . The Report or Export File is
copied to the diskette. You may have to use several diskettes depending on the size of the Reports or
Files.
Follow these steps to move the Report or Export File to Drive A:
1 Make sure a properly formatted diskette is in Drive A:
2 Highlight the Move button and press ENTER/CLICK (or press ALT-M). The Report or Exported File is
moved to the diskette. The Report or Files no longer resides on the hard disk. You may have to use
several diskettes depending on the size of the Reports or Export Files.
Follow this step to view the Report on the screen:
1 Highlight the View button and press ENTER/CLICK to select (or press ALT-V). In a few moments, the
Report will display on the screen.
To move around Report on screen, use the following keys:
TAB, SHIFT-TAB - moves the cursor right and left on screen.
END, END - moves the cursor to end and beginning of Report.
ARROW KEYS - moves cursor in direction of Arrow key.
CTRL-HOME, CTRL-END - moves cursor to beginning and end of Report row.
Follow this step to print the Report:
1 Highlight the Print button and press ENTER/CLICK (or press ALT-P). The Report will print to the
parallel printer port specified on Printer Configuration screen.
Follow this step to delete the Report (.RPT or .HTM) or Announcement File:
1 Highlight Delete button and press ENTER/CLICK (or press ALT-D). The Report or Announcement
File will be deleted from the database.
158
Norstar PRELUDE and CINPHONY ACD 3.6 User Guide
Chapter 6
Chapter 6: Maintenance
Chapter 6: Maintenance
Introduction
The Maintenance Menu allows you to manage call data in the following ways:
◗ Archive Data - copy call data to diskettes for backup or later restoration.
◗ Purge Data - delete call data from database.
◗ Archive and Purge Data - copy call data to diskettes and delete call data from database.
◗ Export Data - create quote-delimited export files for use in other database packages. This is available
for only for CINPHONY I & II Levels.
◗ Restore Archived Data - copy previously archived data from diskettes back into database.
◗ Recorded Calls - view the Agent ID, Call Number, Date, and Time for each Recorded Call, or Delete
the Agent Recorded Call (row).
◗ Data Management Parameters - specify the hour in day that call data is automatically processed and
purged; and, specify, the data storage period for the length of time you want to retain call data before it
is automatically purged.
Process Data
Before data can be Archived or Purged, this data must be Processed to update the database.
Follow these steps to access the Reports Menu and Process Data:
Main Menu
1 On the Main Menu, highlight Reports and the menu will display.
Reports Menu
2 On the Reports Menu, highlight Process Data and press ENTER to select. The Process Data screen
will display.
3 Highlight the Process button and press ENTER/CLICK to select. (You can also press the F10 key or
the ALT-P keys to process). You will receive a message: Processing Data - X% complete. After
100% complete, you can work with the Data.
160
Norstar PRELUDE and CINPHONY ACD 3.6 User Guide
Chapter 6: Maintenance
Archive Data
In this section steps are provided so you can access the Archive Data screen and copy processed call
data from database to diskettes. Make sure data is processed before archiving.
Follow these steps to access the Archive Data screen and copy processed call data from database to
diskettes:
Main Menu
1 On the Main Menu, highlight Maintenance to display menu.
Maintenance Menu
2 Highlight Archive Data and press ENTER/CLICK to select. The Archive Data screen will display.
Date Range
3 Type in a From Date using the format MM/DD/YY.
4 Type in a Thru Date using the format MM/DD/YY.
Note: If Date Range is left blank, the default range will be 1/1/80 through 12/31/79 (January 1, 1980
through December 31, 2079).
From/Thru Rules:
• If From and Thru range fields are left blank, all data in entire database is archived.
• If From range field is completed and Thru range field is left blank, all data is archived from specified
start to end of database.
• If Thru range field is completed and From range field is left blank, all data is archived from beginning
of database to specified end.
• To archive one Date of data, the Date must display in both the From and Thru fields.
Archive
5 Press the F10 Key (or highlight Archive and press ENTER/CLICK, or press ALT-A) to Archive the
specified data. If you want to abort an Archive, press ESC during the Archive.
ACD will prompt you to insert ARCHIVE Disk #1. ACD will indicate how many records are being copied
to the diskette, and will also prompt you to insert more diskettes if necessary. When all data is
Archived, CINPHONY will display a message.
Norstar PRELUDE and CINPHONY ACD 3.6 User Guide
161
Chapter 6: Maintenance
Note: It is best to use a properly formatted high density diskette; however, the Archive utility will format
the disk automatically if it is unformatted. It is also a good idea to label the disk(s) to indicate the range
of data.
162
Norstar PRELUDE and CINPHONY ACD 3.6 User Guide
Chapter 6: Maintenance
Purge Data
In this section steps are provided so you can access the Purge Data screen and delete data from
database. Data purged is unrecoverable unless it was previously archived.
Note: If you want to automatically Purge on a daily basis, you can utilize Data Management
Parameters. See Maintenance Menu, this Chapter.
Follow these steps to access the Purge Data screen and delete this data from database:
Main Menu
1 On the Main Menu, highlight Maintenance to display menu.
Maintenance Menu
2 Highlight Purge Data and press ENTER/CLICK to select. The Purge Data screen will display.
Date Range
3 Type in a From Date using the format MM/DD/YY.
4 Type in a Thru Date using the format MM/DD/YY.
Note: If Date Range is left blank, the default range will be 1/1/80 through 12/31/79 (January 1, 1980
through December 31, 2079).
From/Thru Rules:
• If From and Thru range fields are left blank, all data in entire database is purged.
• If From range field is completed and Thru range field is left blank, all data is purged from specified
start to end of database.
• If Thru range field is completed and From range field is left blank, all data is purged from beginning of
database to specified end.
• To purge one Date of data, the Date must display in both the From and Thru fields.
Purge
5 Press the F10 Key (or highlight Purge and press ENTER/CLICK, or press ALT-P) to Purge the specified
data. ACD displays a message when Purge is complete.
Norstar PRELUDE and CINPHONY ACD 3.6 User Guide
163
Chapter 6: Maintenance
Archive and Purge Data
In this section steps are provided so you can access the Archive and Purge Data screen and copy
processed call data from database to diskettes while deleting this data from database.
Follow these steps to access the Archive and Purge Data screen and copy processed call data from
database to diskettes while deleting this data from database:
Main Menu
1 On the Main Menu, highlight Maintenance to display menu.
Maintenance Menu
2 Highlight Archive and Purge Data and press ENTER/CLICK to select. The Archive and Purge Data
screen will display.
Date Range
3 Type in a From Date using the format MM/DD/YY. Press ENTER to move cursor to Thru Date field.
4 Type in a Thru Date using the format MM/DD/YY.
Note: If Date Range is left blank, the default range will be 1/1/80 through 12/31/79 (January 1, 1980
through December 31, 2079).
From/Thru Rules:
• If From and Thru range fields are left blank, all data in entire database is archived and purged.
• If From range field is completed and Thru range field is left blank, all data is archived and purged
from specified start to end of database.
• If Thru range field is completed and From range field is left blank, all data is archived and purged
from beginning of database to specified end.
• To archive and purge one Date of data, the Date must display in both the From and Thru fields.
164
Norstar PRELUDE and CINPHONY ACD 3.6 User Guide
Chapter 6: Maintenance
Archive and Purge
5 Press the F10 Key (or highlight Archive and press ENTER/CLICK, or press ALT-A) to Archive and
Purge the specified data. If you want to abort an Archive and Purge, press ESC during the Archive and
Purge.
ACD will prompt you to insert ARCHIVE Disk #1. ACD will indicate how many records are being copied
to the diskette, and will also prompt you to insert more diskettes if necessary. After archiving calls
within the specified range to diskette, the same calls within the range will be deleted. When all data is
Archived and Purged, ACD will display a message.
Note: It is best to use a properly formatted high density diskette; however, the Archive utility will
automatically format the disk if it is unformatted.
]
Norstar PRELUDE and CINPHONY ACD 3.6 User Guide
165
Chapter 6: Maintenance
Export Data
Export Data is only available for CINPHONY Levels I & II.
In this section steps are provided so you can perform the following task:
◗ Access the Export Data screen and create quote-delimited export files.
Notes: Make sure data is processed before exporting.
When Data is exported, you will create an Export File with a .EXP extension. This File is automatically
listed on the Report/File Maintenance. There you can Copy or Move the File to A: Drive (disks). The
Export files contain processed call information on which reports are run from the ACD call database.
These files are: CALL.EXP, AGENT.EXP, BUSY.EXP, CATEG.EXP. Refer to Appendix 3: Export Data
Record Formats for detailed information on these files.
Follow these steps to access the Export Data screen from the Main Menu and create export files:
Main Menu
1 On the Main Menu, highlight Maintenance to display the menu.
Maintenance Menu
2 Highlight Export Data and press ENTER/CLICK to select. The Export Data screen will display.
Date Range
3 Type in a From Date using the format MM/DD/YY. Press ENTER to move cursor to Thru Date field.
4 Type in a Thru Date using the format MM/DD/YY.
Date Format (format output in the Export files)
5 Press F2/DBL CLICK, highlight the Date Format, and press ENTER/CLICK to select.
Date Formats include:
•
•
•
•
•
166
MM/DD (10/21)
DD/MM (21/10)
DD MMM (21 OCT)
MMM DD (OCT 21)
MM/DD/YY (10/21/99)
Norstar PRELUDE and CINPHONY ACD 3.6 User Guide
Chapter 6: Maintenance
• DD/MM/YY (21/10/99)
• YY/MM/DD (99/10/21)
Time Range
6 Type in the From Time using the format HH:MM (e.g., 08:30). Press ENTER to move cursor to Thru
Time field.
7 Type in the Thru Time using the format HH:MM (e.g., 05:30). Press ENTER to move cursor to Time
Format field.
Time Format (format output in the Export files)
8 Press F2/DBL CLICK, highlight Time Format, and press ENTER/CLICK to select.
Time Formats include:
• HH:MM (10:20)
• HH:MMA/P (10:20A)
• HH:MM AM/PM (10:20AM)
From/Thru Rules:
• If From and Thru range fields are left blank, all data in entire database is exported.
• If From range field is completed and Thru range field is left blank, all data is exported from specified
start to end of database.
• If Thru range field is completed and From range field is left blank, all data is exported from beginning
of database to specified end.
• To purge one Date of data, the Date must display in both the From and Thru fields.
Export
9 Press the F10 Key (or highlight Export and press ENTER/CLICK, or press ALT-E) to Export the
specified data.
Note: 4 Export files will be created: agent.exp, call.exp, busy.exp, and categ.exp.
Norstar PRELUDE and CINPHONY ACD 3.6 User Guide
167
Chapter 6: Maintenance
Restore Archived Data
In this section steps are provided so you can perform the following task:
◗ Access the Restore Archived Data screen and copy data from diskettes back into the database.
Follow these steps to access the Restore Archived Data screen from the Main Menu and copy data from
diskette back into database:
Main Menu
1 On the Main Menu, highlight Maintenance to display menu.
Maintenance Menu
2 Move cursor to highlight Restore Archived Data and press ENTER/CLICK to select. A message
window will display.
3 Insert ARCHIVE DISK #1 into disk drive and press ENTER. Press F10 (or ALT-R) to start Restore. If
more than one disk was used for Archiving, ACD will prompt you to insert the next disks in sequential
order. When the Restore is complete, the Maintenance Menu will display.
168
Norstar PRELUDE and CINPHONY ACD 3.6 User Guide
Chapter 6: Maintenance
Recorded Calls
In this section steps are provided so you can perform the following task:
◗ Access the Recorded Call screen and view list of Recorded Calls.
◗ Delete a Recorded Call.
Follow these steps to access the Recorded Call screen from the Main Menu and view list of Recorded
Calls:
Main Menu
1 On the Main Menu, highlight Maintenance to display menu.
Maintenance Menu
2 Highlight Recorded Calls and press ENTER/CLICK to select. The Recorded Calls screen will display.
3 Use the cursor keys, displayed at bottom of screen, to view the list of Recorded Calls.
Follow this step to delete a Recorded Call from database:
1 Move cursor to highlight Recorded Call Number. Press the ALT-D Keys simultaneously to delete the
Recorded Call (row).
Note: Recorded Calls use up a lot of disk space; therefore, it is best to periodically clear old calls to free
up space.
Norstar PRELUDE and CINPHONY ACD 3.6 User Guide
169
Chapter 6: Maintenance
Data Management Parameters
There is are 2 fields to complete for Data Management Parameters:
◗ Daily Auto Purge/Process Time
◗ Data Storage Period
In this section steps are provided so you can perform the following tasks:
◗ Access the Data Management Parameters screen
◗ Select a Time to Daily Auto Purge/Process.
◗ Specify how many days for the Data Storage Period
Follow these steps to access the Data Management Parameters screen from the Main Menu:
Main Menu
1 On the Main Menu, highlight Maintenance to display the menu.
2 Highlight Data Management Parameters and press ENTER/CLICK to select. The Data Management
Parameters screen will display.
Follow these steps to select a Time to Daily Auto Purge/Process:
1 Highlight Daily Auto Purge/Process field. Press F2/DBL CLICK, highlight Time, and press
ENTER/CLICK to select. At this time ACD will automatically purge call data older than the specified
storage period and process current call data on a daily basis.
The Time that you select for data to automatically be purged on a daily basis, is also the same Time
that data will automatically be processed. However, Purge is dependent on how many days are
specified for the Data Storage Period. For example, the Data Storage Period is preset to 100 days.
This means that all call data that has remained in the database for more than 100 days, will
automatically be purged at the Time specified.
Notes: The default time is NO EXECUTE if you do not want to automate Purge/Process to run daily. If
you set a daily time for example Midnight, every night at 12:00 am the call data received for that day is
processed. Once data is processed it can be reported and/or purged. If you want to report on or purge
up-to-the-minute call data, you can select Process Data on the Reports Menu and perform a manual
170
Norstar PRELUDE and CINPHONY ACD 3.6 User Guide
Chapter 6: Maintenance
process and/or purge. You can also use Scheduler, to schedule a Purge or Process Data at other
intervals than daily.
If call data is manually purged (Reports Menu) during the 100 day period for example, the period starts
counting toward 100 days from the date of the last Purge. The following example provides
approximations to help you determine the Data Storage Period for your system.
Example: approximately 3600 calls will use up approximately 1 megabyte of hard disk space; therefore,
if you have 40 megabytes of hard disk space free, it will take approximately 136,000 calls to fill up your
hard disk. If you process 3,600 calls per day, you are using up 1 megabyte of hard disk storage per
day; therefore, in 40 days you hard disk will fill up. For this example, it would be best to set the Data
Storage Period to 30 days to compensate for approximations. The maximum you can set the Data
Storage Period is 999 days.
Data Storage Period
3 Type in up to 3 numeric characters (range 1-999) for Data Storage Period.
4 When all screen information is complete, press the F10 Key (or highlight Save and press
ENTER/CLICK, or press ALT-S) to Save this information.
Norstar PRELUDE and CINPHONY ACD 3.6 User Guide
171
Chapter 6: Maintenance
172
Norstar PRELUDE and CINPHONY ACD 3.6 User Guide
Chapter 7
Chapter 7: ACD Control
Chapter 7: ACD Control
ACD Control
The ACD Control option will display on the Main Menu.
The ACD Control screen allows you to perform the following operations:
◗ Activate - if you have selected Deactivate to stop Call Processing, you can select Activate to restart Call
Processing. The Main Menu will then display so you can continue to use ACD.
◗ Deactivate - if you want to stop Call Processing to execute an Add-On install, an Upgrade install, an
Update install, or shut the system down, you will need to select this operation.
◗ Execute - this operation is used to install the Add-Ons:. When you select Execute, the software will
automatically load. There are 3 types of installs that can be executed:
• Add-On (install Automated Attendant, Wallboard, Status Display for Windows (versions 3.1 or
95/NT), and/or Voice Port Activation)
• Upgrade (from one ACD level to another - PRELUDE, CINPHONY I, and CINPHONY II)
• Update (from one ACD version to another)
Refer to the Norstar PRELUDE and CINPHONY ACD Installation Guide for directions to perform
these installs.
◗ Off-Line - this operation starts ACD without enabling Call Processing. This allows you to perform the
following without being connected to the KSU:
• Generate Reports
• Modify Scheduler
• Perform any function not requiring active Call Processing
◗ Return - this option is used to exit the ACD Control screen and return to the Main Menu.
◗ Shutdown - if you select this option, all running programs on the system will stop and allow you to
power off the Application Module. This would be necessary, for example, if you wanted to move the
Applications Module or install a DVC or MS-BIC.
174
Norstar PRELUDE and CINPHONY ACD 3.6 User Guide
Chapter 7: ACD Control
Activate
Follow these steps to Activate Call Processing that was previously deactivated:
1 Display the ACD Control screen.
2 Highlight Activate and press ENTER. Call Processing will start and you will be returned to the Main
Menu.
Note: If you have selected Deactivate and then Execute to perform an install, Call Processing will
automatically resume once the install completes. If you have selected Deactivate and then Shutdown,
Call Processing will automatically resume when you restart the system.
Deactivate
Follow these steps to Deactivate Call Processing:
1 Display the ACD Control screen.
2 Highlight Deactivate and press ENTER. A message will display: "Choosing this option will stop Call
Processing. Are you sure you want to do this?"
3 Highlight OK and press ENTER. Call Processing will stop, and you will remain at the ACD Control
screen where you can select Execute (install software on A: Drive), Activate, and/or Shutdown.
Execute
Refer to the Norstar PRELUDE and CINPHONY ACD Installation Guide for directions to Execute any of the
following installs:
◗ Add-On (Automated Attendant, Wallboard, Status Display for Windows (versions 3.1 or 95/NT), and
Voice Port Activation)
◗ Upgrade (upgrade from one level of ACD to the next highest - PRELUDE, CINPHONY I, and
CINPHONY II).
◗ Update (update from your current Version of ACD to the next Version).
After you execute the install for the software, you will be returned to the Main Menu and Call Processing
will automatically be activated.
Off-Line
If Call Processing has been deactivated, you can select Off-Line to use ACD without Call Processing being
active. You will then be able to perform the following without being connected to the KSU:
◗ Configure
◗ Generate Reports
◗ Modify Scheduler
◗ Perform any function not requiring active Call processing
Follow these steps to go Off-Line:
1 Display the ACD Control screen and make sure Call Processing has been deactivated.
2 Highlight Off-Line and press ENTER. The Main Menu will display.
Return
Select Return to exit the ACD Control screen and display the Main Menu. Highlight Return and press
ENTER (or click on Return).
Shutdown
Shutdown will stop all running programs on the system and allow you to power off the Applications Module.
Follow these steps to Shutdown:
1 Display the ACD Control screen.
2 Follow the previous steps to Deactivate.
Norstar PRELUDE and CINPHONY ACD 3.6 User Guide
175
Chapter 7: ACD Control
3 After Call Processing has stopped, highlight Shutdown and press ENTER. A message will display:
"OK closes all running programs and prepares the system for restart. If chosen, wait for shutdown
messages. Are you sure you want to do this?"
4 Highlight OK and press ENTER. Shutdown will occur for several seconds and the a message will
display: "Shutdown has completed. It is now safe to turn off your computer, or restart the system by
pressing Ctrl+Alt+Del."
5 Turn off the Applications Module by unplugging the power cord. Or to restart, press the Ctrl, Alt, and Del
keys simultaneously. After restart, you will be returned to the Main Menu.
You may want to shutdown, for example, to move the Applications Module to a different location or install a
DVC or MS-BIC.
176
Norstar PRELUDE and CINPHONY ACD 3.6 User Guide
Chapter 8
Chapter 8: DOS-Shell
Chapter 8: DOS-Shell
DOS-Shell
DOS-Shell will display on the Main Menu.
Follow these steps to select DOS-Shell to exit the Main Menu and display the CINPHONY Directory.
1 Highlight DOS-Shell and press ENTER. The CINPHONY Directory prompt will display C:\CINPHONY>. To return to the Main Menu, type in EXIT and press ENTER.
Call Processing will remain active and you will be able to perform various functions at the CINPHONY
Directory.
◗ ACD LOGIN (acdlogin.bat)
◗ Copy Recorded Announcements to the A: drive
◗ Backup Recorded Calls to the A: Drive
◗ Perform maintenance operations coordinated by CINTECH Support (e.g., Rebuild Databases, etc.)
.
178
Norstar PRELUDE and CINPHONY ACD 3.6 User Guide
Chapter 9
Chapter 9: Appendices
Chapter 9: Appendices
There are 7 Appendices:
◗ Appendix 1: Supervisor and Agent Messages
◗ Appendix 2: Troubleshooting
◗ Appendix 3: Export Data Record Formats
◗ Appendix 4: ACD Agent Login / Logout
◗ Appendix 5: Tips and Hints
◗ Appendix 6: Virtual Modem
◗ Appendix 7: Average & Expected QTime Announcements
Appendix 1: Supervisor and Agent Messages
The Applications Module and Norstar Station Sets display messages for Supervisors about Agents,
Groups, and Lines.
Supervisor Messages
There are 4 types of Supervisor Messages:
◗ WARNING
◗ DISPLAY
◗ INFORMATION
◗ CRITICAL
DN 9999999 Fail
WARNING The extension shown is not responding, and Agent has been automatically logged out.
Grp: DAY route
WARNING Group displaying is now using day routing.
180
Norstar PRELUDE and CINPHONY ACD 3.6 User Guide
Chapter 9: Appendices
Grp: 99 NTEroute
WARNING Group displaying is now using night routing.
Grp: 99 - Grp:99
WARNING Group overflow is occurring from - to the groups.
Grp: 99 NoAgents
WARNING All Agents in group have logged out.
Invalid sprv ID
DISPLAY Wrong supervisor ID was entered during registration.
Log out first
DISPLAY Station Set already has Agent logged in.
Norstar PRELUDE and CINPHONY ACD 3.6 User Guide
181
Chapter 9: Appendices
Announcement: 00
BKSP
OK
EXIT
DISPLAY Type in Announcement number to be played or recorded.
Information Msg?
YES
NO
EXIT
INFORMATION YES: CINPHONY displays message for Supervisor.
J. Smith
Login
INFORMATION Agent displaying has just logged in to ACD.
J. Smith
Logout
INFORMATION Agent displaying has just logged out of ACD.
J. Smith
No ans
INFORMATION Agent displaying did not answer last call has just logged out of ACD.
182
Norstar PRELUDE and CINPHONY ACD 3.6 User Guide
Chapter 9: Appendices
J. Smith
Help
CRITICAL Agent displaying requests Supervisor Help.
Agent Messages
All Agent Messages received on Station Set are considered Display Messages.
Available
UNAVAILABLE Key has been pressed; CINPHONY will now route calls to Agent.
Cat:
BKSP
OK
EXIT
Categorize the current call by typing in code to continue.
Dial supervisor
HELP Key was pressed while not on a call. Dial Supervisor's extension for help.
Norstar PRELUDE and CINPHONY ACD 3.6 User Guide
183
Chapter 9: Appendices
End call first
Could not perform certain operation while on a call. Finish call and try again.
Assigned Groups
EDIT
OK
EXIT
Agent is authorized for more than 1 Group. Select all Groups you want to login.
Invalid agent ID
An invalid ID was entered. Press LOGIN Key and start over.
Invalid password
An invalid password was entered. Press LOGIN Key and start over.
Log in first
A operation was requested requiring a login. Press LOGIN Key and start over.
184
Norstar PRELUDE and CINPHONY ACD 3.6 User Guide
Chapter 9: Appendices
9999 Logged in
Agent login is being confirmed by ACD.
Logged out
Agent Logout is being confirmed by ACD.
Login aborted
EXIT was pressed during Login process. Press LOGIN Key and start over.
Login denied
Agent is already logged in using the same ID just entered. Logout and then Login.
Login:
BKSP
OK
EXIT
LOGIN Key was pressed; ACD is now asking for Agent ID.
Norstar PRELUDE and CINPHONY ACD 3.6 User Guide
185
Chapter 9: Appendices
Logins exceeded
The maximum number of Agents have been logged in for ACD. Wait for an Agent to logout before
logging in.
Logout Aborted
EXIT Key was pressed after ACD requested confirmation of a logout command.
Logout?
BKSP
OK
EXIT
The LOGIN Key was pressed while Agent is logged in. ACD is making sure that you wish to
logout.
Logout first
Agent must be logged out before performing the operation requested.
No active call
Agent must be on a call before ACD can start recording a conversation.
186
Norstar PRELUDE and CINPHONY ACD 3.6 User Guide
Chapter 9: Appendices
No supervisor
There is no Supervisor registered for the Agent's Group.
Pwd: 99999999
BKSP
OK
EXIT
An ID was entered as part of Login process. ACD now is asking for the password before
authorizing Login.
Record on
The RECORD CALL was pressed; ACD is now recording current call. Level II only.
Record off
The RECORD CALL Key was pressed during the recording of a call. ACD will now stop recording
and store call to disk.
Record unavail
The device to record call is presently unavailable. Try again.
Norstar PRELUDE and CINPHONY ACD 3.6 User Guide
187
Chapter 9: Appendices
Unavailable
The UNAVAILABLE Key was pressed while Agent is available. Agent is still logged in; however,
ACD will not route calls to station set unless the UNAVAILABLE Key is pressed again.
xxxxxxxx
99:99
A call has been sent to Agent's station set. This display shows the name of the Group for the call
and the amount of time caller has waited.
xxxxxxxx
+99:99
A call has overflowed from one Group and is being sent to this station set. This display shows the
name of the group for the call, a + symbol designated Overflow Call, and the amount of time caller
has waited.
188
Norstar PRELUDE and CINPHONY ACD 3.6 User Guide
Chapter 9: Appendices
Appendix 2: Troubleshooting
The following are common problems that may occur while using ACD. If the solution provided does not
solve the problem, call CINTECH Support.
Problem:
ACD locks during start-up.
Possible Solutions:
Check Applications Module connections (power switches, cords, and outlets).
Listen to system cooling fan. If fan is not running and incoming power is good, a hardware problem
may exist. Call Technical Support.
Check for error messages on ACD screens, and, if displayed, write them down for your dealer's
reference.
Problem:
Agents are not receiving calls.
Possible Solutions:
Try to log in at station set. If LOGIN or END CALL message displays, ACD is operating correctly.
Check to see if the Incoming Lines are working correctly. If Feature 9nn or Feature Inactive displays
on the station set, ACD has stopped running. Warm Boot (CTRL-ALT-DEL) the system.
Try to make an Outgoing call, and, if you cannot, this means that either the Norstar or Lines are not
working.
Try to call a ACD Line while watching the Status Display Screens. If calls are queued while an Agent
is available, have Agents log out and then log in. If this does not work, call Technical Support.
Problem:
Applications Module Time is incorrect which can cause the Day to Night, or Night to Day, routing step
change to be delayed.
Possible Solution:
Time and date for ACD are taken from Norstar during boot up. Check station set and see if time is
correct. If not, the Norstar's time and date must be corrected.
Problem:
Voice port status is INITING or DISABLED.
Solution:
If port fails to respond to INITING after 5 tries, the status will display as DISABLED. The port will
become disabled pending next reboot or voice port verification. Call Technical Support.
Problem:
Receiving "Invalid product ID", “Invalid Verification Key”, or “Security Key Not Found” error message
when turning ACD or rebooting.
Solution:
The ACD Security Key is missing or there is a bad connection. Check the Security Key connector
attaching parallel printer cable to Applications Module's printer port. If missing, or if it is connected but
does not respond, call Technical Support immediately.
Problem
When Configuration changes are made, some Agents may get logged out. Reasons: An Agent is
deleted from Configuration. An Agent ID has been changed. Agent was assigned to a Group that has
been deleted. An Agent has been removed from an Group’s Agent List.
Solution
Re-configure the Agent and login; or, if Agent still exists, login Agent.
Norstar PRELUDE and CINPHONY ACD 3.6 User Guide
189
Chapter 9: Appendices
Problem
If you have been using ACD and then receive a message “Invalid Verification Key”.
Solution:
The ACD Security Key, or port to which it is connected has a problem. Call Technical Support
immediately. They will provide a temporary Verification Key and resolve the Security Key problem.
Appendix 3: Export Data Record Formats
A Comma Delimited ASCII File displays data fields between quotation marks and separated by commas.
See example below each Table.
On the following pages there are 4 Data Export Records:
◗ Agent Records
◗ Categorization Record
◗ Busy Period Record
◗ Call Record
For each of these Record Tables there are 3 columns:
• Field Number
• Field Name
• Notes: length of specified fields or field specifications
These tables reflect the formats for CINPHONY Level II. Differences for PRELUDE and CINPHONY II will
be noted.
190
Norstar PRELUDE and CINPHONY ACD 3.6 User Guide
Chapter 9: Appendices
Agent Record
Each Record corresponds to a single login/logout period for a single Agent.
Field Number
Field Name
Notes
1
“AGENT”
Indicates an Agent Record
2
Agent ID
2 to 4 numeric characters
3
Agent First Name
1 to 15 alphanumeric characters
4
Agent Last Name
1 to 15 alphanumeric characters
5
Login Date
Date in user-selected format
6
Login Time
Time in user-selected format
7
Logout Type
Indicates how the login/logout period
ended:
“ACTIVE” (logged in at period’s end)
“AUTO” (logged out by ACD)
“MANUAL” (logged out normally)
8
Login Duration
Duration in seconds
9
Available Duration
Duration in seconds
10
Unavailable Duration
Duration in seconds
11
Logged Groups
A string of Y/N characters indicating
into which Groups the Agent logged.
For instance,
YNNNYNNNNNNNNNNNNNNNNNNN
indicates an Agent logged into Groups
1 and 5 (dependent on ACD Level).
Example: “AGENT”,”1111”,”JOHN”,”SMITH”,
02/13/95”,”8:20”,”ACTIVE”,”2240”,”1240”,”400”,”YNYNYNNNNNNNYNNNNNNNNNNN”
Maximum Groups: PRELUDE - 3, CINPHONY I - 6, CINPHONY II - 80.
Norstar PRELUDE and CINPHONY ACD 3.6 User Guide
191
Chapter 9: Appendices
Categorization Record
Whenever an Agent categorizes a call, a Record is entered here.
Field Number
Field Name
Notes
1
“CATEGORY”
2
Category
1 to 12 numeric characters
3
Description
1 to 30 alphanumeric characters
4
Date
Date in user-selected format
5
Time
Time in user-selected format
6
Agent ID
2 to 4 numeric characters
7
Group Number
1 to 2 numeric characters (1-80
dependent on ACD Level)
Example: “CATEGORY”,”0001”,”SUPPORT”,”02/13/95”,”8:20:”,”1111”,”02”
Maximum Groups: PRELUDE - 3, CINPHONY I - 6, CINPHONY II - 80.
Busy Period Record
Each Record corresponds to an occasion when all Lines assigned to the Group are busy.
Field Number
Field Name
Notes
1
“BUSY”
2
Group Number
1 to 2 numeric characters (1-80
dependent on CINPHONY Level)
3
Date
Date in user-selected format
4
Start Time
Time in user-selected format
5
Duration
Duration in seconds
Example: “BUSY”,”02”,”02/13/95”,”8:20:”,”20”
Maximum Groups: PRELUDE - 3, CINPHONY I - 6, CINPHONY II - 80.
192
Norstar PRELUDE and CINPHONY ACD 3.6 User Guide
Chapter 9: Appendices
Call Record
Each Record corresponds to a Call.
Field Number
Field Name
Notes
1
“CALL”
Indicates an Agent Record
2
Date
Date in user-selected format
3
Line
1 to 2 numeric characters (1-144)
4
Time
Time in user-selected format
5
Agent ID
2 to 4 numeric characters
6
Type
Indicates the kind of Call: ABANDONED,
ACD, DISCONNECTED, INCOMING,
INTERCOM, OUTGOING, or
TRANSFERRED.
7
Group Number (Answer)
The Call was distributed to an Agent in
this Group. (1 to 2 numeric characters;
1-80 dependent on ACD Level)
8
Origination Group
The 1st. Group associated with the Call:
answered by ACD on a Line assigned to
the Group, or answered outside ACD
and transferred to the Group’s Transfer
DN. (1 to 2 numeric characters; 1-80
dependent on ACD Level).
9
Duration to Answer
Duration in seconds
10
Talk Duration
Duration in seconds
11
Hold Duration
Duration in seconds
12
Wrap Duration
Duration in seconds
13
Abandoned Duration
Duration in seconds
14
Ringing Duration
Duration in seconds
15
Supervisor Help Count
Numeric characters
16
Routing Type
Indicates which Routing Table is applied
to Call: DAY or NIGHT
17-32
Routing Step Counts
Each of these 16 Fields is the count of
the number of times the Call reached
this Step. This can be > 1 if there is a
GOTO in the Routing Table.
33
Originating Number
0 to 10 numeric characters
34
Originating Name
8 alphanumeric characters
35
Destination Number
0 to 10 numeric characters
Example:“CALL”,”03/29/00”,”13”,”05:42PM”,”265”,”ACD”,”7”,”7”,”74”,”146”,”
0”,”0”,”0”,”0”,”0”,”DAY”,”1”,1”,”0”,”0”,”0”,”0”,”0”,”0”,”0”,”0”,”0”,”0”,”0”,”0”,”0”,”0”,”7892341234”,””,”8009443901
”
Norstar PRELUDE and CINPHONY ACD 3.6 User Guide
193
Chapter 9: Appendices
Appendix 4: ACD Agent Login / Logout
This program allows you to perform the following types of logins and logout at the DOS prompt
(CINPHONY Directory):
◗ Manually Login Agents (or Non-Agents*)
• Available and in all Groups
• Available and in specified Groups
• Unavailable and in all Groups
• Unavailable and in specified Groups
• Static Unavailable and in all Groups
• Static Unavailable and in specified Groups
◗ Manually logout Agents (or Non-Agents*)
◗ Automatically login Agents (or Non-Agents*) using EXTERNAL.BAT file
* Non-Agent refers to an IVR (Interactive Voice Response) device to act as an Agent handling a call. The
IVR is connected to an ATA.
Command Line syntax: [ACDLOGIN] [AGENT ID] [DN] [ALL/GROUP] [A/U/S]
Manually Login Agents
Follow these steps to login Agent 0001, in all Groups to which Agent is assigned, and who will be available
at the start to take calls:
1 DOS-Shell or Quit ACD and return to DOS - C:\CINPHONY>
2 After the CINPHONY Directory DOS prompt, type in ACDLOGIN, press the Spacebar once, type in
Agent’s ID (or Non-Agent’s ID), press the Spacebar, type in Agent’s Station Set DN (or ATA’s DN for
Non-Agent), press the Spacebar, type in the word ALL (for all Groups to which Agent is assigned),
press the Spacebar, and type in the letter A (for Available). Then press ENTER to complete login
command line.
Example: C:\CINPHONY>ACDLOGIN 0001 230 ALL A <ENTER>
Follow these steps to login Agent 0001, in specified Groups (3,4, and 5) to which Agent is assigned, and
who will be available at the start to take calls:
1 DOS-Shell or Quit ACD and return to DOS - C:\CINPHONY>
2 After the CINPHONY Directory, type in ACDLOGIN, press the Spacebar once, type in Agent’s ID (or
Non-Agent’s ID), press the Spacebar, type in Agent’s Station Set DN (or ATA’s DN for Non-Agent),
press the Spacebar, type in 3, press the Spacebar, type in 4, press the Spacebar, type in 5, press the
Spacebar, and type in the letter A (for Available). Then press ENTER to complete login command line.
Example: C:\CINPHONY>ACDLOGIN 0001 230 3 4 5 A <ENTER>
Follow these steps to login Agent 0001, in all Groups to which Agent is assigned, and who will be
unavailable at the start to take calls:
1 DOS-Shell or Quit ACD and return to DOS - C:\CINPHONY>
2 After the CINPHONY Directory, type in ACDLOGIN, press the Spacebar once, type in Agent’s ID (or
Non-Agent’s ID), press the Spacebar, type in Agent’s Station Set DN (or ATA’s DN for Non-Agent),
press the Spacebar, type in the word ALL (for all Groups to which Agent is assigned), press the
Spacebar, and type in the letter U (for Unavailable). Then press ENTER to complete login command
line.
Example: C:\CINPHONY>ACDLOGIN 0001 230 ALL U <ENTER>
Note: To take a call, the Agent will have to go available at the station set.
194
Norstar PRELUDE and CINPHONY ACD 3.6 User Guide
Chapter 9: Appendices
Follow these steps to login Agent 0001, in specified Groups (3,4, and 5) to which Agent is assigned, and
who will be unavailable at the start to take calls:
1 DOS-Shell or Quit ACD and return to DOS - C:\CINPHONY>
2 After the CINPHONY Directory, type in ACDLOGIN, press the Spacebar once, type in Agent’s ID (or
Non-Agent’s ID), press the Spacebar, type in Agent’s Station Set DN (or ATA’s DN for Non-Agent),
press the Spacebar, type in 3, press the Spacebar, type in 4, press the Spacebar, type in 5, press the
Spacebar, and type in the letter U (for Unavailable). Then press ENTER to complete login command
line.
Example: C:\CINPHONY>ACDLOGIN 0001 230 3 4 5 U <ENTER>
Note: To take calls, the Agent will have to go available at the station set.
Follow these steps to login Agent 0001, in all Groups to which Agent is assigned, and who will be statically
unavailable to take calls:
1 DOS-Shell or Quit ACD and return to DOS - C:\CINPHONY>
2 After the CINPHONY Directory, type in ACDLOGIN, press the Spacebar once, type in Agent’s ID (or
Non-Agent’s ID), press the Spacebar, type in Agent’s Station Set DN (or ATA’s DN for Non-Agent),
press the Spacebar, type in the word ALL (for all Groups to which Agent is assigned), press the
Spacebar, and type in the letter S (for Static Unavailable). Then press ENTER to complete login
command line.
Example: C:\CINPHONY>ACDLOGIN 0001 230 ALL S <ENTER>
Note: When a call arrives on the Agent’s Station Set, the indicator light is the only signal that a call is in
queue; however, you can use the ALERT Routing Command as the first step in the Routing Table so
that all calls will ring on the station set assigned for the ALERT ring. This way, Agents can hear the
ALERT ring each time a call enters the queue for the Group.
To take a call, the Agent must press the Unavailable button; therefore, this button should be
programmed.
Follow these steps to login Agent 0001, in specified Groups (3,4, and 5) to which Agent is assigned, and
who will be statically unavailable at the start to take calls:
1 DOS-Shell or Quit ACD and return to DOS - C:\CINPHONY>
2 After the CINPHONY Directory, type in ACDLOGIN, press the Spacebar once, type in Agent’s ID (or
Non-Agent’s ID), press the Spacebar, type in Agent’s Station Set DN (or ATA’s DN for Non-Agent),
press the Spacebar, type in 3, press the Spacebar, type in 4, press the Spacebar, type in 5, press the
Spacebar, and type in the letter S (for Static Unavailable). Then press ENTER to complete login
command line.
Example: C:\CINPHONY>ACDLOGIN 0001 230 3 4 5 S <ENTER>
Note: When a call arrives in the Group, the indicator light is the only signal that a call is in queue;
however, you can use the ALERT Routing Command as the first step in the Routing Table so that all
calls will ring on the station set assigned for the ALERT ring. This way, Agents can hear the ALERT
ring each time a call enters the queue for the Group. When Agents, logged in with the “S” parameter,
hangs up an ACD Call, they will remain in an unavailable status.
Manually Logout Agents
Follow these steps to logout Agent 0001:
1 DOS-Shell or Quit ACD and return to DOS - C:\CINPHONY>
2 After the CINPHONY Directory, type in ACDLOGIN, press the Spacebar once, type in Agent’s ID (or
Non-Agent’s ID), press the Spacebar, type in the letters LO (for logout). Then press ENTER to
complete logout command line.
Example: C:\CINPHONY>ACDLOGIN 0001 LO <ENTER>
Norstar PRELUDE and CINPHONY ACD 3.6 User Guide
195
Chapter 9: Appendices
Automatically login Agents using EXTERNAL.BAT file
In this exercise, only one example will be used for login; however, if you want to use any other combination
of login, refer to the examples provided previously.
Follow these steps to login Agents 0001, 0002, 0003, and 0004, in all Groups to which Agent is assigned,
and who will be available at the start to take calls:
1 Select DOS-Shell from the ACD Main Menu to display the CINPHONY Prompt - C:\CINPHONY>
2 At this prompt, type in EDIT, press the Spacebar, type in EXTERNAL.BAT, and press ENTER. The
external.bat file will display (blank text editor file). Then type in the following command lines as an
example:
ACDLOGIN 0001 230 ALL A
ACDLOGIN 0002 231 ALL A
ACDLOGIN 0003 232 ALL A
ACDLOGIN 0004 233 ALL A
3 When completed, Save this file. You will be returned to the CINPHONY Directory prompt. At this
prompt, type in Exit to return to the ACD Main Menu.
4 To automatically login these Agents, select DOS-Shell from the ACD Main Menu. After the CINPHONY
Directory Prompt, type in the word EXTERNAL and press ENTER to login all agents listed. At this
prompt, type in Exit to return to the ACD Main Menu.
Example: C:\CINPHONY>EXTERNAL
<ENTER>
If you have any questions concerning ACD Login, call CINTECH Customer Support.
Appendix 5: Tips and Hints
The following sections comprise this Appendix:
◗ Norstar Time Change
◗ HP LaserJet 6L Printer Driver Installation
Norstar Time Change
The following directions are only required for Norstar KSU versions prior to the release of the ICS 1.1
(Integrated Communication System) KSUs.
ACD receives its time from the Norstar phone system. The following provides directions to change the time
on the Norstar to correct the ACD system time. You will need the current ADMIN Password for your
Norstar.
Changes to Norstar programming are immediate; therefore, be very careful making any changes. If you
are unsure of making these changes, contact your Norstar Administrator or Technician.
Follow these steps:
1 Use a Station Set M310 or M324.
2 Press the Feature Key and then type in **23646. When prompted for a Password, type in 23646 and
then press the OK softkey.
3 After the Password, the 1.SYSTEM SPEED DIAL screen will display and several Indicators will light up
at the top of the small button row. This row could either be at the top of the set or directly under the
display’s softkeys. Press the second key on the right.
4 The Names screen will display. Press the second key on the right.
196
Norstar PRELUDE and CINPHONY ACD 3.6 User Guide
Chapter 9: Appendices
5
6
7
8
The Time and Date screen will display. Press the top key on the right.
The Time screen will display. Press the CHANGE softkey.
The Hour screen will display. Press the CHANGE softkey.
The Hour _____ screen will display. Type in the current hour and then press the second key on the
right.
9 The Minutes screen will display. Press the CHANGE softkey.
10 The Minutes_____ screen will display. Type in the current minutes and then press the first key on
the left.
11 Press the Rls key.
HP LaserJet 6L Printer Driver Installation
If you are using the HP LaserJet 6L and you have not installed its Printer Driver and/or displayed its Printer
Object on the OS/2 Desktop, you will need to follow the directions provided below.
If you have installed the HP LaserJet 6L Printer Driver and its Printer Object is displaying, you will only
need to follow the directions provided in Step 12 in the next section.
Follow these steps if your OS/2 Desktop does not display the HP LaserJet 6L Printer Object and you have
not installed LASERJET.HP LaserJet 6L Printer Driver:
1 In the OS/2 System -Icon View, open the Template Folder. The Templates - Icon View will display.
2 Point to the Printer Template, press and hold down the right Mouse button.
3 Drag the Printer Template to the Desktop and release the right Mouse button.
4 In the Printer Name field, type a name for the Printer (e.g., My-LaserJet 6).
5 Select a Port to which the Printer is connected.
6 Select Install new printer driver. A window will display a list of the Printer Drivers shipped with OS/2.
7 Select Other OS/2 printer driver.
8 Insert the diskette containing the Printer Drivers into Drive A.
9 Select Refresh. The list of Printer Drivers will display.
10 Use the left Mouse button to select LASERJET.HP LaserJet 6L.
11 Select Install. HP LaserJet 6L will install and its Printer Object will display on the OS/2 Desktop.
12 Enter PRELUDE or CINPHONY, select Printer on the Configuration Menu, and then configure HP
LaserJet III that will operate the HP LaserJet 6L model.
Follow these steps if your OS/2 Desktop displays the HP LaserJet 6L Printer Object but the LASERJET.HP
LaserJet 6L Printer Driver has not been installed:
1 On the OS/2 desktop, point to the HP LaserJet 6L Printer Object and click the right Mouse button.
2 Select Settings.
3 Select the Printer driver tab.
4 Point to one of the Printer Objects and click the right Mouse button.
5 Select Install new printer driver. A window will display a list of the Printer Drivers shipped with OS/2.
6 Select Other OS/2 printer driver.
7 Insert the diskette containing the Printer Drivers into Drive A.
8 Select Refresh. The list of Printer Drivers will display.
9 Use the left Mouse button to select LASERJET.HP LaserJet 6L.
10 Select Install. HP LaserJet 6L will install and its Printer Object will display on the OS/2 Desktop.
Norstar PRELUDE and CINPHONY ACD 3.6 User Guide
197
Chapter 9: Appendices
11 Enter PRELUDE or CINPHONY, select Printer on the Configuration Menu, and then configure HP
LaserJet III that will operate the HP LaserJet 6L model.
Appendix 6: Virtual Modem
Norstar Applications Modules, based on their production date, may be equipped with an on-board internal
modem. This virtual modem must only be used in conjunction with a CINTECH Support representative for
troubleshooting purposes. Several important internal modem features will be highlighted here but, for
detailed directions, please refer to your Norstar Applications Module Installation and Maintenance Manual.
The internal modem utilizes voice channels and a standard Norstar DN to establish the modem connection.
It is important to note, therefore, that when the internal modem is in use, your system’s voice
announcement capacities may be impacted.
◗ The internal modem is off by default.
◗ A password protected Norstar Feature Code is used to configure and enable/disable the internal
modem.
◗ When enabled, the internal modem utilizes 1 voice channel.
◗ When a modem connection is established 3 additional voice channels are utilized (i.e., 4 total voice
channels in use for the duration of the modem connection).
Rules for acquiring voice channels:
◗ Available voice channels not utilized by any application (e.g., ACD, voice mail) are used first.
◗ If needed, voice channels are then acquired from applications in an equitable fashion.
Note: A standard physical modem can be installed into systems equipped with the internal (virtual)
modem. For directions, please refer to the Norstar Applications Module Installation and Maintenance
Manual.
Appendix 7: Average & Expected QTime
Announcements
Average QTime Announcement Calculation
ACD calculates the Average Time to Answer statistic for all calls in the Group, rounds up to the next
minute, matches this number of minutes to the corresponding minutes set for the second announcement,
and then plays the second announcement. ACD constantly calculates Average Time to Answer to update
the second announcement.
Expected QTime Announcement Calculation
ACD calculates the Average Time to Answer statistic for all calls, subtracts the amount of time the call has
been in queue, rounds up to the next minute, matches this number of minutes to the corresponding
minutes set for the second announcement, and then plays the second announcement. ACD constantly
calculates Average Time to Answer and time in queue to update the second announcement.
198
Norstar PRELUDE and CINPHONY ACD 3.6 User Guide
Chapter 9: Appendices
Announcement Sets
If you have selected User-Recorded Announcements when selecting Average QTime Announcement or
Expected QTime Announcement as a Routing Step, you will use the Norstar Announcement
Maintenance function to record the set of announcements. Refer to Chapter 3: Using Norstar Sets,
Performing Supervisor Functions, Announcement Maintenance, for directions to record these
announcements.
Follow the same content for each announcement as provided below. ACD will calculate and match to
these numbers in the minute numbering plan. You can alter the way in which you record
Announcements 241 and 242
User-Recorded Announcements for Average QTime and Expected QTime:
241: "The average time to answer a call today is approximately…"
242: "The expected wait time for your call is approximately…"
243: "… one minute."
244: "… two minutes."
245: "… three minutes."
246: "… four minutes."
247: "… five minutes."
248: "… six minutes."
249: "… seven minutes."
250: "… eight minutes."
251: "… nine minutes."
252: "… ten minutes."
253: "… ten minutes or longer."
Pre-Recorded Announcements for Average QTime and Expected QTime:
267: "The average time to answer a call today is approximately…"
268: "The expected wait time for your call is approximately…"
269: "… one minute."
270: "… two minutes."
271: "… three minutes."
272: "… four minutes."
273: "… five minutes."
274: "… six minutes."
275: "… seven minutes."
276: "… eight minutes."
277: "… nine minutes."
278: "… ten minutes."
279: "… ten minutes or longer."
Rules for Average QTime and Expected QTime Announcements:
• If a call takes longer to answer than 10 minutes, Announcement 253 (User-Recorded) or 279 (PreRecorded) will always play.
Norstar PRELUDE and CINPHONY ACD 3.6 User Guide
199
Chapter 9: Appendices
• The first caller in the routing period will receive Announcement 243 ("one minute") (User-Recorded)
or 269 ("one minute") (Pre-recorded) because Average Time to Answer cannot be calculated for one
call.
• If the AVERAGE QTIME ANNOUNCEMENT or EXPECTED QTIME ANNOUNCEMENT is repeated
in a Routing Table and the recording of the time in minutes is greater than or equal to the last
recording of the time in minutes, the next AVERAGE QTIME ANNOUNCEMENT or EXPECTED
QTIME ANNOUNCEMENT will not play until the time in minutes is less than the previous AVERAGE
QTIME ANNOUNCEMENT or EXPECTED QTIME ANNOUNCEMENT. The call will, in this event,
be routed to the next Command.
Example: Routing Step 3 is AVERAGE QTIME ANNOUNCEMENT and the time is 5 minutes. Step
4 is a DISTRIBUTE for 30 seconds. Step 5 is a GO TO Step 3. If the AVERAGE QTIME is 5 or
more minutes the next time the call reaches this command, the announcement will be ignored and
the call will reach the DISTRIBUTE Command. This call, for example, would remain in this loop
between DISTRIBUTE and GO TO Step 3 until the call is answered or the time in minutes is less
than 5 for the AVERAGE QTIME. It is advisable, therefore, to insert an ANNOUNCEMENT
Command after the DISTRIBUTE that basically tells the caller "This call will be answered shortly."
• If a call is transferred out of the Group with a Transfer Command, the call becomes a Non-ACD Call
and will no longer be associated with a Group and that Group's Routing Commands.
• If a call is transferred to another Group by the Group Routing Command, the Average Time to
Answer statistic for the new Group will be in effect; therefore, the caller will hear a different time in
minutes for the Average QTime or the Expected QTime if either command is utilized for the new
Group.
• If a call is prioritized, it may be queued to be answered before a call that is not prioritized. In this
event, the caller without a prioritized call may receive an Average QTime or Expected QTime
Announcement that is not accurate because other prioritized calls have arrived during the same time
frame and moved ahead of this call in the queue. If all calls are prioritized, calls may be answered
before or after the time in minutes announced for the Average QTime or Expected QTime. Refer to
Line Configuration, Destination Number Configuration (DNIS/DID), and Originating Number
Configuration (ANI/ICLID) for more information on assigning a priority to certain calls.
200
Norstar PRELUDE and CINPHONY ACD 3.6 User Guide
Glossary
Glossary
Glossary
A
Abandoned Call Report
This Report provides Group, Date, Line, Time, and Duration of each ACD Call abandoned during a
specified Time Period. If available, ANI/ICLID and DNIS/DID Numbers will be designated. This Report
also displays the length of time that all calls spent in queue before being abandoned, and average length of
time that all calls spent in queue before being abandoned.
About ACD
On the Status Menu, select About ACD to display important information on the application currently in use.
Topics include: ACD Level, Version, Product ID, Number of Voice Ports, Add-Ons currently in use, Norstar
KSU String, and Copyright information.
ACD
ACD is an automatic call distributor directing calls from the Norstar to Agents in Groups. In the Reports
Chapter, ACD is a call processing statistic defined as the number of ACD Calls currently active by each
group. In the Status Chapter it is an Agent statistic defined as the number of ACD Calls being handled by
this Group.
ACD Call Profile Detail Report
This Report provides a count or percentage of ACD Calls received during a specified period of time. The
Report displays: number of calls abandoned, number of call picked up and disconnected, and number of
calls transferred.
ACD Call Profile Summary Report
This Report provides a count or percentage of ACD Calls received during one day. The Report displays:
number of calls abandoned, number of call picked up and disconnected, and number of calls transferred.
ACD Control
This Main Menu option allows you to perform the following operations: Activate, Deactivate, Execute, OffLine, Return, and Shutdown. Refer to these terms in this Glossary.
ACD Duration
A report field (column) for Line Profile Report defined as the total amount of ACD Time during the time
period for the day.
ACD (Group)
An Agent statistic defined as the number of ACD Calls from other Groups being handled by this Group.
ACD Line
When you assign a Group to a Line in ACD, it becomes an ACD Line.
ACD Time
On the Agent Profile Report, ACD Time reflects how long Agent was available, how long Agent talked, how
long Agent put caller on hold, how much wrap time Agent used, how long Agent went unavailable, how
many calls Agent answered, and how many time Agent requested a Supervisor's help.
ACD Security Key
This security key is an Input/Output Device attached to the end of the parallel printer cable that connects to
the parallel printer port on the Applications Module. This key is needed to run ACD.
Activate
On the ACD Control screen you can select Activate to start Call Processing that was previously
deactivated.
Activate Changes
After configuration changes are saved, you can select Update Configuration on the Configuration Menu to
either activate these configurations now or schedule them for a later update.
202
Norstar PRELUDE and CINPHONY ACD 3.6 User Guide
Glossary
Add-Ons
In the Overview Chapter, Introduction section, the ACD Add-Ons are listed in a table. These features are
available to you with this software version and will require an installation. Add-Ons include: Automated
Attendant Routing Command, Caller Directed Routing, Status Display for Windows 95/98/NT, Infocus
Status Display, Wallboard, and Voice Port Activation. These Add-Ons are installed. Refer to the Norstar
PRELUDE and CINPHONY Suite ACD 3.6 Installation Guide for details.
Agent
An Agent is the person who answers an ACD Call. Agents can be assigned to a Group. Refer to this
Glossary for a definition of Agent Configuration and Agent Selection subscreen (Group Configuration).
Agent Configuration
ACD allows you to add, update, or delete Agents. Select Agent Configuration on the Configuration Menu.
Agent Data for (ACD or Non-ACD) Calls
For the Agent Profile Report you can specify whether to report on ACD or Non-ACD Calls handled by
Agents. If you select ACD, you can specify whether the Report Style (or method) is Duration or Percent. If
Non-ACD is selected, the Report Style can only be a Duration method.
Agent Functions
On the Feature Codes Assignments screen there are 7 Agent Functions you can perform on the station
set. These functions include: LOGIN, UNAVAILABLE, CANCEL WRAP, HELP, CALLS QUEUED,
CATEGORIZE, CALLS QUEUED, and RECORD CALL. Refer to this Glossary for a definition of each
function.
Agent ID #
On the Agent Configuration screen, the Agent ID# is used by ACD to login and identify an Agent to the
system. You can either add, update, or delete an Agent. In Recorded Calls (Maintenance Menu), the
Agent ID for the Agent who has recorded a call will display on the screen.
Agent Password
When adding an Agent to the database on the Agent Configuration screen, you can add a Password for the
Agent. When the Agent logs into ACD on the station set, this Password must be entered.
Agent Profile by Group Report
This Report provides an Agent's performance by Group(s) over a specified period of time. The Report
displays: amount of logged-in time, time spent on ACD Calls and how that time was spent (conversation,
wrap, etc.), time spent on ACD Calls for each Group, number of calls answered, and number of times
Supervisor help was requested.
Agent Profile Report
This Report provides an Agent's performance over a specified period of time. This Report displays:
amount of logged-in time, time spent on ACD Calls and how that time was spent (conversation, wrap, etc.),
time spent on Non-ACD Calls, number of calls answered, and number of times Supervisor help was
requested.
Agent Reports
There are 2 Agent Reports that you can run (generate): Agent Profile Report and Agent Profile by Group
Report. Refer to this Glossary for a definition of each Report.
Agent Selection
On the Group Configuration screen you can add an Agent to a Group or delete an Agent from a Group.
Agent Status
The Group Status Display screen displays the status of each Agent for the Group. Agent status includes:
Logged In, Logged Out, Available, Unavailable, currently in wrap, handling Intercom calls, handling
Incoming calls, and handling Outgoing calls. There is also an Agent status for the number of ACD Calls
Norstar PRELUDE and CINPHONY ACD 3.6 User Guide
203
Glossary
currently handled by the Group, and the number of ACD Calls from other Groups being handled by the
Group.
Alert
When a call reaches this command in the Routing Table, the specified station set rings to alert a
Supervisor or Agent that a call has reached this alert step.
Alternate Group
On the Agent Profile by Group Report, this column provides the amount of ACD Time, or percentage of
time, an Agent took calls from another Group.
Analog Station Set
You can use a 2500-Compatible Analog Station Set with ACD. You can only perform, however, a
Login/Logout and Available/Unavailable. To install an Analog Station Set, refer to the Norstar PRELUDE
and CINPHONY Suite ACD 3.6 Installation Guide.
Analog Station Set Parameters
There are 2 Parameters to configure for Analog Station Sets: Login/Logout DN and Unavailable/Available
DN. Refer to Configuration Menu, System Wide Parameters for more information and directions.
ANI (Automatic Number Identification)
On the Originating Number (ANI/ICLID) Configuration screen, you can specify an ANI Number. When a
call arrives on a line with this number, this number will display to inform you who is calling.
Announcement
This Routing Command is used to play a recorded announcement for a caller when an Agent is
unavailable. The announcement is interrupted when an Agent becomes available to take a call. Refer to
this Glossary for a definition of Forced Announcement.
Announcement Maintenance
A Supervisor can enter a feature code on the station set to record an announcement or play back an
announcement.
Appendices
Appendix 1: Error Messages - provides error and informational messages received on station sets by
Agents and Supervisors. Appendix 2: Troubleshooting - provides solutions for some possible problems
you may encounter. For example, ACD may not load or print because a cable may be loose. Appendix 3:
Export Data Record Formats to help you build external spreadsheets and databases from exported ACD
data. Appendix 4: ACD Agent Login / Logout. Appendix 5: Tips and Hints. Appendix 6: Virtual Modem.
Appendix 7: Average & Expected Qtime Announcements.
Archive and Purge
In Maintenance you can copy processed call data from database to diskettes while deleting this data from
database.
Archive Data
In Maintenance you can copy processed call data from database to diskettes.
Archive Disks
As you Archive Data, ACD will ask you to insert diskettes into the floppy disk drive as processed data is
copied from database.
ATA
Analog Terminal Adapters connect the digital Norstar to an analog device. A Directory Number (DN) is
assigned to each ATA in use. Refer to the Norstar PRELUDE and CINPHONY ACD 3.6 Installation Guide
for more information and diagrams.
Auto Logout Duration
On the Group Configuration screen, Auto Logout is the time allotted for an Agent's phone to ring before the
Agent is logged out and the call is directed to the next available Agent.
204
Norstar PRELUDE and CINPHONY ACD 3.6 User Guide
Glossary
Automated Attendant (AUTO ATTD)
This Routing Command is available as an Add-On to ACD. You can use this command to play an
Announcement to the caller. The caller presses specified keys on the Station Set keypad to attend to the
call. You can then direct the call, by the keys the caller presses with the following commands: CDR
TABLE, CONTINUE, GO TO STEP, GROUP, REPLAY, and TRANSFER. Refer to Group Configuration,
Routing, for more details.
Available
Agent is logged in and ready to take calls. On the station set, the Agent can enter the feature code to go
unavailable and available. Refer to this Glossary for a definition of Unavailable.
Average Abandoned
On the Group Profile Report, this report field (column) provides the average amount of ACD Time caller
waited before hanging up (total time all calls spent in queue before being abandoned divided by total
number of abandoned calls).
Average Answered
On the Group Profile Report, this report field (column) provides the average amount of ACD Time caller
waited before Agent answered (total time all calls spent in queue divided by total number of answered
calls).
Average Hold
On the Group Profile Report, this report field (column) provides the average amount of ACD Time Agents
kept callers on hold (total time divided by total number of answered calls).
Average QTime Announcement
On the Group Configuration screen, Routing Table subscreen, you can select this Routing Command to
announce to the caller how long the caller might have to wait before the call is answered.
Average Talk
On the Group Profile Report, this report field (column) provides the average amount of ACD Time Agents
spent conversing with callers (total time divided by number of answered calls).
Average Wrap
On the Group Profile Report, this report field (column) provides the average amount of ACD Time Agents
spent on wrap-up (total time divided by total number of answered calls).
B
Block # / Time
On the ACD Call Profile Detail and Summary Report screens, you can type in a time interval (block of time
in seconds) to receive statistical call data. There are 15 blocks of time you can specify.
Busy Report
This Report provides the Date, Start Time, End Time, and Duration when all Lines, assigned to an ACD
Group, are busy.
C
Calculations: Formulas and Examples
On the Wallboard Configuration screen you can select the System or Group statistics you want to display
on the Wallboard. In this section of this Guide, the calculations are displayed with the formulas and also an
example of application.
Call Categorization Configuration
When a call is taken by an Agent and the Forced Categorization feature is set to YES, the Agent is
prompted at the station set to enter a Call Category Number. If Force Categorization is set to NO, the
Norstar PRELUDE and CINPHONY ACD 3.6 User Guide
205
Glossary
Agent can still use the feature keys to enter this number. On the Call Categorization Configuration screen,
you can add, update, or delete a Call Category Number from the database.
Call Categorization Report
This Report provides a summary of call category information over a specified period of time. The Report
displays: number of calls logged for each category within the reporting period.
Call Category Number
On the Call Categorization Configuration screen, you can add, update, or delete a Call Category Number
from the database.
Caller Directed Routing (CDR)
On the Caller Directed Routing Number Configuration screen, you can add, update, or delete CDR
Numbers in the CDR Table.
Call Number
On the Recorded Call Maintenance screen, you can view the Call Number assigned by ACD for all
Recorded Calls. The Agent recording the call, and the Date and Time the call was recorded can also be
viewed.
Call On Demand
YES – places an Agent in a “Perpetually Unavailable” state when the Agent logs in. The only way that an
Agent can receive a call in this state is to manually press the Available programmed key on the station set.
The Agent would be momentarily available to receive a call; however, when the Agent ends the call, the
Agent would become Unavailable. This functionality is ideal for a Supervisor or backup Agent, for
example, to retrieve calls when they are reaching capacity until the calls return to a normal distribution.
NO – places an Agent in an Available state when the Agent logs in.
Call on Demand can not be applied when using Categorization Codes or when using C3050 and C3060
Companion Portable Station Sets
Call Processing Statistics
On the System Status and Group Status Display screens, the real-time Call processing Statistics can be
viewed. The System (all Groups) statistic topics include: Routing, Logged In, Logged Out, Available, ACD,
Wrap, Unavailable, Calls Queued, Longest Queued, Calls Overflowed Out, Calls Answered, Average Time
To Answer, Calls Abandoned, Average Time To Abandon, Calls Disconnected, and Calls Transferred. The
Group statistic topics include: Calls Queued, Longest Queued, Calls Overflowed Out, Calls Answered,
Average Time To Answer, Calls Abandoned, Average Time To Abandon, and Calls Transferred.
Calls
On the Overflow Group Configuration screen, you can specify the number of calls that must be in queue
before overflow begins. You can use Calls and/or Duration to set overflow thresholds. If either threshold is
met, overflow will occur.
Calls Abandoned
On the Group Profile Report, this report field (column) provides the number of ACD Calls that were not
answered by an Agent or because the caller hung up.
Calls Answered
On the Group Profile Report, this report field (column) provides the number of ACD Calls that were
answered by the Group.
Calls Overflowed Out
On the System Status Display screens, you can view the total number of calls overflowed out of one Group
and answered by other Groups.
Calls Picked Up or Disconnected
On the Group Profile Report, this report field(column) provides the number of calls answered on a station
set other than the original station set by the Norstar "Call Pick-up" feature, or calls disconnected by the
Disconnect Routing Command.
206
Norstar PRELUDE and CINPHONY ACD 3.6 User Guide
Glossary
Calls Queued
On the System and Group Status Display screens, you can view the number of calls in the queue for all
Groups and for a Group.
Calls Received
On the Group Profile Report, this report field (column) provides the number of ACD Calls distributed to the
Group.
Calls Transferred
On the Group Profile Report, this report field (column) provides the number of ACD Calls transferred, by
the TRANSFER TO, GROUP, LINE XFER, LINK XFER, CDR TABLE, or VMAIL XFER routing commands.
Cancel Wrap
This is an Agent Function performed on the station set. It enables the Agent to eliminate the specified
length of time needed to wrap up the last call and become available to receive the next call. A cancel wrap
time period can be specified if Wrap is set to AUTOmatic. If Wrap is set to MANUAL, the Agent must use
the feature code to cancel wrap.
Category By Agent Report
This Report provides the number of calls logged for each Category by Agent during a specified time period.
If Category Description was entered during Configuration, it will also display.
Categorization Reports
On the Reports Menu, you can select 2 Categorization Reports: Category By Agent Report and Call
Categorization Report. Refer to these Reports in this Glossary or to the Reports chapter in this Guide.
Categorize
This is an Agent Function performed on the station set. At the end of a call, the Agent enters a tracking
code or category for each ACD Call. Refer to this Glossary for a definition of Force Categorization.
Category Description
This is a brief definition assigned to the Category Number on the Categorization Code screen.
Category Number
On the Call Categorization Report, this report field (column) provides the number assigned to the calls that
Agents entered at their station sets.
CDR Number
On the Caller Directed Routing Number Configuration screen you can add, update, or delete a CDR
Number on a CDR Table. You can add up to 1,000 CDR Numbers for a CDR Table.
CDR Number Description
On the Caller Directed Routing Number Configuration screen you can add or update a CDR Description for
every CDR Number configured.
CDR Table
On the Caller Directed Routing Number Configuration screen you can utilize a CDR Table to configure
CDR Numbers. You can configure up to 1,000 CDR Numbers for a Table.
CDR TABLE (Group Configuration)
You can utilize this routing command to send a call to a CDR Table.
CDR TABLE (Automated Attendant Routing Command)
You can utilize this routing command within the AUTO ATTD routing command to send a call to a CDR
Table.
Command
On the Routing Table Profile Report, this report field (column) tracks the routing commands used.
Norstar PRELUDE and CINPHONY ACD 3.6 User Guide
207
Glossary
Common Report Parameters
At the beginning of the Reports Chapter, there is a list of report parameters that are common to all reports.
The directions on how to complete these fields are also in this section.
Condensed Print Codes
On the Printer Configuration screen, you can specify the codes for 132 column condensed mode, carriage
return, and line feed for a printer not on the list of printers (F2 list). These codes are found in your printer
manual.
Config
This Voice Port state is the first state to display on the screen. It configures the Voice Port to display an
IDLE or UNUSED state.
Configuration
These menus and configuration screens enable you to specify how your call center is setup. When
configuration information is saved and activated, it becomes a record in the database. New records can be
added, and existing records can be updated or deleted.
Configuration Directory
When configuration information is saved, it is automatically copied to the configuration directory C:\CINPHONY\DATBAK>. As configuration information is vital to your call center and time consuming to
re-enter, this directory provides a backup copy of all configuration information.
Copy Group
On the Group Configuration screen you can select Copy Group to copy all the field information from one
Group configuration to the Group Configuration you have opened. Refer to that section in this Guide for
more details.
Copy Report/File to Drive A:
This Report/File Maintenance utility enables you to copy the contents of any ACD Report, Exported File, or
Recorded Announcement File to a floppy disk in drive A:. Make sure the floppy is properly formatted and
labeled.
Count
Refer to Report Style.
D
Daily Auto Purge/Process Time
On the Data Management parameters screen, Maintenance Menu, you can specify a time of the day to
automatically purge processed data from the hard drive. You can also specify a Data Storage Period.
Refer to the section in this Guide for more details.
Data Storage Period
On the Data Management Parameters screen, Maintenance Menu, you can specify how many days you
want data to be stored before it is automatically purged. Refer to the section in this Guide for more details.
Data Management Parameters
On the Maintenance Menu, you can display the Data Management Parameters screen where you can
specify a time of day to automatically purge processed data and the number of days you want to store this
data before it is purged. Refer to the section in this Guide for more details.
Date
The Date is a Common Report Parameter. For all Reports, you can specify a From and Thru Date.
208
Norstar PRELUDE and CINPHONY ACD 3.6 User Guide
Glossary
Date Format
On the Export Data screen you can select a Date Format from a list of 7 types of formats; these include:
• MM/DD
(10/21)
• DD/MM
(21/10)
• DD MMM
(21 Oct)
• MMM DD
(Oct 21)
• MM/DD/YY (10/21/99)
• DD/MM/YY (21/10/99)
•YY/MM/DD (94/10/21)
Day Routing Commands
These commands are used to route calls during the Day Routing Hours specified. Refer to Routing Hours.
Deactivate
On the ACD Control Menu, you can select Deactivate to stop Call Processing. Once you have deactivated,
you can then execute an Add-On, Upgrade, or Update install, perform a system Shutdown, or Activate Call
Processing.
Delay (ICLID Delay Time)
In Line Configuration, you can specify a 5 second delay when a call arrives on a Line. ACD will not answer
the call until the 5 seconds pass or ICLID information is received from the Norstar.
Refer to System Wide Parameters (Configuration Menu) to specify the length of time for the delay period.
Delay Answer
This Routing Command delays the answering of a call for the time period specified (range - 00:01 to
59:59). When a call arrives on a Line assigned to a Group, ACD will refrain from answering until either the
DELAY ANSWER time has passed or an Agent becomes available. When used, this Command must be
specified as first Routing Command.
Delete Record
By pressing the Alt F10 Keys simultaneously, you can delete a Configuration Record (e.g., Agent, Group,
Supervisor, Overflow Group, etc.). In the Reports, Scheduler, and Report/File Maintenance, you can
delete (Alt F10) a Schedule for Report generation, or a Report that has been generated as a file.
Description
For most of the Configuration Records (e.g., Group, Agent, Line, etc.), you can enter a description to
further identify the record and report.
Destination Number (DNIS/DID)
On the Line Configuration Menu, you can display the Destination Number (DNIS/DID) screen where you
can specify a DNIS or DID Number. A DNIS or DID Number is supplied by your Service Provider as a
string of digits. These digits are what ACD designates as a Destination Number. Refer to the section in this
Guide for more details. Also refer to Line Configuration, Routing. A destination Number (DNIS/DID)
Report can also be generated, refer to that section in this Guide.
DN (Directory Number)
A DN is the directory number assigned to an ATA (Analog Terminal Adapter). Refer to this Glossary for a
definition of ATA.
DNIS (Dialed Number Identification Service)
This is the number the caller called (the internal destination number, usually 800 or 900 numbers). Refer to
Destination Number in this Glossary and to the section in this Guide.
DID (Direct Inward Dial)
This is the number the caller called directly (the internal destination number). Refer to Destination Number
in this Glossary and to the section in this Guide.
Norstar PRELUDE and CINPHONY ACD 3.6 User Guide
209
Glossary
Digit Timeout
On the System Wide Parameters screen (Configuration Menu) you can specify the time a user has to press
a key on the Station Set before the AUTO ATTD’s NONE step sends the call to the specified command.
For Caller Directed Routing, the Digit Timeout is the time a user has to press a key on the Station Set after
the Primary Announcement has played and, if applicable, after each Secondary Announcement is played.
Refer to Group Configuration, Routing, for more details.
Disabled (Voice Port)
At the bottom of the System and Group Status Display screens, all Voice Ports are listed with their current
state. A Disabled Voice Port is considered not in use due to a possible hardware failure.
Disconnect
On the Routing subscreen (Group Configuration), you can select this Routing Command as a step to end a
call. No entry is required in the Value field.
Display on Station Set
On the System Wide Parameters Configuration screen, you can select whether you want Group, DNIS/DID
Description, CDR Number, or CDR Number Description to display on Agents' Stations Sets when ACD
calls are received.
Distribute
On the Routing subscreen (Group Configuration), you can select this Routing Command as a step to send
a call to the first available Agent in the Group within the time specified. Type in the time (MM:SS format of
at least 1 second) in the Value field.
DOS-Shell
On the Main menu, you can select DOS-Shell to exit ACD and display the CINPHONY DOS Prompt
(Directory) - C:\CINPHONY>. Call Processing will remain active.
Duration
On the Overflow Group Configuration screen, you can specify the duration of a call before overflow begins.
You can use Duration and/or Calls to set overflow thresholds. If either threshold is met, overflow will occur.
Duration (Report Style)
Refer to this Glossary for a definition of Report Style.
E
Emergency Routing
The Emergency Group can be enabled from a station set. Once enabled, the Emergency Group will
handle all incoming calls.
Emergency Group Setup
On the Emergency Setup configuration screen, you can add or delete an Emergency Group. After adding
an Emergency Group, a Supervisor or an Agent can route all calls to this Group from the station set.
Execute
On the ACD Control Menu, you can select Execute to perform the following installs: Add-On, Upgrade, or
Update. You must first select Deactivate to stop Call Processing before using Execute.
Expected QTime Announcement
On the Group Configuration screen, Routing Table subscreen, you can select this Routing Command to
announce to the caller how long the caller might be expected to wait before the call is answered.
Export Data
You can use this export function to create quote-delimited files for use in other database packages. This
call data includes these files: CALL.EXP, AGENT.EXP, BUSY.EXP, and CATEG.EXP. Refer to Appendix
3: Export Data Record Formats for more details on these files.
210
Norstar PRELUDE and CINPHONY ACD 3.6 User Guide
Glossary
F
Feature Button
The Norstar station sets have a Feature Button that, after being pressed, enables you to enter a 3-digit
feature code and perform Supervisor and Agent Functions. On the Feature Code Assignments screen, you
can view the codes Norstar has assigned to these functions.
Feature Codes
On the Feature Code Assignments screen, you can view the codes Norstar has assigned to Agent and
Supervisor Functions.
File Name
On the Report screens, you can specify report generation to 1 of 2 types of Files as an output device. After
selecting the File, you will be asked to enter a filename to identify the report. The .RPT or .HTM filename
extension cannot be changed.
First Name
On the Agent Configuration screen, you can add, update, or delete an Agent. When adding or updating an
Agent, you can enter the Agent's First and Last name for further identification. The first initial of the First
Name and the first 8 characters of the Last Name will appear on the station set when the Agent logs in.
Forced Announcement
On the Routing subscreen (Group Configuration), you can select this Routing Command as a step to play
an announcement without interruption. The announcement number is entered in the Value field.
Form Feed
On the Printer Configuration screen, you can specify YES or NO for Form Feed. YES - Printer is
configured for Form Feed, prints next page on previous page if page break on previous page occurs before
specified page length; NO - prints next page regardless of where previous page's page break occurs
(carriage returns are inserted to end of page).
Form Length
On the Printer Configuration screen, you can specify the maximum number of lines that will fit on the form
selected, based on 6 lines per inch. A standard 11 inch form is 66 lines.
From Range
On the Report screens, you can specify the start (From) and end (Thru) for report parameters such as,
Date, Time, Group, Agent ID, etc. Refer to this chapter in the User Guide, Common Report Parameters,
for the From and Thru Rules.
G
Go To Step
On the Routing subscreen (Group Configuration), you can use this Routing Command as a step to return
caller to a previously specified step, execute that step's command, and then repeat the following
commands.
Group
On the group Configuration screen, you can add, update, or delete a group from the database.
Group Overflow Report
This Report provides a summary of call overflow for all configured Groups. The Report displays: outgoing
overflow groups, inward overflow, number of calls received, number of calls answered, number of calls
abandoned, number of calls picked up and disconnected, and number of calls transferred.
Group Profile Report
This Report provides a Group's performance over a specified period of time. The report displays: number
of calls received, number of calls answered, number of calls abandoned, time spent in queue before
answered or abandoned, number of auto-logouts, and requests for Supervisor help.
Norstar PRELUDE and CINPHONY ACD 3.6 User Guide
211
Glossary
Group Reports
There are 3 Group Reports that you can run (generate): Group Profile Report, Group Overflow Report, and
Routing Table Report. Refer to this Glossary for a definition of each Report.
Group (Routing Command)
On the Routing subscreen (Group Configuration) you can use the Group Command as a step to send a call
to a different group than the one defined. You will need to enter the Group Number in the Value field.
Group Status Display
You can view the real-time call processing statistics for a Group, the current status of each Agent, and the
current Voice Ports states. You will be able to monitor Group performance and identify problems as they
occur.
H
Help (F1)
For every ACD screen field there is a help screen defining the field and brief directions on how to complete
field information or confirm the use of the field information. Press the F1 Key when the cursor is positioned
on the field.
Help (Supervisor)
This is an Agent Function performed on the station set. It enables the Agent to request help from the
Supervisor while on a call.
Hold
On the Agent Profile Group Report, this report field (column) provides the amount of ACD Time, or
percentage of time, an Agent wrapped-up between calls for each Group during the specified time period.
The Report displays: amount of logged-in time, time spent on ACD Calls and how that time was spent
(conversation, wrap time, etc.), time spent on ACD Calls for each Group, number of calls answered, and
number of times Supervisor help was requested from Agents in Group.
HTML
On all Report screens, Output Device, you can specify to output a Report to a HTML format if you have
installed LAN Status Display and Reporting as an Add-On. This generated Report is given a .HTM
extension. From the Remote Server PC, you can utilize a Browser to view and print these Reports.
I-K
ID #
On the Supervisor Configuration screen, you can add, update, or delete a Supervisor. The ID# field
enables you to type in a new Supervisor ID, select an existing Supervisor from a list, or delete an existing
Supervisor from list.
Idle (Voice Port)
At the bottom of the System and Group Status Display screens, all Voice Ports are listed with their current
state. An Idle Voice Port is available but not being used.
Include Groups
On the Monthly Summary Report screen, this field allows you to specify or select the Groups you want to
include in the Report.
Incoming Calls
Near the bottom of the Group Status Display screen, this Agent statistic displays the number of Agents
handling Non-ACD Incoming Calls. On an Agent Profile Report, this report field (column) provides the
number of transferred and incoming Non-ACD Calls.
Incoming Duration
On an Agent Profile Report (Non-ACD Duration), this report field (column) provides the amount of time an
Agent was on transferred or incoming Non-ACD Calls.
212
Norstar PRELUDE and CINPHONY ACD 3.6 User Guide
Glossary
Increase Priority
On the Routing subscreen (Group Configuration), this Routing Command is used as a step to increase the
priority of a call incrementally so that it gets distributed and answered by the first available Agent.
Indicator FlashRate 1 & 2
When a call is in queue, the Login Indicator light on the Agent’s station set will flash. On the System Wide
Parameters screen (Configuration Menu), you can set the flash rate breaks points of slow, medium and
fast. Refer to the section in this Guide for more details.
Indicator Lights
On the Norstar station sets there are programmable feature buttons bordering the LCD Indicator light
panel. When any of the features is in use (e.g., Login, Unavailable, etc.), an Indicator Arrow will display on
the panel beside the programmed feature button.
Infocus Status Display - COM
This ACD Add-On allows you to connect via COM Port up to 4 Remote PCs to the Applications Module
and view the statistics for Groups, Agents, and Voice Port states. You can graph and manipulate these
statistics in this application, and you can set alarms on Group statistics that do not meet your limits. Refer
to the Infocus Installation and User Guide directions on installation and use. On the Infocus Status Display
Configuration screen, you will need to configure the following so that the ACD can send Call Data to the
Remote PC(s): Baud Rate, COM Port, Dynamic Data Rate, and Configuration Data Rate.
Infocus Status Display - LAN
This ACD Add-On allows you to connect via NIC (Network Interface Card) an Infocus Server PC to the
Applications Module and view via Browser the statistics for Groups, Agents, Voice Port Status, and Reports
generated to a HTML format. You can also connect additional Infocus Client PCs to the network and utilize
Browsers to use Infocus. You can graph and manipulate these statistics in this application, and you can
set alarms on Group statistics that do not meet your limits. Refer to the Infocus Installation and User Guide
directions on installation and use. On the Infocus Status Display Configuration screen, you will need to
configure the following so that the ACD can send Call Data to the Infocus Server PC: Dynamic Data Rate,
Configuration Data Rate, Name /IP Address, and TCP/IP Port Number.
Init (Initializing)
At the bottom of the System and Group Status Display screens, all Voice Ports are listed with their current
state. An Initializing Voice Port is trying to reset from an error that has occurred.
Insert a Command/Value
On the Routing subscreen (Group Configuration), you can insert a Routing Command between existing
Commands by pressing the Alt I keys simultaneously.
Intercom Calls
Near the bottom of the Group Status Display screen, this Agent statistic displays the number of Agents
handling Intercom Calls. On an Agent Profile Report (Non-ACD Duration), this report field (column)
provides the number of Intercom calls.
Intercom Duration
On an Agent Profile Report (Non-ACD Duration), this report field (column) provides the amount of time
Agent was on the Intercom.
Inward Overflow
On the Group Overflow Report, this report field (column) provides the total number of calls that overflowed
from other groups to the subject Group specified.
Keypad
The keypad on the Norstar station sets is used to dial numbers for outgoing calls, enter numbers for
various features and their codes, and perform functions.
Norstar PRELUDE and CINPHONY ACD 3.6 User Guide
213
Glossary
L
Last Name (Agent)
On the Agent Configuration screen, you can add, update, or delete an Agent. When adding or updating an
Agent, you enter the Agent's First and Last name for further identification. The first initial of the First Name
and the first 8 characters of the Last Name will appear on the station set when the Agent logs in.
Line Configuration
On the Line Configuration screen, you can add a Line, update an existing Line, or delete a Line from the
database. When adding or updating a line, you can also assign a Group or CDR Table to the Line and
prioritize the use of the line and/or delay the answering of a Line. You can also route certain Destination
Number, Originating Number, and/or Caller Directed Routing calls to a different Group or CDR Table than
the one used for the specified Line.
Line Profile Detail Report
This Report provides a summary of ACD line usage. The report displays: number and duration of calls
received during specified intervals, summary ACD Call activities during specified intervals, number and
duration of all incoming and outgoing calls during specified intervals, and the percentage of the interval that
the Line was in use.
Line Profile Summary Report
This Report provides a summary of ACD line usage. The report displays: number and duration of calls
received for one day, summary ACD Call activities for one day, number and duration of all incoming and
outgoing calls for one day, and the percentage of the interval that the Line was in use.
Line Reports
There are 4 Line Reports you can generate: Line Profile Detail Report, Line Profile Summary Report, Busy
Report, and Destination Number (DNIS/DID) Report. Refer to the Reports chapter in this Guide for more
information.
LINE XFER
On the Group Configuration screen, you can display the Routing subscreen where you can use this routing
command to transfer a call to a specific Norstar Line. Refer to the Group Configuration section in this
Guide for more details.
LINK XFER
On the Group Configuration screen, you can display the Routing subscreen where you can use this routing
command to transfer a call to an extension or number outside the Norstar. Refer to the Group
Configuration section in this Guide for more details.
Log Date
On the Agent Profile by Group Report, this report field (column) provides the Agent login period (within
From/Thru range) for each Group listed in ascending order.
Logged In
On the System Status Display screen, this call processing statistic provides the number of Agents logged in
to each group. On the Group Status Display screen, Agent status, this statistic provides the number of
Agents logged in for a Group.
Logged Out
On the System Status Display screen, this call processing statistic provides the number of Agents logged
out of each group. On the Group Status Display screen, Agent status, this statistic provides the number of
Agents logged out of a Group.
Login
On the Norstar station sets, an Agent can use this function to login. The Agent must enter their ID Number,
and, if used, their password to use ACD.
214
Norstar PRELUDE and CINPHONY ACD 3.6 User Guide
Glossary
Login Duration
On the Agent Profile Report, this report field (column) provides how long a Agent was logged in for the
specified time period.
Logout
On the Norstar station sets, an Agent can use this function to logout.
Log Out
On the Agent Profile by Group Report, this report field (column) provides the time of day an Agent logged
out for each group for the specified time period.
Longest Idle
On the Group Configuration screen, you can select Longest Idle from the Method of Selection list. This is a
method of routing calls to the Agent who has been available the longest to take a call. Refer to this
Glossary for a definition of Round Robin and Top Down.
M
M7208, M7310, M7410, M7324
These are the model numbers for the Supervisor and Agent Norstar Station Sets. The M7208 is an Agent
Set; the M7324 and the M7310/M7410 can both be used by Agent and Supervisor. Refer to this chapter in
the User Guide for more details.
Main Menu Options
There are 6 Main Menu Options from which to select: Configuration, Status, Reports, Maintenance, ACD
Control, and DOS-Shell.
Maintenance Menu
Maintenance provides the following utilities to help you manage ACD call data: Archive Data, Archive and
Purge Data, Purge Data, Restore Archived Data, Recorded Calls, Export Data, and Data Management
Parameters (automatic process/purge). Refer to these terms in this Glossary for definitions.
Menu Password Configuration
On the Password Configuration screen, you can select from a list of 6 Main Menu selections to assign a
Password: Configuration Menu, Reports, System Maintenance Menu, ACD Control, and DOS-Shell.
Menus and Screens
This section provides an overview of the structure of ACD and how you can navigate through the various
menus and screens.
Menu Password Configuration
On the Password Configuration screen, you can select from a list of 6 Main Menu selections to assign a
Password: Configuration Menu, Reports Menu, Maintenance Menu, ACD Control, and DOS-Shell.
Method of Selection
On the Agent Selection subscreen (Group Configuration), you can select one of 3 methods for selecting an
available Agent to take the next call: LONGEST IDLE, ROUND ROBIN, and TOP DOWN. Refer to this
Glossary for a definition of each method.
Monitor Call
On the Norstar station sets, a Supervisor can enter a feature code and use this function to silently monitor
(listen in on) an Agent's call and/or join in the call.
Month
On the Monthly Summary Report screen, you are required to enter or select the month and year on which
to report.
Norstar PRELUDE and CINPHONY ACD 3.6 User Guide
215
Glossary
Monthly Summary Report
This report provides a summary of the entire system or Group performance. The Report displays: number
of calls received, average time spent on various aspects of ACD Calls, number of auto-logouts, number of
requests for Supervisor help, and number of incoming, outgoing, and intercom calls made during reporting
period.
Move Report/File to Drive A:
This Report/File Maintenance utility enables you to move the contents of any ACD Report, Exported File, or
a Recorded Announcement File to a floppy disk in drive A:. Make sure the floppy is properly formatted and
labeled.
N
Name (Supervisor)
On the Supervisor Configuration screen, you can add, update, or delete a Supervisor. When adding or
updating a Supervisor, you must enter a Name for the Supervisor.
Night Commands
On the Routing subscreen (Group Configuration), you can add or delete Routing Commands on the Night
Routing Table. These commands will become effective when Day Routing Hours have concluded.
No Answer
On the Routing subscreen (Group Configuration), you can use this Routing Command as a step to have a
call continue to ring until the caller hangs up. No entry is required in Value field.
Non-ACD Line
A Non-ACD Line is any line that has not been assigned to a Group in ACD as an ACD Line. On the Line
List configuration screen, you can specify which lines will be ACD Lines. ACD Lines can be displayed in
ACD and assigned a priority in case a call is transferred into a Group.
Normal Print Codes
On the Printer Configuration screen, you can specify the codes for normal default print codes - 80 column
mode for a printer not on the list of printers (F2 list). These codes are found in your printer manual.
Norstar Station Sets
Refer to this Glossary for more information on models M7208, M7310, M7410, and M7324. Also refer to
the Using Norstar Sets chapter for more details and diagrams.
Number (Recorded Announcement)
On the Recorded Announcement Configuration screen, you can add or update a description for the existing
Recorded Announcements.
O
Off-Line
On the ACD Control Menu, you can select Off-Line to use ACD without active Call Processing. You will be
able to Configure, generate reports, modify the Scheduler, and perform any function not requiring a
connection to the KSU.
Originating Number (ANI/ICLID)
On the Line Configuration Menu, you can display the Originating Number (ANI/ICLID) screen where you
can specify an ANI or ICLID Number. Refer to the section in this Guide for more details. Also refer to Line
Configuration, Routing.
Outgoing Calls
Near the bottom of the Group Status Display screen, this Agent status displays the number of Agents
handling Outgoing Calls for this Group. On an Agent Profile Report, this report field (column) provides the
number of outgoing calls.
216
Norstar PRELUDE and CINPHONY ACD 3.6 User Guide
Glossary
Outgoing Duration
On an Agent Profile Report (Non-ACD Duration), this report field (column) provides the amount of time
Agent was on outgoing calls.
Outgoing Overflow Groups
On the Overflow Group Report, this report field (column) lists the calls that overflowed to this Group from
the subject Group. These calls are labeled at the end of the row.
Output Device
On all Report screens, you can specify the Output Device where you want a report to generate. Output
Devices include: Printer, File with Printer Codes, and File without Printer codes, HTML format, and Screen.
Refer to the section Common Report Parameters, for directions on selecting an Output Device.
Overflow
On the Overflow configuration screen, you can add, update, or delete an Overflow Group. Overflow
enables you to specify a Group to make calls available when the original Group has received too many
calls, or has had a call in queue for too long.
P
Page Break on Agent ID
On the Agent Profile and Agent Profile by Group Report screens, you can specify whether you want page
breaks to occur after each Agent profile, or if you want page breaks to occur normally so that the next
profile starts after the previous.
Page Break on Group
On the ACD Call Profile Report and the Routing Table Profile Report screens, you can specify whether you
want page breaks to occur after each Group's profile, or if you want page breaks to occur normally so that
the next profile starts after the previous.
Page Break on Line
On the Line Profile Report screen, you can specify whether you want page breaks to occur after each Line
Profile, or if you want page breaks to occur normally so that the next Line profile starts after the previous.
Page Break on Topic
On the Scheduler screen, you can specify whether you want page breaks to occur after each Topic, or if
you want page breaks to occur normally so that the next Topic profile starts after the previous.
Page Length
On the Printer Configuration screen, you can specify the number of lines you want to print on each page.
60 lines allows for a 1/2 inch top and bottom margin.
Passwords
On the Agent Configuration and Supervisor Configuration screens, you can assign a password to these
records when adding or updating.
Percent
Refer to Report Style.
Percent Time Busy
On the Line Profile Report, this report field (column) provides the percentage of the time period that the
Line was in use.
Play Call
On the Norstar station sets, a Supervisor can use this function to play back calls previously recorded by
Agents.
Playing (Voice Port)
At the bottom of the System and Group Status Display screens, all Voice Ports are listed with their current
state. For example, a Playing Voice Port is currently playing a recorded call or a recorded announcement.
Norstar PRELUDE and CINPHONY ACD 3.6 User Guide
217
Glossary
Port
On the Voice Port Configuration screen, you can view a DN for the available Voice Ports. In Status, the
System Status Display and Group Status Display screens show the Voice Port states at the bottom of the
screens.
Port Timeout
On the System Wide Parameters screen (Configuration Menu) you can specify the time before Automated
Attendant uses the No Port step in its menu to specify a command that sends a call to another Routing
Table step, sends call to a Group, or transfers a call to an extension if all Voice Ports are in use. Refer to
Group Configuration, Routing, for more details.
Print Report
On the Report/File Maintenance screen, you can print a Report that has been generated previously to a
file.
Printer Configuration
On the Printer Configuration screen, you can select a different printer for use than the default. If a different
printer is to be used, make sure all field information has been completed properly and that the printer cable
and ACD Security Key device are used to connect the new printer. Call Technical Support if there are any
concerns in configuring a different printer.
Priority
On the Group, Line, Destination Number, Originating Number, and Caller Directed Routing configuration
screens, you can specify a priority (1-10) for a line. If, for example, a Line is given a priority of 1, then calls
for that line will be handled first.
Process Data
Before a Report can be generated, Data Archived, or Data Purged; the data must be processed. On the
Reports Menu, select Process Data and complete the field information necessary to process current call
data.
Programmable Memory Keys
The Norstar station sets have memory keys that can be programmed so the Agent and Supervisor can
perform functions.
Prompted Categorization
On the Group Configuration screen, you can specify whether or not an Agent is required to enter a
category code after completing the call. This only applies when the Call Categorization feature is used and
the Wrap Duration is set to AUTOMATIC or MANUAL.
Purge Data
In Maintenance you can delete processed call data from the database.
R
Reconfigure
On the Voice Port Configuration screen, the Reconfigure button updates any saved changes made on this
screen. After changes are saved, select Reconfigure by highlighting Reconfigure and pressing
ENTER/CLICK, or by pressing the ALT R keys simultaneously.
Record Call
On the Norstar station sets, an Agent can use this function to record a call. Once the call is answered and
the Record Call feature invoked, do not press any keys on the station set or the recording will terminate.
Record Call Reserve Ports
On the Voice Port Configuration screen, you can reserve one or more ports for recorded calls.
Recorded Announcement
218
Norstar PRELUDE and CINPHONY ACD 3.6 User Guide
Glossary
On the Recorded Announcement Configuration screen, you can add or update a Description to a
previously Recorded Announcement.
Recorded Calls
In Maintenance, you can view all Recorded Calls, or delete a Recorded Call. The Recorded Call
Maintenance screen displays: Agent ID, Call Number (assigned by ACD), Date, and Time for each
Recorded Call.
Recording (Voice Port)
At the bottom of the System and Group Status Display screens, all Voice Ports are listed in their current
states. For example, a Recording Voice Port is currently recording an announcement.
Register
On a Norstar Station Set, a Supervisor must use this function to register into the system to perform other
functions. A Supervisor can Unregister using the same steps to Register.
Replay (Routing Command)
This is an Automated Attendant Command that allows you to replay the Announcement. Refer to Group
Configuration, Routing section in this Guide for more details.
Reports
This menu enables you to select a Report and run (generate) Report to an output device. You can also
Schedule a Report for generation, and utilize the Report/File Maintenance feature to view, copy, move,
print, or delete a Report that has been generated to a file.
Report/File Maintenance
In Report Generation, you can select Report/File Maintenance and perform the following functions for a
report that has been generated to a file: view, copy, move, print, or delete.
Report Parameters
On the Schedule Reports screen, in Report Generation, you can schedule a report to generate. When you
first display the report to schedule, you have the option to change the Report Parameters previously
specified for the report.
Report Style
On the Agent Profile, the Agent Profile by Group, and the ACD Call Profile Reports; you can specify a
Report Style or method. For Agent Profile, there are 3 styles: ACD Duration (time interval), ACD Percent,
and Non-ACD Duration. For Agent Profile by Group, there are 2 styles: ACD Duration and ACD Percent.
For ACD Call Profile, there are 2 styles: ACD Duration and ACD Count (number).
Restore Archived Data
In System Maintenance, you can restore data to the database that were previously archived (copied) from
database to floppies. You will be using the same Archive Disks to restore.
Retrieve Message
On the Norstar station sets, a Supervisor can enter a feature code and use this function to view one or all
of the messages.
Return
On the ACD Control Menu, you can select Return to exit the ACD Control screen and return to the Main
Menu.
Round Robin
On the Group Configuration screen, you can select Round Robin from the Method of Selection list. This is
a method of routing calls to the Agent who is the next available Agent starting with the last Agent logged in.
Refer to this Glossary for a definition of Longest Idle and Top Down.
Route Order Configuration
You can specify the order that ANI, DNIS, and CDR matching tables are looked at to route a call to the
appropriate Group.
Norstar PRELUDE and CINPHONY ACD 3.6 User Guide
219
Glossary
Routing (ANI/ICLID)
On the Originating Number Configuration screen you can specify whether you want to route calls to a
Group or CDR Table.
Routing (CDR)
On the Caller Directed Routing Number Configuration screen you can route calls to a specified Group.
Routing (DNIS/DID)
On the Destination Number Configuration screen you can specify whether you want to route calls to a
Group or CDR Table.
Routing (Line)
On the Line Configuration screen you can specify whether you want to route calls to a Caller Directed
Routing Table, Destination Number Group, Originating Number Group, or to the Group assigned to this
Line.
Routing Commands
On the Routing subscreen (Group Configuration), you can specify the commands an incoming call must
follow (in steps) for the specified Group. You can specify Day and Night Routing Commands. Day Routing
Commands correspond to the Routing Hours that were configured, and the Night Routing Commands to all
other hours.
Routing Hours
On the Routing subscreen (Group Configuration), you can specify the operating hours for each Group.
ACD uses Day and Night Routing Commands to handle calls for each Group. The hours specified on this
screen are for Day Routing Commands; all hours not specified are for Night Routing Commands.
Routing subscreen
On the Group Configuration screen you can display the Routing subscreen to specify a Group’s Day or
Night Routing Hours and the Routing Commands/Values to route calls arriving at your call center. Refer to
the Group Configuration section in this Guide.
Routing Table Profile Report
This Report provides details of routing table usage. The Report displays: Step Number, Routing
Command, and value for Day and Night Routing Tables, and number and percentage of all calls reaching
each step on the table.
S
Save
On Configuration screens, you can Save new or changed configurations by pressing the F10 key. Once
the information is saved for either Agent, Group, or Supervisor Configuration, you can use the Update
Configuration, Maintenance, feature to activate, schedule, or defer changes. If changes are deferred, a
message will display on ACD screens reminding you that the changes are pending activation or scheduling
for activation. You can also highlight the Save button and press ENTER/CLICK, or press the ALT-S keys
to perform a save.
Schedule Changes
On the Update Configuration screen (Configuration Menu), you can schedule the configuration changes
saved for Agent, Group, Line, Emergency Group, and Supervisor Configuration. You also have the option
to activate changes immediately. When scheduling, you must enter a schedule date and time and then
save the schedule. Refer to the Reports chapter in this Guide for more details.
Schedule Date - refer to Schedule Changes in this Glossary.
220
Norstar PRELUDE and CINPHONY ACD 3.6 User Guide
Glossary
Scheduler
On the Scheduler screen, Reports Menu, you can schedule any ACD Report for generation. You will name
the schedule (Macro Definition), enter a schedule date and time, and you can also change the Report
Parameters before saving the schedule. Purge Data (Maintenance) can also be scheduled. You can also
schedule Process Data (Reports Menu).
Schedule Time - refer to Schedule Changes in this Glossary.
Set Priority
On the Routing Commands configuration screen, you can use this Routing Command as a step to reprioritize a call so that it gets distributed and moved up closer to the beginning of the queue.
Shutdown
On the ACD Control Menu, you can select Shutdown to stop all running programs on the system so you
can turn off the Applications Module. Before selecting Shutdown, you must first Deactivate Call
processing.
Silent Monitor - refer to Monitor Call in this Glossary.
Single Line LCD
On the Norstar model M7208 station set, there is a single line liquid crystal display that provides only one
line of information to an Agent. On Two Line LCD's (Models M7324 & M7310/M7410) there are 2 lines of
information and softkeys below to execute commands and navigate through functions. To execute
commands and navigate for a single line LCD, you must use the keypad Rls, #, and * keys.
Softkeys
On the Norstar models M7324 & M7310/M7410 station sets, there are 3 softkeys below the Two Line LCD.
These softkeys enable you to execute commands and navigate through functions (e.g., EXIT, OK, NEXT,
etc.).
Station Sets
Refer to this Glossary for definitions of T7316, T7208, T7100, M7208, M7310, M7410, M7324, C3050, and
C3060 Norstar Station Sets. Also refer to analog Station sets in this Glossary.
Status Display
From the Status Menu, you can view the status of the system (all Groups), or the status of one group. The
call processing statistics displayed are in real-time and reflect the current performance of all Groups, all
Agents, and Voice Ports. Refer to this chapter for a detailed description of all call processing statistics.
Step
On the Routing subscreen (Group Configuration), you can select a Routing Command for each Step on the
Routing Command Table. When a call comes in, it must route through these steps until it is answered.
You can specify Routing Commands for 16 Steps (maximum). On the Routing Table Profile Report, this
report field (column) displays the Steps used for the Routing Table.
Supervisor Configuration
On the Supervisor Configuration screen, you can add, update, or delete a Supervisor. When adding or
updating, you can assign Groups to the Supervisor.
Supervisor Functions
On the Norstar Station Sets (T7316, M7310, M7410, M7324, C3050, and C3060), you can perform the
following functions: Register, Retrieve Messages, Announcement, Announcement Maintenance, Monitor
Call, Play Call, and Emergency Routing.
Supervisor Help
On the Norstar stations sets, an Agent can request help from a Supervisor while on a call. On the Agent
Profile, Group Profile, and Agent Profile by Group Reports, this report field (column) provides the number
of Supervisor Help requests from the Group.
Norstar PRELUDE and CINPHONY ACD 3.6 User Guide
221
Glossary
System Configuration Report
This report displays all configuration information to provide: an analysis tool so Technical Support can
quickly understand your system, and as a reference tool so you can view the entire setup of your system.
System Reports
There are 5 System Reports that can be generated: ACD Call Profile Detail Report, ACD Call Profile
Summary Report, Monthly Summary Report, Abandoned Call Report, and System Configuration Report.
Refer to this Glossary and User Guide for Report definitions.
System Statistics (Wallboard)
On the Wallboard Configuration screen, you can specify the type of System Statistics you want to
calculate. Refer to the section in this Guide for more details, formulas, and examples.
System Status Display
You can view the real-time call processing statistics for all Groups. You will be able to monitor total Group
performance and identify problems as they occur.
System Wide Parameters
On the Configuration Menu, you can display the System Wide Parameters screen where you can specify
the following: ICLID Delay Time, Login/Logout DN, Available/Unavailable DN, Indicator FlashRate 1 and 2,
Digit Timeout, Port Timeout, and Display on Station Set. Refer to the section this Guide for more details.
T
Telephone Service Factor (T.S.F.%)
The Telephone Service Factor is the percentage of calls answered within a Threshold period (in seconds)
for the TSF Interval (in minutes). You can specify the TSF Threshold and Interval (Group Configuration
screen). For example, during a 30 minute interval how many calls were answered within a 60 second
threshold (from first ring to answer).
Time
For several reports you can specify a From and Thru Time for reporting. Refer to Common Report
Parameters.
Time in Seconds and Block #
On the ACD Call Profile Detail and Summary Reports, this report field (column) provides the number of
seconds specified for a column (15 blocks of time). Each block of time displays the number of calls
abandoned, picked up or disconnected, and transferred within its time interval for each 30 minute time
period for the Detail report and for each day for the Summary report.
Time Period
On the ACD Call Profile Detail Report, this report field (column) provides 30 minute time periods within the
From and Thru range where calls are profiled as to being abandoned, picked up and disconnected, or
transferred. The time periods are in ascending order (earliest to latest).
Top Down
On the Group Configuration screen, you can select Top Down from the Method of Selection list. This is a
method of routing calls to the first available Agent closest to the top of the Agent Selection list found in
Group Configuration.
Transfer DN
On the Group Configuration screen, you can enter a Transfer Directory Number used to transfer calls to the
group. This is a non-physical Norstar DN.
Transfer To
On the Routing subscreen (Group Configuration), you can use this Routing Command as a step to transfer
a call to a Norstar DN. You must enter Directory Number in the Value field.
222
Norstar PRELUDE and CINPHONY ACD 3.6 User Guide
Glossary
Troubleshooting
This Appendix 2 describes a few problems you may encounter installing and using ACD. Solutions
accompany the problems listed.
U
Unavailable
On the Norstar station sets, an Agent can use this function to go unavailable and not receive any ACD calls
until Agent goes available using the same steps. On the System and Group Status Display screens, you
can view number of Agents for each Group, or one Group, who are currently unavailable. This includes
Agents indicating manually their unavailability, and Agents on Non-ACD Incoming, Outgoing, and Intercom
Calls.
Unavailable Manual
On the Agent Profile and Agent Profile by Group Reports, this report field (column) provides the amount of
ACD Time, or percentage of time, Agent was inactive for each Group during specified time period; and,
pressed the Unavailable button to go unavailable.
Unavailable Other
On the Agent Profile and Agent Profile by Group Reports, this report field (column) provides the amount of
ACD Time, or percentage of time, Agent was inactive for each Group during specified time period because
of time spent on Non-ACD Calls.
Unused (Voice Port)
At the bottom of the System and Group Status Display screens, all Voice Ports are listed in their current
states. An Unused Voice Port designates that this port is unavailable for use or does not physically exist.
Update Configuration
On Configuration screens, you can Save new or changed configurations by pressing the F10 key. Once
the information is saved for either Agent, Group, Supervisor, Line, or Emergency Group Configuration, you
can use the Update Configuration (Configuration Menu) feature to activate updates immediately, or
schedule update changes at a later date.
V
Value
On the Routing subscreen (Group Configuration), you can select a Routing Command for each Step on the
Routing Command Table and then enter the Value (if required) for the Command. When a call comes in, it
must route through these steps until it is answered. You can specify Routing Commands for 16 Steps
(maximum). On the Routing Table Profile Report, this report field (column) displays the Values for the
Commands used for the Routing Table.
View Report
On the Report/File Maintenance screen, you can view (F9 key) a report on screen that has been generated
previously to a file.
VMAIL XFER
On the Group Configuration screen you can display the Routing subscreen where you can use this Routing
Command to transfer a call to a specified mailbox in the Norstar Voice Mail application (e.g., StarTalk).
Refer to the section in this Guide for more details.
Voice Port Activation
This ACD Option is used to increase the number of authorized Voice Ports in 2 port increments. For more
information contact your Distributor or a CINTECH Support Technician.
Norstar PRELUDE and CINPHONY ACD 3.6 User Guide
223
Glossary
Voice Port Configuration
On the Voice Port Configuration screen, you can add or update Voice Ports reserved to play Recorded
Calls. Once updating the Record Call Reserve Ports, you must Save and Reconfigure this information.
Voice Ports States
At the bottom of the System and Group Status Display screens, Voice Ports states are displayed. There
are 8 Voice Port states: Configuring, Idle, Recording, Playing, Waiting, Initializing, Disabled, and Unused.
Refer to this Glossary for a definition of each state.
W
Waiting (Voice Port)
At the bottom of the System and Group Status Display screens, all Voice Ports are listed in their current
states. A Waiting Voice Port is currently in use but holding for user intervention, to play an announcement,
or for an ATA to clear.
Wrap
On the System and Group Status Display screens, this call processing statistic provides the number of
Agents currently in wrap for each Group, or one Group. On the Agent Profile and Agent Profile by Group
Reports, this report field (column) provides the amount of ACD Time, or percentage of time, Agent
wrapped-up between calls for each Group during the specified time period.
Wrap Duration
On the Group Configuration screen, you can select 1 of 3 ways to specify the length of wrap time allotted to
an Agent between calls: AUTOmatic, MANUAL, and NONE. If Automatic is selected, you will also have to
specify a cancel wrap time period. If MANUAL is selected, the Agent must use the Cancel Wrap feature
code to cancel wrap.
Y
Year
On the Monthly Summary Report, this report field (column) provides the year for the month on which you
want to report. The default is the current year and month.
YES-CALC ALL GROUPS
YES-CALC SELECTED GROUPS
On the Wallboard Configuration screen you can specify whether you want to calculate System Statistics for
all of the Groups for your call center, or just the Groups you specify on this screen. Refer to the Wallboard
Configuration section in this Guide for more details, formulas, and examples.
224
Norstar PRELUDE and CINPHONY ACD 3.6 User Guide
Index
Index
Index
%
% CALLS, 143
% TIME BUSY, 145, 147
.
.HTM, 129
A
Abandoned, 79
ABANDONED, 154, 156
Abandoned Call Report, 153
ABANDONED DURATION, 145, 147
Abandoned Report, 129, 157
About ACD, 120, 126
ACD, 121, 123
ACD (Group, 121
ACD (Group xx), 121
ACD Agent Login / Logout, 201
ACD Call Profile Detail Report, 129, 153
ACD Call Profile Summary Report, 129, 153, 155
ACD Conference, 121
ACD Control, 76, 181
ACD COUNT and PERCENT Reports, 156
ACD DURATION, 134, 136, 145, 147
ACD Held, 121
ACD Level, 126
ACD LOGIN, 185
ACD Security Key, 15
ACD TIME TOTAL DURATION, 135, 136
ACD Version, 126
Activate, 181, 182
Activate Changes, 25, 74
Add a Description, 65
Add-On, 35, 37, 70, 79, 82, 98, 129, 170
Add-Ons, 8, 12, 126
Agent Configuration, 27
Agent Functions, 87, 125
Agent ID Number, 89
Agent Messages, 190
Agent Profile by Group Report, 129, 133
Agent Profile Report, 129, 133
Agent Records, 197
Agent Reports, 129
Agent Selection, 27, 30, 39
Agent Status, 120
AGENT.EXP, 173
ALERT, 34
ALTERNATE GROUP, 138
226
Norstar PRELUDE and CINPHONY ACD 3.6 User Guide
Index
ANI, 52
ANI/ICLID, 157
ANI/ICLID Number, 52, 53
ANNC MAINT Key, 107, 108
ANNOUNCEMENT, 35
Announcement File, 164
Announcement Maintenance, 88, 102, 107
ANNOUNCEMENT MAINTENANCE, 125, 126
Announcement Maintenance Feature Code, 107
Announcement Number, 108
Answer Forcing, 28
Answered, 79
Archive, 168
Archive and Purge, 172
Archive and Purge Data, 167, 171
Archive Data, 167, 168
ARCHIVE DISK #1, 175
ASSIGNED LINES, 149
AUTO ATTD, 35
AUTO LOGOUT, 141, 159
Auto Logout Duration, 30, 32
Automated Attendant, 8, 30, 35, 70, 225
AUTOMATIC, 32
Automatic Call Distribution, 8
Automatically login Agents (or Non-Agents*) using EXTERNAL.BAT file, 201
Available, 118, 120, 121, 123, 201
AVAILABLE, 134, 136
Available., 94
Available/Unavailable DN, 70, 72, 117
Available\Unavailable, 118
Average Abandon, 79
AVERAGE ABANDONED, 141, 150, 159
Average Answer, 79
AVERAGE ANSWERED, 141, 150, 159
AVERAGE HOLD, 141, 150, 159
AVERAGE TALK, 141, 150, 159
Average Time To Abandon, 120, 123
Average Time To Answer, 120, 123
AVERAGE WRAP, 141, 150, 159
B
Backup Station Set DN, 70, 71
Baud Rate, 83
Busy Period Record, 197
Busy Report, 129, 144, 148
BUSY.EXP, 173
C
Calculations: Formula and Examples, 81
Call, 30, 40
Call Categorization By Agent Report, 129, 152
Call Categorization Report, 129, 151
Call Category Number, 68
Norstar PRELUDE and CINPHONY ACD 3.6 User Guide
227
Index
Call Category Number and Description, 68
call center, 12, 30, 50, 129, 215, 227
Call on Demand, 27, 28, 213
Call Processing Statistics, 120, 123
Call Record, 197
CALL.EXP, 173
Caller Directed Routing, 8, 30, 32, 35, 37, 42, 47, 51, 54, 55, 56, 59, 70, 71, 73, 92, 210, 213, 214, 221, 225, 227
Calls Abandoned, 120, 123
CALLS ABANDONED, 140, 142, 145, 147, 150, 154, 156, 159
Calls Answered, 120, 123
CALLS ANSWERED, 134, 136, 140, 142, 145, 147, 150, 159
Calls Disconnected, 120, 123
Calls Overflowed Out, 120, 123
CALLS PICKED UP OR DISCONNECTED, 141, 145, 147, 150, 159
Calls Queued, 88, 97, 120, 123
CALLS QUEUED, 125
Calls Queued Feature, 97
Calls Queued key, 97
CALLS RECEIVED, 140, 142, 145, 147, 150, 159
Calls Transferred, 120, 123
CALLS TRANSFERRED, 141, 145, 147, 150, 159
CANCEL, 125
Cancel Wrap, 88, 95
Cancel Wrap Duration, 95
Cancel Wrap Feature Code, 95
Cancel Wrap Key, 95
CATEG.EXP, 173
Categorization By Agent Report, 151
Categorization Record, 197
Categorization Reports, 129
Categorize, 88, 98
CATEGORIZE, 125
Categorize Feature Code, 99
Categorize Key, 99
Category Code, 98
CATEGORY DESCRIPTION, 151, 152
Category Number, 68
CATEGORY NUMBER, 151, 152
CDR, 8, 30, 32, 35, 37, 42, 47, 48, 49, 50, 51, 52, 53, 54, 55, 56, 57, 58, 59, 70, 71, 73, 92, 212, 213, 214, 217,
221, 227
CDR Number, 32, 51, 54, 58, 59, 70, 71, 73, 92, 214, 217
CDR Table, 32, 35, 37, 47, 48, 50, 51, 53, 54, 55, 57, 59, 71, 73, 92, 213, 214, 221
CDR Table Routing Command, 55
COM Port, 83
Comma Delimited ASCII File, 197
COMMAND, 143
Common Report Parameters, 131
Condensed Print Codes, 78
Config, 121, 123
Config Data Rate, 84
Configuration, 18
Configuration Directory, 24
Configuration Menu, 76
CONTINUE, 35
228
Norstar PRELUDE and CINPHONY ACD 3.6 User Guide
Index
Copy, 40
Copy Group, 31
Copy Report/File to Drive A:, 163
Copyright information, 126
COUNT, 143
CRITICAL, 187
D
Daily Auto Purge/Process, 177
Daily Auto Purge/Process Time, 177
Data Management Parameters, 167, 177
Data Storage Period, 177, 178
DATBACK, 24
Date, 162
DATE, 145, 146, 149, 150, 157, 159
Date Format, 173
Date Range, 168, 170, 171, 173
Deactivate, 181, 182
DELAY ANSWER, 37
delete a Call Category Number, 69
Delete a Recorded Call, 176
Delete a Supervisor, 61
delete an Agent, 29
Delete an Emergency Group, 63
Delete Report/File, 163
Description, 30, 31, 48, 50, 52, 54, 59, 65, 68, 161
DEST NUMBER, 46
DEST/ORIG, 43, 47
Destination Number, 42
Destination Number (DNIS/DID), 42
Destination Number (DNIS/DID) Report, 149
Destination Number (DNIS/DID) Report, 129, 144
Dial Supervisor, 96
DID, 48, 54
Digit Timeout, 70, 72
Digits to Collect, 57, 58
Disabled, 121, 123
DISCONNECT, 37
DISPLAY, 187
Display Duration, 80
Display field, 79
Display Messages, 190
DISTRIBUTE, 37
DNIS, 48
DNIS/DID, 157
DNIS/DID Number, 48, 49, 56
DOS-Shell, 76, 185
DTMF, 54
Dual Tone Multi-Frequency, 54
Duration, 80
DURATION, 157
Duration (Wrap), 32
DURATION ASSIGNED LINES BUSY, 149
Dynamic Data Rate, 83
Norstar PRELUDE and CINPHONY ACD 3.6 User Guide
229
Index
E
EDIT softkey, 90
Emergency Configuration, 63
Emergency Routing, 102, 115
EMERGENCY ROUTING, 126
Emergency Routing Feature Code, 115
Emergency Routing Key, 115, 116
END TIME, 149
Exception Group, 55, 57, 58
Execute, 181, 182
Export, 174
Export Data, 167, 173
Export Data Record Formats, 197
Export File, 164
F
Feature button, 87
Feature Codes, 87, 120
Features Codes, 125
Field Name, 197
Field Number, 197
File Name, 131
First Name, 28
flash speeds, 70
Force Categorization, 30, 98
FORCED ANNOUNCEMENT, 37
Forced Categorization, 68
Form Feed, 78
Format, 79
From and Thru Ranges, 131
From/Thru Rules, 131
Full Handsfree, 93
G
GO TO STEP, 35, 37
Group, 45, 47, 48, 50, 52, 54, 59, 63
GROUP, 35, 37, 149
Group Assignment, 61, 62
Group Configuration, 30
Group Description, 63
Group Number, 30, 31
Group Overflow Report, 129, 140, 142
Group Profile Report, 129, 140
Group Reports, 129
Group Status Display, 120, 121
Group/Description, 63
Group’s Statistics, 80
H
Handset, 93
Handsfree Mute Key, 93
230
Norstar PRELUDE and CINPHONY ACD 3.6 User Guide
Index
Headset, 93
Help, 88, 95
HELP, 125
Help Feature Code, 96
Help from the Supervisor, 95
Help Key, 96
HOLD, 134, 136
HTML, 131, 164
HTML completion, 132
I
ICLID, 52
ICLID (Delay), 45, 47
ICLID Delay Time, 70, 72
ID #, 27, 61
Idle, 121, 123
Include Groups, 158
Incoming, 121
INCOMING CALLS, 134, 136, 145, 147
INCOMING DURATION, 134, 136, 145, 147
INCOMING NUMBER AND NAME, 157
INCOMING, OUTGOING, INTERCOM, 159
INCREASE PRIORITY, 37
Indicator FlashRate 1, 70
Indicator FlashRate 2, 70
Indicator FlashRate1, 72, 73
Indicator FlashRate2, 72
INFORMATION, 187
Initing, 121, 123
Intercom, 121
INTERCOM CALLS, 134, 136
INTERCOM DURATION, 134, 136
INWARD OVERFLOW, 142
J
JOIN softkey, 110
K
Keyboard Use, 14
KSU String, 126
L
Last Name, 28
LEAVE softkey, 111
Line, 45, 46
LINE, 157
Line Configuration, 42
Line Description, 45, 46
Line Profile Detail Report, 129, 144
Line Profile Report, 146
Line Profile Summary Report, 129, 144, 146
Norstar PRELUDE and CINPHONY ACD 3.6 User Guide
231
Index
Line Reports, 129
LINE XFER, 38
LINK XFER, 38
LOG DATE, 134, 136
LOG DATE, LOG IN, LOG OUT, 134, 136
LOG IN, 134, 136
Log Out, 93
LOG OUT, 134, 136
Logged, 123
Logged in, 89
Logged In, 121
Logged Out, 120, 121
Login, 88, 117
LOGIN, 125
LOGIN DURATION, 134, 136
Login Errors, 90
Login Indicator light, 70
Login/Logout, 117
Login/Logout DN, 70, 72, 117
Logout, 118
LONGEST IDLE, 39
Longest Queued, 120, 123
M
M7310, 86
M7324, 86
Main Menu, 10, 11, 12, 15, 18, 24, 87, 112, 137, 161, 163, 167, 168, 170, 171, 173, 175, 176, 177
Maintenance Menu, 76, 167
MANUAL, 32
Manually Login Agents (or Non-Agents*), 201
Manually logout Agents (or Non-Agents*), 201
Menu Password, 76
Menu Selection, 76
Method of Selection, 30, 39
Model, 79
Models and Description, 79
Monitor Call, 110
MONITOR CALL, 126
Monitor Call (Silent Monitor), 102
Monitor Call Feature Code, 110
Monitor Call Key, 110
Month, 158
Monthly Summary Report, 129, 153, 158
Move Report/File to Drive A:, 163
N
Name, 61
Name on Station Set, 30, 31
Name/IP Address, 84
Night Routing Command, 30
NO ANSWER, 38
NO EXECUTE, 162
Non-ACD DURATION Report, 134, 136
232
Norstar PRELUDE and CINPHONY ACD 3.6 User Guide
Index
NONE, 32, 46
Normal Print Codes, 78
Norstar, 2, 8, 11, 15, 32, 33, 37, 38, 46, 47, 72, 87, 88, 89, 94, 95, 97, 98, 100, 103, 106, 107, 110, 112, 114, 116,
118, 125, 141, 142, 143, 145, 147, 150, 154, 156, 159
Number, 65
Number of Retries, 55, 57, 58
Number of Voice Ports, 126
O
Off-Line, 181, 182
ORIG NUMBER, 46
ORIG/DEST, 46
Originating Number, 42
Originating Number (ANI/ICLID, 42
Outgoing, 121
OUTGOING CALLS, 134, 136, 145, 147
OUTGOING DURATION, 134, 136, 145, 147
OUTGOING OVERFLOW GROUPS, 142
Output Device, 131
overflow call, 93
Overflow Group, 30, 40
P
Page Length, 78
Password, 28, 61, 63, 64, 76, 89, 103, 115
Password Configuration, 76
PERCENT Reports, 134, 136
PICKED UP OR DISCONNECTED, 142, 156
Play Call, 102, 112
PLAY CALL, 126
Play Call Feature Code, 112
Play Call Key, 112
PLAY softkey, 108
Playing, 121, 123
Port Timeout, 31, 51, 59, 70, 73, 92
Possible Solutions, 196
Primary Announcement, 37, 54, 55, 57, 58
Print Report, 163
Printer, 15
Printer Configuration, 77
Printer Name, 78
Printer Port, 77
Priority, 30, 33, 45, 47, 48, 50, 54, 59
Problem, 196
Process button, 168
Process Data, 129, 130, 167
Purge, 170
Purge Data, 167, 170
Q
quotation marks, 197
Norstar PRELUDE and CINPHONY ACD 3.6 User Guide
233
Index
R
Receiving Calls, 92
Record a Call, 100
Record Call, 88, 100
RECORD CALL, 125
Record Call Feature Code, 100
Record Call Key, 100
Record Call Reserved Ports, 67
RECORD softkey, 107
Record Tables, 197
recorded announcement, 35, 37, 121, 123, 225
Recorded Announcement, 65
Recorded Call, 176
Recorded Call Number, 113, 176
Recorded Calls, 167
Recording, 121, 123
Register, 102, 103
REGISTER, 125
Register a Supervisor, 103
Register Feature Code, 103, 104
Register Key, 103, 104
REPLAY, 35
Report/File Maintenance, 129, 163
Reports Menu, 76, 130, 161, 167
Restore Archived Data, 167, 175
Retrieve Message, 102, 106
Retrieve Message Feature Code, 106
Retrieve Message Key, 106
RETRIEVE MESSAGES, 125
Return, 181, 182
ROUND ROBIN, 39
Routing, 30, 45, 46, 123
Routing Command, 30
Routing Hours, 30, 34
Routing Table Report, 129, 140, 143
Run Report, 137
S
Save Schedule, 162
Schedule Changes, 25, 74, 75
Schedule Date, 25, 75
Schedule Time, 25, 75
Schedule Type, 162
Scheduler, 129, 161
Secondary Announcement, 55, 57, 58
Selected Group Status, 121
SET PRIORITY, 38
Shutdown, 181, 182
Softkeys, 86, 88
START TIME, 149
Static Unavailable, 201
Station Sets, 86
Status, 120
234
Norstar PRELUDE and CINPHONY ACD 3.6 User Guide
Index
Status Display and Reporting, 82
Status Display Configuration, 82
Status Display for Windows, 82
Status Display For Windows, 8
Status Menu, 126
STEP, 143
STOP softkey, 108
Supervisor Configuration, 61
Supervisor Functions, 87, 102, 125
SUPERVISOR HELP, 134, 136, 141, 159
Supervisor ID, 61
Supervisor ID Number, 103
Supervisor Messages, 187
Supervisor’s Password, 61
Supervisor's Name, 61
SVGA Monitor, 15
System Configuration Report, 129, 153, 160
System Reports, 129
SYSTEM STATISTICS, 79
System Status, 124
System Status Display, 120, 123
System Wide Parameters, 70
T
T.S.F. %, 120
Table Number, 54
Table Number Desciption, 57
Table Number Description, 54
TALK, 134, 136
TCP/IP Port Number, 84
Telephone Service Factor (T.S.F. %), 154, 156
Time, 40, 162, 177
TIME, 150, 157
Time Format, 174
TIME IN SECONDS AND BLOCK #, 154, 156
TIME PERIOD, 145, 146, 154
Time Range, 174
TOP DOWN, 39
TOTAL, 151, 152
TOTAL CALLS, 145, 147
TOTAL DURATION, 145, 147
touchtone dialing, 54
TRANSFER, 35
Transfer DN, 30, 32, 55, 57
TRANSFER TO, 38
TRANSFERRED, 143, 154, 156
Troubleshooting, 196
TSF Interval, 30, 33
U
Unavailable, 88, 94, 118, 121, 123, 201
UNAVAILABLE, 125
Unavailable Feature Code, 94
Norstar PRELUDE and CINPHONY ACD 3.6 User Guide
235
Index
Unavailable Key, 94
UNAVAILABLE MANUAL, 134, 136
UNAVAILABLE OTHER, 134, 136
Unregister the Supervisor, 104
Unused, 121, 124
Update a Description, 65
Update Configuration, 25, 74
User Input Timeout, 54, 57
V
VALUE, 143
View Report, 163
VMAIL XFER, 38
Voice Port, 67
Voice Port States, 121, 123
W
Waiting, 121, 123
Wallboard, 79
Wallboard Configuration, 79
Wallboard Displays, 80
WARNING, 187
Wildcard, 50, 54, 59
Wrap, 121, 123
WRAP, 134, 136
Wrap Duration, 30
Wrap Type, 30, 32
Y
Year, 158
YES-CALC ALL GROUPS, 79
YES-CALC SELECTED GRPS, 79
Your ACD Product ID, 126
236
Norstar PRELUDE and CINPHONY ACD 3.6 User Guide