1
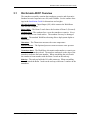
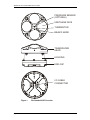
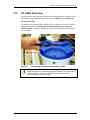
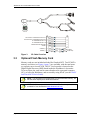
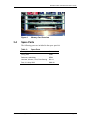
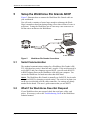
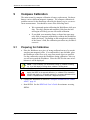
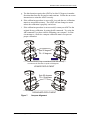
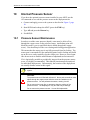
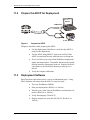
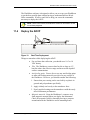
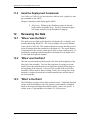
WorkHorse
Rio Grande ADCP
User’s Guide
P/N 957-6167-00 (April 2005)
RD Instruments
Acoustic Doppler Solutions
Table of Contents
1
Introduction....................................................................................................................................... 1
2
WorkHorse Rio Grande ADCP Applications .................................................................................. 2
3
System Overview .............................................................................................................................. 2
3.1
3.2
3.3
3.4
4
Rio Grande ADCP Overview...............................................................................................................3
I/O Cable Overview.............................................................................................................................5
Optional Flash Memory Card ..............................................................................................................6
Spare Parts .........................................................................................................................................7
WorkHorse Care................................................................................................................................ 8
4.1
4.2
4.3
5
General Handling Guidelines ..............................................................................................................8
Assembly Guidelines ..........................................................................................................................9
Deployment Guidelines .......................................................................................................................9
Setup the WorkHorse Rio Grande ADCP ..................................................................................... 10
5.1
5.2
6
Serial Communication .......................................................................................................................10
What if the WorkHorse Does Not Respond.......................................................................................10
Software........................................................................................................................................... 11
6.1
6.2
7
System Requirements.......................................................................................................................11
Software Installation..........................................................................................................................12
Power ............................................................................................................................................... 12
7.1
7.2
8
Bench-Top Battery Power Requirements..........................................................................................12
Operation Modes ..............................................................................................................................12
Testing Your WorkHorse................................................................................................................ 13
9
Compass Calibration...................................................................................................................... 14
9.1
9.2
9.3
10
Preparing for Calibration ...................................................................................................................14
Compass Calibration Verification ......................................................................................................15
Compass Calibration Procedure .......................................................................................................16
Internal Pressure Sensor ............................................................................................................... 18
10.1
11
Deployment Guide .......................................................................................................................... 19
11.1
11.2
11.3
11.4
11.5
12
Pressure Sensor Maintenance..........................................................................................................18
Deployment Checklist .......................................................................................................................19
Prepare the ADCP for Deployment ...................................................................................................20
Deployment Software........................................................................................................................20
Deploy the ADCP..............................................................................................................................21
Send the Deployment Commands ....................................................................................................22
Reviewing the Data......................................................................................................................... 22
12.1
12.2
12.3
'Where' was the Data? ......................................................................................................................22
'When' was the Data? .......................................................................................................................22
'What' is the Data? ............................................................................................................................22
13
A Few Principles of Operation ...................................................................................................... 23
14
Technical Support .......................................................................................................................... 24
List of Figures
Figure 1.
Figure 2.
Figure 3.
Figure 4.
Figure 5.
Figure 6.
Figure 7.
Figure 8.
Figure 9.
Figure 10.
Rio Grande ADCP Overview ........................................................................................... 4
Connecting and Disconnecting the I/O Cable.................................................................. 5
I/O Cable Overview ......................................................................................................... 6
Memory Card Overview................................................................................................... 7
WorkHorse Rio Grande Connections ............................................................................ 10
BBTalk Command History Box ...................................................................................... 15
Compass Alignment ...................................................................................................... 17
Visual Inspection before Deployment ............................................................................ 19
Prepare the ADCP......................................................................................................... 20
Real-Time Deployment.................................................................................................. 21
List of Tables
Table
Table
Table
Table
1:
2:
3:
4:
WorkHorse Rio Grande Application Guide ...................................................................... 2
Spare Parts ..................................................................................................................... 7
WorkHorse Software Main Modules .............................................................................. 11
WorkHorse ADCP Tests ................................................................................................ 13
WorkHorse Rio Grande ADCP User's Guide
Acoustic Doppler Solutions
WorkHorse Rio Grande ADCP User's Guide
1
Introduction
Thank you for purchasing the RD Instruments (RDI) Rio Grande WorkHorse. This guide is designed to help first time WorkHorse users to set up,
test, and deploy their ADCP.
This guide is designed for use with the other WorkHorse Technical Manual
guides. Where needed, there are references to detailed information and figures contained in the WorkHorse Technical Manual.
WorkHorse Rio Grande deployments are most often Real-Time. Real-Time
use refers to the fact you are viewing the data as the ADCP collects it via a
personal computer. This data is also stored on the computer to allow for
data playback and processing at a later time.
NOTE. When you receive your WorkHorse, look for a set up card that
shows all of the pieces you should have in your box. If anything is missing
or damaged, contact RDI immediately.
NOTE. When an addition or correction to the manual is needed, an Interim
Change Notice (ICN) will be posted to our web site on the Customer
Service page (www.rdinstrument.com). Please check our web site often.
P/N 957-6167-00 (April 2005)
page 1
WorkHorse Rio Grande ADCP User's Guide
2
WorkHorse Rio Grande ADCP Applications
The Workhorse Rio Grande ADCP provides customers with reliable and repeatable river discharge measurements, and displays the results through its
exceptional, user-friendly WinRiver software. For detailed information on
how to use WinRiver, see the WinRiver User’s Guide.
The WorkHorse Rio Grande ADCP can also be used in other moving vessel
real time applications that take advantage of the Rio Grande’s bottom tracking abilities. WinRiver is the most often used software package for Rio
Grande ADCP setup, real-time data collection, and data review. RDI also
offers the VmDas program for ADCP setup, real-time data collection, and
data review. For detailed information on how to use VmDas, see the VmDas
User’s Guide.
Table 1:
WorkHorse Rio Grande Application Guide
Estuaries/River
Costal and Continental Shelf
Rio Grande using WinRiver
Rio Grande using VmDas
• River, stream and channel discharge
• Plume tracking
• Suspended sediment load estimation
• Environmental surveys
• Plume tracking
• Planning new ports
• Bridge scouring
• Current mapping
• Simultaneous bathymetry discharge, flow structure
• Costal engineering
• Cable and pipe laying
• Circulation/model studies
3
System Overview
The WorkHorse Rio Grande is designed to measure real-time current profiles from temporary or permanent mounting in a vessel. The Rio Grande
ADCP system consists of an ADCP with Bottom Track mode, High Resolution Water Profiling modes, cables, and software. The input power requirements for the Rio Grande are +12 VDC. The Rio Grande system requires the addition of a Windows® compatible computer to collect data.
NOTE. Do not attempt to attach a Workhorse Monitor/Sentinel I/O cable or
power supply to the Workhorse Rio Grande ADCP. The Workhorse
Monitor and Sentinel ADCPs are 20 to 50 VDC systems. The Workhorse
Rio Grande uses 12 VDC only.
NOTE. The Rio Grande End-Cap is red to differentiate it from the Monitor
and Sentinel ADCPs. Do not swap end-caps between a Rio Grande and a
Monitor/Sentinel. The pin-outs are different on both the I/O cable
connector and the internal I/O cable.
page 2
RD Instruments
WorkHorse Rio Grande ADCP User's Guide
3.1
Rio Grande ADCP Overview
The transducer assembly contains the transducer ceramics and electronics.
Standard acoustic frequencies are 600, and 1200kHz. See the outline drawings in the Installation Guide for dimensions and weights.
I/O Cable Connector – Input/Output (I/O) cable connects the WorkHorse
ADCP to the computer.
Beam-3 Mark – The Beam-3 mark shows the location of Beam-3 (Forward).
Urethane Face – The urethane face covers the transducer ceramics. Never
set the transducer on a hard surface. The urethane face may be damaged.
Housing – The standard WorkHorse housing allows deployment depths to
200 meters.
Thermistor – The Thermistor measures the water temperature.
Pressure Sensor – The Optional pressure sensor measures water pressure
(depth).
Transducer Head – The WorkHorse electronics and transducer ceramics are
mounted to the transducer head. The numbers embossed on the edge of the
transducer indicates the beam number. When assembling the unit, match
the transducer beam number with the Beam 3 mark on the end-cap.
End-Cap – The end-cap holds the I/O cable connector. When assembling
the unit, match the Beam 3 mark on the end-cap with beam 3 number on the
transducer.
P/N 957-6167-00 (April 2005)
page 3
WorkHorse Rio Grande ADCP User's Guide
PRESSURE SENSOR
(OPTIONAL)
URETHANE FACE
THERMISTOR
BEAM 3 MARK
TRANSDUCER
HEAD
HOUSING
END-CAP
I/O CABLE
CONNECTOR
Figure 1.
page 4
Rio Grande ADCP Overview
RD Instruments
WorkHorse Rio Grande ADCP User's Guide
3.2
I/O Cable Overview
Always remove the retaining strap on the end-cap underwater-connect cable
and dummy plug when disconnecting them. Failure to do so will break
the retainer strap.
Do not apply any upward force on the end-cap connector as the I/O cable is
being disconnected. Stressing the end-cap connector may cause the
ADCP to flood. Read the Maintenance guide for details on disconnecting
the I/O cable.
Figure 2.
Connecting and Disconnecting the I/O Cable
NOTE. The Rio Grande End-Cap is red to differentiate it from the Monitor
and Sentinel ADCPs. Do not swap end-caps between a Rio Grande and a
Monitor/Sentinel. The pin-outs are different on both the I/O cable
connector and the internal I/O cable.
P/N 957-6167-00 (April 2005)
page 5
WorkHorse Rio Grande ADCP User's Guide
4
8
3
2
7
6
1
5
P1
RS-232IN/CH A RS485A/RS-422 OUT A
1
RS-232OUT/CH A RS485B/RS-422 OUT B
2
CH B RS485B/RS-422 IN A
5
CH B RS485B/RS-422 IN B
6
BLU
BRN
COMMUNICATION RETURN
3
GRN
5
SPARE
7
RED
4
POWER (+)
POWER (-)
4
8
ORG
WHT
RED
YEL
BLK
BLK
Figure 3.
3.3
P2
BLK
3
WHT
2
9
8
P3 (RED)
P4 (BLACK)
I/O Cable Overview
Optional Flash Memory Card
Memory cards are not included with the Rio Grande ADCP. Two PCMCIA
memory card slots (see Figure 4, page 7) are available, with the total memory capacity not to exceed 2GB. The PC Card recorder is located on the
Digital Signal Processor (DSP) board inside the Workhorse’s electronics.
To recover data, the card can be removed and used in a personal computer
(PC), or left in the Workhorse, and accessed by using WinSC (see the WinSC
and Plan ADCP User's Guide).
NOTE. The WorkHorse Rio Grande does not come with flash memory, but
has the same capacity as a WorkHorse Sentinel.
NOTE. WinSC is not provided with WorkHorse Rio Grande systems, but is
available for free download at www.rdinstruments.com.
page 6
RD Instruments
WorkHorse Rio Grande ADCP User's Guide
Figure 4.
3.4
Memory Card Overview
Spare Parts
The following parts are included in the spare parts kit.
Table 2:
Spare Parts
Description
Part number
O-ring, face
2-260
Desiccant, sealed bag
DES3
Lubricant, silicone, 5.3 oz, Dow-Corning
DC-111
Fuse, 3.0 Amp, 250V
GMA-3A
P/N 957-6167-00 (April 2005)
page 7
WorkHorse Rio Grande ADCP User's Guide
4
WorkHorse Care
This section contains a list of items you should be aware of every time you
handle, use, or deploy your WorkHorse. Please refer to this list often.
4.1
page 8
General Handling Guidelines
•
Never set the transducer on a hard or rough surface. The
urethane faces may be damaged.
•
Always remove the retaining strap on the end-cap underwater-connect cable and dummy plug when disconnecting them.
Failure to do so will break the retainer strap.
•
Do not apply any upward force on the end-cap connector as
the I/O cable is being disconnected. Stressing the end-cap
connector may cause the ADCP to flood. Read the Maintenance guide for details on disconnecting the I/O cable.
•
Do not expose the transducer faces to prolonged sunlight.
The urethane faces may develop cracks. Cover the transducer faces on the Workhorse if it will be exposed to sunlight.
•
Do not expose the I/O connector to prolonged sunlight. The
plastic may become brittle. Cover the connector on the
Workhorse if it will be exposed to sunlight.
•
Do not store the ADCP in temperatures over 75 degrees C.
The urethane faces may be damaged. Check the temperature indicator inside the shipping case. It changes color if the
temperature limit is exceeded.
•
Do not scratch or damage the O-ring surfaces or grooves. If
scratches or damage exists, they may provide a leakage
path and cause the ADCP to flood. Do not risk a deployment with damaged O-ring surfaces.
•
Do not lift or support a WorkHorse by the external I/O cable.
The connector or cable will break.
RD Instruments
WorkHorse Rio Grande ADCP User's Guide
4.2
4.3
Assembly Guidelines
•
Read the Maintenance guide for details on WorkHorse reassembly. Make sure the housing assembly O-rings stay in
their groove when you re-assemble the WorkHorse. Tighten
the hardware as specified. Loose, missing, stripped hardware, or damaged O-rings can cause the WorkHorse
transducer to flood.
•
Place a light amount of DC-111 lubricant on the end-cap
connector pins (rubber portion only). This will make it easier to connect or remove the I/O cable and dummy plug.
•
Do not connect or disconnect the I/O cable with power applied. The connector pins may become pitted and worn.
•
The WorkHorse I/O cable is wet mate-able, not under water
mate-able.
Deployment Guidelines
•
Read the appropriate WorkHorse User’s Guide and the
Software User’s Guides. These guides have tutorials to
help you learn how to use the ADCP.
•
Align the compass whenever the battery pack or recorder
module is replaced, or when any ferrous metals are relocated
inside or around the WorkHorse housing. Ferro-magnetic
materials affect the compass.
•
Avoid using ferro-magnetic materials in the mounting
fixtures or near the Workhorse. Ferro-magnetic materials
affect the compass.
P/N 957-6167-00 (April 2005)
page 9
WorkHorse Rio Grande ADCP User's Guide
5
Setup the WorkHorse Rio Grande ADCP
Figure 5 illustrates how to connect the WorkHorse Rio Grande cable on
your workbench.
You will need a container of water large enough to submerge the WorkHorse’s transducer head into during testing (two to three inches of water is
sufficient). Testing the WorkHorse out of water may cause some tests to
fail but causes no harm to the WorkHorse.
BBTalk
COMPUTER
ADCP
I/O CABLE
12 VDC BATTERY
Figure 5.
5.1
WorkHorse Rio Grande Connections
Serial Communication
The standard communications settings for a WorkHorse Rio Grande is RS232, 9600-baud, no parity, 8 data bits and 1 stop bit. If the serial protocol is
set for RS232 and your computer expects RS422, you will need an RS232
to RS422 adapter between the WorkHorse cable and your computer. You
can set the WorkHorse for baud rates other than 9600 baud.
RS422. The WorkHorse Rio Grande is normally set for RS232, but it can be
changed to RS422 by changing a switch setting. The switch is in plain view
on the top circuit board, near the cable connectors. Its settings are plainly
marked on the board. This user’s guide assumes that you use RS232.
5.2
What if the WorkHorse Does Not Respond
If your WorkHorse does not respond, check the serial port, cables, and
power. If necessary, refer to the Troubleshooting Guide in the WorkHorse
technical manual.
page 10
RD Instruments
WorkHorse Rio Grande ADCP User's Guide
6
Software
RDI has utility programs to help you set up, use, test, and trouble-shoot
your WorkHorse ADCP. Each program has a help file that you can print, or
you can view help while running the program.
Table 3:
WorkHorse Software Main Modules
Program Name
Description
BBTalk
Windows ADCP communication program. Use this program to "talk"
to the ADCP and to run test script files. BBTalk is included on the
RDI Tools CD. For detailed information on how to use BBTalk, see
the RDI Tools User's Guide.
WinADCP
Gives users a visual display of the entire set of data. You can zoom
in on a portion of the data for closer analysis and export data to text
or MatLab files. For detailed information on how to use WinADCP,
see the WinADCP User's Guide.
Documentation CD
The Documentation CD has an Adobe Acrobat® (*.pdf) electronic
version of the WorkHorse Technical Manual. Use the Documentation CD to search for information. For detailed information on how
to use Adobe Acrobat® and the Documentation CD, see the Read
This First guide.
NOTE. See “WorkHorse Rio Grande ADCP Applications,” page 2 to see
what software package to use for collecting data.
6.1
System Requirements
The WorkHorse software requires the following:
•
Windows 95®, Windows 98®, Windows NT 4.0® with Service Pack 4 installed, Windows 2000®, or Windows XP®
•
Pentium class PC 233 MHz (350 MHz or higher recommended)
•
32 megabytes of RAM (64 MB RAM recommended)
•
6 MB Free Disk Space (20 MB recommended)
•
One Serial Port (two High Speed UART Serial Ports recommended)
•
Minimum display resolution of 800 x 600, 256 color (1024 x
768 recommended)
P/N 957-6167-00 (April 2005)
page 11
WorkHorse Rio Grande ADCP User's Guide
6.2
Software Installation
To install the WorkHorse software, do the following.
a. Insert the compact disc into your CD-ROM drive and then follow the
browser instructions on your screen. If the browser does not appear,
complete Steps “b” through “d.”
b. Click the Start button, and then click Run.
c. Type <drive>:launch. For example, if your CD-ROM drive is drive D,
type d:launch.
d. Follow the browser instructions on your screen
7
Power
The Rio Grande requires a DC supply between 10.5 volts and 18 volts. Either an external DC power supply or battery can provide this power. If you
are using a battery, use the largest rated amp-hour battery as possible. A car
battery should last one to two days powering a 600-kHz ADCP.
NOTE. Check that the battery voltage is above 10 Volts DC. Rio Grande
ADCPs will work at 10 volts; however, batteries with voltages below 11
volts are at or near their end of life and are approaching uselessness.
7.1
Bench-Top Battery Power Requirements
While the WorkHorse is awake and responding to commands, it consumes
approximately 2.2 watts. A single internal battery pack supplies this power
level for about five days. When the WorkHorse is asleep, it consumes less
than one mw. A standard battery pack supplies sleep power for years. At
every opportunity, the WorkHorse will “sleep” to conserve power while deployed.
7.2
Operation Modes
The WorkHorse has two modes of operation: command mode, and ping
mode (also referred to as “Deployment Saver” Mode). Depending on what
mode the ADCP is in; it will go either to sleep or to resume pinging.
In the Command Mode
Whenever you wake up your WorkHorse, power dissipation increases from
less than one mw to around 2.2 w. If you leave the WorkHorse in command
mode without sending a command for more than five minutes, the WorkHorse automatically goes to sleep. This protects you from inadvertently
depleting batteries.
page 12
RD Instruments
WorkHorse Rio Grande ADCP User's Guide
In the Ping Mode
After you send commands to the WorkHorse that tells it to start collecting
data, the WorkHorse goes into deployment saver mode. If power is somehow removed and later restored, the WorkHorse simply picks up where it
left off and continues to collect data using the same setup.
8
Testing Your WorkHorse
Use the following steps to test the ADCP.
a. Interconnect and apply power to the system as described in the “Setup
the WorkHorse Rio Grande ADCP,” page 10.
b. Start the BBTalk program (for help on using BBTalk, see the RDI Tools
User's Guide).
c. Press <F2> and run the script file TestWH.rds. The TestWH.txt script file
runs PS0, PS3, PA, PC2, and the PC1 tests. The results of the tests will
be printed to the screen and saved to the log file WH_RSLTS.txt. The
WH_RSLTS.txt file will be created in the same directory that BBTalk is
running from.
Table 4 lists the tests BBTalk runs, gives you guidelines for running the
tests, and tells you what the results mean.
Table 4:
WorkHorse ADCP Tests
Test
Guidelines
Results
PS0
Displays system parameters.
Verify the information is
consistent with what you
know about the setup of
your system.
PA
Extensive pre-deployment test that tests
the signal path and all major signal processing subsystems. This test may not
pass unless the WorkHorse transducer
face is immersed water.
All tests must pass.
PC2
Continuously updates sensor display.
Rotate and tilt WorkHorse and watch the
readings on the display change.
Satisfy yourself that the
readings make sense.
PC1
Beam continuity test. Follow instructions
to rub each beam in turn to generate a
noise signal the WorkHorse uses to verify
the transducer beam is connected and
operational.
All beams must pass.
P/N 957-6167-00 (April 2005)
page 13
WorkHorse Rio Grande ADCP User's Guide
9
Compass Calibration
The main reason for compass calibration is battery replacement. Each new
battery carries a different magnetic signature. The compass calibration algorithm corrects for the distortions caused by the battery to give you an accurate measurement. You should be aware of the following items:
9.1
•
We recommend against calibrating the WorkHorse while on a
ship. The ship’s motion and magnetic fields from the hull
and engine will likely prevent successful calibration.
•
If you think your mounting fixture or frame has some magnetic field or magnetic permeability, calibrate the WorkHorse
inside the fixture. Depending on the strength and complexity
of the fixture’s field, the calibration procedure may be able to
correct it.
Preparing for Calibration
a. Place the Workhorse on a piece of strong cardboard on top of a smooth
wooden (non-magnetic) table. If a wooden table is not available, place
the Workhorse on the floor as far away from metal objects as possible.
Use the cardboard to rotate the Workhorse during calibration—this way
you will not scratch the Workhorse. Place the ADCP in the same orientation as it will be deployed.
NOTE. If you will deploy your Workhorse looking up, calibrate it looking
up. If you will deploy it looking down, calibrate it looking down.
CAUTION. If you calibrate the compass in one direction (up or down) and
deploy the ADCP in the opposite direction (i.e. calibrate it in a downward
position and deploy it in a upward position) the compass calibration will be
invalid. Compass errors in excess of 5 degrees may occur.
b. Connect the Workhorse as shown in “Setup the WorkHorse Rio Grande
ADCP,” page 10.
c. Start BBTalk. See the RDI Tools User’s Guide for assistance on using
BBTalk.
page 14
RD Instruments
WorkHorse Rio Grande ADCP User's Guide
9.2
Compass Calibration Verification
Compass calibration verification is an automated built-in test that measures
how well the compass is calibrated. The procedure measures compass parameters at every 5º of rotation for a full 360º rotation. When it has collected data for all required directions, the Workhorse computes and displays
the results.
NOTE. Verify the compass if you have just replaced the memory module,
or any ferrous metals is relocated inside or around the Workhorse housing.
Calibrate the compass if the battery has been replaced (see “Compass
Calibration Procedure,” page 16).
a. Prepare the ADCP for calibration (see “Preparing for Calibration,” page
14).
b. Using BBTalk, send a Break to wake up the Workhorse.
c. On the Transfer menu, click Command History. In the Enter a
Command box, enter AX and click OK.
Figure 6.
BBTalk Command History Box
d. When prompted, rotate the Workhorse slowly 360 degrees (approximately 5 degrees per second). Pay particular attention to the Overall Error. For example;
HEADING ERROR ESTIMATE FOR THE CURRENT COMPASS CALIBRATION:
OVERALL ERROR:
Peak Double + Single Cycle Error (should be < 5(): ( 1.55(
DETAILED ERROR SUMMARY:
Single Cycle Error:
( 1.54(
Double Cycle Error:
( 0.07(
Largest Double plus Single Cycle Error:
( 1.61(
RMS of 3rd Order and Higher + Random Error:
( 0.31(
If the overall error is less than 2°, the compass does not require alignment.
You can align the compass to reduce the overall error even more (if desired).
P/N 957-6167-00 (April 2005)
page 15
WorkHorse Rio Grande ADCP User's Guide
9.3
Compass Calibration Procedure
The built-in automated compass calibration procedure is similar to the
alignment verification, but requires three rotations instead of one. The
Workhorse uses the first two rotations to compute a new calibration matrix
and the third to verify the calibration. It will not accept the new matrix
unless the calibration was carried out properly, and it asks you to verify that
you want to use the new calibration if it is not as good as the previous calibration. While you are turning the Workhorse for the two calibration rotations, the Workhorse checks the quality of the previous calibration and displays the results. It compares these results with the results of the third calibration rotation.
There are two compass calibrations to choose from; one only corrects for
hard iron while the other corrects for both hard and soft iron characteristics
for materials rotating with the ADCP. Hard iron effects are related to residual magnetic fields and cause single cycle errors while soft iron effects are
related to magnetic permeability that distorts the earth’s magnetic field and
causes double cycle errors. In general, the hard iron calibration is recommended because the effect of hard iron dominates soft iron. If a large double cycle error exists, then use the combined hard and soft iron calibration.
a. Prepare the ADCP for calibration (see “Preparing for Calibration,” page
14).
b. Using BBTalk, send a Break to wake up the ADCP.
c. On the Transfer menu, click Command History. In the Enter a
Command box, enter AF and click OK. When the calibration procedure starts, choose the calibration type.
d. Tilt the ADCP (see Figure 7, page 17). Tilt an upward-looking Workhorse with a block under one side of the end-cap. A 35-mm block will
give you an 11-degree tilt. Check the on-screen instructions to see if the
orientation is OK. Adjust as necessary.
NOTE. The tilts must remain constant during the rotations. The
transducer beam is the center point of the rotation.
e. When prompted, rotate the ADCP slowly 360 degrees (approximately 5
degrees per second).
f. The second rotation requires the ADCP to be tilted 15 degrees in another
direction than from the first rotation (see Figure 7, page 17). Follow the
on-screen instructions to orient the ADCP correctly. When prompted,
rotate the ADCP slowly 360 degrees (approximately 5 degrees per second).
page 16
RD Instruments
WorkHorse Rio Grande ADCP User's Guide
g. The third rotation requires the ADCP to be tilted 15 degrees in another
direction than from the first and second rotations. Follow the on-screen
instructions to orient the ADCP correctly.
h. If the calibration procedure is successful, it records the new calibration
matrix to nonvolatile memory. The ADCP will not change its matrix
unless the calibration is properly carried out.
i. If the calibration procedure is not successful, return your ADCP to the
original factory calibration, by using the AR-command. Try using the
AR-command if you have trouble calibrating your compass. In some
circumstances, a defective compass calibration matrix can prevent
proper calibration.
Spin 90 degrees
Tilt >10 degrees
Place the Dummy Plug or small block under the end-cap
to make the tilt less than or equal to 20 degrees.
UPWARD DEPLOYMENT
Spin 90 degrees
Tilt >10 degrees
DOWNWARD DEPLOYMENT
Figure 7.
Compass Alignment
P/N 957-6167-00 (April 2005)
page 17
WorkHorse Rio Grande ADCP User's Guide
10
Internal Pressure Sensor
If you have the optional pressure sensor installed in your ADCP, use the
AZ-command to zero out the pressure sensor at the deployment site.
a. Connect and apply power to the system as described in Figure 5, page
10.
b. Start BBTalk and wakeup the ADCP (press the END key).
c. Type AZ and press the Return key.
d. Exit BBTalk.
10.1
Pressure Sensor Maintenance
In order to read the water pressure (depth), water must be able to flow
through the copper screw on the pressure sensor. Antifoulant paint will
block the sensor’s port (a small hole that is drilled through the copper
screw). You should tape off the screw during anti-fouling paint application.
This means that the sensor port is not fully protected from bio fouling. The
sensor port is surrounded by the antifouling paint, but bio fouling may build
up on the screw, and eventually clog the sensor port. However, most organisms do not seem to find the small amount of unpainted surface attractive.
If it is logistically possible to periodically inspect/clean the pressure sensor
screw, it is highly recommended. This tradeoff situation must be analyzed
for individual deployments. Unfortunately, the location of the deployment
site usually dictates action in this regard.
NOTE. The pressure sensor is optional. It may not be included on your
system.
CAUTION.
The pressure sensor is filled with silicone oil. Never poke a needle or other
object through the copper screw while the screw is installed over the
pressure sensor. You will perforate the sensor, causing it to fail.
Do not remove the cover disc or attempt to clean the surface of the
pressure sensor. The diaphragm is very thin and easy to damage.
Do not remove the pressure sensor. It is not field replaceable.
page 18
RD Instruments
WorkHorse Rio Grande ADCP User's Guide
11
Deployment Guide
Use the following steps and the Quick Reference card to setup the WorkHorse for a deployment.
11.1
Deployment Checklist
Test the ADCP using BBTalk
Seal the ADCP for deployment
Install new o-rings; use silicone lubricant
Use fresh desiccant (2 bags) inside ADCP
Visually inspect the ADCP
Check the transducer head condition
All mounting hardware installed
Transducer faces clean and free from defects
Verify compass alignment using BBTalk; if necessary, re-calibrate
Are biofouling precautions needed?
Zero pressure sensor (optional) at deployment site with AZ-command
VISUALLY INSPECT THE ADCP
URETHANE TRANSDUCER FACES
REMOVE BARNACLES AND
CHECK FOR CRACKS
TRANSDUCER HEAD
CHECK O-RINGS
AND MOUNTING
HARDWARE ARE
INSTALLED
HOUSING
CHECK FOR
CRACKS
ELECTRONICS
CHECK ALL HARDWARE
IS TIGHT
END-CAP
CHECK O-RINGS AND
MOUNTING HARDWARE
ARE INSTALLED
I/O CABLE CONNECTOR
CONNECT I/O CABLE
Figure 8.
Visual Inspection before Deployment
P/N 957-6167-00 (April 2005)
page 19
WorkHorse Rio Grande ADCP User's Guide
11.2
Prepare the ADCP for Deployment
BBTalk
COMPUTER
I/O CABLE
ADCP
12 VDC BATTERY
Figure 9.
Prepare the ADCP
Things to remember while preparing the ADCP.
11.3
•
Use the Deployment Checklist to verify that the ADCP is
ready for the deployment.
•
Test the ADCP using BBTalk. Some tests will fail if the
ADCP is not placed in water while the tests are being run.
•
Desiccant lasts a year at specified WorkHorse deployment
depths and temperatures. Remember that desiccant rapidly
absorbs moisture from normal room air. Replace the desiccant whenever the WorkHorse housing or end-cap is removed.
•
Verify the compass calibration.
Deployment Software
Real-Time data collection involves a series of independent steps. Using
RDI’s Software will ensure that the ADCP is setup correctly.
page 20
•
Test your WorkHorse (BBTalk)
•
Plan your deployment (WinRiver or VmDas)
•
Transfer your “plan” into the WorkHorse and start data collection (WinRiver or VmDas)
•
Verify data integrity (WinADCP)
•
Display and process your data (WinADCP, WinRiver or
VmDas)
RD Instruments
WorkHorse Rio Grande ADCP User's Guide
The WorkHorse software is designed to allow you to set up your WorkHorse
to get the best possible data without having to understand and use WorkHorse commands. WinRiver and VmDas help you create the commands
necessary to deploy the ADCP.
NOTE. Refer to the VmDas, and WinRiver Guides for information on how
to use these programs.
11.4
Deploy the ADCP
Figure 10.
Real-Time Deployment
Things to remember while deploying the ADCP.
•
For real-time data collection, you should use a 10.5 to 18
VDC battery.
•
Tilts. The Workhorse corrects data for tilts as large as 15°,
but tilts reduce the effective range and increase the depth of
surface contamination.
•
Anti-fouling paint. You are free to use any anti-fouling paint
or other anti-fouling material you wish over any surface of
the Workhorse. However, you should consider the following:
1. Ensure that your coating can be used safely on plastic in
general and polyurethane specifically.
2. Apply it thinly and evenly to the transducer faces.
3. Poorly applied coatings on the transducer could adversely
affect instrument performance.
•
P/N 957-6167-00 (April 2005)
Magnetic material. Keep the Workhorse’s compass away
from magnetic material when you deploy the instrument.
Check for magnetic fields by smoothly moving a compass
around and near the Workhorse and its mounting frame.
page 21
WorkHorse Rio Grande ADCP User's Guide
11.5
Send the Deployment Commands
Use VmDas, or WinRiver (see the respective software user’s guides) to send
the commands to the ADCP.
Things to remember while deploying the ADCP.
•
Ping beeps. Whenever the Workhorse pings, an internal
beeper makes an audible beep. The beep consumes negligible energy and tells you the Workhorse is pinging.
12
Reviewing the Data
12.1
'Where' was the Data?
The quickest way to find out the depth of each depth cell is to display your
recorded data using WinADCP. The velocity display tells you the distance
to the center of each cell. The computed distance assumes that the speed of
sound is constant from the transducer to the depth cell. The actual distance
is proportional to the average sound speed; if the average sound speed is 1%
less than the sound speed at the transducer, the distance to the depth cell is
1% less than the displayed distance.
12.2
'When' was the Data?
The time recorded with each data record is the time of the beginning of the
first ping of the ensemble. Plan sets the ping interval so pings occur uniformly across the ensemble interval (as opposed to putting all the pings at
the beginning of the interval). It leaves a few seconds at the end of each
ensemble to allow time for data recording. Hence, the average time of the
ensemble is midway between the recorded ensemble time and the time of
the next ensemble.
12.3
'What' is the Data?
The WorkHorse records velocity data in units of mm/s. Calibration depends
on how well the WorkHorse knew the speed of sound (which it computed
based on its measured temperature and the salinity value it was given). A
salinity error of 5 ppt introduces less than 0.5% velocity error.
page 22
RD Instruments
WorkHorse Rio Grande ADCP User's Guide
13
A Few Principles of Operation
Consult RDI’s Primer (ADCP Principles of Operation: a Practical Primer,
Second Edition for BroadBand ADCPs) to learn more about WorkHorse
principles of operation. The following are a few points from the Primer that
may be worth knowing:
•
Horizontal velocity measurement accuracy is unaffected by
vertical stratification.
•
Stratification has negligible affect on the ability of the
WorkHorse to penetrate through the water; concentration of
suspended particles is the main factor influencing profiling
range.
•
WorkHorse measurements are automatically corrected for
tilts up to ±20°. In addition to correcting for the beam pointing angles, the WorkHorse maps depth cells to other cells at
the same depth.
•
If you want to make measurements near the surface from a
bottom-mounted WorkHorse, you should minimize the tilt.
•
Depth cells are most sensitive to velocities at the center of
the depth cell and less sensitive at the top and bottom. This
sensitivity is reflected by what we call a ‘triangular weighting function’. The details of this weighting function are
rarely important for interpretation and use of your data.
•
The actual maximum range can be different from the range
predicted in Plan. Plan corrects for range variations caused
by temperature and salinity, but it assumes typical scattering
conditions. Weak backscatter can sometimes reduce range
by a factor of two or more.
•
The maximum profiling range decreases with time as the battery voltage falls. This is because transmit power depends on
battery voltage. Transmit power is optimized for about 13
volts.
P/N 957-6167-00 (April 2005)
page 23
WorkHorse Rio Grande ADCP User's Guide
14
Technical Support
If you have technical problems with your instrument, contact our field service group in any of the following ways:
RD Instruments
RD Instruments Europe
9855 Businesspark Ave.
5 Avenue Hector Pintus
San Diego, California 92131
06610 La Gaude, France
(858) 693-1178
+33(0) 492-110-930
FAX (858) 695-1459
+33(0) 492-110-931
Sales - [email protected]
[email protected]
Field Service –
[email protected]
[email protected]
Web: www.rdinstruments.com
After Hours Emergency Support - +1 858-578-0781
page 24
RD Instruments