1
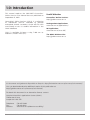
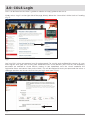
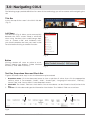
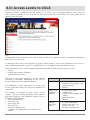
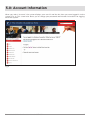
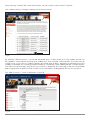
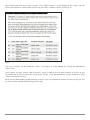
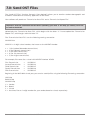
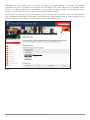
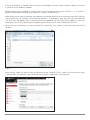
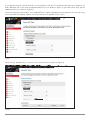
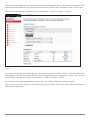
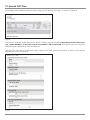
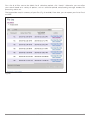
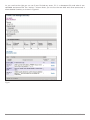
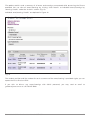
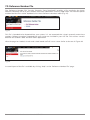
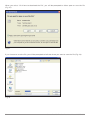
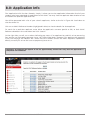
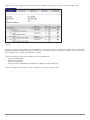
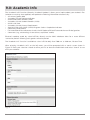
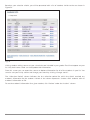
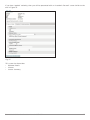
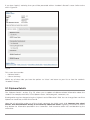
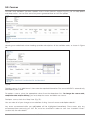
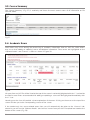
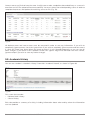
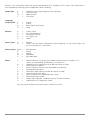
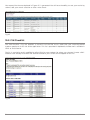
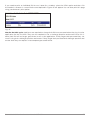
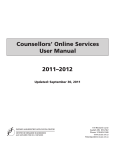
Ontario Universities’ Application Centre
Counsellors’ Online Services
User Manual
2013–2014
Updated: September 27, 2013
170 Research Lane
Guelph ON N1G 5E2
Telephone: 519‑823‑1940
Fax: 519-823-5232
www.ouac.on.ca
http://guidance.ouac.on.ca
Contents
1.0:Introduction.............................................................................................................................................................................. 3
2.0: COLS Login .............................................................................................................................................................................4
3.0: Navigating COLS.................................................................................................................................................................... 5
4.0: Access Levels to COLS........................................................................................................................................................ 6
5.0: Account Information............................................................................................................................................................. 7
6.0: Create a PIN............................................................................................................................................................................. 8
7.0: Send OST Files........................................................................................................................................................................11
7.1: Search OST Files.........................................................................................................................................................16
7.2: Test OST Files ........................................................................................................................................................... 20
7.3: Reference Number File............................................................................................................................................21
8.0: Application Info....................................................................................................................................................................23
9.0: Academic Info........................................................................................................................................................................25
9.1: Diploma Details..........................................................................................................................................................28
9.2: Courses..........................................................................................................................................................................29
9.3: Course Summary...................................................................................................................................................... 30
9.4: Academic Errors....................................................................................................................................................... 30
9.5: Academic History.......................................................................................................................................................31
10.0:Reports.....................................................................................................................................................................................33
10.1: Applicant Status Report.........................................................................................................................................33
10.2:PIN Checklist.............................................................................................................................................................. 34
1.0: Introduction
This manual replaces the 2012-2013 Counsellors’
Online Services User Manual that was published on
September 21, 2012.
Counsellors’ Online Services (COLS) is a collection
of web‑based services intended to provide
authorized Ontario secondary school officials with
user‑friendly access to student information in the
OUAC database.
COLS is available 19 hours a day, 7:00 a.m. to
2:00 a.m., Eastern Time (ET).
Useful Websites
Counsellors’ Online Services:
http://guidance.ouac.on.ca
Undergraduate Applications:
www.ouac.on.ca/applications/
101 Application:
www.ouac.on.ca/ouac‑101/
The OUAC Guidance Site:
http://guidance.ouac.on.ca
Ce document est également disponible en français : http://orientation.ouac.on.ca/resource/cols-manual/.
You can download and print additional copies of this publication at:
http://guidance.ouac.on.ca/resource/cols‑manual/.
To obtain this document in an alternative format, contact:
Ontario Universities’ Application Centre (OUAC)
170 Research Lane
Guelph ON N1G 5E2
Telephone:
Fax:
Website:
519‑823‑1940
519‑822‑1682
www.ouac.on.ca/about‑accessibility/
Counsellors’ Online Services User Manual 2013‑2014
3
2.0: COLS Login
COLS can be found on the OUAC’s guidance website at: http://guidance.ouac.on.ca.
Simply select “Log in” on the right side of the page, directly below the “Counsellors’ Online Services” heading
(Fig. 1).
Fig. 1
Log in to COLS using your personal user ID and password. For security and confidentiality reasons, all users
must register each year, even if they were authorized users in the previous year. User IDs and temporary
passwords are emailed to school officials starting in late September, once the school completes the
registration forms and returns them to the OUAC. You will be required to reset your password and select a
challenge question and answer the first time you log in each year (Fig. 2).
Fig. 2
4
Counsellors’ Online Services User Manual 2013‑2014
3.0: Navigating COLS
The following pages provide definitions for some of the terminology you will encounter while navigating the
site.
Title Bar
Across the top of the screen is the COLS title bar
(Fig. 3).
Fig. 3
Left Menu
The left menu (Fig. 4) allows you to move quickly
between the COLS screens. Keep in mind that
when using functions that create/change data,
such as “Create a PIN” and “Academic Info”,
you should complete and save your work in that
function before moving to another function.
Fig. 4
Button
Clicking a button will cause an action to occur.
Figure 5 depicts two buttons: “Delete Checked
Account(s)” and “Add Account(s)”.
Fig. 5
Text Box, Drop-down Menu and Check Box
Figure 6 illustrates three ways in which information may be entered.
Drop-down menu: Click the downward arrow to view a selection of values, then click the appropriate
value to select it. For example, “Credit”, “Mark”, “Grade Type”, “Language of Instruction”, “Delivery”,
Course Type” and “Course Status” have drop‑down menus.
2. Check box: The “Notes” field uses check boxes. One or more boxes can be clicked to check/uncheck the
box.
3. Text box: Click the box and type the information into the box. The “Mident” field uses a text box.
1.
1
2
3
Fig. 6
Counsellors’ Online Services User Manual 2013‑2014
5
4.0: Access Levels to COLS
Note the functions available on the left menu (Fig. 7). Since users are granted different access levels to
COLS, some will be able to use all of the functions on the left menu while others will only be able to use
some of those functions.
Fig. 7
In September, the principal/vice‑principal at your school assists guidance staff in completing registration
forms for access to COLS.
On the registration forms, each registrant is given a specific level of access. One individual at your school is
given “Administrator level” access. This individual has access to all functions provided in COLS.
Other individuals at your school could be registered with one or more of these levels of access:
• Inquiry
• Inquiry and Academic Updates
• Submit Electronic Data
The chart on the right indicates the menu options
available to individuals, depending on the level of
access indicated on their registration form.
If an individual is given more than one access level
on the registration form, the functions available are
cumulative.
For example, if someone is given access to the
“Inquiry” and the “Submit Electronic Data” options,
then after logging in, the individual is able to access
the options for both levels:
• Account Information
• Send OST Files
• Search OST Files
• Test OST Files
• Reference Number File
• Academic and Application Info (inquiry only)
• Reports
6
Access Level
Functions Available
Inquiry
•
•
•
•
Inquiry and
Academic
Updates
• Account Information
• Create a PIN
• Academic Info (update and
inquiry)
• Application Info
• Reports
Submit
Electronic
Data
•
•
•
•
Account Information
Academic Info (inquiry only)
Application Info
Reports
Account Information
Send or Test OST Files
Search OST Files
Reference Number File
Counsellors’ Online Services User Manual 2013‑2014
5.0: Account Information
When you select “Account”, the system displays your user ID and the last time you were logged in to the
system (Fig. 8). This screen also allows you to change your password and includes instructions for logging
out of the system.
Fig. 8
Counsellors’ Online Services User Manual 2013‑2014
7
6.0: Create a PIN
The “Create a PIN” function allows you to create an account for one or more students and store it on the
OUAC’s database. Most accounts are created when your school submits a file of demographic and academic
data to the OUAC in the October/November submission. The “Create a PIN” function is used when it is not
possible to submit such a file to the OUAC.
For example:
• Your school does not have a computer system that generates academic data in the format the OUAC
requires, as specified in the OCAS/OUAC Secondary School Data Transmission Specification.
• Students are applying to winter entry programs.
• After the October/November data submission, a student transfers to your school from outside of Ontario
or from a non‑SSOLA school within Ontario, and the student needs to get access codes, including a PIN,
in order to apply to university.
• A student who did not attend school in the fall registers at your school for the second semester.
• A student’s record was inadvertently missed in the October/November data submission.
An account generated with the “Create a PIN” function contains only minimal information about the student:
his or her given name, surname, secondary school student number (SSSN) and Ontario Education Number
(OEN). It does not contain any of the demographic or academic data that is normally sent in the October/
November data submission.
After an account is generated using the “Create a PIN” function, the OUAC mails an Application Access
Code Letter for the student(s) and a checklist of the new PINs to the guidance office. Typically, your school
will receive these materials within a week of completing the “Create a PIN” function, although the timing
also depends on the speed of the mail delivery service. A “current” PIN checklist of your OUAC applicants
is available using the “Reports” option of COLS. One business day after you create a PIN, the PIN checklist
report will include the newly created PIN information and you can add the student(s) academic information
using the “Academic Info” function. You will also have the option to print individual Application Access Code
Letters using the HTML version of the PIN checklist.
After students receive their Application Access Code Letter, they can log in to the online application and
apply to university. Depending on when you have added the academic information, the applicant may or
may not see anything under the “Academic Info” section.
8
Counsellors’ Online Services User Manual 2013‑2014
After selecting “Create a PIN” from the left menu, you will see the screen shown in Figure 9.
Click “Add Account(s)” to begin creating one or more accounts.
Fig. 9
By selecting “Add Account(s)”, you will be presented with a screen where up to five student records can
be created at a time. Please note that each student must have a unique SSSN and OEN. The SSSN must be
12 digits long. If your school’s student numbers are shorter than 12 digits, add zeros to the beginning of the
number. For example, for a nine‑digit student number of “123456789”, enter “000123456789” to make 12 digits.
The OEN must be nine digits long. Note: If you receive a “Duplicate” error message, a PIN may have already
been assigned with an identical SSSN or OEN. Contact the OUAC’s Undergraduate Division for assistance.
The “Add Account(s)” screen is depicted in Figure 10.
Fig. 10
Counsellors’ Online Services User Manual 2013‑2014
9
After entering data for one to five accounts, click “Add Account(s)” at the bottom of the screen. You will
return to the previous screen where you will see the newly created accounts listed (Fig. 11).
Fig. 11
The list of accounts can be sorted by “SSSN”, “Last Name” or “Date Added” by clicking the appropriate
column title.
At this point, you may choose “Add Account(s)” again to add up to five more students at a time, or you
can delete one or more accounts by selecting the “Delete” check box beside the account and then clicking
“Delete Checked Account(s)”.
When you are done adding and/or deleting accounts, you may proceed to another function or log out. The
accounts will be created the following business day.
10
Counsellors’ Online Services User Manual 2013‑2014
7.0: Send OST Files
The “Send OST Files” function (formerly “Data Upload”) allows you to transfer student demographic and
academic information for university applicants to the OUAC.
Your software will produce a “Transmission Data File” and a “Transmission Report File”.
Important: Read the information below before uploading your data. It will help you identify which file
to send to the OUAC.
Upload only the “Transmission Data File”, which begins with the letter “S”. Do not upload the “Transmission
Report File”, which begins with the letter “R”.
The “Transmission Data File” uses the following naming convention:
SXXXXXX.Un
XXXXXX = six‑digit school number, also known as the MIDENT Number.
n
n
n
n
n
=
=
=
=
=
1 (for October/November transmission)
2 (for February transmission)
3 (for April transmission)
4 (for July transmission)
5 (for August transmission)
For example, file names for a school with MIDENT Number 123456:
First Transmission
Second Transmission
Third Transmission
Fourth Transmission
Fifth Transmission
=
=
=
=
=
S123456.U1
S123456.U2
S123456.U3
S123456.U4
S123456.U5
Beginning in the 2013‑2014 school year, you can also send zip files using the following file naming convention:
VXXX.zip
BXXXXX.zip
SXXXXXX.zip
V
B
S
X
=
=
=
=
Vendor
Board
School
the three, five or six‑digit number for your vendor, board or school, respectively
Counsellors’ Online Services User Manual 2013‑2014
11
Depending on your browser, you may have the option to toggle between “Accessible File Upload”
(compliant with the Accessibility for Ontarians with Disabilities Act) and “Advanced File Upload” mode.
If there is no option, your browser will default to “Accessible File Upload” mode. For the purpose of this
manual, we will assume you are using the “Advanced File Upload” option.
If you know the name of the file you want to upload, you may enter the name in the text box provided
(e.g., S123456.U1, B12345.zip). Please note: The file name must be entered correctly or the upload function
will fail. Otherwise, click “Browse” to find the file on your computer (Fig. 12).
Fig. 12
12
Counsellors’ Online Services User Manual 2013‑2014
If you click “Browse”, a window similar to Figure 13 will appear on your screen. Using the “Browse” function
is similar to using Windows Explorer.
Before browsing your computer’s contents, be sure to change the file type to “All Files (*.*)” as shown in
Figure 13. Now, browse through your computer’s contents to find the file.
Note: Based on the collection period, some browsers will automatically filter to show only those files with the
correct extension. For example, if the collection period is “1 (November)” then only files with the extension
“.U1” and “.zip” will appear. After clicking the file to be uploaded, you will notice that it appears in the “File
name” box (Fig. 13). The “Advanced File Upload” option allows you to select multiple files at once.
When you are satisfied that you have selected the correct file, click “Open” in the lower right side of the
window.
Fig. 13
After clicking “Open” to select a file, you will return to the “Send OST Files” screen. The file name will show
in the text box. For example, Figure 14 shows the file name “S918679.U1” in the text box.
Fig. 14
Counsellors’ Online Services User Manual 2013‑2014
13
If you do not want to use the file that is in the text box, click the “X” beside the file, then click “Browse” to
find a different file. If you wish to upload another file, click “Browse” again. As you select files, they will be
added to the list, as shown in Figure 15.
Once you have the correct file(s), click “Upload File(s)”. Note: Depending on your browser or if you are using
the “Accessible File Upload” option, you may have to click “Upload File(s)” twice.
Fig. 15
After clicking “Upload File(s)”, you will see a circular timer as shown in Figure 16.
Fig. 16
14
Counsellors’ Online Services User Manual 2013‑2014
The length of time required to accomplish the transfer will depend on the size of the file(s), the speed of the
internet connection between your computer and the OUAC and how busy the OUAC server is at that time.
Successfully uploaded files will appear in the “Pending Files” section, as shown in Figure 17.
Fig. 17
Any errors found during the upload process are indicated under the “Status” column. If you have previously
uploaded the same file, any subsequent files will be flagged under the “Subsequent” column. You can view
any previously sent files by clicking “View Previous” under the “Actions” column.
If you do not wish to proceed with processing a file, click “Delete” under the “Actions” column.
Select “Process All Files” when you are ready to process your file(s). Your file(s) will be placed in the OUAC
queue for full processing.
Counsellors’ Online Services User Manual 2013‑2014
15
7.1: Search OST Files
Immediately after submitting files for processing you will see the “File Log”, as shown in Figure 18.
Fig. 18
You will see “Queued” under “Processing Status” for files you just uploaded. Depending on the time of year
(e.g., grades deadline), it may take several hours before a file is processed. During this time, you may walk
away from your computer or close the browser.
To access the “File Log” at a later time, select “Search OST Files” from the left menu. A search screen will be
available, as shown in Figure 19.
Fig. 19
16
Counsellors’ Online Services User Manual 2013‑2014
For a list of all files sent to the OUAC for all collection periods, click “Search”. Otherwise, you can refine
your search based on a variety of options, such as collection period, error/warning message number, file
processing status, etc.
The log provides a quick summary of your files (Fig. 18 and 20). From here, you can export your list to Excel
or HTML.
Fig. 20
Counsellors’ Online Services User Manual 2013‑2014
17
As you scroll to the right you can see if your file had any errors, if it is a subsequent file, and when it was
uploaded and processed. The “Actions” column allows you to view the raw data and, when processed, a
more detailed summary as shown in Figure 21.
Fig. 21
18
Counsellors’ Online Services User Manual 2013‑2014
File update statistics and a summary of all errors and warnings encountered while processing the file are
provided. You can view all errors/warnings by clicking “View Details” or individual errors/warnings by
selecting “Details” under the “Actions” column (Fig. 21).
Individual error/warning “Details” are depicted in Figure 22.
Fig. 22
The student, position and line number for each occurrence of the error/warning is provided. Again, you can
export the list to Excel or HTML.
If you wish to discuss any errors/warnings with OUAC personnel, you may send an email to
[email protected] or call 519‑823‑1940.
Counsellors’ Online Services User Manual 2013‑2014
19
7.2: Test OST Files
You will only have access to this function if your school’s principal/vice‑principal has registered you to
“Submit Electronic Data”.
This “Test OST Files” function (Fig. 23) allows you to upload a file for any collection period and run it through
the OUAC’s edits without updating student records. You can then correct errors before sending the OST file
for processing. All test files are purged from the OUAC system nightly.
Fig. 23
To select the collection period you wish to test, click “Change Collection Period”, make your selection from
the drop‑down list and click “Continue” (Fig. 24). Note: If you wish to test a summer grades file, select
collection period “5 (August)” from the list.
Fig. 24
20
Counsellors’ Online Services User Manual 2013‑2014
7.3: Reference Number File
The “Reference Number File” function (formerly “Data Download”) provides a file containing the OUAC
Reference Numbers for all of your students who have submitted a university application. You have the option
to download the file in either alphabetical or OUAC Reference Number order (Fig. 25).
Fig. 25
This file is intended to be imported into your system; it is not expected that schools manually enter these
numbers. Reference numbers imported into your system are included in your OST file. This ensures a match
between the student’s data and their OUAC application.
After the page has loaded, schools and school board staff will see a screen similar to the one in Figure 26.
Fig. 26
A record layout of the file is available by clicking “Help” on the “Reference Number File” page.
Counsellors’ Online Services User Manual 2013‑2014
21
When you select “Click here to download the file”, you will be prompted to either open or save the file
(Fig. 27).
Fig. 27
If you choose to save the file, you will be prompted to indicate where you want to save the file (Fig. 28).
Fig. 28
22
Counsellors’ Online Services User Manual 2013‑2014
8.0: Application Info
The “Application Info” function (formerly “Inquiry”) allows you to view application information for all of your
students who have submitted an application to the OUAC. You may view the applicant data whether or not
the student has paid the application fee.
You will be presented with a list of your school’s applicants, similar to the list in Figure 29. Scroll down to
view the entire list.
Click on an OUAC Reference Number (highlighted in blue) to view the details for that applicant.
To search for a particular applicant, enter either the applicant’s surname (partial or full) or their OUAC
Reference Number in the search box and click “Search”.
On the right side, you will see a column indicating pay status. If an applicant has paid his or her processing
fees and has no outstanding payment issues, this field will be blank. However, if an applicant has payment
issues, the message will indicate “No”. Please have the student contact the OUAC Payments Department
directly to rectify his or her fee issues at [email protected].
Important: An applicant will appear on the list approximately one business day after the application is
completed and submitted.
Fig. 29
Counsellors’ Online Services User Manual 2013‑2014
23
After clicking on an applicant’s OUAC Reference Number, you will see a screen similar to Figure 30.
Fig. 30
Initially, you will be presented with the applicant’s university choices, as shown in Figure 30. To view more
detailed information regarding when the data was transferred to the selected universities, click the arrow in
the “Display Dist.” (Display Distributions) column.
From the top menu, you are also able to view the applicant’s:
• Personal Information
• Address Information
• Previous Institutions
• A log of Online Amendments made by the applicant (date and type)
To view academic information, select “Academic Info” from the left menu.
24
Counsellors’ Online Services User Manual 2013‑2014
9.0: Academic Info
The “Academic Info” function (formerly “Academic Updates”) allows you to inquire about your students’ files
(whether or not they have applied) and update the following information electronically:
• All courses/grades data
• Secondary School Diploma Indicator
• Ontario Education Number (OEN)
• Secondary School Student Number (SSSN)
• OSSD Issue Date
• Secondary School Literacy Requirement
• Specialist High Skills Major (SHSM) Program Code + Completion Indicator
• Community Involvement
• For International Baccalaureate schools, the IB Diploma/IB Certificate and the non‑IB designations
• Comments (e.g., extenuating circumstances, equivalent credits)
Electronic updates made by school officials directly to the OUAC database allow for a more efficient
“correction period” following each grades collection period.
The “Academic Info” function is available to school officials daily from 7:00 a.m. to 2:00 a.m., Eastern Time.
After selecting “Academic Info” on the left menu, you will be presented with a search screen shown in
Figure 31. Enter your selection criteria to refine your list or leave the fields blank and select “Search” to see
all of your students.
Fig. 31
Counsellors’ Online Services User Manual 2013‑2014
25
Based on your selection criteria, you will be presented with a list of students similar to the one shown in
Figure 32.
Fig. 32
Visiting students taking courses at your school who are included in your grades file will not appear on your
list. Only their home school can view/update their information.
From this screen you can export the course or diploma information for all of the students in your list. You
can also sort your list by column and change your search by clicking “Change search”.
The “Collection Period” column indicates the last collection period for which the OUAC received any
academic information for the student. A blank in the column represents “Create a PIN” students with no
academic information on file.
To see the academic information for a given student, click “Review” under the “Actions” column.
26
Counsellors’ Online Services User Manual 2013‑2014
If you have “update” authority, then you will be presented with an “Academic Record” screen similar to the
one in Figure 33.
Fig. 33
This screen has three tabs:
• Diploma Details
• Courses
• Course Summary
Counsellors’ Online Services User Manual 2013‑2014
27
If you have “inquiry” authority, then you will be presented with an “Academic Record” screen similar to the
one in Figure 34.
Fig. 34
This screen has two tabs:
• Diploma Details
• Course Summary
Within any of these tabs you have the options to “Close” and return to your list or view the student’s
“Academic History”.
9.1: Diploma Details
The “Diploma Details” section (Fig. 33) allows you to update all diploma‑related information about the
student. For example, their OEN, SSSN, diploma status, SHSM program, comments, etc.
IB designation may be changed using the “Highest Level of Education” field. You can change from non‑IB to
Diploma or Certificate, or from IB to non‑IB.
Note: Not all universities make use of the school comments the OUAC sends. It is important that school
officials send documentation directly to the university admissions offices regarding circumstances where
they believe the information provided in the “Comments” field should be taken into consideration by the
universities.
28
Counsellors’ Online Services User Manual 2013‑2014
9.2: Courses
This tab is only available if you have “update” access. In the “Courses” section (Fig. 35), you can add, update
and drop courses. You can also correct any errors generated from an OST file upload.
Fig. 35
Hovering over underlined column headings provides descriptions of the available codes, as shown in Figure
36.
Fig. 36
To add a course, click “Add Course”, then enter the required information. The course MIDENT is automatically
defaulted to your school.
To update a course, select the appropriate values from the drop‑down lists. To change the course code,
completion date and/or delivery, you must drop the course and add a new course.
To drop a course, check the “Drop” box (Fig. 35).
You can make all of your changes at once before clicking “Save all courses and diploma details”.
Any errors encountered while you add/update will be highlighted immediately. These errors, plus any
encountered from processing an OST file, must be corrected in order to save. See “Academic Errors”
(section 9.4) for more details.
Counsellors’ Online Services User Manual 2013‑2014
29
9.3: Course Summary
The “Course Summary” (Fig. 37) is read‑only and shows the most current status of all information on file
with the OUAC.
Fig. 37
9.4: Academic Errors
Some errors may occur during the processing of academic information from an OST file, while others
may occur when adding or updating course and diploma information. These errors are highlighted on the
“Diploma Details” and “Courses” screens as shown in Figure 38.
Fig. 38
All errors from an OST file will be listed at the top of the screen in red and highlighted with the “!” icon beside
the field in error. Errors encountered while adding or updating a course will be highlighted immediately with
the “!” icon.
Hovering over the icon will provide a short explanation of the error. Clicking on the errors at the top of the
screen will take you to the corresponding section of the screen.
If the student only has course‑related errors then you will automatically be taken to the “Courses” tab,
otherwise you will see the “Diploma Details” tab. Courses in error from your OST file upload are noted at the
bottom of the screen (Fig. 38).
30
Counsellors’ Online Services User Manual 2013‑2014
Current courses on file that have the same six‑digit course code, completion date and delivery as a course in
error from an OST file upload will become read‑only. You must correct the related pending course in order to
complete the process and update the matching course on file (Fig. 39).
Fig. 39
All diploma errors and course errors must be corrected in order to save any information. If you wish to
temporarily ignore an error, check the “Ignore” box. If you wish to completely ignore an error and not correct
it, check the “Drop” box. Note: When you ignore an error it is only ignored temporarily so you can save all
other changes. If you return to this student’s record, the “Ignore” flag will be removed. You must correct,
ignore or drop if you wish to save any further changes.
9.5: Academic History
You can see a student’s “Academic History” from their “Academic Record”, as shown in Figure 40.
Fig. 40
This screen has two tabs:
• Diploma Detail History
• Course History
Each tab provides a summary of activity, including information about when and by whom the information
was last updated.
Counsellors’ Online Services User Manual 2013‑2014
31
Below is a list of possible codes that may be presented on the “Academic Info” screens. This information is
also available by hovering over the applicable column heading.
Grade Type
P
C
M
F
=
=
=
=
Projected course (registered for next semester)
Current course
Midterm mark
Final mark
E
F
B
O
=
=
=
=
English
French
Both English and French
Other
Delivery
D
C
S
N
O
=
=
=
=
=
In day school
By correspondence
During the summer
As a night class
Other
Course Type
R
O
=
=
Regular
Co‑op: “out‑of‑school” component (when indicating “O” for Course Type, you
must also indicate “C” for Notes)
Course Status
blank
D
R
W
X
=
=
=
=
=
Not reported
Delete
Repeat
Withdrawn
Not applicable
Notes
S
=
M
I
F
C
A
H
P
T
B
X
=
=
=
=
=
=
=
=
=
=
Special indicator noting that the student’s performance in a Grade 11 or 12
course was affected by extraordinary circumstances
Modified course expectations that did not lead to a credit
Interdisciplinary studies
Course taught in French Core, Extended, or Immersion
Co‑operative education
Alternative expectations that do not lead to a credit
Specialist High Skills Major
Course taken at an inspected private school
Team‑taught Dual Credit
Credit count adjusted, combined courses exceed maximum
Substitution of a compulsory credit
Language
of Instruction
You may select multiple note values up to a maximum of five.
32
Counsellors’ Online Services User Manual 2013‑2014
10.0: Reports
Two reports are available:
1.
The “Applicant Status Report” allows you to create a report based on various criteria for current‑ and
previous‑year applicants.
2. A current applicant “PIN Checklist” is available in both HTML and Excel format.
You will be presented with the screen in Figure 41 after clicking “Reports” in the left menu.
Fig. 41
10.1: Applicant Status Report
The “Applicant Status Report” allows you to create a summary report for current‑ and previous‑
year applicants. The report includes information about university choices, desired entry point
(e.g., winter), confirmed university and program, status of the OUAC fee payments, and grades collection.
You will be presented with a “Report Selection” screen, as depicted in Figure 42.
Enter your desired search criteria, then select “Submit”.
Important: Current-year applicants will appear on the list approximately one business day after their
application is completed and submitted.
Fig. 42
Counsellors’ Online Services User Manual 2013‑2014
33
Your report, like the one depicted in Figure 43, is generated. You will have the ability to sort your results by
column, edit your search selection or start a new search.
Fig. 43
10.2: PIN Checklist
The “PIN Checklist” (Fig. 44) provides a current list of the PIN access codes that your university‑bound
students require to access the online application. This list is provided in alphabetical order and is available in
HTML or Excel format.
The list is cumulative and is modified to reflect PINs for new students for whom you selected “Create a PIN”.
Students who already received a PIN and transferred to your school will not appear on this list.
Fig. 44
34
Counsellors’ Online Services User Manual 2013‑2014
If you need to print an individual PIN Access Letter for a student, select the HTML option and then click
the student’s surname. A screen like the one depicted in Figure 45 will appear. You can then print this page
using your browser’s print option.
Fig. 45
New for the 2014 cycle: Applicants are required to change their PIN to a password when they log in to the
application for the first time. They are also required to set a challenge question and answer. Once this is
done, their PIN will no longer grant them access to the application. If they forget their password they can
reset it using their challenge question and answer. If they forget their password and challenge question and
answer then they can request a new temporary password online.
Counsellors’ Online Services User Manual 2013‑2014
35
170 Research Lane
Guelph ON N1G 5E2
Phone: 519-823-1940
www.ouac.on.ca
http://guidance.ouac.on.ca