1
UM-2011.0_0.8
Avid Integration
2011
Avid Integration
User Guide 2011
© 2011 Image Systems AB
This publication, or parts thereof, may not be reproduced in any form, by any method, for any
purpose.
The software described in this document is furnished under a license agreement. This license is
available in the docs/licenses folder once the software is installed.
IMAGE SYSTEMS AB MAKES NO WARRANTY, EITHER EXPRESSED OR IMPLIED,
INCLUDING BUT NOT LIMITED TO ANY IMPLIED WARRANTIES, OF MERCHANTABILITY OR
FITNESS FOR A PARTICULAR PURPOSE, REGARDING THESE MATERIALS AND MAKES
SUCH MATERIALS AVAILABLE SOLELY ON AN “AS-IS” BASIS. IN NO EVENT SHALL IMAGE
SYSTEMS AB BE LIABLE TO ANYONE FOR SPECIAL, COLLATERAL, INCIDENTAL, OR
CONSEQUENTIAL DAMAGES IN CONNECTION WITH OR ARISING OUT OF PURCHASE OR
USE OF THESE MATERIALS. THE SOLE AND EXCLUSIVE LIABILITY TO IMAGE SYSTEMS
AB, REGARDLESS OF THE FORM OF ACTION, SHALL NOT EXCEED THE PURCHASE PRICE
OF THE MATERIALS DESCRIBED HEREIN.
IMAGE SYSTEMS AB reserves the right to revise and improve its products as it sees fit. This
publication describes the state of this product at the time of its publication, and may not reflect
the product at all times in the future.
The following are trademarks of IMAGE SYSTEMS AB :
Nucoda Film Master, Nucoda HD, Nucoda Fuse, Nucoda Compose, Phoenix Finish, Phoenix
Refine, Phoenix Touch, DVO, Turbine, Twister and Valhall.
All other brand names, product names, or trademarks belong to their respective holders.
Title :
Document Revision :
Software Revision :
Date :
Avid Integration User Guide 2011
UM-2011.0_0.8
2011.X
26/09/2011
Contents
1
Table of Contents
Avid Integration
.......................................................... 2
Compatibility
........................................................ 3
AAF to Nucoda
........................................................ 3
Export AAF from Avid
........................................................ 4
Im port AAF on Nucoda . . . . . . . . . . . . . . . . . . . . . . . . . . . . . . . . . . . . . . . . . . . . . . . . . . . . . . . . 5
Nucoda AAF Im port Options
........................................................ 7
AAF Back to Avid
Nucoda Exports AAF
Avid Im ports AAF
MXF Back to Avid
Nucoda Exports MXF
Avid Relinks MXF
Avid DS
........................................................ 9
........................................................ 9
. . . . . . . . . . . . . . . . . . . . . . . . . . . . . . . . . . . . . . . . . . . . . . . . . . . . . . . . 11
. . . . . . . . . . . . . . . . . . . . . . . . . . . . . . . . . . . . . . . . . . . . . . . . . . . . . . . . 12
. . . . . . . . . . . . . . . . . . . . . . . . . . . . . . . . . . . . . . . . . . . . . . . . . . . . . . . . 12
. . . . . . . . . . . . . . . . . . . . . . . . . . . . . . . . . . . . . . . . . . . . . . . . . . . . . . . . 15
. . . . . . . . . . . . . . . . . . . . . . . . . . . . . . . . . . . . . . . . . . . . . . . . . . . . . . . . 18
AAF Back to Avid with Interplay
. . . . . . . . . . . . . . . . . . . . . . . . . . . . . . . . . . . . . . . . . . . . . . . . . . . . . . . . 19
Nucoda Exports AAF
Avid Im ports AAF
Interplay Setup
. . . . . . . . . . . . . . . . . . . . . . . . . . . . . . . . . . . . . . . . . . . . . . . . . . . . . . . . 20
. . . . . . . . . . . . . . . . . . . . . . . . . . . . . . . . . . . . . . . . . . . . . . . . . . . . . . . . 21
. . . . . . . . . . . . . . . . . . . . . . . . . . . . . . . . . . . . . . . . . . . . . . . . . . . . . . . . 22
MXF Staging
. . . . . . . . . . . . . . . . . . . . . . . . . . . . . . . . . . . . . . . . . . . . . . . . . . . . . . . . 24
Avid Effects
. . . . . . . . . . . . . . . . . . . . . . . . . . . . . . . . . . . . . . . . . . . . . . . . . . . . . . . . 25
Rendering Avid Effects
Retim es
Freeze Fram es
Nested Effects
Transitions
Dip To Colour
Avid Multicam
Subclips
Add Edits
........................................................
........................................................
........................................................
........................................................
........................................................
........................................................
........................................................
........................................................
........................................................
25
26
26
26
27
27
27
28
28
UM-2011.0_0.8
2
Avid Integration
Avid Integration
1
Image Systems products include extensive support for interoperability with
Avid products, including :
Avid Media Composer
Avid Symphony
Avid DS
This chapter describes the main work flows available for the Nucoda or
Phoenix systems when working alongside an Avid.
Tested and qualified versions of Avid applications are listed in the
Compatibility section, alongside a list of supported formats and
effects.
We will use the Nucoda name through-out but note that the work
flows described are also applicable to the Phoenix restoration
platform.
Process
The work flow process involves three steps.
Step 1 : AAF to Nucoda
The first step is to transfer the AAF composition from the Avid :
Export an AAF composition from an Avid and import it into a
Nucoda.
We will detail the various options, settings and things to look out for in
this process. See AAF to Nucoda.
Step 2
Grade and/or restore on the Nucoda.
Step 3
Re-import the new AAF from Nucoda or re-link to new graded clips for
finishing in the Avid.
The Nucoda can also be used for final finishing and output.
© 2011 Image Systems AB
UM-2011.0_0.8
3
There are three main ways of transferring the material back to the Avid for
finishing :
Sending an AAF back to the Avid.
See : AAF Back to Avid
Note that the AAF back to the Avid route is only available for
Nucoda compositions originally created from imported
AAF files.
Sending MXF media back to the Avid.
See : MXF Back to Avid
Sending an AAF back to the Avid and doing an Interplay check-in.
See : AAF Back to Avid with Interplay
Compatibility
The following Avid product versions are tested and qualified :
Avid Media Composer 5
Avid Symphony 5
Avid DS 10.3
Avid Effect Support
For the level of Avid effect support, see the Avid Effects chapter.
MXF and Codec Compatibility
See our support web site for details of supported MXF and codec formats.
AAF to Nucoda
This chapter describes how to export an AAF from the Avid system and
import it into the Nucoda.
This is the common starting point for each workflow we discuss.
The Avid exports an AAF
The Nucoda system imports this AAF for grading.
© 2011 Image Systems AB
UM-2011.0_0.8
4
Avid Integration
Export AAF from Avid
To export as AAF from the Avid, right-click your sequence and choose
Export... :
Export Settings
At the bottom of the export dialog box, the selected Export Setting and
Options button allow you to define an export preset.
Here we have an AAF export preset defined called FM Enabled :
Use the Options... button to view the settings :
Export As : AAF
Export Method : Link to (Don't Export) Media
© 2011 Image Systems AB
UM-2011.0_0.8
AAF to Nucoda
5
The Export Settings option Render Video Effects forces the Avid to
render everything currently un-rendered.
For more information on this option, see : Avid Effects.
Navigate to the desired folder and enter a file name for your AAF. Then press
Save :
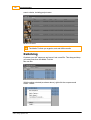
Import AAF on Nucoda
On the Nucoda, switch to the Library view to import the AAF file :
Then press the Import button :
Navigate to the folder containing the previously saved Avid AAF file and press
the ..Import button.
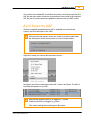
An AAF Import options window opens and lets you set various options used
for the import and initial processing of the AAF file.
© 2011 Image Systems AB
UM-2011.0_0.8
6
Avid Integration
See the Nucoda AAF Import Options section for a full description of
the available settings.
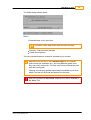
We import the AAF and use settings :
All events as a new composition
Import material from MXF paths
Conform to Material
Expand nested tracks and retimes
The AAF file creates a Nucoda timeline which we can then start working on.
Avid tim eline
Nucoda tim eline
If updated AAF compositions become available, the Nucoda can
import them and merge them into any active timeline.
When we have completed our work, we can proceed as follows :
Finish on the Nucoda.
Finish on the Avid and proceed to one of the work flow options outlined
next.
Do not delete or move the AAF you import to the Nucoda. If the
AAF you import is deleted or moved, you will not be able to export an
AAF from the composition it creates. We recommend you manage
your AAF files carefully and keep copies locally.
© 2011 Image Systems AB
UM-2011.0_0.8
AAF to Nucoda
7
Nucoda AAF Import Options
The various options available on AAF import to Nucoda are described below.
Media files
Set to the top-level Avid media files folders.
Each is searched in turn for MXF media related
to the active AAF composition.
The GUI allows the configuration of three
folders.
The general.prefs preference file lets you
configure more. See Media Files below.
Import material from MXF
paths
Ensure we load source material if we locate it
on disk
Apply AAF effects
If Avid renders (pre-computes) are available, we
can select this to use them in the Nucoda
system.
NOTE :
Avid Transitions (i.e. wipes, dissolves, 3D
transitions etc.) will be displayed as dissolves
on the Nucoda timeline, even if they are
© 2011 Image Systems AB
UM-2011.0_0.8
8
Avid Integration
rendered on the Avid. If you need these,
generate a mixdown. See Transitions.
Expand nested tracks and
retimes
This will expand any nested effects you have in
the AAF, placing the various source
constituents on the Nucoda timeline over the
appropriate number of tracks. See Nested
Effects.
Motion effects will be displayed as a Nucoda
adjustment segment at the correct length of the
effect in the sequence. The full length source
media is placed below the adjustment segment
on a separate track. See Retimes.
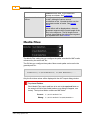
Media Files
The Media Files setting lets you configure the paths searched for MXF media
referenced by the active AAF file.
The GUI lets you configure three paths. More search paths can be set in the
general.prefs file :
mxf
{
avidDirectory "I:\Avid MediaFiles\" "G:\Avid MediaFiles\" ...
}
Only the first three values will be displayed in the AAF Import dialog window.
Top-Level Folders
Each Media Files search path has to be set to the top-level folder or
the search will fail to find media (and an error dialog will appear, see
below). The top-level folder contains an MXF folder.
Correct : I:\Avid MediaFiles
Wrong : I:\Avid MediaFiles\MXF\DVAVID.1
© 2011 Image Systems AB
UM-2011.0_0.8
AAF to Nucoda
9
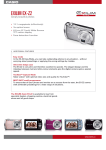
AAF Back to Avid
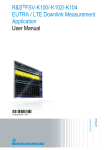
In this work flow, the Nucoda system exports an AAF to the Avid for finishing.
Note that the AAF back to the Avid route is only available for Nucoda
compositions originally created from imported AAF files.
This is illustrated in Figure 1 below.
Figure 1 : AAF from Nucoda back to Avid
Nucoda Exports AAF
In the Nucoda application, we will export the AAF :
Switch to the Library :
© 2011 Image Systems AB
UM-2011.0_0.8
10
Avid Integration
And press the ..Export Media button :
Navigate to the location we wish to write our exported AAF file to (this should
be shared with the Avid).
Note that the location chosen here will be for the AAF file only. The
MXF media is exported at the same time automatically and placed in
the first defined Media Folder.
Set Format and Options
Set your export format as AAF and choose a media export format (e.g. Avid
DNxHD 185X) :
The formats made available will depend on your project format.
You will not be able to set handles or choose uncompressed MXF
formats when exporting an AAF.
You should also choose to export using one of the modes :
Tracks Multi Src TC
Visible Multi Src TC
See the Export Modes section for definitions of the export modes
mentioned above.
Name your AAF file and press the Export button.
MXF Staging
Note that MXF files created as part of an AAF export are staged in
the tempRootDir folder before being moved to their final destination.
See MXF Staging.
© 2011 Image Systems AB
UM-2011.0_0.8
AAF Back to Avid
11
Once all the associated MXF media files have been successfully exported, the
AAF file that was used to create the composition will be copied to the exported
AAF file and its media references updated to reference the new MXF media.
Avid Imports AAF
When the updated (graded/restored) AAF is available from the Nucoda
system, the Avid can import it into a Bin.
When the Nucoda system writes new media to an Avid media folder,
the Avid system will do an automatic re-scan of media folders :
Right-click inside your chosen Bin and select Import... :
Navigate to the folder containing the new AAF, select it and Open. The AAF is
imported and appears in your Bin :
Note that the graded sequence is tagged DV_Graded.
Graded media files are tagged dv_graded.
This makes sorting and searching your Bin easier.
© 2011 Image Systems AB
UM-2011.0_0.8
12
Avid Integration
Double-clicking the sequence will activate it and let you review and continue.
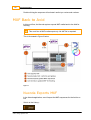
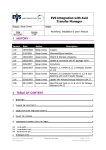
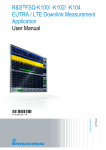
MXF Back to Avid
In this work flow, the Nucoda system exports MXF media back to the Avid for
finishing.
This work flow is MXF media export only. No AAF file is exported.
This is illustrated in Figure 2 below.
Figure 2
Nucoda Exports MXF
In the Nucoda application, we will export the MXF sequences for the Avid to relink.
Switch to the Library :
© 2011 Image Systems AB
UM-2011.0_0.8
MXF Back to Avid
13
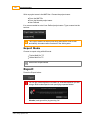
And press the ..Export Media button :
Choosing MXF Export Folder
For the Avid to be able to successfully re-link to the new MXF media, we need
to write the exported MXF files to the correct place.
The correct place is the lowest level of one of the Avid MediaFiles folders
used by the Avid.
This means the full MXF path needs to be at the same media files
folder level as the other MXF source media e.g.
Correct : G:\Avid MediaFiles\MXF\1\
Wrong : G:\Avid MediaFiles\
Set Format and Options
Set your output format to be MXF :
MXF Codec
Then choose your desired MXF export format :
Note that unlike exporting an AAF in the AAF Back to Avid work flow,
you can set handles and choose an uncompressed MXF format.
Avid Project Name
© 2011 Image Systems AB
UM-2011.0_0.8
14
Avid Integration
Write a project name in the MXF files. Choose the project name :
From the MXF File
From the Nucoda project name
User Defined
It is recommended to set a User Defined project name. Type a name into the
text box :
The Project Name can be any text string and can be used to filter
and identify Nucoda media once back in the Avid system.
Export Mode
Choose to export using a Multi format :
Tracks Multi Src TC
Visible Multi Src TC
See section Export Modes.
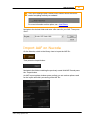
Export
Press the Export button :
You will get a warning about Possible File Overwrite because you are
using a Multi mode export but not specifying separate folders:
Dismiss (and ignore this) by pressing OK.
© 2011 Image Systems AB
UM-2011.0_0.8
MXF Back to Avid
15
MXF Staging
Note that MXF file exports can be staged in the tempRootDir folder
before being moved to their final destination. See MXF Staging.
Avid Relinks MXF
When the updated (graded/restored) MXF media from the Nucoda system
appears in the Avid MediaFiles folder, the Avid system does an automatic rescan to update its media index.
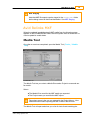
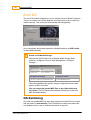
Media Tool
Once the re-scan has completed, open the Media Tool ( T ools / M e dia
T ool).
Avid Media Tool
The Media Tool lets you select a Media Drive and a Project to scan and use
for media :
Select :
The Media Drive used for the MXF media you exported
The Project name you used for the MXF export
The project name is the one you entered in the Project Name : User
Defined text box when exporting the MXF media in the Nucoda.
The Media Tool will open and show you a list of shots found matching the
© 2011 Image Systems AB
UM-2011.0_0.8
16
Avid Integration
search criteria, including project name.
Media Tool shot list
The Media Tool lets you organise, sort and sift the media.
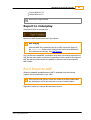
Relinking
Duplicate your AAF sequence and move it into a new Bin. Then drag and drop
your new shots from the Media Tool into
this new Bin.
With the shots selected (as shown above), right-click the sequence and
select : Relink...
© 2011 Image Systems AB
UM-2011.0_0.8
MXF Back to Avid
17
The Relink dialog window opens.
Select :
Selected items in ALL open bins.
It is best to close other bins to avid incorrect re-linking.
Relink by : Start timecode and tape
Create new sequence
The new imported sequence created is activated in your monitor.
Note that if you use two or more identical clips on your timeline
(same timecode, tapename etc.), but using different grades, then
they may re-link incorrectly. The clips may re-link such that they now
have the same grade.
However, the correctly graded clips should be available in your Avid
Media Tool and can be found and spliced in to the track.
Avid pre-computes will not re-link. However, they will be available in
the Media Tool.
© 2011 Image Systems AB
UM-2011.0_0.8
18
Avid Integration
Avid DS
The Avid DS workflow integration is much simpler to that of Media Composer.
There is no need to rescan the database, decompose any clips or relink any
media manually. This is all done automatically and transparently.
Once completed, the Nucoda exports the finished sequence as MXF media
as described previously.
A Note on DS Media Storage
Note that the Avid DS has a list of defined Media Storage folder
locations, configured via menu Data Management / Configure
Storages ...
DS Media Storage
Windows Name
\\unityfc\dnx\avid mediafiles\
K:\Avid MediaFiles\
These are predefined for specific storage configurations and media
types e.g. MXF video files.
You can export the graded MXF files to any folder within this
root folder. The DS indexes these folders and will pick up the new
MXF files automatically.
DS Relinking
Once the new graded MXF files have been exported, the Avid DS will re-index
and pick these up automatically. The DS timeline will refresh and reflect the
new graded sources, and no manual intervention is required.
© 2011 Image Systems AB
UM-2011.0_0.8
MXF Back to Avid
19
The DS may take a short while to refresh, depending on the length of
your timeline and the size of the media databases.
DS Effects
If any shots on the DS have effects applied, these effects will be re-applied
automatically to the newly graded MXF sources when they are re-linked.
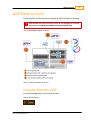
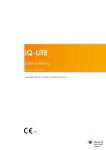
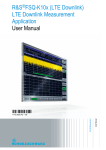
AAF Back to Avid with Interplay
In this work flow, the Nucoda system exports an AAF to the Avid for finishing
and selects to do an Avid Interplay check-in. See Figure 3 below.
Figure 3
This work flow is almost identical to work flow 1 AAF Back to Avid.
For Nucoda Interplay setup, see Interplay Setup.
© 2011 Image Systems AB
UM-2011.0_0.8
20
Avid Integration
Interplay Licensing
Avid Interplay check-in require an Interplay login, which requires an
Interplay license. You will need to make sure you have enough
licenses to cover every client using the Interplay system or your
Nucoda checkins will fail (the error will be reported in the Nucoda
console).
Nucoda Exports AAF
In the Nucoda application, we will export the AAF :
Switch to the Library :
And press the ..Export Media button :
Navigate to the location we wish to write our exported AAF file to (this should
be shared with the Avid).
Set Format and Options
Set your export format as AAF and choose a media export format (e.g. Avid
DNxHD 185X) :
The formats made available will depend on your project format.
You will not be able to set handles or choose uncompressed MXF
formats when exporting an AAF.
You should also choose to export using one of the modes :
© 2011 Image Systems AB
UM-2011.0_0.8
AAF Back to Avid with Interplay
21
Tracks Multi Src TC
Visible Multi Src TC
See section Export Modes.
Export to Interplay
Select the Export to Interplay box :
Name your AAF file and press the Export button.
MXF Staging
Note that MXF files created as part of an AAF export are staged in
the tempRootDir folder before being moved to their final destination
and checked into Interplay. See MXF Staging.
Once all the associated MXF media files have been successfully exported, the
AAF file that was used to create the composition will be copied to the exported
AAF file and its media references updated to reference the newly exported
MXF media.
Avid Imports AAF
When the updated (graded/restored) AAF is available from the Nucoda
system, the Avid can import it into a Bin.
When the Nucoda system writes new media to an Avid media folder,
the Avid system will do an automatic re-scan of media folders.
Right-click inside your chosen Bin and select Import... :
© 2011 Image Systems AB
UM-2011.0_0.8
22
Avid Integration
Navigate to the folder containing the new AAF, select it and Open. The AAF is
imported and appears in your Bin :
Double-clicking the sequence will activate it and let you review and continue.
Interplay Setup
Avid Interplay is a sophisticated asset management system that manages
and tracks digital media throughout a production. Some configuration is
required before using an Avid Interplay system with a Nucoda.
Preference File
The main Nucoda preference file general.prefs contains an Interplay section
which defines various setup parameters. You will need to change these to
reflect your local installation :
interplay
{
host "INTERPLAY HOST NAME"
port "INTERPLAY PORT"
workgroup "AVID_WORK_GROUP"
folder "PROJECTS/FOLDER"
username "USERNAME"
password "PASSWORD"
sharedStorage "\\UNITY_OR_ISIS\WORKSPACE\Avid Mediafiles\MXF\1"
}
The Interplay section is pre-configured by default but you will need to
remove the inserted "<" and ">" characters used to complete the
configuration correctly e.g. replace "<username>" with "david" (for
example).
© 2011 Image Systems AB
UM-2011.0_0.8
AAF Back to Avid with Interplay
23
Interplay Settings
host This is the name of the machine running the Interplay
services.
e.g. mojito
port The port the Interplay services run on.
e.g. 80
workgroup This is the Avid workgroup name (note this is not the
Windows workgroup).
e.g. MyWorkgroup
folder This is the name of the folder Interplay is configured to use
for the active project (see below).
e.g. "Projects/Upstairs Downstairs"
username This is the username the Nucoda uses to log in to the
Interplay.
e.g. david
password The password.
e.g. david123
sharedStorage A path to shared storage used by the Nucoda and the
Interplay.
e.g. "\\isis\sharedmedia\Avid Mediafiles\MXF\1"
This path must be in Windows UNC notation.
MXF files we write from the Nucoda system are placed
here.
Interplay Projects
The Interplay folder settings are configured in the Avid project settings window
as shown below :
Avid project settings show ing Interplay Folder param eter
© 2011 Image Systems AB
UM-2011.0_0.8
24
Avid Integration
Note that the Avid project name is configured inside the general.
prefs file and is not available as a GUI preference. This means you
need to restart the Nucoda application if you want to check your
media into a different Interplay project.
MXF Staging
When writing MXF files to a network volume, it is often more efficient to write
the files locally first and then move them to the target location.
This is called staging.
Staging is particularly useful when exporting to Avid Unity or ISIS
systems. Test your configuration to see which settings are best for
your workflow.
Staging Folder
If staged, MXF files are first written to the folder specified by the general.prefs
configuration parameter (inside media section) :
tempRootDir "X:\path\to\folder\"
When Staging Happens
AAF Export
If you are exporting an AAF file, the MXF files created are always staged to
the folder specified in tempRootDir. Once successfully written, they are
moved to the first Avid MediaFiles folder specified in the preference file.
If you have enabled Export To Interplay, once successfully written, they will be
moved to the Avid Interplay sharedStorage location (see the general.prefs)
and checked in.
MXF Exports
If you are exporting MXF files, the MXF files will be staged if the following
general.prefs configuration parameter (inside mxf section) is set to true :
useTempAsStaging
true
When set to true, MXF files are staged to the folder specified in tempRootDir.
Once successfully written, they are moved to the first Avid MediaFiles folder.
© 2011 Image Systems AB
UM-2011.0_0.8
Avid Effects
25
Avid Effects
This section describes the support for various Avid effects in the documented
work flows, including any caveats around them.
This list is not exhaustive. Please direct any feedback to us through
the web forums at :
http://forum.digitalvision.se
Rendering Avid Effects
When exporting an AAF from the Avid, one of the Export Settings available is
Render Video Effects :
Enabling this will cause the Avid AAF export process to render all timeline
effects. Avid calls these renders pre-computes.
If you are planning on returning to the AVID via AAF, we would
recommend that you do not select the Apply AAF effects option on
import into the Nucoda.
Pre-Computes
Introducing pre-computes to the work flow adds some extra complexity that
you will need to be aware of :
Pre-compute clips will not re-link on return to the Avid. They will also
not be updated in the exported AAF (an Avid limitation).
However, the Nucoda processed (e.g. graded) pre-computes shots
will appear in the Avid Media Tool and are therefore available to you for
manual timeline addition.
Merging the grades into updated AAF sequences will not work for
pre-compute shots because they do not contain timecode or
tapename information.
Make sure all effects used in the Avid are fully rendered (no partial
renders).
© 2011 Image Systems AB
UM-2011.0_0.8
26
Avid Integration
Retimes
If we select to expand retimes on AAF import, the Nucoda system generates
AAF retimes through the use of Adjustment Segments.
An alternative method of transferring retimes is to use a mixdown.
This has the advantage of :
a) Keeping the complete source material available.
b) Keeping the timeline synchronised.
Freeze Frames
When using the freeze frame effect in the Avid, rather than have the Nucoda
build it using an Adjustment Segment, you might prefer to export the single
(frozen) frame and re-import it into the Avid to create the freeze frame
segment (in effect, rendered to the right duration).
This is due to the fact the the Freeze Frame is represented as a single frame
on the timeline if used.
Nested Effects
Avid Media Composer and related products allow you to wrap multiple tracks
and multiple effects inside a single video track segment. This compound
segment is called a nest and renders a single visible output.
Because nested effects add complexity to the timeline we import and
process, it is best to minimise their use.
The Nucoda currently supports simple nests only.
On import to the Nucoda, dissolves are removed from nests on
expansion .Each clip in the nest is placed on its own track, even if a
clip sits beside another on the same track inside the nest.
© 2011 Image Systems AB
UM-2011.0_0.8
Avid Effects
27
Transitions
Currently, all Avid transitions are treated as dissolves in the Nucoda.
Transitions are not displayed even if they have been rendered and are
available.
To include transitions, supply them as a mix-down.
Dip To Colour
The Dip To Colour effect applied as an effect to a cut will not work.
Apply as separate effects at the start or the end of a clip.
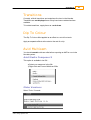
Avid Multicam
You should commit multicam edits before exporting an AAF for use in the
Nucoda system.
Avid Media Composer 5
This option is available in he GUI :
Select your sequence in the Bin
Right-click and Commit Multicam Edits
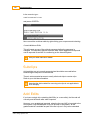
Older Versions
Select Tools / Console :
© 2011 Image Systems AB
UM-2011.0_0.8
28
Avid Integration
In the console, type :
enablecommitmulticam
and press <ENTER>.
Now commit the multicam edits by right-clicking your sequence and selecting:
Commit Multicam Edits
This will create a copy of the original sequence before the sequence is
changed. The sequence without multicam edits will be tagged NoGroups and
can be exported as an AAF for conforming on the Nucoda system.
See your Avid manual for details.
Subclips
Avid subclips are not currently supported and should be removed before
transferring the sequence to the Nucoda.
There is a documented process to easily relink sub-clips to master-clips.
Refer to your Avid documentation.
Note that the Avid method for removing sub-clips is not applicable to
Avid Interplay.
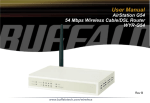
Add Edits
If you have a single clip containing Add Edits (or scene edits), the Nucoda will
correctly see the these edits when imported.
However, once graded and exported, when the the new AAF is imported to the
Avid system, only the first part of clip will be seen to be graded. All the
graded material is available as part of the first clip so it can just be extended
© 2011 Image Systems AB
UM-2011.0_0.8
Avid Effects
29
or cut in from the Avid Bin.
As a workaround, when using Add Edit, make sure each segment
you create is placed on a different video track to the segments
beside it.
Add Edits segm ents separated to break links betw een them .
If you used Add Edit with dissolves, the Nucoda will automatically
export enough material to rebuild them.
© 2011 Image Systems AB
UM-2011.0_0.8
http://www.imagesystems.tv