1
AARO EXCEL CONNECTIVITY
14.0 USER MANUAL
AARO SYSTEMS AB
AARO EXCEL CONNECTIVITY 14.0 USER MANUAL
Last updated: 2014-04-03
Table of Contents
1.
Using AARO with Excel – an overview
1.1
1.2
1.3
1.4
1.5
1.6
Installing a digital certificate for AARO/Excel
Excel macro security settings
Open the AARO Excel add-in
Log on
Log off
ABS term
4
9
12
13
14
14
2.
AARO Excel retrieve formulas
15
2.1
2.2
2.3
2.4
2.5
2.6
Selecting Excel retrieve formulas
Entering AARO Excel formulas directly
Formula results
Cell references and direct data entry
Formats for Excel formulas
Description of Excel retrieve formulas
15
15
16
16
17
17
2.7
2.8
2.9
Retrieve information from AARO to Excel
Validation
Further Excel formulas
24
25
26
3.
AARO Excel send formulas
27
3.1
3.2
Selecting Excel send formulas
Entering formulas directly into the formula bar in
Excel
Formula results
Cell references and direct data entry in Excel
Description of Excel send formulas
27
2.6.1
2.6.2
2.6.3
2.6.4
2.6.5
2.6.6
2.6.7
2.6.8
3.3
3.4
3.5
3.5.1
3.5.2
3.5.3
3.5.4
3.5.5
3.5.6
3.5.7
3.5.8
3.5.9
3.5.10
3.5.11
ABSGetAccountText
ABSGetCompanyRate
ABSGetMinorities
ABSGetName
ABSGetRate
AARORetrieveFlex
ABSRetrieveTextAmount
ABSRetrieveTextString
AAROCreateNewJV
Create journal bookings
Viewing data from AAROCreateNewJV in AARO
AAROSendText
Viewing data from AAROSendText in AARO
ABSSendMatch
Viewing data from ABSSendMatch in AARO
ABSSendOper
Viewing data from ABSSendOper in AARO
ABSSendOperFlex
Viewing data from ABSSendOperFlex in AARO
AARO SYSTEMS AB
4
17
18
18
19
19
20
22
23
28
28
28
29
29
31
33
33
34
35
36
37
38
38
39
ii
AARO EXCEL CONNECTIVITY 14.0 USER MANUAL
3.5.12
3.5.13
3.5.14
3.5.15
ABSSendOS
Viewing data from ABSSendOS in AARO
ABSSendOSFlex
Viewing data from ABSSendOSFlex in AARO
40
42
42
43
3.6
3.7
3.8
Send information from Excel to AARO
Validation
Further Excel formulas
44
45
46
4.
Excel drill down reports
47
4.1
4.2
4.3
4.4
4.5
4.6
4.7
4.8
4.9
4.10
4.11
4.12
4.13
4.14
Accessing Excel drill down reports
‘Live Copy to Excel’ from the AARO application
Create a drill down report in Excel
Criteria for a drill down report
Predefined drill down reports
Right mouse button functions
Drill down options
Run a drill down report in Excel
Edit a drill down report in Excel
Drill down report settings in Excel
Shadow sheet
Delete a drill down report from Excel
Run all reports in a workbook
Further Excel formulas
47
47
48
49
53
55
55
56
56
57
59
60
61
62
5.
Excel input forms
63
5.1
5.2
5.3
5.4
5.5
5.6
5.7
Limitations of Excel input forms
Load an AARO input form into Excel
Edit an input form
Export data to AARO
Reload an input form in Excel
Edit an input form in Excel
Settings of input forms in Excel
63
63
65
66
67
68
69
5.8
5.9
5.10
Colour palette
Visual refresh
Reconcile
72
73
74
6.
Additional AARO Excel options
77
6.1
6.2
6.3
6.4
6.5
Order consolidation
Paste background data
Paste the period setup
AARO Excel settings
About
77
77
79
80
82
5.7.1
5.7.2
5.7.3
5.7.4
Protection options
Selectable cells
Look and feel
Auto-fit columns
AARO SYSTEMS AB
71
71
72
72
iii
AARO EXCEL CONNECTIVITY 14.0 USER MANUAL
Using AARO with Excel – an overview
1.
Using AARO with Excel – an overview
AARO comprises the formula Excel add-in that provides the user with multiple
options to access AARO data directly from Microsoft Excel.
There are two options to access data:
Input data can be sent from Excel to the AARO database.
Consolidated data can be retrieved from the AARO database to Excel.
Two different techniques exist for these alternatives:
Formulas
Excel drill down reports and Excel input forms
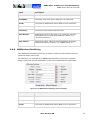
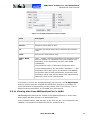
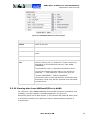
The following table summarizes the possibilities:
Technique
Direction
Overview of possibilities
Data from
Excel into AARO
Data from
AARO into Excel
Formulas
Without formulas
AARO send formulas
Excel input forms
AARO retrieve formulas Excel drill down reports
There are differences between the two techniques and it is advisable to become
acquainted with both in order to choose the most appropriate. The two
techniques can also be mixed.
In addition to the above major features, AARO Excel add-in supports the
creation of journals from Excel.
This manual describes the characteristics of all features: how to open the AARO
Excel add-in and how to log on.
The AARO Excel add-in can be used with Excel 2003 and higher versions.
1.1
Installing a digital certificate for AARO/Excel
Depending on the security settings on Excel installation user might be required
to install the signed certificate from Aaro Systems AB. This process is described
below.
For Excel 2007 and higher, we recommend running Excel using the macro
setting “Disable all macros except digitally signed macros”, ensuring the digital
certificate is installed as detailed below.
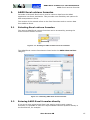
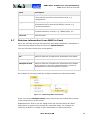
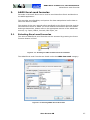
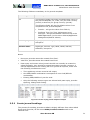
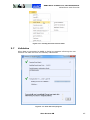
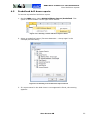
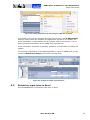
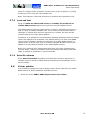
To install the digital certificate, follow these steps:
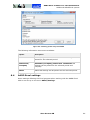
1. Right-click the file ABSXL.XLL and select properties. Select the signature
and press the Details button.
AARO SYSTEMS AB
4
AARO EXCEL CONNECTIVITY 14.0 USER MANUAL
Using AARO with Excel – an overview
Figure 1.1–1 ABSXL.xll file properties, Digital signatures
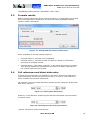
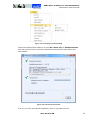
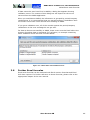
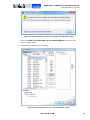
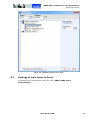
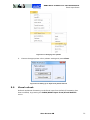
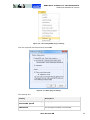
The Digital Signature Details window appears.
2. Click the View Certificate button.
AARO SYSTEMS AB
5
AARO EXCEL CONNECTIVITY 14.0 USER MANUAL
Using AARO with Excel – an overview
Figure 1.1–2 Digital Signatures Details window
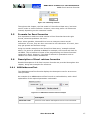
The Certificate window appears.
3. Click Install Certificate.
AARO SYSTEMS AB
6
AARO EXCEL CONNECTIVITY 14.0 USER MANUAL
Using AARO with Excel – an overview
Figure 1.1–3 Installing the certificate
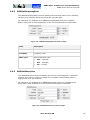
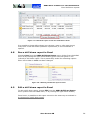
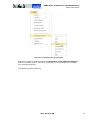
The Certificate Import Wizard window appears.
4. Click Next and then select Place all certificates in the following store
and click the Browse button.
AARO SYSTEMS AB
7
AARO EXCEL CONNECTIVITY 14.0 USER MANUAL
Using AARO with Excel – an overview
Figure 1.1–4 Selecting the certificate store
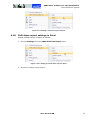
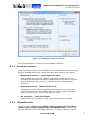
5. Select the Trusted Publishers folder and click OK.
Figure 1.1–5 Selecting the Trusted Publishers folder
6. Click Next and then Finish.
AARO SYSTEMS AB
8
AARO EXCEL CONNECTIVITY 14.0 USER MANUAL
Using AARO with Excel – an overview
Figure 1.1–6 Finishing certificate installation
The Aaro Systems AB certificate is now located in the Trusted Publishers/
Certificate folder.
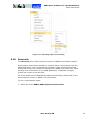
1.2
Excel macro security settings
For Excel add-in to work, Excel Macros need to be enabled for use. This is
dependent on Macro Security settings in Excel.
This manual assumes that settings are selected as ‘Medium’ in Excel 2003 or
`Disable all macros except digitally signed macros´ in Excel 2007 and higher.
Excel 2003
In Excel 2003 the Macro security level is set up on the Excel menu
Tools/Options, and the Security tab, Macro Security… button.
AARO SYSTEMS AB
9
AARO EXCEL CONNECTIVITY 14.0 USER MANUAL
Using AARO with Excel – an overview
Figure 1.2–1 Excel 2003 Macro security settings
Figure 1.2–2 Setting up Macro security level in Excel 2003
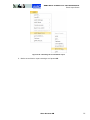
Excel 2007 and higher
In Excel 2007 and higher the Macro security settings are located on the
Excel menu Excel Options/Trust Center. Click the Trust Center
Settings button.
AARO SYSTEMS AB
10
AARO EXCEL CONNECTIVITY 14.0 USER MANUAL
Using AARO with Excel – an overview
Figure 1.2–3 Excel 2007 Macro security settings
On the Macro Settings menu, tick the setting Disable all macros except
digitally signed macros and click OK.
Figure 1.2–4 Setting up Macro security level in Excel 2007
AARO SYSTEMS AB
11
AARO EXCEL CONNECTIVITY 14.0 USER MANUAL
Using AARO with Excel – an overview
1.3
Open the AARO Excel add-in
To open the AARO Excel add-in:
1. Start Microsoft Excel.
2. On the File menu, select Open.
3. Browse to the ABSXL.XLL file, and open it. It is normally found under
C:\AARO (the AARO installation folder). If the file cannot be found, contact
your system administrator. The AARO folder also contains another Excel
file– AARO Reports.xla – used internally by ABSXL.XLL and thus not
advisable to open.
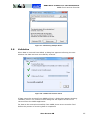
4. If a Security Warning dialog is shown, make sure that the macros are
from Aaro Systems AB and, if that is the case, click the Enable Macros
button to activate the AARO Excel add-in. Depending on the security
settings in Excel, this dialogue may or may not be seen.
If Excel 2007 or higher is used, the certificate of Aaro Systems AB needs to
be imported and trusted separately before the AARO Excel add-in is opened.
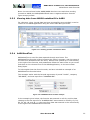
Figure 1.3–1 Enabling security Macros
5. A new menu named AARO appears on the Excel main menu bar. In Excel
2007 and Excel 2010, it is to be found in the add-ins section.
AARO SYSTEMS AB
12
AARO EXCEL CONNECTIVITY 14.0 USER MANUAL
Using AARO with Excel – an overview
Figure 1.3–2 Opening AARO menu from Excel
Note: prior to Excel 2010, the AARO Excel add-in should be started before any
changes are made in the Excel workbook.
1.4
Log on
Logon is necessary before any data can be accessed in the AARO database. To
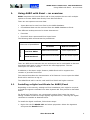
log on to AARO from Excel after opening add-in, follow these steps:
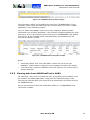
1. On the AARO menu in Excel, select Log On. The logon dialogue box will be
displayed.
2. Select a database (or just accept the default choice), and enter user name
and password. Log on to AARO in the same way as usual. Press Login.
Figure 1.4–1 Logging on the AARO application
AARO SYSTEMS AB
13
AARO EXCEL CONNECTIVITY 14.0 USER MANUAL
Using AARO with Excel – an overview
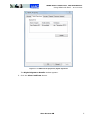
3. The application will now operate and download some lists from the
database. Initially, this may take some time but subsequent logon attempts
will be much faster.
4. After logging on to the AARO database from Excel, all the AARO Excel
features can be accessed.
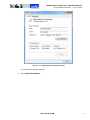
Note: It is recommended to quit and restart Excel once after having logged on
to a certain AARO database for the first time. This is because certain help texts
in the formula wizard of Excel relating to AARO formulas will be updated at the
first logon, but displayed only after Excel has been restarted.
1.5
Log off
When closing Excel, there is no need to issue the log off command separately
as there is an automatic log off from AARO in Excel.
There will also be an automatic log off from AARO if there is no activity for 2
hours (or for some other specific period of time that has been set up by the
system administrator).
Log Off from the AARO menu in Excel is an option if a logoff from AARO in
Excel without closing Excel is requested.
1.6
ABS term
In this manual, there is frequent reference in formulas to “ABS”. This is
because the AARO application was formerly known “ABS” (Aaro Business
Systems). The older product name has been preserved in some of the Excel
formulas so that customers who working with existing Excel workbooks do not
have to make unnecessary changes.
From a working point-of-view the terms ABS and AARO are interchangeable;
AARO is simply the more modern term.
AARO SYSTEMS AB
14
AARO EXCEL CONNECTIVITY 14.0 USER MANUAL
AARO Excel retrieve formulas
2.
AARO Excel retrieve formulas
Formulas in Microsoft Excel can be used to retrieve data from the AARO
application into Excel workbooks. This provides extra flexibility and options for
data manipulation in Excel.
This section of the manual refers to the Excel formulas used to retrieve data
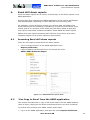
from AARO to Excel.
2.1
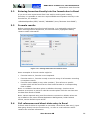
Selecting Excel retrieve formulas
The various AARO Excel retrieve formulas can be accessed by pressing the
Insert Function button in Excel.
Figure 2.1–1 Inserting an AARO formula into Excel worksheet
The AARO Excel retrieve formulas are listed under the AARO data retrieve
category.
Figure 2.1–2 Selecting AARO data retrieve formulas
2.2
Entering AARO Excel formulas directly
If you are a more experienced Excel user and/or working with existing
formulas, it is possible to enter the required AARO retrieve equation directly in
the formula bar, for example:
AARO SYSTEMS AB
15
AARO EXCEL CONNECTIVITY 14.0 USER MANUAL
AARO Excel retrieve formulas
=AARORetrieveFlex("0912A";"ARLANDA";3010;"LOC")
2.3
Formula results
Before entering data using Excel retrieve formulas, it is worthwhile noting that
when entering formula arguments, the formula result (highlighted below)
contains useful information.
Figure 2.3–1 Viewing AARO data retrieve formula result
Some examples of formula results might be:
2.4
Formula result=0, formula is not completed.
Formula result=1, formula is ready to retrieve a string of information
according to template criteria.
Formula result = “Net sales, external”, or any other text string or number.
This directly displays the information received from AARO, dependent on
the criteria input into the formula.
Cell references and direct data entry
In Excel retrieve formulas it is possible to use either ‘direct Excel data entry’
(input data going directly into the function box), or refer to a cell reference
which contains the relevant information.
For example, here some data has been entered directly using the ‘direct Excel
data entry’ method:
Figure 2.4–1 Entering Excel data directly
However, a cell reference containing the relevant information returns exactly
the same result.
Figure 2.4–2 Entering Excel data using cell references
(Where cell B2 was entered as follows):
AARO SYSTEMS AB
16
AARO EXCEL CONNECTIVITY 14.0 USER MANUAL
AARO Excel retrieve formulas
Figure 2.4–3 Selecting cell data
Throughout this chapter, the first model of ‘direct Excel data entry’ has been
used in order to avoid confusion. However, users may prefer cell references
instead, depending on the customers’ needs.
2.5
Formats for Excel formulas
It is important to make sure that criteria in Excel formulas have the right
format, otherwise problems can occur.
Note: where possible, Microsoft Excel tries to interpret criteria as cell
references. If it can, they are then converted to cell references. If it can't, then
they get quoted and become strings.
Using the similar example to the ‘direct Excel data entry’ example outlined
above, if a period is specified as B0803 for example, the formula will look for
cell B803. This is because of some of the programming and ‘smart formulas’
contained in Excel. However, if the data is entered in quotations such as
“B0803” the value is taken as absolute.
2.6
Description of Excel retrieve formulas
Detailed descriptions of all Excel retrieve formulas are provided throughout this
chapter, along with examples for reference.
2.6.1
ABSGetAccountText
The ABSGetAccountText formula displays the descriptive text for an account
code provided.
An example of an ABSGetAccountText formula is outlined below, with a brief
explanation of the required parameter underneath.
Figure 2.6–1 ABSGetAccountText formula example
Field
Description
Account code
Account code which descriptive text is to be retrieved.
AARO SYSTEMS AB
17
AARO EXCEL CONNECTIVITY 14.0 USER MANUAL
AARO Excel retrieve formulas
2.6.2
ABSGetCompanyRate
The ABSGetCompanyRate formula displays the exchange rate for the reporting
currency of a company based on the period and rate type.
For reference, an example of an ABSGetCompanyRate formula is outlined
below, along with a brief explanation of the formula parameters underneath.
Figure 2.6–2 ABSGetCompanyRate formula example
2.6.3
Field
Description
Period
Period for which data is to be retrieved.
Company
Company code.
Rate Type
Rate translation type:
Ope – opening;
Ave – average;
Clo – closing.
ABSGetMinorities
The ABSGetMinorities formula displays the minority percentage for a specified
minority type (direct, indirect or total) for a company shareholding within a
legal group, for a given period.
For reference, an example of an ABSGetMinorities formula is outlined below,
along with a brief explanation of the formula parameters underneath.
Figure 2.6–3 ABSGetMinorities formula example
AARO SYSTEMS AB
18
AARO EXCEL CONNECTIVITY 14.0 USER MANUAL
AARO Excel retrieve formulas
Field
Description
Period
Period for which data is to be retrieved.
Company
Company code.
Minority type
Minority type:
Legal group
2.6.4
DIR – direct;
IND – indirect;
TOT – total.
Legal group. If left empty, the default value is assumed.
ABSGetName
The ABSGetName formula displays the description of a company, group or
other dimension member based on the dimension name and its member code.
For reference, an example of an ABSGetName formula is outlined below, along
with a brief explanation of the formula parameters underneath.
Figure 2.6–4 ABSGetName formula example
Field
Description
Type
Dimension whose description is to be retrieved:
“company” for company;
“group” for group;
dimension name for dimension, e.g. “Business Unit”.
Make sure to spell this exactly as defined in the
database, including any spaces and upper/lower case).
Code of entity
2.6.5
Company, group or dimension member code, e.g.
“CLOTHES”.
ABSGetRate
The ABSGetRate formula displays the exchange rate for a specified currency for
a given period and rate type.
AARO SYSTEMS AB
19
AARO EXCEL CONNECTIVITY 14.0 USER MANUAL
AARO Excel retrieve formulas
For reference, an example of an ABSGetRate formula is outlined below, along
with a brief explanation of the formula parameters underneath.
Figure 2.6–5 ABSGetRate formula example
2.6.6
Field
Description
Period
Period for which data is to be retrieved.
Currency
Currency code.
Rate Type
Rate translation type:
Ope – opening;
Ave – average;
Clo – closing.
AARORetrieveFlex
The AARORetrieveFlex formula is used for retrieving operational figures that are
reported through Input, OS, Matrix and Match forms.
The “Flex” part of the formula allows users to define dimensions themselves,
rather than according to predefined criteria – see Dim1 / Dim2 etc.
For reference, an example of an AARORetrieveFlex formula is outlined below,
along with a brief explanation of the formula parameters underneath.
AARO SYSTEMS AB
20
AARO EXCEL CONNECTIVITY 14.0 USER MANUAL
AARO Excel retrieve formulas
Figure 2.6–6 AARORetrieveFlex formula example
Field
Description
Period
Period for which data is to be retrieved.
Co
Company code from which data is to be retrieved.
Code
Account code from which data is to be retrieved.
Curr
Currency for which the data to be retrieved.
CurrTrans
Currency translation, e.g. Actual, Budget, LastYear.
AccType
Accounting type, e.g. Normal, IFRS or USGAAP.
AcctStd
Accounting standard (a summary of one or more
accounting types).
AARO SYSTEMS AB
21
AARO EXCEL CONNECTIVITY 14.0 USER MANUAL
AARO Excel retrieve formulas
Field
Description
Dim1, Dim2 etc
These are defined by the dimension, group or legal group
name such as “Market” or “Business Unit” (exact names
vary depending on the dimensions setup in each AARO
installation), followed by “:”, followed by value.
In the example above, the dimension, separator “:”, and
dimension values were entered directly into the cell.
Figure 2.6–7 AARORetrieveFlex “dimension:dimension Value”
formula
Alternatively, the values may be taken from in individual
cell references (e.g. I48&":"&I49) instead.
Some dimensions in the Dim field should be written
without space, i.e. LegalGroup.
2.6.7
ProformaType
Proforma type, e.g. Normal.
AdjLevel
Adjustment level, e.g. Company.
InvType
Investment type, e.g. Normal.
ABSRetrieveTextAmount
The ABSRetrieveTextAmount formula is used for retrieving operational figures
that are reported through Text forms.
For reference, an example of an ABSRetrieveTextAmount formula is outlined
below, along with a brief explanation of the formula parameters underneath.
Figure 2.6–8 ABSRetrieveTextAmount formula example
AARO SYSTEMS AB
22
AARO EXCEL CONNECTIVITY 14.0 USER MANUAL
AARO Excel retrieve formulas
2.6.8
Field
Description
Period
Period for which data is to be retrieved.
Company
Company code from which data is to be retrieved.
Form
Text form in AARO from which data is to be retrieved.
Account
Account code.
Currency
Currency for the data to be retrieved.
Key Names
Dimension set up in the form, e.g. “Product”. Several
dimensions can be entered divided by comma, e.g.
“Product,Customer”.
Key Values
Dimension value. Value for each dimension should be
entered divided by comma, e.g. “BIKES,CUST_01”.
ABSRetrieveTextString
The ABSRetrieveTextString formula is used for retrieving descriptions that are
contained within text forms.
For reference, an example of an ABSRetrieveTextString formula is outlined
below, along with a brief explanation of the formula parameters underneath.
Figure 2.6–9 ABSRetrieveTextString formula example
Field
Description
Period
Period for which data is to be retrieved.
Company
Company code from which data is to be retrieved.
Form
Text form in AARO from which data is to be retrieved.
AARO SYSTEMS AB
23
AARO EXCEL CONNECTIVITY 14.0 USER MANUAL
AARO Excel retrieve formulas
2.7
Field
Description
Return field
‘NameInTable’ value in the text form for the description
which will be returned in the formula result, e.g.
‘StringValue1’.
Key names
Dimension set up in the form, e.g. “Product”. Several
dimensions can be entered divided by comma, e.g.
“Product,Customer”.
Key values
Dimension value. Value for each dimension should be
entered divided by comma, e.g. “BIKES,CUST_01”.
Account
Account code.
Retrieve information from AARO to Excel
When the relevant formulas and data cells have been completed, information is
retrieved from AARO to Excel on the menu AARO Retrieve.
The user can then choose one of the options:
Option
Action
All
Retrieve data into all open Excel workbooks from AARO.
Sheet Only
Retrieve data into the open Excel worksheet from AARO.
Multiple Sheets
Retrieve data into multiple Excel worksheets from AARO.
In this scenario, the user is presented with a choice of
worksheets he or she would like to retrieve.
An example for retrieving data for multiple worksheets is referenced below:
Figure 2.7–1 Retrieving AARO formula data
If the user choses Multiple Sheets, they will see the next dialog where sheets
to be retrieved have to be chosen.
Explanations for how to use the dialog boxes are provided within the Excel
dialog boxes to guide users through the necessary steps. An example for
retrieving a data for a couple of open worksheets is referenced below:
AARO SYSTEMS AB
24
AARO EXCEL CONNECTIVITY 14.0 USER MANUAL
AARO Excel retrieve formulas
Figure 2.7–2 Retrieving multiple sheets
2.8
Validation
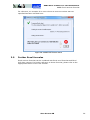
When data is received from AARO, a dialog box appears informing the user
whether the data has been successfully received.
Figure 2.8–1 AARO data retrieve status
If data cannot be received from AARO to Excel, a dialog box appears showing
validation errors. The content of this dialog box will depend on the errors
returned from the AARO application.
For data to be received successfully from AARO, these errors must be fixed
before the process of receiving data is completed.
AARO SYSTEMS AB
25
AARO EXCEL CONNECTIVITY 14.0 USER MANUAL
AARO Excel retrieve formulas
For reference, an example of an error where an account number was not
specified has been included here:
Figure 2.8–2 AARO data retrieve status
2.9
Further Excel formulas
Excel retrieve formulas can be combined with Excel send formulas and Excel
drill down reports. For further reference to those formulas, please refer to the
appropriate section of the user manual.
AARO SYSTEMS AB
26
AARO EXCEL CONNECTIVITY 14.0 USER MANUAL
AARO Excel send formulas
3.
AARO Excel send formulas
Formulas in Microsoft Excel can be used to send data from Excel workbooks to
the AARO application.
This provides extra flexibility and options for data manipulation before data is
sent from Excel to AARO.
This section of the user manual refers specifically to the Excel formulas used to
send data from Excel to AARO. For more detailed information about the AARO
bookings themselves, please refer to the appropriate section of the AARO user
manual, e.g. Input, Match, Journals, Edit Input, etc.
3.1
Selecting Excel send formulas
The various AARO Excel send formulas can be accessed by pressing the Insert
Function button in Excel.
Figure 3.1–1 Inserting an AARO formula into Excel worksheet
The AARO Excel send formulas are listed under the AARO data send category.
Figure 3.1–2 Selecting AARO data send formula
AARO SYSTEMS AB
27
AARO EXCEL CONNECTIVITY 14.0 USER MANUAL
AARO Excel send formulas
3.2
Entering formulas directly into the formula bar in Excel
If you are a more experienced Excel user and/or working with existing
formulas, it is possible to enter the required AARO send equation directly in the
formula bar, for example:
=ABSSendOperFlex(5555;"0912A";"ARLANDA";3010;"Business Unit:FOOD")
3.3
Formula results
Before entering data using Excel send formulas, it is worthwhile noting that
when entering formula arguments, the formula result (highlighted below)
contains useful information.
Figure 3.3–1 Viewing AARO data send formula result
Some examples of formula results might be:
Formula result=0, formula is not completed.
Formula result=1, formula is ready to send a string of information according
to template criteria.
Formula result=4869 (or any other number). This refers to a specific
number which will be sent from an Excel send formula to a corresponding
field in AARO.
Note: no validation has taken place in AARO at the stage; checks such as
whether an account or period is valid do not take place until the user has sent
the data from Excel to AARO.
Note: Values reported using send formulas are reported on default values set
up in AARO on the menu Utilities/Application Management, folder Default
Values, section Default input values.
3.4
Cell references and direct data entry in Excel
In Excel send formulas it is possible to use either ‘direct Excel data entry’ (input
data going directly into the function box), or refer to a cell reference which
contains the relevant information.
AARO SYSTEMS AB
28
AARO EXCEL CONNECTIVITY 14.0 USER MANUAL
AARO Excel send formulas
For example, here is some data that has been entered directly using the ‘direct
Excel data entry’ method:
Figure 3.4–1 Entering parameter value directly
However, a cell reference containing the relevant information returns exactly
the same result.
Figure 3.4–2 Entering parameter information using cell reference
(Where cell B2 was entered as follows):
Figure 3.4–3 Selecting cell data
Throughout this chapter, the model of ‘direct Excel data entry’ has been used in
order to avoid confusion. However, users may prefer cell references instead,
depending on the customers’ needs.
3.5
Description of Excel send formulas
Detailed descriptions of all Excel send formulas are provided throughout this
chapter, along with examples for reference.
3.5.1
AAROCreateNewJV
The AAROCreateNewJV formula is used to create journal bookings, and is an
alternative process to manually entering data in AARO.
The Excel formula itself shows very little data, except an indication that data
will be sent from Excel to AARO, indicated by ‘Formula result = 1’. The reason
for this is explained below.
AARO SYSTEMS AB
29
AARO EXCEL CONNECTIVITY 14.0 USER MANUAL
AARO Excel send formulas
Figure 3.5–1 AAROCreateNewJV formula
In Excel, the AAROCreateNewJV formula can only be used in combination with
the journal template. This is pasted onto an Excel worksheet using the menu
AARO/Paste from AARO/Journal Template.
Figure 3.5–2 Pasting a journal template into Excel
Here is an example of a completed journal template in Excel, ready for sending
to AARO:
Figure 3.5–3 Journal template example in Excel
AARO SYSTEMS AB
30
AARO EXCEL CONNECTIVITY 14.0 USER MANUAL
AARO Excel send formulas
The following fields are mandatory in the journal template:
Journal type
Mandatory fields
all
The following fields should be completed with values in
the journal template: Co, Code, Loc (for local currency
journal) or Amount (for group currency journal).
The following fields will get the default values if not
completed in the journal template:
FromCo – will get the value from field Co;
Proforma Type, Inv Type, Adjustment Level,
AcctType – will get the default values set up in the
AARO application (on the menu Utilities/Application
Management/Default Values).
Past Equity
LegalType, Amount Type, PEID, PECode, OwnedCo,
GroupCurr
Excess Value
LegalType, Amount Type, PEID, GWID, PECode,
OwnedCo, GroupCurr
Notes:
Recurrent journals cannot be created from Excel.
‘MULTIJV’ journals cannot be created from Excel.
Past equity and excess value journals should not normally be created or
edited manually, they should be created as system journals. However, if
manual adjustment to an existing PE or EV journal is required, make sure
the following conditions are met:
The LegalGroup column must be left empty.
One PEID/GWID combination corresponds to one Code/PECode
combination.
Existing PEID/GWID only can be used.
Only the following amount types are allowed with past equity journals:
Opening, Change and Closing.
Figure 3.5–4 Past equity journal template example
3.5.2
Create journal bookings
The process for sending journals to AARO is slightly different from other AARO
Excel send formulas, as the menu AARO/Create Journals needs to be
selected here.
AARO SYSTEMS AB
31
AARO EXCEL CONNECTIVITY 14.0 USER MANUAL
AARO Excel send formulas
Figure 3.5–5 Creating a journal booking
Choose the appropriate submenu to send All, Sheet only or Multiple Sheets
and wait until you have received confirmation that all items have been sent
successfully:
Figure 3.5–6 Create journal status
If at one or more journals fail validation, then no journals are sent.
AARO SYSTEMS AB
32
AARO EXCEL CONNECTIVITY 14.0 USER MANUAL
AARO Excel send formulas
Note: the menus listed under AARO/AARO Send are not used when sending
journals to AARO; the AARO/AARO Send menu is against all other formula
types except journals.
3.5.3
Viewing data from AAROCreateNewJV in AARO
For reference, when journal data has been successfully sent to AARO, it can be
viewed in the AARO application using the menu Data Entry/Journals.
Figure 3.5–7 Viewing journals created from Excel
3.5.4
AAROSendText
AAROSendText is used for data reported through text forms. The
AAROSendText formula in Excel contains the period, company, and the name of
the text form associated with the entry. Data is then ‘picked up’ in cells directly
to the right of the formula, and parameters follow the same order as you would
find them in the relevant form in the AARO application, on the menu Data
Entry/Input.
To help explain how the formula works, we have included an example of an
AAROSendText formula below.
This example works with the formula arguments of period “0912A”, company
“ARLANDA”, and text input form “SHARESSUBS”.
Figure 3.5–8 AAROSendText formula example
In the example given below, the formula was entered in cell A2, and the data
relating to the text input form “SHARESSUBS” was entered in cells B2, C2, D2,
E2, F2, G2, H2, and I2. i.e. the input form data was entered in the cells directly
to the right of the AAROSendText formula.
AARO SYSTEMS AB
33
AARO EXCEL CONNECTIVITY 14.0 USER MANUAL
AARO Excel send formulas
Figure 3.5–9 AAROSendText formula example
The information which is sent against the text form (“SHARESSUBS” in this
example), has to have the same style as you would find in the form in AARO
application, menu Data Entry/Input.
Tip: the “Paste from AARO” menu can be very helpful for pasting header
information into an Excel worksheet – this provides a helpful template for Excel
data entry. Here is an example where input layout “SHARESSUBS” was pasted
into cell B2. In the example below, easy data entry was facilitated for the
formula contained in cell A6.
Figure 3.5–10 AAROSendText template example
Notes:
3.5.5
‘Dimension Name’ and ‘Text Field Name’ values are not sent to the
database. These fields are required in the template but can be left empty.
‘Text Field’ with ‘Content’=‘USERID’ values are ignored, the current user is
always identified.
Viewing data from AAROSendText in AARO
For reference: when text form data has been successfully sent to AARO, it can
be viewed in the AARO application using the menu Data Entry/Input, and
choosing the relevant form (the same form as referenced in the Excel formula
for AAROSendText).
Here is a screenshot of how the information looks in a “SHARESSUBS” text
input form in AARO:
AARO SYSTEMS AB
34
AARO EXCEL CONNECTIVITY 14.0 USER MANUAL
AARO Excel send formulas
Figure 3.5–11 SHARESSUBS form data sent to AARO from Excel
Note: the order of the data entry fields in AARO (from left to right) is exactly
the same as those entered in Excel for a text form.
3.5.6
ABSSendMatch
The ABSSendMatch formula is used to send intercompany transactions to
AARO.
An example of an ABSSendMatch formula is outlined below, with detailed
explanations of the parameters underneath.
Figure 3.5–12 ABSSendMatch formula example
AARO SYSTEMS AB
35
AARO EXCEL CONNECTIVITY 14.0 USER MANUAL
AARO Excel send formulas
Field
Description
TransCurr
Transaction currency. This field should be completed in if
it is used in the Match form.
TransAmount
Transaction amount: value in transaction currency, if
used in the Match form. If the field is empty and
transactions amounts are used in the match form, a zero
value will be sent.
LocValue
Amount in the company’s local currency. If the field is
empty, a zero value will be sent.
Period
Period for which data is sent.
Code
Account code for which data is sent.
Company
Reporting company code.
CounterCo
Counter company code.
<own
dimensions>
Dimension value – if the form is to be reported on a
dimension level, a value for one of the reporting
company dimensions (i.e. business unit) may be entered
here.
<counter
dimensions>
Dimension value – if the form is to be reported on a
dimension level, a value for one of the counter company
dimensions (i.e. business unit) may be entered here.
Counter dimensions will depend on the system setup.
Note: Data sent with the same field values will be summed. Fields not
presented in the form will be ignored. If the sent data matches an existing row,
the row will be overwritten with the values sent from Excel.
3.5.7
Viewing data from ABSSendMatch in AARO
For reference: when data has been successfully sent to AARO, it can be viewed
in the AARO application on the menu Data Entry/Match.
A screenshot for the ABSSendMatch example illustrated above has been
included here:
AARO SYSTEMS AB
36
AARO EXCEL CONNECTIVITY 14.0 USER MANUAL
AARO Excel send formulas
Figure 3.5–13 Match data sent from Excel to AARO
3.5.8
ABSSendOper
The ABSSendOper formula is used for sending data that is reported through
input and matrix forms into the AARO database, and is an alternative process
to manually entering data in AARO input forms.
Here is an example of an ABSSendOper formula:
Figure 3.5–14 ABSSendOper formula example
Field
Description
Value
Value to be sent.
Period
Period for which data is sent.
Code
Account for which data is sent.
Company
Company for which data is sent, identified by company
code.
AARO SYSTEMS AB
37
AARO EXCEL CONNECTIVITY 14.0 USER MANUAL
AARO Excel send formulas
Field
Description
<dimensions>
Dimension for which data is sent – if the form is to be
reported on a dimension level, an appropriate value may
be entered here.
Dimensions will depend on the setup of the form, and
upon which forms the system administrator has activated
for the current period in the AARO application.
NA
Indicates that this field is not used. It is reserved for
more dimensions.
If changes for a form are accepted through journals only, the JV Adjustment
dialog is opened with the template for Adjustment journal to be created. For
more information on adjustment journals, please refer to the section ‘3.2.12
Adjust financial information’ in the AARO 14.0 User Manual.
3.5.9
Viewing data from ABSSendOper in AARO
For reference: when ABSSendOper data has been successfully sent to AARO, it
can be viewed in the AARO application on the menu Data Entry/Input and in
Web reports.
In the example above, data was sent to the form IS_ALL, for the business unit
“MEDIA”, a screenshot has been included for reference here:
Figure 3.5–15 Input data sent from Excel to AARO
3.5.10 ABSSendOperFlex
The ABSSendOper formula is used for sending data that is reported through
input and matrix forms into the AARO database, and is an alternative process
to manually entering data in the AARO data entry input screens.
The “Flex” part of the formula allows users to define dimensions themselves,
rather than according to predefined criteria – see Dim1 / Dim2 etc.
Here is an example of an ABSSendOperFlex formula in Excel:
AARO SYSTEMS AB
38
AARO EXCEL CONNECTIVITY 14.0 USER MANUAL
AARO Excel send formulas
Figure 3.5–16 ABSSendOperFlex formula example
Field
Description
Value
Value to be sent.
Period
Period for which data is sent.
Co
Company for which data is sent, identified by company
code.
Code
Account for which data is sent.
Dim1, Dim2,
etc.
Dim1 – Dim20: these are defined by the dimension name
such as “Market” or “Business Unit” (exact names vary
depending on the dimensions setup in each AARO
installation).
The format for input is “dimension:dimension value”.
In the example above, the dimension, separator “:”, and
dimension values were given as “Business Unit:MEDIA”.
In the same way as other parameters, dimensions and
dimension values may also be taken from individual cell
reference, such as cell reference I48.
If changes for a form are accepted through journals only, the JV Adjustment
dialog is opened with the template for Adjustment journal to be created. For
more information on adjustment journals, please refer to the section ‘3.2.12
Adjust financial information’ in the AARO 14.0 User Manual.
3.5.11 Viewing data from ABSSendOperFlex in AARO
ABSSendOperFlex data can be viewed in the AARO application in menu Data
Entry/Input and Web reports in an appropriate form.
In the example above, data was sent to the form IS_ALL, for the business unit
“MEDIA”, a screenshot has been included for reference here:
AARO SYSTEMS AB
39
AARO EXCEL CONNECTIVITY 14.0 USER MANUAL
AARO Excel send formulas
Figure 3.5–17 Data sent from Excel to AARO
3.5.12 ABSSendOS
‘OS’ is short for Orders and Sales (which is what OS forms have historically
been used for) and OS forms are very similar to text forms. OS forms may,
however, be used for any kind of data.
The ABSSendOS formula is used for sending data that is reported through OS
forms into the AARO database, and is an alternative process to manually
entering data in the AARO input forms.
For data to be transmitted from the ABSSendOS formula in Excel, to AARO an
appropriate OS form must be set up to receive the data. In the case of the
example given below, we set up an OS form in AARO specifically to handle this
example.
AARO SYSTEMS AB
40
AARO EXCEL CONNECTIVITY 14.0 USER MANUAL
AARO Excel send formulas
Figure 3.5–18 ABSSendOS formula example
Field
Description
Value
Value to be sent.
Period
Period for which data is sent.
Code
Account for which data is sent.
Company
Company for which data is sent, identified by company
code.
<dimensions>
Dimension (i.e. Product) for which data is sent – if the
form is to be reported on a dimension level, an
appropriate value may be entered here.
Dimensions will depend on the setup of the form, and
upon which forms the system administrator has activated
for the current period in the AARO application.
<counter
values>
Counter values (i.e. (OS)Co – counter company) for
which data is sent – if the form contains counter values.
Counter values depend on system setup.
NA
Indicates that this field is not used. It is reserved for
more dimensions and counter values.
AARO SYSTEMS AB
41
AARO EXCEL CONNECTIVITY 14.0 USER MANUAL
AARO Excel send formulas
Note: in this example: there are various parameters such as business unit and
business area that did not need to be filled in: their contents are skipped in the
program logic and therefore not sent to AARO.
3.5.13 Viewing data from ABSSendOS in AARO
For reference: when ABSSendOS data has been successfully sent to AARO, it
can be viewed in the AARO application on the menu Data Entry/Input and in
Web forms, in the relevant OS (Order & Sales) form.
A screenshot example of an OS form setup for demonstration purposes is
included here:
Figure 3.5–19 OS form data sent from Excel to AARO
3.5.14 ABSSendOSFlex
As indicated in the previous chapter, ‘OS’ is short for Orders and Sales (which
is what OS forms have historically been used for). Send formulas containing the
‘OS’ formula send data into OS forms in AARO.
For data to be transmitted from an ABSSendOSFlex formula in Excel to AARO
an appropriate OS form must be set up to receive the data. In the case of the
example given below, we set up an OS form in AARO specifically to handle this
example.
The ABSSendOSFlex formula is very similar to the ABSSendOS formula, except
that dimensions defined in the formula are flexible. The “Flex” part of the
formula allows users to define dimensions themselves, rather than according to
predefined criteria – see Dim1, Dim2 etc.
AARO SYSTEMS AB
42
AARO EXCEL CONNECTIVITY 14.0 USER MANUAL
AARO Excel send formulas
Figure 3.5–20 ABSSendOSFlex formula example
Field
Description
Value
Value to be sent.
Period
Period for which data is sent.
Co
Company for which data is sent, identified by company
code.
Code
Account for which data is sent.
Dim1, Dim2,
etc.
Dim1 – Dim20: these are defined by the dimension name
such as “Buying Co” or “Customer” (exact names vary
depending on the dimensions setup in each AARO
installation).
The format for input is “dimension:dimension value”.
In the first example specified above, the dimension,
separator “:”, and dimension values were given as
“Product:FASTFOOD”, “(OS)Co:ARLANDA”.
In the same way as other parameters, dimensions and
dimension values may also be specified from individual
cell references.
3.5.15 Viewing data from ABSSendOSFlex in AARO
For reference: when ABSSendOSFlex formula data has been successfully sent
to AARO, it can be viewed in the AARO application on the menu
Data Entry/Input and in Web reports, in the relevant OS (Order & Sales) form.
A screenshot example of an OS form setup for demonstration purposes is
included here:
AARO SYSTEMS AB
43
AARO EXCEL CONNECTIVITY 14.0 USER MANUAL
AARO Excel send formulas
Figure 3.5–21 OS form data sent from Excel to AARO
3.6
Send information from Excel to AARO
When the relevant formulas and data cells have been completed, information is
sent from Excel to AARO or file using the menu AARO Send.
The user can then choose one of the options:
Option
Action
All to Database
Send data from all open Excel workbooks to AARO
application.
Sheet to
Database
Send data from the open Excel worksheet to AARO
application.
Multiple Sheets
Send data from multiple Excel worksheets to AARO
application. In this scenario, the user is presented with a
choice of which worksheets he or she would like to send.
to File
Send data to a file which can be picked up by AARO or
another application later.
AARO SYSTEMS AB
44
AARO EXCEL CONNECTIVITY 14.0 USER MANUAL
AARO Excel send formulas
Figure 3.6–1 Sending data from Excel to AARO
3.7
Validation
When data is transmitted to AARO, a dialog box appears informing the user
whether the data has been successfully transmitted.
Figure 3.7–1 Excel data send progress
AARO SYSTEMS AB
45
AARO EXCEL CONNECTIVITY 14.0 USER MANUAL
AARO Excel send formulas
If data cannot be sent from Excel to AARO, a dialog box appears showing
validation errors. The content of this dialog box will depend on the errors
returned from the AARO application.
When you send data to AARO, the information is grouped by period/company
combinations. It is recommended that one period/company combination does
not contain more than 10000 entries when sending to AARO.
If you get a validation error, all of the records against the period/company
combination in the error message do not get sent.
For data to be sent successfully to AARO, these errors must be fixed before the
process of sending data is completed. For reference, an example containing
some validation errors has been included below:
Figure 3.7–2 Excel data send validation errors
3.8
Further Excel formulas
Excel send formulas can be combined with Excel retrieve formulas and Excel
drill down reports. For further reference to those formulas, please refer to the
appropriate chapter of the user manual.
AARO SYSTEMS AB
46
AARO EXCEL CONNECTIVITY 14.0 USER MANUAL
Excel drill down reports
4.
Excel drill down reports
Excel drill down reports can be used in a similar way to drill down reports in the
AARO application.
Working with Excel instead of the AARO application brings various advantages
and disadvantages, depending on which task the user is working with.
For example, in Excel drill down reports you can also take advantage of all
Excel features such as formatting, calculations, connectivity to the Excel chart
wizard, and so on. However, some users may find that it easier to drag and
drop report criteria and visualize information within AARO drill down reports.
AARO’s drill down reports combined with full Excel connectivity gives users
complete support for all of their reporting requirements.
4.1
Accessing Excel drill down reports
There are two ways to access Excel drill down reports:
Use ‘Live Copy to Excel’ on the AARO application menu
Reports/Drill Down.
Login to AARO from Microsoft Excel. Go through the menu
AARO/AARO Drilldown Report.
Figure 4.1–1 AARO drill down reports menu
4.2
‘Live Copy to Excel’ from the AARO application
This section describes how to copy a drill down report from the AARO Windows
client to Excel, keeping all drill down functionality active in an Excel workbook.
To perform copy to Excel from AARO, follows these steps:
1. Log in to the AARO application, and open the menu Reports/Drill Down.
AARO SYSTEMS AB
47
AARO EXCEL CONNECTIVITY 14.0 USER MANUAL
Excel drill down reports
2. Create a drill down report as required.
3. Press the Copy button, and choose the Live Copy to Excel option:
New Workbook: opens the Microsoft Excel application, and replaces
sheet 1 with an Excel drill down report containing the AARO drill down
report data.
New Sheet: copies the AARO drill down report data to a new worksheet
in the open Excel workbook.
Figure 4.2–1 Live copy to Excel
4. Choose to enable macros if necessary, and the new Excel workbook or
worksheet will be displayed with the copied report.
Figure 4.2–2 Enabling macros in Excel
4.3
Create a drill down report in Excel
To create a new Excel drill down report:
1. Go to the AARO menu AARO Drilldown Report/New Report. This option
is also available using the right mouse button.
AARO SYSTEMS AB
48
AARO EXCEL CONNECTIVITY 14.0 USER MANUAL
Excel drill down reports
Figure 4.3–1 Creating a new report
2. In the Report order window, enter report heading and select the report
type:
Regular Drill-down – report of type Input;
Matrix – report of type Matrix.
Figure 4.3–2 Report general information
3. Select report criteria as described in 4.4 Criteria for a drill down report.
4. When criteria are defined, press OK and the report will be loaded in the
sheet.
4.4
Criteria for a drill down report
The following criteria are mandatory for any drill down report: Period,
Currency, Account or Report Layout or Matrix Layout.
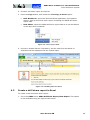
When creating a drill down report,
1. Define report criteria for:
Fixed data: data for the report output.
AARO SYSTEMS AB
49
AARO EXCEL CONNECTIVITY 14.0 USER MANUAL
Excel drill down reports
Figure 4.4–1 Setting up drill down report criteria in Excel
Rows: rows displayed in the report output.
Figure 4.4–2 Setting up drill down report rows in Excel
Columns: columns displayed in the report output.
AARO SYSTEMS AB
50
AARO EXCEL CONNECTIVITY 14.0 USER MANUAL
Excel drill down reports
Figure 4.4–3 Setting up drill down report columns in Excel
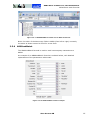
2. To add or change criteria, choose appropriate criteria from the drop down
lists:
Figure 4.4–4 Selecting drill down report criteria in Excel
3. Select value/s from the drop-down next to the criteria.
Figure 4.4–5 Selecting values
4. To change criteria, press the
button and choose data from the list
presented (see selection dialog box below).
5. To delete the selected criteria, press the delete button
criteria you wish to delete.
next to the
6. To move criteria order, press move up or move down buttons.
Figure 4.4–6 Move up and move down buttons.
AARO SYSTEMS AB
51
AARO EXCEL CONNECTIVITY 14.0 USER MANUAL
Excel drill down reports
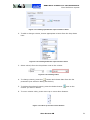
Options such as adding or removing report totals, grand totals, percentages,
calculated items are also available from the selection dialog box, along with
options for changing sort order:
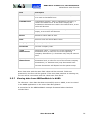
Figure 4.4–7 Selecting parameter values for a drill down report in Excel
Note: users may prefer to filter data using the filter button
to refine
selection criteria, for example by choosing business areas that are in the range
3000–3999.
Figure 4.4–8 Filtering parameter values for a drill down report in Excel
AARO SYSTEMS AB
52
AARO EXCEL CONNECTIVITY 14.0 USER MANUAL
Excel drill down reports
4.5
Predefined drill down reports
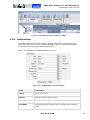
To execute a predefined drill down report:
1. On the AARO menu, select AARO Drilldown Report/Predefined. This
option is also available via the right mouse button:
Figure 4.5–1 Running a saved drill down report in Excel
2. Select a predefined report (‘Income Statement – Group Legal’ in the
example provided here):
Figure 4.5–2 Selecting a saved drill down report in Excel
3. If a report saved in the Web client is not supported in Excel, the warning
appears:
AARO SYSTEMS AB
53
AARO EXCEL CONNECTIVITY 14.0 USER MANUAL
Excel drill down reports
Figure 4.5–3 Warning that the report is not supported in Windows client
Press the Click to execute the report in Web Reports link to run the
report in Web client.
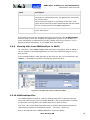
4. Make further selections if necessary.
Figure 4.5–4 Selecting a period for a drill down report in Excel
AARO SYSTEMS AB
54
AARO EXCEL CONNECTIVITY 14.0 USER MANUAL
Excel drill down reports
The AARO report will then be pasted onto the active worksheet; the user can
then manipulate and format the data in Excel as desired.
4.6
Right mouse button functions
One of the key features of working with AARO in combination with Excel is the
ability to work with the right mouse button to ‘call-up’ dynamic functions.
Depending on the cell selected when the right mouse button is clicked, many
different features may be accessed such as edit settings, delete, run a report,
change report criteria, and choose drill down criteria.
The example below shows how it is easy to change the report currency by
pressing the right mouse button on the cell containing currency information in
the report header. In the report example below, clicking right mouse on cell A3
enables the user to change currency.
Figure 4.6–1 Changing currency using the right-click menu
In the same way the other report criteria can be changed, e.g. period.
4.7
Drill down options
Pressing the right mouse button on rows, columns or cells in Excel drill down
reports allows the user to generate greater report detail as required, and drill
down into report information.
This example shows a column being drilled down by reporting currency:
Figure 4.7–1 Drilling down column by reporting currency
When a report has been drilled down for refined criteria, the drilldown report
opens in a new Excel worksheet:
AARO SYSTEMS AB
55
AARO EXCEL CONNECTIVITY 14.0 USER MANUAL
Excel drill down reports
Figure 4.7–2 Drill down report on the new worksheet in Excel
It is possible to keep drilling down into columns, rows or cells many times;
every time a new drill down operation is performed, a new worksheet is
opened.
4.8
Run a drill down report in Excel
Choosing Run from the AARO Drilldown Report menu (either from the AARO
menu or by clicking the right mouse button) gives user the option to run
(refresh) a drill down report. This is particularly useful for refreshing reports
when source data in AARO has been changed.
Figure 4.8–1 Running a drill down report in Excel
4.9
Edit a drill down report in Excel
To edit a drill down report, choose Edit from the AARO Drilldown Report
menu (either from the AARO menu, or by clicking the right mouse button)
From here it is possible to edit report criteria in the same way as outlined in
4.4 Criteria for a drill down report.
AARO SYSTEMS AB
56
AARO EXCEL CONNECTIVITY 14.0 USER MANUAL
Excel drill down reports
Figure 4.9–1 Editing a drill down report in Excel
4.10
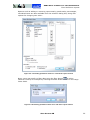
Drill down report settings in Excel
Report settings can be changed as follows:
1. Choose Settings from the AARO Drilldown Report menu.
Figure 4.10–1 Setting up a drill down report in Excel
2. Choose to change report layout:
AARO SYSTEMS AB
57
AARO EXCEL CONNECTIVITY 14.0 USER MANUAL
Excel drill down reports
Figure 4.10–2 Changing drill down report settings in Excel
Report settings have the following fields and buttons:
Section
Field/button
Description
Columns
Truncate zero
columns on next
run
If ticked, blank columns will be truncated on
next report run.
If cleared, blank columns will be shown.
This setting is not applied to a parameter
with All values selected.
Show bold
separator on
multi column
If ticked, the bold line will divide multiple
columns.
If cleared, a regular line will divide multiple
columns.
This setting works only when the ‘Compact
headings’ setting is ticked.
AARO SYSTEMS AB
58
AARO EXCEL CONNECTIVITY 14.0 USER MANUAL
Excel drill down reports
Section
Field/button
Description
Rows
Truncate zero
rows on next run
If ticked, blank rows will be truncated on
next report run.
If cleared, blank rows will be shown.
This setting is not applied to a parameter
with All values selected.
Show bold
separator on
multi row
If ticked, the bold line will divide multiple
rows.
Compact
headings
If ticked, row headings (if several) are
shown in one column.
If cleared, a regular line will divide multiple
rows.
If cleared, row headings (if several) are
shown in several columns.
Fixed
Printed
reports
Fonts
Show codes
If ticked, codes for fixed report parameters
are shown.
Show
descriptions
If ticked, description for fixed report
parameters is shown.
Portrait
If selected, the report in the print preview
mode will be shown in the portrait format.
Landscape
If selected, the report in the print preview
mode will be shown in the landscape format.
Number of
columns in
report view
Number of columns printed on one page in
the print preview mode.
Change font
Font for the printed report is set up here.
In the drop-down field, select a report
element and press the ‘Change font’ button.
Set up font and press OK. The selected font
will be shown in the preview below.
This setting overrides report layout settings
set up on the menu Utilities/Edit Report
Layouts.
Defaults
4.11
Pressing this button sets up report settings
to default.
Shadow sheet
The Shadow Sheet menu provides options to paste drill down report values
into another sheet or sheets in a workbook.
AARO SYSTEMS AB
59
AARO EXCEL CONNECTIVITY 14.0 USER MANUAL
Excel drill down reports
Figure 4.11–1 Pasting drill down report values to another sheet in Excel
After choosing Shadow Sheet, enter the sheet number for a shadow sheet.
Figure 4.11–2 Selecting a sheet to paste drill down report values in Excel
When Run is pressed, data will be pasted onto the shadow sheet (sheet2 in the
example above) as well as updated on the open worksheet. This enables users
to update multiple worksheets with AARO drill down data simultaneously.
4.12
Delete a drill down report from Excel
Choosing Delete from the AARO Drilldown Report menu deletes the drill
down report from the excel sheet. Follow the instructions to confirm deletion.
AARO SYSTEMS AB
60
AARO EXCEL CONNECTIVITY 14.0 USER MANUAL
Excel drill down reports
Figure 4.12–1 Deleting a drill down report from Excel
Note: although values may still appear in the current worksheet after they have
been deleted through this method, right mouse button formulas (such as drill
down) will not be available.
4.13
Run all reports in a workbook
Choose AARO Drilldown Report/Run All Reports in Workbook to update
all of the various drilldown reports that may be contained in worksheets in an
open Excel workbook.
AARO SYSTEMS AB
61
AARO EXCEL CONNECTIVITY 14.0 USER MANUAL
Excel drill down reports
Figure 4.13–1 Running all drill down reports in Excel
4.14
Further Excel formulas
Excel drill down reports can be combined with Excel send and Excel retrieve
formulas. For further reference to those formulas, please refer to the
appropriate section of the user manual.
AARO SYSTEMS AB
62
AARO EXCEL CONNECTIVITY 14.0 USER MANUAL
Excel input forms
5.
Excel input forms
Excel input forms provide an alternative to direct data input using the AARO
application.
This provides the user with the flexibility to use the wide array of features
available within the Excel application before data is uploaded into AARO.
5.1
Limitations of Excel input forms
Currently only forms of type Input are available in Excel.
In addition, the required form must have the “Use as Output Report” setting on
the AARO application menu Utilities/Edit Input otherwise the form cannot be
output into Excel.
Input responsibilities are not applied to input forms in Excel.
Opening balances in input forms may include values booked through journals
according to system settings made by the administrator. Please refer to the
2.9.12 Journal Settings section of the AARO 14.0 User Manual.
For more information regarding different form types within the AARO
application, please refer to the 2.4.4 Forms section of the AARO 14.0 User
Manual.
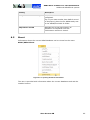
5.2
Load an AARO input form into Excel
To load an AARO input form into Excel:
1. Go to the menu AARO/AARO Input Form/Input Forms(s).
Figure 5.2–1 Inserting an input form into Excel
AARO SYSTEMS AB
63
AARO EXCEL CONNECTIVITY 14.0 USER MANUAL
Excel input forms
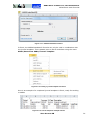
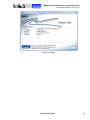
2. Choose an appropriate input form (IS_ALL Income Statement in the
example given here), appropriate dimension values to the right:
Figure 5.2–2 Selecting an input form in Excel
3. The Excel input form will then be loaded and available for data entry; white
cells are open for data entry.
AARO SYSTEMS AB
64
AARO EXCEL CONNECTIVITY 14.0 USER MANUAL
Excel input forms
Figure 5.2–3 AARO input form loaded to Excel
5.3
Edit an input form
To add/delete columns and enter values:
1. To add a column, right-click the form and select Add Column.
Figure 5.3–1 Adding a column to an input form in Excel
Select the dimension value and click OK.
Figure 5.3–2 Selecting a dimension value for a new column
2. To delete a column, right-click the column and press Delete Column.
When prompted, confirm that you wish to delete the column.
AARO SYSTEMS AB
65
AARO EXCEL CONNECTIVITY 14.0 USER MANUAL
Excel input forms
Figure 5.3–3 Deleting a column
3. To enter values, enter data in the white (editable) cells. To save entered
values, proceed as described in 5.4 Export data to AARO.
4. To change parameter value (if enabled by sheet settings), type in a new
value in the cell. To load form for changed parameters, proceed as
described in 5.5 Reload an input form in Excel.
5.4
Export data to AARO
To export data into the AARO application, choose the menu
AARO/AARO Input Form/Save.
Figure 5.4–1 Exporting input form data to the AARO application
Alternatively, click the right mouse button, and choose the menu
AARO Input Form/Save.
AARO SYSTEMS AB
66
AARO EXCEL CONNECTIVITY 14.0 USER MANUAL
Excel input forms
Figure 5.4–2 Exporting input form data using the right-mouse button
If changes for a form are accepted through journals only, the JV Adjustment
dialog is opened with the template for Adjustment journal to be created. For
more information on adjustment journals, please refer to the section ‘3.2.12
Adjust financial information’ in the AARO 14.0 User Manual.
If the information has been successfully exported, a confirmation message will
appear.
To check the information in the AARO application, log on to AARO, and go into
the menu Data Entry/Input and load the relevant form.
Figure 5.4–3 Input form data sent from Excel
5.5
Reload an input form in Excel
Use the Load menu to reload an input form in Excel.
AARO SYSTEMS AB
67
AARO EXCEL CONNECTIVITY 14.0 USER MANUAL
Excel input forms
Figure 5.5–1 Reloading an input form in Excel
5.6
Edit an input form in Excel
Another period, company, input form and other dimension values can be
selected by choosing the menu AARO/AARO Input Form/Edit. In the
example below, period, company and business unit are available for selection.
Excel worksheet Protection, Look and Feel Settings are also accessible from
this screen (detailed further in the section of this user manual).
AARO SYSTEMS AB
68
AARO EXCEL CONNECTIVITY 14.0 USER MANUAL
Excel input forms
Figure 5.6–1 Editing an input form in Excel
5.7
Settings of input forms in Excel
To change input form settings, select the menu AARO/AARO Input
Form/Settings.
AARO SYSTEMS AB
69
AARO EXCEL CONNECTIVITY 14.0 USER MANUAL
Excel input forms
Figure 5.7–1 Changing input form settings
Settings can also be changed when the Protection, Look and Feel Settings
button is pressed when a new form is selected, or an existing form is edited
(see screenshot above).
The following window appears.
AARO SYSTEMS AB
70
AARO EXCEL CONNECTIVITY 14.0 USER MANUAL
Excel input forms
Figure 5.7–2 Setting up an input form in Excel
For more description on settings, see the following sections.
5.7.1
Protection options
Various protection options are available for the Excel worksheet which is being
used as an AARO input form; choose the option best suited to your needs.
Maximum protection – “Strict input form style”
Only enabled figure cells are editable. Everything else on the sheet is
protected. All changes to the sheet, except simple figure editing, must be
performed through the menus (e.g. adding columns, changing fixed
selections).
Medium protection – “Relaxed input form”
Enabled figure cells, column headings, fixed selections, and other cells
outside the figure area are editable. Only not disabled cells in the figure
area are protected (i.e. sums and greyed-out cells).
No protection – “Pure Excel Sheet”
No protection at all is applied. Anything on the sheet can be edited.
5.7.2
Selectable cells
Ticking the box to Allow only editable cells to be selected in the sheet
(makes [Tab] or [Enter] jump to the next editable cell) is useful if you
want to restrict the form to editable cells only – it may be useful for manual
AARO SYSTEMS AB
71
AARO EXCEL CONNECTIVITY 14.0 USER MANUAL
Excel input forms
entry of a large number of figures, as each entry press of [Enter] (or [Tab])
moves the cursor onto the next editable cell.
Note: This feature is used with maximum or medium level protection only.
5.7.3
Look and feel
Using the Paint the sheet with colours and Modify the workbook to
contain AARO colours paints the input form using the AARO colours.
The default setting for Excel input forms is to have a worksheet coloured, so
that it is easy to identify editable cells. If the “Paint the sheet with colours”
checkbox is cleared when an Excel input form is created, the form will be
created without any colour being applied.
In addition, it is possible to choose whether standard Windows colours or AARO
colours are applied to a worksheet. The default setting is to work with AARO
colours. If the checkbox “Modify the workbook to contain AARO colours” is
cleared when an Excel input form is created, standard Windows colours are
applied to the worksheet instead of the default AARO colours.
Note: the ‘Look and Feel’ settings discussed here for colour formatting are
‘forward steps’; clearing a checkbox does not automatically apply ‘backward
steps’ to change a worksheet to a previous state.
5.7.4
Auto-fit columns
If the Auto-Fit Columns checkbox is cleared when an Excel input form is
created, the form will be created without formatting to automatically fit the
column widths.
5.8
Colour palette
It is possible to change the colour palette used in Excel input forms to either
AARO colours or Excel (Windows) standard colours:
1. Select the menu AARO/AARO Input Form/Color Palette.
AARO SYSTEMS AB
72
AARO EXCEL CONNECTIVITY 14.0 USER MANUAL
Excel input forms
Figure 5.8–1 Changing color palette
2.
Choose the appropriate colour palette setting and press Close.
Figure 5.8–2 Setting up an input form palette in Excel
5.9
Visual refresh
Refresh worksheet formatting to the Excel input form default if formatting has
been modified, by pressing the AARO/AARO Input Form/Visual Refresh
menu.
AARO SYSTEMS AB
73
AARO EXCEL CONNECTIVITY 14.0 USER MANUAL
Excel input forms
Figure 5.9–1 Refreshing input form formatting
5.10
Reconcile
The Reconcile menu calls up an Excel version of AARO reconciliation reports.
Reconciliation within Excel operates in a similar way to reconciliation from the
AARO application. The only significant exception is that companies and legal
groups are chosen from within the settings of an AARO Excel input form; when
working with reconciliation in the AARO application, companies and legal
groups are chosen in the left pane.
For more details on the AARO Reconciliations functionality, please refer to the
Reconciliations section of AARO 14.0 User Manual.
To run a reconciliation report:
1. Select the menu AARO/AARO Input Form/Reconcile.
AARO SYSTEMS AB
74
AARO EXCEL CONNECTIVITY 14.0 USER MANUAL
Excel input forms
Figure 5.10–1 Running the reconciliation report
2. Make reconciliation report settings and press OK.
AARO SYSTEMS AB
75
AARO EXCEL CONNECTIVITY 14.0 USER MANUAL
Excel input forms
Figure 5.10–2 Reconciliation report settings
AARO SYSTEMS AB
76
AARO EXCEL CONNECTIVITY 14.0 USER MANUAL
Additional AARO Excel options
6.
Additional AARO Excel options
The AARO Excel add-in provides some additional options that can be helpful
when working with drill down reports, input forms and AARO formulas.
6.1
Order consolidation
One can order a consolidation from Excel:
1. Select menu AARO/Consolidation.
Figure 6.1–1 Running consolidation
2. Select period and company and press OK.
3. Pressing Refresh consolidation information will show the current and
latest consolidations for the selected period and company.
Figure 6.1–2 Ordering consolidation from Excel
The ordered consolidation appears in the consolidation queue in the AARO
application, on the menu Utilities/Consolidation.
6.2
Paste background data
It is possible to paste background data from the AARO application to Excel. The
following data can be pasted:
input form layout;
AARO SYSTEMS AB
77
AARO EXCEL CONNECTIVITY 14.0 USER MANUAL
Additional AARO Excel options
report layout;
list of dimension values;
cash and benchmarking data.
The user must be logged on to the AARO database.
To paste background data:
1. In Excel, select a cell where the data will be pasted.
2. Select the menu AARO/Paste from AARO/Background Data.
Figure 6.2–1 Pasting background data
3. Select the information source and data to be pasted and press Paste.
Figure 6.2–2 Pasting background data from AARO
The following information sources are available:
AARO SYSTEMS AB
78
AARO EXCEL CONNECTIVITY 14.0 USER MANUAL
Additional AARO Excel options
6.3
Option
Description
Input Layout
Input form layouts existing in the database.
Report Layout
Report layouts existing in the database.
Other
Dimensions and groups existing in the database.
Benchmarking
Cash and benchmarking data.
Paste the period setup
Period validation setup and period rates can be pasted to Excel from the AARO
application:
1. In Excel, select a cell where the data will be pasted.
2. Select the menu AARO/Paste from AARO/Period Setup.
Figure 6.3–1 Pasting period setup from AARO
3. Select period, company if required, the information source and data to be
pasted and press Paste.
AARO SYSTEMS AB
79
AARO EXCEL CONNECTIVITY 14.0 USER MANUAL
Additional AARO Excel options
Figure 6.3–2 Pasting period setup from AARO
The following information sources are available:
6.4
Option
Description
Dimension
Validation/Dimension validations tab settings will be
pasted for the selected period.
Dimension/
Company
Validation/Company/Dimension validations tab
settings will be pasted for the selected period and
company.
Rates
Rates tab settings will be pasted for the selected period.
AARO Excel settings
Some settings affecting the Excel progress when working with the AARO Excel
add-in are set up on the menu AARO/Settings.
AARO SYSTEMS AB
80
AARO EXCEL CONNECTIVITY 14.0 USER MANUAL
Additional AARO Excel options
Figure 6.4–1 Accessing AARO plug-in settings
Tick the required check boxes and press OK.
Figure 6.4–2 AARO plug-in settings
The settings are:
Setting
Description
Covered nwith a protecting
blue AARO splash
The progress window is coloured in blue.
Minimized
The progress window is minimized.
AARO SYSTEMS AB
81
AARO EXCEL CONNECTIVITY 14.0 USER MANUAL
Additional AARO Excel options
Setting
Description
Play a sound when ready
Plays a sound when an operation is
completed.
Tip: If you want another than default sound
to be played, place the file ABSXLready.wav
in the AARO/Excel Add-In folder.
Repeat the sound
6.5
Repeats the sound played when an
operation is completed untill the
confirmation window is closed.
About
Information about the current AARO database can be viewed on the menu
AARO/AARO About.
Figure 6.5–1 Opening the About information
The user is provided with information about the current database used and the
installed version.
AARO SYSTEMS AB
82
AARO EXCEL CONNECTIVITY 14.0 USER MANUAL
Additional AARO Excel options
Figure 6.5–2 About
AARO SYSTEMS AB
83