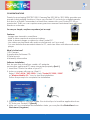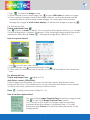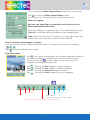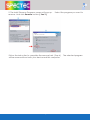
1
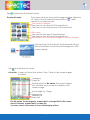
TM
Spectec Secure Digital
PDA Camera
SDIO Cameras
User’s Manual
ver. 2.0
Contents
CONGRATULATIONS ------------------------------------------------- -P.1
So easy so simple, anytime anywhere just a snap!---------------- -P.1
What’s in the box?---------------------------------------------------- -P.1
Software installation ---------------------------------------------------P.1
Getting Started---------------------------------------------------------P.2
How to capture images?----------------------------------------------P.2
How to capture videos? ----------------------------------------------P.3
How to set the capture timer? ----------------------------------------P.3
How to view the saved images or videos?---------------------------P.4
* Slide show mode-------------------------------------------------- P.4
* Thumbnail mode -------------------------------------------------- P.4
* List mode ---------------------------------------------------------- P.4
How to view the Image Record Info & add a note?---------------- P.4
How to send saved images or videos by E-mail ?------------------ P.4
How to beam the saved images or videos?------------------------- P.5
How to save the images and videos? ------------------------ -------P.5
How to transfer the saved images and videos to your PC?---------P.5
How to remove programs? ---------------------- ---------------------P.6
Warranty ------------------------------------------------------ -------- P.8
CONGRATULATIONS
Thanks for purchasing SPECTEC SDIO Camera.The SDC-001A/ SDC-003A provides you
powerful and multiple functions. It turns your Pocket PC not only to a digitalcamera,
but also to a Digital Camcorder.Just insert the camera into your Pocket PC SD expansionslot. Then you can capture every precious moment and share them with your
friends or customers.
So easy so simple, anytime anywhere just a snap!
Features:
- Images are viewed in a real time.
- Able to take snapshots and record videos.
- Able to beam images or videos to other Pocket PC.
- Live video synchronized with audio could be sent out by e-mail.
- You can transfer the recorded videos to PC, and view them with Microsoft media
player.
What’s in the box?
1.SD Camera
2.Application Software CD
3.Travel pouch
4.Warranty Information
Software installation
First, be sure the ActiveSync cradle, AC adapter,
connection cable and PC were connected properly.(See1 )
1. Insert the CD into the drive of your PC.
2. Auto-run screen will pop-up. (See 2 )
Select “ SDC-001A / SDC-003A “ then "Pocket PC 2002 / 2003"
or "Window Mobile 5.0 " icon to start the installation.
Follow the prompts to complete the installation.
3. Plug the Pocket PC into the cradle. Run ActiveSync to load the application from
PC onto your Pocket PC.(See 3)
4. After you’ve completed the installation tasks, you may find the PhotoView from:
Start menu\Programs\
1
Getting Started
1. Make sure the Pocket PC is fully charged.
2. Before you insert the SD camera to your Pocket PC, please check the direction is
same as your Pocket PC expansion slot.
3. After you inserted the camera into the SD expansion slot,
heck if the SD Camera’s LED is on. (If the LED light is on,
that means the SD Camera is working.) ( See 1 )
4. The screen will get into an image mode directly.
When the screen shows a live image, you may
start to take images or select other modes
you want. ( See 2 )
Or you may execute the PhotoView from: Start menu\Programs\ ( See 3 )
How to capture images?
2
1. Tap
to enter the image mode.
2. When screen shows a live image, tap
or press LED button to take an image.
3. If the captured image is saved, the image will show on the thumbnail bar.The
thumbnail bar shows the latest saved images .You may select thumbnail to
enlarge the image to a full screen display. Or delete the image by tapping
For Advanced User
Further adjustment icon
Tap
to show a preferences list. You may select the capture size for your images.
Or set the Brightness, Contrast, Sharpness, Color, BackLight,Jpeg quality from each
adjustment bars directly. Timer
- Setting the image timer ( Refer to P. 6 )
How to capture videos?
1. Tap
to enter the Video mode.
2. Start filming by tap
and stop filming by tap
.
3. If the video is saved, then the first photo of video will be listed on the thumbnail
bar.
For Advanced User
Further adjustment icon
( Refer to P.4 )
Anti-flicker control: (50Hz/60Hz)
If the image shows flickering, you may choose the correct anti-flicker control
toimprove this issue. This control allows you to switch the anti-flicker control based
on the local power system with choices of 50Hz or 60Hz.
Timer
- Setting video timer ( Refer to P. 6 )
How to set the capture timer?
You can find the Image Capture Timer under the image mode.
Tap
to show the Image Capture Timer screen.
You may set up the timer for a single capture ormultiple
captures.When the setting is completed, tap OK to start
thetimer or tap Cancel to undo the setting and back to the
image mode.
3
You can find the Video Capture Timer under the video mode.
Tap
to show the Video Capture Timer screen.
You may set up the timer for the Video Duration and
Time until capture.
Also you can select the record audio icon to have your live
video synchronized with audio.
When the setting is completed, tap OK to start the timer or tap
Cancel to undo the setting and back to the image mode.
Note: When your Pocket PC memory is not enoughto save the
videos, then you’ll fail to proceed a video capture.
How to view the saved images or videos?
You can view the saved images form Slide Show / Thumbnail / List mode by tapping
Tap
to enter the Slide Show mode.
Slide Show mode
Tap
, the screen will playback the saved imagesand videos in
the current category automatically. Video file only showed
the first photo with
on the screen. Or you may view the
images by tapping following icons:
Tap
Tap
Tap
Tap
Home
End
, viewing the first image in current category.
, viewing the last image in current category.
, viewing the previous image in current
, viewing the next image in current category.
Next
Previous
Audio Stop
A u d i o Pa u s e
A u d i o Pl a y
Information
(only for viewing, unable to edit)
Display saved images or videos automatically
4
Tap
to enter the Thumbnail mode.
Thumbnail mode
The screen will show the saved images and the firstphoto
of video. If the thumbnail showed with a
mark,
means it’s a video record.
The current category
Tap here to view the first 9-thumbnail set
Tap here to view the previous 9-thumbnail set
File name
Tap here to view next 9-thumbnail set.
Tap here to view the last 9-thumbnail set.
The location of your saved images in current category.
Double-click the thumbnail, the thumbnail will get
into a Slide Show mode and will enlarge into a full
screen display.
Tap
to enter the List mode.
List mode Screen will show the Name / Size / Date of the saved images
or videos.
Category
Page up
Double-click the file name, the screen willget
into the Slide show mode and display a full
screen image.
Move Page Up / Page
Page down.
Deselect all
Select all
The file name shows Imgxxxx, means that’s a image file.The file name
shows Vdoxxxx, means that’s a video file.
You may select a file name to have following functions:
4
Save selected images or videos to location (iPAQ file store/ Main memory)
Beam the selected images or videos out
Send mails with selected images or videos
Add a note to a selected imDelete selected images or
How to view the Image Record Info & add a note?
Viewing the Image Record Info:
Under Slide Show mode by tapping
,you will enter the information screen.The
screen will show Name / Dimension/Record type / Record size / Created date /
Category and a Note. You only can view the data but can not edit. If you want to edit
the info for your saved images, please enter the Thumbnail modeor List mode by
tapping
to enter the information screen to add a file name or select a category for
your saved images or videos.
Adding a note:
First, select an image or a file name.Then tap
to enter
the information screen to
start editing.Tap OK to save the info or tap Cancel to
back to the previous screen.
How to send saved images or videos by E-mail ?
You may send the saved images or videos by E-mail from Thumbnail mode or List
mode.Under Thumbnail mode, only able to select one image or video file to send.
Under List mode, able to select multiple files by taping or taping
to select all to
mail. Or tap
to deselect all.
First, select an image or a file name. Then
tap
to open a new E-mail message.
The selected image is attached to the
messageas a file attachment.
Tap OK to send or tap Cancel to back to
the previous screen.
4
How to beam the saved images or videos?
You can beam the saved images or videos from Thumbnail mode or List mode.
Align the infrared port on your Pocket PC with the infrared port on the receiving
device. On the receiving device (Pocket PC), tap Start menu / Infrared Receive icon
to get ready to receive.
First, select an image or a file name. Tap
, then
the screen will show “PhotoView will bring up file
explorer. You can use the infrared function in the
file explorer”. Tap OK to open the File Explorer
screen. Select one file, then the screen will showa
list.Tap” Beam File ---” and the screen will enterto
Infrared Send screen. Tap OK to complete the
beam task.
How to save the images and videos?
You may rename your image or video or select a category for your image or video.
Also can saved the image or video to a designate location (iPAQ File Store / Main
memory).
How to transfer the saved images and videos to your PC?
1. Connect the Pocket PC to the PC with ActiveSync program, and make sure they are
fully functioning.
2. Double click the
icon from PC. Then the saved images and videos bill be howed
on the Download photos screen.
3. Select the images or videos which you want to save. And click Download button to
download the selected files to PC. The selected files will be saved to:
My Documents\PhotoView\
5
Note:
If your iPAQ is 5400 series or 39xx series, Please download the driver to enable the SDIO
before install the Application Software for your device.
Below is the web site you can download the driver for iPAQ 5400 series.
http://h18007.www1.hp.com/support/files/handheldiPAQ/us/download/18285.html
Below is the web site you can download the driver to enable SDIO for 3950-3955 series.
http://h18007.www1.hp.com/support/files/handheldiPAQ/us/download/17002.html
Below is the web site you can download the driver for iPAQ 3970-3975 series.
Gttp://h18007.www1.hp.com/support/files/hankheldiPAQ/us/download/17002.html
How to remove programs?
You can remove/uninstall program from both your device and PC completely by
following steps:
Connect the Pocket PC to the PC with ActiveSync Program, and make sure they arefully
functioning.
1. Make sure the PDA exits from the PhotoView.
2. The SD Camera is not inserted in the PDA.
3. If your PDA with Pocket PC 2002, you need to perform a soft reset for the PDA.
If your PDA with Pocket PC 2003, you don’t have to perform a soft reset.
4. Go to the PC and execute the Microsoft ActiveSync. ( See 1 )
Click Tools menu and select Add/Remove Programs.( See 2 )
6
5. The Add/ Remove Programs screen will pop-up.
remove. And click Remove button. ( See 3 )
Select the program you want to
Follow the instruction to complete the remove task. ( See 4 )
will be removed from both your device and this computer.
7
The selected program
LIMITED WARRANTY
HARDWARE: SPECTEC CO., LTD (SDC-001A/ SDC-003A) Warrants to the original end-user
“Customer” that SPECTEC branded products will be free from defects in workmanship and
material under normal use for 90 days from the original purchase date.
SOFTWARE: SPECTEC CO., LTD. (SDC-001A/ SDC-003A) warrants to the end-user “Customer” that SDC-001A PDA CAMERA software, the SDC-001A PDA camera software performs
a compatible product in substantial conformance to the specifications for 90 days from
the original purchase date.
EXCLUSION: This warranty excludes (a) physical damage to the surface of the product including scratches, crack, or outside casing; (b) damage caused by mishandle, disregard,
incorrect installation or testing, unauthorized endeavor to open, repair or any other cause
beyond the range of the intend use; (c) damage cause by accident, fire, power changes, acts of God or risks; (d) other products with any non SDC-001A / SDC-003A PDA camera
compatible, if this product causes the problem.
PURCHASING WARRANTY SERVICE: Its necessary for customer to contact SDC-001A / SDC-003A
PDA camera representatives or near by authorized stores with the applicable warranty period.
Require a receipt or warranty card for the original purchase date. SPECTEC is not liable for
customer products accepted without a warranty, service authorization provided it might
be refused.
Thanks for choosing the SDC-001A / SDC-003A PDA camera, SPECTEC and any authorized stores
are pleased to serve you if any difficult issues occurred.
8