1
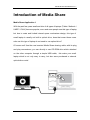
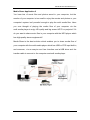
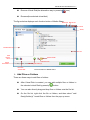
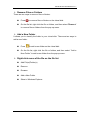
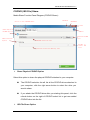
Media Share
User Manual
V 1.1
Media Share User Manual V1.1
TABLES OF CONTENTS
Introduction of Media Share ............................................................. 1
System Requirements on PC:.......................................................... 3
Connect to both sides before using Media Share application. ....... 4
Steps by steps to operate Media Share........................................... 4
Virtual disk Share......................................................................................................4
Add Virtual Disk ............................................................................................... 4
Add Files or Folders......................................................................................... 5
Remove Files or Folders .................................................................................. 6
Add a New Folder............................................................................................. 6
Right click menu of the file on the file list ........................................................ 6
CD/DVD (ISO File) Share .........................................................................................7
Share Physical CD/DVD Option ........................................................................ 7
ISO File Share Option....................................................................................... 7
Function Descriptions of Media Share Window:.............................. 8
Start to share data via Media Share ................................................ 8
Eject Virtual Disk / (CD/DVD) Drive ................................................. 9
Powerful memory of Media Share.................................................... 9
i
Media Share User Manual V1.1
Introduction of Media Share
Media Share Application 1
With the past few years small and slim of all types of laptops (Tablet / Netbook /
UMPC / CULV) become popular, more and more people use this type of laptop,
but due to costs and limited internal space mechanism design, this type of
small laptop is usually not built-in optical drive, does that mean those users
who use this type of laptop do not need to use optical drive?
Of course not! Use the new invented Media Share sharing cable, with its plug
and play convenience, you can directly to use CD-ROM drive which attached
on the other computer through a simple USB cable, this make your small
laptop which is not only easy to carry, but also save purchased a external
optical drive costs!
1
Media Share User Manual V1.1
Media Share Application 2
You have lots of movie files and photos saved in your computer, but the
monitor of your computer is too small to enjoy the movies and photos or your
computer’s system isn’t powerful enough to play the multi-media files. Have
you ever thought of playing the media files of your computer via the
multi-media player to enjoy HD quality and big screen HDTV or projector? Or
do you want to share music files in your computer with the MP3 player which
has high-quality stereo equipments?
Media Share is the best solution which enables you to share media files of
your computer with the multi-media player which has USB or OTG input built-in,
and moreover, via an easy-to-use User Interface and a USB drive and the
transfer cable to connect to the computer and multi-media player.
2
Media Share User Manual V1.1
System Requirements on PC:
² Microsoft Windows 2000 SP3/ Win XP 32-bit/ Vista/ Win 7 32-bit or 64-bit
²
Intel® Pentium® II Processor or later
²
512MB RAM or higher
²
Hard disk space requirement of at least 100 MB
²
Built-in USB port 1.1 or 2.0
Host PC OS support:
Ø
Windows 7
Ø
Windows Vista
Ø
Windows XP
Ø
Windows 2000
Support client system with USB or OTG input:
Ø
PC
Ø
MAC
Ø
HDTV
Ø
DVD/BD Player
Ø
Home Theater
Ø
HD Projector
Ø
BD Media Player
3
Media Share User Manual V1.1
Connect to both sides before using Media
Share application.
Ø Connect the USB Media Transfer Cable to your computer first.
n
Media Share application will be auto -run. If the auto-run command is
closed, you have to open my computer and double click Media S hare
CD Drive on the removable storage to launch Media Share.
Ø Connect the other end of the USB Media Transfer Cable to your
multi-media player with USB or OTG input later.
n
If you connect it to the multi-media player first, Media Share will not
be launched until it connects to PC.
Steps by steps to operate Media Share
Ø First of all, open Media Share window.
Media Share has provided two ways for sharing: Virtual Disk Sharing or
CD/DVD/ISO File Sharing.
Ø Add Virtual Disk
n
Press
to create a virtual disk;the defualt name of the virtual disk
is “No Name”. Right click the virtual disk , you can
n
Add Virtual Disk
4
Media Share User Manual V1.1
n
Remove Virtual Disk(the alternative way is pressing
n
Rename(the selected virtual disk)
icon.)
The figure below displays each function button of Media Share.
Minimize Maximize
Close
About
Virtual Disk List
File List
Add
Virtual
Disk
Add a Folder
Remove File
Active
Information
Add File(s)/Folder(s)
Remove
Virtual Disk
The Screenshot of Media Share
Ø Add Files or Folders
There are three ways to add files or folders:
n
After Virtual Disk is created, you can add multiple files or folders in
the selected virtual Disk by pressing
button.
n
You can also directly drag and drop files or folders onto the file list.
n
On the file list, right click the file or folders, and then select ”add
files(s)/folder(s)” to add files or folders from the pop-up menu.
5
Media Share User Manual V1.1
Ø Remove Files or Folders
There are two ways to remove files or folders:
n
Press
n
On the file list, right click the file or folders, and then select ”Remove”
to remove files or folders on the virtual disk.
to remove files or folders from the pop-up menu.
Ø Add a New Folder
It allows you to classify the folder in your virtual disk. There are two ways to
add a new folder.
n
Press
n
On the file list, right click the file or folders, and then select ”Add a
to add a new folder on the virtual disk.
New Folder” to add a new folder from the pop-up menu.
Ø Right click menu of the file on the file list
n
Add File(s)/Folder(s)
n
Remove
n
Rename
n
Add a New Folder
n
Show in Windows Explorer
6
Media Share User Manual V1.1
CD/DVD (ISO File) Share:
Media Share Function Panel Diagram (CD/DVD Share):
Minimun
Switch to Use CD/DVD Share
Maxmimun
Close
Share Physical
CD/DVD Option
About
Refresh CD/DVD
List
Share ISO File
Option
CD/DVD Selection List
ISO File Selection History List
Ø
Share Physical CD/DVD Option
Select this option to share the phsycail CD/DVD attached to your computer:
n
The CD/DVD selection list will list all the CD/DVD drives attached to
your computer; click the right arrow button to select the drive you
want to share.
n
If you attach the CD/DVD drive after you starting this panel, click the
refresh button on the right of CD/DVD select list to get new added
CD/DVD drive into the list.
Ø
ISO File Share Option
7
Prompt to
select ISO
file
Media Share User Manual V1.1
Select this option to share the ISO file(CD/DVD image file):
n
Click
button to prompt a file selection dialog to browse and
select the ISO file.
n
The ISO file selection history list will remember the last ten selected
ISO file path.
Function Descriptions of Media Share
Window:
Minimize: Click
button on the top-right corner of Media Share Window to
minimize the window.
Maximize: Click
button on the top-right corner of Media Share Window to
maximize the window.
Close: Click
on the top-right corner of Media Share Window to close the
window and exit Media Share.
Active Information: Shows the selected virtual disk’s added files and the total
size.
About: Click
, to show the version of Media Share.
Start to Share Data via Media Share
Ø
After you creating the virtual drive or selecting the CD/DVD drive, you can
simply press “
” button to share all data in the
selected virtual disk / ODD (CD/DVD) drive .
8
Media Share User Manual V1.1
Ø
Each time, you are able to share one virtual disk / ODD (CD/DVD) drive
with the other multi-media player with USB/ OTG input.
Ø
After you press”
”, a message will show” Virtual Disk
/ ODD (CD/DVD) drive is sharing, wait a moment”. Then, you can play the
media files from your computer by your multi-media player.
Ø
Make share that you connect the USB Media Share cable to both ends
before pressing “Share” button..
Ø
If the file types you share from your computer cannot be read by your
multi-media player, it will skip the unsupported files and only play the
supported files.
Eject Virtual Disk / (CD/DVD) Drive
Ø
If you want to use other functions of Media Share while virtual link is
sharing, you have to press “
Ø
” button.
If you press” Close” button while Virtual link is sharing, a pop-up window
will remind you to eject Virtual Disk / (CD/DVD) Drive first and quit it later.
Powerful Memory of Media Share
Ø
After you close media share, the shared data will be save in Media Share.
Next time you open Media Share, the previous shared data will be shown
immediately.
9