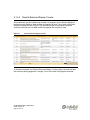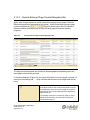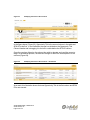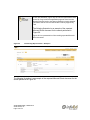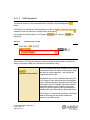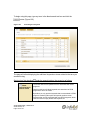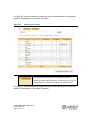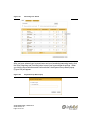
1
INVESTMENT GROUP 33 SPIN USER GUIDE Version 13.0, US Edition Legal Disclaimer InfoEd International, Inc. has prepared this Document for use by InfoEd International, Inc. personnel, licensees, customers, and prospective clients. The information contained in this Document is solely owned, and proprietary to, InfoEd International, Inc. All materials and information contained in this Document are copyrighted and all rights and privileges contained therein are afforded to, and enforceable, by InfoEd International, Inc. The material and information contained in this Document may not be modified, altered, or integrated into any other electronic or printed material without first obtaining written permission from InfoEd International, Inc. Licensees and customers may copy the information contained in this Document for distribution to authorized users for the purposes of developing internal training materials, provided that all titles, trademarks, and copyright, proprietary, and restricted rights notices shall be reproduced in all such copies or materials. Licensee shall not copy, make available, nor distribute all or part of the information contained in this Document to any third party by assignment, sublicense, subscription, or by any other means. InfoEd International, Inc. shall not be liable for technical or editorial errors or omissions in this Document or in any reproduced, translated, or transmitted copies or for incidental or consequential damages resulting from the furnishing, performance, or use of this material. InfoEd International, Inc. reserves the right to revise the information contained in this Document without advance notice. InfoEd International, Inc. will provide a revised electronic copy of this Document with each version release. SPIN USER GUIDE, VERSION 13 InfoEd Global, Inc. Page 2 of 144 Illustrative Prompts We have scattered some simple illustrative prompts throughout this documentation for easy reference and recognition. Here’s a listing of these prompts along with a brief description of each for you to familiarize yourself with and become accustomed to seeing. This icon typically clues the user in to a key point in understanding and/or utilizing the selected system component, functionality or business rule. You will find this icon next to an important piece of information new to this release or a key update from previous documentation versions. Text by this icon provides the user with a point of advice on what to avoid to keep you on the right track. This icon calls attention to an additional word of note that the user may find helpful and/or informative for the selected subject matter. You will find this icon next to an important bit of information that the user might find useful in their quest to gain a quick insight into the subsequent section. This icon is used to depict a sample scenario or illustrated example that more clearly demonstrates the selected functionality. SPIN USER GUIDE, VERSION 13 InfoEd Global, Inc. Page 3 of 144 Manual Conventions Note: Some warnings and notes within the text are written thusly for emphasis. Because of the sheer number of setups and screens in the InfoEd Suite, navigating to a particular setup often involves several separate clicks; so, the navigation instructions are abbreviated, such as Profile > Employment > Add New. This shorthand representation should be interpreted as such: ‘Select Profile, then Select Employment, and then Select Add New’. In addition, all navigation instructions in this admin manual assume that you are beginning from the New Portal screen. If you are already working in the Old Portal, you should replace “Administration menu > Facility Management Admin” in the navigation directions with “Administration > Facility Management Admin.” Words bolded within a sentence are meant to direct you to click on a particular item or link; such as, ‘Click on Profile to open your profile for examination and/or editing.’ A section containing a glossary and other supplemental information is located at the end of this document. SPIN USER GUIDE, VERSION 13 InfoEd Global, Inc. Page 4 of 144 Cross-Referencing This document has been enhanced with a myriad of cross-referencing links to allow users to more efficiently and effectively navigate their way through the various, interrelated pieces of functionality included in this documentation. Cross-referencing links have been integrated into the Table of Contents as well as the Table of Figures sections of this document to allow a user to access a desired Section or Figure (screenshot) directly from their respective listing within the Table of Contents or Table of Figures. For example, if a user would like to read more about the SPIN Main Screen, they would simply go to the Table of Contents and look for ‘SPIN Main Screen’ instead of reading which section and page number the ‘SPIN Main Screen’ information is located in and then manually paging through the document to find the desired page, Cross-referencing links on the Table of Contents, Table of Figures and throughout the narrative of this documentation allow the user to press the ctrl (control) button and single click on the desired Section number or page number to be brought automatically to the clicked on section/page. Further, if the user would like to see a screenshot of the ‘SPIN Main Screen’, they would simply find the desired figure in the Table of Figures (Figure 8) and ctrl-click to be taken directly to the desired screenshot. Cross-reference links have also been included within this documentation to refer to an item that appears in another location in a document. For example, you may be reading about the functionality of the SPIN Main Screen in a narrative section of text and next to where the screen name is listed we may have included (See Section 3.1) or (See Section 3.1, The SPIN Main Screen). A simple listing of the related screenshot Figure and/or Section itself is very helpful in helping navigate your way successfully from screen-to-screen or section-to-section but to make it even easier, not only are the related Figure(s) and Section(s) listed, the numbers of the Section/Figure can be ctrl-clicked for instant access to the related item. SPIN USER GUIDE, VERSION 13 InfoEd Global, Inc. Page 5 of 144 Table of Contents 1 2 Welcome ..................................................................................................... 12 Logging Into SPIN ....................................................................................... 13 2.1 2.2 eRA Access............................................................................................... 14 Anonymous Access ................................................................................... 16 2.2.1 2.3 Login Access ............................................................................................. 20 2.3.1 3 Additional Functionality after Login .......................................................... 20 Working With SPIN ..................................................................................... 22 3.1 The SPIN Main Screen ............................................................................. 22 3.1.1 3.1.2 3.1.3 3.1.4 3.1.5 3.1.6 4 SPIN Login & Copying Anonymous Settings Profile ................................ 19 The InfoEd SPIN Logo Icon ..................................................................... 24 Signing Out of SPIN ................................................................................ 25 The Yellow Tool Bar ................................................................................ 26 Search Mode ........................................................................................... 27 Keyword Search Help.............................................................................. 28 Progressive Text Feature ........................................................................ 31 Searching For A Topic ................................................................................ 33 4.1 Basic Search ............................................................................................. 33 4.1.1 4.1.2 4.1.3 4.1.4 Performing A Basic Search ..................................................................... 34 Saving Your Search Criteria .................................................................... 35 Results Returned .................................................................................... 36 Navigating Through the Results Returned ............................................... 39 4.1.4.1 Results Returned Program Count ............................................................. 40 4.1.4.2 Results Returned Display Counter ........................................................... 41 4.1.4.3 Results Returned Page Counter/Navigation Bar ...................................... 42 4.1.5 Sorting Search Results............................................................................ 44 4.1.5.1 Modifying the Order of the Columns ......................................................... 44 4.1.5.2 Grouping by the Columns ......................................................................... 46 4.1.5.3 Sort Results Using The Column Header(s) .............................................. 47 4.1.6 4.1.7 4.1.8 Filtering Search Results .......................................................................... 49 Viewing The Program Details .................................................................. 51 Minimizing The Program Details .............................................................. 54 4.1.8.1 Program Details Refresh Button ............................................................... 54 4.1.9 View More Detailed Opportunity Information ........................................... 55 4.1.9.1 Opportunity Description Tab ..................................................................... 57 4.1.9.2 Eligibility Requirements Tab ..................................................................... 58 SPIN USER GUIDE, VERSION 13 InfoEd Global, Inc. Page 6 of 144 4.1.9.3 Funding Guidelines Tab ............................................................................ 60 4.1.9.4 Sponsor Information Tab .......................................................................... 62 4.1.9.5 Funding Opportunity Number Information Box ......................................... 63 4.1.10 Bookmarking A Specific Program ............................................................ 64 4.1.11 Exporting Your Search Results To Word or Excel ................................... 68 4.1.11.1 4.2 Customizing Export Content ................................................................. 73 Advanced Search ...................................................................................... 77 4.2.1 Advanced Search Icon Bar ...................................................................... 78 4.2.1.1 AND/OR Search Logic .............................................................................. 79 4.2.1.2 Add Expression ......................................................................................... 80 4.2.1.2.1 Single-Level Advanced Search Example ............................................ 85 4.2.1.3 Add Group ................................................................................................. 86 4.2.1.3.1 Multi-Level Advanced Search Example .............................................. 86 4.2.2 4.3 Category Filters ......................................................................................... 92 4.3.1 4.3.2 4.3.3 4.3.4 4.3.5 4.4 Bookmarked Opportunities .................................................................... 120 Shared Opportunities ............................................................................ 124 Funding Guides ....................................................................................... 126 4.7.1 4.7.2 4.8 Saved Searches .................................................................................... 111 Shared Searches .................................................................................. 115 Bookmarks .............................................................................................. 119 4.6.1 4.6.2 4.7 Search Options ..................................................................................... 103 Detail View Column Options .................................................................. 107 Searches ................................................................................................. 110 4.5.1 4.5.2 4.6 Applicant Location ................................................................................... 94 Applicant Type ........................................................................................ 96 Project Type ............................................................................................ 98 Project Location .................................................................................... 100 Citizenship Status ................................................................................. 101 Search Options ....................................................................................... 102 4.4.1 4.4.2 4.5 An Advanced Search Example ................................................................ 88 Browse Federal Business Opportunities ................................................ 127 US Federal Register Guide ................................................................... 129 Keywords ................................................................................................ 131 4.8.1 Search................................................................................................... 132 4.8.1.1 Including Broader and Narrower Terms.................................................. 135 4.8.2 4.8.3 4.8.4 Saved Keyword Groups ........................................................................ 139 Shared Keyword Groups ....................................................................... 141 Using a Keyword Group as Part of a Search ......................................... 143 SPIN USER GUIDE, VERSION 13 InfoEd Global, Inc. Page 7 of 144 Table of Figures Figure 1 Logging into the eRA Portal ........................................................................................ 14 Figure 2 Find Funding in the eRA Portal ................................................................................... 15 Figure 3 SPIN Main Screen ...................................................................................................... 16 Figure 4 InfoEd Global Website ................................................................................................ 17 Figure 5 Accessing SPIN Via the InfoEd Website .................................................................... 17 Figure 6 SPIN Sign In Link ........................................................................................................ 18 Figure 7 SPIN Login Popup ...................................................................................................... 18 Figure 8 SPIN Main Screen ...................................................................................................... 22 Figure 9 New InfoEd SPIN Logo Icon ....................................................................................... 24 Figure 10 SPIN Logo Icon Screen Refresh ................................................................................. 25 Figure 11 Logout Popup .............................................................................................................. 25 Figure 12 The Yellow Tool Bar .................................................................................................... 26 Figure 13 Search Mode ............................................................................................................... 27 Figure 14 Keyword Search Help Popup ...................................................................................... 28 Figure 15 Basic Search ............................................................................................................... 34 Figure 16 Performing a Basic Search ......................................................................................... 35 Figure 17 Save Current Criteria Popup ....................................................................................... 36 Figure 18 Results Returned Section ........................................................................................... 37 Figure 19 Category in SPIN Search ............................................................................................ 38 Figure 20 Results Returned Program Count ............................................................................... 40 Figure 21 Results Returned Display Counter.............................................................................. 41 Figure 22 Results Returned Page Counter/Navigation Bar ........................................................ 42 Figure 23 Modifying the Order of the Columns ........................................................................... 45 Figure 24 Modifying the Order of the Columns – The Results .................................................... 45 Figure 25 Grouping by the Columns ........................................................................................... 46 Figure 26 Grouping by the Columns – The Results .................................................................... 47 Figure 27 Sort Results Using the Column Header(s) .................................................................. 48 Figure 28 Sort Results Using the Column Header(s) – Reverse Order ...................................... 49 SPIN USER GUIDE, VERSION 13 InfoEd Global, Inc. Page 8 of 144 Figure 29 Filtering Search Results .............................................................................................. 49 Figure 30 Program Details Checkbox & Plus/Minus Button ........................................................ 51 Figure 31 View Program Details – Default View ......................................................................... 52 Figure 32 Expand Program Details ............................................................................................. 53 Figure 33 View Program Details – Expanded View .................................................................... 53 Figure 34 Minimize Program Details ........................................................................................... 54 Figure 35 Program Details Refresh ............................................................................................. 55 Figure 36 Opportunity Title Link .................................................................................................. 55 Figure 37 Opportunity Information Popup ................................................................................... 56 Figure 38 Opportunity Description Tab ....................................................................................... 57 Figure 39 Eligibility Requirements Tab – Scroll 1 ....................................................................... 58 Figure 40 Eligibility Requirements Tab – Scroll 2 ....................................................................... 59 Figure 41 Funding Guidelines Tab .............................................................................................. 60 Figure 42 Sponsor Information Tab ............................................................................................ 62 Figure 43 Screenshot Name ....................................................................................................... 63 Figure 44 Bookmarking a Specific Program in Results Returned ............................................... 65 Figure 45 Bookmark Group Popup ............................................................................................. 65 Figure 46 Bookmark Group Popup – Create New Bookmark Group .......................................... 66 Figure 47 Bookmark Group Popup – Select Existing Bookmark Group ..................................... 67 Figure 48 Bookmark Group Popup – Select Multiple Existing Bookmark Groups ...................... 67 Figure 49 Export Search Results Feature ................................................................................... 68 Figure 50 File Download Popup .................................................................................................. 69 Figure 51 Sample Exported Search Results Document ............................................................. 69 Figure 52 Exported Document Save As Popup .......................................................................... 70 Figure 53 Download Complete Popup ........................................................................................ 71 Figure 54 Folder View Popup ...................................................................................................... 71 Figure 55 Different Format Validation Popup .............................................................................. 72 Figure 56 Microsoft Office Help Screen ...................................................................................... 73 Figure 57 Customizing Export Content – Example 1 .................................................................. 74 Figure 58 Customizing Export Content – Example 1 Resulting Exported Document ................. 74 SPIN USER GUIDE, VERSION 13 InfoEd Global, Inc. Page 9 of 144 Figure 59 Customizing Export Content – Example 2 .................................................................. 75 Figure 60 Customizing Export Content – Example 2 Resulting Exported Document ................. 76 Figure 61 SPIN Search Options Popup – Advanced Search ...................................................... 77 Figure 62 Advanced Search Main Page ..................................................................................... 78 Figure 63 Advanced Search Icon Bar ......................................................................................... 78 Figure 64 AND/OR Search Logic Function ................................................................................. 79 Figure 65 Add Expression Icon Bar ............................................................................................ 80 Figure 66 Adding An Expression – Full Program/Field List ........................................................ 81 Figure 67 Adding An Expression – Contains Lists ...................................................................... 84 Figure 68 Adding An Expression – Equals List ........................................................................... 85 Figure 69 Single Level Advanced Search Sample ...................................................................... 86 Figure 70 Multi-Level Advanced Search ..................................................................................... 87 Figure 71 Advanced Search – Setting Up The First Expression ................................................ 88 Figure 72 Advanced Search – Adding A Second Expression ..................................................... 89 Figure 73 Advanced Search - Adding Additional Expressions ................................................... 89 Figure 74 Advanced Search - Adding Groups ........................................................................... 90 Figure 75 Category Filters Main Menu ........................................................................................ 92 Figure 76 SPIN Search Filters Popup ......................................................................................... 93 Figure 77 Applicant Location ....................................................................................................... 95 Figure 78 Applicant Type ............................................................................................................ 97 Figure 79 Project Type ................................................................................................................ 99 Figure 80 Project Location ........................................................................................................ 100 Figure 81 Citizenship Status ..................................................................................................... 101 Figure 82 Search Options Main Menu ...................................................................................... 103 Figure 83 SPIN Search Options Popup .................................................................................... 103 Figure 84 Detail View Column Options ..................................................................................... 108 Figure 85 Chosen Detail View Columns ................................................................................... 109 Figure 86 Chosen Detail View Columns - Results .................................................................... 110 Figure 87 Searches Main Menu ................................................................................................ 110 Figure 88 Available Saved Searches Screen ........................................................................... 111 SPIN USER GUIDE, VERSION 13 InfoEd Global, Inc. Page 10 of 144 Figure 89 Load Selected Criteria Popup ................................................................................... 114 Figure 90 Search Results .......................................................................................................... 115 Figure 91 Available Shared Searches....................................................................................... 116 Figure 92 Load Selected Criteria Popup ................................................................................... 117 Figure 93 Loading A Shared Search ......................................................................................... 118 Figure 94 Shared Search Results ............................................................................................. 118 Figure 95 Bookmarks Main Menu ............................................................................................. 120 Figure 96 Bookmarked Opportunities ....................................................................................... 121 Figure 97 Add New Group Popup ............................................................................................. 123 Figure 98 Shared Opportunities ................................................................................................ 125 Figure 99 Shared Opportunities – Viewing Shared Programs .................................................. 126 Figure 100 Funding Guide Main Page ........................................................................................ 127 Figure 101 FedBizOpps .............................................................................................................. 128 Figure 102 US Federal Register Guide ....................................................................................... 130 Figure 103 Keywords Main Menu ............................................................................................... 131 Figure 104 Keywords Screen ...................................................................................................... 132 Figure 105 Searching for a Keyword ........................................................................................... 133 Figure 106 Broadening Your Search ........................................................................................... 136 Figure 107 Narrowing Your Search ............................................................................................. 137 Figure 108 Keyword Group Name Popup ................................................................................... 137 Figure 109 Confirm Exit Popup ................................................................................................... 138 Figure 110 Saved Keyword Groups ............................................................................................ 139 Figure 111 Saved Groups – Expanded Detail ............................................................................ 141 Figure 112 Shared Keyword Groups ........................................................................................... 142 Figure 113 Using a Keyword Group as Part of a Search ............................................................ 144 SPIN USER GUIDE, VERSION 13 InfoEd Global, Inc. Page 11 of 144 1 Welcome InfoEd is the leading provider of software solutions for managing sponsored programs. Worldwide, over six hundred academic, medical and scientific institutions rely on InfoEd to support their grant and contract activity. InfoEd's proven web-based modules streamline processes, enable proactive monitoring of compliance, and enhance internal and external collaboration. SPIN provides a comprehensive warehouse of current and relevant funding opportunities for a variety of types of applicants. Sponsors, both public and private, from around the world, are covered on a regular basis to ensure that the most up to date information is provided. The application is designed to place the user as the central factor in the queries; various options and filters are available to describe the applicant (and his/her organization) as well as the applicant’s current needs. SPIN also contains functionality for the administrative level, allowing those with appropriate access to distribute and share both information and preconfigured options and searches the rest of the organization. SPIN is designed to be the single funding data repository resource for students, postdocs, faculty, academic staff, and a variety of other professionals. ADMIN TOOLS MANUAL, VERSION 13 InfoEd International, Inc. Page 12 of 144 2 Logging Into SPIN There are multiple ways to login into the SPIN system. The mechanism of access will depend on what type of license your institution maintains with InfoEd Global. Some institutions maintain their own local installation of InfoEd eRA software. These institutions will most likely access SPIN with authentication through their local portal via a website that is specific to their organization (see eRA Access in table below and Section 2.1). Many other institutions subscribe to SPIN on a “Software as a Service” basis, in which case they will most likely be directed to the main InfoEd Global website for SPIN access. Logging into SPIN via the InfoEd Global website does not required IP based access, but it can be accomplished via IP based which generally authorizes the entirety of an institution’s campus where users can access SPIN anonymously (see Section 2.2, Anonymous Access) or can utilize a username and password login to access their selected user profile/account (See Section 2.3, Login Access). If you are unsure which mechanism of SPIN access applies to your organization, please see your administrator. eRA Access eRA access is for users whose institution has a dedicated InfoEd server environment which means they currently have subscription(s) to a number of InfoEd’s administrative module(s) as well as SPIN. Institutions maintaining their own local installation of InfoEd eRA software may access the SPIN section by logging into the eRA portal. Access via the eRA portal requires the use of the eRA username and password. Please see Section 2.1, eRA Access for more information. Anonymous Access If your organization has a paid subscription for SPIN and you are a user whose IP address falls within an IP range designated by your organization you will be able to access the system anonymously via the InfoEd Global website. Please see Section 2.2, Anonymous Access for more information. Login Access If your organization is a paying subscriber but you are not within a designated IP range for anonymous access; you must successfully log in to access SPIN. Please see Section 2.3, Login Access for more information. ADMIN TOOLS MANUAL, VERSION 13 InfoEd International, Inc. Page 13 of 144 2.1 eRA Access Your organization may have a paid subscription for both the SPIN module and additional administrative modules. If this is the case, you will most likely be directed to a website that is specific to your institution’s domain. If you were given a login username and password from your administrator, you may log into the eRA portal. Otherwise, you may need to create a profile. If you have the ability to log into the eRA, then you’re automatically validated for the SPIN module IF your organization has a paid subscription for SPIN. To log into the eRA portal, begin by entering your username and password. Figure 1 Logging into the eRA Portal Once you have successfully logged into the eRA Portal, you must click on the ‘Find Funding’ link (see Figure 2) located on the top left of the screen to access the SPIN functionality. SPIN USER GUIDE, VERSION 13 InfoEd Global, Inc. Page 14 of 144 Figure 2 Find Funding in the eRA Portal This initial portal page may look different depending on the version of InfoEd software your institution is running and any customizations that have been made. Regardless of what your initial portal page looks like, the SPIN access point will always be the “Find Funding” link. Once the Find Funding link is selected, the SPIN Main Screen (Figure 3) will open, and you may begin to use the application. SPIN USER GUIDE, VERSION 13 InfoEd Global, Inc. Page 15 of 144 Figure 3 SPIN Main Screen Please see Section 3, Working With SPIN, and Section 3.1, The SPIN Main Screen for more information on how to begin using this module. 2.2 Anonymous Access If your organization has a paid subscription for SPIN, this setup is granted to all users whose IP address from the requesting computer falls within the IP range given to InfoEd Global for SPIN access by your organization. Certain functional elements of the application like saving searches and bookmarking opportunities for future use will not be available to users utilizing this mechanism of access as you are not loggedin and therefore do not have a user profile to assign changes or save information to. Be warned that if you’d like to save search settings and results, bookmark opportunities, or use some of the more enhanced SPIN functionality, you must login to the SPIN system. To access the SPIN module anonymously, you must first access the InfoEd Global website (Figure 4) at http://www.infoedglobal.com SPIN USER GUIDE, VERSION 13 InfoEd Global, Inc. Page 16 of 144 Figure 4 InfoEd Global Website Once the screen loads, click ‘SPIN’ in the top navigation bar as shown in Figure 5. Figure 5 Accessing SPIN Via the InfoEd Website Upon selection of the ‘SPIN’ link in the navigation bar, the SPIN Main Screen (Figure 3) will open. Once the screen has opened, you may select to either work as an anonymous user or login to the system as a specific user. SPIN USER GUIDE, VERSION 13 InfoEd Global, Inc. Page 17 of 144 Again, if you select to work in SPIN as an anonymous user, remember that certain functional elements of the application will not be available. For example, with no user profile in use, none of the settings you have designated nor any of the searches you perform may be saved for future use. If you’d like to utilize the bookmarking, filtering, saving, and searching functionality, you must have a SPIN login name and password and must sign in to save any changes to your select user profile. If you were provided a SPIN username and password and wish to sign into the system, click the ‘Sign In’ link at the top right corner of the screen (see Figure 6). Figure 6 SPIN Sign In Link Once clicked, the link will open the SPIN Login Popup window (Figure 7). Figure 7 SPIN Login Popup SPIN USER GUIDE, VERSION 13 InfoEd Global, Inc. Page 18 of 144 In the SPIN Login popup, you have a few options: You may simply enter your Login ID and Password, logging you into the SPIN system as a specific user (allowing you to save your settings and searches). Or, if you were previously using the system as an anonymous user, but now wish to login, you may copy over and save any filters and search options you had set during this session to your user profile. Login ID The SPIN username assigned to you via your organization. Password The SPIN password assigned to you via your organization. Copy anonymous settings to your profile? A checkbox that when checked will copy over and save any filters and search options you had set during your current session to update your user profile. If left unchecked, none of the details of your current session will be saved to your user profile. A checkbox that when checked will save your login and password information, allowing you to bypass this popup window next time you access the SPIN system. Remember me? If left unchecked, your login information will not be saved and you will have to enter your Login ID and Password the next time you try to access the SPIN system. 2.2.1 SPIN Login & Copying Anonymous Settings Profile Upon login to the SPIN system, you will enter your username and password and click on the checkbox, and then click on the button. The SPIN Login popup window (Figure 7) will close, saving any changes/searches you preformed while anonymous, updating your user profile with the selected changes and then allowing you to access them at a later time. Copying anonymous settings into your profile will overwrite the category filters and search options last saved to your unique profile. Only use this option if you have configured these settings prior to logging in and do not wish to retrieve the most recent settings from the last time you logged in. SPIN USER GUIDE, VERSION 13 InfoEd Global, Inc. Page 19 of 144 You may select to click the Remember Me checkbox . This will save your login and password information, allowing you to bypass this popup window the next time you access SPIN. Click here to speak to us. If you are not a subscriber yet, or have any questions, you may click the Click Here link at the bottom of the popup window. This will open XXX. Once you are finished entering your login information on the Login popup window, click the button. The popup window will close, you will be signed in, and you may begin to use the SPIN system as an authenticated user (see Section 2.3, Login Access). 2.3 Login Access If your organization is a SPIN paying subscriber but has not specified an IP range for anonymous access, you will be forced to log in. Additionally, you may have IP range access but wish to log in distinctly because of the additional functionality that will be available to authenticated users, as well as the ability to access SPIN from outside of your institution’s network. If you do not have a username and password for SPIN only, you will be unable to access the SPIN module. For questions on this, please see your administrator. 2.3.1 Additional Functionality after Login As mentioned previously, there are additional elements of functionality available to users that login with their unique username and password. These elements are available to both eRA Access (accessing SPIN via your institution’s local InfoEd portal) users as well as direct Login Access users (accessing SPIN from the main InfoEd website). The details of the following elements are discussed in their own sections below. However, the following functionality becomes available to SPIN users that are logged-in with a distinct profile: Category Filter selections, used to describe yourself and your institution and filter on opportunity eligibility requirements, will be retained across different use sessions for users who are logged-in (see Section 4.3, Category Filters for more information). SPIN USER GUIDE, VERSION 13 InfoEd Global, Inc. Page 20 of 144 In the Options and Detail View Column Options sections, making selections on what you wish to search by and how you would like the results to appear cannot be saved unless you are logged into the system (see Section 4.4, Search Options for more information). The ability to save/access Saved Searches is available for logged-in users only (see Section 4.5, Searches for more information). However, searches shared by an administrator are accessible to anonymous users. The Bookmarks section is a way to save the search you conducted then share your work, even after you’ve navigated away from the page. If you are logged in, you have the option to Bookmark your work and then share it with other users. If you are not logged in, you will only have access to opportunities shared by your administrator (see Section 4.6, Bookmarks for more information). A user has the ability to identify key words and group them in the Keyword section for use in the advanced search but Keyword Groups can only be saved if the user is logged into the system (see Section 4.8, Keywords for more information). Please note that if you’d like to save search settings and results, bookmark opportunities, or use some of the more enhanced SPIN functionality, you must login to the SPIN system. If you are not logged into the system, your search results, bookmarks and other settings will not be retained beyond the existing session. SPIN USER GUIDE, VERSION 13 InfoEd Global, Inc. Page 21 of 144 3 Working With SPIN Congratulations, you’re in! This section will introduce you to the SPIN Main Screen and some of the universal functionality/features of the SPIN system. All of the pictures in this section of the manual are taken as a logged-in user. Depending on your privileges, some of the options may not be available or the pictures may appear different. Please see your administrator with questions. 3.1 The SPIN Main Screen The SPIN Main Screen (Figure 8) provides users with multiple options in performing searches, saving information, and using keywords to aid in a search. Whether you’re accessing the page as an anonymous user or logged in, the main page will appear the same. Figure 8 SPIN Main Screen SPIN USER GUIDE, VERSION 13 InfoEd Global, Inc. Page 22 of 144 Since the page contains a lot of information, we will begin by providing a brief overview of the various screen elements: InfoEd Spin Logo At any point in the system, you may click this logo and it will return you to a refreshed SPIN Main Screen (Figure 10). User Name A user is logged into the system (pictured above), which is why there is a name present. (May be ‘Anonymous User’ if you’re not logged in) (Company Name Header) InfoEd International Inc. (Daily Conversion Rate Notification) If you do not log in, nothing will be displayed. This is a standard title which is present on the screen whether the user is logged-in or not. It will always be displayed. This is a standard notification which is present on the screen whether the user is logged-in or not. It is a notification that the daily conversion rates (for international monetary fields and calculations) are provided by XE.com. Clicking on the Terms of Use link will open the XE Currency website (http://www.xe.com/legal/dfs.php) where the user can read the XE End User Terms of Use Agreement. (Logo Footer) This is a standard footer logo which is present on the screen whether the user is logged-in or not. It will always be displayed on the bottom of the page. Sign In/Out Link If the page opens in Anonymous Access, the link will appear as ‘Sign In’. The anonymous user can click on this link to access the SPIN Login Popup window (Figure 7) where they will enter their username and password to login to the SPIN system. If a user is already logged in, this link will appear as ‘Sign Out’ (Section 3.1.2, Signing Out of SPIN). SPIN USER GUIDE, VERSION 13 InfoEd Global, Inc. Page 23 of 144 3.1.1 The InfoEd SPIN Logo Icon Done with your current search and want to start anew? Have a brilliant idea for a new search but you’re in the middle of something else? Forget repeatedly clicking a random ‘Back’ button or mindlessly double-clicking away to close an endless stream of interconnected windows… To enhance system usability, we have positioned the new InfoEd SPIN Logo (Figure 8) in the left top of the SPIN window frame so that any point in the system, you may click this logo and it will return you to the SPIN Main Screen. Figure 9 New InfoEd SPIN Logo Icon When the Logo icon is clicked, wherever you are in the system, whatever page you are on will immediately be minimized or closed (without saving in some instances) and you will be returned to a refreshed SPIN Main Screen defaulted to whichever search mode you last utilized.. Please note that wherever you happen to be in the SPIN system when you decide to click on the SPIN Logo Icon, any subwindows you have open or any search you may be performing will immediately be minimized or in some instances may even close without saving (if applicable). As such, any searches you may have been performing may not be saved so if before clicking on the Logo Icon to refresh the view, make sure you have performed any desired saves or bookmarked your current view(s). SPIN USER GUIDE, VERSION 13 InfoEd Global, Inc. Page 24 of 144 Figure 10 SPIN Logo Icon Screen Refresh 3.1.2 Signing Out of SPIN When a user is logged into the SPIN system, there will be a link on the top right of the screen that says ‘Sign Out’. Clicking the Sign Out link will open a Logout Popup window (Figure 11). Figure 11 Logout Popup SPIN USER GUIDE, VERSION 13 InfoEd Global, Inc. Page 25 of 144 If you do in fact wish to logout, click the button. If you change your mind and do not wish to logout of SPIN, click either the button or the X in the right corner of the popup to return to the SPIN Main Screen. 3.1.3 The Yellow Tool Bar On the right top of the SPIN Main Screen located under the User Name and Sign In/Out link, there is a yellow tool bar (Figure 12) containing a myriad of additional elements of functionality that make SPIN even more comprehensive and user-friendly. Figure 12 The Yellow Tool Bar Here is a basic description of each of the elements in the Yellow Tool Bar, remember, each of these elements are discussed in detail in their own individual sections: Category Filters Hovering your cursor over the Category Filters section triggers a drop down menu allowing you to choose a filter that describes you or your institution. There are five different categories to choose from. Please see Section 4.3, Category Filters for more information. Options The drop down menu within the Options section includes two selections, Search Options and Detail View Column Options, where the user can designate SPIN-specific search options to search by and designate how they would like the search results to appear: Please see Section 4.4, Search Options for more information. Searches After you search for an opportunity, especially if you’ve identified specific filters or criteria to apply to your search, you may want to save or share the search parameters using the elements in this Searches tab. Please see Section 4.5, Searches for more information. SPIN USER GUIDE, VERSION 13 InfoEd Global, Inc. Page 26 of 144 Bookmarks The Bookmarks section is a way to save the search you conducted then share your work, even after you’ve navigated away from the page. Please see Section 4.6, Bookmarks for more information. Funding Guides This section is a series of preconfigured searches/reports, already saved within the system. You may either Browse the US Federal Business Opportunities or the US Federal Register Guide. Please see Section 4.7, Funding Guides for more information. Keywords This section provides access to search/browse SPIN’s controlled vocabulary, based on the Library of Congress Subject Headings. Please see Section 4.8, Keyword for more information. 3.1.4 Search Mode One of InfoEd Global’s main objectives in the enhancement of the SPIN system was to further improve the scalability and usability of the system. As such, we are introducing two distinct modes of searching, ‘BASIC’ or ‘ADVANCED’, both user-friendly as well as intuitive. On the SPIN Main Screen, there is a blender button where the user now has the option to click on it and change the Search Mode to suit their individual preferences and search needs. Figure 13 Search Mode The Basic search is a way to search for programs using a simple word or term. This method will return numerous results, allowing you to sift through and find the program you’re looking for. See Section 4.1, Basic Search for more on the Basic search mode. The Advanced search allows users to search using more specific guidelines; returning more precise results. Since this function is very detailed and specific, it’s geared more towards a user that is familiar with the system and what type of program they are interested in. See Section 4.2, Advanced Search for more information on the Advanced search mode. SPIN USER GUIDE, VERSION 13 InfoEd Global, Inc. Page 27 of 144 3.1.5 Keyword Search Help The Help button opens the Keyword Search Help popup window (Figure 14) which contains an explanation of the different types of keywords you may search by, and the results they will pull back. Figure 14 Keyword Search Help Popup SPIN USER GUIDE, VERSION 13 InfoEd Global, Inc. Page 28 of 144 The SPIN system searches for words using their inflectional forms, allowing for multiple editions of the same word to pull into searches. Searching for the word ‘Rain’ will scan all SPIN programs for: Rain, Rains, Rained, and Raining. The Keyword Search Help gives users a detailed explanation of each option they have when searching. The popup window describes nine different search techniques available: Railroad Transportation Typing in ‘Railroad’ and ‘Transportation’ searches for programs containing the specific words or their inflectional forms. Both words need to be present to be included in the results, but they don’t need to be directly next to each other. The title of a program in the results could be: 20th Century Railroad: How Transportation Changed Us. Railroad OR Transportation Typing either ‘Railroad’ or ‘Transportation’ searches for programs containing either of the words or their inflectional forms. Programs titled: Steam Railroads or American Transportation could show up in the results. “Railroad Transportation” Putting quotes around a word or term searches for programs containing that specific phrase. Both words need to be present in that specific order to show in results. Programs containing terms such as ‘Transportation: Railroad’ or ‘Railroads Transportation’ will not be present in the results, ONLY ‘Railroad Transportation’ will be available. Railroad -Transportation Inserting a dash before a word searches for programs containing ‘railroad’ and NOT ‘transportation’. Programs containing terms such as ‘Railroad US’ or ‘Railroads Billing’ will be present in the results. Anything with the word Transportation in it will be excluded. SPIN USER GUIDE, VERSION 13 InfoEd Global, Inc. Page 29 of 144 +Railroad Inserting a plus symbol before a word performs searches by disabling the use of inflectional forms. If you search ‘+sleep’, ONLY ‘sleep’ programs will be returned. Programs containing sleeps or sleeping will not be included. Rail* Placing an asterisk to a word invokes a search containing the indicated root plus any suffix of the word. If you search for ‘rail*’, programs including Railroad, Railing, Railway, and Railcar will all display in your results. <Railroad Transportation> Wrapping words or terms in angled brackets searches for programs containing ‘Railroad’ and ‘Transportation’, and ranks results by the proximity of the two. Searching for ‘<Railroad Transportation>’ returns programs such as: High Speed Railroad Transportation and Railroad Applications Transportation. ~Railroad Transportation Inserting a tilde before a word searches for programs containing ‘Railroad’ or its related terms, such as rail or road. Searching for ‘~railroad’ returns programs such as: Rail Application System, Rail Transit Signal, and sponsors including Federal Railroad Administration. ~”Railroad Transportation” Inserting a tilde before a quoted term or phrase searches for programs containing the term ‘Railroad Transportation’ or its related terms, in the thesaurus. This icon is used to depict a sample scenario or illustrated example that more clearly demonstrates the selected functionality. Once you are finished, press the icon to close the Keyword Search Help popup window. From here, you may utilize the multiple search techniques to help pull back additional results. Whether you’re using the basic or advanced search method, the same results will be available, providing a detailed explanation of each program and its requirements. SPIN USER GUIDE, VERSION 13 InfoEd Global, Inc. Page 30 of 144 3.1.6 Progressive Text Feature A helpful tool when using the basic search is the availability of the progressive text feature. There are two progressive text functions that will appear to the user, one available in the Basic search mode, another when a user is in Advanced search mode. The first progressive text feature is a browser-based function that auto-completes text based on the user’s previous inputs when they are in Basic search mode. A user is interested in programs about the earth so they go to the SPIN Home Screen and in Basic search mode, they enter the words ‘soil’ and ‘sod’ in the blank search text box. The user then leaves the SPIN Home screen to later return to the SPIN Home Screen in Basic search mode and starts typing the letter ‘S’ in the blank search text box.. A picklist will display ‘soil’ and ‘sod’ as well as any other terms they already searched for beginning with the letter ‘S’. The second progressive text feature is enabled when using the Advanced search method when saving a search or keyword group, and this is a function of the application itself. The picklists that appear are coded to provide progressive text against the user’s current options, although it’s only available for specific search options including: Contact Country, Contact Name, Cost Sharing, Deadline Type, Indirect Cost, Limited Submission, Open Application Period, Sponsor Mechanism, Sponsor, Sponsor Type, and Target Group. With these 11 options, you may either start typing in the text box and the picklist will open containing similar options, or you may click the icon to open the full list. This helps direct users to more specific search options and save time. A user is interested in programs where the Contact person is located in Uganda. In the Advanced search mode, the user would create an expression where the Contact Country is Equal to Uganda. When the user begins typing in ‘Uganda’ and enters in the letter ‘U’, all Contact Country names in the picklist that begin with the letter U will appear. SPIN USER GUIDE, VERSION 13 InfoEd Global, Inc. Page 31 of 144 This is a browser-based function available in most modern browsers, and is not tied to SPIN or your user profile. If a user logs into their profile from a different browser or computer, this progressive text feature will not perform a lookup to their previous searches. SPIN USER GUIDE, VERSION 13 InfoEd Global, Inc. Page 32 of 144 4 Searching For A Topic The primary function of the SPIN module is to search for programs you may use to find funding, experience, or knowledge. For maximum efficacy and efficiency, InfoEd Global has designed SPIN to allow users to utilize both a basic and an advanced search technique. Both techniques search the system using a full-text search engine. A full-text search engine scans all the words in the SPIN system that match the search criteria, pulling back as many results as possible. This search is run against the entirety of the SPIN record including all SPIN fields such as Sponsor Name, Opportunity Title, Funding Amount, Keywords, etc. The words ‘program’ and ‘opportunity’ are used interchangeably throughout this document, and refer to the same thing. 4.1 Basic Search The Basic search is a way to search for programs using a simple word or term which is then run against the entire SPIN record – every field is searched (ex. Sponsor name, Opportunity Title, Funding Opportunity Number, CFDA Number, Synopsis, Eligibility, Keywords, etc.). This method is very straight forward and provides the most results with the widest range. ‘BASIC’ is the Search Mode system default which appears when the SPIN Main Screen is first opened and/or refreshed. When Basic search mode is selected (Figure 15), a standard entry textbox appears under the Search Mode blender button where the user can enter their search terms to perform a simple SPIN search. The progressive text feature is available in the search field for the Basic search. When a user types in words in the free text box, the word is saved and will display next time you are searching. When you come back and begin typing a similar word, the system will predict what word you are searching for (if you’ve previously searched for terms starting with the same letter). SPIN USER GUIDE, VERSION 13 InfoEd Global, Inc. Page 33 of 144 Figure 15 Basic Search (Search Term Text Box) You may type your search terms in this blank text box. In the above figure, the user has typed in ‘frogs’. When you are finished, press the Search button located to the right of the box. If you press the X located in the far right portion of the box, the text you typed will be deleted, leaving the box empty. After you’ve typed a search term in the text box, press this button to initialize the search for the specific term (s). Search 4.1.1 Performing A Basic Search To begin, type the word or phrase you’re searching for in the search text box and click on the button. In Figure 16, we have entered ‘frogs’ as our search criteria and have clicked the Search button. SPIN USER GUIDE, VERSION 13 InfoEd Global, Inc. Page 34 of 144 Figure 16 Once the search results. Performing a Basic Search button is clicked, the screen will refresh displaying the applicable The Results Returned section is very comprehensive and its various components and functionality will be discussed in more detail in Section 4.1.3, Results Returned. 4.1.2 Saving Your Search Criteria After you’ve typed a search term in the text box, you may save your search criteria by clicking on the Save icon. Save When clicked, this icon launches the Save Current Criteria popup window (Figure 17) allowing you to save the current search criteria for future use. SPIN USER GUIDE, VERSION 13 InfoEd Global, Inc. Page 35 of 144 Figure 17 Save Current Criteria Popup Since anonymous users are unable to save any searches or settings, the Save icon will be not available if you are not logged into the SPIN system. On this popup, you may enter a new title or choose one from the previously saved list (by clicking the button). Once you are finished, you can click either the button or the button. If you select to , the Save Current Criteria popup window will close and the search term(s) you just saved will be available when you click Searches > Saved Searches. If you select to click , the Save Current Criteria popup window will close and the search term(s) will not be saved. 4.1.3 Results Returned Once the user enters their search criteria in the (BASIC) search text box and the button is clicked, the screen will refresh displaying a grid containing the applicable search results. We call this the Results Returned section. SPIN USER GUIDE, VERSION 13 InfoEd Global, Inc. Page 36 of 144 Figure 18 Results Returned Section Located above the top right section of the results returned section are the various types of Categories you may use to filter your search (Figure 19). These categories are derived from information in the Category Filters section of the SPIN system (see Section 4.3, Category Filters). There are five possible Category Filters; Applicant Location, Applicant Type, Project Type, Project Location and Citizenship Status. Please note that the horizontal list of category filters only displays those categories that have anything set. As a result, in Figure 19 below there are only two Category Filters shown in the horizontal Category list (Applicant Location and Citizenship Status) because those are the only category filters that the user has entered and saved criteria in. SPIN USER GUIDE, VERSION 13 InfoEd Global, Inc. Page 37 of 144 Figure 19 Category in SPIN Search These are the same filters that appear in the drop-down menu if you hover your cursor over Category Filters in the yellow tool bar. If the words are bold, the specific filter has been used within the search (in this case, Applicant Type was used as a filter). Although you may not click on these specific terms, they give you insight into whether you’re receiving ALL of the results, or only a portion of them. For more information on working with category filters, please continue on to Section 4.3, Category Filters. SPIN USER GUIDE, VERSION 13 InfoEd Global, Inc. Page 38 of 144 Below the category filters list are multiple columns containing result information listed in individual columns: SPIN ID This is the InfoEd-generated SPIN ID number used to identify the program. Opportunity Title This is the sponsor-designated name for the opportunity. Sponsor Name This is the name of the agency/organization sponsoring the opportunity. Sponsor Number This is the number assigned to the opportunity by the sponsor. Not all opportunities have been given a Sponsor Number. Deadline Date This is the deadline date designating when the applicant must apply for this opportunity. For opportunities with multiple deadline dates, this is the date furthest in the future. Funding Amount This is the monetary valuation converted to the user’s selected currency type that is found within Search Options. 4.1.4 Navigating Through the Results Returned In enhancing the SPIN system, InfoEd Global wanted the new user interface to be as intuitive and easy-to-use as possible. As a result, there are several features added to the Results Returned section to maximize user-friendliness, especially when viewing an expansive number of search results. These features incorporate the inclusion of: A Results Returned Program Count (Section 4.1.4.1); A Results Returned Display Counter (Section 4.1.4.2); and A Results Returned Page Counter/Navigation Bar (Section 4.1.4.3). SPIN USER GUIDE, VERSION 13 InfoEd Global, Inc. Page 39 of 144 4.1.4.1 Results Returned Program Count Just above the top left corner of the Results Returned section there is a display-only count of programs returned for the current search (see Figure 20). Figure 20 Results Returned Program Count In Figure 20, the user searched for ‘transportation’ programs and as a result, 938 opportunities were found. In this example, the Results Returned Program Count reads ‘Results Found: 938’. This field is a system-generated field and is never editable. SPIN USER GUIDE, VERSION 13 InfoEd Global, Inc. Page 40 of 144 4.1.4.2 Results Returned Display Counter Some searches may bring back large numbers of programs yet the Results Returned section can only display a small number of programs at once. As a result, InfoEd has included a display counter (Figure 21) at the bottom right of the Results Returned section so the user can see what series of programs are currently in view. Figure 21 Results Returned Display Counter In the above example, the Results Returned Display Counter informs the user that they are currently viewing programs 1 through 10 out of the total 938 programs retrieved. SPIN USER GUIDE, VERSION 13 InfoEd Global, Inc. Page 41 of 144 4.1.4.3 Results Returned Page Counter/Navigation Bar Again, when a larger number of search results are retrieved, many pages of Results Returned programs are generated by the system. InfoEd Global has included a page counter/navigation bar (Figure 22) at the bottom left of the Results Returned section to allow the user to more efficiently page through the resulting programs. Figure 22 Results Returned Page Counter/Navigation Bar The page counter/navigation bar will have a varied appearance depending upon how many pages of results are returned. In the above depiction (Figure 22), there were 938 results found and pages 1 through 10 have been listed along with ‘…’ which intimates that there are more pages after the ten listed. This button is typically known as the Home button. In the list of pages, when a user clicks on this button, they will be transported back to the very first page of programs, regardless of where in the sequential list of pages they may currently be. For example, if the user is currently on page 21 of the search results and they click this button, they will be brought back to page 1. SPIN USER GUIDE, VERSION 13 InfoEd Global, Inc. Page 42 of 144 This button is typically referred to as the Back button. In the list of pages, when a user clicks on this button, they will be transported back one page. For example, if the user is currently on page 21 of the search results and they click this button, they will be brought back to page 20. This part of the bar lists the page number(s) of search results in the Results Returned section. The initial view upon search generation will include numbers 1 through 10 (if applicable). If there are more than 10 pages of programs, ‘…’ will follow the 10, signifying that there are more pages available for viewing. To access a specific page, the user will simply click upon the page number. In the bar shown here, the user has selected to view the second page of programs, hence the 2 is highlighted in white, informing the user that they are currently viewing page 2 of the search results. If the user would like to jump to a page beyond page 10, they would simply click on the ‘…’ and then next ten pages (if applicable) will be listed (11 to 20 then 21 to 30) and so on. If you would like to view more results on a single page, use the icon to pick how many programs to display on each page. The options are 10, 25, 50 or 100 programs. This button is typically referred to as the Forward button. In the list of pages, when a user clicks on this button, they will be transported forward one page. For example, if the user is currently on page 21 of the search results and they click this button, they will be brought forward to page 22. This button is typically known as the End button. In the list of pages, when a user clicks on this button, they will be transported back to the last page of programs, regardless of where in the sequential list of pages they may currently be. For example, if there are 30 pages total and the user is currently on page 21 of the search results and they click this button, they will be brought forward to the last page, page 30. SPIN USER GUIDE, VERSION 13 InfoEd Global, Inc. Page 43 of 144 To change pages, press any of the arrows in the bar or click on the number of the page you wish to view. In this case (Figure 22) there are more than ten pages of returned results, so only the first ten pages are listed and the user must utilize the arrow buttons to navigate to the desired page number. Finally, if you would like to view more results on a single page, use the select how many programs you’d like to display on each page. entry or the icon to 4.1.5 Sorting Search Results In the new SPIN system, there are several different ways that the user can sort the results returned to further customize the search view: 1. Modify the Order of the Columns, see Section 4.1.5.1 2. Group Opportunities By Column, see Section 4.1.5.2 3. Sort Results Using The Column Header, see Section 4.1.5.3 4.1.5.1 Modifying the Order of the Columns You may modify the order of the columns by clicking on the specific column you wish to change and then dragging it horizontally to the new location. This helps you place column(s) you find more valuable into a more-desired location(s). Perhaps a user is searching for programs based on the Opportunity Title, and they’d like to see that column first on their Results Returned list. No problem! The user will simply click on the Opportunity Title column and then using their mouse, they will drag the selected column to a new location in the grid (see Figure 23). SPIN USER GUIDE, VERSION 13 InfoEd Global, Inc. Page 44 of 144 Figure 23 Modifying the Order of the Columns In the figure above (Figure 23), Opportunity Title is the second column in the table and SPIN ID is the first. In the illustration the user has clicked on the Opportunity Title Column Header and is dragging it to the left to reside before the SPIN ID column. Once the user has clicked on the column they wish to relocate and used the mouse to drag it to the desired position, the table will change to reflect the new sequence of the columns (Figure 24). Figure 24 Modifying the Order of the Columns – The Results As a result, this illustration shows that now Opportunity Title is the first column and SPIN ID is now second. SPIN USER GUIDE, VERSION 13 InfoEd Global, Inc. Page 45 of 144 4.1.5.2 Grouping by the Columns You can also group by the columns by clicking on a specific column you wish to group and dragging it vertically to place it in the top row (the space above the columns that says ‘Drag a column header and drop it here to group by that column’). You may place as many columns as you wish in this top row. This allows you to organize the results into a customized list; placing what you find most useful first. If you no longer wish to group by the selected columns, either press the X next to each grouped Column Header or re-drag the Column back to the regular search results list. Perhaps a user is searching for programs based on the Opportunity Title, Sponsor Name and Funding Amount, and they’d like to group the search results on their Results Returned list by these columns. No problem! The user will simply click on each of the desired column(s) and then using their mouse, they will drag the selected column to the top header row of the Results Returned table (see Figure 25). Figure 25 Grouping by the Columns In the figure above (Figure 25), Opportunity Title, Sponsor Name and Funding Amount columns have been dragged up to the top header of the Results Returned table. Once the user has dragged the column(s) they wish to group the search results by, the Results Returned table will change to reflect the new column grouping (Figure 26). SPIN USER GUIDE, VERSION 13 InfoEd Global, Inc. Page 46 of 144 Figure 26 Grouping by the Columns – The Results As a result, this illustration shows that now the search results are grouped by Opportunity Title and Sponsor Name. 4.1.5.3 Sort Results Using The Column Header(s) Finally, you may adjust how the results are sorted by clicking on the title in the column header. When you click on the column title, the field is lightened in color and the column title will be turned into a button with an up arrow appearing next to the column title . By default, depending on what column you are using to adjust, the newest, smallest, or first alphabetically will appear. SPIN USER GUIDE, VERSION 13 InfoEd Global, Inc. Page 47 of 144 Perhaps a user is searching for programs based on the Opportunity Title, and they’d like to sort all of the results to display in alphabetical order. . No problem! The user will simply click on the Opportunity Title column and the results will be sorted alphabetically from A to Z (see Figure 27). Consequentially, if you’re sorting using SPIN ID, the numbers will be sorted sequentially starting with 00000 and ending with 99999. If you’re sorting using Sponsor Name, names that begin with A will be first, Z will be last. If you’re sorting using Deadline Date, the newest dates will appear first. So sequentially, May 10, 2012 will appear before April 10, 2012. Clicking the icon next to the Column Title reverses the order. So if you’re sorting by Sponsor Name and click the column header, the results will be reverse-sorted starting from Z to A, not the standard A-to Z. Figure 27 Sort Results Using the Column Header(s) In the figure above (Figure 27), the user has clicked on the Column Title and the up arrow has appeared signifying that the Column Title is now a sorting button and the search results have been sorted. In the illustration above, the results have been sorted by Opportunity Title; you will notice the results are listed alphabetically from A to Z. If you’d like to reverse the alphabetical list, clicking the column header itself or the icon next to the Column Title reverses the order. So if you’re sorting by Opportunity Title and click the column header, the results will be reverse-sorted starting from Z to A, not the standard A-to Z. SPIN USER GUIDE, VERSION 13 InfoEd Global, Inc. Page 48 of 144 Figure 28 Sort Results Using the Column Header(s) – Reverse Order As a result, this illustration shows that now the search results are sorted by Opportunity Title in reverse alphabetical order 4.1.6 Filtering Search Results Another option is to filter the search results. Filtering allows you to choose from specific fields to organization the information. With the exception of the Bookmark section, every column may be filtered. Depending on what column you’re trying to filter, you may sort using: the name, what the name contains, or specific dates. Click the button next to the specific category you are filtering. Using the drop down menu (Figure 29), choose the filter, specify what you’re filtering and click Filter. The results list will refresh according to your decision, displaying the new information. Figure 29 Filtering Search Results SPIN USER GUIDE, VERSION 13 InfoEd Global, Inc. Page 49 of 144 Clear Filter When pressed this button will initiate a refresh of the following filter fields, allowing the user to start this filtering process anew. Show rows with value that This is a standard textual title which is a descriptor for the first set of filter fields (the filter-value drop-down and the search text box). (Filter Value #1) This is a drop-down list where the user can designate the following search criteria as Is Equal to, Is not equal to, Starts with, Contains, Or Ends with the value entered in the text box below. (Filter Search Text Box #1) A blank text box for the user to enter in their first search term. AND This is a standard textual title which designates that the first and second filter values are mutually inclusive. (Filter Value #2) A blank text box for the user to enter in their second search term. (Filter Search Text Box #2) This is a drop-down list where the user can designate the following search criteria as Is Equal to, Is not equal to, Starts with, Contains, Or Ends with the value entered in the text box below. Filter When pressed, this button will initiate the filtering of the search results to only include the opportunities that are applicable to the selections made in the Filter fields entered by the user. SPIN USER GUIDE, VERSION 13 InfoEd Global, Inc. Page 50 of 144 4.1.7 Viewing The Program Details Searching for and finding the title, sponsor name/number, deadline date and funding amount of desired program(s) is great but sometimes a user may want to get a more indepth look at an individual opportunity or set of opportunities. That’s where the Program Details checkbox and the Program Plus/Minus button located in the left-most column of the Results Returned section come in… Figure 30 Program Details Checkbox & Plus/Minus Button (Program Details Checkbox) When checked, every program on the screen that is set to Plus will expand, displaying the contact name, email, sponsor website, and synopsis of the program. When a search is first performed, the Results Returned section has this checkbox defaulted to unchecked with all of the Plus/Minus buttons for each of the program(s) in the results set to Plus . When this checkbox is unchecked by the user, every program on the screen that is set to Minus will shrink down to display the standard fields: SPIN ID, Opportunity Title, Sponsor Name, Sponsor Number, Deadline Date and Funding Amount. SPIN USER GUIDE, VERSION 13 InfoEd Global, Inc. Page 51 of 144 (Program Expand/Collapse Button) When a search is first performed, this button is defaulted to Expand for all of the programs in the results set. A denotes that the select program is in ‘standard display mode’, ready to be expanded. The fields displayed for these programs are: SPIN ID, Opportunity Title, Sponsor Name, Sponsor Number, Deadline Date and Funding Amount. To expand an individual program, a user can click on the button for that specific program. A Collapse button denotes that the select program is in ‘expanded display mode’, ready to return back to the ‘standard display mode’. The fields displayed for these programs are: Contact Name, Contact Telephone, Contact Email, Sponsor Website, Program URL, Deadline Dates, and a Synopsis of the Program. To minimize an individual program, a user can click on the button for that specific program. When a user enters their search criteria and the search is first generated, the Results Returned section appears with this checkbox defaulted to unchecked and the Expand/Collapse button for all of the resulting program(s) set to Expand default view (see Figure 30). Figure 31 which is the View Program Details – Default View When the Program Details checkbox is checked by the user, every program in the Results Returned section (seen and unseen) that is set to SPIN USER GUIDE, VERSION 13 InfoEd Global, Inc. Page 52 of 144 will expand. To expand an individual program, a user can click on the program (Figure 32). Figure 32 button for that specific Expand Program Details Once the program(s) display has expanded to include the Contact Name, Contact Telephone, Contact Email, Sponsor Website, Program URL, Deadline Dates, and a Synopsis of the Program, the Plus/Minus button for each of the expanded programs will be set to Figure 33 (see Figure 33). View Program Details – Expanded View SPIN USER GUIDE, VERSION 13 InfoEd Global, Inc. Page 53 of 144 4.1.8 Minimizing The Program Details A minimized view of the returned result opportunities is also referred to as the default view. Once the user has selected to view the program details for the resulting opportunities (see Figure 33), they must uncheck the Program Details checkbox if they would like to minimize the program details and return to the original view for any programs set to Minus (Figure 31). To minimize an individual program, a user can click on the program (Figure 34). Figure 34 4.1.8.1 button for that specific Minimize Program Details Program Details Refresh Button Just as you can select the SPIN Logo Icon on the SPIN Main Screen at anytime to refresh the screen, there is a similar function available for the Results Returned Section for refreshing this program details functionality. SPIN USER GUIDE, VERSION 13 InfoEd Global, Inc. Page 54 of 144 If you would like to refresh the Program Details checkbox and Plus/Minus buttons to the default view (Figure 35) you can press the Refresh icon which will uncheck the checkbox and set all programs to the standard display mode, set to Plus Figure 35 . Program Details Refresh 4.1.9 View More Detailed Opportunity Information To view more detailed information of a specific program, click the Opportunity title link located next to the SPIN ID number (Figure 36). Figure 36 Opportunity Title Link SPIN USER GUIDE, VERSION 13 InfoEd Global, Inc. Page 55 of 144 This will open the Opportunity Information popup window (Figure 37). Figure 37 Opportunity Information Popup This window displays all the information available for the specific opportunity in four distinct tabs and one information box: Opportunity Description, Section 4.1.9.1 Eligibility Requirements, Section 4.1.9.2 Funding Guidelines, Section 4.1.9.3 Sponsor Information, Section 4.1.9.4 Funding Opportunity Number Information Box, Section 4.1.9.5 On this popup, you may: Toggle between the four tabs to view detailed information on the program. Email the program descriptions (using HTML or text) and/or bookmark the program (see Section 4.6, Bookmarks). Look up similar opportunities by clicking Options > Find Similar Opportunities. This will begin a search for additional programs using the eligibility and keywords from the original program you were looking at (see Section 4.4, Search Options). SPIN USER GUIDE, VERSION 13 InfoEd Global, Inc. Page 56 of 144 When you’re finished, you may close the Additional Search and Opportunity screens; returning you to the original SPIN page. 4.1.9.1 Opportunity Description Tab The first tab on the Opportunity Information popup window is the Opportunity Description tab (Figure 44). Figure 38 Opportunity Description Tab SPIN USER GUIDE, VERSION 13 InfoEd Global, Inc. Page 57 of 144 The following information is displayed on this tab: Synopsis This field is a display-only text box containing the program’s synopsis. Program Objectives This field is a display-only text box containing the program’s primary objectives/goals. Keywords This field is a display-only text box containing any keywords that the Sponsor designated for the program. 4.1.9.2 Eligibility Requirements Tab The second tab on the Opportunity Information popup window is the Eligibility Requirements tab (Figure 44). Figure 39 Eligibility Requirements Tab – Scroll 1 SPIN USER GUIDE, VERSION 13 InfoEd Global, Inc. Page 58 of 144 Figure 40 Eligibility Requirements Tab – Scroll 2 The following information is displayed on this tab: Eligibility Requirements This field is a display-only text box containing the eligibility requirements for the program applicant. Applicant Location Requirements This field is a display-only text box containing acceptable geographic location(s) for the program applicant to reside. Applicant Types Eligible This field is a display-only text box containing the type(s) of applicants who are eligible to apply for the program. Project Types Supported This field is a display-only text box containing the project type(s) supported by this program. Project Locations Allowed This field is a display-only text box containing the allowed project location(s) for the program. Citizenship Requirements This field is a display-only text box containing the citizenship requirements that the applicant must satisfy to apply for the program. SPIN USER GUIDE, VERSION 13 InfoEd Global, Inc. Page 59 of 144 Sponsor’s Target Groups This field is a display-only text box containing the primary or exclusive beneficiary group of the work to be done. For example, if a grant were being offered for a group to hold workshops that were solely or primarily focused on improving the education of a minority group, that minority group would be the “Target Group” It does not have to do with who is applying, but rather who is benefiting from the work that will be done. Said a different way, this field denotes the primary or exclusive group that will receive the indirect benefit of the grant being supplied. 4.1.9.3 Funding Guidelines Tab The third tab on the Opportunity Information popup window is the Funding Guidelines tab (Figure 44). Figure 41 Funding Guidelines Tab SPIN USER GUIDE, VERSION 13 InfoEd Global, Inc. Page 60 of 144 The following information is displayed on this tab: Funding Guidelines This field is a display-only text box containing a description of the sponsor’s funding guidelines for the program. Funding Amount This field is a display-only text box containing the anticipated amount of funding available for the program. Duration This field is a display-only text box containing the duration of the program as set by the sponsor. Sponsor Currency Type This field is a display-only text box containing the currency type applicable to the program sponsor. Total Potential Amount This field is a display-only text box containing the total amount of funding available for the program. This is the converted funding amount, the same one that displays on the search results grid. The daily currency conversion rates are provided by XE.com. A user may access XE.com’s Terms of Use by clicking on the Terms of Use link. Cost Sharing This field is a display-only text box containing the designation of whether the program requires Cost Sharing or not. Indirect Costs This field is a display-only text box containing the designation of whether the program has any Indirect Costs associated with it. SPIN USER GUIDE, VERSION 13 InfoEd Global, Inc. Page 61 of 144 4.1.9.4 Sponsor Information Tab The fourth and final tab on the Opportunity Information popup window is the Sponsor Information tab (Figure 44). Figure 42 Sponsor Information Tab The following information is displayed on this tab: Sponsor Contact Information This field is a display-only text box containing the sponsor’s contact information, including: SPIN USER GUIDE, VERSION 13 InfoEd Global, Inc. Page 62 of 144 Contact Name; Contact Title; Contact Mailing Address; Contact Phone Number; Contact fax Number; Contact Email; Sponsor/Contact Website; Program URL; and Sponsor Instructions. 4.1.9.5 Funding Opportunity Number Information Box The first tab on the Opportunity Information popup window is the Opportunity Description tab (Figure 44). Figure 43 Screenshot Name SPIN USER GUIDE, VERSION 13 InfoEd Global, Inc. Page 63 of 144 The following information is displayed on this tab: Funding Opportunity Number This field is a display-only field containing a description of the sponsor’s funding guidelines for the program. CFDA Number This field is a display-only field containing the Catalog of Federal Domestic Assistance Number (if applicable) for the program. The Catalog of Federal Domestic Assistance (CFDA) provides a full listing of all Federal programs available to State and local governments (including the District of Columbia); federally-recognized Indian tribal governments; Territories (and possessions) of the United States; domestic public, quasi- public, and private profit and nonprofit organizations and institutions; specialized groups; and individuals. Deadline Date This field is a display-only field containing deadline date for the applicant to apply for the program. Deadline Type This field is a display-only field containing deadline type for the selected program. Established Date This field is a display-only field containing date the program was established. Last Revised Date This field is a display-only field containing the date the program listing was last revised. Next Followup Date This field is a display-only field containing the next followup date for the program listing. 4.1.10 Bookmarking A Specific Program Another option in the Results Returned section is to bookmark a specific program(s) by clicking the button under the Bookmarks column next to the selected program in the Results Returned section. The Bookmark column is not present for anonymous users, only logged-in users may utilize this functionality to bookmark programs. SPIN USER GUIDE, VERSION 13 InfoEd Global, Inc. Page 64 of 144 Figure 44 Bookmarking a Specific Program in Results Returned When you click the (Figure 45) will open. Figure 45 button for a selected program the Bookmark Group Popup Bookmark Group Popup On the Bookmark Group Popup (Figure 45), you have the choice to add the selected program to a newly created bookmark group or add it to an existing bookmark group (if available). The Bookmark Group Popup defaults to the Create new group option. SPIN USER GUIDE, VERSION 13 InfoEd Global, Inc. Page 65 of 144 As such, if you’d like to create a new bookmark group for your selected program, ensure that the Create new group radiobutton is filled and then type in a name for your new bookmark group in the text field below. In Figure 46, the user has elected to create a new bookmark group entitled ‘Frogs Opportunities’. Figure 46 Bookmark Group Popup – Create New Bookmark Group Once the user has entered in the name of their new group, they will press the at the bottom of the popup to save the selected program into the newly created bookmark group. button If the user clicks on the button, no saves will be made, they will be returned to the Results Returned section with no bookmark created for the selected program. If you’d like to add your selected program to an existing bookmark group, make sure the Select existing group radiobutton is filled and then check the group. In Figure 46, the user can select to add the selected program to the ‘Frogs Opportunities’ bookmark group. SPIN USER GUIDE, VERSION 13 InfoEd Global, Inc. Page 66 of 144 Figure 47 Bookmark Group Popup – Select Existing Bookmark Group Users may also elect to bookmark the selected program to multiple existing bookmark groups as shown in Figure 48. Figure 48 Bookmark Group Popup – Select Multiple Existing Bookmark Groups Once the user has selected the bookmark group(s) to add the selected program to, they will press the button at the bottom of the popup to save the selected program into the newly created bookmark group(s). SPIN USER GUIDE, VERSION 13 InfoEd Global, Inc. Page 67 of 144 If the user clicks on the button, no saves will be made, they will be returned to the Results Returned section with no bookmark created for the selected program. Please see Section 4.6, Bookmarks for more information on working with bookmarked opportunities. Although the Bookmark column will still be present for anonymous users, only logged-in users may bookmark programs. 4.1.11 Exporting Your Search Results To Word or Excel SPIN contains enhanced functionality that allows you to directly export your search results to a Microsoft Excel or Word document. To utilize this export functionality, press (located to the right of the category filter list) and choose which format you would like to export to from the drop-down list: ‘Export as Word’ or ‘Export as Excel’. Figure 49 Export Search Results Feature Once you have selected to Export as a Word document or Export as an Excel document, a File Download popup (Figure 50) will appear prompting you to either Open the new document upon creation or Save the document for future use/access. If you click on the Cancel button, a file will neither be opened nor saved and you will be returned to the Results Returned section filled with your unaltered search results. SPIN USER GUIDE, VERSION 13 InfoEd Global, Inc. Page 68 of 144 Figure 50 File Download Popup If you click on the Open button, the new document will be opened in the select program (either Word or Excel) (see Figure 51). Figure 51 Sample Exported Search Results Document SPIN USER GUIDE, VERSION 13 InfoEd Global, Inc. Page 69 of 144 If you click on the Save button on the File Download popup (Figure 50), the Exported Document Save As Popup (Figure 52) will appear prompting you to name the document and browse to select the desired location to save the new file to. Figure 52 Exported Document Save As Popup If you click on the Cancel button at the bottom of this popup, the file will not be saved and you will be returned to the Results Returned section filled with your unaltered search results. If you would like to Save the exported document, once you have entered a file name and selected the location for your new document, click on the Save button and the file will be generated and saved. A Download Complete popup (Figure 56) appears designating that the file has been downloaded. SPIN USER GUIDE, VERSION 13 InfoEd Global, Inc. Page 70 of 144 Figure 53 Download Complete Popup On this popup, you can select to open the newly created document (see Figure 51) by clicking the Open button. If you’d like to open the folder that the newly created document was sent to, click the Open Folder button and the Folder View popup will appear (Figure 54). Figure 54 Folder View Popup SPIN USER GUIDE, VERSION 13 InfoEd Global, Inc. Page 71 of 144 If you double-click on the exported document in this Folder View, it will open in the selected program. Now let’s backtrack a bit so we can address an important note incorporating the fact that different organizations may be running varied versions of Microsoft Office: Whether you are opening the exported document or saving the exported document, the Save As Type defaults to Microsoft Office Word 97-2003 with a file extension =.doc or Microsoft Office Excel 97-2003 with a file extension =.xls. When opening or saving an exported document, if you are running a more recent version of Microsoft Word or Excel than 2003, a popup message (Figure 55) will appear informing you that the file you are trying to open is in a different format than specified by the file extension. It asks you to verify that the file is not corrupted and is from a trusted source before opening the file. The file is not corrupted and is from a trusted source so it is safe to open. Figure 55 Different Format Validation Popup If you would like to continue open (or save) the file, click the Yes button. If you click on the No button, the file will not be opened (or saved) and you will be returned to the Results Returned section populated with your unaltered search results. If you click on the Help button, a Microsoft Office Help Screen will open with information about file extensions and what to do when a file is in a different file format than what its extension indicates (see Figure 56). SPIN USER GUIDE, VERSION 13 InfoEd Global, Inc. Page 72 of 144 Figure 56 Microsoft Office Help Screen 4.1.11.1 Customizing Export Content Additionally, the user has the ability to customize their export content. Keeping in mind that the export document is a representation of what is displayed on the screen, including if the “detail section” of the opportunities is displaying, if the user decides to filter or sort the results or expand them to view more detailed information, the exported document(s) will vary. In the following illustration (Figure 57), the user has performed a Basic search for ‘frogs’ with three applicable programs found and the Results Returned section left in its original view (with no expansion to include detailed information and no filtering by columns). Figure 58 is a representation of the resulting exported Microsoft Excel document. SPIN USER GUIDE, VERSION 13 InfoEd Global, Inc. Page 73 of 144 Figure 57 Customizing Export Content – Example 1 The following illustration is an example of the exported Microsoft Excel document for the search performed in Figure 57. Figure 58 Customizing Export Content – Example 1 Resulting Exported Document SPIN USER GUIDE, VERSION 13 InfoEd Global, Inc. Page 74 of 144 In this next illustration (Figure 59), the user has performed a Basic search for ‘frogs’ with three applicable programs found and the Results Returned section has been expanded to include detailed information and the user has filtered the results by Opportunity Title. The following illustration is an example of the exported Microsoft Excel document for the search performed in Figure 59. Figure 60 is a representation of the resulting exported Microsoft Excel document. Figure 59 Customizing Export Content – Example 2 The following illustration is an example of the exported Microsoft Excel document for the search performed in Figure 59. SPIN USER GUIDE, VERSION 13 InfoEd Global, Inc. Page 75 of 144 Figure 60 Customizing Export Content – Example 2 Resulting Exported Document SPIN USER GUIDE, VERSION 13 InfoEd Global, Inc. Page 76 of 144 4.2 Advanced Search Another way to search for results is to use the Advanced Search. This customized search method allows you to tailor your search; returning fewer programs but more specific results. This function is helpful because it allows you to weed out programs you know are not pertinent to your search, while still getting a variety of results. The Advanced Search option is available for all users, although it is very specific and geared towards users that have a good idea of what they are looking for. To begin, click the icon located next to Search Mode. A SPIN Search Options popup window (Figure 61) will open, verifying the change in your search method. Continuing with the advanced search option will remove any parameters you placed on your prior searches and any saved results. Figure 61 SPIN Search Options Popup – Advanced Search Clicking the button will close the popup window and the SPIN Main Screen will be refreshed to display the Advanced Search Main Page (Figure 62). Clicking the button will return the user back to the SPIN Main Screen with their current search parameters and results intact. SPIN USER GUIDE, VERSION 13 InfoEd Global, Inc. Page 77 of 144 Figure 62 Advanced Search Main Page The advanced search page initially appears similar to the basic search page. Both the yellow tool bar and the Search, Save, and question mark buttons are still located on the screen. The only immediate difference is the addition of the Advanced Search Icon Bar and the lack of a search textbox. 4.2.1 Advanced Search Icon Bar The Advanced Search Icon Bar (Figure 63) is the foundation of the Advanced Search. Figure 63 Advanced Search Icon Bar The Advanced Search Icon Bar is divided into four parts: AND/OR (Search Logic) Add Expression Clicking AND opens a drop-down menu containing the words AND and OR. Click on whichever search logic option you would like to use in your search. Clicking this icon triggers a blank text box and the words Full Program and Contains. You may click both of these words, generating two drop-down menus. SPIN USER GUIDE, VERSION 13 InfoEd Global, Inc. Page 78 of 144 Add Group Clicking this icon creates an additional Advanced Search Icon Bar, located right below the first one, creating a new, lower level in the hierarchy of the search. Every time you click the Add Group new group to use in your search. Delete 4.2.1.1 icon, you are creating a With the exception the icon in the first Advanced Search Icon Bar, you may delete any of the additional groups/lines. If you have searched using specific criteria and delete the line, the results will change depending on what you deleted. AND/OR Search Logic The first thing the user does when they access the Advanced Search Main Page is click on the AND/OR Search Logic Function, which is the first part of the Icon Bar. Clicking ‘AND’ opens a drop-down list containing the words AND and OR (Figure 64). These AND/OR options represent the search logic to be used in the Advanced Search. The user will click on whichever search logic option they would like to base their search on. Figure 64 AND/OR Search Logic Function SPIN USER GUIDE, VERSION 13 InfoEd Global, Inc. Page 79 of 144 4.2.1.2 Add Expression The second function on the Advanced Search Icon Bar is the Add Expression button. Clicking this icon triggers the Add Expression Icon Bar to appear. There are a few main elements to this new Icon Bar including a blank search box and a button bar with the words ‘Full Program’ Figure 65). Figure 65 and ‘Contains’ , (see Add Expression Icon Bar When clicked, ‘Full Program’ becomes a drop-down list where the user can select the specific expression field(s) they would like to search/filter using. Full Program (Expression Search Field) The Full Program drop-down contains a list of select fields that the user may select to search/filter using and build into their expression. We call this the ‘expression search field’. The default value for the expression search field is ‘Full Program’ which when used as the expression value, searches the entire program listing (all fields contained in the Full Program drop-down) with the expression search mode (‘Contains’ drop-down value) to find the program(s) which correspond to whatever the user enters into the blank search box. ‘Full Program’ is functionally equivalent to the Basic Search mode and can be used to search the entirety of the SPIN record. SPIN USER GUIDE, VERSION 13 InfoEd Global, Inc. Page 80 of 144 Figure 66 Adding An Expression – Full Program/Field List The Full Program drop-down list contains all the program fields you may utilize in this expression for your search, including: CFDA Number This is the Catalog of Federal Domestic Assistance Number for the program (if applicable). Contact Address This is the contact address for the program. Contact City This is the contact city for the program. Contact Country This is the program’s contact country. Contact Email This is the program’s contact email address. Contact Fax This is the program’s contact fax number. Contact Name This is the name of the individual you are required to contact for the program. Contact Phone This is the contact phone number of the program. Contact State This is the contact state for the opportunity. Cost Sharing: This is the designation of whether cost sharing is required or not. Cost Sharing Cap (%) This is the percentage of cost sharing cap that is on the program. Deadline Type This is the program’s deadline type. SPIN USER GUIDE, VERSION 13 InfoEd Global, Inc. Page 81 of 144 Deadline This is the program’s deadline date. There is an the text box. icon next to Clicking this icon opens a calendar allowing you to scroll through the months to choose your specific deadline. Eligibility This is the eligibility requirements for the program. Established Date This is the date the program was established. There is an icon next to the text box. Clicking this icon opens a calendar allowing you to scroll through the months to choose the specific Established Date. Follow-Up Date There is an icon next to the text box. Clicking this icon opens a calendar allowing you to scroll through the months to choose the follow-up date. Full Program This value is selected when the user would like to Funding AmountTotal This is the total amount of funding available for the project. Funding Detail This is the detailed text designated as the Funding Guidelines for the program. Funding Opportunity Number This is the program’s funding opportunity number. Indirect Cost Cap This is the maximum value for Indirect Costs associated with this program. Indirect Costs: This is the designation of whether there are Indirect Costs associated with this program. Keywords These are keyword(s) associated with the program. If you choose this option, an X. icon will be located next to the Clicking this icon opens the Keyword main page, see Section 4.8, Keywords for more information on this topic. Limited Submission This is whether or not the sponsor has imposed a limit on the quantity of submissions for each university/organization. Objectives These are the program’s goals. SPIN USER GUIDE, VERSION 13 InfoEd Global, Inc. Page 82 of 144 Open Application Period This is the designation of whether the program has an Open Application period. Revised Date This is the last date the program was revised. There is an icon next to the text box. Clicking this icon opens a calendar allowing you to scroll through the months to choose the revised date. SPIN ID This is the InfoEd-generated SPIN ID number used to identify the program. Sponsor This is the name of the sponsor that is offering the program. Sponsor Mechanism This is the sponsor mechanism. Sponsor Program URL This is the programs URL address. Sponsor Type This is the sponsor type. Sponsor Website This is the website URL for the sponsor. Synopsis This is the programs outline or summary. Target Group This is the group the program is geared towards. Title This is the title of the program. Zip/Postal Code This is the zip code of the program. The user selects either ‘Full Program’ or one of the above fields as the expression search field to build the expression upon. SPIN USER GUIDE, VERSION 13 InfoEd Global, Inc. Page 83 of 144 Then it is time to move onto the next part of the Add Expression Icon Bar, the ‘Contains’ drop-down: Contains The ‘Contains’ drop-down is the expression’s mode and is a very ‘reactive’, changeable field. (Expression Mode) For example, for expression fields that are text-based, the field is titled ‘Contains’ and can either have two values – ‘Contains’ and ‘Does Not Contain’ or for select fields there will be more values including: Contains, Does Not Contain, Ends With, Equal To, Is Not Null, Not Equal To, and Starts With (see Figure 67). For numeric/quantitative fields like Cost Sharing Cap (%) this field is not ‘Contains’, it is ‘Equal To’ listing values like - Equal To, Greater Than, Greater Than or Equal To, Less Than, Less Than or Equal To, and Not Equal To (see Figure 68). Figure 67 Adding An Expression – Contains Lists For numeric/quantitative fields the field is not titled ‘Contains’, it is titled ‘Equal To’ with values like Equal To, Greater Than, Greater Than or Equal To, Less Than, Less Than or Equal To, and Not Equal To (Figure 68). SPIN USER GUIDE, VERSION 13 InfoEd Global, Inc. Page 84 of 144 Figure 68 Adding An Expression – Equals List The user selects the desired expression mode (i.e. Contains, Does Not Contain, Equal To, Less Than, etc.) and then it is time to complete the expression by entering in their search criteria in the blank search field the expression mode. (Blank Search Field) located next to The user enters their desired search criteria in this blank search field. 4.2.1.2.1 Single-Level Advanced Search Example When the user has completed entering their expression search field, their expression mode and their search criteria in the blank search box, we say that they have created a Single Level Advanced Search (one expression). If you selected ‘Contact City’ (as the expression search field), then chose ‘Starts With’ (as the expression mode) then entered ‘B’; in the blank search field then every program that has a Contact City that starts with B will be listed in the search results. Utilizing the AND/OR functionality and the Add Expression Icon Bar, you may create an unlimited number of expressions to drill further down and get more and more specific in what you are looking for. SPIN USER GUIDE, VERSION 13 InfoEd Global, Inc. Page 85 of 144 Figure 69 Single Level Advanced Search Sample You may select to add additional expressions by clicking on the Add Expression button and repeating the process of selecting an expression search field search mode , and search criteria , . Please see Section 4.2.1.3.1, Multi-Level Advanced Search Example or Section 4.2.2An Advanced Search Example to see sample searches using multiple expressions. 4.2.1.3 Add Group Clicking the Add Group icon in the Advanced Search Icon Bar (Figure 63) creates an additional Advanced Search Icon Bar , located below the first one. Every time you click the Add Group icon, you are creating a new AND/OR expression group to use in your search. The reason you may want to create a new group is to add additional search criteria. Along with creating a new group, you are essentially adding a new level to the hierarchy of the search and now have a Multi-Level Advanced Search. 4.2.1.3.1 Multi-Level Advanced Search Example When the user enters multiple expressions by adding group(s), we say that they have created a Multi-Level Advanced Search (multiple expressions). SPIN USER GUIDE, VERSION 13 InfoEd Global, Inc. Page 86 of 144 If you create an additional group, you may now create a MultiLevel Advanced Search (see Figure 70). For example, we can search to find any programs that contain the words TREE AND CLOUDS AND SOIL OR SEEDS in any of the program fields. In order to do this, we create the first OR expression to include the Full Program (all program fields) as the expression search field and then Contains as the expression mode and then enter in ‘SEEDS’ as the first criteria. Then we add a new group using the AND expression including the Full Program (all program fields) as the expression search field and then Contains as the expression mode and then enter in ‘TREE’ as the second criteria you will add two more identiacal expressions for ‘CLOUDS’ and ‘SOIL’. As you can see in Figure 70, you may create an unlimited number of groups to get more and more specific in what you’re searching for. Also, if you use the OR term, you MUST have at least two criteria you’re using in your search. You’re searching for humans OR animals, fire OR smoke OR water, etc. Using the OR language with only one term will result in the search basically only searching for that singular term. Figure 70 Multi-Level Advanced Search SPIN USER GUIDE, VERSION 13 InfoEd Global, Inc. Page 87 of 144 Please see Section 4.2.2, An Advanced Search Example to see a sample search using expression groups. 4.2.2 An Advanced Search Example Let’s assume you want to search for programs about Automobiles. You would begin by clicking the Add Expression icon, bringing up the Add Expression Icon Bar. You would enter Full Program for the expression search field because you want to search all programs fields for the word Automobile. Then you would select Contains as the search mode and enter ‘Automobile’ in the blank search field (Figure 71). Figure 71 Advanced Search – Setting Up The First Expression Next, you decide you’d like to make sure the program’s deadline is in the future. So you would then add another group with deadlines equal to today’s date. SPIN USER GUIDE, VERSION 13 InfoEd Global, Inc. Page 88 of 144 Figure 72 Advanced Search – Adding A Second Expression Now, you want to add another word to your search. You want to search for full programs containing the words Automobile AND Boats. Figure 73 Advanced Search - Adding Additional Expressions The search will only return programs that contain the words Automobile AND Boats, with deadlines after January 13, 2012. If the program does not contain both words, it will not show up in the results. SPIN USER GUIDE, VERSION 13 InfoEd Global, Inc. Page 89 of 144 In the new SPIN, we have made usability a priority! As such, we know that not every person approaches a problem from the same perspective. Plainly speaking, in SPIN, there are sometimes multiple ways to accomplish the same objective… The “free text fields” (Opportunity Title, Synopsis, Objectives, Eligibility, Funding Detail, and Full Program) offer the same full-text functionality as the Basic search. So, for example, a user could also accomplish the same results as shown in Figure 73 by placing both automobile and boats in the top expression. For Figure 74, the user could alternatively accomplish the same results using a combination of parentheses and the “OR” full-text operator. Now, let’s say you would like to get even more specific to find programs that contain Automobiles AND Boats, and Gas OR Fuel. You would then click the Add Group icon and change AND to OR. Then, click the Add Expression icon two times to add two additional text boxes. Figure 74 Advanced Search - Adding Groups The search will only find programs that contain the words Automobile AND Boats AND Fuel OR Gas. If both Automobile and Boats are present in a program but Gas or Fuel are not, the program will not be in your results. SPIN USER GUIDE, VERSION 13 InfoEd Global, Inc. Page 90 of 144 Additionally, if a program contains the words Boats and Fuel but not Automobile, it will not be in your results. The only way programs will be in the results list is if they contain all the necessary requirements. Throughout your search, you may go through at any point and change the expressions, groups, words or delete any of the lines. Once you are satisfied with the guidelines, you may search for results or save the current criteria by clicking the Save next to the blank search field (only available to logged-in users). icon located It’s important to remember, using AND in your search requires all of the criteria to be present. Using the OR grouping will require one or another criteria to be present. You may have an unlimited number of expressions or groups in a search, causing the results to be more and more tailored to your requirements. This search method is set up as a hierarchy, so all of the criteria are based off the prior specification. Another way to look at the function is using the ‘Parent’ and ‘Child’ concept. Based on the preceding example, the first AND statement containing Automobile and Boats is the ‘Parent’ in the search. Everything from this point on will be focused around that section. When you add any additional expressions or groups, they will all be ‘children’. So the OR group containing Gas and Fuel is the ‘child’ of the first AND statement. The advanced search may be tricky to use at first, but it returns very specific results. You may tailor your search to be exactly what you want to find and spend less time sorting through programs. Similar specific search results can also be achieved by utilizing the Basic Search along with the Category Filters (Section 4.3). SPIN USER GUIDE, VERSION 13 InfoEd Global, Inc. Page 91 of 144 4.3 Category Filters As mentioned in Section 3.1, the first section of the Yellow Tool Bar located at the top right of the SPIN Main Screen is Category Filters. Category Filters are used to describe yourself and your institution and filter on opportunity eligibility requirements. The Category Filters section contains five filter options: Applicant Location, Applicant Type, Project Type, Project Location, and Citizenship Status. To access the filter options, hover your cursor over Category Filters tab on the SPIN Main Screen as shown in Figure 75. Figure 75 Category Filters Main Menu The five Category Filter options will display in a drop down menu. You may click the specific category you wish to filter by, opening the SPIN Search Filters popup window (Figure 76). SPIN USER GUIDE, VERSION 13 InfoEd Global, Inc. Page 92 of 144 Figure 76 SPIN Search Filters Popup Since you have selected ‘Applicant Location’ as your filter option from the Category Filter Main Menu (Figure 75), that’s what the SPIN Search Filters popup window defaults to. Although, it would open to whichever filter option you chose in the Category Filters Main Menu. Simply click your desired filter category when the Search Filters popup window is open, or close the screen and use the picklist. Each category filter window contains unique information for that specific category. Although, every window also contains some standardized features such as the button, the SPIN USER GUIDE, VERSION 13 InfoEd Global, Inc. Page 93 of 144 button, and the button. Save and Exit Exit Help Choosing filters and pressing the button saves the filter information and applies it to your search. Clicking the information. button closes the screen without saving the Finally, pressing the button open a Help popup which discusses how to use the selection tool. Clicking between the filter categories retains any information you previously picked, without having to save and exit each time. Although, once you are finished with entire Category Filters section, make sure to save your settings by pressing the button. The hierarchies created in this area are intended to ensure that the selections made in each category are not unnecessarily excluding opportunities that you would be eligible for. These category filters are intended as assistance to fine tuning your search results, they are not intended to be fine-grained reporting tool functionality. For example, if a user indicates that they are a senior faculty member, they will also receive opportunities that “any” faculty member is eligible for, as well as opportunities that “any” individual is eligible for. 4.3.1 Applicant Location The first category you may filter by is Application Location. This category is used to determine where you or your institution is located. Using this filter option will ensure you will only receive opportunities available to applicants based on your specific location. The content of this section is based upon United Nations and ISO data. You may access the Applicant Location filter category (Figure 77) by clicking SPIN Main Screen > Category Filters > Applicant Location or Applicant Location from within the SPIN Search Filters popup window. SPIN USER GUIDE, VERSION 13 InfoEd Global, Inc. Page 94 of 144 Figure 77 Applicant Location At the top of the popup window is the list of additional category filters along with a brief description of the specific filter you are using. Below the filter description is the Applicant Location list and the Chosen Applicant Locations list. You may filter down to a more specific location (for example, going from Americas > Northern America > United States > New York) by clicking the Expand icon next to the specific location. It is recommended you select the most relevant selection to your location. If you’re based in New York, select New York instead of United States. Once you have choosen your location, either double click or highlight the location and click the Forward button. This will transfer the chosen location from Applicant Locations to Chosen Applicant Locations. The specific location will initially display as the main category filter (for example Americanas instead of New York), but once you expand the hiregraphical tree (by clicking the Expand icon), your specific location will be displayed. If you moved a location to the incorrect list, and you wish to take it off, either double click or highlight that location and click the Back button. SPIN USER GUIDE, VERSION 13 InfoEd Global, Inc. Page 95 of 144 Another option you have is to transfer the entire location list from Applicant Locations to Chosen Applicant Locations, or visa versa. Click either the Group Back button or Group Forward button, and all the possible locations will move to the opposite location category. Once you are finished selecting your chosen location to filter by, click the button to save your filters and close the popup window, or the popup window without saving. button to close the You are from an institution located in Italy, so you want to set your category filter to reflect your most accurate location. You open Category Filters > Application Location and click Europe. Multiple options open, and since Italy is located in Southern Europe, click the Expand icon next to Southern Europe. Then double click Italy and press the button. The screen closes and only programs that will now display in your results will be programs that you’re eligible for based on your location. 4.3.2 Applicant Type Another category you may use to filter your search is Applicant Type. This filter is also set up as a hierarchy, and is used to determine which attribute(s) the sponsor will require of an applicant, either as an individual or as an organization. These are characteristics that pertain specially to you or your institution. To access Applicant Type (Figure 78), click SPIN Main Screen > Category Filters > Applicant Type or Applicant Type from within the SPIN Search Filters popup window. SPIN USER GUIDE, VERSION 13 InfoEd Global, Inc. Page 96 of 144 Figure 78 Applicant Type This screen is set up similarly to the Applicant Location screen. The top contains the additional filter categories along with the description. You may expand or minimize any of the Applicant Type options by pressing either the Expand icon or the Collapse icon. The applicant types may also be moved interchangeably between the Applicant Type and Chosen Applicant Type Restriction tables by using the four buttons located in the middle of the page or double clicking on the specific applicant type. Once you are finished press either the button or the button. You are an individual applicant that is a student, minority, and researcher. You are applying from a professional research organization. In order to pull back as many results as possible, you would click Applicant Type in Category Filters and find all the attributes that apply to you or your organization. You would double click the terms and save your filters. The search you now conduct will only pull back programs that you are eligible for based on your Applicant Type filters. SPIN USER GUIDE, VERSION 13 InfoEd Global, Inc. Page 97 of 144 4.3.3 Project Type The Project Type category filter refers to the type of project the specific sponsor is looking to fund, or what type of work the sponsor is planning to be done by applicants. To use this category correctly, make sure you pick what type of project or work you’re looking for. This will only pull back opportunities that are in your scope, and not programs you’re not interested in. To access Project Type (Figure 79), click SPIN Main Screen > Category Filters > Project Type or Project Type from within the SPIN Search Filters popup window. The screen displays a brief Project Type description along with a table for Project Type Options and Chosen Project Type Restrictions. This list is also set up as a hierarchy, and you may use the Expand icon or the Collapse icon to expand/collapse the results. You may also move the project type options between the two tables, by either double clicking the term or using the Back buttons. SPIN USER GUIDE, VERSION 13 InfoEd Global, Inc. Page 98 of 144 , Forward , Group Back , or Group Forward Figure 79 Project Type Once you are finished, make sure to press either the button. button or the You are an applicant that wants to find programs that are involved with reaching out to communities and informing them about Environmental Education. You would go to Project Type and choose Community Outreach as your interested project type. Only programs that are geared towards applicants interested in Community focused projects will be returned. SPIN USER GUIDE, VERSION 13 InfoEd Global, Inc. Page 99 of 144 4.3.4 Project Location Another option you may filter your search by is through Project Location. This section is used to determine where the sponsor will allow the work to be carried out. A user will want to pick all the locations they are willing to perform the work. To access Project Location (Figure 79), click SPIN Main Screen > Category Filters > Project Location or Project Location from within the SPIN Search Filters popup window to access this filter option. Figure 80 Project Location The location list functions similarly to the other lists in Category Filters; it give you the ability to maximize/ minimize the locations options by pressing either the Expand icon or the Collapse icon. From the list, select the location(s) you are willing to travel to in order to complete the work. Once you have selected your location(s), either double click the location to move it to the opposite table, or press the Back Back , or Group Forward the screen. SPIN USER GUIDE, VERSION 13 InfoEd Global, Inc. Page 100 of 144 , Forward , Group buttons. Make sure to save your filters before exiting You decide that you want to do your work somewhere exotic and decide that either Africa or any place in Oceania will be ideal. So, you would then double-click those locations and have them transferred to your Project Locations Options. You are tired of the cold weather so you would not click Antarctica or Americas. 4.3.5 Citizenship Status The final option you may use to filter your opportunity results is through Citizenship Status. This section is used to determine if the sponsor has a specific citizenship status requirement for their opportunities. To access the Citizenship Status filter (Figure 81), click SPIN Main Screen > Category Filters > Citizenship Status or Citizenship Status from within the SPIN Search Filters popup window. Figure 81 Citizenship Status SPIN USER GUIDE, VERSION 13 InfoEd Global, Inc. Page 101 of 144 The list contains all the possible citizenship types available. Select the citizenship types that apply to you from Citizenship Options and move them over to Selected Citizenship Types. If you do not select any citizenship, nothing will be filtered for your return opportunities. Similarly to the other filters, you may double click the specific option to transfer it to the other table, or use the Back buttons. , Forward , Group Back Once you are finished, make sure to press either the button. 4.4 , or Group Forward button or the Search Options The main goal of the Search Options section is to provide access to special search options, configurations, or user preferences. Some examples include: having the ability to expand search terms, include additional opportunities in your search (such as US Federal or Limited Submission), and changing the currency display. Altering any of the available options will change the amount and type of opportunities you receive in your search. Begin by hovering your mouse over the Search Options section of the tool bar. The menu expands displaying two options: Search Options, and Detail View Column Options. SPIN USER GUIDE, VERSION 13 InfoEd Global, Inc. Page 102 of 144 Figure 82 Search Options Main Menu Clicking on either Options or Detail View Column Options will open popup windows allowing you to further change your search settings and adjust your results. 4.4.1 Search Options Clicking Search Options > Search Options from the tool bar opens the SPIN Search Options popup window (Figure 83). Figure 83 SPIN Search Options Popup SPIN USER GUIDE, VERSION 13 InfoEd Global, Inc. Page 103 of 144 This window offers the ability to adjust multiple default settings: Expand Search Terms via Thesaurus This option examines each full text search term and attempts to expand it via an integrated thesaurus in the database. For example, a search for "cancer" will also search for tumors, carcinoma, sarcoma, malignancy, etc. Not all words or phrases expand, but those that do will bring back additional results because of the expanded search. Use this tool to increase the number of results, without having to type in additional search terms. Limit Search to New Programs Checking this box will only return opportunities which were created a specific number of days ago. The system defaults to new programs created seven days ago, but you may adjust the number of days; from one day to one year. Use the arrows to the right of the number of days to adjust the creation time, and press the button. If you check the Limit Search to New Programs checkbox, the Limit Search to Recent Programs checkbox will become grayed out, and unavailable. You cannot use both options to search by. To uncheck either box, just click the check again and it will no longer be selected. Limit Search to Recent Programs This option is similar to Limit Search to New Programs, although this pertains to programs that were updated within a specific number of days ago. These programs may have been created more than a year ago, but as long as they were revised within the specified date range, it will pull back in your results. The system defaults to programs updated within seven days, but you may adjust the number of days; from one day to one year. Use the arrows to the right of the number of days to adjust the updated date, and press the SPIN USER GUIDE, VERSION 13 InfoEd Global, Inc. Page 104 of 144 button. If you check the Limit Search to Recent Programs checkbox, the Limit Search to New Programs checkbox will become grayed out, and unavailable. You cannot use both options to search by. To uncheck either box, just click the check again and it will no longer be selected. US Federal Opportunities By default, any search you perform will return results that contain US Federal Opportunities. Federal Opportunities include any programs created and funded by any government agency. Normally these opportunities do not apply to many individuals because they have very specific requirements, deadlines, and policies. Clicking the arrow opens the drop-down menu, allowing you to choose to Include, Exclude, or Only find US Federal Opportunities in your search. Limited Submission Opportunities Limited Submission Opportunities are opportunities that require internal coordination within an institution, for specific application process. Some sponsors may only accept one application from each organization. If any additional applications are sent, the entire organization will be disqualified. To prevent this from happening, the interested organization will need to coordinate who will send the application. Clicking the arrow opens the drop-down menu, allowing you to choose to Include, Exclude, or Only find Limited Submission Opportunities in your search. SPIN USER GUIDE, VERSION 13 InfoEd Global, Inc. Page 105 of 144 Suspended Opportunities Suspended Opportunities are opportunities that are normally hidden from searches, for multiple reasons such as: They were not offered the previous year; They are no longer available; The program was stopped due to funding (but not yet ended by the sponsor); or The sponsor had already picked an individual to participate. Although, you may still wish to find information on these programs. Opportunities that are, by definition, one time opportunities will not ever be displayed after they are expired, as well as opportunities that have been confirmed as truly defunct by contact with the sponsor. The results retrieved for Suspended Opportunities will only be those that we believe have a possibility of becoming available in the future. Clicking the arrow opens the drop-down menu, allowing you to choose to Include, Exclude, or Only find Suspended Opportunities in your search. Opportunities that were only offered one time will never end up in a search. Currency Display Clicking the arrow next to the default currency listed, opens a drop-down menu containing all of the currency types you may choose to use. When you perform a search, whatever type of currency you pick will display in the results and the detail page. The base currency and amounts will always be available in the full opportunity description. The currency rates are downloaded on a daily bases. They are never older than 24 hours and are calculated by XE. Once you are finished with the SPIN Search Options popup window, make sure to save your alterations by clicking the button, or press the button to close the window without saving. If you saved the changes, everything will be available in the next search you perform. SPIN USER GUIDE, VERSION 13 InfoEd Global, Inc. Page 106 of 144 At the bottom of the SPIN Search Options popup window is a Terms of Use link. Clicking the link opens a ‘XE Datafeed Legal Agreement’ URL window. This page contains information on the site’s terms of use, the universal currency converter, and information on currency charts. You may continue to browse the website, although this organization is not directly affiliated with InfoEd. 4.4.2 Detail View Column Options The Detail View section provides individuals with the ability to decide what type of information they would like to see in their search results, and it what order. This function provides users with a better idea of what an opportunity is about before you open the program’s full detail page. Please note that the number of fields returned, especially the large text fields like Objectives, will reduce overall search performance. The system will only retrieve the fields requested, and therefore is faster when retrieving less data. To access the Detail View Column Options popup window (Figure 84), click Search Options > Detail View Column Options. SPIN USER GUIDE, VERSION 13 InfoEd Global, Inc. Page 107 of 144 Figure 84 Detail View Column Options The popup window contains two tables: Detail View Column Options and Chosen Detail View Columns. The Detail View Column contains numerous options for what you could include in your search results. When you have picked the terms (you may choose multiple), either double click the word or use the Back , Forward , Group Back , or Group Forward move the options to Chosen Detail View Column. buttons to Once you are finished with this window, make sure to save your alterations by clicking the button, or press the button to close the window without saving. After you’ve saved these terms, conducting a search will return opportunity results containing details with only the fields selected in the Chosen Detail View Columns section. SPIN USER GUIDE, VERSION 13 InfoEd Global, Inc. Page 108 of 144 You decide that when you perform a search and access the expanded view of an opportunity, you only care about the program’s Synopsis and Funding Limit. You would use the Group Forward button to move all values from the Chosen Detail View Columns to the Detail View Columns Options. You would then use the Forward button to move Synopsis and Funding Limit back over to Chosen Detail View Columns. You Save and Exit and when you perform a search, and click to expand a program to display it’s details, only the Synopsis and Funding Limit will show in the expanded program view (see Figure 85). Figure 85 Chosen Detail View Columns Notice in the above illustration (Figure 86) that the user has selected to only include Synopsis and Funding Limit as their Chosen Detail View Columns. SPIN USER GUIDE, VERSION 13 InfoEd Global, Inc. Page 109 of 144 Figure 86 is a representation of a search with the program in expanded view to show the program details. As you can see, there are only two columns displayed - the program’s Synopsis and Funding Limit. Figure 86 4.5 Chosen Detail View Columns - Results Searches After you search for an opportunity, especially if you’ve identified specific filters or criteria to apply to your search, you may want to save or share the search parameters. Saving your search will retain the category filters, search options, and specific parameters. If you’re an administrative user, you may also share search information with other individuals in your institution. Hover your mouse over the Searches section of the tool bar. The menu expands displaying two options – Saved Searches and Shared Searches. Figure 87 Searches Main Menu SPIN USER GUIDE, VERSION 13 InfoEd Global, Inc. Page 110 of 144 The Saved Searches option will only be available for individuals they are logged in. If you are not logged in, the drop-down menu will only show Shared Searches, and you will be unable to save any search conducted. Clicking either Saved Searches or Shared Searches refreshes the screen, displaying the specific Searches page you were intending to use. 4.5.1 Saved Searches The first option (if you’re logged in) under the Searches tab is Saved Searches. From this section you may: see what searches you’ve currently saved, the created date, the date the search was last used, and if it was shared. You may also filter the search results and delete any saved searches. To access the Available Saved Searches screen (Figure 88), click Searches > Saved Searches. Figure 88 Available Saved Searches Screen The screen opens to a display of any and all searches that you have saved. Please note that after loading a saved search, its criteria, including category filters and such, can be modified and it will not alter the saved criteria. After modification, the user may then save the search as their own, or overwrite the original one if the original one was their own search. SPIN USER GUIDE, VERSION 13 InfoEd Global, Inc. Page 111 of 144 The following information is available on the Saved Searches screen: Run By running a search, you are pulling back the search criteria you previously saved. The results will not always be the same, but the search criteria will be the same as when you first conducted the search. . By running a previously saved search, you are re-evaluating that search’s criteria (search parameters, category filters, and search options) against the current data. If the user has included the “Limit Search to Recently Updated Records” option on the SPIN Search Options Popup (Figure 83), they will almost always see entirely different results even though the search criteria has been saved.. Clicking the Run button opens a Load Selected Criteria popup window. You may either choose to Load Search (in which case the search will run, but you will lose any current settings (such as filters or search options) or you may Cancel the request. Please see the bottom of this section for more information on working with the page after you’ve run the search. Filter This button functions the same as the Filter button in the Basic Search section. Please see Section 4.1, Basic Search for more information on this button. You may filter each column, with the exception of the Run and Delete columns, to help you find a Saved search. Once you filter the search, the Saved Search list will refresh according to your filter, displaying the new information. To return to the previous screen, press Searches > Saved Searches. Search Name This is the title you applied to your saved search. This is the same title you entered when you were saving your search on the main page. You may adjust the title by clicking the actual title, which will open a text box. Adjust the title, and then click anywhere on the screen. By default, the titles display according to the created date, but you may adjust the list by clicking the icon or the icon. Click the title and the arrow icons will appear, allowing you to adjust as necessary. When you are finished with the adjustments, click the SPIN USER GUIDE, VERSION 13 InfoEd Global, Inc. Page 112 of 144 button at the bottom of the screen. Created Date This is the date you saved your search. This is a non-editable field, but may be reordered by pressing the icon or the icon. You may also filter the category by pressing the Date Last Used icon. This is the date you last accessed the Saved Search. The field will update every time you work with the Saved search. This is a non-editable field, but may be reordered by pressing the icon or the icon. You may also filter the category by pressing the Shared icon. This column will only be available for Administrators. By sharing a Saved Search, additional people may view the search results, category filters, and specific search information. Click the check box next to the specific Saved Search you wish you share and press the button. The search you shared will display on the Shared Searches page. Please see Section 4.5.2, Shared Searches for more information. Click the check box a second time to take the search off the Shared list. Delete You may delete any search you’ve saved. Click the delete. icon next to the specific saved search you wish you A popup window confirming the pending delete will appear. Press OK to continue with the delete, Cancel you end the process. Once you delete a search, the screen will refresh without the Saved search. This is a permanent step, and cannot be reversed. Make sure you are only deleting Searches you are positive you do not need. . Refresh Clicking the icon refreshes the Saved Searches screen. If you’ve made any changes and the page did not refresh, click this button and the page will reload, displaying the new/adjusted information. SPIN USER GUIDE, VERSION 13 InfoEd Global, Inc. Page 113 of 144 Page Bar If you have entries on additional pages, you may access the other page by clicking any of the arrows. You may also click the specific page number you’re trying to access. Save Button After you’ve made any changes, make sure you press the button to retain your work. After you click the button, a Load Selected Criteria popup window (Figure 89) will open inquiring whether you are sure you would like to continue loading the search as this action will clear any set search criteria or category filters. Also, your grid settings (including columns chosen in the Detail View Column Options screen) will be lost if you proceed. Figure 89 Load Selected Criteria Popup If you wish to continue with the search, click the button. To cancel the request, click the button which will return you back to the Available Saved Searches screen (Figure 88). Continuing with the search will bring you to the SPIN Main Screen with the Results Returned Section displaying all the searches for the selected Saved Search. SPIN USER GUIDE, VERSION 13 InfoEd Global, Inc. Page 114 of 144 Figure 90 Search Results For more information on this search results grid and the Basic search mode, please refer to Section 4.1.3, Results Returned and Section 4.1.1, Performing A Basic Search. 4.5.2 Shared Searches While using the new SPIN module, whether you’re logged-in or not, you have the ability to access any shared searches within your institution. The purpose of a shared search is to conveniently distribute search results (including any set category filters or specific options) to a group of people. This allows multiple individuals to receive the same search results, without creating extra work or the possibility of different results. SPIN USER GUIDE, VERSION 13 InfoEd Global, Inc. Page 115 of 144 To access the Shared Searches screen (Figure 91), click Searches > Shared Searches. Figure 91 Available Shared Searches This page looks and functions very similar to Saved Searches (Section 4.5.1, Saved Searches). You may filter the categories, rearrange the list, and toggle between pages. The only addition to this screen is the Shared By column. This column displays the name of the individual who shared the search. You do not have the ability to adjust the Search Name, as you did on the Saved Searches page. This helps to maintain unison and prevent any confusion. Just as it does in Saved Searches, after you click the Run button, a Load Selected Criteria popup window (Figure 89) will open inquiring whether you are sure you would like to continue loading the search as this action will clear any set search criteria or category filters. Also, your grid settings (including columns chosen in the Detail View Column Options screen) will be lost if you proceed. SPIN USER GUIDE, VERSION 13 InfoEd Global, Inc. Page 116 of 144 Figure 92 Load Selected Criteria Popup If you wish to continue with the search, click the button. To cancel the request, click the button which will return you back to the Available Shared Searches screen (Figure 91). Continuing with the search will bring you to the SPIN Main Screen with the Results Returned Section displaying the programs for the selected Shared Search. The following illustration (Figure 93) is a list of Available Shared Searches. As an example, we have decided to load the search for Non-US Citizen Postdoctoral opportunities shared by David Jetter. SPIN USER GUIDE, VERSION 13 InfoEd Global, Inc. Page 117 of 144 Figure 93 Loading A Shared Search After you click the Run button and then load the search , the same results David received when he performed his initial search for Non-US Citizen Postdoctoral opportunities will be displayed on the screen (Figure 94). Figure 94 Shared Search Results SPIN USER GUIDE, VERSION 13 InfoEd Global, Inc. Page 118 of 144 From here, you may filter the information, view specific opportunities, or bookmark programs. Please see Section 4.1.6, Filtering Search Results, or Section 4.1.7, Viewing The Program Details, and Section 4.1.10, Bookmarking A Specific Program for more information. 4.6 Bookmarks Another way to save and revisit specific programs it to bookmark the opportunity. There are multiple places within the system where you have the ability to bookmark a program; either from the search results grid or the detail page for a specific opportunity. Whenever you bookmark a specific program, you may group specific programs into their own list, allowing you to view group and efficiently find programs. The Bookmark section functions in much the same way as the Saved searches section, but the primary objective in bookmarking is to allow you to group specific programs you’ve selected, while the goal of saving a search is to save time and foster consistency by allowing you to reuse search parameters. Administrators also have the option to share opportunities that they’ve bookmarked. Just like sharing searches, sharing a bookmarked program (or group) allows multiple users to view specific programs that an administrator has picked. This helps eliminate unnecessary work and prevent discrepancies between users. If you hover your mouse over the Bookmarks section of the yellow tool bar, you will see that the Bookmarks menu expands displaying two options – Bookmarked Opportunities and Shared Opportunities. The ability to bookmark programs and the Bookmark Opportunities section will only be available for individuals who are logged in. Like Shared Searches, if you are not logged in, the drop-down menu will only show Shared Opportunities, and you will be unable to bookmark any program. SPIN USER GUIDE, VERSION 13 InfoEd Global, Inc. Page 119 of 144 Figure 95 Bookmarks Main Menu Clicking either Bookmarked Opportunities or Shared Opportunities refreshes the screen, displaying the specific page you were intending to use. 4.6.1 Bookmarked Opportunities The Bookmarked Opportunities section provides logged-in users with the ability to group multiple programs together without having to constantly sort through a long list (like you may have to when you save an entire results list). A single program may fall into multiple groups, allowing you to create distinct groups. Although you are not able to do much on the screen (with the exception of adding programs and groups), it’s a convenient way to organize and group information for future use. To access the Bookmarked Opportunities screen (Figure 96), click Bookmarks > Bookmarked Opportunities. SPIN USER GUIDE, VERSION 13 InfoEd Global, Inc. Page 120 of 144 Figure 96 Bookmarked Opportunities The following functionality is present on the Bookmarked Opportunities screen: Clicking the popup window (Figure 97). button opens an Add New Group From this window you may either create a new group by typing in the blank text box or click the icon to choose from a preexisting title. Once you have chosen your title, you may decide to share the Bookmark. Please see 4.6.2, Shared Opportunities for more information. When you are finished, click either the button or the button. The popup window will close and the new group will be listed under Group Name. You may change the name of a group you created by click the name. This will create a text box with the current name listed. Make your modifications and click anywhere on the screen to save the changes. SPIN USER GUIDE, VERSION 13 InfoEd Global, Inc. Page 121 of 144 Export Clicking Export allows you to transfer the Bookmarked Opportunities to either a Word or Excel document. Just as described in Section 4.1.11, Exporting Your Search Results To Word or Excel, once you click your chosen format, a popup window confirming the step will open. Press the OK button and the results will export to the specified program. (Expand) Pressing this icon expands the specific group’s information. All of the programs you’ve bookmarked under that specific group will display. The SPIN ID number, title, sponsor information, deadline date and last revised date will all be available. From this section, you may filter the results, or delete a specific program from the list. You may also view a certain program’s detail information by clicking the Opportunity Title link (Please Section 4.1.9 , View More Detailed Opportunity Information for more details on this functionality. To minimize the selection, click the (Filter) icon. This filter icon functions just like the other filter icons within the system, allowing you to utilize a drop down menu, choose the filter, type in the specification and click Filter. The results list will refresh according to your decision, displaying the new information. Please see Section 4.1.6, Filtering Search Results for more information on the filter functionality. Shared Checking the Shared checkbox shares the bookmark group. Once you save the changes, the shared group will appear on the Shared Opportunities page. Click the Shared Shared list. a second time to take the group off the Please see Section 4.6.2,Shared Opportunities for more information. SPIN USER GUIDE, VERSION 13 InfoEd Global, Inc. Page 122 of 144 Delete Clicking the Delete icon located at the end of the group line on the main Bookmarked Opportunities page to delete the specific group. When clicked, all the programs in the group will be deleted from the list, and it will no longer be available on either the Bookmarked Opportunities page or the Shared Opportunities page. There is also another Delete icon next to every program within the specific group when you expand the group. If you click on the , Delete icon beside a select program, that program will be deleted from the bookmarked group. Deleting a bookmark group and/or deleting a bookmarked program are both permanent steps, and cannot be reversed. Make sure you are only deleting Programs/Groups you are positive you do not need. (Refresh) Clicking the icon refreshes the screen. If you’ve made any changes and the page did not automatically refresh, click this button and the page will reload, displaying the new/adjusted information. Clicking the button on the Bookmarked Opportunities screen opens an Add New Group popup (Figure 97). Figure 97 Add New Group Popup SPIN USER GUIDE, VERSION 13 InfoEd Global, Inc. Page 123 of 144 From this popup you may either create a new bookmark group by typing in the blank text box or click the icon to choose from a pre-existing title. Once you have chosen your title, you may decide to share the Bookmark by clicking on the Shared checkbox.. Please see 4.6.2, Shared Opportunities for more information. When you are finished adding a new group or selecting a pre-existing group, click either the the button to return to the Bookmarked Opportunities with no changes saved or button to save the new group. Once the button is clicked, the popup will close and the new group will be listed under Group Name. So let’s assume you wanted to find programs about North America that were for students with a deadline after today. After searching, you will find a variety of programs containing multitude amounts of unnecessary information. You search through numerous list and eventually narrow your program list to 20. To save time and effort, you decide to bookmark the programs from each list under a single group. You may now visit the Bookmark page at anytime and work with the specific programs you’ve added to the list. You may continue to add programs to your group over time, allowing you to modify your results based on your interest and needs. 4.6.2 Shared Opportunities Sharing bookmarked programs is a helpful tool because it allows a single user to distribute the same saved group of programs to multiple individuals. This gives additional users access to specific programs without having to perform multiple searches or worry about setting category filters. The only people that may share opportunities are Administrators. Although, anyone may view and use the shared opportunities. SPIN USER GUIDE, VERSION 13 InfoEd Global, Inc. Page 124 of 144 To access the Shared Opportunities screen (Figure 98), click Bookmarks > Shared Opportunities. The Shared Opportunities screen will appear displaying all the groups you’ve shared. Figure 98 Shared Opportunities Just as you may expand an opportunity to gain more detailed information in the Results Returned section of a search, you may also choose to utilize the Expand button next to a specific Shared Opportunity Group to view the program(s) included in the group (Figure 99). SPIN USER GUIDE, VERSION 13 InfoEd Global, Inc. Page 125 of 144 Figure 99 Shared Opportunities – Viewing Shared Programs You can further click on the Opportunity Title of any program in the group list to view the program’s details. See Section 4.1.7, Viewing The Program Details for more information about this functionality. 4.7 Funding Guides The Funding Guide section of the SPIN module provides users with a list of US federal opportunities that are currently available. Although these programs may appear in a search, this section provides users with a fast and efficient way to find specific federal programs or contracts. Most of the results are canned reports (reports that cannot be altered), but still provide users with an overview of the relevant program information. Hovering your mouse over the Funding Guides section of the yellow tool bar displays two sections- Browse FedBizOpps (US Federal Business Opportunities) and US Federal Register Guide (Figure 100). SPIN USER GUIDE, VERSION 13 InfoEd Global, Inc. Page 126 of 144 Figure 100 Funding Guide Main Page Clicking Browse FedBizOpps (US Federal Business Opportunities) refreshes the screen, displaying all of the contract opportunities available, while clicking Federal Register Guide displays programs from the US Federal Register Guide. 4.7.1 Browse Federal Business Opportunities The Browse FedBizOpps (US Federal Business Opportunities) page (Figure 101) displays a variation of contract opportunities. These opportunities are often not listed on Grants.gov and have strict eligibility requirements. Although these programs may be found by conducting a regular search, this section provides users with an easier way to view all available contract opportunities from the US government. Please note that these US Federal Business Opportunities records will return as part of a regular SPIN Search as well, and that this functionality is intended to be provided as a convenient “canned report.” Click Funding Guides > Browse FedBizOpps to access the main FedBizOpps screen (Figure 101). SPIN USER GUIDE, VERSION 13 InfoEd Global, Inc. Page 127 of 144 Figure 101 FedBizOpps Since this page is preconfigured, you are unable to run any searches for specific items. The few options you have on the screen include: Last Updated When the screen opens, the most recently updated programs appear first. Clicking the button changes the order and places the oldest programs first. If you click the button again, the original order is restored. Export Clicking Export allows you to transfer the FedBizOpps programs to either a Word or Excel document. Just as described in Section 4.1.11, Exporting Your Search Results To Word or Excel, once you click your chosen format, a popup window confirming the step will open. Press the OK button and the results will export to the specified program. Reordering Columns You may reorder the column list by clicking a specific column header (such as Sponsor Name, SPIN ID, Deadline Date, etc) and dragging it to the new location. Please see Section 4.1.5.1, Modifying the Order of the Columns for more information on this functionality. SPIN USER GUIDE, VERSION 13 InfoEd Global, Inc. Page 128 of 144 Grouping Columns Filter You may group columns by clicking a specific column header (such as Sponsor Name, SPIN ID, Deadline Date, etc) and dragging it to the table header as described in Section 4.1.5.2, Grouping by the Columns. Click the filter. button next to the specific category you wish to Using the drop down menu, choose the filter, type in the specification and click Filter. The results list will refresh according to your decision, displaying the new information. Please see Section 4.1.6, Filtering Search Results for more information on this functionality. Opportunity Title link To view more detailed information of a specific program; click the link of the specific program under the column Opportunity Title. This will open the Opportunity Information popup window (Figure 37); displaying the specific programs details including the program’s URL where you may be able begin the application process. Please see Section 0, Viewing The Program Details for more information on this functionality. Refresh Clicking the icon refreshes the screen. If you’ve made any changes and the page did not refresh, click this button and the page will reload, displaying the new/adjusted information. Page Bar If you have entries on additional pages, you may access the other page by clicking any of the arrows. You may also click the specific page number you’re trying to access. Result Number Display By default, 10 results display per page. By clicking the button, you may choose to display a varied number of entries. 4.7.2 US Federal Register Guide The US Federal Register Guide section of the SPIN module provides users with an overview of funding selections from the Federal Register. Since the original Federal Register can be very large and daunting, this section contains specific opportunities, which are applicable to many users. SPIN USER GUIDE, VERSION 13 InfoEd Global, Inc. Page 129 of 144 By default, the last four weeks of programs are listed on this page, allowing users to browse through multiple programs, without having to sort through pages of programs that may be useless or out of date. Since this section is preconfigured, users are unable to search for specific programs (by using filters or keywords), but they are still provided with detailed information that is easy to find and useful by simply viewing the program details utilizing the Expand beside each weekly Register listing. button Click Funding Guides > US Federal Register Guide to access the US Federal Register Guide screen (Figure 102). Figure 102 US Federal Register Guide At the top of the US Federal Register Guide screen, there is a United States Federal Register link. Users may click on this link to visit the Federal Register Guide main site http://id.loc.gov. While here, they may search for programs using their system. So SPIN actually affords the user with two methodologies for accessing this information; the SPIN Federal Guide Listing (the four week overview of specific programs) and access to the actual Federal Register Guide in its entirety on the federal site (additional programs but unorganized). SPIN USER GUIDE, VERSION 13 InfoEd Global, Inc. Page 130 of 144 4.8 Keywords A final way to search for programs within the SPIN system is to use specific keywords. This section provides access to search/browse SPIN’s controlled vocabulary list, containing over 300,000 terms. The keyword section is particularly valuable because it gives users the ability to pull back different results, using different keywords. This creates a broader search range, and returns additional programs. InfoEd is not managing any of the words or relationships in this section. This is completely handled by the Library of Congress. The data InfoEd is using is based on the information from the http://www.w3.org/TR/skos-primer/ website. To access the Keyword section, hover your mouse over Keyword in the yellow tool bar. The dropdown menu will display three options. Figure 103 Keywords Main Menu From this menu, users may choose to Search using keywords, work with Keyword Groups, or access Shared Keyword Groups. SPIN USER GUIDE, VERSION 13 InfoEd Global, Inc. Page 131 of 144 Although anyone may search using a keyword and view shared keyword groups, only logged-in users and administrators may save keyword groups. Additionally, sharing a keyword is only available for administrators. 4.8.1 Search Searching for a keyword is beneficial because it helps expand a search. A user may know the term they want to find results on, but not know any related terms. You may be performing a search using the word ‘Ocean’. Keyword Search has the ability to include words like ‘water,’ ‘shipping’, or ‘marine life’ to further expand the breadth and scope of your search. The keyword results will enable a user to find programs that may not have resulted from entering a specific word. To work with the Keywords Search click Keywords > Search. When clicked, the Keywords screen will open (Figure 104). Figure 104 Keywords Screen This screen contains three tabs which correspond directly with the three options in the Keywords Main Menu: Search, Saved Groups, and Shared Groups. The Saved Groups tab will only be available for logged-in users or administrators. SPIN USER GUIDE, VERSION 13 InfoEd Global, Inc. Page 132 of 144 To begin using this page, type any term in the blank search text box and click the button (Figure 105). Figure 105 Searching for a Keyword The page will refresh displaying the additional keywords or terms related to the term you searched using. Starting from first checkbox Show unused terms in search results under the search text box, the screen is as follows: The search will return keywords that are associated with SPIN programs. Checking this box will allow keywords not associated to SPIN programs to return as results. By default, we only provide keywords that are associated to SPIN programs. Selecting this option will expand results to return keywords that are not associated with any SPIN programs, which could be used to simply browse the keyword set. SPIN USER GUIDE, VERSION 13 InfoEd Global, Inc. Page 133 of 144 Hide terms already selected from search results Checking this box will hide keywords from the search that already are contained within one of your saved groups. (Select) Clicking the checkbox in the yellow header of the first column of the grid selects all of the terms on that specific page. if you’ve already saved a keyword in one of your groups, this will not display unless the box is checked. Clicking the checkbox in the the first column of the grid beside a select Term Label selects that specific keyword. If you visit another page, the selections will not be saved. Term Label This is a list of all the word(s)/term(s) related to the specific word you’re searching. Clicking the specific term link opens a box containing information on the alternate labels, broader terms, narrow terms, related terms and the Library of Congress Link. Preferred Label: This is the specific label link you clicked under Term Label. Alternate Label: This is other possible words that may be used in conjunction to the word you clicked under Term Label. Broader Terms: These are additional words that encompass the word you’re using. For example, ship is the broader term for shipping. Narrow Terms: These are more specific words affiliated with your Term Label. For example, nuclear warships are the narrower term for shipping. Related Terms: These are related words to your term label. This is rare, and most keywords will not have them. Define relationships that are not heirgraphical in nature. (Filter) Click the Filter to filter. button next to the specific category you wish Using the drop down menu, choose the filter, type in the specification and click Filter. The results list will refresh according to your decision, displaying the new information. Occurances This is the number of SPIN programs associated to this keyword. SPIN USER GUIDE, VERSION 13 InfoEd Global, Inc. Page 134 of 144 By clicking this checkbox, the search will automatically include keywords associated to the SPIN Program. For example, if you select Fire and click the icon, your search will automatically include any keywords that are related to the term; such as heat or smoke. Returning results with any related terms is very rare since a lot of the words do not contain direct relationships with other words. 4.8.1.1 Including Broader and Narrower Terms On the Keyword Search tab, you may also select to utilize the Include Broader and Include Narrower functionality to create varying levels of searching ‘depth’ to further customize your Keyword Search. This functionality is optionally selected for each keyword chosen for a group. This allows a single selection to traverse the keyword hierarchy, either up or down, when the keyword is used in an advanced search. This is the level to which you want to broaden your search. By checking and changing the number from the default of 0 to a number from 1-10 (with 10 being the broadest level), you will be able to include up to 10 times broader terms in your keyword search. For example, if you went two levels broader in your search (changed the number to two) for the word Shipping, you might return the terms ‘Steamboat’ or ‘Lines’. Instead of selecting multiple keywords, a user can choose to select a single keyword and “Include Narrower Terms” a user-defined number of levels down, and this will automatically include all of the children terms that many levels down the hierarchy when the search is run. For example, selecting the term “Metastasis” and include narrower terms 1 level down, the search will also find opportunities that are associated to “Bone Metastasis”, “Lymphatic Metastasis”, or “Liver Metastasis”. Choosing two levels down will also include all of the narrower terms of those three keywords as well. SPIN USER GUIDE, VERSION 13 InfoEd Global, Inc. Page 135 of 144 In Figure 106, we have selected to include two levels of broader terms for my keyword search of Transportation, Term Label ‘Terminals’. Figure 106 Broadening Your Search This is the level to which you’d like to narrow your search. of levels you want to specify the term. Each level you may go 10 times narrower in your search, returning very specific results. In Figure 107, we have selected to include two levels of narrower terms for my keyword search of Transportation, Term Label ‘Terminals’. SPIN USER GUIDE, VERSION 13 InfoEd Global, Inc. Page 136 of 144 Figure 107 Narrowing Your Search After you have selected your keyword terms and your broadening/narrowing levels, click the Save Selections and Continue button to save your keyword search settings. When you click the Save Selections and Continue button, the Keyword Group Name popup (Figure 108) will appear. Figure 108 Keyword Group Name Popup SPIN USER GUIDE, VERSION 13 InfoEd Global, Inc. Page 137 of 144 You can select to create a new group or select to use an existing keyword group. Once you have made you keyword group name selection, click Continue to save your keyword search. If you click the Cancel button, you are returned back to the Keyword Search tab with your current settings and selections unchanged. If you decide to click the Exit button on the bottom of the Keyword Search tab, a Confirm Exit popup (Figure 109) asking you if you would like to discard any changes you have made. Figure 109 Confirm Exit Popup If you click the Discard Changes button, you are returned back to the SPIN Main Screen (Figure 3) with no Keyword Search changes made. If you click on the Cancel button, you are returned to the Keyword Search Tab, with your settings and selections unchanged. SPIN USER GUIDE, VERSION 13 InfoEd Global, Inc. Page 138 of 144 4.8.2 Saved Keyword Groups When you create a new Keyword Group, that new group is displayed in the Saved Keyword Groups section which is accessed by clicking Keywords > Saved Keyword Groups. When clicked, the Saved Keyword Groups tab will open (Figure 104). Figure 110 Saved Keyword Groups SPIN USER GUIDE, VERSION 13 InfoEd Global, Inc. Page 139 of 144 The following details the functionality of the Saved Keyword Groups tab: (Expand) Pressing this icon expands the specific group’s information. To minimize the selection, click the Group Name (Filter) icon. The name of the keyword group. This filter icon functions just like the other filter icons within the system, allowing you to utilize a drop down menu, choose the filter, type in the specification and click Filter. The results list will refresh according to your decision, displaying the new information. Please see Section 4.1.6, Filtering Search Results for more information on the filter functionality. Shared Checking the Shared checkbox shares the keyword group. Once you save the changes, the shared group will appear on the Shared Keyword Groups page (Figure 112). Click the Shared Shared list. a second time to take the group off the Please see Section 4.8.3, Shared Keyword Groups for more information. Delete Clicking the Delete icon located at the end of the group line on to delete the specific group. When clicked, the group will be deleted from the list, and it will no longer be available on either the Saved Keyword Groups page or the Shared Keyword Groups page. Deleting a keyword group is a permanent step, and cannot be reversed. Make sure you are only deleting groups you are positive you do not need. (Refresh) Clicking the icon refreshes the screen. If you’ve made any changes and the page did not automatically refresh, click this button and the page will reload, displaying the new/adjusted information. Figure 111 is an illustration of the expanded detail of a Saved Keyword Group. SPIN USER GUIDE, VERSION 13 InfoEd Global, Inc. Page 140 of 144 Figure 111 Saved Groups – Expanded Detail 4.8.3 Shared Keyword Groups When you share a Keyword Group on the Saved Keyword Groups screen (Figure 110), that new group is displayed in the Shared Keyword Groups screen (Figure 112) which is accessed by clicking Keywords > Saved Keyword Groups. When clicked, the Saved Keyword Groups tab will open (Figure 104). SPIN USER GUIDE, VERSION 13 InfoEd Global, Inc. Page 141 of 144 Figure 112 Shared Keyword Groups This shared keyword group functionality is available to Anonymous users who have the ability to view these shared groups. However, a user must be logged into the SPIN system if they would like to create their own saved and/or shared keyword groups. SPIN USER GUIDE, VERSION 13 InfoEd Global, Inc. Page 142 of 144 The following fields are available on the Shared Groups tab: Group Name (Filters) The display of the name of the keyword group. The filter icons beside the Group Name, Created, Modified, and Created By column headers function just like the other filter icons within the system, allowing you to utilize a drop down menu, choose the filter, type in the specification and click Filter. The results list will refresh according to your decision, displaying the new information. Please see Section 4.1.6, Filtering Search Results for more information on the filter functionality. Created The display of the date the keyword group was created. Modified The display of the date the keyword group was last modified. Created By The display of the name of the user who created and shared the keyword group. Copy Checking the Copy checkbox user profile. copies the keyword group to your Once you click the Exit button, the keyword group will be saved to your profile (if not already yours) Click the Copy a second time to take the group off the list of groups to copy to your profile. Please see Section 4.8.3, Shared Keyword Groups for more information. (Refresh) Clicking the icon refreshes the screen. If you’ve made any changes and the page did not automatically refresh, click this button and the page will reload, displaying the new/adjusted information. 4.8.4 Using a Keyword Group as Part of a Search Within the Advanced search, one of the available fields is “Keywords”. Using this field will allow a logged in user to select one of their keyword groups as an Advanced search expression. SPIN USER GUIDE, VERSION 13 InfoEd Global, Inc. Page 143 of 144 This shared keyword group functionality is available to Anonymous users who have the ability to view these shared groups. Therefore, an Anonymous user may perform an Advanced search using a shared Keyword Group (see Figure 113). Figure 113 Using a Keyword Group as Part of a Search As you can see in Figure 113, the Keywords picklist contains a list of all shared Keyword Groups. SPIN USER GUIDE, VERSION 13 InfoEd Global, Inc. Page 144 of 144