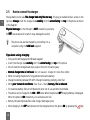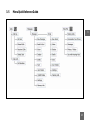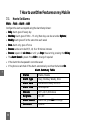
1
The EasyTouch® Discovery 2
HSDPA Multi band 3G Mobile Phone
User Guide
1
ouc
h® Disc
overy 2 a simple way to keep in touch and so much
Congratulations on choosing the EasyT
asyTouc
ouch
Disco
more… See what you can do with your EasyTouch® Discovery 2 mobile phone…
9
9
9
9
9
9
9
9
9
9
9
2
Make a call - see the Getting Started section (page 13)
Store a list of contact names and phone numbers (page 27)
View records of phone calls dialled, received and missed (page 27)
Send and receive text messages (page 43 )
Make a video call (page 32)
Set alarms and reminders (page 50)
Personalise the phone, e.g. change the ring volume, set the key tones etc (page 34)
Use the camera – take photos or record a video (page 61)
Listen to the radio (page 64)
Pair to a Bluetooth Neckloop and Hearing Aids (page 77)
Access the internet on the move – e.g. check the news and weather (page 66)
The package includes:
Contents
Image
9
EasyTouch® Discovery 2
Handset, battery and
charger
USB Data Cable and personal handsfree headset.
Instructional DVD with Join
Me PC Software, user guide
and more…
User Guide and warranty
card
3
Warnings and Safety Notices
Please read all the safety notices before using this device.
PC Software Requirements
Join Me PC Software included supports Windows Vista (32 and 64 bit), Windows 2000 with Service Pack 4 or
Windows XP with Service Pack 2 & 3 only.
A limited version of Join Me is supplied that supports MAC OS.
Copyright © 2009 ZTE Corporation All rights reserved
1 st Edition July 2009
No part of this publication may be excerpted, reproduced, translated or utilized in any form or by any means,
electronic or mechanical, including photocopying and microfilm, without the prior written permission of
ZTE Corporation.
ZTE Corporation operates a policy of continuous development. ZTE Corporation reserves the right to make
changes and improvements to any of the products described in this document without prior notice.
Limitation of Liability
ZTE shall not be liable for any loss of profits or indirect, special, incidental or consequential damages resulting from or arising out of or in connection with using this product, whether or not ZTE had been
advised, knew or should have known the possibility of such damages. The user should refer to the enclosed warranty card for full warranty and service information.
4
Contents
RF Safety Information .................................................................................................................................................... 9
General Safety and Maintenance Information ....................................................................................................... 10
1
How to use this guide ..................................................................................................................... 1 2
1.1
2
2.1
2.2
2.3
2.4
2.5
2.6
2.7
2.8
3
On Mobile Help ............................................................................................................................................... 12
G e t t i n g S t a r t e d .................................................................................................................................... 1 3
How to find your way around your new handset? .............................................................................. 13
How to remove the battery cover ............................................................................................................. 15
How to insert the USIM Card ....................................................................................................................... 15
How to insert the Battery ........................................................................................................................... 17
How to connect the charger ...................................................................................................................... 18
How to switch the phone On or Off .......................................................................................................... 19
How to make a voice call ............................................................................................................................ 19
How to answer an incoming call ............................................................................................................... 19
Getting to Know My Mobile ......................................................................................................... 2 0
3.1
3.2
3.3
3.4
3.5
3.6
4
Information Bar Icons .................................................................................................................................. 20
Keypad Functions ......................................................................................................................................... 21
What is the Main Menu? ............................................................................................................................... 22
What is a Shortcut? ....................................................................................................................................... 22
Menu Quick Reference Guide ...................................................................................................................... 23
How to navigate the Menus and select a menu item ........................................................................... 26
Making Calls .......................................................................................................................................... 2 7
4.1
How to make / answer a Voice Call ........................................................................................................... 27
5
4.2
4.3
5
How to make / answer a Video Call ........................................................................................................... 32
How to use the headphones (Personal Handsfree) ............................................................................... 33
How to Personalise the Phone .................................................................................................... 3 4
5.1
5.2
5.3
5.4
5.5
5.6
6
How to Change Volumes ............................................................................................................................. 34
How to manage my Contacts .................................................................................................................... 36
How to change the Viewing Options ........................................................................................................ 39
How to set up other useful options .......................................................................................................... 40
How to set the time and date .................................................................................................................... 41
How to Disable or Change the PIN Code ................................................................................................... 42
How to use Messages ....................................................................................................................... 4 3
6.1
6.2
6.3
6.4
6.5
6.6
6.7
7
How to use Text Messages (SMS) ............................................................................................................... 43
How to send a Multimedia Message (MMS) ............................................................................................. 47
How to receive a Multimedia Message (MMS) ......................................................................................... 47
How to check your MessageBank (Voicemail) ....................................................................................... 47
How to use Email on your mobile ............................................................................................................. 48
How to receive an Email .............................................................................................................................. 49
How to set up automatic Email Retrieval ................................................................................................ 49
How to use Other Features on my Mobile ........................................................................... 5 0
7.1
7.2
7.3
7.4
7.5
How to Set Alarms ........................................................................................................................................ 50
How to Set Appointments using the Calendar ....................................................................................... 51
Calculator ........................................................................................................................................................ 52
World Time ..................................................................................................................................................... 52
Voice Recorder ............................................................................................................................................... 52
6
7.6
7.7
7.8
7.9
7.10
7.11
7.12
7.13
7.14
7.15
8
Stopwatch ...................................................................................................................................................... 53
Currency Conversion ..................................................................................................................................... 53
Games and Applications ............................................................................................................................... 53
File Manager .................................................................................................................................................... 54
How to use a Memory Card (MicroSD Card) ............................................................................................. 55
PC Connection ................................................................................................................................................ 56
USB Mode – Use the handset as a Mass Storage Device ........................................................................ 56
Connect to the ZTE Bluetooth Car Kit ...................................................................................................... 57
Connect to a Bluetooth Wireless Device .................................................................................................. 57
How to use Dial Up Networking via USB or Bluetooth ......................................................................... 59
How to use Photos and Videos .................................................................................................. 6 1
8.1
8.2
8.3
9
How to Take, Save and Send a Photo ....................................................................................................... 61
How to Take, Save and Send a Video ........................................................................................................ 62
How to View Pictures and Videos .............................................................................................................. 63
Listen to Music on your mobile ................................................................................................. 6 4
9.1
9.2
9.3
9.4
10
11
How to use the FM Radio ............................................................................................................................ 64
How to add music to your mobile ............................................................................................................ 64
How to browse and play music files from File Manager ....................................................................... 64
How to create a new Music Playlist .......................................................................................................... 65
Access the Internet on your mobile phone ........................................................................ 6 6
Connect your phone to a computer ........................................................................................ 6 7
11.1
11.2
Use the phone as a Mass Storage Device with a MicroSD Card ............................................................. 67
Connect your phone to a computer ......................................................................................................... 67
7
11.3
12
12.1
12.2
12.3
12.4
13
Use your Mobile as a Modem ...................................................................................................................... 76
Use with Hearing Aid Devices and Text Terminals ........................................................... 7 7
How to Pair with a Bluetooth Neckloop or Hearing Aid ....................................................................... 77
Tips for better sound quality with Hearing Aids ...................................................................................... 77
CTM ................................................................................................................................................................... 78
Other Accessibility Features (ACIF G627 Matrix) ...................................................................................... 78
Technical, Support and Warranty Information ................................................................. 7 9
13.1
13.2
13.3
13.4
13.5
13.6
Troubleshooting and FAQ’s ........................................................................................................................ 79
Error Messages ................................................................................................................................................ 81
Technical Specifications .............................................................................................................................. 82
Support Information ..................................................................................................................................... 83
Warranty Information .................................................................................................................................. 83
Environmental Statement .......................................................................................................................... 84
8
RF Safety Information
The handset has an internal antenna located in the top of the phone. For optimum performance with
minimum power consumption do not cover the antenna area with your hand. Hold the handset between
thumb and finger in the middle of the device. Covering the antenna affects call quality, may cause the
handset to operate at higher power levels than needed, and may shorten talk and idle times.
The handset is a low-power radio transmitter and receiver. When switched on it intermittently transmits
radio frequency (RF) energy (radio waves). The transmit power level is optimized for best performance and
automatically reduces when there is good quality reception. Maximum power is only used at the edge of
network coverage so under most circumstances the power output is very low. Under poor network conditions the phone transmits at a higher power, may get hot and have a significantly shorter battery life.
Interference with Pacemakers and other Medical Devices
Your mobile phone may cause interference with pacemakers, hearing aids and other medical devices. Interference may be caused by transmitted radio signals when the phone is held in close proximity to the device
or in direct contact with the skin. It is important to note that any interaction between the mobile phone and
the device is temporary. Moving the phone away will restore the device to its correct operation.
Declaration of Conformity – SAR (Specific Absorption Rate)
We declare that the product(s) detailed in this manual, and in combination with our accessories, conform
with the essential requirements of The Radio Communications Standard (Electro-magnetic Radiation Human Exposure) 2003 and the Australian Communications & Media Authority Section 376 of the Telecommunications Act 1997.
N14945
9
General Safety and Maintenance Information
The handset contains delicate electronic circuitry, magnets and battery systems. You should treat it
with care and pay attention to the following points:
• Handle the handset with care. Do not drop or
throw the handset down roughly.
• Do not immerse in any liquid. The handset contains a liquid detection sticker and the warranty will be voided by any liquid ingress.
• The operation of some medical devices, such
as hearing aids and pacemakers, may be affected
by the handset. Please see the warning in the
section above.
• Do not place the handset near computer disks,
credit cards, and other magnetic media. The
information contained on disks or cards may
be erased or damaged.
• Do not leave the handset or battery in direct
sunlight or near heat sources where temperatures could exceed 45°C.
• Keep the handset, battery, charger and other
accessories away from children.
• Do not put the battery in your mouth.
• Be careful not to pierce the battery with sharp
objects.
10
•
•
•
•
•
•
•
•
•
•
•
•
Do not use damaged batteries.
Do not disassemble or modify the battery.
Only use original replacement batteries.
It is normal for the handset to become warm
while the battery is being charged.
Stop using the battery if excessive heat, odour,
discolouration, deformation, or abnormal condition is detected during use, charge or storage.
In the unlikely event of a battery leak avoid
contact with your eyes or skin. Flush with water
and consult a doctor.
Take care not to allow metal objects such as
coins or keys to come into contact with the
battery terminals.
Do not dispose of batteries in a fire.
Do not throw used batteries into household
rubbish, return them to a recycling point.
Only use the supplied charger.
Do not connect the handset to any other
chargers or car adaptors.
Do not attempt to dismantle the handset or
any of its accessories.
• Do not place the handset close to the edge of
a table in case it moves when set on vibrate
mode.
• Do not put the handset into a microwave oven,
dryer, or high-pressure container.
• Don’t use the handset immediately after a sudden temperature change eg. from an air conditioned environment to high temperature and
humidity outside. In such cases there could be
condensing moisture inside the handset which
can cause internal damage. Switch off and
leave for 30 minutes before use.
• Do not use the handset while driving or operating other machinery.
• Do not use the handset where blasting is in
progress.
• Do not leave the handset at the bottom of a
bag where it may be damaged by sharp objects.
• At high volume, prolonged listening to audio
devices can cause hearing loss.
• Observe and obey warning signs at petrol
stations, airports and hospitals.
• Switch the phone off when boarding aircraft.
• Do not use your phone or accessories at refuelling points, near fuel or chemicals or store it in
•
•
•
•
•
•
•
•
•
•
the same compartment as flammable gas, liquid or explosives.
Do not leave the handset discharged or disconnected for a long time, otherwise your personal
data may be lost.
Remember to make backup copies of all important data on the handset.
Take care when the phone is in your pocket.
Sitting down may damage the handset.
Under poor network conditions battery life is
considerably reduced.
When the battery is thrown away cover the
terminals with insulating tape.
Please recycle the packaging and all parts as
advised in Section 13
Emergency service coverage is dependant on
network availability and battery status.
It is always good practice to switch off the
handset regularly.
Do not expose the handset to oils, solvents or
metal filings.
If you have an alarm set the handset will
switch on at the prescribed time.
11
1 How to use this guide
1
The following conventions are used in the manual:
Instruction
Press the Left Arrow
Description
Press the left directional key on the four way controller
Press OK
Press the OK key in the centre of the four way controller
op KKey
ey
Press the L e f t TTop
Press the
Long press
Press and hold the key for 2 seconds
Go to the Main Menu (press OK
OK) select To ols and
press OK to open. This soon becomes automatic
Menu > TTo
o ols
•
•
•
•
•
•
1.1
key just below the screen
The functions for the OK and Top keys change depending on where you are in the menu. The functions are always described at the bottom of the handset display.
The End key
is used to exit the menus, end a Call and switch the handset On or Off
Off. From within
a sub-menu the End key takes you back to the main menu
The C key is used to go back one step in menus, and to clear text in text edit modes. In text edit mode
press once for backspace, press and hold to clear all the text.
The
symbol shows useful tips.
Play your instructional DVD in any DVD player for ‘How to Use’ tips.
Access the User Guide and PC Software by exploring your DVD on a computer.
On Mobile Help
The EasyTouch® Discovery 2 has a unique HELP menu which provides step by step instructions for some key
functions on your mobile including, making calls, messages and use with hearing aids. To access HELP Select Menu > Help File
12
2 Getting Started
2.1
How to find your way around your new handset?
2
1. Earpiece
1
2. Main Display
3. Arrow Keys (
)
4. Left Top Key
2
5. Call Key, show Call History
6. Video Call Key
7. Keypad
8. Microphone
3
10. Clear / Back Key *
4
5
6
11. End / Exit / Power Key
7
9. Speakerphone button
14
13
12
11
10
9
12. Right Top Key
13. OK Key
14. Camera for video calling
8
* The C key is used to go back one step in menus,and to clear text in text edit modes.In text modes press
once for backspace, press and hold to clear all the text.
13
2
Speaker
External Antenna port
Charger, USB and
Headset port
Memory Port
Volume keys
Camera key
Battery Cover
Left
14
Rear
Right
2.2
How to remove the battery cover
Push down gently on the thumb notch then slide the cover down and lift off.
2
2.3
How to insert the USIM Card
The USIM card (UMTS Subscriber Interface Module) is the small plastic smart-card with gold contacts. It
holds personal information such as names and phone numbers. It can be moved between different phones
if required. The USIM card must be inserted before using the handset. For best results you
should always use a Next GTM USIM
•
Insert the USIM card with the gold contacts facing down and the bevelled edge on the right hand
side as shown. Carefully slide it into the socket observing the correct orientation.
15
2
How to insert the USIM card
Insert the USIM card with the gold contacts facing down and the bevelled edge on the right hand side.
There is a diagram showing the correct orientation embossed onto the plastic sleeve.
Always handle the USIM card with care to avoid damage.
For best performance check you are using a Next GTM USIM card.
If your USIM card is faulty please contact Telstra.
If your handset displays:
16
Enter Handset unlock code
The default code is 0000
Enter (U)SIM PIN Code
Enter the PIN supplied with your SIM card
No (U)SIM detected
Check the USIM is inserted correctly.
Enter PUK code
Contact your Service Provider
2.4
How to insert the Battery
Insert the battery as shown with the contacts located against the gold springs. The battery only fits one
way.
Close the case by locating the plastic cover horizontally into the grooves and sliding the cover up to close
it. Do NOT force the cover down by pressing on it. This can damage the cover.
Slide the cover up gently:
Locate the cover into the grooves horizontally and slide up gently.
17
2
2.5
2
How to connect the charger
Charge before initial use.. The charger lead only fits one way
way. The plug is marked with an arrow on the
top face. Always insert the charger lead carefully with the arrow facing the top of the phone as shown
in the diagram:
Physical damage to the USB port is NOT covered by warranty
Do NOT use excessive force which may damage the socket
The phone can also be charged by connecting it to a
computer using the USB lead supplied.
Tips about using charging
• Only use the AC charger and USB lead supplied
• Insert the charger lead carefully with the arrow facing the top of the phone
• Do not insert the charger lead at an angle or force it in the wrong way
hours Do not leave on charge for more than 24hrs
• Normal charge time is 3-4 hours.
• When not using the phone for long periods remove the battery
• Charge the battery between 0°C~45°C. Charge the battery promptly when flat.
• With poor network conditions (less than 2 bars) battery life is reduced
• To maximize battery life turn off Bluetooth when not in use and limit multimedia
• The phone can be charged in the ON or OFF state. When the phone is OFF Charging Battery is displayed.
When the phone is ON the battery icon animates until full
• Battery life is be improved after a few charge / discharge cycles
• After charging in the OFF state disconnect the charger and turn the phone ON by pressing the
18
key
2.6
How to switch the phone On or Off
Press and hold the
key for two seconds to switch the phone ON or OFF.
Enter (U)SIM PIN code – Enter the PIN number supplied with your USIM card. This is on the “scratch and
reveal panel” on the back of the plastic card. (See section 5.6)
The start up screen below is referred to throughout the manual as the Main Screen:
The Information bar
The Main Screen:
2.7
How to make a voice call
• Enter the number on the keypad and press the
• Press OK or the Speaker button
• Press the
2.8
key to make the call
to activate Handsfree (speakerphone) mode
key to end the call.
How to answer an incoming call
• Press
• Press
to answer the call or press OK or
for Speakerphone mode
or Reject to end the call. Press Mute to stop the incoming ring.
If MessageBank is active pressing Reject will forward the call to MessageBank.
19
2
3 Getting to Know My Mobile
3.1
3
Information Bar Icons
The Information Bar icons appear at the top of the Main Screen to indicate what is happening on your mobile.
For example, the signal strength icon indicates what level of signal strength or reception you are getting in
a particular location. If you are in an area with good reception the indicator is full.
3G Signal Strength
Battery Level Indicator
GSM Signal Strength
Alarm is set
New SMS (Text Message)
Missed Voice Call
SMS or MMS Memory is Full
Missed Video Call
New MMS (Multimedia Message)
Silent Mode
MMS Memory is Full
Vibrate mode enabled
New Email
Call Forward is Active
Email Memory is Full
Data Services available (GPRS)
New Wap Push Message
Data Services active (PDP)
Wap Push Message Memory is Full
High speed data active-HSDPA
Headset and Vibrate Mode
Roaming
Headset Mode
Car kit attached
Bluetooth is ON
20
3.2
Keypad Functions
K e y Corresponding Functions
1
1 | punctuation marks | long press for MessageBank
2
2 | abc | ABC
3
3 | def | DEF
4
4 | ghi | GHI
5
5 | jkl | JKL
6
6 | mno | MNO
7
7 | pqrs | PQRS
8
8 | tuv | TUV
9
9 | wxyz | WXYZ
0
0 | Space
3
Speaker phone. Activate Loudspeaker mode
*
From the main screen press twice for the international prefix ‘+’,
press three times for pause ‘P’ In text screens access special characters
#
From the main screen long press to activate Meeting mode
In text screens change text entry mode, abc, ABC, En, 123
Call a dialled or selected number.
C a l l From the main screen view All Calls. Last number redial.
End a call. Exit a menu.
E n d Long press to power ON / OFF
21
3.3
What is the Main Menu?
The Main Menu presents a list of options for selection. eg. Find a contact, create a message, set an alarm.
To access the Main Menu press the OK key
key. The image below shows the My Plac
Placee icon highlighted.
3
3.4
What is a Shortcut?
A Shortcut is a quick way to access key menu functions directly from the main screen. Press the arrow keys
to access the default shortcuts as shown:
My Place
Email
Messages
Contacts
To change the default shortcuts:
Menu > Settings > Arrow Right
22
to Handset > Shortcut keys (See Section 5.4.3)
3.5
Menu Quick Reference Guide
3
23
Menu Quick Reference Guide Continued…
3
24
Menu Quick Reference Guide Continued…
3
25
3.6
How to navigate the Menus and select a menu item
From the Main Screen press OK to access the Main Menu
Menu. Use the Arrow Keys
3
to move the cursor
around the Main Menu
Menu. The icon is described at the bottom of the screen. To make a selection, highlight the
function you wish to access and press the OK button to select. To return to the menu screen, press the C key.
You can also quick select the required menu item by pressing the corresponding number key as shown
on the grid. Eg Menu > 5 = My Place
Press OK
26
4 Making Calls
4.1
How to make / answer a Voice Call
4.1.1
How to make a Voice Call
• Enter the number on the keypad and press the Call key
• Press OK or the Speaker button
• Press the
to make a voice call.
to activate Handsfree (speakerphone) mode
key to end the call.
4
4.1.2
How to add a Contact
op KKey
ey to Sav
• From the Main Scr
Scree en enter the phone number, press the Le f t TTop
Savee
• Press OK to create a New Contact or Arrow Down
to Update existing contact
• Using the keypad, enter a Name for the new Contact or modify an existing contact
• Press OK to Save
Save. The default save location is the Handset. Change if required to store numbers on your
USIM card.
4.1.3
How to make a call using Call History
• Press the
key to bring up All Calls
Calls. Press
• Use the Arrow Keys
• Press the
• Press the
again for Last Number Redial
to choose a number from the All calls list
key to make the call
key to end the call
27
4.1.4
How to make a Call using Contacts
• Press OK for the main menu, press the down arrow for Contacts then press OK
• Use the Arrow Keys
to scroll to the chosen contact
• Search Contacts using the letter keys – eg. press ‘J’ to find John
• Press the
• Press the
key to make the call
key to end the call
From the Main screen Arrow Down
4
4.1.5
(default shortcut) for the Contacts menu.
How to answer a Call
When you receive an incoming call
call:
• The phone rings
rings, light ups and vibrates depending on the current profile setting.
ic
ation displayed on the scr
• You receive an incoming c all notif
notific
ication
scree en
• Press
to answer the call. or
• Press OK or the Speaker button
• Press
to activate Handsfree (speakerphone) mode
to Reject the call
Mutee the inc
incoming
• Press the Right TTop
op KKey
ey to Mut
oming ring if required. This feature is useful to silence the
incoming ring without answering the call. The other party hears ring tone until the call ends.
28
4.1.6
General tips for Calls
• For International numbers press the star key twice for the International Prefix ‘++ ’
• To call a number received in a message highlight the number, press the Call key
• The microphone is next to the # key. Be careful not to block it with your hands
• During a call you can change the earpiece volume using the side Volume keys
• The number of rings before the phone diverts to MessageBank is set by Telstra. The default is 6 rings.
Contact Telstra to change this setting.
• To enable international roaming please contact Telstra.
• You can set the handset to answer the call when you Open the Flip by following:
Menu > Settings > Arrow Right
to Call > Open flip to answer
• Switch on or off to enable / disable auto-answer when you open the handset
• If you have a missed call the blue LED on the front panel flashes. A missed call reminder sounds if you
have enabled this feature (see section 5.4.5)
4.1.7
Call Options during an active Voice Call
op KKey
ey for Options during a voice call. Use the End key
Press the Le f t TTop
to return to the call menu
Hold:
Puts the current call on hold
End call
call:
End the call
Record:
Record the incoming audio. The file is saved to the My Audios folder
DTMF Off/On
Off/On:
Enable or disable sending DTMF tones. Default is ON
Message
Message:
Switch to the Message interface during a call
Contacts:
Switch to Contacts interface during a call
B r o w s e rr:
Launch the web browser
29
4
4.1.8
How do I make Emergency Calls?
To make an emer
genc
y ccall
all during normal use
emergenc
gency
• Ensure that the handset is switched on and in service
service.
•
Press the
•
Enter the emergency number for the present location using the keypad, (eg 000).
•
Press the
key repeatedly to return to the Main Screen
Screen.
key to call the number. Follow instructions received and do not end the call until told
to do so.
4
•
If the keypad is locked it is still possible to dial the Emergency Numbers without having to unlock the
keypad. Press the numbers as required then press the Call key.
Emergency calls can be made without a USIM Card (Phone PIN not required)
When the USIM card is not inserted or registered it is possible to dial the emergency services.
or OK to make the call.
Enter the emergency number and press
•
•
•
•
•
30
Advise the operator which emergency service you require
Give your position and remain stationary to get the best coverage
Due to the nature of the cellular system the connection of emergency calls cannot be guaranteed
Never rely solely on any wireless device for essential communications ie. medical emergencies
The Emergency Number 112 is used internationally.
4.1.9
How to use Call Divert
Menu > Settings > Arrow Right
to Call > Call divert
This service enables incoming calls to be diverted to another number. Choose the Call divert function
required from the menu list.
Select the function to Activate, Deactivate or Check status.
Always
All incoming calls are diverted to your specified number
When busy
Calls are diverted when you are on another call
When no reply
Calls are diverted after a set period of rings
When unreachable
Calls are diverted when your handset is off or out of coverage
Cancel all call diverts
Cancel all current diverts
4
4.1.10 How to use Call Waiting
Menu > Settings > Arrow Right
to Call > Call Waiting > Activate
This feature allows an incoming call to be answered while already on a call. Answering the incoming call
automatically places the first call on hold. The handset displays a table showing the Active call and call
Hold’ calls.
Hold. Pressing Options allows the switching between the ‘Active
Active’ and ‘Hold
on Hold
Hold
Active
Press Options to switch calls between Hold and Active:
Press Options > Hold to switch calls
Active
03991234xx
03996543xx
Hold
Press Options > Retrieve to switch calls
4.1.11 Call Options when Connected to a Bluetooth device
If the handset is connected to a Bluetooth accessory such as a car kit
kit, wireless headset or hearing
aid device then an incoming call is forwarded to the Bluetooth device. Press the Call key on the Bluetooth
31
device to answer the call. Press the call key on the Bluetooth device for Last Number Redial. The handset
does not support the transfer of Contacts over Bluetooth.
An active call can be switched between the Bluetooth device and the handset by pressing:
Options > Switch to Handset / Switch to Bluetooth.
4
4.2
How to make / answer a Video Call
4.2.1
How to make a Video Call
3G coverage is required to make and receive video calls.
• Enter the phone number using the keypad or from the Contacts list as already described
• Press the Video call key
• Press the End key
to make a video call
call.
to end the call.
If the call is not successful you are asked if you want to try a voice call instead.
4.2.2
How to answer a Video Call
3G coverage is required to make and receive video calls. If a video call is received when browsing or using
multimedia functions, the browser, media player or FM radio are suspended for the duration of the call.
• Press the Video call key
• Press the End key
32
to accept an incoming video call
to end the call.
4.2.3
How to use Call Options during an active Video Call
op KKey
ey for the following O ptions during a vide
o ccall
all
Press the LLee f t TTop
video
all:
Hold/Retrieve
Send a still picture instead of your own image and the voice is muted
Start recording video
Record video from the other party (i.e. received video stream)
Block/Send my picture
Block / Send your own image to the other party
Use back/front camera
Select the back/front camera
Brightness
Adjust the brightness
Zoom
Change the magnification of your own image
PIP off/on
Hide or show your own picture on the local screen
Exchange PIP
Reverse the Picture in Picture display
New text message
Send SMS during a video call
Contacts
Switch to Contacts interface
4.3
•
•
•
•
•
•
4
How to use the headphones (Personal Handsfree)
The Personal Handsfree headphones include a microphone and a call switch
Insert the headset carefully with the arrow facing the top of the phone
Incoming ring only beeps in the headset when in Meeting or Silent mode
In normal ringing mode the handset rings, press the call switch to answer
Music playing is suspended when a call is received and resumes after the call ends
The headset acts as the FM antenna and needs to be inserted to use the FM Radio.
33
5 How to Personalise the Phone
There are many ways to customise the handset such as changing the profiles, wallpaper, ringtones and
setting up shortcuts.
5.1
How to Change Volumes
During a call press the side volume keys to adjust the earpiece or speaker volume
5.1.1
How to Change the Profiles
Profiles are used to set the ring volume
volume, ringtone
ringtone, vibrate mode
mode, key tones etc.
Menu > Set
tings > Arrow Right
Settings
5
ile
ey to Edit the required Prof
ile
to PPrr of
ofile
iless > press the Right Top KKey
ofile
The following settings can be changed by pressing Edit
Voicecall ringtone
Ring volume
Message tone
Keypad sounds
Videocall ringtone
Ringing type (vibrate)
Keypad volume
Warning tone
Earpiece volume
Pre defined profiles:
General
Keytones ON, Ringing ON, Vibrate ON
Meeting
Keytones OFF, Ringing OFF, Vibrate ON
Outdoor
Keytones ON, Ringing ON (loud), Vibrate ON
Silent
Keytones OFF, Ringing OFF, Vibrate OFF
Car Kit
Keytones OFF, Ringing ON, Vibrate OFF, Auto answer and Backlighting Always on
The Car Kit profile is only activated when the device is installed in a car kit and provides two extra features;
Auto Answer and Backlighting Always on.
34
5.1.2
•
•
•
•
•
ile
op KKey
ey to E dit
to P rof
ofile
iless > press the Right TTop
Select Volume Level
Press OK
5.1.3
•
•
•
•
•
How to Adjust the Ring Volume
tings > Arrow Right
Select Menu > Set
Settings
to Ring volume
Arrow down
Press OK to Modify
How to Adjust the Earpiece Volume
tings > Arrow Right
Select Menu > Set
Settings
to Earpiece Volume
Arrow down
Press OK to Modify
ile
op KKey
ey to Edit
to P r of
ofile
iless > press the Right TTop
5
Select Volume Level
Press OK
5.1.4
How to Change your default Ringtone or Message Tone
Menu > Settings > Arrow Right
to Profiles > Edit
• Select from Voicecall ringtone, Videocall ringtone or Message tone
• Press OK to Modify
• Select Open > Ring to see the available built in tones
• Press OK to Set the required tone
5.1.5
How to Switch Vibrate Mode On / Off (Ringing type)
Menu > Settings > Arrow Right
to Profiles > Edit
n
• Arrow dow
down
to Ringing Type and press OK to Modify
• Select the required mode and press OK to confirm.
• The vibrate icon
is displayed on the Information Bar
35
5.1.6
How to Enable Meeting Mode with a single key press
• Meeting Mode puts the handset in silent mode with vibrate on
• From the Main Screen long press the # key to engage & disengage Meeting Mode
• The vibrate icon
5.1.7
are displayed on the Information Bar
and mute symbol
How to Change the Key Tones to Beep or Spoken
Menu > Settings > Arrow Right
to Profiles > Edit, Arrow down
:
• Keypad volume sets the volume level when you press the keys. Use Mute to disable.
• Keypad sounds is used to set spoken key sounds or tones
5
5.1.8
How to adjust the length of Ring Time
The default ring time is set by the network. Contact Telstra to change the ring duration
5.2
How to manage my Contacts
5.2.1
How to copy Contacts from a USIM card
All USIM Contacts are automatically read by the handset. Storing the Contact on the phone enables more
features like setting Groups and dedicated Ringtones.
To create a copy of Cont
ontac
acts
ac
ts in the handset memory follow the steps below:
• Insert the USIM card to copy contacts from. Switch the phone on
• From the Main screen Arrow Down
for Contacts
• Arrow Right
once for USIM to show the list of Contacts on the USIM card.
op KKey
• Press the Le f t TTop
arrro w keys to select, Copy > Copy all > OK > Ye s
ey for Options then use the ar
to confirm.
36
5.2.2
How to search Contacts
From the Main scr
screeen Ar
Arrrow Down
ac
ts
ac
for Cont
ontac
acts
ts. To find the Cont
ontac
actt ‘John’ press the 5 key once for
‘J’. All names starting with ‘J’ are displayed.
Refine the search by entering a subsequent letter that can occur anywhere in the name. Eg. ‘Jn’ will find
‘John’ and ‘Julian’ but not ‘James’
5.2.3
How to add a Contact from a received call number
After receiving a call you can add the caller’s number to the Contacts list:
• Press the
key to display All Calls
• The last call received is at the top of the list
w ccont
ont
ac
• Press the L e f t TTop
Savee > Ne
New
ontac
actt or Updat
Updatee to modify a contact > OK
op KKey
ey > O ptions > Sav
Save.
• Enter or modify the contact details and press OK to Save
5.2.4
How to add a Contact from a received SMS (Text Message)
Menu > Messages > Inbox
• Select the required message and press OK to View
• Press Options > Use highlighted item to save the number
• Choose New Contact to create a new contact from the received SMS number.
37
5
5.2.5
How to set a particular ringtone or image to a Contact
The contact needs to be stored on the handset in order to set a dedicated ring or image. See 5.2.1 to copy
your contacts into the handset.
Menu > Contacts (Shortcut = Down Arrow
• Use the arrow keys
)
to find the contact (the Contact must be stored on the handset. see Section
5.2.1 to create a copy)
• Press OK to View > Edit > Options > Add ring and photo. Select the required feature
• Press Add then navigate to the folder where the Ringtone or Picture is stored.
• Press OK to Save your choices when complete
5
5.2.6
How to add a Contact
op KKey
ey to Sav
• From the Main Scr
Screeen enter the phone number on the keypad, press the L e f t TTop
Savee .
• Press OK to create a New Contact or Arrow Down
to Update existing contact
• Using the keypad, enter a name for the new Contact or modify an existing contact
• Press OK to Save
Save. The default save location is the USIM card. Change if required.
5.2.7
How to update an existing Contact
• Edit the existing contact: Menu > Contacts > View > Edit. Press Save when finished
38
5.3
How to change the Viewing Options
5.3.1
How to Change the Background Screen (Wallpaper)
Menu > Settings > Wallpaper
• Browse to the required folder eg Photos > My Pictures
• Choose the required picture and press Set to confirm.
5.3.2
How to Change the Display Brightness
Menu > Settings > Display Brightness
• Arrow up or down
5.3.3
to set the desired level.
5
How to Change the Backlight Timers
Menu > Settings > Backlight timers
• Arrow left or right
to set the Backlight Duration. After the set time the screen goes to half light
• Screen half-light, the screen is partially lit for the specified time.
5.3.4
How to Set the Keypad Backlighting
Menu > Settings > Keypad Backlighting
Keypad light
The time the keypad stays illuminated after the last key press
Period- Always On
The keypad backlighting is enabled for the Duration specified
Period- Customise
The keypad is only illuminated between the times set
39
5.4
How to set up other useful options
5.4.1
How to use Speed Dial
Having Speed Dials set makes it quicker to call selected contacts.
Menu > Contacts > Select the Contact > Options > Arrow down
> Speed Dial > Setup
• Assign the chosen contact to the next available number
• Speed dials 1, 2 and 3 are preset and cannot be changed
• Press the OK Key to Setup the speed dial or press OK again to cancel
• Press the
5
5.4.2
key to exit when finished.
How to make a call using Speed Dial
• From the Main screen press and hold the required number key to call that Contact
• E.g. Long press the 1 key to automatically dial the MessageBank service.
5.4.3
How to Change the Shortcuts (Arrow keys)
Three of the arrow keys (
) can be customised to launch your favourite features quickly from the
Main screen
screen.
Menu > Settings > Arrow Right
to Handset > Shortcut Keys > OK
• Set each key in turn to the preferred setting
• Scroll to the chosen feature and press OK to assign the shortcut key.
5.4.4
How to set Open flip to answer
Menu > Settings > Arrow Right
40
to Call > Open flip to answer
5.4.5
Missed Calls Alert
Menu > Settings > Arrow Right
to Handset > Missed calls alert
After missing a call, the missed call icon
is displayed on the information bar and the blue LED on
the front panel flashes.
When the Missed calls alert is set the reminder tones sound at your specified interval for 5 times or until
the on screen message is acknowledged.
After a missed call press the green call key
Press the green call key
to display the All Calls list.
again to dial the last number.
5
5.4.6
How to Add a Greeting and Owner name
Menu > Settings > Owner name
Menu > Settings > Greeting
• The Owner name is permanently displayed on the Main screen
• The Greeting is displayed during the start up sequence
5.5
How to set the time and date
The time and date is set automatically from the network
network. It takes a few seconds to update
ork Time menu. To manually
when the phone is first switched on. Select 12 or 24 hr format in the Netw
Network
set the time it is first necessary to switch Network Time off
off:
Menu > Settings > Arrow Right
to Handset > Network Time > State Off
Set the time and date manually:
Menu > Settings > Arrow Right
to Handset > Time and date
date.
41
5.6
How to Disable or Change the PIN Code
Menu > Settings > Arrow Right
to Security > Enable PIN codes > PIN code
• The PIN code is stored on the USIM card and protects your account against unwanted use. The PIN
code is enabled by default.
• Select On or Off and enter the PIN number to confirm. The original PIN number is provided by Telstra but
can be changed if required
• To change the PIN code select Change PIN CCode
odess
ode
• If you forget the PIN code it can be reset by Telstra.
5.6.1
5
What is the Handset Lock Code?
Menu > Settings > Arrow Right
to Security > Enable PIN codes > Handset lock code
• The Handset lock code is stored on the handset and protects against unwanted use. If the handset is lost
or stolen it cannot be switched on without the handset lock code. This provides a greater level of protection than the PIN code which protects the USIM card only. The default code is 0000. The handset code
is OFF by default.
• Select On or Off and enter the Handset code, 0000.
• To change the Handset lock code select Change PIN ccode
odess and enter a new code of your choice
ode
• It is important to remember this code as it cannot be reset by the user. It can only be
reset by the repair agent for a fee
5.6.2
How to Reset the Handset to Defaults
Menu > Settings > Arrow Right
to Handset Settings > Restore default settings > 0000
If the handset is not working as normal, restore the handset to default factory settings. The default Handset
Lock Code is 0000. User content is not erased.
42
6 How to use Messages
6.1
How to use Text Messages (SMS)
6.1.1
How to send a Text Message
From the main scr
screeen press the LLee f t TTop
Messsage
sagess > Ne
New
messsage > T e xt me
mess sage
op KKey
ey for Me
w me
• Press the OK Key to select from Contacts (Cont.) or enter the number manually.
• Scroll to the chosen contact and press OK twice (once to select and once to confirm)
• Arrow Down
twice (once to add extra contacts, once again to enter the text area)
• The default text mode is Predictive Text indicated by the En symbol
• Enter text by pressing the corresponding keys once for each required letter eg. 43556 for ‘hello’. The system
updates the display to show the most probable entry. See Section 6.1.3 for more details
• Select the desired word from the available list and press OK to confirm or choose Spell Word? to add
a new word to the My Words dictionary
• Press Options for the My Words dictionary
• Press the # key to toggle between En
En, 123
123, ABC and abc text modes
• When completed press the OK Key to Send the message.
6.1.2
How to view a received Text Message
• The envelope icon
is displayed on the information bar to indicate a received message. The
message alert tone and vibrate activate depending on the current profile setting. Press OK to View
the message
• Select Menu > Messages > Inbox > OK to view all received messages in the Inbox.
43
6
6.1.3
How to use Predictive Text
Predictive text allows words to be entered more efficiently using a single keypress for each letter, as opposed
to multiple keypresses in multi-tap text mode. Compare how to write the word ‘the’:
Traditional multi-tap text mode (ABC, abc)
Predictive Text Mode (En)
Press 8 (tuv) once to select ‘t’
Press 8 once for ‘t’
Press 4 (ghi) twice to select ‘h’
Press 4 once for ‘h’
Press 3 (def) twice to select ‘e’
ce for ‘e’
Press 3 on
once
• The default text mode is predictive text indicated by En in the top right of the display
• Press the # key to toggle between different modes En, abc, ABC, 123
6
• It is not possible to disable predictive text mode or to change the initial mode
• Predictive text uses a built-in dictionary to generate words from the sequence of letters pressed
• When a word is highlighted press the # key to change to capitals as follows: dave, Dave, DAVE
• Select the desired word from the available list using the
arrow keys and press OK to confirm or
choose Spell Word? to add a new word to the My Words dictionary
• Unknown words default to Spell Word?
• If the next letter is on the same key, wait until the cursor appears or Arrow Right
to move the cursor
on
• To insert a spac
spacee press the 0 key. To delet
deletee letters press the C key
• Press the 1 key for common punctuation marks. Press the * key for special characters (see 6.1.5 for more
information)
• In text input screens (eg SMS, MMS and Email) you can add your own words to the built-in Dictionary
which is called My Words.
44
6.1.4
•
•
•
•
•
How to add words to the built in Dictionary (My Words)
From predictive text mode enter words directly by choosing Spell Word?
From the text entry screen press Options and select My Words
The first time you use My Words press OK to Add a new word
Type the new word using the ABC
ABC, abc or 123 mode then press OK to Save it
Edit, Delete or Delete all words.
In My Words you can press Options to Edit
6.1.5
Special Characters and SMS Message Length
Number of characters
SMS Message count
6
The underlined character ‘…’ in the above chart is a Unicode Character which is not part of the
sent Normal SMS message length
set. This require 2 SMS characters to be sent.
standard SMS character set
is 160 characters. If exceeded, the message is sent by two SMS’. When the underlined character is used the
message length is limited to 70 characters. When 70 characters is exceeded the message is sent by two SMS’.
45
6.1.6
How to Delete a message
op KKey
ey for Me
• From the Main Scr
Screeen press L e f t TTop
Mess sage
sagess > Inbo
Inboxx
• Select the chosen message using the arrow keys
• Press Options then Delete
6.1.7
How to Forward a message
op KKey
ey for Me
• From the Main Scr
Screeen press L e f t TTop
Mess sage
sagess > Inbo
Inboxx
• Choose Message from Inbox that you want to forward
op KKey
ey then F orw
ar
d
• Choose O ptions with L e f t TTop
orwar
ard
• Enter Contact information
• Press Send
6
6.1.8
How to Review a sent message
op KKey
ey for Me
• From the Main Scr
Scree en press L e f t TTop
Mess sage
sagess > Sent
• Select the message you wish to review using the arrow keys
• Press OK to View the message
6.1.9
•
•
•
•
What are User Folders?
User Folders can be used to file your incoming SMS, MMS and Email messages
Menu > Messages or Email > Inbox > Options > Move to user folder
Menu > Messages or Email > user folders to view the contents
Rename your User Folders if required, eg Work, Personal etc…
46
6.2
How to send a Multimedia Message (MMS)
Use a Multimedia message to send pictures
pictures, music or video files to your friends.
You can also send an MMS directly to an Email address.
Menu > Messages > New message > Multimedia message
• Enter the phone number, email or press OK for Contacts
• Arrow down
• Arrow down
to enter the subject field (if required)
to enter the main message text
• From the text area press OK to Insert an Image
Image, Audio or Video file
• Browse the folders to select the required file. Press OK
op KKey
ey > O ptions to Send
• When finished press the L e f t TTop
Each ‘page’ can only contain one image, one audio, and one
video file. To add more than one file of the same type, select Options to add a new page.
6.3
6
How to receive a Multimedia Message (MMS)
Menu > Messages > Inbox
• When receiving an MMS you get a standard message alert
alert. Press OK to View
View.
ey for O ptions
• Press the Le f t TTop
ptions.
op KKey
• Choose Use Highlighted item to Save the file into File Manager
6.4
How to check your MessageBank (Voicemail)
From the Main Screen long press the 1 key or enter 101 on the keypad and press the
Call Key. Follow the
voice prompts to access your MessageBank.
47
6.5
How to use Email on your mobile
The default Email client is configured for MyEmail provided by Telstra. Configure the settings via Menu
> My Place > MyEmail
To set up an alternate provider using the native Email client:
Menu > Messages > Arrow Right
to Email > Settings > Mailbox Settings
• Press Add to configure an alternate Email service.
• Add your username
username, password and email address and other settings by reference to your service
provider
• The username should be the full address: [email protected]
Sending an Email
Menu > Messages > Arrow Right
6
•
to Email > New Email
Enter the sender address e.g. [email protected]
•
wn ar
Press the do
down
arrrow
to access the Copy To Field
•
Press the down arrow
to access the Title Field
•
Press the down arrow
to enter the Text Field
•
•
•
Press OK to Insert attachments if required
Browse to the appropriate folder to add the attachment
When you are finished press the Le f t Top KKey
ey > Options to Send.
You can also send an email by typing the email address directly into a Multimedia message. See 6.2
above for more details.
48
6.6
How to receive an Email
The de
deffault Email client is configured for MyEmail provided by Telstra. To receive Emails from alternate
providers configure the native Email Client with your personal settings:
Menu > Messages > Arrow Right
to Email > Settings > Mailbox Settings
• Press Add to configure an alternate Email service.
• Add your username
username, password and email address and other settings by reference to your service
provider
• The username should be the full address: [email protected]
• You can send an SMS, MMS or Email to up to 10 recipients
Receiving an Email
Menu > Messages > Arrow Right
to Email > Inbox > Options > Retrieve
6
New Email messages are delivered to the handset
6.7
How to set up automatic Email Retrieval
Menu > Messages > Arrow Right
to Email > Settings > Automatic Retrieval
Set your required polling time interval to check the server for new Email messages.
49
7 How to use Other Features on my Mobile
7.1
How to Set Alarms
Menu > To ols > Alarm > Ad
d
Add
Configure the alarm as required using the Alarm Setup Screen:
• Daily Alarm goes off every day
• Workday Alarm goes off Mon – Fri only (Rest days can be set under Options
Options)
• Weekly Alarm goes off at the same time each week
• Once Alarm only goes off once
• Snooze can be set to be Off, 5, 10, 15 or 30 minute intervals
• Snooze repeats for six times or until you Stop the alarm by pressing the OK key
• The Alarm Sound is preset. Press Edit to change if required
7
• If the Alarm time has passed it cannot be saved
• If the phone is switched off the Alarm automatically switches the handset On
On.
Alarm Summary TTab
ab l e
50
Status
Alarm type
Alarm date
Alarm time
Snooze
Enable / Disable
Daily, Workday, Weekly, Once
Available with Weekly and Once
Set as required
Off, 5, 10, 15, 30 minutes
Ringtone
Alarm sound
Comment
On / Off
Alarm.mid, press Edit to change
Optional
7.2
How to Set Appointments using the Calendar
Menu > To ols > C alendar > Ad
d
Add
• Add a Meeting
Meeting, Memo or Reminder. The memo function does not include an alarm
• Use the Meeting to set repeat events such as Weekly Meetings and Anniversaries
• Follow the prompts on screen to configure the event, see the examples below
• Events are shown by a highlighted box on the event day
• Use Options to see the Week view and to change default behaviour under Settings
• If the Alarm time has passed or is after the event time you cannot save it
• If the phone is switched off the Alarm automatically switches the handset On.
Examples of different uses for the Calendar > Meeting function
Exa mple >
Daily Meeting
Meeting with alarm
Repeat Meeting
Anniversary
Subject
Check mail
Appointment
Team Brief
John’s B’day
Dentist
Office
Start time
10.00am
11.00am
10.00am
08.00am
End time
10.00am
01.00pm
11.00am
08.00am
Start date
28/9/08
30/10/2008
29/9/2008
29/03/2009
Alarm set
On
On
On
On
Alarm time
09.45am
10.00am
09.45am
08.00am
Alarm date
28/9/08
30/10/2008
29/9/2008
29/3/09
RRepeat
epeat se t
Daily
Not repeated
Weekly
Yearly
Repeat until
28/10/08
N/A
29/9/2012
29/03/2030
Location
7
All user files and downloaded content are stored in the File Manager.
51
7.3
Calculator
Menu > TTo
o ols > C alc
ulat
or
alculat
ulator
• Press 0~9 keys to enter numbers. Press Point to enter the decimal point.
• Press
for +, -, x, ÷.
• Press the C key to clear digits and results.
• Press OK to show the result
7.4
World Time
Menu > TTo
o ols > W orld Time
• The world time function provides time information on major cities worldwide.
• Scroll to the desired city by using the Left & Right Arrow keys
keys.
• Select the required city then press the OK Key to save the selected city as the local time zone.
• Note changing time zones changes the current time setting.
7
7.5
Voice Recorder
Menu > Multimedia > Voice recorder > (Options to change the Duration if required)
• Press OK to Start recording the voice memo
• Press OK to Pause / Continue (Contin
Contin.) recording
Contin
Stop
• Press the Right TTop
op KKey
ey to St
op recording
• Press OK to Save
Save. The file is saved to My Audios
• Press Right TTop
Discar
ard
op KKey
ey to Disc
ar
d the voice memo
• Press LLeef t TTop
op KKey
ey to Send the memo via MMS, Email or Bluetooth.
52
7.6
Stopwatch
Menu > TTo
o ols > St
opw at c h
Stopw
• Press OK Key to Start timing.
• Press OK to Stop timing. The screen displays the event time.
• Press OK to continue timing.
• Press Right TTop
ey to reset.
op KKey
7.7
Currency Conversion
Menu > TTo
o ols > C ur
y C onv
er
sion
urrr enc
ency
onver
ersion
• Convert currencies quickly and easily
• The exchange rate stays set after you close the function
• Use the
arrows to highlight the required field
• Press Point to use a decimal point
• The result is displayed in local or foreign currency automatically
7.8
Games and Applications
7
Menu > Multimedia > Games & Apps
• Built in applications are provided by your Service Provider
• Download the latest games from Telstra or other specialist websites
• The handset supports Java Midlet 2.0
• Use Join Me to copy other games from your computer (see Connectivity)
• Games and applications are saved into the Others folder
• Select Open to install the game.
53
7.9
File Manager
Menu > File Manager
File Manager is a storage area for Photos
Photos, Audios
Audios, and Videos
Videos. It is separated into four folders, Photos
Photos,
Audios, Videos and Others as shown:
Audios
Folder
Photos
Audios
7
Videos
Others
Contents
Description
Pics
Link to BigPond
Wallpapers
Background screens for the handset
My Pictures
Default directory for handset pictures
BigPond Tones
Link to BigPond
BigPond Music
Link to BigPond
Ring
Pre-loaded handset Ring Tones
My Audios
Storage for your own Audio files (MP3 etc)
BigPond Music Videos
Link to BigPond
My Videos
Default directory for handset videos
Downloaded Internet files, JAVA apps etc.
Preloaded files in the Wallpapers and Ring folders are read only and cannot be deleted.
54
7.10 How to use a Memory Card (MicroSD Card)
Handset memory can be increased by inserting a Micro SDHC card up to 8GB.
MicroSD cards up to 2GB are supported (FAT 16 format)
MicroSD HC (high capacity) cards up to 8GB are supported (FAT 32 format)
•
•
•
•
Open the MicroSD port cover on the right hand edge of the phone
Carefully insert the MicroSD card as shown above
Close the side cover
The external memory is accessed through the File Manager application:
Menu > File Manager > Arrow Right
7
to Memory Card
• The external memory can be used as an external storage device see 7.12
With the MicroSD card inserted the default storage location for user photos and videos is updated to
Card.
be the Memory Card
This can be set under Menu > Settings > Handset > Download Location
55
7.11 PC Connection
Menu > Settings > Arrow Right
to Handset > PC Connection
PC Connection > Bluetooth is used for Dial Up Networking over Bluetooth (wireless). The active data
port on the handset is the Bluetooth serial port.
PC Connection > USB sets the data port to the USB cable. This is used to connect to the Join Me Computer
Suite and for Dial Up Networking via the USB cable.
If PC Connection > Bluetooth is selected then Join Me will not connect to the handset.
Set the PC Connection to USB to re-enable Join Me.
7.12 USB Mode – Use the handset as a Mass Storage Device
Menu > Settings > Arrow Right
7
to Handset > USB Mode
Mass Storage enables the MicroSD Memory card to be connected to the computer as an external drive.
The handset can be used as a USB mass storage device. Files can be transferred to and from the handset via
the USB cable.
PC Suite Mode enables the handset to transfer files to the Join Me Computer Suite via the USB cable.
Note
Note: When the handset is connected to a computer in Mass Storage mode then calls cannot be made
or received. The handset is disconnected from the network.
56
7.13 Connect to the ZTE Bluetooth Car Kit
The dedicated hands-free wired car kit provides a superior car kit solution. The fully wired cradle supports
charging and an external antenna connection. The handset connects via Bluetooth to the car kit. See your
dealer and car kit manual for more information.
7.14 Connect to a Bluetooth Wireless Device
Bluetooth is used as a wireless connection for headsets, hands free car kits and computers. Not all applications
or devices are supported. Bluetooth is an open forum and manufacturers choose which functions to
implement.
The handset supports Bluetooth 1.2 with Handsfree, Headset, FTP and DUN profiles. The transfer of contacts
over Bluetooth is not currently supported.
Consult the other device for compatibility, connection issues and to find the pairing password.
Please follow the process carefully. Connecting to a Bluetooth device first time around requires authentication
where both devices share a password.
When the devices are paired and connected the process is more automatic.
Connect to a Bluetooth Device
o oth > Bluet
o oth manager
Blueto
Blueto
Menu > To ols > Bluet
• Press the Left or Right Arrow Key to switch Bluetooth on.
• Go down to Visible On/Off then press the Left or Right Arrow Key to select Show
Show. The phone
name can be customised if required. Press OK to confirm.
• Go to My devices and press OK
OK. Press Search to look for Bluetooth devices nearby.
• The chosen device must be switched on and in pairing mode.
• Available devices are listed in the device list. Select the required device and press OK to Connect
Connect.
code, usually 0000 or 1234. Consult the device for more information.
• Enter the pass code
57
7
• If you are connecting to a PC or another mobile enter the same password when requested on that device.
• Once the password has been shared and accepted by both devices they are paired.
Send files from the handset to another device
Menu > File Manager
• Browse through the folders to the chosen file
op KKey
ey for O ptions
• Press the Le f t TTop
• Choose Send then select Via Bluetooth and press the OK Key
• If no devices are shown press Search
• Select the required device to send the file to
• Enter a pass code and use the same pass code on the other device (eg 0000).
Receive files from another device
• When another device sends you a file press Yes to authorise the connection
• Press Ye s to accept the file
7
Connect to a Bluetooth Car Kit or Personal Headset
Pairing mode must be enabled on the other device to connect to the phone. Follow the manufacturer’s
instructions carefully to enable Pairing Mode on the other device.
Select the required device, share a pass code and press Connect
Connect.
Menu > TTo
o ols > Bluet
o oth > Bluet
urn O
n, Sho w > OK
o oth manager > TTurn
Blueto
On,
Blueto
• Make sure Bluetooth is On and in Show mode and the other device is in Pairing Mode
o oth: Menu > To ols > Bluet
o oth > My de
vic
• On the handset go to Bluet
Blueto
devic
vicee s
Blueto
• Press the Right TTop
Searcch
op KKey
ey to Sear
58
•
•
•
•
•
•
From the list of available devices select the required device and press OK to Connect
Enter the pass code specified in the user guide of the far end device (eg 0000 or 1234)
When the devices are paired the handset shows the device has been added
In My devices go to the new device and press OK to Connect
The devices are now connected
When connected, incoming calls are sent to the Bluetooth device automatically. Press the call button
to answer.
• During a call press Options > Switch to Handset to return the call to the handset
7.15 How to use Dial Up Networking via USB or Bluetooth
Dial Up Networking (DUN) is a method to connect your PC or MAC to the internet using the handset as a
modem.
1. Dial up Networking over USB using the Windows Wizard
Make sure Join Me is installed, the handset is on and connected to the PC using the USB lead supplied.
Example for Windows XP
On the PC go Start > Accessories > Communications > New Connection Wizard and follow the
prompts:
Connect to the internet > Set up my connection manually > Connect using a dial up
modem
Select the ZTE USB Modem and uncheck any other modems
The ISP Name can be any name you like eg. T2 Handset
Set the Phone number to *99# > The Username and Password must be blank >
‘Make this the default Internet connection’ can be unchecked (optional) >
‘Add a shortcut to this connection to my Desktop’ can be checked (optional) > Finish
59
7
Press Dial to test the connection
The PC opens an internet connection using the handset as a high speed modem
2. Dial Up Networking over Bluetooth
Bluetooth can be considered as a wireless replacement for the USB connection and is compatible with any
DUN enabled Bluetooth device. Use Bluetooth to connect the handset to a PC or MAC and use Dial Up
Networking to create an internet connection.
a) Both devices must have Bluetooth ON
o ols > Bluet
o oth > Bluet
o oth manager > T urn O
n, Sho
w > OK
Blueto
Blueto
On,
Show
Handset: Menu > TTo
PC or MAC: Enable Bluetooth using the appropriate hardware or software settings
b) Set the handset PC Connection to Bluetooth
Menu > Settings > Arrow Right
7
to Handset > PC Connection > Bluetooth
c) Create a New Connection on the PC or MAC
Launch the Bluetooth manager software on your PC or MAC. This varies depending on your platform, hardware
and software. Create a new connection and enter the same password, when prompted, on each device.
Select the T2 Handset, the Dial Number is *99# and the Username and Passwords are blank.
When the Bluetooth manager opens a connection to the handset, accept the incoming connection by
pressing Yes when prompted.
The PC or MAC can now connect to the internet via the handset.
The features described are dependant on external suppliers’ hardware and software and vary between
platforms and components. Consult your system supplier for more information.
60
8 How to use Photos and Videos
8.1
How to Take, Save and Send a Photo
Menu > Multimedia > Camera > Press OK to Capture
Take a Phot
o
Photo
From the main screen long press the side Camera Key to activate the camera.
The Camera Key activates the shutter. Press again to Save the image.
From Still mode press
to change to Video mode as shown by the icon in the top right hand corner.
Use the Up and Down arrows to control the zoom*
Press Options to:
¾ Change the Photo size
size**
¾ Change the Photo quality
¾ Change the Brightness
¾ Change the Contrast
Normal, B&W or Sepia
¾ Apply an Effect (Normal,
Sepia)
¾ Change the Shutter sound
¾ Save to – Handset memory or External Memory (MicroSD card if fitted)
¾ Use front / back camera
¾ Switch to video camera
* Zoom is not available on 1200 x 1600 as the screen is at maximum resolution
** The default photo size is small to enable easy sending by MMS. Change if required.
Send a Photo
After taking your picture press Options > Send > Via MMS
MMS. Enter the Contact number and send the
message in the same way you would send a Text Message
Message.
61
8
8.2
How to Take, Save and Send a Video
Menu > Multimedia > Vide
o ccamer
amer
a > OK to R
ec
or
d. Press the Right TTop
op KKey
ey to St
op
Video
amera
Rec
ecor
ord.
Stop
o
Video
Take a Vide
From the main screen Long Press the side camera key to activate the camera.
The Camera Key activates the shutter. Press again Save the image.
From Still mode press
8
to change to Video mode as shown by the icon in the top
right hand corner.
Use the Up and Down arrows to control the zoom
Press Options to change the following:
size, default is 15 seconds. Change this if required.
¾ Video size
¾ Video quality
¾ Brightness
¾ Contrast
Normal, B&W or Sepia
¾ Effect (Normal,
Sepia)
¾ Video sound
¾ Video format, MP4 or 3GP
¾ Save to – Handset memory or External memory (MicroSD card if fitted)
¾ Use front / back camera
¾ Switch to camera
Send a Video
MMS. Enter the Contact number and send the message in the
After taking your Video press Send > Via MMS
same way you would send a Text Message
Message.
Press My Vids to view your saved video files
When viewing a video press Full Screen to view in Landscape.
62
8.3
How to View Pictures and Videos
1 . View the file directly from file manager
Menu > File Manager > Photos > My Pictures or
Menu > File Manager > Videos > My Videos
Scroll down the list to your chosen picture, Press OK to Open to view the image.
2 . Create a slide show to view pictures in sequence
Menu > Multimedia > Slide show > Add > Photos > My Pictures
ey to Mark your selected photos and then OK to Save
Press the Right TTop
op KKey
Press Start to automatically view the pictures sequentially.
3 . View My Pics or My Vids from Camera mode
Menu > Multimedia > Camera > My Pics
Menu > Multimedia > Video Camera > My Vids
Press the Right TTop
op KKey
ey to select My Pics or My Vids to view your saved photos.
Scroll down the list to your chosen picture, Press OK to Open to view the image.
Additional features when viewing Pictures and Videos
SStill
till Pictures
8
Videos
Full Screen
Right Top Key
Landscape mode
Right Top Key
Zoom in and out
Up / Down Arrows
Volume up / down
Up / Down Arrows
Rotate image
1,3 keys
Brightness
2,8
Move the image
2,4,6,8
63
9 Listen to Music on your mobile
9.1
How to use the FM Radio
Menu > Multimedia > FM radio
• Insert the personal hands free kit. The headset acts as the antenna for the FM radio and must be connected to use the FM radio
• Tune the channels using the
•
•
•
•
•
keys or Options > Auto-search or Add preset
Auto-search scans automatically for channels and presents you with up to 10 detected channels
Use Add preset to enter the frequency using the keypad and * key to access the decimal point
channel.
Remember to Save the new channel
Press Options > Rename to personalize the channel name e.g. ABC
If an incoming call is received, the radio suspends for the duration of the call.
9.2
How to add music to your mobile
To import music files onto the handset see the following sections:
• Import music files from a computer using Join Me (See 11.2.3)
• Import music files from a computer or other device using Bluetooth (See 7.13)
• Import music files from a computer using Mass Storage mode (See 7.12)
Place> Music
• Download music from BigPond Music: Menu > My Place
9
9.3
How to browse and play music files from File Manager
Menu > File Manager > Audios > My Audios
• Press Open to play the desired music file.
64
9.4
How to create a new Music Playlist
Method 1: Create a Playlist from File Manager
Menu > File Manager > Audios > My Audios
op KKey
ey to Mark or press Options > Mark all files to select
• Scroll through the files and press Right TTop
files then Press OK
• Press Options > Add to playlist > OK (for existing Playlist) or Add / New (to create a playlist)
• The selected song or songs are added to an existing or new playlist
• Menu > Multimedia > Playlist > Scroll to select,, OK to Play
• Press Options to access the Equalizer and to set the Repeat setting etc.
Method 2: Create a playlist in Multimedia
Menu > Multimedia > Playlist > Options > New Playlist > Playlist name > OK > Audios > My
Audios
op KKey
ey to Mark or press Options > Mark all files to add
• Scroll through the tracks and press the Right TTop
the selected files to the playlist
• Press OK to save the Playlist
Playlist, Press OK again to begin playing it
• Press Options to access the Equalizer and to set the Repeat setting etc.
ey to E dit to add tracks. Press O ptions to
op KKey
• Once a Playlist has been saved press the Right TTop
Remove tracks or Change Order.
• Use the side volume keys to adjust the volume
• Use
keys to select tracks from your playlist. Press the
• Press and hold the
keys to skip tracks
keys to forward or rewind through tracks
• It is possible to create up to six different playlists.
65
9
10 Access the Internet on your mobile phone
10.1.1 Access the Internet using the Browser
From the Main Scr
Screeen press the Right TTop
BigPond
op KKey
ey to launch the BigP
ond internet browser.
Choosing BigPond gives you direct access to the BigPond Home Page.. Within the Home tab, you can
browse as much as you like for free (eg. Accessing local weather updates). Browsing charges only apply when
you browse sites from the web tab, leave the Home tab (eg. By clicking on a third party weblink from search
results) or when you type in URL addresses from your browser. Charges also apply for content and subscription services. However, Telstra tells you before any content or subscription charges are incurred.
10.1.2 Access local weather, news and sport on BigPond
op KKey
ey to select BigP
ond
• From the Main Scr
Scree en
en, press the Right TTop
BigPond
• Press OK on Home > arrow down
and select Check Local Weather
• You’ll be asked to type in your post
postccode
• Press OK then arrow down
and select Continue
ation and press OK again
• You’ll see a list of suburbs, selec
selectt your loc
location
• Arrow down
to select Current
Current, and you’ll see the weather report
10.1.3 Telstra applications
10
Go to Menu > My Place to access the built in applications provided by Telstra. Please contact Telstra for
information and support on these applications. Some applications may require a subscription service or changes
to your phone plan.
66
11 Connect your phone to a computer
11.1 Use the phone as a Mass Storage Device with a MicroSD Card
Menu > Settings > Arrow Right
to Handset > USB Mode
Mass Storage enables the MicroSD Memory card to be connected to the computer as an external drive.
The handset can be used as a USB mass storage device. Files can be transferred to and from the handset via
the USB cable.
PC Suite Mode enables the handset to transfer files to the Join Me Computer Suite via the USB cable.
11.2 Connect your phone to a computer
Join Me is a computer program to connect your phone to a computer. Once installed Join Me is used to
manage contacts, messages and calendar functions. It is also used to connect to the internet and transfer
music / picture files.
Compatibility
• The software is only compatible with Windows Vista, XP (SP2 & SP3), Windows 2000 SP4 and MAC OS 10.
4, 10.5 but cannot be guaranteed to run on these systems
• It is not compatible with Windows ME, 98, 95
•
•
•
•
•
The software may not run in all environments, or in conjunction with other software
Multi-boot systems are not supported
Please install the software before connecting your phone to your computer
The software should be installed and run with the Administrator login
For installation support please consult our web site FAQ’s http://www.zte.com.au
11
67
11.2.1 Install the Join Me Computer Software
Please install the Join Me DVD before connecting your phone to the computer.
The following procedures and examples are applicable to the PC version of Join Me.
• Insert the DVD provided into the computer
• The DVD auto-starts after a few seconds. Exit the media player and open My Computer to browse your
DVD. Right click on the DVD and choose ‘Explore’
• Open Join Me > Windows and then double click the Setup
•
•
•
•
11
icon to start
Please follow the prompts to install the software
When the installation is complete plug the handset into the computer using the USB lead supplied
The USB lead is unique and should not be used for other devices (it is not the same as digital camera leads)
When the handset is plugged in the computer automatically installs the drivers. If this fails consult our
website for more help or access Windows Device Manager to update the drivers. See http://www.zte.com.
au for instructions.
Note
If the phone is connected to the computer before installing Join Me then the drivers are not installed correctly
• Unplug the phone, un-install then re-install Join Me
• See http://www.zte.com.au for more assistance
68
11.2.2 How to copy photos to a computer
Transfer photos from the handset to a computer using Join Me:
• Make sure the phone is switched on and connected to the computer and Join Me has
been installed.
• The PC Connection on the handset needs to be set to USB
Menu > Settings > Arrow Right
to Handset > PC Connection > USB
• Double-click the Join Me icon on the desktop
desktop.
• Select the phone type and press Connect
Connect.
• Select the Media tab
•
•
•
•
•
•
as shown on the next page
Double click on My Phone in the bottom left hand corner
Double click on Photos to expand the folder structure
Double click on My Pictures to see the picture files on the right hand side.
Drag* the required file from the list and Drop
Drop* it in the destination folder on the PC
Drag
The file is copied to the destination folder (Desktop in the example below)
Files can only be transferred into Folders
The default picture size is small when viewed on the computer.
See section 7.1 to change the image size
* Drag and Drop is a method of copying files. Click on the file, hold down the left mouse button, move the
mouse pointer to the required destination and release the left mouse button to Drop the file to that location.
Alternatively right click on the file and use Copy and Paste from the menu.
69
11
How to copy files (eg Photos) from your phone to a computer
1. Select the Media TTab
ab in Join Me
2. Select My Pictures folder on My Phone
3. Drag the picture from My Pictures and Drop
to a folder on the PC
4. Alternatively right click on the file and
use Copy and Paste from the menu
Files can only be copied into Folders
11
70
11.2.3 How to copy music from a computer
Music files can be transferred onto the phone using Join Me
• Make sure the phone is switched on and connected to the computer
computer,, and Join Me has
been installed
• The PC Connection on the handset needs to be set to USB
Menu > Settings > Arrow Right
to Handset > PC Connection > USB
•
•
•
•
•
•
Double click the Join Me icon on the desktop
Select the phone type and press Connect
Select the Media tab as shown in the picture on the next page
Double click My Phone in the bottom left hand corner
Double click Audios to open up the Audios folder
Locate the music files on the computer by browsing through the Windows file structure in Join Me
• Drag the required file from the top half (computer) and drop on My Audios on the phone
• The file is copied to the destination folder (as shown below). Files can only be copied into Folders
• Alternatively Right Click on the file, choose Copy
Copy, then go to the destination folder and Paste
MP3, WAV, and MIDI Files are supported but MP3 is preferable due to smaller file size.
11
71
Copy files (eg Music) from a Computer to the handset using Join Me
Use drag and drop to copy the
selected file from the computer to
the My Audios folder on the handset.
Alternatively select the file, right click
to Copy the file, select the destination
folder (on the handset) and choose Paste
Paste.
Note that the file and folder needs to be closed.
If you are editing the active file or folder then the
the file cannot be transferred properly. If you get
the error “File does not exist or is in the wrong
format”, close the file and folder and copy
it to the handset again.
Files can only be transferred into user folders
on the handset
handset. Eg. Transfer music files into
My Audios, pictures into My Pictures and java
games and applications into the Others folder.
All other folders are write protected.
11
72
11.2.4 How to Enter your Contacts using Join Me
Use Join Me to enter new contacts into the phone.
On the phonebook tab enter contacts
directly using the PC.
Select “New Contact” then complete
the required fields.
Select the Save Position; Local, Phone
or (U)SIM.
The save position ‘Local’ refers to the computer. Remember to change this if you want to save contacts directly to the handset or use the copy function to copy contacts from Local to Phone.
There is less storage available on the USIM card so some of the fields are greyed out.
73
11
11.2.5 How to create a backup of your Phonebook on your PC
2. ‘Select all’ by checking the
box at the top.
3. Drag and drop the complete list to
Local.
This will copy all the USIM contacts
to the PC (Local)
You can also select an individual
contact to copy it in either direction.
1. Select the USIM card to copy
contacts from the USIM to the
PC.
You can also right click on the
Contacts grid and Import from
Outlook. See 11.2.6
11
Copy one or all of the contacts from Local to Phone using the same method‘
74
11.2.6 How to Import Contacts from Microsoft Outlook
• Launch Microsoft Outlook, have Join Me running and connected to the
handset.
• Note, at the end of the import process Outlook can shut down. Please save
any information beforehand.
• Make sure you are on the Phonebook tab in Join Me, see image in 11.2.5 above.
• Right click anywhere on the Contacts grid and select Import From
Microsoft Outlook.
• Only contacts in the root folder (Contacts) of Outlook are copied
• The following fields are imported from Outlook to Join Me as below:
Outlook
Join Me
Full Name
Name
Mobile Telephone Number
Home mobile
Home Telephone Number
Home phone
Business Telephone Number
Work mobile
Company Main Telephone Number
Work phone
Other Telephone Number
Other mobile
Company Name
Company
Profession
Notes
Email Address
Email
Web Page
Web
11
75
11.2.7 Import Calendar events from Microsoft Outlook
•
•
•
•
•
•
•
Launch Microsoft Outlook, have Join Me running and connected to the handset
Note, at the end of the import process Outlook can shut down. Please save any information beforehand
Make sure you are on the Calendar tab in Join Me
Right click anywhere on the Calendar grid and select Import From Microsoft Outlook
All calendar entries are copied into Join Me
Select the required entries, or select All
Copy the imported entries from Local to phone.
11.3 Use your Mobile as a Modem
You can use the mobile phone as a dial up modem to connect a computer to the internet.
• Make sure the phone is switched on and connected to the computer and Join Me has
been installed
• The PC Connection on the handset needs to be set to USB
Menu > Settings > Arrow Right
11
•
•
•
•
•
to Handset > PC Connection > USB
Double click the Join Me icon on the desktop
Select the Internet tab as shown below
Press Connect to go online
The default APN is Telstra.internet
If you subscribe to a data connection service you may need to change the default APN. Contact Telstra
for more information.
76
12 Use with Hearing Aid Devices and Text Terminals
12.1 How to Pair with a Bluetooth Neckloop or Hearing Aid
Menu > To ols > Bluet
o oth > Bluet
o oth manager
Blueto
Blueto
• Arrow Left or Right to switch Bluetooth On
• Arrow down
to Visible Show/Hide and select Show
Show. Press OK to confirm
wn
• Ar
Arrro w do
down
op KKey
ey to Sear
to My Devices. Press OK
OK. Press the Right TTop
Searcc h
• Your chosen device must be switched on and in pairing mode
• Select the required device from the available list. Press OK to Connect
• Enter the password. Usually 0000 or 1234, consult your device for more information.
12.2 Tips for better sound quality with Hearing Aids
• Menu > Settings > Arrow right
• Arrow down
to Handset > Network settings > Preferred Mode
to UMTS
UMTS. Press OK to enable UMTS only mode
• Selecting UMTS locks the handset to 3G signals only. This eliminates the audible buzz sometimes associated
with 2G mobile phones
• Set your hearing aid to T-mode if available and enable T-mode on your handset
• To stop whistling feedback turn up your phone volume and hold it a bit further away from your hearing
aid
• If you are using a cochlear implant, turning the sensitivity / volume down on the speech processor and
turning the volume up on the mobile phone tends to lower low to medium background noises
• A Telecoil can provide more clarity in a wide range of environments
• If you are using a Telecoil set T-mode On
On. Menu > Settings > Handset > T-mode On
77
12
12.3 CTM
Menu > Set
tings > Arrow Right
Settings
TM
to Handset > CCTM
CTM (Cellular Text Telephone Modem) is a text based protocol to offer support to hearing and speech impaired people using a suitable terminal to connect to the phone.
C TM Mode
Description
Full
Text entered on the terminal is sent to the other party. Received text from
the other party is displayed on the terminal.
R ead & TTalk
alk
Received text is displayed. Voice is sent to the other party
Write & Hear
Text entered on the terminal is sent to the other party. Speech is heard from
the other party
Off
All CTM is disabled, use the phone as normal.
If you are using a TTY terminal make sure the terminal baud rate is set to 45.45 bps
If you are using a terminal with a CTM modem built in then select CTM off on the handset
12
12.4 Other Accessibility Features (ACIF G627 Matrix)
The handset supports other features in line with the ACIF Accessibility Matrix. This specifies the features
available to help elderly or disabled users. The full list of supported features can be viewed on our website
http://www.zte.com.au
78
13 Technical, Support and Warranty Information
13.1 Troubleshooting and FAQ’s
Symptom
Solution
No incoming ring
Check the ring tone and ring volume settings under Profiles
or alarm tone
Check the handset is not muted (Long press the # Key
Key)
(No) keytones when
Check the key tone settings in the current profile.
pressing keys
A phone number cannot
Check for network coverage
be dialled
Check whether any call restrictions are set.
Short messages cannot
See Text Message Settings and check the SMS centre number is correct.
be sent or received
Contact Telstra for more details.
MMS messages cannot
Your subscription does not include data services. Check with Telstra.
be sent or received
How to switch off
13
The # key is used to toggle between different text modes.
Predictive Text?
I cannot connect to
Your subscription is not provisioned for data services. Check with Telstra.
FOXTEL or BigPond
I cannot connect to
Check: Menu > Settings > Handset > PC Connection > USB
Join Me
Uninstall and re-install the DVD software
See FAQ’s at http://www.zte.com.au for more assistance
79
Symptom
Resolution
My phone is slow to
Restart your phone occasionally to refresh the memory.
respond, handset stor-
Delete or archive old SMS messages and other content
age problems
Restore default settings:
Menu > Set
tings > Handset > R e st
or
Settings
stor
oree D e f ault > 0000 > Ye s
Check the signal strength. With only 1 or 2 bars, the battery has to work
The battery discharges
harder to maintain network contact. Limit multi-media and Bluetooth
quickly
usage to save power. The battery may be worn out and needs to be
replaced.
Confirm the charger is properly inserted. Remove the battery, clean the
I cannot charge the
phone
contacts with a dry cloth and check it is inserted correctly. The battery
may be worn out and needs to be replaced.
Tip: You can also charge the phone using the USB cable.
13
How to enter text in an
From the phone number field press the down arrow twice to move into
SMS?
the text area. Use predictive text or ‘abc’ mode to manually type words.
How to change the
Edit the current profile and select a new tune from the Audios directory.
Ringtone?
The handset switches
The handset is charging in the off state. Press and hold the Red key to
off after charging.
switch the handset ON or charge it in the ON state
The handset switches
An alarm or calendar event automatically switches the handset on.
on automatically
80
Symptom
Resolution
My phone is not able to
Turn Bluetooth on. Set visibility to Show. Possible compatibility issues.
connect to other
Manufacturers incorporate different Bluetooth profiles. Not all function-
Bluetooth devices
ality is supported.
How to transfer pictures
This is not supported due to different Bluetooth profiles. Copy photos
via Bluetooth to a photo
using Join Me or a Memory card
printer (e.g. Kodak)?
13.2 Error Messages
Message
No (U)SIM detected
Solution
Check a valid USIM card is inserted
See 2.3 How to insert the USIM Card?
Enter PIN code
Enter the correct PIN code supplied by Telstra
Enter PUK code
Contact Telstra to get the PUK code
Enter 16 digit unlock
Please contact Telstra
13
code
Enter handset lock
The default handset lock code is 0000
code
See the Technical Specifications below to check the file type is supported
File does not exist or is
by the handset.
in the wrong format
On your PC or MAC, make sure the file and folder is closed. Re-send the file
to the handset using Join Me, Mass Storage Mode or Bluetooth transfer.
81
13.3 Technical Specifications
Network Compatibility
3G WCDMA 850, 1900, 2100 MHz with HSDPA data up to 3.6Mbps
GSM 850, 900, 1800, 1900 MHz with EDGE data up to 236.8Kbps
Dimensions
Approx 101mm x 51mm x 17.6mm
Weight
Approx 110g (Including standard battery)
MP4 video, MP3 audio, 2.0/0.3MPixel camera, Video Phone, USB, FM
Features
Radio, Java MIDP 2.0, 2.4” QVGA TFT 262K colour LCD display, MMS,
Email, Calendar, Speakerphone, Voice Recorder, Bluetooth 1.2 Stereo,
Supports 8GB MicroSDHC, USB Mass Storage, CTM, T-Coil enabled for
hearing aids.
13
Battery
900mA hours, Lithium ion (Li-ion)
Continuous idle time*
Up to 200 hours
Continuous talk time*
180 minutes on GSM network, 180 minutes on WCDMA network,
Video call >70 minutes
Charge time
Approximately 3-4 hours
Battery Life
Approximately 400 charge cycles
Supported Files
JPG, BMP, GIF, MP3, WAV, MID, MMF, AMR, MP4, 3GP, TXT
Bluetooth 1.2
OPP, FTP, HSP, HFP, A2DP, AVRCP, DUNP
*The phone’s talk and idle time are based on ideal working environments. The use of extended backlighting,
browser, and network conditions can reduce battery life and talk/idle time.
82
13.4 Support Information
• For Warranty Service directions please consult the ZTE website at http://www.zte.com.au
• All calls for PIN number enquiries, Network problems, Next GTM Services, BigPond account information,
Web Access, Account and Billing Information, USIM card registration and general enquiries should be
directed to Telstra.
13.5 Warranty Information
The warranty does not apply to defects or errors in the product caused by:
(a) Reasonable abrasion, ingress of dust and dirt.
(b) Misuse including mishandling, physical damage, improper installation, unauthorized disassembly of
the product.
(c) Water, exposure to solvents or any other liquid damage.
(d) Any unauthorized repair or modification.
(e) Power surges, lightning damage, fire, flood or other events outside ZTE’s reasonable control.
(f) Use of the product with any unauthorized third party products such as generic chargers.
(g) Any other cause beyond the range of normal usage for products.
The End User shall have no right to reject, return, or receive a refund for any product from ZTE under the
above-mentioned situations.
Note: Consult the warranty card for full information
83
13
13.6 Environmental Statement
The ZTE handset is made using the latest manufacturing techniques and environmental standards to
reduce waste and hazards to the environment. However at the end of life of the equipment the
manufacturer recommends that you return the handset and accessories to the nearest re-cycling depot
or send it to our recycling agent below. Valuable materials such as gold, silver, and copper can be recovered
from the handset. Any toxic materials are prevented from entering the environment and the waste materials
will be recycled.
At the end of life of the equipment please send the handset, batteries and charger to:
MRI (Australia) Pty Ltd
13
or
MRI Sydney
20-24 Dennis St
1 – 4 Bentley Street
Campbellfield
Wetherill Park
VIC 3061
NSW 2164
www.mri.com.au
MRI Australia recycles every part of the equipment and diverts over 90% of the materials from landfill for
re-use.
84
Index
Alarms
50
Call Waiting
31
Anniversary
51
Camera
61, 62
Answer a Call
19, 28
CD
68
Appointments
51
Change PIN Numbers
42
Arrow keys
13, 22
Charger
18
Background Screen
39
Connect to a computer
67
Backlight Duration
39
Contacts
28, 36, 37
Battery
17
Copy music
71
BigPond
66
Copy photos
69, 70
Bluetooth
57, 58
Currency Conversion
53
Bluetooth neckloop
77
Delete Messages
46
Calculator
52
Dial Up Networking (DUN)
59
Calendar
51
Dictionary
44
Call Divert
31
Download Location
55
Call History
27
DTMF
29
Call Options
29
Earpiece Volume
35
85
Email
48
Java Games
53
Emergency Calls
30
Join Me
68
En
43
Key tones
36
Environmental
84
Keypad
21
Error Messages
81
Keypad Backlighting
39
FAQ’s
79
Last Number Redial
27
File Manager
51, 54
Main Menu
22, 26
FM radio
64
Make a Voice Call
19, 27
Games and Applications
53
Mass Storage Device
67
Greeting
41
Meeting Mode
36
Handset lock code
81
MessageBank
47
Handsfree
19
MicroSD Card
55, 67
Headset
33
Microsoft Outlook
75
Hearing Aid
77
Missed Calls
41
Information Bar
20
Modem
76
International Dialling
29
MP3 Player
64
Internet
66
Multimedia Message
47
86
Music Player
64
Set the Time
41
My Words
45
Shortcuts
22, 40
Owner name
41
Silent Mode
35
PC
68, 71
SIM card
15
PC Connection
56
SMS
43
Photos and Videos
61
SMS Message Length
45
PIN Numbers
42
Snooze
50
Playlist
65
Speakerphone
19
Predictive Text
44
Speed Dial
40
Profiles
34
Stopwatch
53
Receive a Text Message
43
Support
83
RF Safety Information
9
Switch On / Off
19
Ring volume
35
Technical Specifications
82
Ringtone
35
Text Messages
43
Safety Information
10
Text terminal (CTM)
78
Screen Brightness
39
Time and date
41
Send a Text Message
43
Troubleshooting
79
87
Unlock your handset
54
View Pictures
63
USB
18
Voice Recorder
52
USB Mode
56
Wallpaper
39
Vibrate Mode
35
Warranty
83
Video Call
32
World Time
52
88