1
EVault Software
vSphere Agent
Version 7.1
User Guide
Revision: This manual has been updated for Version 7.10 (December 2012).
Software Version: 7.10
1997-2012 EVault Inc.
EVault, A Seagate Company, makes no representations or warranties with respect to the contents hereof and specifically
disclaims any implied warranties of merchantability or fitness for any particular purpose. Furthermore, EVault reserves the
right to revise this publication and to make changes from time to time in the content hereof without obligation of EVault to
notify any person of such revision of changes. All companies, names and data used in examples herein are fictitious unless
otherwise noted.
No part of this document may be reproduced, transmitted, transcribed, stored in a retrieval System or translated into any
language including computer language, in any form or by any means electronic, mechanic, magnetic, optical, chemical or
otherwise without prior written permission of:
EVault, A Seagate Company
c/o Corporation Trust Center
1209 Orange Street
Wilmington, New Castle
Delaware 19801
www.evault.com
EVault, EVault Software, EVault SaaS, and EVault DeltaPro, are registered trademarks of EVault, A Seagate Company. All
other products or company names mentioned in this document are trademarks or registered trademarks of their respective
owners.
Acknowledgements: Two encryption methods, DES and TripleDES, include cryptographic software written by Eric Young.
The Windows versions of these algorithms also include software written by Tim Hudson. Bruce Schneier designed Blowfish
encryption.
“Part of the software embedded in this product is gSOAP software. Portions created by gSOAP are Copyright 2001-2006
Robert A. van Engelen, Genivia Inc. All Rights Reserved. THE SOFTWARE IN THIS PRODUCT WAS IN PART PROVIDED
BY GENIVIA INC., AND ANY EXPRESS OR IMPLIED WARRANTIES, INCLUDING, BUT NOT LIMITED TO, THE IMPLIED
WARRANTIES OF MERCHANTABILITY AND FITNESS FOR A PARTICULAR PURPOSE ARE DISCLAIMED. IN NO
EVENT SHALL THE AUTHOR BE LIABLE FOR ANY DIRECT, INDIRECT, INCIDENTAL, SPECIAL, EXEMPLARY, OR
CONSEQUENTIAL DAMAGES (INCLUDING, BUT NOT LIMITED TO, PROCUREMENT OF SUBSTITUTE GOODS OR
SERVICES; LOSS OF USE, DATA, OR PROFITS; OR BUSINESS INTERRUPTION) HOWEVER CAUSED AND ON ANY
THEORY OF LIABILITY, WHETHER IN CONTRACT, STRICT LIABILITY, OR TORT (INCLUDING NEGLIGENCE OR
OTHERWISE) ARISING IN ANY WAY OUT OF THE USE OF THIS SOFTWARE, EVEN IF ADVISED OF THE
POSSIBILITY OF SUCH DAMAGE.”
The EVault Software Agent, EVault Software CentralControl, and EVault Software Director applications provide encryption
options for 128/256-bit AES (Advanced Encryption Standard). Advanced Encryption Standard algorithm (named Rijndael,
pronounced “Rain Doll”) was developed by cryptographers Dr. Joan Daemen and Dr. Vincent Rijmen. This algorithm has
been chosen by the National Institute of Standards and Technology (NIST) of the U.S. Department of Commerce to be the
Federal Information Processing Standard (FIPS).
The EVault Software Agent and EVault Software Director applications include the security feature of over-the-wire (OTW)
encryption.
Contents
1
2
EVault vSphere Agent ....................................................................................................4
1.1
Introduction ............................................................................................................4
1.2
What’s New in Version 7.10? .................................................................................5
1.3
What’s New in Version 7.01? .................................................................................5
1.4
What’s New in Version 7.00? .................................................................................6
Deploying and Configuring the vSphere Agent ..........................................................7
2.1
Deploying the vSphere Agent ................................................................................7
2.2
Configuring Network Settings for the vSphere Agent ............................................9
2.3
Adding Static Entries on the vSphere Agent for the vCenter and ESX(i) Servers .9
2.4
Setting the vSphere Agent Time Zone .................................................................10
2.5
Registering the vSphere Agent with vCenter Server ...........................................10
2.6
Adding the vSphere Agent in Windows CentralControl .......................................11
2.7
Adding the vSphere Agent in Web CentralControl...............................................13
2.7.1
Registering the vSphere Agent with Web CentralControl .............................13
2.7.2
Configuring the vSphere Agent in Web CentralControl ................................14
2.8
2.8.1
Changing the CBT Setting using Windows CentralControl ..........................15
2.8.2
Changing the CBT Setting using Web CentralControl ..................................16
2.9
3
4
Changing the CBT Setting ...................................................................................15
vCenter User Privileges for Backup and Restore ................................................16
2.9.1
Creating a vCenter Role for a User ..............................................................17
2.9.2
Assigning a vCenter Role to a User .............................................................17
2.9.3
Changing vCenter Credentials on the Agent ................................................18
2.9.4
Changing vCenter Credentials in Windows CentralControl ..........................18
2.9.5
Changing vCenter Credentials in Web CentralControl .................................18
Upgrading the vSphere Agent ....................................................................................20
3.1
Upgrading the vSphere Agent Over the Internet..................................................20
3.2
Manually Upgrading the vSphere Agent ..............................................................21
Backing Up Virtual Machines ......................................................................................23
4.1
Backing Up Virtual Machines Using Windows CentralControl .............................23
i
4.1.1
Creating a Backup Job Using Windows CentralControl ...............................23
4.1.2
Running a Backup Job Using Windows CentralControl ...............................27
4.1.3
Scheduling a Backup Job Using Windows CentralControl ...........................28
4.2
5
6
7
4.2.1
Creating and Scheduling a Backup Job Using Web CentralControl .............29
4.2.2
Running a Backup Job Using Web CentralControl .......................................33
Restoring Virtual Machines .........................................................................................35
5.1
Restoring Virtual Machines Using Windows CentralControl ................................35
5.2
Restoring Virtual Machines Using Web CentralControl .......................................37
Restoring VMDKs .........................................................................................................40
6.1
Restoring VMDKs Using Windows CentralControl ..............................................40
6.2
Restoring VMDKs Using Web CentralControl......................................................41
Restoring Files and Folders ........................................................................................44
7.1
9
Sharing VMDKs for Restoring Files and Folders .................................................45
7.1.1
Sharing VMDKs Using Windows CentralControl ..........................................45
7.1.2
Sharing VMDKs Using Web CentralControl .................................................47
7.2
8
Backing Up Virtual Machines Using Web CentralControl ....................................29
Accessing Shared VMDKs and Restoring Files ...................................................48
7.2.1
Accessing Files and Folders Using a UNC Share ........................................49
7.2.2
Accessing Files and Folders Using a Dynamic Disk Tool Mount .................50
7.2.3
Installing the Dynamic Disk Tool ..................................................................52
Restoring from Another vSphere Agent’s Backup Job ............................................54
8.1
Restoring from Another Agent’s Backup Job using Windows CentralControl ......54
8.2
Restoring from Another Agent’s Backup Job using Web CentralControl .............55
Best Practices and Limitations ...................................................................................56
9.1
vCenter Login Credentials ...................................................................................56
9.2
Organization and Naming Conventions ...............................................................56
9.3
vSphere Agent Settings .......................................................................................56
9.4
vCenter Environment ...........................................................................................56
9.5
Changed Block Tracking (CBT) ...........................................................................57
9.6
vMotion and Storage vMotion ..............................................................................57
ii
9.7
Limitations ............................................................................................................58
9.7.1
Unsupported Features in vSphere 5.1..........................................................58
9.7.2
Domain Name, Username and Password Limitations ..................................58
9.7.3
vSphere Object Naming Limitations .............................................................59
9.7.4
Snapshot Removal .......................................................................................59
9.7.5
Concurrent Backup Session Limit ................................................................59
9.7.6
VM Size Limit................................................................................................59
9.7.7
VMDK Size Limit...........................................................................................60
9.7.8
Virtual Machine Templates ...........................................................................60
9.7.9
Raw Disk Mapping (RDM) - Virtual and Physical .........................................60
9.7.10
Quick File Scanning Disabled.......................................................................60
9.7.11
Devices with Attached Images .....................................................................60
9.7.12
Delays in Detecting Changes .......................................................................61
10 Appendix: Setup Interface ...........................................................................................62
11 Appendix: Command Line Interface ...........................................................................63
11.1
vSphere Agent Commands ..................................................................................63
11.1.1
agent.............................................................................................................63
11.1.2
config ............................................................................................................63
11.1.3
mount............................................................................................................64
11.1.4
net.................................................................................................................64
11.1.5
ntp.................................................................................................................65
11.1.6
ssh ................................................................................................................65
11.1.7
support..........................................................................................................65
11.1.8
system ..........................................................................................................65
11.1.9
vcenter ..........................................................................................................66
11.1.10 webcc ...........................................................................................................66
11.2
Creating a Share and Working with Mounts with the vSphere Agent ..................67
11.2.1
Creating a Share and Adding External Mounts to the vSphere Agent .........67
11.2.2
Viewing Existing Mounts...............................................................................67
11.2.3
Mounts: Remove 1 by 1 or All: .....................................................................67
11.2.4
Mount Remove All ........................................................................................68
11.3
Creating and Sending a Support Bundle .............................................................68
11.4
Restoring a vSphere Agent ..................................................................................69
iii
vSphere Agent 7.1 User Guide
1
EVault vSphere Agent
1.1 Introduction
The EVault vSphere Agent 7.1 backs up virtual machines (VMs), and restores VMs, virtual
disks (VMDKs), and specific files and folders in VMware vSphere environments.
vSphere Agent 7.1 supports granular file restores. This allows you to select and restore
specific files or folders rather than restoring an entire VM or VMDK. For example, you can
restore individual files from a My Documents folder (or even the entire My Documents
folder) without restoring a whole VM. You can also recover entire VMs and VMDKs with
vSphere Agent 7.1.
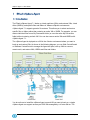
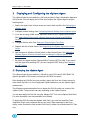
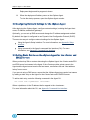
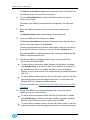
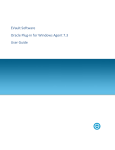
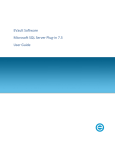
The vSphere Agent is deployed as a VM in the vCenter environment where you want to
back up and restore VMs. As shown in the following diagram, you use Web CentralControl
or Windows CentralControl to manage the Agent and jobs, back up VMs to a secure,
remote vault, and restore VMs, VMDKs and files and folders.
You do not have to install the vSphere Agent on each VM you want to back up; a single
vSphere Agent can support as many as 1000 VMs managed by a vCenter Server. The
Page 4
vSphere Agent 7.1 User Guide
Agent supports both ESXi and ESX hosts, and does not require the VMware ESX Service
Console.
The Agent performs backups using the VMware vStorage APIs for Data Protection
(VADP), ensuring correct backups regardless of the power state of the VM. Backups read
only the disk blocks that are being used by the guest operating system, applications and
user data. Delta backups use Changed Block Tracking (CBT) to reduce backup time and
space required on the vault. For more information, see Backing Up Virtual Machines.
You can restore entire VMs, VMDKs, or specific files and folders from a vSphere Agent
backup. For more information, see Restoring Virtual Machines, Restoring VMDKs, and
Restoring Files and Folders.
When restoring specific files and folders, you are provided with a UNC path of mounted
VMDKs. You can use this UNC path to access and restore required files and folders on
the machine where you want to restore files. On supported Windows operating systems,
the Dynamic Disk Tool (provided for use with the vSphere Agent) is the preferred way to
access all available data. For more information, see Accessing Shared VMDKs and
Restoring Files.
1.2 What’s New in Version 7.10?
The vSphere Agent now supports vSphere version 5.1, including the following
features:
vCenter Single Sign-On server. vSphere Agent 7.10 can authenticate with a
vCenter Single Sign-On server configured with multiple Active Directory
domains.
Hardware version 9. vSphere Agent 7.10 can back up and restore VMs that
are running hardware version 9.
vCenter Server Appliance. vSphere Agent 7.10 can back up and restore VMs
in a vCenter that is managed by the vCenter Server Appliance.
vSphere 5.1 vMotion. vSphere Agent 7.10 can back up VMs that have been
migrated to another host.
1.3 What’s New in Version 7.01?
The vSphere Agent can now support as many as 1000 VMs managed by a
vCenter Server. Previous versions of the Agent could support as many as 250
VMs managed by a vCenter Server. For more information, see Introduction.
The vSphere Agent now backs up VMs with VMDKs as large as 2032 GB. 2032
GB is the maximum VMDK size recommended by VMware to allow sufficient
overhead for snapshots, and snapshots are required for vSphere Agent backups. If
Page 5
vSphere Agent 7.1 User Guide
a backup job includes a VM with a VMDK that is larger than 2032 GB, the VM is
skipped during the backup. For more information, see Backing Up Virtual
Machines.
1.4 What’s New in Version 7.00?
The vSphere Agent now supports granular file and folder recovery. This allows you
to restore specific files and folders from a VM backup, rather than restoring an
entire VM or VMDK. For example, you can restore individual files from a My
Documents folder (or even the entire My Documents folder) instead of restoring
the entire VM or VMDK where the folder resides. For more information, see
Restoring Files and Folders.
Page 6
vSphere Agent 7.1 User Guide
2
Deploying and Configuring the vSphere Agent
The vSphere Agent is pre-installed in a VM, and provided in Open Virtualization Appliance
(OVA) format. You can deploy the OVA file and configure the vSphere Agent using the
following steps:
1. Deploy the Agent in the vCenter where you want to back up VMs. See Deploying the
vSphere Agent.
2. Configure network settings. See Configuring Network Settings for the vSphere Agent.
3. If you are not using a DNS server, add static entries for your vSphere environment.
See Adding Static Entries on the vSphere Agent for the vCenter and ESX/ESXi
Servers.
4. Configure the time zone. See Setting the vSphere Agent Time Zone.
5. Register with the vCenter Server. See Registering the vSphere Agent with vCenter
Server.
6. Add the Agent in Windows CentralControl or Web CentralControl. See Adding the
vSphere Agent in Windows CentralControl or Adding the vSphere Agent in Web
CentralControl.
7. By default, the Agent enables Changed Block Tracking (CBT) for VMs. If you want to
stop the Agent from enabling CBT, you can change the CBT setting. See Changing
the CBT Setting.
2.1 Deploying the vSphere Agent
The vSphere Agent is pre-installed in a VM with 2 virtual CPUs and 2 GB of RAM. The
Agent is provided in OVA format, and requires 158 GB of free space.
After obtaining the OVA file from your provider, deploy the file in the vCenter where you
want to back up VMs. For a list of supported vSphere platforms, see the vSphere Agent
release notes.
The following procedure describes how to deploy the OVA file using one version of the
vSphere Client. The procedure can vary depending on the vSphere version.
You can also deploy the OVA file using the VMware OVF Tool or the vSphere Web Client.
For more information, see documentation from VMware.
To deploy the OVA file using the vSphere Web Client, you must first install the Client
Integration Plug-in on the machine that you are using. When searching for the file to
deploy, make sure that the filter includes OVA files; by default, the wizard shows OVF files
only.
Page 7
vSphere Agent 7.1 User Guide
To deploy the vSphere Agent:
1.
Log in to the vCenter using the vSphere Client.
2.
From the File menu, select Deploy OVF Template.
The Deploy OVF Template wizard begins with the Source screen.
3.
Enter the location of the vSphere Agent OVA file, or browse to it.
4.
Click Next.
The OVF Template Details screen shows vSphere Agent information.
5.
Review the information. Click Next.
The End User License Agreement screen appears.
6.
Review the license agreement, click Accept, and then click Next.
The Name and Location screen appears.
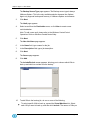
7.
In the Name field, enter a name for the vSphere Agent VM.
8.
In the Inventory Location tree, specify the location for deploying the
Agent. Click Next.
The Host/Cluster screen appears.
9.
Select the host or cluster for running the vSphere Agent. Click Next.
The Storage screen appears.
10.
Select the storage location for the vSphere Agent files. Click Next.
The Disk Format screen appears.
11.
Select one of the following formats for storing virtual disks:
Thick Provision Lazy Zeroed
Thick Provision Eager Zeroed
Thin Provision
By default, the vSphere Agent is deployed as “Thick Provision Lazy-Zeroed”.
This is the recommended format.
Note: In vSphere 4.0, the vSphere Agent automatically deploys with thick
provisioning. The wizard does not allow you to select a different format.
12.
Click Next.
The Ready to Complete screen appears.
13.
Review the deployment settings. Click Finish.
Page 8
vSphere Agent 7.1 User Guide
Deployment begins and its progress is shown.
14.
When the deployment finishes, power on the vSphere Agent.
To view the startup process, open the vSphere Agent console.
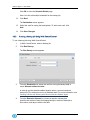
2.2 Configuring Network Settings for the vSphere Agent
After deploying the vSphere Agent, configure network settings, including the Agent host
name, IP address, and default gateways.
Optionally, you can set up DNS servers and change the IP address assignment method.
By default, the Agent is configured to use Dynamic Host Configuration Protocol (DHCP).
There are two ways to configure network settings for the vSphere Agent:
Using the Agent’s Setup interface. For more information, see Appendix: Setup
Interface.
Using commands in the Agent’s command line interface (CLI). For more
information, see Appendix: Command Line Interface.
2.3 Adding Static Entries on the vSphere Agent for the vCenter and
ESX(i) Servers
When you back up VMs or restore data using the vSphere Agent, the vCenter sends ESX
and ESXi server host names to the Agent. If the vCenter provides a host name to the
Agent and the Agent cannot resolve the host name, connections fail and “Host address
lookup” errors occur.
If you are not using a DNS server, ensure that the vSphere Agent can resolve host names
by adding a static entry on the Agent for the vCenter and each ESX/ESXi server.
To add a static entry, enter the following command in the Agent CLI:
net hosts add <ipaddress> <hostname>
Where <ipaddress> is the IP address that is mapped to the <hostname>.
For more information about the CLI, see Appendix: Command Line Interface.
Page 9
vSphere Agent 7.1 User Guide
2.4 Setting the vSphere Agent Time Zone
By default, the vSphere Agent time zone is set to Pacific time. To ensure that backup logs
show the correct time, and to prevent problems when the Agent communicates with other
servers, you must set the correct vSphere Agent time zone using the Agent CLI.
To set the time zone, enter the following command in the Agent CLI:
config set timezone <region>/<timezone>
Where:
<region> is the region associated with the timezone. Available values are: Africa,
America, Antarctica, Arctic, Asia, Atlantic, Australia, Brazil, Canada, Chile, Europe,
Indian, Mexico, Mideast, Pacific, and US.
<timezone> is the time zone for the vSphere Agent. To show a list of available
time zones in a region, use the following command:
config show timezones list <region>
Examples of <region>/<timezone> combinations include: America/New_York,
Europe/Paris, and US/Pacific.
For example, to set the time zone to US Eastern time, use this command:
config set timezone US/Eastern
Note: Ensure that the Agent date and time are set correctly. To change the Agent date
and time, use the following command:
config set date <MM>/<DD>/<YYYY> <HH>:<MM> [<:SS>]
Where <MM>/<DD>/<YYYY> is the current date (month/day/year) and
<HH>:<MM>[<:SS>] is the current time (hour:minute:second).
2.5 Registering the vSphere Agent with vCenter Server
Before you can back up VMs using the vSphere Agent, you must register the Agent with
the vCenter Server where you want to back up VMs. You cannot connect to the vSphere
Agent using Web CentralControl or Windows CentralControl unless you register the Agent
with vCenter Server.
To register the Agent with vCenter Server, enter the following command in the Agent CLI:
vcenter register [<vCenter> [<backupUsername>]]
Where:
<vCenter> is the name or IP address of the vCenter where you are registering the
vSphere Agent.
Page 10
vSphere Agent 7.1 User Guide
<backupUsername> is the name of the user for performing backups and restores.
You must use a vCenter or domain account that is mapped to a vCenter role with
full administrator permissions. For more information, see vCenter User Privileges
for Backup and Restore.
If you do not include the <vCenter> or <backupUsername> in the command, you are
prompted for the information. You are also prompted for the user password.
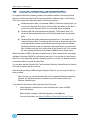
2.6 Adding the vSphere Agent in Windows CentralControl
To manage the vSphere Agent through Windows CentralControl, add the Agent in
Windows CentralControl.
Note: For more information, see the Windows CentralControl guide or online help.
To add the vSphere Agent in Windows CentralControl:
1.
In Windows CentralControl, right-click the Workspace icon and choose
New Agent from the menu.
The Agent Properties screen appears.
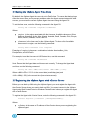
2.
In the Description field, enter an Agent name.
3.
In the Network address field, enter the IP address or host name of the
vSphere Agent.
4.
In the User name and Password fields, provide the vCenter credentials
that you used to register the vSphere Agent with vCenter Server. See
Registering the vSphere Agent with vCenter Server.
The vCenter credentials allow Windows CentralControl to access the vSphere
Agent.
Page 11
vSphere Agent 7.1 User Guide
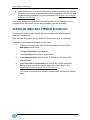
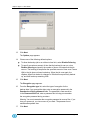
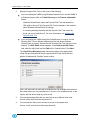
5.
Check the Agent connection settings by clicking Get Status.
If the settings are correct, the Agent Status screen shows Agent information.
Click OK.
If the IP address or host name information is incorrect, a “Failed to connect to
<...>” message appears. Enter a new IP address or host name.
If the authorization information is incorrect, a “Failed to authorize user () or user
() possesses insufficient privilege” message appears. Enter a new user name or
password.
Note: A Windows domain account is used to register the vSphere Agent with
vCenter Server. If the password or domain credentials change, you need to
make the same changes on the vSphere Agent (using the vcenter change login
command) and in Windows CentralControl (on the vCenter tab in the Agent
Configuration screen). For more information, see vCenter User Privileges for
Backup and Restore.
6.
Click OK.
The new Agent appears in the left pane of Windows CentralControl.
Page 12
vSphere Agent 7.1 User Guide
2.7 Adding the vSphere Agent in Web CentralControl
To manage the vSphere Agent through Web CentralControl, register the Agent with Web
CentralControl using the CLI. You can then configure the vSphere Agent.
2.7.1
Registering the vSphere Agent with Web CentralControl
To register the vSphere Agent with Web CentralControl, enter the following command in
the Agent CLI:
webcc register [<WebCCAddress>] [<port>] [<login>]
[<password>]
Where:
<WebCCAddress> is the Web CentralControl IP address or host name.
<port> is the port used to communicate with Web CentralControl. The default port
is 8086.
<login> is the username for logging in to Web CentralControl.
<password> is the password for logging in to Web CentralControl.
If you do not include the <WebCCAddress>, <port>, <login> or <password> parameter in
the command, the following questions prompt you for the information:
What is the Web-based Agent Console address?
What is the Web-based Agent Console connection port? [8086]
Note: Press Enter to accept the default port of 8086.
What is your Web-based Agent Console username?
What is your Web-based Agent Console password?
When the registration is complete, a “Registration complete. Agent restarted successfully”
message appears.
Page 13
vSphere Agent 7.1 User Guide
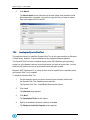
2.7.2
Configuring the vSphere Agent in Web CentralControl
When you register the vSphere Agent with Web CentralControl, Web CentralControl
obtains vCenter credentials from the Agent. You can test and change the credentials and
create a backup job through one wizard in Web CentralControl, as described in the
following procedure.
You can also change Agent credentials and settings using the Agent Settings screen. For
more information, see Changing vCenter Credentials in Web CentralControl.
Note: For more information about configuring an Agent through Web CentralControl, see
the online help.
To configure the vSphere Agent in Web CentralControl:
1.
In Web CentralControl, select the unconfigured vSphere Agent.
2.
Click This is a new Agent I would like to configure in the lower pane of
the screen.
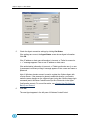
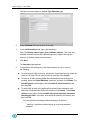
The Configure Agent wizard starts with the Agent Configuration screen.
3.
In the Agent Description field, enter a description for the Agent.
4.
Click Next.
Web CentralControl tests the vCenter credentials from the Agent.
5.
If the vCenter credentials obtained from the Agent are invalid, a “Test
Credentials Failed” message appears. Click Close.
The Job Type Selection screen appears.
The Backup Source Type is always VMware vSphere. This is the only
available selection because the vSphere Agent only supports backup and
recovery in VMware vSphere environments.
vCenter credentials appear in the User Name and Password fields. These
credentials are obtained from the vSphere Agent.
If the vCenter credentials are valid, the User Name and Password fields cannot
be edited. To change the credentials, see Changing vCenter Credentials in
Web CentralControl.
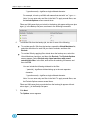
6.
If the vCenter credentials are not valid, the User Name and Password
fields can be edited. Enter vCenter credentials in the fields, and then click
Test.
If the new credentials are valid, a “Success” message appears. Click Close.
Page 14
vSphere Agent 7.1 User Guide
If the new credentials are not valid, an “Error” message appears. Click Close,
and then enter new vCenter credentials.
Note: A Windows domain account is used to register the vSphere Agent with
vCenter Server. If the password or domain credentials change, you need to
make the same changes on the vSphere Agent (using the vcenter change login
command) and in Web CentralControl (on the vCenter tab in the Agent Settings
screen). For more information, see vCenter User Privileges for Backup and
Restore.
7.
Click Next.
8.
On subsequent wizard pages, configure a backup job by entering a job
name, adding VMs, and changing encryption and other backup options.
For more information, see Creating and Scheduling a Backup Job Using
Web CentralControl.
2.8 Changing the CBT Setting
Changed Block Tracking (CBT) is a VMware feature that tracks changed disk sectors and
improves the performance of VM backups. By default, the vSphere Agent enables
Changed Block Tracking (CBT) for VMs.
However, because CBT requires some virtual disk processing overhead, you can stop the
Agent from enabling CBT for VMs. This does not disable CBT for VMs that already have it
enabled through the Agent or another mechanism. It only stops the Agent from enabling
CBT in the future for VMs that do not already have it enabled.
For detailed information about CBT and the vSphere Agent, see Changed Block Tracking
(CBT).
2.8.1
Changing the CBT Setting using Windows CentralControl
To change the CBT setting using Windows CentralControl:
1.
In Windows CentralControl, right-click the Agent and choose Agent
Configuration from the menu.
The Agent Configuration screen opens.
2.
Click the vCenter tab.
3.
Choose one of the following CBT settings:
To allow the Agent to enable CBT for VMs, select Change Block Tracking.
Change Block Tracking is selected by default.
Page 15
vSphere Agent 7.1 User Guide
To stop the Agent from enabling CBT for VMs, clear Change Block
Tracking.
Note: Clearing this option does not disable CBT for VMs that already have
it enabled through the Agent or through another mechanism. It only stops
the Agent from enabling CBT in the future for VMs that do not already have
it enabled.
4.
2.8.2
Click OK.
Changing the CBT Setting using Web CentralControl
To change the CBT setting using Web CentralControl:
1.
In Web CentralControl, select the vSphere Agent.
2.
Point to the Edit button and choose Agent Settings from the menu.
The Agent Settings screen appears.
3.
Click the vCenter tab.
4.
Choose one of the following CBT settings:
To allow the Agent to enable CBT for VMs, select the Enable Changed
Block Tracking (CBT) for Virtual Machines check box.
The CBT check box is selected by default.
To stop the Agent from enabling CBT for VMs, clear the Enable Changed
Block Tracking (CBT) for Virtual Machines check box.
Note: Clearing this check box does not disable CBT for VMs that already
have it enabled through our software or through another mechanism. It only
stops the Agent from enabling CBT for VMs in the future.
5.
Click OK.
2.9 vCenter User Privileges for Backup and Restore
A Windows domain account is used to register the vSphere Agent with vCenter Server.
Full Administrator rights are the minimum requirements for the account that the vSphere
Agent uses to back up and restore VMs.
To create a vCenter role with the required permissions and assign it to a user, see
Creating a vCenter Role for a User and Assigning a vCenter Role to a User.
If the password or domain credentials change, you need to make the same changes on
the vSphere Agent (using the vcenter change login command) and in CentralControl. For
Page 16
vSphere Agent 7.1 User Guide
more information, see Changing vCenter Credentials on the Agent, Changing vCenter
Credentials in Windows CentralControl and Changing vCenter Credentials in Web
CentralControl.
2.9.1
Creating a vCenter Role for a User
Full Administrator rights are required for the account that the vSphere Agent uses to back
up and restore VMs.
Note: The following procedure describes how to create a vCenter role using one version
of the vSphere Client. For complete information, see the documentation from VMware.
To create a vCenter role for a user:
1. Open a vSphere client and select View > Administration > Roles.
2. If you wish to create a custom user role, you can clone it from the
"Administrator" role. Select the Administrator role and clone it.
To back up the entire vCenter, the administrator role should be propagated from the top
level.
To back up VMs in a particular datacenter, the administrator role should be propagated
from this level.
2.9.2
Assigning a vCenter Role to a User
After creating a vCenter role for the backup user, you can assign the role to a user.
Note: The following procedure describes how to assign a vCenter role using one version
of the vSphere Client. For complete information, see the documentation from VMware.
To assign a vCenter role to a user:
1. Open a vSphere client and select View > Inventory > Hosts and Clusters.
2. In the tree panel, select the level at which you want the user permission to
start.
3. Select the Permissions tab.
4. Right-click to add permissions.
5. Select the role on the right.
6. Click Add. On the left, select the new or existing user.
7. Click OK.
Page 17
vSphere Agent 7.1 User Guide
2.9.3
Changing vCenter Credentials on the Agent
You can change vCenter login credentials by entering the following command in the Agent CLI:
vcenter change login [backupUsername]
backupUsername is the name of the user for performing backups and restores. You must use
a vCenter or domain user account that is mapped to a vCenter role with full administrator
permissions. For more information, see vCenter User Privileges for Backup and Restore.
For example, enter:
vcenter change login NewUser
This command changes the login name to “NewUser”. The change occurs after the password
for the new user name has been authenticated.
2.9.4
Changing vCenter Credentials in Windows CentralControl
To change vCenter credentials in Windows CentralControl:
1.
In Windows CentralControl, right-click the Agent and choose Agent
Configuration from the menu.
The Agent Configuration screen opens.
2.
Click the vCenter tab.
3.
In the User name and Password fields, enter the backup user name and
password.
4.
Click Test.
A message indicates whether or not the credentials are valid. Click OK. If the
credentials are not valid, enter new vCenter credentials.
5.
2.9.5
Click OK.
Changing vCenter Credentials in Web CentralControl
To change vCenter credentials in Web CentralControl:
1.
In Web CentralControl, select the vSphere Agent.
2.
Point to the Edit button and choose Agent Settings from the menu.
The Agent Settings screen appears.
Page 18
vSphere Agent 7.1 User Guide
3.
Click the vCenter tab.
4.
In the User Name and Password fields, enter the backup user name and
password.
5.
Click Test.
If the credentials are valid, a “Success” message appears. Click Close.
If the credentials are not valid, an “Error” message appears. Click Close, then
enter new vCenter credentials.
6.
Click OK.
Page 19
vSphere Agent 7.1 User Guide
3
Upgrading the vSphere Agent
You can upgrade previous vSphere Agent versions to version 7.1. When you upgrade the
Agent, settings such as vCenter registration and Web CentralControl credentials are
preserved.
Note: vSphere Agents prior to version 7.0 were named “Agent for VMware”.
Important: Beginning in version 7.0, the vSphere Agent VM partition that contains Agent
files is significantly larger than in previous Agent versions. The larger VM partition ensures
sufficient room for catalog and delta files. If you upgrade the vSphere Agent from version
6.91 or earlier, the partition size is not increased and the upgrade might fail if you have a
large number of configured jobs and VMs. Instead of upgrading the vSphere Agent, you
can remove the previous vSphere Agent version using the vSphere Client, deploy and
configure Agent version 7.1, and then re-register the Agent to the vault.
Note: When you upgrade Agent 6.91 for VMware to vSphere Agent 7.1, the tmpfs setting
for the Agent VM is increased. This increase enables the Agent to support as many as
1000 VMs managed by a vCenter Server. Previous versions of the Agent could support as
many as 250 VMs in a vCenter.
There are two ways to upgrade the vSphere Agent:
With Internet access, you can enter a command in the Agent CLI. The system then
connects to the vSphere Agent upgrade server, and checks for and performs any
available updates. For more information, see Upgrading the vSphere Agent Over
the Internet.
If direct internet access is not available, you can download required RPMs from
your service provider, and upgrade the vSphere Agent locally. For more
information, see Manually Upgrading the vSphere Agent.
3.1 Upgrading the vSphere Agent Over the Internet
With internet access, you can upgrade the vSphere Agent by entering a command in the
Agent CLI. The system then checks for Agent updates on the upgrade server, and
performs available updates.
Connections to the upgrade server are done through the host name
vraupdate.evault.com. If name resolution is not configured in your environment, you must
manually add a static entry for the upgrade server using the net hosts command.
After upgrading the vSphere Agent, you must reboot the vSphere Agent VM.
Page 20
vSphere Agent 7.1 User Guide
To upgrade the vSphere Agent over the Internet:
1.
If name resolution is not configured in your environment, add a static
entry by entering the following command in the Agent CLI:
net hosts add 199.87.219.148 vraupdate.evault.com
2.
Ensure that no backups or restores are running.
3.
Enter the following command in the Agent CLI:
system upgrade
If no updates are available, a “No packages marked for update” message
appears.
If updates are available, you will see the updated RPMs on the server. You
have the option to select Y or N. If you select Y, then the upgrade will
commence.
Note: Do not interrupt the upgrade process or power off the vSphere Agent VM
during the upgrade process.
4.
After the upgrade is complete, reboot the vSphere Agent VM by entering
the following command in the Agent CLI:
system reboot
3.2 Manually Upgrading the vSphere Agent
If direct Internet access is not available, you can download RPMs from your service
provider, create a CIFS share, and upgrade the vSphere Agent locally.
To manually upgrade the vSphere Agent:
1.
Create a CIFS share.
2.
Download the RPMs from your service provider, and save them in the
CIFS share.
3.
Enter the following command:
system upgrade manual <\\server\share> <username>
<password>
Where:
<\\server\share> specifies the server and CIFS share where the RPMs are
saved.
<username> is a user with read access to the CIFS share where the RPMs
are saved.
Page 21
vSphere Agent 7.1 User Guide
<password> is the password for the specified user.
Note: If you do not provide a username and password, the system attempts to
connect to the CIFS share as the Guest user. The Guest account must be
enabled and have read access to the share, or the upgrade will fail.
Page 22
vSphere Agent 7.1 User Guide
4
Backing Up Virtual Machines
After the vSphere Agent is deployed and configured, you can back up virtual machines.
You can create and run backup jobs using Windows CentralControl or Web
CentralControl. For more information, see Backing Up Virtual Machines Using Windows
CentralControl and Backing Up Virtual Machines Using Web CentralControl.
The Agent performs crash-consistent backups rather than application-consistent backups.
Note: The vSphere Agent does not back up a VM if it has a VMDK larger than 2032 GB.
2032 GB is the maximum VMDK size recommended by VMware to allow sufficient
overhead for snapshots, and snapshots are required for backups. If a backup job includes
a VM with a VMDK that is larger than 2032 GB, the VM is skipped during the backup.
Note: Avoid running concurrent backups of the same VM or job from the same or another
vSphere Agent. This can cause negative results in CBT and delta backups to be out of
synch.
4.1 Backing Up Virtual Machines Using Windows CentralControl
To create and back up virtual machines using Windows CentralControl, see Creating a
Backup Job Using Windows CentralControl and Running a Backup Job Using Windows
CentralControl.
You can also schedule backup jobs to run. For more information, see Scheduling a
Backup Job Using Windows CentralControl.
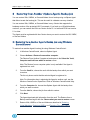
4.1.1
Creating a Backup Job Using Windows CentralControl
To create a backup job using Windows CentralControl:
1.
In Windows CentralControl, do one of the following:
Select a vSphere Agent, and choose File > New Job.
Right-click the Agent, and choose New Job.
The New Job Wizard opens to the Welcome page.
Note: If the Skip this screen in the future check box is selected, the Welcome
page does not appear.
2.
Click Next.
Page 23
vSphere Agent 7.1 User Guide
The Backup Source Type page appears. The Backup source type is always
VMware vSphere. This is the only available selection because the vSphere
Agent only supports backup and recovery in VMware vSphere environments.
3.
Click Next.
The Vault page appears.
4.
Select a vault from the Destination menu, or click New to create a new
vault destination.
Note: To add a new vault, please refer to the Windows CentralControl
Operations Guide or Windows CentralControl Help.
5.
Click Next.
The New Job Name page appears.
6.
In the Name field, type a name for the job.
7.
In the Description field, type a job description.
8.
Click Next.
The Source page appears.
9.
Click Add.
The Include/Exclude screen appears, allowing you to choose which VMs to
back up and which to exclude from the backup.
10.
To add VMs to the backup job, do one or more of the following:
To select specific VMs to back up, expand the Virtual Machines list. Select
each VM you want to back up, and then click Include. The names of VMs you
Page 24
vSphere Agent 7.1 User Guide
include appear in the Virtual Machine pane. You can include more than one
VM in your backup.
To back up all VMs (including VMs that are added after the backup job is
created), select Virtual Machines, and then click Include. The Confirm VMs
to Include screen appears. Select Include all virtual machines, and then
click Yes.
To select VMs to back up by applying filter criteria when the backup runs,
select Virtual Machines, and then click Include. The Confirm VMs to
Include screen appears. Select Include only virtual machines with names
matching this filter. In the field, enter a filter for selecting VM names, and
then click Yes.
You can include the following wildcards in the filter:
* (asterisk) - signifies a wildcard string up to the next separator
character
? (question mark) - signifies a single wildcard character
For example, to include all VMs with names that start with “vm”, type vm*
and then click Yes.
11.
To exclude VMs from the backup job, do one or more of the following:
To exclude specific VMs from the backup, expand the Virtual Machines tree.
Select each VM you want to exclude, and then click Exclude.
To exclude VMs by applying filter criteria when the backup runs, select Virtual
Machines, and then click Exclude. The Confirm VMs to Exclude screen
appears. Select Exclude only virtual machines with names matching this
filter. In the field, enter a filter for selecting VM names, and then click Yes.
You can include the following wildcards in the filter:
* (asterisk) - signifies a wildcard string up to the next separator
character
? (question mark) - signifies a single wildcard character
For example, to exclude all VMs with names that start with “vm”, type vm*
and then click Yes.
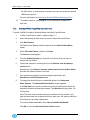
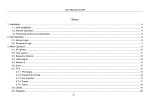
12.
Click OK.
Filters and VM names that you include in the backup job appear in the Virtual
Machine pane of the Source page, as shown in the following screenshot.
Page 25
vSphere Agent 7.1 User Guide
13.
Click Next.
The Options page appears.
14.
Choose one of the following deferral options:
To allow the backup job to run without a time limit, select Disable Deferring.
To specify a maximum amount of time that the backup job can run, clear
Disable deferring and specify the number of hours or minutes that the job
can run. The backup job stops after the specified amount of time even if some
VMs in the job have not been backed up. When the job runs again, the
vSphere Agent first checks for changes in VMs that were previously backed
up, and then backs up remaining VMs.
15.
Click Next.
The Encryption page appears.
16.
From the Encryption type list, select the type of encryption for the
backup data. If you encrypt the data, enter an encryption password in the
Password and Verify password fields. The password is case-sensitive.
In the Password Hint field, enter a password hint to help you remember
the encryption password during a restore.
Warning: You must remember the encryption password to recover files. If you
lose your password, you lose access to your data. The password is not
maintained anywhere else.
17.
Click Next.
Page 26
vSphere Agent 7.1 User Guide
The Log Options page appears.
18.
Specify one of the following logging options:
To generate log files for the job, select the Create log file check box. From
the Log detail level list, choose the level of log detail. To automatically delete
log files when a backup is deleted, select the Automatically purge expired
log files check box. To delete the oldest log file after reaching a certain
number of log files, enter a number in the Keep the last x log files field.
To not generate log files for the job, clear the Create log file check box.
19.
Click Next.
The Finished page appears.
20.
Select one of the following options for running the job, and then click
Finish:
Run the job immediately.
Schedule the job. For more information, see Scheduling a Backup Job Using
Windows CentralControl.
Just exit from this wizard. If you select this option, the job is created but does
not start running.
4.1.2
Running a Backup Job Using Windows CentralControl
To run a backup job using Windows CentralControl:
1.
In Windows CentralControl, do one of the following:
Select the job and click the Backup icon.
Select the job and choose Actions > Backup.
Right-click the job, and select Backup.
The Backup Wizard opens to the Welcome page. Click Next.
Note: If the Skip this screen in the future check box is selected, the Welcome
page does not appear.
The Destination page appears.
2.
From the Back up list, select the vault for saving the backup data or
select Alternate safeset location.
In order to use the alternate safeset location option, you must create an
external CIFS or external mount to a Windows share. For more information, see
Creating a Share and Working with Mounts with the vSphere Agent.
Page 27
vSphere Agent 7.1 User Guide
3.
Do one of the following:
To run the job without changing options, click Back Up Now.
To change retention or backup time options before running the job, click Next.
The Options page appears. Specify retention and backup time options, and
then click Next. The Finish page appears. Click Finish.
4.1.3
Scheduling a Backup Job Using Windows CentralControl
To schedule a backup job using Windows CentralControl:
1.
In Windows CentralControl, do one of the following:
Select an Agent and choose Tools > Schedule Entries.
Right-click an Agent, and choose Schedule Entries.
The Schedule List screen appears.
2.
Click New.
The Schedule Wizard opens to the Welcome page.
Note: If the Skip this screen in the future check box is selected, the
Welcome page does not appear.
3.
Click Next.
The Command page appears.
4.
Select Backup, and click Next.
The Job List page appears.
5.
Select the backup job to schedule, and then click Next.
The Options page appears.
6.
From the Retention list, choose a retention scheme that specifies the
number of days for keeping backups, number of backups to store online,
and days to archive the data.
7.
From the Compression type list, choose the level of data compression.
Compression levels allow you to optimize the volume of data sent versus the
speed of transmission. In some cases it might be better to take the time and
CPU cycles to compress the data before sending it at a slower rate, as opposed
to not compressing it and sending it at a faster rate. Also, compression reduces
the space required to store the data on the vault.
Page 28
vSphere Agent 7.1 User Guide
8.
Choose one of the following deferral options:
To allow the backup job to run without a time limit, select the Disable
Deferring check box.
To specify a maximum amount of time that the backup job can run, clear the
Disable deferring check box and specify the number of hours or minutes that
the job can run. The backup job stops after the specified amount of time even
if some VMs in the job have not been backed up. When the job runs again,
the vSphere Agent first checks for changes in VMs that were previously
backed up, and then backs up remaining VMs.
9.
Click Next.
The Command Cycle page appears.
10.
In the Command cycle area, select whether you want the job schedule to
be Weekly, Monthly, or Custom, and then click Next.
11.
On the following page, specify when to run the backup job, and then click
Next.
The Finish page appears.
12.
Click Finish.
When your scheduled job runs on the specified date and time, you can see the
job running in the Process Manager.
4.2 Backing Up Virtual Machines Using Web CentralControl
You can create and schedule backup jobs using Web CentralControl, and run backup jobs
on demand. For more information, see Creating and Scheduling a Backup Job Using Web
CentralControl and Running a Backup Job Using Web CentralControl.
4.2.1
Creating and Scheduling a Backup Job Using Web CentralControl
To create and schedule a backup job using Web CentralControl:
1.
In Web CentralControl, select a vSphere Agent, and choose Add > Job.
Page 29
vSphere Agent 7.1 User Guide
The New Job wizard opens to the Job Type Selection page.
2.
In the Job Name field, type a name for the job.
3.
In the Job Description field, type a job description.
Note: The Backup source type is always VMware vSphere. This is the only
available selection because the vSphere Agent only supports backup and
recovery in VMware vSphere environments.
4.
Click Next.
The Selection page appears.
5.
To add VMs to the backup job, in the vSphere pane, do one or more of
the following:
To select specific VMs to back up, expand the Virtual Machines list, select the
check box for each VM you want to back up, and then click Include.
To back up all VMs (including VMs that are added after the backup job is
created), select the Virtual Machines check box, and then click Include. The
Include Options screen opens. Select Include all virtual machines, and
then click OK.
To select VMs to back up by applying filter criteria when the backup runs,
select the Virtual Machines check box, and then click Include. The Include
Options screen opens. Select Include only virtual machines with names
matching this filter. In the field, enter a filter for selecting VM names, and
then click OK.
You can include the following wildcard characters in the filter:
* (asterisk) - signifies a wildcard string up to the next separator
character
Page 30
vSphere Agent 7.1 User Guide
? (question mark) - signifies a single wildcard character
For example, to back up all VMs with names that start with “vm”, type vm*.
Note: You can enter only one filter in the field. To apply several filters, use
the Include Options screen several times.
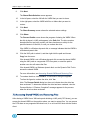
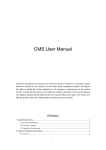
Filters and VM names that you include in the backup job appear with green plus
signs (+) in the Backup Set pane, as shown in the following screenshot:
6.
To exclude VMs from the backup job, do one or more of the following:
To exclude specific VMs from the backup, expand the Virtual Machines list,
select the check box for each VM you want to exclude, and then click
Exclude.
To exclude VMs by applying filter criteria when the backup runs, select the
Virtual Machines check box, and then click Exclude. The Exclude Options
screen appears. Select Exclude only virtual machines with names
matching this filter. In the field, enter a filter for selecting VM names, and
then click OK.
You can include the following wildcards in the filter:
* (asterisk) - signifies a wildcard string up to the next separator
character
? (question mark) - signifies a single wildcard character
Note: You can enter only one filter in the field. To apply several filters, use
the Exclude Options screen several times.
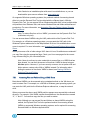
Filters and VM names that you exclude from the backup job appear with red
minus signs (-) in the Backup Set pane.
7.
Click Next.
The Options screen appears.
Page 31
vSphere Agent 7.1 User Guide
8.
From the Encryption type list, select the type of encryption for the
backup data. If you encrypt the data, enter an encryption password in the
Password and Verify Password fields. The password is case-sensitive.
In the Password Hint field, enter a password hint to help you remember
the encryption password during a restore.
9.
To set retention, compression or logging options, click Advanced
Backup Options. The Advanced Options screen opens.
From the Retention list, choose a retention scheme that specifies the number
of days for keeping backups, number of backups to store online, and days to
archive the data.
From the Compression list, choose the level of data compression. Data
compression allows you to optimize the volume of data sent against the speed
of transmission.
To generate log files for the job, select the Create log file check box. From the
Log detail level list, choose the level of log detail. To automatically delete log
files when a backup is deleted, select the Automatically purge expired log
files check box. To delete the oldest log file after reaching a certain number of
log files, enter a number in the Keep the last x log files field.
Click OK.
10.
Click Next.
The Schedule screen appears.
11.
To create a backup schedule and set retention options for the scheduled
job, click Add. The Schedule Details page opens. From the Schedule
View list, choose Days of Week, Days of Month, or Custom, and
specify when to run the backup.
From the Retention Scheme menu, choose a retention scheme that specifies
the number of days for keeping backups from the scheduled job, number of
backups to store online, and days to archive the data.
To specify data compression and deferral options, click Advanced Schedule
Options. From the Compress file data list, choose the file compression
level.To allow the backup job to run without a time limit, clear Use Deferring.
To specify a maximum amount of time that the backup job can run, select Use
Deferring. In the Backup Time Window fields, specify the number of hours or
minutes that the job can run. The backup job stops after the specified amount of
time even if some VMs in the job have not been backed up. When the job runs
again, the vSphere Agent first checks for changes in VMs that were previously
backed up, and then backs up remaining VMs. Click OK to close the Advanced
Options page.
Page 32
vSphere Agent 7.1 User Guide
Click OK to close the Schedule Details page.
Note: You can add multiple schedules for the backup job.
12.
Click Next.
The Destination screen appears.
13.
Select the vault for saving the backup data. To add a new vault, click
Add.
14.
Click Save Changes.
4.2.2
Running a Backup Job Using Web CentralControl
To run a backup job using Web CentralControl:
1.
In Web CentralControl, select a backup job.
2.
Click Run Backup.
The Run Backup screen appears.
3.
From the Destination list, select the vault for saving the backup data or
select Alternate safeset location.
In order to use the alternate safeset location option, you must create an
external CIFS or external mount to a Windows share. For more information, see
Creating a Share and Working with Mounts with the vSphere Agent.
4.
From the Retention Scheme list, choose a retention scheme that
specifies the number of days for keeping backups, number of backups to
store online, and days to archive the data.
Page 33
vSphere Agent 7.1 User Guide
5.
To specify deferring options, click Advanced Backup Options. To allow
the backup job to run without a time limit, clear Use Deferring. To specify
a maximum amount of time that the backup job can run, select Use
Deferring. In the Backup Time Window fields, specify the number of
hours or minutes that the job can run. The backup job stops after the
specified amount of time even if some VMs in the job have not been
backed up. When the job runs again, the vSphere Agent first checks for
changes in VMs that were previously backed up, and then backs up
remaining VMs. Click OK to close the Advanced Backup Options page.
6.
Click Start Backup.
Page 34
vSphere Agent 7.1 User Guide
5
Restoring Virtual Machines
You can restore entire VMs from a backup.
You can also restore a single VMDK or specific files and folders from a backup. For more
information, see Restoring VMDKs and Restoring Files and Folders.
Note: You can only restore VMs with hardware version 8 to a vSphere 5 or later ESXi
host.
The Agent performs crash-consistent backups rather than application-consistent backups.
VMs are started from the BIOS after they are restored, and may perform forced checkdisks after being started.
5.1 Restoring Virtual Machines Using Windows CentralControl
To restore virtual machines using Windows CentralControl:
1.
In Windows CentralControl, select a vSphere Agent.
2.
Select the backup job from which you want to restore a VM.
3.
Click the Restore icon, click Ctrl + R, or right-click the backup job and
then select Restore.
Note: The Restore process requires 15% more space than the size of the VM
being restored.
The Restore from a backup workflow begins with the Choose what you want
to restore screen.
4.
Select Virtual Machines, and then click Next.
The Select the source from which to restore screen appears.
5.
From the Source list, select a source (usually a vault) from which to
restore data.
6.
From the Safeset list, select the safeset from which you want to restore
data (i.e., a recovery point).
7.
Click Next.
The Select Virtual Machines to restore screen opens.
8.
Select the checkbox for each VM that you want to restore. Click Include.
The VM names that you include appear in the right pane of the screen.
Note: You cannot select incomplete VMs to restore.
Page 35
vSphere Agent 7.1 User Guide
9.
Click Next.
The Select the datastore where you want to restore the Virtual Machines
screen opens.
10.
From the list, select the datastore where you want to restore the VMs.
11.
Choose one of the following options for restoring VMs to the selected
datastore:
Restore all selected Virtual Machines to the selected datastore only
Restore to the selected datastore only when a Virtual Machine’s
original datastore is not available. If a VM contains multiple VMDKs that
reside on two or more datastores, and one or more of those datastores is
unavailable, the entire VM will be restored to the selected datastore.
Note: If you restore a VM or TEMPLATE to a vCenter, and the original VM is
present, it will restore as a clone. The VM will be restored as a clone of the
original and named {VMNAME}-vra-restored-{DATE}. The VM will be restored
as a clone whether the original VM is powered On, Off, or Suspended. If the
original VM is powered on and using a static IP Address, you may encounter an
IP Address conflict when the newly restored (cloned) VM is powered on.
12.
To view VMs that have been selected for the restore, and their original
hosts and datastore locations, click View Selected Virtual Machines.
13.
Click Next.
The Select the host where you want to register your Virtual Machines
screen opens.
14.
From the list, select the host where you want to register the VMs.
Only hosts that have access to the datastore selected on the preceding page
appear in the list.
15.
Choose one of the following options for registering the VMs with the
selected host:
Register all selected Virtual Machines with the selected host only
Register with the selected host only when a Virtual Machine’s original
host is not available
16.
To power on the VMs after restoring, select Power on the VM after
restoring.
Note: When restoring a VM to an alternate host and datastore, when the VM is
powered on either manually or through our software, a VMware dialog box
might indicate that the VM was moved or copied. If you do not know whether
Page 36
vSphere Agent 7.1 User Guide
the VM was moved or copied, choose “Copied”. A new UUID will then be
generated which will not cause a conflict with an existing VM.
17.
Click Next.
The Customize the restore behavior screen opens.
18.
Choose a log file detail level from the list.
19.
To use all available bandwidth, select Use all available bandwidth.
20.
Click Next.
The Restore Summary screen shows the restore settings.
21.
If you are satisfied with the settings, click Run Restore.
5.2 Restoring Virtual Machines Using Web CentralControl
To restore virtual machines using Web CentralControl:
1.
In Web CentralControl, select a vSphere Agent.
2.
Select the backup job from which you want to restore a VM.
3.
Click Run Restore.
Note: The Restore process requires 15% more space than the size of the VM
being restored.
The Restore from Backup workflow begins with the Select Restore Mode
screen.
4.
Select Virtual Machines, and then click Next.
The Source screen appears.
5.
From the Safeset location list, choose the vault from which to restore
virtual machines.
6.
From the Restore from this backup version list, choose the safeset
from which you want to restore virtual machines.
Alternatively, select Restore from the safeset entered in the textbox below,
and enter the safeset number in the field.
7.
If the safeset is encrypted, enter the encryption password in the
Password and Verify Password fields.
8.
To change log detail or bandwidth use options, click Advanced Restore
Options. The Advanced Restore Options page appears.
From the Log detail level list, choose the level of logging detail.
Page 37
vSphere Agent 7.1 User Guide
Specify one of the following bandwidth settings:
To use all available bandwidth so that the restore runs as fast as possible,
select the Use all available bandwidth check box.
To apply Agent bandwidth settings to the restore, clear the Use all available
bandwidth check box.
Click OK to close the Advanced Restore Options page.
9.
Click Next.
The Data Selection screen appears.
10.
In the left pane, select the VMs to restore. Click Include.
The VMs that you include appear in the right-hand pane. You must include at
least one VM to continue.
Note: You cannot select incomplete VMs to restore.
11.
Click Next.
The Destination Datastore screen appears.
12.
From the Datastore list, choose the datastore where you want to restore
the VMs.
13.
Choose one of the following datastore options:
To restore all VMs to the selected datastore, select Restore all selected
Virtual Machines to the selected datastore only.
To only restore a VM to the selected datastore if the VM's original datastore
no longer exists, select Restore to the selected datastore only when a
Virtual Machine's original datastore is not available. If a VM contains
multiple VMDKs that reside on two or more datastores, and one or more of
those datastores is unavailable, the entire VM will be restored to the selected
datastore.
14.
To view VMs that have been selected for the restore, and their original
hosts and datastore locations, click Show Selected Items.
15.
Click Next.
The Host Selection screen appears.
16.
From the Host list, select the host where you want to register the VMs.
Only hosts that have access to the datastore selected on the preceding page
appear in the list.
Page 38
vSphere Agent 7.1 User Guide
17.
Choose one of the following options for registering the VMs with the
selected host:
To register all of the selected VMs with the selected host, select the Register
all selected Virtual Machines with the selected host only.
To only register VMs to the selected host if the VM’s original host no longer
exists at restore, select Register with the selected host only when a
Virtual Machine's original host is not available.
18.
To automatically power on all restored VMs when the restore finishes,
select the Power VMs on after restoring check box.
19.
Click Next.
The Summary screen shows the selected restore settings.
20.
Click Run Restore.
Page 39
vSphere Agent 7.1 User Guide
6
Restoring VMDKs
You can restore VMDKs from a backup.
You can also restore a full VM or specific files and folders from a backup. For more
information, see Restoring Virtual Machines and Restoring Files and Folders.
6.1 Restoring VMDKs Using Windows CentralControl
To restore VMDKs using Windows CentralControl:
1.
In Windows CentralControl, select a vSphere Agent.
2.
Select the job from which you want to restore one or more VMDKs.
3.
Click the Restore icon, click Ctrl R, or right click then select Restore.
Note: The Restore process requires 15% more space than the size of the
VMDK being restored.
The Restore from a backup workflow begins with the Choose what you want
to restore screen.
4.
Select Virtual Disks, and then click Next.
The Select the source from which to restore screen opens.
5.
From the Source list, select a source (usually a vault) from which to
restore data.
6.
From the Safeset list, select a safeset from which to restore data.
7.
Click Next.
The Select Virtual Disks to restore screen shows VMs that are available for
VMDK restore.
8.
In the left pane, expand the VMs to show VMDKs that are available for
restore.
9.
Select the checkbox for each VMDK that you want to restore. Click
Include.
The VMDK names that you choose appear in the right-hand pane.
10.
Click Next.
The Select where to restore the Virtual Disks screen opens.
11.
From the Datastore list, select the datastore where you want to restore
the VMDKs.
Page 40
vSphere Agent 7.1 User Guide
Folders in the selected datastore appear in the Available Folders list.
12.
Specify one of the following locations for restoring VMDKs:
To restore the VMDKs to an existing folder, select the folder in the
Available Folders list.
To restore the VMDKs to a new folder, enter a folder name in the Use new
folder field, and then click Apply.
The datastore and folder names appear in the Restore to this datastore/folder
field.
Note: When restoring to a new folder, a datastore must be selected before “Use
New Folder” becomes available. You can then enter a folder name in the “Use
New Folder” section.
13.
Click Next.
The Customize the restore behavior screen opens.
14.
From the Log file detail level list, choose a log file detail level.
15.
To use all available bandwidth, select Use all available bandwidth.
16.
Click Next.
The Restore Summary screen shows the restore settings.
17.
If you are satisfied with the settings, click Run Restore.
6.2 Restoring VMDKs Using Web CentralControl
To restore VMDKs using Web CentralControl:
1.
In Web CentralControl, select a vSphere Agent.
2.
Select the job from which you want to restore one or more VMDKs.
3.
Click Run Restore.
Note: The Restore process requires 15% more space than the size of the
VMDK being restored.
The Restore from Backup workflow opens with the Select Restore Mode
screen.
4.
Select Virtual Disks, and then click Next.
The Source screen appears.
5.
From the Safeset location list, choose the vault from which to restore
VMDKs.
Page 41
vSphere Agent 7.1 User Guide
6.
Choose the safeset for restoring files from the Restore from this backup
version menu.
Alternatively, select Restore from the safeset entered in the textbox below,
and enter the safeset number in the field.
7.
If the safeset is encrypted, enter the encryption password in the
Password and Confirm password fields.
8.
To change log detail or bandwidth use options, click Advanced Restore
Options. The Advanced Restore Options page appears.
From the Log detail level list, choose the level of logging detail.
Specify one of the following bandwidth settings:
To use all available bandwidth so that the restore runs as fast as possible,
select the Use all available bandwidth check box.
To apply Agent bandwidth settings to the restore, clear the Use all available
bandwidth check box.
Click OK to close the Advanced Restore Options page.
9.
Click Next.
The Data Selection screen appears.
10.
In the left pane, expand the VMs to show VMDKs that can be restored.
11.
Select the checkbox for each VMDK you want to restore. Click Include.
The VMDK names that you include appear in the right-hand pane.
12.
Click Next.
The Datastore Folder Selection page appears.
13.
From the Datastore list, select the datastore where you want to restore
the VMDKs.
Folders in the selected datastore appear in the Available Folders list.
14.
Specify where to restore the VMDK by doing one of the following:
To restore the VMDK to an existing folder, select the folder in the Available
Folders list.
To create a new folder in the selected datastore and restore the VMDK to the
new folder, enter a folder name in the Create new folder field, and then click
Apply.
The datastore and folder names appear in the Restore to this datastore/folder
field.
Page 42
vSphere Agent 7.1 User Guide
15.
Click Next.
The Summary screen shows the selected restore settings.
16.
Click Run Restore.
Page 43
vSphere Agent 7.1 User Guide
7
Restoring Files and Folders
EVault vSphere Agent 7.1 supports granular file restores. This allows you to select and
restore specific files and folders from a VM backup, rather than restoring an entire VM or
VMDK. For example, you can restore individual files from a My Documents folder (or even
the entire My Documents folder) instead of restoring the entire VM or VMDK where the
folder resides.
You can only restore files and folders when both the vSphere Agent and vault versions
are 7.00 or later. Files and folders can be restored from safesets that were created using
vSphere Agent version 6.90 or later and version 6.x vaults, but only after both the Agent
and vault are upgraded to version 7.00 or later.
Note: vSphere Agents prior to version 7.0 were named “Agent for VMware”.
You can restore specific files and folders from a VM backup using the following steps:
1.
Using Windows CentralControl or Web CentralControl, from a VM
backup, select a VMDK with files and folders you want to restore and
share the VMDK. This process provides a Universal Naming Convention
(UNC) path (CIFS share) for accessing the VMDK on the machine where
you want to restore files.
For more information, see Sharing VMDKs for Restoring Files and Folders.
2.
Access the shared VMDK on the machine where you want to restore files.
You can access the CIFS share on any supported Windows host, or on a
Linux/UNIX host with the Samba client.
Note: Samba is an installable option with some Linux distributions, or you
can download the open-source software from www.samba.org.
The preferred method of accessing shared VMDKs on supported Windows
operating system is to use the Dynamic Disk Tool (provided with the vSphere
Agent). If the shared VMDK is a Windows dynamic disk, you must use the
Dynamic Disk Tool to access files and folders on the disk. If you do not use this
tool, not all data will be accessible.
Note: The Dynamic Disk Tool is a Windows-based application. It can only
be used to mount supported Windows file systems. You cannot use the
Dynamic Disk Tool to mount Linux or other file systems. For a list of
supported Windows versions, see the release notes.
For more information, see Accessing Shared VMDKs and Restoring Files.
3.
Copy files and folders from the shared VMDK to the desired location.
Page 44
vSphere Agent 7.1 User Guide
7.1 Sharing VMDKs for Restoring Files and Folders
Using Windows CentralControl or Web CentralControl, you can share a VMDK from a VM
backup for restoring files and folders. This process provides a UNC path (CIFS share) for
accessing the VMDK on the machine where you want to restore files.
After sharing the VMDK, you can access the disk using the UNC path provided. On
supported Windows operating systems, the preferred method of accessing shared disks is
to use the Dynamic Disk Tool (provided with the vSphere Agent). For more information,
see Accessing Shared VMDKs and Restoring Files.
7.1.1
Sharing VMDKs Using Windows CentralControl
To share a VMDK for restoring files and folders using Windows CentralControl:
1.
In Windows CentralControl, select a vSphere Agent.
2.
Select a Job.
3.
Click the Restore icon.
The Restore from a backup workflow begins with the Choose what you want
to restore screen.
4.
Select Files and Folders, and then click Next.
The Select the source from which to restore screen appears.
5.
From the Source list, select a source from which to restore data.
6.
From the Safeset list, select a safeset from which to restore.
7.
If the safeset is encrypted, enter the encryption password in the
Password and Verify Password fields.
8.
To change the share idle time or bandwidth options, click Advanced
Share Options. The Advanced Share Options screen appears.
In the Idle time field, enter the number of minutes of inactivity after which the
shared drive should automatically unshare. The Idle time can range from 2 to
180 minutes.
Note: The drive will not unshare as long as new data is being copied. If you
copy the same data from a shared drive more than once, the system could time
out because no new data is being read.
To use all available bandwidth, select Use all available bandwidth.
Click OK to close the Advanced Share Options screen.
9.
Click Next.
Page 45
vSphere Agent 7.1 User Guide
The Select a virtual disk to share screen shows the names of VMs with files
and folders that can be restored from the safeset.
10.
From the Virtual Machines list, choose the VM from which you want to
restore files or folders.
The names of the VMDKs associated with the VM appear in the right-hand
pane.
11.
Select the VMDK from which you want to restore files, and then click
Next.
The Share Summary screen shows settings for the shared disk.
12.
If you are satisfied with the settings, click Share.
The Process Information screen shows the process status. When the disk is
shared, a UNC path appears in the Path field.
The drive remains shared while files are being copied, until there is no activity
for the specified amount of idle time, or until you click the Unshare button.
If the shared VMDK is a Windows dynamic disk, a message indicates that the
VMDK is a Windows dynamic disk.
13.
If the shared VMDK is a Windows dynamic disk, use the Dynamic Disk
Tool to access the shared VMDK.
To restore files on the machine where Windows CentralControl is installed,
click Start Recovery. If the Dynamic Disk Tool is installed, the tool starts. If
the Dynamic Disk Tool is not installed, the share is shown in Windows
Explorer, but you cannot browse all of the data unless you install the Dynamic
Disk Tool.
To restore files on another machine, click the UNC path to select it, and then
right-click the path and choose Copy from the menu. Use this path in the
Dynamic Disk Tool installed on another machine.
For more information, see Accessing Files and Folders Using a Dynamic Disk
Tool Mount.
14.
If the shared VMDK is not a Windows dynamic disk, access the shared
VMDK by doing one of the following:
To restore files on the machine where Windows CentralControl is installed,
click Start Recovery. The path to the shared VMDK is opened in Windows
Explorer. Copy files that you want to restore from the VMDK.
To restore files on another machine, click the UNC path to select it, and then
right-click the path and choose Copy from the menu. Use this path to access
Page 46
vSphere Agent 7.1 User Guide
the UNC share, or send the path to another user who can access the shared
VMDK and copy files.
For more information, see Accessing Shared VMDKs and Restoring Files.
15.
7.1.2
To unshare the drive, click Unshare. In the confirmation message box,
click Yes.
Sharing VMDKs Using Web CentralControl
To share a VMDK for restoring files and folders using Web CentralControl:
1.
In Web CentralControl, select a vSphere Agent 7.1.
2.
Select the backup job from which you want to restore files and folders.
3.
Click Run Restore.
The Restore from Backup workflow opens with the Select Restore Mode
screen.
4.
Select Files and Folders, and then click Next.
The Source screen appears.
5.
From the Safeset location list, choose the vault from which you want to
restore files and folders.
6.
Choose the safeset for restoring files from the Restore from this backup
version menu.
Alternatively, select Restore from the safeset entered in the textbox below,
and enter the safeset number in the field.
7.
If the safeset is encrypted, enter the encryption password in the
Password and Verify Password fields.
8.
To change the share idle time or bandwidth options, click Advanced
Share Options. The Advanced Share Options screen appears.
In the Idle time field, enter the number of minutes of inactivity after which the
shared drive should automatically unshare. The Idle time can range from 2 to
180 minutes.
Note: The drive will not unshare as long as new data is being copied. If you
copy the same data from a shared drive more than once, the system could time
out because no new data is being read.
To use all available bandwidth, select Use all available bandwidth.
Click OK to close the Advanced Share Options screen.
Page 47
vSphere Agent 7.1 User Guide
9.
Click Next.
The Shared Data Selection screen appears.
10.
In the left pane, select the VM with the VMDK that you want to share.
11.
In the right pane, select the VMDK with files or folders that you want to
restore.
12.
Click Next.
The Share Summary screen shows the selected restore settings.
13.
Click Share.
The Process Details screen shows the progress of sharing the VMDK. When
the disk is shared, a UNC path appears in the Path field. The drive remains
shared while files are being copied, until there has been no activity for the
specified amount of idle time, or until you unshare the drive.
If the VMDK is a Windows dynamic disk, a message indicates that the VMDK is
a Windows dynamic disk.
14.
Click the UNC path to select it, and then right-click the path and choose
Copy from the menu.
If the shared VMDK is not a Windows dynamic disk, access the shared VMDK
using the UNC path on a supported CIFS file system, or send the path to
another user who will restore the files.
If the shared VMDK is a Windows dynamic disk, use the Dynamic Disk Tool to
access the shared VMDK.
For more information, see Accessing Shared VMDKs and Restoring Files.
15.
To unshare the drive, click Unshare. A confirmation dialog box appears.
To allow the Agent to unshare the drive, click Yes.
Note: The Process Details dialog box does not indicate when the drive has
been unshared. To determine whether the drive has been unshared, view the
Process Monitor. A “Restore Completed” message appears for the process
when the drive has been unshared.
7.2 Accessing Shared VMDKs and Restoring Files
After sharing a VMDK from a VM backup and obtaining a UNC path (CIFS share), you can
access the shared VMDK on the machine where you want to restore files. You can access
the CIFS share on any supported Windows host, or on a Linux/UNIX host with the Samba
client.
Page 48
vSphere Agent 7.1 User Guide
Note: Samba is an installable option with some Linux distributions, or you can
download the open-source software from www.samba.org.
On supported Windows operating systems, the preferred method of accessing shared
disks is to use the Dynamic Disk Tool (provided with the vSphere Agent). With the
Dynamic Disk Tool, you can access files on Windows dynamic disks, mount multiple disks
and partitions from Windows VMs, and restore Windows files and folders with advanced
permissions. For more information, see Accessing Files and Folders Using a Dynamic
Disk Tool Mount.
Note: To restore files from a Linux VMDK, you cannot use the Dynamic Disk Tool
(a Windows only tool).
You can access shared VMDKs using the UNC path outside of the Dynamic Disk Tool.
For example, on a Windows operating system, you can paste the UNC path in the
Windows Explorer address bar or the Map Network Drive tool. No authentication or user
name is required. For more information, see Accessing Files and Folders Using a UNC
Share.
When you access a file or folder using a UNC share in Linux, file attributes are retained if
you copy files using the appropriate flags. Check your Linux man pages for the correct
copy command flag for your Linux distribution.
Note: Users do not have to enter credentials to access files on a VMDK that has
been shared. You can limit the amount of time that a VMDK is shared using an
Idle time option. However, if you have security concerns, do not perform file and
folder restores; restore entire VMs or VMDKs instead. For information about
limiting the amount of time that a VMDK is shared, see Sharing VMDKs for
Restoring Files and Folders.
7.2.1
Accessing Files and Folders Using a UNC Share
Most shared VMDKs can be accessed using a standard method on the VM where you
want to restore files. For example, on a VM with a Windows guest operating system, you
can paste the UNC path into the Windows Explorer address bar, or map the network
drive.
When you access the share, each VMDK partition appears as a sequentially-numbered
directory. For example, if the VMDK contains three partitions, the directories are named
“0”, “1” and “2”. You can then copy the files you want to restore.
Note: Although you can access files and folders on shared VMDKs using this
method, the Dynamic Disk Tool is the preferred method for accessing shared
VMDKs on supported Windows operating systems, and is required for accessing
files and folders on Windows dynamic disks.
Page 49
vSphere Agent 7.1 User Guide
7.2.2
Accessing Files and Folders Using a Dynamic Disk Tool Mount
On supported Windows operating systems, the preferred method of accessing shared
disks is to use the Dynamic Disk Tool (provided with the vSphere Agent). The Dynamic
Disk Tool is required or especially useful in the following cases:
Windows dynamic disks. If the shared VMDK is a Windows dynamic disk, you
must use the Dynamic Disk Tool to access all files and folders on the disk. If
you do not use the Dynamic Disk Tool, not all data will be accessible.
Windows VMs with multiple disks and partitions. The Dynamic Disk Tool
mounts all disks and partitions from a VM with Windows basic and dynamic
disks.
Windows files and folders with advanced permissions. If you restore a file
using the Dynamic Disk Tool and copy the file using an advanced copy utility
or the appropriate switches, advanced permissions on the file are retained.
Advanced permissions are not retained on files and folders if you access the
files or folders using the UNC path outside of the Dynamic Disk Tool. Instead,
the user copying the data from the shared VMDK becomes the file owner.
When you share a VMDK in Windows CentralControl or Web CentralControl, a message
indicates if the shared VMDK is a Windows dynamic disk. You can then run the Dynamic
Disk Tool on any supported Windows operating system on a VM or in a disaster recovery
environment where you want to restore files.
You can also start the Dynamic Disk Tool from within Windows CentralControl so that the
UNC path is passed directly to the tool.
After accessing a shared VMDK using the Dynamic Disk tool, you can copy the files you
want to restore.
Note: You can only use the Dynamic Disk tool on supported Windows operating
systems. The preferred setup is to install the tool on the same machine as
Windows CentralControl.
To access files and folders using a Dynamic Disk Tool mount:
1.
Using Windows CentralControl or Web CentralControl, share a VMDK
from a VM backup.
When the disk is shared, a UNC path appears in the Path field.
For more information, see Sharing VMDKs for Restoring Files and Folders.
Page 50
vSphere Agent 7.1 User Guide
2.
Start the Dynamic Disk Tool by doing one of the following:
If you are sharing the VMDK using Windows CentralControl, and the VMDK is
a Windows dynamic disk, click Start Recovery on the Process Information
screen.
Windows CentralControl opens the Dynamic Disk Tool and passes the
UNC path to the tool (if the Dynamic Disk Tool is installed on the machine
where Windows CentralControl is running).
If a warning message indicates that the Dynamic Disk Tool cannot be
found, you must install the tool. For more information, see Installing the
Dynamic Disk Tool.
If you are sharing the VMDK using Web CentralControl, or want to run the
Dynamic Disk Tool on different machine than the one where Windows
CentralControl is running, double-click the Dynamic Disk Tool shortcut on the
desktop. The UNC Share screen appears. In the Path to the UNC Share
field, enter the UNC path from the Path field in CentralControl. Click Next.
The Virtual Drive Mounting screen shows drive letters for mapping each
virtual disk and disk partition from the protected VM. Each virtual disk and
partition is labeled with “Partition” and a number.
Note: The drive letter for each disk is obtained from the available drive letters on
the system where you are restoring files. If you run out of available drives on the
system, the tool will not map any more drives.
3.
For each disk and partition that you want to map as a different drive letter,
choose a drive letter from the drop-down list.
4.
For each partition that you do not want to mount as a mapped drive,
choose “none” from the drive letter drop-down list.
Page 51
vSphere Agent 7.1 User Guide
5.
Click Mount.
The Mount Status screen shows the drive letter where each protected virtual
disk and partition is mapped. You can then copy the files you want to restore
from each mapped drive to the VM.
7.2.3
Installing the Dynamic Disk Tool
The preferred setup is to install the Dynamic Disk Tool on the same machine as Windows
CentralControl. However, it can be installed on any supported Windows platform.
The Dynamic Disk Tool can be installed directly on the VM (Windows guest operating
system) or in the disaster recovery environment where you want to restore files. You can
send the UNC path to the user to access and restore the required data.
Microsoft .NET Framework 3.5 or a later version must be installed on the machine where
the Dynamic Disk Tool is installed.
To install the Dynamic Disk Tool:
1.
On the computer where you want to restore files and folders, double-click
the Dynamic Disk Tool installation executable file.
The Dynamic Disk Tool – InstallShield Wizard screen opens.
2.
Click Install.
The Welcome page appears.
3.
Click Next.
The Destination Folder screen opens.
4.
Specify an installation directory, and then click Next.
The Ready to Install the Program screen appears.
Page 52
vSphere Agent 7.1 User Guide
5.
Click Install.
Page 53
vSphere Agent 7.1 User Guide
8
Restoring from Another vSphere Agent’s Backup Job
You can restore VMs, VMDKs, or files and folders from a backup using a vSphere Agent
that did not create the backup job. This can be useful in a disaster recovery situation.
You can restore VMs, VMDKs, or files and folders in any vCenter that supports the
hardware version of the protected VM. For example, if you back up a VM with hardware
version 9, you can restore the VM to a vCenter version 5.1 or later and ESXi host version
5.1 or later.
The Agent must be registered with the vCenter where you want to restore the VM, VMDK,
or files and folders.
8.1 Restoring from Another Agent’s Backup Job using Windows
CentralControl
To restore from another Agent’s backup job using Windows CentralControl:
1.
In Windows CentralControl, select a vSphere Agent.
2.
Choose Actions > Restore from another computer.
The Restore From Another Computer wizard opens to the Select the Vault,
Computer and Job from which to restore screen.
Note: The Restore from a computer option is only available if the Agent is
registered to a vault.
3.
From the Vault list, choose the vault with the backup from which you want
to restore.
The list only shows vaults that the selected Agent is registered to.
Note: For information about registering the Agent to another vault, see the
Windows CentralControl Operations Guide or Windows CentralControl Help.
4.
From the Computer list, choose the vSphere Agent with the backup from
which you want to restore.
5.
From the Job list, choose the job from which to restore.
6.
Click Next.
The Agent downloads job information from the vault. The Restore from a
Backup workflow begins with the Choose what you want to restore screen.
7.
Restore VMs, VMDKs, or files and folders as described in Restoring
Virtual Machines, Restoring VMDKs, and Restoring Files and Folders.
Page 54
vSphere Agent 7.1 User Guide
8.2 Restoring from Another Agent’s Backup Job using Web
CentralControl
To restore from another Agent’s job using Web CentralControl:
1.
In Web CentralControl, select a vSphere Agent.
2.
Choose Advanced > Restore from another Computer.
The Restore From Another Computer screen appears.
Note: The Restore from a computer option is only available if the Agent is
registered to a vault.
3.
From the Vault list, choose the vault with the backup from which you want
to restore.
The list only shows vaults that the selected Agent is registered to.
Note: For information about registering the Agent to another vault, see the Web
CentralControl Help.
4.
From the Computer list, choose the vSphere Agent with the backup from
which you want to restore.
5.
From the Job list, choose the job from which to restore.
6.
Click Next.
The Agent downloads job information from the vault. The Choose what you
want to restore screen appears.
7.
Restore VMs, VMDKs, or files and folders as described in Restoring
Virtual Machines, Restoring VMDKs, and Restoring Files and Folders.
Page 55
vSphere Agent 7.1 User Guide
9
Best Practices and Limitations
9.1 vCenter Login Credentials
The same user account should be used for registering the vSphere Agent with the
vCenter and connecting to the vSphere Agent from Windows CentralControl. If you
change to a different user in the vSphere Agent using "vCenter change login", you should
also change the account in Windows CentralControl.
In CentralControl, on the Agent Configuration > vCenter tab, provide the same
credentials that you used for vCenter.
9.2 Organization and Naming Conventions
Use meaningful host names when deploying vSphere Agents to help you distinguish them
from other vSphere Agents. Since you can have more than one vSphere Agent in the
same vCenter, name your Agents carefully. Names such as vSphereAgent-Win and
vSphereAgent-Unix might be helpful.
On the Agent Properties screen of CentralControl, it might be useful for you to make the
Description field match the name of the vSphere Agent.
Note: In vCenter 5, the following characters cannot be used and are not supported for VM
names: # & @ { }
9.3 vSphere Agent Settings
The vSphere Agent is deployed on a VM with 2 GB of RAM and 2 virtual CPUs. You can
increase the RAM for the VM higher than the default value. Changing the RAM setting will
require you to power off the VM.
The Agent performs best if you choose Thick provisioned format when you deploy the
vSphere Agent. This is the default behavior. Eager Zeroed is recommended.
9.4 vCenter Environment
Ensure that the vCenter has sufficient resources, including CPU and memory, for the
vSphere Agent and all VMs in your vCenter. Ensure that the vCenter configuration follows
VMware recommendations and best practices.
Using Microsoft SQL Server Express for the vCenter Server database is not
recommended.
Page 56
vSphere Agent 7.1 User Guide
We recommend not exceeding 1000 VMs per vCenter.
We recommend one vSphere Agent per vCenter. To distribute the workload, you can have
up to four vSphere Agents in a single vCenter.
Avoid removing the original network adapter from a deployed vSphere Agent. If it is removed
or replaced, network services may need to be reset from the Agent Setup interface.
If you add a secondary virtual network adapter on a different VLAN to the vSphere Agent, and
reboot the vSphere Agent, the new network adapter is not added until you reset the network
using the Agent Setup interface. For information about the Setup interface, see Appendix:
Setup Interface.
Note: VMs configured with VMware Fault Tolerance or independent disks are not
supported.
9.5 Changed Block Tracking (CBT)
To support CBT, VMs must be CBT enabled through CentralControl. Enable CBT through
the Agent Configuration > vCenter tab. For more information, see Changing the CBT
Setting.
The vSphere Agent enables CBT globally for CBT-capable VMs. CBT cannot be enabled
in the following cases:
The hardware of the virtual machine is lower than version 7.
With any disks that use Virtual Raw Device Mapping.
If a VM is in SUSPENDED state and has not been previously backed up with CBT,
then CBT will not be set on the VM because the Advanced Properties of the VM
cannot be accessed in this state. As a result, this VM will not take advantage of
CBT until the VM is powered on and a backup is performed.
Note: If you add a VM that has CBT enabled to an existing Job, you will not see any
messages regarding CBT until the subsequent backup. This is expected behavior as the
VM must be read in full before CBT can be applied.
9.6
vMotion and Storage vMotion
During a backup window, do not migrate a virtual machine’s disks to another datastore or
migrate a virtual machine, including memory and storage, to another host and datastore.
A backup might fail if it occurs while a VM is being migrated to a different datastore.
Page 57
vSphere Agent 7.1 User Guide
9.7
Limitations
9.7.1
Unsupported Features in vSphere 5.1
The following vSphere 5.1 features have not been tested with vSphere Agent 7.1, and are
not supported:
The Agent has not been tested with vCenter Single Sign-On servers configured
with identity sources other than Active Directory, such as OpenLDAP, NIS, local
UNIX or local Windows.
vSphere Agent 7.10 backs up VMs with vSphere Distributed Switches, but restores
the VMs without the switches.
9.7.2
Domain Name, Username and Password Limitations
Domain name:
The Domain field value accepts alphanumeric characters and dash “-“. The value should
start with a letter. The maximum length is 15 characters.
The domain field value can be set in two places: the Domain field in the Agent Properties
window, and on the vCenter tab of the Agent Configuration window.
Username:
Username field accepts alphanumeric characters and the following special characters:
!#$%-'().
The maximum length is 20 characters.
The Agent Properties window and Agent Configuration window are two places where the
username field is used.
Password:
Accepts alphanumeric characters and the following special characters:
!"#$%&'()*+,-./~`[]?\^<>=
The maximum length is 31 characters in the Agent Properties window.
The Agent Properties window and Agent Configuration window are located in two places
where the username field is a user with different limitations:
The Agent Properties window and Agent Configuration window accept up to 31
characters.
Page 58
vSphere Agent 7.1 User Guide
9.7.3
vSphere Object Naming Limitations
vSphere Object
Naming Limitation
VM
VM names can contain a maximum of 80 characters.
In vCenter 5, VM names cannot contain any of the following
characters: # & @ { }
VMDK
VMDK names can contain a maximum of 27 characters,
including the suffix "-flat.vmdk".
Snapshot
Snapshot names can contain a maximum of 81 characters. The
maximum suffix length is 20 characters.
Datastore
Datastore names cannot contain any of the following
characters: [ ] @
Datacenter
In vCenter 5, long datacenter names with multibyte characters
are not supported. Datacenter names cannot exceed 255
bytes.
In vCenter 4, datacenter names cannot contain multibyte
characters.
VMware Folder (e.g.,
Folder/Datacenter/Cluster/
Hypervisor or
Datacenter/Folder/Cluster/
Hypervisor)
9.7.4
In vCenter5, VMware folder names cannot contain wide
characters, or any of the following characters: ^ )_+={} [ ] \
/@|<>
In vCenter 4, VMware folder names cannot contain wide
characters, or any of the following characters: \ / []
Snapshot Removal
After VM backups finish, there is a lag before snapshots are removed.
9.7.5
Concurrent Backup Session Limit
VMware allows a limited number of connections to a vCenter. Our recommendation is to
not to exceed 10 concurrent connections to the vCenter, including connections for
backups, restores, VMware, and 3rd party applications.
9.7.6
VM Size Limit
There is no size limit imposed.
Page 59
vSphere Agent 7.1 User Guide
9.7.7
VMDK Size Limit
The vSphere Agent cannot back up a VM if it has a VMDK that is greater than 2032 GB in
size. If a backup job includes a VM with a VMDK that is larger than 2032 GB, the VM is
skipped during the backup.
2032 GB is the maximum VMDK size recommended by VMware to allow sufficient
overhead for snapshots, and snapshots are required for vSphere Agent backups.
9.7.8
Virtual Machine Templates
Virtual machine templates which were backed up in a folder (container created by
VMware) are restored outside the folder.
9.7.9
Raw Disk Mapping (RDM) - Virtual and Physical
Backups and restores of physical RDMs are not supported with vSphere Agent. VMware
does not allow snapshots of physical RDMs, and snapshots are required for vSphere
Agent backups. If you back up a VM with a physical RDM, the VM backup is marked as
incomplete. You cannot restore a VM from a backup that is marked as incomplete, but you
can restore a VMDK or specific files and folders from the backup.
To back up a physical RDM, you must install an Agent in the VM with the physical RDM.
Backups and restores of virtual RDMs are supported. If you created a backup of a VM
with a Virtual Raw Disk Mapping on a different datastore (rather than with the VMDK),
upon restore of your VM that contains a virtual RDM disk, the restore will attempt to
restore the virtual RDM to the datastore used for the mapping. The total size of the virtual
RDM disk is usually larger than the datastore used for storing the mapping. As a result,
you may see a warning in the log that indicates that the space maybe insufficient. Since a
virtual RDM is restored as a VMDK, please ensure that the datastore used for storing the
mapping has sufficient space to store the VMDK. Virtual RDM disks will be restored as
VMDKs on an accessible datastore.
9.7.10
Quick File Scanning Disabled
Quick File Scanning (QFS) is disabled globally by the vSphere Agent. It cannot be
enabled through CentralControl or any other method.
9.7.11
Devices with Attached Images
If you restore a virtual device such as a CD-ROM or floppy drive with an attached image,
the image is not restored.
Page 60
vSphere Agent 7.1 User Guide
9.7.12
Delays in Detecting Changes
After a VM or VMDK is added or deleted, the vSphere Agent detects the change as soon
as a related backup or other event runs. However, if no related backup or other event
occurs, it can take up to an hour to detect the VM or VMDK change.
Page 61
vSphere Agent 7.1 User Guide
10 Appendix: Setup Interface
To view or change vSphere Agent network settings, use the Agent Setup interface.
To use the Setup interface:
1.
Open the vSphere Agent console.
2.
Press Enter.
The vSphere Agent Login screen appears.
3.
Type the username (sysadmin) and password (sysadmin) in the fields,
and then press Enter.
The Setup screen appears.
4.
Do one or more of the following:
To highlight the setting you want to view or change, press the up and down
arrow keys.
To select a setting, press Enter.
To select an option, press the space bar.
To change a value, type the new value.
To save a setting, press Enter.
To exit from the Setup interface, press Esc.
Page 62
vSphere Agent 7.1 User Guide
11 Appendix: Command Line Interface
To configure and manage the vSphere Agent, use the Agent’s Command Line Interface
(CLI).
For a list of CLI commands, see vSphere Agent Commands.
To use the CLI:
1.
Open the vSphere Agent console.
2.
Press 1.
The Command Line Interface appears.
3.
Log in as sysadmin (password is sysadmin).
The command prompt appears.
4.
Enter commands at the command prompt. For a list of CLI commands,
see vSphere Agent Commands.
5.
To exit from the CLI, type Exit
11.1 vSphere Agent Commands
The following is a list of the commands available in the vSphere Agent CLI.
11.1.1
agent
agent start
– launches the EVault Agent processes
agent stop
– stops running EVault Agent processes
agent restart
– relaunches running EVault Agent processes
agent status
– displays the run status of both the VVAgent and buagent processes as well as
their PIDs (Process IDs)
– also reports running backups or restores
11.1.2
config
config set date MM/DD/YYYY HH:MM[:SS]
- manually sets the date and time for the vSphere Agent
config set timezone <timezone>
- sets the timezone of the vSphere Agent. This is necessary for proper operation
of the Agent.
Page 63
vSphere Agent 7.1 User Guide
config show timezones [help|regions|all] [list <region-name>]
[search <pattern>]
- lists available regions such as “Canada”, “America” and “Europe”
- based on the region, you can list available timezones in that region (i.e.
Eastern, Pacific, Toronto)
11.1.3
mount
mount add [//host/share [[domain/]username | guest]]
- mount a share from a Unix or Windows host – used when backing up to disk
mount remove [all]
- removes a previously added mount by selection
mount list
- Displays a listing of the existing mounts
11.1.4
net
net hosts add <ipaddr> <hostname>
- lets you map an IP address to a hostname
net hosts del <ipaddr>
- Delete the mapping of the IP address specified
net hosts show
- Lists the IP/Hostname mappings currently configured
net hosts reset
- Clears the entire list of IP/hostname mappings
net nslookup <hostname | ipaddr>
- performs a names server lookup to determine the IP address of a hostname
net ping <host>
- sends a ping to a specified hostname or IP
net reset
- resets all networking configuration to default values
net set hostname <hostname>
- sets the hostname for the vSphere Agent
net show config [all]
- displays current networking configuration of the vSphere Agent
net show dhcp
- displays current dhcp portion of the networking configuration of the vSphere
Agent
net show hostname
- displays the hostname of the vSphere Agent
net show routes
- displays the routing table of the vSphere Agent
net show status
- displays the current connections as well as open and listening ports on the
vSphere Agent
Page 64
vSphere Agent 7.1 User Guide
11.1.5
ntp
ntp add <server>
- adds a server address to the list of Network Time Protocol (ntp) servers
configured for the vSphere Agent
ntp del <server>
- removes a server address from the ntp list
ntp show
- displays a list of ntp servers currently configured
ntp sync
- manually synchronizes the date/time between the configured ntp servers and
the vSphere Agent
ntp reset
- resets the list of ntp servers to the default (pool.ntp.org)
11.1.6
ssh
ssh enable
- enables ssh for the vSphere Agent which is necessary for the SCP portion of the
support command
ssh disable
-Disables the SSHD daemon for incoming connections to the vSphere Agent. You
will not be able to use SSH (like putty) to connect to the vSphere Agent. Does not
disable outgoing SSH connections from the vSphere Agent. You can still use
support logs with scp.
ssh status
- displays the run status of the ssh service
11.1.7
support
support logs scp [[user@]host[:path]] | copy
[//hostname/share/path[[domain/]username | guest]]
For more information, see Creating and Sending a Support Bundle.
11.1.8
system
system reboot [force]
- reboots the vSphere Agent if there are no backups or restores running – use the
[force] option if you wish to reboot the vSphere Agent regardless of backups and
restores running. It is NOT recommended to force reboot the vSphere Agent.
system show date
- shows the current date/time of the vSphere Agent
system password
- change the password for the <sysadmin> user of the vSphere Agent
system show uptime
- displays total uptime of the vSphere Agent
system shutdown [force]
Page 65
vSphere Agent 7.1 User Guide
- shuts down the vSphere Agent if there are no backups or restores running – use
the [force] option if you wish to shut down the vSphere Agent regardless of
backups and restores running. It is NOT recommended to force shutdown the
vSphere Agent.
system upgrade [manual username password]
- checks for available vSphere Agent updates and performs the update if
available. Username and password are for the share where the downloaded files
are located.
11.1.9
vcenter
vcenter register [<vCenter> [<backup username>]]
- registers the vSphere Agent to a vSphere vCenter server – this is required before
EVault backups can be performed
vcenter change login [<backup username>]
- enables changing the user and password associated to the vCenter registration
vcenter show
- show which vCenter the vSphere Agent is registered to if any
vcenter unregister vCenter
- unregisters the vSphere Agent from a vSphere vCenter server
vcenter –force unregister
- unregisters the vSphere Agent from a vSphere vCenter server
11.1.10
webcc
webcc register <WebCCAddress> <port> <login> <password>
- registers the vSphere Agent to your Web CentralControl server. Webcc register
cannot be run when backups and restores are in progress. vCenter register must
be run first, before webcc register.
Page 66
vSphere Agent 7.1 User Guide
11.2 Creating a Share and Working with Mounts with the vSphere
Agent
In order to use the alternate safeset location option when backing up VMs, you must
create an external CIFS or external mount to a Windows share. You can create one or
more mounts.
These mounts are per session. If you reboot the vSphere Agent, these mounts will be
disconnected and will have to be re-established. Once you create an external mount, you
can use Windows CentralControl or Web CentralControl to perform backups to these
locations (alternate safeset locations).
11.2.1
Creating a Share and Adding External Mounts to the vSphere Agent
1.
Create a Windows share. The share must have write access for the user
that you will establish the connect with (or Allow Full Control for
Everyone).
2.
If you do not have name resolution, use the IP of your Windows machine
and run the following command:
mount add //<hostname>/megatest SSV/<username>
Password: {enter password}
11.2.2
Viewing Existing Mounts
vra-9f0023> mount list
Mounted shares:
//<hostname>/megatest
Name:
<hostname>-megatest
User:
<username>
//<hostname>/disk1
Name:
<hostname>-disk1
User:
<username>
11.2.3
Mounts: Remove 1 by 1 or All:
vra-9f0023> mount remove
Page 67
vSphere Agent 7.1 User Guide
1. <hostname>-megatest (//<hostname>/megatest)
2. <hostname>-disk1 (//<hostname>/disk1)
Specify mount number (1 - 2), "all", or "list". Press ENTER to
cancel.
Remove which mount?
11.2.4
Mount Remove All
vra-9f0023> mount remove all
......
Successfully removed mounted share
"//<hostname>/megatest".
......
Successfully removed mounted share "//<hostname>/disk1".
11.3 Creating and Sending a Support Bundle
If you should require assistance from Support, they may ask you to create and send them
a support bundle. This will assist them in diagnosing the situation.
To create a support bundle:
1. The syntax is:
support logs scp [[user@]host[:path]]
2. Ensure there is a Windows share accessible with the appropriate permissions set
for the user intended (example: /home/evault/support_bundle).
3. Also ensure you can access the destination from the vSphere Agent. This can be
checked by pinging the IP address or hostname you wish to reach by typing “net
ping <IP or hostname>”.
4. At the command line type:
support logs scp
[email protected]:/home/evault/support_bundle
5. You will see “Collecting Support logs. This may take a while…”
Page 68
vSphere Agent 7.1 User Guide
6. At the end of this, you will be asked for your user’s password to complete the
request.
7. Also, you will be asked if you want to save the RSA key for future sessions.
8. Once completed successfully, you will find a file similar to the following: “supportbundle-20111118-054151.tar.bz2” (the numbers are datestamp and timestamp).
11.4 Restoring a vSphere Agent
If a vSphere Agent is deleted, damaged, or lost, you can restore the vSphere Agent using
the following procedure.
Note: This procedure is not recommended for regular upgrades. When you first run an
existing backup job using a restored vSphere Agent, the Agent rereads all data for the job
rather than using CBT to recognize changed data. Backups after regular upgrades use
CBT and do not reread all data.
To restore a vSphere Agent:
1. Ensure the previous vSphere Agent is cleaned up (removed) if necessary.
2. Deploy a new vSphere Agent of the same version or a later version.
3. Configure the new vSphere Agent and register to the vCenter.
4. Connect with Windows or Web CentralControl.
5. Perform a reregister from the Vault.
6. Add the vCenter credentials in Windows or Web CentralControl.
7. If data is encrypted, reset the encryption password.
8. Perform a synchronize for delta recreation of the Job(s).
9. Backups can proceed.
Page 69