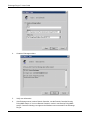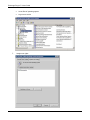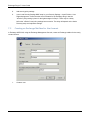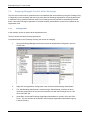
1
EVault Software Microsoft Exchange Plug-in 7.3 User Guide Revision: This manual has been updated for Version 7.33 (August 2014). Software Version: 7.33 2014 EVault Inc. EVault, A Seagate Company, makes no representations or warranties with respect to the contents hereof and specifically disclaims any implied warranties of merchantability or fitness for any particular purpose. Furthermore, EVault reserves the right to revise this publication and to make changes from time to time in the content hereof without obligation of EVault to notify any person of such revision of changes. All companies, names and data used in examples herein are fictitious unless otherwise noted. No part of this document may be reproduced, transmitted, transcribed, stored in a retrieval System or translated into any language including computer language, in any form or by any means electronic, mechanic, magnetic, optical, chemical or otherwise without prior written permission of: EVault, A Seagate Company c/o Corporation Trust Center 1209 Orange Street Wilmington, New Castle Delaware 19801 www.evault.com EVault, EVault Software, EVault SaaS, and EVault DeltaPro, are registered trademarks of EVault Inc. All other products or company names mentioned in this document are trademarks or registered trademarks of their respective owners. Acknowledgements: Two encryption methods, DES and TripleDES, include cryptographic software written by Eric Young. The Windows versions of these algorithms also include software written by Tim Hudson. Bruce Schneier designed Blowfish encryption. “Part of the software embedded in this product is gSOAP software. Portions created by gSOAP are Copyright 2001-2006 Robert A. van Engelen, Genivia Inc. All Rights Reserved. THE SOFTWARE IN THIS PRODUCT WAS IN PART PROVIDED BY GENIVIA INC AND ANY EXPRESS OR IMPLIED WARRANTIES, INCLUDING, BUT NOT LIMITED TO, THE IMPLIED WARRANTIES OF MERCHANTABILITY AND FITNESS FOR A PARTICULAR PURPOSE ARE DISCLAIMED. IN NO EVENT SHALL THE AUTHOR BE LIABLE FOR ANY DIRECT, INDIRECT, INCIDENTAL, SPECIAL, EXEMPLARY, OR CONSEQUENTIAL DAMAGES (INCLUDING, BUT NOT LIMITED TO, PROCUREMENT OF SUBSTITUTE GOODS OR SERVICES; LOSS OF USE, DATA, OR PROFITS; OR BUSINESS INTERRUPTION) HOWEVER CAUSED AND ON ANY THEORY OF LIABILITY, WHETHER IN CONTRACT, STRICT LIABILITY, OR TORT (INCLUDING NEGLIGENCE OR OTHERWISE) ARISING IN ANY WAY OUT OF THE USE OF THIS SOFTWARE, EVEN IF ADVISED OF THE POSSIBILITY OF SUCH DAMAGE.” The EVault Software Agent, EVault Software CentralControl, and EVault Software Director applications have the encryption option of AES (Advanced Encryption Standard). Advanced Encryption Standard algorithm (named Rijndael, pronounced “Rain Doll”) was developed by cryptographers Dr. Joan Daemen and Dr. Vincent Rijmen. This algorithm was chosen by the National Institute of Standards and Technology (NIST) of the U.S. Department of Commerce to be the new Federal Information Processing Standard (FIPS). The EVault Software Agents and EVault Software Director applications also have the added security feature of an over the wire encryption method. Exchange Plug-in 7.3 User Guide Contents 1 2 Exchange Plug-in Overview ............................................................................................................4 1.1 Features ........................................................................................................................... 4 1.2 Supported Platforms.......................................................................................................... 5 1.3 Parallel Backups ................................................................................................................ 5 1.4 Cluster Support ................................................................................................................. 5 1.4.1 Exchange 2007 CCR (Cluster Continuous Replication) DR Support ................................. 5 1.4.2 Exchange 2010/2013 DAG (Database Availability Group) DR Support ............................ 5 1.5 Backup Methods ............................................................................................................... 6 1.6 Disaster Recovery (DR) ....................................................................................................... 6 1.7 DR Backup ........................................................................................................................ 6 1.8 Mailbox Level (MAPI) ......................................................................................................... 6 1.9 Additional Documentation ................................................................................................. 7 1.9.1 CentralControl Operations Guide................................................................................ 7 1.9.2 Agent for Windows User Guide .................................................................................. 8 1.9.3 Release notes ........................................................................................................... 8 1.9.4 Online Help ............................................................................................................... 8 Installing the Exchange Plug-in .......................................................................................................9 2.1 3 4 Exchange Plug-in Licensing ................................................................................................. 9 Working with Backups ................................................................................................................ 10 3.1 Creating a New Agent for Your Exchange Server ................................................................ 11 3.2 Creating an Exchange Server (DB Backup) Job .................................................................... 11 3.3 DR Backups ..................................................................................................................... 12 3.3.1 Exchange 2007 ........................................................................................................ 13 3.3.2 Exchange 2010/2013 ............................................................................................... 13 3.4 Backup Options ............................................................................................................... 14 3.5 PowerShell Log Messages ................................................................................................ 16 3.6 Scheduling your Exchange Backup .................................................................................... 17 3.7 Remaining Steps for Job Creation ..................................................................................... 17 3.8 Verifying Your Backup ...................................................................................................... 18 Performing Restores ................................................................................................................... 19 4.1 About Disaster Recovery (DR) ........................................................................................... 19 4.2 Recovering from a Worst Case Disaster ............................................................................. 20 4.3 Restoring the Exchange Data ............................................................................................ 20 4.3.1 DR Restores ............................................................................................................ 20 i Exchange Plug-in 7.3 User Guide 4.3.2 Exchange 2007 ........................................................................................................ 21 4.3.3 Exchange 2010/2013 ............................................................................................... 21 4.4 Restoring a Standalone Database ..................................................................................... 22 4.5 Restoring a DAG Replica Database .................................................................................... 23 4.6 Storage Group and Database Selection for Restore ............................................................ 24 4.6.1 Exchange 2007 ........................................................................................................ 24 4.6.2 Exchange 2010/2013 ............................................................................................... 25 4.7 4.7.1 Exchange 2007 Restore Destination .......................................................................... 26 4.7.2 Exchange 2010/2013 Restore Destination ................................................................. 27 4.8 5 6 7 Storage Group and DB Selection for Restore Destination .................................................... 26 Granular Restore for Microsoft Exchange – Sharing a DR Safeset ........................................ 28 4.8.1 Overview – Recover individual mailboxes and messages with GR ................................ 28 4.8.2 Sharing a DR Safeset for Granular Restore with Windows CentralControl .................... 28 4.8.3 Sharing a DR Safeset for Granular Restore with Web CentralControl ........................... 29 4.9 MAPI - Restoring Exchange Mailboxes and Public Folders ................................................... 30 4.10 Restoring to a PST file – Considerations ............................................................................. 31 4.11 Troubleshooting – Restore to an Alternate Location ........................................................... 32 DR Optimization ......................................................................................................................... 33 5.1 Optimizing your Exchange Backup .................................................................................... 33 5.2 Choosing a Backup Schedule (DR only) .............................................................................. 34 5.2.1 Low Traffic/250 Users .............................................................................................. 34 5.2.2 Medium Traffic / 1000 Users .................................................................................... 35 5.2.3 High Traffic / 4000 Users – Twice Weekly Full ............................................................ 35 5.2.4 High Traffic / 4000 Users – Once Weekly Full ............................................................. 36 5.3 How Exchange Maintenance Affects your Backups ............................................................. 36 5.4 How Exchange Backups Affect your Maintenance .............................................................. 36 MAPI Backup Optimization Strategies ......................................................................................... 38 6.1 Split by Content............................................................................................................... 38 6.2 Split by Importance ......................................................................................................... 39 6.3 Using Selection Filters ...................................................................................................... 39 6.4 Setting Schedule Priorities................................................................................................ 40 Exchange MAPI Setup ................................................................................................................. 41 7.1 Creating a Windows Account ............................................................................................ 41 7.2 Creating an Exchange Mailbox for the Account .................................................................. 45 7.3 Assigning Delegate Control within Exchange ...................................................................... 48 7.3.1 Exchange 2007 ........................................................................................................ 48 ii Exchange Plug-in 7.3 User Guide 8 7.3.2 Exchange 2010 ........................................................................................................ 50 7.3.3 Windows Server 2008 SP2........................................................................................ 51 7.3.4 Windows Server 2008 R2 ......................................................................................... 51 7.4 Creating a MAPI Profile .................................................................................................... 52 7.5 Configuring the MAPI Plug-in............................................................................................ 54 7.6 Testing the MAPI Account ................................................................................................ 54 7.7 MAPI Plug-in User Profile Options ..................................................................................... 55 7.8 Administrator Mailboxes in Child/Parent Domains ............................................................. 56 Appendix ................................................................................................................................... 58 8.1 Backup Considerations for Exchange 2007 CCR and LCR Setups ........................................... 58 8.1.1 Disaster protection for LCR ...................................................................................... 58 8.1.2 Exchange 2010/2013 Database Availability Group (DAG) ............................................ 58 8.1.3 Restore Considerations ............................................................................................ 59 8.2 Other Exchange Considerations ........................................................................................ 59 iii Exchange Plug-in 7.3 User Guide 1 Exchange Plug-in Overview This manual describes how to back up and restore Microsoft Exchange databases and mailboxes using the Exchange Plug-in. It discusses strategies and best practices on how to configure and optimize the Disaster Recovery (DR) mode of this Plug-in. This manual also describes how to share a DR backup safeset so you can restore specific mailboxes, messages or other objects to a .pst file with the new Granular Restore for Microsoft Exchange application. This ability can eliminate the need to run MAPI backups. Note: Support is ending for Exchange MAPI backups. You cannot create new backup jobs with this legacy type. Existing jobs will be supported for a period of time. The “Agent for Microsoft Windows User’s Guide” has information on installation of the Agent and Plug-ins, and Agent configuration. For information about managing Exchange backups using Portal, see the Portal online help. The online help for Web CentralControl and Windows CentralControl has information about managing Exchange backups using these legacy interfaces. 1.1 Features Backup and Restore support for Microsoft Exchange 2013 Added support for the Agent to share 2013 Exchange DR backup safesets for use with the Granular Restore for Microsoft Exchange application. The Agent now has the ability to share 2007/2010 Exchange DR backup safesets for use with the Granular Restore for Microsoft Exchange application. Once a DR safeset is shared, the Granular Restore application can be used to restore individual mailboxes and messages to a .pst file. This eliminates the need to have additional MAPI Jobs, thus reducing your storage costs and backup demands. Support for Windows Server 2012 (includes cluster support). Added MAPI support for the Exchange 2010 Plug-in for Windows Agent MAPI restore to .pst now splits a restore into multiple files before it reaches 2GB. Performance advantage through allowing Exchange mailbox backups without prescanning Users can select groups within public folders and/or recipients for mailbox backups Support for wildcard searches Users can exclude mail messages backup or restore Options for backing up or restoring Contacts, Journal, and Email Messages Unicode UTF-8 support for backups and restores (to Mailbox only) Users can include the archive mailboxes of recipients in backups 4 Exchange Plug-in 7.3 User Guide Note: Exchange Server 2007/2010/2013 can now be backed up with a 64-bit Agent using VSS (Volume Shadow Copy Services). This applies to new VSS Jobs only. DR continues to be used with existing Jobs and other systems. 1.2 Supported Platforms See the latest Windows Agent release notes (32-bit or 64-bit) for a list of supported platforms. 1.3 Parallel Backups When an Exchange 2007/2010/2013 server has multiple Storage Groups (Exchange 2007) or Databases (Exchange 2010/2013), it is now possible to put the different Storage Groups/Databases into separate Jobs. The Jobs may then be run simultaneously. In earlier versions (pre- 6.0) of the software, there was an artificial limitation that prevented two (or more) backup Jobs from running simultaneously on the same Exchange Server. Note: Do not create parallel Jobs for the same Storage Group (Exchange 2007) or Database (Exchange 2010/2013). This combination can result in conflicts that will prevent the Jobs from completing successfully. This also applies to Jobs created by Third Party backup applications or Agents on other DAG members. 1.4 Cluster Support On the Windows Server 2008 Enterprise Edition, it is possible to create a two-node cluster for the Exchange 2007 Enterprise Server. Clustering is supported for Windows Agents, with a separately licensed Cluster Support Plug-in. The main function of the Cluster Support Plug-in is for the Agent on an Exchange Server, which has a virtual IP address in the cluster, to be able to follow the server when it fails over to another node in a cluster. The Agent can still access its configuration (on a shared drive), and scheduled backups will occur as usual, without it looking like a "different" backup and causing a reseed. 1.4.1 Exchange 2007 CCR (Cluster Continuous Replication) DR Support DR on CCR: Agent, Cluster Plug-in and Exchange DR Plug-in. Shared resource required to handle failover and function with the Cluster Plug-in. 1.4.2 Exchange 2010/2013 DAG (Database Availability Group) DR Support The DAG requires failover clustering to be installed in a Majority node configuration, which does not require any shared drives. The “Agent for Microsoft Windows User’s Guide” has information on installing and using the Cluster Support Plug-in. 5 Exchange Plug-in 7.3 User Guide 1.5 Backup Methods The Exchange Plug-in supports two types of online backups (DR and MAPI) and three types of restores (DR, MAPI, and share a DR safeset). Most Exchange Plug-in users would regularly schedule DR (disaster recovery) backups to protect their Exchange databases. MAPI backups may no longer be necessary due to the Agent's ability to share Exchange DR safesets which can then be used by the Granular Restore for Microsoft Exchange application to restore individual mailboxes and messages to a .pst file. Note: Support is ending for Exchange MAPI backups. You cannot create new backup jobs with this legacy type. Existing jobs will be supported for a period of time. DR backups are faster than MAPI backups, but prior to the release of the Granular Recovery for Microsoft Exchange application, you could not easily recover a single mail message or mailbox. MAPI backups are considerably slower, but allow you to selectively choose what to recover. Normally a DR backup is done to recover everything, in case of a disaster. MAPI backups are done to recover mailboxes or messages when needed. Now that you can selectively choose what to recover from a shared DR safeset, MAPI backups are not necessary. Volume Shadow Copy service (VSS) in Microsoft Windows Servers is used to by the application to back up and restore Microsoft Exchange Server 2007/2010/2013. 1.6 Disaster Recovery (DR) Disaster Recovery (DR) backups are full backups of Exchange. These backups are used in case of a total loss of data in Exchange (i.e.: a disk crash or other catastrophic damage to the system). This method essentially backs up the entire Exchange database. The Exchange Plug-in refers to this type of restore as Exchange Server (Database backup only). Important Note: To protect your Exchange, it is a necessary “best practice” to back up using Disaster Recovery. Only a Disaster Recovery backup can completely protect your data. A MAPI backup is user-configured to back up selected mailboxes and folders only. 1.7 DR Backup Exchange 2007 DR only supports a 64-bit Operating System. The Exchange Plug-in supports backups and restores. See the latest release notes for details. Exchange 2010/2013 DR only supports a 64-bit Operating System. The Exchange Plug-in supports backups and restores on the 64-bit versions of Windows Server 2008 and Windows Server 2012. 1.8 Mailbox Level (MAPI) This is the older method that can be used for mailbox-level backup and recovery. It interfaces with the Exchange MAPI (Messaging Application Program Interface). It is user-configured to back up selected items (mailboxes and folders) within the database. The Exchange Plug-in refers to this option as Exchange MAPI. These backups are normally used for recovering data accidentally deleted, or that require specific backup uses (i.e.: retention for legal restrictions). 6 Exchange Plug-in 7.3 User Guide Note: Support is ending for Exchange MAPI backups. You cannot create new backup jobs with this legacy type. Existing jobs will be supported for a period of time. Note: For Exchange 2007/2010/2013 the Granular Restore for Microsoft Exchange application should be used to restore individual mailboxes and messages to a .pst file. Note: MAPI is not supported for Exchange 2013. An important difference between backing up the Exchange DR (disaster recovery module) and backing up specific mailboxes or folders (MAPI) is that it takes four to eight times longer per gigabyte to perform backups at the mailbox level. This is primarily because Microsoft optimizes the backup protocol for backing up the entire DB, rather than backups at the mailbox or folder level. Also, for mailbox and folder-level backups, a pre-scan is required, which can slow the process. A slower backup process may or may not influence your backup selection depending on your specific situation. Due to limitations using MAPI to back up large numbers of users, messages and volumes of data – the limit is approximately 400 MB/hr – it is recommended that users do not attempt to use the MAPI backup option to back up more than approximately 100 mailboxes per Job, with a total of 400,000 to 500,000 messages, or more than 50 GB of data, in total. However, to speed the backup process it is possible to use two MAPI Jobs at the same time. One could be used to back up Public folders, for example, and one could back up Recipient folders. 1.9 Additional Documentation This guide is intended to be used in conjunction with other manuals that describe the Windows Agent, Portal and CentralControl. 1.9.1 CentralControl Operations Guide This manual starts with a brief overview of how the products work. The chapters in the manual cover the following topics: Installing the main CentralControl software (GUI). Using the CentralControl GUI – Workspace, Agents, Agent Configurations, Jobs, Safesets, Catalogs and Log files. Performing backups – Types, Seeding, Mapped drives and databases, Options, Tape, Retentions, Notification, Expiration, Scheduling and Ad-hoc (on demand) Backups. Report Logs – Creating and Managing Log files. Data Security – User Authentication and Encryption. Troubleshooting and Command Line Interface. 7 Exchange Plug-in 7.3 User Guide 1.9.2 Agent for Windows User Guide Agent for Windows Install Using the Agent for backups and restores Windows Systems Recovery Cluster Support Plug-in 1.9.3 Release notes A Release Notes text file contains “up to the minute” information on the released product. Release Notes contain an overview of new features, known defect (bug) fixes incorporated since the last release, a description of known issues, and a section on product support. Release Notes are available from your service provider. 1.9.4 Online Help Online help is available in Portal, and in the legacy Windows and Web CentralControl applications. 8 Exchange Plug-in 7.3 User Guide 2 Installing the Exchange Plug-in The Exchange Plug-in is installed during the Windows Agent installation. See the Agent for Windows User’s Guide. The Plug-in can be installed when installing the Agent or it can be installed later, by re-running the installation with the Modify selection. The Cluster Support Plug-in can be installed the same way. The Exchange Plug-in is available in the Windows Agent installation kit. It will be installed when the Exchange option is selected. The Plug-in will also be installed when upgrading from an older Agent version that has Exchange installed. The Exchange DR Plug-in will continue to be installed to support existing DR Jobs that cannot be upgraded, and for use with older versions of Exchange. During uninstall, the Server Agent kit will remove the Exchange Plug-ins. Select Installation Features for a 64-Bit Agent Note: The Exchange 2003 Plug-in is available in the 32-bit Windows Agent 7.33 installation kit, but is not supported. Exchange 2003 is not supported on Windows Agent 7.33 supported platforms. 2.1 Exchange Plug-in Licensing The Exchange Plug-in requires a separate license. The license will be automatically supplied from the vault. See the Agent User Guide or the CentralControl Guide for more information on licensing. 9 Exchange Plug-in 7.3 User Guide 3 Working with Backups To back up your Exchange Server you will first need to add a new Agent, create a new Job using the Exchange DR type, and then schedule that Job to run. This first backup, of your Exchange is forced to be a “seed” backup, even if “incremental” is selected. Future backups default to the setting on the Job. You can also perform backups for selected mailboxes and folders. For this selective type of backup, you create a separate Job using the MAPI for Exchange backup type. Note: Support is ending for Exchange MAPI backups. You cannot create new backup jobs with this legacy type. Existing jobs will be supported for a period of time. DR backup safesets can now be shared so you can restore specific mailboxes, messages or other objects to a .pst file with the new Granular Restore for Microsoft Exchange application. Backup terms that apply to the Exchange Plug-in: Seed: The “first” backup that is performed is referred to as a seed, and is a complete backup of selected Exchange database. However, a seed is not a selectable type of backup. The seed is created automatically as your “first” backup whether Incremental or Full is selected as the backup type. The seed usually takes the greatest amount of time to complete. Full: Full refers to how it performs its Full backup type. This reads all the information on an Exchange Server. The backup type Full, using a Delta (changed data) technique, backs up and optimizes all the changes in your Exchange (.edb, .log, etc.) that have occurred since the last backup. This data is added to the original safeset to complete the entire backup safeset. Using Full with the Delta technique saves a great deal of time, as only changes are transmitted to the Vault. It is recommended to periodically schedule a full backup as this will reduce the size of the log files, which in turn will reduce the time required for a recovery if needed. Incremental: Incremental backups are transaction logs and the checkpoint file only. To produce a complete picture of the up-to-date Exchange database the incremental transaction logs are added to the safeset. Incremental backups take the least amount of time to perform. During recovery, the log files will be played back to achieve the most up to date restore since the last backup. Note: When backing up an Exchange DB, do not use Open Transaction Manager™ or Open File Manager™. The backup does not benefit from OTM or OFM in this case. Also, using OTM or OFM may slow the backup. The following points apply to DR and/or MAPI backups: All Exchange services remain operational while backups occur. For Exchange Server 2007/2010/2013 the stores remain mounted. Always perform a Full backup after database maintenance or recovery. Always perform ‘full system backup (including a system state backup)’ plus a ‘full Exchange backup’ every time you install new hardware/software. Having these backups will significantly simplify baremetal recoveries. Splitting big MAPI Jobs into smaller Jobs is recommended. Smaller Jobs can run simultaneously. One can be for Public Folders, another for important mailboxes. 10 Exchange Plug-in 7.3 User Guide DR only: It is now possible to put different Storage Groups (Exchange 2007) or Databases (Exchange 2010/2013) into separate Jobs and back them up simultaneously. 3.1 Creating a New Agent for Your Exchange Server Please refer to the Windows Agent Guide, Web CentralControl Help or Windows CentralControl Help for instructions on adding a new Agent. Note: When configuring the CentralControl application to connect to an Agent, you need to specify a particular username and password. For details, refer to “Agent Access Privileges” in the CentralControl Guide or Help. If an authentication password changes (i.e. the user listed on the Agent Properties dialog changes his or her system password), the Agent Properties dialog must be updated. 3.2 Creating an Exchange Server (DB Backup) Job 1. Launch the New Job Wizard. Set the Backup type, select a vault profile and enter a Job Name, as described in the CentralControl manual, “Create a Job”. The following selections will appear in the Backup source type menu. 2. On the New Job Wizard - Backup Source Type window, select the appropriate Exchange DR from the menu, and then click Next. Note: The Exchange DR backup source types available that appear are dependant on the Exchange Plug-ins installed. 3. The Encoding type is Unicode, so some database names might not display properly in selection screens. You can back these databases up, though. Click Next to continue. 11 Exchange Plug-in 7.3 User Guide 4. Select a Destination for the backup. Click Next. 5. Enter a name for your Job. Enter a Job description (optional). Click Next. 6. On the Source screen, click Add to open the Include/Exclude dialog. 7. Information about the Exchange server will appear. Expand the entry to display its contents. 8. Select databases or components to back up, and click Include. The items that you choose will appear in the lower pane of the screen. 9. Click OK to continue. 10. Click the Options button to open the Server Backup Options panel. 11. Select the Incremental backup type. The first backup will always be a Full “seed” of the Exchange database regardless of the whether Incremental or Full is selected. Subsequent to the first backup, only the transaction log files will be backed up when is Incremental selected. The default backup type is Incremental. Note: Incremental backups for Exchange cannot be deferred, even if deferring is enabled for the job. Deferring can be applied to full backups for Exchange. 12. Select the Delete Exchange log files after backup checkbox if you want to instruct the Exchange server to delete the log files that you have just backed up. This option helps to conserve space on your Exchange server, and reduces the time required for the next backup. Deselect this option if you want to maintain the original Exchange logs for other specific purposes. 13. Click Next to proceed to the next step in the New Job Wizard. Complete the Job as you normally would, and then click Finish. Note: You can edit your Exchange backup options by opening the Job Properties panel of a selected Job and clicking on the Source tab. 3.3 DR Backups The Exchange Plug-in offers two methods for backing up Exchange with VSS: Full and Transaction Log (Incremental). When the Full option is selected, the Plug-in will back up the transaction log and database files for the Storage Group(s) (Exchange 2007) or Database(s) (Exchange 2010/2013) selected. 12 Exchange Plug-in 7.3 User Guide When the Incremental option is selected, the Plug-in will back up the transaction log for the Storage Groups/Databases selected. You must have done a FULL backup before this. With any successful backup of Exchange, the transaction logs for the selected Storage Groups/Databases are truncated. 3.3.1 Exchange 2007 If you are running a Windows Agent 64-bit (version 6.5 or higher) on an Exchange 2007 Server, and have installed the Exchange Plug-in, you will see an option in Backup Source Type called Exchange 2007 DR. This is applicable to new Jobs only. If you have existing DR type Exchange backups, they will remain as DR type Jobs. There are three types of replication strategies in Exchange 2007: CCR (Cluster Continuous Replication) that replicates to another Exchange Server and has failover capabilities LCR (Local Continuous Replication) that replicates locally SCR (Standby Continuous Replication) that also replicates to another Exchange server but does not have failover capability Note: For a Backup to work on Exchange 2007 CCR (Cluster Continuous Replication), you must have only one database per Storage Group. Typically, you would use one backup Job for each Storage Group. 3.3.2 Exchange 2010/2013 There are a number of changes in Exchange 2010/2013 that affect replication strategies: CCR, LCR and SCR are no longer used to replicate the Exchange Data and provide failover capabilities DAG (Database Availability Groups), which replicates the database to other Exchange Servers and has failover capabilities Storage Groups are no longer used, each database has its own checkpoint file and set of transaction logs. To backup the replica or copy databases in the DAG, Exchange 2010/2013 uses the Exchange Replica VSS Writer which is connected to the Microsoft Exchange Replication Service. This VSS Writer can only backup the databases; restore is not supported. Note: Only databases that are in a Mounted or Healthy state are backed up. Any unmounted databases will be skipped. If the skipped database(s) are in a Mounted or Healthy state for the next backup (in the case of a subsequent incremental backup), they will not need to be reseeded. If all of the selected databases are unmounted, or not in a Healthy state, the Job will fail. 13 Exchange Plug-in 7.3 User Guide 3.4 Backup Options There are three options available to the user when the Exchange DR Plug-in is performing a backup. Exchange 2010/2013 do not use the ‘Only Back Up Active Instance’ option. Backup Type The Exchange DR Plug-in will support both Full and Incremental (or Transaction Log) backups. When performing a FULL, the Plug-in will back up the databases, checkpoint file and transaction logs for the selected Storage Group(s) in Exchange 2007 or Database(s) in Exchange 2010/2013. When performing an INCREMENTAL, the Plug-in will backup only the transaction logs and checkpoint file for the selected Storage Group(s) or Database(s). By default, the backup type will be FULL. Traditionally, an Incremental backup would only contain the checkpoint file and transaction log files for the Storage Groups or Database(s) selected. With this Plug-in, the transaction logs will be rolled up with the contents of the previous FULL and Incremental backups. This simplifies the restore process from an Incremental because it can be done from a single safeset. An Incremental backup requires that at least one FULL backup has been run previously. The FULL backup establishes a baseline for all subsequent Incremental backups. If the Plug-in determines that it is unable to run an Incremental backup, it ignores the option and runs a FULL backup instead. This does not occur when validation has failed or there were changes to the log files since the last incremental backup. In those cases the backup will fail. It is possible to select Incremental Backups for both scheduled and ad-hoc backups. Note: Incremental backups for Exchange cannot be deferred, even if deferring is enabled for the job. Deferring can be applied to full backups for Exchange. Validate Exchange Database When backing up Exchange the integrity of the Exchange Database files is not validated. When selected, the Plug-in will use a utility provided by Exchange to validate the exchange data during the backup. By default, this option is enabled. The validation runs in parallel with the backup to validate transaction logs and database files. If it detects an error, the Agent reports the corruption and fails the entire backup. The Exchange Plug-in provides an option to validate the integrity of the databases and transaction log files during the backup. The validation option is offered as a Job setting as well as a scheduled option. Only Backup Active Instance Exchange 2007 allows backups to be performed against a replica of the Exchange database(s) instead of the active copy. This option really only applies to backups that are run on an LCR configuration. When enumerating the list of Storage Groups to be backed up, the Plug-in will determine whether the Storage Groups support Local Replication (LCR). If all selected Storage Groups support local replication, the Plug-in will use the replica copy for backup. If one or more Storage Groups do not support local replication, the Plug-in will use the active copy 14 Exchange Plug-in 7.3 User Guide for backup. When this is option is turned on, the Plug-in will only use the active copy for backup. If the Exchange configuration does not support LCR, the option is just ignored. By default, this will be disabled. Include/Exclude Choose a Server or one or more Storage Groups/Databases. Note: With CCR, in Exchange 2007, backups can only be performed at the Storage Group level. You cannot select an individual database for backup. However, you can restore a single database from a Storage Group. With LCR and SCR, you can select more than one database for backup. 15 Exchange Plug-in 7.3 User Guide With Exchange 2010/2013 DR backups, you can select more than one database for backup in a single Job: 3.5 PowerShell Log Messages The Agent with the Exchange Plug-in uses PowerShell to run commands. This can produce PowerShell-related Eventlog popup messages. At backup time, you may see a warning message similar to this: You will need to periodically clear the PowerShell Eventlog messages by following the instructions on this screen. 16 Exchange Plug-in 7.3 User Guide 3.6 3.7 Scheduling your Exchange Backup 1. Select your Exchange Agent in the left pane of the CentralControl application. The Exchange Job you created plus the Schedule, Global and Inventory files appear in the right pane. 2. Double-click the Schedule file. The Schedule List appears. 3. Click the New button. The Schedule wizard launches. 4. Work through the Schedule wizard as described in the CentralControl manual. “Add a New Schedule Entry.” 5. On the Schedule wizard – Options page, make sure Incremental backup is selected. This ensures that only your Exchange transaction logs are backed up. 6. On the Schedule wizard – Weekly page, select the days when you want the Job to run (e.g. Monday through Friday). 7. Continue working through the Schedule wizard until finished. 8. Repeat the above procedure to run a backup of your Exchange Job once per week with Full backup selected. 9. Next, you should decide how to tailor your backup and recovery options based on your specific Exchange server. Remaining Steps for Job Creation The Options screen Quick file scanning: Enabling this option (where available) reduces the amount of data read during the backup process. Any file streams that are deemed unchanged since the last backup are skipped over. If this setting is disabled, files are read in their entirety. Disable deferring: This option allows you to run the job without stopping, even if it means extending the run beyond the Backup time window. Backup type: The first time you back up an Exchange database, it will be a backup type of Full. If you choose Incremental for your first backup, a Full backup will run instead. Subsequent backups can run as Incremental. (Remember that you should run a full DR backup at least once per week.) 2. Encryption: You can optionally use encryption. Select an Encryption type from the list. Compose your own Password for encryption. This is not stored anywhere on the system. If you lose this password, your data will not be accessible. 3. Choose from the Log Options that follow. Log files are created on the server machine (with the Agent) in directories using the job names. Create log file: Enable this option to generate log files for each job executed. These printable log files report start-connect-completion and disconnect times, file names (i.e., the name of each file that was copied during a backup process), and any processing errors. 17 Exchange Plug-in 7.3 User Guide Log detail level: You can select a detail level of None, Summary, Directories, or Files. Detailed logging creates large log files, but this is useful for troubleshooting problems. Changing the Log detail level only affects log files that are created from that point on. It does not affect any previously created log files. Automatically purge expired log files only: You can automatically purge expired log files, or keep a selected number of them before they get deleted. The oldest file is deleted first. Keep the last <number of> log files: You can specify how many log files to keep. When that number is reached, the oldest log file will be deleted to make space for the new one. 4. Run the job immediately, Schedule the job, or Just exit from this wizard: You can run your job immediately, or schedule it for later. If you click Finish and simply exit, the job will still be available. 3.8 Verifying Your Backup After a successful backup, you may check the safeset properties by right-clicking on the safeset, and choosing Properties (or using F2). In the logs directory you can view the log file that the backup produced. You may also have set the option to receive an email notification on a successful or failed backup. See the “CentralControl Operations Guide”. 18 Exchange Plug-in 7.3 User Guide 4 Performing Restores Restoring an Exchange Server (DR) is a two-step process. The first step in the process ends when the Restore Job ends, and the second one starts right after that if you have selected the “Start Hard Recovery” option in the restore Job. The progress of the first step is recorded in the restore log, and the progress of the second is recorded in Windows Event Viewer. For Exchange, you must unmount and set for “overwrite” (in the Exchange Management Console) the databases that you are restoring. For all Exchange recovery strategies, please refer to the Microsoft Exchange documentation on Microsoft’s website. Restoring selected Exchange Mailboxes and Public folders only is a simpler process than restoring an entire Exchange Server (i.e., disaster recovery). For this, the Exchange Plug-in provides mailbox-level restore options. 4.1 About Disaster Recovery (DR) This section describes how to restore an Exchange server after a worst-case disaster. With Exchange 2007, the introduction of multiple storage groups and databases adds complexity to restoring. Exchange 2010/2013 have removed the use of storage groups, and allowed for the use of multiple databases, each having its own checkpoint file and set of transaction logs. This reduces some of the complexity for recovery work. However, using the /disasterrecovery option allows you to run setup in Disaster Recovery (DR) mode to rebuild a server previously lost in case you have no full drive backups available for restore. To fully recover from a total disaster, you need the following: Any replacement hardware, if necessary. The original operating system disks that were being used, including any applicable service packs or fixes. Full drive backups of the system drives, and other logical drives where critical applications or data were installed. A “Full backup” consists of the ‘System State backup’ and the ‘full drive or system backup’. A ‘System State backup’ for Windows Server captures Active Directory, registry, IIS metabase, and types of data that may not be backed up by some other backup systems. Exchange database backups. Along with backups of the information store database, you may also need backups of ancillary databases such as the SRS databases and KMS databases. All patches and settings previously applied. 19 Exchange Plug-in 7.3 User Guide 4.2 Recovering from a Worst Case Disaster Reconfigure hardware that is similar to the original hardware. 1. Create a logical drive that matches the original configuration. Although hardware does not always need to be identical, be aware that some drivers that are listed in the backup set may be incompatible with hardware on the new systems, and may require you to manually remove or install drivers in Safe mode. Test the system state recovery on replacement hardware before you actually need to perform a system state recovery. 2. Reinstall the operating system. Install the same version of Windows Server as a stand-alone server to the same drives and paths to which Windows Server was previously installed. Use the same server names as those used before. 3. Restore full-drive backups. The full backup consists of your ‘System State backup’ and the ‘full drive or system backup’. By restoring the system state, you have restored Active Directory, the IIS metabase, and other components. See the Exchange documentation for further details. 4. Reinstall Exchange using disaster recovery mode if you do not have a full-drive backup available for restore, and Active Directory is installed on a separate machine. The disaster recovery mode in Setup reads the Active Directory, and restores as many settings as possible. For example, database paths are stored in Active Directory, and they are set correctly whether or not you install Exchange program files to the previous locations. Note: If you restore full-drive backups and System State information, you do not need to run in disaster recovery mode. The local Exchange installation may be completely functional already. When you use disaster recovery mode, you must manually select all of the components that were previously installed on the server. Setup uses Disaster Recovery (DR) switches when it enters disaster recovery mode. For Exchange 2007/2010/2013, the DR syntax is: /mode:recoverserver 5. 4.3 4.3.1 Restore the Exchange databases. Restoring the Exchange Data DR Restores If you have used DR to back up an Exchange database, you can choose to restore the database to its original location, an alternate location, or to an alternate Exchange database. If you are overwriting an existing database (which must be on the same domain), it must be unmounted and marked for “overwrite” in the Exchange Management Console. 20 Exchange Plug-in 7.3 User Guide 4.3.2 Exchange 2007 If you are restoring to a new location and want to mount the database, you must first create a database in a Recovery Storage Group with a Database name by using the Exchange Management Shell. For complete details, please refer to the relevant procedures recommended by Microsoft. The Agent/Plug-in supports the restore of entire Storage Groups and/or individual databases within a Storage Group. From a workflow perspective, the restore is basically the same whether restoring from an Exchange Full or Incremental backup. In either case, the Plug-in will only need to restore from a single backup safeset. You can only restore to the active node of an Exchange CCR cluster. The restore will fail otherwise. You may have manually deleted a Storage Group’s transaction log files (if they were corrupt, for example). In this case, restoring a single database to a Storage Group with more than one database could result in data loss from other databases if Exchange had not committed the removed transaction logs to the database. 4.3.3 Exchange 2010/2013 If you are restoring to a new location and you want to mount the database, you must first create a Recovery Database through the Exchange Management Shell. For complete details, please refer to the relevant procedures recommended by Microsoft. The Agent/Plug-in supports the restore of the entire server or individual databases on the server. From a workflow perspective, the restore is basically the same whether restoring from an Exchange Full or Incremental backup. In either case, the Plug-in will only need to restore from a single backup safeset. You can only restore to the active copy in a Database Availability Group. A restore to the replica copy will result in not being able to mount the database or making it active. The restored files will have to be copied to the active copy node in order to successfully mount and take precedence over the other copies. Each copy will have to be updated through the Exchange Management Console. Refer to the relevant procedures recommended by Microsoft. 21 Exchange Plug-in 7.3 User Guide 4.4 Restoring a Standalone Database Your Exchange Server standalone database is restored from a single DR safeset. You need to select the Exchange Server backup Job on the CentralControl application and run the Restore Wizard. 1. Before restoring your Exchange database, unmount the database you want to restore and set it to be overwritten. 2. Select your Exchange Job on the CentralControl application and click the Restore button. The Restore Wizard launches. 3. Work through the wizard, as described in the “CentralControl Operations Guide". 4. On the Restore wizard – Select Restore Objects page, select the Exchange Server check box. All Exchange objects available for restore appear in the bottom pane. Select the Exchange objects you wish to restore. When you are finished with the Select Restore Objects page, click Next or click the Options button to set the available options. 5. Selecting an object enables the Options button. Click the Options button to open the Exchange Server Restore Options panel. Selecting Hard Recovery will apply the database and replay the log files. For Exchange 2007/2010/2013, it will also roll forward any logs created since the last backup that are in the original directory as long as there are no missing or corrupt log files. Hard Recovery is selected by default. 6. Complete the Job and click Finish when done. 7. For Exchange, databases must be manually mounted after restore is complete and Exchange has finished restoring the databases as well as replaying the log files. 22 Exchange Plug-in 7.3 User Guide Note: You should always verify that your restore is successful before mounting the stores. You do this by noting that there are no errors in the restore log file and the Windows Event Viewer Log. Note: If, after a bare-metal restore, you are unable to mount the database, check the following (Windows Event Viewer Log): If the error logs had no errors, but you received an error like C1041724, and ESE Event ID 455 and Event ID 9518. The problem may be that the System State Restore restored Exchange checkpoint files that do not reflect subsequent Exchange DR backups. To avoid the error, you should delete all the checkpoint files from the database directory (or exclude them from System State restore) before restoring the Exchange DR backup. This is a known Microsoft problem. See Microsoft Knowledge Base Article # 896143, “The Exchange database store may not mount in Exchange Server, and event IDs 9175, 486, 455, 413, and 5 may be logged”. 4.5 Restoring a DAG Replica Database Your Exchange 2010/2013 Server DAG Replica database is restored from one backup. You need to select the Exchange Server backup Job in the Web CentralControl application and run the Restore Wizard. 1. Before restoring, you must make the copy on the restore server active and suspend replication to all the other copies; unmount the Exchange database and set it to be overwritten. 2. Select your Exchange Job in the Web CentralControl application, and click the Run Restore button. The Restore wizard launches. 3. Work through the wizard. 4. On the Restore wizard – Select Restore Objects page, select the Exchange Server checkbox. All Exchange objects available for restore appear in the bottom pane. Select the Exchange objects you wish to restore. When you are finished, click Next. 5. Selecting an object enables the Options button. Click the Options button to open the Exchange Server Restore Options page. For Exchange 2010/2013, selecting Hard Recovery will apply the database and replay the log files and it will also roll forward any logs created since the last backup that are in the original directory as long as there are no missing or corrupt log files. Hard Recovery is selected by default. 6. Complete the Job and then click Finish. 7. The databases must be manually mounted after restore is complete. After Exchange has finished restoring the databases and replaying the log files, check the restore log file and the Windows Event Viewer Application Log for errors before mounting a database. 8. Mount the database. 9. Update the Suspended copies through the Exchange Management Console or Shell. 10. After replication has completed, move the active copy back to the original node. 23 Exchange Plug-in 7.3 User Guide 4.6 4.6.1 Storage Group and Database Selection for Restore Exchange 2007 From an Exchange server name, you can browse, and select one or more Storage Groups by name. Under a Storage Group, you can select one or more databases. Note: You may have manually deleted a Storage Group’s transaction log files if any are corrupt or missing. If the transaction log files have been removed, an incremental backup after the restore will not succeed. A Full backup must be performed before attempting another incremental backup. Restoring a single database to a Storage Group with more than one database could result in data loss from other databases. An Options button is available when the Exchange Plug-in performs a restore. Start Hard Recovery: When selected, the Exchange Plug-in will replay the transaction logs, and prepare the restored Storage Group to be used by Exchange. By default, this option is set to true. If you do not use this option, the Storage Group will not be available to Exchange. The Administrator can review and check the restore and Exchange files and database, and must then manually prepare the Storage Group for Exchange. Refer to the relevant procedures recommended by Microsoft. 24 Exchange Plug-in 7.3 User Guide Next, choose what to include or exclude from the restore. 4.6.2 Exchange 2010/2013 From an Exchange server name, you can browse, and select one or more databases by name on the Restore wizard page. Note: You may have manually deleted a database’s transaction log files if any were corrupt or missing. If the transaction log files had to be removed, an incremental backup after the restore will not succeed. A Full backup must be performed before attempting another incremental backup. An Options button is available when the Exchange Plug-in performs a restore. Start Hard Recovery: When selected, the Exchange Plug-in will replay the transaction logs, and prepare the restored database to be used by Exchange. By default, this option is set to true. If you do not use this option, the database will not be available to Exchange. The Administrator can review and check the restore and Exchange files and database, and must then manually prepare the Storage Group for Exchange. Refer to the relevant procedures recommended by Microsoft. 25 Exchange Plug-in 7.3 User Guide 4.7 4.7.1 Storage Group and DB Selection for Restore Destination Exchange 2007 Restore Destination Select Restore Destination: Similar to selecting a Database to restore from, here you can select a database to restore to. From an Exchange server name, you can browse, and select specific Storage Groups by name. Under a Storage Group you select a specific database. Next you may choose to restore your backup files to their original locations, an alternate location, or to an alternate database. 26 Exchange Plug-in 7.3 User Guide See the sections that follow for information about completing the restore. Note: If you are overwriting an existing database (which must be on the same Domain), it must be unmounted, and marked for “overwrite”. In the Exchange Management Console, with a database selected, right click on Database Properties to set the option “This database can be overwritten by a restore”. 4.7.2 Exchange 2010/2013 Restore Destination Select Restore Destination: Similar to selecting a database to restore from, here you can select a database to restore to. From an Exchange server name, you can browse to, and select a specific database by name. Next you may choose to Restore your backup files to their Original Location, an Alternate Location, or to an Alternate database. Note: If you are overwriting an existing database (which must be on the same domain), it must be unmounted and marked for overwrite. In the Exchange Management Console, with a database selected, edit database option, select “This database can be overwritten by a restore”. 27 Exchange Plug-in 7.3 User Guide 4.8 Granular Restore for Microsoft Exchange – Sharing a DR Safeset 4.8.1 Overview – Recover individual mailboxes and messages with GR The Agent now has the ability to share 2007/2010/2013 Exchange DR backup safesets for use with the Granular Restore for Microsoft Exchange application. Once a DR safeset is shared, the Granular Restore application can be used to restore individual mailboxes and messages to a .pst file. This eliminates the need for additional MAPI Jobs, reducing your storage costs and backup demands. 4.8.2 Sharing a DR Safeset for Granular Restore with Windows CentralControl 1. To share a DR safeset from within CentralControl, select the Agent and Job you wish to restore from. Right-click and select Restore. 2. This will launch the Restore wizard. Here you are asked to “Choose what you want to restore”. 3. Select the Mailboxes, messages and other Exchange objects. Click Next. Note: If the Granular Restore application is not found on the system, a warning message is displayed. 4. Select the Source and safeset from which to restore. The Source default will display the appropriate setting from the safeset backup. You can select a different safeset to restore, or a different source location. If the backup was encrypted, you must enter and confirm the password. 5. Advanced Share Options will allow you to provide sharing options for the data source. To access the advanced share options click the Advanced Share Options button. Idle time: Enter the number of minutes that the share can be idle before it is automatically unshared (value can be from 2 to 180 minutes). The default idle time is five minutes. Bandwidth Options: Use all available bandwidth is checked by default. 6. Click OK when your selection is complete. The Restore Job Share summary page is displayed for your review. 7. Click Share to create the share and display the share path. You should copy the share path so that you can paste it into the Granular Restore application. To copy the share path, click once to highlight the path, then right-click to copy the path to your clipboard. 8. Click Start Recovery to launch the Granular Restore for Microsoft Exchange application. 28 Exchange Plug-in 7.3 User Guide 4.8.3 Sharing a DR Safeset for Granular Restore with Web CentralControl 1. To share a DR safeset from within Web CentralControl, select the Agent and Job you wish to restore from. Click the Run Restore button. 2. This will launch the Restore from Backup Wizard. Here you are asked to “Choose what you want to restore”. 3. Select the Mailboxes, messages and other Exchange objects. Click Next. 4. Select the Source and safeset from which to restore. The Source default will display the appropriate setting from the safeset backup. You can select a different safeset to restore or a different source location. If the backup was encrypted, you must enter and confirm the password. 5. Advanced Share Options will allow you to provide sharing options for the data source. To access the advanced share options click on the Advanced Share Options button. Idle time: Enter the number of minutes that the share can be idle before it is automatically unshared (value can be from 2 to 180 minutes). The default idle time is five minutes. Bandwidth Option: Use all available bandwidth is checked by default 6. Click OK to save the Advanced Share Options. Click Next when your selection is complete. The Restore Job Share summary page is displayed for your review. 7. Click Share to create the share and display the share path. You should copy the share path so that you can paste it into the Granular Restore application. To copy the share path, click once to highlight the path, then right-click to copy the path to your clipboard. 8. You can now use the Granular Restore application to restore mailboxes and messages to a .pst file. 29 Exchange Plug-in 7.3 User Guide 4.9 MAPI - Restoring Exchange Mailboxes and Public Folders 1. To restore from the Exchange Mailboxes and Public Folder safesets, select your Exchange Agent in the left pane of the CentralControl application. Right-click a Job and select Restore. This will launch the Restore wizard. 2. The Source defaults will display the appropriate settings from the backup. You can select a different safeset to restore using the drop-down menu or a different source location. 3. Select Next and the Logon page will display the default settings. Click Next to bring up the Restore wizard - Select MAPI items to restore page. 4. When you select Add, the Include/Exclude dialog box is displayed. The databases available are displayed here and their contents can be expanded and/or selected. 5. Be aware that when restoring to a PST file, you will overwrite any information previously stored in that location if any exists. You will NOT be prompted with a warning. 6. You can also search the restore catalogue for objects to restore by clicking on the Search button. Enter the message name to be searched for in the field and check one or more “type” from the Messages, Mailboxes, and Folders checkboxes. You can use wildcards in your search such as “*” and “?”, where “*” will allow all and “?” will allow a single character wildcard replacement. As a mailbox can sometimes contain thousands of files, you have the option to cancel the search by clicking the cancel button. 7. Click OK to continue when your selection is complete. 8. To remove an object from your restore, select the object and then click Remove. 30 Exchange Plug-in 7.3 User Guide 9. The next page is the Destinations Options page. Restore to Exchange Server is selected by default. To restore to a different location, click the Restore to directory on disk (PST File) option. You must enter a valid PST location for this restore or click Browse to find the location you want to use. Every mailbox store selected will create a PST file. 10. Click Next to bring up the Advanced Restore Options. Complete the Job and click Finish to start the restore. 4.10 Restoring to a PST file – Considerations When creating a PST file / restoring to a PST file the default password is "password". Be aware that when restoring to a PST file, you will overwrite any information previously stored in that location if any exists. You will NOT be prompted with a warning. When restoring to a PST (ANSI) file in Outlook, the Agent now will split a large .pst restore into multiple files before it reaches 2GB. Example: mailbox (users.domain).pst, 1,971,056 KB PST File mailbox (users.domain)_1.pst, 1,897,332 KB PST File mailbox (users.domain)_2 .pst, 324,416 KB PST File The MAPI Client and Collaboration Data Objects (CDO MAPI) framework does not support the creation of a Unicode PST where the maximum size a PST can be is 20 gigabytes. Note: Unicode encoded MAPI backups currently are not able to restore to a PST file. Restore to PST can only be used when restoring from a Default (ANSI) encoded backup. Exchange 2013 With Exchange 2013, MAPI backups are not supported. However, data from older MAPI backup safesets created from previous versions of Exchange can be restored to Exchange 2013 as a PST file. In order to allow restore to a PST file, the user needs to do the following: Create a MAPI profile (see section 7.4). Install the MAPI Plug-in. Create a Restore from Another Computer Job selecting the appropriate MAPI safeset created from an earlier version of Exchange MAPI. Make your restore selection and restore as a PST file. Exchange 2007/2010 The installation of the Outlook and MAPI Client and Collaboration Data Objects (CDO MAPI) framework adds the MAPISVC.INF to the C:\Windows\SysWOW64 folder on the server automatically when it is installed. It supports the creation of ANSI PST files. 31 Exchange Plug-in 7.3 User Guide 4.11 Troubleshooting – Restore to an Alternate Location Symptoms: Exchange databases restored to another location (Mailbox or Public Folder) cannot be mounted. The Database and backup logs are being retrieved, but it seems like there are no restore.env files. The database is in a dirty shutdown state, and you cannot replay log files successfully to bring it back to a clean shutdown. Description: The restore.env file is a checkpoint file, for being able to replay transaction logs on the server. During a Soft Recovery, the checkpoint file is used to determine where to begin replaying logs. If the file does not exist, then it will start replaying, starting with the oldest log. Hard Recovery does not require a restore.env file. The file is only created when you restore without selecting the "Hard Recovery" option. A restore to alternate location is not considered a typical Exchange "recovery", so you should have no Soft/Hard Recovery options during the restore process. When the "Restore to an alternate location" option is chosen, the Plug-in places the database and log files in the new location. This means that it is the user's responsibility to correctly use these files. Restore to alternate location should be used if: A normal restore is impossible. A normal restore will not be possible if the database or log files are corrupted. The user wants to do some lower level work on these files, e.g. use a third party tool that might extract some data (e.g. mailboxes) from databases. 32 Exchange Plug-in 7.3 User Guide 5 DR Optimization This chapter details strategies on optimizing your backups for the disaster recovery (DR) component. This method essentially backs up the entire Exchange database. The Exchange Plug-in refers to this option as Exchange Server DR. 5.1 Optimizing your Exchange Backup Optimizing your Exchange backups and restores requires creating a schedule of both regular Incremental backups and periodic Full backups. The backup/restore speeds for disaster recovery (DR) are far superior to the backup/restore speeds for the mailbox-level (MAPI) component (for a dataset of the same size). The Exchange Plug-in (DR Module) has a built-in capability to simplify backup/restore strategies: A user should usually use the "Incremental" setting when setting up an Exchange backup type. Optimizing the speed of your restore Jobs requires a periodic "Full Backup", which backs up your Exchange server by first creating a full seed of the complete database. By default, all later backups are incremental and are transaction logs only. This means that only changes are transmitted to the vault. The transaction logs are added to the seed to produce a complete picture of the up-to-date Exchange database. Over time, transaction logs can accumulate, creating safesets with many log files. We recommend performing a "Full Backup" periodically. A Full Backup instructs the Agent to create a new delta of the complete Exchange database. To optimize your Exchange backups and restores, we recommend you first create a backup Job with the Incremental backup type. Schedule the Job to run frequently (e.g. Monday through Saturday). Next, create a new schedule to periodically run the Job with the Full backup type (e.g. Sunday only). If you are not sure how many transaction logs have been added to your safeset, open the Job in CentralControl and check its backup log for the approximate number of files being backed up. If the “Log detail level” is set to Files, all Exchange transaction logs are listed together as .log files. There might be other cases when you should consider forcing backup to "Full": A Job fails and log and/or Windows Event Viewer - Applications indicates an error. You want to eliminate log files in the backup. This could save time on log replaying when restoring. You are performing database repair, defragmentation or recovery. You are updating the Exchange server to the latest Service Pack. Note: Defragmentation of the database will cause the database to re-seed. The database is completely rebuilt during defragmentation so it is considered a new file. In addition to the above, always check the Job log for the progress of backup and the log and Windows Event Viewer > Applications for the progress of restore. Remember, that restore is a two step process - the first one ends when restore Job ends and the second starts straight after that if you have selected the "Start Hard Recovery" option in the restore Job. The progress of the first step is recorded in the log and the progress of the second is in Windows Event Viewer > Applications. 33 Exchange Plug-in 7.3 User Guide It is recommended NOT to run Full backups within your regularly scheduled Exchange maintenance time window. Your maintenance will be put on hold during a backup. For all Exchange recovery strategies, please refer to Microsoft Exchange documentation. The following pages illustrate how different backup schedules will affect your vault storage for various sizes of Exchange databases. 5.2 Choosing a Backup Schedule (DR only) The following three scenarios present three different Exchanges with different amounts of daily traffic and number of users. The recommended backup schedule differs based on the size of the Exchange database as well as your backup and communication needs. For Low Traffic / 250 Users For Medium Traffic / 1000 Users For High Traffic / 4000 Users The examples also show how the schedule can affect your safeset. Note: Your actual results will vary depending on your traffic, database maintenance, and archive settings. Note: Logs are data, and are considered part of the total data transferred. 5.2.1 Low Traffic/250 Users In this example, the Exchange Server has approximately 4GB of data and approximately 250MB of daily data traffic or 250 users. Notice that on the second week’s Saturday a Full backup is performed. All changes (delta) to the Exchange server are transferred to your safeset. The size of the safeset is reduced because the 34 Exchange Plug-in 7.3 User Guide accumulated 2-week Logs approximate the 2 week’s changes, and have already been incorporated into your Exchange database. 5.2.2 Medium Traffic / 1000 Users In this example, the Exchange Server has approximately 16GB of data and approximately 1GB of daily data traffic or 1000 users. Notice on Saturday a Full backup is performed. All changes (delta) to the Exchange server are transferred to your safeset. The size of the safeset is reduced because the accumulated week’s logs approximate the week’s changes and have already been incorporated into your Exchange database. 5.2.3 High Traffic / 4000 Users – Twice Weekly Full In this example, the Exchange Server has approximately 64GB of data and approximately 4GB of daily data traffic or 4000 users. Notice that on the mid-week Wednesday Full backup and on the Saturday Full backup, all 35 Exchange Plug-in 7.3 User Guide the changes (delta) to the Exchange are transferred to your safeset. The size of the safeset is reduced because the accumulated 3-day logs approximate the changes over these 3 days and have already been incorporated into your Exchange database. 5.2.4 High Traffic / 4000 Users – Once Weekly Full In the case of a High Traffic server, you might not want to use your communications bandwidth for backups during the mid-week period. In this case, you may prefer using the schedule outlined in this figure and perform a Full backup on Saturday only. The speed of your bandwidth and your backup time window schedule may be determining factors. Also, a Saturday Full backup can defer onto Sunday if necessary. 5.3 How Exchange Maintenance Affects your Backups Your regularly scheduled Exchange maintenance can affect how much data is transferred to your safeset during a Full backup. If, for example, you run daily maintenance on your Exchange server, then the database will be changing considerably each day. When performing a Full backup, these changes will be incorporated into your safeset. This will result in longer Full backup times, as you will be transferring more data. Your maintenance schedule will not affect an Incremental backup. In this case the transaction logs are the only data being transferred. Note: Your backup has priority over the MDB (messaging database) maintenance schedule and as such will complete ahead of regular maintenance. 5.4 How Exchange Backups Affect your Maintenance Your Full backup can also affect how your maintenance is performed as your backup Jobs have priority over the MDB maintenance schedule. If your maintenance is run concurrently with a backup Job, your maintenance will be put on hold until the backup completes. If there is still time within the maintenance schedule window the maintenance can complete. If however, you ran Full backups every night during the time scheduled for maintenance, then it is possible that your Exchange 36 Exchange Plug-in 7.3 User Guide would not have time to complete its maintenance. It is important to schedule your maintenance and Full backups so that they are not in conflict. Running an Incremental backup Job will not significantly affect your maintenance schedule as only the transaction logs are being transferred. This effect will also vary depending on the size and activity of your MDB as well as your maintenance schedule. Maintenance scheduling is done at the storage group level by default within Exchange but can be customized for each MDB. The Exchange (MDB) maintenance schedule, effects, and defaults are detailed in Microsoft knowledge base article Q271222 at http://support.microsoft.com/. This article outlines performance costs and makes several recommendations. The default maintenance schedule for Exchange is between 1:00 am and 5:00 am. Your regular maintenance performs three Jobs: Checking Active directory for deleted mailboxes. Deleting any mailboxes or messages that are older than your set retentions. Defragmenting the MDB store while still online. In the case of Exchange 2010/2013, online defragmentation is no longer only part of the database maintenance process. Online defragmentation can run in the background continuously when Enable background database maintenance (24x 7 ESE scanning) is selected. This setting is enabled by default. As Jobs 2 and 3 are disk-intensive Jobs your maintenance should be scheduled outside of the time scheduled for a Full backup. Running specific Exchange utilities such as ESEutil (extensible storage engine) require unmounting the MDB store. Backups cannot occur while running this utility. See Microsoft knowledge base article Q192185 at http://support.microsoft.com/ 37 Exchange Plug-in 7.3 User Guide 6 MAPI Backup Optimization Strategies Note: Support is ending for Exchange MAPI backups. You cannot create new backup jobs with this legacy type. Existing jobs will be supported for a period of time. This chapter details strategies on optimizing and streamlining mailbox and public folder (MAPI) backups. This method is user-configured to back up selected items (mailboxes and folders) within the database(s). The Exchange Plug-in refers to this option as Exchange Server (Mailboxes and Public Folders only). It is recommended that MAPI backups be performed after a complete DR backup has been performed as MAPI backups do not protect the entire Exchange database. An important difference between Exchange DR (Disaster Recovery)and MAPI backups is that it takes four to eight times longer per gigabyte to perform backups at the mailbox level. This is primarily because Microsoft optimized the backup protocol for backing up the entire database, not for performing backups at the mailbox or folder level. Also, for MAPI backups, a pre-scan is required which can slow the process. A slower backup process may or may not influence your backup selection depending on your specific situation. Because of speed limitations using MAPI (the limit is approximately 400 MB/hr), MAPI is not recommended for backing up more than approximately 100 users, with a total of 400,000 to 500,000 messages, or more than a total of 50GB of data. However, to speed up the backup process it is possible to use two MAPI Jobs at the same time. For example, you may use one Job to back up Public folders, and one to back up Recipients. Or, you may use one Job to back up one set of Recipients and the other to back up another set. You may find that backing up your selected mailboxes and folders poses no problems for your organization or your system. In this case, you may not need to streamline your backup Jobs or selections at all. However, you may also find that backups of your mailboxes and folders are taxing your communication bandwidth, or that you are storing some data unnecessarily. If this is the case, you may find it prudent to streamline your backups. By streamlining your backup selection, you can dramatically reduce the size of the backup and correspondingly reduce the time required to complete the backup, thereby freeing up your communications bandwidth. There are several ways to optimize MAPI backup performance. 6.1 Split up the data by content, using multiple Jobs. Split up the data by importance, using multiple Jobs. Use selection filters in the Backup Options to skip any unnecessary items. Set schedule priorities in order to back up the most important files first. Run two or three MAPI smaller Jobs simultaneously. Split by Content To speed up the backup process, it is possible to use two MAPI Jobs at the same time, one to back up Public folders, and one to back up Recipient folders. Along with the other methods listed here, you can select Jobs, the data to back up, and the scheduling of the Jobs to perform the backups. 38 Exchange Plug-in 7.3 User Guide 6.2 Split by Importance You can create multiple backup Jobs and split them by their importance to your organization. This will enable you to customize the selection of backup items for the different Jobs. You may want to create a separate backup Job for mailboxes of your executives and upper management team only. This would ensure that the most important mailboxes for your company are backed up, perhaps on a nightly basis. A separate Job could be created for backing up middle managers mailboxes as well as other staff. This Job could be run less frequently, perhaps on Sunday and Wednesday. Splitting the Jobs by their importance to your organization can free up your communications bandwidth and reduce the size of your backup storage. 6.3 Using Selection Filters You can also streamline your backups through the Backup Options filters when you create Jobs. You may choose not to back up certain items, such as Calendar, Attachments, Notes, Outbox, Sent Items, Deleted Items, or Public Folders, within the Job. You can also omit different items from different Jobs. For example: For your executives and upper management team, you may want to create a backup Job that includes Inbox, Attachments, Outbox, and Sent Items. (Note: Inbox is always selected, and it does not appear as a selectable option.) For your other staff, you may only want to back up the Inbox (selected by default) and perhaps Sent Items. 39 Exchange Plug-in 7.3 User Guide By customizing these Jobs independently, you can reduce the size and time of your backup, while continuing to back up the items that you want. Select the Backup single instance of shared entries option to force a second pass through the data to find duplicates. This backup is slower, but smaller, because it does not back up all occurrences (i.e., duplicates included) of attachments and messages. Clear this option to avoid the pre-scanning process. The backup will be faster, but the size may be larger. This is because you are backing up each occurrence of a shared entry without a second scan (pass). If you choose not to back up Email Messages, you will not be able to back up attachments or messages from any folder, except for specific Outlook items (which are handled by other options). In order to select Outbox Folder, Sent Items, or Deleted Items, you also need to choose something from the upper section of the screen (e.g. Email Messages, Notes), depending on exactly what you need to back up. 6.4 Setting Schedule Priorities It is important that you prioritize the scheduling of your backup Jobs. For example, if you have created two separate MAPI Jobs for backing up mailboxes (e.g., Job1 for executives and Job2 for everybody else), you should set your executive backup Job to a higher priority level than Job2. This will ensure that you back up your most important data first. If you have set your backup time window for a limited number of hours (based on your need to keep your bandwidth clear at certain times) and Job2 does not have enough time to complete, your Job2 backup will be deferred at the end of this time window. Your backup will continue when the backup window opens again (unless you have manually disabled deferring). You can move your scheduled entries up or down to set their priority using Schedule Entries > Schedule List in the CentralControl application. For more information on Backup Time Windows and Schedule Priorities, see the CentralControl Operations Guide, Creating Jobs and Scheduling Jobs. 40 Exchange Plug-in 7.3 User Guide 7 Exchange MAPI Setup Note: Support is ending for Exchange MAPI backups. You cannot create new backup jobs with this legacy type. Existing jobs will be supported for a period of time. The Administrator/Installer needs to create a separate Windows account and Exchange Mailbox to run the backups. Note: The administrator who installs the Exchange Plug-in requires sufficient privileges to create a Windows user account, and assign administrative group membership. As well, the administrator needs sufficient rights within the Exchange organization to create a mailbox and assign administrative/owner access to it. Complete the following steps in order to pass the profile validation provided with the Exchange Plug-in, and use the Plug-in to back up your Exchange server. Create a Windows account Create an Exchange mailbox Assign Exchange privileges Create a MAPI profile Sections B and C can vary, depending on combinations of: Exchange 2007 on Windows Server 2008 (SP2 or R2) Exchange 2010 on Windows Server 2008 (SP2 or R2) After you complete the steps, you can install the Exchange Plug-in. You must also supply license information to complete the installation. Note: Properties related to mailbox objects metadata such as Folder Retention Policy settings are not backed up or restored with MAPI backups. 7.1 Creating a Windows Account For Exchange 2007/2010: For each step that follows, you must complete one successfully before you start the next step. 1. Using Active Directory User and Computers MMC snap-in on the Exchange server, create an account for the Exchange Plug-in to use. Note: The option to create a user mailbox is only available when you run the snap-in on a server that includes the Exchange System Manager. 41 Exchange Plug-in 7.3 User Guide 2. Create a new Windows user account 3. Assign password and other account settings (optional) 42 Exchange Plug-in 7.3 User Guide 4. Create an Exchange mailbox 5. Verify user information 6. If the Exchange server is also a Domain Controller, use the Domain Controller Security Policy MMC snap-in. If it is not a Domain Controller, use the Local Security Policy MMC snap-in. Grant the following user rights to the Windows account created for the Exchange Plug-in: 43 Exchange Plug-in 7.3 User Guide 7. Act as Part of operating system Log on as a service Assign user rights 44 Exchange Plug-in 7.3 User Guide 8. Add security policy settings 9. In the Local Security Settings MMC snap-in, go to Security Settings > Local Policies > User Rights Assignment. Confirm that the account created for the Exchange Plug-in has the “effective” policy setting in place for the rights assigned in Step 2. There may be a delay before the “effective” local policy settings become active. The delay will depend on the Active Directory setup and replication settings. 7.2 Creating an Exchange Mailbox for the Account In Exchange 2007/2010, using the Exchange Management Console, create an Exchange mailbox for the newly created account. 1. Create a user. 45 Exchange Plug-in 7.3 User Guide 2. Create an Exchange Mailbox (part 1) 46 Exchange Plug-in 7.3 User Guide 3. Create an Exchange Mailbox (part 2). 4. Create an Exchange Mailbox (part 3). 5. Create an Exchange Mailbox (part 4). 47 Exchange Plug-in 7.3 User Guide 7.3 Assigning Delegate Control within Exchange The user account must now be granted access to all mailboxes that will be backed up using the Exchange Plugin. Depending on the complexity and security in place within the Exchange organization, this privileged access to mailboxes can be granted at different levels in the Exchange hierarchy and will be automatically inherited down. If the entire Exchange organization is controlled centrally, administrative access can be granted at the Organization level. 7.3.1 Exchange 2007 In this example, access is granted at the Organization level. The account also needs the following permissions Local Administrator on the Exchange server(s) the account is managing 1. Using the Exchange Management Console, select the Organization Configuration from the console tree. 2. Right-click the Organization Configuration node and select Add Exchange Administrator. 3. The “Add Exchange Administrator” wizard will begin. Select Browse, and from the list of users and groups select the user account created for use with the Exchange Plug-in. Click OK to select the user. 4. Under Role, ensure that Exchange Organization Administrator is selected. Click Add. Click Finish. The user account will be added to the Exchange Organization Administrators group in Active Directory. 48 Exchange Plug-in 7.3 User Guide 49 Exchange Plug-in 7.3 User Guide 7.3.2 Exchange 2010 In this example, access is granted at the Organization level. 1. Add the user account to the Organization Management group using the Active Directory Users and Computers MMC. The account also needs the following permissions: Local Administrator on the Exchange server(s) the account is managing For Exchange 2007/2010 on Windows Server 2008 the User Account Control must be disabled for the MAPI Service account to allow the MAPI agent to properly function on the server. 50 Exchange Plug-in 7.3 User Guide 7.3.3 Windows Server 2008 SP2 To disable Admin Approval Mode 1. Click Start, click All Programs, click Accessories, click Run, type secpol.msc in the Open box, and then click OK. 2. If the User Account Control dialog box appears, confirm that the action it displays is what you want, and then click Continue.. 3. From the Local Security Settings console tree, double-click Local Policies, and then doubleclick Security Options. 4. Scroll down and double-click User Account Control: Run all administrators in Admin Approval Mode. 5. Select the Disabled option, and then click OK. 6. Close the Local Security Settings window. To change the elevation prompt behavior for administrators 1. Click Start, click Accessories, click Run, type secpol.msc in the Open box, and then click OK. 2. From the Local Security Settings console tree, click Local Policies, and then Security Options. 3. Scroll down to and double-click User Account Control: Behavior of the elevation prompt for administrators. 4. From the drop-down list, select one of the following settings: Elevate without prompting (tasks requesting elevation will automatically run as elevated without prompting the administrator) Prompt for credentials (this setting requires user name and password input before an application or task will run as elevated Prompt for consent (default setting for administrators) 5. Click OK. 6. Close the Local Security Settings window. User Account Control Step-by-Step Guide http://technet.microsoft.com/en-us/library/cc709691(WS.10).aspx 7.3.4 Windows Server 2008 R2 1. Log on to the Exchange server using the service account created. 2. Open the Control Panel and go to the User Account Control Settings. 3. Set notify to Never, and apply the settings. 4. Restart the server. 51 Exchange Plug-in 7.3 User Guide 7.4 Creating a MAPI Profile For the Exchange Plug-in to function, a MAPI profile must be created on the Exchange server computer that will run the Plug-in software. In addition, because MAPI profiles are user specific the following steps need to be executed directly on the Exchange server computer itself. Note: For Exchange 2007/2010, the MAPI Client and Collaboration Data Objects (CDO MAPI) framework must be installed on the server. This download is available from Microsoft. Note: The User Account Control Settings needs to be set to Never Notify for MAPI Service Account. The user must log off and log back on for the settings to take effect. Download the Microsoft Profile Manager 2.0 utility from Microsoft. 1. Logon directly to the Exchange server computer using the Windows account created for the Exchange Plug-in to use. This is the account created in A. 2. Using the Microsoft Profile Manager 2.0 utility create a new MAPI profile for the user account. 3. Add the Exchange Server service to the MAPI profile by selecting New/Service from the Profile Manager toolbar. Select MSEMS (Microsoft Exchange Server) from the list of providers. 4. Enter the name of your Exchange server in the Exchange Server field and the name of the Exchange Plug-in mailbox (created in B) in the Mailbox field. 52 Exchange Plug-in 7.3 User Guide 5. Click the Check Name box to make sure the profile validates. If the MAPI profile does not validate properly, check the other settings on the Properties > General page. Retry the validation. Note: If the mailbox is on an Exchange 2007/2010 server, you must use Encrypt information > When using the network to successfully connect to the mailbox. 53 Exchange Plug-in 7.3 User Guide 7.5 Configuring the MAPI Plug-in There are possible setup issues when you use the MAPI Plug-in on Windows Server 2008 (including the SCC, SCR, LCR and CCR environments). Special steps are required to prepare Exchange 2007 on Windows Server 2008 to operate with the Exchange MAPI Plug-in. Note: A public folder database must exist in the Exchange environment. 1. Uninstall Outlook and MAPI Client and Collaboration Data Objects (CDO MAPI) framework if they are installed. 2. Install the latest CDO MAPI framework. 3. (This step applies to systems with IPv6 enabled) Disable IPv6: Steps outlined in Microsoft article: http://technet.microsoft.com/en-us/library/bb629624.aspx 4. Create a MAPI profile with ProfMan.exe. Use the "Check Name" button to make sure the Exchange server name (not the IP) gets resolved. 5. Use the MFCMapi.exe utility to verify that the MAPI framework is working. 6. 7.6 Open MFCMapi.exe. Click on “session”. Select “Logon and display store table”. Verify that the MAPI framework is working. Proceed with the MAPI Plug-in installation. Testing the MAPI Account To properly use the MAPI backup function of the Exchange Plug-in, you must create a profile that the backup can use to access all user folders and mailboxes to which you have access rights. But before you run a backup Job, it is important to check to ensure that the backup Job can access all those folders and mailboxes. If not, some or all of the mailbox/folder backups could fail. The first screen shows you the list of settings that will be verified: Exchange Version Domain/User Name and password Exchange Organization/Site/Server information MAPI profile exists If any of these are not verified properly, an error message is presented. You can return to the Options screen to correct any information. When the data is OK, click Next to continue. Note: For Exchange 2007 and 2010, the test does not verify the Exchange permissions for the Exchange privileges test. As long as the MAPI Profile user is a member of the Exchange Organization Management group, the whole test will complete successfully. 54 Exchange Plug-in 7.3 User Guide The second screen lets you select either a random sampling test (faster) or a complete test that checks every folder/mailbox. Normally a random check would suffice. If any of these tests fail, you can return to accounts, privileges, and profiles to correct any information. If the tests complete without errors, it means the profile with permissions should be able to access all the mailboxes/folders. You are returned to the Options screen that started the test. For Exchange 2007/2010, if the MAPI Profile user is not a member of the Exchange Organization Management group the random and complete test will hang when trying to login to the Exchange server and then complete with errors after 2 to 5 minutes. Click Stop Process to cancel the test before the timeout period. If the Quick Test fails, apply the following: 1. Open regedit. 2. Stop at: HKEY_LOCAL_MACHINE\System\CurrentControlSet\Services\MSExchangeIS\ParametersS ystem 3. Add new key: Name: Enable Remote Streaming Backup Type: DWORD Value: 1 = remote backup enabled 4. 7.7 To monitor progress, a Verify Progress screen shows you the status of each check. If there are more than 50 errors the verification will halt. It assumes that there are more errors than “normal”. The problem should be corrected and the verification restarted. MAPI Plug-in User Profile Options Also, under the Agent Configuration Plug-in tab in CentralControl, there is a “Plug-in Options” button. Here you enter the credentials to access the user profile used to back up the Exchange data. 55 Exchange Plug-in 7.3 User Guide This information must be updated every time you change Windows or Exchange settings. Note: When you have entered the account and profile information in the Options screen, you must click the “OK” button to retain that information. Then, when you are back in the Plug-in screen, you must click “Set” to save everything. The “Test” button checks to ensure that the MAPI backup can access all the folders and mailboxes to which it has rights. First, you are shown if the Exchange information is correct (“OK”), if the profile exists and if the backup account has the correct privileges. Then you may select a verification test; either short (random sampling), or full (complete). If this program produces any errors as it monitors the progress, you should go back and check Exchange, MAPI, and the parameters, and then retry. See the section in this manual on “Testing the MAPI Account”. 7.8 Administrator Mailboxes in Child/Parent Domains Unique Name Scenario (Default) Exchange Servers may exist in parent/child domains. The simplest approach to using multiple users here is to create separate, uniquely named users for each domain where an Exchange Server exists. Then assign the necessary rights (Exchange Full Administrator rights – see Section 2.2 for more information) to the user, and create a MAPI profile for it. Use these credentials to configure the MAPI Plug-in. Same Name Scenario It is also possible to have multiple mailboxes with the same (non unique) alias name in several sites or Administration groups within an Exchange organization. There may be a situation in a child/parent domain where each domain has an Administrator. Both have the same user name, and have their own (same name) mailboxes on their own server. Problems may arise with the name duplication. The Administrator on the parent domain can create a profile on the parent Exchange server. But if you try to create a profile with the Administrator on the child domain Exchange server, you may receive an error message 56 Exchange Plug-in 7.3 User Guide that you do not have sufficient privileges. You also, from the child domain, might not be able to use the Administrator for the parent domain. If such a situation occurs, the following is a way to resolve the naming conflict so that MAPI backups can function properly. The name <user> is the same in all cases here. 1. Create a user <user> on the child domain. 2. Create a user <user> on the parent domain. 3. Create a profile called <user> on the child domain Exchange server. Point it to the child Exchange server, and <user> mailbox. 4. Create a profile <user> on the parent domain Exchange server. Point it to the parent Exchange server, and <user> mailbox. During this operation you will be prompted to choose <user> from the child domain or parent domain. Choose the parent domain. 5. Click OK to complete the creation. 6. Enter the following into the Exchange Plug-in section: On the child domain Exchange PC: user name = <user>, domain= child domain, profile=<user> On the parent domain Exchange PC: user name = <user>, domain= parent domain, profile=<user> Both Plug-ins should now be configured to use the same <user> mailbox, with the same <user> profile, but with different domains. 57 Exchange Plug-in 7.3 User Guide 8 Appendix 8.1 Backup Considerations for Exchange 2007 CCR and LCR Setups The Agent must be installed on both the Active and Passive nodes. The Cluster Plug-in is not used for LCR as there is no shared storage. For Disaster Recovery protection, you must back up: The entire C:\ drives (system state and data) on both the Active and Passive nodes. Exchange database Note: There may be other dependencies/computers in your scenario that should be backed up as well: Active Directory, DNS, and Certificate Services. Important: The Agent Service running on the Passive Node(s) must have the appropriate permissions to access the Active Exchange instance in order to obtain information regarding the mount status of databases. WORKAROUND: The agent services (BUAgent and VVAgent) should be running as a domain user with the following permissions: (Domain Administrator account will satisfy these requirements) Exchange View-Only Administrator Local administrators group (for the active node) 8.1.1 Disaster protection for LCR LCR requires a single installation of the Agent. For Disaster Recovery protection, you must back up: o The entire C:\ drive (system state and data) o Exchange database o Exchange Administrator permissions are required. Note: There may be other dependencies/computers in your scenario that should be backed up as well: Active Directory, DNS, and Certificate Services. 8.1.2 Exchange 2010/2013 Database Availability Group (DAG) The Agent must be installed on a DAG member containing copies of the databases to be backed up. The Cluster Plug-in is not used because there is no shared storage. For Disaster Recovery protection, you must back up: o The entire C:\ drives (System State and data) on both the Active and Passive nodes (open-file management should be used) 58 Exchange Plug-in 7.3 User Guide o Exchange database Note: There might be other dependencies/computers in your scenario that should be backed up as well (e.g., Active Directory, DNS, and Certificate Services). Important: The Agent Service running on the DAG member must have sufficient permission to access the Active Exchange instance in order to obtain information regarding the mount status of databases. WORKAROUND: Run the Agent services (BUAgent and VVAgent) as domain users with the following permissions. (Domain Administrator account will satisfy these requirements.) Exchange View-Only Administrator Local administrator group (for the Active node) 8.1.3 Restore Considerations Disaster recovery for CCR 1. (If necessary) Re-install OS to the machine where Active Directory, DNS and Certificate Services will reside. 2. (If necessary) Restore Active Directory, DNS and Certificate Services. 3. Re-install OS for each CCR node where Exchange will reside. 4. Restore the System state and data Job to node 1. Re-boot on prompt. (Your original static IP’s should be restored at this point.) 5. Restore the System state and data Job to node 2. Re-boot on prompt. (Your original static IPs should be restored at this point.) 6. You may need to re-start cluster services. 7. Restore the Exchange database. Disaster recovery for LCR: 1. (If necessary) Re-install OS to the machine where Active Directory, DNS and Certificate Services will reside. 2. (If necessary) Restore Active Directory, DNS and Certificate Services. 3. Re-install OS to the machine where Exchange will reside. 4. Restore the System state and data Job (Re-boot on prompt) 5. Restore the Exchange database. 8.2 Other Exchange Considerations The situation: You are running incremental backups, using separate Jobs, in the same Storage Group(s) (Exchange 2007) or Database(s) (Exchange 2010/2013). The first Job does a full backup, then an incremental. The second Job does a full backup, then an incremental. The first incremental backup’s pointers are now 59 Exchange Plug-in 7.3 User Guide invalidated by the second incremental backup, because both Jobs are sharing the same incremental pointers/markers. The second Job can be restored, but the first will give errors if you try to restore it because it is trying to use the markers from the last incremental backup, which belong to the second backup. So, the roll forward option cannot be used in this case for the first Job. Following is an example of steps that can cause this situation: Launch a full DR backup of your store. Launch a MAPI backup of your store. Once both of the above backups are completed, restore the MAPI backup (but only restore a single mailbox to create a few transaction log files). Once the MAPI restore is complete, unmount the store and attempt a DR restore of this store with the "roll forward" and "hard recovery" options selected. Restore will complete, but the playback of the logs fails (see Event Viewer). Use separate Storage Group(s) (Exchange 2007), do everything in the same Job, or keep track of which incremental backup was last done. The situation: An Active Directory user has login disabled. The MAPI backup attempts to open the mailbox and receives a “failed to open mailbox”, and “error logging to mailbox …” errors. This is a limitation on MAPI requirements. As a workaround, establish login hours for the user so that the backup can access the mailbox. The situation: When backing up Exchange Mailboxes, and Public Folders, you can select several options (Back up Email Messages, Calendar, Notes, Tasks, Contacts, etc.). Note the following conditions for Mailboxes and Public Folders: Without Messages selected, you are unable to back up attachments or messages from any folder, with the exception of special Outlook items (which are provided by other check boxes). The selection of Outbox Folder, Sent mail, or Deleted items is not valid without something from above selected for backup (Messages, Notes, etc.) depending on what you are trying to back up in these folders. Other notes: Installing the Agent on different nodes of the same Database Availability Group (DAG) is allowed. Make sure that database backups are not overlapping. The active and copy databases are considered the same database even if they are on different nodes. Third Party VSS Writers are not supported for the Exchange DR Plug-in. The Exchange DR Plug-in only supports the Exchange VSS Writers that came with Exchange. 60