1
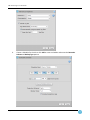
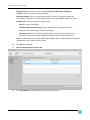
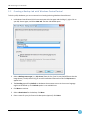
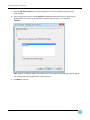
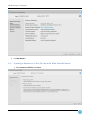
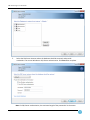
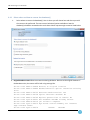
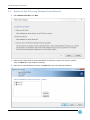
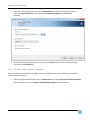
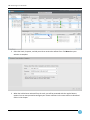
EVault Software Microsoft SQL Server Plug-in 7.3 User Guide Revision: This manual has been updated for Version 7.33 (August 2014). Software Version: 7.33 2014 EVault Inc. EVault, A Seagate Company, makes no representations or warranties with respect to the contents hereof and specifically disclaims any implied warranties of merchantability or fitness for any particular purpose. Furthermore, EVault reserves the right to revise this publication and to make changes from time to time in the content hereof without obligation of EVault to notify any person of such revision of changes. All companies, names and data used in examples herein are fictitious unless otherwise noted. No part of this document may be reproduced, transmitted, transcribed, stored in a retrieval System or translated into any language including computer language, in any form or by any means electronic, mechanic, magnetic, optical, chemical or otherwise without prior written permission of: EVault, A Seagate Company c/o Corporation Trust Center 1209 Orange Street Wilmington, New Castle Delaware 19801 www.EVault.com EVault, EVault Software, EVault SaaS, and EVault DeltaPro, are registered trademarks of EVault, A Seagate Company. All other products or company names mentioned in this document are trademarks or registered trademarks of their respective owners. Acknowledgements: Two encryption methods, DES and TripleDES, include cryptographic software written by Eric Young. The Windows versions of these algorithms also include software written by Tim Hudson. Bruce Schneier designed Blowfish encryption. “Part of the software embedded in this product is gSOAP software. Portions created by gSOAP are Copyright 2001-2006 Robert A. van Engelen, Genivia Inc. All Rights Reserved. THE SOFTWARE IN THIS PRODUCT WAS IN PART PROVIDED BY GENIVIA INC., AND ANY EXPRESS OR IMPLIED WARRANTIES, INCLUDING, BUT NOT LIMITED TO, THE IMPLIED WARRANTIES OF MERCHANTABILITY AND FITNESS FOR A PARTICULAR PURPOSE ARE DISCLAIMED. IN NO EVENT SHALL THE AUTHOR BE LIABLE FOR ANY DIRECT, INDIRECT, INCIDENTAL, SPECIAL, EXEMPLARY, OR CONSEQUENTIAL DAMAGES (INCLUDING, BUT NOT LIMITED TO, PROCUREMENT OF SUBSTITUTE GOODS OR SERVICES; LOSS OF USE, DATA, OR PROFITS; OR BUSINESS INTERRUPTION) HOWEVER CAUSED AND ON ANY THEORY OF LIABILITY, WHETHER IN CONTRACT, STRICT LIABILITY, OR TORT (INCLUDING NEGLIGENCE OR OTHERWISE) ARISING IN ANY WAY OUT OF THE USE OF THIS SOFTWARE, EVEN IF ADVISED OF THE POSSIBILITY OF SUCH DAMAGE.” The EVault Software Agent, EVault Software CentralControl, and EVault Software Director applications provide encryption options for 128/256-bit AES (Advanced Encryption Standard). Advanced Encryption Standard algorithm (named Rijndael, pronounced “Rain Doll”) was developed by cryptographers Dr. Joan Daemen and Dr. Vincent Rijmen. This algorithm has been chosen by the National Institute of Standards and Technology (NIST) of the U.S. Department of Commerce to be the Federal Information Processing Standard (FIPS). The EVault Software Agent and EVault Software Director applications include the security feature of over-the-wire (OTW) encryption. Microsoft SQL Server Plug-in 7.3 User Guide Contents 1 Introduction to the SQL Server Plug-in............................................................................... 3 1.1 Product Overview ............................................................................................................ 3 1.2 Features........................................................................................................................... 4 1.3 Clustering ........................................................................................................................ 5 1.4 Supported Platforms ....................................................................................................... 5 2 Installing the SQL Server Plug-in ........................................................................................ 6 3 Working with Backups ...................................................................................................... 7 3.1 Creating a Backup Job with Web CentralControl ............................................................ 7 3.2 Creating a Backup Job with Windows CentralControl .................................................. 13 3.3 Running an Ad Hoc Backup – Web CentralControl ....................................................... 17 3.4 Running an Ad Hoc Backup Job – Windows CentralControl ......................................... 20 3.5 Notes on Advanced Backup Options: Quick File Scanning and Use Deferring.............. 21 3.5.1 About Database and Transaction Log Deferring during a Full Backup ................. 21 3.6 Running a Scheduled Backup ........................................................................................ 23 3.7 Simultaneous Backups .................................................................................................. 23 3.8 Verifying a Backup ......................................................................................................... 24 3.9 Viewing Job Properties .................................................................................................. 24 3.10 Transaction Logs............................................................................................................ 25 3.11 Reregistering an Agent .................................................................................................. 26 3.12 Error Messages .............................................................................................................. 26 3.13 Removing a Database from a Backup Job ..................................................................... 27 4 3.13.1 For a VDI Legacy Backup Job ................................................................................. 27 3.13.2 For a VSS Backup Job ............................................................................................ 27 Working with Restores ................................................................................................... 28 4.1 SQL Server – Restoring from SQL VSS backups ............................................................. 28 4.2 Restore to SQL Server Job with Web CentralControl – common steps ........................ 29 4.2.1 4.3 Page i Select where and how to recover the database(s) ............................................... 32 Creating a Restore to a flat file Job with Web CentralControl ...................................... 35 Microsoft SQL Server Plug-in 7.3 User Guide 4.4 Restore to SQL Server Job with Windows CentralControl – common steps................. 38 4.4.1 4.5 Restore to flat files using Windows CentralControl ...................................................... 42 4.6 Restore from another Computer .................................................................................. 43 4.7 Notes about Restoring .................................................................................................. 45 4.8 Deleting a Database ...................................................................................................... 45 4.9 Database Types ............................................................................................................. 45 4.10 Restoring System Databases ......................................................................................... 46 4.10.1 Restoring the Master Database - VSS type backup............................................... 46 4.10.2 Restoring the Master Database - Legacy VDI type backup ................................... 47 4.10.3 Restoring the Master Database - SQL 2008 Cluster - Legacy VDI type backup .... 48 4.11 5 Creating a Legacy VDI type Restore Job ........................................................................ 49 Protecting SQL Databases in AlwaysOn Availability Groups .............................................. 56 5.1 Restoring Primary Databases in AlwaysOn Availability Groups .................................... 57 5.1.1 6 Select where and how to recover the database(s) ............................................... 40 Restoring Secondary Databases in AlwaysOn Availability Groups ....................... 57 Appendix: Quick Reference Material ............................................................................... 58 6.1 Page ii Summary of Job Requirements ..................................................................................... 58 SQL Server Plug-in 7.3 User Guide 1 Introduction to the SQL Server Plug-in This chapter provides an overview of the SQL Server Plug-in and its features. 1.1 Product Overview As shown in the following diagram, the SQL Server Plug-in is installed with the Windows Agent on the SQL database host. Using Portal or the legacy Web CentralControl or Windows CentralControl interface, you can configure jobs, back up SQL databases to a secure, remote vault, and restore SQL databases. The current version of the SQL Server Plug-in uses VSS (Volume Shadow Copy Services) to perform backups. The SQL Server Plug-in using VSS effectively backs up SQL databases, SQL databases that span volumes, allows backups to be performed while applications continue to write to a volume, and provides data consistency within and across databases. VSS allows multiple backups to run at the same time. Note: Support is ending for legacy SQL VDI jobs. You cannot create new backup jobs with this legacy type. Existing jobs will be supported for a period of time. You can run full database backups, full database with transaction logs backups, or transaction logs only backups. For more information, see Working with Backups. You can restore SQL databases to the same SQL instance or to a different SQL instance. You can restore databases with the original database names, overwrite existing databases, and restore using the No Recovery option. For more information, see Working with Restores. Page 3 SQL Server Plug-in 7.3 User Guide 1.2 Features Ability to protect secondary databases in AlwaysOn Availabilty Groups using the 64-bit Agent and SQL Server Plug-in. See Protecting SQL Databases in AlwaysOn Availability Groups. Ability to share SQL VSS DR safesets containing SharePoint 2010/2013 content databases for use with the Granular Restore for Microsoft SharePoint application. Once a safeset is shared, the Granular Restore application can be used to restore Site Collections, Web Sites, Lists, Libraries, Folders, List Items, or Documents. Ability to protect and restore SQL Server with the SQL Server VSS option. The VSS option is the default type for newly created SQL Jobs. Support for Delta-friendly backup of databases located on spanned volumes. Ability to protect databases in full recovery model with a single schedule entry. This option allows protecting databases and managing truncation of transaction logs in a single schedule entry. The SQL Server Plug-in supports Full, Full with Include Transaction Logs, and Transaction Log backups (updated terminology to align with SQL Server terminology). EVault will continue to support the Single Pass Restore functionality that allows the customer to select a point in time “transaction log” backup. EVault will restore full database(s) and all transaction logs necessary to restore the database to the selected point in time. A backup job can contain one or more databases from the same single SQL Server instance. A separate Job can be created to back up other databases from a different SQL Server instance which can be run simultaneously if desired. More detail in the summary of the backup session to indicate type of the database, type of backup, and status information. Ability to restore databases with “No Recovery” to provide additional recovery options via SQL Server Management Studio. Alternate restore option supports restore to files, which allows the database administrator to mount the databases via SQL System Manager. Alternate restore includes the ability to direct the restore of one database into another even when the logical database names are not matching. For mismatched objects, the Plug-in will create databases in the default database location for the instance. The (legacy) VDI-based SQL Plug-in has been included to allow for controlled transition to SQL VSS backups. Transition of an existing job involves creating a new job and seeding it. The legacy Plug-in does not support the new features listed in this document. Page 4 SQL Server Plug-in 7.3 User Guide Support for Transparent Data Encryption (TDE) with 64-bit SQL Server 2008 R2 (SP1) and SQL Server 2012. If a SQL Server host is completely lost, the SQL Server software may be installed, and the database completely restored. (The Master database must be restored first.) Once the backup has started, the backup occurs with or without the database services running. Restores are supported to original database names (with or without overwrite existing databases), Restore over an existing database, or to files on disk. The Plug-in can implement large delta block sizes (32 KB). This improves performance for backups. The large block sizes result in the overall delta changes that are sent to the vault being relatively small. Upgrades of earlier Plug-in versions are supported without reconfiguration or reseeding of existing data for previous VDI backups. 1.3 Clustering There is cluster support for this SQL Plug-in using VSS with the Cluster Support Plug-in. See the Windows Agent Guide for configuration and setup details. See the Windows Agent release notes for supported platforms. The Agent can still access its configuration (on a shared drive), and scheduled backups can occur as usual, without appearing to be "different" backups (causing a reseed). 1.4 Supported Platforms For supported platform information, see the Windows Agent release notes. The SQL Server Plug-in is used in conjunction with Director version 7.0 or later. Page 5 SQL Server Plug-in 7.3 User Guide 2 Installing the SQL Server Plug-in The SQL Server Plug-in integrates into the existing Agent architecture, and allows you to back up/restore SQL Server databases to/from the Director vault. The Windows Agent and the SQL Server Plug-in are installed together on the same system that runs SQL Server. The SQL Server Plug-in is installed using the Windows Agent installation kit. The Plug-in can be included when you install the Agent, or you can install it later by rerunning the installation in Modify mode. See the Windows Agent User Guide. For supported Director, Portal, and legacy CentralControl versions, see the Windows Agent release notes. Page 6 SQL Server Plug-in 7.3 User Guide 3 Working with Backups This chapter describes how to create a backup job, schedule the job, and check for completion or errors. You can configure and run your SQL Server backups using Portal or the legacy Web CentralControl or Windows CentralControl interface. Legacy Web CentralControl and Windows CentralControl interfaces are shown in the following sections. The SQL Server Plug-in uses VSS (Volume Shadow Copy Services) to run backups from your SQL Server databases. This helps to ensure the integrity of your backup data. It also enables your databases to continue to operate online while your backups are running in the background. Backups can also run when databases are not running. The SQL Server Plug-in supports Full backups, Full with Include transaction logs, and Transaction Log backups. Note: Filestream data is protected by the Plug-in in the same manner as other Microsoft SQL databases. Only Microsoft SQL with filestream enabled is supported. Note: Backups and restores require Windows and SQL Administrator privileges. 3.1 Creating a Backup Job with Web CentralControl To back up SQL databases, you can create and run a backup job using Web CentralControl. 1. Page 7 In Web CentralControl, (which communicates with the Agent and the Plug-in), click on ther SQL Server Agent, and select Add. From the dropdown menu select Job. The New Job Wizard opens. SQL Server Plug-in 7.3 User Guide Page 8 2. Select a Backup source type (i.e., Microsoft SQL) from the list. (Your list may look different than the image below.) The SQL Server Plug-in must be installed and licensed in order for Microsoft SQL to appear here. 3. The SQL Server Options will appear. SQL Server Plug-in 7.3 User Guide 4. You can select the SQL Server Default instance or any other instance shown from the dropdown list. All available instances will be shown in the dropdown list. 5. Windows authentication (applied to Agent and SQL Plug-in during installation) is selected by default. You must enter your User Name, Password and Domain. Click Next to continue. Note: For SQL Server authentication, access is controlled through the User Name and Password on this screen. Enter a user name and password to connect to the selected instance. The maximum length of the password is 31 characters. Note: Support is ending for legacy SQL VDI jobs. You cannot create new backup jobs with this legacy type. Existing jobs will be supported for a period of time. 6. Select the databases you wish to back up and click Include to add them to the Job. When your selection is complete, click Next to continue. Note: It is strongly recommended that you back up the system databases (master, model and msdb) in one job. Then back up any other (user) databases in one or more other jobs. For a disaster recovery scenario, you must restore the Master Database first, by itself. Then you can restore the other system databases. Page 9 SQL Server Plug-in 7.3 User Guide 7. Encryption: You can optionally use encryption. Select an Encryption type from the dropdown list. Note: If you use encryption, you must remember your encryption password or your data will not be recoverable. 8. Click the Advanced Backup Options to configure Retention, Compression and Log File options. Retention: Choose from Daily, Weekly, or Monthly. Compression: Choose from None, Minimal, Better or Maximum. Create log file: Check this box to generate log files for each job executed. These viewable and printable log files report start-connect-completion and disconnect times, file names (i.e., the name of each file that was copied during a backup process), and any processing errors. Log detail level: You can select a detail level of None, Summary, Directories, or Files. Detailed logging creates large log files, but this is useful for troubleshooting problems. Changing the Log detail level only affects log files that are created from that point on. It does not affect any previously created log files. Automatically purge expired log files: You can automatically purge expired log files, or keep a selected number of them before they get deleted. The oldest log file is deleted first. Keep the last <number of> log files: You can specify how many log files to keep. When that number is reached, the oldest log file will be deleted to make space for the newest one. Click Ok when complete. Page 10 SQL Server Plug-in 7.3 User Guide 9. Page 11 Choose a Schedule for the Job or click Add to create a schedule and access the Retention Scheme and Backup Type options. SQL Server Plug-in 7.3 User Guide Schedule View: Here you can create a schedule by Days of Week, Days of Month, or Custom and set the time for the backup to begin. Retention Scheme: Here you can select the retention scheme. The default schemes are Daily, Weekly or Monthly. To create custom retentions, see the Windows Agent User Guide. Backup Type: Here you can select the Backup Type. Full: Full creates a Full backup. Full with Include transaction logs: Full with Include transaction logs creates a Full backup with transactions logs included in the backup. Transaction Log (only): A Transaction Log backup when run for the first time will run a Full backup and Transaction Logs. Subsequent backups will be transaction logs only. Note: For VSS backups on SQL Server 2005, 2008, 2008 R2, 2012, transactions logs are skipped if the database is set to simple recovery mode. 10. Click Ok when complete. 11. Select a vault destination for your Job. 12. Click Save Changes to complete the creation of your backup Job. Page 12 SQL Server Plug-in 7.3 User Guide 3.2 Creating a Backup Job with W indows CentralControl To back up SQL databases, you can create and run a backup job using Windows CentralControl. 1. In Windows CentralControl (which communicates with the Agent and the Plug-in), right-click on your SQL Server Agent, and select New Job. The New Job Wizard opens. 2. Select a Backup source type (i.e., SQL Server) from the list. (Your list may look different than the image above.) The SQL Server Plug-in must be installed and licensed in order for SQL Server to appear here. 3. The Encoding type will be Default, so databases whose names are not in the current language might not be backed up. The Unicode option is not available here. 4. Click Next to continue. 5. Select a Destination for the backup. Click Next. 6. Enter a name for your job. Enter a Job description (optional). Click Next. Page 13 SQL Server Plug-in 7.3 User Guide 7. Select an SQL Server Instance. You are provided with a list of the available instances for the client installed. 8. The list begins with an entry named <Default>, designating the default instance. Other entries will be present only if they can be retrieved. If there is only one entry, you must select <Default>. Note: Support is ending for legacy SQL VDI jobs. You cannot create new backup jobs with this legacy type. Existing jobs will be supported for a period of time. 9. Click Next to continue. Page 14 SQL Server Plug-in 7.3 User Guide 10. SQL Server Login: This screen allows you to select the authentication type (Windows or SQL Server). 11. For SQL Server authentication, access is controlled through the User Name and Password on this screen. Enter a user name and password to connect to the selected instance. The maximum length of the password is 31 characters. 12. For Windows authentication, access is controlled through the Windows login. The Instance name appears here in read-only format, for information purposes. After you have supplied valid credentials, click Next. Page 15 SQL Server Plug-in 7.3 User Guide 13. Database Selection: Select databases to back up. See Database Types for information about specific types of databases. You can choose Back up all existing databases for this instance. If databases are added or removed from the instance, the job will automatically include all of them at backup time. It is strongly recommended that you back up the system databases (master, model and msdb) in one job. Then back up any other (user) databases in one or more other jobs. For a disaster recovery scenario, you must restore the Master Database first, by itself. Then you can restore the other system databases. 14. Options screen Page 16 Quick file scanning reduces the amount of data read during the backup process. Any file streams that are deemed unchanged since the last backup are skipped over. Without Quick file scanning, files are read in their entirety. Disable deferring: This option allows you to run the job in its entirety, even if it means extending the run beyond the Backup time window. This option is only available for jobs based on VSS type backups. SQL Server Plug-in 7.3 User Guide 15. Encryption: You can optionally use encryption. Select an Encryption type from the list. Compose your own Password for encryption. This is not stored anywhere on the system. If you lose this password, your data will be inaccessible. 16. Choose from the following Log Options. Create log file: Check this box to generate log files for each job executed. These printable log files report start-connect-completion and disconnect times, file names (i.e., the name of each file that was copied during a backup process), and any processing errors. Log detail level: You can select a detail level of None, Summary, Directories, or Files. Detailed logging creates large log files, but this is useful for troubleshooting problems. Note: Changing the Log detail level only affects log files that are created from that point on. It does not affect any previously created log files. Automatically purge expired log files only: You can automatically purge expired log files, or keep a selected number of them before they get deleted. The oldest file is deleted first. Keep the last <number of> log files: You can specify how many log files to keep. When that number is reached, the oldest log file will be deleted to make space for the newest one. Run the job immediately, Schedule the job, or Just exit from this wizard: You can run your job immediately, or schedule it for later. If you click Finish and simply exit, the job will still be available. See the next section for information about creating a schedule. Log files are created on the server machine (with the Agent) in directories with the job name. They are normally viewed from CentralControl. Note: For VSS backups on SQL Server 2005, 2008, 2008 R2, 2012, transactions logs are skipped if the database is set to simple recovery mode. 3.3 Running an Ad Hoc Backup – Web CentralControl 1. Select a Job to run and click on the Run Backup button. 2. The Run Backup window will open. You can review the summary details, Agent, Job and make changes to Destination, Retention Scheme and Backup Type. Page 17 SQL Server Plug-in 7.3 User Guide The Backup Type selections available are: Full (provides a Full backup of the DB from the point in time the backup was started) Full, Include Transaction Logs (provides a Full backup of the DB and includes the latest transaction logs from the point in time the backup was started) Transaction Logs (Provides a backup of transaction logs only. SQL Server Management Studio can be used to apply the transaction logs you require). Note: The first time that you back up an SQL database, it will be a backup type of Full or Full with Include Transaction Logs. If you run a backup type of only Transaction Logs as a first backup, the backup will be full with transaction logs. Subsequent backups will be transaction logs only. For subsequently scheduled backups, you can choose between Full, Full with Include Transaction Logs and Transaction Logs. 3. You can review or change the Advanced Backup Options or click on the Start Backup button to immediately start the backup. Page 18 SQL Server Plug-in 7.3 User Guide 4. When you click Start Backup, the Process details will be displayed which you can monitor as the backup progresses. You can also close this dialogue with the backup in progress and the backup will continue. When Status: Backup completed is displayed, click Close to go back to the Web CentralControl dashboard. Page 19 SQL Server Plug-in 7.3 User Guide 3.4 Running an Ad Hoc Backup Job – Windows CentralControl 1. Select a Job to run, right click and select Backup, or click the Backup icon. The Backup Wizard Welcome screen will launch. Click Next. 2. Select the Destination vault. 3. You can skip further configuration and Back Up Now, or you click Next to configure more Backup Options. Here you can set Quick File Scanning, the Backup time options (deferring) as well as the Backup type. 4. The Backup Type selections available are: Full (provides a Full backup of the DB from the point in time the backup was started)) Full, Include Transaction Logs (provides a Full backup of the DB and includes the latest transaction logs from the point in time the backup was started) Transaction Logs (Provides a backup of transaction logs only. SQL Server Management Studio can be used to apply the transaction logs you require). Note: When you first back up an SQL database, it will always be a Full backup even when Transaction Logs is the only selection. Page 20 SQL Server Plug-in 7.3 User Guide 5. Click Next when your selection is complete. 6. Click Finish to run the Job. 3.5 Notes on Advanced Backup Options: Quick File Scanning and Use Deferring Quick file scanning: Quick file scanning reduces the amount of data read during the backup process. Any file streams that are deemed unchanged since the last backup, are skipped over. Without Quick file scanning, files are read in their entirety. Disable deferring: Disabling the deferring option (check Disable deferring) allows you to run the job in its entirety, even if it means extending the run beyond the Backup time window. This option is only available for jobs based on VSS type backups. 3.5.1 About Database and Transaction Log Deferring during a Full Backup When Full backup is selected, the database or transaction log or both may be deferred depending upon the size of the database and defer duration setting. We consider the status of a database Page 21 SQL Server Plug-in 7.3 User Guide complete if it was backed up and incomplete if it was deferred irrespective of whether the transaction log was deferred. Below we describe two cases - the first when the database was backed up and second when it was deferred. In both cases, the status of the transaction log has no bearing on that of the database. In both cases, Full backup was selected. 1. When the Database is Backed Up: In this case we treat the database as complete. The BUAgent log shows something like the following: 22-May 22-May 22-May 22-May 22-May 22-May 22-May 17:07 17:07 17:07 17:07 17:07 17:07 17:07 SQ12-I-09335 SQ12-I-09313 SQ12-I-09335 SQ12-I-09314 SQ12-I-09314 SQ12-I-09314 SQ12-I-09314 FULL FULL FULL FULL FULL FULL FULL - OK OK OK OK OK OK OK TRN TRN TRN TRN TRN TRN TRN - N/A OK N/A DEFER DEFER DEFER DEFER master (SIMPLE) model (FULL) msdb (SIMPLE) JennTestDB (FULL) JennTestDB3 (FULL) testDB1 (FULL) testdb2 (FULL) Notice that the database was backed up but transaction log was deferred. Consequently when you select Restore in the UI, you are able to select this database and restore it. 2. When the Database is Deferred: In this case we treat the database as incomplete. The BUAgent log shows something like the following: 23-May 12:15 SQ12-I-09291 SQL server backup summary for instance: DENALIINST 23-May 12:15 SQ12-I-09311 FULL - DEFER master (SIMPLE) 23-May 12:15 SQ12-I-09311 FULL - DEFER model (FULL) 23-May 12:15 SQ12-I-09311 FULL - DEFER msdb (SIMPLE) 23-May 12:15 SQ12-I-09310 FULL - OK JennTestDB3 (FULL) 23-May 12:15 SQ12-I-09311 FULL - DEFER testDB1 (FULL) 23-May 12:15 SQ12-I-09311 FULL - DEFER testdb2 (FULL) 23-May 12:15 SQ12-I-09311 FULL - DEFER testdb3 (FULL) 23-May 12:15 SQ12-I-09311 FULL - DEFER testdb4 (FULL) 23-May 12:15 SQ12-I-09311 FULL - DEFER testdb5 (FULL) 23-May 12:15 SQ12-I-09311 FULL - DEFER testdb6 (FULL) 23-May 12:15 SQ12-I-09311 FULL - DEFER testdb7 (FULL) 23-May 12:15 SQ12-I-09311 FULL - DEFER testdb8 (FULL) 23-May 12:15 SQ12-I-09311 FULL - DEFER testdb9 (FULL) 23-May 12:15 SQ12-I-09311 FULL - DEFER testdb10 (FULL) 23-May 12:15 SQ12-I-09310 FULL - OK 23-May 12:15 SQ12-I-09310 FULL - OK JennTestDefaultInstDB (FULL) In this case, the database is not available for selection for restore in the UI. Page 22 SQL Server Plug-in 7.3 User Guide 3.6 Running a Scheduled Backup 1. Select your SQL Server Agent from the left pane of the main CentralControl screen. The SQL Server job you created plus Schedule, Global, and log files appear in the right pane. 2. Double-click the Schedule file. The Schedule List appears. 3. Click the New button. The Schedule Wizard opens. 4. Follow the Schedule Wizard. For details about adding schedule entries, see the CentralControl Operations Guide. When you reach the Options screen, choose a Backup type of Full, Full with Include Transaction Logs or Transaction Logs. Regardless of this setting, when you first back up an SQL database, it will always be a backup type of Full or Full with Include Transaction Logs. 3.7 Simultaneous Backups With VSS type backups, simultaneous backups are supported. For legacy backups (VDI), simultaneous backups using different jobs backing up the same database instance may cause your jobs to fail with an error such as NONE-E-6406 Cannot find database to back up. As a good practice, “stagger” the scheduling of different jobs that back up the same instance. Page 23 SQL Server Plug-in 7.3 User Guide 3.8 Verifying a Backup To see a backup summary, right-click a safeset and select Properties. Also, in the Logs directory, you can view the log file that the backup produced. In addition, you can choose to receive email regarding successful (or failed) backups. Refer to the CentralControl Operations Guide. 3.9 V iewing Job Properties Open the Job Properties screen by right-clicking on a job or clicking the Properties icon. From here, you can view or modify the job properties. The tabs for Job Properties may include: General Advanced Log Source Encryption Note: The tabs available can vary depending on the Agent and Plug-ins installed. If you try to open the Job Properties for a legacy SQL job with an SQL Server instance that has been upgraded to SQL Server 2012 or later, you will get an error: Page 24 SQL Server Plug-in 7.3 User Guide 3.10 Transaction Logs If your SQL Server version is earlier than 2012, supported transaction logs backups are for databases in Full recovery mode. The simple recovery model provides you with simple and efficient backups and restores. It does not back up the transaction logs with the database. Instead it deletes them when transactions that they contain are committed to the database. This is similar to a circular logging option. You must handle the truncation and recovery of transaction log space yourself. The full and the bulk-logged recovery model uses the Agent to manage the database and transaction logs. For transaction logs backup, you need to run Full with includes transaction logs and transaction logs backups. Transaction Logs backups do not reduce the size of the transaction logs file. To manage the transaction log space, truncate the logs using the SQL Plug-in through the Full with includes transaction logs and transaction logs backups to reclaim the space used by the logs. When the logs are truncated, the space left by previous obsolete transactions is reused. SQL logs can be truncated after Full with includes transaction logs and transaction logs backups. When you use the full recovery model, consider these other factors: A Full with includes transaction logs backup job must be scheduled The level of activity on the database, as this affects the rate at which SQL transaction logs will grow Amount of space required for the local transaction logs and how their growth is managed Amount of space required on the vault The complexity of the restore procedure (a single-pass restore is still supported) Refer to the Microsoft SQL documentation for information about how to properly manage your database and transaction logs. Page 25 SQL Server Plug-in 7.3 User Guide 3.11 Reregistering an Agent If you delete an Agent from a vault, you are deleting the actual profile on the Agent computer. If you then add that same Agent (it uses the Agent’s computer name) to the vault, the vault recognizes it and prompts you for a reregistration. This will also happen on a Restore From Another Computer. The original profile is downloaded from the vault back to the Agent, but in this case for security reasons, it omits several fields: The encryption password, if you used encryption on backups The domain, user name and password of the account used to back up the SQL Server (“Run As” tab in Job Properties) If “Source” was used with SQL Authentication, you must reenter that information in the Job Properties > Source tab. You will receive error-log messages similar to the following when a backup or restore fails because of a reregistration, or a problem with restoring from another computer. PARS-W-0002 Due to a computer registration, configuration file "Global" is missing the following information: PARS-W-0002 Plugin0.Password (Password) Please use the CentralControl to re-enter the missing information. In this version of the Agent, the Agent reregistration process creates a "register.log" file that reports any missing job file settings. The log file can be viewed via CentralControl once the reregistration is complete. Any attempt to perform a backup or restore using one of the affected job files will fail until the job file has been reconfigured. Should this failure occur, the backup or restore log file will contain information similar to that of the “register.log” (indicating which job settings are missing). 3.12 Error Messages When an SQL database is backed up using the incremental (transaction log) method, the logs are sent to the vault, and are applied against the last full backup during a restore. However, if a backup is performed outside of the Plug-in applications (such as Enterprise Manager), this causes the database to produce a transaction log file. This is recorded by the SQL server in the msdb, but the Plug-in does not have information about this. In this case the transaction log files are out of synch for the Plug-in, and a full backup must be performed to ensure the integrity of the data. If incremental backups are continued they will not fail (however, attempts to restore from an incremental SQL backup may fail with a “REST-F-0014 Job failed to complete” message, and the database may be left in a “loading” state). Page 26 SQL Server Plug-in 7.3 User Guide 3.13 Removing a Database from a Backup Job A failure in one SQL database can cause an entire SQL backup to fail. This may happen if the database is open or running a process. 3.13.1 For a VDI Legacy Backup Job To omit the database, you can use a line command or a registry entry. Using the Command Line Interface (CLI), add /LOGANDCONTINUE=YES to the vv.exe parameter list. To set (create) a registry entry, create a DWORD called HKEY_LOCAL_MACHINE\SOFTWARE\EVault Software\Agent\LOGANDCONTINUE and set its value to 1. You can do this for an SQL Server instance, or a Virtual SQL Server instance in a clustered environment. 3.13.2 For a VSS Backup Job There is no CLI process to remove a database from an existing VSS backup Job. The Job should be recreated excluding the failed database. Page 27 SQL Server Plug-in 7.3 User Guide 4 Working with Restores This chapter describes how to set up and run a restore, as well as check for status or errors using the legacy Web CentralControl or Windows CentralControl interface. It also outlines the different types of restore scenarios, capabilities, and available options. For an SQL database or transaction-log restore, you must select a backup (a safeset) from which you would like to restore. Restores can be to the original location, an alternate location, or a file. You can configure and run your SQL database restores through Portal or either of the legacy CentralControl applications – Web CentralControl or Windows CentralControl. Notes SQL backups and restores must be run with Windows or SQL Administrator rights. A regular (VSS) restore of an SQL database to a file preserves the complete directory structure. Transaction-log files are given .bak extensions. This is similar to SQL Server behavior. During restores, you cannot apply transaction logs (*.bak files) through SQL Server Management Studio. To apply transaction logs during restores, you must use the legacy Windows CentralControl or Web CentralControl interface. 4.1 SQL Server – Restoring from SQL VSS backups The following restore scenarios can be performed directly to the same SQL instance or a different SQL instance: A. Original database names: Does not overwrite existing databases. Restores to the original database. If the database exists, the restore will fail. B. Original database names with Overwrite existing databases: Restores to the original database. If the database exists, the existing database will be overwritten. C. Original database names with Restore using the No Recovery option: Does not overwrite existing databases. Restores to the original database. The database will be in Restoring Mode state. SQL Server Management Studio should be used in this case to complete the restore as desired. D. Original database names with Overwrite existing databases, and Restore using the No Recovery option: Restores to the original database. If the database exists, the existing database will be overwritten. The database will be in Restoring Mode state. SQL Server Management Studio should be used in this case to complete the restore as desired. E. Alternate Database Name: Does not overwrite existing databases. Restores to an alternate database. If the database exists, the restore will fail. Page 28 SQL Server Plug-in 7.3 User Guide F. Alternate Database Name with Overwrite existing databases: Restores to an alternate database. If the database exists, the existing database will be overwritten. G. Alternate Database Name with Restore using the No Recovery option: Does not overwrite existing databases. Restores to an alternate database. The database will be in Restoring Mode state. SQL Server Management Studio should be used in this case to complete the restore as desired. H. Alternate Database Name with Overwrite existing databases, and Restore using the No Recovery option: Restores to an alternate database. If the database exists, the existing database will be overwritten. The database will be in Restoring Mode state. SQL Server Management Studio should be used in this case to complete the restore as desired. The following restore scenario can be performed to a file location on disk: I. Restore to a flat file location - recover files to disk: There is also the option to provide a Fallback file location for a restore. A Fallback location will only be used if the original drive for the database is full or unavailable. There is also the capability of retrieving a safeset (recover a job from another computer) from a vault by running a Restore from another Computer. Then you can run the restore choosing from the above restore scenarios. 4.2 Restore to SQL Server Job with Web CentralControl – common steps The first six steps for the eight “Restore directly to SQL Server scenarios” A, B, C, and D (Original database names) as well as E, F, G, and H (Alternate Database Name) are the same. 1. First select the Agent and then the Job you require from Web CentralControl. Click “Run Restore”. The Restore from Backup Wizard will pop up. Page 29 SQL Server Plug-in 7.3 User Guide 2. Choose how you want to restore: Restore to SQL Server (Select databases and restore directly into an existing SQL Server Instance). Restore to flat files (i.e., select databases to restore as flat files). See section 4.3. Granular restore of SharePoint 2010/2013 data (if applicable) Note: For information about restoring SharePoint 2010/2013 using an SQL safeset share, please refer to the SharePoint 2010/2013 Backup and Restore Guide. Page 30 SQL Server Plug-in 7.3 User Guide 3. Select Restore to SQL Server. Click Next. 4. Select a restore source device from which to restore and safeset from which to restore. The source is usually a vault. You can also select the safeset / backup version from which to restore or enter a safeset number directly in the textbox provided. Click Next when you have made your selection. 5. Select one or more databases to restore. Click Next when you have made your selection. Page 31 SQL Server Plug-in 7.3 User Guide 6. Select the SQL Server instance where the database should be restored, and provide credentials. You can use Windows or SQL Server authentication. Click Next when complete. Note: For SQL Server authentication, the maximum length of the password is 31 characters. Select where to restore (e.g., recover to the original database). Click Next when complete. 4.2.1 Select where and how to recover the database(s) 1. Select where to recover the database(s). Here is where you will choose how and where you wish the restore to be performed. There are several selections/options available on how the database(s) should be recovered and as such these choices represent eight scenarios listed below. Page 32 SQL Server Plug-in 7.3 User Guide A. Original database names: Does not overwrite existing databases. Restores to the original database. If the database exists, the restore will fail with a log message like: 28-Jun 10:55 REST-I-04838 28-Jun 10:55 REST-I-04840 files 28-Jun 10:55 REST-I-04735 28-Jun 10:55 REST-I-04738 28-Jun 10:55 REST-I-04740 28-Jun 10:55 SQ12-F-09321 28-Jun 10:55 REST-F-04110 28-Jun 10:55 SQ12-I-09372 <SQL Instance name>: 28-Jun 10:55 SQ12-I-09374 Restore to original location Rename/Overwrite option: Overwrite existing Generate subdirectories: Yes Ignore alternate streams: No Replace opened files on reboot: No The database dataDB1 already exists. job failed to complete SQL Server restore summary for instance FAILED dataDB1 B. Original database names with Overwrite existing databases: Restores to the original database. If the database exists, the existing database will be overwritten. C. Original database names with Restore using the No Recovery option: Does not overwrite existing databases. Restores to the original database. The database will be in Restoring Mode state. SQL Server Management Studio should be used in this case to complete the restore as desired. D. Original database names with Overwrite existing databases, and Restore using the No Recovery option: Restores to the original database. If the database exists, the existing database will be Page 33 SQL Server Plug-in 7.3 User Guide overwritten. The database will be in Restoring Mode state. SQL Server Management Studio should be used in this case to complete the restore as desired. E. Alternate Database Name: Does not overwrite existing databases. Restores to an alternate database. If the database exists, the restore will fail. F. Alternate Database Name with Overwrite existing databases: Restores to an alternate database. If the database exists, the existing database will be overwritten. G. Alternate Database Name with Restore using the No Recovery option: Does not overwrite existing databases. Restores to an alternate database. The database will be in Restoring Mode state. SQL Server Management Studio should be used in this case to complete the restore as desired. H. Alternate Database Name with Overwrite existing databases, and Restore using the No Recovery option: Restores to an alternate database. If the database exists, the existing database will be overwritten. The database will be in Restoring Mode state. SQL Server Management Studio should be used in this case to complete the restore as desired. Notes: No Recovery: The No Recovery option will allow you to apply the database, transaction logs manually via SQL Server Management Studio. With this method you can apply only up to the specific transaction logs that you wish. For example, if there was corruption at a certain time, you can restore to a point in time before the corruption occurred. When you are performing a restore with the No Recovery option, the database in SQL Server Management Studio is displayed in restoring mode state. This means that if you have transaction logs that you need to apply, you must do it at this time. After that, you must run the command (within the SQL Server Management Studio): Restore database <database name> with recovery; Fallback file location: can be selected. A Fallback location will only be used if the original drive for the database is full or unavailable. 2. Click Next when you have selected where to recover the database(s) and your recovery options. 3. Select the Log file detail level and the bandwidth Performance options. Click Next when complete. 4. Review the Restore Summary. You can use the Back button to revise the restore settings if you wish. Page 34 SQL Server Plug-in 7.3 User Guide 5. Click Run Restore. 4.3 Creating a Restore to a flat file Job with Web CentralControl 1. Select Restore to flat files. Click Next. Page 35 SQL Server Plug-in 7.3 User Guide 2. Select a source from which to restore and safeset from which to restore. The source is usually a vault. Click Next when you have made your selection. 3. Select one or more databases to restore. Click Next when you have made your selection. Page 36 SQL Server Plug-in 7.3 User Guide 4. Select the restore options. Enter the restore Destination path or Browse to the restore location. Select the Log file detail level and the bandwidth Performance options. Click Next when complete. 5. Review the Restore settings summary. You can use the Back button to revise the restore settings if you wish. 6. Click Run Restore. Page 37 SQL Server Plug-in 7.3 User Guide 4.4 Restore to SQL Server Job with W indows CentralControl – common steps The first five steps for the eight “Restore directly to SQL Server scenarios” A, B, C, and D (Original database names) as well as E, F, G, and H (Alternate Database Name) are the same. 1. Select a Job in CentralControl, right click and select Restore, or click the Restore icon. 2. Choose how you want to restore: Restore to SQL Server (Select databases to restore directly into an existing SQL Server Instance). Restore to flat files (Select databases restore as flat files) Granular restore of SharePoint 2010/2013 data (if applicable) Note: For information about restoring SharePoint 2010/2013 using an SQL safeset share, please refer to the SharePoint 2010/2013 Backup and Restore Guide. 3. Select a source from which to restore and safeset from which to restore. The source is usually a vault. Click Next when you made your selection. 4. Select one or more databases to restore. Click Next when you have made your selection. Page 38 SQL Server Plug-in 7.3 User Guide 5. Select the SQL Server instance where the database should be restored, and provide credentials. You can use Windows or SQL Server authentication. Click Next when complete. Note: For SQL Server authentication, the maximum length of the password is 31 characters. Page 39 SQL Server Plug-in 7.3 User Guide 4.4.1 Select where and how to recover the database(s) 1. Select where to recover the database(s). Here is where you will choose how and where you wish the restore to be performed. There are several selections/options available on how the database(s) should be recovered and as such these choices represent eight scenarios listed below. A. Original database names: Does not overwrite existing databases. Restores to the original database. If the database exists, the restore will fail with a log message like: 28-Jun 10:55 REST-I-04838 28-Jun 10:55 REST-I-04840 files 28-Jun 10:55 REST-I-04735 28-Jun 10:55 REST-I-04738 28-Jun 10:55 REST-I-04740 28-Jun 10:55 SQ12-F-09321 28-Jun 10:55 REST-F-04110 28-Jun 10:55 SQ12-I-09372 <SQL Instance name>: 28-Jun 10:55 SQ12-I-09374 Page 40 Restore to original location Rename/Overwrite option: Overwrite existing Generate subdirectories: Yes Ignore alternate streams: No Replace opened files on reboot: No The database dataDB1 already exists. job failed to complete SQL Server restore summary for instance FAILED dataDB1 SQL Server Plug-in 7.3 User Guide B. Original database names with Overwrite existing databases: Restores to the original database. If the database exists, the existing database will be overwritten. C. Original database names with Restore using the No Recovery option: Does not overwrite existing databases. Restores to the original database. The database will be in Restoring Mode state. SQL Server Management Studio should be used in this case to complete the restore as desired. D. Original database names with Overwrite existing databases, and Restore using the No Recovery option: Restores to the original database. If the database exists, the existing database will be overwritten. The database will be in Restoring Mode state. SQL Server Management Studio should be used in this case to complete the restore as desired. E. Alternate Database Name: Does not overwrite existing databases. Restores to an alternate database. If the database exists, the restore will fail. F. Alternate Database Name with Overwrite existing databases: Restores to an alternate database. If the database exists, the existing database will be overwritten. G. Alternate Database Name with Restore using the No Recovery option: Does not overwrite existing databases. Restores to an alternate database. The database will be in Restoring Mode state. SQL Server Management Studio should be used in this case to complete the restore as desired. H. Alternate Database Name with Overwrite existing databases, and Restore using the No Recovery option: Restores to an alternate database. If the database exists, the existing database will be overwritten. The database will be in Restoring Mode state. SQL Server Management Studio should be used in this case to complete the restore as desired. Notes: No Recovery: The No Recovery option will allow you to apply the database, transaction logs manually via SQL Server Management Studio. With this method you can apply only up to the specific transaction logs that you wish. For example, if there was corruption at a certain time, you can restore to a point in time before the corruption occurred. When you are performing a restore with the No Recovery option, the database in SQL Server Management Studio is displayed in restoring mode state. This means that if you have transaction logs that you need to apply, you must do it at this time. After that, you must run the command (within the SQL Server Management Studio): Restore database <database name> with recovery; Fallback file location: can be selected. A Fallback location will only be used if the original drive for the database is full or unavailable. 2. Select the Log file detail level and the bandwidth Performance options. Click Next when complete. 3. Review the Restore settings summary. You can use the Back button to revise the restore settings if you wish. 4. Click Run Restore. Page 41 SQL Server Plug-in 7.3 User Guide 4.5 Restore to flat files using W indows CentralControl 1. Select Restore to flat files. Click Next. 2. Select a source from which to restore and safeset from which to restore. The source is usually a vault. Click Next when you made your selection. 3. Select one or more databases to restore. Click Next when you have made your selection. Page 42 SQL Server Plug-in 7.3 User Guide 4. Select the restore options. Enter the restore Destination path or Browse to the restore location. Select the Log file detail level and the bandwidth Performance options. Click Next when complete. 5. Review the Restore settings summary. You can use the Back button to revise the restore settings if you wish. Click Run Restore. 4.6 Restore from another Computer When a safeset is not available for your Agent, you can use Restore from another Computer to make that safeset available for restore. 1. Select the Agent desired and hover over the Advanced button. Select Restore from another Computer from the dropdown menu. The Restore From Another Computer wizard will pop up. Page 43 SQL Server Plug-in 7.3 User Guide 2. Select the Vault, Computer, and Job you wish to retrieve the safeset from. Click Next when your selection is complete. 3. When the Job has been retrieved from the vault, you will be presented with the regular Restore options. You can now proceed to configure your restore selections in the same manner as described earlier in this chapter. Page 44 SQL Server Plug-in 7.3 User Guide 4.7 Notes about Restoring When you restore a single database, the SQL Server Plug-in expects that the source and destination databases will use identical database and transaction log "file names". Database name and physical file "locations" may be different. The path to the database being restored must exist prior to the restore. With multiple databases restored in the same job, the destination can only be the original database name, or to a directory (file). If only a single database is restored, you have the choice of original database name, Alternate database name, or restore to files on disk. Note: When restoring to an existing database for SQL (other than original), the logical and file names are not changed to the existing database. Note: The Plug-in reports errors differently for different server versions when it restores a database from one instance to another. 4.8 Deleting a Database If you delete a database that you have previously backed up, you can restore that database using the Original database restore option. The restore will complete with no errors and the database will be recovered. 4.9 Database Types SQL databases fall into two major categories. 1. System databases, which are created by/for SQL Server for metadata storage: Page 45 SQL Server Plug-in 7.3 User Guide The master database – As the name suggests, this is the main system database. It contains information about all other databases, as well as SQL Server instance configuration. Back up this database frequently, especially when system changes are made. The msdb database – This contains information about backup history, replication, and log shipping. Protect this database often, using regular backups. The model database – This a template database for SQL database creation. If customized database configuration is done, this database needs to be protected by periodic backups depending on how regularly customization changes. 2. User databases, which are created for or by users. SQL Server 2005 installations provide sample user databases: Northwind AdventureWorks Notes: It is strongly recommended that the system (master, model and msdb) databases be backed up in one job, and the other (user) databases be backed up in one or more other jobs. During a recovery process, the master database must be restored first, by itself. Then the other system databases can be restored. 4.10 Restoring System Databases The master database contains important information about SQL Server installation. If it is damaged or removed, the SQL Server instance will not start. The process of recovering the master database is described below. The msdb database can be restored in the same way as user databases. The model database can be restored in the same way as user databases. System databases in SQL Server include the master, model, and msdb databases that are shipped and installed as part of SQL Server. This section describes how these databases are handled in a VSS snapshot backup process. The SQL writer supports restore of both model and msdb databases online, without shutting down the instance. (This is an additional improvement over MSDE writer behavior). 4.10.1 Restoring the Master Database - VSS type backup Steps for restoring an SQL Server master database: 1. Stop the SQL Server services. Page 46 SQL Server Plug-in 7.3 User Guide 2. Manually copy to a different location the Master database (.mdf and .ldf). 3. Run a restore using the Restore to files option. 4. Select the Master database for restore. 5. Restore the database to a different location than the original location of the Master database. 6. Manually copy the restored Master database to the original location (with replace). 7. Restart all the SQL services. 4.10.2 Restoring the Master Database - Legacy VDI type backup To restore the master database, the server must be running in single-user mode. For details about starting in single-user mode, see the Microsoft documentation (e.g., "How to: Start an Instance of SQL Server (sqlservr.exe)" in Books Online). 1. Stop the services of the SQL Server. 2. SQL Server 2005 and 2008 do not have the REBUILDM utility. The master database must be rebuilt manually. See “Rebuilding the Master Database” and “How to Install SQL Server 2005” in the Microsoft documentation. 3. Reinstall the SQL Server service pack. 4. Restart the SQL Server in single-user mode from Administrative Tools > Services: If the default instance is being used, select MSSQLSERVER > Properties > General. In the Start parameters box, type: -m Note: You must click the Start button on this screen. Simply clicking OK will not start the service with the -m parameter. If a specific instance is being restored, select (instance_name) > Properties > General. In the Start parameters box, type: -m Note: You must click the Start button on this screen. Simply clicking OK will not start the service with the -m parameter. Page 47 SQL Server Plug-in 7.3 User Guide 5. Restore the master database using regular restore procedures with the help of Agent/CentralControl. 6. Restart the SQL Server instance in normal mode. Verify that the data in the master database has been successfully restored. At this point, information about user-created databases should be visible. 7. Restore other databases as needed. You might see three files, called Master.full, Master.log and Master.end that are created by the Plug-in. They are only used by the Plug-in, and are not needed by other programs (such as Enterprise Manager). You can delete them without affecting EM recoveries. 4.10.3 Restoring the Master Database - SQL 2008 Cluster - Legacy VDI type backup You may not be able to restore an SQL Server 2008 master database on a Windows Server 2008 Cluster in Disaster Recovery mode. Windows CentralControl may show a “Failed to connect to the server” message, and Web CentralControl may show the Agent as offline. This is because the SQL Server Agent service is in a stopped state. For example, assume that a two-node Server 2008 cluster exists with SQL 2008 (default and named instances) with a separate Active Directory machine. If the AD and both nodes are totally destroyed, they will need to be recovered from your backup. Reinstall the operating system on the AD machine and the two nodes. Clustering is configured with a default installation of SQL 2008. Install the Agent on both nodes, and reregister them. Page 48 SQL Server Plug-in 7.3 User Guide When you attempt to restore the SQL instance with CentralControl you will see that the SQL Server Agent service is in a stopped state. Steps for restoring an SQL Server master database on a Cluster: 1. Make sure the Cluster Service and SQL Services are functioning correctly. If SQL 2008 is being used, make sure that SQL Server 2005 Backward Compatibility is installed. 2. Install the Agent on the owner physical node, and register the Virtual Agent for clustered SQL service. The SQL job is ready to be restored. Open the Failover Cluster Management Console, and take the SQL Server resources offline, except for network and disk resources. These two resources need to be online and accessible. 3. Open a CMD.exe window, and go to the program folder of the SQL instance that is going to be restored. (You can find the path from the SQL instance service properties on the service snap-in. For example: C:\Program Files\Microsoft SQL Server\MSSQL10.MSSQLSERVER\MSSQL\Binn) 4. Run "sqlservr -c -m -s <instance_name>". This command is used to start the SQL instance in single user mode. You can use "sqlservr -c -m" for the default instance. 5. Go to CentralControl, and operating from the virtual Agent, restore the master (only) database. The "sqlservr" command stops when the restore finishes. 6. Check the restore log to make sure the master database was recovered successfully. 7. On the Cluster Management Console, bring the SQL instance online. Note: SQL 2005 should follow the same steps to restore a clustered SQL Server master database. 4.11 Creating a Legacy VDI type Restore Job The SQL Plug-in also supports SQL VDI legacy type restores. The SQL Restore Wizard guides you through the steps to create a restore job. 1. Select the Agent and a backup job that contains the safeset from which you want to restore. Right-click on the job and select Restore. The SQL Restore Wizard opens. Click Next. 2. Select a source from which to restore (typically a vault). Select the safeset from which you wish to restore. Click Next when you have made your selection. Page 49 SQL Server Plug-in 7.3 User Guide 3. Select one or more databases to restore. Click Next when you have made your selection. Page 50 SQL Server Plug-in 7.3 User Guide 4. Select the SQL Server Instance where the database should be restored. Click Next when you have made your selection. 5. Enter the authentication information for the SQL Server Login. Windows authentication will be prepopulated when using Windows CentralControl. Click Next. Page 51 SQL Server Plug-in 7.3 User Guide 6. Select an SQL Server database restore destination. You can select to restore to: Original database - Restores to the original database. Other database - Restores to another database that you select from the list of available databases. Directory - Restores to an alternate location. You can browse to the directory location using the Browse button or type the location path in the field provided. Page 52 SQL Server Plug-in 7.3 User Guide SQL Server Restore Options: When restoring to either Original database or Other database, you can click the Options button to access the “With replace” option. The “With replace” option allows you to overwrite an existing database. If you try to restore over an existing database without enabling the “With replace” overwrite option, the restore will fail. Page 53 SQL Server Plug-in 7.3 User Guide 7. Click Next when you have made your selection. 8. Select Logging Options. Click Next when your selection is complete. Page 54 SQL Server Plug-in 7.3 User Guide 9. Click Finish to start the restore process. VDI Restore Notes: When you restore an existing database (in the full recovery model), SQL Server requires you to back up the tail of the log before you restore the database under the full or bulk-logged recovery model. Trying to restore a database before you back up the tail of the log causes an error, unless the RESTORE statement contains a “with replace” or “with stopat” clause. Secondly, an SQL restore may fail when you try to restore an SQL database from one instance to another instance on the same SQL Server. In this case, make sure the original database (the one that you are restoring) does not exist on the SQL Server, on any of the available instances. Then apply the “With replace” option. Page 55 SQL Server Plug-in 7.3 User Guide 5 Protecting SQL Databases in AlwaysOn Availability Groups The 64-bit and 32-bit Windows Agent and SQL Server Plug-in can back up primary databases in AlwaysOn Availability Groups. The 64-bit Windows Agent and SQL Server Plug-in can also back up secondary databases in AlwaysOn Availability Groups. If you run a full backup of a database in a secondary replica, the Agent automatically performs a copy-only backup of the database, which does not affect the sequence of conventional SQL Server backups. Microsoft only supports copy-only backups of secondary databases (see http://msdn.microsoft.com/en-us/library/hh245119.aspx). Note: If a backup job includes secondary databases and databases that are not in a secondary replica, a copyonly backup will be performed for all databases in the job. To protect SQL databases in AlwaysOn Availability Groups, do one of the following: Install the Windows Agent and SQL Server Plug-in on the server where the primary replica is hosted. You can then run a full backup of the primary databases, followed by full or transaction log backups. If the primary replica becomes a secondary replica after a failover, the Agent automatically runs copyonly database backups instead of full backups. Transaction log backups remain the same. Install the 64-bit Windows Agent and SQL Plug-in on a server where a secondary replica is hosted. You can then run a copy-only backup of the secondary database, followed by copy-only or transaction log backups. This backup strategy offloads backup processing to a non-primary server. Note: If the availability mode of the secondary replica is asynchronous-commit, transaction logs on the secondary database could lag behind the primary replica database. If the secondary database is being backed up, data loss could occur. If the secondary replica where you are backing up databases becomes the primary replica after a failover, the Agent automatically runs full backups instead of copy-only backups. Transaction log backups remain the same. Install the 64-bit Windows Agent and SQL Server Plug-in on the primary replica server and on secondary replica servers. You can then run a full backup on the primary replica, followed by full or transaction log backups. You can also run copy-only backups on the secondary replicas, followed by copy-only or transaction log backups. This strategy ensures that backups continue even if one of the replicas is down. Note: If a SQL database in an AlwaysOn Availability Group is hosted on a SQL Server Failover Cluster Instance, protect the database as you normally would protect a SQL cluster: install the Agent, SQL Server Plug-in and Cluster Plug-on each physical node, and configure jobs on the virtual node. Full backups will run if the database is a primary database, and copy-only backups will run if the database is a secondary database. Page 56 SQL Server Plug-in 7.3 User Guide 5.1 Restoring Primary Databases in AlwaysOn Availability Groups You must always restore a SQL database to the primary replica in an AlwaysOn Availability Group. If the Windows Agent and SQL Plug-in are not installed on the primary replica server, fail over to a server where the Agent and Plug-in are installed before restoring the database. After you restore a database to the primary replica, and add the database back into the AlwaysOn Availability Group, it will be replicated to the secondary replicas. To reduce the amount of replication traffic after a restore, you could run a “Restore from another computer” on any secondary replica server where the Windows Agent and SQL Plug-in are installed. See Restoring Secondary Databases in AlwaysOn Availability Groups. To restore a primary database in an AlwaysOn Availability Group: 1. If the Agent is not installed on the primary replica server, fail over to the secondary database instance where the Agent is installed. The formerly secondary replica where you backed up the database becomes the primary replica. 2. Remove the primary database from the AlwaysOn Availability Group. 3. Delete the database from all secondary replicas. 4. Restore the primary database to the original database name using the Overwrite Existing Databases option. 5. Add the restored primary database to the AlwaysOn Availability Group using the Full Synchronization option. 5.1.1 Restoring Secondary Databases in AlwaysOn Availability Groups You must always restore a SQL database to the primary replica in an AlwaysOn Availability Group. The database will then be replicated to the secondary replicas. After restoring a SQL database to the primary replica, you can reduce the amount of replication traffic required by restoring the database to secondary replica servers where the Windows Agent and SQL Plug-in are installed. To restore a secondary database in an AlwaysOn Availability Group: 1. Remove the secondary database from the AlwaysOn Availability Group. 2. On a secondary replica server where the Agent and Plug-in are installed, run a Restore From Another Computer using the No Recovery option. 3. Add the restored secondary database to the AlwaysOn Availability Group using the Join option. Page 57 SQL Server Plug-in 7.3 User Guide 6 Appendix: Quick Reference Material 6.1 Summary of Job Requirements Before you create an SQL Server backup job, make sure that you have all of the information such as names, locations, passwords, etc., that the wizard will require. You can use the following table for reference. System requirement User-supplied information Comments Backup source type Type = Select SQL Server from the list. The Encoding will become Default. Vault Destination = Choose an existing vault from the list. You can also configure a new vault here. New job name Name = Specify a job name and optional description. SQL Server instance Instance = Select an instance name. For instances earlier than SQL Server 2012, you can enable legacy support. SQL Server login Authentication = Choose between Windows and SQL Server authentication. User Name = Password = Supply login credentials. Domain is not required for SQL Server authentication. Domain = Database selection Database = Job options Quick file scanning = Select one or more databases to back up. Disable deferring = Backup time window = Encryption Encryption type = Password = Log options If you use encryption, you must supply a password. Create log file = Log detail level = Copies = Finished Run immediately = Schedule job = Just exit = Page 58 Choose an option and click Finish.