1
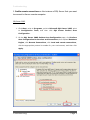
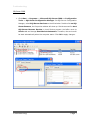
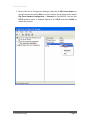
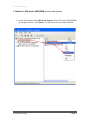
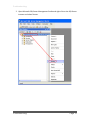
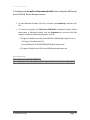
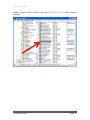
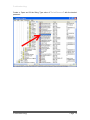
TestElite - Troubleshooting
Revision Sheet
1.0
Balázs Mayer
2014 © TestElite. All Rights Reserved.
Troubleshooting
This document is a collection of the frequented asked questions (FAQ) for solving the
general, but non-trivial problems which have already appeared more than once. The
document is valid for TestElite © software product as it is a part of the documentation.
Troubleshooting
Page i
Revision Sheet
Revision History
Version
Date
Revision Description
0.1
08/21/2014
Template creation, initial draft
1.0
11/28/2014
First release
Troubleshooting
Page ii
Table of Contents
1.
Remote Settings .................................................................................................................... 1
How to enable remoting on Windows machines? ................................................................ 1
2.
Remote Database Access ................................................................................................... 3
How to connect to remote SQL database? ........................................................................... 3
3.
Auto Login ............................................................................................................................ 12
How to enable automatic logon in Windows? ..................................................................... 12
Page 0
Troubleshooting
1.
Remote Settings
How to enable remoting on Windows machines?
Possible error messages during remote access:
- Access is denied.
- Logon failure: unknown user name or bad password.
For remote access you have to do the following settings on the remote machines:
The impersonated user who is running TestElite.RemotingServer.exe needs to have
admin rights on the remote computer and the user must be the member of
Administrators group.
Further settings on Vista and Windows 7:
1. First of all you need to have File and Printer Sharing enabled:
Control Panel\Network and Internet\Network and Sharing Center\Change advanced
sharing settings
There are two profiles. You probably don’t want this on when you’re on a public network
so open Home or Work. Under the header File and Printer sharing, select the Turn on…
option.
2. And you also need to change the registry: Start\Run\regedit and navigate all the way
to
HKEY_LOCAL_MACHINE\SOFTWARE\Microsoft\Windows\CurrentVersion\Policies\Sys
tem. Right-click in the pane on the right side and add a new DWORD (32-bit). Give the
new setting the name LocalAccountTokenFilterPolicy. Double click on that setting and
give it a value of 1.
3. It's probably wise to reboot after doing this, although it might not be needed.
(http://www.intelliadmin.com/index.php/2009/08/windows-7-the-admin-share/)
Troubleshooting
Page 1
Troubleshooting
Further settings on Windows XP:
1. Turn off "simple file sharing": MyComputer\Tools\Folder options\View\Advanced
settings (http://support.microsoft.com/kb/307874)
Remarks: This will turn on "classical file sharing"
Explanation: By default, simple file sharing is enabled on a Microsoft Windows XP-based
computer if the computer is not a member of a domain. With simple file sharing, you can
share folders with everyone on your workgroup or network and make folders in your user
profile private. However, if simple file sharing is enabled, you cannot prevent specific
users and groups from accessing your shared folders. If you turn off simple file sharing,
you can permit specific users and groups to access a shared folder. Those users must be
logged on with the credentials of user accounts that you have granted access to your
shared folder.
2. Turn off "network users identify as guests":
Control Panel\Administrative Tools\Local Security Settings\Local Policies\Security
Options\"Network Access: Sharing and security model for local accounts".
(http://davidchuprogramming.blogspot.com/2009/12/psexecexe-access-denied.html )
Remarks: This will turn on "network users identify as themselves"
Explanation: WinXP machines, contrary to Win2K machines, will map any incoming
network user to the Guest account. I.e. even if you logon saying "I am Administrator", by
default WinXP will reduce you to Guest status. Guests do not have enough privileges to
use the ADMIN$ and/or execute any commands. For WinXP Home this behaviour cannot
be changed. (At least I found no way to do so.) For WinXP Prof this behaviour is the
default, unless your machine is member of an Active Directory Domain.
Troubleshooting
Page 2
Troubleshooting
2.
Remote Database Access
How to connect to remote SQL database?
When you try to connect to an instance of Microsoft SQL Server 2005/2008 from a remote
computer, you may receive the following error messages. This problem may occur when
you use any program to connect to SQL Server:
Error: An error has occurred while establishing a connection to the server. When
connecting to SQL Server, this failure may be caused by the fact that under the default
settings SQL Server does not allow remote connections. (provider: SQL Network
Interfaces, error: 28 – Server doesn’t support requested protocol) (Microsoft SQL
Server)
Error: An error has occurred while establishing a connection to the server. When
connecting to SQL Server, this failure may be caused by the fact that under the default
settings SQL Server does not allow remote connections. (provider: SQL Network
Interfaces, error: 26 – Error Locating Server/Instance Specified) (Microsoft SQL
Server)
Error: Login failed for user ‘username‘. (Microsoft SQL Server, Error: 18456)
This problem may occur when SQL Server 2005/2008 is not configured to accept remote
connections. By default, SQL Server 2005/2008 Express Edition and SQL Server 2005/2008
Developer Edition do not allow remote connections. To configure SQL Server to allow
remote connections, complete all the following steps:
Note: Changes to Connection Settings will not take effect until you restart the Database
Engine service.
Troubleshooting
Page 3
Troubleshooting
1. Enable remote connections on the instance of SQL Server that you want
to connect to from a remote computer.
SQL Server 2005:
1. Click Start, point to Programs, point to Microsoft SQL Server 2005, point
to Configuration Tools, and then click SQL Server Surface Area
Configuration.
2. On the SQL Server 2005 Surface Area Configuration page, click Surface
Area Configuration for Services and Connections, then expand Database
Engine, click Remote Connections, click Local and remote connections,
click the appropriate protocol to enable for your environment, and then click
Apply.
Troubleshooting
Page 4
Troubleshooting
SQL Server 2008:
1. Click Start, point to Programs, point to Microsoft SQL Server 2008 and
then click SQL Server Management Studio.
2. In the SQL Server Management Studio right click on the SQLEXPRESS
instance and select Properties, and on the upcoming dialog click Connections
and after at Remote server connections check Allow remote connections
to this server.
Troubleshooting
Page 5
Troubleshooting
2. Turn on the SQL Server Browser service
SQL Server 2005:
1. On the SQL Server 2005 Surface Area Configuration page, click Surface
Area Configuration for Services and Connections and after click SQL
Server Browser, click Automatic for Startup type, and then click Apply.
Troubleshooting
Page 6
Troubleshooting
SQL Server 2008:
1. Click Start -> Programs -> Microsoft SQL Server 2008 -> Configuration
Tools -> SQL Server Configuration Manager. On SQL Server Configuration
Manager, select SQL Server Services on the left window. Double-click on SQL
Server Browser, the Properties window will show up. Set the account for start
SQL Server Browser Service to Local Service account. And after move to
Service tab and change Start Mode to Automatic. Therefore, the service will
be start automatically when the computer starts. Click OK to apply changes.
Troubleshooting
Page 7
Troubleshooting
2. Back to SQL Server Configuration Manager, right-click on SQL Server Bowser on
the right window and select Start to start the service. On the left window, expand
SQL Server Network Configuration -> Protocols for SQLEXPRESS. You see that
TCP/IP protocol status is disabled. Right-click on TCP/IP and select Enable to
enable the protocol.
Troubleshooting
Page 8
Troubleshooting
3. Restart the SQL Server 2005/2008 instance and services
1. On the left window, select SQL Server Services. Select SQL Server (SQLEXPRESS)
on the right window -> click Restart. The SQL Server service will be restarted.
Troubleshooting
Page 9
Troubleshooting
2. Open Microsoft SQL Server Management Studio and right-click on the SQL Server
Instance and select Restart.
Troubleshooting
Page 10
Troubleshooting
4. Configure the firewall to allow network traffic that is related to SQL Server
and to the SQL Server Browser service.
1. To open Windows Firewall, click Start, click Run, type firewall.cpl, and then click
OK.
2. To create an exception for SQL Server 2005/2008 in Windows Firewall, follow
these steps: in Windows Firewall, click the Exceptions tab, and then click Add
Program. Browse the following programs, click Ok:
- C:\Program Files\Microsoft SQL Server\MSSQL.1\MSSQL\Binn\sqlservr.exe or
C:\Program Files\Microsoft SQL
Server\MSSQL10_50.SQLEXPRESS\MSSQL\Binn\sqlservr.exe
- C:\Program Files\Microsoft SQL Server\90\Shared\sqlbrowser.exe
More information:
http://support.microsoft.com/kb/914277
http://www.linglom.com/2007/08/31/enable-remote-connection-to-sql-server-2005-express/
http://www.linglom.com/2009/03/28/enable-remote-connection-on-sql-server-2008-express
Troubleshooting
Page 11
Troubleshooting
3.
Auto Login
How to enable automatic logon in Windows?
Using RegEdit, navigate to the registry key:
HKEY_LOCAL_MACHINE\SOFTWARE\Microsoft\Windows NT\CurrentVersion\Winlogon
Troubleshooting
Page 12
Troubleshooting
Create or Open and fill the String Type value of "DefaultUsername" with the desired
username.
Troubleshooting
Page 13
Troubleshooting
Create or Open and fill the String Type value of "DefaultPassword" with the desired
password.
Troubleshooting
Page 14
Troubleshooting
Create or Open and fill the String Type value of "AutoAdminLogon" with the data "1".
To set up the the desired DomainName, modify the data from value "DefaultDomainName"
Source: http://www.wikihow.com/Enable-Automatic-Logon-in-Windows-XP
Troubleshooting
Page 15