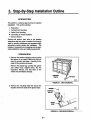
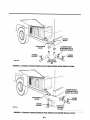
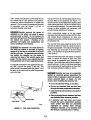
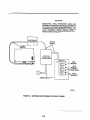
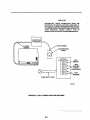
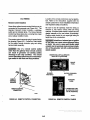
1
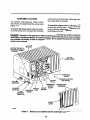
KY
MicroLiteTM 4000 Series
Printed U.S.A. 2-93
981-0627
Redistribution or publication of this document,
by any means, is strictly prohibited.
Table of Contents
. SECTION
TITLE
PAGE
SAFETY PRECAUTIONS......................................
ii.iii
2
INTRODUCTION ............................................
General ..................................................
Installation Codes and Safety Recommendations .................
Component Locations .......................................
SPECIFICATIONS ...........................................
1-1
1-1
1-1
1-2
2-1
3
STEP-BY-STEP INSTALLATIONOUTLINE
.......................
Introduction ...............................................
Preparation ...............................................
3-1
Compartment Mounting ......................................
Under-Floor Mounting .......................................
Connecting to Vehicle Systems ...............................
Exhaust System ...........................................
MOUNTING ................................................
General ..................................................
compartment Mount ........................................
Under-Floor Mount .........................................
VENTILATION AND ACOUSTICS ...............................
3-1
3-1
3-2
3-3
3-5
3-6
4-1
4-1
4-1
4-4
5-1
Ventilation ................................................
Acoustics .................................................
EXHAUST SYSTEM ..........................................
5-1
5-2
6-1
6-1
6-1
6-1
6-1
7
General ..................................................
Muffler Recommendations ...................................
Exhaust Installation Guidelines ................................
Tailpipe Recommendations ...................................
FUEL SYSTEM ..............................................
8
General ..................................................
Gasoline Fuel System .......................................
LPG Fuel System ..........................................
ELECTRICALCONNECTIONS .................................
7-1
7-1
7-3
8-1
General ...................................................
AC Wring
DCWiring
INITIAL START AND CHECKS
Pre-Start Checks ...........................................
Initial Starting and Checks ...................................
Installation Review
8-1
8-1
8-5
9-1
9-1
9-2
9-4
10-1
1
4
9
10
................................................
................................................
.................................
.........................................
WIRING SCHEMATIC/DIAGRAMS .............................
7-1
Redistribution or publication of this document,
by any means, is strictly prohibited.
i
Safety Precautions
Before operating the generator set, read the
Operator's Manual and become familiar with it and
the equipment. Safe and efficient operation can
be achieved only If the unit is properly operated
and maintained. Many accidents are caused by
failure to follow fundamental rules and precautions.
GASOLINE AND LPG FUEL MAY BE ACCIDENTALLY IGNITED BY ELECTRICAL
SPARKS, presenting the hazard of fire or exploslon that can result in severe personal injury
*
4
or death. When lnstalllng the generator set:
Keep electrical and fuel lines as far apart as
possible. Do not allow contact unless both lines
are sheathed.
The following symbols, found throughout this manual, alert you to potentially dangerous conditionsto
C~
or the equipment.
the operator, S ~ M 'personnel,
EXHAUST GASES ARE DEADLY
This symbol warns of immediate
hazards which will result in severe personal
lnjuv or death.
Never sleep in the vehicle with the generator set
running unless the vehicle is equipped with an
operating carbon monoxide detector.
Provide an adequate exhaust system to properly
expel discharged gases. Do not use engine cooling air to heat a compartment.
/-(This
symbol refers to a hazard or
unsafe pmctice which can result in severe
personal injury or death.
Be sure the unit is well ventilated.
[-This
symbol refers to a hazard or
unsafe practice which can result In personal
injury or product or properiy damage.
MOVING PARTS CAN CAUSE SEVERE
PERSONAL INJURY OR DEATH
Before starting work on the generator set,
disconnect batteries. This will prevent accidental
starting and electrical arcs. Disconnect the
Negative (-) battery cable first to reduce the risk
of arcing.
FUEL AND FUMES ARE FLAMMABLE
Fire, explosion, and personal injury can result from
improper practices.
Keep your hands away from moving parts,
Do not smoke or allow an open flame or sparkproducing equipment near the generator set or
fuel tank.
Make sure that fasteners on the generator set
are secure. Tighten supports and clamps, keep
guards in position over fans, drive belts, etc.
Fuel lines must be adequately secured and free
of leaks. Fuelconnection at the engine should be
made with an approved flexible, nonconductive
line.
Do not wear loose clothing or jewelry while
working on generator sets. Loose clothing and
jewelry can become caught in moving parts.
Jewelry can short out electrical contacts and
cause shock or burning.
If adjustment must be made while the unit is
running, use extreme caution around hot
manifolds, moving parts, etc.
Redistribution or publication of this document,
by any means, is strictly prohibited.
ii
9
4
ELECTRICAL SHOCK CAN CAUSE
SEVERE PERSONAL INJURY OR DEATH
GENERAL SAFETY PRECAUTIONS
Wear safety glasses and protective clothing
when servicingbatteries. DO NOTSMOKEwhile
servicing batteries. Lead-acid batteries emit a
highlyexplosivehydrogengas that can be ignited
by electrical arcing or by smoking.
Disconnect the negative (-) cable at the starting
battery before removing protective shields or
touching electrical equipment. Use rubber
insulative mats placed on dry wood platforms on
the ground or over floors that are metal or
concrete when around electrical equipment. Do
not wear damp clothing (particularty wet shoes)
or allow skin surfacesto be damp when handling
electrical equipment.
0
0
0
Have a fire extinguisher rated ABC nearby.
Maintain extinguisher properly and become
familiar with its use.
0
Use extreme caution when working on electrical
components. High voltages can cause injury or
death.
Follow all state and local electrical codes. Have
all electricalinstallationsperformedby a qualified
electrician. Tag open switchesto avoid accidental closure.
0
DO NOT CONNECT GENERATOR SET
DIRECTLY TO ANY BUILDING ELECTRICAL
SYSTEM. Hazardousvoltages can flow from the
generator set into the utility line. This creates a
potential for electrocution or property damage.
Connect only through an approved device and
after building main switch is open. Consult an
electrician in regard to emergency power use.
Benzene and lead, found in some gasoline, have
been identified by some state and federal
agencies as causing cancer or reproductive
toxicity. When checking, draining or adding
gasoline, take care not to ingest, breathe the
fumes, or contact gasoline.
Used engine oils have been identified by some
state or federal agencies as causing cancer or
reproductive toxicity.
When checking or
changing engine oil, take care not to ingest,
breathe the fumes, or contact used oil.
Do not wok on this equipment when mentally or
physically fatigued, or after consuming any
alcohol or drug that makes the operation of
equipment unsafe.
RGA-IN1
Redistribution or publication of this document,
by any means, is strictly prohibited.
iii
Redistribution or publication of this document,
by any means, is strictly prohibited.
1 Introduction
INSTALLATION CODES
AND SAFETY RECOMMENDATIONS
GENERAL
This manual provides installationguidelines for the
MicroLitem (KY) generator set. The generator set
The following list of Installation Codes and Safety
Recommendations applies to the installation and
operation of RV generator sets. The address of
each agency is listed so that copies of the codes
may be obtained for reference. Installation codes
and recommendationsare subject to change, and
may vary by location or over time. The RV
manufacturer and the genset installer bear sole
responsibilityfor following all applicable codes and
regulations.
must be installed properly to operate reliably,
quietly, and safely. Read this entire manual before
starting the installation.
For operation and maintenance procedures, see
the Operator’s Manual (981-0132) that accompanies each genset.
When properly installed, this generator set meets
or exceeds the following requirements:
NationalElectrical Code, NFPA 70-Article551
ANSVRVIA EGS-1 - 1986, Generator Set
Standard
ANSI A I 19.2/NFPA 501 C Standard for
Recreational Vehicles
1. ANSI-A119.2
FMVSS 301
Recreational Vehicle
Industry Association
14650 Lee Road
Chantilly VA 22021
2. NFPA 70 (N.E.C.)
National Fire Protection
Association
470 Atlantic Avenue
Boston MA 02210
NFPA-501C
NFPA 58
NFPA Liquefied Petroleum Gas
CSA Electrical bulletin 946
The RV manufacturer and/or the set installer must
comply with localcodes such as Californiaadministrative Code title 25, which applies to generator set
installation. The RV installer bears sole responsibility for the selection of the appropriate generator
set, installation design, and installation.
Consider the following requirementsbefore installing the set. Each topic is covered in the following
text.
3. CSA Electrical
Bulletin #946
Canadian Standards
Association, Housing and
Construction Materials
Section
178 Rexdale Blvd.
Rexdale, Ontario,
Canada M9W 1R3
4. California
State of California
Documents Section
P.O. Box 1015
North Highlands, CA
Administrative
Code - Title 25
Chapter 3
95660
Level and supportive mounting surface
Adequate cooling air
This manual contains informationthat is subject to
change. For this reason, use only the installation
manual supplied with the generator set for the
installation.
Adequate fresh induction air
Discharge of circulated air
Noise levels
Incorrect installation, service, or
replacement of park can result in severe
personal injury, death and/or equipment
damage. Sewice personnel must be qualified
to perform electrical and/or mechanical
component installation.
Redistribution or publication of this document,
Accessibility for maintenanceand service
Exhaust connections
Fuel supply
Electrical connections
MicroLite is a trademark of the Onan Corporation
by any means, is strictly prohibited.
1-1
COMPONENT LOCATIONS
so the arrows point to the right. Pull the top of the
cover away from the housing.
The standard control panel and routine maintenance items are located behind the access cover
(Figure 1-1).
To secure the access cover; Positionthe bottom
of the cover over the base. Push the top of the
cover in and turn fasteners onequarter turn counterclockwise so the arrows point up. .
To remove the access cover: Rotate the fasteners on the access cover onequarter turn clockwise
'
1-1
Operation of the generator set with the access cover removed can result in severepersonal injury or equipment damage. Hot components are exposed when theaccess cover is removed
and generator set cooling air does not circulateproperly. Do not operate the generator set with the
access cover removed.
i
MUQNSIDE COVER)
-
SPARK PLUG
ACCESS
DRAIN ON BOlTOM
(NOT SHOWN)
\
AC CONDUIT
CONNECTlON
CARBURETOR
ALTITUDE
CIRCUIT
NEGATIVE (-)
CONNECllON
sTART/sTOP
SWrrcH
BREAKER
QUARER-TURN
FASTENERS
P-
ACCESS
COVER
Redistribution or publication of this document,
by any means, is strictly prohibited.
AGURE 1-1. MICROLITE (KY) GENERATOR SET COMPONENT LOCATIONS
1-2
L
2. Specifications
.
~
MODEL
4000 KY
3600 KY (LP)
Onan? Revolving Field, 2-Pole
60
4000
120
33.3
Onan , Revolving Field, 2-Pole
60
3600
120
30
Onan E095H-G
4-StrokeYSingle Cylinder, OHV
3600 rpm
Electronic Magneto (Breakerless)
Gasoline
1.7 qt (1.6 L)
Onan E095H-G
4-Stroke, Single Cylinder, OHV
3600 rpm
Electronic Magneto (Breakerless)
LPG Vapor (11 inches W.C.)
1.7 qt (1.6 L)
12-Volt
360 (450 Below 32OF [OOC])
0.025 in. (0.64 mm)
12-Volt
360 (450 Below 32OF [ O O C ] )
0.025 in. (0.64 mm)
0.15 gph (0.57 Uh)
0.40 gph (1.51 Uh)
0.66 gph (2.5 Uh)
0.35 gph (0.54 Uh)
0.54 gph (2 Uh)
0.82 gph (3.1 Uh)
30 in. (762 mm)
19.4 in. (493 mm)
13.8 in. (350.2 mm)
168 Ib (76.2 kg)
30 in. (762 mm)
19.4 in. (493 mm)
13.8 in. (350.2 mm)
168 Ib (76.2 kg)
19 ftVrnin (0.54 m3/min)
300 ftWnin (8.5 m3/min)
3 ft (0.91 m]
19 ftVmin (0.54 m3/min)
300 ftVmin (8.5@/inin)
GENERATOR
Generator Type
Frequency (Hertz)
Power (Watts)
Voltage
Current (Amperes)
ENGINE
Engine Model
Engine Type
Engine Speed
Ignition Type
Fuel
Engine Oil Capacity
Battery Requirements:
Battery Size
Cold Cranking Amps
Spark Plug Gap
Average Fuel Consumphn:
No Load
Half Load
Full Load
GENERATOR SET DETAILS
Dimensions:
Length
Width
Height
Weight
Air Requirements:
Combustion
Engine/Generator Cooling
Fuel Pump Lift
-
Redistribution or publication of this document,
by any means, is strictly prohibited.
Redistribution or publication of this document,
by any means, is strictly prohibited.
3. SteD-Bv-SteD Installation Outline
INTRODUCTION
This section is a step-by-step overview of a typical
installation. This section includes:
Preparation
0 Compartment Mounting
0 Under-Floor Mounting
Connecting to Vehicle Systems
0 Exhaust System
Review this section, then refer to the detailed
instructionsthat are given in sections four through
eight for specific procedures and important safety
precautions before starting the installation. The
installer is responsible for complying with all applicable installation codes and safety requirements.
0
PREPARATION
1. Remove the wooden shipping crate by prying
the bottom of the crate's sides and ends out
from the wooden skid base. Carefully lift the
crate off the genset and discard.
Remove the plastic bag covering the genset
and collect loose shipped items, like the
Operator's Manual, and add them to the
vehicle documentation package.
FIGURE 3-1. CRATE REMOVAL
2. Remove the mounting bolts that secure the
wooden skid to the ends of the genset base.
GENSET
SHIPPING
4
I
FIGURE 3-2. Redistribution
SKID BASEorREMOVAL
publication of this document,
by any means, is strictly prohibited.
3-1
COMPARTMENT MOUNTING
Installthe generator set in its own compartment. If
any part of the compartment is above the vehicle
floor, separate the compartment from the living
quarterswith vapor-tightwalls. Referto the Mountingsection for compartment construction details.
Vehicles that are unusually sensitive to vlbration
may require secondary Isolatlon and a larger
compartment.
lgWAR"GJExhaust gases present the hazard
of severe personal Injury or death. Make the
compatfment walls vapor tlght to the inferior of
the vehicle to prevent exhaust fumes from
enferlng fhe llvlng quarters.
The generator set requiresanunobstructedair inlet
of at least 40 square inches (258cm2). Refertothe
Mountingand Ventilation section for details. Provide an adequate genset access for maintenance
(11.25 X 19.5 inch minimum opening) and service
removal either through the door or out the bottom.
1. Carefully measure the compartment size to
make sure there will be proper clearance for
the generator set. Figure 3-3 shows the
compartment dimensions. Add 1/2 inch to
compartment depth if 1/2-inch insulation is
used inside the door.
Allowing one to two inches of added space on
the left side of the compartment will make
electrical and fuel connections easier.
~
I
NFPA70
225wh-II
I
@Ea
551-30 (d)
dn
MINIMUM
COMPARTMENT
DIMENSIONS
FIGURE3-3. COMPARTMENT DlMENSlONS
2. Put holes in the bottomof the compartmentfor
genset mounting, air outlet and oil drain
(Figure 3-4). If the bottomof the compartment
is wooden, remove the wooden section under
compartmentand replace it with a sheet metal
floor and an adequate steel support frame.
(Refer to Onan template number 539-1383).
DMNAGE
HOLES
\
OIL
DRAIN
I
GENSET
MOUNTING
/ HOLES
AIR
OUTLET
USE TEMPLATE OR SEE FIGURE4-2
uiw6
Redistribution or publication
this document,
FIGURE 34. COMPARTMENT
FLOORofTEMPLATE
by any means, is strictly prohibited.
3-2
3. Put holes in the compartment to run connections for the fuel line, battery cable, remote
control harness and AC conduit. Design holes
so they will not chafe or restrict the lines.
LOCATE FUEL AND ELECTRICAL LINE
ENTRANCE HOLES IN SHADED AREA
If the remote control harnessor AC conduit go
directly into the interior of the vehicle, seal
around the wires and inside the conduit to
prevent the passage of exhaust gases. The
fuel line must not be routedthrough the interior
of the vehicle.
UlmM
I
FIGURE 3-5. GENSET TO VEHICLE SYSTEMS
CONNECTIONS
4. Mount the generator set in the compartment
with four 5/16-16 screws. Screw length must
not protrude more than I/Z-inch (13 mm)
through the genset base. The exposed above
floor section of exhaust pipe must be shielded
with the Onan-supplied exhaust shield.
5. Proceed to Connecting To Vehicle Systems
(page 3-5).
I12 INCH luAx
PROTRUSION
5/16-16 SCREW
UNDER-FLOOR MOUNTING
1
I
SUPPORT
THICKNESS
flGURE 3-6. COMPARTMENT MOUNTING
An optional kit is requiredfor under-floormounting.
Support brackets are used to suspend the genset
below the floor of the vehicle. Refer to the
instructionsthat are supplied with the kit for specific
installation instructions and important safety
precautions. For additional under-floor mounting
information refer to the Mounting section.
1. Use the template to locate the holes in the
vehicle support structure. (Reference Onan
template number 539-1382).
1-
Fallure to provlde an adequate
support structure can resuIt In severe
personal Injuv, death, and/or q u I p e n t
damage. Carefully follow the Under-FIoor
HousIng kif Installation instrvctions and
provlde an adequate support structure.
Use spcifled hardware and tighten all
mounting hardware to the recommended
torque seftlngs.
0.406IN. HOLES (4) FOR 3/8 BOLTS
Ml88E
FIGURE 3-7. UNDER-FLOOR MOUNTING
TEMPLATE
Redistribution or publication of this document,
by any means, is strictly prohibited.
3-3
2. If the areaabove the compartment is made of a
wood product, you must install a 26gauge
(0.02-inch) galvanized metal plate (or equivalent) above the genset.
NFPA 70 (NEC)551-30 (9
,id@
rLI,
--
e
AREA ABOVE SET,
APPROX 20 INCH X 30
INCH, MUST BE METAL
YlIM-1
FIGURE 3-8. UNDER-FLOOR MOUNTING KIT
WITH METAL CEILING (NOT SUPPLIED WITH KIT)
3. Assemble the Under-Floor Housing kit according to the instructions supplied with the kit. Securely mount hanger brackets and side panels
to the under-floor support structure.
1-
Dropping ihegeneratorset can
cause severe personal injury or death.
Make sure no onemoves the vehicle during
insWatlon and keep feet and hands clear
durlng Insfallaiion.
FIGURE 3-9. UNDER-FLOOR
MOUNTING KIT
4. Assemble the front and back rails to the genset. U s e z forklift to carefully raise the genset
into position in the support frame. Secure the
rails to the support frame with the mounting
hardware included in the Under-Floor Housing
kit.
,
5. Proceed to the next section on connecting to
the vehicle systems.
FIGURE 3-10. UNDER-FLOOR
Redistribution or publication of this document,
INSTALLATION
by any means, is strictly prohibited.
3-4
CONNECTING TO VEHICLE SYSTEMS
1. Route fuel line separate from electricalwires or
separate them with conduit or other sheathing.
BAlTERY POSITIVE (+) CABLE
/aWAR”GI Fuel presents thehazard of fire
or explosion that can result in severe
personal injury or death. Do not smoke or
allow any flame, spark, pllot light,
arc-producingequipment or other ignition
sources near fuel or in the installatlonarea.
Read the important safefy precautions in
the Fuel Systems section.
.I
I
FUEL LINE
u1m
I
FIGURE 3-11. FUEL AND ELECTRIC LINES
2. Gasoline Fuel: Connect 1/4-inch I.D. fuel
hose (typeSAE 30-R7)to the barb fitting on the
generator set.
LPG Fuel: Connect 3/8-inch I.D. fuel hose
(see LPG Fuel Sysfem) to the barb fitting on
the generator set.
Secure fuel hose to barb fitting with a stainless
steel clamp (worm-gear type). Do not over
tighten clamp or hose could be damaged.
FIGURE 3-12. FUEL LINE CONNECTION
3. Installa listed 1/2-inchflexible conduitover the
NFPA 70 (NEC) 551-30 (e)
AC wiring. (Use water-tight conduit for underfloor mounting.) Secure the conduit to the
fitting on the generator set.
,
Accidental starting can cause
severe personal injury or death. Do not
connect the battery cables to the genset
startlng battery until instnrcted to in the
Initial Start and Checks section.
FIGURE 3-13. AC CONDUIT CONNECTION
4. Remove the service access cover. Route the
battery positive (+) cable through the access
hole inthe left side ofthe housing. Connectthe
battery positive (+) cable to the B+ connection
on the start solenoid.
START
SOLENOID
publication(+)
of this document,
FIGURE 3-14. Redistribution
BATTERY or
POSITIVE
by any means, is strictly prohibited.
CONNECTION
3-5
5. Connect the battery negative (-) cable (with a
W8-inch ring terminal) to the ground connection on the left side of the base. Refer to the
Electrical Connections section for important
genset grounding instructions.
LQWAR”GjFai1ure to ground the genset
properly can result in Injwy or death. If the
genset is not grounded to the vehiclechassis thtvugh the baitery negative (-) cable,
atfach an 8 AWG equipment ground wlre
between the vehicle chassis and the battery negative (-) connection.
FIGURE 3-15. BAlTERY NEGATIVE (-)
CONNECTION
6. Route the remote control connector through
the access opening in the left side of the housing. Connect the remote control connector to
the mating connector inside the genset.
TO REMOTE
7. Proceed to the next section on connecting the
exhaust system.
REMOTE CONTROL
CONNECTION
EXHAUST SYSTEMS
FIGURE 3-16. REMOTE CONTROL
CONNECTION
lCgWAR”G1Ekhaust gas presents the hazard of
severe personal injury or death. Do not
temrlnafe the exhaust pipe under the vehicle.
The exhaust pipe must not tennlnate so #?at
any vent) window, or opening Into the llving
area is wlthln the triangular area shown in
figure 3-21. Read the important safety
precautions In the Exhaust Systems section.
1. Connect the exhaust pipe (1 1/2-inch O.D. or
13/8-inch I.D., installer-supplied) to the genset
with a U-bolt clamp.
A short-radius exhaust elbow is supplied with
the generator set for installations that require a
tight turn of the exhaust pipe at the outlet. Use
the Onan-supplied exhaust shield for compartment mount installations whenever the
exhaust elbow is turned down for through-thefloor installations.
UBOLT
/
EXHAUST
PIPE
I
EXHAUST
SHIELD
~
or publication of this document,
FIGURE 3-17.Redistribution
EXHAUST
PIPE CONNECTION
by any means, is strictly prohibited.
316
2. Do not terminate the exhaust tail pipe under
the vehicle. The exhaust tail pipe must
ANSI 119 2 PAR. 3-4.3
terminate 1 inch (25.4 mm) beyond the side or
end of the vehicle.
MTEND TAlL PIPE
In
PAST OUTSIDE
EDGE OF VEHICLE
OUTSIDE EDGE
OF VEHICLE
d
-elk
1"
miin
FIGURE 3-18. TAIL PIPE EXTENSION BEYOND
VEHICLE
3. Support the tail pipe as close to the outside of
the vehicle as possible.
~
1
LOCATE TAIL PIPE
HANGERCLOSE
OUSIDE EDGE OF
VEHICLE
TAIL PIPE HANGER
FIGURE 3-19. EXHAUST PIPE SUPPORT
4. Termination of the exhaust tail pipe below the
angle of departure (lowest point on rear of
vehicle to the tire ground contact point) must
be protected by a skid bar, trailer hitch, or
some frame member.
L
ANSI 119.2 PAR. 3-4.3
LOCATETAlL
PIPE IN SHADED
..
AREAORABOVE
I
KID BAR
I
US186
FIGURE 3-20. TAIL PIPE PROTECTION
5. Be aware that any vent, window, or opening
that can be opened and that is not permanently
sealed from the vehicle living space, can be an
avenue for carbon monoxide.
The tail pipe must not terminate so that any
vent, window, or opening into the living area is
within the triangular area shown in Figure3-21.
ANSI 119.2 PAR 3-4.3
NO OPENINGS INTO
VEHICLE'S INTERIOR,
INCLUDING ENTRY
WORS, ARE ALLOWED
IN THIS AREA
6. Refer to each of the sections in this manual for
detailed installationinstructionsand for important safety precautions. Always follow the
procedures in the Initial Start and Checks
section when the installation is complete.
FIGURE 3-21.Redistribution
TAIL PIPE
or LOCATION
publication of this document,
by any means, is strictly prohibited.
3-7
Redistribution or publication of this document,
by any means, is strictly prohibited.
4. Mounting
If insulation is used to line the compartment,
increase the compartment size to include the
width of the insulation.
2. If any part of the compartment is above the
vehicle floor, separate the compartment area
from the living quarters and fuel supply with
vapor-tight walls.
3. Line the compartment walls with 26gauge
galvanized steel or a material of comparable
strength and fire resistance (see NFPA 70,
NEC and California Title 25 for complete
detaiIs).
GENERAL
MicroLite generator sets are designed for either
compartment or underfloor mounting. Choose the
appropriate part of this section and carefully follow
the instructions. Read any applicable kit instructions before installingthe generator set.
COMPARTMENT MOUNT
In a compartment mount, the genset is installed in a
frame that is part of the vehicle. This frame must be
constructed according to safety-approved specifications (see Compartment Construction in this
section).
Vehlcles that are unusually sensitive to vlbration
may requlre secondary isolation and a larger
laWAR"GIExhaust gases present the
hazard of severe personal injury or death.
Make the comparfmenfwaiis vapor-tightto
the Interior of the vehicle to prevenf
exhaust fumes fmm entering.
4. Construct a compartment floor that will prevent
compartment.
Unlessthe set will be removedfrom underneaththe
vehicle, make the access opening large enough to
remove the set. Allow enough clearance for
removal of the access cover. See Figure 1-1.
oil, fuel or water accumulation. Provide
openings in the compartment floor according
to the Compartment Floor Plan, Figure 4-2.
Do not use absorbent soundproofing material
on the comparlment floor or oil and gas could
cause a fire hazard. The floor should have as
few openings as possible, to reduce the noise
level.
Minimum compartment dimensions are shown in
Figure 4-1. Clearancesbetweenthe genset and the
compartment are included in these dimensions.
Allow for air intakeat the front left side of the set and
air discharge at the bottom of the set. Air inlets to
the set compartment must not allow dirt, rocks,
water, or slush to reachthe set. Minimize dust and
salt entrance into the compartment. (See Venfilafion section.)
5. Equip the base with an oil drain hole to the
outside of the compartment. Do not mount the
exhaust pipe below the oil drain hole.
1-
Exposed above-floor section of exhaust pipe must
be shieldedwith the Onan-suppliedexhaust shield.
Compartment Constructlon
Fire presents the hazard of severe personal injury or death. Do not positlon the exhaustplpe directlybelow a draln
hole. Hot exhaust can ignite fuel or 011.
6. Secure the genset mounting base to the support frame with four 5/16-18 UNC grade 5
screws. The mounting bolts must not extend
morethan 112inch (3
Imm)intothe base. See
Figures 4-1 and 4-2. Torque 5/16 inch mounting screws to 15 ft Ibs (20 Nam).
1. Install the gen set in its own compartment.
Allow a minimum of W i n c h (6.4 mm)
clearance at the front, sides, back and top of
the set. See Figures 4-1 and 4-2.
Allow additional front (service side) clearance
if the vehicle air inlet is not aligned with the
genset air inlet, to obtain the minimum free air
inlet of 40in2(258 cm2).
Example: If the air inlet is alongthe entire bottom front edge of the compartment, increase
the front clearance to 1-113 inches (34mm).
40 in2 i 3 0 in (air inlet length) = 1-1/3in.
1-
If the mounting base is not fas-
tened securely to the vehlclecomparfmenf,
road vlbration wiil damage thegenset components. Use iong enough screws for at
ieast 1-1/2 threads to extend through the
weld nut. The mountingbolts must not exor publication of this document,
7/2 in. (13mm)
intoisthe
base.
tend more thanRedistribution
by any means,
strictly
prohibited.
4-1
12-9 --.
-I
M)
3.8.2 IN
I
~
I -
. .- -
_.. -
NOTES I
Top
GENW
pwjINEpD
SERVICE SIDE
BACKSIDE
HIN FREE AIR
uffpkI#.rr
0.
6.4
6.4
6.4
6.4
6.4
258&
.25 IN
IN
.=IN
.25
.25 IN
.25 IN
&IN.
76.2KG168LB
4. MHAusf PIPE SHIELD Musf BE
USED Fa?COCPARTMHT INSTALLATIONS. FOR MDERROOR
INSTALLATIONS IT MAY BE
RMOVED.
~-
5. HINIPUH INSTAuAfIoN SIZE IS
URGERANDVARIESWITH
MOUJTWG KIT USED
Redistribution or publication of this document,
FIGURE 4-1. COMPARTMENT OUTLINE DRAWING
by any means, is strictly prohibited.
4-2
712
t-
28.0
IN
-7
I
11.6
IN
4x1
Mou
13
PRO
am
2nd
-
-39.a
1.57
OIL # U I N
64'
17
IN
IN
-292.1
11.5
i24m
4.9r
f
I
3
214.2
8.4, IN
IN
t
-28.8
1.14
IN
t
27.3
1.07
-I
IN
1
38.3
1.50
PI
-AIR I N A S
L:
649.7
25.6lN
I
IL
m
13
iP(
#zApuGE
DRAWING NOTES
ON PAGE 4-2
FIGURE 4-2. COMPARTMENT FLOOR PLAN
Redistribution or publication of this document,
by any means, is strictly prohibited.
4-3
Under-floor mounted sets do not require the
exhaust pipe heat shield.
UNDER-FLOOR MOUNT
In an under-floor installation, the generator set is
mountedbelow the floor and outsidethe passenger
compartment of the vehicle. This type of installation must comply with the Installation Codes and
Safety Recommendations (see Introduction section). Read this section for general application information, and study the under-floor housing kit instructions for more information on under-floor installations and important safety precautions.
laWAR"G]Fire presents the hazard of severe
personal injury or deafh. Install a metal barrier
between the generator set and any wooden or
flammableparts of the vehicle.
Generator Set Location
Figure 4-3 shows the most common mounting
areas for a generator set. Protectthe generator set
from road splash and debris. If possible, drive the
vehicle through mud and slush to test the
installation.
The vehicle stmcture must be able to support the
weight of the generator set (see Specifications
section). The vehicle manufacturer and/or the
installer must provide a structurally sound support
frame, using tubing, angle brackets, or steelreinforced plywood or other composition board.
Plywood or particle board can be reinforced with
3-inch (76 mm) or larger washers or a full metal
plate.
Leave a minimum space of 1-112 inches (38.1 mm)
between the generator set and the vehicle skirt for
an air inlet if a side air inlet is not aligned with the
genset air inlet. Provide a minimum back, top, and
side clearance of 0.25 inches (6.4 mm).
The air inlet opening to the generator set compartment must not admit dirt, rocks, water or slush. The
entrance of dust and salt into the compartment
must be minimized. Baffles may be needed to
protectcertain areas. See the Ventilationsection of
this manual for more detailed information.
Ifthe generator set will be installedbelow a wooden
floor, a metal barrier must be installed between the
wooden floor and the generator set.
Use 26-gauge (0.021 7 inch) painted or galvanized
sheet metal or a material of comparable strength
and fire resistance (see NFPA 70, NEC and
California Title 25 for complete details).
Redistribution or publication of this document,
FIGURE 4-3. COMMON GENERATOR SET MOUNTING
AREAS
by any means, is strictly prohibited.
4-4
MountingBrackets: The vehicle must be adapted
for use with the under-floor mounting bracket kit.
The construction of the vehicle must support the
weight of the generator set (see s~~ificafions
section). it is the vehicle manUfaCtUrer and/or the
installer's responsibility t0 provide hardware t0
attach the mounting brackets.
Access Openjng; Provide an access opening to
the generator set on the side of the vehicle. Make
the access large enough to allow for removal of the
generator set access cover. AISO allow access to
the oil drain located at the bottom of the set, SO the
generator set does not have to be removed for
servicing (see Figure 1-1for service locations).
Review the €xhaust System section. Plan clearances for moving or removingexhaust components
when the set is removed for service.
Redistribution or publication of this document,
by any means, is strictly prohibited.
4-5
Redistribution or publication of this document,
by any means, is strictly prohibited.
5. Ventilation and Acoustics
VENTILATION
1-
Operating thegenerator set wjth the
cover removed can cause equipment damage.
Generator set cooling air does not circulate
properIy with the access cower removed. Do
not operate the generator set with the access
cover removed.
The most important factors of ventilation for an air
cooled generator set are sufficient incoming air (for
combustionand cooling) and adequate exhausting
of heated air.
When designing the air inlet and outlet for the set
compartment (see Figures 4-1 and 4-2), allow for
the restriction of grilles and ductwork: some
expanded metal grilles provide only 60 percent
free-air inlet area per square foot. The most
efficient grille provides only 90 percent free inlet
area per square foot. Obtain the free inlet area of
the grille material from the material supplier.
Multiply the grille area by the free area percentage
to get the free inlet area. The minimum size of the
free air inlet is 40 in2 (258 cm2). The compartment
size, air inlet opening size and grille design must
meet the minimum air inlet opening requirements.
A fan draws cooling air through the inlet on the
generator end and pushes it across the generator
and engine cooling fins. The heated air is expelled
through the air outlet on the bottom of the set See
Figure 5-1.
Make certain that nothing obstructs or restricts the
air intake and air outlet. Air recirculation must be
minimized. If a noise or dust deflector are addedto
the set, it must be located a minimum of 6 inches
(150 mm) below the generator set and it must be
open on three sides.
1-
Exhaust gas presents the hazard of
severe personal injury or death. Because discharged coolingair can contain deadly exhaust
gas, never use discharged cooling air to heat
the vehicle.
Air ducting must provideadirect free-airflow pathto
the generator set, with minimal bends. The duct
must be smooth and non-restrictiveto airflow.
Air inlet openings should be located as high as
possible to allow for convection cooling of heated
air from the generator set Compartment after unit
shutdown. Otherwise, hard starting could result
from vapor locking, hot combustion air, etc.
1-
Fuel and fuel leakage present the
hazanl of fire or explosion, which can cause
severepersonal injury or death. Theventiiation
system should provide a constant flow of air to
expel any accumu!ation of fuel vapor. The
generator set compartmentmust be vapor-tight
to the vehicle inferior, to keep fumes from
entering the vehicie.
Locatingthe free air inlet openingin thevehicle skirt
or side access door is recommended. If the vehicle
skirt does not extend to or below the bottom of the
generator set, provide an extension. Inlet air taken
from below the vehicle must come from the skirt
side of the compartment.
FIGURE 5-1. COOLING AIRFLOW
Redistribution or publication of this document,
by any means, is strictly prohibited.
5-1
ACOUSTICS
0
The genset is designedto minimize noise levels. If
additional noise reduction is required, line the top
and sides of the genset compartmentwith a 1 inch
(25.4 mm) thickness of sound absorbing material.
The optionalexhaust resonator can also be usedto
lower the noise level. Locating the air inlet away
from the genset air inlet opening will reduce the
noise level; however, additional compartment
spacewill be required (see CompartmentMounting
in the Mounting section). See the following
guidelines to construct the housing.
0
1-1
High temperatures in the compartment can present the hazard of fire,
which can result in severe personal injury
or death. To meet ANSI and CSA temperature rise requirements for vehfcles, fhe
layer of insulatfon must not reduce the
minimum compartment size specified in
Figure 4-1.
Make certain that all joints and comers of the
compartment are vapor-tight to the interior/
cab of the vehicle. Lining the compartment is
less effective if openings, cracks, doors and
joints are not sealed. Seal the compartment
door edge to eliminate noise leaks around the
door Denmeter.
.
,
Cover the back, top and sides of the compartment (not the compartment base) with
fiberglass or other self-extinguishing, soundabsorbent material. Sound insulation and
adhesive should be rated at ZOOOF (90OC)
minimum. See Figure 4-2 to design the set
compartment for optimum noise reduction.
A combination of materials can reduce noise
more than a single materialcan. For instance,
a sheet of lead combined with a layer of
acoustical material is more effective than
either one alone.
. .. .. . .. . '
.. -' *: .
..
.
.
SERVlCE SIDE
ACCESS PANEL
. .. .
SELF-ECnNGUISHING
L/-./- %.--/-.I
ACOUSTICAL MATERIAL 112 TO 1
INCH (12.7 TO 25.4 MM THICK)
or publication of this document,
FIGURE 5-2. NOISE REDUCTION COMPARTMENT Redistribution
DESLGNby any
means, is strictly prohibited.
5-2
6. Exhaust System
with a base of 2 feet measured one foot horizontally
from the pipe in either direction.
GENERAL
.
Plan the exhaust system carefully. A proper
installation is not only vapor-tight, it is also quieter
and safer. Use the Onan-supplied exhaust shield
for compartment installations whenever the exhaust elbow is turned down for through-the-floor installations. The exhaust shield can be discardedfor
under-floor installations. The exhaust system installation must comply with all applicable standards, local codes and regulations. Study the following recommendations.
1-1
Ekhausi gas presents the hazard of
severe personal hjuw or death. Do not
temlnate an exhaust pipe under the vehicie.
?he iaiipipe must not terminafe so that any
wenf, window, or opening into the living area Is
withln the triangular area shown ln Figure 6-7.
Keep all openings dosed when the generator
set is runnlng.
To reduce the chance of damaging the tailpipe and
emitting exhaust gases under the vehicle, make
certain that no part of the exhaust system intrudes
into the departure angle or approach angle of the
vehicle, unless it is protected by a skid bar or other
protection device. The shaded areas in Figure 6-1
illustrate typical mounting locations.
MUFFLER RECOMMENDATIONS
The Onan-installed spark arrester muffler is U.S.
Forest Service-approved, and meets code requirements. Failureto provide and maintain a spark arrester can be a violation of the law.
r
EXHAUST INSTALLATION GUIDELINES
jExhaustgaspresents the hazard of
severe personal lnjuv or death. Do not mount
any potfion of the exhaust system Into the
approach or departure angle unless If Is
adequaiely protected. Use only Onan-specifled
exhaust q u l m e n t wffh thegenerator set Use
a sufflcient number of hangers to prevent
disiocatlon of the system.
The exhaust system must be placed no closer than
TAILPIPE RECOMMENDATIONS
Liability for damage or injury, and warranty expenses dueto use of unapprovedmufflersor installation modifications becomes the responsibility of
the person installing the substitute muffler or performing the modifications. Contact an Onan distributor for approved exhaust system parts.
3inches(76 rnm) from combustiblematerial (wood,
felt, cotton, organic fibers, etc.), or be so located,
An exhaust tailpipe is not supplied with the
generator set because length requirements vary
between vehicle manufacturers. A short-radius
exhaust elbow is suppliedwith the generator set for
installations that require a tight turn of the exhaust
pipe at the outlet. Referto the following recommendations for information and safety considerations.
insulated or shielded that it does not raise the
temperatureof any combustiblematerialmorethan
117OF (65OC) above the ambient air inlet temperature.
4
The exhaust system must extend a minimum 1 inch
(25 mm) beyond the perimeter of the vehicle. Do
not terminate the exhaust tailpipe under the
vehicle. Be aware that any vent, window, storage
compartment or opening that can be opened and
that is not permanently sealed from the vehicle
living space can be an avenue for carbon
monoxide.
Use 1-112 inch O.D. (1-3/8inch I.D.) 18-gaugealuminized steel or stainless steel tubing for tailpipe.
1-
Exhaust gas presenfs the hazard of
severe personal injury or death. Do not use
f8exible exhaust tal@$%?, because if can leak or
break from road shock of vibraflon Do nsf
terminate the exhaerst system mder the
vehlck Direct exhaust gases a m y from any
window, door, or compartmenf openings. Do
nsf opefate the generator set without an
exhaust tallpipe. Redistribution or publication of this document,
The tailpipe must not terminate so that any vent,
window, or opening into the living area is within the
triangular area shown in Figure 6-1. This area is
defined as an isosceles triangle with a height of 3
feet measured from the tailpipe termination and
by any means, is strictly prohibited.
6-1
Use a 1-318 inch U-bolt type automotive muffler
clamp to connect the exhaust tailpipe to the exhaust elbow.
If the tailpipe extends more than 1-1/2 feet (0.46m)
from the generator set, attach an automotive
tailpipe hanger for additional support. Also use
additionalautomotive type tailpipe hangers every 2
to 3 feet (0.6 to 0.9 m) of tailpipe run. Always
support the exhaust system at or near the
perimeter of the vehicle to prevent the pipe from
being damaged and pushed up under the vehicle
skirt. Attach hangersto steel framework, not wood
or other floor materials. Refer to Figures 6-2 and
6-3 for typical tailpipe installations.
1-
Excessive exhaust back pressure
can cause engine damage. If a &i/p/pedeflector
is used, make sure It Is large enough to prevent
back pressure.
1-
Water vapor can cause engine damage. Do not connect the generator set exhaust
to the vehicle exhaust system, because water
vapor from one engine can damage the other.
P
J
r
f ,
d
THE TAILPIPE MUST NOT
TERMINATE SO THAT ANY VENT,
WINDOW OR OPENING INTO M E
UWNG AREA IS WITHIN M E
TRIANGULAR AREA.
SEALED WINDOW
/
TAII
7,
-...............
..............................-.-.
e
.
.
.................
..............
I
n..
..........-
....--.............
*.__I
EkUST
TAILPIPE
TERMINATION
ninr
SKID BARS
TAILPIPE INSTALLATlON
Redistribution or publication of this document,
by any means, is strictly prohibited.
FIGURE 6-1. TAILPIPE INSTALLATION
6-2
SHORT-RADIUS
HANGER BRACKET
TAlLMPE NOT
Mslllobr
SET
FIGURE 6-2. EXHAUST SYSTEM EXAMPLES FOR COMPARTMENT MOUNT INSTAUATIONS
LENGTH OF TAILPIPE)
Redistribution or publication of this document,
FIGURE 6-3. EXHAUSTSYSTEM EXAMPLES FOR UNDER-FLOOR MOUNT INSTALLATIONS
by any means, is strictly prohibited.
6-3
Redistribution or publication of this document,
by any means, is strictly prohibited.
7, Fuel System
Recommended Fuel
GENERAL
a
Use clean, fresh regular grade gasoline.
This section describes fuel system installations for
recreational vehicles.
JBWAR”G1Fuel presents the hazard of fire or
explosion that can cause severe personal
injury or death. Never fill the fuel tank when the
engine is hot or is running. Do not permlt any
flame, spark, pilot. lighf, cigareffe or other
ignition source near fhe fuel system.
Fuel presents the hazard of fire or
explosion that can result in severe personal
injury or death. Do nof smoke or allow any
flame, spark, pilot light, arc-produclng equip
ment or other ignition sources around fuel or
fuel components, or in the insfallatlon area.
Keep a type ABC fire extinguishernearby. The
ventilation system must provide a constant
flow of air to expel any accumulation of &el
vapor while the vehicle is in transit. Cornpartmenfs must be vapor-tight fo the vehicle interior fa prevenf any fumes from entering these
areas.
Fuel Consumption
Generator set fuel consumption vanes proportionately to differing electrical loads. Refer to the
Specifications section for approximate fuel
consumption at no load, half load, and full load.
Fuel Line Installation
Vehicle fuel systems operate at a specified fuel
pressure. Forthis reason, do not change or remove
the fuel fill tube, fill limiter vent, vapor canister,
vapor lines, filler cap and all parts of the fuel system
without the approval of the vehicle manufacturer.
Check the filler cap to make sure that the pressure
vacuum relief valve functions properly at 1-112psi:
replace it if necessary.
FUEL SYSTEM
Fuel System Provisions
Use a separate fuel pickup tube or a separate fuel
tank. Do not tie into the vehicle fuel supply line. On
some vehicles, the generator set can share the
vehicle fuel supply tank with the vehicle engine.
Connectionto the vehicle fuel tank must be made
according to the chassis (vehicle) manufacturer‘s
detailed instructions. See Fuel Line Installation, in
this section.
Do not tie the generator set fuel line into the vehicle fuel supply line. Unauthorized fuel system
modifications can cause dangerous operatingconditions.
Tying a generator set fuel line into a vacuum
supply line (vehicle fuel pump at the engine)
can cause the generator set to starve for fuel at
highway speeds or during acceleration.
Tying a generator set fuel line into a pressure
supply line (vehicle fuel pump in the fuel tank)
can cause poor generator set operation and
create a hazard of fire or explosion caused by
fuel leakage.
The fuel pump has an integral fuel shutoff valve as
a safety feature. If the vehicle fuel tank becomes
pressurized(3psi maximum), the positivefuel shutoff prevents the engine from being flooded when
the genset is not running. The vehicle fuel tank gas
cap should relieve pressure at 1-1/2 psi.
Redistribution or publication of this document,
by any means, is strictly prohibited.
7-1
Some vehicle manufacturers permit tying into the
fuel return line on high pressure fuel systems.
Contact the vehicle manufacturer for details and
approval. The fuel return line pressure at the point
of connection must not exceed 1-112 psi, or
carburetor flooding could result.
Connect 1/4-inch I.D. fuel hose (type SAE30-R7) to
the barb fitting on the generator set (Figure 7-1).
Securefuel hose to barb fittingwith a stainless steel
clamp (worm-geartype). Do not over tighten clamp
or hosecould be damaged. Fuel hose must be long
enough to allow generator set movement, and
prevent binding, stretching or breaking.
1aWAR"GIGasoline presents the hazard of
explosion or fire, which can result in severe
personal injury or death. Do not connect the
generator set fuei line to thepressurizedpart of
the vehicle fuei system. Floodlng of the
generator set engine and compartment can
occur, resulting in a fire hazard.
Onan recommends copper or hot dip coated
seamless steel tubing (conformingto ASTM A-254)
and double flared connections for long runs
between the fuel tank and the flexible connector to
the generator set.
Run fuel line at the same height as the top of the
fuel tank (or above the tank) to a point as close to
the genset as possible. This reducesthe danger of
fuel siphoning out of the tank if the line should
break. The maximumfuel pump lift oithe genset is
3 feet (0.91m).
-1The
generator set could starve for
fuel when the vehicle is opemted at highway
speeds lf its fuel line is connected to the main
fuel line with a tee. Thegenerator set fuel pump
has neither the capaclty nor fhe power to
overcome the draw of the vehicle engine fuel
pump. For this reason, use a sqamte fuel line
to thegenerator set, or use a separate fuei tank.
Keep fuel lines away from hot engine or exhaust
areas, to reduce the chance of vapor lock. Fuel
lines should be accessible and protected from
damage. Use metal straps without sharp edges to
secure fuel lines. Do not run fuel lines where they
may contact sharp or rough surfaces, orwhere they
may be kinked, pinched, chaffed, or struck.
If a separate connection is not supplied for the genset, add a second fuel pickup in the tank This
pickup should not extend below the bottom 114 of
the tank, so the vehicle will run after the generator
runs out of fuel.
)QWAR"GIGasollnefuei may be accidenbliy
ignited by electrical sparks, presentlng the
hazard of fire or explosion, which can result In
severe personal Injury or death. For this
reason, when installing the generator set:
Do not tie electrical wiring to fuel lines.
NEL~OSE
Do not run electrical ilnes and fuel lines
through the samecompartment openings.
Keep electrical and fuel lines as far apart as
possible.
Piace a physicai bamler between fuel llnes
and electrical lines wherever posslbie.
if electrical and fuel lines must pass
through the same compartment opening,
make certain that they are physlcally
separated by running them through
indlvidual channels, or by passing each
line thsvugh
a separate piece of tubing.
Redistribution or publication of this document,
CLAMP
FIGURE 7-1. FUEL LINE CONNECTION
by any means, is strictly prohibited.
7-2
a
Fuel Consumption
LPG FUEL SYSTEM
Generator set fuel consumption vanes proportionately to differing electrical loads. Referto the Specifications section for approximate fuel consumption
at no load, half load, and full load.
Fuel System Provisions
The LPG models are designed to operate on LP
Vapor at 6 to 8 ounces per square inch (10 to 14
inches of water column). A regulator must be installed between the fuel cylinder and the genset
that reduces the cylinder pressure to 6 to 8 ounces
per square inch (10 to 14 inches of water column).
Propane Fuel Lines and Supply Tank
1-
LPgas (Propane)presents the hazard of fire or explosion that can cause severe
personal Injury or death. Do not permit any
flame, spark, pilot light, cigarette, or other
ignltion source near the fuel system. Keep an
ABC type flre extinguisher nearby.
LQWAR"GI LPG
fuel presents the hazard of
exploslon or flre that can result in severe
personal injury or death. Do not connect the
genset fuel ilne directly to the LPG fuel cylinder
or fuel leakage could result from excessive fuel
Inlet pressure. A regulator must be used beWeen the genset and the fuel cylinder that
reduces cyllnderpressureto 71 inches of water
column.
Review each of the codes that apply to LPG generator set installation. Paragraph 2-1 1 (LP-Gas
Engine Fuel installations) of NFPA Pamphlet 501C
and paragraph 3-6.2.5 of NFPA 58 (piping hose
and fittings). These sections deal with fuel tanks
and lines, but does not cover all applicable codes
and regulations. Obtain this pamphlet by writing to
the address listed in the beginning of this manual.
LPG genset operation is highly sensitive to
vanations in altitude, temperature, and fuel BTU
content. For this reason, the fuel system may need
to be adjusted after installation. Referto the Service
Manual if adjustments are required.
Mount a manual shutoff valve on the fuel supply
tank. When installing the fuel lines, keep these factors in mind:
Install LPG fuel lines to be accessible, but
protected from damage.
Use metal straps without sharp edges to
secure fuel lines.
Keep fuel lines away from hot engine or
exhaust.
Do not run fuel lines next to electrical wiring.
Recommended Fuel
Use commercial propane or HD-5grade LPG in a
mixture of at least 90 percent propane. Propane
fuels other than HD-5 may contain more than 2.5
percent butane, and may cause poor engine
0 C).
starting in low temperatures (below 32' F or '
Redistribution or publication of this document,
by any means, is strictly prohibited.
7-3
Do not connect the genset fuel supply line to any
appliance fuel supply line. The genset can draw
fuel away from other appliances and cause a flame
out. To prevent the possibility of flameout, the fuel
supply system must be designed to deliver sufficient fuel for normal operation of the genset and
other appliances at the expected temperature conditions. It may be necessaryto use a separate fuel
tank for the genset if sufficient fuel cannot be supplied with a single tank system.
LPG fuelpresenfs fhe hazard of explosion or fire which can result in severe personalinjury or deafh. If flameout occurs wifhan
unvenfedappliance, LP gas can accumulate inside the vehicle and creafe a safe& hazard. Do
not connect thegenerator sef fuel supply line to
an LPgas supply line that is supplying another
appliance.
Testing Fuel System fur Leaks
Before operating the set, test the LPG fuel system
for leaks. Testing must conform to procedures
listed in NFPA-58, or to the UL recommendedtest
procedure, as follows:
After assembly and before initial operation, all fuel
system connections, hose, valves, regulators, and
fittings must be tested and proven free of leaks using a soap-and-water (or equivalent) solution while
the system is under gas or air pressure of at least
90 psi (620 kPa).
Other approved methodsof detecting leaks may be
used if appropriate. This test shall NOT be made
with a flame.
/aWAR"G(f PG fuelpresenfs the hazard ofexplosion or fire which can result in severe personal injury or death. Do not smoke or allow
any flame, spa&, pilot light, arc-producing
equipment or other ignition sources around
fuel or fuel components.
Redistribution or publication of this document,
by any means, is strictly prohibited.
*
8. Electrical Connections
either meet this insulationrating, or be a larger size
(see National ElectricalCode, NFPA 70).
GENERAL
This section covers installing the generator set
electrical system for:
Use stranded wire for all load connections. Load
wiring must be appropriately sized and insulatedfor
the specified current rating. Grounding must
comply with all codes.
6
0
0
Connecting the load
Connecting a remote control
Connecting the battery
Conduit
Connectthe battery last, to avoid accidentally starting or short-circuiting the set during installation.
Install the generator load conductors in a flexible
conduit. Cut the conduit to length, leaving extra
wire for the junction box connections. Connecting
wires must be correctly sized and insulated for the
current rating. Round off or cover the ends of the
conduit, to prevent its sharp edges from cutting the
insulation.
Accidentally starfing the generator
set during Installatlon can cause severe personal Injury or death. Do not connect the
starting battery until Instructed to do so In fhe
lnltial Start and Checks section.
Use waterproof conduit if the conduit is run outside
The wiring must meet all applicable electrical
codes. For this reason, a qualified electrician
should install and inspect the wiring.
'
of a compariment.
To reposition the 90' conduit fitting, loosen the
locking nut (toothed ring), turn fitting counterclockwise to desired location, and retighten locking nut.
Mount switches and controls securely, to prevent
damage from vibration and road shocks. All
switches must be vibration-proof to prevent accidental opening or closing while the vehicle is in
motion.
Seal all openings made for conduit into the vehicle
interior, so exhaust or fuel vapor cannot enter the
living quarters. Flexible metal conduit must be
sealed internally at the end where it terminates
inside the junction box or panel board (flexible
.
conduit is not vapor-tight along its length).
AC WIRING
Wlre Types
The leads attached to the generator set output
must have a current rating not less than 115
percent of the nameplate current rating of the
generator set. The Onan-supplied AC feeder
conductor insulation is rated at 125OC. Wires
connected to the Onan feeder conductors must
1-1
Exhaustgas and fuel fumespresent
the hazard of severe personal Injury or death.
To prevent exhaust gas and fuel fumes from
entering the vehlcle Interior9seal a11 opnhgs
made .for conduit, wlrlng, etc. Also seal the
wiring within the condulf itsek Use a silicone/
nrbber based sealant.
Redistribution or publication of this document,
by any means, is strictly prohibited.
8-1
Wiring Disconnect Method
There must be no chancethat an outside power
source be connected to the generator set.
Feeder conductors from the set compartmentmust
terminate in a 120-volt double-pole, double-throw,
positive-off switching device mountedahead of the
vehicle distribution panel: or they must connectto a
generator set receptacle box. Figures 8-1 and 8-2
show examples of the wire connection.
Line Circuit Breaker
The generator set has a line circuit breaker
mounted on the front of the set mounted control
panel. The breaker providesshort circuit and overload protection for the generator.
Load Connections
The generator output voltage and maximum
current rating are specified on the generator nameplate.
Load wiring must be appropriately sized and
insulated for the specified current rating. Grounding procedure must comply with codes.
A lead to be connectedto an output feeder conductor shall not be more than two AWG sizes smaller
than the output lead conductor and the insulation
shall be:
Rubber (with braid), neoprene, or thermoplastic, with a wall thickness of at least 0.030 inch
(0.76 mm).
Other material having the same or better
electrical and mechanical properties.
~ I E l e c t r i c ashock
i
can cause severe
personal lnjuy or death. Use only approved
power supply assemblies. Never remove the
grounding pin from assemblies. Incorrect
ground or no ground can cause the vehicle to
become electrically "hof't Equlp the vehicle
with adequate Ground-Fault Clrcult frotectlon
devices to meet fhe National Eiectrlcal Code
(NFPA 70,551-9[C])and for personal safety.
1-f
Gasoline fuei can be accidentally
ignited by elecfrical sparks, presenting the
hazard of fire or expioslon, whlch can resuit in
severe personal injury or death. For this
reason, when insfalling the generator set:
Do not tie electrical wiring to fuel Ilnes.
Do not run electrical llnes and fuel lines
through the same compatfment openings
unless they are physically separated by
runnlng them through lndlvldual channels,
or by passing each llne through a separate
piece of tubing.
Keep efectricaland fuelllnes as iaraparfas
possible.
Place a physical barrier between fuel lines
and electrlcal fines wherever possible.
Redistribution or publication of this document,
by any means, is strictly prohibited.
b
*IMPORTANTI
GROUND-FAULT CIRCUIT INTERRUPTERS (GFCIS) ARE
REQUIREDBY THE wnow ELECTRICALCODE (NFPA~O,
551-9 IC]) INAII.MTERNALANDSOMElNTERNALOUTIETS.
TO PROPERLY EQUIP YOUR RECREATIONALVEHICEwmt
THESE PROTECTION DEVICES, CONTACT YOUR RV
MANUFACTURER OR DEALER FOR RECOMMENDATIONS.
.
.....,. (IF REQUIRED)
FLEXIBLE
CONDUIT
r
Y
\
DOUBLE POLE
DOUBLE THROW
SWITCHING DEVICE
I-"
MAlN
DISTRIBUTIONPANEL
BREAKER
HACR
BREAKERS
FOR AIR
CONDITIONERS
POWER SUPPLY CORD
I
I
GFCI*
. BREAKERS
FIGURE 8-1. SWITCHING DEVICE WIRING FOR UTILITY POWER
Redistribution or publication of this document,
by any means, is strictly prohibited.
*IMPORTANTI
GROUND-FAULT CIRCUIT INTERRUFTERS (GFCIS) ARE
REQUIRED BY THE rutnow ELECTRICAL CODE ~ F P A70,
551-9 [C])IN ALL EXTERNALAND SOME INTERNALOUTLETS.
TO PROPERLY EQUIP YOUR RECFEATIONALVEHICLE WTH
THESE PROTECTION DEVICES, CONTACT YOUR RV
MANUFACTURER OR DEALER FOR RECOMMENDATIONS.
POWER SUPPLY CORD
I
1
FIGURE8-2. UTlUTY POWER CORD FOR SWITCHING
Redistribution or publication of this document,
by any means, is strictly prohibited.
Y
Location of the remote control can vary by application. Refer to the instructions supplied with the
remote control kit for more installation information
and important safety precautions.
DC WIRING
Remote Control (Option)
I
Onan offers optional remotecontrol kitsthat can be
connected to the generator set (Figure 8-4). The
Standard Remote Control includes a stadstop
switch and an indicator lamp. The Deluxe Remote
Control has these items plus a running time meter
and a battery condition meter.
The remote control connector plug is located inside
the housing (Figure 8-3). Contact an Onan dealer
for the proper remote connector plug and wiring
harness lead assembly.
I-[
Use of a remote control swftch
other than the optional Onan remote controls
a n result in generator set starting battey
dfscharge In the stop condiflon. The remote
controlStarUStop switchmust be a momenfarvtype switch In the Start and Stop posltlons.
Be sure to seal all openings made for wiring so
exhaust or fuel vapors cannot enter the living
quarters. If flexible metal conduit is used it must be
sealed internally at the end where it terminates.
Flexible metal conduit is not vapor-tight along its
length due to its construction.
1-1
Inhalationof exhaustgas or Ignition
of fuel vapor can cause severe personal Injury
or death. Be sure to vapor-seal flexible metal
conduit and all openings made during lnstailation of the generator set with a sllicone/iubber
based sealant.
GENERATING LAMP (ILLUMINATES
WHEN SET IS OPERATING)
DELUXE
PANEL
RUNNING
BATIEFIY CONDITION
TIME METER
METER
STANDARD
PANEL
CONNECTOR
-(ILLUMINATES
GENERATING LAMP
WHEN
\
SET IS OPERATING)
ESlo94
FIGURE8-3. REMOTE CONTROL CONNECTION
FIGURE 89. REMOTE CONTROL PANELS
Redistribution or publication of this document,
by any means, is strictly prohibited.
Starting Battery and Cable Selections
TABLE 8-2. COLD CRANKING AMPS FOR
MINIMUM 12-VOLT BATTERY*
The generator set requires a 12-volt battery with a
rating of 360 cold-crankingamps. A larger capacity
battery will be required if it powers other coach
accessories. Onan does not recommend that the
vehicle starting battery be used to operate the
generator set. Doingthis can discharge the battery
under some operating conditions.
ABOVE 32" F
360 Cold Cranking
* Largercapacity batteries will be required if battery
is also used to power other coach accessories.
Battery Compartment
Mount the battery in its own compartment, away
from the generator set and any spark-producing
device. For ventilation, provide the battery compartmentwith an openingof at least 1.7 in2 (11cm2)
at the top and 1.7 in2 (11 cm2) at the bottom.
TABLE 8-1. CABLES FOR COLD WEATHER
STARTING TO -20°F (-29°C)
*CABLE LENGTH
IN FEET (METRES)
0-10 (0-3)
11-15 (3-4.5)
16-20 (4.561
I
CABLE
SIZE
Mount the battery on a rigid support structure,
where leaks and accidental spills cannot damage
the generator set, fuel lines, and wiring.
I
2**
0
OOO
450 Cold Cranking
(Approx. 70 amphour) (Approx. 95 amphour)
For reliable cold-weather starting, the voltage drop
from the battery terminals to the generator set
starter should not exceed 0.12 volts per 100
amperes of current while the generator set is
cranking. Refer to Table 8-1 to determine cable
size and Table 8-2 for battery rating.
I
BELOW 32" F
(0" C)
1-1
Batteries present the hazard ot
explosion, which can result in severe personal
injury. Because batteries give off explosive
gas, install the battery in a separate compaftment from the generator set and away from all
fiames, pilot lighf, arcing, or sparkrproducing
devices..
Distance from battery to set.
** For warm weather operation, #2 cable can be
acceptable up to 20 feet (6.1 m).
Redistribution or publication of this document,
by any means, is strictly prohibited.
8-6
Battery Connectlons
Positive (+) Battery Cable: Connect this cable to
the start relay B+ post with a 3/8-inch ring terminal.
Tighten the B+ connection securely (Figure 8-5).
Make sure that the frame (ground) connection
(major frame member if possible) is secure enough
to minimize electrical resistance. Avoid makingthis
connection at a weld or mechanicaljoint. On short
cable runs, the negative (-) battery cable can be
connected between the generator set and the battery as long as the battery negative (-) has a separate 8 AWG chassis ground connection.
liEZEGiI~ail~re
to secure the B+ terminal
can resuit in personal injury andlor equipment
damage from an eiectrlcai short. See that the
terminal connecflon Is secure. If necessary
secure lead to prevent abrasion.
Negative(-)Battery Cable: Connectthis cable securely to the genset base battery negative (-) connection with a 3/8-inch ring terminal (Figure 8-5).
Use the same size cable for both positiveand negative battery connections. Make sure that the battery negative (-) circuit is tied to chassis ground at
the starting battery negative (-) terminal or at the
battery negative (-) connectionon the genset base.
Check to confirm that good electrical ground connection is made (Figure 8-5).
1-
Failure to ground the genset properly can resuit In injuty or death. If thegenset Is
not grounded fo fhe vehicle chassfs through
the batfery negative (-) cable, attach an 8 A WG
equipent ground wire between the vehicle
chassis and the battery negative (-) connectlon.
Route the battery cables between the genset and
its starting battery. Make sure that the cables are
long enough, but do not connect them to the battery
until instructed to do so in the lniiial Start and
Checks section ofthis manual. Provide adequate
support for the battery cables to avoid abrasion
wear due to vibrations, when the vehicle is in
transit.
laWAR"G1Bafteries present the h a a d of
explosion, which can result In severe personal
injury. Because batteries give off explosive
gas, always disconnect the negative (-) cable
first, and connect if last fo reduce fhe rlsk of
arcing.
START
RELAY
POSITIVE (+)
CONNECTION
\
NEGATIVE (-)
CONNECTION
J
FIGURE 8 6 . BATTERY CONNECTIONS
Redistribution or publication of this document,
by any means, is strictly prohibited.
8-7
,
Redistribution or publication of this document,
by any means, is strictly prohibited.
9. Initial Start and Checks
IAWARNING]
EXHAUSTGAS is DHDLYI
Exhaust gases contain carbon monoxide, an odorless and colorless gas.
Canbonmonoxide ispoisonous and cancauseunconsciousnessand death.
Symptoms of w b o n monoxide poisoning can inciude:
Dizziness
Nausea
Headache
Weakness and Sleepiness
Throbbing in Temples
Muscular Twitching
Vomiting
inability to Think Coherently
IF YOU OR ANYONE ELSE EXPERIENCE ANY OF THESE SYMPTOMS, GET
OUT iNT0 THE FRESH AIR IMMEDIATELY. if symptoms persisf, seek
medical attention. Shut down the unit and do not operate until it has been
inspected and repaired.
Never sleep in vehicle with the generator sef running unless the vehicle
inferior is equipped with an operating carbon monoxide detector.
Protection against carbon monoxide inhalation also Includes proper
exhaust system installation and visuai and audible inspection of the
complete exhaust system at the start of each generator set operation.
1-RV
PRE-START CHECKS
Before starting the generator set, perform these
steps:
1. Perform the Installation Review described in
this section.
2. Check the engine oil level. Remove and clean
the oil level indicator. Insertthe oil level indicator into the oil filler neck. It is not necessary to
screw the oil level indicator in to obtain an oil
level reading. If low, add oil very slowly untilthe
Full mark is reached. Screw the oil level indicator into the filler neck securely to prevent oil
leakage.
OIL Flu
TUBE
OIL LEYEL
INDICATOR
3
FULLMARK+
lsli7l-a
U
Redistribution
or publication of this document,
FIGURE 9-1. OIL
LEVEL INDICATOR
by any means, is strictly prohibited.
9-1
3. Checkthat batteryterminalsandcable connectors are clean and dry. Connect the positive (+)
battery cable to the POS. (+) battery post first,
then connect the negative (-) battery cable to
chassis ground or the NEG. (-) battery post if
the battery has a separate vehicle chassis
ground cable. Always connect the negative (-)
battery cable last to reduce the risk of arcing.
INITIAL STARTING AND CHECKS
1-
Ekhaust gas presents the hazard of
severepersonal injury or death. Do not operate
the generator set inside any room or building.
Starting from the Set Mounted Control
Batteries present the hazard of
explosion, which can result in severe
personal injury.. Because batteriesproduce
explosive gas, do not smoke or allow any
arc-producing devices in the battery area.
Do nofdisconnect cables from the battery
while the generator set is cranklng or
running. This causes arcing and can result
in an explosion.
4. Review the Operator's Manual, and note the
features of the genset. Open the fuel supply
valve to the generator set (if equipped).
1. Move the Start/Stop switch to the START
position (Figure 9-2). The engine should crank
and start. The set may need more cranking
during the initial start, to prime the fuel system.
Ifthe genset fails to start, see the Troubleshoofing Guide in the Operator's Manual.
,
Fuse 5A
Clmlt Breaker
C61 3OA
FIGURE 9-2. STANDARD CONTROL PANEL
Redistribution or publication of this document,
by any means, is strictly prohibited.
9-2
6
J
2. After the set starts, check for fuel leaks. If any
4. Operate the set with a normal load, monitoring
leaks are found, stop the set immediately, close
the fuel supply valve (if equipped) and havethe
leak(s) repaired. Make sure that the fuel lines
do not touch anything that can damage them.
Do not operate the set for more than a few
minutes with the access cover removed or the
generator set will overheat.
fuel supply connections, exhaust system, set
performance, and amount of noise reduction. If
set performance is not acceptable, see the
Service Manual for adjustment procedures, or
contact an authorized Onan service center for
assistance. If the generator set requires adjustment or repair, disconnect the starting battery,
negative (-) cable first, to prevent accidental
start-up.
-[Fuel
presents the hazard of
explosion or fire that can result in severe
personal injury or death. If a fuel leak 1s
found, stop the generator set and have the
leak repalred immediately,
Accidental starting of the generator set during maintenance procedures
can cause severe personal injury or death.
Disconnect the generator sef skrting
battery, negative (-) cable first, before
performing maintenance.
5. Move the StartlStop switch to the STOP position to stop the generator set.
1-
A hot generator set can cause
severe burns. Always allow the generator
set to cool down beforeperformingservice.
Starting from the Remote Control
3. Examine the exhaust system for leaks. If any
leaks are found, stop the set and have the
exhaust system repaired immediately.
1. Move the Remote Start/Stop switch to the
START position. The engine should crank and
start as indicated by indicator light on the
switch. Ifit does not, see the Troubleshoofing
Guide in the Operator's Manual. Check all
remote control connections, repair if necessary, and restart the set.
2. After the genset starts, check the battery
condition meter (if equipped) to confirm its
proper operation.
3. Move the StartlStop switch to the STOP position to stop the generator set.
1-
Exhaust gas presenfs €he
hazard of severe personal injury or death.
Inspect the exhaust system audibly and
visually. With the generafor set running,
and the service access cover removed,
inspect the muffier. Do not operate the
generator set if it is excessiveiy noisy.
Have any leaks repaired immediately.
Redistribution or publication of this document,
by any means, is strictly prohibited.
9-3
INSTALLATION REVIEW
Prior to initial start-up of the generator set, check (4)each of the following items. For a proper installation,
each answer must be yes: ifnot, that aspectof the installationshould be reworkedor provision madeto satisfy
the requirement.
J
[ ] If installed in a compartment, Is the compartment metal-lined and sealed around all edges?
[ ] Are wiring holes into the inside of coach (includingthe inside of AC conduit) sealed to prevent passage
of exhaust gases?
[ 3 Can the following routine maintenanceitems be performedthrough the vehicle access panel? Refer to
Figure 3-3.
Change oil
Adjust carburetor
StarVStop the unit
*Change air filter
Adjust governor
Access AC circuit breaker and control fuse
Change spark plug
[ ] Are air inlet and exhaust openings clear and large enough (see Mountingsection) for proper airflow?
[ ] If the installationis for an under-floor kit, is there a metal barrier between the genset and a combustible
floor? See Figure 3-8.
[ 3 Are fuel lines and electrical wires protected from chafing and damage and are they insulated from each
other? Refer to Figure 3-11.
[ 3 Are all fuel connections and hose clamps tight? Refer to Figure 3-12.
[ ] Is a flexible section of non-conductingfuel line installed between the fuel inlet and the fuel line from the
tank? Refer to Figure 3-12.
[ J Are all electrical leads connected and protected, and is the conduit adequately supported? Refer to
Figure 3-13,-14,-15, and -16.
[]
Does the exhaust system extend beyond the perimeterof the vehicle a minimumof 1 inch (25 mm)? See
Figure 3-18.
[ ] Are there operable windows, doors or storage compartmentswithin a triangldformedby a base one foot
on either side of the exhaust pipe and 3 feet above the exhaust pipe? Refer to Figure 3-21.
[ ] If the exhaust system is run into the angle of approach or departure (see Figure 3-20), is it protected from
bottoming out by use of skid bars, rollers, etc.?
-T
[ ] Is the exhaust system secure and are all connectionstight? Are all required exhaust clamps, hangers,
and support straps in place per the Exhaust System section of this manual and the kit instructions?
\
[ 3 Is the generator set protected from direct road splash from vehicle wheels?
Redistribution or publication of this document,
by any means, is strictly prohibited.
9-4
IO. Wiring Schematic\Diagram
----e+@
s2
mAI
I
I
Item
Description
VR1
T1-IGN
S2
Si
R1
REGULATOR-VOLTAGE
COIL-IGNITION
SWITCH-LOW OIL LEVEL
SWITCH-START-STOP
RESISTOR-BAITERYCHARGE
SOL-REGULATOR LP
RELAY-STARTER
MAGNETO-IGNITION
GENERATOR
FUSE
FUEL PUMPlNELSHUTOff
SOLENOID (LP)
SPARKPLUG
RECTIFIER-BRIDGE
CIRCUIT B M R (AC OUTptJTj
WrnY12V
MOTOR-STARTER
REMOTECONTROL-STANDARD
REMOTE CONTROL-DELUXE
CONTROLASSY
K2
K1
62
G1
F1
E2
El
CR1
CB1
BT1
81
A3.
A2
A1
I=
FIGURE 10-1. WIRING SCHEMATIC 611-1194
10-1
Redistribution or publication of this document,
by any means, is strictly prohibited.
GNL
12OV AC
P I 4
111-1
J
TI-IGN
L
+
-T
BTI
PL-9
cei-~mn
I
L/--
01-12
I '
PI-4
P5-6
62-2
A2
A3
-
-..T I -IGN
I
l
I
PI-IO
BUD"
PI-2
BLACh
P I 4
YELLOW
PI-(
1
1
I
l
CaI Ac-2
j
2
PCB-J6
PCB-J8
GI-FI
E2
Cat AC-l
4
0
G2- I
SI-!
P6-4
SI-2
P5-4
P4
9
5
0
6
0
0
0
0
0
0
n e n
Pd-7
51-3
tM)
FIGURE 10-2. WIRING DIAGRAM 611-1194Redistribution or publication of this document,
by any means, is strictly prohibited.
10-2
Redistribution or publication of this document,
by any means, is strictly prohibited.
Curnrnins Power Generation
1400 73rd Avenue N.E.
Minneapolis, MN 55432
763-574-5000
Fax: 763-574-8087
Cummlns and Onan are registeredtrademarks of Cummins Inc.
Redistribution or publication of this document,
by any means, is strictly prohibited.