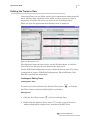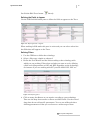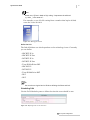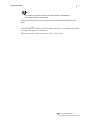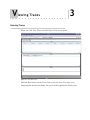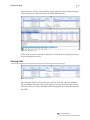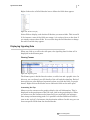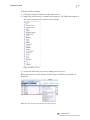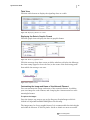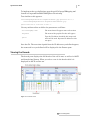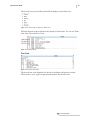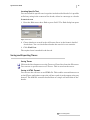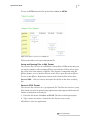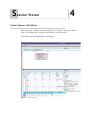
1
QTrace™ New Version
User Guide
Valid from
© RADCOM Ltd., November 2009
Version 8.00
IP Notices:
© 2009 RADCOM Ltd. All rights reserved.
RADCOM is a trademark of RADCOM Ltd. in Israel and/or other countries. Microsoft ® Windows ®
and Microsoft® Windows NT ® are registered trademarks or of Microsoft Corporation in the US and/
or other countries. All other brand and product names referred to herein are either registered or
unregistered trademarks or service marks belonging to their respective owners.
This documentation contains proprietary information of RADCOM Ltd. and RADCOM Equipment
Inc. Such information is hereby supplied solely for the purpose of informing explicitly and properly
authorized persons of the documentation on the operation of RADCOM equipment. Without the
express prior written permission of RADCOM Ltd. and RADCOM Equipment Inc., no part of the
contents hereof may be used for any other purpose, disclosed to persons or firms outside the recipient
company, or reproduced by any means.
The text and drawings herein are for the purpose of illustration and reference only. The specifications
on which they are based are subject to change without notice.
Publication Date: November, 2009
Revision A
Further Information
For further information contact:
US Office:
RADCOM Equipment Inc.
6 Forest Avenue, Paramus, NJ 07652, USA
Tel: (201) 518-0033 or 1-800-RADCOM-4, Fax: (201) 556-9030
E-mail: [email protected]; Internet: http://www.radcom.com
Corporate Headquarters:
RADCOM Ltd.
24 Raoul Wallenberg St., Tel Aviv, 69719, Israel
Tel: 972-3-6455055, Fax: 972-3-6474681
E-mail: [email protected]
China Office:
RADCOM Ltd.
2309, Block A, Beijing Full Link Plaza
No. 18, ChaoYangMenWai Avenue, Chaoyang District
Beijing 100020, China
Tel: +86-10-65886207, +86-10-65886237, +86-10-65886170
Fax.: +86-10-65886207 Ext: 188
E-mail: [email protected]
RADCOM Ltd.
End-User Product License Agreement
1. This License applies to the computer communications product and/or software (as defined herein below) with which it is enclosed. The
purchaser of such product/software shall be referred to herein as "Licensee", or "Buyer"; the entity from which such product/software has
been purchased shall be referred to as "Distributor"; and the manufacturer of such product/software shall be referred to as "Licensor", or
"RADCOM".
2. Licensee has signified willingness to be bound by the terms of this License and consents hereto by opening the enclosed package.
3. Definitions: Software shall mean all computer programs and related documentation, as well as all corrections, updates, new releases and
new versions of such programs and documentation. Software Products shall mean Software, as well as computer communications products
("Hardware") in which Software is an inherent and integral part.
4. This License is effective upon clicking the "I Accept" button.
5. Subject to the terms set forth in this License, the Licensee may use the Software Product and all associated documentation furnished
herewith. The Licensee may use the Software for execution with a single CPU (hereinafter, "the host computer"). Such Software may be
accessed on the host computer via terminal and/or system console in a timesharing manner by more than one user and/or may be remotely
accessed via a communications line or a network line. No license, right, or interest in any patent, copyright, trademark, trade name,
service mark or other intellectual property right of the Licensor or any third party from whom it has acquired license rights are granted to
the Licensee hereunder.
6. The Licensee may use the Software on backup equipment in the event and only so long as the host computer is inoperative.
7. The Licensee may make one backup copy of the Software or of the Software inherent in the Software Product, as applicable, provided that
the same copyright and proprietary information notices are those affixed to the original Software Product are affixed to the backup copy. In
lieu of such a backup copy, the Licensee may transfer the said Software to a single hard disk, subject to the provisions concerning copyright
and proprietary right notices as specified herein above, provided that in such case the original Software be kept solely for backup or
archive purposes.
8. All upgrades, updates, modifications and provisions of the Software Product delivered by the Licensor to the Licensee shall be subject to
the terms and conditions of this License.
9. The Software Product and its patents, copyrights and all intellectual property rights are owned and so shall remain exclusively by the
Licensor or its suppliers, and are protected by law and by international treaties. Except as provided under section 7 above, the Licensee
may not copy the Software or reproduce the Software Product. The Licensee may not copy or translate the written materials except by
specific written consent of the Licensor, which must be obtained in advance.
10. Downloading or otherwise copying the Software Product for execution on more than one CPU is strictly prohibited. The Licensee may not
copy, modify, reverse compile, reverse engineer, sell, license, rent or transfer the Software Product or any documentation related thereto to
any third party. The Software contains a module called Graphics Server SDK which is copyrighted by Bits Per Second Ltd. This module is
considered as part of the Software Product and must not be used alone. No other use of the Software and the Software Product except as
expressly set forth in this License is permitted.
11. The Licensor warrants solely to the Licensee for a period of twelve months from the date of the Software Product delivery to the Licensee
that the Software shall be in operable condition as described in the documentation provided therewith, and will be free from defects in
material and workmanship under normal use.
12. The warranty as set out in section 11 supra shall be the sole and exclusive warranty, and the Licensor shall accept no responsibility beyond
that which is set out therein.
13. In particular, and without derogating from the generality of the above, the Licensor does not warrant that the Software and or Software
Product shall be error-free, that the Software and or Software Product shall operate without interruptions and or with any hardware and
software other than the Software Product, as specified in the documentation provided with the Software Product, or that the Software
Product shall satisfy the Licensee's own specific requirements. The Licensor DISCLAIMS THE IMPLIED WARRANTIES OF
MERCHANTABILITY AND FITNESS FOR A PARTICULAR PURPOSE. The Licensor's third party suppliers, if any, assume no liability
whatsoever regarding the Software Product or any portion thereof.
14. The agents, employees, distributors and dealers of the Licensor are not authorized to make modifications to this warranty, nor are
additional warranties binding on Licensor or its suppliers, if any.
15. The Licensee's sole and exclusive remedy and the Licensor's sole and exclusive liability hereunder shall be, upon the Licensee's return of
the Software Product to a Distributor within the warranty period, replacement or repair of the Software Product that does not meet the
Licensor's limited warranty as above. The Licensor's suppliers shall not be held liable for any damages suffered or incurred by the
Licensee.
16. Notwithstanding anything to the contrary, in no event shall the Licensor or its suppliers be liable to the Licensee or any other person for
any indirect, incidental, collateral, special, or consequential damages, including without limitation, damages for loss of profits, loss of
income, loss of customers, loss of goodwill, work stoppage, data loss, computer failure or malfunction, claims by any party other than
Licensee or any and all other similar damages or loss and in no event shall its liability exceed the price of the Software Product.
17. The Licensor shall have no liability or responsibility for Software Products altered, modified, converted by the Licensee or by a third party,
damages resulting from accident, abuse or misapplication of the Software Products or for problems due to the malfunction of the Licensee's
equipment or software not supplied by the Licensor.
18. This License is effective until terminated and will automatically be terminated immediately with or without notice from the Licensor if the
Licensee fails to comply with any of its provisions. Upon termination the Licensee shall destroy the Software and all copies or portions
thereof.
19. This license is governed by the laws of the State of New York, USA and the sole and exclusive jurisdiction over all matters arising from this
License shall rest with the competent courts in New York, USA.
YOUR ACCEPTANCE OF THE FOREGOING AGREEMENT WAS INDICATED DURING INSTALLATION.
Warranty
The Hardware is warranted against defects in material and workmanship for the longer between the period of time as defined by your warranty
agreement or 12 months from date of shipment. During the warranty period, RADCOM will either repair or replace hardware which prove to be
defective.
For warranty service or repair, this product must be returned to a service facility designated by RADCOM. The Buyer shall prepay shipping
charges to RADCOM and RADCOM shall pay shipping charges, taxes and rates to return the product to the Buyer.
RADCOM warrants that its firmware designed by RADCOM for use with an instrument will execute its programming instructions when properly
installed on that instrument. RADCOM does not warrant that the operation of the instrument or firmware will be uninterrupted or error-free.
LIMITATION OF WARRANTY
The foregoing warranty shall not apply to defects resulting from improper or inadequate maintenance by the Buyer, Buyer-supplied firmware or
interfacing, unauthorized modification or misuse, operation outside of the environmental specifications for the product, or improper site
preparation or maintenance. No other warranty is expressed or implied. RADCOM specifically disclaims the implied warranties of
merchantability and fitness for a particular purpose.
EXCLUSIVE REMEDIES
The remedies provided herein are the Buyer's sole and exclusive remedies. RADCOM shall not be liable for any indirect, special, incidental, or
consequential damages, whether based on contract, tort, or any legal theory and in no event shall its liability exceed the price of the applicable
product.
ADDITIONAL INFORMATION
Software or hardware purchased as an addition to the unit receive 3 months warranty. Warranty expiration for software or hardware purchased
separately from the unit, will be the same as the unit or 3 months from the date of purchase, according to the latest date between the two.
T
able of Contents
About This Guide
Document Objectives
Document Conventions
Typographical Conventions
How This Guide is Organized
Further Information and Technical Support
1
1
1
1
2
2
Chapter 1: Overview
Introduction
Mode of Operation
Installation
3
3
3
Chapter 2: QTrace Configuration
Overview of Running QTrace
Prerequisite for Running the Application
Running the Application
Defining the Traces to View
Creating and Editing Traces
Defining the Fields to Appear
Defining Filters
Scheduling Calls
4
4
4
5
5
6
6
7
Chapter 3: Viewing Traces
Running Traces
Viewing Calls
Displaying Signaling Data
Viewing Frames
Table View
Displaying the Data in Graphic Format
Customizing the Image and Name of the Network Element
Viewing the Decode
Tree View
Locating Specific Text
Saving and Exporting Traces
Saving Traces
Saving in HTML Format.
Saving and Opening Files in XML Format
Export to PCAP Format
Appendix 4: Session Viewer
9
10
11
11
13
13
13
14
15
16
16
16
16
17
17
QTrace User Guide
2
Session Viewer with QTrace
1
Table of Contents
A
bout This Guide
The QTrace User Guide describes how to trace online test calls using the
QTrace application. A familiarity with the QExpert and Omni-Q application is
assumed.
Document Objectives
The purpose of this guide is to instruct Omni-Q users and administrators in
how to use and configure the QTrace application.
In addition, the online help provides an easy method for accessing the
information in this guide. To access the online help, select Help from the Help
menu.
Document Conventions
The following icons appear throughout this guide:
NOTE
Provides additional information on the current topic.
TIP
Provides additional advice on how to implement the current topic.
Typographical Conventions
Italic is used for fields that appear in the software and to refer to other
documents.
Boldface is used for operations that you must perform (e.g., name of a button
to be clicked or option to be selected) or to emphasize a field or concept being
described.
QTrace User Guide
2
How This Guide is Organized
This guide is organized into the following chapters and appendices:
Chapter 1: Overview
This chapter provides an overview of QTrace and its benefits.
Chapter 2: Configuration
This chapter provides information on how to configure the QTrace application.
Chapter 3: Viewing Traces
This chapter provides information on how to view and save Traces.
Appendix A: Session Viewer
This chapter provides information on the Session Viewer application.
Further Information and Technical Support
Contact your local distributor for additional help with specific problems and
questions.
About this Guide
O
verview
1
Introduction
RADCOM's QTrace application provides online information on any designated
call or link in the network. You can observe the call in real time and not just
historically. Examples of use for QTrace are troubleshooting and network
verification.
QTrace enables you to:
• Trace end-user calls to facilitate customer support.
• Run real-time call traces in parallel to probe monitoring.
• Use a pre-defined group or set customized trace filters.
The call trace relates to both the signaling and user-plane of the call.
The following topics are covered in this chapter:
• Mode of Operation
• Installation
Mode of Operation
QTrace consists of a client server configuration. The server is installed by
RADCOM on a dedicated Windows system. You can install the client yourself.
There can be more than one client opposite one server.
Installation
Install the system from the CD.
Follow the instructions from the CD to complete the installation.
Q
Trace Configuration
2
Overview of Running QTrace
To run QTrace
1. Use the filters to define the Traces you want to view
2. Run the Traces
3. Export or save as required.
Prerequisite for Running the Application
• Your system must have .net 3.5 framework.
• You must be defined as an Omni-Q (QTrace, Administrator, QExpert Group
or Enhanced) user on the QManager system (refer to your system
administrator for details)
Running the Application
Click the QTrace icon on your desktop, the QTrace login box opens.
Figure 2-1: QTrace Login
1. Type your user name and password. Make sure you use your own user
name, as Filters are stored according to user.
2. Use the drop down arrow to select the server to which you want to log in to.
The default port is 8000, but if your system requires it, a different port
may be used.
3. Click Login.
QTrace User Guide
5
Defining the Traces to View
Using the QTrace you can follow certain calls or transactions between specific
users, who may have a problem, or for whom you may want to see what is
happening. You define the traces you want to view by defining filters.
When you open the application the following screen is displayed.
Figure 2-2: Main QTrace view
The right pane shows the open traces, use the Windows menu, or click the
Trace box on the left pane to move between the open traces.
Use the CDR field configuration screen to define the data to view. The screen
is comprised of 4 panes, CDR Field Configuration, Filter Definition, Calls
Scheduler and General information.
Creating and Editing Traces
Creating a New Trace
To create a new trace click the New Session Trace button
Load Trace button to Load an Existing Trace and edit it.
, or click the
Editing Traces
1. Click the Load Trace button
to load an existing Trace.
2. Either click the duplicate Trace button
to edit a copy of this trace
without changing the original trace. and then click Edit Trace
Chapter 2: QTrace Configuration
QTrace User Guide
6
Or click the Edit Trace button
directly.
Defining the Fields to Appear
Use the CDR field definition pane to define the fields to appear on the Trace.
Figure 2-3: Defining Fields to Appear
When working in Edit mode this pane is active and you can select or deselect
the fields that will appear on the Trace.
Defining Filters
1. Use the CDR box to define the technology.
2. Select a filter type, simple or advanced
3. Define the User Details and the link according to the technology with
which you are working. Filter what and who you want to see by defining
called and calling number or OPC and DPC depending on the technology;
for instance if you are working with SS7 you will define DPC, OPC etc.
Figure 2-4: Defining filters
4. Click as many checkboxes as you require according to your technology.
Then use the drop down arrows to choose available fields. Use the second
drop down box to add specific parameters. You can use wildcards when
defining parameters so that you can focus on a wider range of data.
Chapter 2: QTrace Configuration
QTrace User Guide
7
NOTE
Please note, QTrace is baed on SQL coding. % represents the wildcard
(*), while _ is the same as ? .
For example, to see all calls coming from a number that begins 03 646,
enter the value 03 646 %
Figure 2-5: Adding parameters
Define the Link
The link definitions are also dependent on the technology in use. Currently
you can define:
• SRC RTP IP in
• SRC RTP IP Out
• DST RTP IP in
• DST RTP IP Out
• Term ID-EndPoint SRC
• SRC SIG IP
• DST SIG IP
• Term ID EndPoint DST
• DPC
• OPC.
TIP
You can also use logical And or OR when defining the filters and link.
Scheduling Calls
Use the Call Scheduler pane to define the time the trace should be run.
Figure 2-6: Defining when to run the trace
Chapter 2: QTrace Configuration
QTrace User Guide
8
NOTE
The QTrace only stores call history of several minutes, depending on
the available memory on the server
The general information pane summarizes the information defined for the
trace.
Click Publish
to share your Trace with other users, i.e to make it available
to anyone who logs on to this server.
Click Save or Trace View to open the Trace View screen.
Chapter 2: QTrace Configuration
V
iewing Traces
3
Running Traces
When you click View Traces the Call Trace View screen opens.
Figure 3-1: Call Trace view
Click the Run button on the Trace view to run the trace. The trace runs,
displaying the defined call fields. For each call the application displays the
QTrace User Guide
10
signaling data;, and for each signaling frame it displays the decoded message
and the raw data, both with details and ASCII/Hex format.
Figure 3-2: Results screen
Click on the arrows to expand or hide panes, click on Trace Settings to return
to the configuration screen.
Viewing Calls
Figure 3-3: Calls pane
The calls pane displays data about the call. For each call, an index number,
the last update (the time of the latest update received about the call) and the
Call state (open or closed). The other fields that appear here are determined by
the CDR.
Chapter 3: Viewing Traces
QTrace User Guide
11
Right click on the calls field header bar to define the fields that appear.
Figure 3-4: Fields to display
Select fields to display, and deselect fields that you want to hide. This is useful
if, for instance, some of the fields are empty; it is easier to focus on the data if
you simply remove these fields. You can also drag the field headers to change
the order in which they appear.
Displaying Signaling Data
When you click on a call in the calls pane, the signaling data for that call is
displayed in the Frames pane.
Viewing Frames
Figure 3-5: Signaling data
The Frames pane is divided into 2 sections, a table view and a graphic view. In
this way you can directly see full details of the call and the signaling. Each of
these panes are also displayed separately when you click the table, or graph
button. Right click on the header row to add more fields to the table pane.
Customizing Tool Tips
Mouse over the arrows on the graph to display the call information. This is
displayed in the graph pane of the full view, and in the graph display. When
you mouse over the arrows on the frame field you can display the message,
time stamp and measuring probe. It is possible to define additional fields to
view in the “tool tip”; for instance the destination address. In this way you can
focus on specific fields from the detailed decode.
Chapter 3: Viewing Traces
QTrace User Guide
12
To define fields to display.
1. Click the tool tip checkbox to enable this feature.
2. Right click on the arrow, a context menu appears. The fields that appear in
this menu depend on the contents of the packet.
Figure 3-6: Define tool tips
3. Select the fields that you want to display in the tool tip.
When you mouse-over the arrows, details about the fields you selected are
displayed.
Figure 3-7: Tool tip shows details about the fields selected
Chapter 3: Viewing Traces
QTrace User Guide
13
Table View
Click the table button to display the signaling data as a table.
Figure 3-8: Displaying Frames as a table
Displaying the Data in Graphic Format
Click the graph icon to display the data in graphic format.
Figure 3-9: Frame in graphical view
Click the message drop down arrow to define whether to display the Message,
the time stamp (appears above the line) or the name of the measuring probe
from which the message was sent.
Figure 3-10: Graphical view
Customizing the Image and Name of the Network Element
You can customize the image and name of the network element, by adding
your own image for each element, and changing the element names to more
meaningful names.
To replace the images:
Copy the images you want to use to the directory StationImages which is
located in ProgramFiles/RADCOM/QTraceClient/config.
The images may be of any graphic format. It is recommended that their height
and width be between 15 and 50 pixels. 30x30 or 40x40 are most successful.
Chapter 3: Viewing Traces
QTrace User Guide
14
To implement the new definitions open the xml file ImageIPMapping.xml
located in ProgramFiles/RADCOM/QTraceClient/config
Text similar to this appears:
StationImageMap Name="Shai" ImagePath="Phone.jpg" IpList="5-10-7" />
<StationImageMap Name="Tal" ImagePath="MobilePhone.jpg"
IpList="192.168.70.5 192.168.70.226" />
Use any xml/text editor to define the parameters as follows:
StationImageMap Name
The name that will appear next to the station
ImagePath
The name of the graphic file that will appear
IpList
Type the IP address for which this image and
name will be used. Separate IP addresses with
one space
Save the file. The next time signals from the IP addresses you defined appear,
the name and icon you defined will be displayed in the Frames pane.
Viewing the Decode
The decode pane displays the full decode of the call in text, as well as in ASCII
and hexadecimal format. When you select a row in the decode table it is
displayed in ASCII and hex too.
Figure 3-11: Decode View
Chapter 3: Viewing Traces
QTrace User Guide
15
Click on the top row to define the fields to display in the table view.
Figure 3-12: Select fields to display in Table view
Click the buttons to move between the display of the decode, You can see Table
view, Row View and Tree View.
Figure 3-13: Decode Rows
Tree View
Figure 3-14: Decode Tree View
The decode tree view displays the decode according to the protocol stacks.
Click on the + and - signs to expand and contract the decode rows.
Chapter 3: Viewing Traces
QTrace User Guide
16
Locating Specific Text
You can search for specific text in a packet in the detailed decode. It is possible
to find any string in the context of the decode, either in a message or a decode.
To search for text
1. From the Edit menu chose Find or press Ctrl F. The Find dialog box opens.
Figure 3-15: Find
2. Chose whether to search in the call frames list or in the frame's detailed
decode data. You can also define whether the search is case sensitive.
3. Click Find Now.
The required text is marked in the decode.
Saving and Exporting Traces
Saving Traces
Click on the Save button to save the Traces or Chose Save from the File menu.
You can save a specific traces or all Traces . This is saved on the server.
Saving in HTML Format.
You can save the call trace as an HTML file. This enables users without access
to the QTrace application to open the call trace and view the output using any
browser. The html file contains detailed data of a single call with links to the
decode. .
Chapter 3: Viewing Traces
QTrace User Guide
17
To save as HTML from the File menu Choose Save as HTML .
Figure 3-16: QTrace exported to an HTML file
Click on the links to navigate through the file.
Saving and Opening Files in XML Format
You can save the call trace to an XML file. Saving files to XML means that you
can send a complete call to another QTrace user and they will be able to open
the call in their own instance of QTrace. This format is compatible with the
QTrace format; you can double-click on such a file to open directly in QTrace.
To save in the QTrace Proprietary format (.xsif), from the File menu chose
Save as XML. . Select a location and name for the file in the Save as dialog
box.
Export to PCAP Format
You can save the call trace to a *.pcap format file. The files are saved as *.pcap
files which can later be opened using applications that support this format for
further examination and analysis.
1. From the file menu click Save as PCAP. The Save as dialog box opens.
2. Type a name and select a location for the file you want to save.
Click Exit to close the application.
Chapter 3: Viewing Traces
S
ession Viewer
4
Session Viewer with QTrace
When you have a QTrace client installed on your system, when you double
click a file ending opz,. in opens in the QTrace client interface.
Currently only the signaling file is displayed.
Figure 4-1: Session Viewer
US Office:
RADCOM Equipment Inc.
6 Forest Avenue, Paramus, NJ 07652, USA
Tel: (201) 518-0033 or 1-800-RADCOM-4, Fax: (201) 556-9030
E-mail: [email protected]
Corporate headquarters:
RADCOM Ltd.
24 Raoul Wallenberg St., Tel Aviv, 69719, Israel
Tel: 972-3-6455055, Fax: 972-3-6474681
E-mail: [email protected]
China Office:
RADCOM Ltd.
2309, Block A, Beijing Full Link Plaza
No. 18, ChaoYangMenWai Avenue, Chaoyang District
Beijing 100020, China
Tel: +86-10-65886207, +86-10-65886237, +86-10-65886170
Fax.: +86-10-65886207 Ext: 188
E-mail: [email protected]
Web Site:
http://www.radcom.com
©RADCOM, 2009