1
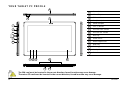
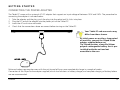
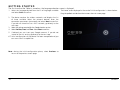
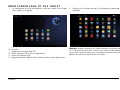
Codice:
Code: 383331V-01
53xxxxx_IT
TABLET PC
USER GUIDE
Edited/Published/Produced by:
Code: 537093D
Olivetti S.p.A.
Gruppo Telecom Italia
Via Jervis, 77
Ivrea (TO) - Italy
www.olivetti.com
Date of publication: October 2011
Copyright © Olivetti, 2011
All rights reserved
Trademarks: Microsoft and Windows are registered
trademarks of Microsoft Corporation.
Other trademarks and trade names
may be used in this document to refer to either the entities
claiming the marks and names or their products.
Olivetti disclaims any proprietary interest in trademarks and
trade names other than its own.
0700
The mark affixed to the product certifies that
the product satisfies the basic quality
Requirements.
Here by, Olivetti S.p.A. declares that this product is in compliance with the
essential requirements and other relevant provisions of Directive 1999/5/EC.
This product is in compliance with requirements of European Directives
2004/108/EC e 2006/95/EC relating to electromagnetic compatibility and
safety of electrical equipment designed for use within certain voltage limits.
The Declaration of Conformity can be found at:
www.olivetti.com/site/public/support.asp
TABLE OF CONTENTS
INTRODUCTION .......................................................................................................................................... 3
SAR (SPECIFIC ABSORPTION RATE)CERTIFICATION DATA ....................................................................... 4
SAFETY WARNINGS.................................................................................................................................... 5
YOUR TABLET PC PROFILE ......................................................................................................................... 6
CARING FOR YOUR TABLET PC.................................................................................................................. 7
LCD SCREEN.................................................................................................................................................................................7
IF WATER ENTERS THE TABLET PC ................................................................................................................................................7
OTHER WARNINGS.......................................................................................................................................................................8
TRAVELLING WITH YOUR TABLET PC ............................................................................................................................................8
GETTING STARTED ..................................................................................................................................... 9
CONNECTING THE POWER ADAPTER............................................................................................................................................9
GETTING STARTED .................................................................................................................................... 10
MAIN SCREEN PAGE OF THE TABLET ....................................................................................................... 11
STATUS ICONS........................................................................................................................................... 12
SYSTEM SETTINGS..................................................................................................................................... 12
UPDATE...................................................................................................................................................... 13
NETWORK CONFIGURATION .................................................................................................................... 13
MOBILE NETWORKS (ONLY FOR MODEL WITH 3G FUNCTION) ............................................................. 14
WIRELESS CONNECTION ........................................................................................................................... 15
OLIPAD
1
BLUETOOTH CONNECTION ....................................................................................................................... 15
BLUETOOTH SETTINGS ................................................................................................................................................................16
INSERTION OF THE SD CARD .......................................................................................................................................................17
CONNECTION TO A PC................................................................................................................................................................17
CONNECTION OF HEADPHONES..................................................................................................................................................18
INSERTION OF THE SIM CARD......................................................................................................................................................18
COMMUNICATION .................................................................................................................................... 19
BROWSER....................................................................................................................................................................................19
CONTACTS..................................................................................................................................................................................20
EMAIL – HOW TO SET UP AN ACCOUNT .....................................................................................................................................21
ENTERTAINMENT ........................................................................................................................................ 23
PHOTOVIEW................................................................................................................................................................................23
MUSIC ........................................................................................................................................................................................24
CAMERA .....................................................................................................................................................................................25
TECHNICAL SPECIFICATION ...................................................................................................................... 26
APPENDIX .................................................................................................................................................. 27
TROUBLESHOOTING ....................................................................................................................................................................27
2
OLIPAD
INTRODUCTION
The Quick Guide will help you start to use your Tablet. For further information on how to use the Olipad, consult the User Manual.
Meanings of icons:
Indicates operations that are forbidden in order to prevent damage to the Tablet PC.
Any reproduction of this document not explicitly authorised by the manufacturer is strictly forbidden.
The images of the product contained in this manual are for illustrative purposes only.
Important: important information, notes, definitions, general knowledge and references, etc.
Other trademarks and trade names may be used in this manual to refer to entities claiming the marks and names or their products. The manufacture
disclaims any proprietary interest in trademarks and trade names other than its own. Information in this manual is subject to change without notice.
Reproduction in any manner without the written permission of the manufacturer is strictly forbidden.
Product images in this manual are for reference purposes only.
OLIPAD
3
SAR (SPECIFIC ABSORPTION RATE)CERTIFICATION DATA
This product complies with EU requirements regarding restriction of exposure of persons to radio-frequency energy (RF) emitted by
telecommunication and radio devices as it is designed and manufactured in such a way as not to exceed the exposure limits indicated
by the Council of the European Union. The permitted SAR limit for the general population is 2.0 W/Kg. This limit guarantees an ample
safety margin such as to protect all persons regardless of age and conditions of health.
SAR tests are carried out using normal operator stations with the device transmitting at its highest certified power limit in all the
frequency bands tested.
During the test, the highest SAR level recorded for this model was equal to 1.45 W/kg.
During normal use, the effective SAR limit of the device may be well below the maximum value as it has been designed to emit only
the radio-frequency energy necessary to transmit the signal to the nearest base station of the network.
The Declaration of Conformity available at the address indicated at the start of this guide demonstrates conformity of this device with
the R&TTE (European Radio & Terminal Telecommunications Equipment) Directive.
4
OLIPAD
SAFETY WARNINGS
1. DO NOT stow the Tablet in its case together with small objects that may scratch the LCD Screen or penetrate inside the
Tablet.
2. DO NOT use the Tablet PC in a dirty or dusty environment. Keep the environment clean and dry.
3. DO NOT place the Tablet PC on an uneven or unstable work surface.
4. DO NOT place or drop objects on top of the Tablet PC. DO NOT push any foreign objects into the Tablet PC. DO NOT
cover the LCD Screen with heavy objects.
5. DO NOT expose the Tablet PC to strong magnetic or electrical fields; DO NOT place the floppy disk near or on the Tablet
PC as this may cause loss of floppy disk data.
6. DO NOT leave the Tablet PC in bright sunlight, especially in the car, as this may damage the LCD Screen.
7. SAFE TEMP: This Tablet PC should be used only in environments with an ambient temperature of between 5°C and 35°C.
8. DO NOT expose the Tablet PC to liquids, moisture or in rain.
9. DO NOT dispose of the Tablet PC in municipal waste. Check local regulations for disposal of electronic products. Recycle
the Battery Pack and check with your Local Authority or retailer for recycling advice.
10. VOLTAGE: Refer to the rating label on the Tablet PC and make sure that the Power Adapter complies with the
specifications indicated. Use only attachments or accessories approved by the manufacturer.
11. Before turning on the Tablet PC, check connections between the main unit and attachments.
12. DO NOT use the Tablet PC when eating to avoid soiling the Tablet PC.
13. DO NOT insert anything in the Tablet PC that may cause a short-circuit or damage electrical circuits.
14. Switch off the Tablet PC before installing or removing external devices that do not support hot plug-in.
15. Disconnect the Tablet PC from the electrical outlet and keep it out of the reach of children.
16. DO NOT disassemble the Tablet PC. Only a certified service technician should repair your computer. Otherwise, problems
may be caused and the manufacturer shall not be held responsible for any damage.
17. Excessive sound pressure from earphones and headphones can cause hearing loss.
OLIPAD
5
YOUR TABLET PC PROFILE
8
7
6
1
1
Power button
2
Micro SD port
3
SIM card slot
4
Headphone jack
5
Micro-USB port
VOL -/+ button
7
2M Pixel front camera
3
8
5M Pixel rear camera
9
Back key
SIM
6
2
HOME menu
4
5
9 10 11
14
12
11
Recent applications
12
Reset key
13
Docking port
14
Loudspeakers
15
Status bar
15
13
The SIM card must be inserted in the correct direction; forced insertion may cause damage.
The micro SD card must be inserted in the correct direction; forced insertion may cause damage.
6
OLIPAD
CARING FOR YOUR TABLET PC
Your Tablet PC is a precision-engineered device and may be damaged by misuse.
LCD SCREEN
•
•
•
•
•
•
•
•
•
The LCD Screen, made of thin glass, is the most delicate component of your Tablet PC and may be damaged by heavy impacts.
Protect the cover of your Tablet PC against scratches as these cannot be removed.
DO NOT place or drop heavy objects on the LCD Screen.
DO NOT scratch the LCD Screen with your fingernails or hard objects.
DO NOT clean the LCD Screen with chemical cleaners.
The LCD Screen MUST NOT come into contact with hard objects (such as buttons, watch-strap).
Use a soft, lint-free cloth to wipe your Tablet PC gently in order to avoid damaging the LCD Screen.
Wipe the LCD Screen gently with a soft, lint-free dry cloth. DO NOT wipe the LCD Screen directly with your hand.
DO NOT spill liquids into the Tablet PC as this may damage its components.
DO NOT clean the Touch Pad with acid cleaners or spray cleaning solutions directly on the Tablet PC.
OTHER PRECAUTIONS
Take the following precautions before cleaning the Tablet PC and related accessories:
1. Switch off the Tablet PC. Disconnect the Tablet PC and all external devices from their power outlets.
2. Dampen a soft lint-free cloth with water and pass this delicately on the surface of the Tablet PC.
DO NOT allow water to enter the Tablet PC as this could cause short-circuit and damage.
IF WATER ENTERS THE TABLET PC
•
•
•
•
•
•
•
DO NOT turn on the Tablet PC immediately.
Disconnect the power cord if used and turn off the Tablet PC.
Drain the water from the Tablet PC. Wipe the surface of the Tablet PC with a moist soft cloth.
Dry the Tablet PC and accessories with a fan and then send it to the service centre.
DO NOT use a hair drier to dry the Tablet PC as it may be distorted by high temperatures.
DO NOT replace the Tablet PC in a wet carrying case.
Switch on the Tablet PC again only when it is completely dry
OLIPAD
7
OTHER WARNINGS
•
•
•
DO NOT expose the Tablet PC to high temperatures for long periods, especially in the car, or parts may be distorted.
Make periodic back-up copies of the data.
Update hardware and software regularly so that the Tablet PC is always compatible and stable.
TRAVELLING WITH YOUR TABLET PC
Disconnect the Tablet PC and all lines before transporting this. If you intend to travel with your Tablet PC:
1. Turn off the Tablet PC and disconnect it from wall outlets.
2. Stow the Tablet PC in its carrying case to protect it against dust, water, impacts and scratches when travelling.
3. Check that you have taken the AC Adapter, power cords, manual and warranty card with you. DO NOT forget any passwords you
may have set.
4. Check voltage in the countries you intend to visit. As your Tablet PC comes with a universal AC-DC adapter, you only need to buy
the power cords necessary for connection to the various outlets. Some hotels provide universal outlets able to accommodate the
power cord of your Tablet PC
Never leave the Tablet PC in direct sunlight in the car. Stow it in a cool shady place.
8
OLIPAD
GETTING STARTED
CONNECTING THE POWER ADAPTER
The Tablet PC comes with a universal AC-DC adapter that supports an input voltage of between 100V and 240V. The procedure for
connecting the adapter is indicated below:
1. Take the adapter and the plug, push the plug into the socket until it clicks into place.
2. Plug the DC end of the adapter into the power jack of the Tablet PC.
3. Insert the AC end into a wall outlet
4. Check that the connections above are correct before turning on the Tablet PC.
Your Tablet PC and accessories may
differ from those shown.
At initial power-on or after a long period
of inactivity, connect the Olipad to the
adapter supplied before use.
The Olipad contains a long-life lithium
polymer rechargeable battery that is preinstalled inside the unit and not
accessible to the user.
Minimum battery consumption even with the unit turned off may cause complete discharge in a couple of weeks.
Connection of the Olipad to the adapter supplied (which also functions as battery charger) and complete charging of battery before
use are recommended.
OLIPAD
9
GETTING STARTED
The first time that the Tablet is turned on, the language selection screen is displayed.
1. Select the language desired from the list of languages available
and select Start to confirm.
The Home screen displayed at the end of initial configuration is shown below.
Drag the padlock outside the circle to access the main screen page
2. The device searches for wireless networks and displays the list
of those available. Select the network desired, enter the
connection parameters (password) and select Next to confirm.
If you do not intend to use a Wi-Fi network, go directly to the
next step.
3. Select the settings required for the Google location service.
4. Select Position, Date and Time. Select Next to confirm.
5. If desired, you can insert your Google account. If you do not
intend to use this service, go directly to the next step.
6.7. Initial configuration of the device has been completed and you
can now use all its capabilities
Note: during the initial configuration phase, select Previous to
return to the previous screen page
10
OLIPAD
MAIN SCREEN PAGE OF THE TABLET
1.
On completion of initial configuration, the main screen of the Tablet
shown below is displayed.
This includes:
1) Google search widget (top left)
2) Button (top right) for access to applications
3) Status bar (bottom right)
4) Navigation buttons (bottom left): previous, home, recent applications.
OLIPAD
2. Touching the + button (top right), the following screen page is
displayed.
Warning: to optimise battery life, Olipad switches to stand-by mode
if it is not used for more than 1 minute (this value may be modified).
To exit from stand-by mode, press the power button and drag the
padlock outside the circle to unlock the screen.
11
STATUS ICONS
The status icons to the top right of the screen are always active and indicate:
− the current time
− the presence of messages to be read
− battery charge status and whether you are using the internal battery or are connected to the mains supply
− availability and any connection to the Wi-Fi network
− availability and any connection to the mobile network (e.g. to the 3G system)
Note: If you have a Google Account configured on your Tablet PC, during connection to Google services (e.g. Gmail synchronisation,
Calendar, etc.), the network status icons change to BLUE.
If you do not have a Google Account Google or, for example, you are connected to a Wi-Fi network that does not permit
Internet access, the network status icons change to GREY.
SYSTEM SETTINGS
To access the configuration menu, select the
icon.
All available settings are listed to the left (tap the display to show the
items of the settings menu).
Example:
1. Select the item desired which will open the related submenu in the
right-hand part of the screen.
2. To return to the previous menu or to one of the other available
menus, select the title in the left-hand list.
12
OLIPAD
UPDATE
When available, Olivetti releases updates of the software of the Tablet PC that can be downloaded via the Internet.
To check availability of new updates, access the menu:
Settings > About Tablet > System Update.
Note: as update involves transfer of large volumes of data, it is advisable to use a Wi-Fi connection.
To use the 3G connection, check any costs with your telephone network operator beforehand.
NETWORK CONFIGURATION
This guide helps you configure your wireless, Bluetooth and mobile network settings for connection to the Internet.
To access the network configuration menu, select the
icon.
Then select Wireless and networks to enable/disable and set the
Mobile, Wi-Fi and Bluetooth network operating parameters.
Airplane mode
If this mode is enabled, all wireless connections are disabled.
OLIPAD
13
MOBILE NETWORKS (ONLY FOR MODEL WITH 3G FUNCTION)
In the 3G connection (Mobile networks) menu, you can:
− enable data access via a mobile network (mobile phone)
− enable data access in roaming
− select the operator and define the APN (Access Point Name)
necessary for data exchange.
WARNING:
To optimise device performance, a data connection must always
be active. If the Internet connection is established via a radiomobile network (3G), the service cost may be high. All operators
offer special rates that permit low-cost data connections. Make
sure your subscription is suitable before using the device for long
periods.
APN (Access Point Name) setting
With the SIM card inserted, select “Access Point Names”. The various APN made available by your network operator will be displayed.
Check that the APN selected matches that specified in your contract. Selection of a different APN may involve very high costs.
Setting of a personalised APN
Select “New APN“ from the drop-down menu and fill in the fields according to the parameters provided by the network operator.
14
OLIPAD
WIRELESS CONNECTION
1.
2.
Click “Wi-Fi” to activate the Wi-Fi device, then click “Wi-Fi
Settings” for configuration.
Run the automatic search and choose the network desired
from the list of networks available. Click “Connect” to
connect automatically to the network defined in the “Wi-Fi
Settings” menu. Enter the password for the network (if
necessary)
A Wi-Fi network can also be added manually using the “Add WiFi network” option, entering the network SSID and related
security settings.
Note: If you want to be notified when an open network is
available, make sure that the “Network notification” checkbox is
ticked.
OLIPAD
BLUETOOTH CONNECTION
1.
2.
Click ”Bluetooth” to activate the Bluetooth device and
click “Bluetooth Settings” for configuration.
Click “Find devices nearby”, connect the device and
carry out other functions after pairing the two devices.
Before this operation, turn on your Bluetooth device
(mobile phone, Bluetooth earphone etc.,) and make sure
the device is within field of reception (approx. 10 metres).
Bluetooth: to turn the Bluetooth switch on or off.
Device name: to define the name of the Bluetooth device.
Discoverable: to allow the Bluetooth device to be detected by
other devices.
Find devices nearby: to start the search for remote Bluetooth
devices
15
BLUETOOTH SETTINGS
Bluetooth allows exchange of files between the local and remote devices.
Pairing Devices (“Pairing”)
1. Press the button to turn Bluetooth on/off.
2. Select the Bluetooth settings and tick “Discoverable”.
3. Scan the network to find other accessible devices and select that required.
4. Wait for recognition and, if requested, enter the password (the default password is usually “0000”). Confirm by selecting OK.
5. The connection with the device is now established.
To send a file to a remote device
1. Carry out pairing, select a file on the local device using the File Explorer application and select the “Send” option using Bluetooth.
2. The Tablet displays a setup screen containing a list of the remote devices.
3. Select the device desired and the corresponding item.
To receive a file from a remote device
1. Carry out pairing between the Bluetooth devices.
2. Make sure that “Discoverable” is still active (it is de-activated automatically after 2 minutes).
3. Select a file on the remote device and send it to the local device via Bluetooth. A message appears (see message icon at top right)
indicating an incoming file.
4. Confirm reception of the file and transfer starts.
16
OLIPAD
INSERTION OF THE SD CARD
The device is equipped with a slot for Micro SD Card which must be inserted as shown in the figure to the right:
CONNECTION TO A PC
The device is equipped with a micro-USB port for connection to a PC. See the figure
to the side for details.
The computer recognizes the Tablet PC as a USB device.
Therefore, from the PC, you can select the following access modes to the Tablet PC:
a) mass memory: permits transfer of multimedia files between the Tablet PC and PC.
b) MTP device: permits use of Windows Media Player to transfer/synchronise
multimedia files.
OLIPAD
17
CONNECTION OF HEADPHONES
Your Tablet PC is equipped with a stereo audio outlet (3.5 mm jack) for
connection of ear- or head-phones.
When the jack of the headphones is inserted, the speakers are automatically deactivated.
Note:
Excessively loud volume could damage your hearing so turn down the
volume before connecting headphones and then raise this to comfort
level.
INSERTION OF THE SIM CARD
The device is equipped with a slot for SIM Card which must be inserted as shown in the figure to the
right:
18
OLIPAD
COMMUNICATION
BROWSER
After completing network connection, click the Browser
icon to navigate the network or click the Bookmarks
icon of the browser for direct display of a preferred
web site.
Click the icon to the top right to access the configuration
menu.
Note: The capabilities available are those of the
main browsers available on the market and
differ only according to use in ‘‘tap’’ (touch
screen) mode.
Graphic-intensive sites take longer to load and may
slow navigation.
OLIPAD
19
CONTACTS
Insert new contact
1. From the Contacts application, select “Create new contact”.
A screen page is displayed asking for the data of the new
contact.
2. Select the area of the item to be compiled; the keypad is
displayed at the bottom of the screen for insertion of the
letters and numbers desired.
3. Compile the areas concerned (scrolling, other fields may be
visible at the bottom) and then tap the “Save” key.
Import contacts
1. From the Contacts application, click the drop-down menu to
the top right.
2. Tap “Import/export”.
3. Select import mode (SIM/GFile)
Note: import of contacts via mail account is automatic in the
case of previous registration and synchronisation with a Google
account. Import via account is possible only with an active
Internet connection (3G or Wi-Fi).
20
OLIPAD
EMAIL – HOW TO SET UP AN ACCOUNT
1. Enter your email address and password
2. Select ”Next” to allow the device to attempt automatic
configuration of the mail client; otherwise, select “Manual
configuration” for manual insertion of the configuration
parameters.
If you have selected manual configuration, select the type of
incoming mail server, e.g. POP3, and then select Save.
Make sure that the names of the incoming and outgoing mail
servers are correct.
OLIPAD
21
Configuration of an Exchange account
Account configuration for access to services that use the
Exchange protocol (refer to the precious screen pages):
1. Using the on-screen keyboard, enter the email address
and related password and click “Next”;
2. Select type of incoming server, e.g. Exchange (Microsoft
Exchange);
3. Select “Synchronise” to the bottom and tick “Contacts”
and “Calendars”;
4. Save the settings and wait until the Tablet PC has made
the necessary checks and saved the configuration data.
This setting will permit creation of an Exchange account and
import of contacts and notes regarding the specific
Exchange account.
22
OLIPAD
ENTERTAINMENT
PHOTOVIEW
This application facilitates access to images and videos saved on the device (internal memory), on the Sdcard (external memory) and
import of images from your Picasa/Google account.
Note: you must already have a Picasa/Google account or create this from the Picasa/Google web site.
Photos
This application permits display of images on your Tablet PC.
Album display
Select an album to display its contents and carry out various operations on the images it contains. The controls for the various
operations are located to the top right:
Slide show: to display the album as a slide show
Eliminate: to eliminate the current image;
Share: for example, to send the image to an email address.
OLIPAD
23
Videos
Access this environment to view films or videos saved in the internal memory or on the external memory card.
Select the video desired to view this.
In addition to the usual play, stop, pause functions, a cursor permits for fast playback with a simple tap.
MUSIC
With this application, you can display and play albums.
Multimedia contents are divided into Artists, Albums, Tracks,
Playlists.
Functions include play, stop, pause, forward, rewind, shuffle
and repeat the track.
24
OLIPAD
CAMERA
This application permits use of the integrated camera to take
photos and/or record videos.
- Permits selection of photo mode.
- Permits selection of record mode (film).
- Displays (to the bottom left) the miniature of the photo
or video. Simply clicking the miniature, you can play back
the video or display the photo.
Note: a zoom function is also provided; to use this, click the
+/- icons to the top right (see the figure).
OLIPAD
25
TECHNICAL SPECIFICATION
Main characteristics
Power
Processor
NVIDIA Tegra2
Memory
LP-DDR2 1GB RAM
Adapter
Operating system
Android 3.1
Output power (max.)
Input: 100-240V AC 50/60Hz,
0.8A;
Output: 12V DC 2A
24.7 W
Battery (type)
Built-in Lithium Polymer Battery
Data storage
Mass memory
16GB (max. 32GB)
Ports
Display
Format
10.1”
Technology
TFT-LCD
Resolution
1280 x 800
Touch panel
Audio port
Headphone, Speaker and
Built-in Microphone port
USB port
Micro USB
Micro SD card port
Supports Micro-SD cards
Capabilities:
Charger input
HMDI output (via optional cable)
Type
Multiple-point Capacitive
Docking station
Localisation
GPS
2 Mpixel (front)
5 Mpixel (rear)
Physical characteristics
Camera
Bluetooth
Bluetooth Specification: V2.1+ EDR
Wireless
802.11 b/g/n
HSUPA/HSDPA
850/900/1900/2100MHz (data
exchange only)
3G
Audio/video features
Audio
Stereo
Video
HD Output (supports max. 1080P)
26
Dimensions
259 x 178 x 13.2 mm
Features and specifications are subject to change without
prior notice. The # symbol means that the item is optional.
OLIPAD
APPENDIX
TROUBLESHOOTING
Q1:How do I switch off the Tablet PC if the system blocks?
A:Insert the tip of a paper-clip in the hole close to the DOCK connector for at least one second; the Tablet PC will reboot.
Q2:How do I check the Tablet PC if I can’t switch it on?
1. The battery may be low, connect it to an electric outlet.
2. Remove the micro-SD card and any other external device that may prevent functioning.
Q3:What do I do if water penetrates inside the Tablet PC?
1. DO NOT turn on the Tablet PC.
2. Disconnect the cable in order to turn off the Tablet PC instead of turning it off with the POWER button. Disconnect all external devices and
then send the Tablet PC to a service centre.
3. DO NOT replace the Tablet PC in the wet carrying case.
Q4:How do I restore factory settings?
A:Click “Settings”---“Privacy”---“Factory data reset” in the main menu to restore factory settings.
Q5:How can I extend use of the Battery?
1. Reduce brightness of the LCD screen to a suitable level in “Brightness”.
2. Lower the volume.
3. Reduce the Screen timeout value
Q6: What do I do if the image isn’t clear
A: Check (after taking a photo or recording a video) that the lens is clean and, if not, clean with the soft cloth.
OLIPAD
27
Q7: What do I do if it is not possible to read a micro-SD card?
A: Re-insert the card and reboot.
Q8:How do I deal with Bluetooth pairing problems?
A: Make sure that the Bluetooth detection timeout has not expired and whether the Tablet PC (or remote device) cannot be detected.
Q9: What do I do in the case of light-sensor malfunction?
A: Activate the automatic brightness function. To do this, select “Screen Settings”Æ”Brightness” and tick the “Automatic brightness”
option.
Q10: What do I do if Bluetooth, 3G and Wi-Fi are disabled?
A:Check whether “Airplane mode” is enabled; if so, the Bluetooth, 3G and Wi-Fi functions cannot be activated.
28
OLIPAD
DIRECTIVE 2002/96/EC ON THE TREATMENT, COLLECTION, RECYCLING AND DISPOSAL OF ELECTRIC AND
ELECTRONIC DEVICES AND THEIR COMPONENTS
1. FOR COUNTRIES IN THE EUROPEAN UNION (EU)
The disposal of electric and electronic devices as solid urban waste is strictly prohibited: it must be collected separately. The dumping of these devices at
unequipped and unauthorized places may have hazardous effects on health and the environment.
Offenders will be subjected to the penalties and measures laid down by the law.
TO DISPOSE OF OUR DEVICES CORRECTLY:
a
Contact the Local Authorities, who will give you the practical information you need and the instructions for handling the waste correctly, for example:
location and times of the waste collection centres, etc.
b When you purchase a new device of ours, give a used device similar to the one purchased to our dealer for disposal.
The crossed dustbin symbol on the device means that:
– When it to be disposed of, the device is to be taken to the equipped waste collection centres and is to be handled separately from urban waste;
– Olivetti guarantees the activation of the treatment, collection, recycling and disposal procedures in accordance with Directive 2002/96/CE (and
subsequent amendments).
2. FOR OTHER COUNTRIES (NOT IN THE EU)
The treatment, collection, recycling and disposal of electric and electronic devices will be carried out in accordance with the laws in force in the country in question.
DIRECTIVE 2006/66/EC ON BATTERIES AND ACCUMULATORS
AND ON WASTE BATTERIES AND ACCUMULATORS
INFORMATION
Applicable in European Union countries and in other countries with recycling collection systems
The symbol shown on batteries, on their packaging or on their documentation means that the batteries supplied with the product must not be
disposed of as solid urban waste but must be collected separately. Take used batteries to the authorised recycling centres.
Improper disposal could have dangerous effects on the environment and on health.
When any of the chemical symbols Hg (mercury), Cd (cadmium) or Pb (lead) are present, they indicate that the battery contains a higher quantity of the related
substance than stipulated in the directive.
Code: 537093D
TABLET PC
GUIDA RAPIDA