1
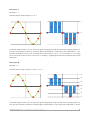
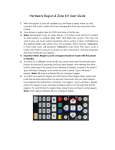
Troubleshooting HDMI with 840Hxl
By Tom Kopin – CTS, ISF-C
AUGUST 2012
KRAMER WHITE PAPER
WWW.KRAMERELECTRONICS.COM
TABLE OF CONTENTS
overview...........................................................................................................1
resolutions. . ...................................................................................................1
HDCP.................................................................................................................. 2
Color depth.....................................................................................................2
color space.....................................................................................................3
hdmi / dvi. . .........................................................................................................3
PCM Audio.........................................................................................................4
Audio Sampling Frequency...........................................................................4
Audio Bit Depth.. ...............................................................................................4
PC Control Software....................................................................................5
Summary.. .........................................................................................................5
Appendix 1 - Resolutions. . ..............................................................................6
Appendix 2 - Color depth. . ..............................................................................7
Appendix 3 - Audio Sampling Frequency......................................................9
Appendix 4 - Audio Bit Depth......................................................................... 10
examples................................................................................................... 11-12
Overview
The 840Hxl is a new Pattern Generator by Kramer Electronics. The 840Hxl replaces the 840H in the
Kramer Line. The 840H was a simple pattern generator that allowed you to choose a pre-defined resolution,
and then sent a number of different HDMI test patterns. The new 840Hxl can be used not only as a pattern
generator, but as a true HDMI troubleshooting device.
Via the front panel or through PC software, the 840Hxl gives the user the ability to control the pattern being
outputted, the resolution of the HDMI signal (whether HDCP is on or off), the color depth, and the color
space of the video output. The 840Hxl provides full audio support allowing the user to change the sampling
frequency and bit depth.
Combine all these features together into a single generator and you have a powerful product that can be
used to determine where the problems are in HDMI environments. Read below for a description of each of
these features and how they could help.
Resolutions
Like most signal generators, the 840Hxl has a predefined list of selectable output resolutions. These
resolutions include:
»»
640x480@60Hz
»»
1360x768@60Hz
»»
1280x1024@75Hz
»»
720x480@60Hz
»»
1440x900@60Hz
»»
1920x1080@60Hz
»»
800x600@60Hz
»»
1400x1050@60Hz
»»
1920x1200@60Hz
»»
1024x768@60Hz
»»
1280x1024@60Hz
»»
720x480i@60Hz
»»
1280x720@60Hz
»»
1680x1050@60Hz
»»
1920x1080i@60Hz
KRAMER ELECTRONICS, Ltd
Troubleshooting HDMI with 840Hxl
1
This is great; however, with EDID becoming more and more popular, having a predefined bank of resolutions
will not always work in every situation. For this reason we added 8 more resolution spaces. Seven of these
spaces are user-defined and will allow you to create any resolution you like based on a set of detailed timing
numbers. The last space is called “Output Native Resolution” which reads the detailed mode line of the Native
Resolution of the display’s EDID, and sets its output to exactly what the display is looking for. This feature
makes our pattern generator much less like a generator and more like a computer graphics card with the
ability to adapt to anything you plug into it.
In today’s world of non-standard resolutions and every display manufacturer doing something a little different,
having a generator that can adapt to the EDID of any display is imperative.
See Appendix 1 for more details on Resolutions and EDID.
HDCP
The 840Hxl has another very powerful feature, the ability to turn HDCP On and Off.
We all know HDCP is the 4-letter word that we love to hate. It quietly adds that extra level of complexity to
our HDMI signals which can sometimes be the difference between getting a picture or not. Testing for HDCP
compliance can be hard because it usually requires switching sources. For example, when I want to test with
an HDCP compliant source I will use the Blu-Ray player, and when I want to test a non- compliant source I will
use my PC. Even though this method works well, problems arise when the Blu-Ray doesn’t work. It is difficult
to know if the problem is actually HDCP, Color Space, Color Depth, or something else.
Using the 840Hxl to toggle HDCP on and off is very important, because with one button you can individually
isolate the HDCP signal. By isolating the HDCP signal, you can identify the reason the source isn't working
without changing anything else.
Color Depth
HDMI 1.3 introduced something called Deep Color which adds color depths of 30-bit, 36-bit, and 48-bit into
the HDMI standard. These color depths are higher than the existing standard of 24-bit color. These higher
color depths were added so HDMI sources could send more colors than the human eye can discern. This
would eliminate any potential color banding artifacts that could be seen when there are not enough color
shades to properly display certain images.
One thing to be careful of with Color Depth is how much it affects the total Bandwidth of your HDMI signal.
If one product or cable in the signal path is not capable of this bandwidth, it will result in no picture on the
screen. Here you can see the differences between different color depths at 1080p60Hz:
»»
@24bit Color Depth: Data Rate = 1.540Gbps
»»
@36bit Color Depth: Data Rate = 2.156Gbps
»»
@48bit Color Depth: Data Rate = 2.772Gbps
2
KRAMER ELECTRONICS, Ltd
Troubleshooting HDMI with 840Hxl
With the 840HxL, you can toggle the HDMI output between 24-bit, 30-bit, and 36-bit color depths (48-bit
color is currently not implemented in any standard HDMI equipment). Color Depth can also be set to Auto,
which will set the color depth of the output according to the EDID it reads from the downstream device.
Sources that output Deep Color will be Blu-Ray players or Media Players for the most part.
See Appendix 2 for more details on Color Depth.
Color Space
HDMI is capable of supporting 2 main color spaces, RGB and YUV (aka. YCbCr). Different sources will output
different color spaces depending on the type of source and also depending on the EDID of the downstream
device.
RGB color space sends a full value of all three primary colors (Red, Green, and Blue) and is completely
un-compressed. In YUV color space black and white information is being sent over the Y channel and the
chrominance, or color, is being sent over the U and V channels.
The 840Hxl has the ability of outputting these two different color spaces in 3 different forms:
»»
RGB – The standard color space of HDMI and DVI. Common sources of this color space include PC’s.
»»
YUV 4:4:4 – YUV (YCbCr) color space in which the Y, Cb, and Cr are all weighted equally, and is also
un-compressed.
»»
YUV 4:2:2 – YUV (YCbCr) color space in which the Cb and Cr carry half the weight as the Y signal. 4:2:2
uses a mathematical compression technique in which weights of colors are calculated based on the color
accuracy of the human eye to optimize picture while reducing overall bandwidth.
»»
Auto – In this mode, the color space being outputted will be selected based on the EDID of the downstream
device.
HDMI / DVI
One option on the 840Hxl is switching between an HDMI and DVI signal mode. What you are basically doing
is telling the generator whether you would like to output audio or not. Based on experience, I can tell you that
when certain “DVI” monitors receive embedded audio, they do not know what to do with it and crash showing
no picture at all and others will just ignore the audio and show the video. DVI is in quotations because the
fact that a display has a DVI connector does not always mean it does not support audio. Some manufactures
will use a DVI connector just for the locking mechanism while the EDID provides audio support.
The 840Hxl has 3 settings for this feature:
»»
HDMI – Which will output embedded audio with the set Audio Sampling Frequency and Audio Bit Depth
Selected.
»»
DVI – Which will output a digital video signal without embedded audio.
»»
Auto – When in Auto Mode, the 840Hxl will use the EDID of the downstream device to determine whether
to send audio or not. It will only send out what the destination supports.
The 840Hxl will output 2-channel PCM audio when audio is being embedded. Now let us take a look at the
audio capabilities of the 840Hxl.
KRAMER ELECTRONICS, Ltd
Troubleshooting HDMI with 840Hxl
3
Audio Sampling Frequency
PCM Audio
Pulse Code Modulation (PCM) Audio is a method of digitally representing an analog audio signal. It uses both
a Sampling Frequency and Bit depth to convert a continuous analog voltage into a series of 1’s and 0’s.
Audio Sampling Frequency
The audio sampling frequency is defined as the number of measurements taken on the X-axis of an audio
signal per unit of time (usually per second). During the conversion from analog audio, a higher sampling rate
will result in a more comprehensive recording, especially in the higher frequencies of the original signal. The
Nyquist theorem states that the minimum sampling frequency must be at least 2x as high as the maximum
frequency of the audio being recorded. The human ear can hear frequencies up to 20kHz which is why CD’s
chose a sampling frequency of 44.1kHz, slightly higher than 2x the ability of the human ear.
The 840Hxl allows you to output audio in 6 common sampling rates:
»»
44kHz
»»
48kHz
»»
88kHz
»»
96kHz
»»
176kHz
»»
192kHz
There is also an Auto Mode which will set the Sampling Frequency base on the EDID of the downstream
device.
See Appendix 3 for examples of Sampling Frequency.
Audio Bit Depth
Bit Depth for Audio is essentially the number of binary digits used to represent each audio sample on
the Y-axis (very similar to Color Depth in video). The greater the bit depth of your Digital Audio, the more
accurate your measurements will be resulting in higher dynamic range.
The 840Hxl allows you to choose between 3 different Bit Depths for the audio output:
»»
16bit
»»
20bit
»»
24bit
It also has an Auto mode which will select the Audio Bit Depth based on the EDID of the downstream device.
See Appendix 4 for examples on Audio Bit Depth.
4
KRAMER ELECTRONICS, Ltd
Troubleshooting HDMI with 840Hxl
PC Control Software
Using the free PC control software you can easily connect to the 840Hxl via USB or RS-232, providing easy
access to all the controls described above. See a screen shot of the software below.
Summary
As described here the 840Hxl is much more than a simple pattern generator, it is a tool that when used
properly can assist to narrow down issues in HDMI systems. By having one source that can toggle all of
these options, it is simple to single out individual issues in an HDMI system. What really makes this box
unique is its ability to react to the EDID of the device it is connected to. This will allow the generator to behave
less like the generators we are used to, and more like a real world source.
KRAMER ELECTRONICS, Ltd
Troubleshooting HDMI with 840Hxl
5
Appendices
Appendix 1 - Resolutions
If you’re like me, when you mention a computer resolution it is simply described using its viewable or
active pixels such as 1920x1080. However, as you could have guessed, there is more going on in a
computer signal other than the number of active pixels being sent (See Figure 1). In the past, the active
pixels alone were enough to describe a resolution, because you were referring to an existing standard
that was followed by the industry. Resolutions like 1024x768 and 1600x1200 are in this category. Every
monitor that supported 1024x768(XGA) supported the exact same previously defined standard version of
XGA. Also, every computer, when you choose 1024x768 as your output resolution, outputted the same
standardized version of XGA. This made all devices instinctively compatible with each other. Today, with the
rapid acceleration toward High Definition and widescreen display devices, standardization has been pushed
aside and reliance toward communication between the display and source has become necessary.
Figure 1: Make-Up of a Computer Resolution (Horizontal Only)
Total Pixels
Back Porch
Front Porch
ACTIVE VIDEO
Looking above at Figure 1 you will see that a resolution is certainly more complicated than only active pixels.
Every resolution has these set of parameters, all of which are needed to achieve a perfect image. Through
EDID, a display is able to show the source all of these numbers in the detailed timing section. It can be
displayed by what we call a mode line. This is an example of a mode line for 1024x768:
Detailed timing #1....... 1024x768p at 60Hz (4:3)
Mode line............... "1024x768" 65.000 1024 1048 1184 1344 768 771 777 806 -hsync -vsync
6
KRAMER ELECTRONICS, Ltd
Troubleshooting HDMI with 840Hxl
Beginning with 65.000 which is the Pixel Clock for this resolution, we then have four numbers that describe
horizontal timing, four numbers that describe vertical timing, and finally the polarity of the sync pulses
themselves. Remember, if displaying XGA is your goal then this mode line communication through EDID is
overkill because every display and computer supports this XGA mode line.
Knowing that the standardization problem exists mostly in widescreen resolutions, let’s look at an example
revolving around 1920x1080. These mode lines were read from the EDID’s of the VGA inputs of different
1080p monitors.
»»
LG LCD
Detailed timing #1....... 1920x1080p at 60Hz (16:9)
Modeline........ "1920x1080" 148.500 1920 2008 2052 2200 1080 1084 1089 1125 +hsync +vsync
»»
Westinghouse LCD
Native/preferred timing.. 1920x1080p at 60Hz (16:9)
Modeline........ "1920x1080" 138.500 1920 1968 2000 2080 1080 1082 1087 1111 +hsync -vsync
»»
Samsung LCD
Native/preferred timing.. 1920x1080p at 60Hz (16:9)
Modeline........ "1920x1080" 138.500 1920 1968 2000 2080 1080 1083 1088 1111 +hsync -vsync
»»
Panasonic Plasma
Detailed timing #1....... 1920x1080p at 60Hz
Modeline........ "1920x1080" 148.500 1920 2008 2052 2200 1080 1084 1089 1125 -hsync -vsync
»»
Vizio LCD
Native/preferred timing.. 1920x1080p at 60Hz
Modeline........ "1920x1080" 136.500 1920 1952 1984 2048 1080 1081 1084 1111 +hsync +vsync
You can clearly see that while all these monitors claim to be 1920x1080 monitors, they all support a
different version of 1920x1080. Now it is clear that describing active pixels alone is not specific enough
to define a resolution. Display manufacturers are able to get away with this because each of their specific
timings is completely described in the EDID of that monitor. When a computer is connected directly to any of
these monitors, the mode line is read by the PC and the PC modifies its output to comply with that display.
Appendix 2 - Color Depth
What is Color Depth?
Every HDMI signal has a color depth associated with it. Color depth basically defines how many different
colors can be represented by that HDMI signal. A normal HDMI signal has a color depth of 8 bits per color.
This may also be referred to as 24-bit color (8-bits per color x 3 colors RGB). The number of bits refers to
the amount of binary digits used to determine the maximum number of colors that can be rendered. For
example, the maximum number of colors for 24-bit color would be:
111111111111111111111111(binary) = 224 = 16777216 = 16.7 million different colors.
Color depth is very important in HDMI signals because the more colors you send, the higher the bandwidth
of your HDMI signal.
KRAMER ELECTRONICS, Ltd
Troubleshooting HDMI with 840Hxl
7
Deep Color
HDMI 1.3 introduced something called Deep Color which adds color depths of 30-bit, 36-bit, and 48-bit into
the HDMI standard. These higher color depths were added so HDMI sources could send more colors than
the human eye can discern. This would eliminate any potential color banding artifacts that could be seen
when there are not enough colors to properly display certain images.
Maximum Colors:
»»
30-bit: 1.073 Billion Colors
»»
36-bit: 68.71 Billion Colors
»»
48-bit: 281.5 Trillion Colors
Calculating HDMI Bandwidth
Since all HDMI products are hardware limited to a maximum bandwidth, it is important to know how to
calculate the bandwidth of source signals to make sure all downstream devices are compatible. There are
many factors that determine bandwidth like Resolution, Refresh Rate, and Color Depth. The first thing to
determine is the pixel clock of the desired resolution. Pixel Clock is the number of pixels being sent every
second by the source.
Pixel Clock = Total_Horizontal_Pixels * Total_Vertical_Pixels * Refresh_Rate
Common Pixel Clocks
»»
1080p@60Hz: approximately 154MHz
»»
1080p@24Hz: approximately 74.275MHz
»»
1080i@60Hz: approximately 74.275MHz
»»
720p@60Hz: approximately 74.275MHz
Once the Pixel Clock is determined, the bandwidth can be calculated with the following formula:
Bandwidth = Pixel_Clock * (bit_depth_per_color + 2)
Common Bandwidth Calculations
»»
720p/1080i@60Hz Pixel Clock = 74.275MHz
@36bit Color Depth: Data Rate = 74.275 * (12 + 2) = 1.039Gbps
@48bit Color Depth: Data Rate = 74.275 * (16 + 2) = 1.336Gbps
»»
1080p@24 Pixel Clock = 74.275MHz
@24bit Color Depth: Data Rate = 74.275 * (8 + 2) = 742.75Mbps
@36bit Color Depth: Data Rate = 74.275 * (12 + 2) = 1.039Gbps
@48bit Color Depth: Data Rate = 74.275 * (16 + 2) = 1.336Gbps
»»
1080p@60Hz Pixel Clock = 154MHz
@24bit Color Depth: Data Rate = 154 * (8 + 2) = 1.540Gbps
@36bit Color Depth: Data Rate = 154 * (12 + 2) = 2.156Gbps
@48bit Color Depth: Data Rate = 154 * (16 + 2) = 2.772Gbps
8
KRAMER ELECTRONICS, Ltd
Troubleshooting HDMI with 840Hxl
Appendix 3 - Audio Sampling Frequency
The frequency of the original analog audio is 2 units in all examples. Also, in the digital representations,
sufficient bit depth is assumed.
In the example below, on the left, the analog audio signal will be sampled at a rate of 2, which is below the
Nyquist Rate. The image on the right is a representation of your digital signal based on this sampling rate. In
this case, because I am below the Nyquist Rate, much of in the audio information is lost (in this case ALL).
In the example below, on the left, the analog audio signal will be sampled at a rate of 4, which is at the
Nyquist Rate. The image on the right is a representation of your digital signal based on this sampling rate.
In this case, because I am at the Nyquist Rate, the basic shape of the original sine wave is still intact. It may
not be as smooth as the analog wave but all the highs and lows are accounted for.
KRAMER ELECTRONICS, Ltd
Troubleshooting HDMI with 840Hxl
9
In the last example below, on the left, the analog audio signal will be sampled at a rate of 8, which is twice
the Nyquist Rate. The image on the right is a representation of your digital signal based on this sampling
rate. You can see that the more samples I take, the more my digital signal start to become like the analog
signal. These crude examples could be applied in theory to all audio signals.
Sampling Rates are not the only thing creating your digital waveform. Ultimately, sampling rates are only
telling you where to measure on the X-axis. Read on to Bit Depth to determine how to measure the Y-Axis.
Appendix 4 - Audio Bit Depth
Now that we know how to sample an analog signal, we need to learn how to create it. Audio Bit Depth is
the last piece of that puzzle. Bit Depth is the value of the analog audio at each sample. The greater the bit
depth, the more binary digits you have to make the reading more accurate.
»»
1-bit – 2 Potential Values. 0 or 1
»»
2-bit – 4 Potential Values. 00, 01, 10, or 11
»»
4-bit – 16 Potential Values. 0000-1111
»»
24-bit – 17million Potential Values. 000000000000000000000000-111111111111111111111111
Looking at the examples you will see how bit depth alone can play a large part in creating the digital signal.
To isolate bit depth, in the examples, the frequency of the original analog signal and the Digital Sampling
Rate will be constants.
»»
Analog Audio Frequency = 2 units
»»
Digital Sampling Rate = 8
10
KRAMER ELECTRONICS, Ltd
Troubleshooting HDMI with 840Hxl
Example 1
Bit Depth = 1
Potential Values of Each Sample = 0 or 1
1
0
1
On the left diagram below, you can see the original analog signal along with where the sampling points are.
The right hand diagram shows the resulting digital representation of that signal with a Bit Depth of 1 bit.
Since the bit depth is so low, each sampling point must be either a 0 or a 1. For samples 2, 4, 6, and 8
you can see that we are forced to round up to 1 resulting in a digital signal that looks nothing like the original
analog one.
Example 2
Bit Depth = 2
Potential Values of Each Sample = 00, 01, 10, 11
11
10
01
00
01
10
11
On the left diagram below, you can see the original analog signal along with where the sampling points are.
The right hand diagram shows the resulting digital representation of that signal with a Bit Depth of 2 bits.
KRAMER ELECTRONICS, Ltd
Troubleshooting HDMI with 840Hxl
11
Now that we have more values to choose from, we don’t have to round up quite as much for samples 2, 4,
6, and 8. This results in a digital signal that is starting to look more and more like its analog cousin.
Example 3
Bit Depth = 3
Potential Values of Each Sample = 000, 001, 010, 011, 100, 101, 110, 111
111
110
101
100
011
010
001
000
001
010
011
100
101
110
111
On the left diagram below, you can see the original analog signal along with where the sampling points are.
The right hand diagram shows the resulting digital representation of that signal with a Bit Depth of 3 bits.
Again you can see that now with even more selections we are able to become more accurate in our sample
measurements. It seems the sampling rate is now, for the moment, the limiting factor to making this digital
signal better.
KRAMER ELECTRONICS, Ltd.
KRAMER ELECTRONICS USA, INC.
3 Am VeOlamo St.
Jerusalem, Israel, 95463
Tel:
+ 972 732650200
Fax:
+ 972 2 653 5369
E-mail:[email protected]
Web:www.kramerelectronics.com
HEADQUARTERS
96 Route 173 West Suite 1
Hampton, NJ 08827
Tel:
(908) 735 0018
(888) 275 6311
Fax:
(908) 735 0515
TECH SUPPORT AFTER 6PM EST:
Tel:
(888) 275 6311
E-mail:[email protected]
Web:www.kramermatrix.com
© 2012 Kramer Electronics, Ltd. All Rights reserved. Reproduction in whole or in part without written permission is prohibited.