1
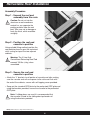
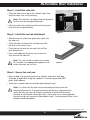
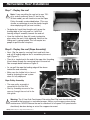
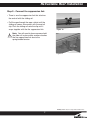
CommData
Aisle Containment
System
www.cooperbline.com
V-Line™ Aisle Retractable Roof Pod System
Installation Manual
VCRP2054RB & VCRP1560RB
Figure 1
Overview
The The V-Line™ Aisle Retractable Roof Pod
System is the only retractable roof system for both
cold and hot aisle containment. It combines cost
effectiveness ease of installation, fire safety, and
good looks. Over the long term the V-Line Aisle
Retractable Roof Pod System will reduce the “total
cost of ownership” by making it easier to fully
separate cold supply air and hot exhaust air,
improving cooling efficiency.
Housing
ESD Fire Resistant Roof
UL/FM Rated Fir Suppression Link
Incorporating a high-grade aluminum track, UL
and FM rated fire suppression links, and ESD
fire resistant vinyl, the V-Line Aisle Retractable
Roof Pod System has been engineered to provide long lasting reliability in operation. The
V-Line Aisle Retractable Roof Pod System
includes all of the components and fasteners
required to assemble and install the partition
system. V-Line Aisle Containment Retractable
Roofs can be installed quickly and easily to a
range of V-Line Cabinets.
As shown in Figure 1, the V-Line Aisle
Containment Retractable Roof System is
modular in design. It comes in two model widths
(1) 60 inches (1.52m) wide and (2) 84 inches
(2.13m) wide and is available in single span
lengths of up to
30 feet (9.14m).
BLVCAERPMAN-11
Retractable Roof Installation
Safety & Quality Assurance
The following recommendation should be carefully observed as part of any door installation. In
particular, the safety of the installers must be placed ahead of all other considerations. Some of
the following warnings or cautions have been highlighted in the appropriate sections of the
manual.
✔ DO READ and follow the V-Line Aisle Retractable Roof Pod installation manual.
✘ DO NOT lift the V-Line Aisle Retractable Roof Pod on your own.
✘ DO NOT drill into structures without first ensuring that no electrical wires are in the area
of the drilling.
✔ ALWAYS comply with local or regional health and safety regulations.
✔ ALWAYS wear personal protective equipment (PPE) when drilling or attaching the door.
PPE includes: Gloves, Safety eyeglasses, Hardhats.
✘ NEVER leave the assembly unattended until the installation has been completed.
!
Cautions and Warnings
The manual contains important information of the installation of your V-Line Aisle
Retractable Roof Pod System. We strongly recommend that you read and follow the
instruction contained in this manual. At several points in the manual items of special
interest or significant impact are highlighted by one of the following notices.
Warning: Hazards or unsafe practices that could cause personal
injury or death.
Caution: Hazards or unsafe practices that could cause product
damage.
Note: Significant points of interest.
Warning: Details subject to change without written notice.
2
Retractable Roof Installation
Component Overview
The roof pod assembly comes crated and comprises of
five groups of components:
1.
2.
3.
4.
5.
6.
7.
Tools Required:
• Rubber Mallet
• Screw Gun
• Measuring Tape
• Hex Key 3/16”
(1) Roof Pod Cassette
(10) Side Rails
(1) End Rail
(1) Thermal Buckle
(12) Angled Mounting Brackets with Hardware
(8) Perforated OZIP Plates with Hardware
(1) Length of Rope
1
2
5
6
7
3
4
Installed Planning
Determine where the roof pod is to be installed and which cabinets they
will be mounted to. Generally the roof pod is to be installed at one end
of a row of adjacent cabinets. Ensure that there is sufficient clearance
overhead to accommodate the roof pod structure and ensure that
sufficient clearance exists to allow the roof pod to be positioned without
encroaching or obstructing incoming services, etc.
!
Warning: The V-Line Aisle Containment Retracting Roof Pod
exceeds 150 lbs (68kg) when fully assembled. Care should be
taken to ensure that the relevant health and safety regulation
are adhered to when lifting. It is suggested that the assembly
is lifted into position using a suitable hand operated lift (similar
to the one shown at right).
Warning: Details subject to change without written notice.
3
Retractable Roof Installation
Assembly Procedure
Step 1 - Unpack the roof pod
assembly from the crate
!
Caution: Do not cut into the
aluminum or roof membrane
material as you separate the
packing material from the roof
pod. Take care not to damage or
mark the finish, which would be
unsightly.
Figure 1
Step 2 - Position the roof pod
cassette in position
Using suitable lifting method, position the
roof pod into place to span the contained
aisle, resting on top of the two adjacent
cabinets.
!
Warning: The V-Line Aisle
Containment Retracting Roof Pod
exceeds 150 lbs. (68kg) when
assembled.
Figure 2
Step 3 - Secure the roof pod
cassette in position
• Attach the “L” brackets to rail portion of cassette and after making
sure the cassette and rails are square to the aisle and flush with
the end of the cabinets, secure with self-tapping screw provided.
• Swap out the standard OZIP plate for the perforated OZIP plate and
using the brackets provided, secure the cassette to the perforated
OZIP plate.
!
Note: If sliding doors are used it is recommended that
the cassette is fixed to the sliding door top header rail
using the brackets provided.
Warning: Details subject to change without written notice.
4
Retractable Roof Installation
Step 4 - Install the side rails
• Place the side rails on top of the cabinets and in line
with the starter rails on the housing.
!
Note: The side rails are labeled and are designed
to mate with the corresponding letters.
• Attach the side rails into the end rails or housing until
they lock with the push buttons.
Figure 3
Step 5 - Install the end rail attachment
• Slide the end rail attachment (pictured at right) into
the side rails.
• Verify that when inserted fully it will be even with
the ends of the server racks.
• Push the end rail onto the two side rails until the
push buttons lock.
• Use a soft rubber mallet to ensure the side rails
fully seat into the side rails.
!
Note: The rails can be cut down for a custom
fit if required. Use appropriate equipment and
make sure ends are cut flush.
Figure 4
Step 6 - Secure the roof pod
• Refer to Step 3 to secure the end rail to cabinets and end of aisle door
assembly (if applicable) using the supplied “L” brackets, perforated OZIP
plates and hardware.
• Verify roof is square and secure before proceeding to step 7.
!
Note: It is critical that the side rails be spaced exactly equal from the
housing to the end rail. If spaced incorrectly the roof may sag excessively.
Verify that rails are true and straight and parallel to each other for entire
distance of travel before securing to racks. Once racks are in correct positions,
secure the side rails and end as described in step 1. Do not exceed 10 feet (3.0m)
between attachment points.
Warning: Details subject to change without written notice.
5
Retractable Roof Installation
Step 7 - Deploy the roof
!
Note: If you are pulling the roof out to over 70%
of its overall maximum (over 21 feet for the
30 foot model) you will need to to use the Rope
Pulley Assembly as described below. (This may
also be an advantage to use the shorter lengths
when deploying with just one installer.)
• To deploy by hand (short lengths only) grasp the
leading edge of the roof panel as it exits the
housing and pull smoothly towards the end rail.
Figure 5
• Have the fusible link (item #4) ready to drop into
place when the roof is fully deployed. Note that the
sliding roof is spring loaded. This will require two
people to pull the roof into place.
Step 8 - Deploy the roof (Rope Assembly)
• Next - Rig the ropes by running it back and forth from
end rail to leading edge so that is resembles pictures at
right (Figure 7).
Figure 6
• Then tie a simple knot in the end of the rope after threading
it back down through the remaining hole in the end rail.
See example below reference Figure 9.
• As you pull the rope the leading edge will be drawn
toward the end assembly.
• Make sure the fusible link is close at
hand to fastening the roof system
when it’s fully deployed.
Figure 7
Rope Pulley Assembly
• The rope pulley assembly is
connected to the Rail End.
• Start by threading one end of the
rope up through the end rail in the
hole guide
Figure 9
Figure 8
!
Warning: The V-Line Aisle Containment Retracting Roof Pod roof should always be
returned to the housing in a controlled manner. Always use the rope system during
maintenance. NEVER release the roof to slide back at full speed. Full speed returns
should only be done during an actual fire suppression event.
Warning: Details subject to change without written notice.
6
Retractable Roof Installation
Step 9 - Connect fire suppression link
• There is one fire suppression link that attaches
the end rail with the sliding rail.
• Pull the rope through the rope ratchet until the
sliding rail comes into contact with the end rail
clip. Push the sliding rail onto the clip until it
snaps together with the fire suppression link.
!
Figure 10
Note: You will need to have someone hold
the slide rail in place while another attaches
the fire suppression link due to the
spring-loaded tension.
Figure 11
Warning: Details subject to change without written notice.
7
Retractable Roof Installation
V-Line Aisle Containment Solution
Warning: Details subject to change without written notice.
Cooper B-Line • 509 West Monroe Street • Highland, IL 62249
Phone: 800-851-7415 • Fax: 618-654-1917 • Web: www.cooperbline.com
8