1
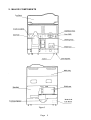
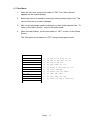
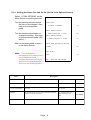
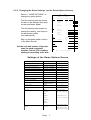
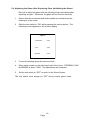
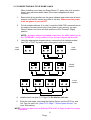
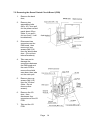
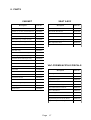
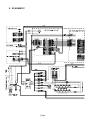
This document has been downloaded from:
The largest resource for amusement machines
documentation on the world wide web!
2
RIDGE RACER
Operators Manual
Part No 90500075
© 1993,1994
Ltd - all rights reserved.
No part of this publication may be reproduced by any mechanical, photographic or
electronic process, or in the form of phonographic recording, nor may it be stored in a
retrieval system, transmitted or otherwise copied for public or private use, without
permission from namco Ltd.
While the information contained in this manual is given in good faith and was accurate
at the time of publication, BRENT LEISURE LIMITED reserve the right to make
changes and alterations without notice.
No responsibility is accepted for unauthorized changes or modifications made to the
machine.
Published by:
BRENT LEISURE Ltd.
Unit 1 Brent Crescent,
London. NW10 0QT
Phone:- 081-965-0550
Fax:- 081-961-0574
Contents
Operators Manual .......................................................................................................... 1
1.
SPECIFICATIONS .................................................................................................. 5
2.
MAJOR COMPONENTS ........................................................................................ 6
3.
PRECAUTIONS ...................................................................................................... 7
3-1
Cautions When Installing. ...................................................................... 7
3-2
Caution when Handling. ......................................................................... 7
3-3
When Transporting. ............................................................................... 7
4.
INSTALLATION ...................................................................................................... 8
4-1
Connecting the Seat Assemblies to the Cabinet.................................... 8
4-2
Adjusting the Level Adjusters................................................................. 8
5.
ADJUSTMENTS ..................................................................................................... 8
5-1
Turning on the Power ............................................................................. 8
5-2
Switches for Adjustments ...................................................................... 8
5-3
Test Mode .............................................................................................. 9
5-3-1
Setting the Game Fee and So On (On the Coin Options Screen) ....... 10
5-3-2
Changing the Game Settings (on the Game Options Screen) ............ 11
5-3-3
Switch Test .......................................................................................... 12
5-3-4
Sound Test (Adjusting the Sound Volume) ....................................... 13
5-3-5
Lamp Test ......................................................................................... 13
5-4
Adjusting the Game After Replacing Parts (Initializing the Game) ...... 14
5-5
CONNECTING MULTIPLE GAME LINKS ........................................... 15
6.
HOW TO PLAY ..................................................................................................... 16
7.
MAINTENANCE ................................................................................................... 17
7-1
Replacing Fluorescent Lamps ............................................................. 17
7-2
Replacing the Leading Driver Lamps ................................................... 17
7-3
Removing the Game Printed Circuit Board (PCB) ............................... 18
7-4
Removing the Shield Case .................................................................. 19
7-5
Removing the Power Control Panel ..................................................... 19
7-6
AB Pedal Assy (Replacing the Control) ............................................... 19
7-7
Gear Shift Assy (removing) .................................................................. 19
7-8-1
Replacing the control .......................................................................... 20
7-8-2
Replacing The Steering Wheel ........................................................... 20
8.
PARTS .................................................................................................................. 21
9.
SCHEMATIC ......................................................................................................... 22
Page
1. SPECIFICATIONS
POWER SUPPLY :-
220/240volts AC
MONITOR:auto degauss.
Hantarex 28" Polo Colour Monitor with
DIMENSIONS :When Assembled:Cabinet:Seat Assy:-
1400(w) x 1770(d) x 1980(h)
1400(w) x 920(d) x 1980(h)
470(w) x 940(d) x 1230(h)
WEIGHT :When Assembled:Cabinet:Seat Assy:-
310kg
250kg
30kg (ea)
ACCESSORIES :-
Keys:
(Cash Door)
(Coin Assy)
(Back Door)
2
2
2ea
M10x30 Hex Head Bolts
M10 Flat Washer
M10 Spring Washer
Seat/Cabinet Joint Bracket
24
24
24
4
Phono Link Lead
1
IEC mains Lead
1
Operators Manual
1
Page
1
2. MAJOR COMPONENTS
Page
2
3. PRECAUTIONS
3-1 Cautions When Installing.
This game is designed for indoor use only. The game must not be installed
outdoors or
under the following conditions:a.
In areas directly exposed to sunlight, high humidity, direct water contact,
dust, high heat or extreme cold.
b.
In locations that would present an obstacle in the case of an emergency,
i.e.. near fire equipment or emergency exits.
c.
On an unstable surface or subject to floor vibration.
3-2 Caution when Handling.
a.
AC power must always be turned OFF, and the game disconnected, before
replacing any parts or connecting/disconnecting connectors.
b.
When unplugging the game from an electrical outlet, always grasp the
plug, not the mains lead.
c.
The machine must be earthed with a securely connected earthed plug.
d.
Care must be taken at all times to avoid electric shock when inspecting or
adjusting the game.
e.
Adjustment is required whenever the game PCB board, ROM, Steering
Assy, AB pedal Assy or control are replaced. (See 5-4 "Adjusting the Game
After Replacing Parts" on page 10)
3-3 When Transporting.
a.
Do not subject the game to physical shock when transporting or moving it.
b.
Always return the levellers to the UP position before moving the machine.
c.
Take care not to rope any moulded (plastic) parts when transporting.
d.
Always separate the seat assemblies from the cabinet before moving or
transporting.
Page
3
4. INSTALLATION
Remove from the cash box the four joint plates, 24off M10x30 hex head
bolts, 24off M10 flat washers and 24off M10 spring washers.
4-1 Connecting the Seat Assemblies to the Cabinet
1. Place the cabinet in the installation position.
2. Connect the connectors from the cabinet to the connectors in the seat
assemblies.
3. Fix the seat assemblies to the cabinet using the joint plates, M10 hex
head
bolts, flat washers and spring washers taking care not to trap any wires
between the seat assemblies and cabinet.
4-2 Adjusting the Level Adjusters
Adjust the level adjusters of the cabinet and seat assemblies (four each for
the cabinet and each seat assembly) with a wrench (24mm) so that the
castors are raised from the floor by about 5mm. Ensure the machine is
level and stable then back up the lock nut to lock the adjuster.
5. ADJUSTMENTS
5-1 Turning on the Power
After installing the product, turn on the power. The power switch is located
above the
mains inlet on the rear of the cabinet.
5-2 Switches for Adjustments
Open the coin door for access to the switches for adjustments.
1.
Service Switch
Press this switch to establish credits without incrementing the coin counter.
2.
Test Switch
Set this switch to "ON" to enter test mode. You can change the price of
play and perform various tests in Test Mode. (See "5-3 Test Mode" on
page 5)
COIN COUNTER
RIGHT PLAYER
LEFT
L PLAYER
EFT
RIGHT
TEST
SERVICE
Page
LEFT
TEST
4
RIGHT
SERVICE
SEAT VOLUME
5-3 Test Mode
1.
Open the coin door, set the test switch to "ON". The "Menu Screen"
appears on the monitor display.
2.
Select the item to be tested by turning the steering wheel right or left. The
colour of the item you select changes.
3.
Step on the accelerator pedal to display the menu of the selected item. To
return to the “Menu Screen” step on the brake pedal
4.
When the test finishes, set the test switch to “OFF” to return to the Game
Screen.
The Test switch must always be “OFF” during normal game mode.
MENU
COIN
OPTIONS
(a)
For setting the price of play (see 5-3-1)
GAME
OPTIONS
(b)
For setting the game options (see 5-3-2)
BOARD
TEST
(c)
For testing the game PCB
(d)
For testing switches (see 5-3-3)
(e)
For adjusting the sound volume (see 5-3-4)
(f)
For
monitor
SWITCH
TEST
SOUND
TEST
MONITOR
TEST
adjustments
ADS
TEST
(g)
For
displaying
PCG
TEST
(h)
For
testing
game
graphics
(i)
For
testing
leading
driver
(j)
For restoring each setting to standard value
LAMP
TEST
ABOUT
IN=STEP
ON
THE
GAS
Page
5
game
data
collected
lamps
5-3-1 Setting the Game Fee and So On (On the Coin Options Screen)
Select 1 “COIN OPTIONS” on the
Menu Screen to set the game fee
Turn the steering wheel to select
the item to be changed, then
step on the accelerator
pedal.
COIN OPTIONS
GAME COST
2 COINS 1 CREDIT
(a)
COIN 1 MECH VALUE
Turn the steering wheel again to
change the setting, then step
on the accelerator pedal (See
table 1.)
COIN 2 MECH VALUE
Step on the brake pedal to return
to the Menu Screen.
BONUS FOR QUANTITY BUY-IN
1 COIN COUNT AS 1 COIN
1 COIN COUNT AS 1 COIN
NONE
(b)
(c)
(d)
FREE PLAY
Note: The price of play
adjustments are made on the
credit dispense board
(located inside the coin door)
and the coin options should
be set as the following table.
OFF
EXIT = STEP ON THE BRAKE
Item
(a) Game fee
(e)
Description
One to nine
Set to 1
(b) Coin 1 mechanism Number of credit pulses per coin
One to nine
Set to 1
(c) Coin 2 mechanism Not Used
One to nine
(d) Bonus
The extra credit given as a bonus when the specified
number of coins are inserted
One credit per one coin
Three credits per nine
coins
Free play started by stepping on the accelerator
OFF/ON
(e) Free play
Number of credit pulses necessary for game credit
Page
6
Set to NONE
set to OFF
5-3-2 Changing the Game Settings (on the Game Options Screen)
Select 2 “GAME OPTIONS” to
change the game options.
GAME
OPTIONS
(DEFAULT
GAME
IN
DIFFICULTY
Turn the steering wheel to select
the item to be changed then step
on the accelerator pedal.
GREEN)
TIME
EXTEND
NOVICE
D
** ** **
(a)
ADVANCED
D
** ** **
(b)
EXPERT
D
** ** **
(c)
T.T.
D
** ** **
(d)
LINKABLE
D
** ** **
(e)
NOVICE
2
(f)
ADVANCED
3
(g)
EXPERT
3
(h)
T.T.
3
(i)
LINKABLE
3
(j)
KM/H
(k)
ON
(l)
LAP
Turn the steering wheel again to
change the setting, then step on
the accelerator pedal
(see table below).
SPEED
Step on the brake pedal to return
to the Menu Screen.
SOUND
CPU
CAR
Set the rank and number of laps the
same for each connected
machine. Set the CPU numbers
starting in ascending order with
IN
ATTRACT
No
TYPE
LINK
EXIT
=
*
(m)
*
(n)
*
(o)
STEP ON THE BRAKE
Settings of the Game Options Screen
Item
Description
Factory setting
(a) Play time for the novice level
A (shortest) to H (longest)
D
(b) Play time for the advanced level
A (shortest) to H (longest)
D
(c) Play time for the expert level
A (shortest) to H (longest)
D
(d) Play time for the time trial game
A (shortest) to H (longest)
D
(e) Play time for linked game
A (shortest) to H (longest)
D
(f) Laps for the novice level
2 to 5
2
(g) Laps for the advanced level
2 to 5
3
(h) Laps for the expert level
2 to 5
3
(i) Laps for the time trial game
2 to 5
3
(j) Laps for the linked game
2 to 5
3
(k) Unit of speed
KMH (Kilometers per Hour)
Set for Country of Use
MPH (Miles per Hour)
(l) Attract sound
ON/OFF
(m) CPU No.
(n) Car type
ON
Set in order starting from
the left
0 to 7
1 BLUE
1 BLUE - Left Player
2 YELLOW
2 YELLOW - Right Player
3 RED
When linked to other
4 GREEN
machines set to player No.
5 BLUE
6 YELLOW
7 RED
8 GREEN
(o) Link
Displays number of linked
machines. If there is a
problem or only one seat
set, (NG) will be displayed.
2, 4, 6 or 8
Page
7
5-3-3 Switch Test
Select 3 “SWITCH TEST” to display the following screen.
SWITCH TEST
DIP SW2 1 2 3 4 5 6 7 8
(a) Option switch (SW2 on the CPU)
SW3 1 2 3 4 5 6 7 8
(b) Option switch (SW3 on the CPU)
STEERING
*0000
(c) Steering
GAS
*0000
(d) Accelerator
BRAKE
*0000
(e) Brake
SHIFT
CENTRE
SWITCH 1 OFF
(f) Shift
SWITCH 2 OFF
SERVICE
OFF
(g) Service switch
COIN 1
OFF
(h) Coin 1 switch
COIN 2
OFF
(i) Coin 2 switch
EXIT = STEP ON THE BRAKE
AND ACCELERATOR
a.
b.
c.
d.
e.
f.
h.
i.
j.
The status of the option switch SW2 on the game PCB (CPU-PCB) is
indicated here.
The status of the option switch SW3 on the game PCB (CPU-PCB) is
indicated here.
The SW2 or SW3 switch is set to ON when the corresponding number
is red.
When you turn the steering wheel to the right, the number increments.
When turning it to the left, the number decrements.
When you step on the accelerator pedal, the number increments.
When you step on the brake pedal, the number increments. An
approximate value of “0000” appears on the item c, d or e respectively
when you locate the steering wheel in the middle and when the
accelerator and brake pedals are released. (Even if the least digit of
the number changes, the game is operating normally). “OK” appears to
the right of the number when the accelerator and brake pedals are
depressed.
The position of the shift and the status of two switches are indicated
here.
When you move the shift lever to low CENTRE changes to DOWN and
switch 1 is set to ON. When you move it to high Centre changes to UP
and switch 2 is set to ON.
”ON” appears when you press the service switch inside the coin door.
“ON” appears when you operate the credit available button only if
credits are established on the dispense board.
Not used.
To return to the Menu Screen, step on both the brake and gas pedal at the same
time 8
Page
5-3-4 Sound Test (Adjusting the Sound Volume)
Select “SOUND TEST” on the menu screen to adjust the sound volume.
The following screen appears.
SOUND TEST
VOLUME(L)
3F
(a) Sound volume for left speakers
VOLUME(R)
3F
(b) Sound volume for right speakers
STEREO CHECK
SONG
(c) Stereo checking function
00
EXIT=STEP ON THE BRAKE
Use the steering wheel to select the item to be changed. Step on the
accelerator and the item selected will stop flashing. Use the steering to
adjust the level. Step on the accelerator when the desired setting is
reached and the item will start flashing. The steering can now select
another item.
The sound volume can be adjusted in 64 steps between 00 (minimum) to
3F (maximum). The factory setting is “3F”. (i.e. Loudest)
When you select (c) and step on the accelerator pedal, sound is produced
the left speaker, then the right speaker. Step on the brake pedal to return
to the Menu Screen.
The volume controls on the service bracket enable the seat speakers to be
reduced from the main volume.
5-3-5 Lamp Test
The Leading Driver Lamps will turn ON or OFF each time the accelerator pedal
is pressed.
Page
9
5-4 Adjusting the Game After Replacing Parts (Initializing the Game)
Be sure to adjust the game with the following instructions below after
replacing any part. Otherwise, the game will not function correctly.
1.
Ensure that the accelerator and brake pedals are released and the
steering is in the centre.
2.
Slide the test switch to “ON” while pressing the service button. The
following screen appears on the monitor display.
ADJUST
STEERING
0000
GAS
0000
BRAKE
0000
3.
To zero the settings press the service switch.
4.
When each number on the right hand side of the items: STEERING, GAS
and BRAKE is about “0000”, the adjustments are complete.
5.
Set the test switch to “OFF” to return to the Game Screen.
The test switch must always be “OFF” during normal game mode.
10
Page
5-5 CONNECTING MULTIPLE GAME LINKS
When installing more than one Ridge Racer 2™ game, the units must be
linked using screened audio cable (One lead is supplied with each
machine)
1.
Ensure that all leg levellers on the game cabinets and seats have all been
lowered, and that all castors are clear of the floor. Make sure that power
to all the games is turned OFF.
2.
To link multiple cabinets (2-4 units), locate the LINK PCB, mounted next to
the mains-in socket (remove the cover plate to gain access), on each
Game Cabinet, and move all slide switches to the "External" (Right)
position.
NOTE:- A single cabinet (not linked) must have the slide switch set to
the "INTERNAL" (Left) position. If not, the two players will not link.
3.
Using the appropriate diagram below, connect the link cables provided
from "IN" to "OUT" between each of the game units to be linked.
ONE
GAME
TWO
GAMES
OUT
IN
OUT
OUT
IN
IN
THREE
GAMES
OUT
IN
OUT
IN
OUT
IN
FOUR
GAMES
OUT
IN
OUT
IN
OUT
IN
OUT
IN
4.
Initialize each car (see 5-4 Page 10). Do this for each car.
5.
Enter the test mode, and using the Option Screen, set the CPU No. and
Car Type for each unit. (See 5-3-2, Page 7 "Game Option Screen", for
more information).
NOTE:- Each car must have a different CPU and Car Type number for proper
operation.
11
Page
6. HOW TO PLAY
•
Players can race by themselves against the computer or head to head on
the same track. With four machines linked, up to 8 players can race on the
same track.
•
Four difficulties are provided. NOVICE, INTERMEDIATE, ADVANCED and
T.T.(Time Trials), with up/down gear shift or fully automatic transmission.
(Outline of a Game)
•
When a player drives a car the specified number of laps within the given
time, they finish the race, the ranking, lap time and total time are displayed
and the game is over.
•
If the countdown timer reaches 00 before a player finishes the race, the
game is over.
(Starting a Game)
•
Insert coins, and press the credit available button for each driver.
Turn the steering wheel to select MANUAL or AUTOMATIC then press the
accelerator. Turn the steering wheel to select NOVICE, INTERMEDIATE,
ADVANCED or TT then press the accelerator. A linked game starts when
all linked seats have been entered, or when 20 seconds have elapsed
since the first credit available button was pressed.
(Difference of Difficulty Levels)
•
When a player selects the NOVICE level, he or she drives a car on the
MAIN COURSE at a low speed. This is the player’s car vs. computer
driven cars race game.
•
When a player selects the INTERMEDIATE level, he or she drives a car
on the MAIN COURSE at a high speed. This is the player’s car vs.
computer-driven cars race game.
•
When a player selects the ADVANCED level, he or she drives a car on the
MAIN COURSE and a TECHNICAL BRANCH at a high speed. This is the
player’s car vs. computer-driven cars race game.
•
When a player selects the TT level, he or she drives a car on the MAIN
COURSE and the TECHNICAL BRANCH at a higher speed than that of
the ADVANCED level. This is the player’s car vs. a computer-driven car or
other player's time trial race. When a player clocks a good time, they can
record their name.
•
When drivers are driving against each other in LINK mode, they drive on
the intermediate level.
Page
12
7. MAINTENANCE
7-1 Replacing Fluorescent Lamps
1.
Remove the ten M5x16 button head screws, and remove the top flash (see fig.
below). taking care to unplug the 2 Leading Driver Lamp plugs.
2.
Replace the fluorescent lamp and/or starter.
7-2 Replacing the Leading Driver Lamps
1.
Remove the ten M5x16 button head screws, and remove the top flash (see fig.
below). taking care to unplug the 2 Leading Driver Lamp plugs.
2.
Replace the lamps. (12v 2.2w Wedge Lamps)
Page
13
7-3 Removing the Game Printed Circuit Board (PCB)
1.
Remove the back
door,
2.
Remove two
assembling bolts
(M6 x 30), then pull
out the power control
panel about 25cm.
(Note: if you pull it
out too much, it will
be detached).
3.
Disconnect two
connectors on the
EMI board, then
remove six cup
screws (M4 X 10)
from the shield case
door. (Do not lose
internal washers).
4.
Take care not to
damage the
connectors between
the EMI board and
the main PCB to
remove the shield
case door, then take
out the main pcb.
5.
Remove two cup
screws (M4 X 10)
from the I/O door.
(Note: Do not
remove other
screws).
6.
Remove the I/O
door, then
disconnect four
connectors of the I/O
PCB.
7.
Take out the I/O
PCB.
Page
14
7-4 Removing the Shield Case
1.
Perform Steps (1) and (2) described in Section 7-3.
2.
Disconnect the connector of the AC Fan.
3.
Remove two cup screw (M5 x 14) then take out the shield case.
7-5 Removing the Power Control Panel
1
Perform steps 1, 2, 5 and 6 described in Section 7-3.
2.
Disconnect two connectors of the EMI board, remove a cup screw (M4 X
10) from the shield case door, then remove the ground terminal. (Note:
do not lose the internal washer).
3.
Disconnect the connectors connecting the power control panel and the
main body assy: one connector on the right side and two connectors on
the left side then remove the power control panel.
7-6 AB Pedal Assy (Replacing the Control)
1.
Remove four hex head bolts (M6x20) and withdraw the assy forward .
2.
Loosen the quadrant gear clamp screw and remove the quadrant gear.
3.
Loosen the gear grub screw and remove the gear.
4.
Replace the control potentiometer.
Note: When reassembling
a. Ensure that the potentiometer locating tag is engaged in the mounting
plate
cutout.
b. Turn the potentiometer shaft almost fully clockwise before engaging the
quadrant gear.
7-7 Gear Shift Assy (removing)
1.
Remove 4off M5x20 button head screws and pull forward the play panel
assy and disconnect the four way connector on the gear shift assy.
2.
Remove four M4 coach bolts and withdraw the shifter assy.
Re-initialize the game (see 5-4 Page 10 "Adjusting the Game") whenever
the game PCB board, ROM, Steering Assy, AB Pedal Assy or Controls
are replaced before the game is played.
Page
15
7-8 Steering Assy
7-8-1
Replacing the control
1.
Remove 4off M5x20 button head screws and pull forward the play panel
assy to gain access to the steering assy.
2.
Loosen the grub screw on the gear wheel and remove the gear wheel.
3.
Replace the control potentiometer.
4.
Replace the gear wheel and re-tighten the grub screw securely.
Note: When replacing the control potentiometer ensure that the locating tag of
the potentiometer is located in the hole in the mounting bracket and the pot
shaft is at
its mid travel before tightening the gear grub screw.
7-8-2
Replacing The Steering Wheel
1. Remove the centre cover of the steering wheel.
2. Remove three socket button heads (M6x16)
3. Pull off the steering wheel, then replace it with a new one.
Re-initialize the game (see 5-4 Page 10 "Adjusting the Game") whenever
the game PCB board, ROM, Steering Assy, AB Pedal Assy or Controls are
replaced before the game is played.
16
8. PARTS
CABINET
Description
SEAT ASSY
Part No.
Description
Part No.
Monitor 28" Hantarex Polo
84000012
Seat - (black)
88300630
Speaker 4 1/2" 20w (with shield can)
62000006
Seat Slider Mechanism
88300680
Speaker - Piezo Horn
62000046
Speaker 4 1/2" 20w
62000006
Dual Pedal Assy (with pots)
88800029
Speaker Cover Plate (Left)
88300603
Dual Pedal Assy Control Pot (5k)
76000652
Speaker Cover Plate (Right)
88300604
Steering Assy (270 deg)
88800001
M16 Adjustable Foot
88300079
Steering Control Pot (5k)
76000652
75mm Castor
59000005
Steering Wheel
88800008
Gear shift Assy
88800009
Credit Available Button Assy
60200215
Power Supply Assy - 5v/30amp
83000004
Schaffner Mains Filter Input Assy
66000016
Fuse 5a 20mm
63500601
Interlock Switch
60000006
Fan
67000015
Front Glass
31000019
100ohm 10w W/W Volume Control
76000164
Slide Switch
60000023
Push button Switch
60000059
4ft Fluorescent Tube
64000014
12v 2.2w Wedge Lamp
64000002
M16 Adjustable Foot
88300079
75mm Castor
59000005
VAC-FORMS/ACRYLIC/DECALS
Page
Description
Part No.
Steering Cover Vac-Form
39000047
Top Flash Vac-Form
45000170
Top Flash Acrylic
30000029
Cabinet Side Decal (Left)
40000037
Cabinet Side Decal (Right)
40000038
Play Panel Instruction Decal
40000043
Seat - Back Decal
40000035
Seat - Ridge Racer Decal
40000042
Seat - Namco Decal
40000036
Top Flash System 22 (Left) Decal
40000039
Top Flash System 22 (Right) Decal
40000040
17
9. SCHEMATIC
Page
Page