1
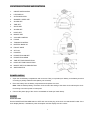
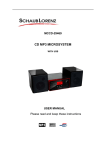
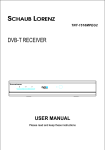
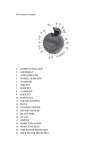
AM/FM LED PROJECTION CLOCK RADIO NM300ACL USER MANUAL Please keep and read these instructions Important safety instructions – please read carefully and keep for future reference To reduce the risk of fire or electric shock, do not expose this product to water, rain or moisture. To prevent the risk of electric shock, do not remove the cover or back of this product. In case of product failure, only qualified personnel can repair. There are no user-serviceable parts inside. CAUTION ! Dangerous tension inside the product ! Do not open. Risk of electric shock ! No parts can be repaired by the end-user. Only qualified personnel can repair and maintain this product. If the electric cord is damaged, it must be replaced by the manufacturer or qualified after-sales personnel in order to avoid any danger. The product must be installed in accordance with local laws. Damaged batteries must be properly disposed. In order to protect the environment, please dispose the batteries properly, in accordance with local laws (information is available at your reseller). Where to install the product - Place the product on a straight, rigid and stable place. Do not place the product on a carpet. - Do not place the product on top of another that may cause overheating (for example, a recei ver or amplifier). - Do not place anything underneath the product (for example, CDs or magazines). Proper ventilation - Place the product in a sufficiently–aerated place to avoid overheating. Allow at least 10cm spacing at the back and top of the product, and 5cm spacing on both sides to prevent overheating. - Do not place items such as newspapers, tablecloth, curtains, in front of the ventilating openings. Do not expose the product to high temperatures, moisture, water and dust. - The apparatus shall not be exposed to dripping or splashing. No object filled with liquids, such as vases, shall be placed on the apparatus. - Do not place other items close to this product that may damage it (for example, objects containing water or lightened candles). - No naked flame sources, such as lighted candles, should be placed on the apparatus. Electric supply - Please unplug the product in case of prolonged non-use. - This product is intended to be used under temperate climate and should not be used under tropical climate. 1 - If the supply cable is damaged, it must be replaced by the manufacturer or qualified after-sales personnel to avoid any danger. - This product must be connected to an electrical supply 230V ~ 50Hz. - The mains plug is used as the disconnect device, so the disconnect device shall remain readily operable. This product is compliant with directives 2006/95/CE (abrogating the directive 73/23/CEE modified by the directive 93/68/CEE) and 2004/108/CE (abrogating the directive 89/336CEE). - This logo set on the product means that the recycling of this apparatus comes within the framework of the directive 2002/96/EC of January 27, 2003 concerning the waste on electrical and electronic equipment (WEEE). - The presence of dangerous substances in the electrical and electronic equipments can have potential consequences on the environment and human health in the cycle of reprocessing this product. - Therefore, at the end of its lifetime, this product shall not be disposed with other non-recycled waste. - As the end user, your role is of prime importance in the cycles of re-using, recycling, and other forms of valorization of this electrical and electronic equipment. Local authorities and resellers have set special procedures for the purpose of collecting and recycling this product. - You have the obligation to use the selective waste collection systems put in place by your local authorities. 2 LOCATIONS OF RADIO AND CONTROLS 1. ON/OFF/AUTO/ALARM 2. LED DISPLAY 3. AUTO INDICATOR 4. SNOOZE / SLEEP OFF 5. ALARM SET 6. TIME SET 7. SLEEP SET 8. ALARM OFF 9. HOUR SET 10. MINUTE SET 11. VOLUME CONTROL 12. FOCUS 13. TUNNING CONTROL 14. BATTERY BACK-UP 15. FM ANT. WIRE 16. AC Cord 17. POINTER 18. PROJECTION ON/OFF 19. PROJECTION HEAD 20. TIME SET FOR PROJECTION 21. HOUR SET FOR PROJECTION 22. MINUTE SET FOR PROJECTION 23. AM/FM SWITCH POWER SUPPLY 1. Open the clock battery compartment and connect a LR61 (or equivalent) 9V battery to the battery terminal according to polarity marked inside (battery not included). 2. Place the battery into the battery compartment and replace the cover. Note: With the backup battery, the alarm clock can store the setting of the alarm clock and keep the clock functioning even when power is interrupted. 3. Connect the power plug of the clock to a standard AC outlet (AC 230V 50Hz). CLOCK Check the time Set the ON/OFF/AUTO/ALARM switch to OFF and connect the plug of the clock to a standard AC outlet. If the clock display flashes, it indicates a power interruption and the display time is incorrect. 3 To set the time Press the Time set button and Minute Set Button simultaneously to adjust the minute digit, press Hour Set Button simultaneously to adjust the hour digit. TIME SETTING FOR PROJECTION 1. To set the hour digit, press the HOUR BUTTON and the TIME BUTTON simultaneously. Or, you can press and hold the HOUR BUTTON and the TIME BUTTON for fast setting. 2. To preset the minute digit, repeatedly press the MINUTE BUTTON and the TIME BUTTON simultaneously. Or, you can press and hold the MINUTE BUTTON and the TIME BUTTON for fast setting. 3. Turn the projection out of its groove so that the projected light falls onto the desired position of the wall or ceiling. The projection distance should be in the range of 1~3 meters. Note: this operation should be done in a darken room. 4. To adjust the projection sharpness, turn the Focus adjustment until the projected time is clearly seen on the ceiling or wall. SETTING ALARM 1. To set the alarm time, press the Alarm Set Button and Minutes Set Button simultaneously, or Hour Set Button simultaneously until the desired alarm time is displayed. 2. Set the ON/OFF/AUTO/ALARM switch to Alarm, the AUTO indicator will illuminate. When alarm sound You can press the Snooze/Sleep off to stop for 9 minutes. This can be repeated up to 5 times. Slide ON/OFF/AUTO/ALARM switch to “OFF”. Set the ON/OFF/AUTO/ALARM switch to Alarm. The alarm will activate again after 24 hours. Press ALARM OFF button to cancel alarm. SLEEP You can set a sleep time up to 1 hour 59 minute to turn off the radio automatically when you are listening to the radio. 1. Set the ON/OFF/AUTO/ALARM switch to OFF or AUTO. 2. Repeatedly press or hold the Sleep Set Button and Hour/Minute Set Button simultaneously until the desired sleep time is displayed. 3. The radio will turns off when the sleep time has elapsed. You can press the Snooze/Sleep Off Button to turn off the radio. RADIO The clock has a built-in antenna for AM. You can rotate the radio for best reception. For best FM reception, unroll and extend the FM cord antenna at rear side of the clock. 1. Slide the ON/OFF/AUTO/ALARM switch to ON position. 2. Slide the AM/FM Switch to AM or FM. 3. Adjust the Tuning Control to select the desired station. 4 4. Adjust the Volume Control to adjust the volume. 5. To turn off the radio, slide the ON/OFF/AUTO/ALARM switch to OFF. CLEANING Clean the cabinet with a soft cloth moistened with water or mild detergent. Do not use solvents such as alcohol, benzene or thinners, as they may damage the cabinet finish. Make sure to disconnect the mains lead from the supply before cleaning. Notes: Projection time on the ceiling or wall of the darkened room. Maximum projection distance is 2 m. The LED digital clock and the projection clock must be set separately. The socket outlet shall be installed near the apparatus and shall be easily accessible. Use the apparatus in moderate climates. The mains plug of apparatus should not be obstructed OR should be easily accessed during intended use. Minimum distances 10cm around the apparatus for sufficient ventilations. SPECIFICATIONS Frequency Range: AM 540-1600KHz FM 88 –108 MHz Power Source: AC 230V ~ 50 Hz, 6 W DC9V (For back-up) SAV ADMEA / LOGISAV ZI du clos des charmes 26 rue du clos des charmes 77090 COLLEGIEN - FRANCE 5