1
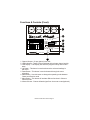
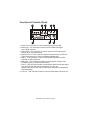
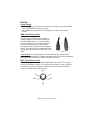
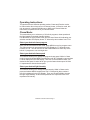
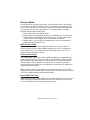
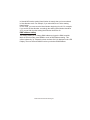
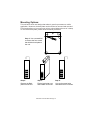
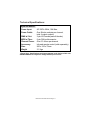
English
R
Professional Light Controller
USER'S MANUAL
Please read this manual carefully before use!
Unpacking:
Thank you for your purchase of this Botex Professional product.
Every unit has been thoroughly tested and carefully packed before delivery.
Unpack the shipping carton carefully, check carefully for sure your new unit
is not damaged and all accessories not missing. In the event damage has
been found or parts are missing, please do not use it and contact your authorized dealer immediately.
Introduction:
This unit is a four channel DMX/ MIDI pack. This unit can be used as a four
channel stand alone chaser, also you can use any DMX controller or MIDI to
control this unit. Moreover, this unit can be wireless controlled by the optional
remote control(sold separately). This unit has built in memory to save and
retain your data in case the unit's power is accidently disconnected.
To optimize the performance of this product, please read these operating
instructions carefully to familiarize yourself with the basic operations of this
unit.
Warning!
This product must be grounded. Do not spill water or other liquids into or on to
your unit. To prevent or reduce the risk of electrical shock or fire, do not expose
this unit to rain or moisture.
Caution!
There are no user serviceable parts inside this unit. Do not attempt any repairs
yourself. Should you experience any problem during use, please contact your
local dealer immediately.
Do not discard the shipping cartoon in the trash. Please recycle when ever
possible.
Fuse replacement:
Disconnect the unit's main power. Insert a standard flat screwdriver in to the
fuse holder housing. Turn the screwdriver in counterclockwise direction to
release the fuse holder. Remove the old fuse and replace it with the same
type. Insert the fuse holder back into its housing and turn in clockwise direction
to lock the holder in place.
Multi-Pak Instruction Manual Page 3
Functions & Controls (Front):
1
2
MENU
MODE
DISPLAY
1 CH.
2 CH.
3 CH.
4 CH.
3
CHASE PROGRAM
CHASE
CHASE SPEED
Receive
DMX Signal
Parallel
CHASE DIMMER
MIDI Signal
Chase
MIDI-IN CHANNEL
6
NOTE NUMBER
RECEIVE
DMX CHANNEL
MODE
+
MENU
separate
/
parallel
7
5
MIDI MODE NORMAL
MIDI MODE SPECIAL
MODE
MENU
INFRARED
R
MPX-405
INFRARED SENSOR
4
8
1. Channel Output - 5A per channel, total 16A.
2. LED Indicators - These LEDs will indicate their relevant channel activity.
3. LED Display - This Display will show the program activity and function
state.
4. Up Button - This button is used to advance the selected readings in
the menu.
5. Down Button - This button is used to descend through the menu
selections.
6. Mode Button - Use this button to change the operating mode between
Chase and Receive mode
7. Menu Button - This button will activate different functions in Chase or
Receive mode.
8. Infrared Sensor - Detects infrared signal from its remote control(optional).
Multi-Pak Instruction Manual Page 4
Functions & Controls (Rear):
5
4
MIDI
F6.3A 250V 5x20mm
1
2
3
4
IN
8
7
6
LINK
EX. SENSOR
THRU
IN
OUT
POWER INPUT:AC 230V~50Hz, 16A max
2
1=Ground
2=Data3=Data+
1
1
3
DMX IN
DMX OUT
2
3
1. Power Cord - Plug this cord into a matching wall power outlet.
2. DMX Input - This connector is used to receive DMX input signal
from a DMX controller.
3. DMX Output - This connector is used to send your DMX input signal
through to the next DMX device.
4. Channel Fuses - Each of the four channels is protected by a 6.3A fuse.
These fuses prevent you from overloading and damaging.
5. MIDI In - This connector is used to receive MIDI signal from a MIDI
controller or MIDI sequencer.
6. MIDI Thru - This connector is used to send the signal coming in from
the MIDI IN jack (5) to another MIDI device.
7. Link In - This connector accepts communication data from the preceding
unit. All the linked units will be controlled by the first unit.
Besides, this connect also can be used for the external infrared detector
(sold separately).
8. Link Out - This connector sends he communication data to the next unit.
Multi-Pak Instruction Manual Page 5
Set-Up:
Power Supply
1. Before plugging your unit in be sure the source voltage in your area matches
the required voltage marked on your unit.
2. Do not attempt to operate this unit if the power cord has been frayed or
broken.
DMX Cable Requirements
This unit and your DMX controller require a
standard 3-pin XLR connector for DMX input
and DMX output (figure 1). If you are making
your own cables be sure to use standard two
conductor shield cable (This cable may be
purchased at almost all pro sound and lighting
stores). Your cable should be made with a male
and female XLR connector on either end of the
cable.
Figure 1
*Special Note: For reducing signal errors and avoiding signal transmission
problems and interference, it is always advisable to connect 120 ohm impedance
DMX signal cable and DMX terminator for signal connection.
MIDI Cable Requirements
The MIDI input will accept multiplexed digital MIDI control signal. The control
is via 5-pin DIN type connector. Pin connections are shown in figure 2. Another
5-pin DIN connector is also fitted for signal pass through, allowing the MIDI
signal to be fed through to other devices.
Figure 2
NC
NC
Data +
Data NC
Multi-Pak Instruction Manual Page 6
Operating Instructions:
This product has two different operating modes: Chase and Receive modes.
In Chase mode, this unit serves as a 4 channel chaser. In Receive mode, this
unit serves as a 4 channel DMX dimmer or MIDI pack. Please follow the
instructions to operate the unit in your desired mode.
Chase Mode:
This mode allows you to select any of 16 built-in programs, chase speed and
the light intensity for desired dramatic lighting.
Use the MODE to select Chase mode, the LED near Chase is lit indicating your
selection and the LED Display shows "P" followed by two numbers from 01-16.
Select your desired chase program
Once you have accessed Chase mode, press MENU to scroll to program menu.
The chase program is represented in the LED Display by "P" followed by two
numbers 01 -16. You can use the UP and DOWN Buttons to select any of the
built-in 16 programs to run at a single time.
Select your desired chase speed
This function allows you to change the program chase speed. While in Chase
mode, press and release MENU several times until "SP" followed by two numbers
01-99 is displayed in the LED Display. Then use UP and DOWN to select your
desired chase speed. A value 99 will give you the fastest chase speed. A value
01 represents the slowest chase speed.
Select your desired light intensity
This function allows you to change the light intensity. While in Chase mode,
press and release MENU several times until "d" followed by three numbers
000-100 is displayed in the LED Display. Then use UP and DOWN to change
the light output intensity. A value 000 represents zero output and value 100
represents full intensity.
Multi-Pak Instruction Manual Page 7
Receive Mode:
Use the MODE to access Receive mode, the LED near Receive is lit indicating
your selection and the LED Display shows "CH" followed by two numbers from
01-16. This mode allows you to use your unit as a four channel DMX/ MIDI pack.
You may also set your unit to function as a 1 or 4 channel pack. To change
between Separate and Parallel mode:
1. Press and hold down the MODE button.
2. While holding down the MODE button, tap the MENU button, the LED near
Parallel will be lit indicating this unit will be used as a single channel pack
and the output of four channel will be controlled by one channel.
3. Repeat steps 1 & 2, the LED near parallel will go out, this unit will shift to
Separate mode(4 channel pack).
MIDI channel setting
This setting allows you to select MIDI input channel from 01 to 16. While in
Receive mode, press and release MENU several times until "CH" followed by
two numbers from 01-16 is displayed in the LED Display. Then use UP and
DOWN to select MIDI input channel.
Note Number setting
This setting allows you to select starting MIDI Note Number to trigger this MIDI
pack. Any MIDI device is required to send 21 Note Numbers to control the pack.
Note Numbers 1-4(velocity) control the intensity of the four individual channel.
Note Numbers 5-20 turn ON/OFF the programs 01-16 respectively, and the
Velocities control the master level of the programs. Note Number 21 adjusts the
chase speed of the program.
While in Receive mode, press MENU to scroll to Note Number mode, the LED
Display will show "N" followed by three numbers 001-128 indicating your selection.
Use UP and DOWN to select desired Note Number.
Normal MIDI/ F36 mode
While in Receive mode, press MENU to scroll to Normal MIDI or F36 mode, "Nor"
in the LED Display represents Normal MIDI and "F36" will display in F36 mode.
Use UP or DOWN to change between these two mode.
Multi-Pak Instruction Manual Page 8
In Normal MIDI mode, starting Note Number is exactly what you have selected
in Note Number mode. For example, if you select 008, then it is the starting
Note Number.
In F36 mode, you must count the Note Number beginning from 36. For example,
if you set 001 in Note Number, accordingly the starting Note Number should be
36, if you set 008, then the starting Note Number should be 43.
DMX address setting
This setting allows you to change DMX address to trigger the DMX controller.
While in Receive mode, press MENU to scroll to DMX address setting. This
will be indicated by "A" followed by three numbers 001-512 displayed in the LED
Display. Then use UP and DOWN to select your desired DMX address.
Multi-Pak Instruction Manual Page 9
Mounting Options:
This unit has a sleek case design that makes it great for permanent or mobile
application. Moreover, the back plate can be used to be removed and reversed.
This function allows you to mount your unit to a tripod without the use of a clamp.
To reverse the back plate, please follow the below procedures:
Step 1: Use a screwdriver
to remove the four screws
that hold the back plate to
the unit.
Step 2:
Remove the Back
plate from the unit
Step 3:
Flip the back plate over
and reattach to the unit.
Step 4:
Line up the screw holes
and fasten the four screws.
Multi-Pak Instruction Manual Page 10
Technical Specifications:
Specifications:
Power Input:
Power Outlet:
DMX In/ Out:
MIDI In/ Thru:
Channel Fuses:
Accessory:
AC 230V~50Hz, 16A Max.
One Schuko sockets per channel,
total 4 output sockets
3-pin XLR socket(male & female)
5-pin DIN multiconnector
One 6.3 A fuse per channel
Infrared remote control (sold separately)
Size:
Weight
260 x 210 x 75mm
3.1 Kgs
*Please Note: Specifications and improvements in the design of this unit
and this manual are subject to change without prior notice.
Multi-Pak Instruction Manual Page 11
R
24-004-0515-00
Rev 2.2
Internet: www.botex.com