1
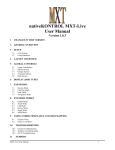
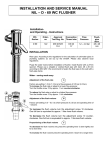
Installationand
User-Guide
for
SLD-Importer
Installation
To extend the functionality of Blender by adding the SLD-Import-Script you will first have to
install a Python-Environment adequate to your Blender-Version. The Python-Version used by your
Blender-Installation is normally shown at the top of the Console-Window. For Blender 2.42 you
will need Python 2.4.4, for Blender 2.44, Python 2.5.1 is necessary.
To add the SLD-Import-Script to Blender it is just necessary to copy the Python-File into the
Scripts-Folder of Blender. Under Windows, this folder is located at <InstallDir>\.blender\scripts.
Under Linux, you can find out the location of the folder by the following procedure:
•
Open a File-Editor-Window in Blender
•
Open a new file and type in the following Script:
import Blender
print Blender.Get(‘scriptsdir’)
•
Run the script by pressing Alt+P. The path of the Script-Folder is then printed out on the
console.
•
If None is printed out, then you have to set the Python-Scripts-Directory in the UserPreferences-Window of Blender. It can be found by dragging-down the upper menu bar and
pressing the “File Paths”-Button. The corresponding edit box is labeled with “Python:”.
Usage
To run the SLD-Import-Script, it is recommended to open a separate Scripts-Window in Blender.
For example, this can be done by splitting the 3D-View-Window and set the Window-Type of the
new window to “Scripts Window”. In the menu bar of the scripts-window choose
“Scripts”->”Import”->”Solid Molecule Surface (.sld)”. Then, the GUI of the importer will appear as
you can see below.
Figure 1: GUI of the SLD-Importer
The first thing to do is to load a SLD-File. The button “Load SLD-File” opens a file-selectionwindow and imports the molecule-model. You have two options when loading a file:
●
Center: When this option is set, then the model is centered in the Blender-Scene
●
Clear: If you want to clear the scene before importing, you should select this option
These options should be set before loading a file.
Once you have loaded a SLD-Model, you will have some more options related to the physical
qualities of the model:
Figure 2: Setting up quality-options
In the selection-menu you are able to choose a quality, whose values are used to color the surface.
To apply the chosen quality to the scene-model, you have press the “Update Scene”-Button. Then
each vertex gets it's new UV-coordinates.
Under “Palette-Selection”, you can select the texture used for the model. You can either choose the
standard-palette, which is shown in the picture above, or you can load an image from the filesystem. Supported file-formats for images are BMP, JPG, PNG, TGA, TIFF, OpenEXR, Cineon,
DPX and Radiance HDR. PSD and GIF are only partially supported. The gradient must be in
horizontal direction.