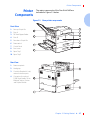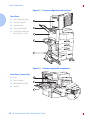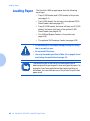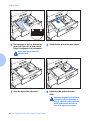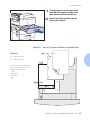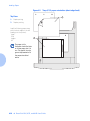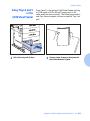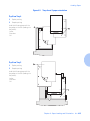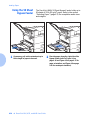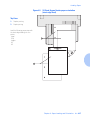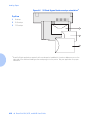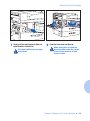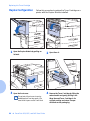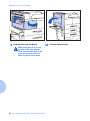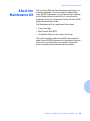
1
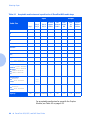
The Xerox
DocuPrint N24, N32, and
N40 Network Laser
Printers
User Guide
Version 1.8
Copyright © 1998, 1999, Xerox Corporation. All Rights Reserved.
Copyright protection claimed includes all forms of matters of
copyrightable materials and information now allowed by statutory or
judicial law or hereinafter granted, including without limitation, material
generated from the software programs which are displayed on the screen
such as styles, templates, icons, screen displays, looks, etc.
XEROX®, The Document Company®, the stylized X, DocuPrint, and
N24, N32, and N40 are trademarks of Xerox Corporation or its
subsidiaries.
Adobe® and PostScript® are trademarks of Adobe Systems
Incorporated.
PCL, HP, and LaserJet are trademarks of Hewlett-Packard Company.
IBM is a trademark of International Business Machines Corporation.
Microsoft, Microsoft Windows, Microsoft Word, MS, and MS-DOS are
trademarks of Microsoft Corporation. Univers is a trademark of Linotype
AG or its subsidiaries. WordPerfect is a trademark of Corel Corporation.
Centronics is a trademark of Centronics Corporation. Macintosh and
TrueType are trademarks of Apple Computer, Incorporated. OnPage is a
trademark of COMPUTER:applications, Inc. All other product names are
trademarks/tradenames of their respective owners.
PCL, PCL5e, and PCL6 are trademarks of Hewlett-Packard Company.
This printer contains an emulation of the Hewlett-Packard PCL
command language, recognizes HP PCL commands, and processes these
commands in a manner comparable with Hewlett-Packard LaserJet
printer products.
This product includes an implementation of LZW licensed under U.S.
Patent 4.558.302.
Notice
Specifications described in this publication are subject to change without
notice. Use of some features may be limited by your hardware or
software configuration. Contact your dealer, Xerox, or Xerox Limited for
details.
Table of Contents
i
Chapter 1 Getting Started ............................................................... 1-1
Introduction...................................................................... 1-2
User Documentation Road Map...................................... 1-3
Hardcopy User Documentation in the Box ........................ 1-3
Your N40 CD Which Comes in the Box............................. 1-4
How Much of This Book Must I Read?............................ 1-6
Printer Components ......................................................... 1-7
Installing Your Printer...................................................... 1-9
Printing a Configuration Sheet ..................................... 1-11
Chapter 2 Printer Management Software and Drivers ............. 2-1
Using CentreWare DP with the DocuPrint N40.............. 2-2
DocuPrint N40 PCL Emulation Printer Drivers ................ 2-4
DocuPrint N40 PostScript Printer Drivers ....................... 2-5
Driver Features ................................................................. 2-6
Installing CentreWare DP and Drivers ............................ 2-8
Configuring Your Drivers.................................................. 2-8
Chapter 3 Using the Control Panel ................................................ 3-1
Control Panel Features..................................................... 3-2
DocuPrint N24, N32, and N40 User Guide
❖ TOC 1
The Display ...................................................................... 3-3
Menu Options................................................................... 3-4
Chapter 4 Paper Loading and Orientation ................................... 4-1
Selecting Paper................................................................. 4-2
Storing Paper.................................................................... 4-5
Loading Paper................................................................... 4-6
Using Trays 1, 2, and 3 (if installed).................................. 4-7
Using Trays 4 and 5 in the 2,500 Sheet Feeder............... 4-11
Using the 50 Sheet Bypass Feeder .................................. 4-14
Using the 100 Envelope Feeder ...................................... 4-19
Automatic Tray Switching ............................................. 4-20
Paper Size/Type Mismatch.............................................. 4-21
Duplex (Two-Sided) Printing......................................... 4-22
Print Orientation and Control Panel Settings................... 4-23
Chapter 5 Clearing Jams and Jam Recovery ................................ 5-1
Paper Jams ........................................................................ 5-2
What Causes a Paper Jam? .............................................. 5-2
Clearing Paper Jams ......................................................... 5-2
Clearing Area A (No Duplex Module)................................ 5-7
Clearing Area A (With Duplex Module)............................. 5-9
Clearing Area B.............................................................. 5-12
Clearing Area C.............................................................. 5-12
Clearing Area D ............................................................. 5-13
Clearing Tray 5............................................................... 5-14
Clearing the Duplex Module........................................... 5-15
Chapter 6 Replacing Your Toner Cartridge ................................. 6-1
Replacing the Toner Cartridge ........................................ 6-2
Standard Configuration.................................................... 6-3
Duplex Configuration....................................................... 6-6
About the Maintenance Kit............................................. 6-9
TOC 2 ❖ DocuPrint N24, N32, and N40 User Guide
Chapter 7 Troubleshooting ............................................................. 7-1
Diagnostic Message Display............................................ 7-2
Printer Operation Problems............................................. 7-3
Chapter 8 References ........................................................................ 8-1
Further References ........................................................... 8-2
Appendix A CE Declaration ................................................................ A-1
DocuPrint N24, N32, and N40 User Guide
❖ TOC 3
TOC 4 ❖
DocuPrint N24, N32, and N40 User Guide
Getting Started
1 r e tpahC
Introduction .................................................................... 1-2
User Documentation Road Map .................................... 1-3
Hardcopy User Documentation in the Box ...................... 1-3
Your N40 CD Which Comes in the Box ........................... 1-4
How Much of This Book Must I Read? .......................... 1-6
Printer Components ....................................................... 1-7
Installing Your Printer .................................................... 1-9
Printing a Configuration Sheet ................................... 1-11
Chapter 1: Getting Started
❖ 1-1
Introduction
Introduction
This guide is for use with the Xerox DocuPrint N24, N32,
and N40 family of printers.
Because most of the printer’s features and functionality
are shared by all three, this guide uses the generic name
DocuPrint N40 when referring to these printers. And it
refers to all features not found on the base printer as
options.
It identifies two different configurations for the DocuPrint
N40:
• The tabletop configuration.
• The console configuration (sitting on top of the
optional 2,500 Sheet Feeder).
Samples of each configuration are shown later in this
chapter; however, the figures throughout this guide may
show either configuration when illustrating a feature or
procedure.
1-2 ❖ DocuPrint N24, N32, and N40 User Guide
User Documentation Road Map
User
Documentation
Road Map
Hardcopy User
Documentation
in the Box
There is user documentation provided to you for the N40
printer in several different places. This section will serve
as an initial roadmap to that documentation.
You have received the following pieces of documentation:
1. An N24, N32, and N40 Quick Installation Guide
(QIG) which shows you how to get the printer up and
running.
2. This N24, N32, and N40 User Guide (UG) which
provides you with the basic information needed to use
your printer. (More detailed N40 user information is
contained in your System Administrator Guide [SAG]
on your N40 CD.)
3. The N24, N32, and N40 Quick Network Install Guide
(QNIG) which briefly shows you how to connect your
printer to a network in your specific environment.
(More detailed Network/Environment information is
contained in the Technical Information Guide [TIG]
on your N40 CD.)
Chapter 1: Getting Started
❖ 1-3
User Documentation Road Map
Your N40 CD Which
Comes in the Box
This CD contains the following pieces of information:
1. The N24, N32, and N40 User Guide (UG)
2. The N24, N32, and N40 Quick Network Install Guide
(QNIG)
3. The N24, N32, and N40 System Administrator Guide
(SAG)
4. The 2,000 Sheet Finisher documentation
5. A procedure to upgrade your printer software.
The System Administrator Guide on this CD contains the
following information should you require it:
1. The N24, N32, and N40 Quick Install Guide in
Chapter 1
2. Installation instructions for N40 options in Appendix
C
3. Installation instructions for the Toner Cartridge and
the Maintenance Kit in Appendix B.
This document also contains a considerable amount of
more detailed N40 user information.
1-4 ❖ DocuPrint N24, N32, and N40 User Guide
User Documentation Road Map
The documents on the N40 CD are provided as PDF files
with hyperlink capabilities which allow you to easily
jump to and access different areas of the document. In
addition, after you access the page or pages of
information which you are looking for, you can then only
print out the page(s) you need rather than print out the
entire chapter or the manual. If you do not have a PDF
reader on your system, you can also install one from this
CD.
N40 printer drivers are also contained on the N40 product
CD. The majority of Driver User Documentation is
provided via the HELP files included with your drivers.
In addition to the N40 product CD, you are also provided
with an N40 Printer Management Software CD. This CD
contains various pieces of Xerox-provided Client
Software as well as documentation for this software.
The N40 Product and Printer Management Software CDs
are both provided with a CD Installation Booklet,
packaged in the CD jewel case. You can also refer to the
Read Me files on the CDs for more information.
Since these CDs provide so much important N40
information, please ensure that you save them and keep
them in a safe place.
Chapter 1: Getting Started
❖ 1-5
How Much of This Book Must I Read?
How Much of
This Book Must I
Read?
Use this book as a reference for:
• Getting Started (Chapter 1: Getting Started)
• Information about CentreWare and installing printer
drivers (Chapter 2: Printer Management Software and
Drivers)
• Instructions on using the Control Panel
(Chapter 3: Using the Control Panel)
• Paper specifications, loading paper, and duplex
printing (Chapter 4: Paper Loading and Orientation)
• Clearing Jams(Chapter 5: Clearing Jams and
Jam Recovery)
• Replacing Your Toner Cartridge (Chapter 6: Replacing
Your Toner Cartridge)
• Troubleshooting printing problems, if they occur
(Chapter 7: Troubleshooting)
• Further References (Chapter 8: References)
1-6 ❖ DocuPrint N24, N32, and N40 User Guide
Printer Components
Printer
Components
The major components of the DocuPrint N40 are
indicated in Figure 1.1 below.
Figure 1.1
Base printer components
Front View
1
Face-up Output Bin
2
Door A
3
50 Sheet Bypass Feeder
4
Door B
5
Face-down Output Bin
6
Power switch
7
Control Panel
8
Front cover
9
Paper Tray 1
10 Paper Tray 2
Rear View
1
Power receptacle
2
Hand grips
3
Controller Board with host/
network interface ports.
4
Connectors for optional
2,500 Sheet Feeder, 10-bin
Mailbox/Collator, Finisher
and Duplex Module
Chapter 1: Getting Started
❖ 1-7
Printer Components
Figure 1.2
Console configuration with options
Figure 1.3
Customer replaceable components
Front View
1
10-bin Mailbox/Collator
2
Face-up Output Bin
3
Duplex Module
4
100 Envelope Feeder
5
2,500 Sheet Feeder with
Paper Trays 3, 4, and 5
Front View, Covers Open
1
Fuser
2
Toner Cartridge
3
Bias Transfer Roll (BTR)
4
Feedrolls
1-8 ❖ DocuPrint N24, N32, and N40 User Guide
Installing Your Printer
Installing Your
Printer
There are other documents which will help you install
your printer. The purpose of this section is simply to guide
you to those documents (and sections of documents). The
following documentation is available for installation
assistance:
• The DocuPrint N40 System Administrator Guide (on
the N40 product CD)
— Chapter 1 shows how to initially install the
DocuPrint N40.
— Appendix B shows how to install the DocuPrint N40
Toner Cartridge and Maintenance Kit.
— Appendix C shows how to install (and remove) the
2,500 Sheet Feeder, Duplex Module, 10-bin
Mailbox/Collator, 100 Envelope Feeder, Hard Disk
Drive, XNIC Network Interfaces, and memory
SIMMs.
• The 2,500 Sheet Feeder, Duplex Module, 10-bin
Mailbox/Collator and 100 Envelope Feeder have
installation instructions in their boxes.
• The DocuPrint N40 itself comes with a Quick
Installation Guide which guides you on your initial
installation of the printer.
• The DocuPrint N40 Quick Network Install Guide
provides guidance as to how to connect to the network
within your specific environment.
Chapter 1: Getting Started
❖ 1-9
Installing Your Printer
•
Chapter 2 of this guide provides some direction on
how to install your DocuPrint N40 drivers and
CentreWare software.
• More detailed information about installation can also
be found in your CentreWare DP Users Manual,
contained on the Printer Management Software CD
that comes with your DocuPrint N40.
Please remember to save and store all your packing materials
in a dry place so that you can retrieve these materials in the
future should you be required to transport your DocuPrint
N40 or its options.
1-10 ❖ DocuPrint N24, N32, and N40 User Guide
Printing a Configuration Sheet
Printing a
Configuration
Sheet
A very convenient way of both testing basic printer
operation and determining how your printer is configured
is to print a Configuration Sheet.
The following operator sequence from the DocuPrint N40
Control Panel will cause a Configuration Sheet to be
printed:
1. Press Menu Up
or Menu Down
until you see:
Men us
Tes t M enu
on the Display.
2. Press Item Up
or Item Down
until you see:
Tes t M enu
Con fig Sh eet
on the Display.
3. Press Enter
printed.
. The Configuration Sheet will be
Chapter 1: Getting Started
❖ 1-11
Printing a Configuration Sheet
1-12 ❖ DocuPrint N24, N32, and N40 User Guide
Printer Management
Software and Drivers
2 r e tpahC
Using CentreWare DP with the DocuPrint N40 ............ 2-2
DocuPrint N40 PCL Emulation Printer Drivers .............. 2-4
DocuPrint N40 PostScript Printer Drivers ..................... 2-5
Driver Features ............................................................... 2-6
Installing CentreWare DP and Drivers .......................... 2-8
Configuring Your Drivers ................................................ 2-8
Chapter 2: Printer Management Software and Drivers
❖ 2-1
Using CentreWare DP with the DocuPrint N40
Using
CentreWare DP
with the
DocuPrint N40
Xerox CentreWare DP is easy-to-use printer management
software for Xerox printers. Through the ease of
point-and-click navigation, you can install, connect, and
configure the DocuPrint N40 on a network quickly and
easily.
CentreWare DP provides network administrators with
simplified setup procedures and effortless management of
networked Xerox DocuPrint N40 printers.
Table 2.1 lists CentreWare DP key features and benefits.
For more specific information about CentreWare DP use
and operation, see “The CentreWare DP User Guide.”
Table 2.1
CentreWare DP key features and benefits
Feature
Benefit
Setup Wizard
Provides a step-by-step guide to get your
printer quickly up and running on the
network.
Advanced Setup
Provides a tool to service multiple file servers
and queues.
Instant Status
Allows you to select a printer from the
Printer List to see what that printer is doing
at any given time.
Remote Configuration
and Management
Allows you to do most configuration and
monitoring tasks from your workstation.
Printer Upgrades
Allows you to upgrade your printer from
your workstation.
2-2 ❖ DocuPrint N24, N32, and N40 User Guide
Using CentreWare DP with the DocuPrint N40
CentreWare Sun OS/Solaris Services are also available to
allow you to set up queues and also contain your N40
drivers for Sun OS/Solaris.
All the CentreWare software and documentation is on
your Printer Management Software CD.
Chapter 2: Printer Management Software and Drivers
❖ 2-3
DocuPrint N40 PCL Emulation Printer Drivers
DocuPrint N40
PCL Emulation
Printer Drivers
The base DocuPrint N40 supports the PCL printer drivers
listed in Table 2.2. To take full advantage of all the
printer's features when printing PCL jobs, install the
appropriate DocuPrint N32 PCL emulation printer
driver(s).
Table 2.2
Environment
Windows
DocuPrint N40 PCL Emulation printer drivers
Printer Driver
Windows 3.1x/ Windows 95
Windows NT 3.5.1
Windows NT 4.0
2-4 ❖ DocuPrint N24, N32, and N40 User Guide
DocuPrint N40 PostScript Printer Drivers
DocuPrint N40
PostScript
Printer Drivers
The PostScript option supports the PostScript drivers
listed in Table 2.3. To take full advantage of all the
printer's features when printing PostScript jobs, install
the appropriate DocuPrint N40 printer drivers(s).
Table 2.3
Environment
Windows
DocuPrint N40 PostScript printer drivers
Printer Driver
Windows 3.1/ Windows 95
Windows NT 3.5.1
Windows NT 4.0
IBM OS/2
OS/2 Ver. 2.1
OS/2 WARP
Macintosh
System 6.x
System 7.x
UNIX
Sun Solaris 2.4, 2.5, 2.5.1, 2.6
Sun OS 4.14
IBM AIX 4.1.x, 4.2.x
HP-UX 9.x, 10.x
Chapter 2: Printer Management Software and Drivers
❖ 2-5
Driver Features
Driver Features
DocuPrint N40 drivers will support the following standard
features:
• Input tray/Output bin selection
• Duplex selection
• Paper size, orientation and media
• Number of copies
• Collating
Table 2.4 on page 2-7 lists a general overview of features
supported by the DocuPrint N40 drivers. Actual driver
capabilities can be determined by invoking specific
drivers.
Uni Drivers are universal drivers while custom devices
are Xerox custom drivers.
2-6 ❖ DocuPrint N24, N32, and N40 User Guide
Driver Features
Table 2.4
DocuPrint N40 driver features
Image
Quality
Cover
Sheets
Secure
Printing
Edge-to
-Edge
N-Up
WaterMark
Fit-tosize1
Windows 3.1x (Custom)
Y
Y
Y
Y
N
N
N
Windows 95 (Custom)
Y
Y
Y
Y
N
N
N
Windows NT 3.5.1 (Uni)
N
N
N
N
N
N
N
Windows NT 4.0 (Uni)
Y
N
N
N
Y
N
N
Windows 3.1x (Custom)
Y
Y
Y
Y
Y
Y
Y
Windows 95 (Custom)
Y
Y
Y
Y
Y
Y
Y
Windows NT 3.5.1 (Uni)
Y
N
N
N
N
N
N
Windows NT 4.0 (Custom)
Y
Y
Y
Y
Y
N
Y
MAC PS
N
N
N
N
N
N
N
OS/2 PS
N
N
N
N
N
N
N
Sun Solaris 2.4, 2.5, 2.5.1,
2.6
N
N
N
N
N
N
N
Sun OS 4.14
N
N
N
N
N
N
N
IBM AIX 4.1,x, 4.2.x
N
N
N
N
N
N
N
HP-UX 9.x, 10.x
N
N
N
N
N
N
N
Driver
PCL
PS
UNIX PS
1 Page
policy
Xerox custom drivers are recommended for use with the
DocuPrint N40 since they will generally support the most
DocuPrint N40 features.
Chapter 2: Printer Management Software and Drivers
❖ 2-7
Installing CentreWare DP and Drivers
Installing
CentreWare DP
and Drivers
Inside the cover of the DocuPrint N40 CDs, which come
with your printer, are booklets which give you
instructions on how to load both your DocuPrint N40
drivers and your DocuPrint N40 CentreWare software
(depending on your software environment).
In addition, your System Administrator also has the
capability to download drivers directly to your
workstation.
Configuring Your
Drivers
When you initially use any of your drivers, make sure to
properly configure your driver by setting the correct
DocuPrint N40 options displayed under the “PRINTER
CONFIGURATION” tab in the drivers. You can
determine which DocuPrint N40 options you have by
printing a Configuration Sheet.
2-8 ❖ DocuPrint N24, N32, and N40 User Guide
Using the Control Panel
3 r e tpahC
Control Panel Features ................................................... 3-2
The Display .................................................................... 3-3
Menu Options ................................................................. 3-4
Chapter 3: Using the Control Panel
❖ 3-1
Control Panel Features
Control Panel
Features
The DocuPrint N40 Control Panel serves two purposes:
1. It displays information about the status of the printer
(or the job in process).
2. It provides the means for changing printer settings
and printer defaults to control how the DocuPrint N40
operates.
As shown in Figure 3.1, your printer’s Control Panel will
either have icons and text, or icons only.
Figure 3.1
DocuPrint N40 Control Panel
North America Control Panel
(Latin American machines will
have translated version)
1
Indicator lights
2
Two-line by 16-character display
3
Control keys (8)
European Control Panel
3-2 ❖ DocuPrint N24, N32, and N40 User Guide
Control Panel Features
The Display
The Control Panel's display performs two functions.
1. It informs you of printer status conditions, such as
when toner is low, when a paper tray is empty, when a
job is in process, and so on. For example, when you
turn on the printer, you see the following message on
the display:
Rea dy
This message appears whenever the printer is online
and ready to accept print jobs. The display will also
show:
Pro ces sin g when processing data.
Wai tin g when waiting for more data.
2. It presents a hierarchy of menu options and settings to
configure and control the printer.
For example, when you press Menu Up
or Menu
Down
, you will see the following two-line message
on the display:
Men us
Item Men u (such as Job Me nu)
See Chapter 3 of the DocuPrint N40 Systems
Administrator Guide for information on the Menu system
hierarchy.
Chapter 3: Using the Control Panel
❖ 3-3
Menu Options
Menu Options
Figure 3.2 on page 3-5 depicts a “Menu Map” for the
DocuPrint N40. This map shows which variables are
controlled by the DocuPrint N40 menus.
Details of all the available settings for the variables in
these menus are contained in Chapter 3 of the System
Administrator Guide.
In addition, Chapter 3 of the System Administrator Guide
lists all the operations associated with the DocuPrint N40
Control Panel keys and lists the specific key processes
which need to be executed to set any of these DocuPrint
N40 variables.
3-4 ❖ DocuPrint N24, N32, and N40 User Guide
Menu Options
Figure 3.2
DocuPrint N40 Menu Map
Job Menu
Password Menu1
Cancel Job
Form Feed
Enter Password
Tray Menu
PCL Menu
PostScript Menu
Font Number
Pitch2
Point Size2
Form Length
Symbol Set
Line Terminat.
No Jobs
All Jobs
Job n
Print
Delete
Envelope Size
MBF Size
MBF Type
Tray 1 Type
Tray 2 Type
Tray 3 Type3
Tray 4 Type3
Tray 5 Type3
Tray Sequence
Paper Size
Paper Type
Page Policy
Page Timeout
Copies
Orientation
Duplex4
Draft Mode
Edge-to-Edge
Output Timeout
Output Offset
Output Dest
Power Saver
Defaults
Print Errors
Binary PS
System Menu
Parallel Menu
Port Enable
Port Timeout
Parallel PDL
Bidirectional
Serial Menu
Port Enable
Port
poTimeout
Serial PDL
Handshake
Baud Rate
Novell Enable
LPR Enable
LPR Banner
LPR PDL
DLC/LLC Enable
DLC PDL
NetBEUI Enable
NetBEUI PDL
AppSocket Enabl
AppSocket PDL
ETalk Enable
HTTP Enable
IP Address Res.
IP Address
Subnet Mask
Default Gateway
Port Timeout
Speed6
Ethernet Menu
Token Ring Menu5
Novell Menu
Test Menu
Reset Menu
Novell PDL
Novell Mode
Frame Type
Polling Interval
PServer Name
Primary Server
NDS Tree
NDS Context
Config Sheet
Demo Page
PCL Font List
PS Font List
Test Print
Disk Directory1
Hex Mode
Restart Printer
Novell Enable
LPR Enable
LPR Banner
LPR PDL
DLC/LLC Enable
DLC PDL
NetBEUI Enable
NetBEUI PDL
AppSocket Enable
AppSocket PDL
TTalk Enable
HTTP Enable
IP Address Res.
IP Address
Subnet Mask
Default Gateway
Port Timeout
Source Routing
Speed
LAA
Language
Factory Defaults
Network Defaults
Demo Mode
Delete Jobs
Init Disk1
1
Appears only when the Hard
Disk Drive is installed.
2
Either Pitch or Point Size
appears (but not both),
depending upon the type of
font currently in effect.
3
Appears only when the 2,500
Sheet Feeder is installed.
4
Appears only when the Duplex
Module is installed.
5
Appears only when the Token
Ring Card is installed.
6
Appears only when the 10/100
Ethernet Card is installed.
Chapter 3: Using the Control Panel
❖ 3-5
Menu Options
3-6 ❖ DocuPrint N24, N32, and N40 User Guide
Paper Loading and
Orientation
4 r e tpahC
Selecting Paper ............................................................... 4-2
Storing Paper .................................................................. 4-5
Loading Paper ................................................................. 4-6
Using Trays 1, 2, and 3 (if installed) ................................ 4-7
Using Trays 4 and 5 in the 2,500 Sheet Feeder ............. 4-11
Using the 50 Sheet Bypass Feeder ................................ 4-14
Using the 100 Envelope Feeder .................................... 4-19
Automatic Tray Switching ........................................... 4-20
Paper Size/Type Mismatch ............................................ 4-21
Duplex (Two-Sided) Printing ....................................... 4-22
Print Orientation and Control Panel Settings ................. 4-23
Chapter 4: Paper Loading and Orientation
❖ 4-1
Selecting Paper
Selecting Paper
This chapter will help you understand what kinds of
paper you can use with the DocuPrint N40 and also how
to properly position paper in the different paper input
trays so as to accomplish what you want with the
DocuPrint N40.
Table 4.1 on page 4-4 lists the size paper, envelopes, and
other print media you can use with all DocuPrint N40
input and output bins.
The DocuPrint N40 supports paper weights as follows:
• 17-28 lbs. (64-105 g/m2) via paper trays
• 17-57 lbs. (64-190 g/m2) A6 via the 50 Sheet Bypass
Feeder
• 17-24 lbs. (64-90 g/m2) with duplex
• The optional 2,500 Sheet Feeder supports 18-24 lbs.
(68-90 g/m2)
Using sizes other than those listed in Table 4.1, or paper
not recommended for laser printers, may result in paper
jams and print quality problems. The following media are
unacceptable for use in the DocuPrint N40:
• Excessively thick or thin paper
• Paper that has already been printed on (preprinted
letterhead is allowed)
• Wrinkled, torn, or bent paper
• Moist or wet paper
• Curled paper
• Paper with an electrostatic charge
• Glued paper
4-2 ❖ DocuPrint N24, N32, and N40 User Guide
Selecting Paper
•
Paper with special coating
• Paper unable to withstand a temperature of 150º C
(302º F)
• Thermal paper
• Carbon paper
• Paper with paper fasteners, ribbons, tape, etc.
attached
• Heavily textured paper
• Label stock with exposed backing sheets
Chapter 4: Paper Loading and Orientation
❖ 4-3
Selecting Paper
Table 4.1
Acceptable media sizes and capacities for all DocuPrint N40 media trays
Input
Media Size
Tray 1
Tray 2
Tray 3
A3 297x420 mm
•
•
A4 210x297 mm
•
•
A5 148x210 mm
•
Tray 4
Tray 5
•
A6 105x148 mm
Output
50 Sheet
100
Bypass Envelope
Feeder
Feeder
Facedown
Bin
Faceup
Bin
10-bin
Mailbox/
Collator
•
•
•
•
•
•
•
•
•
•
•
•
•
•
•
•
•
•
•
Statement 5.5x8.5” 140x216 mm
•
Executive 7.25x10.5” 184x267 mm
•
•
•
•
•
•
•
Letter 8.5x11” 216x279 mm
•
•
•
•
•
•
•
Folio 8.5x13” 216x330 mm
•
•
•
•
•
•
Legal 8.5x14” 216x356 mm
•
•
•
•
•
•
Ledger 11x17” 279x432 mm
•
•
•
•
•
•
•
•
•
•
•
•
•
•
•
•
•
•
•
•
•
•
•
•
•
•
500
200
Envelopes
COM-10 4.125x9.5” 105x241mm
Monarch 3.87x7.5” 98x191mm
DL 4.33x8.66” 110x220 mm
C5 6.38x9.01” 162x229 mm
•
•
•
•
•
•
•
•
Transparencies
A4 210x297 mm
Letter 8.5x11” 216x279mm
•
•
Tray 2
Tray 2
Labels
A4 210x297 mm
Letter 8.5x11” 216x279mm
Capacity1
1
500
500/tray 1000/tray
50
100
100/bin
Maximum capacity using 20 lb. (80 g/m2) stock.
For acceptable media sizes for use with the Duplex
Module, see Table 4.2 on page 4-22.
4-4 ❖ DocuPrint N24, N32, and N40 User Guide
Storing Paper
Storing Paper
The DocuPrint N40’s print quality is optimized when
paper and other print media are properly stored. Proper
storage ensures optimum print quality and trouble-free
printer options.
• Store the paper on a flat surface, in a relatively low
humidity environment.
• Avoid storing paper in such a way as to cause
wrinkling, bending, curling, etc.
• Do not unwrap paper until you are ready to use it, and
rewrap any paper you are not using.
• Do not expose paper to direct sunlight or high
humidity.
Chapter 4: Paper Loading and Orientation
❖ 4-5
Loading Paper
Loading Paper
The DocuPrint N40 accepts paper from the following
input trays:
• Trays 1 (500 sheets) and 2 (500 sheets) in the printer
(see page 4-7)
• Tray 3 (500 sheets), the top tray in the optional 2,500
Sheet Feeder (also see page 4-7)
• Trays 4 (1,000 sheets), the lower left tray, and 5 (1,000
sheets), the lower right tray, in the optional 2,500
Sheet Feeder (see page 4-11)
• The 50 Sheet Bypass Feeder in the printer (see
page 4-14)
• The optional 100 Envelope Feeder (see page 4-19)
• Do not attempt to load paper during printing into a tray
that is currently in use.
• Do not overfill the trays.
• Use only the media specified in Table 4.1 on page 4-4 and
avoid using the media listed on page 4-2.
The multiple trays of the DocuPrint N40 enable you to
dedicate specific trays to specific sizes and types of paper. For
example, if you have applications that require printing on
letterhead, you can dedicate one of the printer’s trays to that
paper stock.
4-6 ❖ DocuPrint N24, N32, and N40 User Guide
Loading Paper
Using Trays 1, 2, and
3 (if installed)
Trays 1 and 2 in the printer, and Tray 3 in the optional
2,500 Sheet Feeder, hold up to 500 sheets of 20 lb.
(80 g/m2) paper each. Refer to the section “Selecting
Paper” (page 4-2) for acceptable paper sizes and weights.
1
Pull out the tray (Tray 1 is shown above)
until it stops.
2
Prepare a stack of paper, making sure the
tops of the sheets are aligned.
3
Gently lift up the width guide and slide it
all the way until it stops.
4
Press down the gray handle and slide the
side guide all the way until it stops.
If you are replacing paper of the same
size, skip to Step 5 on page 4-8.
Chapter 4: Paper Loading and Orientation
❖ 4-7
Loading Paper
5
Place the paper in the tray, between the
guides (see Figure 4.1 on page 4-9 and
Figure 4.2 on page 4-10 for orientation).
6
Adjust the side guide to the paper length.
8
Adjust the width guide to the paper
width.
Do not stack paper above the
indicated mark.
7
Align the edges of the paper stack.
Make sure the guide is locked firmly
in the guide hole on the bottom of
the tray, and that both the side and
width guides are set correctly for
the size of paper you are using.
4-8 ❖ DocuPrint N24, N32, and N40 User Guide
Loading Paper
9
10
Figure 4.1
If changing paper size, you may want to
insert the correct paper size label in the
paper size slot on the front of the tray.
Push the tray all the way back into the
printer until it latches.
Trays 1/2/3 paper orientation (long edge feed)
Top View
1
Duplex printing
2
Simplex printing
Load the following paper sizes
with the long edge on the left
(leading into the printer):
Letter
Statement
Executive
A4
A5
Chapter 4: Paper Loading and Orientation
❖ 4-9
Loading Paper
Figure 4.2
Trays 1/2/3 paper orientation (short edge feed)
Top View
1
Duplex printing
2
Simplex printing
Load the following paper sizes
with the short edge on the left
(leading into the printer):
Legal
Folio
Ledger
A3
The paper in this
illustration looks like letter
or A4 size paper, but it is
not. The graphic is only a
generic representation of
the paper sizes listed
above.
4-10 ❖ DocuPrint N24, N32, and N40 User Guide
Loading Paper
Using Trays 4 and 5
in the
2,500 Sheet Feeder
1
Pull out the tray until it stops.
Trays 4 and 5 in the optional 2,500 Sheet Feeder hold up
to 1,000 sheets of 20 lb. (80 g/m2) paper each (in A4,
Letter and Executive size only). The following procedure
uses Tray 4 as an example, but can be used for Tray 5 as
well.
2
Prepare a stack of paper, making sure the
tops of the sheets are aligned.
Chapter 4: Paper Loading and Orientation
❖ 4-11
Loading Paper
3
Place paper in the tray, against the left
side (refer to Figure 4.3 on page 4-13 for
orientation). Slide back the stop.
Do not stack paper above the
indicated mark.
4-12 ❖ DocuPrint N24, N32, and N40 User Guide
4
Push the tray back in.
Loading Paper
Figure 4.3
Trays 4 and 5 paper orientation
Top View Tray 4
1
Duplex printing
2
Simplex printing
Load the following sizes with the
long edge on the left (leading into
the printer):
Letter
Executive
A4
Top View Tray 5
1
Duplex printing
2
Simplex printing
Load the following sizes with the
long edge on the left (leading into
the printer):
Letter
Executive
A4
Chapter 4: Paper Loading and Orientation
❖ 4-13
Loading Paper
Using the 50 Sheet
Bypass Feeder
1
The DocuPrint N40’s 50 Sheet Bypass Feeder holds up to
50 sheets of 20 lb (80 g/m2) paper. Refer to the section
“Selecting Paper” (page 4-2) for acceptable media sizes
and weights.
If necessary, pull out the extension tray to
fit the length of paper to be used.
4-14 ❖ DocuPrint N24, N32, and N40 User Guide
2
Place the paper along the right side of the
Bypass Feeder (refer to Figure 4.4 on
page 4-16 and Figure 4.5 on page 4-17 for
paper orientation, and Figure 4.6 on page
4-18 for envelope orientation).
Loading Paper
3
Push the paper guide to slightly touch the
paper stack (to ensure contact with the
paper sensor).
4
Push the paper as far as it can go into the
printer.
5
When finished printing from the Bypass
Feeder, remove any remaining paper
from the tray and push back the extension
tray (if necessary), as paper will be fed
from the Bypass Feeder if it is selected in
the tray sequence.
Chapter 4: Paper Loading and Orientation
❖ 4-15
Loading Paper
Figure 4.4
50 Sheet Bypass Feeder paper orientation
(long edge feed)
Top View
1
Simplex printing
2
Duplex printing
Load the following paper sizes with
the long edge leading into the
printer:
Letter
Statement
Executive
A4
A5
4-16 ❖ DocuPrint N24, N32, and N40 User Guide
Loading Paper
Figure 4.5
50 Sheet Bypass Feeder paper orientation
(short edge feed)
Top View
1
Simplex printing
2
Duplex printing
Load the following paper sizes with
the short edge leading into the
printer:
Legal
Folio
Ledger
A3
A6
Chapter 4: Paper Loading and Orientation
❖ 4-17
Loading Paper
Figure 4.6
50 Sheet Bypass Feeder envelope orientation1
Top View
1
Envelope
2
DL Envelope
3
C5 Envelope
1
Some PostScript applications require that the envelopes be loaded with the return address corner on the
right side of the stack and leading as the envelopes go into the printer. Test your application for proper
orientation.
4-18 ❖ DocuPrint N24, N32, and N40 User Guide
Loading Paper
Using the
100 Envelope Feeder
1
The 100 Envelope Feeder is an optional paper handling
device available for the DocuPrint N40. Refer to Table 4.1
on page 4-4 for acceptable envelope sizes.
Prepare a stack of envelopes, making
sure all flaps are closed and the
envelopes are not stuck together.
2
Lift the envelope stopper and insert the
stack with the flap-side up and the long
edges leading into the printer.
3
Slide the side guide so that it lightly
touches the edges of the envelope stack.
To avoid paper jams, do not stack
envelopes above the paper limit
mark, and do not attempt to add
envelopes while printing.
Chapter 4: Paper Loading and Orientation
❖ 4-19
Automatic Tray Switching
Automatic Tray
Switching
Automatic tray switching, available for both PCL and
PostScript jobs, enables you to group two or more input
trays together into one logical tray, and in a specific order
in which the trays will be searched to satisfy an input
request. Tray switching is useful for:
• Increasing paper capacity.
When the current paper tray runs out of paper, the
printer automatically switches to the next tray in the
sequence, provided the paper size and type in the next
tray is the same size and type as that in the current
tray.
• Searching for the correct paper size and type.
If the paper size and type specified in your software
application does not match the size paper loaded in
the current paper tray, the printer automatically
searches the next tray in the sequence for a paper size
and type that matches.
• Loading paper in one tray while printing from another
tray (filling an empty tray while printing).
Tray switching is made possible via the Tray Sequence
item in the Control Panel’s Tray Menu. It enables
grouping of Trays 1 and 2 in the printer, the 50 Sheet
Bypass Feeder, and Trays 3, 4, and 5 in the 2,500 Sheet
Feeder (if installed) into a variety of sequence
combinations. Tray switching can also be turned off.
The 50 Sheet Bypass Feeder is referred to as the MBF (for
Multiple Bypass Feeder) in the Control Panel’s Tray Sequence
settings.
4-20 ❖ DocuPrint N24, N32, and N40 User Guide
Automatic Tray Switching
Paper Size/Type
Mismatch
Paper size/type mismatch occurs when the requested size
is not available in the printer. This can be caused by
running out of paper in a tray that is configured for the
requested paper, or by requesting a paper that is not
configured in the printer. The printer goes off-line under
paper mismatch conditions. It automatically returns
on-line and continues printing after the paper mismatch
condition is resolved.
If a tray is configured for the requested paper, but the tray
is out of paper, the display prompts you to load the
requested paper (size and type) in the appropriate tray.
After the tray is loaded, printing continues.
If the request is for paper that is not configured in the
printer, you are prompted to load the requested paper in
the first tray of the Tray Sequence setting.
If you do not want to load paper in the first tray of the
Tray Sequence setting, two options are available:
• One of the trays may be loaded with the requested size
paper and reconfigured via the Tray Menu to match
the requested paper type.
• Value Up
or Value Down
may be pressed to
scroll through all the trays, displaying the size and
type paper in each tray. If one of these alternate papers
is acceptable, pressing Enter
will cause printing to
continue on the new paper. Trays are searched in the
order specified in the Tray Sequence setting.
Chapter 4: Paper Loading and Orientation
❖ 4-21
Duplex (Two-Sided) Printing
Duplex
(Two-Sided)
Printing
Once the optional Duplex Module is installed and Duplex
printing is enabled in the Control Panel, you can print
two-sided (duplex) jobs. Duplex printing can also be
enabled from your printer driver.
Use only the size paper listed in Table 4.2 for two-sided
jobs. Do not use envelopes, card stock, transparencies, or
label paper for duplex jobs.
Table 4.2
Paper sizes that can be used with the
Duplex Module
Paper Size
Weight
A3 (297 x 420 mm)
17 lb. (64 g/m2) to 24 lb. (90 g/m2)
A4 (210 x 297 mm)
17 lb. (64 g/m2) to 24 lb. (90 g/m2)
A5 (148 x 210 mm)
17 lb. (64 g/m2) to 24 lb. (90 g/m2)
Statement (5.5 x 8.5” / 140 x 216 mm)
17 lb. (64 g/m2) to 24 lb. (90 g/m2)
Executive (7.25 x 10.5” / 216 x 279 mm) 17 lb. (64 g/m2) to 24 lb. (90 g/m2)
Letter (8.5 x 11” / 216 x 279 mm)
17 lb. (64 g/m2) to 24 lb. (90 g/m2)
Folio (8.5 x 13” / 216 x 330 mm)
17 lb. (64 g/m2) to 24 lb. (90 g/m2)
Legal (8.5 x 14” / 216 x 356 mm)
17 lb. (64 g/m2) to 24 lb. (90 g/m2)
Ledger (11 x 17” / 279 x 432 mm)
17 lb. (64 g/m2) to 24 lb. (90 g/m2)
Refer to Figure 4.1 on page 4-9 and Figure 4.4 on page
4-16 for the proper orientation of drilled paper and
letterhead when printing duplex.
4-22 ❖ DocuPrint N24, N32, and N40 User Guide
Duplex (Two-Sided) Printing
Print Orientation and
Control Panel
Settings
To ensure that duplex jobs print in the proper orientation,
set the Duplex option (in the System Menu) to the
appropriate setting (see Figure 4.7). The Duplex settings
for both PCL and PostScript are as follows:
Duplex = Off
Duplex = Short Edge, or
Duplex = Long Edge
Figure 4.7
Duplex binding orientation and Control Panel menu settings
Portrait Orientation: Set Duplex to Long Edge.
Portrait Orientation: Set Duplex to Short Edge.
Landscape Orientation: Set Duplex to Long Edge.
Landscape Orientation: Set Duplex to Short Edge.
Chapter 4: Paper Loading and Orientation
❖ 4-23
Duplex (Two-Sided) Printing
4-24 ❖ DocuPrint N24, N32, and N40 User Guide
Clearing Jams and
Jam Recovery
5 r e tpahC
Paper Jams ...................................................................... 5-2
What Causes a Paper Jam? ............................................ 5-2
Clearing Paper Jams ....................................................... 5-2
Clearing Area A (No Duplex Module) .............................. 5-7
Clearing Area A (With Duplex Module) ........................... 5-9
Clearing Area B ............................................................ 5-12
Clearing Area C ............................................................ 5-12
Clearing Area D ........................................................... 5-13
Clearing Tray 5 ............................................................. 5-14
Clearing the Duplex Module ......................................... 5-15
Chapter 5: Clearing Jams and Jam Recovery
❖ 5-1
Paper Jams
Paper Jams
Your DocuPrint N40 printer has been designed to provide
reliable, trouble-free operation. However, you may
experience an occasional paper jam.
When the printer detects a misfeed or a paper jam, the
printing process is halted and a Control Panel message is
displayed.
After the paper jam has been cleared, the printer will
resume operation to complete the print job. The pages in
the print engine will be reprinted when the jam is cleared
and printing resumes.
What Causes a Paper
Jam?
Paper jams occur most often when:
• The paper stock does not meet specification. See
Chapter 4: Paper Loading and Orientation.
• The paper stock is in poor condition.
• The printer needs cleaning.
• Printer parts are worn and need to be replaced.
Clearing Paper Jams
Table 5.1 lists the types of paper jams that may occur. If
you see a Control Panel message that indicates a paper
jam, find the message in the left-hand column and
perform the accompanying steps to clear the paper jam.
Be careful not to touch any of the components inside the
printer when removing jammed paper. They may be very hot.
5-2 ❖ DocuPrint N24, N32, and N40 User Guide
Paper Jams
Table 5.1
Paper jam messages
Message
Description/Corrective Action
Clear Area A
Clear Env/Bypass
A paper jam has occurred in Area A.
Clear Area A
Reset Tray 1
A paper jam has occurred in Area A.
ACTION:
Clear the Envelope Feeder or the Bypass Feeder. Then reseat Tray 1.
Use one of the following procedures to clear Area A:
• “Clearing Area A (No Duplex Module)” (page 5-7)
• “Clearing Area A (No Duplex Module)” (page 5-7).
Then reseat Tray 1.
Clear Area B
Reset Tray 2
A paper jam has occurred in Area B.
Use the procedure:
• “Clearing Area B” (page 5-12).
Then reseat Tray 2.
Clear Area C
Reset Tray 4
A paper jam has occurred in Area C.
Use the procedure“Clearing Area C” (page 5-12) to clear Area C.
Then reseat Tray 4.
Clear Area A,B
Reset Tray 2
A paper jam has occurred in Areas A and B.
Use one of the following procedures to clear Area A:
• “Clearing Area A (No Duplex Module)” (page 5-7)
• “Clearing Area A (With Duplex Module)” (page 5-9).
Then use the procedure “Clearing Area B” (page 5-12) to clear Area B. Then
reseat Tray 2.
Table 5.1 Page 1 of 4
Chapter 5: Clearing Jams and Jam Recovery
❖ 5-3
Paper Jams
Table 5.1
Paper jam messages (continued)
Message
Clear Area C
Reset Tray 5
Description/Corrective Action
A paper jam has occurred in Area C.
Use the procedure“Clearing Area C” (page 5-12) to clear Area C.
Then reseat Tray 5.
Clear Area A,B
Reset Tray 3
A paper jam has occurred in Areas A and B.
Use one of the following procedures to clear Area A:
• “Clearing Area A (No Duplex Module)” (page 5-7)
• “Clearing Area A (With Duplex Module)” (page 5-9).
Then use the procedure “Clearing Area B” (page 5-12) to clear Area B. Then
reseat Tray 3.
Clear Area A,B,C
Reset Tray 4
A paper jam has occurred in Areas A, B, and C.
Use one of the following procedures to clear Area A:
• “Clearing Area A (No Duplex Module)” (page 5-7)
• “Clearing Area A (With Duplex Module)” (page 5-9).
Then use the procedure “Clearing Area B” (page 5-12) to clear Area B.
Then use the procedure “Clearing Area C” (page 5-12) to clear Area C.
Then reset Tray 4.
Clear Area A,B,C
Reset Tray 5
A paper jam has occurred in Areas A, B, and C.
Use one of the following procedures to clear Area A:
• “Clearing Area A (No Duplex Module)” (page 5-7).
• “Clearing Area A (With Duplex Module)” (page 5-9).
Then use the procedure “Clearing Area B” (page 5-12) to clear Area B.
Then use the procedure “Clearing Area C” (page 5-12) to clear Area C.
Then reset Tray 5.
Table 5.1 Page 2 of 4
5-4 ❖ DocuPrint N24, N32, and N40 User Guide
Paper Jams
Table 5.1
Paper jam messages (continued)
Message
P ape r J am
C lea r A rea A
Description/Corrective Action
A paper jam has occurred in Area A.
Use one of the following procedures:
• “Clearing Area A (No Duplex Module)” (page 5-7).
• “Clearing Area A (With Duplex Module)” (page 5-9).
P ape r J am
C lea r A rea A,B
A paper jam has occurred in Areas A and B.
First use one of the following procedures to clear Area A:
• “Clearing Area A (No Duplex Module)” (page 5-7).
• “Clearing Area A (With Duplex Module)” (page 5-9).
Then use the procedure “Clearing Area B” (page 5-12) to clear Area B.
P ape r J am
C lea r A rea
A ,B, C
A paper jam has occurred in Areas A, B, and C. First use one of the following
procedures to clear Area A:
• “Clearing Area A (No Duplex Module)” (page 5-7).
• “Clearing Area A (With Duplex Module)” (page 5-9).
Then use the procedure “Clearing Area B” (page 5-12) to clear Area B.
Then use the procedure “Clearing Area C” (page 5-12) to clear Area C.
P ape r J am
C lea r A rea B
A paper jam has occurred in Area B.
P ape r J am
C lea r A rea B,C
A paper jam has occurred in Areas B and C.
Use the procedure “Clearing Area B” (page 5-12).
First use the procedure “Clearing Area B” (page 5-12) to clear Area B.
Then use the procedure “Clearing Area C” (page 5-12) to clear Area C.
P ape r J am
C lea r A rea C
A paper jam has occurred in Area C (2,500 Sheet Feeder).
Use the procedure “Clearing Area C” (page 5-12).
Table 5.1 Page 3 of 4
Chapter 5: Clearing Jams and Jam Recovery
❖ 5-5
Paper Jams
Table 5.1
Paper jam messages (continued)
Message
Description/Corrective Action
P ape r J am
C lea r A rea D
A paper jam has occurred in Area D (Mailbox/Collator).
P ape r J am
C lea r D upl x
U nit
A paper jam has occurred in the Duplex Module.
P ap er J am
C le ar E nv Fe ed er
The printer cannot feed from the Envelope Feeder.
P ap er J am
C le ar T ray 5
A paper jam has occurred in Tray 5 (2,500 Sheet Feeder).
Use the procedure “Clearing Area D” (page 5-13).
Use the procedure “Clearing the Duplex Module” (page 5-15).
ACTION:
ACTION:
Open the Envelope Feeder and remove any jammed envelopes.
Open Tray 5 and remove jammed paper. Refer to the section
“Clearing Paper Jams” (page 5-2) and the procedure “Clearing Tray
5” (page 5-14).
Table 5.1 Page 4 of 4
5-6 ❖ DocuPrint N24, N32, and N40 User Guide
Paper Jams
Clearing Area A (No
Duplex Module)
1
Follow the procedure below to clear a paper jam from
Area A when the Control Panel display reads C lear
Are a A and the printer does not have the Duplex
Module installed.
Remove the Face-up Bin by lifting it up
and out.
2
Open Door A.
3
Remove any jammed paper.
A If the leading edge of the paper is
already in the Face-down Bin, gently
pull out the paper until it is completely
removed.
Chapter 5: Clearing Jams and Jam Recovery
❖ 5-7
Paper Jams
B If the paper is jammed in the Fuser
area, remove it carefully without
touching the Fuser. If it becomes
difficult to pull out the paper, locate
the green knob— at the same time,
press it in and turn it until the paper is
adequately out and easy to pull.
Never touch the Fuser area (where
a label indicating high temperature
is located).
C If the paper jammed in Area A is below
the Fuser, remove it by gently pulling it
away from the printer.
5-8 ❖ DocuPrint N24, N32, and N40 User Guide
Paper Jams
4
Close Door A, then reattach the Face-up
Bin.
If the Control Panel message
indicates an Area B jam, continue to
the section “Clearing Area B”
(page 5-12).
Clearing Area A (With
Duplex Module)
1
Follow the procedure below to clear a paper jam from
Area A when the Control Panel display reads C lear
Are a A and there is a Duplex Module installed on the
printer.
Remove any paper from the Face-up Tray,
then open the Duplex Module.
2
Open Door A.
Chapter 5: Clearing Jams and Jam Recovery
❖ 5-9
Paper Jams
3
Remove any jammed paper:
A If the leading edge of the paper is
already in the Face-down Bin, gently
pull out the paper until it is completely
removed.
B If the paper is jammed in the Fuser
area, remove it carefully without
touching the Fuser. If it becomes
difficult to pull out the paper, locate
the green knob— at the same time,
press it in and turn it until the paper is
adequately out and easy to pull.
Never touch the heater area (where
a label indicating high temperature
is located).
5-10 ❖ DocuPrint N24, N32, and N40 User Guide
Paper Jams
C If the paper jammed in Area A is below
the Fuser, remove it by pulling it away
from the printer.
4
Close Door A, then close the Duplex
Module.
If the Control Panel message
indicates an Area B jam, continue to
the section “Clearing Area B”
(page 5-12).
Chapter 5: Clearing Jams and Jam Recovery
❖ 5-11
Paper Jams
Clearing Area B
Follow the procedure below to clear a paper jam from
Area B of the printer when the Control Panel display
reads Cl ear Are a B .
1
Open Door B and remove any jammed
paper.
For easier access to Door B, you can
fold up the 50 Sheet Bypass Feeder
(shown at left) or pull out the
Envelope Feeder (if installed).
2
Close Door B by pressing it in the middle.
If the Control Panel message
indicates an Area C jam, continue to
the section “Clearing Area C”
below.
Clearing Area C
Follow the procedure below to clear a paper jam from
Area C of the 2,500 Sheet Feeder when the Control Panel
display reads Cle ar Are a C .
5-12 ❖ DocuPrint N24, N32, and N40 User Guide
1
Open Door C and remove any jammed
paper.
2
Close Door C by pressing it in the middle.
Paper Jams
Clearing Area D
1
Open Door D.
Follow the procedure below to clear a paper jam from
Area D (Mailbox/Collator) when the Control Panel
display reads Cle ar Are a D .
2
Remove any jammed paper.
3
Close Door D.
Chapter 5: Clearing Jams and Jam Recovery
❖ 5-13
Paper Jams
Clearing Tray 5
Follow the procedure below to clear a paper jam from
Tray 5 of the 2,500 Sheet Feeder when the Control Panel
display reads Res et Tra y 5 .
1
Open Door C and remove any jammed
paper. Then close Door C.
2
Open and remove Tray 3 by lifting the
tray from the front. Carefully pull out any
jammed paper. Reseat the paper, then
replace and close Tray 3.
3
Open Trays 4 and 5. Carefully remove
any jammed paper. Reseat the paper in
the trays.
4
Lift the Tray 5 transport and carefully
remove any jammed paper, then close
Trays 4 and 5.
5-14 ❖ DocuPrint N24, N32, and N40 User Guide
Paper Jams
Clearing the Duplex
Module
Follow the procedure below to clear a paper jam from the
Duplex Module when the Control Panel display reads
Cle ar Dup lx Unit .
1
Open the Duplex Module.
2
Open the inside cover of the Duplex
Module.
3
Remove any jammed paper in the
direction of the arrow.
4
Close the inside cover of the Duplex
Module, then close the Duplex Module.
Chapter 5: Clearing Jams and Jam Recovery
❖ 5-15
Paper Jams
5-16 ❖ DocuPrint N24, N32, and N40 User Guide
Replacing Your Toner
Cartridge
6 r e tpahC
Replacing the Toner Cartridge ...................................... 6-2
Standard Configuration .................................................. 6-3
Duplex Configuration ..................................................... 6-6
About the Maintenance Kit ........................................... 6-9
Chapter 6: Replacing Your Toner Cartridge
❖ 6-1
Replacing the Toner Cartridge
Replacing the
Toner Cartridge
This section describes how to replace the DocuPrint N40
Toner Cartridge in both a standard configuration printer
and a printer with a Duplex Module attached.
• Do not expose the Toner Cartridge to direct sunlight or
artificial light for more than 15 minutes. Overexposure
will permanently damage the photosensitive imaging
drum.
• Do not open the drum shutter or touch the green imaging
drum surface.
• Be sure to shake the Toner Cartridge as directed to
distribute the toner inside the cartridge. Print quality may
be degraded if the toner is not evenly distributed. If the
toner has not been properly freed by shaking the
cartridge, you may hear a noise when powering on the
printer, and the Toner Cartridge may be damaged.
• Never touch the Fuser area inside the printer (where a
label indicates high temperature).
If your printer does not have a Duplex Module installed,
go to the section “Standard Configuration” (page 6-3).
If your printer has the Duplex Module installed, go to the
section “Duplex Configuration” (page 6-6).
Instructions for replacing the Toner Cartridge are also
available on a label on the back of the left front cover of
the printer and in the Toner Cartridge box.
6-2 ❖ DocuPrint N24, N32, and N40 User Guide
Replacing the Toner Cartridge
Standard
Configuration
1
Open Door A.
Follow this procedure to replace the Toner Cartridge on a
standard configuration printer.
2
Open the front cover (which is spring
loaded; you must hold it open or else it
will shut).
Chapter 6: Replacing Your Toner Cartridge
❖ 6-3
Replacing the Toner Cartridge
3
Remove the Toner Cartridge by lifting the
amber handle and gently pulling it out.
4
Remove the new Toner Cartridge from its
package and pull out the protective paper
sheet from the drum shutter.
6
Hold the amber handle with one hand
and gently push the Toner Cartridge all
the way into the printer.
Wrap the used Toner Cartridge in its
original packing and return it as per
directions in the packaging.
5
Hold the Toner Cartridge horizontally
and gently shake it 5 to 6 times to evenly
distribute the toner inside.
Do not touch any parts inside the
printer. Make sure the cartridge is
firmly seated in the printer.
6-4 ❖ DocuPrint N24, N32, and N40 User Guide
Replacing the Toner Cartridge
7
Gently pull the sealing tape straight out
in the direction of the arrow.
If the tape is pulled out at an angle,
it may break.
8
Close the front cover and Door A.
When closing Door A, follow the
instruction label on the door for the
correct location at which to push
the door closed.
Chapter 6: Replacing Your Toner Cartridge
❖ 6-5
Replacing the Toner Cartridge
Duplex Configuration
Follow this procedure to replace the Toner Cartridge on a
printer with the Duplex Module installed.
1
Open the Duplex Module by pulling on
its latch.
2
Open Door A.
3
Open the front cover.
4
Remove the Toner Cartridge by lifting the
amber handle and gently pulling it out.
The printer’s front cover is spring
loaded and will not stay open. You
must hold it open or else it will shut.
6-6 ❖ DocuPrint N24, N32, and N40 User Guide
Wrap the used Toner Cartridge in its
original packing and return it as per
directions on the packaging.
Replacing the Toner Cartridge
5
Remove the new Toner Cartridge from its
package and pull out the protective paper
sheet from the drum shutter.
6
Hold the Toner Cartridge horizontally
and gently shake it 5 to 6 times to evenly
distribute the toner inside.
7
Hold the amber handle with one hand
and gently push the Toner Cartridge all
the way into the printer.
8
Gently pull the sealing tape straight out
in the direction of the arrow.
Do not touch any parts inside the
printer. Make sure the cartridge is
firmly seated in the printer.
If the tape is pulled out at an angle,
it may break.
Chapter 6: Replacing Your Toner Cartridge
❖ 6-7
Replacing the Toner Cartridge
9
Close the front cover and Door A.
When closing Door A, do not use
the latch on the cover. Instead,
follow the instruction label on the
cover for the correct location at
which to push the cover closed.
6-8 ❖ DocuPrint N24, N32, and N40 User Guide
10
Close the Duplex Module.
About the Maintenance Kit
About the
Maintenance Kit
The DocuPrint N40 also has a Maintenance Kit which is
customer installable. This kit should be installed after
every 300,000 impressions. You will be told by a message
on the Display when to install this kit. Instructions for
installing this kit are in Appendix B of the DocuPrint N40
System Administrator Guide.
The Maintenance Kit is comprised of three items:
• Fuser Cartridge
• Bias Transfer Roll (BTR)
• 15 feedrolls (three for each paper input tray)
The Fuser Cartridge, feedrolls and BTR have expected
useful lives of 300,000 impressions. Although printing can
continue, to ensure optimum print quality you should
order and replace these parts as soon as possible.
Chapter 6: Replacing Your Toner Cartridge
❖ 6-9
About the Maintenance Kit
6-10 ❖ DocuPrint N24, N32, and N40 User Guide
Troubleshooting
7 r e tpahC
Diagnostic Message Display .......................................... 7-2
Printer Operation Problems ........................................... 7-3
Chapter 7: Troubleshooting
❖ 7-1
Diagnostic Message Display
Diagnostic
Message Display
Chapter 6 of the DocuPrint N40 System Administrator
Guide contains the entire set of messages which can
appear on the DocuPrint N40 Control Panel display. Many
of these messages are diagnostic messages which appear
when there is a problem with the DocuPrint N40.
Chapter 6 of the DocuPrint N40 System Administrator
Guide also contains a discussion of Print Quality
symptoms and possible corrective actions.
If you have a problem with your DocuPrint N40 printer,
and you cannot solve the problem using the actions
suggested in Table 7.1 on page 7-3 of this guide, consult
Chapter 6 of the DocuPrint N40 System Administrator
Guide.
7-2 ❖ DocuPrint N24, N32, and N40 End User Guide
Printer Operation Problems
Printer
Operation
Problems
Table 7.1
Consult Table 7.1 for corrective actions when the printer
will not print or when the printed output is not what you
expect.
Printer operation problems
Problem
The printer will not print
at all, or a file sent from
the client/server will not
print.
Action
1. Check with your network administrator to see that the printer is powered up,
connected to the network, and that the network is operational.
2. Check Control Panel messages for “Paper Jam,” “Door Open,” etc.
3. If the port (parallel or network) the printer is connected to is disabled, enable
it. Check the Configuration Sheet for the port you are using to see if the Port
Enable item in the appropriate Interface Menu is set to On. If it is set to Off,
set it to On and try again.
4. If the printer has printed recently, do the following:
- Attempt to print a Configuration Sheet. If it does not print, contact your
dealer or Xerox.
- If the Configuration Sheet prints, check to see that the printer is configured
properly.
- If the printer is configured properly, check the Configuration Sheet to confirm
that the correct emulation is On.
- If the correct emulation is On and the printer continues not to print, contact
your dealer or Xerox.
Table 7.1 Page 1 of 3
Chapter 7: Troubleshooting
❖ 7-3
Printer Operation Problems
Table 7.1
Printer operation problems (continued)
Problem
A printed page does not
look like it should.
Action
1. Make certain that the software application you are using to create your print
job is configured properly. Refer to your software documentation.
2. Make sure the correct driver is being used.
3. Send a file containing PCL or PostScript commands to the printer.
- If your page prints as it should, your printer and interface are functioning
properly.
- If your information prints correctly, but doesn't look right, you may have:
- An error in your command sequence/operator.
- A missing downloaded font.
- A mismatched printer option against your host formatting.
- Command errors may be identified by looking at your input file. You can
determine which fonts are in the system by printing a PCL or PS Font List. You
can verify your data setup by printing a Configuration Sheet and checking
your printer setup.
The requested font for
the job does not print.
Print a PCL Font List, or PostScript Font List if the job is PostScript.
• If fonts print on the Font List, your print job may need correcting.
• If fonts do not print on the Font List, reload the fonts and print another PCL or
PostScript Font List.
Table 7.1 Page 2 of 3
7-4 ❖ DocuPrint N24, N32, and N40 End User Guide
Printer Operation Problems
Table 7.1
Printer operation problems (continued)
Problem
PostScript commands are
printed instead of the
PostScript job.
Action
1. Make certain that the software application you are using to create your job is
configured properly. Refer to your software documentation.
2. The job sent to the printer might have included an incorrect header, and
therefore not have indicated that a PostScript job was being sent.
- Check your software to make sure the PostScript header file is being sent to
the printer.
3. Set the Print Errors item in the PostScript Menu to On and resend the job.
- If an error page prints, there is a problem in the PostScript coding. Correct the
coding problem and resend the job.
- If the job still does not print and an error page was not printed, the job may
require additional memory.
A PostScript or PCL job
fails to print.
1. Check that PostScript is installed; also check that you are using a
DocuPrint N32 PostScript printer driver.
2. For a PostScript job, set the Print Errors item in the PostScript Menu to On and
resend the job.
- If an error page prints, there is a problem in the PostScript coding. Correct the
coding problem and resend the job.
- If the job still does not print and an error page was not printed, the job may
require additional memory.
3. For a PCL job, do the following:
- Check the output for PCL errors.
- If there is a problem in the PCL coding, correct the coding problem and
resend the job.
- If there is no error message, resend the job.
- If the job still does not print, the job may require additional memory.
Table 7.1 Page 3 of 3
Chapter 7: Troubleshooting
❖ 7-5
Printer Operation Problems
7-6 ❖ DocuPrint N24, N32, and N40 End User Guide
References
8 r e tpahC
Chapter 8: References
❖ 8-1
Further References
Further
References
If you need further information over and above what is
contained in this Guide, please consult the areas
indicated in the following references:
• Maintenance of the DocuPrint N40
Chapter 1 and Appendix B of the DocuPrint N40
System Administrator Guide
• Special DocuPrint N40 Features and Options
Chapter 1 of the DocuPrint N40 System Administrator
Guide
• Memory Considerations
Chapter 1 of the DocuPrint N40 System Administrator
Guide
• Extended Paper Handling Capabilities
Chapter 2 of the DocuPrint N40 System Administrator
Guide
• Use of the DocuPrint N40 Optional Hard Disk Drive
and Flash SIMMs
Chapter 5 of the DocuPrint N40 System Administrator
Guide
• DocuPrint N40 Ordering Information
Appendix A of the DocuPrint N40 System
Administrator Guide
• DocuPrint N40 Resident Fonts
Appendix D of the DocuPrint N40 System
Administrator Guide
8-2 ❖ DocuPrint N24, N32, and N40 User Guide
Further References
•
Printer Specifications
Appendix E of the DocuPrint N40 System
Administrator Guide
• DocuPrint N40 Unique Printer Commands
Appendix F of the DocuPrint N40 System
Administrator Guide
• DocuPrint N40 Environmental Specifics including
Safety
Appendix G of the DocuPrint N40 System
Administrator Guide
• More Detailed Network/Environment Technical
Information
The DocuPrint N40 Technical Information Guide (on
the N40 CD)
• DocuPrint N40 Support Information
The DocuPrint N40 Support Brochure or your warranty
booklet
• Network Installation Information
The DocuPrint N40 Quick Network Installation Guide
• DocuPrint N40 CentreWare Information
The DocuPrint N40 CentreWare DP Users Guide (on
the Printer Management Software CD)
• DocuPrint N40 System Administrator Guide (on the
N40 CD)
• Translated Versions of the DocuPrint N40 User
Documentation (on the N40 CD)
Chapter 8: References
❖ 8-3
Further References
8-4 ❖ DocuPrint N24, N32, and N40 User Guide
CE Declaration
A x i dneppA
This Appendix contains the “CE Declaration” which only
applies to European Countries.
Appendix A: CE Declaration
❖ A-1
CE Declaration
A-2 ❖ DocuPrint N24, N32, and N40 User Guide
CE Declaration
Appendix A: CE Declaration
❖ A-3
CE Declaration
A-4 ❖ DocuPrint N24, N32, and N40 User Guide
Index
XI
Numerics
100 Envelope Feeder
Capacity 4-4
Envelope orientation 4-18
Envelope sizes supported 4-4
Loading envelopes 4-19
Location on printer 1-8
10-bin Mailbox/Collator
Bin capacity 4-4
Location on printer 1-8
Paper sizes supported 4-4
2,500 Sheet Feeder
Location on printer 1-8
A5 size paper
Dimensions 4-4
Supported trays/bins 4-4
A6 size paper
Dimensions 4-4
Supported trays/bins 4-4
B
Bias Transfer Roll (BTR)
Also see Maintenance Kit
Location in printer 1-8
50 Sheet Bypass Feeder
Capacity 4-4
Loading 4-14 to 4-18
Location on printer 1-7
Paper orientation 4-16 to 4-18
Paper sizes supported 4-4
Bins
Face-down Bin
See Face-down Bin
Face-up Bin
See Face-up Bin
Mailbox
See 10-bin Mailbox/
Collator
A
C
A3 size paper
Dimensions 4-4
Supported trays/bins 4-4
C5 size envelopes
Dimensions 4-4
Supported trays/bins 4-4
A4 size paper
Dimensions 4-4
Supported trays/bins 4-4
CentreWare DP
Description 2-2
Features 2-2
Com10 size envelopes
Index
❖ IX-1
D
Dimensions 4-4
Supported trays/bins 4-4
Control Panel 3-2 to 3-3
Display
Description 3-3
Location on printer 3-2
Indicator lights
Location on printer 3-2
Keys
Location on printer 3-2
Location on printer 1-7
Controller Board
Location on printer 1-7
D
DL size envelopes
Dimensions 4-4
Supported trays/bins 4-4
DocuPrint N32
Components 1-7 to 1-8
Drivers
See Drivers
Family of printers 1-2
Maintenance
Also see Maintenance Kit
Troubleshooting
See Troubleshooting
Door A
Location on printer 1-7
Door B
Location on printer 1-7
Drivers
PCL emulation
Description 2-4
Features 2-6
PostScript
Description 2-5
Features 2-6
Usage
Setting duplex printing 4-22
Duplex Module
Also see Duplex printing
Location on printer 1-8
Duplex printing
Also see Duplex Module
Control Panel settings 4-23
Long edge feed
IX-2 ❖ DocuPrint N24, N32, and N40 User Guide
Landscape orientation 4-23
Portrait orientation 4-23
Paper orientation
50 Sheet Bypass Feeder 4-16, 4-17
Trays 1,2 and 3 4-9, 4-10
Trays 4 and 5 4-13
Paper sizes supported 4-22
Short edge feed
Landscape orientation 4-23
Portrait orientation 4-23
E
Envelopes
Duplex printing 4-22
Loading in 100 Envelope Feeder 4-19
Loading in 50 Sheet Bypass Feeder 4-14
Orientation 4-18, 4-19
Sizes supported 4-4
Executive size paper
Dimensions 4-4
Supported trays/bins 4-4
F
Face-down Bin
Capacity 4-4
Location on printer 1-7
Paper sizes supported 4-4
Face-up Bin
Capacity 4-4
Location on printer 1-7, 1-8
Paper sizes supported 4-4
Feedrolls
Also see Maintenance Kit
Location in printer 1-8
Folio size paper
Dimensions 4-4
Supported trays/bins 4-4
Front cover
Location on printer 1-7
Fuser/Fuser Cartridge
Also see Maintenance Kit
Location in printer 1-8
H
Hand grips
Location on printer 1-7
L
L
Labels
Sizes supported 4-4
Supported Trays/Bins 4-4
Ledger size paper
Dimensions 4-4
Supported trays/bins 4-4
Legal size paper
Dimensions 4-4
Supported trays/bins 4-4
Letter size paper
Dimensions 4-4
Supported trays/bins 4-4
M
Maintenance Kit
Bias Transfer Roll 6-9
Description 6-9
Feedrolls 6-9
Fuser Cartridge 6-9
Monarch size envelopes
Dimensions 4-4
Supported trays/bins 4-4
O
Output bins
Face-down Bin
See Face-down Bin
Face-up Bin
See Face-up Bin
Mailbox
See 10-bin Mailbox/Collator
P
Paper
Jam removal
See Paper jams
Jams
See Paper jams
Loading 4-6 to 4-19
50 Sheet Bypass Feeder 4-14 to 4-18
Tray 1 4-7 to 4-10
Tray 2 4-7 to 4-10
Tray 3 4-7 to 4-10
Tray 4 4-11 to 4-13
Tray 5 4-11 to 4-13
Orientation
50 Sheet Bypass Feeder 4-16 to 4-18
Tray 1 4-9 to 4-10
Tray 2 4-9 to 4-10
Tray 3 4-9 to 4-10
Tray 4 4-13
Tray 5 4-13
Selecting for use 4-2
Sizes supported
10-bin Mailbox/Collator 4-4
50 Sheet Bypass Feeder 4-4
Face-down Bin 4-4
Face-up Bin 4-4
Tray 1 4-4
Tray 2 4-4
Tray 3 4-4
Tray 4 4-4
Tray 5 4-4
Storing 4-5
Unacceptable for use 4-2
Weights supported 4-2
Paper jams 5-2 to 5-15
Causes 5-2
Clearing 5-2 to 5-15
From Area A (with Duplex Module) 5-9 to
5-11
From Area A (without Duplex Module) 5-7 to
5-9
From Area B 5-12
From Area C 5-12
From Area D 5-13
From Duplex Module 5-15
From Tray 5 5-14
Control Panel messages 5-3
Paper trays
See Tray 1, Tray 2, Tray 3, Tray 4, Tray 5
PCL emulation
Drivers
Description 2-4
PostScript
Drivers
Description 2-5
Power receptacle
Location on printer 1-7
Power switch
Location on printer 1-7
Printer drivers
See Drivers
Index
❖ IX-3
S
S
Statement size paper
Dimensions 4-4
Supported trays/bins 4-4
T
Toner
Also see Toner Cartridge
Toner Cartridge
Location in printer 1-8
Recycling 6-4, 6-6
Replacing 6-2 to 6-8
With Duplex Module 6-6 to 6-8
Without Duplex Module 6-3 to 6-5
Transparencies
Sizes supported 4-4
Supported Trays/Bins 4-4
Tray 1
Capacity 4-4
Loading 4-7 to 4-10
Location on printer 1-7
Paper orientation 4-9 to 4-10
Paper sizes supported 4-4
Tray 2
Capacity 4-4
Loading 4-7 to 4-10
Location on printer 1-7
Paper orientation 4-9 to 4-10
Paper sizes supported 4-4
Tray 3
Capacity 4-4
Loading 4-7 to 4-10
Location on printer 1-8
Paper orientation 4-9 to 4-10
Paper sizes supported 4-4
Tray 4
Capacity 4-4
Loading 4-11 to 4-13
Location on printer 1-8
Paper orientation 4-13
Paper sizes supported 4-4
Tray 5
Capacity 4-4
Loading 4-11 to 4-13
Location on printer 1-8
Paper orientation 4-13
Paper sizes supported 4-4
IX-4 ❖ DocuPrint N24, N32, and N40 User Guide
Tray Sequence
Also see Tray switching
Tray switching
Also see Tray Sequence
Description 4-20 to 4-21
Paper size/type mismatch 4-21
Troubleshooting
Paper jams 5-2 to 5-15
Printer operation problems 7-3 to 7-5