1
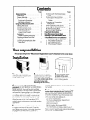
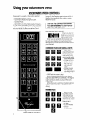
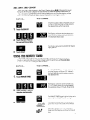
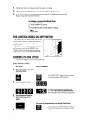
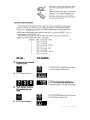
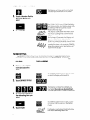
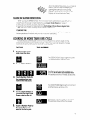
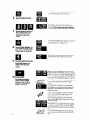
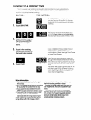
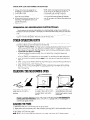
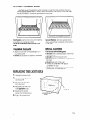
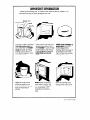
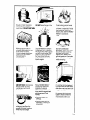
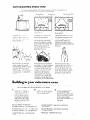
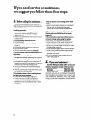
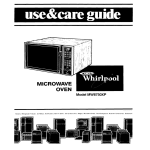
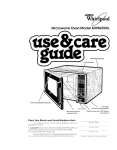
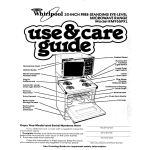
Microwave
Defrost
Guide
Oven Model
MW87OOXL
(N
\
\
Door Latch
Model and Serial
Number Plate
Control
Bi-Level
2-Position
Cooking
Rack
\
Pan~ON/OFF
Switch
(not shown)
Contents
Page
Responsibilities
,_
Installation
Proper, Safe Use
Precautions to Avoid Possible
Exposure to Excessive
Microwave
Energy
Using Your Microwave
Oven
Setting The Clock
Using the Minute Timer
Cooking in One Cycle
High Cook Power
Lower Cook Powers
Defrosting
Faster or Slower Defrosting
Cooking in More Than One
Cycle
Cooking Automatically
after
Defrosting
kur
Page
3
4
5
5
6
6
7
8
9
9
11
responsfbilities..
Fill out and
return
the “Microwave
Cooking with The Temperature
Probe
., .,
.,
Cooking to a Serving Time
Serve Time and the Temperature
Probe ..,.........,.,.,..,.,.,
Changing
or CancellIng
Instructions
O?her Operating
Instructions
Cleaning
the Microwave
Oven
Bi-Level Cooking Rack
Replacing
the Light Bulb
Important
Information
How Microwave
Ovens Work
Building In Your Microwave
Oven
If You Need Service or Assistance
1. Before Calling for Assistance
2. If You Need Assistance
3. If You Need Service
4. If You Have a Problem
2
2
3
14
16
17
17
17
17
18
18
19
21
21
22
22
22
23
23
.
Registration
Card”attached
to the oven
door.
Installation
1. Empty the microwave
oven and clean Inside It with
c soft, damp cloth
2.
Put the oven or a cart,
counter, table oi shelf that is
strong enough to hold the
oven. (The control side of the
unit is the heavy side.
Handling can be tricky.)
4. For your surety, this oven must be
grounded.
DO NOT REMOVE THE THIRD PRONG
FROM THE PLUG. You must have a qualified
electrician
put in the right outlet if Yours does
not have the 3-prong plug-in, or if the outlet
IS net grounded
according
to National Electrical Codes and local codes or ordinances
The outlet must supply 120 volts, 60 Hz., A.C.
When the over> is on, it will use about 1375
watts. It shoula not share a circuit with another
appliance
5. Put about tine cup (250 mLj of cold water
In a glass contolner
In the oven Close the
door Make sure It locks Follow the directions
on page 4 to set the oven to COOK for 1’ z
3. Do not block vents
on back of the oven.
Blocking vents can cause
poor cooking results.
minures. When the time is up, the water
be heated.
should
6. Fill out and return the “Microwave Registration Card” attached
to the oven door. If
the card is missing, please send the model
and serial number of your microwave
oven,
with your name and address to...
WhIrlpool Corporation
Microwave
Registration
Department
Admirlistrative
Center
2000 U S 33 North
Benton Harbor, Michigan
49022
This information will help us reach you if
there IS ever a need to pass along information
aboul Your mlcrowave
oven
Proper, safe use
Your microwave
must be...
l
Installed according
to the installation
Instructions
l
Protected from the weather.
l
Used only for jobs expected
of home mrcrowove ovens.
NEVER start the oven when
it’s empty. lhe oven can be
damagea
l
l
Used only by people who can operate
properly.
Kept clean and in good repair
DO NOT cook or reheat
whole eggs in the microwave oven. Steam buildup can cause an egg to
burst. Damage to the oven
or injury to the user may
result.
DO NOT use the oven until
you have read and understand ALL the information
on safe use.
It
Using your microwave oven
MICROWWE
There are three ports In the control section:
-The Digital Display
Clock,
- Command
Pods and Signal Lights,
- Number Pods.
What each of these does will be covered
on the following
pages. Read them carefully.
When you first plug in the oven, the Display
will show 88:88. If, after you set the Clock
OVEN CONTROLS
(page 5), the Display
means your electricity
Reset the Clock.
again shows @II 8’s it
‘was off for a while
One note: The Command
and Number
Pads are not buttons. You don’t have to
Dush them...iust touch them.
DIGITAL
DISPLAY
~- /CLOCK
When you are using the micr6wave
oven,
this acts OS a display. It counts down time
settings and it shows you what number pods
you touched.
COMMAND
PADS AND SIGNAL LIGHTS
Touch Command Pods to tell
the microwave
oven what to do
and in what order.
A few examples:
-COOK CYCLE 1
cook at less than full power.
- START tells the oven to start.
Each Command
Pod has its own Signal
Light (except START and CANCEL). The Signal
Light comes on when you touch the Command Pod.
While the oven is running, o Signal Light [or
lights] will be on to show what the oven is
doing.
NUMBER
a
Con&l
Panel ON /OFF Switch
PADS
SETTING THE CLOCK
When the oven IS first plugged
in, the Clock/Display
shows 88:88. If the electric power
ever q3es off, the Clock/ Display will olso show all 8’s when the power comes bock on.
vou an cook or use the Minute Timer without setting the clock, but the display will be
r:lank after cooking The oven door must be closed before setting the clock.
QO THIS...
THIS HAPPENS...
The Signal Light on the CLOCK SET pod will
come on. Start touching number pods for
the desired time within 5 seconds.
1.
Touch CLOCK SET.
The Display will show what numbers you
touched in the order you touched them.
This example
shows 3:25.
2.
Touch Number Pads tor
the correct time of day.
The Clock is set when the CLOCK SET Signal
Lrght goes off
3.
Touch START,
USING THE MINUTE
TIMER
The Minute Timer does not start or stop cooking; it works like o kitchen timer. Set in
mrnutes or seconds and you will hear a beep when the set time is up. The oven door
must be closed before setting the Minute Timer.
DO THIS...
THIS HAPPENS...
The MINUTE TIMER Signal Light will come on
and the Display will show CI “0.” Within 5
seconds start touching number pods for
the desired time.
Touch MINUTE TIMER.
The Display will show what numbers you
touched in the order you touched them.
This example
shows 1 minute, 45 seconds.
Touch Number Pads for
minutes and seconds.
The MINUTE TIMER Signal Light will stay on to
show that the Minute Timer is running.
Touch START.
d
count
own
P
The Display counts down the seconds to
show how much time is left on the Minute
Timer.
When the set time is up. you will hear o
beep and the Display will show the time of
day.
5
1.
2.
3.
The Mini.lte Timer can be used when the oven is cooking.
Opening
the microwave
oven door does not stop the Minute
If you open oven door and reset the Minute
Minute Elmer and to restart the oven.
To change
or cancel
Timer touch
the Minute
I. Touch MINUTE TIMER.
2. Touch number 0 to cancel,
or
2. Touch desired new number
Then:
3. Touch START.
Timer.
START twice
to start the
Timer:
pads to change.
THE CONTROL PANEL ON/OFF SWITCH
Just inside trle microwave
oven door, on the
control pane! frame, IS a switch. The switch IS
designed
to Leen “busy little fingers” from
using the oven.
When the suitch is OFF. the Clock and Minute Timer wili work, but the DEFROST and
COOK CYCLkS cannot be used. The switch
must be ON :,I cook In the microwave
oven.
COOKING IN ONE CYCLE
Follow th?se steps to cook at one power
level,
HIGH COOK POWER
DO THIS...
1.
THIS HAPPENS...
Put food in the oven
close the door.
and
The COOK CYCLE 1 Signal Light will come
on and the Display will show 4 0’s.
2.
Touch
COOK
CYCLE 1.
The Display will show the numbers you
touched in the order you touched them.
This example
shows 4 minutes, 30 seconds.
3.
Pads for
Touch Number
the cooking
time you
want.
The oven will automatically
cook
at high Cook
Power.
The COOK CYCLE 1 Signal Light will stay on
tc show that the oven is cooking in the first
cycle.
The Display counts down the time to show
how much cooking
time is left in the first
cycle.
When the cooking time ends you will hear
4 beeps [You can stop the beeping
by
opening the oven door ortouching
CANCEL) When the beeping
stops, the Display
will show the time of day.
LOWER COOK POWERS
ior best results, some recipes call for iower Cook Powers. Lowering the Cook Power
slows the cooking. The lower the Cook Power. the slower the cooking. Each Number
Pad on your microwave
oven stands for a different percentage
of Cook Power. Many
tell you, by number, which Cook Power to
recipes in your MICRO MENUS Cookbook
use. Recipes in other books and magazines
may tell you by name (HI, MED. LO. etc.] or
by percentage
(1 O%, 50%, 808, etc.).
The following chart gives you the percentage
of Cook Power each Number Pad
stands for, and the Cook Power name us~ually used
Tmk
HIGH
automatic
2 00% of frill power
9
90% of flJll power
80% ot full power
8
MED.HI
70% of full power
7
60% of full power
6
MED
5
50% of full power
4
40% ot tul! poLver
30% of !uil power
MED-LO
3
2
20% of fuii power
1
10% of flail power
LOW
THIS HAPPENS...
DO THIS...
1.
Put food in the oven and
close the door.
The COOK CYCLE 1 Signal Light will come
on and the Display will show 4 0‘s.
2.
Touch
COOK
CYCLE 1.
The Display will show the numbers you
touched in the order you touched them.
This example
shows 7 minutes, 30 seconds.
3.
Touch Number Pads for
the cooking time you
want.
The COOK POWER Signal Light will come
and the Display will show 2 0‘s.
4.
on
Touch COOK POWER.
I:ONTINI:ED
T\!EXTPAGE
mCc~vVt
c
:jC
r
.*:r’.
‘il-
P\
,!
j
The Display WIII show what you touched
Thus example
shows 60% of full power
5.
Touch a Number Pad for
the Cook Power you
want.
count
down
Iam
The COOK CYCLE 1 and COOK POWER Signal Lights will stay on to show that the oven
is cooking in the first cycle at a Cook
Power other than hrgh.
The Drsplay counts down the time to show
how much cooking time is left in the first
cycle
For 2 of every IO seconds, the Display WIII
show the Cook Power you selected.
When the cooking trme ends. you will hear
4 beeps. (You can stop the beeping
by
opening the door or by touching
CANCEL.)
When the beeping
stops. the Display WIII
show the time of day
Use DEFROST CYCLE to thaw froren food before cookrng. for suggested
check the guide on the Inside of the oven door or rn your MICRO MENUS
defrost trmes.
Cookbook
Tmk
THIS HAPPENS...
DO THIS...
Put frozen food in the
oven and close the
door.
The DEFROST CYCLE Signal Light will come
on and the Drsplay will show 4 0’s.
Touch DEFROST CYCLE.
Touch Number
the defrosting
want.
Pads for
time you
The DEFROST CYCLE Signal Lights will stay
on to show that the oven is in the Defrost
Cycle
Touch START.
count
down
The Display counts down the time to show
how much defrosting time is left.
l&IT
Q
0 &~~~~
LVhen the defrost time ends you ~111hear 4
beeps (You can stop the beeping
by
opening the oven door or touching
CANCEL.) When the beeprng
stops, the
Display will show the time of day
FASTER OR SLOWER DEFROSTING
When you touch DEFROST CYCLE the mrcrowave
oven automatrcatly
uses 30% of tull
Cook Power For slower or faster defrosting
see Lower Cook Powers on page 7
l
Use 20% of full power for slower detrostrng
l
Use 40% of full power for faster defrosting. Defrosting
at Cook Powers higher than
30% can cause some cooking on the outside of the food.
STANDING TIME:
For best results allcw the food to :;tand ‘or a ,tihile after defrosting
the temperature
of the food and provide more even defrostrng
COOKING
This will equalize
IN MORE THAN ONE CYCLE
For best results some recipes call for one Cook Power for a certain iength of time.
and another Cook Power for another length of time Your oven can be set to change
from one to the other and even a third one automatrcally.
DO THIS...
1.
THIS HAPPENS.. .
Put food in the oven
and close the door.
The COOK CYCLE 1 Signal Light WIII come
on and the Display will show 4 O’s
2.
Touch COOK CYCLE 1.
The Display will show the numbers you
touched in the order you touched them.
This example
shows 3 minutes, 25 seconds
3.
Touch Number Pads for
the cooking time you
want in the first cycle.
The COOK POWER Signal Light WIII come
and the Display will show 2 O’s
4.
Touch COOK POWER. (If
you want the high Cook
Power, skip to step 6.)
The Display will show what you touched
This example
shows 60% of full power.
5.
Touch a Number Pad for
the Cook Power you
want in the first cycle.
on
The COOK CYCLE 2 Signal Light will come
on and the Display will show 4 O’s
6.
Touch COOK CYCLE 2.
The Display will show the numbers you
touched in the order you touched them.
:hls example
shows 4 minutes. 30 seconds.
7.
Touch Number Pads for
the cooking time you
want in the second
cycle.
The COOK POWER Signal Light will come
and the Display will show 2 O’s
8.
on
Touch COOK POWER. (If
you want the high Cook
Power, skip to step 10.)
The Display will show what you touched
This example
shows 40% of full power.
9.
Touch a Number Pad for
the Cook Power you
want in the second
cycle.
10. Touch START.
For a third cooking
cycle, touch COOK
CYCLE 3 and repeat
steps 7,8 and 9.
d
count
own
tam
count
10
down
than high. All other Signal Lights will go off.
The Display counts down the cooking time
to show how much time is left in each
cycle.
For 2 of every 10 seconds of countdown,
the Display will show the Cook Power you
selected,
if you are using a Cook Power
other than high.
You will hear a beep at the end of each
cycle. You can either open the door to
check the food, or you can let the oven
start the next cycle. If you do open the
door, touch START after closing the door to
restart the oven.
The COOK CYCLE 2 Light will be on during
the second cycle. If a third cycle is used,
the COOK CYCLE 3 Light will be on during
that
The COOK POWER Light will be on during
any cycle using a Cook Power other than
high
When the last cycle ends you will hear
4 beeps (You can stop the beeping
by
opening the door or touching CANCEL.)
When the beeping
stops, the Display will
show the time of day
COOKING AUTOMJXTICALLY AFTER DEFROSTING
The controls can be set so the microwave
the Cook Cycles you have touched In
DO THIS...
1.
oven goes automatically
from defrosting
to
THIS HAPPENS...
Put frozen food in the
oven and close the door.
The DEFROST CYCLE Signal Light will come
on and the Display will show 4 0’s.
2.
Touch DEFROST CYCLE.
The Display will show the numbers you
touched in the order you touched them.
This example
shows 2 minutes, 30 seconds.
3.
Touch Number Pads for
defrosting
time you
want.
The COOK CYCLE 1 Signal Light irJill come
and the Display will show 4 0’s.
4.
on
Touch COOK CYCLE 1.
The Display will show the numbers you
touched in the order you touched them.
This example
shows 3 minutes, 25 seconds.
5.
Touch Number Pads for
the cooking time you
want in the first cycle.
:he COOK POWER Signal Light will come
end the Display will show 2 0’s.
6.
Touch COOK POWER.
(Options: Skip to step 8 if
you want the first cycle to
cook at high power. Skip
to step 12 if you want only
one cycle at high power.)
on
11
7.
Touch a Number Pad for
the Cook Power you
want in the first cooking
cycle.
The COOK CYCLE 2 Signal Light will come
on and the Display will show 4 0‘s.
8.
Touch COOK CYCLE 2.
(Option: Touch START if
cookinginonlyone
cycle after defrosting.)
The Display WIII show the numbers you
touched in the order you touched them.
This example
shows 4 minutes. 30 seconds.
9.
Touch Number Pads for
the cooking time you
want in the second
cooking cycle.
The COOK POWER Signal Light will come
and the Display will show 2 O’s
on
1 &Touch
COOK POWER.
(Option: Skip to step 12
if you want the second
cycle to cook at high
power.)
The Display WIII show what you touched
This example
shows 40% of full power.
11 .Touch
a Number Pad
for the Cook Power
you want in the
second cooking
cycle.
When you touch START,the DEFROST CYCLE
Signal Light will stay on. All other Signal
Lights will go off
12. Touch
START.
For a third cooking
cycle, touch COOK
CYCLE 3 and repeat
steps 9,10 and 11.
count
d--own
The Display counts down the time to show
how much time is lef in the defrost cycle.
When the defrost time ends, the microwave
oven automatically
lets the food stand for
the same amount of time used for
defrosting.
The Display counts down the
standing time. During the countdown, the
oven
12
will be dark ond the fan will be off
other Signal
Lights will be on.
No
When the standing time IS over. you WIII
hear a beep and the first cooking cycle
will start
P
The Display counts down the time to S~CW
how much time IS left in the first cookiig
cycle
count
down
For 2 of every 10 seconds, the Display ‘VVIII
show the Cook Power you selected
if you
are using a Cook Power other than high.
P
When the first cooktng
iear a beep
cycle
ends you w1l1
The second cooktng cycle WIII star1 iIf
only one cooklng cycle IS used you WIII
hear 4 beeps and the oven ‘&ill ston ]
---I
The COOK CYCLE 2 Signal Light wili be G?
during the second cookIng cycle The
COOK POWER Light wlli also be on if You
are using a Cook Power other than high
count
down
The Disp!ay counts down the time to show
how much cooking time IS lef-t in fne
second cycle
For 2 of every 10 seconds, the Display wili
show the Cook Power you selected
If you
are using a Cook Power other than high.
When the last cooking cvcle ends (COOK
CYCLE 2 or 3). You will hear 4 beeps [You
can stop the beeping
by opening the oven
door or touching CANCEL.) When the
beeping
stops the Display will snow the
time of day
Standlng tlme provldes more even
defrosting and cooking because It allows
food temperature to even out.
To sklp the automatic standlng time:
l
Instruct the microwave
oven to defrost
DEFROST CYCLE and to cook in COOK
CYCLE 2 or 3.
in
To check or stlr foods between or
during cycles:
1.
2.
3.
4.
Open
Check,
Close
Touch
where
the door. The oven will shut off.
stir or rotate the food.
the door.
START.The oven will go on from
it stopped.
13
COOKING WITH THE TEMPERATURE PROBE
‘he V\;:-AL SENSOR .Temperature Probe tukes guesswork out of cookrng roasts and
icrger ; lsseroles
The probe IS designed
to turn off the oven when it senses the
?emger iture you want For suggested
temperatures
for different foods, see your MICRO
ME,hJlJS <Cookbook
rirar
oa temperature
settings are orlntec on Number Pads
DO THIS...,
1.
uise : at ieast ’ I ot the
rern;jerature
probe Into
-he : >od
DO THIS...
2. Place food In the? oven
and plug the probe into
the socket on the oven
wali
3.
Make sure;he probe
does not touch any part
of the oven interior. Close
the door.
THIS HAPPENS...
The COOK TEMP Signal Light will come
and the Display will show 2 O’s
Touch
COOK
on
TEMP.
E!m
Touch a Number Pad for
the desired final
temperature.
The Display will show the number you
touched. This example
uses 6, or a final
cooked temperature
of about 150 F (66 C).
Tne 0 means the food is still cold.
The COOK POWER Signal Light will come
and the Display will show 2 0’s.
on
Touch COOK POWER.
(Option: Touch START if
you want to use
full power.)
The Display will show what you touched
This example
shows 60% of full power.
Touch the Number Pad
for the Cook Power
you want.
Tmk
Touch START.
8.
The left number on the display shows what
temperature
[number] you selecteil
The
right number shows you how the
temperature
IS rrsrng in the food
Em
For 2 of every 10 seconds, the Display WIII
show the Cook Power You seiected
lf you
cre usrng a Cook Power other than hrgh
‘When the probe senses the temperature
YOU selected, the oven shuts oft and yoti ‘will
hear 4 beeps. (You can stop the beeping
by openrng the oven door or touching
CANCEL ) When the beeping
stops the
Display will show the time of day
HINTS FOR USING THE TEMPERATURE PROBE
DON’T...
DO...
l
l
l
l
use hot pads when removrng probe from
food or food from oven
star foc>ds during cookrng when
recommended
stir soups, casseroles
ond drunks before
serving.
cover roasts with for and let stand Q few
minutes after cooking
Remove foil it You decide to cook It
longer
For casseroles, the tip of
the probe should be In
the center of the food Stir
foods when recommended
Replace the
probe.
iet probe or probe cable touch any rxrt
of the oven interior.
* let probe touch foil (if used). Foil can be
kept away from probe with wooden
toothpicks.
Remove foil if arcrng occurs
l use paper,
plastic wrap or or plastic con
tainers They WIII be in the oven too long
* use probe In regular oven
0 force probe into frozen food.
l
use probe for foods that need to simmer.
l
For liquids b’-Jlance ‘he
probe on o w’joder;
spoon or spotuia SC?+he
tip of the prcbe IS IR the
center of the lrqurd
For roasts. the tip of the
probe should be in tne
center of ?he largest
muscle, but not tOlJChliIg
fct or bone
15
COOKING TO A SERVING TIME
The rp crowave
oven controls can be set to start and stop the oven automatically,
e-den wr en you are not home The Serve Time feature allows you to set the time you
war:t thi, food to be flnlshed cooking
1.
DO THIS...
PHIS HAPPENS...
i!lim
q
The SERVE TIME Signal Light will come on
and the Display will show 4 0’s. Decide
what time you want the food to be done
liil@El
cooking
Touch SERVE TIME.
2.
Touch Number Pads for
the time you want the
food to be ready to
serve.
3.
Touch in the cooking
instructions
needed for
the food to be cooked.
Cook in DEFROST CYCLE, COOK CYCLE 1,
COOK CYCLE 2, COOK CYCLE 3 or a
combination
of them. Use high Cook Power
or lower Cook Powers.
m
If the Display begins flashing, there isn’t
enough time left before the Serve Time for
the oven to do what you told it to do. Touch
CANCEL and start over with a later Serve
Time
4.
Touch START.
The SERVE TIME Signal Light will stay on. All
the other lights will go off. When cooking
starts, Signal Lights and the Display will
show what is happening.
Extra Information:
Make sure the Clock is set to the right
time of day.
l You can’t set the Serve Time for more than
12 hours after the correct time of day.
l If you open the door
before the oven
begins to cook, be sure to retouch START.
l If You want the mlcrowave
oven to start
cooking when you are not home:
Use foods that will not go bad or spoil
while waiting for cooking to start. Avoid
using dishes with milk or eggs, cream
l
soups, cooked meats, poultry or fish, or any
item with baking powder or Yeast.
Smoked or frozen meats may be used: so
can vegetables,
frults and casserole-type
foods.
Any food that has to wait for cooking to
start should be very cold or frozen before it
is put in the oven. MOST UNFROZEN FOODS
SHOULD NEVER STAND MORE THAN TWO
HOURS BEFORE COOKING STARTS.
SERVE TIME AND THE TEMPERATURE PROBE
1 Follow in:lructrons on page 14 for
plugging
In tne Temperature
Probe
2 Touch SERVE TIME
3 Touch the number pads forthe time you
want tne rood finished
4. Follow insrructrons on pages 14-75 tar
touching in temperature
and cook
power instructions.
5 Touch START.
NOTE: When cookrng towara a Serve Fme
wnlle ustng the Temperature
Probe, the
mrcrowave
oven will start cooking
Yi) minutes before the Serve nrne you se: I!
YCIJ know that cooklng time wilt be less
‘ban 90 mrnutes, set a Serve Time later than
,you want.
CHANGING OR CANCELLING INSTRUCTIONS
To change or cancel any instructions you have touched, simply touch CANCEL. All
instructrons will be cance!led
The Display will show the time of day and you can start
over
If you want to change or cancel instructlons before you nave touched START simply
touch ir the new instructions
They will cancei the old ones
OTHER OPERA’TING HINTS
These are a number of things you can do wlfh your rnicrowa’ve
oven. Some w~l/ be
reminders
Others will be mentioned
for the first time
1 To double check settings while the ,oven IS running, touch the command
paa for the
setting you want to check The instruction programmed
for that pad will show on
the Display for 5 seconds. Then the Display returns to show what the oven is doing
2 To stop the oven while it is running:
l Open
the door. The oven Lvill stop You can reslart it by closrng the door and
tou~chrng START
a Touch CANCEL A!I instructions WI/I be erased ‘qou must touch in new instructions
3 If you touch two instructions into the same cycle the second instructions will erase
the fl,st
4 Whef usfng a Cook Power other trlan hian the Display WIJI show the Cook Power for
2 seconds ot every 10 during cooking
d
5 Wher- COOK CYCLE 1 foliows DEFROST CYCLE, a standing +ime equal to the defrostIng time WIII occur between the two COOK CYCLE 1 will automatically
begirl aftethis sr’~nding time
CLEKNING THE MICROWWE
‘Wipe often with warm sudsy
water and a ! oft cloth or
sponge
OVEN
For stubborn soil, boii a cup
of water rn the oven for 2 or 3
minutes Steam will soften
tne soil
Be sure to clean tne areas
where the door and oven
frame touch when closed.
Rinse well.
AbrasivtA cleaners. steel wooi pads, gritty wash cloths and the like can damage
the
control panel and electronics.
Use a soft cioth
or z sponge with a mrld detergent
or
commercial
glass cleaner
CLEANING
THE PROBE:
I. Remove probe from microwave
oven using hot pads
2. Wipe prob+ with a hot sudsy cloth Use a plastic scouring pad to remove stubborn foods
3 Probe may be placed
In tne silverware
basket of the dishwasher
4. Be careful not to kink the cable
NOTE: Make s.Jre vou have the right probe for your oven It WIII have ‘HI-Z” on the handle
17
M-LEVEL
COOKING
RACK
Use the Bi-Level Cooking Rack when cooking in more than one container
The rack
can be turned upsrde-down
to help fit taller containers
on the bottom of the oven. See
the MICRO MENUS’ Cookbook
provided
with your oven
J
\
First Position: Use the rack only when heatrng
more than one contarner of food.
Do not let a container
touch the top of the
oven.
Second Position: Turn rack upside-down
when using a taller container
on the bottom
of the oven.
CLEANING
._~~__
SPECIAL CAUTIONS
l
l
THE RACK
Wash by hand with a mrld detergent
cr In
vour drshwasher.
Do not use abrasive
scrubbers or cleansers.
REPLACING
1.
Unplug
l
THE LIGHT BULB
the power
2. Remove holdtng
access panel
Do not use with browning
dish.
Use only when cooking foods in more than
one container.
l
Use only in the microwave
oven.
l
Do not let food or containertouch
the top of
the oven.
o Do not store rack in the oven.
0 Put food in containers,
then place
containers
on rack.
0 Do not cook foods directly on rack without
putting them in containers
first.
l
cord
screw on
3. Remove tne light bulb
from its sot ket.
4. Replace bulb with a 40.
watt appliance
bulb.
5. Replace the access
panel and holding screw.
6. Plug In the power
18
cord
-Tmk
IMPORTANT
Before you start using your mrcrowave
inlormotfon
Metallic
Cooking
rn metal
w/l/ help yo~ovo~d
damage
INFORMATION
oven, read this section
containers
To test o dish for sole use, put it
the oven. So
can containers
with hldden
metal (twist-ties, foil-lining,
into the oven with a cup of
water beslde it Cook on high
Cook Power for one minute.
staples, metallic glaze or
trim], Test dinnerware
or cook-
If the dlsh gets hot and the
water stays cool, do not
use It.
betore
T/-r/s
Trim
can damage
ware
carefully
to your over:
using.
Paper can char or burn,
and some plastics can
melt if used when heating
foods for more than 4
minutes.
NEVERstart a microwave
oven when it’s empty. The
oven can be damaged.
If
you experiment,
put a
COntainer
of water in the
oven.
NEVERCOOK OR REHEATA
WHOLE EGG. Slice hard
boiled eggs before
heating. Steam build-up
rn
whole eggs may cause
them to burst and possibly
damage
the oven
Don’t let anything
touch
the top of the oven cavity
Contrnued
rlext poge
19
Rough or harsh cleaners
DO NOT store things in the
can scratch or dull the
oven.
oven finish. DO NOT USETHEM.
Overcooking
some foods
can cause them to scorch
or flame...especially
foods
like potatoes, popcorn,
snacks, etc. See the MICRO
MENUS- Cookbook.
+Tmk
Make popcorn
only in
poppers designed
for use
in microwave
ovens.
Follow popper directions,
Results are the popper
manufacturer’s
responsibility.
Liquids heated in certain
containers
may overheat.
The liquid may then splash
out with a loud noise. This
does not harm the oven,
but you should not use
such containers to heat
liquids again.
DO NOT OVERCOOK
POTATOES. At the end of the
recommended
cooking
time they should be
slightly firm. Wrap in foil
and set aside for 5 minutes.
They will finish cooking
while standing.
USEHOT PADS. Microwave
Follow MICRO MENUS*
Cookbook
directions
carefully. If using a
different cookbook,
you
may need to experiment
with times and Cook
Powers.
It is normal for the inside of
the oven door to look wavy
after the oven has been running for a while.
energy does not heat
containers,
but the hot
food does.
l
l
If your electric power line
voltage is less than the
normal 120 volts, cooking
times may be longer.
Double-check
settings.
all
It is normal for the signal
lights to flicker while the
microwave
oven is on.
Use the oven only for
defrosting, cooking or
reheating.
Tmk
HOW MICRQVAVE OVENS WORK
licrclwave
ovens are safe MIcrowave
energy 1snot hot It caiises
m ke 11scLvn neat and it’s this heat that cooks the food
Mode
\
F.d~xei
Cerqmlc
Magnetron
I
Bottom
/
Metal
MIcrowaves
i 3s~ through
glass, paper cjnd plastic
without heatir!J them so food
absorbs the e’iergy
Micro
waves bounc? off metal pans
so fooa does “3t absorb the
energy
foo3 T<j
Bottom
A magnetron
:n The microwave oven proauces
microwaves
The mlcrowaves
move into the oven where
they are scattered
or stirred
by a mode mixer (like a fan).
Microwaves
Dounce off
metal oven walls and are
absorbed
by focd.
The ceramic
bottom uf vour
mcrowave
oven lets microwaves through Then they
bounce off a metal floor.
back through the ceramic
bottom and are absorbed
by
the food
Microwaves
may not reach
:he center of a roast The heat
around the outside is what
cooks the roast all the way
through This IS one of the
reasons for letting some
foods (roasts. baked potatoes) stand for a while after
cooking. or for stirring some
foods during the cooklng time
The mlcrowaves
disturb
water molecules
tn the food
As the molecules
bounce
around bumping
Into each
other, heat IS made. like rubbing your hands together
This IS the heat that ccoks
Building in your microwave oven
Your ,liicrowave
oven is not limited to carts, counters
are mc 3e easy with kits avatlable
from your dealer
1.
Build the IT icrowave
even Into c cabinet or
waJI by itse:f or ov.er
built-In sinsie ovens In
the Whlrlpcol RDE REE.
RGE. RB ani7 SB modei
series or lrroerlal
7200
single gas jvens
2.
or tables,
Attach the microwave
oven to a wall by Itself or
w!th crlbinets over It
Ask your deale. tor details on.
e RCK803 (632849) -30-Inch
Built-in Kit
o RCK805 (832-5t)-25’:.Inch
Built-In Kii
* RCK807 (832950) - 27.Inch Built-In Kit
* RCK710 (832-;63) -Wall Mount Kit
Tmk
3.
Custom
lnstallatlons
Put the microwave
oven
on the MICRO SHELF
Hood over a cooktop. The
hood is available
ducted
or fls a recirculating
hood, and includes cooktop lights.
RCKBII (832875) -Wall Mount Vent Grille
and Filler Kit
l
RCK713 (832769) -Wall Mount Cookbook
Storage Cabinet
. RH3330XL - MICRO SHELF Hood
l
2"
If you need service or assistance,
we suggest you follow these four steps:
1
l
Before calling for assistance.. .
Performance
problems
often result from
little things you can find and fix yourself without tools of any kind.
If nothing operates:
Is the oven correctly
plugged
into a
live circuit with the proper voltage?
(See page 2.)
l
Have you checked
the main fuse or circuit
breaker box?
If the microwave
oven will not run:
l
Is the timer set?
l
Is the Control Panel Switch ON? (See
Page 6.1
l
Is the door firmly closed and latched?
l
Did you touch START?
l
Did you follow the directions
exactly?
l
If the microwave
oven has been stored in a
cold area:
l Allow
it to stand for 20 to 30 minutes at room
temperature
before operating
the controls.
If microwave
cooking times seem too long:
Is the electric supply to your home low or
lower than normal? Your electric company
can tell you if the line voltage
is low.
l
Is the Cook Power at the recommended
setting?
l
Are you allowing
for more time when cooking more food at one time?
If the display shows a time counting down
but the oven is not cooking...
l
Is the Minute Timer Signal Light on?
l
Is the oven door closed completely?
l
Is the oven in a standing time between
DEFROST CYCLE and COOK CYCLE I? (See
page12.)
l
22
If the fan seems to be running slower than
usual...
l
Has the oven been stored in a cold area?
The fan will run slower until the oven
warms up to normal room temperature.
If there has been a power interruption,
the
Display will show 88:88. Reset the clock
(page 51.
If the microwave
oven turns off too soon or
not soon enough when using the probe:
l
Is at least J/3of the probe in the food?
l
Is the probe tip in the center of the food?
l
Is the probe touching
bone or fat?
l
Have you allowed
roasts to stand for a few
minutes after cooking?
l
Is the probe plugged
tightly into its socket?
l
Is the Cook Power set where it should be?
l
Is the Cook Temperature
set at the end temperature you want?
l Do you have
the correct probe for your
oven? See page 17.
2
l
If you need assistance * . . .
Call the Whirlpool
COOL-LINE B service
assistance telephone
number. Dial free from:
Contlnental
U.S. . . . . . . . . (800) 253-1301
Michigan
. . . . . . . . . . . . . . . . (300) 632-2243
Alaska b Hawail . . . . . . . . (800) 253-l 121
and talk with one of our trained Consultants.
The Consultant
can instruct you in how to obtain satisfactory
operation
from your appliance or, if service is necessary,
recommend
a
qualified
service company
in your area.
3 o If you need service”.
..
Whirlpool
90s a
nationwide
network of franchlsed
technlclans
are
trained to fulfill the
~ produc?
FRANCHISED
SERVICE
warranty
and provide
afterwJarranly
serdrce.
anywhere
in the United
States To locate
TECH-CARE service
in your
area, call our CQOL-LINE service
assistance
telephone
number (see Step 2) or look in your
telephone
directcry
Yellow) Pages under:
APPL.IANCESm-HOUSEHOLDMAJOR -SERVICE
& REPAIR
4
l
If you have a problem”.
..
Call our COOL-LINE service assistance
telephone number (see Step 2) and talk with one
of our Consultants, or if you prefer, write to:
Mr Guy Turner, Vice President
Whirlpool Corporation
Administrative
Center
2000 US-33 North
Benton Harbor, Ml 49022
If you must call orwrite, please provide: model
number, serial number, date of purchase, and
a complete
description
of the problem.
This
information
is needed
in order to better respond to your request for assistance.
ELECTRICAL
APPLIANCES
MAJOR-REPAIRING
& PAPTS
23
FSP is a regrslered
trademark
of Whrrlpool
Corporation
far
quality parts. took for thrs
FSP
symbol of quality whenever
part
R you need a replacement
for your Whirloaol
aDDliance
FSP replacement
pbrts
wrll fit right and work right, because
they are
made lo the same exacting
specifications
used to build every new Whrrlpoal
appliance
0
Benton Harbor. Michigan. Automalic Washers, Clolhes Dryers,
Freezers, Retrigeralor.Freezers.
Ice Makers, Dishwashers,
Euill-in Ovens and Surface Units. Ranges, Microwave Ovens,
Compaclors. Room Air Conditioners. Dehumidifiers,
Cenlral
Healing and Air Conditioning Syslems.
Printed
in U SA