1
4-085-330-13(1)
LCD Video Projector
LCD Video Projector
VPL-HS1
Operating Instructions
Mode d’emploi
_________________________________________FR
Manual de instrucciones
VPL-HS1
© 2001 Sony Corporation
___________________________________GB
__________________________________ES
WARNING
To prevent fire or shock hazard, do not expose
the unit to rain or moisture.
To avoid electrical shock, do not open the
cabinet. Refer servicing to qualified personnel
only.
This symbol is intended to alert the user to
the presence of uninsulated "dangerous
voltage" within the product's enclosure
that may be of sufficient magnitude to
constitute a risk of electric shock to
persons.
This symbol is intended to alert the user to
the presence of important operating and
maintenance (servicing) instructions in
the literature accompanying the
appliance.
For the customers in the USA
If you have any questions about this product, you may
contact:
Sony Electronics Inc.4-085-330-13(1)Attn: Business
Information Center (BIC)
12451 Gateway Boulevard
Ft. Myers, Florida 33913
Telephone No.: 800-686-7669
The number below is for FCC related matters only.
Declaration of Conformity
Trade Name: SONY
Model No.: VPL-HS1
Responsible Party: Sony Electronics Inc.
Address: 680 Kinderkamack Road, Oradell
NJ 07649 U.S.A.
Telephone No.: 201-930-6972
This device complies with Part 15 of the FCC Rules.
Operation is subject to the following two conditions: (1)
This device may not cause harmful interference, and (2)
this device must accept any interference received,
including interference that may cause undesired
operation.
GB
2
This equipment has been tested and found to comply
with the limits for a Class B digital device, pursuant to
Part 15 of the FCC Rules. These limits are designed to
provide reasonable protection against harmful
interference in a residential installation. This equipment
generates, uses, and can radiate radio frequency energy
and, if not installed and used in accordance with the
instructions, may cause harmful interference to radio
communications. However, there is no guarantee that
interference will not occur in a particular installation. If
this equipment does cause harmful interference to radio
or television reception, which can be determined by
turning the equipment off and on, the user is encouraged
to try to correct the interference by one or more of the
following measures:
- Reorient or relocate the receiving antenna.
- Increase the separation between the equipment and
receiver.
- Connect the equipment into an outlet on a circuit
different from that to which the receiver is connected.
- Consult the dealer or an experienced radio/TV
technician for help.
You are cautioned that any changes or modifications not
expressly approved in this manual could void your
authority to operate this equipment.
For the customers in Canada
This Class B digital apparatus complies with Canadian
ICES-003.
Voor de klanten in Nederland
Gooi de batterij niet weg maar lever deze
in als klein chemisch afval (KCA).
The socket-outlet should be installed near the
equipment and be easily accessible.
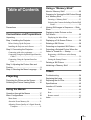
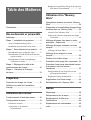
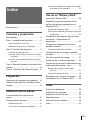
Table of Contents
Using a “Memory Stick”
About a “Memory Stick” ..........................22
Preparing for Viewing the Still Picture Stored
in a “Memory Stick” .................................23
Inserting a “Memory Stick” ..........................23
Selecting the Contents Including a Desired Still
Picture ......................................................24
Precautions ............................................... 4
Viewing Still Images in Sequence — Slide
Show .......................................................25
Connections and Preparations
Displaying Index Pictures on the
Full Screen ..............................................26
Unpacking ................................................. 5
Displaying the Index Menu ...........................27
Step 1: Installing the Projector .................. 5
Displaying a Full-Screen Picture .............28
Before Setting Up the Projector ..................... 6
Rotating a Still Picture .............................28
Installing the Projector and a Screen .............. 7
Protecting an Important Still Picture ........29
Step 2: Connecting the Projector .............. 8
Connecting with video equipment ................. 8
Projecting a Selected Picture When the
Power Is Turned On — Startup ...............30
Connecting Using the Optional Signal Interface
Cables ........................................................ 8
Registering a Still Picture as the Startup
Picture ......................................................30
Connecting Using the Optional Interface
Unit ............................................................ 9
Setting the Startup Picture ............................31
Step 3: Adjusting the Picture Size and
Position ..................................................... 9
Step 4: Selecting the Menu Language .... 12
Deleting a Still Picture .............................32
Initializing a “Memory Stick” ....................33
Others
Projecting
Troubleshooting .......................................34
Projecting the Picture on the Screen ...... 14
Replacing the Air Filter ............................39
Selecting the Picture Viewing Mode ....... 16
Specifications ..........................................40
Replacing the Lamp ................................38
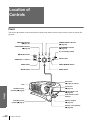
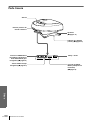
Location of Controls ................................44
Using the Menus
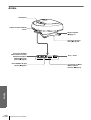
Front ..............................................................44
Operation through the Menus ................. 17
Rear ...............................................................45
Menu Configurations ............................... 18
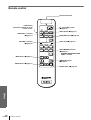
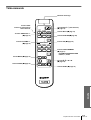
Remote control ..............................................46
Menu Items ................................................... 19
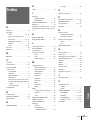
Index .......................................................47
About the Preset Memory No. ..................... 21
Adjusting Picture Quality of a Signal from the
Computer ................................................. 21
3GB
Precautions
On safety
• Check that the operating voltage of your unit is
identical with the voltage of your local power
supply.
• Should any liquid or solid object fall into the
cabinet, unplug the unit and have it checked by
qualified personnel before operating it further.
• Unplug the unit from the wall outlet if it is not to be
used for several days.
• To disconnect the cord, pull it out by the plug. Never
pull the cord itself.
• The wall outlet should be near the unit and easily
accessible.
• The unit is not disconnected to the AC power source
(mains) as long as it is connected to the wall outlet,
even if the unit itself has been turned off.
• Do not look into the lens while the lamp is on.
• Do not place your hand or objects near the
ventilation holes. The air coming out is hot.
On preventing internal heat build-up
After you turn off the power with the I / 1 (on/
standby) switch, do not disconnect the unit from the
wall outlet while the cooling fan is still running.
Caution
The projector is equipped with ventilation holes
(intake) and ventilation holes (exhaust). Do not block
or place anything near these holes, or internal heat
build-up may occur, causing picture degradation or
damage to the projector.
On repacking
Save the original shipping carton and packing
material; they will come in handy if you ever have to
ship your unit. For maximum protection, repack your
unit as it was originally packed at the factory.
GB
4
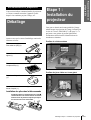
Precautions
This section describes how to install the projector and
screen, how to connect the equipment from which
you want to project the picture, etc.
Step 1: Installing
the Projector
Connections and
Preparations
Connections and Preparations
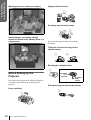
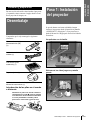
Unpacking
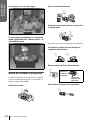
You can obtain good picture quality even when you
project the picture from the side of the screen (“SIDE
SHOT”) (1 page 7). You can enjoy home
entertainment with this projector in various situations.
Enjoying home theater
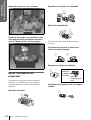
Check the carton to make sure it contains the
following items:
Remote control (1),
Size AA (R6)
batteries (2)
Signal interface
cable (1)
Air filter (for
replacement) (1)
Enjoying video games on a large screen
Lens cap (1)
AC power cord (1)
Operating Instructions (1)
Inserting the batteries into the remote
control
Insert the batteries E side first as shown
in the illustration.
Inserting them forcibly or with the
polarities reversed may cause a short
circuit and may generate heat.
Unpacking / Step 1: Installing the Projector
5 GB
Connections and
Preparations
Watching sports, etc. with your company
;
Highly heated and humid
Very dusty and extremely smoky
Viewing images, recorded by a digital
camera and stored in the “Memory Stick,” on
a large screen
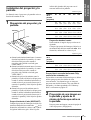
Do not use the projector under the following
conditions.
Tilting the unit out of the range of the
adjuster setting
Blocking the ventilation holes
Before Setting Up the
Projector
Do not place the projector in the following situations,
which may cause malfunction or damage to the
projector.
Poorly ventilated
GB
6
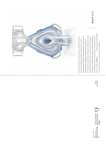
Step 1: Installing the Projector
Ventilation
holes
(exhaust)
Ventilation
holes
(intake)
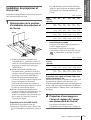
Placing the projector without the adjuster
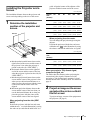
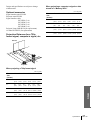
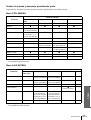
The installation distance between the projector and
screen varies depending on the size of the screen.
1 Determine the installation
position of the projector and
screen.
Screen
Unit: m (feet)
Screen 40
size
(inches)
60
80
100
120
150
a
0.6
(2.0)
0.9
(3.0)
1.2
(3.9)
1.5
(4.9)
1.8
(5.9)
2.3
(7.5)
b
0.4
(1.3)
0.6
(2.0)
0.8
(2.6)
1.0
(3.3)
1.2
(3.9)
1.6
(5.2)
c
1.7
(5.6)
2.7
(8.9)
3.6
4.5
5.4
6.8
(11.8) (14.8) (17.7) (22.3)
d
1.6
(5.2)
2.5
(8.2)
3.3
4.2
5.0
6.3
(10.8) (13.8) (16.4) (20.7)
When projecting from the center
You can change the projection angle using the
adjuster.
Position the projector with the lens end come
within the area
in the illustration, by using
the values c and d in the table below as a guide.
c
a
b
10°
d
Connections and
Preparations
guide. Align the bottom of the adjuster of the
projector with the bottom end of the screen.
Installing the Projector and a
Screen
10°
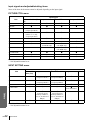
Unit: m (feet)
Projector
a: Maximum horizontal distance between the
right/left end of the screen and the center of
the projector’s lens when the projector is
placed on the side (for “SIDE SHOT”)
b: Horizontal distance between the right/left
end of the screen and the center of the lens
when the projector is placed on the side (for
“SIDE SHOT”)
c: Maximum projection distance between the
screen and the center of the projector’s lens
when you use the horizontal distance a, or
when you place the projector with the center
of the screen and the center of the lens
aligned.
d: Minimum projection distance between the
screen and the center of the lens when you
use the horizontal distance b, or when you
place the projector with the center of the
screen and the center of the lens aligned.
Screen 40
size
(inches)
60
80
100
120
150
c
1.8
(6.0)
2.8
(9.1)
3.7
4.7
5.6
7.0
(12.2) (15.3) (18.4) (23.0)
d
1.6
(5.2)
2.4
(7.9)
3.2
4.0
4.9
6.1
(10.6) (13.2) (15.9) (19.9)
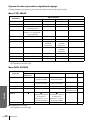
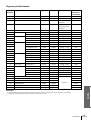
When you project a 720p format signal,
computer’s signal, etc.
The tables show the distances when projecting the
conventional video signals. Distances used for
projecting a 720p format signal, computer’s signal
and data stored in the “Memory Stick” are shown on
page 41.
2 Project an image on the screen
and adjust the picture so that it
fits the screen.
To project an image, connect video equipment to
the projector. (1 page 8)
When projecting from the side (SIDE
SHOT)
Position the projector with the lens end come
within the area
in the illustration, by using
the values a, b, c and d in the table below as a
Step 1: Installing the Projector
7 GB
Connections and
Preparations
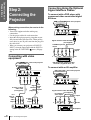
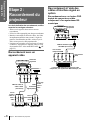
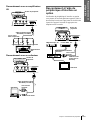
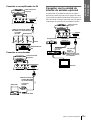
Connecting Using the Optional
Signal Interface Cables
Step 2:
Connecting the
Projector
To connect with a DVD player with
component video connectors/digital
BS tuner
Rear of the projector
When making connections, be sure to do the
following:
• Turn off all equipment before making any
connections.
• Use the proper cables for each connection.
• Insert the cable plugs properly; plugs that are not
fully inserted often generate noise. When pulling
out a cable, be sure to pull it out from the plug, not
the cable itself.
• When you connect your projector to PJ MULTI
INPUT, select the input signal with the INPUT-A
setting in the SET SETTING
menu. (1 page
20)
Signal interface cable SIC-HS20
(not supplied)
to RGB/component
output
to audio
output
CB
Y (PB)
Connecting with video
equipment
Rear of the projector
CR
(PR)
S
Video Audio L Audio
R
DVD player with component video
connectors, digital BS tuner, etc.
To connect with an AV amplifier
Rear of the projector
Signal
interface
cable
(supplied)
S video or video/
audio cable
(not supplied)
to S
video or
video/
audio
output
with
SONY
logo
upside
Signal interface cable SIC-HS40
(not supplied)
to component
video output
to video output
to video/
audio
output
Y
Video equipment
GB
8
Step 2: Connecting the Projector
Video equipment
CB
(PB)
CR
(PR)
S
Video
Video
AV amplifier
Rear of the projector
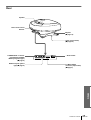
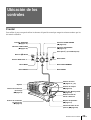
Step 3: Adjusting
the Picture Size
and Position
Connections and
Preparations
To connect with a computer
Rear remote
control detector
6
5,8
Signal interface cable
SIC-HS30 (not supplied)
Computer
to monitor output
Front remote control
detector
Adjuster stopper
6
to audio output
Connecting Using the Optional
Interface Unit
Using the optional interface unit allows you to
connect various video equipment, and to select the
output to the projector or TV from the connected
equipment simply by switching the select switch on
the interface unit.
Rear of the projector
SIDE
SHOT
VOLUME
+
–
+
–
INPUT
MS SLIDE
APA
VIDEO MEMORY
DYNAMIC STANDARD
USER 1
USER 2
LIVING
2
4
7
USER 3
OFF
MENU
ENTER
VCR, etc.
RESET
DVD player, etc.
Interface unit
IFU-HS1
to PJ multi
output
PJ multi cable
(supplied with
the IFU-HS1)
TV
Step 3: Adjusting the Picture Size and Position
9 GB
Connections and
Preparations
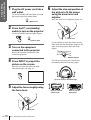
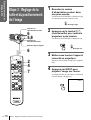
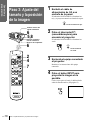
1 Plug the AC power cord into a
wall outlet.
The ON/STANDBY indicator lights in red and
the projector goes into standby mode.
ON/
STANDBY
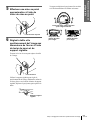
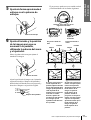
6 Adjust the size and position of
the picture to fit the screen
using the zoom lever and
adjuster.
Move the zoom lever to adjust the picture size.
Lights in red.
2 Press the [/1 (on/standby)
switch to turn on the projector.
The ON/STANDBY indicator lights in green.
ON/
STANDBY
Zoom lever
Lights in green.
Use the adjuster to adjust the picture position.
Hold down and slide the adjuster stopper to the
right, move the projector, then replace the
stopper.
3 Turn on the equipment
connected to the projector.
Refer to the operating instructions of the
connected equipment.
Adjuster stopper
4 Press INPUT to project the
picture on the screen.
You can move the projector vertically and
horizontally within the following ranges:
Each time you press the button, the input
indication changes. (1 page 15)
VIDEO 1
INPUT
Up to 20° each for horizontal angle
5 Adjust the focus roughly using
the focus lever.
Focus lever
GB
10
Step 3: Adjusting the Picture Size and Position
Up to 10° each for
vertical angle
Up to 2° each for
tilting angle
When projecting from
the center
Screen
Screen
Picture
Picture
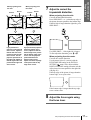
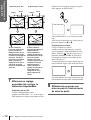
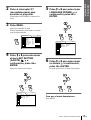
7 Adjust to correct the
trapezoidal distortion.
When projecting from the side
Corrects the horizontal distortion.
Press SIDE SHOT + or – so that the top edge of
the picture becomes parallel to the bottom edge.
If the left side is longer than the right side, press
SIDE SHOT –.
If you position the
projector on the left side
of the screen, adjust so
that the left side of the
picture fits the left side
of the screen. For the
projector positioned on
the right side, adjust so
that the right side of the
picture fits the right side
of the screen.
If you position the projector
below the bottom of the
screen, adjust so that the
bottom edge of the picture
fits the bottom edge of the
screen. For the projector
positioned above the
bottom of the screen,
adjust so that the top edge
of the picture fits the top
edge of the screen.
Connections and
Preparations
When projecting from
the side
Use SIDE SHOT + if the right side is longer.
To fine-adjust the distortion, press M or m.
When projecting from the center
Corrects the vertical distortion.
Use the menu. Select V (vertical) with the
KEYSTONE DIR setting in the INSTALL
SETTING
menu. Next, adjust with the
DIGIT KEYSTONE setting so that the left side
of the picture becomes parallel to the right side.
(1 page 20)
If the top edge of the picture is longer than the
bottom edge, set to a plus value.
If the bottom edge is longer than the top edge,
set to a minus value.
8 Adjust the focus again using
the focus lever.
Step 3: Adjusting the Picture Size and Position
11 GB
Connections and
Preparations
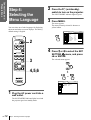
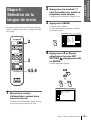
Step 4:
Selecting the
Menu Language
You can select one of nine languages for displaying
the menu and other on-screen displays. The factory
default setting is English.
2 Press the [/1 (on/standby)
switch to turn on the projector.
The ON/STANDBY indicator lights in green.
3 Press MENU.
The menu appears.
The menu presently selected is shown as a
yellow button.
CONTRAST:
BRIGHT:
COLOR:
HUE:
SHARP:
D.PICTURE:
COLOR TEMP:
COLOR SYS:
VOLUME:
MENU
SIDE
SHOT
VOLUME
+
–
+
–
2
INPUT
4 Press M or m to select the SET
VIDEO MEMORY
USER 1
USER 2
SETTING
menu, and press
, or ENTER.
LIVING
USER 3
OFF
MENU
ENTER
80
50
50
50
50
OFF
HIGH
AUTO
30
MS SLIDE
APA
DYNAMIC STANDARD
VIDEO 1
PICTURE CTRL
3
The selected menu appears.
RESET
4,5,6
ENTER
or
VIDEO 1
SET SETTING
STATUS:
INPUT-A:
LANGUAGE:
POWER SAVING:
1 Plug the AC power cord into a
wall outlet.
The ON/STANDBY indicator lights in red and
the projector goes into standby mode.
GB
12
Step 4: Selecting the Menu Language
ON
COMPONENT
ENGLISH
OFF
Connections and
Preparations
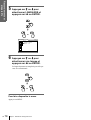
5 Press M or m to select
LANGUAGE, and press , or
ENTER.
ENTER
or
VIDEO 1
SET SETTING
STATUS:
INPUT-A:
LANGUAGE:
POWER SAVING:
ON
COMPONENT
ENGLISH
OFF
6 Press M or m to select a
language, and press < or
ENTER.
The menu changes to the selected language.
ENTER
or
To clear the menu
Press MENU.
Step 4: Selecting the Menu Language
13 GB
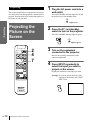
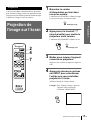
1 Plug the AC power cord into a
Projecting
This section describes how to operate the projector to
view the picture from the equipment connected to the
projector. It also describes how to adjust the quality of
the picture to suit your taste.
wall outlet.
The ON/STANDBY indicator lights in red and
the projector goes into standby mode.
ON/
STANDBY
Lights in red.
Projecting
Projecting the
Picture on the
Screen
2 Press the [/1 (on/standby)
switch to turn on the projector.
The ON/STANDBY indicator lights in green.
ON/
STANDBY
Lights in green.
SIDE
SHOT
VOLUME
+
–
+
–
INPUT
MS SLIDE
APA
VIDEO MEMORY
DYNAMIC STANDARD
USER 1
USER 2
LIVING
USER 3
OFF
3 Turn on the equipment
connected to the projector.
Refer to the operating instructions of the
connected equipment.
4 Press INPUT repeatedly to
select the input you want to
project on the screen.
Display the indication of the input you want.
MENU
ENTER
2
4
7
RESET
Example: To view the picture from the video
equipment connected to the VIDEO
INPUT jack.
VIDEO 1
INPUT
GB
14
Projecting the Picture on the Screen
To view the picture
from
Press
INPUT to
display
Sound is
heard from the
equipment
connected to
Video equipment
connected to VIDEO
INPUT on the projector
VIDEO 1
AUDIO INPUT
Video equipment
connected to S VIDEO
INPUT on the projector
S-VIDEO 1 AUDIO INPUT
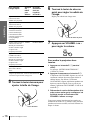
6 Move the focus lever to adjust
the focus.
Adjust to obtain sharp focus.
VIDEO 2
Video equipment
connected to PJ MULTI
INPUT via the optional
signal interface cable or
the interface unit
PJ MULTI
INPUT
MS
7 Press VOLUME + or – to adjust
the volume.
S-VIDEO 2 PJ MULTI
Video equipment
INPUT
equipped with S VIDEO
connected to PJ MULTI
INPUT via the optional
signal interface cable or
the interface unit
“Memory Stick”
inserted into the
“Memory Stick” slot
Focus lever
Projecting
INPUT A* PJ MULTI
RGB/component
equipment connected to
INPUT
PJ MULTI INPUT via
the optional signal
interface cable or the
interface unit
AUDIO INPUT
* Set the INPUT-A setting in the SET SETTING
menu
according to the input signal. (1 page 20)
5 Move the zoom lever to adjust
the size of the picture.
VOLUME
+
–
To turn off the power
1 Press the [/1 (on/standby) switch.
A message “Power OFF?” appears on the screen.
2 Press the [/1 switch again.
The ON/STANDBY indicator flashes in green and
the fan continues to run to reduce the internal heat.
Also, the ON/STANDBY indicator flashes quickly
during which you will not be able to light up the
ON/STANDBY indicator with the [/1 switch.
3 Unplug the AC power cord from the wall
outlet after the fan stops running and the
ON/STANDBY indicator lights in red.
You can turn off the projector by holding the [/1 (on/
standby) switch for about one second, instead of
performing the above steps.
Zoom lever
Projecting the Picture on the Screen
15 GB
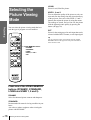
Selecting the
Picture Viewing
Mode
Projecting
You can select the picture viewing mode that best
suits the type of program or room condition.
SIDE
SHOT
VOLUME
+
–
+
–
INPUT
VIDEO MEMORY
DYNAMIC STANDARD
USER 1
USER 2
LIVING
USER 3
VIDEO MEMORY buttons
DYNAMIC
STANDARD
LIVING
USER 1, 2 and 3
OFF
OFF
MENU
ENTER
RESET
Press one of the VIDEO MEMORY
buttons (DYNAMIC, STANDARD,
LIVING and USER 1, 2 and 3).
DYNAMIC
Select for enhanced picture contrast and sharpness.
STANDARD
Recommended for normal viewing condition in your
home.
Also select to reduce roughness when viewing the
picture with DYNAMIC.
GB
16
USER 1, 2 and 3
You can adjust the quality of the picture to suit your
taste and store the settings into the selected memory
of the projector. Press one of the USER 1, 2 and 3
buttons, then adjust the picture by using the menus.
The settings are stored, and you can view the picture
with the adjusted picture quality by pressing the
button. (1 page 20)
OFF
Select for the setting stored in each input that can be
selected with the INPUT button, or each input signal.
Tip
You can select the picture viewing mode using the VIDEO
MEMORY button on the projector. Each press of the button
selects the above item.
MS SLIDE
APA
LIVING
Select for soft, film-like picture.
Selecting the Picture Viewing Mode
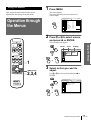
1 Press MENU.
Using the Menus
This section describes how to make various
adjustments and settings using the menus.
Operation through
the Menus
The menu appears.
The menu presently selected is shown as a
yellow button.
VIDEO 1
PICTURE CTRL
CONTRAST:
BRIGHT:
COLOR:
HUE:
SHARP:
D.PICTURE:
COLOR TEMP:
COLOR SYS:
VOLUME:
MENU
80
50
50
50
50
OFF
HIGH
AUTO
30
2 Press M or m to select a menu,
and press , or ENTER.
The selected menu appears.
VOLUME
+
–
+
–
Menus
Items
Settings
INPUT
MS SLIDE
VIDEO 1
SET SETTING
STATUS:
INPUT-A:
LANGUAGE:
POWER SAVING:
APA
ON
COMPONENT
ENGLISH
OFF
VIDEO MEMORY
DYNAMIC STANDARD
LIVING
ENTER
USER 1
USER 2
USER 3
OFF
1
MENU
ENTER
or
Using the Menus
SIDE
SHOT
3 Select an item you want to
RESET
RESET button
2,3,4
adjust.
Use M or m to select an item, and press , or
ENTER.
VIDEO 1
SET SETTING
STATUS:
INPUT-A:
LANGUAGE:
POWER SAVING:
ON
COMPONENT
ENGLISH
OFF
ENTER
or
Operation through the Menus
17 GB
4 Make the setting or adjustment
on an item.
When changing the adjustment level
Menu
Configurations
To increase the value, press M or ,.
To decrease the value, press m or <.
Press ENTER to restore the original screen.
When changing the setting
Press M or m to change the setting.
Press < or ENTER to restore the original
screen.
The projector is equipped with four menu pages. The
items that can be adjusted in each menu are described
on pages 19 and 20.
PICTURE CTRL menu
VIDEO 1
SET SETTING
STATUS:
INPUT-A:
LANGUAGE:
POWER SAVING:
ON
COMPONENT
ENGLISH
ON
Using the Menus
ENTER
or
To clear the menu
Press MENU.
To reset items that have been
adjusted
Select the item you want to reset, then press RESET.
“Complete!” appears on the screen and the setting is
reset to its factory preset value.
Items that can be reset are:
• CONTRAST, BRIGHT, COLOR, HUE, SHARP
and RGB ENHANCER in the PICTURE CTRL
menu
• DOT PHASE, SIZE H and SHIFT in the INPUT
SETTING menu
• DIGIT KEYSTONE in the INSTALL SETTING
menu
GB
18
Menu Configurations
The PICTURE CTRL menu is used for adjusting the
picture. You can also adjust the volume with this
menu.
INPUT SETTING menu
The INPUT SETTING menu is used to adjust the
input signal. You can adjust the size and position, etc.
of the picture.
SET SETTING menu
The SET SETTING menu is used for changing the
settings of the projector.
INSTALL SETTING menu
The INSTALL SETTING menu is used for correcting
distortion. You can change the display position,
intensity of the background picture, etc., of the menu
screen.
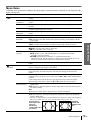
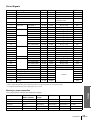
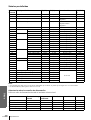
Menu Items
Adjustable items are limited according to the input signals. Items that cannot be adjusted are not displayed in the
menu. (1 page 42)
Menu
Item
PICTURE CONTRAST
CTRL
BRIGHT
(brightness)
COLOR
Using the Menus
INPUT
SETTING
Description
The higher the setting, the greater the contrast. The lower the setting, the lower the
cotrast.
The higher the setting, the brighter the picture. The lower the setting, the darker the
picture.
The higher the setting, the greater the intensity. The lower the setting, the lower the
intensity.
HUE
The higher the setting, the more greenish the picture becomes. The lower the setting,
the more purplish the picture becomes.
SHARP
The higher the setting, the sharper the picture. The lower the setting, the softer the
(sharpness)
picture.
RGB ENHANCER Adjusts the picture sharpness when computer signals are input.
D. (Dynamic)
ON: Emphasizes the black color.
PICTURE
OFF: Reproduces the dark portions of the picture accurately, in accordance with the
source signal.
GAMMA MODE GRAPHICS: Reproduces the photos in natural tones.
TEXT: Contrasts black and white. Suitable for images that contain lots of text.
COLOR TEMP
HIGH: Gives the white colors a blue tint.
MIDDLE: Gives the white colors a neutral tint.
LOW: Gives the white colors a red tint.
COLOR SYS
Select the color system of the input signal.
(System)
AUTO: NTSC3.58, PAL, SECAM and NTSC4..43 (switched automatically).
Normally, set to this position.
PAL-M/N: PAL-M/PAL-N and NTSC3.58 (switched automatically).
When the PAL-M, PAL-N or NTSC3.58 signal is input with COLOR SYS set to
AUTO, set to this position if the picture is distorted or colorless.
VOLUME
Adjusts the volume. It can be adjusted for each of the inputs selected with the INPUT
button.
DOT PHASE
When a signal from a computer is input, adjusts the picture for clearer picture after the
picture is adjusted by pressing the APA button.
SIZE H
When a signal from a computer is input, adjusts the horizontal size of the picture. The
higher the setting, the wider the picture. The lower the setting, the narrower the
picture.
SHIFT
As the setting for H (horizontal) increases, the picture moves to the right, and as the
setting decreases, the picture moves to the left. Use < or , to adjust the horizontal
position.
As the setting for V (vertical) increases, the picture moves up, and as the setting
decreases, the picture moves down. Use M or m to adjust the vertical position.
SCAN CONV
ON: Displays a computer signal according to the screen size. The picture will be
(Scan converter)
slightly softer.
OFF: Displays a computer signal as it is input. The picture will be clear but the picture
size will be smaller.
Note
ASPECT
When SVGA or XGA signal is input, this item will not be displayed.
4:3: Select when the 4:3 aspect ratio picture is input.
16:9: Select when the 16:9 aspect ratio picture (squeezed) is input from equipment
such as a DVD player.
* Squeezed: An original picture is recorded horizontally compressed, as shown in the illustration.
When you set ASPECT to 16:9, you can view the picture with16:9 aspect ratio.
Original picture
Displayed
(16:9 aspect ratio
picture with
picture is
ASPECT set to
horizontally
16:9
compressed to be a
4:3 picture.)
Menu Configurations
19 GB
Menu
INPUT
SETTING
(continued)
Using the Menus
GB
20
Item
VIDEO
MEMORY
Description
You can select picture viewing mode that best suits the type of picture or the
environment.
OFF: Select for the setting stored in each input channel or input signal.
DYNAMIC: Select for enhanced picture contrast and sharpness.
STANDARD: Recommended for normal viewing condition. Also select to reduce
roughness when viewing the picture with DYNAMIC.
LIVING: Select for soft, film-like picture.
USER 1, 2 and 3: You can adjust the quality of the picture to suit your taste and store
the settings. Once the settings are stored, you can view the picture with the adjusted
picture quality by pressing the button.
To store the settings
1 Select USER 1, USER 2 or USER 3.
2 Adjust the items you want in the menus.
Items that can be stored are:
CONTRAST, BRIGHT, COLOR, HUE, SHARP, RGB ENHANCER,
D.PICTURE, COLOR TEMP, COLOR SYS, SCAN CONV, ASPECT.
Tip
You can also adjust the picture quality in DYNAMIC, STANDARD or LIVING
mode. To reset to the factory setting, press RESET.
SET
STATUS
Set to OFF to turn off the on-screen displays except for the menus, message when
SETTING
turning off the power, and warning messages.
To display all of the on-screen display again, set to ON.
INPUT-A
Selects the signal input from the PJ MULTI connector.
COMPUTER: Inputs the signal from a computer.
COMPONENT: Inputs the component or progressive component signal from a DVD
player, digital BS tuner, etc.
VIDEO GBR: Inputs the signal from a TV game, DVD player or HDTV broadcast.
LANGUAGE
Selects the language used in the menu and on-screen displays. Available languages
are: English, French, German, Italian, Spanish, Japanese, Chinese, Portuguese and
Korean.
POWER SAVING When set to ON, the POWER SAVING indicator lights. The projector goes into power
saving mode if no signal is input for 10 minutes, and the lamp goes out and the cooling
fan keeps running. In power saving mode, no button functions for the first 60 seconds.
It is cancelled when a signal is input or any button is pressed. If you do not set the
projector to power saving mode, select OFF.
INSTALL KEYSTONE
ON: DIGIT KEYSTONE setting is stored.
SETTING
MEM (memory)
The data is retrieved when the projector power is turned on. The setting will remain
the same every time.
OFF: DIGIT KEYSTONE is reset to “0” when the power is turned on next time.
DIGIT
Corrects the trapezoidal distortion caused by the projection angle. Use this item after
KEYSTONE
selecting the type of distortion, H (horizontal) or V (vertical), with KEYSTONE DIR.
KEYSTONE DIR When the picture is a vertical trapezoid (
), select V. Next, correct the
distortion with DIGIT KEYSTONE. When the picture is a holizontal trapezoid
(
), select H, then correct the distortion with DIGIT KEYSTONE.
MENU POSITION Selects the display position from TOP LEFT, BOTTOM LEFT, CENTER, TOP
RIGHT and BOTTOM RIGHT.
MENU COLOR
Selects the tone of the menu display from STANDARD, WARM, COOL, GREEN or
GRAY.
MENU
Selects the intensity of the background picture of the menu display from DARK,
BACKGROUND STANDARD or LIGHT.
LAMP TIMER
Indicates how long the lamp has been turned on.
Menu Configurations
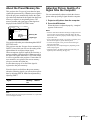
About the Preset Memory No.
This projector has 32 types of preset data for input
signals (the preset memory). When the preset signal is
input, the projector automatically detects the signal
type and recalls the data for the signal from the preset
memory to adjust it to an optimum picture. The
memory number and signal type of that signal are
displayed in the INPUT SETTING menu.
INPUT-A
INPUT SETTING
DOT PHASE:
SIZE H:
SHIFT:
SCAN CONV:
15
800
H: 200
ON
V: 30
Memory No.
No. 13
640
480
Signal type
You can automatically adjust to obtain the clearest
picture when projecting a signal from the computer.
1 Project a still picture from the computer.
2 Press the APA button.
When the picture is adjusted properly, “complete”
appears on the screen.
Notes
• Press the APA button when the full image is displayed on the
screen. If there are black edges around the image, the APA
function will not function properly and the image may extend
beyond the screen.
• If you switch the input signal or re-connect a computer, press
the APA button again to get the suitable picture.
• To restore the original screen, press the APA button again
during the adjustment.
• The picture may not be adjusted properly depending on the
kinds of input signals.
• Adjust the items in the INPUT SETTING menu when you
adjust the picture manually. (1 page 19)
Using the Menus
You can also adjust the preset data through the INPUT
SETTING menu.
This projector also has 20 types of user memories for
INPUT-A into which you can save the setting of the
adjusted data for an unpreset input signal.
When an unpreset signal is input for the first time, a
memory number is displayed as 0. When you adjust
the data of the signal in the INPUT SETTING menu,
it will be registered to the projector. If more than 20
user memories are registered, the newest memory
always overwrites the oldest one.
See the chart on page 43 to find if the signal is
registered to the preset memory.
Adjusting Picture Quality of a
Signal from the Computer
Since the data is recalled from the preset memory
about the following signals, you can use these preset
data by adjusting SIZE H. Make fine adjustment by
adjusting SHIFT.
Signal
Memory
No.
SIZE H
Super Mac-2
23
1312
SGI-1
23
1320
Macintosh 19”
25
1328
Note
When the aspect ratio of input signal is other than 4:3, a part of the
screen is displayed in black.
Menu Configurations
21 GB
Using a “Memory Stick”
Before using a “Memory Stick”
Terminal
This section describes how to view the still images
that are recorded by a digital camera and stored in a
“Memory Stick.” You can make a slide show using
the images, display an index screen of the images, etc.
About a “Memory
Stick”
On “Memory Stick”s
“Memory Stick” is a new compact, portable and
versatile IC recording medium with a data capacity
that exceeds a floppy disk. “Memory Stick” is
specially designed for exchanging and sharing digital
data among “Memory Stick” compatible products.
Because it is removable, “Memory Stick” can also be
used for external data storage.
Types of “Memory Stick”s
Using a “Memory
Stick”
There are two types of “Memory Stick”s: MagicGate
“Memory Stick”s that are equipped with the
MagicGate copyright protection technology and
general “Memory Stick”s. You can use both types of
“Memory Stick” with your projector. However,
because your projector does not support the
MagicGate standards, data recorded in the “Memory
Stick” is not subject to MagicGate copyright
protection.
Write-protect
tab
Labeling
position
• You cannot rotate or erase still images when the
write-protect tab on the “Memory Stick” is set to
LOCK.
• We recommend backing up important data.
• Image data may be damaged in the following cases:
– If you remove the “Memory Stick,” turn the power
off, or detach the battery for replacement when the
access lamp is flashing.
– If you use a “Memory Stick” near static electricity
or magnetic fields.
Notes
• Prevent metallic objects or your finger from coming into
contact with the metal parts of the connecting section.
• Do not attach any other material than the supplied label onto the
label space.
• Attach the label to the prescribed labeling position. Make sure
the label is attached to the labeling position properly.
• Do not bend, drop or apply strong shock to a “Memory Stick.”
• Do not disassemble or modify a “Memory Stick.”
• Do not let the “Memory Stick” get wet.
• Do not use or keep a “Memory Stick” in locations that are:
– Extremely hot such as in a car parked in the sun or under the
scorching sun.
– Under direct sunlight.
– Very humid or subject to corrosive gases.
• When you carry or store a “Memory Stick,” put it in its case.
About formatting “Memory Stick”s
When “Memory Stick”s are shipped from the factory,
they are already formatted to a special standard
format. When you format “Memory Stick”s, we
recommend formatting them on this unit.
On MagicGate
MagicGate is copyright protection technology that
uses encryption technology.
Format that can be displayed with this
projector
Image data recorded with a digital camera and
recorded on a “Memory Stick” in the following
format:
Images (DCF-compatible) compressed in the JPEG
(Joint Photographic Experts Group) format
(extension: .jpg)
GB
22
About a “Memory Stick”
Caution when formatting “Memory Stick”s
on a personal computer
Pay attention to the following points when formatting
“Memory Stick”s on the personal computer, for
example, that you are using.
Operation of “Memory Stick”s formatted on the
personal computer is not guaranteed on this unit. To
use a “Memory Stick” that has been formatted on the
personal computer, the “Memory Stick” must be
reformatted on this unit. Note that in this case all data
stored on the “Memory Stick” will be lost.
Access Lamp
If the access lamp is turned on or is flashing, data is
being read from or written to the “Memory Stick.” Do
not shake the projector or subject it to shock. Do not
turn off the power of the projector or remove the
“Memory Stick.” This may damage the data.
Notes
• To prevent data loss, make backup of data
frequently. In no event will Sony be liable for any
loss of data.
• Unauthorized recording may be contrary to the
provisions of copyright law.
• The “Memory Stick” application software may be
modified or changed by Sony without prior notice.
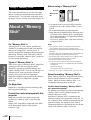
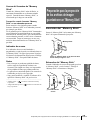
Preparing for Viewing
the Still Picture Stored
in a “Memory Stick”
Inserting a “Memory Stick”
Insert the “Memory Stick” into the “Memory Stick”
slot on the front of the projector.
.....................................................................................
• “Memory Stick” and
are trademarks of Sony
Corporation.
• “MagicGate Memory Stick” and
are trademarks of Sony
Corporation.
“Memory Stick”
Insert the “Memory Stick” in the
direction of the arrow until it clicks.
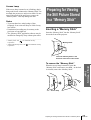
To remove the “Memory Stick”
Using a “Memory
Stick”
When the access lamp is turned off, press the
“Memory Stick” and remove your hand. As the lock
is released, remove the “Memory Stick.”
Access lamp
Preparing for Viewing the Still Picture Stored in a “Memory Stick”
23 GB
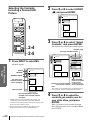
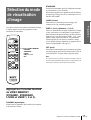
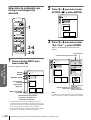
Selecting the Contents
Including a Desired Still
Picture
2 Press M or m to select EVENT
, and press ENTER.
EVENT
JPEG Viewer
Slide Show
Index
Select Contents
SIDE
SHOT
VOLUME
+
–
+
–
INPUT
MS SLIDE
1
APA
VIDEO MEMORY
DYNAMIC STANDARD
USER 2
USER 1
LIVING
USER 3
3 Press M or m to select “Select
OFF
Contents,” and press ENTER.
MENU
ENTER
RESET
2-4
2-5
The sub menu for selecting the contents appears.
to upper stage
Currently selected contents
EVENT
DCIM
JPEG Viewer
1 Press INPUT to select MS.
MS home appears.
Using a “Memory
Stick”
0100MSDCF
0101MSDCF
0102MSDCF
0103MSDCF
0104MSDCF
0105MSDCF
EVENT
EVENT
SETTING
“MEMORY STICK”
The name of the
selected contents*
will be displayed.
JPEG Viewer
Slide Show
Index
Select Contents
First two thumbnails** that are
included in the selected contents
will appear.
* Multiple still pictures are included in the contents. The
contents may include individual still pictures and other
contents. You must select contents when you are viewing a still
picture stored in a “Memory Stick.”
** Several small pictures included in the contents can be
displayed at one time. They are called thumbnails.
24
Index
Select Contents
MS home mark
GB
Slide Show
Preparing for Viewing the Still Picture Stored in a “Memory Stick”
When the JPEG
pictures are saved
in the current
contents, one of
them is displayed.
Pictures or contents included
in the current contents
Note
The contents are sorted numerically and alphabetically up
to 256 contents. The later contents will not be sorted.
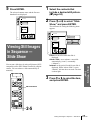
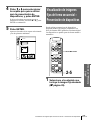
4 Press
M or m to select the
contents you want to use for
your slide show, and press
ENTER.
When you want to select contents other than
those displayed on the menu, select v or V, then
press ENTER.
5 Press ENTER.
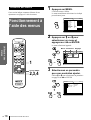
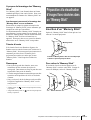
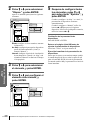
1 Select the contents that
The selected contents name and the first two
thumbnails are displayed.
include a desired still picture.
(1
1 page 24)
EVENT
JPEG Viewer
2 Press M or m to select “Slide
Slide Show
Index
Show,” and press ENTER.
The sub menu for setting the following items
appears.
Select Contents
DCIM
EVENT
JPEG Viewer
Slide Show
Index
Select Contents
Execute
Return
Effect
Off
Advan.Slds.
Auto
Interval
1 sec
DCIM
Viewing Still Images
in Sequence —
Slide Show
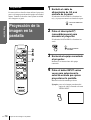
3 Press M or m to select the item,
SIDE
SHOT
VOLUME
+
–
+
–
and press ENTER.
INPUT
Using a “Memory
Stick”
You can run a slide show by using still pictures (DCFcompatible) of the JPEG format recorded by a digital
camera. You can advance a slide automatically or
manually.
Effect: set the effect when the slide is
displayed.
Advan. Slids : set to advance a next slide
automatically (“Auto”) or manually
(“Manual”).
Interval: set the period for which one slide is
displayed. When “Advan. Slids” is set to
“Manual,” this item does not work. The time
is about right.
MS SLIDE
MS SLIDE button
APA
VIDEO MEMORY
DYNAMIC STANDARD
USER 1
USER 2
LIVING
USER 3
OFF
MENU
ENTER
RESET
2-5
Viewing Still Images in Sequence — Slide Show
25 GB
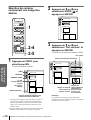
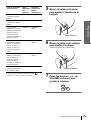
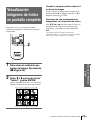
4 Press M or m to set the
selected item, and press
ENTER.
EVENT
JPEG Viewer
Slide Show
Index
Select Contents
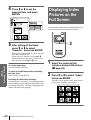
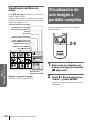
Displaying Index
Pictures on the
Full Screen
Execute
Return
Effect
Off
Advan.Slds.
Auto
Interval
5 sec
DCIM
You can display 9 index pictures (thumbnail pictures)
contained in the selected contents at one time.
MENU
ENTER
5 After setting all the items,
RESET
2
press M or m to select
“Execute” and press ENTER.
When you set “Advan. Slids” to “Auto,” the slide
show starts automatically.
When you set to “Manual,” use the , or m
button to advance a next slide. To return to the
previous slide, use the < or M button.
Using a “Memory
Stick”
To end the slide show
Press MS SLIDE or ENTER.
To return to the MS home before executing
the slide show
Select “Return” in step 5 above.
Executing the Slide Show Promptly
As the settings are stored even if you change the input
after performing steps 1 to 4, press MS SLIDE just as
you start the slide show. The input is changed to MS
and the slide show starts promptly.
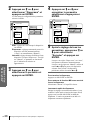
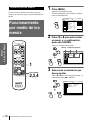
1 Select the contents that
include a desired still picture.
(1
1 page 24)
2 Press M or m to select “Index,”
and press ENTER.
The index screen appears, and 9 index pictures
of the selected contents are displayed.
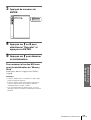
Reciipe
flour - - - - 2
s u g a r - - - 1/2
s a l t - - - - - 1/2
butter - - -1
GB
26
Displaying Index Pictures on the Full Screen
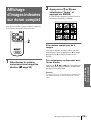
When more than 9 pictures are
contained in the contents
You can display the pictures other than the displyed
ones by pressing v (previous 9 pictures) or V (next 9
pictures) and ENTER.
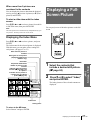
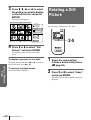
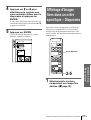
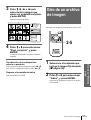
Displaying a FullScreen Picture
To start a slide show with the index
screen
Press M, m, < or , to select a picture from which
a slide show starts, then press MS SLIDE.
Note
The index pictures are sorted numerically and alphabetically up to
256 pictures. The later pictures will not be sorted.
You can project one of the index pictures on the full
screen.
MENU
Displaying the Index Menu
Press M, m, < or , to select a picture, and press
ENTER.
The index menu for the selected picture is displayed.
With this menu you can make various settings for
each picture. (1 pages 27 to 32)
ENTER
RESET
2-4
Date when the picture is
recorded
Name given to each picture
(displayed alphabet and
numbers only)
Resolution
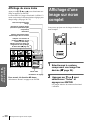
include a desired still picture.
(1
1 page 24)
2
No.: 4/32
Size: 1024x768
File: SPORTS
Date:7/29/2001
14:22
Full Screen
Press M or m to select “Index,”
and press ENTER.
The index pictures of the selected contents are
displayed.
Using a “Memory
Stick”
1 Select the contents that
Sequential number/total
number of pictures in the
contents
Indicates when the protect
function (1
1 page 29) is set
to a picture.
Indicates when a picture is
registered as the startup
picture (1
1 page 30)
Close
Reciipe
flour - - - - 2
s u g a r - - - 1/2
s a l t - - - - - 1/2
butter - - -1
Return
Protect
Rotate
Startup
Delete
Index menu
Setting items
To return to the MS home
Select “Return” and press ENTER.
Displaying a Full-Screen Picture
27 GB
3 Press M, m, < or , to select
the picture you want to display
on the full screen, and press
ENTER.
Rotating a Still
Picture
The Index menu appears.
No.: 4/32
Size: 1024x768
File: SPORTS
Date:7/29/2001
14:22
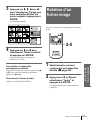
You can rotate a still picture in 90° steps.
Full Screen
Close
Reciipe
flour - - - - 2
s u g a r - - - 1/2
s a l t - - - - - 1/2
butter - - -1
Return
MENU
Protect
Rotate
Startup
Delete
ENTER
RESET
2-5
4 Press M or m to select “Full
Screen,” and press ENTER.
The selected picture is projected to fit the
screen.
To display a previous or next slide
To display the next slide, press , or m. To return to
the previous slide, press < or M.
Using a “Memory
Stick”
GB
28
1 Select the contents that
include a desired still picture.
(1
1 page 24)
To return to the Index screen
Press MS SLIDE or ENTER.
2 Press M or m to select “Index,”
and press ENTER.
The index pictures of the selected contents are
displayed.
Rotating a Still Picture
3 Press M, m, < or , to select
the picture you want to rotate,
and press ENTER.
The Index menu appears.
No.: 4/32
Size: 1024x768
File: SPORTS
Date:7/29/2001
14:22
Full Screen
Close
Reciipe
flour - - - - 2
s u g a r - - - 1/2
s a l t - - - - - 1/2
butter - - -1
Return
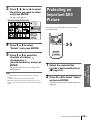
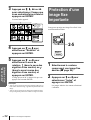
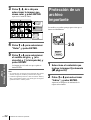
Protecting an
Important Still
Picture
You can protect a still picture to prevent it from
accidental erasure.
Protect
Rotate
Startup
MENU
Delete
ENTER
4 Press M or m to select
RESET
2-5
“Rotate,” and press ENTER.
5 Press M or m to select the
The picture rotates 90° every pressing of the
ENTER button.
Notes
• You cannot rotate a picture which is protected. (1 right
column)
To rotate it, release the protection on that picture.
• When the write-protect tab on the “Memory Stick” is set to
LOCK, you cannot rotate the pictures stored in that “Memory
Stick.”
1 Select the contents that
include a desired still picture.
(1
1 page 24)
2 Press M or m to select “Index,”
and press ENTER.
The index pictures of the selected contents are
displayed.
Protecting an Important Still Picture
Using a “Memory
Stick”
direction of rotation,
(clockwise) or
(counterclockwise), and press
ENTER.
29 GB
3 Press M, m, < or , to select
the picture you want to
protect, and press ENTER.
The Index menu appears.
No.: 4/32
Size: 1024x768
File: SPORTS
Date:7/29/2001
14:22
Full Screen
Close
Reciipe
flour - - - - 2
s u g a r - - - 1/2
s a l t - - - - - 1/2
butter - - -1
Return
Protect
Rotate
Startup
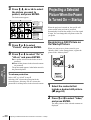
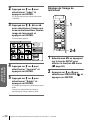
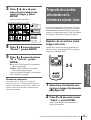
Projecting a Selected
Picture When the Power
Is Turned On — Startup
When the projector is turned on, the specific still
picture stored in the projector is projected
automatically for about one minute, even if no signal
is input. You can change this still picture to the one
you prefer.
Delete
4 Press M or m to select
“Protect,” and press ENTER.
5 Press M or m to select “On” or
“All on,” and press ENTER.
Using a “Memory
Stick”
On: A picture selected on the Index screen is
protected.
All on: All the pictures in the selected contents
are protected.
The protect mark appears in the Index menu for
the protected picture.
Registering a Still Picture as
the Startup Picture
When you want to use a picture stored in your
“Memory Stick” as the startup picture, register the
picture in the “Memory Stick.”
MENU
ENTER
RESET
2-5
To release protection
Select “Off” or “All off” in step 5.
Selecting “Off” releases the protection for the
selected picture. Selecting “All off” releases the
protection for all the pictures in the selected contents.
1 Select the contents that
include a desired still picture.
(1
1 page 24)
2 Press M or m to select “Index,”
and press ENTER.
The index pictures of the selected contents are
displayed.
GB
30
Projecting a Selected Picture When the Power Is Turned On — Startup
3 Press M, m, < or , to select
Setting the Startup Picture
the picture you want to use as
the startup picture, and press
ENTER.
The Index menu appears.
No.: 4/32
Size: 1024x768
File: SPORTS
Date:7/29/2001
14:22
Full Screen
Close
Reciipe
flour - - - - 2
s u g a r - - - 1/2
s a l t - - - - - 1/2
butter - - -1
SIDE
SHOT
VOLUME
+
–
+
–
INPUT
MS SLIDE
1
APA
VIDEO MEMORY
DYNAMIC STANDARD
LIVING
Return
USER 1
USER 2
USER 3
Protect
OFF
Rotate
Startup
Delete
4 Press M or m to select
MENU
ENTER
RESET
2-4
“Startup,” and press ENTER.
5 Press M or m to select “Entry,”
and press ENTER.
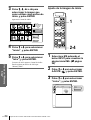
INPUT button to display MS
home. (1
1 page 24)
2 Press M or m to select
SETTING
ENTER.
, and press
3 Press M or m to select
“Startup,” and press ENTER.
Using a “Memory
Stick”
The startup mark is displayed in the Index menu.
You can register one picture used for the startup
picture, per one “Memory Stick.”
1 Select MS by pressing the
SETTING
Startup:
Original
Original
Custom
Off
Projecting a Selected Picture When the Power Is Turned On — Startup
31 GB
4 Press M or m to select the item
used for startup picture, and
press ENTER.
Original: Select to use the original picture
stored in the projector. This is the factory
setting.
Custom: Select to use the picture registered in
the index screen and stored in the “Memory
Stick.” (1 page 30)
Off: Select when you do not set the startup.
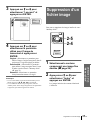
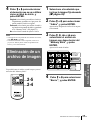
2 Press M or m to select “Index,”
and press ENTER.
The index pictures of the selected contents are
displayed.
3 Press M, m, < or , to select
the picture you want to delete
from the “Memory Stick,” and
press ENTER.
Notes
• When you want to clear the startup screen while displaying it,
press M/m/</,, or ENTER.
• When you are using the registered picture, insert the “Memory
Stick” where the registered picture is saved into the projector,
then turn on the power.
The Index menu appears.
No.: 4/32
Size: 1024x768
File: SPORTS
Date:7/29/2001
14:22
Full Screen
Close
Reciipe
flour - - - - 2
s u g a r - - - 1/2
s a l t - - - - - 1/2
butter - - -1
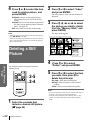
Deleting a Still
Picture
Protect
Rotate
Startup
Delete
4
Using a “Memory
Stick”
You can delete unnecessary picture from the
“Memory Stick.”
RESET
2-5
2-4
1 Select the contents that
include a desired still picture.
(1
1 page 24)
GB
32
Deleting a Still Picture
Press M or m to select
“Delete,” and press ENTER.
5 Press M or m to select the item
MENU
ENTER
Return
you want, then press M to
delete the picture(s).
Sel. Img.: delete the selected picture
All Img.: delete all pictures of the selected
contents
Close: when you do not delete the picture
Notes
• You cannot delete the picture which is protected. (1 page 29)
To delete it, release the protection on that picture.
• When the write-protect tab on the “Memory Stick” is set to
LOCK, you cannot delete the pictures from that “Memory
Stick.”
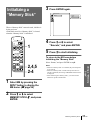
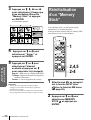
Initializing a
“Memory Stick”
3 Press ENTER again.
MEMORY STICK
Format
Execute
Return
When a “Memory Stick” cannot be used, initialize it
by the projector.
All the data stored in a “Memory Stick” is cleared
when the “Memory Stick” is initialized.
4 Press M or m to select
SIDE
SHOT
VOLUME
+
–
+
–
INPUT
MS SLIDE
1
5 Press M to start initializing.
APA
VIDEO MEMORY
DYNAMIC STANDARD
USER 1
USER 2
“Execute,” and press ENTER.
LIVING
To return to the MS home before
initializing the “Memory Stick”
USER 3
OFF
Select “Return,” and press ENTER in step 4.
MENU
RESET
Notes
• When the “Memory Stick” is initialized, the protected picture
is also cleared.
• When the “Memory Stick” with the write-protect tab set to
LOCK is initialized, the message “MEMORY STICK locked”
is displayed.
• While initializing the “Memory Stick,” you cannot use the
buttons for operation in MS home.
1 Select MS by pressing the
Using a “Memory
Stick”
ENTER
2,4,5
2-4
INPUT button to display the
MS home. (1
1 page 24)
2 Press M or m to select
MEMORY STICK
ENTER.
, and press
Initializing a “Memory Stick”
33 GB
Others
This section describes how to solve the problems, how to
replace a lamp and air filter, etc.
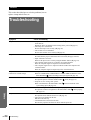
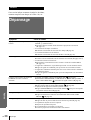
Troubleshooting
Symptom
Cause and Remedy
The power is not turned on.
• The power has been turned off and on with the [/ 1 (on/standby) switch at a
short interval.
c Wait for about one minute before turning on the power (1 page 15).
• The lamp cover is detached.
c Close the lamp cover securely (1 page 38).
• The air filter cover is detached.
c Close the air filter cover securely (1 page 39).
No picture.
• Cable is disconnected or the connections are wrong.
c Check that the proper connections have been made (1 pages 8 and 9).
• Input selection is incorrect.
c Select the input source correctly using the INPUT button (1 page 15).
• The computer signal is not set to output to an external monitor.
c Set the computer signal to output to an external monitor.
• The computer signal is set to output to both the LCD of the computer and
external monitor.
c Set the computer signal to output only to the external monitor.
The picture from the PJ MULTI
connector is colored strange.
• Setting for INPUT-A in the SET SETTING
menu is incorrect.
c Select COMPUTER, COMPONENT or VIDEO GBR for INPUT-A in the
SET SETTING
menu according to the input signal (1 page 20).
Color balance is incorrect.
• Picture has not been adjusted properly.
c Adjust the picture in the PICTURE CTRL
• Projector is set to wrong color system.
c Set COLOR SYS in the PICTURE CTRL
system being input (1 page 19).
The picture is too dark.
Others
GB
34
The picture is not clear.
Troubleshooting
menu (1 page 19).
menu to match the color
• Contrast or brightness has not been adjusted properly.
c Adjust the contrast or brightness in the PICTURE CTRL
(1 page 19).
• Picture is out of focus.
c Adjust the focus with the focus lever (1 page 15).
• The lens cap is attached to the lens.
c Remove the lens cap.
• Condensation has occurred on the lens.
c Leave the projector for about two hours with the power on.
menu properly
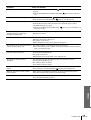
Symptom
Cause and Remedy
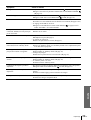
The picture flickers.
• DOT PHASE in the INPUT SETTING
menu has not been adjusted
properly.
c Adjust DOT PHASE in the INPUT SETTING
menu properly (1 page
19).
On-screen display does not appear.
• STATUS in the SET SETTING
menu is set to OFF.
c Set STATUS in the SET SETTING
menu to ON (1 page 20).
No sound.
• Cable is disconnected or the connections are wrong.
c Check that the proper connections have been made (1 pages 8 and 9).
• VOLUME setting is not correct.
c Adjust VOLUME in the PICTURE CTRL
menu, or press VOLUME + on
the remote control.
When sound is input through the
AUDIO connector, sound comes
through one channel only.
• Monaural sound is being input through the AUDIO connector.
c Input stereo sound.
The remote control does not work.
• Batteries cound be weak.
c Replace the batteries (1 page 5).
• The polarity is not correct.
c Insert the batteries with correct polarities (1 page 5).
The “Memory Stick” cannot be inserted • The “Memory Stick” is not facing in the correct direction.
into the “Memory Stick” slot.
c Insert the “Memory Stick” with the arrow mark pointing toward the “Memory
Stick” slot of the projector.
A still picture in the “Memory Stick”
cannot be rotated or deleted.
• The write-protect tab on the “Memory Stick” has been set to LOCK.
c Cancel the lock (1 page 22).
• The picture is protected.
c Release the protect in the Index screen (1 page 29).
The “Memory Stick” cannot be
formatted.
• The write-protect tab on the “Memory Stick” has been set to LOCK.
c Cancel the lock (1 page 22).
• The “Memory Stick” is broken.
c Use another “Memory Stick”.
When the slide show is made, the MS
flashes.
• Pictures with different resolutions are used for the slide show.
c Set STATUS of the SET SETTING
menu to OFF (1 page 20).
When the slide show is made, a black
picture appears.
• When pictures with different resolutions are used, a black picture appears.
c Set the resolution of the pictures to the same setting.
The thumbnails are not displayed.
• The pictures are the JPEG format but not DCF-compatible.
c Use the DCF-compatible pictures.
Others
Troubleshooting
35 GB
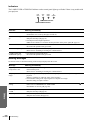
Indicators
The LAMP/COVER or TEMP/FAN indicator on the control panel lights up or flashes if there is any trouble with
your projector.
LAMP/
COVER
TEMP/
FAN
POWER
SAVING
ON/
STANDBY
TEMP/FAN Indicator
LAMP/COVER Indicator
Indicator
Meaning and Remedy
LAMP/COVER flashes.
• The lamp cover or the air filter cover is detached.
c Attach the cover securely (1 pages 38 and 39).
LAMP/COVER lights
up.
• The lamp has reached the end of its life.
c Replace the lamp (1 page 38).
• The lamp becomes a high temperature.
c Wait for one minute to cool down the lamp and turn on the power again (1 page 15).
TEMP/FAN flashes.
• The fan is broken.
c Consult with qualified Sony personnel.
TEMP/FAN lights up.
• The internal temperature is unusually high.
c Check to see if nothing is blocking the ventilation holes.
LAMP/COVER and
TEMP/FAN light up.
• The electrical system breaks down.
c Consult with qualified Sony personnel.
Warning Messages
Use the list below to check the meaning of the messages displayed on the screen.
Others
GB
36
Message
Meaning and Remedy
High temp.!
Lamp off in 1 min.
• Internal temperature is too high.
c Turn off the power.
c Check to see if nothing is blocking the ventilation holes.
Frequency is out of
range!
• This input signal cannot be projected as the frequency is out of the acceptable range of the
projector.
c Input a signal that is within the range of the frequency.
• The resolution setting of the output signal of a computer is too high.
c Set the setting of output to SVGA.
Please check INPUT-A
setting.
• You have input RGB signal from the computer when INPUT-A in the SET SETTING
menu is set to COMPONENT or VIDEO GBR.
c Set INPUT-A correctly (1 page 20).
Please replace the
LAMP.
• It is time to replace the lamp.
c Replace the lamp (1 page 38).
Please replace the filter.
• It is time to replace the air filter.
c Replace the air filter (1 page 39).
Troubleshooting
Caution Messages
Use the list below to check the meaning of the messages displayed on the screen.
Message
Meaning and Remedy
NO INPUT
• No input signal
c Check connections (1 page 8).
Not applicable!
• You have pressed the wrong button.
c Press the appropriate button.
File error
• In the sub menu for selecting the contents when using a “Memory Stick,” the presently
selected contents name consists of more than 66 characters (“/” included).
c Reenter the name with less than 66 characters.
No MEMORY STICK
• The “Memory Stick” is not correctly inserted.
c Check the “Memory Stick” and insert it correctly.
Caution displays while you are using the “Memory Stick”
When the following display appears on the screen, you cannot use this “Memory Stick.” Use another one.
• The image data is the JPEG format but not DCF-compatible.
• Resolution of the image data is out of the acceptable range of the projector.
(The projector accepts images with resolution of 5120 × 4096 dots.)
There is the thumbnail but it is not DCF-compatible.
There is no selected image data.
There is the image data but no thumbnail.
There is the image data but the thumbnail is broken.
The image data is broken.
Others
Troubleshooting
37 GB
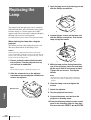
3 Open the lamp cover by loosening a screw
with the Philips screwdriver.
Replacing the
Lamp
The lamp used for the light source has a certain life.
When the lamp dims, the color balance of the picture
becomes strange, or “Please replace the LAMP.”
appears on the screen, the lamp is exhausted. Replace
the lamp with a new one (not supplied).
Use LMP-H120 Projector Lamp as the replacement lamp.
4 Loosen the two screws on the lamp unit
with the Philips screwdriver. Pull out the
lamp unit by the handle.
When replacing the lamp after using the
projector
Turn off the projector, then unplug the power cord.
Wait for at least an hour for the lamp to cool.
1
Caution
The lamp becomes a high temperature after turning off the
projector with the [/1 (on/standby) switch. If you touch the lamp,
you may scald your finger. When you replace the lamp, wait for
at least an hour for the lamp to cool.
1 Place a protective sheet (cloth) beneath
the projector. Turn the projector over so
you can see its underside.
Note
Be sure that the projector is stable after turning it over.
2 Slide the release lever on the adjuster
outward and turn the adjuster clockwise to
remove the adjuster.
2
3
1
Release lever
2
3
1
5 With the lamp surface facing toward the
rear of the projector, insert the new lamp
all the way in until it is securely in place.
Tighten the two screws. Fold up the
handle.
Notes
• Be careful not to touch the glass surface of the lamp.
• The power will not turn on if the lamp is not secured
properly.
6 Close the lamp cover and tighten the
screws.
7 Attach the adjuster.
Others
8 Turn the projector back over.
9 Connect the power cord and turn the
projector to standby mode.
10 Press the following buttons on the control
panel in the following order for less than
five seconds each: RESET, <, ,, ENTER.
GB
38
Replacing the Lamp
Notes
• Do not put your hands into the lamp replacement spot, or not
fall any liquid or object into it to avoid electrical shock or fire.
• Be sure to use the LMP-H120 Projector Lamp for replacement.
If you use lamps other than LMP-H120, the projector may
cause a malfunction.
• Be sure to turn off the projector and unplug the power cord
before replacing the lamp.
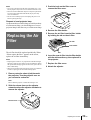
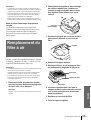
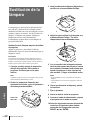
3 Push the knob on the filter cover to
remove the filter cover.
Knob
Disposal of used projector lamp
As the materials used in this lamp are similar to those
of a fluorescent lamp, you should dispose of a used
projector lamp in the same way as a fluorescent lamp.
4 Remove the filter holder.
Replacing the Air
Filter
5 Remove the air filter from the filter holder
by holding the tab on the air filter.
Air filter
Filter holder
The air filter should be replaced periodically. When
“Please replace the filter.” appears on the screen,
replace the air filter immediately.
Notes
• Replacing the air filter is very important to maintain the high
efficiency of the projector and to prevent a malfunction. When
the replacement message appears on the screen, replace the air
filter without delay.
• When removing the air filter from the projector, be careful that
no dust or object gets into the inside of the projector.
Tab
6 Insert the new air filter into the filter holder
with the white surface up, then replace it in
the projector.
7 Replace the filter cover.
8 Attach the adjuster.
1 Place a protective sheet (cloth) beneath
the projector. Turn the projector over so
you can see its underside.
Note
Be sure that the projector is stable after turning it over.
2 Slide the release lever on the adjuster
outward and turn the adjuster clockwise to
remove the adjuster.
Others
2
3
1
Release lever
Replacing the Air Filter
39 GB
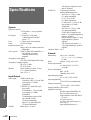
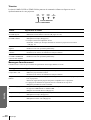
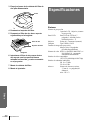
Specifications
System
Projection system
3 LCD panels, 1 lens, projection
system
LCD panel
0.7-inch TFT LCD panel,
1,440,000 pixels (480,000
pixels × 3)
Lens
1.2 times zoom lens (manual)
Lamp
120 W UHP type
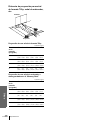
Projection picture size
Range: 40 to 150 inches (measured
diagonally)
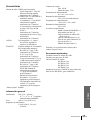
Color system
NTSC3.58/PAL/SECAM/NTSC4.43/
PAL-M/PAL-N system,
switched automatically/
manually
Acceptable video signals
15k, DTV (480i/480p/1080i/720p)
Acceptable computer signals
fH: 19 to 72 kHz
fV: 48 to 92 Hz
Speaker
Stereo speakers system, 33 mm
(1 5/16 inches) diameter,
max. 2 W × 2
Input/Output
Video input
Others
AUDIO
GB
40
Specifications
VIDEO: phono type
Composite video: 1 Vp-p ± 2 dB
sync negative (75 ohms
terminated)
S VIDEO: Y/C mini DIN 4-pin
type (male)
Y (luminance): 1 Vp-p ±2 dB
sync negative (75 ohms
terminated)
C (chrominance): burst 0.286
Vp-p ±2 dB (NTSC)
(75 ohms terminated),
burst 0.3 Vp-p ±2 dB (PAL)
(75 ohms terminated)
Phono type × 2, stereo
500 mVrms, impedance more
than 47 kilohms
PJ MULTI
32-pin multi connector
Analog RGB/component:
R/CR (PR): 0.7 Vp-p ±2 dB
(75 ohms terminated)
G: 0.7 Vp-p ±2 dB
(75 ohms terminated)
G with sync/Y: 1 Vp-p ±2 dB
sync negative (75 ohms
terminated)
B/CB (PB): 0.7 Vp-p ±2 dB
(75 ohms terminated)
SYNC/HD: Composite sync
input: 1-5 Vp-p high impedance,
positive/ negative
Horizontal sync input: 1-5 Vp-p
high impedance, positive/
negative
VD: Vertical sync input: 1-5
Vp-p high impedance, positive/
negative
“Memory Stick” slot 1
General
340 × 154 × 300 mm
(13 1/2 × 6 1/8 × 11 7/8 inches)
(w/h/d)
Mass
Approx. 3.9 kg (8 lb 10 oz)
Power requirements
AC 100 to 240 V, 1.9-0.8 A,
50/60 Hz
Power consumption
Max. 190 W
(Standby mode: 5 W)
Operating temperature
0ºC to 35ºC (32ºF to 95ºF)
Operating humidity
35% to 85% (no condensation)
Storage temperature
–20ºC to 60ºC (–4ºF to 140ºF)
Storage humidity 10% to 90%
Supplied accessories
Remote control RM-PJHS1 (1)
Size AA (R6) batteries (2)
Signal interface cable SIC-HS10
(5 m) (1)
AC power cord (1)
Air filter (for replacement) (1)
Lens cap (1)
Operating Instructions (1)
Dimensions
Design and specifications are subject to change
without notice.
When projecting a computer’s signal or data
stored in a “Memory Stick”
Unit: m (feet)
Optional accesories
Signal interface unit IFU-HS1
Projector stand SU-HS1
Signal interface cable
SIC-HS10 (5 m)
SIC-HS20 (5 m)
SIC-HS30 (5 m)
SIC-HS40 (5 m)
Projector Lamp LMP-H120 (for replacement)
Air filter PK-HS1FL (for replacement)
Projection Distances for a 720p
format signal, computer’s signal, etc.
Screen 40
size
(inches)
60
80
100
120
150
a
0.1
(0.3)
0.1
(0.3)
0.2
(0.7)
0.3
(1.0)
0.4
(1.3)
0.4
(1.3)
b
0
(0)
0
(0)
0
(0)
0
(0)
0
(0)
0
(0)
c
1.8
(5.9)
2.8
(9.2)
3.7
4.7
5.6
7.0
(12.1) (15.4) (18.4) (23.0)
d
1.6
(5.2)
2.5
(8.2)
3.3
4.2
5.0
6.3
(10.8) (13.8) (16.4) (20.7)
Screen
c
a
b
10°
d
10°
Projector
When projecting a 720p format signal
Unit: m (feet)
60
80
100
120
150
a
0.3
(1.0)
0.5
(1.6)
0.7
(2.3)
0.9
(3.0)
1.1
(3.6)
1.3
(4.3)
b
0.1
(0.3)
0.2
(0.7)
0.3
(1.0)
0.4
(1.3)
0.5
(1.6)
0.6
(2.0)
c
2.0
(6.6)
3.0
(9.8)
4.0
5.1
6.1
7.6
(13.1) (16.7) (20.0) (24.9)
d
1.8
(5.9)
2.7
(8.9)
3.6
4.5
5.4
6.8
(11.8) (14.8) (17.7) (22.3)
Others
Screen 40
size
(inches)
Specifications
41 GB
Input signals and adjustable/setting items
Some of the items in the menus cannot be adjusted depending on the input signal.
PICTURE CTRL menu
Input signal
Item
Video or S video (Y/
C)
Component
Video GBR
Computer/MS
CONTRAST
z
z
z
z
BRIGHT
z
z
z
z
COLOR
z
(except for B & W)
z
z
–
HUE
z
(NTSC3.58/4.43 only,
except for B & W)
z
z
–
SHARP
z
z
z
–
RGB ENHANCER
–
–
–
z
D. PICTURE
z
z
(15k RGB only)
z
(15k RGB only)
–
GAMMA MODE
–
–
z
(15k RGB only)
z
COLOR TEMP
z
z
z
z
COLOR SYS
z
–
–
–
VOLUME
z
z
z
z
z : Adjustable/can be set
– : Not adjustable/cannot be set
INPUT SETTING menu
Input signal
Item
Video or S
video (Y/C)
Computer
MS
–
–
(except for HDTV)
–
(except for HDTV)
z
–
SIZE H
–
–
(except for HDTV)
–
(except for HDTV)
z
–
SHIFT
z
z
z
z
–
SCAN CONV
–
–
–
z
(lower than VGA)
–
ASPECT
z
z
(except for preset
memory numbers 5,
45, 47, 48 and 50 of
HDTV)
z
(except for preset
memory numbers 5,
45, 47, 48 and 50 of
HDTV)
–
–
VIDEO MEMORY
z
z
z
z
–
Others
42
Video GBR
DOT PHASE
z : Adjustable/can be set
– : Not adjustable/cannot be set
GB
Component
Specifications
Preset Signals
Memory No.
1
2
3
4
5
6
7
8
9
10
11
12
13
14
15
16
17
18
19
20
21
22
23
24
25
26
43
44
45
47
48
50
Preset signal
Video 60 Hz
Video 50 Hz
15k RGB/Component 60 Hz
15k RGB/Component 50 Hz
fH (kHz) fV (Hz)
15.734
59.940
15.625
50.000
15.734
59.940
15.625
50.000
1080/60i, 1035/60i (DTV)
640 × 350
VGA mode 1
VGA VESA 85Hz
640 × 400
PC-9801 Normal
VGA mode 2
VGA VESA 85Hz
640 × 480
VGA mode 3
Macintosh 13”
VGA VESA 72Hz
VGA VESA 75Hz
VGA VESA 85Hz
800 × 600
SVGA VESA 56Hz
SVGA VESA 60Hz
SVGA VESA 72Hz
SVGA VESA 75Hz
SVGA VESA 85Hz
832 × 624
Macintosh 16”
XGA VESA 43Hz
1024 × 768
XGA VESA 60Hz
XGA VESA 70Hz
XGA VESA 75Hz
XGA VESA 85Hz
480/60p (Progressive component)
575/50p (Progressive component)
1080/50i (DTV)
720/60p (DTV)
720/50p (DTV)
540/60p
33.750
31.469
37.861
24.823
31.469
37.861
31.469
35.000
37.861
37.500
43.269
35.156
37.879
48.077
46.875
53.674
49.724
35.522
48.363
56.476
60.023
68.677
31.470
31.250
28.130
45.000
37.500
33.750
60.000
70.086
85.080
56.416
70.086
85.080
59.940
66.667
72.809
75.000
85.008
56.250
60.317
72.188
75.000
85.061
74.550
43.479
60.004
70.069
75.029
84.997
60.000
50.000
50.000
60.000
50.000
60.000
Sync
––
––
SonG/Y or Composite Sync
SonG/Y or Composite sync/
Composite video
SonG/Y
H-pos, V-neg
H-pos, V-neg
H-neg, V-neg
H-neg, V-pos
H-neg, V-pos
H-neg, V-neg
H-neg, V-neg
H-neg, V-neg
H-neg, V-neg
H-neg, V-neg
H-pos, V-pos
H-pos, V-pos
H-pos, V-pos
H-pos, V-pos
H-pos, V-pos
H-neg, V-neg
H-pos, V-pos
H-neg, V-neg
H-neg, V-neg
H-pos, V-pos
H-pos, V-pos
SIZE H
––
––
––
––
1800
800
832
848
800
832
800
864
832
840
832
1024
1056
1040
1056
1048
1152
1264
1344
1328
1312
1376
––
––
2000
2150
2342
1796
SonG/Y
Notes
• Whan a signal other than the preset signals shown above is input, the picture may not appear properly.
• The signal from the Memory Stick is displayed as No. 53 to 60.
The United
States, Canada
Plug type
YP-11
Female end
YC-13L
Cord type
SPT-2
Rated Voltage & Current 10A/125V
Safety approval
UL/CSA
Continental
Europe
YP-21
YC-13L
H03VVH2-F
2.5A/250V
VDE
UK
Australlia
Japan
SP-61
YC-13L
H03VVH2-F
2.5A/250V
BS
B8
C7-2
H03VVH2-F
2.5A/250V
SAA
YP-13
YC-13L
VCTFK
7A/125V
DENANHO
Specifications
Others
Warning on power connection
Use a proper power cord for your local power supply.
43 GB
Location of
Controls
Front
You can use the buttons on the control panel with the same names as those on the remote control to operate the
projector.
POWER SAVING indicator
(1
1 page 20)
TEMP/FAN indicator
(1
1 page 36)
LAMP/COVER indicator
(1
1 page 36)
ON/STANDBY indicator
(1
1 page 14)
LAMP/
COVER
M/m/</, buttons
TEMP/
FAN
POWER
SAVING
[/1 (on/standby) switch
ON/
STANDBY
SIDE SHOT
+
MENU
VIDEO
MEMORY
ENTER
RESET
INPUT
SIDE SHOT +/– buttons
MENU button
ENTER button
Lens
Ventilation holes
(exhaust) (1
1 page 6)
–
INPUT button
VIDEO MEMORY button
RESET button
Zoom lever
(1
1 pages 10 and 15)
Focus lever
(1
1 page 15)
Others
“Memory Stick” slot
(1
1 page 23)
Front remote control
detector
Ventilation holes
(intake) (1
1 page 6)
Adjuster stopper
(1
1 page 10)
Air filter cover (bottom)
(1
1 page 39)
GB
44
Location of Controls
Rear
Speaker
Rear remote control
detector
Adjuster
(1
1 page 10)
Lamp cover (bottom)
(1
1 page 38)
S VIDEO INPUT connector
(mini DIN 4-pin)/VIDEO
INPUT jack (phono type)
(1
1 page 8)
AUDIO L/R jacks (phono
type) (1
1 page 8)
~ AC IN socket
(MONO)
S VIDEO
VIDEO
L AUDIO R
INPUT
PJ MULTI
~ AC IN
PJ MULTI INPUT
connector (32-pin multi)
(1
1 page 8)
Others
Location of Controls
45 GB
Remote control
Infrared transmitter
LIGHT button
Illuminates the buttons on the
remote control.
SIDE SHOT +/– buttons
(1
1 page 11)
[/1 (on/standby) switch
(1
1 page 14)
SIDE
SHOT
VOLUME
+
–
+
–
INPUT
INPUT button (1
1 page 14)
MS SLIDE
MS SLIDE button (1
1 page 26)
APA
VOLUME +/– buttons
(1
1 page 15)
VIDEO MEMORY
DYNAMIC STANDARD
USER 1
USER 2
LIVING
USER 3
OFF
MENU button (1
1 page 17)
APA button (1
1 page 21)
VIDEO MEMORY buttons
(1
1 page 16)
DYNAMIC/STANDARD/LIVING
USER 1, 2, 3/OFF
MENU
M/m/</, buttons
(1
1 page 17)
ENTER button (1
1 page 17)
ENTER
RESET
RESET button (1
1 page 18)
Others
GB
46
Location of Controls
H
Index
A
Adjuster ............................................. 10
Adjusting
focus ....................................... 10, 15
picture size and position .............. 9
the picture ............................. 19, 21
trapezoidal distortion ................ 11
volume ......................................... 15
zoom ...................................... 10, 15
Air filter ............................................. 39
ASPECT ............................................ 19
B
BRIGHT ............................................ 19
C
COLOR.............................................. 19
COLOR SYS .................................... 19
COLOR TEMP................................. 19
Connections
AV amplifier .................................. 8
computer ........................................ 9
digital BS tuner ............................. 8
DVD player.................................... 8
using the optional interface unit . 9
using the optional signal interface
cables ............................................ 8
video equipment ........................... 8
CONTRAST ..................................... 19
D. PICTURE..................................... 19
DIGIT KEYSTONE ........................ 20
DOT PHASE .................................... 19
G
GAMMA MODE ............................. 19
HUE .................................................... 19
O
I
Optional accesories .......................... 41
Indicator
LAMP/COVER .......................... 36
TEMP/FAN ................................. 36
INPUT SETTING menu ........... 18, 19
INPUT-A............................................ 20
INSTALL SETTING menu ...... 18, 20
Installing the Projector and a Screen ..
7
P
K
KEYSTONE DIR ............................. 20
KEYSTONE MEM .......................... 20
L
Lamp replacement ............................
LAMP TIMER ..................................
LANGUAGE.....................................
Location of controls
front ..............................................
rear ................................................
remote control.............................
38
20
20
44
45
46
M
“Memory Stick”
delete a still picture ....................
full-screen picture ......................
index pictures ..............................
initializing ...................................
inserting .......................................
MS home .....................................
protection .....................................
rotate ............................................
slide show ....................................
startup...........................................
Menu
clearing the menu display .........
operation ......................................
reset ..............................................
MENU BACKGROUND ................
MENU COLOR ................................
MENU POSITION ..........................
Message
caution..........................................
caution display
(“Memory Stick”) ....................
32
28
26
33
23
24
29
28
25
30
18
17
18
20
20
20
PICTURE CTRL menu ............ 18, 19
POWER SAVING............................. 20
Preset memory ........................... 21, 43
Projection ........................................... 14
R
Remote control
inserting the batteries ................... 5
location of controls .................... 46
Remote control detector
front ................................................ 9
rear .................................................. 9
RGB ENHANCER ........................... 19
S
SCAN CONV .................................... 19
Screen size ........................................... 7
Selecting the menu language .......... 12
SET SETTING menu ................ 18, 20
SHARP ............................................... 19
SHIFT ................................................. 19
SIZE H................................................ 19
Specifications .................................... 40
STATUS ............................................. 20
Supplied accessories .......................... 5
T
Troubleshooting ................................ 34
V
Ventilation holes
exhaust ........................................... 6
intake .............................................. 6
VIDEO MEMORY .................... 16, 20
DYNAMIC ........................... 16, 20
LIVING ................................. 16, 20
STANDARD ........................ 16, 20
USER 1, 2 and 3 .................. 16, 20
VOLUME .......................................... 19
Others
D
warning ........................................ 36
37
37
Index
47 GB
$9(57,66(0(17
$ILQG¶pYLWHUWRXWULVTXHG¶LQFHQGLHRX
G¶pOHFWURFXWLRQQ¶H[SRVH]SDVFHWDSSDUHLOjOD
SOXLHRXjO¶KXPLGLWp
$ILQG¶pYLWHUWRXWULVTXHG¶pOHFWURFXWLRQ
Q¶RXYUH]SDVOHFKkVVLV&RQILH]O¶HQWUHWLHQ
XQLTXHPHQWjXQSHUVRQQHOTXDOLILp
3RXUOHVXWLOLVDWHXUVDX&DQDGD
&HWDSSDUHLOQXPpULTXHGHODFODVVH%HVWFRQIRUPHjOD
QRUPH10%GX&DQDGD
/DSULVHGRLWrWUHSUqVGHO¶DSSDUHLOHWIDFLOHG¶DFFqV
)5
7DEOHGHV0DWLHUHV
5pJODJHGHODTXDOLWpGHO¶LPDJHG¶XQVLJQDOHQ
SURYHQDQFHG¶XQRUGLQDWHXU 8WLOLVDWLRQG¶XQ³0HPRU\
6WLFN´
,QIRUPDWLRQVUHODWLYHVDX[FDUWHV³0HPRU\
6WLFN´ 3UpFDXWLRQV 5DFFRUGHPHQWVHWSUpSDUDWLIV
'pEDOODJH (WDSH,QVWDOODWLRQGXSURMHFWHXU $YDQWO¶LQVWDOODWLRQGXSURMHFWHXU ,QVWDOODWLRQGXSURMHFWHXUHWG¶XQpFUDQ (WDSH5DFFRUGHPHQWGXSURMHFWHXU 5DFFRUGHPHQWDYHFXQDSSDUHLOYLGpR 5DFFRUGHPHQWjO¶DLGHGHVFkEOHVG¶LQWHUIDFH
VLJQDOHQRSWLRQ 5DFFRUGHPHQWjO¶DLGHGXSpULSKpULTXH
G¶LQWHUIDFHHQRSWLRQ (WDSH5pJODJHGHODWDLOOHHWGX
SRVLWLRQQHPHQWGHO¶LPDJH (WDSH6pOHFWLRQGHODODQJXH
GHPHQX 3UpSDUDWLRQjODYLVXDOLVDWLRQG¶LPDJHVIL[HV
VWRFNpHVGDQVXQ³0HPRU\6WLFN´ ,QVHUWLRQG¶XQ³0HPRU\6WLFN´ 6pOHFWLRQGXFRQWHQXFRPSUHQDQWXQHLPDJH
IL[HGpVLUpH $IILFKDJHG¶LPDJHVIL[HVGDQVXQRUGUH
VSpFLILTXH±'LDSRUDPD $IILFKDJHG¶LPDJHVLQGH[pHVVXUpFUDQ
FRPSOHW
$IILFKDJHGXPHQX,QGH[
$IILFKDJHG¶XQHLPDJHVXUpFUDQ
FRPSOHW
5RWDWLRQG¶XQILFKLHULPDJH
3URWHFWLRQG¶XQHLPDJHIL[HLPSRUWDQWH
3URMHFWLRQG¶XQHLPDJHVpOHFWLRQpHORUVTXH
OHSURMHFWHXUHVWVRXVWHQVLRQ±
/DQFHPHQW (QUHJLVWUHPHQWG¶XQHLPDJHIL[HHQWDQW
TX¶LPDJHGHODQFHPHQW 5pJODJHGHO¶LPDJHGHODQFHPHQW 3URMHFWLRQ
6XSSUHVVLRQG¶XQILFKLHULPDJH 3URMHFWLRQGHO¶LPDJHVXUO¶pFUDQ 5pLQLWLDOLVDWLRQG¶XQ³0HPRU\6WLFN´ 6pOHFWLRQGXPRGHGHYLVXDOLVDWLRQ
G¶LPDJH 8WLOLVDWLRQGHVPHQXV
$XWUHV
'pSDQQDJH
5HPSODFHPHQWGHODODPSH )RQFWLRQQHPHQWjO¶DLGHGHVPHQXV 5HPSODFHPHQWGXILOWUHjDLU &RQILJXUDWLRQVGHPHQX 6SpFLILFDWLRQV 3DUDPqWUHVGXPHQX (PSODFHPHQWGHVFRPPDQGHV
$SURSRVGXQGHPpPRLUH
GHSUpVpOHFWLRQ ,QGH[ )5
3UpFDXWLRQV
6pFXULWp
$VVXUH]YRXVTXHODWHQVLRQGHVHUYLFHGHYRWUH
DSSDUHLOHVWLGHQWLTXHjODWHQVLRQVHFWHXUORFDOH
6LGXOLTXLGHRXXQREMHWTXHOFRQTXHYHQDLWj
SpQpWUHUGDQVOHFKkVVLVGpEUDQFKH]O¶DSSDUHLOHW
IDLWHVOHYpULILHUSDUXQWHFKQLFLHQTXDOLILpDYDQWGH
OHUHPHWWUHHQVHUYLFH
'pEUDQFKH]O¶DSSDUHLOGHODSULVHPXUDOHVLYRXV
Q¶DYH]SDVO¶LQWHQWLRQG¶XWLOLVHUOHSURMHFWHXU
SHQGDQWSOXVLHXUVMRXUV
3RXUGpEUDQFKHUOHFRUGRQVDLVLVVH]OHSDUODILFKH
1HWLUH]MDPDLVVXUOHFRUGRQSURSUHPHQWGLW
/DSULVHPXUDOHGRLWVHWURXYHUjSUR[LPLWpGH
O¶DSSDUHLOHWrWUHIDFLOHG¶DFFqV
/¶DSSDUHLOQ¶HVWSDVGpFRQQHFWpGHODVRXUFH
G¶DOLPHQWDWLRQVHFWHXUWDQWTX¶LOUHVWHEUDQFKpjOD
SULVHPXUDOHPrPHV¶LODpWpPLVKRUVWHQVLRQ
1HUHJDUGH]SDVYHUVO¶REMHFWLIORUVTXHODODPSHHVW
DOOXPpH
1HSODFH]SDVODPDLQRXG¶DXWUHVREMHWVjSUR[LPLWp
GHVRULILFHVGHYHQWLODWLRQ/¶DLUH[SXOVpHVWEUODQW
3UpYHQWLRQGHODVXUFKDXIIHLQWHUQH
$SUqVDYRLUPLVO¶DSSDUHLOKRUVWHQVLRQDXPR\HQGH
ODWRXFKH,1 PDUFKHYHLOOHQHGpEUDQFKH]SDV
O¶DSSDUHLOGHODSULVHVHFWHXUWDQWTXHOHYHQWLODWHXUGH
UHIURLGLVVHPHQWWRXUQH
$WWHQWLRQ
/HSURMHFWHXUHVWpTXLSpG¶RULILFHVGHYHQWLODWLRQ
SULVHG¶DLUHWG¶RULILFHVGHYHQWLODWLRQVRUWLHG¶DLU
1¶REVWUXH]SDVFHVRULILFHVHWQHSODFH]ULHQj
SUR[LPLWpFDUYRXVULVTXHULH]GHSURYRTXHUXQH
VXUFKDXIIHLQWHUQHSRXYDQWHQWUDvQHUXQHDOWpUDWLRQGH
O¶LPDJHRXGHVGRPPDJHVDXSURMHFWHXU
)5
3UpFDXWLRQV
(PEDOODJH
&RQVHUYH]OHFDUWRQG¶HPEDOODJHHWOHVPDWpULDX[GH
FRQGLWLRQQHPHQWG¶RULJLQHFDULOVFRQVWLWXHQWXQH
SURWHFWLRQLGpDOHVLYRXVrWHVDPHQpjWUDQVSRUWHU
O¶DSSDUHLO3RXUXQHSURWHFWLRQRSWLPDOHUHPEDOOH]
YRWUHDSSDUHLOFRPPHLODpWpHPEDOOpjO¶RULJLQHHQ
XVLQH
&HWWHVHFWLRQLQGLTXHFRPPHQWLQVWDOOHUOHSURMHFWHXU
HWO¶pFUDQFRPPHQWUDFFRUGHUO¶DSSDUHLOjSDUWLU
GXTXHOYRXVVRXKDLWH]SURMHWHUO¶LPDJHHWF
'pEDOODJH
$VVXUH]YRXVTXHOHFDUWRQG¶HPEDOODJHFRQWLHQWOHV
pOpPHQWVVXLYDQWV
(WDSH
,QVWDOODWLRQGX
SURMHFWHXU
5DFFRUGHPHQWVHW
SUpSDUDWLIV
5DFFRUGHPHQWVHWSUpSDUDWLIV
9RXVSRXYH]REWHQLUXQHERQQHTXDOLWpGHO¶LPDJH
PrPHORUVTXHODSURMHFWLRQGHO¶LPDJHV¶HIIHFWXHSDU
OHF{WpGHO¶pFUDQ³6,'(6+27´1SDJH&H
SURMHFWHXUYRXVSHUPHWGHSURILWHUSOHLQHPHQW
G¶DQLPDWLRQVDXGLRYLVXHOOHVjGRPLFLOHGDQVGH
QRPEUHXVHVVLWXDWLRQV
3URILWH]GXFLQpPDPDLVRQ
7pOpFRPPDQGH
3LOHVWDLOOH$$5
&kEOHG¶LQWHUIDFH
VLJQDO
)LOWUHjDLUSRXU
UHPSODFHPHQW
3URILWH]GHVMHX[YLGpRVXUpFUDQJpDQW
&DSXFKRQG¶REMHFWLI
&RUGRQG¶DOLPHQWDWLRQVHFWHXU
0RGHG¶HPSORL
,QVWDOODWLRQGHVSLOHVGDQVODWpOpFRPPDQGH
,QVWDOOH]OHVSLOHVHQFRPPHQoDQWSDUOHF{WpE
FRPPHLOOXVWUp/HXULQVHUWLRQIRUFpHRXGDQVOH
PDXYDLVVHQVGHSRODULWpULVTXHGHSURYRTXHU
XQFRXUWFLUFXLWHWXQHVXUFKDXIIH
'pEDOODJH(WDSH,QVWDOODWLRQGXSURMHFWHXU
)5
5DFFRUGHPHQWVHW
SUpSDUDWLIV
5HJDUGH]OHVSRUWHWFDYHFYRVDPLV
;
([SRVLWLRQjODFKDOHXUHWjO¶KXPLGLWp
(QGURLWWUqVSRXVVLpUHX[
9LVXDOLVH]GHVLPDJHVHQUHJLVWUpHVjO¶DLGH
G¶XQDSSDUHLOSKRWRQXPpULTXHHWVWRFNpHV
GDQVOH³0HPRU\6WLFN´VXUpFUDQJpDQW
1¶XWLOLVH]SDVOHSURMHFWHXUGDQVOHVVLWXDWLRQV
VXLYDQWHV
,QFOLQDLVRQGHO¶DSSDUHLOHQGHKRUVGHV
OLPLWHVGXVXSSRUWUpJODEOH
'pJDJH]OHVRULILFHVGHYHQWLODWLRQ
$YDQWO¶LQVWDOODWLRQGX
SURMHFWHXU
1¶LQVWDOOH]SDVOHSURMHFWHXUGDQVOHVVLWXDWLRQV
VXLYDQWHV&HVLQVWDOODWLRQVSHXYHQWHQWUDvQHUXQ
G\VIRQFWLRQQHPHQWRXFDXVHUGHVGRPPDJHVDX
SURMHFWHXU
0DXYDLVHYHQWLODWLRQ
)5
(WDSH,QVWDOODWLRQGXSURMHFWHXU
2ULILFHVGH
YHQWLODWLRQ
VRUWLHG¶DLU
2ULILFHVGH
YHQWLODWLRQSULVH
G¶DLU
,QVWDOODWLRQGXSURMHFWHXUVDQVVRQVXSSRUW
UpJODEOH
/DGLVWDQFHG¶LQVWDOODWLRQHQWUHOHSURMHFWHXUHWO¶pFUDQ
YDULHVXLYDQWODWDLOOHGHO¶pFUDQ
'pWHUPLQDWLRQGHODSRVLWLRQ
G¶LQVWDOODWLRQGXSURMHFWHXUHW
GHO¶pFUDQ
(FUDQ
D
E
F
G
8QLWpPSLHGV
7DLOOH
G¶pFUDQ
SRXFHV
D
E
F
G
3URMHFWLRQSDUOHFHQWUH
9RXVSRXYH]PRGLILHUO¶DQJOHGHSURMHFWLRQj
O¶DLGHGXVXSSRUWUpJODEOH
3RVLWLRQQH]OHSURMHFWHXUGHVRUWHTXH
O¶H[WUpPLWpGHO¶REMHFWLIVHWURXYHGDQVOD]RQH
GHO¶LOOXVWUDWLRQHQXWLOLVDQWOHVYDOHXUV
F HWG
3URMHFWHXU
D 'LVWDQFHKRUL]RQWDOHPD[LPXPHQWUH
O¶H[WUpPLWpGURLWHJDXFKHGHO¶pFUDQHWOH
FHQWUHGHO¶REMHFWLIGXSURMHFWHXUORUVTXHOH
SURMHFWHXUHVWLQVWDOOpVXUOHF{WpSRXU
³6,'(6+27´
E'LVWDQFHKRUL]RQWDOHPLQLPXPHQWUH
O¶H[WUpPLWpGURLWHJDXFKHGHO¶pFUDQHWOH
FHQWUHGHO¶REMHFWLIORUVTXHOHSURMHFWHXUHVW
LQVWDOOpVXUOHF{WpSRXU³6,'(6+27´
F 'LVWDQFHGHSURMHFWLRQPD[LPXPHQWUH
O¶pFUDQHWOHFHQWUHGHO¶REMHFWLIGXSURMHFWHXU
ORUVTXHYRXVFKRLVLVVH]ODGLVWDQFH
KRUL]RQWDOHDRXORUVTXHYRXVLQVWDOOH]OH
SURMHFWHXUGHVRUWHTXHOHFHQWUHGHO¶pFUDQHW
OHFHQWUHGHO¶REMHFWLIVRQWDOLJQpV
G'LVWDQFHGHSURMHFWLRQPLQLPXPHQWUH
O¶pFUDQHWOHFHQWUHGHO¶REMHFWLIORUVTXHYRXV
FKRLVLVVH]ODGLVWDQFHKRUL]RQWDOHERX
ORUVTXHYRXVLQVWDOOH]OHSURMHFWHXUGHVRUWH
TXHOHFHQWUHGHO¶pFUDQHWOHFHQWUHGH
O¶REMHFWLIVRQWDOLJQpV
3URMHFWLRQSDUOHF{Wp6,'(6+27
3RVLWLRQQH]OHSURMHFWHXUGHVRUWHTXH
O¶H[WUpPLWpGHO¶REMHFWLIVHWURXYHGDQVOD]RQH
GHO¶LOOXVWUDWLRQHQXWLOLVDQWOHVYDOHXUVD
5DFFRUGHPHQWVHW
SUpSDUDWLIV
EFHWGGXWDEOHDXVXLYDQWFRPPHUpIpUHQFH
$OLJQH]ODSDUWLHLQIpULHXUHGXVXSSRUWUpJODEOH
GXSURMHFWHXUVXUO¶H[WUpPLWpLQIpULHXUHGH
O¶pFUDQ
,QVWDOODWLRQGXSURMHFWHXUHW
G¶XQpFUDQ
8QLWpPSLHGV
7DLOOH
G¶pFUDQ
SRXFHV
F
G
3URMHFWLRQG¶XQVLJQDODXIRUPDWSG¶XQ
VLJQDOG¶RUGLQDWHXUHWF
/HVWDEOHDX[LQGLTXHQWOHVGLVWDQFHVjUHVSHFWHUSRXU
ODSURMHFWLRQGHVLJQDX[YLGpRFODVVLTXHV/HV
GLVWDQFHVDSSOLFDEOHVSRXUODSURMHFWLRQG¶XQVLJQDODX
IRUPDWSG¶XQVLJQDOG¶RUGLQDWHXUHWGHGRQQpHV
HQUHJLVWUpHVGDQVOH³0HPRU\6WLFN´VRQWLQGLTXpHVj
ODSDJH
3URMHFWLRQG¶XQHLPDJHVXU
O¶pFUDQHWUpJODJHGHO¶LPDJH
DX[GLPHQVLRQVGHO¶pFUDQ
3RXUSURMHWHUXQHLPDJHUDFFRUGH]
O¶pTXLSHPHQWYLGpRDXSURMHFWHXU1SDJH
(WDSH,QVWDOODWLRQGXSURMHFWHXU
)5
5DFFRUGHPHQWVHW
SUpSDUDWLIV
(WDSH
5DFFRUGHPHQWGX
SURMHFWHXU
/RUVGHODUpDOLVDWLRQGHVUDFFRUGHPHQWVYHXLOOH]
UHVSHFWHUOHVFRQVLJQHVVXLYDQWHV
0HWWH]WRXVOHVDSSDUHLOVKRUVWHQVLRQDYDQWWRXW
UDFFRUGHPHQW
8WLOLVH]OHVFkEOHVDSSURSULpVSRXUFKDTXHUDFFRUGHPHQW
%UDQFKH]FRUUHFWHPHQWOHVILFKHVGHVFkEOHVGHVILFKHV
LQFRPSOqWHPHQWHQILFKpHVVRQWVRXYHQWjO¶RULJLQHGH
SDUDVLWHV3RXUGpEUDQFKHUXQFkEOHVDLVLVVH]OHSDUOD
ILFKHQHWLUH]SDVVXUOHFkEOHSURSUHPHQWGLW
/RUVTXHYRXVUDFFRUGH]YRWUHSURMHFWHXUjO¶HQWUpH
3-08/7,VpOHFWLRQQH]OHVLJQDOG¶HQWUpHjO¶DLGH
GXSDUDPqWUH(17$GXPHQX5(*/$*( 1
SDJH
5DFFRUGHPHQWDYHFXQ
DSSDUHLOYLGpR
$UULqUHGX
SURMHFWHXU
5DFFRUGHPHQWjO¶DLGHGHV
FkEOHVG¶LQWHUIDFHVLJQDOHQ
RSWLRQ
5DFFRUGHPHQWDYHFXQOHFWHXU'9'
pTXLSpGHFRQQHFWHXUVYLGpR
FRPSRVDQWG¶XQV\QWRQLVHXU%6
QXPpULTXH
$UULqUHGX
SURMHFWHXU
&kEOHG¶LQWHUIDFHVLJQDO
6,&+6QRQIRXUQL
YHUVODVRUWLH
FRPSRVDQW59%
YHUVODVRUWLH
DXGLR
<
&%
3%
&5
35
6
9LGpR $XGLR/ $XGLR
5
/HFWHXU'9'pTXLSpGHFRQQHFWHXUVYLGpR
FRPSRVDQWG¶XQV\QWRQLVHXU%6QXPpULTXHHWF
&kEOH6YLGpRRX
YLGpRDXGLR
QRQIRXUQL
YHUVOD
VRUWLH6
YLGpRRX
YLGpR
DXGLR
DYHFORJR
621<
&kEOH
YHUVOH
G¶LQWHUIDFH KDXW
VLJQDOIRXUQL
YHUVOD
VRUWLHYLGpR
DXGLR
$SSDUHLOYLGpR
)5
(WDSH5DFFRUGHPHQWGXSURMHFWHXU
$SSDUHLOYLGpR
$UULqUHGXSURMHFWHXU
5DFFRUGHPHQWjO¶DLGHGX
SpULSKpULTXHG¶LQWHUIDFHHQ
RSWLRQ
/¶XWLOLVDWLRQGXSpULSKpULTXHG¶LQWHUIDFHHQRSWLRQ
YRXVSHUPHWGHUDFFRUGHUSOXVLHXUVDSSDUHLOVYLGpRHW
GHWUDQVIpUHUODVRUWLHVXUOHSURMHFWHXURXODWpOpYLVLRQ
jSDUWLUGHO¶DSSDUHLOUDFFRUGpHQDSSX\DQWWRXW
VLPSOHPHQWVXUODWRXFKH
5DFFRUGHPHQWVHW
SUpSDUDWLIV
5DFFRUGHPHQWDYHFXQDPSOLILFDWHXU
$9
$UULqUHGX
SURMHFWHXU
&kEOHG¶LQWHUIDFHVLJQDO
6,&+6QRQIRXUQL
YHUVODVRUWLH
YLGpRFRPSRVDQW
<
&%
3%
&5
35
6
9LGpR
9LGpR
$PSOLILFDWHXU
$9
5DFFRUGHPHQWDYHFXQRUGLQDWHXU
$UULqUHGX
SURMHFWHXU
0DJQpWRVFRSHHWF
/HFWHXU'9'HWF
3pULSKpULTXHG¶LQWHUIDFH
,)8+6
YHUVODVRUWLH
3-PXOWL
&kEOH3-PXOWL
IRXUQLDYHFOH
,)8+6
7pOpYLVLRQ
&kEOHG¶LQWHUIDFHVLJQDO
6,&+6QRQIRXUQL
2UGLQDWHXU
YHUVODVRUWLH
PRQLWHXU
YHUVODVRUWLHDXGLR
(WDSH5DFFRUGHPHQWGXSURMHFWHXU
)5
5DFFRUGHPHQWVHW
SUpSDUDWLIV
(WDSH5pJODJHGHOD
WDLOOHHWGXSRVLWLRQQHPHQW
GHO¶LPDJH
%UDQFKH]OHFRUGRQ
G¶DOLPHQWDWLRQVHFWHXUGDQV
XQHSULVHPXUDOH
/¶LQGLFDWHXU2167$1'%<V¶DOOXPHHQURXJH
HWOHSURMHFWHXUSDVVHHQPRGHGHYHLOOH
ON/
STANDBY
(FODLUDJHURXJH
'pWHFWHXUGH
WpOpFRPPDQGHDUUHLqUH
$SSX\H]VXUODWRXFKH[1
PDUFKHYHLOOHSRXUPHWWUHOH
SURMHFWHXUVRXVWHQVLRQ
/¶LQGLFDWHXU2167$1'%<V¶DOOXPHHQYHUW
'pWHFWHXUGH
WpOpFRPPDQGHDYDQW
ON/
STANDBY
%XWpHGHVXSSRUWUpJODEOH
SIDE
SHOT
VOLUME
+
–
+
–
INPUT
MS SLIDE
APA
VIDEO MEMORY
DYNAMIC STANDARD
USER 1
USER 2
LIVING
USER 3
(FODLUDJHYHUW
0HWWH]VRXVWHQVLRQO¶DSSDUHLO
UDFFRUGpDXSURMHFWHXU
5HSRUWH]YRXVDXPRGHG¶HPSORLGHO¶DSSDUHLO
UHOLp
$SSX\H]VXU,1387SRXU
SURMHWHUO¶LPDJHVXUO¶pFUDQ
$FKDTXHSUHVVLRQGHFHWWHWRXFKHO¶LQGLFDWLRQ
G¶HQWUpHFKDQJH1SDJH
OFF
VIDEO 1
MENU
INPUT
ENTER
)5
RESET
(WDSH5pJODJHGHODWDLOOHHWGXSRVLWLRQQHPHQWGHO¶LPDJH
(IIHFWXH]XQHPLVHDXSRLQW
DSSUR[LPDWLYHjO¶DLGHGX
OHYLHUGHPLVHDXSRLQW
5DFFRUGHPHQWVHW
SUpSDUDWLIV
9RXVSRXYH]GpSODFHUOHSURMHFWHXUjODYHUWLFDOH
HWjO¶KRUL]RQWDOHGDQVOHVOLPLWHVVXLYDQWHV
-XVTX¶jGDQVFKDTXHGLUHFWLRQ
SRXUO¶DQJOHKRUL]RQWDO
/HYLHUGHPLVHDXSRLQW
5pJOH]ODWDLOOHHWOH
SRVLWLRQQHPHQWGHO¶LPDJHDX[
GLPHQVLRQVGHO¶pFUDQjO¶DLGH
GXOHYLHUGH]RRPHWGX
VXSSRUWUpJODEOH
-XVTX¶jGDQV
FKDTXHGLUHFWLRQ
SRXUO¶DQJOH
-XVTX¶jGDQV
FKDTXHGLUHFWLRQ
SRXUO¶DQJOH
7RXUQH]OHOHYLHUGH]RRPSRXUDMXVWHUODWDLOOH
GHO¶LPDJH
/HYLHUGH]RRP
8WLOLVH]OHVXSSRUWUpJODEOHSRXUUpJOHUOH
SRVLWLRQQHPHQWGHO¶LPDJH0DLQWHQH]HQIRQFpH
HWIDLWHVJOLVVHUYHUVODGURLWHODEXWpHGHVXSSRUW
UpJODEOHGpSODFH]OHSURMHFWHXUSXLVUHSODFH]OD
EXWpH
%XWpHGHVXSSRUW
UpJODEOH
(WDSH5pJODJHGHODWDLOOHHWGXSRVLWLRQQHPHQWGHO¶LPDJH
)5
5DFFRUGHPHQWVHW
SUpSDUDWLIV
3URMHFWLRQSDUOHF{Wp
(FUDQ
,PDJH
LQIpULHXU6LOHF{WpJDXFKHHVWSOXVORQJTXHOH
GURLWDSSX\H]VXU6,'(6+27±
3URMHFWLRQSDUOHFHQWUH
,PDJH
(FUDQ
8WLOLVH]6,'(6+27VLOHF{WpGURLWHVWSOXV
ORQJ
3RXUFRUULJHUODGLVWRUVLRQDYHFHQFRUHSOXVGH
SUpFLVLRQDSSX\H]VXUMRXm
6LYRXVLQVWDOOH]OH
SURMHFWHXUjJDXFKHGH
O¶pFUDQHIIHFWXH]OH
UpJODJHGHVRUWHTXHOH
F{WpJDXFKHGHO¶LPDJH
WLHQQHVXUODSDUWLHJDXFKH
GHO¶pFUDQ/RUVTXHOH
SURMHFWHXUHVWLQVWDOOpj
GURLWHSURFpGH]DX
UpJODJHGHVRUWHTXHOH
F{WpGURLWGHO¶LPDJH
WLHQQHVXUODSDUWLHGURLWH
GHO¶pFUDQ
(IIHFWXH]XQUpJODJH
SHUPHWWDQWGHFRUULJHUOD
GLVWRUVLRQWUDSp]RwGDOH
3URMHFWLRQSDUOHF{Wp
&RUULJHODGLVWRUVLRQKRUL]RQWDOH
$SSX\H]VXU6,'(6+27RX±GHVRUWHTXHOH
ERUGVXSpULHXUGHO¶LPDJHVRLWSDUDOOqOHDXERUG
)5
3URMHFWLRQSDUOHFHQWUH
&RUULJHODGLVWRUVLRQYHUWLFDOH
$FFpGH]DXPHQX6pOHFWLRQQH]9YHUWLFDO
DYHFOHSDUDPqWUH&25575$3(=(GXPHQX
5(*/,167$/
(QVXLWHUpJOH]DYHFOH
SDUDPqWUH75$3(=180(5GHVRUWHTXHOH
F{WpJDXFKHGHO¶LPDJHVRLWSDUDOOqOHDXF{Wp
GURLW1SDJH
6LOHERUGVXSpULHXUGHO¶LPDJHHVWSOXVORQJTXH
OHERUGLQIpULHXUUpJOH]jXQHYDOHXUSOXVpOHYpH
6LYRXVLQVWDOOH]OH
SURMHFWHXUGHQLYHDXSDU
UDSSRUWDXEDVGH
O¶pFUDQHIIHFWXH]OH
UpJODJHGHVRUWHTXHOH
ERUGLQIpULHXUGHO¶LPDJH
WLHQQHVXUODSDUWLH
LQIpULHXUHGHO¶pFUDQ
/RUVTXHOHSURMHFWHXUHVW
LQVWDOOpGHQLYHDXSDU
UDSSRUWDXKDXWGH
O¶pFUDQHIIHFWXH]OH
UpJODJHGHVRUWHTXHOH
ERUGVXSpULHXUGH
O¶LPDJHWLHQQHVXUOD
SDUWLHVXSpULHXUHGH
O¶pFUDQ
(WDSH5pJODJHGHODWDLOOHHWGXSRVLWLRQQHPHQWGHO¶LPDJH
6LOHERUGLQIpULHXUGHO¶LPDJHHVWSOXVORQJTXH
OHERUGVXSpULHXUUpJOH]jXQHYDOHXUSOXVIDLEOH
(IIHFWXH]GHQRXYHDXXQH
PLVHDXSRLQWjO¶DLGHGXOHYLHU
GHPLVHDXSRLQW
$SSX\H]VXUODWRXFKH[1
PDUFKHYHLOOHSRXUPHWWUHOH
SURMHFWHXUVRXVWHQVLRQ
/¶LQGLFDWHXU2167$1'%<V¶DOOXPHHQYHUW
9RXVSRXYH]VpOHFWLRQQHUO¶XQHGHVQHXIODQJXHVGH
PHQXHWG¶DIILFKDJHVXUpFUDQ/HUpJODJHSDUGpIDXW
HVWO¶DQJODLV
$SSX\H]VXU0(18
/¶pFUDQGHPHQXV¶DIILFKH
/HPHQXDFWXHOOHPHQWVpOHFWLRQQpHVWLQGLTXp
SDUXQERXWRQMDXQH
VIDEO 1
PICTURE CTRL
SIDE
SHOT
VOLUME
+
–
+
–
USER 2
LIVING
USER 3
OFF
MENU
ENTER
MENU
80
50
50
50
50
OFF
HIGH
AUTO
30
INPUT
VIDEO MEMORY
USER 1
CONTRAST:
BRIGHT:
COLOR:
HUE:
SHARP:
D.PICTURE:
COLOR TEMP:
COLOR SYS:
VOLUME:
MS SLIDE
APA
DYNAMIC STANDARD
5DFFRUGHPHQWVHW
SUpSDUDWLIV
(WDSH
6pOHFWLRQGHOD
ODQJXHGHPHQX
RESET
$SSX\H]VXUMRXmSRXU
VpOHFWLRQQHUOHPHQX6(7
6(77,1* HWDSSX\H]VXU,
RX(17(5
/HPHQXVpOHFWLRQQpDSSDUDvW
ENTER
RX
VIDEO 1
SET SETTING
%UDQFKH]OHFRUGRQ
G¶DOLPHQWDWLRQVHFWHXUGDQV
XQHSULVHPXUDOH
STATUS:
INPUT-A:
LANGUAGE:
POWER SAVING:
ON
COMPONENT
ENGLISH
OFF
/¶LQGLFDWHXU2167$1'%<V¶DOOXPHHQURXJH
HWOHSURMHFWHXUSDVVHHQPRGHGHYHLOOH
(WDSH6pOHFWLRQGHODODQJXHGHPHQX
)5
5DFFRUGHPHQWVHW
SUpSDUDWLIV
$SSX\H]VXUMRXmSRXU
VpOHFWLRQQHU/$1*8$*(HW
DSSX\H]VXU,RX(17(5
ENTER
RX
VIDEO 1
SET SETTING
STATUS:
INPUT-A:
LANGUAGE:
POWER SAVING:
ON
COMPONENT
ENGLISH
OFF
$SSX\H]VXUMRXmSRXU
VpOHFWLRQQHUXQHODQJXHHW
DSSX\H]VXU<RX(17(5
/DODQJXHGXPHQXHVWUHPSODFpHSDUFHOOHTXH
YRXVDYH]VpOHFWLRQQpH
ENTER
RX
3RXUIDLUHGLVSDUDvWUHOHPHQX
$SSX\H]VXU0(18
)5
(WDSH6pOHFWLRQGHODODQJXHGHPHQX
3URMHFWLRQ
&HWWHVHFWLRQLQGLTXHFRPPHQWXWLOLVHUOHSURMHFWHXU
SRXUYLVLRQQHUO¶LPDJHjSDUWLUG¶XQDSSDUHLOUDFFRUGp
DXSURMHFWHXU(OOHLQGLTXHpJDOHPHQWFRPPHQWUpJOHU
ODTXDOLWpGHO¶LPDJHjYRWUHFRQYHQDQFH
%UDQFKH]OHFRUGRQ
G¶DOLPHQWDWLRQVHFWHXUGDQV
XQHSULVHPXUDOH
/¶LQGLFDWHXU2167$1'%<V¶DOOXPHHQURXJH
HWOHSURMHFWHXUSDVVHHQPRGHGHYHLOOH
ON/
STANDBY
(FODLUDJHURXJH
$SSX\H]VXUODWRXFKH[1
PDUFKHYHLOOHSRXUPHWWUHOH
SURMHFWHXUVRXVWHQVLRQ
3URMHFWLRQ
3URMHFWLRQGH
O¶LPDJHVXUO¶pFUDQ
/¶LQGLFDWHXU2167$1'%<V¶DOOXPHHQYHUW
ON/
STANDBY
SIDE
SHOT
VOLUME
+
–
+
–
INPUT
MS SLIDE
APA
VIDEO MEMORY
DYNAMIC STANDARD
USER 1
USER 2
LIVING
(FODLUDJHYHUW
0HWWH]VRXVWHQVLRQO¶DSSDUHLO
UDFFRUGpDXSURMHFWHXU
5HSRUWH]YRXVDXPRGHG¶HPSORLGHO¶DSSDUHLO
UHOLp
USER 3
OFF
MENU
ENTER
RESET
$SSX\H]jSOXVLHXUVUHSULVHV
VXU,1387SRXUVpOHFWLRQQHU
O¶HQWUpHTXHYRXVVRXKDLWH]
SURMHWHUVXUO¶pFUDQ
$IILFKH]O¶LQWLWXOpGHO¶HQWUpHGpVLUpH
([HPSOH 3RXUYLVLRQQHUO¶LPDJHjSDUWLUGH
O¶DSSDUHLOYLGpRUDFFRUGpDX
FRQQHFWHXU9,'(2,1387
VIDEO 1
INPUT
3URMHFWLRQGHO¶LPDJHVXUO¶pFUDQ
)5
3RXUYLVLRQQHU
O¶LPDJHGHSXLV
$SSX\H]
VXU
,1387
SRXU
DIILFKHU
8QVLJQDO
VRQRUHHVW
pPLVSDU
O¶DSSDUHLO
UDFFRUGpj
5pJOHUSRXUREWHQLUXQHLPDJHQHWWH
3URMHFWLRQ
$SSDUHLOYLGpRUDFFRUGpDX 9,'(2
FRQQHFWHXUG¶HQWUpH
9,'(2VXUOHSURMHFWHXU
$8',2,1387
$SSDUHLOYLGpRUDFFRUGpDX 69,'(2
FRQQHFWHXUG¶HQWUpH6
9,'(2VXUOHSURMHFWHXU
$8',2,1387
5*%DSSDUHLOFRPSRVDQW (17$
UDFFRUGpDXFRQQHFWHXU
G¶HQWUpH3-08/7,SDU
O¶LQWHUPpGLDLUHGXFkEOH
G¶LQWHUIDFHVLJQDOHQRSWLRQ
RXGXSpULSKpULTXH
G¶LQWHUIDFH
3-08/7,,1387
$SSDUHLOYLGpRUDFFRUGpDX 9,'(2
FRQQHFWHXUG¶HQWUpH3-
08/7,SDUO¶LQWHUPpGLDLUH
GXFkEOHG¶LQWHUIDFHVLJQDO
HQRSWLRQRXGX
SpULSKpULTXHG¶LQWHUIDFH
3-08/7,,1387
69,'(2
$SSDUHLOYLGpRPXQLGH
6 9,'(2UDFFRUGpDX
FRQQHFWHXUG¶HQWUpH3-
08/7,SDUO¶LQWHUPpGLDLUH
GXFkEOHG¶LQWHUIDFHVLJQDO
HQRSWLRQRXGX
SpULSKpULTXHG¶LQWHUIDFH
3-08/7,,1387
³0HPRU\6WLFN´LQVpUp
GDQVODIHQWH³0HPRU\
6WLFN´
06
/HYLHUGHPLVHDXSRLQW
$SSX\H]VXU92/80(RX±
SRXUUpJOHUOHYROXPH
VOLUME
+
–
3RXUPHWWUHOHSURMHFWHXUKRUV
WHQVLRQ
$SSX\H]VXUODWRXFKH[1 PDUFKH
YHLOOH
/HPHVVDJH³0(75(+2567(16,21"´
V¶DIILFKHVXUO¶pFUDQ
$8',2,1387
5pJOH]OHSDUDPqWUH(17$GDQVOHPHQX5(*/$*(
IRQFWLRQGXVLJQDOG¶HQWUpH1SDJH
7RXUQH]OHOHYLHUGHPLVHDX
SRLQWSRXUUpJOHUODQHWWHWpGH
O¶LPDJH
HQ
7RXUQH]OHOHYLHUGH]RRPSRXU
DMXVWHUODWDLOOHGHO¶LPDJH
$SSX\H]GHQRXYHDXVXUODWRXFKH[1
/¶LQGLFDWHXU2167$1'%<FOLJQRWHHQYHUWHWOH
YHQWLODWHXUFRQWLQXHGHWRXUQHUSRXUUpGXLUHOD
FKDOHXULQWHUQH3DUDLOOHXUVO¶LQGLFDWHXU
2167$1'%<FOLJQRWHUDSLGHPHQWSHQGDQWXQH
GXUpHDXFRXUVGHODTXHOOHYRXVQHSRXYH]SDV
DOOXPHUO¶LQGLFDWHXU2167$1'%<jO¶DLGHGHOD
WRXFKH[1
'pEUDQFKH]OHFRUGRQG¶DOLPHQWDWLRQGHOD
SULVHVHFWHXUDSUqVTXHOHYHQWLODWHXUV¶HVW
DUUrWpGHWRXUQHUHWO¶LQGLFDWHXU21
67$1'%<V¶DOOXPHHQURXJH
/HYLHUGH]RRP
)5
3URMHFWLRQGHO¶LPDJHVXUO¶pFUDQ
9RXVSRXYH]PHWWUHOHSURMHFWHXUKRUVWHQVLRQHQ
PDLQWHQDQWODWRXFKH[1PDUFKHYHLOOHHQIRQFpH
SHQGDQWHQYLURQXQHVHFRQGHDXOLHXG¶HIIHFWXHUOHV
pWDSHVFLGHVVXV
6pOHFWLRQGXPRGH
GHYLVXDOLVDWLRQ
G¶LPDJH
SIDE
SHOT
VOLUME
+
–
+
–
INPUT
VIDEO MEMORY
USER 1
USER 2
LIVING
USER 3
7RXFKHV9,'(20(025<
'<1$0,&
67$1'$5'
/,9,1*
86(5HW
2))
OFF
MENU
ENTER
86(5HWXWLOLVDWHXUHW
9RXVDYH]ODSRVVLELOLWpGHUpJOHUODTXDOLWpGHO¶LPDJH
jYRWUHFRQYHQDQFHHWG¶HQUHJLVWUHUFHVSDUDPqWUHV
GDQVODPpPRLUHGXSURMHFWHXUTXHYRXVDXUH]FKRLVLH
$SSX\H]VXUO¶XQHGHVWRXFKHV86(5RXSXLV
UpJOH]O¶LPDJHjSDUWLUGHVPHQXV/HVSDUDPqWUHV
VRQWHQUHJLVWUpVHWYRXVSRXYH]YLVLRQQHUO¶LPDJH
DYHFODTXDOLWpG¶LPDJHVRXKDLWpHHQDSSX\DQWVXUOD
WRXFKHFRUUHVSRQGDQWH1SDJH
MS SLIDE
APA
DYNAMIC STANDARD
/,9,1*YLYDQW
6pOHFWLRQQH]FHSDUDPqWUHSRXUOHVLPDJHVSHX
FRQWUDVWpHVGHW\SHFLQpPDWRJUDSKLTXH
3URMHFWLRQ
9RXVSRXYH]FKRLVLUOHPRGHGHYLVXDOLVDWLRQG¶LPDJH
OHPLHX[DGDSWpDXW\SHGHSURJUDPPHRXDX[
FRQGLWLRQVHQYLURQQDQWHV
67$1'$5'
)RQFWLRQUHFRPPDQGpHSRXUOHVFRQGLWLRQVQRUPDOHV
GHYLVXDOLVDWLRQjYRWUHGRPLFLOH
6pOHFWLRQQH]pJDOHPHQWFHSDUDPqWUHDILQGHUpGXLUH
ODUXJRVLWpGHO¶LPDJHORUVGHODYLVXDOLVDWLRQDYHFOD
IRQFWLRQ'<1$0,&
2))DUUHW
6pOHFWLRQQH]FHWWHWRXFKHSRXUOHSDUDPqWUHHQUHJLVWUp
VXUFKDTXHHQWUpHSRXYDQWrWUHVpOHFWLRQQpjO¶DLGHGH
ODWRXFKH,1387RXSRXUFKDTXHVLJQDOG¶HQWUpH
1RWH
9RXVSRXYH]FKRLVLUOHPRGHGHYLVXDOLVDWLRQG¶LPDJHjO¶DLGHGH
ODWRXFKH9,'(20(025<GXSURMHFWHXU$FKDTXHSUHVVLRQGH
FHWWHWRXFKHO¶pOpPHQWFLGHVVXVSHXWrWUHVpOHFWLRQQp
RESET
$SSX\H]VXUO¶XQHGHVWRXFKHV
GH9,'(20(025<
'<1$0,&67$1'$5'
/,9,1*HW86(5HW '<1$0,&G\QDPLTXH
6pOHFWLRQQH]FHSDUDPqWUHSRXUUHQIRUFHUOHFRQWUDVWH
HWODQHWWHWpGHO¶LPDJH
6pOHFWLRQGXPRGHGHYLVXDOLVDWLRQG¶LPDJH
)5
8WLOLVDWLRQGHVPHQXV
&HWWHVHFWLRQLQGLTXHFRPPHQWHIIHFWXHUGLYHUV
DMXVWHPHQWVHWUpJODJHVjO¶DLGHGHVPHQXV
)RQFWLRQQHPHQWj
O¶DLGHGHVPHQXV
$SSX\H]VXU0(18
/¶pFUDQGHPHQXV¶DIILFKH
/HPHQXDFWXHOOHPHQWVpOHFWLRQQpHVWLQGLTXp
SDUXQERXWRQMDXQH
CONTRASTE:
LUMIERE:
COULEUR:
TEINTE:
NETTETE:
IMAGE D.:
TEMP COULEU:
STANDARD:
VOLUME:
MENU
80
50
50
50
50
OFF
HAUT
AUTO
30
$SSX\H]VXUMRXmSRXU
VpOHFWLRQQHUXQPHQXHW
DSSX\H]VXU,RX(17(5
8WLOLVDWLRQGHV
PHQXV
/HPHQXVpOHFWLRQQpDSSDUDvW
SIDE
SHOT
VOLUME
+
–
+
–
0HQXV 3DUDPqWUHV 5pJODJHV
INPUT
MS SLIDE
VIDEO 1
REGLAGE
ETAT:
ENT.A:
@ @LANGAGE:
MODE ECO:
APA
VIDEO MEMORY
DYNAMIC STANDARD
USER 1
VIDEO 1
CTRL IMAGE
USER 2
ON
COMPOSANT
FRANCAIS
OFF
LIVING
USER 3
OFF
ENTER
RX
MENU
ENTER
RESET
7RXFKH5(6(7
6pOHFWLRQQH]XQSDUDPqWUH
TXHYRXVVRXKDLWH]DMXVWHU
8WLOLVH]MRXmSRXUVpOHFWLRQQHUXQSDUDPqWUH
HWDSSX\H]VXU,RX(17(5
VIDEO 1
REGLAGE
ETAT:
ENT.A:
@ @LANGAGE:
MODE ECO:
ENTER
RX
)5
)RQFWLRQQHPHQWjO¶DLGHGHVPHQXV
ON
COMPOSANT
FRANCAIS
OFF
3URFpGH]DXUpJODJHRXj
O¶DMXVWHPHQWG¶XQSDUDPqWUH
/RUVGHODPRGLILFDWLRQG¶XQQLYHDXGH
UpJODJH
3RXUDXJPHQWHUODYDOHXUDSSX\H]VXUMRX,
3RXUUpGXLUHODYDOHXUDSSX\H]VXUmRX<
$SSX\H]VXU(17(5SRXUUHYHQLUjO¶pFUDQ
G¶RULJLQH
/RUVGHODPRGLILFDWLRQGXUpJODJH
$SSX\H]VXUMRXmSRXUPRGLILHUOHUpJODJH
$SSX\H]VXU<RX(17(5SRXUUHYHQLUj
O¶pFUDQG¶RULJLQH
VIDEO 1
REGLAGE
ON
COMPOSANT
FRANCAIS
ON
ENTER
RX
/HSURMHFWHXUSRVVqGHTXDWUHSDJHVGHPHQX/HV
SDUDPqWUHVSRXYDQWrWUHUpJOpVGDQVFKDTXHPHQX
VRQWGpFULWVVXUOHVSDJHVHW
0HQX&75/,0$*(
/HPHQX&75/,0$*(SHUPHWG¶DMXVWHUO¶LPDJH
9RXVDYH]pJDOHPHQWODSRVVLELOLWpGHUpJOHUOHYROXPH
SDUOHELDLVGHFHPHQX
0HQX5(*/(175((
/HPHQX5(*/(175((VHUWDXUpJODJHGXVLJQDO
G¶HQWUpH9RXVSRXYH]UpJOHUODWDLOOHHWOH
SRVLWLRQQHPHQWHWFGHO¶LPDJH
0HQX5(*/$*(
3RXUIDLUHGLVSDUDvWUHOHPHQX
$SSX\H]VXU0(18
3RXUUpLQLWLDOLVHUOHVSDUDPqWUHVTXL
YLHQQHQWG¶rWUHUpJOpV
6pOHFWLRQQH]O¶pOpPHQWTXHYRXVVRXKDLWH]
UpLQLWLDOLVHUSXLVDSSX\H]VXU5(6(7
³(IIHFWXp´DSSDUDvWjO¶pFUDQHWOHVUpJODJHVVRQW
UHVWDXUpVjOHXUYDOHXUSDUGpIDXW
/HVSDUDPqWUHVSRXYDQWrWUHUpLQLWLDOLVpVVRQW
&2175$67(/80,(5(&28/(857(,17(
1(77(7(HW237,0,6(8559%GDQVOHPHQX
&75/,0$*(
3+$6($03/+HW'(3/GDQVOHPHQX5(*/
(175((
75$3(=180(5GDQVOHPHQX5(*/,167$/
/HPHQX5(*/$*(HVWXWLOLVpSRXUFKDQJHUOHV
UpJODJHVGXSURMHFWHXU
8WLOLVDWLRQGHV
PHQXV
ETAT:
ENT.A:
@ @LANGAGE:
MODE ECO:
&RQILJXUDWLRQVGH
PHQX
0HQX5(*/,167$/
/HPHQX5(*/,167$/SHUPHWGHFRUULJHUOHV
GLVWRUVLRQV9RXVSRXYH]PRGLILHUODSRVLWLRQ
G¶DIILFKDJHO¶LQWHQVLWpGHO¶DUULqUHSODQHWFGH
O¶pFUDQGHPHQX
&RQILJXUDWLRQVGHPHQX
)5
3DUDPqWUHVGXPHQX
/HVSDUDPqWUHVUpJODEOHVVRQWOLPLWpVHQIRQFWLRQGHVVLJQDX[G¶HQWUpH/HVSDUDPqWUHVQHSRXYDQWSDVrWUH
PRGLILpVQ¶DSSDUDLVVHQWSDVGDQVOHPHQX1SDJH
8WLOLVDWLRQGHV
PHQXV
)5
0HQX
3DUDPqWUH
'HVFULSWLRQ
&75/
,0$*(
&2175$67(
3OXVODYDOHXUGHUpJODJHHVWpOHYpHSOXVOHFRQWUDVWHHVWLPSRUWDQW3OXVODYDOHXUGH
UpJODJHHVWEDVVHSOXVOHFRQWUDVWHHVWIDLEOH
/80,(5(
OXPLQRVLWp
3OXVODYDOHXUGHUpJODJHHVWpOHYpHSOXVODOXPLQRVLWpHVWLPSRUWDQWH3OXVODYDOHXU
GHUpJODJHHVWEDVVHSOXVO¶LPDJHHVWVRPEUH
&28/(85
3OXVODYDOHXUGHUpJODJHHVWpOHYpHSOXVO¶LQWHQVLWpGHVFRXOHXUVHVWLPSRUWDQWH
3OXVODYDOHXUGHUpJODJHHVWEDVVHSOXVO¶LQWHQVLWpGHVFRXOHXUVHVWIDLEOH
7(,17(
3OXVODYDOHXUGHUpJODJHHVWpOHYpHSOXVO¶LPDJHWHQGYHUVOHVYHUWV3OXVODYDOHXU
GHUpJODJHHVWEDVVHSOXVO¶LPDJHWHQGYHUVOHVPDXYHV
1(77(7(QHWWHWp
3OXVODYDOHXUGHUpJODJHHVWpOHYpHSOXVO¶LPDJHHVWQHWWH3OXVODYDOHXUGHUpJODJH
HVWEDVVHPRLQVO¶LPDJHHVWQHWWH
237,0,6(8559%
$MXVWHODQHWWHWpGHO¶LPDJHORUVTXHGHVVLJQDX[59%VRQWHQWUpV
,0$*('
G\QDPLTXH
215HQIRUFHOHVFRXOHXUVQRLUHV
2))5HVWLWXHILGqOHPHQWOHV]RQHVQRLUHVGHO¶LPDJHFRQIRUPpPHQWDXVLJQDO
VRXUFH
02'(*$00$
*5$3+5HSURGXLWOHVSKRWRVGDQVGHVFRORUDWLRQVQDWXUHOOHV
7(;7(6RXOLJQHOHFRQWUDVWHHQWUHOHQRLUHWOHEODQF&RQYLHQWDX[LPDJHV
FRPSRUWDQWEHDXFRXSGHWH[WH
7(03&28/(8
+$87'RQQHDX[FRXOHXUVEODQFKHVXQHFRORUDWLRQEOHXH
02<(1'RQQHDX[FRXOHXUVEODQFKHVXQHFRORUDWLRQQHXWUH
%$6'RQQHDX[FRXOHXUVEODQFKHVXQHFRORUDWLRQURXJH
67$1'$5'
V\VWqPHFRXOHXU
6pOHFWLRQQHOHV\VWqPHGHFRXOHXUGXVLJQDOG¶HQWUpH
$872176&3$/6(&$0HW176&FRPPXWDWLRQDXWRPDWLTXH(Q
SULQFLSHVpOHFWLRQQH]FHWWHSRVLWLRQ
3$/013$/03$/1HW176&FRPPXWDWLRQDXWRPDWLTXH/RUVTXHOH
VLJQDO3$/03$/1RX176&HVWHQWUpDYHF67$1'$5'UpJOpVXU
$872UpJOpVXUFHWWHSRVLWLRQORUVTXHO¶LPDJHHVWGpIRUPpHRXDFKURPDWLTXH
92/80(
$MXVWHOHYROXPH,OSHXWrWUHUpJOpSRXUFKDFXQHGHVHQWUpHVVpOHFWLRQQpHVjO¶DLGH
GHODWRXFKH,1387
&RQILJXUDWLRQVGHPHQX
0HQX
3DUDPqWUH
'HVFULSWLRQ
5(*/
(175((
3+$6(
/RUVTX¶XQVLJQDOHQSURYHQDQFHG¶XQRUGLQDWHXUHVWHQWUpUpJOH]O¶LPDJHSRXU
TX¶HOOHVRLWSOXVFODLUHDSUqVDYRLUDMXVWpO¶LPDJHHQDSSX\DQWVXUODWRXFKH$3$
$03/+
/RUVTX¶XQVLJQDOHQSURYHQDQFHG¶XQRUGLQDWHXUHVWHQWUpUpJOH]ODGLPHQVLRQ
KRUL]RQWDOHGHO¶LPDJH3OXVODYDOHXUGHUpJODJHHVWpOHYpHSOXVO¶LPDJHHVWODUJH
3OXVODYDOHXUGHUpJODJHHVWEDVVHSOXVO¶LPDJHHVWpWURLWH
'(3/
GpSODFHPHQW
3OXVODYDOHXUGH+KRUL]RQWDODXJPHQWHSOXVO¶LPDJHVHGpSODFHYHUVODGURLWH
SOXVODYDOHXUGLPLQXHSOXVO¶LPDJHVHGpSODFHYHUVODJDXFKH8WLOLVH]<RX,
SRXUUpJOHUOHSRVLWLRQQHPHQWKRUL]RQWDOGHO¶LPDJH
3OXVODYDOHXUGH9YHUWLFDODXJPHQWHSOXVO¶LPDJHVHGpSODFHYHUVOHKDXWSOXVOD
YDOHXUGLPLQXHSOXVO¶LPDJHVHGpSODFHYHUVOHEDV8WLOLVH]MRXmSRXUUpJOHUOH
SRVLWLRQQHPHQWYHUWLFDOGHO¶LPDJH
&219)5(4
FRQYHUWLVVHXUGH
EDOD\DJH
21$IILFKH]XQVLJQDOG¶RUGLQDWHXUHQIRQFWLRQGHODWDLOOHGHO¶pFUDQ/¶LPDJH
DIILFKpHHVWOpJqUHPHQWPRLQVFRQWUDVWpH
2))$IILFKHOHVLJQDOG¶RUGLQDWHXUFRPPHLOHVWHQWUp/¶LPDJHDIILFKpHHVWFODLUH
PDLVG¶XQHWDLOOHLQIpULHXUH
5HPDUTXH
/RUVTX¶XQVLJQDO69*$RX;*$HVWUHoXFHWpOpPHQWQ¶HVWSDVDIILFKp
)250$7
,PDJHG¶RULJLQH
XQHLPDJHDX
IRUPDWHVW
FRPSULPpH
KRUL]RQWDOHPHQW
DILQGHGHYHQLU
XQHLPDJHDX
IRUPDW
0(02,5(9,'(2
,PDJH
DIILFKpHDYHF
OHSDUDPqWUH
)250$7
UpJOpVXU
8WLOLVDWLRQGHV
PHQXV
6pOHFWLRQQH]FHSDUDPqWUHORUVTX¶XQHLPDJHGHIRUPDWHVWHQWUpH
6pOHFWLRQQH]FHSDUDPqWUHORUVTX¶XQHLPDJHGHIRUPDWpFUDVpHHVW
HQWUpHjSDUWLUG¶XQDSSDUHLOWHOTX¶XQOHFWHXU'9'
eFUDVpH8QHLPDJHG¶RULJLQHHVWHQUHJLVWUpHFRPSULPpHKRUL]RQWDOHPHQW
FRPPHUHSUpVHQWpVXUO¶LOOXVWUDWLRQORUVTXHYRXVUpJOH]OHSDUDPqWUH)250$7
VXUOHIRUPDWG¶LPDJH
9RXVSRXYH]FKRLVLUOHPRGHGHYLVXDOLVDWLRQG¶LPDJHOHPLHX[DGDSWpDXW\SH
G¶LPDJHRXDX[FRQGLWLRQVHQYLURQQDQWHV
2))6pOHFWLRQQH]FHSDUDPqWUHSRXUOHUpJODJHHQUHJLVWUpGDQVFKDTXHFDQDO
G¶HQWUpRXFKDTXHVLJQDOG¶HQWUpH
'<1$0,48(6pOHFWLRQQH]FHSDUDPqWUHSRXUUHQIRUFHUOHFRQWUDVWHHWODQHWWHWp
GHO¶LPDJH
67$1'$5'5HFRPPDQGpSRXUOHVFRQGLWLRQVQRUPDOHVGHYLVXDOLVDWLRQ
6pOHFWLRQQH]pJDOHPHQWFHSDUDPqWUHDILQGHUpGXLUHODUXJRVLWpGHO¶LPDJHORUV
GHODYLVXDOLVDWLRQDYHFODIRQFWLRQ'<1$0,48(
9,9$176pOHFWLRQQH]FHSDUDPqWUHSRXUOHVLPDJHVSHXFRQWUDVWpHVGHW\SH
FLQpPDWRJUDSKLTXH
87,/,6$7(85HW9RXVSRXYH]UpJOHUODTXDOLWpGHO¶LPDJHjYRWUH
FRQYHQDQFHHWHQUHJLVWUHUOHVSDUDPqWUHV8QHIRLVOHVSDUDPqWUHVHQUHJLVWUpV
YRXVSRXYH]YLVLRQQHUO¶LPDJHDYHFODTXDOLWpG¶LPDJHVRXKDLWpHHQDSSX\DQWVXU
ODWRXFKHFRUUHVSRQGDQWH
3RXUPpPRULVHUOHUpJODJH
6pOHFWLRQQH]87,/,6$7(8587,/,6$7(85RX87,/,6$7(85
$MXVWH]OHVSDUDPqWUHVVRXKDLWpVGDQVOHVPHQXV
/HVSDUDPqWUHVSRXYDQWrWUHHQUHJLVWUpVVRQW
&2175$67(/80,(5(&28/(857(,17(1(77(7(237,0,6(85
59%,0$*('7(03&28/(867$1'$5'&219)5(4)250$7
5HPDUTXH
9RXVSRXYH]pJDOHPHQWUpJOHUODTXDOLWpGHO¶LPDJHDX[PRGHV'<1$0,48(
67$1'$5'HW9,9$173RXUUpWDEOLUOHVUpJODJHVSDUGpIDXWDSSX\H]VXU
5(6(7
&RQILJXUDWLRQVGHPHQX
)5
0HQX
3DUDPqWUH
5(*/$*( (7$7
8WLOLVDWLRQGHV
PHQXV
)5
5(*/
,167$/
'HVFULSWLRQ
5pJOH]VXU2))SRXUVXSSULPHUOHVPHVVDJHVDIILFKpVjO¶pFUDQDXWUHVTXHOHV
PHQXVOHVPHVVDJHVGHPLVHKRUVWHQVLRQGHO¶DSSDUHLOHWOHVPHVVDJHV
G¶DYHUWLVVHPHQW
3RXUYLVXDOLVHUWRXVOHVPHVVDJHVDIILFKpVVXUpFUDQUpJOH]VXU21
(17$
6pOHFWLRQQHO¶HQWUpHGHVLJQDOGXFRQQHFWHXU3-08/7,
25',1$7(85,QMHFWHOHVLJQDOHQSURYHQDQFHG¶XQRUGLQDWHXU
&20326$17,QMHFWHOHVLJQDOGHFRPSRVDQWRXOHVLJQDOGHFRPSRVDQW
SURJUHVVLIHQSURYHQDQFHG¶XQOHFWHXU'9'G¶XQV\QWRQLVHXU%6QXPpULTXHHWF
9,'(2*%5,QMHFWHOHVLJQDOHQSURYHQDQFHG¶XQMHXYLGpRG¶XQOHFWHXUGH
'9'RXG¶XQHpPLVVLRQ79+'
/$1*$*(
6pOHFWLRQQHODODQJXHG¶DIILFKDJHGXPHQXV\VWqPHHWGHVpFUDQVGHPHQX/HV
ODQJXHVGLVSRQLEOHVVRQWDQJODLVIUDQoDLVDOOHPDQGLWDOLHQHVSDJQROMDSRQDLV
FKLQRLVSRUWXJDLVHWFRUpHQ
02'((&2
/RUVTXHFHSDUDPqWUHHVWUpJOpVXU21O¶LQGLFDWHXU32:(56$9,1*V¶DOOXPH/H
SURMHFWHXUSDVVHDXPRGHpFRQRPLTXHORUVTX¶DXFXQVLJQDOQ¶HVWHQWUpSHQGDQW
PLQXWHVDORUVOHWpPRLQV¶pWHLQWHWOHYHQWLODWHXUGHUHIURLGLVVHPHQWFRQWLQXHGH
WRXUQHU$XPRGHpFRQRPLTXHDXFXQHWRXFKHQHSHXWrWUHDFWLYpHDXFRXUVGHV
SUHPLqUHVVHFRQGHV&HPRGHHVWDQQXOpORUVTX¶XQVLJQDOHVWHQWUpRXTX¶XQH
WRXFKHTXHOFRQTXHHVWHQIRQFpH6LYRXVQHUpJOH]SDVOHSURMHFWHXUDXPRGH
pFRQRPLTXHVpOHFWLRQQH]2))
21/HUpJODJH75$3(=180(5HVWHQUHJLVWUp
0(02,5(
/HVGRQQpHVVRQWUpFXSpUpHVORUVTXHOHSURMHFWHXUHVWPLVVRXVWHQVLRQ/H
75$3(=PpPRLUH
UpJODJHVHUDOHPrPHWRXWHVOHVIRLV
2))75$3(=180(5HVWUHPLVj³´jODSURFKDLQHUHPLVHVRXVWHQVLRQ
75$3(=180(5
$MXVWHODGLVWRUVLRQWUDSp]RwGDOHGXHjO¶DQJOHGHSURMHFWLRQ8WLOLVH]FHSDUDPqWUH
DSUqVVpOHFWLRQGXW\SHGHGLVWRUVLRQV+KRUL]RQWDOHVRX9YHUWLFDOHVjO¶DLGHGH
ODWRXFKH&25575$3(=(
&25575$3(=(
/RUVTXHO¶LPDJHDODIRUPHG¶XQWUDSq]HYHUWLFDO
VpOHFWLRQQH]9
&RUULJH]HQVXLWHODGLVWRUVLRQjO¶DLGHGHODWRXFKH75$3(=180(5/RUVTXH
O¶LPDJHDODIRUPHG¶XQWUDSq]HKRUL]RQWDO
VpOHFWLRQQH]+&RUULJH]
HQVXLWHODGLVWRUVLRQjO¶DLGHGHODWRXFKH75$3(=180(5
326,7,210(18
6pOHFWLRQQH]ODSRVLWLRQGHO¶DIILFKDJHSDUPLOHVRSWLRQV(1+$87$*$8&+(
(1%$6$*$8&+(&(175((1+$87$'52,7(HW(1%$6$'52,7(
&28/(850(18
6pOHFWLRQQHODWRQDOLWpGXPHQXSDUPL67$1'$5'&+$8'()52,'(9(57(
RX*5,6(
$55,(5(3/$1
0(18
6pOHFWLRQQHO¶LQWHQVLWpGHO¶DUULqUHSODQGXPHQXHQWUH620%5(67$1'$5'RX
&/$,5
'85((/$03(
,QGLTXHOHQRPEUHWRWDOG¶KHXUHVGHIRQFWLRQQHPHQWGHODODPSH
&RQILJXUDWLRQVGHPHQX
$SURSRVGXQGHPpPRLUHGH
SUpVpOHFWLRQ
&HSURMHFWHXUHVWGRWpGHW\SHVGHGRQQpHVGH
SUpVpOHFWLRQSRXUOHVVLJQDX[G¶HQWUpHODPpPRLUHGH
SUpVpOHFWLRQ/HSURMHFWHXUGpWHFWHDXWRPDWLTXHPHQW
OHW\SHGHVLJQDOHWUpFXSqUHOHVLQIRUPDWLRQVUHODWLYHV
DXVLJQDOGDQVODPpPRLUHGHSUpVpOHFWLRQORUVTXHOH
VLJQDOGHSUpVpOHFWLRQHVWHQWUp/HQXPpURGH
PpPRLUHHWOHW\SHGHVLJQDOGHFHVLJQDOVRQWDIILFKpV
GDQVOHPHQX5(*/(175((
ENT.A
REGL ENTREE
PHASE:
AMPL H:
DEPL:
CONV FREQ:
15
800
H: 200
ON
V: 30
No. 13
640
1GHPpPRLUH
480
7\SHGHVLJQDO
8QHIRQFWLRQGHUpJODJHDXWRPDWLTXHYRXVSHUPHW
G¶REWHQLUO¶LPDJHODSOXVQHWWHSRVVLEOHORUVGHOD
SURMHFWLRQG¶XQVLJQDOHQSURYHQDQFHG¶XQRUGLQDWHXU
3URMHWH]XQHLPDJHIL[HGHO¶RUGLQDWHXU
$SSX\H]VXUODWRXFKH$3$
/RUVTXHO¶LPDJHHVWFRUUHFWHPHQWUpJOpH
³(IIHFWXp´V¶DIILFKHjO¶pFUDQ
5HPDUTXHV
$SSX\H]VXUODWRXFKH$3$ORUVTXHO¶LPDJHHQWLqUHHVWDIILFKpH
jO¶pFUDQ6¶LO\DGHVERUGVQRLUVDXWRXUGHO¶LPDJHODIRQFWLRQ
$3$QHIRQFWLRQQHUDSDVFRUUHFWHPHQWHWO¶LPDJHULVTXHGH
GpERUGHUGHO¶pFUDQ
6LYRXVFRPPXWH]OHVLJQDOG¶HQWUpHRXVLYRXVUHEUDQFKH]XQ
RUGLQDWHXUDSSX\H]GHQRXYHDXVXUODWRXFKH$3$SRXUREWHQLU
XQHLPDJHDGpTXDWH
3RXUUHYHQLUjO¶pFUDQG¶RULJLQHDSSX\H]GHQRXYHDXVXUOD
WRXFKH$3$DXFRXUVGXUpJODJH
,OVHSHXWTXHO¶LPDJHQHVRLWSDVUpJOpHFRUUHFWHPHQWHQ
IRQFWLRQGHVW\SHVGHVLJQDX[HQWUpV
5pJOH]OHVSDUDPqWUHVGDQVOHPHQX5(*/(175((ORUVTXH
YRXVDMXVWH]O¶LPDJHPDQXHOOHPHQW1SDJH
8WLOLVDWLRQGHV
PHQXV
9RXVSRXYH]pJDOHPHQWDMXVWHUOHVGRQQpHVGH
SUpVpOHFWLRQYLDOHPHQX5(*/(175((
&HSURMHFWHXUHVWpJDOHPHQWGRWpGHW\SHVGH
PpPRLUHVXWLOLVDWHXUSRXU(17$GDQVOHVTXHOOHV
YRXVSRXYH]VDXYHJDUGHUOHUpJODJHGHVGRQQpHV
UpJOpHVSRXUXQVLJQDOG¶HQWUpHQRQSUpVpOHFWLRQQp
/RUVTX¶XQVLJQDOQRQSUpVpOHFWLRQQpHVWHQWUpSRXUOD
SUHPLqUHIRLVOHQXPpURGHPpPRLUHV¶DIILFKH6LOH
VLJQDOG¶HQWUpHHVWDMXVWpGDQVOHPHQX5(*/
(175((LOVHUDDIIHFWpDXSURMHFWHXU6LSOXVGH
PpPRLUHVXWLOLVDWHXUVRQWDIIHFWpHVODPpPRLUHOD
SOXVUpFHQWHUHPSODFHWRXMRXUVODSOXVDQFLHQQH
5HSRUWH]YRXVDXWDEOHDXGHODSDJHSRXUVDYRLUVL
OHVLJQDOHVWHQUHJLVWUpGDQVODPpPRLUHGH
SUpVpOHFWLRQ
5pJODJHGHODTXDOLWpGH
O¶LPDJHG¶XQVLJQDOHQ
SURYHQDQFHG¶XQRUGLQDWHXU
&RPPHOHVGRQQpHVVRQWUDSSHOpHVGHODPpPRLUHGH
SUpVpOHFWLRQSRXUOHVVLJQDX[VXLYDQWVYRXVSRXYH]
XWLOLVHUFHVGRQQpHVSUpVpOHFWLRQQpHVHQDMXVWDQW
$03/+(IIHFWXH]OHUpJODJHILQHQDMXVWDQW'(3/
6LJQDO
1GH
PpPRLUH
$03/+
GLPHQVLRQ
KRUL]RQWDOH
6XSHU0DF
6*,
0DFLQWRVK
5HPDUTXH
/RUVTXHOHIRUPDWGHO¶LPDJHGXVLJQDOG¶HQWUpHHVWGLIIpUHQWGH
XQHSDUWLHGHO¶pFUDQV¶DIILFKHHQQRLU
&RQILJXUDWLRQVGHPHQX
)5
8WLOLVDWLRQG¶XQ³0HPRU\6WLFN´
&HWWHVHFWLRQLQGLTXHFRPPHQWYLVLRQQHUOHVjO¶DLGH
G¶XQDSSDUHLOSKRWRQXPpULTXHHWVWRFNpVGDQVXQH
FDUWH³0HPRU\6WLFN´9RXVSRXYH]UpDOLVHUXQ
GLDSRUDPDjSDUWLUGHVILFKLHUVDIILFKHUXQpFUDQ
G¶LQGH[GXILFKLHUHWF
,QIRUPDWLRQVUHODWLYHV
DX[FDUWHV³0HPRU\
6WLFN´
,QIRUPDWLRQVUHODWLYHVDX[FDUWHV
³0HPRU\6WLFN´
8WLOLVDWLRQG¶XQ
³0HPRU\6WLFN´
)5
/H³0HPRU\6WLFN´HVWXQQRXYHDXVXSSRUW
G¶HQUHJLVWUHPHQW,&H[WUrPHPHQWFRPSDFWIDFLOHj
WUDQVSRUWHUHWHUJRQRPLTXHDYHFXQHFDSDFLWpGH
VWRFNDJHGHGRQQpHVVXSpULHXUHjFHOOHG¶XQH
GLVTXHWWH&HVXSSRUWHVWFRQoXSRXUO¶pFKDQJHHWOH
SDUWDJHGHGRQQpHVQXPpULTXHVDYHFGHVSURGXLWV
FRPSDWLEOHV³0HPRU\6WLFN´'HSOXVpWDQW
DPRYLEOHLOSHXWpJDOHPHQWrWUHXWLOLVpSRXUOH
VWRFNDJHGHGRQQpHVH[WHUQHV
7\SHVGH³0HPRU\6WLFN´GLVSRQLEOHV
,OH[LVWHGHX[W\SHVGH³0HPRU\6WLFN´OHVFDUWHV
³0HPRU\6WLFN´0DJLF*DWHGLVSRVDQWGHOD
WHFKQRORJLHGHSURWHFWLRQGHVGURLWVG¶DXWHXU
0DJLF*DWHHWOHVFDUWHV³0HPRU\6WLFN´JpQpULTXHV
&HORJLFLHODFFHSWHOHVGHX[W\SHVGH³0HPRU\
6WLFN´&HSHQGDQWpWDQWGRQQpTXHFHORJLFLHOQHJqUH
SDVOHVQRUPHV0DJLF*DWHOHVLQIRUPDWLRQV
HQUHJLVWUpHVVXUODFDUWH³0HPRU\6WLFN´QHVRQWSDV
VRXPLVHVjODSURWHFWLRQGHVGURLWVG¶DXWHXU
0DJLF*DWH
,QIRUPDWLRQVUHODWLYHVDX[FDUWHV³0HPRU\6WLFN´
,QIRUPDWLRQVUHODWLYHVDX0DJLF*DWH
/DWHFKQRORJLHGHSURWHFWLRQGHVGURLWVG¶DXWHXU
0DJLF*DWHXWLOLVHODWHFKQLTXHGHFU\SWDJHGHV
GRQQpHV
)RUPDWG¶DIILFKDJHFRPSDWLEOHDYHF
FHSURMHFWHXU
/HVGRQQpHVLPDJHHQUHJLVWUpHVjO¶DLGHG¶XQDSSDUHLO
SKRWRQXPpULTXHHWPpPRULVpHVVXUXQ³0HPRU\
6WLFN´DXIRUPDWVXLYDQW
)LFKLHUVLPDJHFRPSDWLEOHV'&)FRPSUHVVpVDX
IRUPDW-3(*-RLQW3KRWRJUDSKLF([SHUWV*URXS
DYHFO¶H[WHQVLRQMSJ
$YDQWG¶XWLOLVHUXQ³0HPRU\6WLFN´
&RQQHFWHXU
2QJOHWGH
SURWHFWLRQHQ
pFULWXUH
(PSODFHPHQW
GHO¶pWLTXHWWH
9RXVQHSRXYH]SDVWRXUQHUQLHIIDFHUGHVLPDJHV
IL[HVORUVTXHO¶RQJOHWGHSURWHFWLRQHQpFULWXUHHVW
UpJOpVXU/2&.
1RXVYRXVFRQVHLOORQVGHIDLUHXQHFRSLHGH
VDXYHJDUGHGHVGRQQpHVLPSRUWDQWHV
/HVGRQQpHVLPDJHSHXYHQWrWUHHQGRPPDJpHVGDQV
OHVFDVVXLYDQWV
±6LYRXVUHWLUH]OH³0HPRU\6WLFN´PHWWH]OH
SURMHFWHXUKRUVWHQVLRQRXUHWLUH]ODSLOHSRXUOD
UHPSODFHUORUVTXHOHWpPRLQG¶DFFqVFOLJQRWH
±6LYRXVXWLOLVH]XQ³0HPRU\6WLFN´jSUR[LPLWpGH
FKDPSVpOHFWULTXHVRXPDJQpWLTXHV
5HPDUTXHV
(YLWH]GHWRXFKHUOHVSDUWLHVPpWDOOLTXHVGHODSLqFHGH
UDFFRUGHPHQWRXGHOHVODLVVHUHQFRQWDFWDYHFG¶DXWUHVREMHWV
PpWDOOLTXHV
1HIL[H]VXUO¶HVSDFHUpVHUYpjO¶pWLTXHWWHDXFXQDXWUHpOpPHQW
TXHO¶pWLTXHWWHIRXUQLH
)L[H]O¶pWLTXHWWHVXUO¶HPSODFHPHQWSUpYXjFHWHIIHW$VVXUH]
YRXVTX¶HOOHHVWSDUIDLWHPHQWSRVLWLRQQpH
(YLWH]GHGpIRUPHUGHODLVVHUWRPEHURXGHVRXPHWWUHjGHV
FKRFVOH³0HPRU\6WLFN´
1HGpPRQWH]SDVHWQHPRGLILH]SDVOH³0HPRU\6WLFN´
(YLWH]WRXWFRQWDFWGX³0HPRU\6WLFN´DYHFGHVOLTXLGHV
1¶XWLOLVH]SDVRXQHFRQVHUYH]SDVOH³0HPRU\6WLFN´GDQVGHV
HQGURLWV
H[WUrPHPHQWFKDXGVWHOVTX¶XQHYRLWXUHJDUpHHQSOHLQVROHLO
VRXPLVjODOXPLqUHGLUHFWHGXVROHLO
UqVKXPLGHVRXVRXPLVjGHVJD]FRUURVLIV
7UDQVSRUWH]RXFRQVHUYH]OH³0HPRU\6WLFN´GDQVVRQERvWLHU
$SURSRVGXIRUPDWDJHGHV³0HPRU\
6WLFN´
/HV³0HPRU\6WLFN´VRQWIRUPDWpVGDQVXQIRUPDW
VWDQGDUGVSpFLILTXHjOHXUVRUWLHG¶XVLQH1RXVYRXV
UHFRPPDQGRQVGHIRUPDWHUOHV³0HPRU\6WLFN´VXU
FHWDSSDUHLO
$YHUWLVVHPHQWFRQFHUQDQWOHIRUPDWDJHGHV
³0HPRU\6WLFN´VXUXQRUGLQDWHXU
3UHQH]ELHQHQFRPSWHOHVSRLQWVVXLYDQWVORUVGX
IRUPDWDJHGH³0HPRU\6WLFN´VXUXQRUGLQDWHXUSDU
H[HPSOHVXUFHOXLTXHYRXVXWLOLVH]
/HIRQFWLRQQHPHQWGHV³0HPRU\6WLFN´IRUPDWpVVXU
XQRUGLQDWHXUQ¶HVWSDVJDUDQWLVXUFHWDSSDUHLO3RXU
XWLOLVHUXQ³0HPRU\6WLFN´IRUPDWpVXUXQRUGLQDWHXU
OH³0HPRU\6WLFN´GRLWrWUHUHIRUPDWpVXUFHW
DSSDUHLO1RWH]TXHGDQVFHFDVWRXWHVOHVGRQQpHV
PpPRULVpHVVXUOH³0HPRU\6WLFN´VRQWSHUGXHV
3UpSDUDWLRQjODYLVXDOLVDWLRQ
G¶LPDJHVIL[HVVWRFNpHVGDQV
XQ³0HPRU\6WLFN´
,QVHUWLRQG¶XQ³0HPRU\6WLFN´
,QVpUH]OH³0HPRU\6WLFN´GDQVODIHQWHSUpYXHjFHW
HIIHWVXUO¶DYDQWGXSURMHFWHXU
³0HPRU\6WLFN´
7pPRLQG¶DFFqV
6LOHWpPRLQG¶DFFqVHVWDOOXPpRXFOLJQRWHGHV
GRQQpHVVRQWHQFRXUVGHOHFWXUHRXG¶pFULWXUHVXUOH
³0HPRU\6WLFN´1HVHFRXH]SDVOHSURMHFWHXUHWQHOH
VRXPHWWH]SDVjGHVFKRFV1HPHWWH]SDVOH
SURMHFWHXUKRUVWHQVLRQQHUHWLUH]SDVODFDUWH
³0HPRU\6WLFN´9RXVULVTXHULH]G¶DOWpUHUOHV
GRQQpHV
,QVpUH]OH³0HPRU\6WLFN´GDQVOHVHQVLQGLTXpSDU
ODIOqFKHHWSRXVVH]MXVTX¶DXGpFOLF
3RXUUHWLUHUOH³0HPRU\6WLFN´
5HPDUTXHV
³0HPRU\6WLFN´HW
VRQWGHVPDUTXHVGpSRVpHVGH6RQ\
&RUSRUDWLRQ
³0DJLF*DWH0HPRU\6WLFN´HW
VRQWGHVPDUTXHVGpSRVpHV
GH6RQ\&RUSRUDWLRQ
6LOHWpPRLQG¶DFFqVHVWpWHLQWDSSX\H]VXUOH
³0HPRU\6WLFN´HWUHWLUH]YRWUHPDLQ/RUVTXHOH
YHUURXVHGpEORTXHUHWLUH]OH³0HPRU\6WLFN´
8WLOLVDWLRQG¶XQ
³0HPRU\6WLFN´
3RXUpYLWHUGHSHUGUHGHVGRQQpHVQRXVYRXV
FRQVHLOORQVGHIDLUHVRXYHQWGHVFRSLHVGH
VDXYHJDUGH'DQVDXFXQFDV6RQ\QHSHXWrWUHWHQX
UHVSRQVLEOHG¶XQHSHUWHGHGRQQpHV
&HUWDLQVHQUHJLVWUHPHQWVQRQDXWRULVpVSHXYHQWrWUH
FRQWUDLUHVDX[GLVSRVLWLRQVGHODORLVXUOHVGURLWV
G¶DXWHXU
6RQ\VHUpVHUYHOHGURLWGHFKDQJHURXGHPRGLILHU
OHORJLFLHOG¶DSSOLFDWLRQ³0HPRU\6WLFN´HWFHOD
VDQVSUpDYLVR
7pPRLQG¶DFFqV
3UpSDUDWLRQjODYLVXDOLVDWLRQG¶LPDJHVIL[HVVWRFNpHVGDQVXQ³0HPRU\6WLFN´
)5
6pOHFWLRQGXFRQWHQX
FRPSUHQDQWXQHLPDJHIL[H
GpVLUpH
$SSX\H]VXUMRXmSRXU
VpOHFWLRQQHUe9e1
HW
DSSX\H]VXU(17(5
ÉVÉN.
Visualisateur JPEG
Diaporama
Index
SIDE
SHOT
VOLUME
+
–
+
–
INPUT
MS SLIDE
Sél. contenu
APA
VIDEO MEMORY
DYNAMIC STANDARD
USER 1
USER 2
LIVING
USER 3
OFF
MENU
ENTER
RESET
$SSX\H]VXU,1387SRXU
VpOHFWLRQQHU06
8WLOLVDWLRQG¶XQ
³0HPRU\6WLFN´
/DIRQFWLRQ06KRPHV¶DIILFKH
YHUVOHKDXW
ÉVÉN.
DCIM
Visualisateur JPEG
Diaporama
Index
ÉVÉN.
e9e1
5(*/$*(
³0(025<67,&.´
/HQRP
FRUUHVSRQGDQWDX
FRQWHQX
VpOHFWLRQQp
V¶DIILFKH
Sél. contenu
Visualisateur JPEG
0100MSDCF
0101MSDCF
0102MSDCF
0103MSDCF
0104MSDCF
0105MSDCF
Diaporama
Index
Sél. contenu
/HVGHX[SUHPLqUHVYLJQHWWHVGX
FRQWHQXVpOHFWLRQQpV¶DIILFKHQW
'HVLPDJHVIL[HVPXOWLSOHVVRQWLQFOXHVGDQVOHFRQWHQX/H
FRQWHQXSHXWFRPSRUWHUGHVLPDJHVIL[HVLQGLYLGXHOOHVHW
G¶DXWUHVW\SHVGHILFKLHUV9RXVGHYH]VpOHFWLRQQHUFRQWHQX
ORUVTXHYRXVYLVXDOLVH]XQHLPDJHIL[HPpPRULVpHVXUXQ
³0HPRU\6WLFN´
3OXVLHXUVSHWLWHVLPDJHVLQFOXHVGDQVOHFRQWHQXSHXYHQWrWUH
DIILFKpHVHQPrPHWHPSV2QOHVDSSHOOHGHVYLJQHWWHV
/HVRXVPHQXGHVpOHFWLRQGXFRQWHQXV¶DIILFKH
&RQWHQXDFWXHOOHPHQWVpOHFWLRQQp
6\PEROH06KRPH
)5
$SSX\H]VXUMRXmSRXU
VpOHFWLRQQHU³6pOFRQWHQX´HW
DSSX\H]VXU(17(5
3UpSDUDWLRQjODYLVXDOLVDWLRQG¶LPDJHVIL[HVVWRFNpHVGDQVXQ³0HPRU\6WLFN´
/RUVTXHOHV
LPDJHV-3(*VRQW
,PDJHVRXFRQWHQX VDXYHJDUGpHV
FRQWHQXVGDQVOH GDQVOHFRQWHQX
FRQWHQXHQFRXUV HQFRXUVO¶XQ
G¶HX[V¶DIILFKH
5HPDUTXH
/HVFRQWHQXHVVRQWFODVVpHVSDURUGUHQXPpULTXHHW
DOSKDEpWLTXHSRXUFRQWHQXHVPD[LPXP/HVGHUQLqUHV
FRQWHQXHVQHVHURQWSDVFODVVpV
$SSX\H]VXUMRXmSRXU
VpOHFWLRQQHUOHFRQWHQXTXH
YRXVVRXKDLWH]XWLOLVHUSRXUOH
GLDSRUDPDHWDSSX\H]VXU
(17(5
6LYRXVYRXOH]VpOHFWLRQQHUXQGRVVLHUDXWUHTXH
FHX[DIILFKpVGDQVOHPHQXVpOHFWLRQQH]vRXV
HWDSSX\H]VXU(17(5
$SSX\H]VXU(17(5
/HQRPGXFRQWHQXVpOHFWLRQQpHWOHVGHX[
SUHPLqUHVYLJQHWWHVV¶DIILFKHQW
$IILFKDJHG¶LPDJHV
IL[HVGDQVXQRUGUH
VSpFLILTXH±'LDSRUDPD
9RXVSRXYH]XWLOLVHUOHGLDSRUDPDHQXWLOLVDQWGHV
LPDJHVIL[HVFRPSDWLEOH'&)DXIRUPDW-3(*
HQUHJLVWUpSDUXQDSSDUHLOSKRWRQXPpULTXH9RXV
SRXYH]DYDQFHUXQHGLDSRVLWLYHDXWRPDWLTXHPHQWRX
PDQXHOOHPHQW
ÉVÉN.
Visualisateur JPEG
Diaporama
Index
SIDE
SHOT
VOLUME
Sél. contenu
+
–
+
–
INPUT
MS SLIDE
DCIM
APA
7RXFKH066/,'(
VIDEO MEMORY
DYNAMIC STANDARD
USER 1
USER 2
LIVING
USER 3
OFF
MENU
RESET
6pOHFWLRQQH]OHFRQWHQX
FRPSUHQDQWXQHLPDJHIL[H
GpVLUpH1 SDJH $IILFKDJHG¶LPDJHVIL[HVGDQVXQRUGUHVSpFLILTXH±'LDSRUDPD
8WLOLVDWLRQG¶XQ
³0HPRU\6WLFN´
ENTER
)5
$SSX\H]VXUMRXmSRXU
VpOHFWLRQQHU³'LDSRUDPD´HW
DSSX\H]VXU(17(5
/HVRXVPHQXGHFRQILJXUDWLRQGHVSDUDPqWUHV
VXLYDQWVV¶DIILFKH
$SSX\H]VXUMRXmSRXU
HQUHJLVWUHUOHSDUDPqWUH
VpOHFWLRQQpHWDSSX\H]VXU
(17(5
ÉVÉN.
ÉVÉN.
Visualisateur JPEG
Visualisateur JPEG
Diaporama
Diaporama
Index
Sél. contenu
Exécuter
Index
Retour
Effet
Désactivé
Diapo avan.
Auto
Intervalle
1 sec
Sél. contenu
Exécuter
Retour
Effet
Désactivé
Diapo avan.
Auto
Intervalle
5 sec
DCIM
DCIM
(IIHWUpJODJHGHO¶HIIHWORUVTXHODGLDSRVLWLYH
HVWDIILFKpH
'LDSRDYDQUpJODJHSHUPHWWDQWGHSDVVHUjOD
GLDSRVLWLYHVXLYDQWHDXWRPDWLTXHPHQW
³$XWR´RXPDQXHOOHPHQW³0DQXHO´
,QWHUYDOOHUpJODJHGXWHPSVG¶DIILFKDJHG¶XQH
GLDSRVLWLYH/RUVTXH³'LDSRDYDQ´HVWUpJOp
VXU³0DQXHO´FHSDUDPqWUHQHIRQFWLRQQH
SDV/¶LQGLFDWLRQGHODGXUpHHVW
DSSUR[LPDWLYH
8WLOLVDWLRQG¶XQ
³0HPRU\6WLFN´
$SSX\H]VXUMRXmSRXU
VpOHFWLRQQHUOHSDUDPqWUHHW
DSSX\H]VXU(17(5
$SUqVOHUpJODJHGHWRXVOHV
SDUDPqWUHVDSSX\H]VXUMRX
mSRXUVpOHFWLRQQHU
³([pFXWHU´HWDSSX\H]VXU
(17(5
/RUVTXHYRXVUpJOH]³'LDSRDYDQ´VXU³$XWR´
OHGLDSRUDPDFRPPHQFHDXWRPDWLTXHPHQW
/RUVTXHYRXVOHUpJOH]VXU³0DQXHO´XWLOLVH]OD
WRXFKH,RXmSRXUSDVVHUjODGLDSRVLWLYH
VXLYDQWH3RXUUHYHQLUjODGLDSRVLWLYH
SUpFpGHQWHXWLOLVH]ODWRXFKH<RXM
3RXUWHUPLQHUOHGLDSRUDPD
$SSX\H]VXU066/,'(RX(17(5
3RXUUHVWDXUHUODIRQFWLRQ06KRPHDYDQWGH
ODQFHUOHGLDSRUDPD
6pOHFWLRQQH]³5HWRXU´jO¶pWDSHFLGHVVXV
/DQFHPHQWUDSLGHGXGLDSRUDPD
3XLVTXHOHVUpJODJHVVRQWPpPRULVpVPrPHVLYRXV
PRGLILH]O¶HQWUpHDSUqVH[pFXWLRQGHVpWDSHVj
DSSX\H]VXUODWRXFKH066/,'(DXGpEXWGX
GLDSRUDPD/¶HQWUpHHVWSDUDPpWUpHVXU06HWOH
GLDSRUDPDFRPPHQFHUDSLGHPHQW
)5
$IILFKDJHG¶LPDJHVIL[HVGDQVXQRUGUHVSpFLILTXH±'LDSRUDPD
$IILFKDJH
G¶LPDJHVLQGH[pHV
VXUpFUDQFRPSOHW
$SSX\H]VXUMRXmSRXU
VpOHFWLRQQHU³,QGH[´HW
DSSX\H]VXU(17(5
/¶pFUDQG¶LQGH[DSSDUDvWHWLPDJHVLQGH[pHV
GXFRQWHQXVpOHFWLRQQpV¶DIILFKHQW
9RXVSRXYH]DIILFKHULPDJHVLQGH[pHVYLJQHWWHV
G¶XQFRQWHQXVpOHFWLRQQpHQXQHVHXOHIRLV
Reciipe
flour - - - - 2
s u g a r - - - 1/2
s a l t - - - - - 1/2
butter - - -1
MENU
ENTER
RESET
6LOHFRQWHQXFRPSWHSOXVGH
LPDJHV
9RXVSRXYH]DIILFKHUGHVLPDJHVDXWUHVTXHFHOOHV
DFWXHOOHPHQWjO¶pFUDQHQDSSX\DQWVXUvLPDJHV
SUpFpGHQWHVRXVLPDJHVVXLYDQWHVHWVXU
(17(5
$SSX\H]VXUMm<RX,SRXUVpOHFWLRQQHUXQH
LPDJHLPDJHSDUOHTXHOOHFRPPHQFHXQGLDSRUDPD
SXLVDSSX\H]VXU066/,'(
5HPDUTXH
/HFRQWHQXHVWFODVVpSDURUGUHQXPpULTXHHWDOSKDEpWLTXHSRXU
pOpPHQWVPD[LPXP/HVGHUQLHUVpOpPHQWVQHVHURQWSDV
FODVVpV
$IILFKDJHG¶LPDJHVLQGH[pHVVXUpFUDQFRPSOHW
8WLOLVDWLRQG¶XQ
³0HPRU\6WLFN´
6pOHFWLRQQH]OHFRQWHQX
FRPSUHQDQWXQHLPDJHIL[H
GpVLUpH1 SDJH 3RXUFRPPHQFHUXQGLDSRUDPDDYHF
O¶pFUDQG¶LQGH[
)5
$IILFKDJHGXPHQX,QGH[
$SSX\H]VXUMm<RX,SRXUVpOHFWLRQQHUXQH
LPDJHHWDSSX\H]VXU(17(5
/HPHQXLQGH[GHO¶LPDJHVpOHFWLRQQpHV¶DIILFKH&H
PHQXYRXVSHUPHWG¶HIIHFWXHUSOXVLHXUVUpJODJHVSRXU
FKDTXHLPDJH1SDJHVj
'DWHG¶HQUHJLVWUHPHQWGH
O¶LPDJH
1RPGRQQpjFKDTXHLPDJH
FDUDFWqUHVDOSKDQXPpULTXHV
XQLTXHPHQW
$IILFKDJHG¶XQH
LPDJHVXUpFUDQ
FRPSOHW
9RXVSRXYH]SURMHWHUXQHGHVLPDJHVLQGH[pHVVXU
pFUDQFRPSOHW
5pVROXWLRQ
1XPpURVpTXHQWLHOQRPEUH
WRWDOG¶LPDJHVGDQVOHFRQWHQX
MENU
,QGLTXH]VLODIRQFWLRQGH
SURWHFWLRQ1
1 SDJH HVW
DFWLYpHVXUXQHLPDJH
,QGLTXHORUVTX¶XQHLPDJHHVW
HQUHJLVWUpHHQWDQWTX¶LPDJH
GHODQFHPHQW1
1 SDJH ENTER
RESET
n°: 4/32
Ampl: 1024x768
Fichier: SPORTS
Date:29/7/2001
14:22
Écran
complet
Écran
complet
Fermer
Reciipe
flour - - - - 2
s u g a r - - - 1/2
s a l t - - - - - 1/2
butter - - -1
Retour
Protect.
Rotation
Lancmnt
8WLOLVDWLRQG¶XQ
³0HPRU\6WLFN´
Suppr.
0HQXLQGH[
3DUDPqWUHVGHUpJODJH
3RXUUHYHQLUjODIRQFWLRQ06KRPH
6pOHFWLRQQH]³5HWRXU´HWDSSX\H]VXU(17(5
6pOHFWLRQQH]OHFRQWHQX
FRPSUHQDQWXQHLPDJHIL[H
GpVLUpH1 SDJH $SSX\H]VXUMRXmSRXU
VpOHFWLRQQHU³,QGH[´HW
DSSX\H]VXU(17(5
/HVLPDJHVLQGH[pHVGXFRQWHQXUVpOHFWLRQQp
V¶DIILFKHQW
)5
$IILFKDJHG¶XQHLPDJHVXUpFUDQFRPSOHW
$SSX\H]VXUMm<RX,
SRXUVpOHFWLRQQHUO¶LPDJHTXH
YRXVVRXKDLWH]DIILFKHUVXU
pFUDQFRPSOHWHWDSSX\H]VXU
(17(5
5RWDWLRQG¶XQ
ILFKLHULPDJH
/HPHQX,QGH[DSSDUDvW
n°: 4/32
Ampl: 1024x768
Fichier: SPORTS
Date: 29/7/2001
14:22
9RXVSRXYH]IDLUHSLYRWHUXQHLPDJHSDULQFUpPHQWV
GH
Écran
complet
Écran
complet
Fermer
Reciipe
flour - - - - 2
s u g a r - - - 1/2
s a l t - - - - - 1/2
butter - - -1
Retour
MENU
Protect.
Rotation
Lancmnt
ENTER
Suppr.
RESET
$SSX\H]VXUMRXmSRXU
VpOHFWLRQQHU³(FUDQFRPSOHW´
HWDSSX\H]VXU(17(5
/¶LPDJHVpOHFWLRQQpHHVWSURMHWpHDX[
GLPHQVLRQVGHO¶pFUDQ
3RXUDIILFKHUODGLDSRVLWLYHVXLYDQWHDSSX\H]VXU,
RXm3RXUUHYHQLUjODGLDSRVLWLYHSUpFpGHQWH
DSSX\H]VXU<RXM
3RXUUHYHQLUjO¶pFUDQG¶LQGH[
$SSX\H]VXU066/,'(RX(17(5
6pOHFWLRQQH]OHFRQWHQX
FRPSUHQDQWXQHLPDJHIL[H
GpVLUpH1 SDJH $SSX\H]VXUMRXmSRXU
VpOHFWLRQQHU³,QGH[´HW
DSSX\H]VXU(17(5
8WLOLVDWLRQG¶XQ
³0HPRU\6WLFN´
3RXUDIILFKHUODGLDSRVLWLYH
SUpFpGHQWHRXVXLYDQWH
/HVLPDJHVLQGH[pHVGXFRQWHQXVpOHFWLRQQp
V¶DIILFKHQW
5RWDWLRQG¶XQILFKLHULPDJH
)5
$SSX\H]VXUMm<RX,
SRXUVpOHFWLRQQHUO¶LPDJHTXH
YRXVVRXKDLWH]IDLUHSLYRWHUHW
DSSX\H]VXU(17(5
/HPHQX,QGH[DSSDUDvW
n°: 4/32
Ampl: 1024x768
Fichier: SPORTS
Date: 29/7/2001
14:22
Écran
complet
Écran
complet
3URWHFWLRQG¶XQH
LPDJHIL[H
LPSRUWDQWH
9RXVSRXYH]SURWpJHUXQHLPDJHIL[HDILQG¶pYLWHU
WRXWHIIDFHPHQWDFFLGHQW
Fermer
Reciipe
flour - - - - 2
s u g a r - - - 1/2
s a l t - - - - - 1/2
butter - - -1
Retour
Protect.
Rotation
MENU
Lancmnt
Suppr.
ENTER
8WLOLVDWLRQG¶XQ
³0HPRU\6WLFN´
)5
$SSX\H]VXUMRXmSRXU
VpOHFWLRQQHU³5RWDWLRQ´HW
DSSX\H]VXU(17(5
$SSX\H]VXUMRXmSRXU
VpOHFWLRQQHUOHVHQVGH
URWDWLRQ GDQVOHVHQVGHV
DLJXLOOHVG¶XQHPRQWUHRX GDQVOHVHQVLQYHUVHGHV
DLJXLOOHVG¶XQHPRQWUHHW
DSSX\H]VXU(17(5
/¶LPDJHSLYRWHGHjFKDTXHIRLVTXHYRXV
DSSX\H]VXUODWRXFKH(17(5
5HPDUTXHV
9RXVQHSRXYH]SDVWRXUQHUXQHLPDJHSURWpJpH1 SDJH 3RXUWRXUQHUXQHWHOOHLPDJHVXSSULPH]ODSURWHFWLRQGHFHWWH
LPDJH
9RXVQHSRXYH]SDVWRXUQHUOHVLPDJHVG¶XQ³0HPRU\6WLFN´
ORUVTXHO¶RQJOHWGHSURWHFWLRQHQpFULWXUHHVWUpJOpVXU/2&.
3URWHFWLRQG¶XQHLPDJHIL[HLPSRUWDQWH
RESET
6pOHFWLRQQH]OHFRQWHQX
FRPSUHQDQWXQHLPDJHIL[H
GpVLUpH1 SDJH $SSX\H]VXUMRXmSRXU
VpOHFWLRQQHU³,QGH[´HW
DSSX\H]VXU(17(5
/HVLPDJHVLQGH[pHVGXFRQWHQXVpOHFWLRQQp
V¶DIILFKHQW
$SSX\H]VXUMm<RX,
SRXUVpOHFWLRQQHUO¶LPDJHTXH
YRXVVRXKDLWH]SURWpJHUHW
DSSX\H]VXU(17(5
/HPHQX,QGH[DSSDUDvW
n°: 4/32
Ampl: 1024x768
Fichier: SPORTS
Date: 29/7/2001
14:22
Écran
complet
Écran
complet
Fermer
Reciipe
flour - - - - 2
s u g a r - - - 1/2
s a l t - - - - - 1/2
butter - - -1
Retour
Protect.
Rotation
Lancmnt
3URMHFWLRQG¶XQHLPDJH
VpOHFWLRQpHORUVTXHOHSURMHFWHXU
HVWVRXVWHQVLRQ±/DQFHPHQW
$ODPLVHVRXVWHQVLRQGXSURMHFWHXUO¶LPDJHIL[H
VSpFLILTXHVWRFNpHVXUOHSURMHFWHXUHVWSURMHWpH
DXWRPDWLTXHPHQWSHQGDQWHQYLURQXQHPLQXWHHWFH
PrPHORUVTX¶DXFXQVLJQDOQ¶HVWHQWUp9RXVSRXYH]
FKDQJHUFHWWHLPDJHIL[HSRXUVpOHFWLRQQHUFHOOHTXH
YRXVSUpIpUH]
Suppr.
$SSX\H]VXUMRXmSRXU
VpOHFWLRQQHU³3URWHFW´HW
DSSX\H]VXU(17(5
$SSX\H]VXUMRXmSRXU
VpOHFWLRQQHU³$FW´RX³7WDFW´
HWDSSX\H]VXU(17(5
(QUHJLVWUHPHQWG¶XQHLPDJH
IL[HHQWDQWTX¶LPDJHGH
ODQFHPHQW
/RUVTXHYRXVVRXKDLWH]TX¶XQHLPDJHVWRFNpHGDQV
YRWUH³0HPRU\6WLFN´GHYLHQQHO¶LPDJHGH
ODQFHPHQWPpPRULVH]O¶LPDJHGDQVOH³0HPRU\
6WLFN´
MENU
ENTER
RESET
3RXUVXSSULPHUODSURWHFWLRQ
6pOHFWLRQQH]³'pV´RX³7WGpV´jO¶pWDSH
/DVpOHFWLRQGXSDUDPqWUH³'pV´VXSSULPHOD
SURWHFWLRQGHO¶LPDJHVpOHFWLRQQpH/DVpOHFWLRQGX
SDUDPqWUH³7WGpV´VXSSULPHODSURWHFWLRQGHWRXWHV
OHVLPDJHVGXFRQWHQXVpOHFWLRQQp
8WLOLVDWLRQG¶XQ
³0HPRU\6WLFN´
$FW8QHLPDJHVpOHFWLRQQpHGDQVO¶pFUDQ
,QGH[HVWSURWpJp
7WDFW7DLWHVOHVLPDJHVGXFRQWHQX
VpOHFWLRQQpVRQWSURWpJpV
/HV\PEROHGHSURWHFWLRQV¶DIILFKHGDQVOHPHQX
,QGH[SRXUO¶LPDJHSURWpJpH
6pOHFWLRQQH]OHFRQWHQX
FRPSUHQDQWXQHLPDJHIL[H
GpVLUpH1 SDJH 3URMHFWLRQG¶XQHLPDJHVpOHFWLRQpHORUVTXHOHSURMHFWHXUHVWVRXVWHQVLRQ±/DQFHPHQW
)5
$SSX\H]VXUMRXmSRXU
VpOHFWLRQQHU³,QGH[´HW
DSSX\H]VXU(17(5
5pJODJHGHO¶LPDJHGH
ODQFHPHQW
/HVLPDJHVLQGH[pHVGXFRQWHQXVpOHFWLRQQp
V¶DIILFKHQW
$SSX\H]VXUMm<RX,
SRXUVpOHFWLRQQHUO¶LPDJHTXH
YRXVVRXKDLWH]XWLOLVHUFRPPH
LPDJHGHODQFHPHQWHW
DSSX\H]VXU(17(5
SIDE
SHOT
VOLUME
+
–
+
–
INPUT
MS SLIDE
APA
VIDEO MEMORY
DYNAMIC STANDARD
USER 1
/HPHQX,QGH[DSSDUDvW
USER 2
LIVING
USER 3
OFF
MENU
n°: 4/32
Ampl: 1024x768
Fichier: SPORTS
Date: 29/7/2001
14:22
ENTER
Écran
complet
Écran
complet
Fermer
Reciipe
flour - - - - 2
s u g a r - - - 1/2
s a l t - - - - - 1/2
butter - - -1
Retour
RESET
Protect.
Rotation
Lancmnt
Suppr.
8WLOLVDWLRQG¶XQ
³0HPRU\6WLFN´
$SSX\H]VXUMRXmSRXU
VpOHFWLRQQHU³/DQFPQW´HW
DSSX\H]VXU(17(5
$SSX\H]VXUMRXmSRXU
VpOHFWLRQQHU³(QWUpH´HW
DSSX\H]VXU(17(5
6pOHFWLRQQH]06HQDSSX\DQW
VXUODWRXFKH,1387SRXU
DIILFKHUODIRQFWLRQ06KRPH
1 SDJH $SSX\H]VXUMRXmSRXU
VpOHFWLRQQHU5e*/$*(
HW
DSSX\H]VXU(17(5
/HV\PEROHGHODQFHPHQWV¶DIILFKHGDQVOHPHQX
,QGH[
9RXVSRXYH]VpOHFWLRQQHUXQHLPDJHGH
ODQFHPHQWSRXUFKDTXH³0HPRU\6WLFN´
)5
3URMHFWLRQG¶XQHLPDJHVpOHFWLRQpHORUVTXHOHSURMHFWHXUHVWVRXVWHQVLRQ±/DQFHPHQW
$SSX\H]VXUMRXmSRXU
VpOHFWLRQQHU³/DQFPQW´HW
DSSX\H]VXU(17(5
6XSSUHVVLRQG¶XQ
ILFKLHULPDJH
RÉGLAGE
Lancement:
Original
Original
Personnalisé
Désactivé
9RXVSRXYH]VXSSULPHUOHVLPDJHVLQXWLOHVGHYRWUH
³0HPRU\6WLFN´
MENU
ENTER
$SSX\H]VXUMRXmSRXU
VpOHFWLRQQHUOHSDUDPqWUH
XWLOLVpSRXUO¶LPDJHGH
ODQFHPHQWHWDSSX\H]VXU
(17(5
5HPDUTXHV
6LYRXVYRXOH]HIIDFHUO¶pFUDQGHODQFHPHQWWDQGLVTX¶LOHVW
DIILFKpDSSX\H]VXUMm<,RXVXU(17(5
6LYRXVVRXKDLWH]XWLOLVHUO¶LPDJHHQUHJLVWUpHLQVpUH]OH
³0HPRU\6WLFN´OjRO¶LPDJHHQUHJLVWUpHHVWVDXYHJDUGpGDQV
OHSURMHFWHXUSXLVPHWWH]O¶DSSDUHLOVRXVWHQVLRQ
6pOHFWLRQQH]OHFRQWHQX
FRPSUHQDQWXQHLPDJHIL[H
GpVLUpH1 SDJH $SSX\H]VXUMRXmSRXU
VpOHFWLRQQHU³,QGH[´HW
DSSX\H]VXU(17(5
/HVLPDJHVLQGH[pHVGXFRQWHQXVpOHFWLRQQp
V¶DIILFKHQW
6XSSUHVVLRQG¶XQILFKLHULPDJH
8WLOLVDWLRQG¶XQ
³0HPRU\6WLFN´
2ULJLQDO6pOHFWLRQQH]FHSDUDPqWUHSRXU
XWLOLVHUO¶LPDJHG¶RULJLQHHQUHJLVWUpHGDQVOH
SURMHFWHXU,OV¶DJLWGXUpJODJHSDUGpIDXW
3HUVRQQDOLVp6pOHFWLRQQH]FHSDUDPqWUH
SRXUXWLOLVHUO¶LPDJHHQUHJLVWUpGDQVO¶pFUDQ
G¶LQGH[HWVWRFNpGDQVOH³0HPRU\6WLFN´
1 SDJH 'pVDFWLYp6pOHFWLRQQH]FHSDUDPqWUH
ORUVTX¶DXFXQODQFHPHQWQ¶HVWUpJOp
RESET
)5
$SSX\H]VXUMm<RX,
SRXUVpOHFWLRQQHUO¶LPDJHTXH
YRXVVRXKDLWH]HIIDFHUGX
³0HPRU\6WLFN´HWDSSX\H]
VXU(17(5
/HPHQX,QGH[DSSDUDvW
n°: 4/32
Ampl: 1024x768
Fichier: SPORTS
Date: 29/7/2001
14:22
Écran
complet
Écran
complet
Fermer
Reciipe
flour - - - - 2
s u g a r - - - 1/2
s a l t - - - - - 1/2
butter - - -1
5pLQLWLDOLVDWLRQ
G¶XQ³0HPRU\
6WLFN´
6LXQ³0HPRU\6WLFN´QHSHXWSDVrWUHXWLOLVp
UpLQLWLDOLVH]OHjO¶DLGHGXSURMHFWHXU
7RXWHVOHVGRQQpHVVWRFNpHVGDQVXQ³0HPRU\6WLFN´
VRQWHIIDFpHVORUVGHVDUpLQLWLDOLVDWLRQ
Retour
Protect.
Rotation
Lancmnt
Suppr.
$SSX\H]VXUMRXmSRXU
VpOHFWLRQQHU³6XSSU´HW
DSSX\H]VXU(17(5
8WLOLVDWLRQG¶XQ
³0HPRU\6WLFN´
VOLUME
+
–
+
–
INPUT
MS SLIDE
APA
VIDEO MEMORY
DYNAMIC STANDARD
USER 1
USER 2
LIVING
USER 3
OFF
$SSX\H]VXUMRXmSRXU
VpOHFWLRQQHUO¶pOpPHQW
VRXKDLWpHWDSSX\H]VXUM
SRXUVXSSULPHUOHVLPDJHV
,PJVpOVXSSUHVVLRQGHO¶LPDJHVpOHFWLRQQpH
7WVLPJVVXSSUHVVLRQGHWRXWHVOHVLPDJHVGHV
FRQWHQXVVpOHFWLRQQpHV
)HUPHUVLYRXVQHVXSSULPH]SDVO¶LPDJH
5HPDUTXHV
9RXVQHSRXYH]SDVVXSSULPHUOHVLPDJHVSURWpJpHV
1 SDJH 3RXUHIIDFHUXQHWHOOHLPDJHVXSSULPH]OD
SURWHFWLRQGHFHHLPDJH
9RXVQHSRXYH]SDVHIIDFHUOHVILFKLHUVG¶XQ³0HPRU\6WLFN´
ORUVTXHO¶RQJOHWGHSURWHFWLRQHQpFULWXUHHVWUpJOpVXU/2&.
)5
SIDE
SHOT
5pLQLWLDOLVDWLRQG¶XQ³0HPRU\6WLFN´
MENU
ENTER
RESET
6pOHFWLRQQH]06HQDSSX\DQW
VXUODWRXFKH,1387SRXU
DIILFKHUODIRQFWLRQ06KRPH
1 SDJH $SSX\H]VXUMRXmSRXU
VpOHFWLRQQHU0(025<
67,&. HWDSSX\H]VXU
(17(5
$SSX\H]GHQRXYHDXVXU
(17(5
MEMORY STICK
Format
Exécuter
Retour
$SSX\H]VXUMRXmSRXU
VpOHFWLRQQHU³([pFXWHU´HW
DSSX\H]VXU(17(5
$SSX\H]VXUMSRXUGpPDUUHU
ODUpLQLWLDOLVDWLRQ
8WLOLVDWLRQG¶XQ
³0HPRU\6WLFN´
3RXUUHVWDXUHUODIRQFWLRQ06KRPH
DYDQWODUpLQLWLDOLVDWLRQGX³0HPRU\
6WLFN´
6pOHFWLRQQH]³5HWRXU´HWDSSX\H]VXU(17(5j
O¶pWDSH
5HPDUTXHV
/RUVTXHOH³0HPRU\6WLFN´HVWUpLQLWLDOLVpOHILFKLHULPDJH
SURWpJpHVWpJDOHPHQWVXSSULPp
/RUVTX¶XQ³0HPRU\6WLFN´GRQWO¶RQJOHWGHSURWHFWLRQHQ
pFULWXUHHVWUpJOpVXU/2&.HVWUpLQLWLDOLVpO¶LQGLFDWLRQ
³0(025<67,&.YHUURXLOOp´V¶DIILFKH
/RUVGHODUpLQLWLDOLVDWLRQGX³0HPRU\6WLFN´LOYRXVHVW
LPSRVVLEOHG¶XWLOLVHUOHVWRXFKHVGHFRPPDQGHGHODIRQFWLRQ
06KRPH
5pLQLWLDOLVDWLRQG¶XQ³0HPRU\6WLFN´
)5
$XWUHV
&HWWHVHFWLRQLQGLTXHFRPPHQWUpVRXGUHOHVLQFLGHQWV
FRPPHQWUHPSODFHUXQHODPSHRXOHILOWUHjDLUHWF
'pSDQQDJH
6\PSW{PH
&DXVHHWUHPqGH
/HSURMHFWHXUQHVHPHWSDVVRXV
WHQVLRQ
/HSURMHFWHXUDpWpPLVKRUVHWVRXVWHQVLRQjEUHIVLQWHUYDOOHVjO¶DLGHGHOD
WRXFKH[1 PDUFKHYHLOOH
c $WWHQGH]HQYLURQPLQXWHDYDQWGHPHWWUHOHSURMHFWHXUVRXVWHQVLRQ
1 SDJH /HFRXYHUFOHGHODODPSHHVWPDOIL[p
c 5HIHUPH]FRUUHFWHPHQWOHFRXYHUFOHGHODODPSH1 SDJH /HFRXYHUFOHGXILOWUHjDLUHVWPDOIL[p
c 5HIHUPH]FRUUHFWHPHQWOHFRXYHUFOHGXILOWUHjDLU1 SDJH 3DVG¶LPDJH
8QFkEOHHVWGpEUDQFKpRXOHVUDFFRUGHPHQWVVRQWPDOHIIHFWXpV
c 9pULILH]VLOHVUDFFRUGHPHQWVRQWpWpHIIHFWXpVFRUUHFWHPHQW1SDJHVHW
/DVpOHFWLRQG¶HQWUpHHVWLQFRUUHFWH
c 6pOHFWLRQQH]FRUUHFWHPHQWODVRXUFHG¶HQWUpHjO¶DLGHGHODWRXFKH,1387
1 SDJH /HVLJQDOGHO¶RUGLQDWHXUQ¶HVWSDVGpILQLSRXUVRUWLUYHUVXQPRQLWHXUH[WHUQH
c 5pJOH]OHVLJQDOGHO¶RUGLQDWHXUSRXUTX¶LOVRUWHYHUVXQPRQLWHXUH[WHUQH
/HVLJQDOGHO¶RUGLQDWHXUHVWGpILQLSRXUVRUWLUYHUVO¶pFUDQ/&'GHO¶RUGLQDWHXU
HWXQPRQLWHXUH[WHUQH
c 5pJOH]OHVLJQDOGHO¶RUGLQDWHXUSRXUTX¶LOVRUWHXQLTXHPHQWYHUVXQPRQLWHXU
H[WHUQH
/¶LPDJHHQSURYHQDQFHGXFRQQHFWHXU /HUpJODJHSRXU(17$GDQVOHPHQX5(*/$*( HVWLQFRUUHFW
c 6pOHFWLRQQH]25',1$7(85&20326$17RX9,'(2*%5SRXU(17$
3-08/7,HVWG¶XQHFRORUDWLRQ
DQRUPDOH
GDQVOHPHQX5(*/$*( HQIRQFWLRQGXVLJQDOG¶HQWUpH1 SDJH $XWUHV
)5
/DEDODQFHGHVFRXOHXUVHVWLQFRUUHFWH
/¶LPDJHQ¶HVWSDVFRUUHFWHPHQWUpJOpH
c 5pJOH]O¶LPDJHGDQVOHPHQX&75/,0$*( 1 SDJH /HSURMHFWHXUHVWUpJOpVXUOHPDXYDLVV\VWqPHFRXOHXU
c 5pJOH]67$1'$5'GDQVOHPHQX&75/,0$*( SRXUTX¶LOFRUUHVSRQGH
DXV\VWqPHFRXOHXUHQWUp1 SDJH /¶LPDJHHVWWURSIRQFpH
/HFRQWUDVWHRXODOXPLQRVLWpQ¶HVWSDVUpJOpFRUUHFWHPHQW
c 5pJOH]FRUUHFWHPHQWOHFRQWUDVWHRXODOXPLQRVLWpGDQVOHPHQX&75/
,0$*( 1 SDJH /¶LPDJHQ¶HVWSDVFODLUH
/¶LPDJHQ¶HVWSDVQHWWH
c 5pJOH]ODPLVHDXSRLQWjO¶DLGHGXOHYLHUGHPLVHDXSRLQW1 SDJH /HFDSXFKRQG¶REMHFWLIHVWIL[pjO¶REMHFWLI
c 'pSRVH]OHFDSXFKRQG¶REMHFWLI
'HODFRQGHQVDWLRQV¶HVWIRUPpHVXUO¶REMHFWLI
c /DLVVH]OHSURMHFWHXUHQYLURQGHX[KHXUHVVRXVWHQVLRQ
'pSDQQDJH
6\PSW{PH
&DXVHHWUHPqGH
/¶LPDJHWUHPEORWH
/HSDUDPqWUH3+$6(GXPHQX5(*/(175(( Q¶DSDVpWpELHQUpJOp
c 5pJOH]FRUUHFWHPHQWOHSDUDPqWUH3+$6(GDQVOHPHQX5(*/(175((
1 SDJH 3DVG¶DIILFKDJHVXUpFUDQ
/HSDUDPqWUH(7$7GXPHQX5(*/$*( HVWUpJOpVXU2))
c 5pJOH]O¶(7$7GDQVOHPHQX5(*/$*( VXU211 SDJH 3DVGHVRQ
8QFkEOHHVWGpEUDQFKpRXOHVUDFFRUGHPHQWVVRQWPDOHIIHFWXpV
c 9pULILH]VLOHVUDFFRUGHPHQWVRQWpWpHIIHFWXpVFRUUHFWHPHQW1SDJHVHW
/HUpJODJH92/80(HVWLQFRUUHFW
c 5pJOH]OH92/80(GDQVOHPHQX&75/,0$*( RXDSSX\H]VXUOD
WRXFKH92/80(GHODWpOpFRPPDQGH
/RUVTXHOHVRQHVWWUDQVPLVSDUOH
8QVRQPRQDXUDOHVWHQWUpSDUOHFRQQHFWHXU$8',2
FRQQHFWHXU$8',2OHVRQQHSDVVHTXH c (QWUH]XQVRQVWpUpR
SDUXQVHXOFDQDO
/DWpOpFRPPDQGHQHIRQFWLRQQHSDV
/HVSLOHVGHODWpOpFRPPDQGHVRQWIDLEOHV
c 5HPSODFH]OHVSLOHV1 SDJH /DSRODULWpHVWLQFRUUHFWH
c ,QVpUH]OHVSLOHVGDQVOHERQVHQV1 SDJH /H³0HPRU\6WLFN´QHSHXWSDVrWUH
LQVpUpGDQVODIHQWH³0HPRU\6WLFN´
/H³0HPRU\6WLFN´Q¶DSDVpWpLQVpUpGDQVOHERQVHQV
c ,QVpUH]OH³0HPRU\6WLFN´DYHFODIOqFKHSRLQWDQWYHUVO¶HPSODFHPHQWSUpYX
jFHWHIIHWGDQVOHSURMHFWHXU
8QHLPDJHIL[HGX³0HPRU\6WLFN´QH /¶RQJOHWGHSURWHFWLRQHQpFULWXUHGX³0HPRU\6WLFN´DpWpUpJOpVXU/2&.
SHXWSDVrWUHWRXUQpHRXVXSSULPp
c 'pYHUURXLOOH]OH³0HPRU\6WLFN´1 SDJH /¶LPDJHHVWSURWpJpH
c 'pVDFWLYH]ODSURWHFWLRQVXUO¶pFUDQG¶LQGH[1 SDJH /H³0HPRU\6WLFN´QHSHXWSDVrWUH
IRUPDWp
/¶RQJOHWGHSURWHFWLRQHQpFULWXUHGX³0HPRU\6WLFN´DpWpUpJOpVXU/2&.
c 'pYHUURXLOOH]OH³0HPRU\6WLFN´1 SDJH /H³0HPRU\6WLFN´HVWFDVVp
c 8WLOLVH]XQDXWUH³0HPRU\6WLFN´
/¶LQGLFDWLRQ06FOLJQRWHSHQGDQWOH
GLDSRUDPD
'HVLPDJHVD\DQWGHVUpVROXWLRQVGLIIpUHQWHVVRQWXWLOLVpHVSRXUOHGLDSRUDPD
c 5pJOH]O¶(7$7GXPHQX5(*/$*( VXU2))1 SDJH 8QHLPDJHQRLUHV¶DIILFKHSHQGDQWOH
GLDSRUDPD
8QHLPDJHQRLUHV¶DIILFKHORUVTX¶XQHLPDJHDYHFGHVUpVROXWLRQVGLIIpUHQWHVHVW
XWLOLVpH
c 8WLOLVH]OHPrPHUpJODJHSRXUODUpVROXWLRQGHVLPDJHV
/HVYLJQHWWHVQHVRQWSDVDIILFKpHV
/HVLPDJHVVRQWDXIRUPDW-3(*PDLVQHVRQWSDVFRPSDWLEOHV'&)
c 8WLOLVH]GHVLPDJHVFRPSDWLEOHV'&)
$XWUHV
'pSDQQDJH
)5
7pPRLQV
/HWpPRLQ/$03&29(5RX7(03)$1GXSDQQHDXGHFRPPDQGHV¶DOOXPHRXFOLJQRWHHQFDVGH
G\VIRQFWLRQQHPHQWGHYRWUHSURMHFWHXU
LAMP/
COVER
TEMP/
FAN
POWER
SAVING
ON/
STANDBY
7pPRLQ7(03)$1
7pPRLQ/$03&29(5
7pPRLQ
6LJQLILFDWLRQHWUHPqGH
/HWpPRLQ/$03
&29(5FOLJQRWH
/HFRXYHUFOHGHODODPSHRXGXILOWUHjDLUHVWPDOIL[p
c 5HIHUPH]FRUUHFWHPHQWOHFRXYHUFOH1SDJHVHW
/HWpPRLQ/$03
&29(5V¶DOOXPH
/DODPSHDDWWHLQWODILQGHVDGXUpHGHYLH
c 5HPSODFH]ODODPSH1 SDJH /DODPSHDDWWHLQWXQHWHPSpUDWXUHpOHYpH
c $WWHQGH]PLQXWHTXHODODPSHUHIURLGLVVHHWUHPHWWH]OHSURMHFWHXUVRXVWHQVLRQ
1 SDJH /HWpPRLQ7(03)$1
FOLJQRWH
/HYHQWLODWHXUHVWGpIHFWXHX[
c $GUHVVH]YRXVjXQSHUVRQQHOTXDOLILp6RQ\
/HWpPRLQ7(03)$1
V¶DOOXPH
/DWHPSpUDWXUHjO¶LQWpULHXUGXSURMHFWHXUHVWDQRUPDOHPHQWpOHYpH
c 9pULILH]VLOHVRULILFHVGHYHQWLODWLRQQHVRQWSDVREVWUXpV
/HVWpPRLQV/$03
&29(5HW7(03)$1
VRQWWRXVGHX[DOOXPpV
/HFLUFXLWpOHFWULTXHHVWGpIHFWXHX[
c $GUHVVH]YRXVjXQSHUVRQQHOTXDOLILp6RQ\
0HVVDJHVG¶DYHUWLVVHPHQW
&RQVXOWH]ODOLVWHFLGHVVRXVSRXUFRQQDvWUHODVLJQLILFDWLRQGHVPHVVDJHVDIILFKpVjO¶pFUDQ
0HVVDJH
6LJQLILFDWLRQHWUHPqGH
6XUFKDXIIH
/DPSH2))PLQ
/DWHPSpUDWXUHjO¶LQWpULHXUGXSURMHFWHXUHVWWURSpOHYpH
c 0HWWH]OHSURMHFWHXUKRUVWHQVLRQ
c 9pULILH]VLOHVRULILFHVGHYHQWLODWLRQQHVRQWSDVREVWUXpV
)UpTXHQFHHVWKRUV
OLPLWHV
&HVLJQDOG¶HQWUpHQHSHXWrWUHSURMHWpFDUODIUpTXHQFHHVWHQGHKRUVGHODSODJHFRPSDWLEOH
DYHFFHSURMHFWHXU
c (QWUH]XQVLJQDOGDQVODSODJHGHIUpTXHQFHVFRPSDWLEOHDYHFFHSURMHFWHXU
/HUpJODJHGHODGpILQLWLRQGXVLJQDOGHVRUWLHGHO¶RUGLQDWHXUHVWWURSpOHYp
c 5pJOH]OHSDUDPqWUHGHVRUWLHVXU69*$
9pULILH]OHUpJODJH(17 9RXVDYH]HQWUpXQVLJQDO59%GHO¶RUGLQDWHXUDORUVTXH(17$GDQVOHPHQX5(*/$*(
$
HVWUpJOpVXU&20326$17RX9,'(2*%5
c 5pJOH]FRUUHFWHPHQW(17$1 SDJH $XWUHV
)5
5HPSODFHUODODPSH
/HPRPHQWHVWYHQXGHUHPSODFHUODODPSH
c 5HPSODFH]ODODPSH1 SDJH 5HPSODFHUOHILOWUH
/HPRPHQWHVWYHQXGHUHPSODFHUOHILOWUHjDLU
c 5HPSODFH]OHILOWUHjDLU1 SDJH 'pSDQQDJH
0HVVDJHVGHSUpFDXWLRQ
&RQVXOWH]ODOLVWHFLGHVVRXVSRXUFRQQDvWUHODVLJQLILFDWLRQGHVPHVVDJHVDIILFKpVjO¶pFUDQ
0HVVDJH
6LJQLILFDWLRQHWUHPqGH
3$6'¶(175((
$EVHQFHGHVLJQDOG¶HQWUpH
c &RQWU{OH]OHVUDFFRUGHPHQWV1 SDJH 1RQDSSOLFDEOH
9RXVDYH]DSSX\pVXUODPDXYDLVHWRXFKH
c $SSX\H]VXUODWRXFKHDSSURSULpH
(UUHXUILFKLHU
/RUVGHO¶XWLOLVDWLRQG¶XQ³0HPRU\6WLFN´GDQVOHVRXVPHQXGHVpOHFWLRQG¶XQILFKLHUOH
QRPGHILFKLHUDFWXHOOHPHQWVpOHFWLRQQpHVWFRPSRVpGHSOXVGHFDUDFWqUHV³´LQFOXV
c 6DLVLVVH]XQQRXYHDXQRPGHILFKLHUFRPSRVpGHPRLQVGHFDUDFWqUHV
3$6'(0(025<
67,&.
/H³0HPRU\6WLFN´Q¶HVWSDVFRUUHFWHPHQWLQVpUp
c 9pULILH]OH³0HPRU\6WLFN´HWLQVpUH]OHFRUUHFWHPHQW
(FUDQVGHPLVHHQJDUGHORUVGHO¶XWLOLVDWLRQGX³0HPRU\6WLFN´
/RUVTXHO¶DIILFKDJHVXLYDQWDSSDUDvWVXUO¶pFUDQYRXVQHSRXYH]SDVXWLOLVHUFH³0HPRU\6WLFN´8WLOLVH]HQXQ
DXWUH
/HVGRQQpHVLPDJHVRQWDXIRUPDW-3(*PDLVQHVRQWWSDVFRPSDWLEOH'&)
/DUpVROXWLRQGHVGRQQpHVLPDJHHVWHQGHKRUVGHODSODJHFRPSDWLEOHDYHFFHSURMHFWHXU
/H SURMHFWHXUDFFHSWHGHVLPDJHVG¶XQHUpVROXWLRQGHîSRLQWV
/DYLJQHWWHHVWDIILFKpHPDLVHOOHQ¶HVWSDVFRPSDWLEOH'&)
$XFXQHGRQQpHLPDJHQ¶HVWVpOHFWLRQQpH
/HVGRQQpHVLPDJHVRQWDIILFKpHVPDLVSDVODYLJQHWWH
/HVGRQQpHVLPDJHVRQWDIILFKpHVPDLVODYLJQHWWHHVWFDVVpH
/HVGRQQpHVLPDJHVRQWFDVVpH
$XWUHV
'pSDQQDJH
)5
5HPSODFHPHQWGH
ODODPSH
/DODPSHXWLOLVpHFRPPHVRXUFHGHOXPLqUHSRVVqGH
XQHGXUpHGHYLHOLPLWpH/RUVTXHODODPSHDSHUGXHQ
OXPLQRVLWpTXHO¶pTXLOLEUHGHVFRXOHXUVGHO¶LPDJH
SUHQGXQDVSHFWpWUDQJHRXTXHOHPHVVDJH
³5HPSODFHUODODPSH´V¶DIILFKHjO¶pFUDQODODPSHHVW
XVpH5HPSODFH]ODODPSHSDUXQHQHXYHQRQ
IRXUQLH
8WLOLVH]ODODPSHSRXUSURMHFWHXU/03+FRPPH
ODPSHGHUHFKDQJH
3RXUUHPSODFHUODODPSHDSUqVDYRLUXWLOLVp
OHSURMHFWHXU
0HWWH]OHSURMHFWHXUKRUVWHQVLRQHWGpEUDQFKH]OH
FRUGRQG¶DOLPHQWDWLRQ$WWHQGH]DXPRLQVXQHKHXUH
TXHODODPSHUHIURLGLVVH
$WWHQWLRQ
/DODPSHDWWHLQWXQHWHPSpUDWXUHWUqVpOHYpHDSUqVODPLVHKRUV
WHQVLRQGXSURMHFWHXUDYHFODWRXFKH[1 PDUFKHYHLOOH6LYRXV
WRXFKH]ODODPSHYRXVULVTXH]GHYRXVEUOHUOHVGRLJWV3RXU
UHPSODFHUODODPSHDWWHQGH]DXPRLQVXQHKHXUHTXHODODPSHVRLW
UHIURLGLH
3ODFH]XQHIHXLOOHGHSURWHFWLRQWH[WLOH
VRXVOHSURMHFWHXU5HWRXUQH]OHSURMHFWHXU
GHIDoRQjHQYRLUOHGHVVRXV
5HPDUTXH
9HLOOH]jFHTXHOHSURMHFWHXUQHEDVFXOHSDVDSUqVDYRLUpWp
UHWRXUQp
)DLWHVJOLVVHUOHOHYLHUGHGpYHUURXLOODJH
GXVXSSRUWUpJODEOHYHUVO¶H[WpULHXUHW
WRXUQH]OHVXSSRUWUpJODEOHGDQVOHVHQV
GHVDLJXLOOHVG¶XQHPRQWUHSRXUUHWLUHU
FHOXLFL
$XWUHV
)5
3
1
5HPSODFHPHQWGHODODPSH
'HVVHUUH]OHVGHX[YLVGXPRGXOHGH
ODPSHjO¶DLGHGXWRXUQHYLV3KLOLSV
([WUD\H]OHPRGXOHGHODPSHSDUOD
SRLJQpH
1
2
3
1
$YHFODVXUIDFHGHODODPSHRULHQWpHYHUV
O¶DUULqUHGXSURMHFWHXULQVpUH]jIRQGOD
QRXYHOOHODPSHMXVTX¶jFHTX¶HOOHVRLWELHQ
HQSODFH6HUUH]OHVGHX[YLV5HSOLH]OD
SRLJQpH
5HPDUTXHV
9HLOOH]jQHSDVWRXFKHUODVXUIDFHHQYHUUHGHODODPSH
/HSURMHFWHXUQHVHPHWSDVVRXVWHQVLRQVLODODPSHQ¶HVWSDV
FRUUHFWHPHQWLQVWDOOpH
5HIHUPH]OHFRXYHUFOHGHODODPSHHW
VHUUH]OHVYLV
)L[H]OHVXSSRUWUpJODEOH
5HPHWWH]OHSURMHFWHXUjO¶HQGURLW
2
/HYLHUGH
GpYHUURXLOODJH
2XYUH]OHFRXYHUFOHGHODPSHHQ
GHVVHUUDQWXQHYLVjO¶DLGHGXWRXUQHYLV
3KLOLSV
%UDQFKH]OHFRUGRQG¶DOLPHQWDWLRQHW
DFWLYH]OHSURMHFWHXUHQPRGHGHYHLOOH
$SSX\H]VXUFKDFXQHGHVWRXFKHV
VXLYDQWHVGXSDQQHDXGHFRPPDQGHGDQV
O¶RUGUHLQGLTXpSHQGDQWPRLQVGHFLQT
VHFRQGHV5(6(7<,(17(5
5HPDUTXHV
1¶LQWURGXLVH]SDVOHVGRLJWVjO¶LQWpULHXUGXORJHPHQWGHOD
ODPSHHWYHLOOH]jFHTX¶DXFXQOLTXLGHRXREMHWQ¶\SpQqWUHGH
PDQLqUHjSUpYHQLUWRXWULVTXHG¶pOHFWURFXWLRQRXG¶LQFHQGLH
3RXUOHUHPSODFHPHQWXWLOLVH]XQLTXHPHQWXQHODPSHSRXU
SURMHFWHXU/03+6LYRXVXWLOLVH]XQHDXWUHODPSHOH
SURMHFWHXUULVTXHGHFRQQDvWUHXQHGpIDLOODQFH
0HWWH]OHSURMHFWHXUKRUVWHQVLRQHWGpEUDQFKH]OHFRUGRQ
G¶DOLPHQWDWLRQDYDQWGHSURFpGHUDXUHPSODFHPHQWGHODODPSH
0LVHDXUHEXWG¶XQHODPSHGHSURMHFWHXU
XVDJpH
/HVPDWpULDX[XWLOLVpVGDQVFHWWHODPSHpWDQW
VLPLODLUHVjFHX[G¶XQHODPSHIOXRUHVFHQWHYRXV
GHYH]WRXMRXUVPHWWUHDXUHEXWOHVODPSHVGH
SURMHFWHXUGHODPrPHPDQLqUHTXHOHVODPSHV
IOXRUHVFHQWHV
5HPSODFHPHQWGX
ILOWUHjDLU
/HILOWUHjDLUGRLWrWUHUpJXOLqUHPHQWQHWWR\p/RUVTXH
OHPHVVDJH³5HPSODFHUOHILOWUH´V¶DIILFKHjO¶pFUDQ
UHPSODFH]LPPpGLDWHPHQWOHILOWUHjDLU
5HPDUTXHV
/HUHPSODFHPHQWGXILOWUHjDLUHVWWUqVLPSRUWDQWSRXUSUpVHUYHU
WRXWHO¶HIILFDFLWpGXSURMHFWHXUHWpYLWHUGHV
G\VIRQFWLRQQHPHQWV/RUVTXHOHPHVVDJHGHUHPSODFHPHQW
V¶DIILFKHjO¶pFUDQUHPSODFH]OHILOWUHjDLUVDQVWDUGHU
/RUVGHODGpSRVHGXILOWUHjDLUGXSURMHFWHXUSUHQH]JDUGH
G¶pYLWHUTXHGHODSRXVVLqUHRXGHVREMHWVQHSpQqWUHQWj
O¶LQWpULHXUGXSURMHFWHXU
3ODFH]XQHIHXLOOHGHSURWHFWLRQWH[WLOH
VRXVOHSURMHFWHXU5HWRXUQH]OHSURMHFWHXU
GHIDoRQjHQYRLUOHGHVVRXV
2
3
1
/HYLHUGH
GpYHUURXLOODJH
3RXVVH]ODSRLJQpHGXFRXYHUFOHGHILOWUH
SRXUSRXYRLUGpSRVHUOHFRXYHUFOHGH
ILOWUH
3RLJQpH
'pSRVH]OHVXSSRUWGHILOWUH
'pSRVH]OHILOWUHjDLUGXVXSSRUWGHILOWUH
HQPDLQWHQDQWODODQJXHWWHGXILOWUHjDLU
)LOWUHjDLU
6XSSRUWGHILOWUH
/DQJXHWWH
,QVpUH]OHQRXYHDXILOWUHjDLUGDQVOH
VXSSRUWGHILOWUHVXUIDFHEODQFKHRULHQWpH
YHUVOHKDXWSXLVSODFH]OHGHQRXYHDX
GDQVOHSURMHFWHXU
5HSODFH]OHFRXYHUFOHGHILOWUH
$XWUHV
5HPDUTXH
9HLOOH]jFHTXHOHSURMHFWHXUQHEDVFXOHSDVDSUqVDYRLUpWp
UHWRXUQp
)DLWHVJOLVVHUODSRLJQpHGHGpYHUURXLOODJH
GXVXSSRUWUpJODEOHYHUVO¶H[WpULHXUHW
WRXUQH]OHVXSSRUWUpJODEOHGDQVOHVHQV
GHVDLJXLOOHVG¶XQHPRQWUHSRXUUHWLUHU
FHOXLFL
)L[H]OHVXSSRUWUpJODEOH
5HPSODFHPHQWGXILOWUHjDLU
)5
AUDIO
Spécifications
Système
Système de projection
Système de projection à 3
panneaux LCD, 1 objectif
Panneau LCD
Panneau LCD TFT 0,7 pouce,
1.440.000 pixels (480.000
pixels × 3)
Objectif
Zoom 1,2 × (manuel)
Lampe
Type UHP de 120 W
Dimensions de l’image projetée
Plage: 40 à 150 pouces (en
diagonale)
Système couleur NTSC3,58/PAL/SECAM/NTSC4,43/
PAL-M/PAL-N, commutation
automatique/manuelle
Signaux vidéo compatibles
15k, DTV (480i/480p/1080i/720p)
Signaux d’ordinateur compatibles
fH: 19 à 72 kHz
fV: 48 à 92 Hz
Haut-parleur
Haut-parleurs stéréo, 33 mm
(1 5/16 pouces) de diamètre,
max. 2 W × 2
Entrée/sortie
Entrée vidéo
Autres
FR
44
Spécifications
VIDEO: type phono
Vidéo composite: 1 Vcc ± 2 dB
de synchro négative
(terminaison à 75 ohms)
S VIDEO: miniconnecteur DIN Y/
C à 4 broches (mâle)
Y (luminance): 1 Vcc ±2 dB de
synchro négative (terminaison à
75 ohms)
C (chrominance): salve 0,286
Vcc ±2 dB (NTSC)
(terminaison à 75 ohms),
salve 0,3 Vcc ±2 dB (PAL)
(terminaison à 75 ohms)
Type phono × 2, stéréo
500 mVrms, impédance
supérieure à 47 kilohms
PJ MULTI
Connecteur multi 32 broches
Composant/RVB analogique :
R/CR (PR) : 0,7 Vp-p ± 2 dB
(terminaison à 75 ohms)
G : 0,7 Vp-p ± 2 dB
(terminaison à 75 ohms)
G avec sync/Y : 1 Vp-p ± 2 dB
sync négative
(terminaison à 75 ohms)
B/CB (PB) : 0,7 Vp-p ± 2 dB
(terminaison à 75 ohms)
SYNC/HD : Entrée sync
composite : 1-5 Vp-p haute
impédance, tension positive/
négative
Entrée sync horizontale : 1-5
Vp-p haute impédance, tension
positive/négative
VD : Entrée sync verticale : 1-5
Vp-p haute impédance, tension
positive/négative
“Memory Stick” fente 1
Généralités
340 × 154 × 300 mm
(13 1/2 × 6 1/8 × 11 7/8 pouces)
(l/h/p)
Poids
Approx. 3,9 kg (8 lb 10 oz)
Alimentation
100 à 240 V ca, 1,9–0,8 A,
50/60 Hz
Consommation électrique
Max. 190 W
(Mode de veille: 5 W)
Température de service
0 à 35ºC (32 à 95ºF)
Humidité de service
35 à 85% (sans condensation)
Température de stockage
–20 à 60ºC (–4 à 140ºF)
Humidité de stockage
10 à 90%
Accessoires fournis
Télécommande RM-PJHS1 (1)
Piles de taille AA (R6) (2)
Câble d’interface signal SIC-HS10
(5 m) (1)
Cordon d’alimentation secteur (1)
Filtre à air (pour remplacement) (1)
Capuchon d’objectif (1)
Dimensions
Mode d’emploi (1)
La conception et les spécifications sont sujettes à
modification sans préavis.
Projection d’un signal d’ordinateur ou de
données enregistrées dans le “Memory
Stick”
Unité : m (pieds)
Accessoires en option
Périphérique d’interface signal IFU-HS1
Support de projecteur SU-HS1
Câble d’interface signal
SIC-HS10 (5 m)
SIC-HS20 (5 m)
SIC-HS30 (5 m)
SIC-HS40 (5 m)
Lampe pour projecteur LMP-H120 (pour
remplacement)
Filtre à air PK-HS1FL (pour remplacement)
Taille
40
d’écran
(pouces)
60
80
100
120
150
a
0,1
(0,3)
0,1
(0,3)
0,2
(0,7)
0,3
(1,0)
0,4
(1,3)
0,4
(1,3)
b
0
(0)
0
(0)
0
(0)
0
(0)
0
(0)
0
(0)
c
1,8
(5,9)
2,8
(9,2)
3,7
4,7
5,6
7,0
(12,1) (15,4) (18,4) (23,0)
d
1,6
(5,2)
2,5
(8,2)
3,3
4,2
5,0
6,3
(10,8) (13,8) (16,4) (20,7)
Distance de projection pour un signal
au format 720p, signal d’ordinateur,
etc.
Ecran
c
a
b
10°
d
10°
Projecteur
Projection d’un signal au format 720p
Unité : m (pieds)
60
80
100
120
150
a
0,3
(1,0)
0,5
(1,6)
0,7
(2,3)
0,9
(3,0)
1,1
(3,6)
1,3
(4,3)
b
0,1
(0,3)
0,2
(0,7)
0,3
(1,0)
0,4
(1,3)
0,5
(1,6)
0,6
(2,0)
c
2,0
(6,6)
3,0
(9,8)
4,0
5,1
6,1
7,6
(13,1) (16,7) (20,0) (24,9)
d
1,8
(5,9)
2,7
(8,9)
3,6
4,5
5,4
6,8
(11,8) (14,8) (17,7) (22,3)
Autres
Taille
40
d’écran
(pouces)
Spécifications
45 FR
6LJQDX[G¶HQWUpHHWSDUDPqWUHVUpJODEOHVGHUpJODJH
&HUWDLQVSDUDPqWUHVGHVPHQXVQHSHXYHQWSDVrWUHUpJOpVHQIRQFWLRQGXVLJQDOG¶HQWUpH
0HQX&75/,0$*(
3DUDPqWUH
6LJQDOG¶HQWUpH
9LGpRRX6YLGpR<&
&RPSRVDQW
9LGpR*%5
2UGLQDWHXU06
&2175$67(
z
z
z
z
/80,(5(
z
z
z
z
&28/(85
z
VDXISRXU%1
z
z
±
z
176&XQLTXHPHQW
VDXISRXU%1
z
z
±
1(77(7(
z
z
z
±
237,0,6(8559%
±
±
±
z
,0$*('
z
z
N59%
XQLTXHPHQW
z
N59%
XQLTXHPHQW
±
02'(*$00$
±
±
z
N59%
XQLTXHPHQW
z
7(03&28/(8
z
z
z
z
67$1'$5'
z
±
±
±
92/80(
z
z
z
z
7(,17(
z5pJODEOHSHXWrWUHUpJOp
±1RQUpJODEOHQHSHXWrWUHUpJOp
0HQX5(*/(175((
6LJQDOG¶HQWUpH
3DUDPqWUH
9LGpRRX6
YLGpR<&
$XWUHV
9LGpR*%5
2UGLQDWHXU
06
3+$6(
±
±
VDXISRXU79+'
±
VDXISRXU79+'
z
±
$03/+
±
±
VDXISRXU79+'
±
VDXISRXU79+'
z
±
'(3/GpSODFHPHQW
z
z
z
z
±
&219)5(4
±
±
±
z
LQIpULHXUj9*$
±
)250$7
z
±
±
0(02,5(9,'(2
z
z
±
z5pJODEOHSHXWrWUHUpJOp
±1RQUpJODEOHQHSHXWrWUHUpJOp
)5
&RPSRVDQW
6SpFLILFDWLRQV
z
z
VDXISRXUOHVQXPpURV VDXISRXUOHVQXPpURV
GHPpPRLUHGH
GHPpPRLUHGH
SUpVpOHFWLRQ SUpVpOHFWLRQ
HWGH79+'
HWGH79+'
z
z
6LJQDX[SUpVpOHFWLRQQpV
1GH
6LJQDOSUpVpOHFWLRQQp
PpPRLUH
I+N+]
I9+]
9LGpR+]
9LGpR+]
59%NjFRPSRVDQWHV+]
59%NjFRPSRVDQWHV+]
LL'79
× 9*$PRGH
9*$9(6$+]
× 3&1RUPDO
9*$PRGH
9*$9(6$+]
× 9*$PRGH
0DFLQWRVK
9*$9(6$+]
9*$9(6$+]
9*$9(6$+]
× 69*$9(6$+]
69*$9(6$+]
69*$9(6$+]
69*$9(6$+]
69*$9(6$+]
× 0DFLQWRVK
;*$9(6$+]
× ;*$9(6$+]
;*$9(6$+]
;*$9(6$+]
;*$9(6$+]
S&RPSRVDQWSURJUHVVLI
S&RPSRVDQWSURJUHVVLI
L'79
S'79
S'79
S
6\QFKUR
$03/+
GLPHQVLRQ
KRUL]RQWDOH
±±
±±
±±
±±
6VXU*<RX6\QF
±±
FRPSRVLWH
6VXU*<RX6\QF
±±
FRPSRVLWH9LGpR
FRPSRVLWH
6VXU*<
+SRV9QpJ
+SRV9QpJ
+QpJ9QpJ
+QpJ9SRV
+QpJ9SRV
+QpJ9QpJ
+QpJ9QpJ
+QpJ9QpJ
+QpJ9QpJ
+QpJ9QpJ
+SRV9SRV
+SRV9SRV
+SRV9SRV
+SRV9SRV
+SRV9SRV
+QpJ9QpJ
+SRV9SRV
+QpJ9QpJ
+QpJ9QpJ
+SRV9SRV
+SRV9SRV
±±
±±
6VXU*<
$XWUHV
5HPDUTXHV
/RUVTX¶XQVLJQDODXWUHTXHO¶XQGHFHX[SUpVHQWpVFLGHVVXVHVWHQWUpO¶LPDJHSRXUUDQHSDVDSSDUDvWUHFRUUHFWHPHQW
/HVLJQDOSURYHQDQWGX0HPRU\6WLFNV¶DIILFKHHQWDQWTXH1Rj
6SpFLILFDWLRQV
)5
$YHUWLVVHPHQWUHODWLIDXUDFFRUGHPHQWVHFWHXU
8WLOLVH]XQFRUGRQG¶DOLPHQWDWLRQDGpTXDWSRXUYRWUHDOLPHQWDWLRQVHFWHXUORFDOH
7\SHGHILFKH
([WUpPLWpIHPHOOH
7\SHGHFRUGRQ
7HQVLRQHWFRXUDQW
QRPLQDX[
$SSUREDWLRQGH
VpFXULWp
$XWUHV
)5
6SpFLILFDWLRQV
(WDWV8QLV
&DQDGD
<3
<&/
637
$9
(XURSH
FRQWLQHQWDOH
<3
<&/
+99+)
$9
5R\DXPH8QL
$XVWUDOLH
-DSRQ
63
<&/
+99+)
$9
%
&
+99+)
$9
<3
<&/
9&7).
$9
8/&6$
9'(
%6
6$$
'(1$1+2
(PSODFHPHQWGHV
FRPPDQGHV
$YDQW
9RXVSRXYH]XWLOLVH]OHVWRXFKHVGXSDQQHDXGHFRPPDQGHSRUWDQWOHPrPHQRPTXHOHVWRXFKHVGHOD
WpOpFRPPDQGHDILQGHIDLUHIRQFWLRQQHUOHSURMHFWHXU
,QGLFDWHXU32:(56$9,1*
1
1 SDJH 7pPRLQ7(03)$1
1
1 SDJH 7pPRLQ/$03&29(5
1
1 SDJH ,QGLFDWHXU2167$1'%<
1
1 SDJH LAMP/
COVER
7RXFKHVMm<,
TEMP/
FAN
POWER
SAVING
&RPPXWDWHXU[1PDUFKHYHLOOH
ON/
STANDBY
SIDE SHOT
+
MENU
VIDEO
MEMORY
ENTER
RESET
INPUT
7RXFKHV6,'(6+27±
7RXFKH0(18
7RXFKH(17(5
2EMHFWLI
2ULILFHVGHYHQWLODWLRQ
VRUWLHG¶DLU1
1 SDJH –
7RXFKH,1387
7RXFKH9,'(20(025<
7RXFKH5(6(7
/HYLHUGH]RRP
1
1SDJHVHW
/HYLHUGHPLVHDXSRLQW
1
1 SDJH &DSWHXUGH
WpOpFRPPDQGHDYDQW
2ULILFHVGHYHQWLODWLRQ
SULVHG¶DLU1
1 SDJH $XWUHV
)HQWH³0HPRU\6WLFN´
1
1 SDJH %XWpHGHVXSSRUWUpJODEOH
1
1 SDJH &RXYHUFOHGXILOWUHjDLU
EDV1
1 SDJH (PSODFHPHQWGHVFRPPDQGHV
)5
$UULqUH
+DXWSDUOHXU
&DSWHXUGHWpOpFRPPDQGH
DUULqUH
6XSSRUWUpJODEOH
1
1 SDJH &RXYHUFOHGHODPSH
EDV1
1 SDJH &RQQHFWHXU69,'(2
,1387PLQLFRQQHFWHXU
',1EURFKHVSULVH
9,'(2,1387W\SH
SKRQR1
1 SDJH 3ULVHV$8',2/5W\SH
SKRQR1
1 SDJH $XWUHV
)5
(PSODFHPHQWGHVFRPPDQGHV
3ULVHa$&,1
(MONO)
S VIDEO
VIDEO
L AUDIO R
INPUT
PJ MULTI
~ AC IN
&RQQHFWHXU3-08/7,
,1387PXOWL
EURFKHV1
1 SDJH 7pOpFRPPDQGH
(PHWWHXULQIUDURXJH
7RXFKH/,*+7
(FODLUHOHVWRXFKHVGHOD
WpOpFRPPDQGH
7RXFKHV6,'(6+27±
1
1 SDJH &RPPXWDWHXU[1PDUFKHYHLOOH
1
1 SDJH SIDE
SHOT
VOLUME
+
–
+
–
INPUT
7RXFKH,13871
1 SDJH MS SLIDE
7RXFKH066/,'(1
1 SDJH APA
7RXFKHV92/80(±
1
1 SDJH VIDEO MEMORY
DYNAMIC STANDARD
USER 1
USER 2
LIVING
USER 3
OFF
7RXFKH0(181
1 SDJH 7RXFKH$3$1
1 SDJH 7RXFKHV9,'(20(025<
1
1 SDJH '<1$0,&67$1'$5'/,9,1*
86(52))
MENU
7RXFKHVMm<,
1
1 SDJH 7RXFKH(17(51
1 SDJH ENTER
RESET
7RXFKH5(6(71
1 SDJH $XWUHV
(PSODFHPHQWGHVFRPPDQGHV
)5
,QGH[
/
3
/$1*$*( /80,(5( 3+$6( 326,7,210(18 3URMHFWLRQ 0
$
$FFHVVRLUHVHQRSWLRQ $FFHVVRLUHVIRXUQLV $03/+ $55,(5(3/$10(18 &
&DSWHXUGHWpOpFRPPDQGH
DUULqUH DYDQW &2175$67( &219)5(4 &25575$3(=(
&28/(85 &28/(850(18 '
'pSDQQDJH '(3/GpSODFHPHQW '85((/$03( (
(PSODFHPHQWGHVFRPPDQGHV
DUULqUH DYDQW WpOpFRPPDQGH (17$
(7$7 )
$XWUHV
)LOWUHjDLU )250$7 ,
,0$*(' ,QVWDOODWLRQGXSURMHFWHXUHW
G¶XQpFUDQ )5
,QGH[
0pPRLUHGHSUpVpOHFWLRQ 0(02,5(75$3(= 0(02,5(9,'(2 '<1$0,48( 67$1'$5' 87,/,6$7(85HW 9,9$17 ³0HPRU\6WLFN´
GLDSRUDPD LPDJHVXUpFUDQFRPSOHW LPDJHVLQGH[pHV LQVHUWLRQ ODQFHPHQW 06KRPH SURWHFWLRQ UpLQLWLDOLVDWLRQ URWDWLRQ VXSSUHVVLRQG¶XQILFKLHU 0HQX
IRQFWLRQQHPHQW SRXUIDLUHGLVSDUDvWUHOHPHQX UpLQLWLDOLVHU 0HQX&75/,0$*( 0HQX5(*/(175(( 0HQX5(*/,167$/ 0HQX5(*/$*( 0HVVDJH
DYHUWLVVHPHQW pFUDQGHPLVHHQJDUGH³0HPRU\
6WLFN´ SUpFDXWLRQ 02'((&2 02'(*$00$ 1
1(77(7( 2
237,0,6(8559% 2ULILFHVGHYHQWLODWLRQ
SULVHG¶DLU VRUWLHG¶DLU 5
5DFFRUGHPHQWV
jO¶DLGHGHVFkEOHVG¶LQWHUIDFH
VLJQDOHQRSWLRQ jO¶DLGHGXSpULSKpULTXH
G¶LQWHUIDFHHQRSWLRQ DPSOLILFDWHXU$9 DSSDUHLOYLGpR OHFWHXU'9' RUGLQDWHXU V\QWRQLVHXU%6QXPpULTXH 5pJODJH
GHO¶LPDJH GLVWRUVLRQWUDSp]RwGDOH PLVHDXSRLQW WDLOOHHWSRVLWLRQQHPHQWGH
O¶LPDJH YROXPH ]RRP 5HPSODFHPHQWGHODODPSH 6
6pOHFWLRQGHODODQJXHGHPHQX 6SpFLILFDWLRQV 67$1'$5' 6XSSRUWUpJODEOH 7
7DLOOHG¶pFUDQ 7(,17( 7pOpFRPPDQGH
HPSODFHPHQWGHVFRPPDQGHV LQVWDOODWLRQGHVSLOHV 7pPRLQ
/$03&29(5 7(03)$1 7(03&28/(8 75$3(=180(5 9
92/80( ADVERTENCIA
Para evitar el riesgo de incendio
o electrocución, no exponga la unidad a la
lluvia ni a la humedad.
Para evitar recibir descargas eléctricas, no
abra el aparato. Contrate exclusivamente los
servicios de personal cualificado
La toma de corriente debe encontrarse cerca del
equipo y ser de fácil acceso.
ES
2
Índice
Ajuste de la calidad de la imagen de una señal
procedente de un ordenador .....................23
Uso de un “Memory Stick”
Acerca del “Memory Stick” ......................24
Precauciones ............................................ 4
Conexión y preparación
Desembalaje ............................................. 5
Paso 1: Instalación del proyector .............. 5
Antes de instalar el proyector ......................... 6
Preparación para la proyección de los
archivos de imagen guardados en un
“Memory Stick” ........................................25
Inserción del “Memory Stick” ......................25
Selección de contenido que incluye una imagen
fija deseada ...............................................26
Visualización de imágenes fijas de forma
secuencial – Presentación de
diapositivas .............................................27
Instalación del proyector y la pantalla ........... 7
Visualización imágenes de índice en
pantalla completa ....................................29
Paso 2: Conexión del proyector ................ 8
Visualización del Menú de índice .................30
Conexión al equipo de vídeo .......................... 8
Visualización de una imagen a pantalla
completa ..................................................30
Conexión con los cables de interfaz de señales
opcionales .................................................. 8
Conexión con la unidad de interfaz de señales
opcional ..................................................... 9
Paso 3: Ajuste del tamaño y la posición de la
imagen .................................................... 10
Paso 4: Selección del idioma del menú . 12
Giro de un archivo de imagen .................31
Protección de un archivo importante .......32
Proyección de un archivo seleccionado con
la alimentación activada - Inicio ..............33
Registro de un archivo cómo imagen
de inicio ....................................................33
Ajuste de la imagen de inicio ........................34
Proyección
Proyección de la imagen en la pantalla .. 14
Selección del modo de visualización de la
imagen .................................................... 16
Eliminación de un archivo de imagen .....35
Inicialización de un “Memory Stick” .........36
Otros
Solución de problemas ............................38
Utilización de los menús
Sustitución de la lámpara ........................42
Funcionamiento por medio de los
menús ..................................................... 18
Sustitución del filtro de aire .....................43
Configuraciones de menú ....................... 19
Ubicación de los controles ......................49
Elementos de menú ...................................... 20
Index .......................................................52
Especificaciones .....................................44
Acerca del nº de memoria predefinida ......... 23
3 ES
Embalaje
Precauciones
Seguridad
• Compruebe que la tensión de funcionamiento de la
unidad sea la misma que la del suministro eléctrico
local.
• Si se introduce algún objeto sólido o líquido en la
unidad, desenchúfela y haga que sea revisada por
personal especializado antes de volver a utilizarla.
• Desenchufe la unidad de la toma mural cuando no
vaya a utilizarla durante varios días.
• Para desconectar el cable, tire del enchufe. Nunca
tire del propio cable.
• La toma mural debe encontrarse cerca de la unidad
y ser de fácil acceso.
• La unidad no estará desconectada de la fuente de
alimentación de CA (toma de corriente) mientras
esté conectada a la toma mural, aunque haya
apagado la unidad.
• No mire al objetivo mientras la lámpara esté
encendida.
• No coloque la mano ni ningún objeto cerca de los
orificios de ventilación, ya que el aire que sale es
caliente.
Prevención del calentamiento interno
Después de desactivar la alimentación con la tecla
I/1 (encendido/espera), no desconecte la unidad de la
toma mural mientras el ventilador de refrigeración
esté en funcionamiento.
Precaución
El proyector está equipado con orificios de
ventilación de aspiración y de escape. No bloquee
dichos orificios ni coloque nada cerca de ellos, ya que
si lo hace puede producirse un recalentamiento
interno, causando el deterioro de la imagen o daños al
proyector.
ES
4
Precauciones
Guarde la caja y los materiales de embalaje
originales, ya que resultarán útiles cuando tenga que
embalar la unidad. Para obtener una máxima
protección, vuelva a embalar la unidad como se
embaló originalmente en fábrica.
En esta sección se describe cómo instalar el proyector
y la pantalla, cómo conectar el equipo desde el cual
desea proyectar la imagen, etc..
Paso 1: Instalación
del proyector
Conexión y
preparación
Conexión y preparación
Desembalaje
Compruebe que la caja contenga los siguientes
elementos:
Se puede obtener una buena calidad de imagen
incluso si la proyecta desde el lateral de la pantalla
(“SIDE SHOT”) (1 página 7). Este proyector se
puede disfrutar en el hogar para diversas actividades
recreativas.
Ver películas con la familia
Mando a distancia (1),
pilas tamaño AA (R6)
(2)
Cable de interfaz de
señales (1)
Filtro de aire (para
sustitución) (1)
Tapa de objetivo (1)
Disfrutar de los vídeo juegos en pantalla
grande
Cable de alimentación de CA (1)
Manual de instrucciones (1)
Introducción de las pilas en el mando
a distancia
Introduzca las pilas en el mando a distancia
comenzando por el lado E, cómo se muestra
en la ilustración. Si las introduce forzándolas
o con las polaridades invertidas, podría
provocar un cortocircuito y generar calor.
Desembalaje / Paso 1: Instalación del proyector
5 ES
Conexión y
preparación
Ver deportes, etc., con los amigos
;
Calor y humedad excesivos
Ambientes con mucho polvo en suspensión
o mucho humo
Ver las imágenes grabadas con una cámara
digital y guardadas en el “Memory Stick”, en
una pantalla grande
No emplee el proyector en las siguientes condiciones.
Inclinando la unidad fuera del margen de
regulación del ajustador
Bloqueando los orificios de ventilación
Antes de instalar el proyector
No utilice el proyector en las condiciones siguientes,
ya que su funcionamiento podría verse afectado o el
aparato podría resultar dañado.
Ventilación escasa
ES
6
Paso 1: Instalación del proyector
Orificios de
ventilación
(de escape)
Orificios de
ventilación (de
aspiración)
Colocando el proyector sin el ajustador
La distancia entre el proyector y la pantalla varía en
función del tamaño de ésta.
1 Disposición del proyector y la
pantalla.
Pantalla
Unidad: m (pies)
40
Tamaño
de la
pantalla
(pulgadas)
b
100
120
150
0,6
0,9
1,2
(2,0) (3,0) (3,9)
1,5
(4,9)
1,8
(5,9)
2,3
(7,5)
b
0,4
0,6
0,8
(1,3) (2,0) (2,6)
1,0
(3,3)
1,2
(3,9)
1,6
(5,2)
c
1,7
2,7
3,6
4,5
5,4
6,8
(5,6) (8,9) (11,8) (14,8) (17,7) (22,3)
d
1,6
2,5
3,3
4,2
5,0
6,3
(5,2) (8,2) (10,8) (13,8) (16,4) (20,7)
Proyección desde el centro
Puede cambiar el ángulo de proyección con el
ajustador.
Coloque el proyector de forma que el objetivo se
encuentre dentro del área sombreada
de la
ilustración, utilizando los valores c y d.
10°
d
80
a
c
a
60
10°
Unidad: m (pies)
Proyector
a: distancia máxima horizontal entre el extremo
derecho/izquierdo de la pantalla y el centro
del objetivo del proyector cuando el
proyector está colocado a un lado (para
“SIDE SHOT”)
b: distancia mínima horizontal entre el extremo
derecho/izquierdo de la pantalla y el centro
del objetivo del proyector, cuando el
proyector está colocado a un lado (para
“SIDE SHOT”)
c: distancia de proyección máxima entre la
pantalla y el centro del objetivo del proyector
cuando se utiliza la distancia horizontal a, o
cuando coloca el proyector de forma que el
centro de la pantalla y el del objetivo quedan
alineados.
d: distancia de proyección mínima entre la
pantalla y el centro del objetivo del proyector
cuando se utiliza la distancia horizontal b, o
cuando coloca el proyector de forma que el
centro de la pantalla y el del objetivo queden
alineados.
Proyección desde el lado (SIDE SHOT)
Coloque el proyector de forma que el objetivo se
encuentre dentro del área sombreada
de la
ilustración, utilizando los valores a, b, c y d de
la siguiente tabla como guía. Alinee la parte
Conexión y
preparación
inferior del ajustador del proyector con el
extremo inferior de la pantalla.
Instalación del proyector y la
pantalla
40
Tamaño
de la
pantalla
(pulgadas)
60
80
100
120
150
c
1,8
2,8
3,7
4,7
5,6
7,0
(6,0) (9,1) (12,2) (15,3) (18,4) (23,0)
d
1,6
2,4
3,2
4,0
4,9
6,1
(5,2) (7,9) (10,6) (13,2) (15,9) (19,9)
Proyección de una señal de formato 720p,
una señal de ordenador, etc.
En las tablas se muestran las distancias que se deben
utilizar para proyectar las señales de vídeo
convencionales. Las distancias que se usan para
proyectar una señal de formato 720p, una señal de
ordenador, y los datos guardados en el “Memory
Stick” se muestran en página 47.
2 Proyección de una imagen en
la pantalla y ajuste de la
misma de forma que entre en
la pantalla.
Para proyectar una imagen, conecte el equipo de
vídeo al proyector. (1 página 8)
Paso 1: Instalación del proyector
7 ES
Conexión y
preparación
Paso 2:
Conexión del
proyector
Conexión con los cables de
interfaz de señales opcionales
Conexión a un reproductor de DVD
con conectores de vídeo o
sintonizador digital de emisiones vía
satélite
Parte trasera del
proyector
Cuando realice las conexiones, asegúrese
de realizar lo siguiente:
• Apague todos los equipos antes de realizar
cualquier conexión.
• Utilice los cables apropiados para cada conexión.
• Introduzca los enchufes de los cables
correctamente; si no se introducen por completo
suelen producir ruido. Cuando desconecte un cable,
asegúrese de tirar del enchufe, no del cable.
• Cuando conecte el proyector a PJ MULTI INPUT,
seleccione la señal de entrada con el ajuste
ENTRAD A del menú AJUSTE
. (1 página 22)
Cable de interfaz de señales
SIC-HS20 (no suministrado)
a salida de RVA/
componente
a salida de
audio
Conexión al equipo de vídeo
Parte trasera del
proyector
Y
CB
(PB)
CR
(PR)
S
vídeo Audio L Audio R
Reproductor de DVD con conectores de vídeo,
sintonizador digital de emisiones vía satélite, etc.
Cable de S vídeo o
vídeo/audio
(no suministrado)
a la
salida de
S vídeo o
vídeo/
audio
Con el
logotipo
de SONY
Cable de
hacia
interfaz de
arriba
señales
(suministrado)
a la salida
de vídeo/
audio
Equipo de vídeo
ES
8
Paso 2: Conexión del proyector
Equipo de vídeo
Parte trasera del
proyector
Conexión con la unidad de
interfaz de señales opcional
La utilización de la unidad de interfaz de señales
opcional le permite conectar varios equipos de vídeo,
y seleccionar la señal de salida hacia el proyector o la
televisión desde el equipo conectado, con solo pulsar
el interruptor de selección de la unidad de interfaz.
Conexión y
preparación
Conexión a un amplificador de AV
Parte trasera del
proyector
Cable de interfaz de señales
SIC-HS40 (no suministrado)
a la salida
de vídeo
Y
CB
(PB)
CR
(PR)
S
vídeo
Vídeograbadora,
etc.
Reproductor
de DVD, etc.
Vídeo
Amplificador de
AV
Conexión a un ordenador
Parte trasera del
proyector
Unidad de interfaz
de señales
a la salida de
IFU-HS1
conector
múltiple PJ
Cable con conector PJ
múltiple (suministrado
con la IFU-HS1)
Televisión
Cable de interfaz de
señales SIC-HS30
(no suministrado)
Ordenador
a salida de
monitor
a salida de audio
Paso 2: Conexión del proyector
9 ES
Conexión y
preparación
Paso 3: Ajuste del
tamaño y la posición
de la imagen
1 Enchufe el cable de
alimentación de CA a un
enchufe de la pared.
El indicador ON/STANDBY se iluminará en
rojo y el proyector entrará en el modo de espera.
ON/
STANDBY
La luz se ilumina en rojo.
Detector trasero del
mando a distancia
6
5,8
Detector frontal del
mando a distancia
Bloqueo del a ajustador
2 Pulse el interruptor [/1
(encendido/espera) para
encender el proyector.
El indicador ON/STANDBY se iluminará en
verde.
6
ON/
STANDBY
La luz se ilumina
en verde.
SIDE
SHOT
VOLUME
+
–
+
–
INPUT
MS SLIDE
APA
VIDEO MEMORY
DYNAMIC STANDARD
USER 1
USER 2
LIVING
2
4
7
USER 3
OFF
al proyector.
Remítase a las instrucciones del equipo
conectado.
4 Pulse el botón INPUT para
proyectar la imagen en la
pantalla.
MENU
ENTER
3 Encienda el equipo conectado
RESET
Cada vez que pulse el botón, la indicación de
señal de entrada cambia. (1 página 15)
VIDEO 1
INPUT
ES
10
Paso 3: Ajuste del tamaño y la posición de la imagen
enfoque con la palanca de
enfoque.
Conexión y
preparación
5 Ajuste de forma aproximada el
El proyector se puede mover en sentido vertical
y horizontal dentro de los límites siguientes:
Hasta 20° para cada uno de los
ángulos horizontales
Palanca de enfoque
6 Ajuste el tamaño y la posición
de la imagen para que se
acomode a la pantalla,
utilizando la palanca del zoom
y el ajustador.
Hasta 10° para el
ángulo vertical
Hasta 2° para el
ángulo de
inclinación
Proyección desde un
lado
Proyección desde el
centro
Pantalla
Pantalla
Imagen
Imagen
Mueva la palanca del zoom para ajustar el
tamaño de la imagen.
Palanca del zoom
Ajuste la posición de la imagen con el ajustador.
Apriete hacia abajo el bloqueo del ajustador y
deslícelo hacia la derecha, mueva el proyector, y
devuelva el bloqueo a su posición original.
Bloqueo del ajustador
Si coloca el proyector en
el lado izquierdo de la
pantalla, ajústelo de modo
que el lado izquierdo de la
imagen quede ajustado al
lado izquierdo de la
pantalla. Con el proyector
colocado en el lado
derecho, ajústelo de
modo que el lado derecho
de la imagen quede
ajustado al lado derecho
de la pantalla.
Si coloca el proyector al
mismo nivel que la parte
inferior de la pantalla,
ajústelo de forma que el
borde inferior de la
imagen se ajuste al
borde inferior de la
pantalla. Cuando el
proyector se coloque al
mismo nivel que la parte
superior de la pantalla,
ajústelo de forma que el
borde superior de la
imagen se ajuste al
borde superior de la
pantalla.
Paso 3: Ajuste del tamaño y la posición de la imagen
11 ES
Conexión y
preparación
7 Ajuste para corregir la
distorsión trapezoidal.
Proyección desde un lado
Corrige la distorsión horizontal.
Pulse los botones + o – de SIDE SHOT de modo
que el borde superior de la imagen quede
paralelo al borde inferior. Si el lado izquierdo es
más largo que el lado derecho, pulse el botón –
de SIDE SHOT.
Paso 4:
Selección del
idioma del menú
Es posible seleccionar el idioma que se desee entre los
nueve existentes para el menú y demás indicaciones
en pantalla. El ajuste por defecto de fábrica es el
idioma inglés.
SIDE
SHOT
VOLUME
+
–
+
–
2
INPUT
MS SLIDE
APA
Pulse el botón + de SIDE SHOT si es el lado
derecho el que tiene mayor longitud.
Para ajustar la distorsión de forma precisa, pulse
M o m.
Proyección desde el centro
Corrige la distorsión vertical.
Seleccione V (vertical) con el ajuste DIR
TRAPEZ del menú AJUSTE INST.
.A
continuación, ajuste con la opción DIST TRAP
DIG, de forma que el lado izquierdo de la
imagen se ponga en paralelo con el lado
derecho. (1 página 22)
Si el borde superior de la imagen es más largo
que el inferior, ajústelo a un valor positivo.
Si el borde inferior es más largo que el superior,
ajústelo a un valor negativo.
8 Vuelva a ajustar el enfoque
con la palanca de enfoque.
ES
12
Paso 4: Selección del idioma del menú
VIDEO MEMORY
DYNAMIC STANDARD
USER 1
USER 2
LIVING
USER 3
OFF
MENU
ENTER
3
RESET
4,5,6
1 Enchufe el cable de
alimentación de CA a un
enchufe de la pared.
El indicador ON/STANDBY se iluminará en
rojo y el proyector entrará en el modo de espera.
5 Pulse M o m para seleccionar
(encendido/espera) para
encender el proyector.
El indicador ON/STANDBY se iluminará en
verde.
LANGUAGE (IDIOMA), y, a
continuación, pulse , o
ENTER.
Conexión y
preparación
2 Pulse el interruptor [/1
3 Pulse MENU.
Aparecerá la pantalla de menú.
El menú actualmente seleccionado se muestra
como un botón amarillo.
ENTER
VIDEO 1
PICTURE CTRL
CONTRAST:
BRIGHT:
COLOR:
HUE:
SHARP:
D.PICTURE:
COLOR TEMP:
COLOR SYS:
VOLUME:
MENU
o
80
50
50
50
50
OFF
HIGH
AUTO
30
VIDEO 1
SET SETTING
STATUS:
INPUT-A:
LANGUAGE:
POWER SAVING:
ON
COMPONENT
ENGLISH
OFF
4 Pulse M o m para seleccionar
el menú SET SETTING
(AJUSTE) , y, a
continuación, pulse , o
ENTER.
Aparecerá el menú seleccionado.
6 Pulse M o m para seleccionar
un idioma, y, a continuación,
pulse < o ENTER.
El menú aparecerá en el idioma seleccionado.
ENTER
ENTER
o
o
VIDEO 1
SET SETTING
STATUS:
INPUT-A:
LANGUAGE:
POWER SAVING:
ON
COMPONENT
ENGLISH
OFF
Para que el menú desaparezca
Pulse MENU.
Paso 4: Selección del idioma del menú
13 ES
1 Enchufe el cable de
Proyección
En esta sección se describe cómo utilizar el proyector
para ver la imagen procedente del equipo conectado al
mismo. También se describe cómo ajustar la calidad
de la imagen a su gusto.
alimentación de CA a un
enchufe de la pared.
El indicador ON/STANDBY se iluminará en
rojo y el proyector entrará en el modo de espera.
ON/
STANDBY
Proyección
Proyección de la
imagen en la
pantalla
La luz se ilumina en
rojo.
2 Pulse el interruptor [/1
(encendido/espera) para
encender el proyector.
El indicador ON/STANDBY se iluminará en
verde.
ON/
STANDBY
SIDE
SHOT
VOLUME
+
–
+
–
INPUT
MS SLIDE
APA
VIDEO MEMORY
DYNAMIC STANDARD
USER 1
USER 2
LIVING
3 Encienda el equipo conectado
al proyector.
Remítase a las instrucciones del equipo
conectado.
USER 3
OFF
MENU
ENTER
2
4
7
La luz se ilumina
en verde.
RESET
4 Pulse el botón INPUT varias
veces para seleccionar la
señal de entrada que quiere
proyectar en la pantalla.
Muestra la señal de entrada que desea.
Ejemplo: para ver la imagen procedente del
equipo de vídeo conectado a la toma
VIDEO INPUT.
VIDEO 1
INPUT
ES
14
Proyección de la imagen en la pantalla
Pulse
INPUT para
que
aparezca
El sonido
procede del
equipo
conectado a
Equipo de vídeo
conectado a VIDEO
INPUT
VIDEO 1
AUDIO INPUT
Equipo de vídeo
conectado a S VIDEO
INPUT
S VIDEO 1
AUDIO INPUT
Para ver la imagen
procedente de
5 Mueva la palanca del zoom
para ajustar el tamaño de la
imagen.
Equipo de vídeo
conectado a PJ MULTI
INPUT por medio del
cable de interfaz de
señales opcional o la
unidad de interfaz de
señales.
VIDEO 2
PJ MULTI
INPUT
Palanca del zoom
Proyección
ENTRAD A* PJ MULTI
Equipo de RVA/
componente conectado
INPUT
a PJ MULTI INPUT por
medio del cable de
interfaz de señales
opcional o la unidad de
interfaz de señales
6 Mueva la palanca de enfoque
para ajustar el enfoque.
Ajuste para obtener un enfoque nítido.
Vídeo equipado con S S VIDEO 2
VIDEO conectado a PJ
MULTI INPUT por
medio del cable de
interfaz de señales
opcional o la unidad de
interfaz de señales.
PJ MULTI
INPUT
MS
“Memory Stick”
introducido en la ranura
para “Memory Stick”
AUDIO INPUT
* Ajuste la opción ENTRAD A del menú AJUSTE
acuerdo con la señal de entrada. (1 página 22)
Palanca de enfoque
de
7 Pulse los botones + o – de
VOLUME (volumen) para
ajustar el volumen.
VOLUME
+
–
Proyección de la imagen en la pantalla
15 ES
Desconexión de la alimentación
1 Pulse el interruptor [/1 (encendido/
espera).
En la pantalla aparece el mensaje
“DESACTIVAR?”.
Proyección
2 Vuelva a pulsar el interruptor [/1.
El indicador ON/STANDBY parpadeará en verde
y el ventilador seguirá funcionando para reducir el
calentamiento interno. Además, mientras el
indicador ON/STANDBY esté parpadeando
rápidamente no podrá encender el indicador ON/
STANDBY con el interruptor [/1.
3 Desenchufe el cable de alimentación de
CA del enchufe de la pared cuando el
ventilador deje de funcionar y el indicador
ON/STANDBY se ilumine en rojo.
Puede apagar el proyector manteniendo pulsado el
interruptor [/1 (encendido/espera) aproximadamente
un segundo, en lugar de realizar los pasos
anteriormente descritos.
Selección del modo de
visualización de la
imagen
El modo de visualización de la imagen que mejor se
adapte al tipo de programa o a las condiciones de la
habitación se puede seleccionar pulsando el botón del
mando a distancia o del proyector.
SIDE
SHOT
VOLUME
+
–
+
–
INPUT
MS SLIDE
APA
VIDEO MEMORY
DYNAMIC STANDARD
USER 1
USER 2
LIVING
USER 3
OFF
MENU
ENTER
ES
16
Selección del modo de visualización de la imagen
RESET
Botones VIDEO MEMORY
DYNAMIC
STANDARD
LIVING
USER 1, 2 y 3
OFF
Pulse uno de los botones VIDEO
MEMORY, es decir, DYNAMIC,
STANDARD, LIVING y USER 1, 2 y
3
DYNAMIC (dinámico)
Selecciónelo para dar más contraste y más nitidez a la
imagen.
Proyección
STANDARD
Recomendado para unas condiciones de visualización
normales en el hogar.
Selecciónelo también para reducir las irregularidades
de la imagen cuando se esté viendo con el modo
DYNAMIC.
LIVING (sala estar)
Selecciónelo para obtener una imagen más suave,
como la de las películas.
USER 1, 2 y 3 (usuario 1, 2 y 3)
Puede ajustar la calidad de la imagen a su gusto y
guardar los ajustes en la memoria que haya
seleccionado del proyector. Pulse uno de los botones
USER 1, 2 o 3 y a continuación, ajuste la imagen
utilizando los menús. Los ajustes se guardan, y
pulsando el botón puede ver la imagen con la calidad
de imagen que ha ajustado. (1 página 21)
OFF (no)
Selecciónelo para el ajuste guardado en cada entrada
que se puede seleccionar con el botón INPUT, o cada
señal de entrada.
Consejo
El modo de visualización de la imagen se puede seleccionar con
el botón VIDEO MEMORY del proyector. Cada vez que se pulsa
el botón se selecciona el elemento superior.
Selección del modo de visualización de la imagen
17 ES
Utilización de los menús
En esta sección se describe cómo hacer diversos
cambios en el nivel de ajuste y ajustes utilizando los
menús.
1 Pulse MENU.
Aparecerá la pantalla de menú.
El menú actualmente seleccionado se muestra
como un botón amarillo.
VIDEO 1
CTRL IMAGEN
Funcionamiento
por medio de los
menús
CONTRASTE:
BRILLO:
COLOR:
TONALIDAD:
NITIDEZ:
IMAG DI:
TEMP COLOR:
SIST COLOR:
VOLUMEN:
MENU
80
50
50
50
50
NO
ALTO
AUTO
30
2 Pulse M o m para seleccionar
un menú, y, a continuación,
pulse , o ENTER.
Utilización de los
menús
Aparecerá el menú seleccionado.
SIDE
SHOT
VOLUME
+
–
+
–
Menús
Elementos Ajustes
INPUT
MS SLIDE
VIDEO 1
AJUSTE
ESTADO:
ENTRAD A:
IDIOMA:
AHORRO ENERGIA:
APA
SI
COMPONENTE
ESPANOL
NO
VIDEO MEMORY
DYNAMIC STANDARD
LIVING
ENTER
USER 1
USER 2
USER 3
OFF
1
MENU
ENTER
o
3 Seleccione un elemento que
RESET
Botón RESET
2,3,4
desee ajustar.
Utilice M o m para seleccionar un elemento, y, a
continuación, pulse , o ENTER.
VIDEO 1
AJUSTE
ESTADO:
ENTRAD A:
IDIOMA:
AHORRO ENERGIA:
ENTER
o
ES
18
Funcionamiento por medio de los menús
SI
COMPONENTE
ESPANOL
NO
4 Realice el ajuste o cambie el
nivel de ajuste en uno de los
elementos.
Configuraciones
de menú
Al cambiar el nivel de ajuste
Para que el número aumente, pulse M o ,.
Para que el número disminuya, pulse m o <.
Pulse ENTER para recuperar la pantalla
original.
Cuando cambie el ajuste
Pulse M o m para cambiar el ajuste.
Pulse < o ENTER para recuperar la pantalla
original.
VIDEO 1
AJUSTE
SI
COMPONENTE
ESPANOL
SI
ENTER
o
Menú CTRL IMAGEN
El menú CTRL (control) IMAGEN se utiliza para
ajustar la imagen. Con este menú se puede ajustar el
volumen.
Menú AJUS ENTRAD
El menú AJUS ENTRAD se utiliza para ajustar la
señal de entrada. Puede ajustar el tamaño y la
posición, etc., de la imagen.
Menú AJUSTE
Desactivación del menú
Pulse MENU.
Para reajustar elementos ajustados
Seleccione el elemento que desea reajustar, y a
continuación pulse el botón RESET.
“Completado” aparecerá en pantalla y los ajustes
mostrados en ésta recuperarán los valores de fábrica.
Los elementos que pueden reajustarse son los
siguientes:
• CONTRASTE, BRILLO, COLOR, TONALIDAD,
NITIDEZ y POTENCIA RVA del menú CTRL
IMAGEN.
• FASE PUNTO, TAMAÑO H y DESPLAZ del
menú AJUS ENTRAD
• DIST TRAP DIG del menú AJUSTE INST
El menú AJUSTE se utiliza para cambiar los valores
del proyector.
Utilización de los
menús
ESTADO:
ENTRAD A:
IDIOMA:
AHORRO ENERGIA:
El proyector cuenta con cuatro páginas de menú. Los
elementos que pueden ajustarse en cada menú se
describen las pçaginas 20 y 22.
Menú AJUSTE INST
El menú AJUSTE INST se utiliza para corregir la
distorsión. Puede cambiar la posición de la pantalla, la
intensidad de la imagen de fondo, etc., de la pantalla
del menú.
Configuraciones de menú
19 ES
Elementos de menú
Los elementos que se pueden ajustar están limitados según el tipo de señal de entrada. Los elementos que no
pueden ajustarse no aparecen en el menú. (1 página 47)
Utilización de los
menús
ES
20
Menú
Elemento
Descripción
CTRL
IMAGEN
CONTRASTE
Cuanto mayor sea el ajuste, mayor será el contraste. Cuanto menor sea el ajuste, menor
será el contraste.
BRILLO
(brillantez)
Cuanto mayor sea el ajuste, mayor será el brillo de la imagen. Cuanto menor sea el
ajuste, menor será el brillo de la imagen.
COLOR
Cuanto mayor sea el ajuste, mayor será la intensidad. Cuanto menor sea el ajuste,
menor será la intensidad.
TONALIDAD
Cuanto mayor sea el ajuste, la imagen adquirirá un tono más verdoso. Cuanto menor
sea el ajuste, la imagen adquirirá un tono más morado.
NITIDEZ
Cuanto mayor sea el ajuste, mayor será la nitidez de la imagen. Cuanto menor sea el
ajuste, la imagen aparecerá con mayor suavidad.
POTENCIA RVA
Ajusta la nitidez de la imagen cuando se introducen señales RVA.
IMAG DI
(Dinámica)
SI: Enfatiza el color negro.
NO: Reproduce las partes oscuras de la imagen con precisión, de acuerdo con la señal
fuente.
MODO GAMMA
GRAFICO: Reproduce las fotografías en tonos naturales.
TEXTO: Contrasta el blanco y el negro. Adecuado para imágenes que contienen
mucho texto.
TEMP COLOR
ALTO: el color blanco adquiere un tono azulado.
MEDIO: el color blanco adquiere un tono neutro.
BAJO: el color blanco adquiere un tono rojizo.
SIST (Sistema)
COLOR
Selecciona el sistema de color de la señal de entrada.
AUTO: NTSC3,58, PAL, SECAM y NTSC4,43 (conmutación automática).
Normalmente, seleccione esta posición.
PAL-M/N: PAL-M/PAL-N y NTSC3,58 (conmutación automática). Cuando la señal
PAL-M, PAL-N o NTSC3,58 se introduce con SIST COLOR ajustado en AUTO,
seleccione esta posición si la imagen está distorsionada o sin color.
VOLUMEN
Ajusta el volumen. El volumen puede ajustarse para cada una de las entradas,
seleccionándolas con el botón INPUT.
Configuraciones de menú
Menú
Elemento
Descripción
AJUS
ENTRAD
FASE PUNTO
Cuando la señal de entrada procede de un ordenador, una vez ajustada la imagen, la
ajusta con mayor precisión pulsando el botón APA.
TAMANO H
Cuando la señal de entrada procede de un ordenador, ajusta el tamaño horizontal de la
imagen. Cuanto mayor sea el ajuste, más ancha será la imagen. Cuanto menor sea el
ajuste, más estrecha será la imagen.
DESPLAZ
Al aumentar el ajuste de H (horizontal), la imagen se desplazará a la derecha, y al
disminuirlo, se desplazará a la izquierda. Utilice los botones < o , para ajustar la
posición horizontal.
Al aumentar el ajuste de V (vertical), la imagen se desplazará hacia arriba, y al
disminuirlo, se desplazará hacia abajo. Utilice los botones M o m para ajustar la
posición vertical.
CONV EXPLO
(Convertidor de
exploración)
SI: proyecta la señal procedente de un ordenador de acuerdo con el tamaño de la
pantalla. La imagen será ligeramente más suave.
NO: proyecta la señal procedente de un ordenador sin modificarla. La imagen será
clara, pero su tamaño será menor.
Nota
Cuando se introduce la señal SVGA o XGA, no aparece este elemento.
ASPECTO
Imagen original (La
imagen con una relación
de aspecto 16:9 se ha
condensado
horizontalmente para
que sea una imagen 4:3.)
MEMORIA
VIDEO
Imagen
mostrada
con
ASPECTO
ajustado a
16:9
Utilización de los
menús
4:3: Si se introduce la imagen con la relación 4:3.
16:9: Si se introduce la imagen con la relación 16:9 (comprimida*) desde un equipo
como un reproductor de DVD.
* Comprimida: una imagen original se graba condensada horizontalmente, cómo se
muestra en la ilustración. Cuando ajusta ASPECTO a la relación 16:9.
Puede seleccionar el modo de visualización de la imagen que mejor se adapte al tipo de
imagen o de ambiente.
NO: Selecciónelo para el ajuste guardado en cada canal de entrada o señal de entrada.
DINAMICO: Selecciónelo para dar más contraste y más nitidez a la imagen.
STANDARD: Recomendado para unas condiciones de visualización normales.
Selecciónelo también para reducir las irregularidades de la imagen cuando se esté
viendo con el modo DINÁMICO.
SALA ESTAR: Selecciónelo para obtener una imagen más suave, como la de las
películas.
USUARIO 1, 2 y 3: Puede ajustar la calidad de la imagen a su gusto y guardar los
ajustes. Una vez guardados los ajustes, puede ver la imagen con la calidad de imagen
que ha ajustado pulsando el botón.
Memorización de los ajustes
1 Seleccione USUARIO 1, USUARIO 2 o USUARIO 3.
2 Ajuste los elementos que desee en los menús.
Los elementos que pueden guardarse son:
CONTRASTE, BRILLO, COLOR, TONALIDAD, NITIDEZ, POTENCIA RVA,
IMAG DI, TEMP COLOR, SIST COLOR, CONV EXPLO, ASPECTO.
Consejo
También es posible ajustar la calidad de imagen en los modos DINAMICO,
STANDARD y SALA ESTAR. Para restaurar el ajuste de fábrica pulse RESET.
Configuraciones de menú
21 ES
Menú
AJUSTE
Utilización de los
menús
ES
22
Elemento
Descripción
ESTADO
Ajústelo en NO para desactivar las indicaciones en pantalla, excepto los menús, el
mensaje que aparece al desconectar la alimentación, y los mensajes de aviso.
Para volver a mostrar todas las indicaciones en pantalla, ajústelo en SI.
ENTRAD A
Selecciona la señal de entrada procedente del conector PJ MULTI:
ORDENADOR: Introduce la señal de un ordenador.
COMPONENTE: Introduce la señal de componente o componente progresivo de un
reproductor de DVD, un sintonizador digital de emisiones vía satélite, etc.
VIDEO GBR: Introduce la seña procedente de un juego de ordenador, reproductor de
DVD o emisiones HDTV.
IDIOMA
Selecciona el idioma que se utiliza en el menú y en las indicaciones en pantalla. Los
idiomas que están disponibles son: inglés, francés, alemán, italiano, español, japonés,
chino, portugués y coreano.
AHORRO
ENERGIA
Cuando se ajusta en SI, se enciende el indicador POWER SAVING. El proyector entra
en el modo de ahorro de energía si no entra una señal en un periodo de tiempo de 10
minutos; la lámpara se apaga y el ventilador de refrigeración sigue funcionando. En el
modo de ahorro de energía, no funciona ninguno de los botones durante los primeros
60 segundos. Dicho modo se cancelará al introducir una señal o al pulsar cualquier
tecla. Si no desea ajustar el proyector al modo de ahorro de energía, seleccione NO.
AJUSTE DI TRA DIG
INST
MEM (memoria)
SI: El ajuste de DIST TRAP DIG queda almacenado.
Los datos se recuperan cuando se enciende el proyector. El ajuste permanecerá igual
cada vez que se conecte.
NO: DIST TRAP DIG se reajusta al valor 0 cuando se vuelve a activar la alimentación.
DIST TRAP DIG
Corrige la distorsión trapezoidal causada por el ángulo de proyección. Utilice este
elemento después de seleccionar el tipo de distorsión, H (horizontal) o V (vertical), con
DIR TRAPEZ
DIR TRAPEZ
Cuando la imagen sea un trapecio vertical (
), seleccione V. A continuación,
corrija la distorsión con DIST TRAP DIG. Cuando la imagen sea un trapecio
horizontal (
), seleccione H, y a continuación, corrija la distorsión con DIST
TRAP DIG.
POSICION
MENU
Selecciona la posición de la pantalla del menú entre IZQ SUP, IZQ INF, CENTRO,
DER SUP y DER INF.
COLOR MENU
Selecciona el tono de la pantalla del menú entre ESTANDAR, CALIDO, FRIO,
VERDE o GRIS.
FONDO MENU
Selecciona la intensidad de la imagen de fondo de la pantalla del menú entre
OSCURO, ESTANDAR o LUMINOSO.
CONTADOR
LAMPARA
Indica cuánto tiempo ha estado encendida la lámpara.
Configuraciones de menú
Acerca del nº de memoria
predefinida
Este proyector dispone de 32 tipos de datos
predefinidos para señales de entrada (memoria
predefinida). Al introducirse una señal predefinida, el
proyector detecta automáticamente el tipo de señal y
recupera los datos correspondientes a la misma de la
memoria predefinida con el fin de ajustarla y obtener
una imagen óptima. El número de memoria y el tipo
de señal de esa señal aparecen en el menú AJUS
ENTRAD.
ENTRAD A
AJUS ENTRAD
FASE PUNTO:
TAMANO H:
DESPLAZ:
CONV EXPLO:
15
800
H: 200
SI
V: 30
Nº de memoria
No. 13
640
480
También es posible ajustar los datos predefinidos
mediante el menú AJUS ENTRAD.
Este proyector dispone de 20 tipos de memorias de
usuario para ENTRAD A, en las que es posible
guardar el ajuste de los datos definidos para una señal
de entrada no predefinida.
Si se introduce una señal no predefinida por primera
vez, aparecerá un número de memoria (0). Cuando
ajuste los datos de la señal en el menú AJUS
ENTRAD, se registrarán en el proyector. Si se
registran más de 20 memorias de usuario, la memoria
más reciente siempre sobrescribirá la más antigua.
Consulte la tabla de la página48 para averiguar si la
señal está registrada en la memoria predefinida.
Es posible realizar una ajuste automático con el fin de
obtener la imagen más clara posible, cuando la señal
que se proyecta procede de un ordenador.
1 Proyecte una imagen fija desde el
ordenador.
2 Pulse el botón APA.
Cuando la imagen esté correctamente ajustada, la
palabra “Completado” aparecerá en pantalla.
Notas
• Pulse el botón APA cuando aparezca la imagen completa en
pantalla. Si hay bordes negros alrededor de la imagen, la
función APA no se activará correctamente y la imagen podrá
extenderse más allá de la pantalla.
• Si cambia la señal de entrada o vuelve a conectar un ordenador,
pulse el botón APA de nuevo para obtener una imagen
adecuada.
• “AJUSTANDO” aparece en la pantalla. Para recuperar la
pantalla original, pulse de nuevo el botón APA durante el
ajuste.
• La imagen puede no ajustarse adecuadamente dependiendo del
tipo de señal de entrada.
• Defina los elementos del menú AJUS ENTRAD cuando ajuste
la imagen de forma manual. (1 página 21)
Utilización de los
menús
Tipo de señal
Ajuste de la calidad de la
imagen de una señal
procedente de un ordenador
Puesto que los datos de las siguientes señales se
recuperan de la memoria predefinida, puede emplear
estos datos predefinidos ajustando TAMANO H.
Realice ajustes de mayor precisión con DESPLAZ.
Señal
Nº de
memoria
TAMAÑO
H
Super Mac-2
23
1312
SGI-1
23
1320
Macintosh 19”
25
1328
Nota
Si la relación de aspecto de la señal de entrada no es 4:3, parte de
la pantalla aparecerá en negro.
Configuraciones de menú
23 ES
Uso de un “Memory Stick”
En esta sección se describe cómo visualizar archivos
de imagen grabados con una cámara digital y
guardados en un “Memory Stick”. Puede hacer una
presentación de diapositivas utilizando los archivos,
mostrar una pantalla de índice del archivo, etc.
Acerca del
“Memory Stick”
MagicGate
MagicGate es una tecnología de protección de
copyright que utiliza tecnología de cifrado.
Formatos en los que este proyector
puede mostrar la imagen
Los datos de imagen grabados con una cámara digital
y guardados en un “Memory Stick” en el siguiente
formato:
Imágenes (compatibles con DCF) comprimidas en el
formato JPEG (Joint Photographic Experts Group)
(extensión: .jpg).
Antes de utilizar un “Memory Stick”
Terminal
“Memory Stick”
El “Memory Stick” es un nuevo medio de grabación
IC compacto, portátil y versátil con una capacidad de
datos superior a la de un disquete. El “Memory Stick”
está especialmente diseñado para intercambiar y
compartir datos digitales entre productos compatibles
con el “Memory Stick”. Puesto que es extraíble, el
“Memory Stick” también puede utilizarse para
almacenamiento externo de datos.
Uso de un “Memory
Stick”
ES
24
Tipos de “Memory Stick”
Existen dos tipos de “Memory Stick”: MagicGate
“Memory Stick”, que están equipados con la
tecnología de protección de copyright MagicGate, y
“Memory Stick” generales. Se pueden utilizar ambos
tipos de “Memory Stick” con el proyector. Sin
embargo, puesto que el proyector no es compatible
con las normas MagicGate, los datos grabados en el
“Memory Stick” no están sujetos a la protección de
copyright MagicGate.
Acerca del “Memory Stick”
Lengüeta de
protección
contra
escritura
Posición de
etiquetado
• No es posible girar ni borrar imágenes fijas si la
lengüeta de protección contra escritura del
“Memory Stick” está ajustada en LOCK.
• Se recomienda hacer copias de seguridad de los
datos importantes.
• Los datos de imagen pueden dañarse en los
siguientes casos:
– Si extrae el “Memory Stick”, desactiva la
alimentación, o desmonta la pila para sustituirla
mientras el indicador de acceso parpadea.
– Si utiliza un “Memory Stick” cerca de electricidad
estática o campos magnéticos.
Notas
• Evite que objetos metálicos o sus dedos entren en contacto con
los componentes metálicos de la sección de conexión.
• En el espacio para la etiqueta, no adhiera ningún material que
no sea la etiqueta suministrada.
• Adhiera la etiqueta en la posición de etiquetado indicada.
Compruebe que adhiere adecuadamente la etiqueta en la
posición de etiquetado.
• No doble, deje caer, ni dé golpes fuertes a los “Memory Stick”.
• No desmonte ni modifique los “Memory Stick”.
• No permita que el “Memory Stick” se moje.
• No utilice ni guarde los “Memory Stick” en lugares:
– extremadamente calientes, cómo en un automóvil aparcado al
sol o bajo un sol abrasador.
– bajo la luz solar directa.
– muy húmedos o expuestos a gases corrosivos.
• Cuando vaya a transportar o guardar el “Memory Stick”,
póngalo en su caja.
Acerca del formateo de “Memory
Stick”
Cuando los “Memory Stick” salen de fábrica, se
encuentran formateados en un formato estándar
especial. Cuando formatee “Memory Stick”, se
recomienda que lo haga en esta unidad.
Precaución cuando formatee “Memory
Stick” en un ordenador personal
Preste atención a los siguientes puntos cuando
formatee “Memory Stick” en el ordenador personal,
por ejemplo, que utilice.
No se garantiza que los “Memory Stick” formateados
en un ordenador personal funcionen en esta unidad.
Para utilizar un “Memory Stick” que se ha formateado
en un ordenador personal, se debe volver a formatear
en esta unidad. Tenga en cuenta que, en este caso,
todos los datos almacenados en el “Memory Stick” se
perderán.
Preparación para la proyección
de los archivos de imagen
guardados en un “Memory Stick”
Inserción del “Memory Stick”
Inserte el “Memory Stick” en la ranura para “Memory
Stick” de la parte delantera del proyector.
“Memory Stick”
Indicador de acceso
Si el indicador de acceso está iluminado o
parpadeando, se están leyendo o escribiendo datos en
el “Memory Stick”. No agite el proyector ni lo golpee.
No desactive la alimentación del proyector ni extraiga
el “Memory Stick”. Esto podría dañar los datos.
Notas
Extracción del “Memory Stick”
Cuando el indicador de acceso esté apagado, presione
el “Memory Stick” y retire la mano. Extraiga el
“Memory Stick” al cancelarse el bloqueo.
• “Memory Stick” y
son marcas comerciales de Sony
Corporation.
• “MagicGate Memory Stick” y
son marcas comerciales de
Sony Corporation.
Uso de un “Memory
Stick”
• Para evitar que se produzcan pérdidas de datos,
realice copias de seguridad de los datos con
frecuencia. En ningún caso Sony será responsable
de las pérdidas de datos que puedan producirse.
• La grabación no autorizada puede ir en contra de lo
establecido por las leyes de copyright.
• Sony puede modificar o cambiar el software de la
aplicación “Memory Stick” sin previo aviso.
.....................................................................................
Inserte el “Memory Stick” en la dirección de la
flecha hasta que oiga un “clic”.
Indicador de
acceso
Preparación para la proyección de los archivos de imagen guardados en un “Memory Stick”
25 ES
Selección de contenido que
incluye una imagen fija
deseada
2 Pulse M o m para seleccionar
ACCIÓN
, y pulse ENTER.
ACCIÓN
Visor JPEG
Diapos.
Índice
Sel. cont.
SIDE
SHOT
VOLUME
+
–
+
–
1
INPUT
MS SLIDE
APA
VIDEO MEMORY
DYNAMIC STANDARD
USER 1
USER 2
LIVING
USER 3
3 Pulse M o m para seleccionar
OFF
MENU
ENTER
2-4
2-5
RESET
1 Pulse el botón INPUT para
Uso de un “Memory
Stick”
seleccionar MS
“Sel. Cont.”, y pulse ENTER.
Aparece el submenú para seleccionar una
carpeta.
a la fase superior
Contenido actualmente seleccionado
ACCIÓN
DCIM
Visor JPEG
Diapos.
Aparece la página inicial MS.
Índice
Sel. cont.
ACCIÓN
ACCIÓN
AJUSTE
“MEMORY STICK”
El nombre del
contenido
seleccionado*
aparecerá.
Visor JPEG
Diapos.
Índice
Sel. cont.
Marca de la página
inicial MS
Aparecerán las dos primeras
miniaturas** incluidas en el
contenido seleccionado.
Cuando los archivos
JPEG están
Carpetas incluidas en la guardados en el
carpeta actual carpeta actual, se
muestra uno de ellos.
Nota
El contenido se ordena numéricamente y alfabéticamente
hasta los 256 archivos. El último contenido no se ordenará.
* En el contenido se incluyen varias imágenes fijas. En el
contenido pueden estar incluidas varias imágenes fijas y otros
elementos. Cuando esté visualizando una imagen fija guardada
en un “Memory Stick”, debe seleccionar el contenido.
** Varias pequeñas imágenes contenidas en una carpeta se pueden
proyectar a la vez. Reciben el nombre de miniaturas.
ES
26
0100MSDCF
0101MSDCF
0102MSDCF
0103MSDCF
0104MSDCF
0105MSDCF
Preparación para la proyección de los archivos de imagen guardados en un “Memory Stick”
4 Pulse M o m para seleccionar
la carpeta que quiere utilizar
para la presentación de
diapositivas, y pulse ENTER.
Si desea seleccionar una carpeta que no se
encuentra en el menú, seleccione v o V, y pulse
ENTER a continuación.
5 Pulse ENTER.
Aparecen el nombre de la carpeta seleccionada
y las dos primeras miniaturas.
Visualización de imágenes
fijas de forma secuencial –
Presentación de diapositivas
Puede realizar presentaciones de diapositivas
utilizando archivos de imagen (compatibles con
DCF) de formato JPEG grabados con cámara digital.
Las diapositivas se pueden pasar de forma manual o
automática.
ACCIÓN
Visor JPEG
Diapos.
Índice
Sel. cont.
DCIM
SIDE
SHOT
VOLUME
+
–
+
–
INPUT
MS SLIDE
Botón MS SLIDE
APA
VIDEO MEMORY
DYNAMIC STANDARD
USER 1
USER 2
LIVING
USER 3
OFF
ENTER
RESET
2-5
1 Seleccione el contenido que
incluye la imagen fija deseada
(1
1 página 26).
Visualización de imágenes fijas de forma secuencial – Presentación de diapositivas
Uso de un “Memory
Stick”
MENU
27 ES
2 Pulse M o m para seleccionar
“Diapos.” y pulse ENTER.
Aparece el submenú para ajustar los siguientes
elementos.
ACCIÓN
Visor JPEG
Diapos.
Índice
Sel. cont.
Ejecutar
Volver
Efecto
No
Av. diap.
Auto
Interval
1 seg
DCIM
5 Después de configurar todos
los elementos, pulse M o m
para seleccionar “Ejecutar”, y
pulse ENTER.
Cuando se configura “Av. diap.” en “Auto”, la
presentación de diapositivas comienza
automáticamente.
Cuando lo configure a “Manual,” utilice los
botones , o m para pasar a la siguiente
diapositiva. Para volver a la diapositiva anterior,
utilice los botones < o M.
Finalización de la presentación de
diapositivas
Pulse MS SLIDE o ENTER.
Efecto: configure el efecto cuando se muestra
la diapositiva.
Av. diap.: configúrelo para que las diapositivas
pasen del forma automática (“Auto”) o
manual (“Manual”).
Interval: configure el período de visualización
de una diapositiva. Cuando “Av. diap.” está
ajustado en “Manual” no funciona. El tiempo
es el apropiado.
Uso de un “Memory
Stick”
3 Pulse M o m para seleccionar
Retorno a la página inicial MS antes de
ejecutar la presentación de diapositivas
Seleccione “Volver” en el paso anterior 5.
Ejecución inmediata de la presentación de
diapositivas
Puesto que los ajustes se memorizan aunque cambie
la entrada después de llevar a cabo los pasos 1 a 4,
pulse el botón MS SLIDE al iniciar la presentación.
La entrada cambia a MS y la presentación se inicia de
forma inmediata.
el elemento, y pulse ENTER.
4 Pulse M o m para configurar el
elemento seleccionado, y
pulse ENTER.
ACCIÓN
Visor JPEG
Diapos.
Índice
Sel. cont.
Ejecutar
Volver
Efecto
No
Av. diap.
Auto
Interval
5 seg
DCIM
ES
28
Visualización de imágenes fijas de forma secuencial – Presentación de diapositivas
Visualización
imágenes de índice
en pantalla completa
Se pueden ver a la vez 9 imágenes de índice
(imágenes de miniaturas) contenidas en la carpeta
seleccionada.
Cuando la carpeta contiene más de 9
archivos de imagen
Puede visualizar las imágenes que no aparecen en
pantalla pulsando v (9 imágenes anteriores) o V (9
imágenes siguientes) y ENTER.
Comienzo de una presentación de
diapositivas con la pantalla de índice
Pulse M, m, < o , para seleccionar el archivo de
imagen por el que empieza una presentación de
diapositivas, y a continuación, pulse MS SLIDE.
Nota
Las imágenes de índice se ordena numéricamente y
alfabéticamente hasta los 256 archivos de imagen. Los últimos
archivos que se tengan que ordenar no se ordenarán.
MENU
ENTER
RESET
2
Uso de un “Memory
Stick”
1 Seleccione el contenido que
incluye la imagen fija deseada
(1
1 página 26).
2 Pulse M o m para seleccionar
“Índice”, y pulse ENTER.
Aparece la pantalla de índice, y se visualizan 9
imágenes de índice de la carpeta seleccionada.
Reciipe
flour - - - - 2
s u g a r - - - 1/2
s a l t - - - - - 1/2
butter - - -1
Visualización imágenes de índice en pantalla completa
29 ES
Visualización del Menú de
índice
Pulse M, m, < o , para seleccionar un archivo de
imagen, y pulse ENTER.
Aparece el menú de índice del archivo seleccionado.
Con este menú puede efectuar varios ajustes para cada
archivo. (1 páginas 30 a 35)
Visualización de
una imagen a
pantalla completa
Fecha de grabación de la imagen
Puede proyectar una de las imágenes de índice a
pantalla completa.
Nombre dado a cada imagen
(sólo caracteres alfabéticos y
números)
Resolución
Número secuencial/número
total de archivos en la carpeta
MENU
Indica cuando la función de
protección (1
1 página 32) está
establecida en un archivo.
Indica cuando un archivo está
registrado cómo imagen de
inicio (1
1 página 33)
ENTER
RESET
2-4
Num.: 4/32
Tamaño: 1024x768
Archivo: SPORTS
Fecha: 29/7/2001
14:22
Pant. Completa
Cerrar
Reciipe
flour - - - - 2
s u g a r - - - 1/2
s a l t - - - - - 1/2
butter - - -1
Volver
Protec.
Rotar
Uso de un “Memory
Stick”
ES
30
Iniciar
1 Seleccione el contenido que
incluye la imagen fija deseada
(1
1 página 26).
Borrar
Menú de índice
Elementos de ajuste
Regreso a la página inicial MS
Seleccione "Volver" y pulse ENTER.
2
Pulse M o m para seleccionar
“Índice”, y pulse ENTER.
Aparecen las imágenes de índice de la carpeta
seleccionada.
Visualización de una imagen a pantalla completa
3 Pulse M, m, < o , para
seleccionar la imagen que
quiere ver a pantalla completa,
y pulse ENTER.
Giro de un archivo
de imagen
Aparecerá el menú de índice.
Num.: 4/32
Tamaño: 1024x768
Archivo: SPORTS
Fecha: 29/7/2001
14:22
Un archivo de imagen se puede girar en pasos de 90°.
Pant. Completa
Cerrar
Reciipe
flour - - - - 2
s u g a r - - - 1/2
s a l t - - - - - 1/2
butter - - -1
Volver
Protec.
MENU
Rotar
Iniciar
Borrar
ENTER
RESET
2-5
4 Pulse M o m para seleccionar
“Pant. completa”, y pulse
ENTER.
La imagen seleccionada se muestra a pantalla
completa.
Para visualizar la siguiente diapositiva, pulse , o m.
Para volver a la diapositiva anterior, pulse < o M.
Regreso a la pantalla de índice
Pulse MS SLIDE o ENTER.
1 Seleccione el contenido que
incluye la imagen fija deseada
(1
1 página 26).
2 Pulse M o m para seleccionar
“Índice”, y pulse ENTER.
Aparecen las imágenes de índice de la carpeta
seleccionada.
Giro de un archivo de imagen
Uso de un “Memory
Stick”
Visualización de una diapositiva
anterior o posterior
31 ES
3 Pulse M, m, < o , para
seleccionar la imagen que
desea rotar, y pulse ENTER.
Aparecerá el menú de índice.
Num.: 4/32
Tamaño: 1024x768
Archivo: SPORTS
Fecha: 29/7/2001
14:22
Pant. Completa
Cerrar
Reciipe
flour - - - - 2
s u g a r - - - 1/2
s a l t - - - - - 1/2
butter - - -1
Volver
Protección de un
archivo
importante
Los archivos se pueden proteger para evitar que se
borren accidentalmente.
Protec.
Rotar
Iniciar
MENU
Borrar
ENTER
4 Pulse M o m para seleccionar
RESET
2-5
“Rotar”, y pulse ENTER.
5 Pulse M o m para seleccionar
el sentido de giro, (a la
derecha) o (a la izquierda), y
pulse ENTER.
Uso de un “Memory
Stick”
ES
32
La imagen gira 90° cada vez que se pulsa el
botón ENTER.
Nota
• No se puede girar una imagen que esté protegida (1 columna
derecha). Para girarla, elimine la protección de la imagen.
• Cuando la lengüeta de protección contra escritura del “Memory
Stick” está ajustada en LOCK, no se pueden girar las imágenes
guardadas en dicho “Memory Stick”.
1 Seleccione el contenido que
incluye la imagen fija deseada
(1
1 página 26).
2 Pulse M o m para seleccionar
“Índice”, y pulse ENTER.
Aparecen las imágenes de miniatura de la
carpeta seleccionada.
Protección de un archivo importante
3 Pulse M, m, < o , para
Proyección de un archivo
seleccionado con la
alimentación activada - Inicio
seleccionar la imagen que
quiere proteger, y pulse
ENTER.
Aparecerá el menú de índice.
Num.: 4/32
Tamaño: 1024x768
Archivo: SPORTS
Fecha: 29/7/2001
14:22
Al activar la alimentación del proyector, la imagen
fija específica guardada en el proyectorse proyecta
automáticamente durante alrededor de un minuto,
incluso si no entra ningún tipo de señal. Esta imagen
fija se puede cambiar por la imagen que prefiera.
Pant. Completa
Cerrar
Reciipe
flour - - - - 2
s u g a r - - - 1/2
s a l t - - - - - 1/2
butter - - -1
Volver
Protec.
Rotar
Iniciar
Borrar
4 Pulse M o m para seleccionar
“Protec.”, y pulse ENTER.
5 Pulse M o m para seleccionar
“Sí” o “Todo sí”, y pulse
ENTER.
Registro de un archivo cómo
imagen de inicio
Cuando desee utilizar una imagen guardada en el
“Memory Stick” como imagen de inicio, registre la
imagen en el “Memory Stick”.
MENU
ENTER
RESET
2-5
Eliminar la protección
Seleccione “No” o “Todo no” en el paso 5.
Al seleccionar “No” se elimina la protección del
archivo seleccionado. Al seleccionar “Todo no” se
elimina la protección de todos los archivos de la
carpeta seleccionada.
1 Seleccione el contenido que
Uso de un “Memory
Stick”
Sí: un archivo seleccionado en la pantalla de
índice está protegido.
Todo sí: Todos los archivos de la carpeta
seleccionada están protegidos.
La marca de protección aparece en el menú de
índice del archivo protegido.
incluye la imagen fija deseada
(1
1 página 26).
2 Pulse M o m para seleccionar
“Índice”, y pulse ENTER.
Aparecen las imágenes de miniatura de la
carpeta seleccionada.
Proyección de un archivo seleccionado con la alimentación activada - Inicio
33 ES
3 Pulse M, m, < o , para
Ajuste de la imagen de inicio
seleccionar la imagen que
quiere utilizar cómo archivo de
inicio, y pulse ENTER.
Aparecerá el menú de índice.
Num.: 4/32
Tamaño: 1024x768
Archivo: SPORTS
Fecha: 29/7/2001
14:22
VOLUME
+
–
+
–
INPUT
MS SLIDE
1
APA
VIDEO MEMORY
Pant. Completa
DYNAMIC STANDARD
Cerrar
Reciipe
flour - - - - 2
s u g a r - - - 1/2
s a l t - - - - - 1/2
butter - - -1
SIDE
SHOT
LIVING
Volver
USER 1
USER 2
USER 3
Protec.
OFF
Rotar
Iniciar
MENU
Borrar
ENTER
4 Pulse M o m para seleccionar
RESET
2-4
“Iniciar”, y pulse ENTER.
5 Pulse M o m para seleccionar
1 Seleccione MS pulsando el
botón INPUT para visualizar la
página inicial MS. (1
1 página
26)
“Intro”, y pulse ENTER.
Uso de un “Memory
Stick”
La marca de inicio aparece el menú de índice.
Puede registrar un archivo de inicio por
“Memory Stick”.
2 Pulse M o m para seleccionar
AJUSTE
, y pulse ENTER.
3 Pulse M o m para seleccionar
“Iniciar”, y pulse ENTER.
AJUSTE
Iniciar:
Original
Original
Personal
No
ES
34
Proyección de un archivo seleccionado con la alimentación activada - Inicio
4 Pulse M o m para seleccionar
el elemento que se va a utilizar
cómo archivo de inicio, y
pulse ENTER.
Original: selecciónelo para utilizar el archivo
originalmente guardado en el proyector. No
puede cambiar el archivo original.
Personal: selecciónelo para utilizar el archivo
registrado en la pantalla de índice y guardado
en el “Memory Stick”. (1 página 33)
No: selecciónelo cuando no ajuste el inicio.
Notas
• Cuando desee borrar la pantalla de inicio mientras la visualiza,
pulse M/m/</,, o ENTER.
• Cuando esté utilizando el archivo registrado, inserte en el
proyector el “Memory Stick” donde está guardado dicho
archivo, y active la alimentación.
1 Seleccione el contenido que
incluye la imagen fija deseada
(1
1 página 26).
2 Pulse M o m para seleccionar
“Índice”, y pulse ENTER.
Aparecen las imágenes de índice de la carpeta
seleccionada.
3 Pulse M, m, < o , para
seleccionar el archivo de
imagen que desee borrar del
“Memory Stick”, y pulse
ENTER.
Aparecerá el menú de índice.
Eliminación de un
archivo de imagen
Num.: 4/32
Tamaño: 1024x768
Archivo: SPORTS
Fecha: 29/7/2001
14:22
Pant. Completa
Cerrar
Reciipe
flour - - - - 2
s u g a r - - - 1/2
s a l t - - - - - 1/2
butter - - -1
Volver
Protec.
Iniciar
Borrar
Es posible borrar el archivo o archivos que ya no se
necesiten del “Memory Stick”.
MENU
ENTER
RESET
2-5
2-4
4
Pulse M o m para seleccionar
“Borrar”, y pulse ENTER.
Eliminación de un archivo de imagen
Uso de un “Memory
Stick”
Rotar
35 ES
5 Pulse M o m para seleccionar
el elemento que desee, y a
continuación pulse M para
borrar el archivo o archivos.
Sel. Img.: elimina el archivo de imagen
seleccionado
Todo Im.: elimina todos los archivos de imagen
del contenido seleccionado
Cerrar: cuando no se elimina el archivo
Notas
• No puede eliminar el archivo de imagen que esté protegido.
(1 página 32) Para eliminarlo, cancele la protección de dicho
archivo.
• Cuando esté utilizando la imagen registrada, inserte en el
proyector el “Memory Stick” donde está guardada dicha
imagen, y active la alimentación.
Inicialización de
un “Memory
Stick”
Cuando no pueda utilizar un “Memory Stick”,
inicialícelo con el proyector.
Los datos que contenga el “Memory Stick” se
borrarán al inicializarlo.
SIDE
SHOT
VOLUME
+
–
+
–
INPUT
MS SLIDE
1
APA
VIDEO MEMORY
DYNAMIC STANDARD
USER 1
USER 2
LIVING
USER 3
OFF
MENU
Uso de un “Memory
Stick”
ENTER
RESET
2,4,5
2-4
1 Seleccione MS pulsando el
botón INPUT para visualizar la
página inicial MS. (1
1 página
26)
2 Pulse M o m para seleccionar
“MEMORY STICK”
ENTER.
ES
36
Inicialización de un “Memory Stick”
, y pulse
3 Vuelva a pulsar ENTER.
MEMORY STICK
Formato
Ejecutar
Volver
4 Pulse M o m para seleccionar
“Ejecutar”, y pulse ENTER.
5 Pulse la tecla M para comenzar
la inicialización.
Retorno a la página inicial MS antes
de inicializar el “Memory Stick”
Uso de un “Memory
Stick”
Seleccione “Volver” y pulse ENTER en el paso 4.
Notas
• Al inicializar el “Memory Stick”, los archivos de imagen
protegidos también se borran.
• Cuando se inicializa el “Memory Stick” con la lengüeta de
protección contra escritura ajustada en LOCK, aparece el
mensaje “MEMORY STICK bloqueado”.
• Durante la inicialización del “Memory Stick”, no puede utilizar
los botones de la página inicial MS.
Inicialización de un “Memory Stick”
37 ES
Otros
En esta sección se describe cómo solucionar los problemas,
cómo cambiar una lámpara y el filtro de aire, etc..
Solución de
problemas
Otros
ES
38
Problema
Causa y solución
La alimentación no se activa.
• La alimentación se ha desactivado y activado de nuevo con la tecla [/1 (on/
standby) en un corto intervalo.
c Espere unos 1 minuto antes de activar la alimentación (1 página 16).
• La cubierta de la lámpara no está fijada.
c Cierre firmemente la cubierta de la lámpara (1 página 42).
• La cubierta del filtro de aire no está fijada.
c Cierre firmemente la cubierta del filtro de aire (1 página 43).
No aparece la imagen.
• El cable está desconectado o las conexiones son incorrectas.
c Compruebe que ha realizado las conexiones adecuadas (1 páginas 8 y 9).
• La selección de entrada es incorrecta.
c Seleccione la fuente de entrada correctamente con el botón INPUT (1
página 15).
• La señal del ordenador no está ajustada para enviarse a un monitor externo.
c Ajuste la señal del ordenador para enviarse a un monitor externo.
• La señal del ordenador está ajustada para enviarse al LCD del mismo y a un
monitor externo.
c Ajuste la señal del ordenador para enviarse solamente al monitor externo.
El color de la imagen procedente del
conector PJ MULTI es extraño.
• El ajuste de ENTRAD A del menú AJUSTE
es incorrecto.
c Seleccione ORDENADOR, COMPONENTE o VIDEO GBR para ENTRAD
A en el menú AJUSTE
en función de la señal de entrada (1 página 22).
El balance de color es incorrecto.
• No ha ajustado correctamente la imagen.
c Ajuste la imagen en el menú CTRL IMAGEN
(1 página 20).
• El proyector está ajustado en un sistema de color incorrecto.
c Defina SIST COLOR en el menú CTRL IMAGEN
de acuerdo con el
sistema de color de entrada (1 página 20).
La imagen es demasiado oscura.
• El contraste o el brillo no se ha ajustado correctamente.
c Ajuste el contraste o el brillo en el menú CTRL IMAGEN
(1 página 20).
La imagen no es nítida.
Solución de problemas
• La imagen está desenfocada.
c Ajuste el enfoque con la palanca de enfoque (1 página 15).
• La tapa del objetivo está fijada al objetivo
c Retire la tapa del objetivo
• Se ha condensado humedad en el objetivo.
c Deje el proyector encendido durante unas dos horas.
correctamente
Problema
Causa y solución
La imagen parpadea.
• No se ha ajustado correctamente FASE PUNTO en el menú AJUS
ENTRAD .
c Ajuste FASE PUNTO en el menú AJUS ENTRAD
correctamente (1
página 21).
La indicación en pantalla no aparece.
• El ESTADO en el menú AJUSTE
se ha ajustado en NO.
c Ajuste ESTADO en el menú AJUSTE
en SI (1 página 22).
No se oye el sonido.
• El cable está desconectado o las conexiones son incorrectas.
c Compruebe que se han realizado las conexiones adecuadas (1 páginas 8 y
9).
• El ajuste de VOLUME (volumen) es incorrecto.
c Ajuste el VOLUMEN en el menú CTRL IMAGEN
o pulse el botón
VOLUME + del mando a distancia.
Cuando se produce la entrada de sonido • Se produce la entrada de sonido monofónico a través del conector AUDIO.
mediante el conector AUDIO, el sonido
c Introduzca sonido estéreo.
se oye sólo por un canal.
El mando a distancia no funciona.
• Las pilas podrían estar agotadas.
c Cambie las pilas (1 página 5).
• La polaridad no es correcta.
c Monte las baterías con las polaridades correctas (1 página 5).
El “Memory Stick” no se puede
introducir en la ranura para “Memory
Stick”.
• El “Memory Stick” no está orientado en el sentido correcto.
c Inserte el “Memory Stick” con la marca de flecha orientada hacia la ranura
para “Memory Sticks” del proyector.
Las imágenes fijas guardadas en el
“Memory Stick” no se pueden girar ni
borrar.
• La lengüeta de protección contra escritura del “Memory Stick” se ha ajustado
en LOCK.
c Cancele el bloqueo (1 página 24).
• El archivo está protegido.
c Cancele la protección en la pantalla Índice (1 página 32).
El “Memory Stick” no se puede
formatear.
• La lengüeta de protección contra escritura del “Memory Stick” se ha ajustado
en LOCK.
c Cancele el bloqueo (1 página 24).
• El “Memory Stick” no funciona.
c Utilice otro “Memory Stick”.
Parpadea MS cuando se realiza la
presentación de diapositivas.
• Se utilizan archivos de imagen con resoluciones diferentes para la presentación.
c Ajuste ESTADO en el menú AJUSTE
en NO (1 página 22).
Cuando se realiza la presentación de
• Al utilizar el archivo de imagen con distintas resoluciones, se muestra una
diapositivas, aparece una imagen negra. imagen en negro.
c Ajuste la resolución de los archivos de imagen en el mismo valor.
Las miniaturas no se muestran.
• Los archivos son de formato JPEG, pero no compatibles con DCF.
c Utilice los archivos compatibles con DCF.
Otros
Solución de problemas
39 ES
Indicadores
El indicador LAMP/COVER o el indicador TEMP/FAN del panel de control se enciende o parpadea si el proyector
tiene algún problema.
LAMP/
COVER
TEMP/
FAN
POWER
SAVING
ON/
STANDBY
Indicador TEMP/FAN
Indicador LAMP/COVER
Indicador
Significado y solución
El indicador LAMP/
COVER parpadea.
• La cubierta de la lámpara o la del filtro de aire no está fijada.
c Fije la cubierta firmemente (1 páginas 42 y 43).
El indicador LAMP/
COVER se ilumina.
• La lámpara ha llegado al final de su vida útil.
c Sustituya la lámpara (1 página 42).
• La lámpara se calienta en exceso.
c Espere 1 minuto para que la lámpara se enfríe y vuelva a activar la alimentación
(1 página 16).
El indicador TEMP/FAN • El ventilador está averiado.
parpadea.
c Consulte con personal Sony especializado.
El indicador TEMP/FAN • La temperatura interna es inusualmente alta.
se ilumina.
c Compruebe que nada bloquea los orificios de ventilación.
Los indicadores LAMP/
COVER y TEMP/FAN
se iluminan.
• Se ha producido una avería en el sistema eléctrico.
c Consulte con personal Sony especializado.
Mensajes de aviso
Utilice la siguiente lista para comprobar el significado de los mensajes que aparecen en pantalla.
Otros
ES
40
Mensaje
Significado y solución
Temperatura alta!
Apag. 1 min.
• La temperatura interna es demasiado alta.
c Desactive la alimentación.
c Compruebe que nada bloquea los orificios de ventilación.
Frecuencia fuera de
rango!
• Esta señal de entrada no puede proyectarse ya que la frecuencia se encuentra fuera del margen
admisible del proyector.
c Introduzca una señal que se encuentre dentro del margen de la frecuencia.
• El ajuste de resolución de la señal de salida del ordenador es demasiado alto.
c Establezca el ajuste de la señal de salida en SVGA.
Compruebe ajuste
ENTRAD A.
• Ha introducido la señal RVA del ordenador cuando ENTRAD A del menú AJUSTE
ajustada en COMPONENTE o VIDEO RVA.
c Ajuste ENTRAD A correctamente (1 página 22).
Por favor cambie la
lámpara.
• Es necesario sustituir la lámpara.
c Sustituya la lámpara (1 página 42).
Por favor cambie el
filtro.
• Es necesario sustituir el filtro.
c Sustituya el filtro de aire (1 página 43).
Solución de problemas
está
Mensajes de precaución
Utilice la siguiente lista para comprobar el significado de los mensajes que aparecen en pantalla.
Mensaje
Significado y solución
SIN ENTRADA
• Ninguna señal de entrada
c Compruebe las conexiones (1 página 8).
¡No aplicable!
• Ha pulsado una tecla incorrecta.
c Pulse la tecla apropiada.
Error archivo
• En el submenú para seleccionar un archivo, cuando se utiliza un “Memory Stick”, el nombre
de carpeta seleccionada en ese momento tiene más de 66 caracteres (“/” incluido).
c Vuelva a introducir el nombre de carpeta con menos de 66 caracteres.
NINGÚN MEMORY
STICK
• El “Memory Stick” no se ha insertado correctamente en la ranura.
c Compruebe el “Memory Stick” e insértelo correctamente en la ranura.
Indicaciones de precaución cuando se utiliza el “Memory Stick”
Si la siguiente indicación aparece en pantalla, no puede utilizar este “Memory Stick.” Utilice otro.
• El archivo de imagen es de formato JPEG, pero no compatible con DCF.
• La resolución de los datos de imagen se encuentra fuera de los límites aceptables para el
proyector. (El proyector es compatible para imágenes con una resolución de 5120 × 4096
puntos.)
Hay una miniatura, pero no es compatible con DCF.
No hay ningún archivo de imagen seleccionado.
Hay un archivo de imagen, pero ninguna miniatura.
Hay un archivo de imagen, pero la miniatura está dañada.
El archivo de imagen está dañado.
Otros
Solución de problemas
41 ES
Sustitución de la
lámpara
La lámpara que se utiliza para la iluminación tiene
una vida útil. Cuando la luz de la lámpara pierde
intensidad, el balance de color de la imagen se vuelve
extraño, o aparece el mensaje “Por favor cambie la
lámpara”, la lámpara está agotada. Sustituya la
lámpara por una nueva (no suministrada).
La lámpara de recambio debe ser una lámpara de
proyector LMP-H120.
Sustitución de la lámpara después de utilizar
el proyector
Apague el proyector y desenchufe el cable de
alimentación. Espere al menos una hora hasta que la
lámpara se enfríe.
Precaución
La temperatura de la lámpara será alta después de apagar el
proyector con el interruptor [/1 (encendido/espera). Si toca la
lámpara, es posible que se queme el dedo. Antes de sustituir la
lámpara, espere al menos una hora hasta que se enfríe.
1 Coloque una hoja (paño) de protección
debajo del proyector. Dé la vuelta al
proyector de forma que vea la parte
inferior.
Nota
Asegúrese de que el proyector se encuentra en una posición
estable después de haberle dado la vuelta.
2 Deslice la palanca de liberación del
ajustador hacia fuera, y gire el ajustador a
derechas para desmontarlo.
4 Afloje los dos tornillos de la lámpara con
el destornillador Phillips. Tire de la
lámpara hacia fuera utilizando el asa.
1
2
3
1
5 Con la superficie de la lámpara mirando
hacia la parte trasera del proyector, inserte
por completo la lámpara nueva hasta que
quede encajada en su sitio. Apriete los
dos tornillos. Pliegue el asa hacia arriba.
Notas
• Tenga cuidado de no tocar la superficie de cristal de la
lámpara.
• La alimentación no se activará si la lámpara no está bien
instalada.
6 Cierre la cubierta de la lámpara y apriete
los tornillos.
7 Fije el ajustador.
2
Otros
3
1
Palanca de
liberación
3 Abra la cubierta de la lámpara aflojando un
tornillo con el destornillador Phillips.
8 Vuelva a darle la vuelta al proyector.
9 Conecte el cable de alimentación y ajuste
el proyector en el modo de espera.
10 Pulse los siguientes botones del panel de
control en el siguiente orden durante
menos de cinco segundos cada uno:
RESET, <, ,, ENTER.
ES
42
Sustitución de la lámpara
Notas
• Con el fin de evitar descargas eléctricas o incendios, no
introduzca las manos en el compartimento de sustitución de la
lámpara, ni permita que se introduzcan líquidos ni objetos.
• Asegúrese de utilizar la lámpara de proyector LMP-H120 para
la sustitución. Si utiliza otras lámparas que no sean la
LMP-H120, el proyector puede causar fallos de
funcionamiento.
• Compruebe que apaga el proyector y desenchufa el cable de
alimentación antes de sustituir la lámpara.
Tratamiento de las lámparas de proyector
usadas
Dado que los materiales utilizados en la lámpara son
similares a los que se utilizan en los tubos
fluorescentes, debería dar a las lámparas de proyector
desechadas el mismo tratamiento que da a los tubos
fluorescentes fuera de uso.
Sustitución del
filtro de aire
El filtro de aire debe sustituirse regularmente. Cuando
aparezca en pantalla el mensaje “Por favor cambie el
filtro”, sustituya el filtro de aire inmediatamente.
Notas
• La sustitución del filtro es muy importante para mantener un
alto rendimiento del proyector, y para evitar fallos de
funcionamiento. Cuando aparezca en pantalla el mensaje de
sustitución, sustituya el filtro inmediatamente.
• Al desmontar el filtro de aire del proyector, tenga cuidado de
que no entre polvo ni caiga ningún objeto en el interior del
proyector.
1 Coloque una hoja (paño) de protección
debajo del proyector. Dé la vuelta al
proyector de forma que vea la parte
inferior.
Nota
Asegúrese de que el proyector se encuentra en una posición
estable después de haberle dado la vuelta.
2 Deslice la palanca de liberación del
ajustador hacia fuera, y gire el ajustador a
derechas para desmontarlo.
2
3
1
Palanca de
liberación
Otros
Sustitución del filtro de aire
43 ES
3 Empuje el pomo de la cubierta del filtro de
aire para desmontarla.
Especificaciones
Pomo
Sistema
4 Desmonte el soporte del filtro.
5 Desmonte el filtro de aire de su soporte
sujetándolo por la lengüeta.
Filtro de aire
Soporte del filtro
Lengüeta
6 Introduzca el filtro de aire nuevo dentro
del soporte con la superficie blanca
mirando hacia arriba, y vuelva a montarlo
en el proyector.
7 Monte la cubierta del filtro.
8 Monte el ajustador.
Otros
ES
44
Especificaciones
Sistema de proyección
3 paneles LCD, 1 objetivo, sistema
de proyección
Panel LCD
Panel LCD de TFT de 0,7
pulgadas, 1.440.000 píxeles
(480.000 píxeles × 3)
Objetivo
Zoom de 1,2 aumentos (manual)
Lámpara
Tipo UHP de 120 W
Tamaño de imagen de proyección
Margen: 40 a 150 pulgadas
(medido diagonalmente)
Sistema de color NTSC3,58/PAL/SECAM/NTSC4,43/
PAL-M/PAL-N , conmutado
automática/manualmente
Señales de vídeo compatibles
15k, DTV (480i/480p/1080i/720p)
Señales de ordenador admisibles
fH: 19 a 72 kHz
fV: 48 a 92 Hz
Altavoz
Sistema de altavoces estéreo,
33 mm (1 5/16 pulgadas) de
diámetro,
máx. 2 W × 2
Entrada/Salida
Entrada de vídeo VIDEO: tipo fonográfico
Vídeo compuesto: 1 Vp-p ± 2
dB sincronización negativa
(terminación de 75 ohmios)
S VIDEO: tipo Y/C mini DIN de 4
terminales (macho)
Y (luminancia): 1 Vp-p ±2 dB
sincronización negativa
(terminación de 75 ohmios)
C (crominancia): sincronización
de color 0,286 Vp-p ±2 dB
(NTSC)
(terminación de 75 ohmios),
sincronización de color 0,3 Vp-p
±2 dB (PAL)
(terminación de 75 ohmios)
AUDIO
Tipo fonográfico × 2, estéreo
500 mVrms, impedancia
superior a 47 kiloohmios
PJ MULTI
Conector múltiple de 32 terminales
RVA/componente analógico:
R/CR(PR): 0,7 Vp-p ±2 dB
(terminación de 75 ohmios)
G: 0,7 Vp-p ±2 dB
(terminación de 75 ohmios)
G con sincronización/Y:1 Vp-p
±2 dB sincronización negativa
(terminación de 75 ohmios)
B/CB(PB): 0,7 Vp-p ±2 dB
(terminación de 75 ohmios)
SYNC/HD: Entrada de
sincronización compuesta:
1-5 Vp-p alta impedancia,
positiva/negativa
Entrada de sincronización
horizontal: 1-5 Vp-p alta
impedancia, positiva/negativa
VD: Entrada de sincronización
vertical: 1-5 Vp-p alta
impedancia, positiva/negativa
“Memory Stick” Ranura 1
Consumo de energía
Máx. 190 W
(Modo de espera: 5 W)
Temperatura de funcionamiento
0ºC a 35ºC (32ºF a 95ºF)
Humedad de funcionamiento
35% a 85% (sin condensación)
Temperatura de almacenamiento
–20ºC a 60ºC (–4ºF a 140ºF)
Humedad de almacenamiento
10% a 90%
Accesorios proporcionados
Mando a distancia RM-PJHS1 (1)
Pilas tamaño AA (R6) (2)
Cable de interfaz de señales SICHS10 (5 m) (1)
Cable de alimentación de CA (1)
Filtro de aire (para sustitución) (1)
Tapa de objetivo (1)
Manual de instrucciones (1)
El diseño y las especificaciones están sujetos a
cambios sin previo aviso.
Accesorios opcionales
Unidad de interfaz de señales IFU-HS1
Caballete para proyector SU-HS1
Cable de interfaz de señales
SIC-HS10 (5 m)
SIC-HS20 (5 m)
SIC-HS30 (5 m)
SIC-HS40 (5 m)
Lámpara de proyector LMP-H120 (para sustitución)
Filtro de aire PK-HS1FL (para sustitución)
Información general
Otros
Dimensiones
340 × 154 × 300 mm
(13 1/2 × 6 1/8 × 11 7/8 pulgadas)
(anchura/altura/profundida)
Peso
Aprox. 3,9 kg (8 lb 10 oz)
Requisitos de alimentación
CA 100 a 240 V, 1,9-0,8A,
50/60 Hz
Especificaciones
45 ES
Distancia de proyección para señal
de formato 720p, señal de ordenador,
etc.
Pantalla
c
a
b
10°
d
10°
Proyector
Proyección de una señal de formato 720p
Unidad: m (pies)
40
Tamaño
de la
pantalla
(pulgadas)
60
80
100
120
150
a
0,3
0,5
0,7
(1,0) (1,6) (2,3)
0,9
(3,0)
1,1
(3,6)
1,3
(4,3)
b
0,1
0,2
0,3
(0,3) (0,7) (1,0)
0,4
(1,3)
0,5
(1,6)
0,6
(2,0)
c
2,0
3,0
4,0
5,1
6,1
7,6
(6,6) (9,8) (13,1) (16,7) (20,0) (24,9)
d
1,8
2,7
3,6
4,5
5,4
6,8
(5,9) (8,9) (11,8) (14,8) (17,7) (22,3)
Proyección de una señal de ordenador o
datos guardados en el “Memory Stick”
Unidad: m (pies)
40
Tamaño
de la
pantalla
(pulgadas)
Otros
ES
46
60
80
100
120
150
a
0,1
0,1
0,2
(0,3) (0,3) (0,7)
0,3
(1,0)
0,4
(1,3)
0,4
(1,3)
b
0
(0)
0
(0)
0
(0)
0
(0)
c
1,8
2,8
3,7
4,7
5,6
7,0
(5,9) (9,2) (12,1) (15,4) (18,4) (23,0)
d
1,6
2,5
3,3
4,2
5,0
6,3
(5,2) (8,2) (10,8) (13,8) (16,4) (20,7)
Especificaciones
0
(0)
0
(0)
Señales de entrada y elementos ajustables/de ajuste
Algunos de los elementos del menú no pueden ajustarse dependiendo de la señal de entrada.
Menú CTRL IMAGEN
Señal de entrada
Elemento
Vídeo o S vídeo
(Y/C)
Componente
Vídeo RVA
Ordenador/MS
CONTRASTE
z
z
z
z
BRILLO
z
z
z
z
COLOR
z
(excepto para B & W)
z
z
–
TONALIDAD
z
(solo NTSC 3,58/4,43
excepto para B & W)
z
z
–
NITIDEZ
z
z
z
–
POTENCIA RVA
–
–
–
z
IMAG DI
z
MODO GAMMA
–
TEMP COLOR
z
z
(15k RVA solamente) (15k RVA solamente)
–
–
z
(15k RVA solamente)
z
z
z
z
z
SIST COLOR
z
–
–
–
VOLUMEN
z
z
z
z
z : Ajustable/puede ajustarse
– : No ajustable/no puede ajustarse
Menú AJUS ENTRAD
Señal de entrada
Elemento
Vídeo o S
vídeo (Y/C)
Componente
Vídeo RVA
Ordenador
MS
–
–
–
(excepto para HDTV) (excepto para HDTV)
z
–
TAMANO H
–
–
–
(excepto para HDTV) (excepto para HDTV)
z
–
DESPLAZ
z
z
z
z
–
CONV EXPLO
–
–
–
z
(menor que VGA)
–
ASPECTO
z
–
–
MEMOIRE VIDEO
z
z
–
z
z
(excepto para los
(excepto para los
números de memoria números de memoria
predefinida 5, 45, 47, predefinida 5, 45, 47,
48 y 50 de HDTV)
48 y 50 de HDTV)
z
z
Otros
FASE PUNTO
z : Ajustable/puede ajustarse
– : No ajustable/no puede ajustarse
Especificaciones
47 ES
Señales predefinidas
Nº de
memoria
1
2
3
Señal predefinida
fH (kHz)
fV (Hz)
Vídeo 60 Hz
Vídeo 50 Hz
RVA de 15k/Componente 60 Hz
15,734
15,625
15,734
59,940
50,000
59,940
4
RVA de 15k/Componente 50 Hz
15,625
50,000
5
6
7
8
9
10
11
12
13
14
15
16
17
18
19
20
21
22
23
24
25
26
43
44
45
47
48
50
1080/60i, 1035/60i (DTV)
640 × 350
Modo VGA 1
VGA VESA 85Hz
640 × 400
PC-9801 Normal
Modo VGA 2
VGA VESA 85Hz
640 × 480
Modo VGA 3
Macintosh 13"
VGA VESA 72Hz
VGA VESA 75Hz
VGA VESA 85Hz
800 × 600
SVGA VESA 56Hz
SVGA VESA 60Hz
SVGA VESA 72Hz
SVGA VESA 75Hz
SVGA VESA 85Hz
Macintosh 16"
832 × 624
XGA VESA 43Hz
1024 × 768
XGA VESA 60Hz
XGA VESA 70Hz
XGA VESA 75Hz
XGA VESA 85Hz
480/60p (componente progresivo)
575/50p (componente progresivo)
1080/50i (DTV)
720/60p (DTV)
720/50p (DTV)
540/60p
33,750
31,469
37,861
24,823
31.469
37,861
31,469
35,000
37,861
37,500
43,269
35,156
37,879
48,077
46,875
53,674
49,724
35,522
48,363
56,476
60,023
68,677
31,470
31,250
28,130
45,000
37,500
33,750
60,000
70,086
85,080
56,416
70,086
85,080
59,940
66,667
72,809
75,000
85,008
56,250
60,317
72,188
75,000
85,061
74,550
43,479
60,004
70,069
75,029
84,997
60,000
50,000
50,000
60,000
50,000
60,000
Sincronización
TAMAÑO
H
––
––
––
––
S en G/Y o Sincronización
––
compuesta
S en G/Y o Sincronización
––
compuesta/Vídeo
compuesto
S en G/Y
1800
H-pos, V-neg
800
H-pos, V-neg
832
H-neg, V-neg
848
H-neg, V-pos
800
H-neg, V-pos
832
H-neg, V-neg
800
H-neg, V-neg
864
H-neg, V-neg
832
H-neg, V-neg
840
H-neg, V-neg
832
H-pos, V-pos
1024
H-pos, V-pos
1056
H-pos, V-pos
1040
H-pos, V-pos
1056
H-pos, V-pos
1048
H-neg, V-neg
1152
H-pos, V-pos
1264
H-neg, V-neg
1344
H-neg, V-neg
1328
H-pos, V-pos
1312
H-pos, V-pos
1376
––
––
2000
S en G/Y
2150
2342
1796
Notas
• Si se introduce una señal que no sea una de las predefinidas que se indican, es posible que la imagen no se vea correctamente.
• La señal del Memory Stick aparece cómo los nº 53 a 60.
Otros
ES
48
Advertencia sobre la conexión de alimentación
Utilice un cable de alimentación adecuado al suministro eléctrico local.
Estados Unidos y
Canadá
Tipo de enchufe
YP-11
Extremo hembra
YC-13L
Tipo de cable
SPT-2
Corriente y tensión nominal 10A/125V
Aprobación de seguridad
UL/CSA
Especificaciones
Europa
continental
YP-21
YC-13L
H03VVH2-F
2,5A/250V
VDE
Reino Unido
Australia
Japón
SP-61
YC-13L
H03VVH2-F
2,5A/250V
BS
B8
C7-2
H03VVH2-F
2,5A/250V
SAA
YP-13
YC-13L
VCTFK
7A/125V
DENANHO
Ubicación de los
controles
Frontal
Para utilizar el proyector puede utilizar los botones del panel de control que tengan los mismos nombres que los
del mando a distancia.
Indicador POWER SAVING
(1
1 página 22)
Indicador TEMP/FAN
(1
1 página 40)
Indicador LAMP/COVER
(1
1 página 40)
Indicador ON/STANDBY
(1
1 página 14)
LAMP/
COVER
Botones M/m/</,
TEMP/
FAN
POWER
SAVING
Interruptor [/1 (encendido/espera)
ON/
STANDBY
SIDE SHOT
+
MENU
VIDEO
MEMORY
ENTER
RESET
INPUT
Botones SIDE SHOT +/–
Botón MENU
Botón ENTER
Objetivo
Orificios de ventilación
(de escape)
(1
1 página 6)
–
Botón INPUT
Botón VIDEO MEMORY
Botón RESET
Palanca del zoom
(1
1 páginas 11 y 15)
Palanca de enfoque
(1
1 página 15)
Detector frontal del
mando a distancia
Orificios de ventilación
(de aspiración)
(1
1 página 6)
Otros
Ranura del “Memory Stick”
(1
1 página 25)
Bloqueo del ajustador
(1
1 página 11)
Cubierta del filtro de aire
(inferior) (1
1 página 43)
Ubicación de los controles
49 ES
Parte trasera
Altavoz
Detector posterior de
mando a distancia
Ajustador
(1
1 página 11)
Cubierta de la lámpara
(inferior) (1
1 página 42)
Conector S VIDEO INPUT
(mini DIN de 4 terminales)/
toma VIDEO INPUT (tipo
fonográfico) (1
1 página 8)
Tomas AUDIO L/R (tipo
fonográfico) (1
1 página 8)
Otros
ES
50
Ubicación de los controles
Clavija ~ AC IN
(MONO)
S VIDEO
VIDEO
L AUDIO R
INPUT
PJ MULTI
~ AC IN
Conector PJ MULTI
INPUT (múltiple de 32
terminales)
(1
1 página 8)
Mando a distancia
Transmisor de infrarrojos
Botón LIGHT
Ilumina los botones del mando a
distancia.
Botones SIDE SHOT +/–
(1
1 página 12)
Interruptor [/1 (encendido/espera)
(1
1 página 14)
SIDE
SHOT
VOLUME
+
–
+
–
INPUT
Botón INPUT (1
1 página 14)
MS SLIDE
Botón MS SLIDE (1
1 página 28)
APA
Botones VOLUME +/–
(1
1 página 15)
VIDEO MEMORY
DYNAMIC STANDARD
USER 1
USER 2
LIVING
USER 3
OFF
Botón MENU (1
1 página 18)
Botón APA (1
1 página 23)
Botones VIDEO MEMORY
(1
1 página 16)
DYNAMIC/STANDARD/LIVING
USER 1, 2, 3/OFF
MENU
Botones M/m/</,
(1
1 página 18)
Botón ENTER (1
1 página 18)
ENTER
RESET
Botón RESET (1
1 página 19)
Otros
Ubicación de los controles
51 ES
Index
Posterior ......................................
DI TRA DIG MEM .........................
DIR TRAPEZ ...................................
DIST TRAP DIG .............................
50
22
22
22
E
ENTRAD A ...................................... 22
Especificaciones ............................... 44
ESTADO ........................................... 22
A
F
Accesorios opcionales ..................... 45
Accesorios proporcionados ............... 5
AHORRO DE ENERGÍA ............... 22
Ajustador ............................................ 11
Ajuste
de la imagen ......................... 20, 23
distorsión trapezoidal................. 12
enfoque.................................. 11, 15
tamaño y posición
de la imagen .............................. 10
volumen ....................................... 15
zoom ...................................... 11, 15
ASPECTO.......................................... 21
FASE PUNTO .................................. 21
Filtro de aire...................................... 43
FONDO MENU ............................... 22
N
I
O
IDIOMA ............................................ 22
IMAG DI ........................................... 20
Indicador
LAMP/COVER .......................... 40
TEMP/FAN ................................. 40
Instalación del proyector y la pantalla
7
Orificios de ventilación
Aspiración ..................................... 6
Escape ............................................ 6
B
Mando a distancia
introducción de las pilas .............. 5
ubicación de los controles ........ 51
Memoria predefinida ................. 23, 48
MEMORIA VIDEO
DINAMICO................................ 17
SALA ESTAL ............................ 17
STANDARD .............................. 17
USUAR 1, 2 y 3 ......................... 17
“Memory Stick”
eliminación de un archivo ........ 35
giro ............................................... 31
imagen a pantalla completa...... 30
imágenes de índice .................... 29
inicialización .............................. 36
inicio ............................................ 33
inserción ...................................... 25
página inicial MS ....................... 26
presentación de diapositivas .... 27
protección.................................... 32
Mensaje
aviso ............................................. 40
indicación de precaución
(“Memory Stick”) ................... 41
precaución ................................... 41
BRILLO ............................................. 20
C
Otros
COLOR .............................................. 20
COLOR MENU ................................ 22
Conexiones
amplificador de AV ...................... 9
con los cables de interfaz de
señales opcionales ..................... 8
equipo de vídeo............................. 8
ordenador ....................................... 9
reproductor de DVD .................... 8
sintonizador digital de emisiones
vía satélite ................................... 8
utilización de la unidad de interfaz
de señales opcional .................... 9
CONTADOR LAMPARA .............. 22
CONTRASTE ................................... 20
CONV EXPLO ................................. 21
D
DESPLAZ .......................................... 21
Detector del mando a distancia
Frontal .......................................... 10
ES
52
Menú
desactivación de la pantalla de
menú .......................................... 19
funcionamiento ........................... 18
reajuste ......................................... 19
Menú AJUS ENTRAD .............. 19, 21
Menú AJUSTE ................................. 19
menú AJUSTE .................................. 22
Menú AJUSTE INST ................ 19, 22
Menú CTRL IMAGEN ............. 19, 20
MODO GAMMA ............................. 20
Index
M
NITIDEZ ........................................... 20
P
POSICION MENU .......................... 22
POTENCIA RVA ............................. 20
Proyección ......................................... 14
S
Selección del idioma del menú ......
SIST COLOR ....................................
Solución de problemas ....................
Sustitución de la lámpara ................
12
20
38
42
T
Tamaño de la pantalla ........................ 7
TAMANO H ..................................... 21
TEMP COLOR ................................. 20
TONALIDAD ................................... 20
U
Ubicación de los controles
Frontal .......................................... 49
Mando a distancia ...................... 51
Parte trasera ................................. 50
V
VOLUMEN ....................................... 20
Sony Corporation Printed in Japan