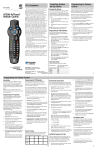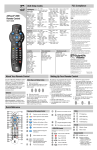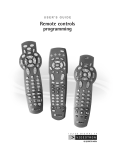
1
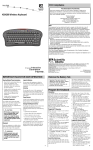
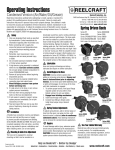
FCC Compliance
This device complies with Part 15 of the FCC
Rules. Operation is subject to the following two
conditions: (1) This device may not cause
harmful interference, and (2) this device must
accept any interference received, including
interference that may cause undesired operation.
Note: This equipment has been tested and found
to comply with the limits for a class B digital
device, pursuant to Part 15 of the FCC Rules.
These limits are designed to provide reasonable
protection against harmful interference in a
residential installation. This equipment generates, uses, and can radiate radio frequency
energy and, if not installed and used in accordance with the instructions, may cause harmful
interference to radio communication. However,
there is no guarantee that interference will not
occur in a particular installation If this equipment does cause harmful interference to radio or
television reception, which can be determined by
turning the equipment off and on, the use is
encourage to try to correct the interference by
one or more of the following measures:
• Reorient or relocate the receiving antenna.
• Increase the separation between the
equipment and the receiver.
• Connect the equipment into an outlet on a
circuit different from that to which the
receiver is connected.
• Consult the dealer or an experienced radio/
TV technician for help.
Any changes or modifications not expressly
approved by Scientific-Atlanta could void the
user’s authority to operate this equipment.
Model ER1
Remote Control
User’s Guide
V
C
R
C
B
L
POWER
TV
INF
IDE
O
GU
S
E
T
T
I
N
G
S
+
SELECT
EXI
T
M
–
UTE
P
A
G
E
+
+
VOL
CH
–
–
A
B
C
1
2
3
4
5
6
7
8
LAST
Identifying Codes
Controlling Volume
To Program for Volume Control
To Identify Programmed Codes
You can program the remote control to
control the volume and mute functions
through the EXPLORER 2000 DHCT, or
through your TV. The default is
through the TV.
You can find out which code you used to
program your TV or VCR. You can
determine the code by counting the
number of times the LED blinks during the
following procedure.
1. Point the remote control away from
the EXPLORER 2000 DHCT, the TV,
and the VCR.
1. Point the remote control away from the
EXPLORER 2000 DHCT , the TV, and
the VCR.
2. Press and hold the CBL key and the
SELECT key at the same time, until
the LED on the remote control
blinks twice.
2. Do one of the following:
3. Using the remote control keypad,
enter 993. The LED on the remote
blinks twice.
• To identify the VCR code, press and
hold the VCR key and the SELECT
key at the same time until the LED
on the remote control blinks twice.
4. Press the TV key or the CBL key,
depending on which device you
want to control the volume. The
LED on the remote control blinks
twice to confirm a valid selection.
5. Point the remote toward the device
on which you chose to control the
volume, and adjust the volume to
confirm operation.
Record of Codes
Record your setup codes
in the following table.
9
S
PAS
BY
/VC
TV R
United States: Scientific-Atlanta, Inc.
4261 Communications Drive, P.O. Box 6850,
Norcross, GA 30091-6850
Tel: 770.903.5000 TWX: 810.799.4912 Telex: 0542898
Europe: Scientific-Atlanta Western Europe Limited,
Home Park Estate, Kings Langley, Herts WD4 8LZ,
England Tel: +44.1.923.266133 Fax: +44.1.923.269018
Asia-Pacific: Scientific-Atlanta (HK), Ltd. Suite 56-57,
5/F New Henry House, 10 Ice House Street, Central,
Hong Kong Tel: 852.2522.5059 Fax: 852.2522.5624
VCR
VO D
3. Using the remote control keypad, enter
990. The LED on the remote blinks
twice.
4. Press 1 on the keypad; then, count the
LED blinks. The number of blinks
indicates the first number in the code.
For example, 4 blinks indicates the first
number in the code is 4. If the LED
does not blink, the digit is 0 (zero).
5. Press 2 on the keypad; then, count the
LED blinks. The number of blinks
indicates the second number in the
code.
FAV
0
• To identify the TV code, press and
hold the TV key and the SELECT
key at the same time until the LED
on the remote control blinks twice,
or
6. Press 3 on the keypad; then, count the
LED blinks. The number of blinks
indicates the third number in the code.
TV
VCR
7. Write down the code in the table
provided for future reference.
CBL
© 2000 Scientific-Atlanta, Inc.
All rights reserved.
Printed in USA January 2000 Part Number 716360 Rev D
ER1 Remote Control Quick Reference
Power
27
26
25
1
24
2
23
3
22
4
21
5
20
6
7
Channels
1
DHCT on or off
2
25
VCR on or off
6
26
TV on or off
8
27
LED
Sound
22
Mutes sound
20
Adjusts volume
Device Control
9
18
10
17
11
16
12
15
13
14
T8101
13
Displays channel
information
Selects channels, up or
down
Enter channel numbers
(also used to enter your
personal identification
number [PIN] for
parental control)
3
Pages Up/Pages Down
4
Hides interactive screen
7
Makes on-screen
decisions
24
Displays interactive
program guide
9
Views favorite channels
23
Displays DHCT settings
19
Returns to last channel
viewed
5
Moves through interactive
screen choices
10
Fast forwards VCR/VOD
21
Chooses interactive
screen item
11
Records VCR program
12
Stops VCR/VOD
18
Rewinds VCR/VOD
16
Plays VCR/VOD
17
Pauses VCR/VOD
VCR/VOD
8
19
Screens
Switches control between
your VCR and Video On
Demand (VOD) program
14
Controls your VCR’s
TV/VCR function.
15
Controls the BYPASS
option (See Optional
Bypass Feature)
Notes:
• Program the remote control
before you use the DHCT. See
Programming the Remote
Control for programming
procedures.
• Make sure you use only alkaline
batteries in the remote control. See
Inserting the Batteries for more
information.
Inserting the Batteries
Procedure
Your remote control requires two AA
alkaline batteries.
1. Press forward then lift up on the lever
on the back cover of the remote control.
The battery cover releases, and you can
pull the cover up to remove it.
2. Remove and safely dispose of the old
batteries.
4. Slide the front of the battery cover back
onto the remote control and snap
the back of the cover into place.
CAUTION:
Make sure you correctly align
the positive (+) and negative (-)
terminals on the batteries to the
corresponding terminals in the
remote control.
T6434
3. Insert and firmly seat two new AA
batteries (alkaline required) into the
battery compartment.
T6435
T6436
Programming the Remote Control
Introduction
In addition to operating your digital home
communications terminal (DHCT), you can
program the ER1 Remote Control to
operate your TV and VCR. To program the
remote control, use the following procedure.
Using Device Keys
Remember to press the following appropriate device key to switch the remote control
operation for the specific device:
TV
VCR
CBL
Programming for TV Operation
The remote control for the DHCT controls
the power, volume up and down, and mute
functions.
Make sure the power to your TV is turned
on before you program the remote control.
1. Locate your TV brand and TV setup
code in the table below. If your TV
brand is not listed, see Searching the
Code Library.
2. Point the remote control away from the
DHCT, TV, and VCR.
3. On your remote control, press and hold
the TV key and the SELECT key at the
same time, until the LED on the remote
blinks twice.
4. Using the remote control keypad, enter
your TV’s 3-digit setup code. The LED
on the remote control should blink
twice. If not, try another setup code, if
available.
5. Confirm by pointing the remote control
toward the TV and test the POWER,
VOLUME, and MUTE functions.
Note: If you programmed the remote
control to adjust the volume on your
DHCT rather than the volume on the
TV, test only the POWER function. If
these functions do not operate from the
remote control, enter the next TV setup
code from the list and repeat this
procedure from step 1.
Programming for VCR Operation
The remote control for the DHCT controls
the VCR power, tape play, record, fast
forward, rewind, stop, and TV/VCR
functions. You can program the DHCT
remote control to play video tapes. If you
want the DHCT to manage the recording
of events with your VCR, you must use the
VCR Commander™ module. (See the VCR
Commander™ User’s Guide for more information or ask your cable service provider.)
Without this module, you must manually
set up your VCR to record programs.
Make sure the power to your VCR is
turned on before you program the remote
control.
1. Move the VCR/VOD slide switch on
the remote control to the VCR position.
4. On your remote control, press and hold
the VCR key and the SELECT key at the
same time, until the LED on the remote
blinks twice.
5. Using the remote control keypad, enter
your VCR’s 3-digit setup code. The LED
on the remote control should blink
twice. If not, try another setup code, if
available.
6. Confirm by pointing the remote control
toward the VCR and test the POWER,
PLAY, and STOP functions. If these
functions do not operate from the
remote control, enter the next VCR setup
code in the list and repeat this procedure
from step 1.
Searching the Code Library
If none of the listed TV or VCR codes work,
you can enter a code that searches the
library of codes. The remote control
automatically selects the proper code for
your TV or VCR. Make sure the power to
your TV or VCR is turned on before you
program the remote control.
1. Point the remote control away from
your TV or VCR, depending on which
device you are programming.
2. Locate your VCR brand and VCR setup
code in the table below. If yourVCR
brand is not listed, see Searching the
Code Library.
2. Do one of the following:
• To search for TV codes, press and
hold the TV key and the SELECT key
at the same time, until the LED on
the remote control blinks twice.
• To search for VCR codes, press and
hold the VCR key and the SELECT
key at the same time, until the LED
on the remote control blinks twice.
Note: The LED on the remote control
also blinks twice when it reaches the
end of its search library.
3. Using the remote control keypad, enter
991. The LED on the remote blinks
twice.
4. Point the remote control toward your
TV or VCR, and press the TV key or the
VCR key depending on which device
you are programming.
5. Did the TV or VCR turn off?
• If yes, go step 6.
• If no, repeat step 4.
6. Press the SELECT key to confirm a valid
code. The remote control LED blinks
twice.
7. Point the remote toward the device you
programmed and press Power to
confirm that the device turns on and off.
3. Point the remote control away from the
DHCT, the TV, and the VCR.
TV Setup Codes
VCR Setup Codes
Brand—Codes
Brand—Codes
Brand—Codes
Brand—Codes
Brand—Codes
Brand—Codes
Admiral—107
Adventura—060
Aiko—106
Akai—044
Alaron—193
Ambassador—191
Anam—194
Anam National—069, 194
AOC—033, 044, 199
Audiovox—106, 194, 465
Baysonic—194
Belcor—033
Bell & Howell—030, 168
Bradford—194
Brocksonic—250, 477
Candle—066, 044, 070
Carnivale—044
Carver—068
Celebrity—014
Cineral—106, 465
Citizen—060, 044, 070,
074, 106
Concerto—070
Contec—194
Craig—194
Crosley—068
Crown—194
Curtis Mathes—180, 030,
044, 061, 065, 068,
070, 074, 107, 159,
168, 465
CXC—194
Daewoo—106, 465
Denon—159
Dumont—031
Electroband—014
Emerson—250, 168, 191,
192, 193, 194, 296,
477
Envision—044
Fisher—168
Fujitsu—193
Funai—185, 193, 194
Futuretech—194
GE—035, 061, 065, 107,
149, 192, 296, 465
Gilbrater—031, 044
GoldStar—044, 070, 192
Gradiente—067, 070
Grunpy—193, 194
Hallmark—192
Harley Davidson—193
Harvard—194
Hitachi—070, 159
Infinity—068
Inteq—031
Janeil—060
JBL—068
JCB—014
JVC—067
KEC—194
Kenwood—044
Kloss—060
KTV—044, 194
LG—070
Logik—030
Luxman—070
LXI—061, 068, 168, 170,
192
Magnavox—044, 068, 193
Majessti—030
Marantz—044, 068
Matsushita—264
Megatron—159, 192
Memorex—030, 070, 164,
168, 192, 264
MGA—044, 164, 192
Midland—031, 061, 065,
149
Minutz—035
Mitsubishi—107, 164, 192
Motorola—107
MTC—044, 070, 074
Multitech—194
NAD—180, 170, 192
NEC—044, 070
Nikko—044, 106, 192
NTC—106
Onwa—194
Optimus—180, 168, 264
Optonica—179, 107
Orion—250, 193, 477
Panasonic—065, 264
Penney—035, 044, 061,
065, 070, 074, 149,
170, 192
Philco—044, 068, 159, 477
Philips—068
Pilot—044
Pioneer—180
Portland—106
Prism—065
Proscan—061
Proton—192
Pulsar—031
Quasar—179, 065, 264
Radio Shack—179, 044,
061, 070, 168, 192, 194
RCA—061, 104, 149, 065,
107
Realistic—179, 044, 070,
168, 192, 194
Runco—053
Sampo—044
Samsung—044, 070, 074,
192
Sansei—465
Sansui—477
Sanyo—168
Scotch—192
Scott—250, 192, 193, 194
Sears—061, 068, 070, 168,
170, 185, 192, 193
Semivox—194
Semp—170
Sharp—179, 107
Signatur—030
Sony—014
Soundesign—192, 193, 194
Squareview—185
SSS—194
Starlite—194
Supre-Macy—060
Supreme—014
Sylvania—044, 068
Symphonic—185
Tandy—107
Tatung—069
Technics—065, 264
Technol Ace—193
Techwood—065, 070
Teknika 030, 068, 070,
074, 106, 164, 193, 194
Telefunken—070
TMK—070, 191, 192
Toshiba—074, 168, 170
Vector Research—044
Victor—067
Vidikron—068
Vidtech—192
Viking—060
Wards—030, 179, 035, 044,
068, 070, 192, 193
Yamaha—044
Zenith—030, 031, 106
Admiral—062
Adventura—014
Aiko—292
Aiwa—014, 051
Akai—055, 075, 120
American High—049
Asha—254
Audiovox—051
Beaumark—254
Bell & Howell—118
Brocksonic—016, 135, 198,
225
CCE—086, 292
Calix—051
Canon—049
Carver—095
Cineral—292
Citizen—051, 292
Colt—086
Craig—051, 061, 086, 254
Curtis Mathes—049, 055,
074, 176
Cybernex—254
Daewoo—059, 292
Denon—056
Dynatech—014
Electrohome—051
Electrophonic—051
Emerex—046
Emerson—014, 016, 051,
057, 075, 135, 198,
222, 225, 226, 292
Fisher—061, 068, 118
Fuji—047, 049
Funai—014
GE—062, 049, 074, 254
Garrard—014
GoldStar—051, 052
Gradiente—014
HI-Q—061
Harley Davidson—014
Harman/Kardon—052
Harwood—086
Headquarter—060
Hitachi—014, 055, 056,
119
JVC—081, 055
Jensen—055
KEC—051, 292
Kenwood—081, 052, 055
KLH—086
Kodak—049, 051
LXI—051
Lloyd’s—014, 222
Logik—086
Magnasonic—292
Magnavox—014, 049, 053,
095
Magnin—254
Marantz—049, 095
Marta—051
Matsushita—049, 176
MEI—049
Memorex—060, 062, 014,
049, 051, 053, 061, 118,
176, 254
MGA—057, 075, 254
MGN Technology—254
Minotla—056, 119
Mitsubishi—081, 062, 057,
075
Motorola—062, 049
MTC—014, 254
Multitech—014, 086
NEC—81, 052, 055, 118
Nikko—051
Noblex—254
Olympus—049
Optimus—062, 051, 118,
176
Orion—016, 198
Panasonic—049, 176
Penney—049, 051, 052, 056,
068, 254
Pentax—056, 119
Philco—049
Philips—049, 095
Pilot—051
Pioneer—081, 176
Profitronic—254
Proscan—086
Protec—086
Pulsar—053
Quarter—060
Quartz—060
Quasar—049, 176
RCA—062, 049, 056, 074,
119, 120, 254
Radio Shack—014, 051
Radix—051
Randex—051
Realistic—060, 062, 014,
049, 051, 061, 118
Runco—053
Samsung—059, 254
Sanky—062, 053
Sansui—081, 014, 055
Sanyo—060, 061, 118, 254
Scott—057, 059, 135, 198,
255, 226
Sears—060, 014, 049, 051,
056, 061, 068, 118, 119
Semp—059
Sharp—062
Shintom—086
Shogun—254
Singer—086
Sony—047, 014, 046, 049
STS—056
Sylvania—014, 049, 057, 095
Symphonic—014
TMK—222, 254
Tatung—055
Teac—014, 055
Technics—049, 176
Teknika—014, 049, 051,
Thomas—014
Toshiba—057, 059, 226
Totevision—051, 254
Unitech—254
Vector—059
Vector Research—052
Video Concepts—059, 075
Videosonic—254
Wards—062, 014, 049, 056,
061, 074, 086, 095, 226,
254
White Westinghouse—292
XR-1000—014, 049, 086
Yamaha—052