1
the possibilities
Thank you for purcnaslng this Sarr sung proauct.
To receive more complete service.
please register your product at
www.samsung.com/register
Active Speaker System
This unit features an Active Speaker System that provides high sound quality ina single slim unit.
This unit does not require any satellite loudspeakers or speaker cabling, which are normallyassociated with
conventional surround sound systems.
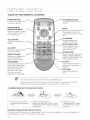
Multi=function
Remote
Control
The suppliedremote control can be usedto control the TVconnectedto this unit.
The remote control has a TVhotkeythat enablesyou to performvariousoperationswith the simple pressof a button.
You can adjustthe volume,changethe channel or customizethe navigationmenu of the TVusing this Multi-functionRemote
Control.
Special Sound Field mode
You can select from 7 different sound field modes (NEWS, DRAMA, SPORTS, GAME, CINEMA, MUSIC and PASS
(OriginalSound)) depending on the type of content you want to enjoy.
Compatibility with various audio Technologies
Thisunitemploysdecoderscompatiblewith DolbyDigital,DTS(DigitalTheaterSystems)and SFE(SoundFieldEffect).
Dolby Digital
This is the standard audio signal format used on DVDs and other purely digital media.
This surround technology delivers high-quality digital audio of up to 5.1 discrete channels to produce a
directional and more realistic effect.
-
DTS (Digital Theater Systems)
DTS provides a discrete 5.1 CH digital audio signal for both music and movie contents and uses less
compression than Dolby Digitalfor richer sound.
-
SFE (Sound Field Effect) Using 32bit Audio Digital Signal Processing
Provides more realistic surround sound with normal stereo audio sources.
Wireless
Subwoofer
Samsung's wireless moduledoes away with cables runningbetweenthe mainunit and the subwoofer.
Instead,the subwoofer connects to a compact wireless modulethat communicates withthe main unit.
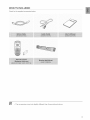
WHAT'S
INCLUDED
Check for the supplied accessories below.
iiiiiiiiiiiiiiiii
iiiiiiiiiiiiiiiii
iiiiiiiiiiiiiiiii
iiiiiiiiiiiii_,'
_iii(:_/_!:ii!i!_i
_i_i_i:ii_:iiiii_i_i_i:_i
_i:
i_i
_II:_:III
_i!_i
_!:_ii
__/:
The accessories may look slightly different than those pictured above.
3
nforrn
on
J
SAFETY WARNINGS
TOREDUCE
THERISKOFELECTRIC
SHOCK,
DONOTREMOVE
THECOVER(OR
BACK)NOUSER-SERVICEABLE
PARTS
AREINSIDEREFERSERVICING
TOQUALIFIED
SERVICE
PERSONNEL
RISK
OFELECTRIC
SHOOK
DONOTOPEN
The lighting flash and Arrowhead within
Triangle Is a warning sign alerting you of
dangerous voltage Inside the product
CAUTION: TO REDUCE THE RISK OF
ELECTRIC SHOCK, DO NOT REMOVE
COVER (OR BACK) NO USER SERVICEABLE
PARTS INSIDE. REFER SERVICING TO
QUALIFIED SERVICE PERSONNEL.
The explanation point within the triangle is a
warning sign alerting you of important
instructions accompanying the product.
WARNING
• To reduce the risk of fire or electric shock, do not expose this appliance to rain or moisture.
• To prevent injury, this apparatus must be securely attached to the floor/watt in accordance with the installation instructions.
CAUTION
• Apparatus shall not be exposed to dripping or splashing and no objects filled with liquids, such as vases, shall be placed on the apparatus.
• The Mains plug is used as a disconnect device and shall stay readily operable at any time.
This product satisfies FCC regulations when shielded cables and connectors are used to connect the unit to other equipment. To prevent
electromagnetic interference with electric appliances, such as radios and televisions, use shielded cables and connectors for connections.
FCC NOTE (for U.S.A):
This equipment has been tested and found to comply with the limits for a Class B digital device, pursuant to Part 15 of the FCC Rules. These
limits are designed to provide reasonable protection against harmful interference in a residential installation.
This equipment generates, uses and can radiate radio frequency energy and, if not installed and used in accordance with the instructions, may
cause harmful interference to radio communications. However, there is no guarantee that interference wilt not occur in a particular installation.
If this equipment does cause harmful interference to radio or television reception, which can be determined by turning the equipment off and on,
the user is encouraged to try to correct the interference by one or more of the following measures:
• Reorient or relocate the receiving antenna.
• Increase the separation between the equipment and receiver.
• Connect the equipment into an outlet on a circuit different from that to which the receiver is connected.
• Consult the dealer or an experienced radio/TV technician for help.
Caution : FCC regulations state that any unauthorized changes or modifications to this equipment may void the user's authority to operate it.
Important Safety Instructions
Read these operating instructions carefully before using the unit. Follow all the safety instructions listed below. Keep these operating instructions
handy for future reference.
1) Read these instructions.
2) Keep these Instructions.
3) Heed all warnings.
4) Follow all instructions.
5) Do not use this apparatus near water.
6) Clean only with dry cloth.
7) Do not block any ventilation openings. Install in
zaccordance with the manufacturer? instructions.
8) Do not install near any heat sources such as
radiators, heat registers, stoves, or other apparatus (including
amplifiers) that produce heat.
9) Do not defeat the safety purpose of tile polarized or grounding-type
plug. A polarized plug has two blades with one wider than the other.
A grounding type plug has two blades and a third grounding prong.
The wide blade or the third prong are provided for your safety. If the
provided plug does not fit into your outlet, consult an electrician for
replacement of the obsolete outlet.
10) Protect the power cord from being walked on or pinched
particularly at plugs, convenience receptacles, and the point where
they exit from the apparatus.
11) Only use attachment/accessories
specified by the manufacturer.
12) Use only with the cart, stand, tripod,
bracket, or table spech_iedby the
manufacturer, or sold with the apparatus.
When a cart is used, use caution when
moving the cart/apparatus combination
to avoid injury from tip-over.
13) Unplug this apparatus during lightning storms or when unused for
long periods of time.
14) Refer all servicing to qualified service personnel. Servicing is
required when the apparatus has been damaged in any way, such
as power-supply cord or plug is damaged, liquid has been spilled
or objects have fallen into the apparatus, the apparatus has been
exposed to rain or moisture, does not operate normally, or has
been dropped.
PRECAUTIONS
Ensure that the AC power supply in your house complies with the identificalion
product horizontally, on a suitable base (furniture), with enough space around
are not covered, Do not place the unit on arrlplifiers or other equipment which
In order to disconnect the unit completely from the power supply, remove the
for a long period of time.
During thunderstorms, disconnect the AC main plug from the
wall outlet. Voltage peaks due to lightning could damage the unit.
sticker located on the back of your product. Install your
it for ventilation (3--4 inches), Make sure the ventilation slots
may become hot, This unit is designed for continuous use,
main plug from the wall outlet, especially when left unused
Do not expose the unit to direct sunlight or other heat sources.
This could lead to overheating and malfunction of the unit.
i{
il.
Protect the product from moisture (i.e. vases), and excess heat
(e.g.fireplace) or equipment creating strong magnetic or electric fields
Disconnect the power cable from the AC supply if the unit malfunctions.
Your product is not intended for industrial use. Use of this product is for
personal use only.
The batteries used with this product contain chemicals that are harmful to
the environment.
Do not dispose of batteries in the general household trash.
Condensation may occur if your product or disc has been stored in
cold temperatures. If transporting the unit during the winter,
wait approximately 2 hours until the unit has reached room temperature
before using.
This product
is covered
by one or more
of the following
5,060,220
6,771,891
7,142,493
7,203,891
5,457,669
6,894,963
7,142,495
7,209,423
5,561,649
6,895,593
7,145,861
7,210,067
5,705,762
6,937,815
7,146,624
7,228,062
7,280,460
7,283,729
7,286,454
7,304,938
This device
is protected
by U.S. Patent
6,043,912
6,996,327
7,151,729
7,245,566
U.S. patents:
6,438,099
7,009,926
7,161,879
7,245,567
6,467,061
7,085,221
7,164,647
7,257,065
6,556,521
7,088,649
7,167,437
7,263,045
6,578,163
7,092,327
7,173,891
7,269,110
6,697,307
7,099,566
7,177,250
7,272,086
6,728,474
7,123,564
7,194,187
7,272,106
Nos:
6,836,549; 6,381,747; 7,050,698; 6,516,132; and 5,583,936.
5
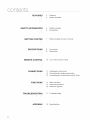
content
FEATURES
SAFETY
INFORMATION
GETTING
STARTED
DESCRiPTiONS
REMOTE
CONTROL
CONNECTIONS
i
FUNCTIONS
TROUBLESHOOTING
i
2
3
Features
What's included
4
5
Safety warnings
Precautions
7
Before reading the user's manual
8
9
Front panel
Rear panel
10
Tour of the remote control
11
12
13
Installing the wall mount
Connecting the wireless subwoofer
Connecting the Crystal Surround Air Track
14
14
Basic functions
Advanced functions
16
Software upgrade
17
Troubleshooting
18
Specifications
i
APPENDIX
i
aett na tarLecJ
BEFORE READING THE USER'S
MANUAL
Make sure to check the following terms before reading the user manual,
Icons that will be used in manual
This involves a case where a function does not operate or settings may be
canceled.
This involves tips or instructions on the page that help each function operate.
About
the use of this user's
manual
1) Be sure to be familiar with Safety Instructions before using this product. ( See page 4 )
2) Ifa problem occurs, check the Troubleshooting. ( See page 17 )
Copyright
©2009 Samsung Electronics Co.,Ltd.
All rights reserved; no part or whole of this user's manual may be reproduced or copied without the prior
written permission of Samsung Electronics Co.,Ltd.
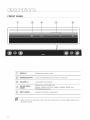
DISP_Y
Displays
thecurrent
mode.
POWER
BU_ON Turns
theCrystal
Surround
AirTrackonandoff.
_
VOEUME
_/_
SOUND
MODEFIELD
INPUT
MODE
Controls
thevolume
level.
Selects
thesound
fieldmode.
(NEWS,
DRAMA,
SPORTS,
GAME,
CINEMA,
MUSIC
and
PASS(Original
Sound))
Selects
theOptical
orAudioinput.
When
youturnonthepowerofthisunit,therewillbea4 to5second
delay
before
itcan
reproduce
sound.
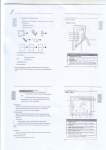
REAR PANEL
%
@
_1
USB PORT
You can update this unit through the USB port.
[_
POWER
CABLE SUPPLY
Plug the power supply cable into the AC wall outlet.
AUDIO IN JACK
Connect to the analog output of an external device.
OPTICAL DIGITAL IN
1,2
Connect to the digital (optical) output of an external device.
When disconnecting the power cable from the wall outlet, hold the plug.
Do not pull the cable.
Do not connect this unit or other components to the main power until all connections
between components are complete.
9
remote contro
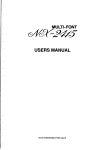
TOUR OF THE REMOTE CONTROL
POWER BUTTON
Turns the Crystal Surround
Air Track on and off.
TV POWER BUTTON
Turns your Samsung TV on
and off.
ADJUST THE TV
NAVIGATION MENU
Adjusts and selects an item
of the navigation menu on
your Samsung TV.
MUTE
Mutes the sound from the unit.
Press again to restore the
sound to the previous volume
level.
TV CHANNEL
Switches between the
available TV channels.
VOL/CONTROL
Adjusts the volume level of
the unit.
AUTO POWER LINK
Synchronizes to turn the
unit on with the optical
signal from the TV.
O/A iNPUT
Selects the Digital (Optical)
or the Audio input.
SOUND MODE
Selects the sound field mode.
(NEWS, DRAMA, SPORTS,
GAME, CINEMA, MUSIC and
PASS(Original Sound))
SMART VOLU ME
Regulate and stabilize the
volume level against a
drastic volume change.
DRC/DIMMER
You can use this function to
enjoy Dolby Digital sound
when watching movies at
low volume at night
(Standard, MAX, MIN).
You can control the
brightness of the Display.
AV SYNC
Used to help sync video to
audio when connected to a
digital TV.
S/W LEVEL
Adjusts the Subwoofer
level.
The remote control can operate TVs made by SAMSUNG only.
Depending on the TV you are using, you may not be able to operate your TV with this
remote control. In this case, operate the TV using the TV's remote control.
Installing
batteries
in the Remote Control
1, Lift the cover at the back of
the remote control upward as
shown,
compartment:
Operation
Range
2.
install tWOAAASize batteries,
Make Sure to match the !%" and "-" ends
of the batteries with the diagram inside the
of the Remote
3:
Bep!aCethe cover.
Assuming typical TV usage,
the batteries last for about
one year:
Control
The remote control can be used up to approximately 23 feet (7 meters) in a straight line. It can also be operated at a
horizontal angle of up to 300from the remote control sensor.
10
connect
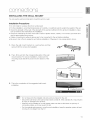
INSTALLING
THE WALL MOUNT
You can use the wall mount bracket to mount this unit on a wall.
Installation
Precautions
= Do not install on a place other than vertical wall.
• For the installation, avoid high temperature or humidity, or wall that cannot sustain the weight of the set.
Check the strength of the wall. If the strength of the wall is insufficient for the product installation, make
sure to reinforce the wall before the installation.
Check the material of the wall. If the wall is made of plaster board, marble, or iron board, purchase and
use the appropriate fixing screws.
Cables connecting to external devices are to be connected to the set before installing.
Be sure to turn off and unplug the unit before installation. Otherwise, it may cause electric shock.
1.
Place the wall mount bracket on a wall surface and then
secure it with two screws (net supplied).
2=
Then, fit the unit into the corresponding slots of the wall
mount bracket. For secure installation, make sure the
mounting studs slide firmly down into the bottom of the
slots.
3=
This is the completion of the suggested wall mount
installation.
2 inches (5 crn) or more
Do not hang onto the installed unit and avoid any impact to the unit.
Secure the unit firmly to the wall so that it does not fall off. If the unit falls off, it may result in
an injury or damage to the product.
When the unit is installed on a wall, please make sure that a child does not pull any of
connecting cables, as it may cause it to fall.
For the optimal performance in a wall mount installation, keep the speaker system at least
2 inches (5 cm) distant from the TV.
11
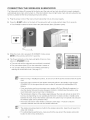
CONNECTING
THE WIRELESS
SUBWOOFER
The Subwoofer's linking ID is preset at the factory and the main unit and sub should link (connect wirelessly)
automatically when main unit is turned on. If the link indicator does not light when main unit and subwoofer are
turned on, please set the ID by following the process below.
1. Plug the power cords of the main unit and subwoofer into an AC power supply.
2.
Press the ID SET button on the back of the subwoofer with a small, pointed object for 5 seconds.
• The STANDBY indicator is turned off and the LINK indicator (Blue LED)blinks quickly.
STANDBY
@
LINK
3=
4=
While the main unit is powered off (STANDBY mode), press
MUTE on the remote control for 5 seconds.
MUTE
The Power Indicator on the main unit lights off and on, then
returns to STANDBY mode.
,, The main unit and the subwoofer are now linked (connected).
The Link indicator (blue LED)on the subweefer is turned on.
You can enjoy better sound from the wireless subwoofer by
selecting the sound field mode. See page 15 )
Before moving or installing the product, be sure to turn off the power and disconnect the power
cord.
If the main unit is powered off, the wireless subwoofer will be in the standby mode and the
STANDBY LED on the upper side will come on after 30 seconds Link indicator(Blue LED)
blinking.
If you use a device such as a microwave oven, wireless LAN Card, Bheteoth equipment, or
any other device that uses the same frequency (2.4GHz or 5.SGHz) near the system, some
sound interruption may be heard due to interference.
The transmission distance of the wireless signal between the main unit and sub is about 33 ft.,
but may vary depending on your operating environment. If a steel-concrete or metallic wall is
between the main unit and the wireless subwoofer, the system may not operate at all, because
the wireless signal cannot penetrate metal.
If the main unit doesn't make wireless connection, follow steps 1-4 above to retry the
connection between the main unit and wireless subweefer.
The wireless receiving antenna is built into the wireless subwoofer. Keep the unit away from
water and moisture.
For optimal listening performance, make sure that the area around the wireless subwoofer
location is clear of any obstructions.
12
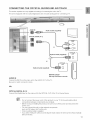
CONNECTING
THE CRYSTAL
SURROUND
AiR TRACK
This section explains two ways (digital and analog) of connecting the unit to the TV.
This unit is equipped with two optical digital jacks and one audio analog jack for connecting a TV.
AUDIO IN
OPTICAL
Audio Cable (supplied)
DIGITAL IN 1,2
AUDIO
or
©R
1"-OPTICAL
Optical Cable (supplied)
I
OUT
o@
Set-top
AUDIO IN
Connect AUDIO IN on the main unit to the AUDIO OUT of the TV.
Be sure to match connector colors.
box/Game
console
OR,
OPTICAL DIGITAL IN 1,2
Connect the Digital Input on the main unit to the OPTICAL OUT of the TV or Source Device.
Do not connect the power cord of this product or your TV to the wall outlet until all
connections between components are complete.
Before moving or installing this product, be sure to turn off the power and disconnect the
power cord.
You can connect this unit to other external components.
(such as DVD player, Set-Top Box etc.)
Only one optical cable is supplied.
If you select 'ANALOG' without connecting the Audio Cable, the set is turned off automatically
after 20 minutes.
13
f AnGt
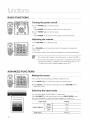
BASIC FUNCTIONS
Turning the power on/off
1. Touch POWER ( _ ) on the front panel.
OR,
Press POWER on the remote control to turn on the power.
2. Touch POWER ( _ ) on the front panel.
OR,
Press POWER on the remote control again to turn off the power.
Adjusting
the volume
Touch VOLUME +/- on the front panel.
OR,
Press VOLUME +/- on the remote control to increaseor decrease the
volume level.
• The numeric value of the volume levelappears in the front panel display.
The volume levelincreasesor decreaseswhen you press VOLUME+/-.
Ifyou want to enjoythe sound only from the Crystal Surround Air Track,
you must turn off the TV's speakers inthe Audio Setup menu of your
TV. Referto the owner's manualsupplied with your TV.
ADVANCED
FUNCTIONS
...........
_ .°TE
Muting the sound
This is useful when answering a doorbell or telephone call.
1. Press MUTE ([_<) on the remote control to mute the sound.
2. Press MUTE on the remote control again (or press VOLUME +/-) to
restore the sound.
Selecting
the input mode
You can select either Optical Digital in or Audio input.
Press O/A INPUT on the remote control or touch INPUT MODE on the
front panel repeatedly to select the Optical Digital in or Audio input.
Optical Digital in
Audio input
14
PCM
PCM
DOLBY
D.D
DTS
DTS
ANALOG
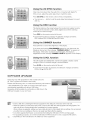
Using the sound field
mode
You can select from 7 different sound field modes (NEWS, DRAMA,
SPORTS, GAME, CINEMA, MUSIC and PASS (OriginalSound)) depending
on the type of sources you want to enjoy.
Press SOUND MODE on the remote control or touch SOUND FIELD
MODE on the front panel repeatedly to select the sound field mode you want.
Sound field
mode
J
PASS
Select PASSmode if you want to enjoy the originalsound.
MUSIC
Select MUSICmode when you play music sources.
Select NEWSmode when you play news sources.
NEWS
DRAMA
CINEMA
SPORTS
GAME
Using
Select DRAMAmode when you playdrama sources.
Select CINEMAmode when you playmovie sources.
Select SPORTSmode when you play sports sources.
Select GAMEmode when you play game sources.
the AUTO
POWER
LINK function
The CrystalSurround Air Track is automaticallyturned on when you turn the
power on of a TVor any device connected to the Air Track with the optical cable.
Press AUTO POWER on the remote control of this unit.
• Auto power link function turns on and off each time you press AUTO
POWER=
AUTO POWER LINK
ON
OFF
Display
POWERLINK ON
POWERLINK OFF
If a TV or any device connected to Air Track with the optical
cable is off and there is no digital input, the Air Track is turned
off after 20 minutes.
........... ii
Using
the "rv functions
1. Press TV POWER on the remote control of this unit.
2. Press TV CH on the remote control to select the TV channel.
3. Select one of the sound field mode buttons on the remote control to select
the desired sound field mode.
The remote control can operate TVs made by SAMSUNG only.
Using
the S/W LEVEL function
You can control the base volume with S/W Level key in the Remote control.
1. Press the S/W Level button on the Remote control.
2. "SW 00" is appeared on the Display.
3. Press "+" on the VOL/CONTROL key if you want to increase the
subwoofer volume. You can set it from SW+01 to SW+06.
4. Press "-" on the VOL/CONTROL key if you want to decrease the
subwoofer volume. You can set it from SW-01 to SW-06.
15
Using the AV SYNC function
Video may lookslower than the audio if it isconnected with digital TV.
Ifthisoccurs, adjust the audio delay time to match the 'video.
Press AV SYNC on the remote control of thisunit repeatedly.
= You can use +, - button to set the audio delay time between 0 ms and
300 ms.
Using the DRC function
This feature balances the range between the loudest and quietest sounds.
You can use this function to enjoy Dolby Digital sound when watching
movies at low volume at night.
Press DRC on the remote control of this unit.
,, Each time the button is pressed, the selection changes as follows :
DRC MIN _ DRC STANDARD _ DRC MAX
Using the DIMMER
function
Press Dimmer to control the brightness of the Display.
Ifyou press and hold the DRC(DIMMER) button for over 4seconds, the
Display is dimmed and the message "DIMMER LEVEL 1" is appears on
the Display. If the button is pressed and held again, the Display is
brightened and the message "DIMMER LEVEL 2" appears on the Display.
Using the S.VOL function
This will regulate and stabilize the volume level against a drastic volume
change in case of a channel change or scene transition.
Press S.VOL on the remote control of this unit.
• Each time the button is pressed, the selection changes as follows :
S.VOL ON _ S.VOL OFF
SOFTWARE
UPGRADE
Samsung may offer upgrades for the Crystal Surround
Air Track's system's firmware in the future.
Please visit Samsung.com or contact the Samsung call center at
1-800-SAMSUNG (726-7864) to receive information about
downloading upgrades and using a USB drive.
Upgrades will be possible by connecting a USB drive to the
USB port located on your Air Track.
16
Inserta USBdrive containingthe firmware upgradeinto the USB port on the back of the main unit.
Pleasebe carefulto not disconnectthe power or removethe USBdrive while upgradesare being applied. The
mainunit will turn off automaticallyafter completingthe fi rmware upgrade.
When software is upgraded, settingsyou havemade will return to their default (factory)settings.We recommend
you write down your settingsso that you can easilyreset them after the upgrade.
Ifyou fail to upgradethe firnware, we recommendformatting the USB data in FAT16and trying again.
For upgrading purposes, do not format USB data in NTFS because it is not a supported file system.
Depending on the manufacturer, the USB may not be supported.
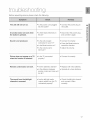
Before requesting service, please check the following.
The unit will not turn on.
• Is the power cord plugged
into the outlet?
• Connect the power plug to
the outlet.
A function does not work when
the button is pressed.
• Is there static electricity in
the air?
• Disconnect the power plug
and connect it again.
Sound is not produced.
• Is the unit properly
connected to your TV?
• Is the Mute function on?
• Is the volume set to
minimum?
Connect it correctly.
Press the Mute button to
cancel the function.
• Adjust the volume.
Picture does not appear on a TV
when the function is selected.
• Is the TV connected
Remote control does not work.
• Are the batteries drained?
• Replace with new batteries.
• Is the distance between
remote control and main unit
too far?
• Operate at a close distance.
• Are the left/right audio
output cables from the TV
connected properly?
• Check the left!right channel
and connect it/them
correctly.
The sound from the left/right
channels is reversed.
Connect it correctly.
properly?
17¸
SPECIFICATIONS
Power supply
AC 120V, 60Hz
Standby power consumption
0.75W
Power
Main unit
45W
consumption
Subwoofer
20W
Main unit
5.01 Ibs
Subwoofer
12.011bs
Main unit
37.66 x 3.62 x 1.77 inches
Subwoofer
6.89 x 13.78 x 11.61 inches
Weight
Dimensions
(W x H x D)
Operating temperature range
+41°F to +95°F
Operating humidity range
10 % to 75 %
Rated output
Main unit
80W/CH, 40, THD -- 10%, 1kHz
power
Subwoofer
120W, 40, THD -- 10%, 100Hz
Input sensitivity/Impedance
450mV/20KD
S/N ratio (analog input)
70dB
Separation(lkHz)
70dB
Analog input
20Hz-20kHz(+3dB)
Digital input/48kHz
PCM
20Hz-20kHz(_+3dB)
* S/N ratio, distortion, separation and usable sensitivity are based on measurement using AES (Audio Engineering
Society) guidelines.
*: Nominal specification
- Samsung Electronics Co., Ltd reserves the right to change the specifications without notice.
- Weight and dimensions are approximate.
18
WARRANTY
This SAMSUNG brand product, as supplied and distributed by Samsung Electronics America, Inc (SAMSUNG)and delivered new,
in the original carton to the original consumer purchaser, is warranted by SAMSUNG against manufacturing defects in materials and
workmanship for a limited warranty period of:
One (1) Year Parts and Labor*
(*90 Days Parts and Labor for Commercial
Use)
This limited warranty begins on the original date of purchase, and is valid only on products purchased and used in the United States. To
receive warranty service, the purchaser must contact SAMSUNGfor problem determination and service procedures. Warranty service
can only be performed by a SAMSUNG authorized service center. The original dated bill of sale must be presented upon request as
proof of purchase to SAMSUNG or SAMSUNG's authorized service center. Transportation of the product to and from
the service center is the responsibility of the purchaser.
SAMSUNG will repair or replace this product, at our option and at no charge as stipulated herein, with new or reconditioned parts
or products if found to be defective during the/mited warranty period specified above. All replaced parts and products become the
property of SAMSUNG and must be returned to SAMSUNG. Replacement parts and products assume the remaining originalwarranty,
or ninety (90) days, whichever is longer
SAMSUNG'sobligationswith respectto softwareproductsdistributed bySAMSUNGunderthe SAMSUNGbrandnameare set forth in the
appicable end user licenseagreement.Non-SAMSUNGhardwareand softwareproducts,if provided,are on an "AS IS" basis.
Non-SAMSUNGmanufacturers,supplers, publishers,and serviceprovidersmay providetheirown warranties.
This limited warranty covers manufacturing defects in materials and workmanship encountered in normal, and except to the extent
otherwise expressly provided for in this statement, noncommercial use of this product, and shall not apply to the following, including,
but not limited to: damage which occurs in shipment; delivery and insta/ation; applications and uses for which this product was not
intended; altered product or serial numbers; cosmetic damage or exterior finish; accidents, abuse, neglect, fire, water, lightning or other
acts of nature; use of products, equipment, systems, uti/ties, services, parts, supples, accessories, applications, installations, repairs,
external wiring or connectors not supplied and authorized by SAMSUNG, or which damage this product or result in service problems;
incorrect electrical line voltage, fluctuations and surges; customer adjustments and failure to folow operating instructions, cleaning,
maintenance and environmental instructions that are covered and prescribed in the instruction book; product removal or reinstalation;
reception problems and distortion related to noise, echo, interference or other signal transmission and delivery problems SAMSUNG
does not warrant uninterrupted or error-free operation of the product.
THEREARE NO EXPRESSWARRANTIESOTHER THAN THOSE LISTEDAND DESCRIBEDABOVE, AND NO WARRANTIES
WHETHER EXPRESSOR IMPLIED, INCLUDING,BUT NOT LIMITEDTO, ANY IMPLIED WARRANTIESOF MERCHANTABILITY
OR FITNESSFOR A PARTICULARPURPOSE, SHALL APPLY AFTERTHE EXPRESSWARRANTY PERIODSSTATEDABOVE, AND
NO OTHER EXPRESSWARRANTY OR GUARANTY GIVEN BY ANY PERSON,FIRM OR CORPORATIONWITH RESPECTTO THIS
PRODUCT SHALL BE BINDING ON SAMSUNG. SAMSUNG SHALL NOT BE LIABLE FOR LOSS OF REVENUEOR PROFITS, FAILURE
TO REALIZE SAVINGS OR OTHER BENEFITS,OR ANY OTHER SPECIAL,INCIDENTALOR CONSEQUENTIALDAMAGES CAUSED
BY THE USE, MISUSE OR INABILITYTO USETHIS PRODUCT, REGARDLESSOF THE LEGAL THEORY ON WHICH THE CLAIM IS
BASED, AND EVEN IF SAMSUNG HAS BEEN ADVISED OF THE POSSIBILITYOF SUCH DAMAGES. NOR SHALL RECOVERYOF
ANY KIND AGAINST SAMSUNG BE GREATER IN AMOUNT THAN THE PURCHASE PRICEOF THE PRODUCTSOLD BY SAMSUNG
AND CAUSING THE ALLEGED DAMAGE. WITHOUT LIMITINGTHE FOREGOING,PURCHASERASSUMES ALL RISKAND LIABILITY
FOR LOSS, DAMAGE OR INJURYTO PURCHASERAND PURCHASER'S PROPERTYAND TO OTHERS AND THEIR PROPERTY
ARISING OUT OF THE USE, MISUSE OR INABILITYTO USETHIS PRODUCTSOLD BY SAMSUNG NOT CAUSED DIRECTLYBY
THE NEGLIGENCEOF SAMSUNG THIS LIMITED WARRANTYSHALL NOT EXTENDTO ANYONE OTHERTHAN THE ORIGINAL
PURCHASER OF THIS PRODUCT, IS NONTRANSFERABLEAND STATES YOUR EXCLUSIVEREMEDY.
Some states do not alow limitations on how long an implied warranty lasts, or the exclusion or limitation of incidental or consequential
damages, so the above limitations or exclusions may not apply to you. This warranty givesyou specific legal rights, and you may also
have other rights which vary from state to state.
To obtain warranty hardware service, please contact SAMSUNG at:
Samsung Electronics America, Inc.
105 Challenger Road Ridgefield Park, NJ 07660-0511
1-800-SAMSUNG (726-7864) and www.samsung.com/us
Contact
SAMSUNG
WORLD
If you have any questions
customer care center.
or comments
WIDE
relating to Samsung
products,
please contact the SAMSUNG
ry
Latin America
CANADA
1-800-SAMSU
MEXICO
01-800-SAMSUNG(726-7864)
www.samsung.com/mx
U.S.A
www.samsung.com/us
ARGENTINE
1-800-SAMSU
0800-333-3733
BRAZIL
0800-124-421,4004-0000
www.samsung.com/br
CHILE
www.samsung.com/cl
NICARAGUA
800-SAMSUNG(726-7864)
00-1800-5077267
HONDURAS
800-7919267
www.samsung.com/iatin
COSTA RICA
0-800-507-7267
www.samsung.com/iatin
ECUADOR
1-800-10-7267
www.samsung.com/iatin
EL SALVADOR
800-6225
www.samsung.com/iatin
GUATEMALA
1-800-299-0013
www.samsung.com/iatin
JAMAICA
1-800-234-7267
www.samsung.com/tatin
PANAMA
800-7267
www.samsung.com/iatin
RICO
1-800-682-3180
www.samsung.com/iatin
RER DOMINICA
1-800-751-2676
TRINIDAD
1-800-SAMSU
PUERTO
Europe
CIS
Middle East &
Africa
www.samsung.com/ca
NG(726-7864)
www.samsung.com/ar
www.samsung.com/iatin
www.samsung.com/tatin
NG(726-7864)
www.samsung.com/iatin
VENEZUELA
0-800-100-5303
www.samsung.com/iatin
COLOMBIA
01-8000112112
www.samsung.com.co
BELGIUM
02 201 2418
wvc,v.samsung.com/be (Dutch)
wve,v.samsung.com/be_fr (French)
OZECH REPUBLIC
800-SAMSUNG(800-726786)
www.samsung.com/cz
DENMARK
8-SAMSU NG(7267864)
www.samsung.com/dk
FINLAND
30-6227 515
www.samsung.com/fi
FRANCE
01 4863 0000
GERMANY
01805
HUNGARY
06-80-SAMSU
ITALIA
800-SAMSUNG(726-7864)
LUXEMBURG
02 261 03 710
NETHERLANDS
0900-SAMSUNG
NORWAY
3-SAMSU NG(7267864)
POLAND
0 801 1SAMSUNG(172678),
PORTUGAL
80826-SAMSUNG(726-7864)
www.samsung.com/pt
SLOVAKtA
0800-SAMSUNG(726-7864)
www.samsung.com/sk
SPAIN
902-1-SAMSU
www.samsung.com/es
SWEDEN
075-SAMSUNG(726
U.K
0845 SAMSUNG
EIRE
0818 717 100
AUSTRIA
0810-SAMSUNG(7267864,
_ 0.07/rain)
www.samsung.com/at
SWITZERLAND
0848-SAMSUNG(7267864,
CHF 0.08/min)
www.samsung.com/ch
RUSSIA
8-800-555-55-55
www.samsung.ru
KAZAHSTAN
8-10-800-500-55-500
www.samsung.com/kz_ru
UZBEKISTAN
8-10-800-500-55-500
www.samsung.com/kz_ru
KYRGYZSTAN
00-800-500-55-500
TADJIKISTAN
8-10-800-500-55-500
UKRAINE
8-800-502-0000
www.samsung.ua
LITHUANIA
8-800-77777
www.samsung.com/It
LATVIA
8000-7267
www.samsung.com/tv
ESTONIA
800-7267
www.samsung.com/ee
AUSTRALIA
1300 362 603
NEW ZEALAND
0800 SAMSUNG
CHINA
800-810-5858,
3698-4698
HONG
Asia Pacific
& TOBAGO
NG(726-7864)
KONG
www.samsung.com/fr
- SAMSUNG(726-7864
_ 0,14/Min)
www.samsung.de
NG(726-7864)
www.samsung.com/hu
www.samsung.com/it
www.samsung.com/lu
(0900-7267864)
(_ 0,1O/Min)
www.samsung.com/nl
www.samsung.com/no
022-607-93-33
NG (902 172 678)
www.samsung.com/pl
78 64)
www.samsung.com/se
(7267864)
www.samsung.com/uk
www.samsung.com/ie
www.samsung.com/au
(0800 726 786)
400-810-5858,
010-6475
www.samsung.com/nz
1880
www.samsung.com/cn
www.samsung.com/hk
INDIA
3030 8282, 1800 1t0011,
INDONESIA
0800-112-8888
www.samsung.com/id
JAPAN
0120-327-527
www.samsung.com/jp
MALAYSIA
1800-88-9999
PHILIPPINES
1-800-16-SAMSUNG(726-7864)
1-800-3-SAMSUNG(726-7864),
SINGAPORE
1800-SAMSUNG(726-7864)
www.samsung.com/sg
THAILAND
1800-29-3232,
www.samsung.com/th
TAIWAN
0800-329-999
www.samsung.com/tw
VIETNAM
t 800 588 889
www.samsung.com/vn
TURKEY
444 77 11
SOUTH AFRICA
0860-SAMSUNG(726-7864
)
www.samsung.com/za
U.A.E
800-SAMSUNG
8000-4726
www.samsung.com/ae
1-800-3000-8282
www.samsung.com/in
www.samsung.com/my
02-5805777
02-689-3232
www.samsung.com/ph
www.samsung.com/tr
(726-7864),
QUESTIONS
OR COMMENTS?
i
COUNTRY=
¸
i
CALL
OR VISIT US ONLINE AT
1-800-SAMSUNG
IN THE US
(7267864)
WRITE
Samsung Electronics America, Inc.
www.samsung.com/us
105 Challenger Road Ridgefield Park,
NJ 07660-0511
AH68-02273R