1
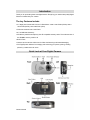
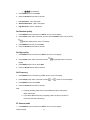
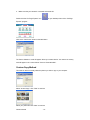
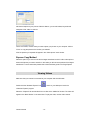
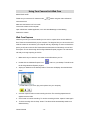
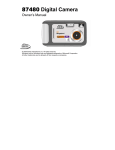
81379 Digital Camera
Owner’s Manual
© 2005 Sakar International, Inc. All rights reserved.
Windows and the Windows logo are registered trademarks of Microsoft Corporation. All other
trademarks are the property of their respective companies.
Table of Content
Introduction ..............................................................................................................................2
Quick Look at Your Digital Camera ..........................................................................................2
Explanation of the Icons that Appear on the LCD Monitor ........................................................3
Setting up your camera for use ................................................................................................3
Install the PhoTags Express Software & the Camera Driver .....................................................4
Operation Instruction ................................................................................................................6
The Set Mode ..........................................................................................................................7
Transferring Images to your PC .............................................................................................10
Manual Photo Download ........................................................................................................ 11
Viewing Videos ......................................................................................................................13
Using Your Camera As A Web Cam .......................................................................................14
Technical Support ..................................................................................................................15
Appendix: Troubleshooting.....................................................................................................15
Owner’s Manual
-1-
Introduction
Thank you for purchasing the 81379 digital camera. Everything you need to take quality Digital
Photos is included with your camera.
The key Features include
• 2.1 Mega pixel Camera with choice of 3 Resolutions- 1600 x 1200 Pixels (UXGA) 1280 x
1024 Pixels (SXGA), 640 x 480 Pixels (VGA)
• Web Cam resolution 320 x 240 Pixels
• 8 X 16 MB internal memory
• SD Memory Card Slot accepts any size SD compatible memory cards. The maximum size of
the SD/MMC memory cards is 1G
• Built in Flash
• Camera can be used as a Web Cam for Video Conferencing and Instant Messaging.
• PhoTags Express software for managing and enhancing your photos, printing, sending
photos by e-mails and much more.
Quick Look at Your Digital Camera
Owner’s Manual
-2-
Explanation of the Icons that Appear on the LCD Monitor
Setting up your camera for use
Install the batteries
Your camera requires two AAA size alkaline batteries. Please follow the below steps to
load the batteries before you taking photos.
1. Remove the battery cover by sliding it in the direction of the arrow.
2. Insert the batteries correctly as indicated by the polarity icons.
3. Close the battery cover.
Note:
¾
Download the photo before replace battery. Otherwise, the photos in camera may be
lost.
¾
If you do not intend to use the camera for a long time, remove the batteries from the
camera.
¾
When the battery low icon
flashing, please download the photos to computer
and replace the batteries in time. The photos may be lost when the battery energy is
used up.
Load the SD/MMC Card
You can use SD card or MMC card. Please push the Card firmly into the slot as far as it
will go until you hear “Click” sound.
When a memory card is inserted into the digital camera, the digital
camera will check the format of the memory card, if the format of
Owner’s Manual
-3-
the memory card is different from the required format of the digital camera, the LCD panel of
the digital camera will display either “C2” or “C1”. Press the shutter button twice and the digital
camera will format the memory card. Once the formatting is finished, the digital camera will
enter into normal mode.
Note:
Image files cannot be recorded or erased if a write-protect sticker is affixed to the SD/MMC
card.
Remove the SD/MMC Card
1.
Press the card. The card will be leaped out.
2. Take out the card.
Install the PhoTags Express Software & the Camera Driver
Insert the CD into your CD-ROM drive. Make sure that your camera is NOT connected to the
computer.
Insert the Software CD that came with your camera into the CD-ROM drive.
In a few seconds the “Install your camera software” screen will appear.
Select your camera model from the drop down list and click the “Install” button to install
PhoTags Express followed by the installation of PhoTags Web Cam Express and your
camera driver.
On the “PhoTags Express" screen, click the “Next” button.
Owner’s Manual
-4-
Please review the license terms and click the “Agree” button to continue.
Let the “PhoTags Express” installer create the folder where the program will be installed to,
and then click “Install”.
Click “Finish” to let the “PhoTags Express” installer finish the installation program.
This will automatically launch the Install shield for the camera driver. Click “Next” to continue.
Once the program has finished installing you will be asked to restart your computer. Please do
so. Congratulations!! You have successfully installed the “PhoTags Express” software, the
“PhoTags WebCam Express” and the Camera Driver.
Owner’s Manual
-5-
Operation Instruction
Turn on the power
Press the MODE button for about 3 second to turn on the power, and then operate after beep.
Take Photo
1. Press the MODE button to power on your camera.
2. Hold the camera steadily and press the shutter button to take the photo. The camera will
beep once after the image is saved. The number will appear on the LCD display. If the
camera does not beep after a picture is taken or FUL appears on the LCD display, then the
memory is full.
Note: You cannot use the LCD monitor to preview the objects.
Self-timer Photography
1.
Press the MODE button to select the icon
2.
Press the Shutter Button within 5 seconds. The timer runs for about 10 seconds
shown on the LCD display.
before the photo is taken.
Note:
The camera will return to standby mode if you do not press the button
within 5 seconds.
Motion Photography
1.
Repeatedly press MODE button to select the icon
2.
Press the Shutter Button within 5 seconds. The flash LED will keep flashing.
3.
Press the Shutter Button to stop the motion photography.
shown on the LCD display.
Note:
¾
The photos taken by this mode will be saved as AVI (Audio Video Interleave)
format, and can be played by Webcam Express, Media Player or Quick Time.
¾
The shooting time varies slightly depending on the available space on your camera. If the
indicated LED is not flashing, then the memory is full.
3pcs Continuously Shoot
1.
Repeatedly press MODE button to select the icon
2.
Press the Shutter Button within 5 seconds. 3pcs photos will be taken continuously.
shown on the LCD display.
Note: The photos taken by this mode will be downloaded individually. After the capture, the
picture number on the LCD display will be updated to 3 more pictures.
Delete All of the Photos
1.
Repeatedly press MODE button to select the icon
Owner’s Manual
-6-
shown on the LCD display.
2.
Press Shutter button within 5 seconds. The digits will keep flashing.
3.
Press Shutter button within 5 seconds again. All of the photos in the camera are
deleted.
Delete the Last Photo
shown on the LCD display.
1.
Repeatedly press MODE button to select the icon
2.
Press Shutter button within 5 seconds. The last photo in the camera is deleted.
Turn Camera off
1.
Press MODE button and hold for 3 seconds to turn off the power.
Note: The camera will be off automatically if there is no operation for 60 seconds.
The Set Mode
The Set mode lets you determine your camera settings.
The camera settings available are:
1. Flash Settings:
¾
Flash off
¾
Flash Automatically
¾
Force Flash mode
2. Set Photo Resolution
¾
Low Resolution
¾
Normal resolution
¾
High resolution
3. Set Photo Quality
¾
High Quality
¾
Standard Quality
4. Set Frequency
¾
50Hz
¾
60Hz
5. Set camera to PC camera mode or to regular camera mode
¾
Owner’s Manual
PC Camera mode
-7-
Regular camera mode
¾
6. Exit settings
¾
Esc- exit the Set mode
Flash OFF
1. Press MODE button to select the icon SET shown on the LCD display.
2. Press Shutter button within 5 seconds, and then click the Shutter button until you select
shown on the LCD display.
3. Press MODE button until you select ESC.
4. Press the Shutter button within 5 seconds.
Force-flash mode
1. Press MODE button to select the icon SET shown on the LCD display.
2. Press Shutter button within 5 seconds, and then click the Shutter button until you select
shown on the LCD display.
3. Press MODE button until you select ESC.
4. Press the Shutter button within 5 seconds.
The camera will flash forcefully.
Note:
When the battery icon is shown on the LCD display. The flash on function cannot be
activated.
Flash Automatically
1. Press MODE button to select the icon SET shown on the LCD display.
2. Press Shutter button within 5 seconds, and then click the Shutter button until you select
shown on the LCD display.
3. Press MODE button until you select ESC.
4. Press the Shutter button within 5 seconds.
The camera will flash automatically.
Set Photo Resolution
1. Press MODE button to select the icon SET shown on the LCD display.
2. Press Shutter button within 5 seconds, and then click the Shutter button until you select
one of the 3 options available:
¾
¾
Owner’s Manual
Low Resolution
Normal resolution
-8-
High resolution
¾
3. Press MODE button to select ESC.
4. Press the Shutter button within 5 seconds.
1. Low Resolution - 640 x 480 pixels.
2. Standard Resolution- 1280 x 1024 pixels.
3. High Resolution- 1600 x 1200 pixels.
Set Standard quality
1. Press MODE button to select the icon SET shown on the LCD display.
2. Press Shutter button within 5 seconds, and then click the Shutter button until you select
standard quality shown on the LCD display.
3. Press MODE button until you select ESC.
4. Press the Shutter button within 5 seconds.
Set High quality
1. Press MODE button to select the icon SET shown on the LCD display.
2. Press Shutter button within 5 seconds to select
High quality shown on the LCD
display.
3. Press MODE button until you select ESC.
4. Press the Shutter button within 5 seconds.
Set Frequency
1. Press MODE button to select the icon “SET” shown on the LCD display.
2. Press Shutter button within 5 seconds to select
or
shown on the LCD display
3. Press MODE button to select ESC.
4. Press the Shutter button within 5 seconds.
Note:
¾
Generally speaking, 60Hz used in United States and Asia. 50Hz used in
Japan and Europe.
¾
If you select different frequency of lighting system, the photo you taken or
video shoot will have line bending.
PC Camera mode
1. Press MODE button to select the icon SET shown on the LCD display.
Owner’s Manual
-9-
2. Press Shutter button within 5 seconds, and then click the Shutter button until you select
shown on the LCD display.
3. Press MODE button to select ESC.
4. Press the Shutter button within 5 seconds.
Camera mode
2. Press MODE button to select the icon SET shown on the LCD display.
2. Press Shutter button within 5 seconds, and then click the Shutter button until you select
shown on the LCD display.
3. Press MODE button to select ESC.
4. Press the Shutter button within 5 seconds.
Transferring Images to your PC
Transfer Images Using PhoTags Express
Make Sure that the camera is in the
regular camera mode.
1. Plug one end of the USB cable into the USB port of the camera.
2. Plug the other end of the USB cable into a USB port on your computer.
3. If the Camera is off it will automatically be turned on when the USB cable is properly
connected and the Transfer mode icons will appear on the LCD screen.
4. The “Camera/Removable Media Auto Detect” window will automatically appear on your
PC screen.
5. The number of pictures and other media (videos included) on the camera or memory card
will appear on the window. Click “OK” if you want to transfer the photos and save them to
your computer.
Owner’s Manual
- 10 -
6. The “PhoTags Express” application you installed will open in the “Get photos” wizard
mode and will ask you to select the photos you want to transfer. Select your photos and
click “Next” to continue.
7. Add Active Captions to your pictures. You can add a date, keywords, categories and more.
Click “Next” to continue.
8. On the next screen, choose where you want to place your photos and click the “Finish”
button to copy the photos to your computer.
9. All of the pictures you imported will appear in the “Select Photos” main window.
Manual Photo Download
Get photos manually using PhoTags Express
Use the “PhoTags Express” program to import the photos from your camera.
1. Plug one end of the USB cable into the USB slot on your camera.
2. Plug the other end of the USB cable into a USB port on your computer.
Owner’s Manual
- 11 -
3. Make sure that your camera is connected and turned ON.
Double-click the “PhoTags Express” icon
on your desktop to launch the “PhoTags
Express” program.
Click on the “Get Photos” button on the Main Menu.
The “Device Selection” mode will appear. Select your camera device. Your camera or memory
card will appear in the “Active devices” list as a “Removable disk”.
Custom Copy Method
This mode is used to manually select the photos you wish to copy to your computer.
Select "Custom Copy". Click "Next" to continue.
Select your photos and click "Next" to continue.
Owner’s Manual
- 12 -
Add Active Captions to your pictures. With this feature, you can add a date, keywords and
categories. Click “Next” to continue.
On the next screen, choose where you want to place your photos on your computer. Click on
“Finish” to copy the photos to the location you selected.
All of the pictures you imported will appear in the “Select photos” main window.
Express Copy Method
Select this option if you want to have all the images transferred to the PC without the option to
select which photos you want to transfer. In this mode you will not see a preview of the images
transferred. For more information please refer to the Quick Start guide in PhoTags Express.
Viewing Videos
Make sure that your camera is connected to your computer with the USB cable.
Double-click the “Webcam Express” icon
that is on your desktop to launch the
“WebCam Express” program.
Select the “Playback” tab and double click on a video in the “Media list” window. The video will
appear in the “Main Window” in the actual size. To play the video, use the video controls.
Owner’s Manual
- 13 -
Using Your Camera As A Web Cam
IMPORTANT NOTE:
Please set your camera to PC Camera mode
before using the video conference/
web camera /AVI.
Make sure the Camera is in PCC mode.
Connect the camera to the computer.
Open a Web Cam enabled application, such as Instant Messenger or Net Meeting.
Position the camera.
Web Cam Express
Now that you have your camera installed you can use it to capture short movies called AVI
files. These can be saved directly to your computer. The length of time you can record an AVI
while the camera is connected to your computer will vary, depending on how much hard drive
space you will use to save the file. Please take note that these AVI files take up a lot of hard
drive space. This is done through the PhoTags WebCam Express program. This next section
will walk you though capturing an AVI file.
1. Make sure that your camera is connected via the USB cable to your PC.
2. Double-click the “WebCam Express” icon
that is on your desktop. This will launch
the PhoTags WebCam Express program.
3. Adjust your WebCam to the desired position. The screen will display what the WebCam
"sees".
(To add audio to your video, plug a microphone into your computer.)
4. Click the “Capture” button to start recording the video. The recording elapse time will
appear under the video.
5. Click “Pause” to hold the recording. To continue recording click the “Capture” button again.
6. To finish recording click the “Stop” button. The videos will be automatically saved into a
default directory.
Owner’s Manual
- 14 -
Using camera for Video Conference
You can use this camera as a webcam to chat with friends and family, sending live video feeds
straight to them
NOTE: In order to use this camera you must make sure that you have YAHOO MESSENGER
Ver 5.5 or later.
1. Start Yahoo messenger.
2. Select the "tools" listing on the top of the toolbar. Go to the drop down menu and select the
listing for "start my webcam".
3. You will see a window appear with your video that you are playing. Now people who have
your Yahoo login name will be able to see your video.
Technical Support
For technical support issues please visit our website at www.sakarhelp.com. You can find
manuals, software , drivers, and FAQ’s at the website. Can’t find what you are looking for? Fill
out an online ticket and one of our technical support team members will answer questions or
call 877-397-8200 or 732-476-5098 to access our technical support information on the phone.
For question on warranty information please email [email protected]
Appendix: Troubleshooting
I've taken photos, but my computer says 'No Photos In Camera' - what do I do?
First, ensure that you have taken photos with your camera. Press the shutter button a few
times to take some sample photos and try again. If you still get a no photos error, this indicates
that the driver is not installed (or not installed correctly) or you may not meet the minimum
system requirements
System Requirements:
First, ensure that you have at least a Pentium II 300 MHz, AMD Athlon 300 MHz, or a Celeron
400 MHz or higher as well as at least 64 MB of RAM. Please note that the older AMD K6
processors will not work. More information about determining your computer's specifications
can be found in the General Computer Information section. If you have determined that you
have pictures in your camera and you meet the system requirements, follow the steps below to
reinstall the software.
Software Reinstallation
1) First, uninstall the software and drivers. Click on Start, Settings, Control Panel, then
Add/Remove programs. There are two programs you will need to remove – PhoTags Express
Owner’s Manual
- 15 -
and your Camera Driver. After removing these programs, restart your computer. If your
camera is connected, disconnect it.
2) Now, let's reinstall the software. Insert the CD that came with your camera. It should
automatically run the installation3) Now restart your computer again.
4) Once your computer is back up, plug the camera into your computers USB port
5) Right-click on my computer icon and select properties. If you are running Windows 98,
98SE, or ME: Click on device manager. If you are running Windows 2000 or XP: Click on
hardware and then device manager. If the camera is installed correctly, there will be a
category listed for "Imaging Devices" and clicking on the "+" next to it should reveal your
camera. If not, you will likely see "Digital Still Camera" under "Other Devices" with a brightly
colored marking next to it indicating it is not functioning correctly. If you are running Windows
98SE: Right click on the non-functioning device and select remove. If you are running
Windows 2000 or XP: Right click on the non-functioning device and select uninstall. If a
warning pops up, press OK.
6) Restart your computer again. Your camera is now successfully installed.
· How do I make sure I don't lose important pictures?
Your camera uses flash memory that requires a constant electric current to store your photos.
Should your camera lose power (for instance if the batteries die or are removed), all stored
pictures will be lost. We recommend always downloading your photos to your computer as
soon as possible to prevent unintentional data loss.
· I have a MAC, will your camera work?
Unfortunately, the system requirements for our cameras require a Windows operating system.
There is no Mac driver available and no current plans to develop one.
Owner’s Manual
- 16 -